#spiked jewelry
Text


(x)
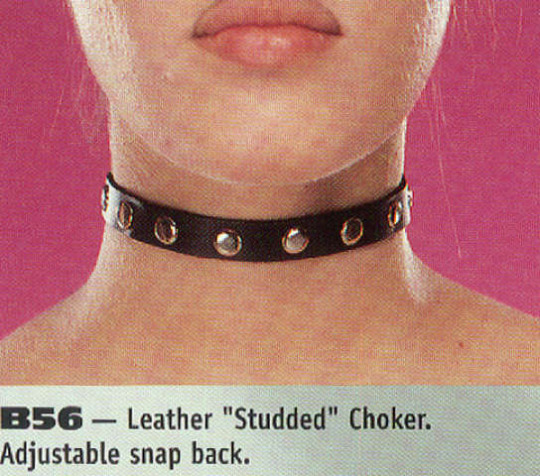
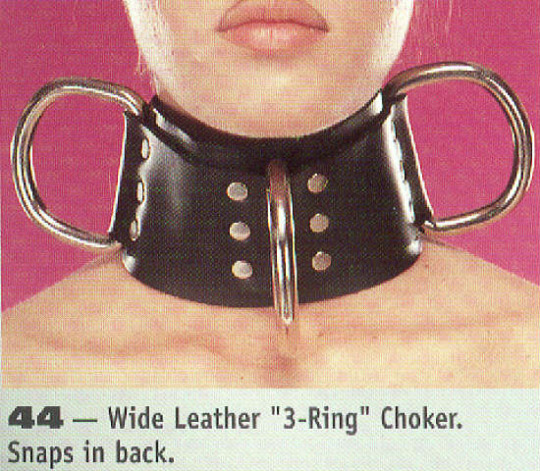
#u#web finds#chokers#jewelry#accessories#goth#gothic#spiked jewelry#2000s#early 2000s#fashion#punk#90s#old web#y2k#gothgoth#goth subculture#00s goth#emo#alternative#collars
3K notes
·
View notes
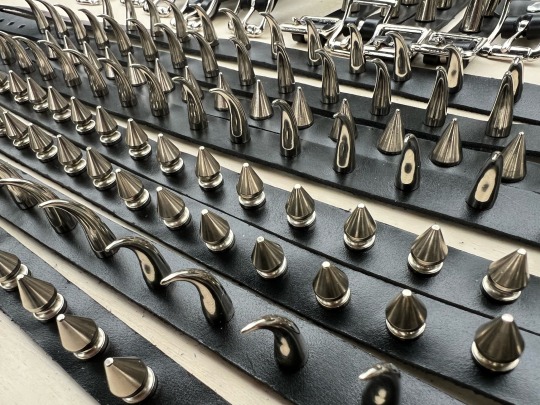
Text


Hashtag just punk things
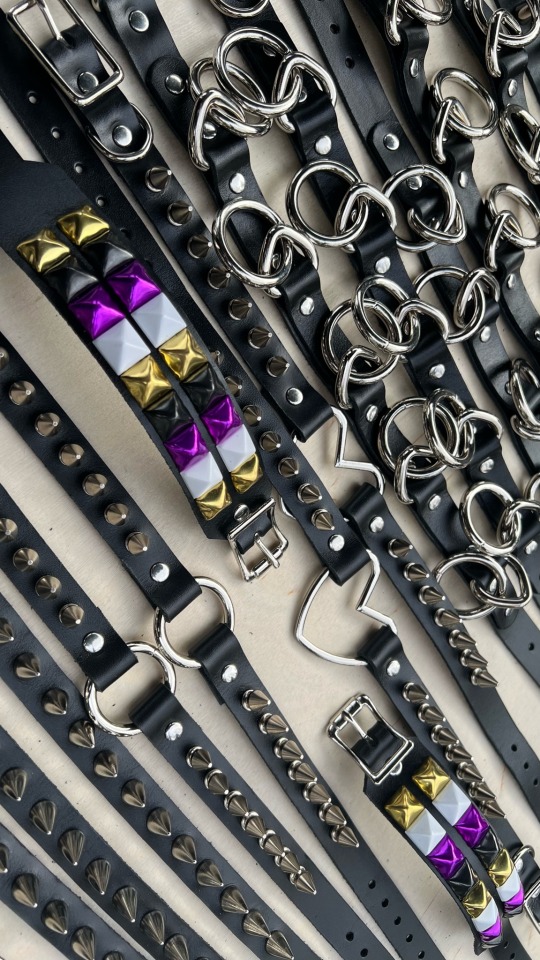
#punk fashion#diy punk#leathercraft#handmade#leatherwork#punkstyle#i made it#goth fashion#i made something#spike bracelets#spike collar#spike choker#spiked jewelry#spiked collar#spiked choker#punk jewelry#punk rock#punk#goth stuff#goth#goth jewelry#non binary#nonbinary#enby#enby pride
258 notes
·
View notes
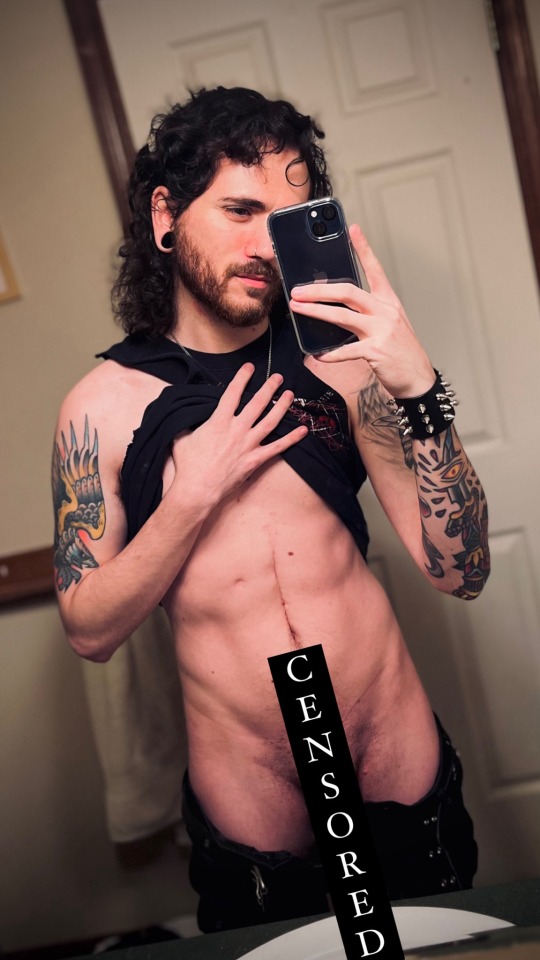
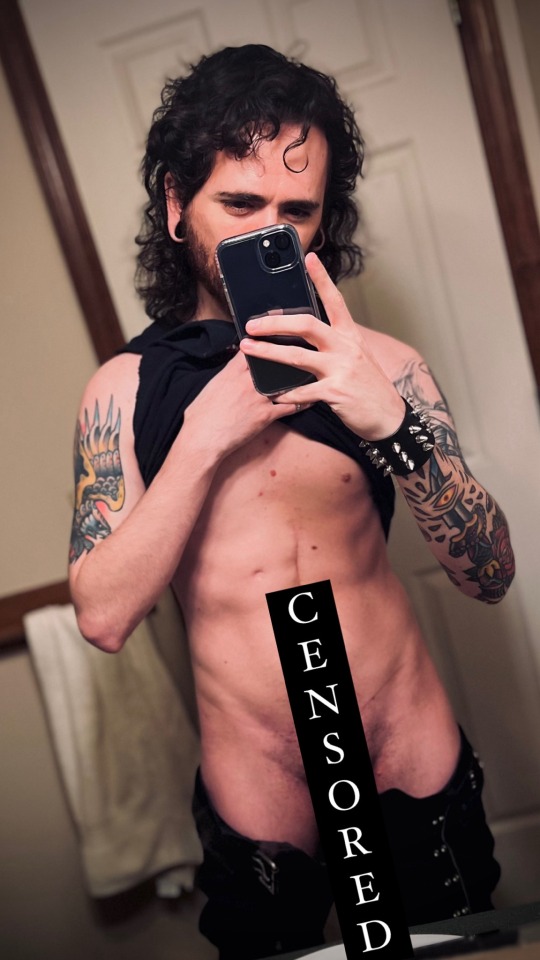
Text


Don’t mind me, I’m just here to show off my newly made spiky boi
The censor bar comes off here
#alternative#bi ns/fw#guys with beards#guys with plugs#guys with tattoos#ns/fw#alt aesthetic#bi nsft#spicy content#spicy creator#spiked jewelry#mullet#ns/ft blog#ns/ft#metalhead
92 notes
·
View notes
Text

228 notes
·
View notes
Text
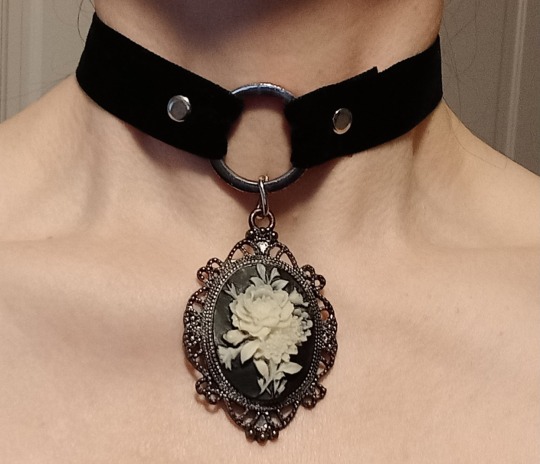
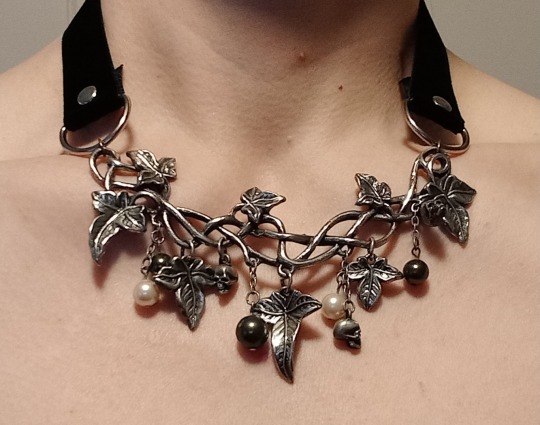
Velvet ribbon necklaces and chokers
This is one of my favourite ways to make a necklace - extremely quick and simple but I think it looks beautiful. I use velvet ribbon but it would also work with satin ribbon and possibly lace, though that might not be sturdy enough. I personally don't like to use leather or faux leather because it can get very sweaty and uncomfortable, but you can absolutely use that too if you want! Craft shops also sell patterned or embroidered ribbon.
I've even done variants on this which were made from just a long strip of fabric which I hemmed along the edges.
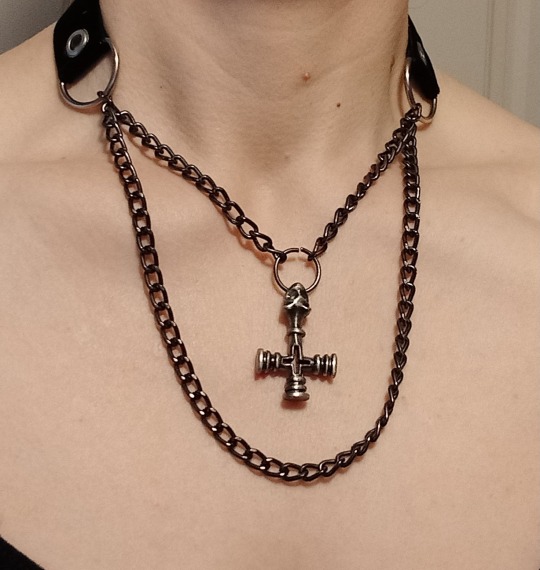
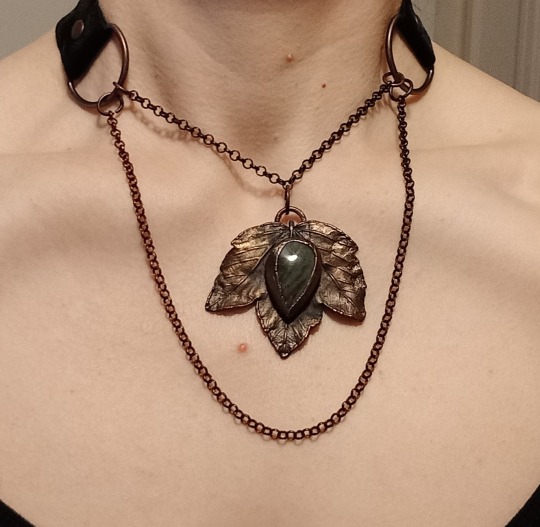

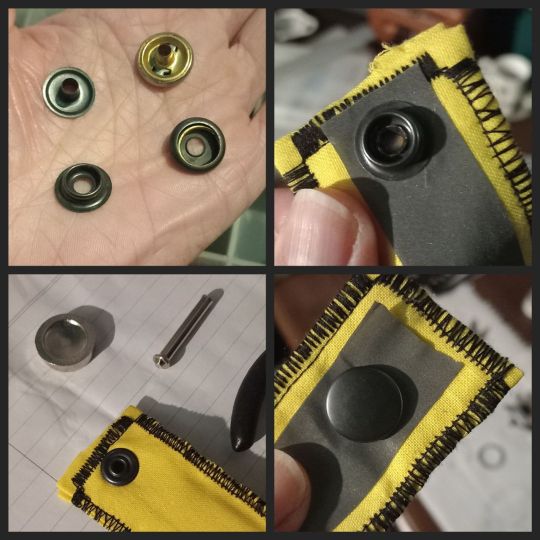
In addition to the ribbon you will need rivets or eyelets, d-rings or o-rings, and heavy snap studs to fasten them.
The pendants in these photos came from various places: the flower cameo was thrifted, the wolfs cross was bought from some alternative shop I don't remember the name of decades ago, the leaf and the large ocean jasper came from an Etsy shop called Enchanted Creations (link here) and the ivy is Alchemy Gothic.
For whatever reason I decided I didn't like the necklaces they came on so I remade them. The pendant parts and chains were attached using jewellery pliers and either jump rings or links of the chain if it was large enough.
Then all you need to do is loop your ribbon through the d-rings and poke a hole through both layers (I have a leather punch I tend to use but you can also use scissors) then secure it with either a rivet or an eyelet. You can buy these online or in craft shops, they're usually very cheap, come in various colours of metal and have instructions for how to put them together. They're fairly self-explanatory - one half on each side of the fabric and hit them with a hammer a few times. If using rivets make sure you put the pieces on the correct sides.

You could also use screw on spikes. Anything that will keep the ends together will work - obviously you could sew them too, but this looks neater (than my hand sewing anyway!) and gives a bit of extra visual interest.
To get the right length of ribbon I just put it around my neck making sure to overlap the ends then add a couple of centimetres extra for the folds. If the ribbon is synthetic (most of the the time they will be) use a lighter to singe the ends slightly. This will cause it to melt a little and prevent fraying. Please be careful when doing this! You don't need to put the ribbon *in* the flame, just close enough to heat it.
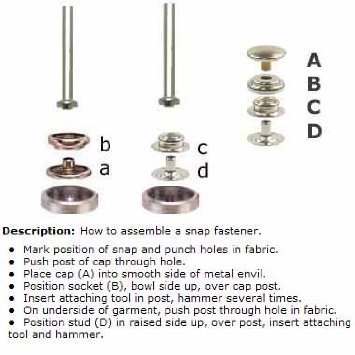
For fastenings I always use heavy snap studs. These make the fastening very secure and neat looking - it will lay completely flat to the back of your neck.

These studs come in 4 parts.
Again, double over the ends of the ribbon, poke a hole through both layers, put the correct pieces of the fastening on each side and hit them with a hammer a few times. These can likewise be bought online and come with a tool and instructions for use. The most important thing with these is to make sure all parts are facing the right direction so you can close them properly.
Here are some brief instructions I found online for how to use them.
Again, you don't have to fasten them the way I do, whatever way suits you is fine. Even a safety pin would work!
This basic method can be used to make collars too, I did a cyber collar a while back (full post here)


As I said above you can use any kind of ribbon you like, patterned or plain, or even a long strip of fabric, that's what I did for this collar.
You could cover it with safety pins, buttons, embroidery, fabric paint, whatever you like!
#goth diy#diy jewelry#goth jewelry#spiked jewelry#spiked collar#homemade jewelry#homemade#goth#gothic#gothic fashion#goth aesthetic#goth fashion#punk jewelry#punk aesthetic#alternative fashion#alternative#gothic jewelry#choker#goth choker#collar
24 notes
·
View notes
Text

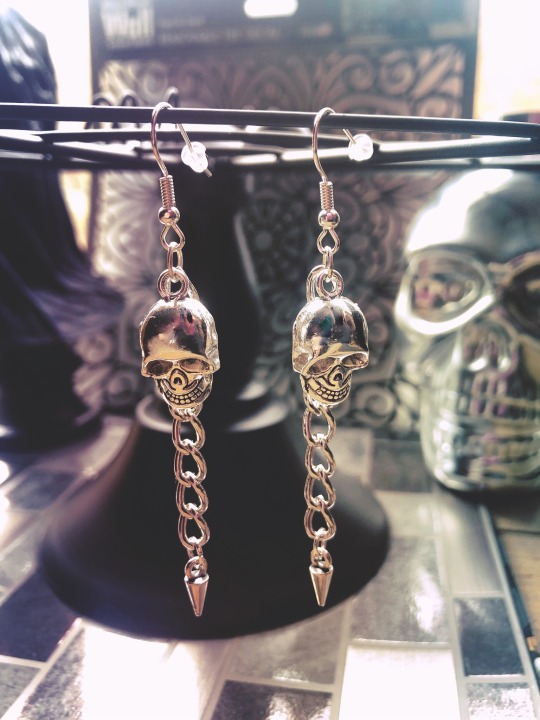


Memento Mori: Skull Spike Earrings
You’re going to slay in these 💀
https://sackeandsugarco.etsy.com
#goth aesthetic#goth store#goth fashion#alternative fashion#gothic fashion#goth jewelry#gothic jewelry#skulljewelry#spiked jewelry#punk jewelry#punk style#punk fashion#horror punk#punk aesthetic#goth punk#badass#metal af#horror jewelry
33 notes
·
View notes
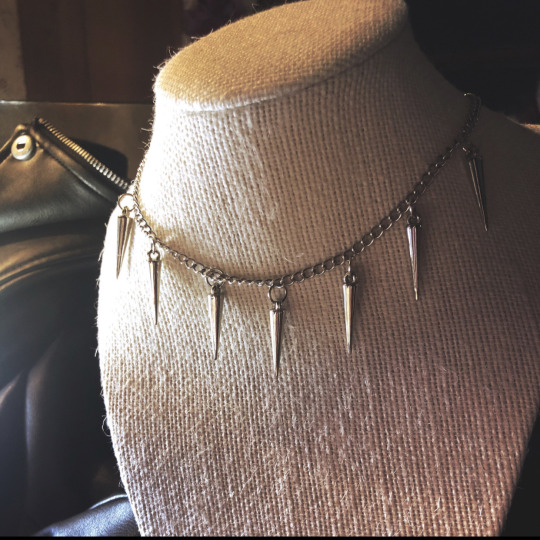
Text
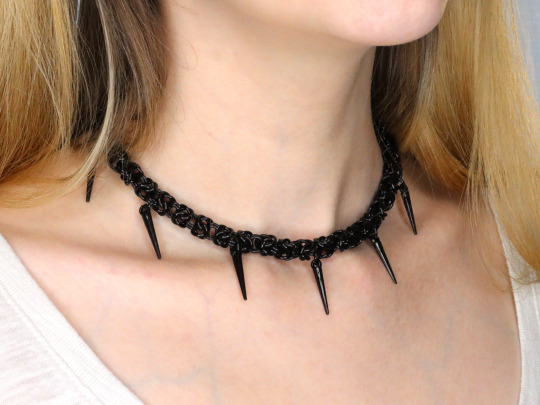
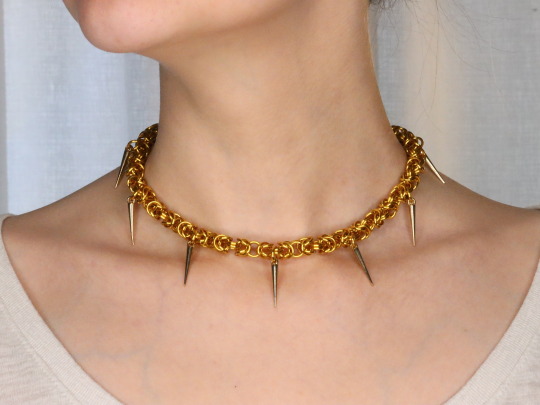
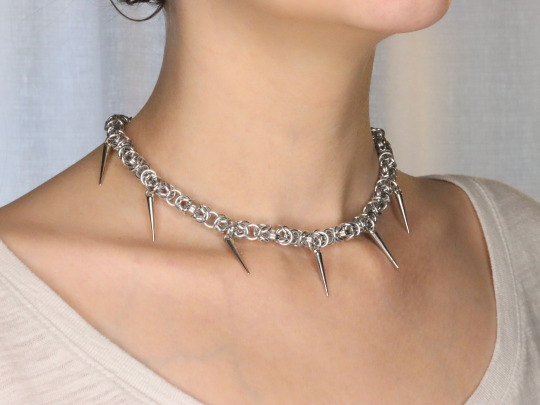
New Spiked Chain Chokers! These gothic fantasy necklaces come in black, silver, and gold finishes to go with any wardrobe.
Check them out here: https://www.streetmaille.etsy.com/listing/1522888481
Matching Earrings: https://www.streetmaille.etsy.com/listing/160240413
#goth aesthetic#punk rock#spiked choker#streetmaille#handmade jewelry#chainmail#spiked jewelry#alternative fashion#alt girl#alternative#gothcore#punk fashion#vampire costume#fantasy jewelry#chainmail necklace
17 notes
·
View notes
Text

Spiked Crystal heart made by ig: @flo.alai you can find this piece Available on my catalog www.floalai.etsy.com
#jewelry#chainmail#chainmaille#soft soldering#goth#goth jewelry#spiked jewelry#spiked heart#heart#necklace#barcelona#goth accessories#goth aesthetic#jewllery#heart necklace
9 notes
·
View notes
Text

Morute shoes!
#morute#alternative#accessories#alt aesthetic#alt clothing#alt girl#pastel dress#spiked jewelry#shoes#platform shoes#alt shoes#leg warmers#platform boots#boots
5 notes
·
View notes
Text

(x)
#u#web finds#goth#gothic#emo#punk#alternative#mall goth#fashion#jewelry#spiked jewelry#2000s#early 2000s#00s#y2k#90s
544 notes
·
View notes
Text
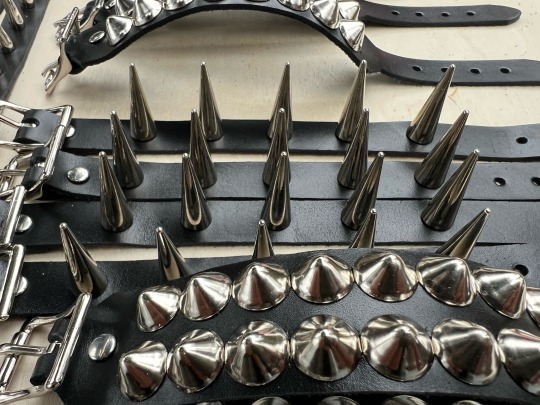
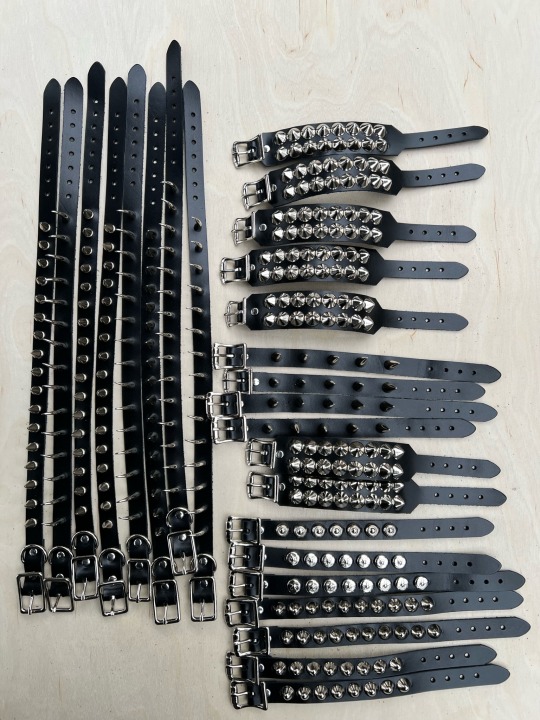

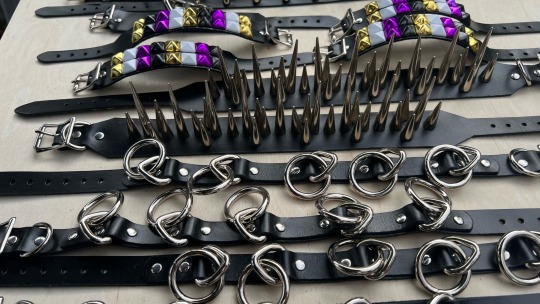
Spiked and/or studded bracelets and collars, painstakingly handmade by me
#punk fashion#diy punk#leathercraft#handmade#leatherwork#punkstyle#i made it#goth fashion#i made something#spike collar#spiked choker#spiked jewelry#spike bracelets#spike bracelet#dbeatrawpunk#punksdresspunk#punk style#punk#goth jewelry#goth stuff
233 notes
·
View notes
Text
𝔄𝔰 ℑ 𝔠𝔩𝔬𝔰𝔢 𝔪𝔶 𝔢𝔶𝔢𝔰, ℑ 𝔣𝔢𝔢𝔩 𝔦𝔱 𝔞𝔩𝔩 𝔰𝔩𝔦𝔭𝔭𝔦𝔫𝔤 𝔞𝔴𝔞𝔶
ℑ 𝔠𝔬𝔪𝔢 𝔱𝔬𝔴𝔞𝔯𝔡 𝔶𝔬𝔲
𝔚𝔢 𝔞𝔩𝔩 𝔤𝔬𝔱 𝔩𝔢𝔣𝔱 𝔟𝔢𝔥𝔦𝔫𝔡, 𝔴𝔢 𝔩𝔢𝔱 𝔦𝔱 𝔞𝔩𝔩 𝔰𝔩𝔦𝔭 𝔞𝔴𝔞𝔶
ℑ 𝔦𝔤𝔫𝔬𝔯𝔢 𝔶𝔬𝔲
Come play with me
#alternative#bi ns/fw#guys with beards#guys with plugs#guys with tattoos#ns/fw#alt aesthetic#bi nsft#spicy content#spicy creator#spiked jewelry#mullet#guys with piercings#guys with long hair#cute guys#spicy pics#spicy site
48 notes
·
View notes
Text
my friends have started to call me spikes bc i literally always have spiked jewelry on… my life is actually complete now
#literally the cutest nickname ever#i don’t think i’ll ever recover from this#what an ego boost honestly#mall goth#90s mall goth#spiked jewelry
15 notes
·
View notes
Text
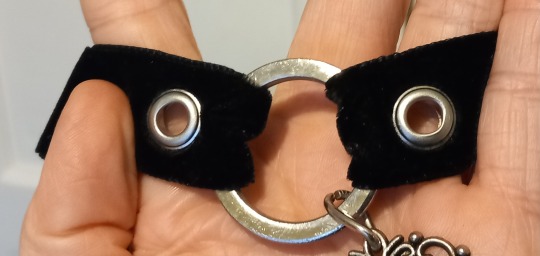
DIY cybergoth collar
I've been customising this dress, and I thought it would be cool to have a matching collar. Pics with and without flash to show how it might look under club lights!

I used some of the yellow fabric, cut a piece that was a little longer than the length around my neck so it can overlap at the ends, and a little more than twice as wide as I needed.
I doubled it over and sewed around the edges - pro tip - to save having to turn it inside out, just turn in all the edges a little, iron them down, then fold over along the width and top-stitch all around the edge. This will make it nice and flat, and save the tedium of turning a narrow piece of fabric inside out.
I didn't have any yellow thread so used black for contrast in a narrow zig-zag, and deliberately made it messy. Messy on purpose > trying to be neat and failing! I used my sewing machine but this could also be done by hand.
The reflector was stolen from a high visibility jacket which I don't really wear anymore. I glued it down first using pva glue, and then put spikes through which will help hold it in place if the glue starts to degrade. These are the screw on kind where you poke a hole through for the base and screw the spike on. The ring is from a key-chain, and this will just be sewn on by hand.
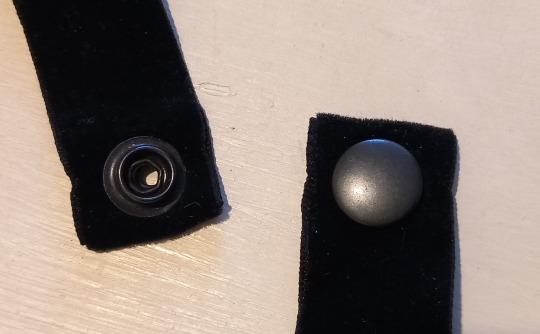
I always fasten collars and chokers with heavy duty snap studs. These are cheaper and safer than a buckle (no choking hazard if the collar gets caught on something or someone grabs it as they'll break apart under pressure) but are still very secure and are neater and easier to fasten than using safety pins or similar.

They come in a packet, each stud has 4 parts and the tool for attaching them is included. You'll need something to make a small hole to insert them. I have a leather punch but you could just use the end of scissors to poke a hole. You'll also need a hammer and a sturdy surface to do this on. I usually use my kitchen floor, you might end up damaging a tabletop or desk.
The instructions are usually printed on the packet but they're pretty simple to figure out, not too different to inserting eyelets. Just make sure you're inserting them the right way around so you can close them correctly - check and double check before hammering them shut! Can be bought online, but sewing and crafting stores usually have them too.
#cyber goth#goth diy#goth sewing#gothic fashion#gothic diy#alternative fashion#spiked collar#spiked jewelry#spiked choker#diy sewing#diy craft#alternative#industrial#electronic music#goth upcycling#upcycle#upcycling
3 notes
·
View notes
Text


Punk Spiked Jewelry collection
You’ll look sharp. Literally.
#goth fashion#alternative fashion#punk jewelry#punk aesthetic#goth punk#punk fashion#edgy fashion#alternative goth#alt aesthetic#spiked jewelry#emo style#emocore
3 notes
·
View notes
Text

Pleaser’s eye customized for myself. I’m excited to create more looks and possibly create for many beautiful souls 🖤🗡️
0 notes
Last Seen Blogs

bcrubber-blog
Bcrubber

paigealyssaarts
just a lil bit artsy

hightro2
lol

wmeiniang
上輩子一早約你

maplesyrupsainz
maddie ༝༚༝༚