#diy jewelry
Text
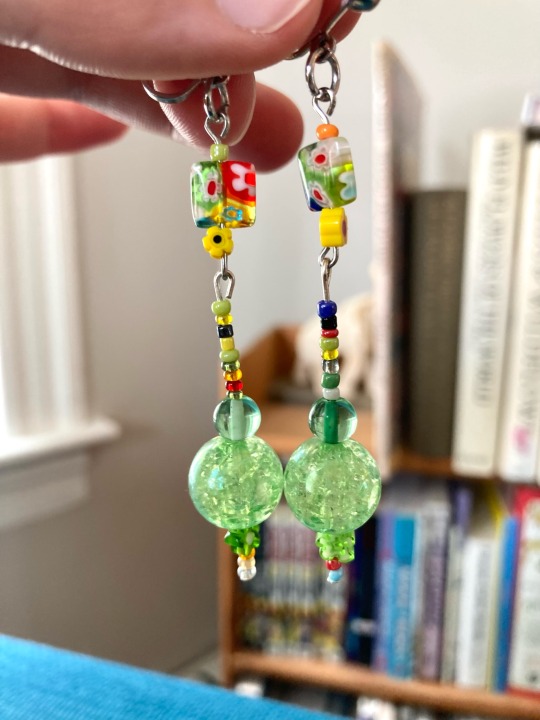

New pair of earrings I made recently 🥰💚
248 notes
·
View notes
Text
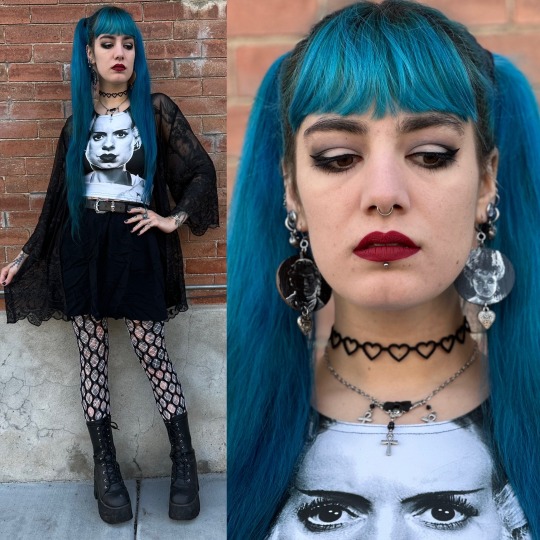
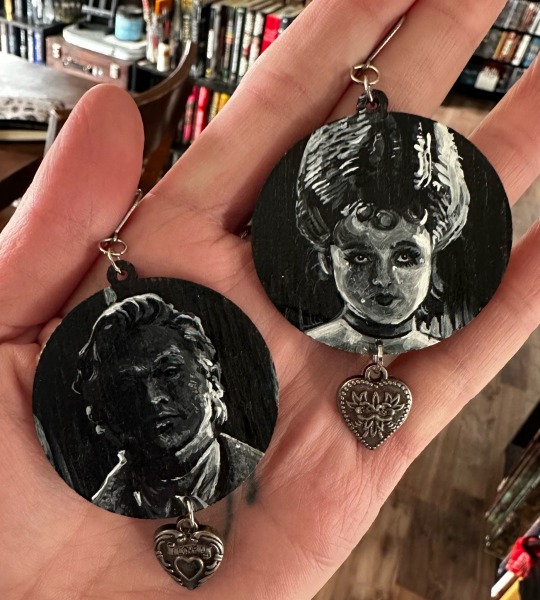
Did I paint Lisa Frankenstein earrings because I couldn’t find merch? Yes, gotta appreciate that artist power⚡️Top from blxckfly on Etsy, moth duster from Hot Topic, boots Demonia, earrings acrylic on wood with found charms.
#ootd#bride of Frankenstein#blxckfly#demonia#fishnets#diy jewelry#hand painted earrings#lisa frankenstein
188 notes
·
View notes
Text
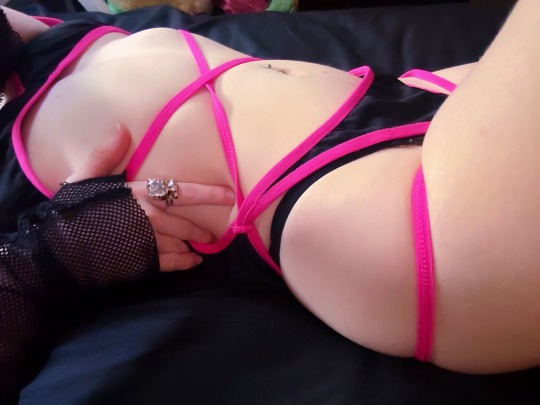
using this pose to once again show off my Hello Kitty ring that I made with krazy glue
OF | fansly | wishlist | my links | nsfw blog
#me#mine#hello kitty#soft tummy#cute tummy#tummy kink#pierced navel#navel piercing#belly piercing#bellybutton piercing#egirl outfit#soft egirl#alt grunge#alt aesthetic#black and pink#pink and black#diy jewelry
266 notes
·
View notes
Text


Can tab chains! Making these is so calming
Tabs: found on the street & collected over the course of 15 years
Shoelaces: from old boots
Closings: from thrifted lanyards
Trash crafts best crafts
303 notes
·
View notes
Text

I felt that this meat / flesh themed bracelet would be appreciated here on Tumblr. 90% of the beads, including that meat slab charm, are made by me.
[Liha Is finnish For Meat]
#Morsos bead works#Bracelets#diy jewelry#diy bracelet#self made#(I still don't know all the right tags for this stuff)#crafters of tumblr#fimo clay#fimoart#meatcore#fleshcore#meat aesthetic
316 notes
·
View notes
Text

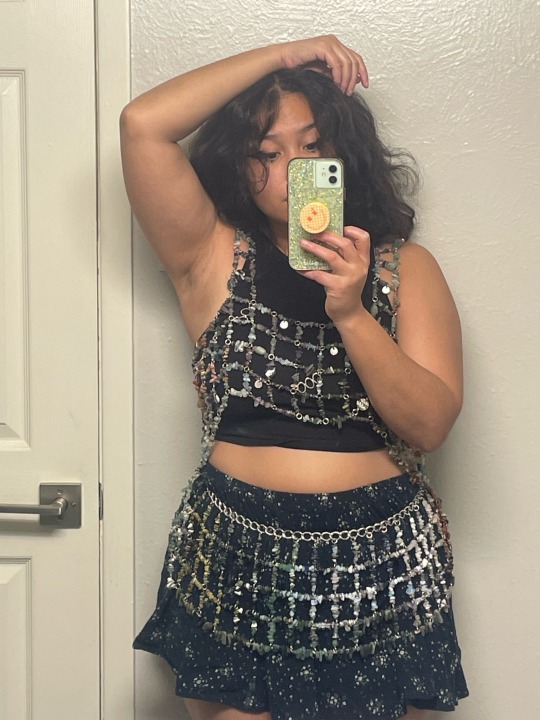
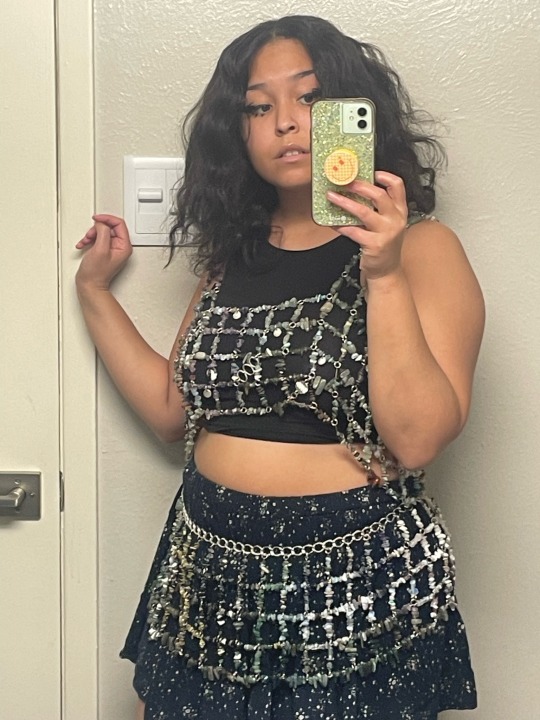
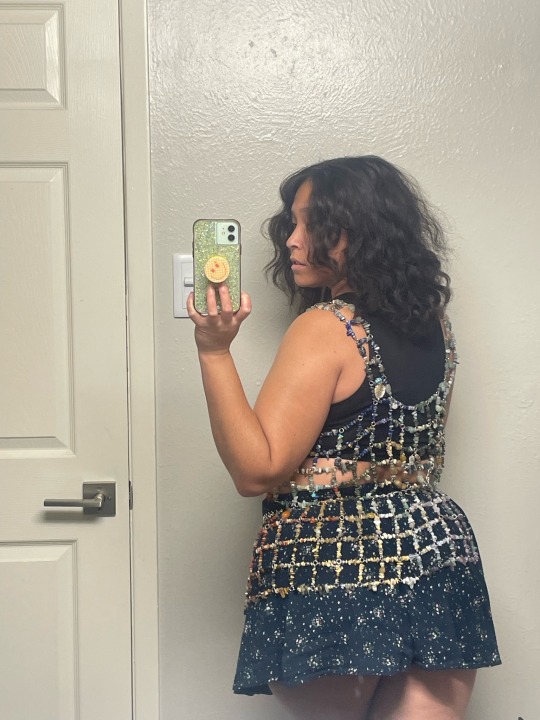

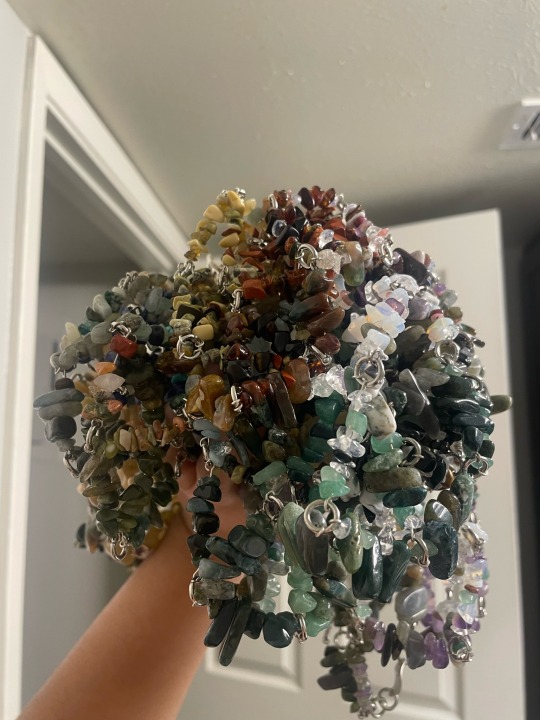
finished this finally!!! the pebble mail!!
57 notes
·
View notes
Text
I made bracelets for the crew!!!
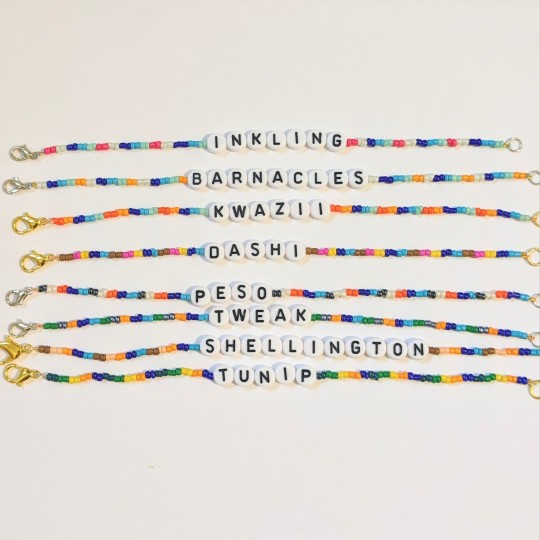
Bouta be DROWNIN in drip B)
#octonauts#professor inkling#captain barnacles#kwazii#dashi#peso#tweak#shellington#tunip#vegimals#octonauts vegimals#bracelets#jewelry#diy jewelry
109 notes
·
View notes
Text

Octavinelle inspired bracelet
#ithseem's arts and crafts#octavinelle#diy jewelry#azul ashengrotto#jade leech#floyd leech#disney twisted wonderland#twisted wonderland
96 notes
·
View notes
Text
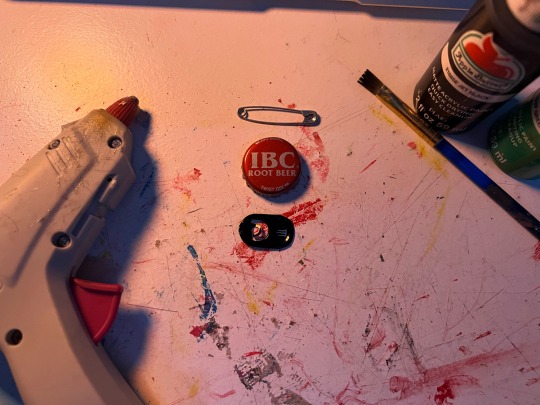
[ DANNY'S TUTORIALS: BOTTLECAP PIN ]
Hi there!! I'm gonna teach you how to make a bottlecap pin since I've gotten a lot of questions about where I got mine from baby punks and others who just find them cool! I've found that a lot of people buy their pins online from companies that overprice and over-process their designs, and often times steal them from smaller businesses. Punk has been gentrified over the years, so this tutorial acts as a way to reconnect to the roots of DIY fashion made by people with limited resources and time. This is a great way to show your interests, pride in your community, and pretty much anything else you want even if you don't have a penchant for traditional art. Don't worry about it looking good, just try to have fun! At the end of the day, the shittier the job, the more punk it is.
[ Step Count : 6 ]

Here's what you're gonna need! (optional materials have a star next to them instead of a regular point):
-> hot glue gun (in replacement of pliers)
-> safety pin
-> bottlecap (unbent, preferably a twist off)
-> can tab
✮ pencil/pen
✮ sandpaper
✮ paint & paintbrush/posca pens
✮ regular Elmer's glue
STEP 1:
Gather your all of your materials and place them on your workspace. I'm going to paint mine, so I got the sandpaper, paintbrush, and paints as extra materials.
STEP 2:
If you're not going to paint yours, go ahead and skip to step 3. Otherwise, get your sandpaper and your bottlecap, then sand down the surface (A). Paint your base, draw a design with the pencil/pen, and fill it in with your paints/posca pens (B)! After I'm done painting I'll usually seal it in regular Elmer's glue to make sure it doesn't get messed up anytime soon (C). I chose a little green skull since the person I'm gifting this too likes and spooky stuff and green is their favorite color :]

[ Also sorry for the change of scenery, I had to finish at the library cause I was studying. Visiting, donating, and helping your local library is Punk As Fuck. ]
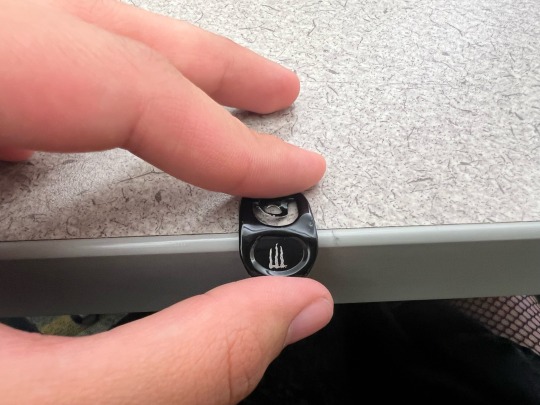
STEP 3:
What you're going to do now is set your bottlecap aside, and take out your can tab. I have joint problems and I can't use pliers, so I bend it over the edge of a table by holding it half over the edge and pushing down to bend the metal. But try not to bend it too much so your safety pin stays in place!
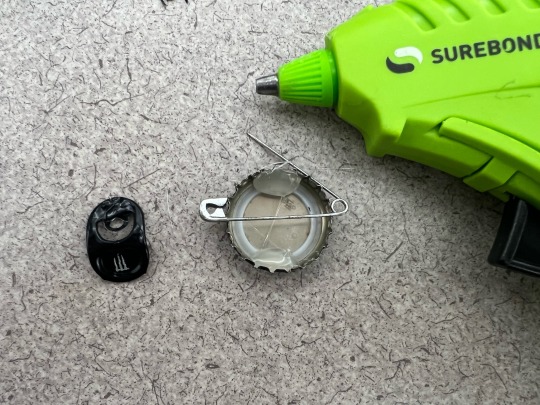
STEP 4:
Okay, here comes the tricky part. Like I said, I have joint issues, so I can't use pliers because they hurt my hands. Instead I'm going to set aside my now bent can tab and bring back my bottle cap, then flip it over. Place 2 hefty drops of hot glue on the bottom and top of the pin, then get your safety pin and open it so you can place it on the back horizontally.
STEP 5:
Now, place your bent can tab on the back of the pin and over the open safety pin, pressing it into the hot glue drops and letting it dry for a little bit (A). If you like, you can also put two more drops of hot glue on the tops of the bent can tab for extra security (B). I also put some hot glue in the middle of the tab's opening for extra security on the safety pin. Please pardon the absolute dogshit photo quality it wasn't cooperating for some reason LMAO
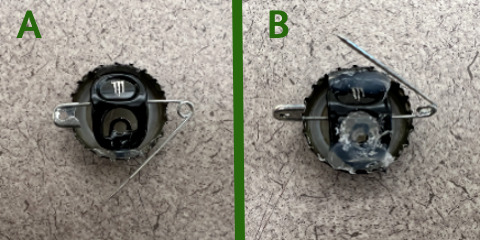
STEP 6 [FINAL]:
Wait for it to dry, then you're all done!! Your very own bottlecap pin. You can attach this to bags, jackets, shirts, pants, and pretty much any material that a safety pin can glide through.

Here's the finished product, as presented by my friend D at the library (everybody say thank you D for modeling)!!
[ -> Next (coming soon:]) ]
#punk#diy punk#bottle cap pin#diy tutorial#punk rock#bottlecap#bottle caps#punk tutorial#diy#diy jewelry#diy accessories#danny's tutorials
473 notes
·
View notes
Text
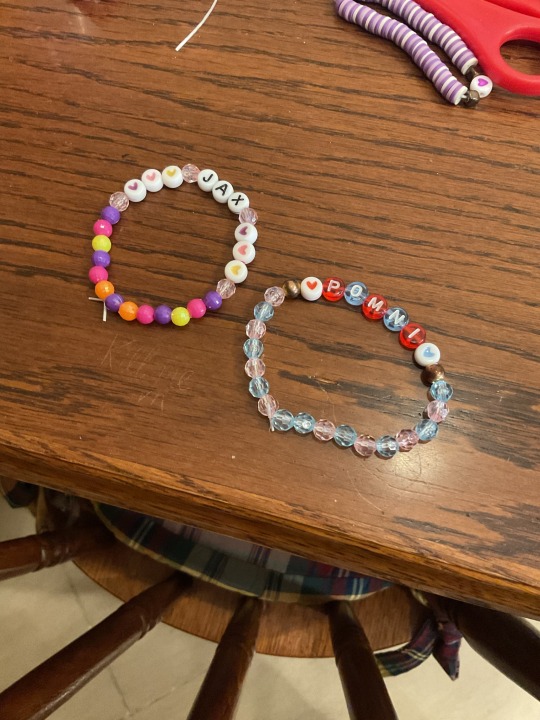
Jax and Pomni bracelets :) -🔥
31 notes
·
View notes
Text
Velvet ribbon necklaces and chokers
This is one of my favourite ways to make a necklace - extremely quick and simple but I think it looks beautiful. I use velvet ribbon but it would also work with satin ribbon and possibly lace, though that might not be sturdy enough. I personally don't like to use leather or faux leather because it can get very sweaty and uncomfortable, but you can absolutely use that too if you want! Craft shops also sell patterned or embroidered ribbon.
I've even done variants on this which were made from just a long strip of fabric which I hemmed along the edges.
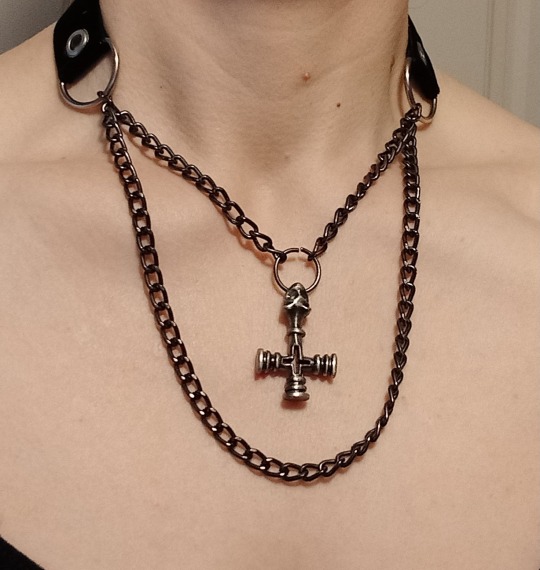
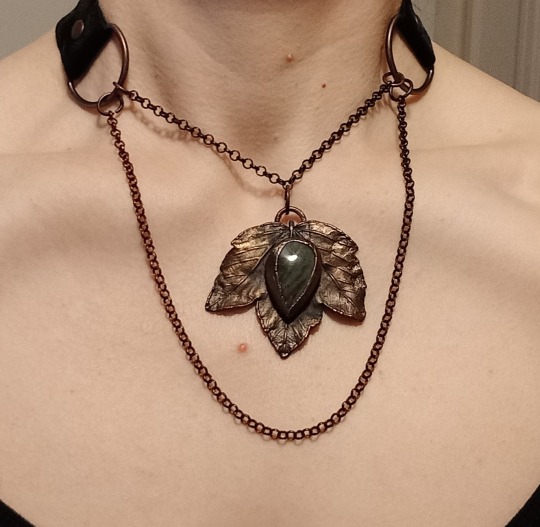
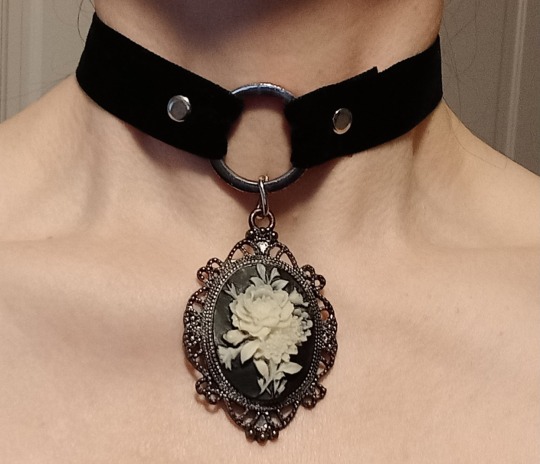
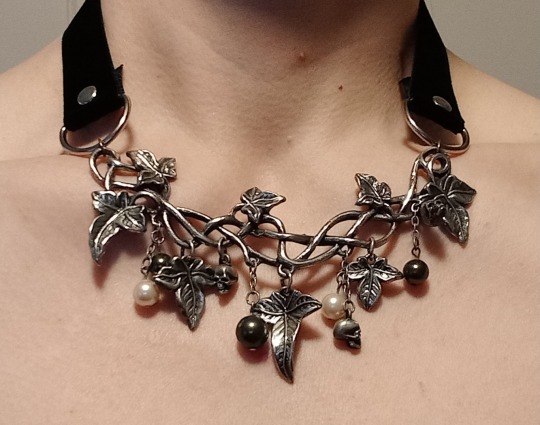

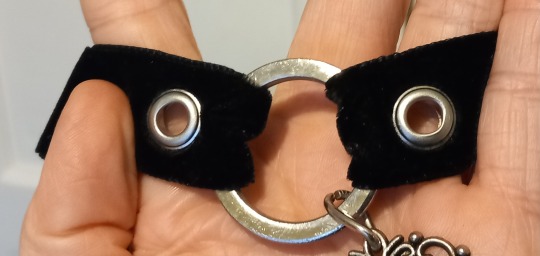
In addition to the ribbon you will need rivets or eyelets, d-rings or o-rings, and heavy snap studs to fasten them.
The pendants in these photos came from various places: the flower cameo was thrifted, the wolfs cross was bought from some alternative shop I don't remember the name of decades ago, the leaf and the large ocean jasper came from an Etsy shop called Enchanted Creations (link here) and the ivy is Alchemy Gothic.
For whatever reason I decided I didn't like the necklaces they came on so I remade them. The pendant parts and chains were attached using jewellery pliers and either jump rings or links of the chain if it was large enough.
Then all you need to do is loop your ribbon through the d-rings and poke a hole through both layers (I have a leather punch I tend to use but you can also use scissors) then secure it with either a rivet or an eyelet. You can buy these online or in craft shops, they're usually very cheap, come in various colours of metal and have instructions for how to put them together. They're fairly self-explanatory - one half on each side of the fabric and hit them with a hammer a few times. If using rivets make sure you put the pieces on the correct sides.

You could also use screw on spikes. Anything that will keep the ends together will work - obviously you could sew them too, but this looks neater (than my hand sewing anyway!) and gives a bit of extra visual interest.
To get the right length of ribbon I just put it around my neck making sure to overlap the ends then add a couple of centimetres extra for the folds. If the ribbon is synthetic (most of the the time they will be) use a lighter to singe the ends slightly. This will cause it to melt a little and prevent fraying. Please be careful when doing this! You don't need to put the ribbon *in* the flame, just close enough to heat it.
For fastenings I always use heavy snap studs. These make the fastening very secure and neat looking - it will lay completely flat to the back of your neck.

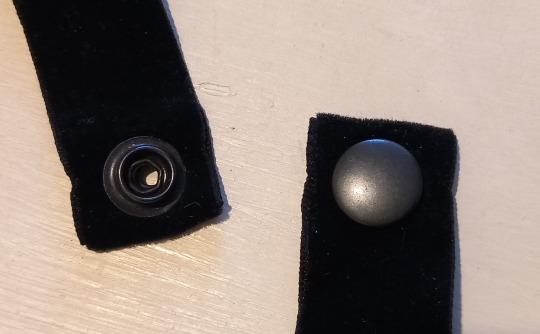
These studs come in 4 parts.
Again, double over the ends of the ribbon, poke a hole through both layers, put the correct pieces of the fastening on each side and hit them with a hammer a few times. These can likewise be bought online and come with a tool and instructions for use. The most important thing with these is to make sure all parts are facing the right direction so you can close them properly.
Here are some brief instructions I found online for how to use them.
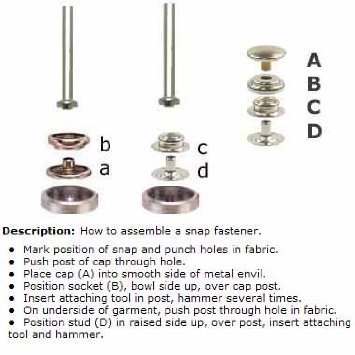
Again, you don't have to fasten them the way I do, whatever way suits you is fine. Even a safety pin would work!
This basic method can be used to make collars too, I did a cyber collar a while back (full post here)


As I said above you can use any kind of ribbon you like, patterned or plain, or even a long strip of fabric, that's what I did for this collar.
You could cover it with safety pins, buttons, embroidery, fabric paint, whatever you like!
#goth diy#diy jewelry#goth jewelry#spiked jewelry#spiked collar#homemade jewelry#homemade#goth#gothic#gothic fashion#goth aesthetic#goth fashion#punk jewelry#punk aesthetic#alternative fashion#alternative#gothic jewelry#choker#goth choker#collar
22 notes
·
View notes
Text

Another pair of earrings I made the other night! Thank you all so much for the love on the pair I shared the other day! You are all too sweet! 🥺🙏💖💕
141 notes
·
View notes
Text
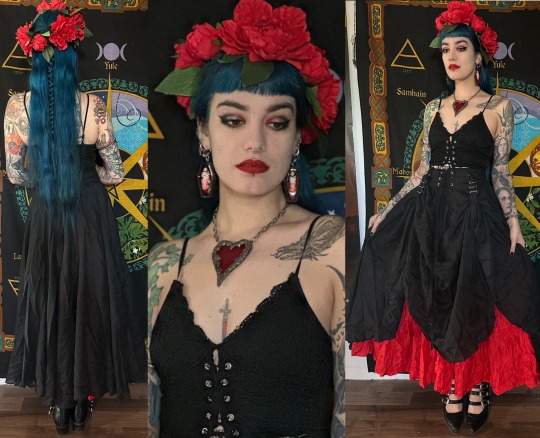
Outfit vibe is the Concrete Blonde album “Bloodletting”☠️🥀🦇Skirt garter belt by Nuit Clothing Atelier, flower crown and Carmilla earrings made by me, shoes TUK, layered skirts vintage, top off Amazon, necklace from Black Cat Closet.
148 notes
·
View notes
Text
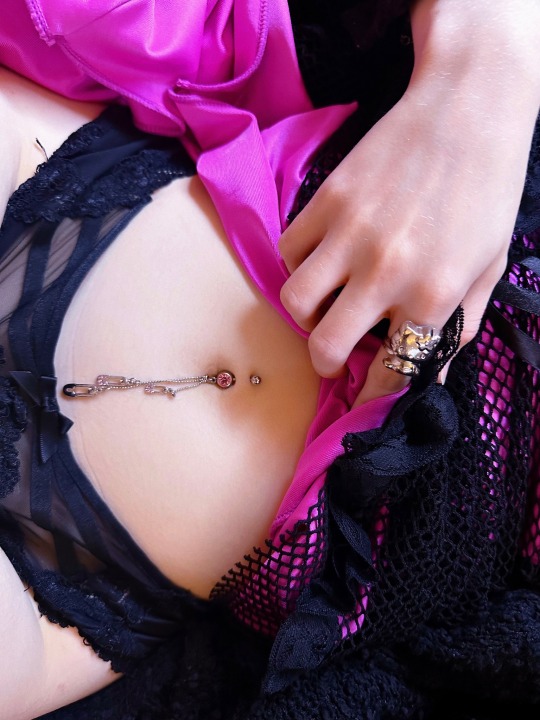
look at the Hello Kitty ring I made!!
Instagram | NSFW blog | OF | fansly | wishlist | my links
#me#mine#diy jewelry#navel piercing#egirlvibes#goth lingerie#tummy kink#sanrio#belly piercing#hello kitty#soft tummy#bellybutton piercing#pinkcore#safety pin#pink aesthetic#hot pink#alternative goth#alternative grunge#alternative fashion#alt grunge#alt girl#alt aesthetic#goth egirl#egirl aesthetic#soft egirl#hot egirls#egirl style#egirl outfit
357 notes
·
View notes
Text
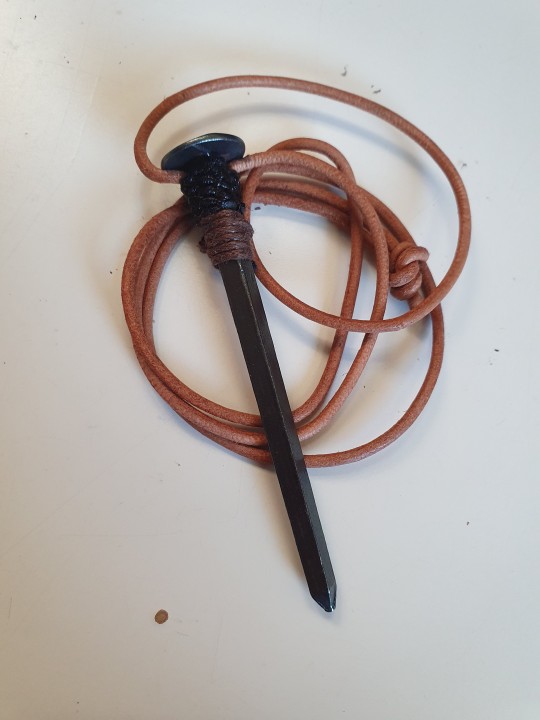

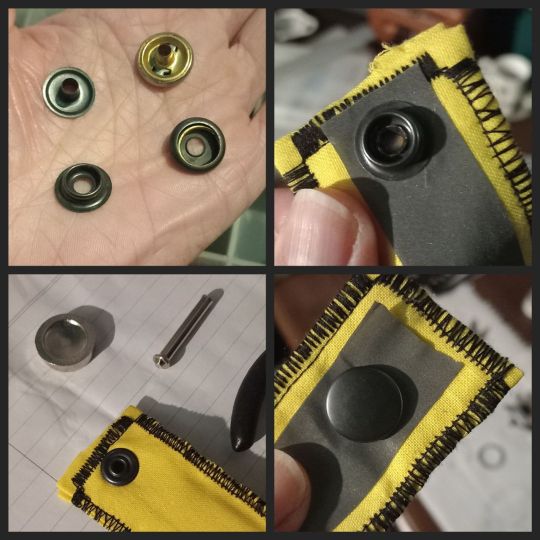
Made a nail necklace!
It's a handcrafted nail I got from a little fantasy store, meticulously wrangled onto a string so it somehow stays vertical. I've seen coffin nail necklaces and the like for a while so I wanted ny own. The nail itself was at most 1 euro, the rest I already had in the Craft Stash.
184 notes
·
View notes
Text

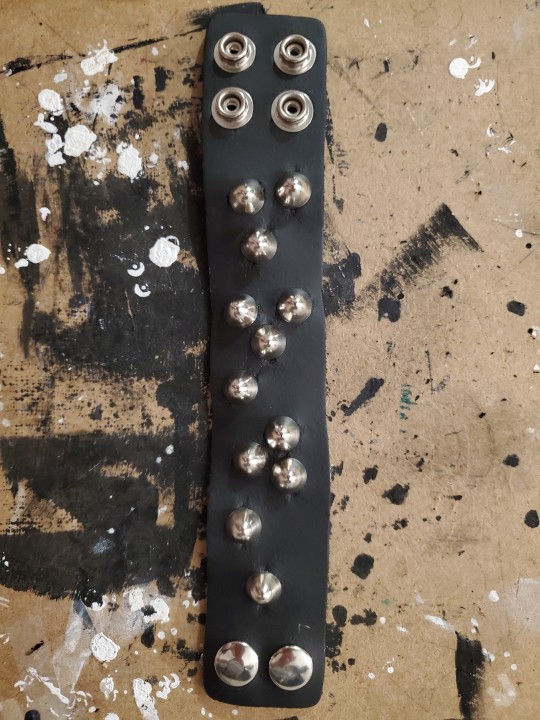
Diy Chaos stud cuff
124 notes
·
View notes
Last Seen Blogs

ironstarlightgiver
Untitled

colgreen31
Untitled

klankarussell
klankarussell
susililys
Susie

hiddlestonologist
Hiddlestonologist