#springtesting
Explore tagged Tumblr posts
Visit Tumblr Blog
Explore Tumblr blogs with no restrictions, modern design and the best experience.
Last Seen Tumblr Blogs


Fun Fact
Tumblr is used by 21% of adults online aged 18-29 years.
Text
Guide To choose the Right Tensile/Compression Strength Testing Machine
Despite the fact that Tensile/Compression strength testing machines are and utilized pretty much in every industry there is still absence of information with regards to buying the right machine. Given the scope of items, the features and the variations in cost getting one can be a bit overwhelming and this becomes especially true for non -standard applications.
One of the inquiries we get posed to by our clients is whether to pick a manually operated machine or motorized one and if motorized is chosen, would it be a good idea for us we pick a machine with Computer Control and inclusive of data acquisition. So, we should check out at this according to a point of view of a spring manufacturer.
There are two elements which go with this choice simpler. The first and most clear one is the price. Manually operated machines are less expensive obviously, then motorized lastly computerized. In any case, in the event that you are taking a heavier spring which are utilized in train bogies or airplanes, then, at that point, motorized ones must be utilized no matter what the budget. Imaging putting a pressure power of 5000 kg on a spring, (for example, the ones utilized under the train bogies) with a hand wheel. Indeed, even with utilization of a geared 3 train it's diligent effort.
Whenever that is chosen, the other element which is significant is the volume of testing. A spring manufacturer can let out a huge number of springs a day. The question then is whether to do batch testing or 100% testing. Batch testing is where you pick a couple of tests from the batch, test them and assuming all are good you say that the entire batch is good. In such cases a manual machine would be satisfactory. However, if one wants to test several thousand springs a day it's smarter to go for a motorized machine and reduce the burden of manual labour on the machine operator.
So, we decided on a manual or motorized machine. Subsequent stage in the development is whether to get a computer-controlled machine. These are machines operated straightforwardly from the computer and give the testing output as a force versus displacement chart. This imagines the way of behaving of the spring constantly. Regularly these software’s also provide a statistical report for all the tests, so min, max, standard deviation etc. and so forth. Are accessible as reports. Any large organizations where the report should be imparted to the higher ups who just need an outline of the production quality, these machines are a good decision. Any new product requiring data for approval must be tested on such machines. In many cases the client request that the manufacturer present the report online or in pdf format to avoid any possibility of manipulation. The best way to avoid from this is to utilize a computerized machine.
In specific cases the product you manufacture dictates the type of machine, there are ASTM, IS norms which settle on the decision for you. Be that as it may, for situations where it’s a non-standard product, we trust this article assists you with choosing what's best for you.

#utm#tensile#compressiontesting#stm#spring#universal testing machine manufacturers#mechanical engineering#manufacturer#springtesting#tensile testing machines
0 notes
Photo

Jentera dulu2 Selamat menyambut Ramadhan 😀🏁 Follow: @7rarecing #mentionowner #dragracing #drag201m #springtest #rarecing https://www.instagram.com/p/B_XQFtWDCKf/?igshid=kdcrqaqs29dd
0 notes
Photo

Kenal jentera apa asalnya?😀🏁 Follow: @7rarecing #dragracing #drag201m #springtest #rarecing https://www.instagram.com/p/B_T9HdUjxdQ/?igshid=18m1oo5m99w4c
0 notes
Photo

On bossku 🏁 Follow: @7rarecing #dragracing #springtest #201meter #rarecing https://www.instagram.com/p/B_Jk5FNjgDd/?igshid=q13c126lz889
0 notes
Photo

Jangan menghina hobi kami, kerana hobi kami mempunyai yang tersurat dan tersirat.. Follow: @7rarecing #201meter #dausracingproject #dragracing #drag201m #springtest #terengganu #rarecing https://www.instagram.com/p/B_ErUk_Dpq0/?igshid=nybvie2uybkl
0 notes
Photo

Stay at home✌️🤕🤥 Follow: @7rarecing #rarecing #hondadrag #springtest #dragracing https://www.instagram.com/p/B-3YKEYjzmg/?igshid=15323x6g99xg0
0 notes
Photo

Selamat bersabar sahabat-sahabat kita semua @gs_motormachine 💛 Follow: @7rarecing #rarecing #dragracing #springtest #covid_19 https://www.instagram.com/p/B-03J7tDxnP/?igshid=1djetwzzjsjf5
0 notes
Text
Spring Digging Road 2-> Assembly of SpringBean
# Assembly of SpringBean
##SpringBean allocation plan
Spring container is responsible for creating bean in applications and coordinating the relationships among these objects through dependency injection.
But as a developer, you need to tell Spring which bean to create and how to assemble them together. When describing how bean are assembled, Spring has great flexibility and provides three main assembly mechanisms:
```
1. Implicit bean discovery mechanism-annotation;
2. Explicit configuration in Java -- JavaConfig;
3. Explicit configuration in XML -- XML configuration.
```
###Annotation assembly Bean
Spring realizes automatic assembly from two angles:
```
Component scanning : Spring will automatically discover bean created in the application context
Automatic assembly : Spring automatically satisfies the dependencies between bean.
```
**PS : The combination of component scanning and automatic assembly can minimize explicit configuration.
**
```
1.Create bean that can be discovered
2.Name the bean scanned by the component
3.Set the basic package for component scanning
4.Automatic assembly by adding annotations to bean
```
The directory structure is as follows

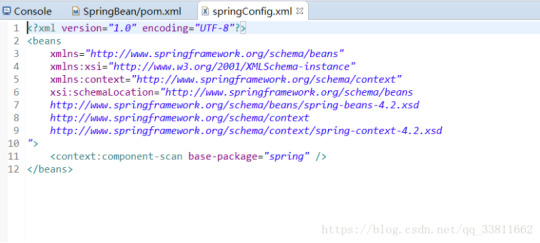
First of all, let everyone look at the contents of pom.xml and springConfig.xml on my side, as shown in the figure:

Several ways to annotate Bean assembly
```
Member variable injection
Constructor injection
Setting mode injection
```
Ok, it's time to code.
The following is member variable injection, which mainly adds @Autowire annotation to A to be passed into Class B.
public class SpringTest {
public static void main(String[] args) {
AbstractApplicationContext context = new ClassPathXmlApplicationContext("/spring/springConfig.xml");
B b = (B) context.getBean("b");
b.print();
}
}
@Component
class A {
@Override
public String toString() {
return "introduce Class A";
}
}
@Component
class B {
@Autowired
A a;
void print() {
System.out.println("In the method of Class B" + a);
}
}
Then there is constructor injection, at this time, the constructor of B is added @Autowired
public class SpringTest {
public static void main(String[] args) {
AbstractApplicationContext context = new ClassPathXmlApplicationContext("/spring/springConfig.xml");
B b = (B) context.getBean("b");
b.print();
}
}
@Component
class A {
@Override
public String toString() {
return "introduce Class A";
}
}
@Component
class B {
A a;
@Autowired
B(A a) {
this.a = a;
}
void print() {
System.out.println("In the method of Class B" + a);
}
}
Finally, set the way to inject. In one method, automatic assembly is performed. The method name can be arbitrary, only @Autowired needs to be added to the method name. here, for the sake of standardization, setA is used as the method name
public class SpringTest {
public static void main(String[] args) {
AbstractApplicationContext context = new ClassPathXmlApplicationContext("/spring/springConfig.xml");
B b = (B) context.getBean("b");
b.print();
}
}
@Component
class A {
@Override
public String toString() {
return "introduce Class A";
}
}
@Component
class B {
A a;
@Autowired
void setA(A a) {
this.a = a;
}
void print() {
System.out.println("In the method of Class B" + a);
}
}
###Java code assembly Bean
Although it is a more recommended way to realize automatic configuration of Spring through component scanning and annotation in many scenarios, sometimes the scheme of automatic configuration does not work, so it is necessary to explicitly configure Spring Bean.
For example, when you want to assemble a component in a third-party library into an application, you can't add @Component and @Autowired annotations to its class, so you can't use the automatic assembly scheme.
In this case, explicit configuration must be adopted. There are two alternatives for explicit configuration: JavaConfig and XML, and JavaConfig is a better one because it is more powerful, type-safe and friendly to refactoring. After all, JavaConfig belongs to Java code.
At the same time, JavaConfig is different from other Java codes, which is conceptually different from business logic and domain codes in applications. Although it uses the same language as other components, JavaConfig is the configuration code.
This means that it should not contain any business logic, and JavaConfig should not intrude into business logic code. Although it is not necessary, JavaConfig is usually put in a separate package, which makes it separate from other application logic, so that there is no confusion about its intention.
Several ways of assembling Bean with Java code:
```
Constructor injection
Setting mode injection
```
The first is constructor injection
@Configuration
public class JavaConfigTest {
@Bean
A newA() {
return new A();
}
@Bean
B newB() {
return new B(newA());
}
public static void main(String[] args) {
AbstractApplicationContext context = new AnnotationConfigApplicationContext(JavaConfigTest.class);
B b = (B) context.getBean("newB");
b.print();
}
}
class A {
@Override
public String toString() {
return "introduce Class A";
}
}
class B {
A a;
B(A a) {
this.a = a;
}
void print() {
System.out.println("In the method of Class B" + a);
}
}
Then setting mode injection
@Configuration
public class JavaConfigTest {
@Bean
A newA() {
return new A();
}
@Bean
B newB() {
B b = new B();
b.setA(newA());
return b;
}
public static void main(String[] args) {
AbstractApplicationContext context = new AnnotationConfigApplicationContext(JavaConfigTest.class);
B b = (B) context.getBean("newB");
b.print();
}
}
class A {
@Override
public String toString() {
return "introduce Class A";
}
}
class B {
A a;
void setA(A a) {
this.a = a;
}
void print() {
System.out.println("In the method of Class B" + a);
}
}
###Assemble Bean through XML
When Spring first appeared, XML was the main way to describe configuration, but XML was no longer the only alternative way to configure Spring. However, in view of the large number of Spring configuration projects based on XML, it is very important to understand how to assemble Sping projects through XML.
Several ways to assemble Bean through XML
```
Constructor injection
Setting mode injection
```
The first is constructor injection:
Project code is:
public class XMLTest {
public static void main(String[] args) {
AbstractApplicationContext context = new ClassPathXmlApplicationContext("/xml/springConfig.xml");
B b = (B) context.getBean("b");
b.print();
}
}
class A {
@Override
public String toString() {
return "introduce Class A";
}
}
class B {
A a;
B(A a) {
this.a = a;
}
void print() {
System.out.println("In the method of Class B" + a);
}
}
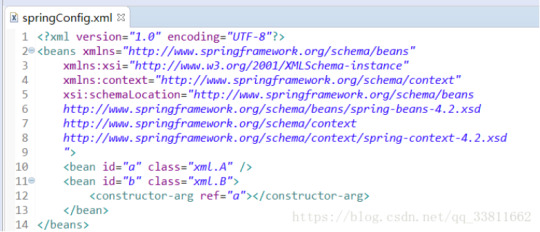
springconfig.xml As shown in figure:
Then there is the setting mode injection
Project code is:
public class XMLTest {
public static void main(String[] args) {
AbstractApplicationContext context = new ClassPathXmlApplicationContext("/xml/springConfig.xml");
B b = (B) context.getBean("b");
b.print();
}
}
class A {
@Override
public String toString() {
return "introduce Class A";
}
}
class B {
A a;
public void setA(A a) {
this.a = a;
}
void print() {
System.out.println("In the method of Class B" + a);
}
}
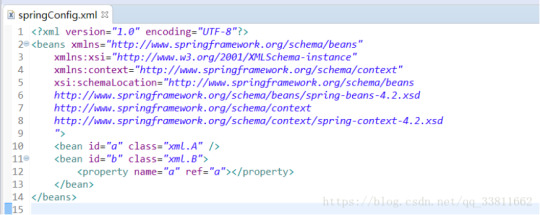
springconfig.xml Figure:
###Spring annotation
@Autowired : Automatically assemble member variables, and @Autowired(required=false) will not report an error if no matching Bean can be found.
@Qualifier : Comments specify the ID of the injected bean
@Component : Define a bean
@Controller : Controller
@Service : Define a service bean
@Repository : Used to take the class identity of data access layer (DAO) as a bean
@Scope : Set the type of bean
###Others:
Singleton: In the whole application, only one instance of bean is created :
```
value=ConfigurableBeanFactory.SCOPE_SINGLETON
```
Prototype : A new bean instance is created every time it is injected or acquired through Spring context
```
value=ConfigurableBeanFactory.SCOPE_PROTOTYPEE
```
Request : In a Web application, a bean instance is created for each request :
```
value=WebApplicationContext.SCOPE_REQUEST
```
Session : In a Web application, a bean instance is created for each session
```
value=WebApplicationContext.SCOPE_SESSION
```
0 notes
Video
instagram
Harap harap ada la raya tahun ni ☹️🏁 Follow: @7rarecing #raya2020 #syawal2020 #stayathome #hondaex5 #yamaharxz #springtest #ganukite #rarecing https://www.instagram.com/p/B_ZOpiMDXVI/?igshid=19ulpxbfn6x47
0 notes