#tensorflow2.0
Explore tagged Tumblr posts
Visit Tumblr Blog
Explore Tumblr blogs with no restrictions, modern design and the best experience.
Last Seen Tumblr Blogs


Fun Fact
Mobile US users spent an average of 115.8 minutes on Tumblr app monthly.
Quote
今回チェックした中では、Numpy、Pandas、Matplotlib、Seaborn、Scikit-learnといった、通常のPythonのライブラリはひとまず動作しました。 しかし、PyStan2.19、Tensorflow2.0は未対応でした。 これらは内部で独自の言語を使っているためと思われます。 Tensorflowは、M1チップに対応したver.2.4のベータ版がすでに出ているようなので、それに期待しようと思います。
【M1チップ】MacでPythonデータ分析→結論:注意が必要です | サイエンス備忘録
2 notes
·
View notes
Text
Docker Solution For TensorFlow 2.0: How To Get Started
Containers have a long history that dates back to the ‘60s. Over time, this technology has advanced to a great deal and has become one of the most useful tools in the software industry. Today, Docker has become synonymous for containers. In one of our previous articles, we discussed how Docker is helping in the Machine Learning space. Today, we will implement one of the many use cases of Docker in the development of ML applications. What you will learn Introduction To Docker Installing & Setting Up Docker Getting Started With Docker TensorFlow 2.0 Container Downloading Tensorflow 2.0-Docker Firing Up Container Accessing The Jupyter Notebook Sharing Files Installing Missing Dependencies Committing Changes & Saving The container Instance Running Container From The New Image Introduction To Docker Docker is a very popular and widely-used container technology. Docker has an entire ecosystem for managing containers which includes a repository of images, container registries and command-line interfaces, among others. Docker also comes with cluster management for containers which allows multiple containers to be managed collectively in a distributed environment. Installing & Setting Up Docker Head to https://hub.docker.com/ and sign up with a Docker ID. Once you are in, you will see the following page.
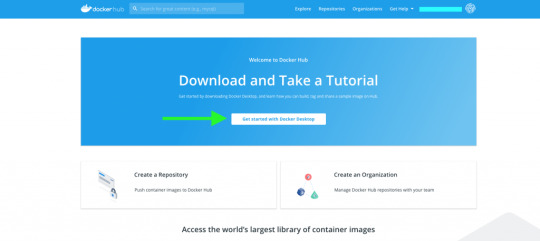
Click on the Get started with Docker Desktop button.
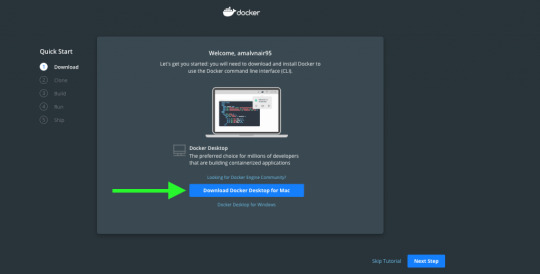
Click to download the right version for your operating system. Once the file is downloaded, open it to install Docker Desktop. Follow the standard procedure for installation based on your operating system and preferences. On successful installation, you will be able to see Docker on your taskbar.

You can click on the icon to set your Docker preferences and to update it.
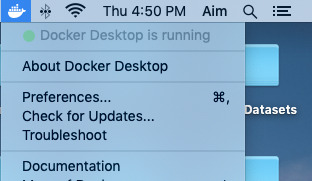
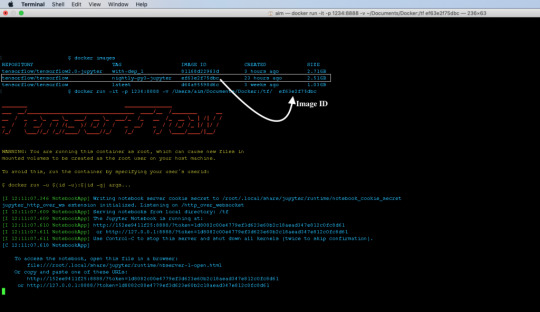
If you see a green dot which says Docker Desktop is running we are all set to fire up containers. Also, execute the following command in the terminal or command prompt to ensure that everything is perfect: docker --version If everything is fine, it should return the installed version of the docker. Output: Docker version 19.03.4, build 9013bf5 Getting Started With Docker Before we begin, there are a few basic things that you need to know. Images: An image or Docker Image is a snapshot of a Linux operating system or environment which is very lightweight. Docker Hub which is Docker’s official repository contains thousands of images which can be used to create containers. Check out the official Docker images here. Containers: Containers are the running instances of a docker image. We use an image to fire up multiple containers. Some basic docker commands: Get familiar with the following commands. docker pull The above command downloads the specified version of a docker image from the specified repository. docker images The above command will return a table of images in your local (local machine) repository. docker run The above command fires up a container from a specified image. docker ps The above command will return a table of all the running docker containers. docker ps -a -q The above command will display all the containers both running and inactive. docker rmi The above command can be used to delete a docker image from the local repository. docker stop The above command stops a running container. docker rm -f The above command can be used to delete or remove a running Docker container. The -f flag force removes the container if it’s running. Like images, containers also have IDs and names. We will be using the above commands a lot when dealing with Docker containers. We will also learn some additional commands in the following sections. TensorFlow 2.0 Container We will use TensorFlow’s official Docker image with Jupyter named tensorflow:nightly-py3-jupyter. The image comes with preinstalled Jupyter Notebook and the latest TensorFlow 2.0 version. Downloading TensorFlow 2.0 Docker Image To download the image run the following command. docker pull tensorflow/tensorflow:nightly-py3-jupyter Once all the downloading and extracting is complete, type docker images command to list the Docker images in your machine.

Firing Up The Container To start the container we will use the Docker run command. docker run -it -p 1234:8888 -v /Users/aim/Documents/Docker:/tf/ image_id Let's break it down: docker run: used to fire up containers from a docker image -it: This flag enables interactive mode. It lets us see what's going on after the container is created. -p: This parameter is used for port mapping. The above command maps the port 1234 of the local machine with the internal port 8888 of the docker container. -v: This parameter is used to mount a volume or directory to the running container. This enables data sharing between the container and the local machine. The above command mounts the directory /Users/aim/Documents/Docker inside the docker containers /tf directory. Image_id or name: The name or ID of the docker image from which the container is to be created.
We can now list the running containers in the system using docker ps command. To stop the container use docker stop. The container id will be returned by the docker ps command. Accessing The Jupyter Notebook On successful execution of the run command, the Jupyter Notebook will be served on port 1234 of the localhost. Open up your browser and enter the following url. http://localhost:1234/
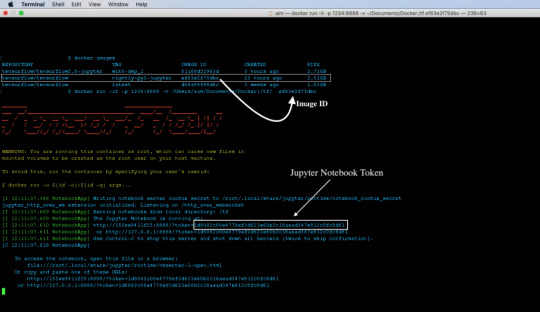
Copy the token from the logs and use it to log in to Jupyter Notebook.

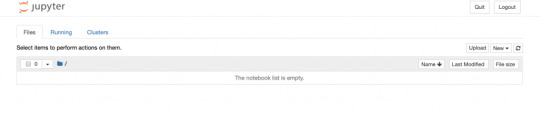
Once logged in you will see an empty directory which is pointing to the /tf/ directory in the container. This directory is mapped to the Documents/Docker directory of the local machine.
Sharing Files While running the container, we mounted a local volume to the container that maps to the /tf/ directory within the container. To share any files with the container, simply copy the required files into the local folder that was mounted to the container. In this case copy the file to /Users/aim/Documents/Docker to access it in the Jupyter Notebook. Once you copy and refresh the notebook, you will find your files there.

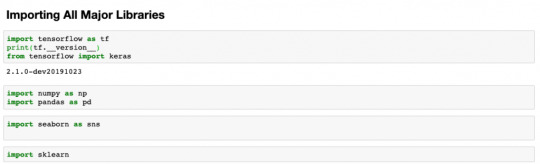
Installing Missing Dependencies Find an example notebook below. In the following notebook we will try to predict the cost of used cars from MachineHack’s Predicting The Costs Of Used Cars - Hackathon. Sign up to download the datasets for free. Download the above notebook along with the datasets and copy them into your mounted directory. (/Users/aim/Document/Docker - in my case). Now let's start from where we left off with our Jupyter Notebook running on docker. Open the notebook and try to import some of the necessary modules. import tensorflow as tf print(tf.__version__) import numpy as np import pandas as pd Output:
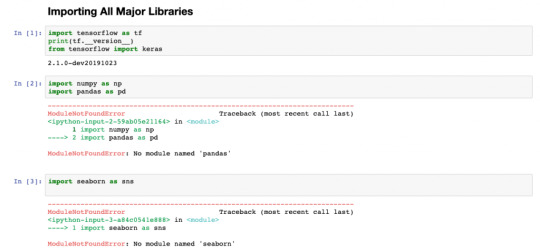
You will find that most of the modules are missing. Now let's fix this. There are two ways to fix this. We can either use pip install from the Jupyter Notebook and commit changes in the container or we can go inside the container install all the missing dependencies and commit changes. Let's take the second approach. Entering The Docker Container Note: Since we have used -it flag we will not be able to use the existing terminal /command prompt window. Open a new terminal for the following process. Get the container id using docker ps and use the following command to enter inside the running container. docker exec -it /bin/bash
Since containers are lightweight Linux kernels, all you need to know are some basic Linux commands. So let's install all those necessary modules that we need. For this example, I will install 4 modules that I found missing. Inside the container do pip install for all the missing libraries: pip install pandas pip install xlrd pip install sklearn pip install seaborn

Exit from the container instance by typing exit. Note: The easiest way to do it is by listing all the missing modules inside a requirements.txt file from your local machine and copying it into the shared directory of the container and run pip install -r requirements.txt. You can also use pip freeze > requirements.txt command to export the installed modules from your local environment into requirements.txt file. Now go back to your Jupyter Notebook and try importing all those modules again.
Hooray! No more missing modules error! Committing Changes & Saving The container Instance Now that we have our development environment ready with all dependencies let's save it so that we don't have to install all of them again. Use the following command to commit the changes made to the container and save it as a new image/version. docker commit new_name_for_image Eg: docker commit ae6071309f1f tensorflow/tensorflow2.0:all_deps_installed

Running Container From The New Image Now we have a new image with all the dependencies installed, we can remove the downloaded image and use the new one instead. To delete or remove an image, use the following command: docker rmi Eg: docker rmi tensorflow/tensorflow:nightly-py3-jupyter Note: To remove an image you must first kill all the running containers of that image. Use docker stop command to stop and docker rm command to remove containers. To fire up containers from the new image, use the following command: docker run -p localmachine_port:container_port -v localmachine_directory:container_directory image_name:version Eg. docker run -it -p 8081:8888 -v /Users/aim/Documents/Docker:/tf/ tensorflow/tensorflow2.0 all_deps_installed Note: You can create as many containers as your machine would permit. In the above example, you can run multiple Jupyter notebooks by mapping different local machine ports to different containers. Great! You can now set up different development environments for each of your projects! Read the full article
0 notes
Video
tumblr
Liked on YouTube: "Very Simple Explanation Of Neural Network | Deep Learning Tutorial 4 (Tensorflow2.0, Keras & Python)" https://www.youtube.com/watch?v=ER2It2mIagI
0 notes
Photo

Greetings!!! If you want to break into AI, this Specialization will help you do so. Deep Learning is one of the most highly sought after skills in tech. We will help you become good at Deep Learning.Build Deep Learning Algorithms with TensorFlow 2.0, Dive into Neural Networks.Gain a Strong Understanding of TensorFlow - Google’s Cutting-Edge Deep Learning Framework. Interested people can share me your details. Inbox me and get registered. #deeplearning,#tensorflow,#python,#algorithms,#neural,#networks,#artificialintelligence,#machinelearinh,#tensorflow2.0, #cnn,#python,#mathematics,#datascientists,#Biostatisticians,#computervision,#naturallanguageprocessing,#datascience,#datablending Check our Info : www.incegna.com Reg Link for Programs : http://www.incegna.com/contact-us Follow us on Facebook : www.facebook.com/INCEGNA/? Follow us on Instagram : https://www.instagram.com/_incegna/ For Queries : [email protected] https://www.instagram.com/p/B4ujDK5g9Ag/?igshid=u4ht2q2c5wdi
#deeplearning#tensorflow#python#algorithms#neural#networks#artificialintelligence#machinelearinh#tensorflow2#cnn#mathematics#datascientists#biostatisticians#computervision#naturallanguageprocessing#datascience#datablending
0 notes
Photo

#Tensorflow2.0 removes #redundantAPIs, makes #APIs more consistent and better integrates with the #python runtime with #Eagerexecution. Brief summary of major changes:- 1.Aapai Cleanup 2.Eager Execution 3.No more globals 4.Functions,not sessions . . . . . . . . . . . . . #skillathon #upskilleasy #datascience #machinelearning #artificialintelligance #fullstackengineering (at Skillathon) https://www.instagram.com/p/B3MRH1Vg1_n/?igshid=67xs96jz8b5n
#tensorflow2#redundantapis#apis#python#eagerexecution#skillathon#upskilleasy#datascience#machinelearning#artificialintelligance#fullstackengineering
0 notes
Photo

"[P] Music Transformer ( Huang et al, Google Brain, ICLR2019 ) Re-Implementation ( Tensorflow 2.0 )"- Detail: Hi, r/MachineLearning !As I finished implementation of Google's MusicTransformer,I want to share it to here.library : Tensorflow2.0 (beta)training env : v100 x 1GPUpaper : https://ift.tt/2KAruus : https://ift.tt/31E5g0w Magenta blog : https://magenta.tensorflow.org/music-transformerFor more details, you can see in README.mdThank you :)ps) A video below here is generated sample after listened "Boy with Love (BTS)"https://ift.tt/2KArvP2. Caption by LIKELIH00D. Posted By: www.eurekaking.com
0 notes
Text
大幅に進化するらしいTensorFlow2.0について - HELLO CYBERNETICS [はてなブックマーク]

大幅に進化するらしいTensorFlow2.0について - HELLO CYBERNETICS

2018 - 09 - 20 大幅に進化するらしいTensorFlow2.0について 人工知能 人工知能-TensorFlow Follow @ML_deep はじめに TensorFlow2.0がもうすぐ来るよ! APIs High level APIs Eager Exexution Reference Models Contribの扱い プラットフォーム TensorFlow Lite Te...


kjw_junichi あとで読む
from kjw_junichiのブックマーク https://ift.tt/2PK4j0K
0 notes
Video
youtube
What is a neuron? | Deep Learning Tutorial 3 (Tensorflow2.0, Keras & Python)
0 notes
Text
分布式系统架构设计:以第一性原理思维模型解读TensorFlow 2.0的架构设计
动机
依据李善友老师的定义“第一性原理思维 = 逻辑奇点 + 公理化方法”,逻辑奇点即基石假设。根据这个第一性原理思维 ,本文解读了tensorFlow 2.0的架构设计,其涵盖了tensorFlow2.0的第一性原理、设计原则以及架构视图,本文的动机是展示第一性原理的架构设计思想在分布式系统架构设计中的应用。
TensorFlow 的第一性原理
… from 分布式系统架构设计:以第一性原理思维模型解读TensorFlow 2.0的架构设计 via KKNEWS
0 notes
Text
Fresh from the Python Package Index
• jcopdl J.COp DL is a deep Learning package to complement pytorch workflow. It includes pytroch callbacks and metrics. • latent-dirichlet-allocation Latent-dirichlet-allocation • TensorKit • TensorKit-plottools • TensorKit-tools • torchtrainer Focus on building and optimizing pytorch models not on training loops. PyTorch model training made simpler without loosing control. Focus on optimizing your model! Concepts are heavily inspired by the awesome project [torchsample](https://…/torchsample ) and [Keras](https://…/keras ). Further, besides applying Epoch Callbacks it also allows to call Callbacks every time after a specific number of batches passed (iterations) for long epoch durations. • TorchVC Voice Conversion in PyTorch • abode Python Environment and Package Manager • dibbo A framework for Distributed Black-Box Optimization • jupyterlab-zenodo A Jupyter Notebook extension which enables uploading to Zenodo from JupyterLab • mlgen MLGen is a tool which helps you to generate machine learning code with ease. MlGen is a tool which helps you to generate machine learning code with ease. MLGen uses a ‘.mlm’ file format which is a file with YML like syntax. This tool as of now supports keras and tensorflow2.0(not fully supported) • naturalselection An all-purpose pythonic genetic algorithm • pyexlatex Python Extends LaTeX – A High-Level Python API for Creating Latex Documents. This project is aimed at creating LaTeX documents using only Python, without directly writing LaTeX code. Rather than building a direct Python API to LaTeX, this package has its own, simpler API to creating documents. • pysimrel Simulating data from linear model data • saattrupdan.darwin An all-purpose pythonic genetic algorithm • som-learn Self-Organizing Map algorithm. • sqlizer Orchestration service for SQL only ETL workflows. In many cases you can use SQL only for ETL (extract/transform/load) pipelines relying on CTAS (create table as) queries and the builting import/export futures of your RDBMS or data warehouse software (eg. Redshift). • textsense TextSense.ai a Text analytics platform. http://bit.ly/34pxcqy
0 notes
Text
2019/11/06
今日は1つのサイトに絞って考え、エラーとその原因について掘り下げていく形をとった。
⑴ https://qiita.com/mdo4nt6n/items/d9523aff14dd9fb70c37
$ cd tf-openpose
で
-bash: cd: tf-openpose: No such file or directory
というエラー文
よくみたら前工程でクローンしたディレクトリ名と、移動先のディレクトリ名が違う……。
ディレクトリ名を合わせるため、前の工程を変更し、tf-pose-estimationではなくtf-openposeに統一してみる。
$ git clone https://github.com/ildoonet/tf-pose-estimation
$ cd tf-openpose
↓
$ git clone https://github.com/ildoonet/tf-openpose
$ cd tf-openpose
$ python run.py
で
ModuleNotFoundError: No module named 'tensorflow.contrib'
というエラー文
よく調べたらtensorflow2.0ではtensorflow.contribがないらしい。
インストールしたtensorflow2.0を削除する命令を調べて、tensorflow1.15.0rc3をインストールし直す。
$ pip uninstall tensorflow
$ pip install --upgrade pip
$ sudo pip3 install tensorflow==1.15.0rc3
$ pip install opencv-python
こんな感じで進めていったら、tensorflow1.15.0rc3はインストールできたが意図しない場所に保存されてしまう現象が起きる。
また「tf-openpose」ではなく「tf-pose-estimation」の方がTensorFlow版のフォルダであることを途中で理解する。
TensorFlow版の実装を紹介しているサイトだったので、一度すべてを削除して、tf-pose-estimationの方でやり直す。
$ git clone https://github.com/ildoonet/tf-pose-estimation
$ cd tf-openpose
$ git clone https://github.com/ildoonet/tf-pose-estimation
$ cd tf-pose-estimation
$ pip install tensorflow
($ pip install --upgrade pip)?
$ pip install tensorflow==1.15.0rc3
$ pip install opencv-python==3.4.0.14
$ cd tf-pose-estimation/src
$ cd tf-pose-estimation
サイトの記述を以上のように変更していったら成功した。
参考:
https://github.com/tensorflow/tensorflow/issues/31350
http://tecsingularity.com/cuda/version/
https://www.python-izm.com/tips/pip/
https://temcee.hatenablog.com/entry/tensorflow_install_error
https://www.kunihikokaneko.com/tools/ubuntu/ubuntu_tensorflow.html
https://qiita.com/yamionp/items/138c32f37b3ab4134280
https://qiita.com/n_kats_/items/b8f770491e7489549cc8
https://www.sejuku.net/blog/38134
0 notes
Quote
こんな情報を見つけたよ TensorFlow2.0 with KerasでいろいろなMNIST(TPU対応) https://t.co/EtpLYDLrN6— 壊れbot 2号 (@broken_bot_2) October 16, 2019 October 17, 2019 at 06:03AM
http://twitter.com/broken_bot_2/status/1184575575039664128
0 notes
Text
なるほどですね
(全 37 件)
1. Dropbox Japan、日本ヘの投資を拡大 ローカル ホスティングの提供で、日本市場における成長を目指す
2. 「Firefox 66」リリース、自動再生の音声がデフォルトでオフに
3. Jetson NANO 開発者キット、売れてます
4. 米国の成人のスマートスピーカー保有率が25%を突破 ほか
5. 横浜市「RPAの有効性検証の成果について」を読んで、仕事とは何かを思い知らされる - orangeitems’s diary
6. ウィンアクター
7. 横浜市総務局 横浜市におけるRPAの有効性検証の成果の公表について
8. Adiantum : ��廉な端末でも効率的に使える暗号化技術
9. 超直前予約サービス「トレタnow」を公開しました|ひとし|note
10. 月額1万2000円からの出張料理サブスク、最大4人の料理家が「つくおき」してくれる
11. 落書きをリアルな風景写真にリアルタイムで変換できる驚異的なお絵かき技術「GauGAN」をNVIDIAが発表
12. 篠原健太「彼方のアストラ」マンガ大賞2019に輝く
13. 【続】平成の次の元号を、AIだけで決めさせる物語(@テレビ取材)
14. Central Certificate Store (CCS) with IIS
15. Edge Computing - VMs at the Edge
16. Microsoft Launcher 5.3.0 is coming!
17. Crafting Reusable HTML Templates
18. 東電電柱にキャリア共同の5G基地局、KDDI、ソフトバンク、楽天が実証
19. ミニマリストは必見! スマホのワイヤレスチャージャーを兼ねるデスクランプ登場
20. 階段も走破!台湾&ロンドン発、8輪スケートボード「Stair-Rover」 | ギズモード・ジャパン
21. Developer news, articles and more
22. 速報:Apple、���iMac発表 21.5インチでも3Dがグリグリ動く
23. System.IO.Compressionの圧縮結果が.NET 4.5以降とそれ以前で異なる
24. 「もうからないのが一番の問題だ」 IIJが語る“農業IoT”の課題
25. GeForce NOWがワイヤレスVR&ARに対応し,RTXクラウドゲームサーバーはソフトバンクが2019年後半に国内展開――NVIDIAが発表
26. NVIDIAが99ドルでNintendo Switch同等の開発キットを発売
27. 監視 入門 ~ マイクロサービス時代の監視設計
28. 非エンジニアがTensorFlow2.0 Alphaのビギナー向けチュートリアルをやってみた
29. 大規模なゲームサーバを最大90%安いコスト��運用する方法
30. レノボ、社外での安全な利用を実現する13.3型モバイルノート「ThinkPad X390」
31. 街の電信柱が各社共用の「5G」基地局に 東電、KDDI、ソフトバンク、楽天が本格検討へ
32. Google、ゲーム機不要の新ゲームプラットフォーム「STADIA」発表! 2019年サービス開始へ
33. 「現場主導のRPAはスケールしない」 大企業が抱える悩み、突破口は専門組織 (1/2)
34. 「Internet Explorerへの依存」やめるべき 大阪市議会、国に意見書
35. Googleもついに、ファーストプライスオークションを採用:移行に頭を悩ますバイヤーたち
36. Disable Client Certificate Revocation (CRL) Check on IIS
37. 東京大学など、仮想スティックを物体に衝突させた際の触覚を再現するハンドヘルドVRデバイス「PaCaPa」発表。振動を使わず2枚の翼の開閉で再現
0 notes
Video
youtube
Machine learning latest updates || DIFIMIDX
In this video we are going to see about as a recent update in tenseorflow 2.0 and development of machine learning which using world wide as it is very useful for all developers and new technicals where developed in machine learning.
#machinelearning
#deeplearning #tensorflow2.0
0 notes