#this was originally gonna be a more rendered painting but i was hating that process
Text
good luck thinking you’re not a toy after THAT, sheesh
hello i have harmed the boy . but do not fear! he’s fine probably
@veryfoolishgamers @t4tcecilos @empiressmp @the3rddenialist @moonlight22oa @rockydrago @funkily @renchanters @popcornsalty @suurrii @thatonesheep @cabbagetwunk @treeofwhimsy @weaselmcdiesel @peskybirb @flyingfish1234 @viridian-artist @cobrawaifu @griancraft @c0nstantparanoia @yanyawnyan @f4rlands @gayboybdubs @aquello-main @saiiboat @itsafangirlthing416 @booisghost @angiemelon
#.png#empires jimmy#jimmy solidarity#empires s2#empires smp#body horror#? ish#eyestrain#nptau#< don’t worry abt that#went a little wild with the adjustment layers on this#would you believe me if i said the base colours are mostly brown#this was originally gonna be a more rendered painting but i was hating that process#so after that g drawing i just did this instead#which probably looks better than whatever i was doing before anyway#nptart
489 notes
·
View notes
Photo

IT IS FINISHED
I am SO proud of this! I really, REALLY am! This was definitely a learning experience for me as I didn’t know how to do a LOT of stuff @ebbiondi was requesting. Which isn’t a bad thing! It taught me quite a lot about myself as an artist, what I’m capable of, how to better estimate the time it takes to do things, and also just how much fun the art process is.
And, like, I think that’s something that’s so easy to lose sight of when the message for artists is to just churn out as much as possible as quickly as possible and to monetize our every effort. Doing this piece genuinely reminded me why it was I love art so much as well as being an artist. I know that sounds cheesy but it’s very true. I got to explore a lot of new things I’d never rendered before and even had more than one character which was definitely kind of scary for me! But it really stretched my comfort zone and I’m so grateful for that.
Not to mention, honestly, this was just Really Fucking Fun to draw. I mean client as Skeletor’s bride? That’s so weird! And super whimsical!
Anyway, before I rant forever and ever and ever about all the effort and love and fun this piece brought, it’s time I ran the numbers for anyone interested in commissioning me. This piece took me a total time of 19 hours and 48 minutes which would bring the total to $545 in labor hours alone as I do indeed charge $25 per labor hour. This, of course, does not include preliminary sketches to get posing and whatnot set or flats. I do not charge for learning how to do new things which, for this piece, were bone, horns, painted nails, lace, and whatever the fuck Skeletor has going on for skin. That $545 is only for line work and color work thus why my price is so high and also why, even at almost 20 labor hours, this entire piece took 15 weeks or almost 4 months. (Note: a 10% tip is automatically included in your final price for pieces $50+)
Do keep that in mind before you message me for a commission as I charge half your estimated price up front and will only send you your digital download link after I have received the rest of your bill. If you wish for your piece to be printed or otherwise physical, you will be charged additional shipping and handling. Feel free to PM me if you wish to discuss a potential commission!
My Ko-fi since we are indeed having a baby and every little bit is appreciated!
I really do hate how I can’t post the original 12MB file and have to go with a smaller, less detailed jpeg but what are you gonna do? At least it’s up I suppose.
#original post#pixels#digital art#fanart#skeletor#he man#he man and the masters of the universe#he man skeletor#commission#digital commission#ebbiondi#onigiri draws#kofi#wedding#wedding photo#ask to tag if i missed something for you
17 notes
·
View notes
Note
hey so your fjord model completely blew me away; do you have any process pics? If not, can you explain a little of your process, for both fjord and beau? absolutely stunning.
Hey !
Thank you, that’s super nice ! I usually post my progress on Twitter but I can make a recap here ;D
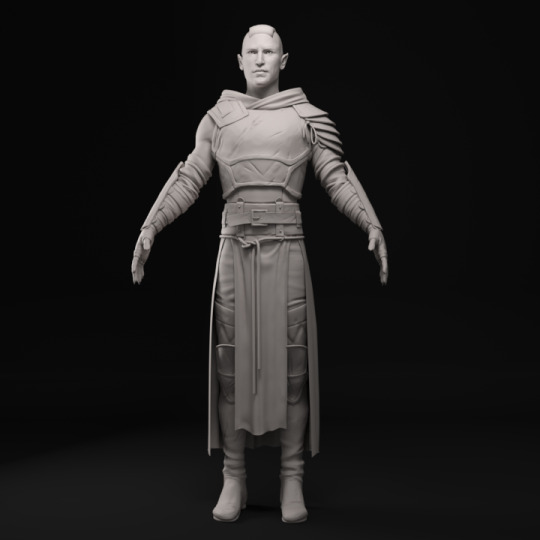
1 - First thing first I make a base model in 3Dsmax. I know a lot of people start in ZBrush directly but A) I am not comfortable enough when it comes to creating from scratch in ZBrush and B) I don’t have to do retopology when I’m done he he. I also think it’s easier to manage a shape with a few points rather than sculpt in it but that’s a personal preference so if you’re more at ease with sculpting, go for it ! For this model I tried to stay relatively low poly (and then people from Ubi told me their models were up to 50K and I realized I could have put more edges).
The ropes are still splines at that point and are not transferred to ZBrush. I later used this tutorial to make a high poly version that was then baked on the low poly:https://www.youtube.com/watch?v=OxAYvMs117I&t=120s
I put a placeholder for the hair so I could see what the silhouette would look like eventually.

When I’m done I send the model over to ZBrush !
2 - I import each asset in .obj one by one, starting with the body. To avoid ZBrush making mush out of my shapes when subdividing them, I add one level of subdivision, then come back to the now slightly different first level of subdiv and reimport my original asset. That way it regains its original form and I keep my levels of subdivisions. This method can create some artefact on squared shapes but it’s the only one I found that worked.
When working in ZBrush I try to apply some tips I’ve learned from watching FlippedNormals’ tutorials and work by levels of details: low, middle and high-frequency. Here is the video that explains it the best but I really recommend most of their channel, you learn a ton of important principles when it comes to sculpting ! https://www.youtube.com/watch?v=VKstQNoI2w0
Second important tip: never work with the default orange material, it lies to you.
ZBrush is also a good moment to check my overall proportions and anatomy. I use the Transpose Master in ZPlugin to make my different subtools one, I move and resize everything that feels off and then I reconvert them into separate objects. You don’t loose any subdivision information and it’s completely undoable so it’s very handy !Another thing when working with ZBrush: step back and look at the whole thing from time to time. Remember where your area of focus should be and check that you didn’t overdo it in areas that shouldn’t draw the focus away. For exemple at the beginning I had spent a lot of time on the folds of the boots at the ankles. Turns out the hard shadows they created were catching the eye too much and drawing the attention away from the face. So I smoothed them down a bit.
When I’m done with the sculpt it’s time to do some UVs !
3 - For that part I come back to 3dsmax. I use the ZPlugin “FBX Import/Export” to transfer everything at the lowest subdivision level. And then it’s UVs, yay ! I’m not going to explain how to make UVs, I’ll just say I used two UDIMs, one for the whole body and one for the face. Looking back three would have been nice since the hood is too low definition for being so close to the face. I used a checker to make sure all the UVs have the same size.

Beautiful, I know.
When the UVs are done I export each asset one by one in .OBJ to update the ZBrush model. There again I go back to the first level of subdivision and I reimport, it keeps my higher levels of subdiv.
Ok now we have a low poly version and a high poly it is time for texturing and… baking. Oh dear I hate that part.
4 - So, I’m gonna be honest, when it comes to baking normal maps ZBrush has always been the death of me, and since Substance Painter was involved in my process I decided to do everything in Substance. It was my first time using it so I lost a whole day trying to understand how to make it work :)
Basically you start your project by importing your low poly in .fbx, with every asset named NameOfAsset_low. You then can bake your maps by importing your high poly as a fbx, with every asset in it named NameOfAsset_high. And then ask Substance to “match by name”.
And then time to work ! I can’t really give tips on Substance to be honest, I’m very new at it, but there are tons of very good tutorials out there ! I worked using PBR Metallic Roughness. I made the opacity map for the edges of the cloth by simply taking the smallest brush size I could and painting threads. There’s one thing a recruiter told me once about Substance, that vaguely sounded like “With Substance kids these days don’t know how to paint textures, it’s all automatic”. So I think using the materials available in substance is nice, but you need to work over them after that. FlippedNormals’ channel has videos on Substance and how to think while texturing so I recommend checking those !

Then I just exported all my maps and put them on my model ! For Substance to Arnold there is a good video explaining in which slot goes which map: https://www.youtube.com/watch?v=kgiZ-ZOEPNg&t=2103s
5 - And now… the hair. The hair was a first too, and it was quite difficult.
I learned the principle of the method from this video (it’s a very interesting interview with the guy who made the hair for Horizon Zero Dawn):https://www.youtube.com/watch?v=Z58OQ9x0E68
And I found another tutorial that used the method but with tools I knew how to use (I have never touched xgen in maya and the fibermesh in ZBrush seemed more approachable): https://www.artstation.com/artwork/GW9JB
For baking I used 3dsmax (you really need to up the global supersampler to get something not horrible) and xNormals.
When I had all my hair strands all pretty and baked I started placing them. I think I put way too many of them and I would certainly do things a little differently but the method itself is good, I think you just need practice to get better results. For the eyebrows and lashes I couldn’t get something satisfying on ZBrush so I painted the maps by hand. The normal map is a combination of xNormals’ HeightToNormal baking and handpainted normal.

And we’re not done yet ! Because that’s a three weeks of work model.
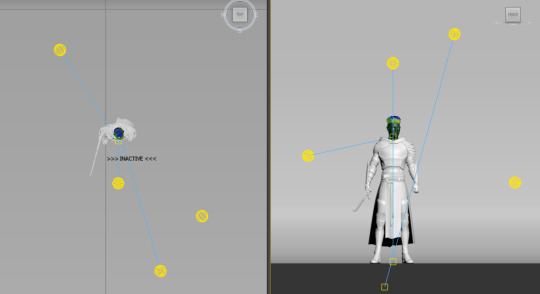
6 - The rig and skin. I’ll just say I used a CAT from 3dsmax. Those are extremely easy to learn and use with tutorials on youtube and they can really bring a character to life. I merged most of the objects together and then skinned them to the CAT. Here you need to know anatomy but if you want references you can check out Hippydrome, a handy website for modelers and riggers showing where articulations should be and how they work. It can also help with good topology ! https://hippydrome.com/
7 - Lighting and rendering. I used Arnold on 3dsmax for rendering everything. It’s very simple to use once you’ve learned the basics:
A) for the light settings you use intensity first, exposure second, and you change the color using temperature (Kelvin)B) for rendering settings you start low, you check where the noise is and you up the corresponding samples
For lighting I used 4 lights. From left to right: a rim light, a key light, a secondary and a fill light. The fill light is a skydome. I used this article to get a good base: https://3dtotal.com/news/inspiration/10-top-tips-for-lighting-and-presenting-your-sculpts-by-james-w-cain-zbrush-hair
And I think that’s all !
As you can see I spent a lot of time researching tutorials, but in parallel I also asked for a lot of feedback from friends who work in the industry.
For Beauregard I only did modeling on 3dsmax, UVs, handpainted textures in photoshop, rig/skin and rendering in Arnold. She took me a week. For Fjord I introduced new elements and methods: I decided to use ZBrush and Substance, and I wanted to make hair cards. He took me three weeks.I think starting simple with Beauregard helped me figure out a lot of stuff and made it much easier to work on Fjord after. Struggling every step of the way can be overwhelming and make me loose interest in a personal project, so I really recommend starting small and introducing difficulty and new methods when you’re at ease with the basics. Finished is better than perfect !
I hope this will help you in some way. Don’t hesitate if you have specific questions I’ll be happy to answer as best as I can !
37 notes
·
View notes
Text
The things I’ve learned from art school: part 1/?
I’m a second year illustration student, and I’m here to share with you pearls of wisdom from what I’ve experienced and learned in college (so far), from the actual drawing process to attitudes about art/drawing. Most of these things I’ve learned the hard way, and some are from things I’ve seen others struggle with.
The most work you should be doing in your drawing process is thumbnails/sketching stage.
“There’s no point in finishing a drawing if it’s flawed from the beginning”. That’s what my Composition & Transparent Media professor constantly told us. During our first piece of the semester, he had us stay on the sketching and redrawing stage for a little over a month in order to perfect them. He wanted to make sure the perspective was right, composition was pushed to its fullest, details were added to make every space interesting, the whole shebang. Obviously you’re probably not going to spend a whole month redrawing a piece over and over every time you draw, especially if it’s a time-sensitive project or just a personal piece you’re doing for funsies. However, the sketching stage is where most of the creativity happens. You have to decide on composition, scale, design elements, characters and how they’re positioned in the space, environment, and so much more. And I’d be willing to bet that you won’t get it right the first time.
Give yourself projects when you aren’t in school.
It helps with artist block. The summer between freshman and sophomore year of school I could probably count the number of drawings I did on one hand. To be fair, I was working two jobs 6 days a week so i didn’t exactly have a lot of time, but I found that once I got out of school I had zero drive or ideas. Without assignments from class to draw for, I had nothing to draw, and when I got back to school for sophomore year I had a lot of trouble getting inspired again. It made the beginning of the year really hard for me. Find something, ANYTHING, to draw while you’re out of school, even if you draw fanart for one thing all summer, at least you’re still drawing.
If a character in your drawing is reminiscent of another character/too generic, think about altering it- especially if it’s a work that focuses on said character.
This really only applies for artists who’s focus/career is character design, but it’s still relevant to others. As painful as it is to hear, it means you might not be pushing your concepts enough. I took a class on Concept Art, and the first assignment was character design. A few of mine were deemed too generic looking, and one was too reminiscent of an existing character. It really hurt to hear, especially since I pride myself on character design and they were for a story I’ve had in development for over 6 years. It really made me feel like shit and made me not want to develop the characters further. But I needed to hear it, and I had to continue developing them for the class, so I ended up overhauling and redesigning the characters until they didn’t seem like the same ones anymore in order to make them more interesting. I hated it, but it’s what I had to do.
That being said, things like this really make you think about distinguishing your characters and art from others out there. It’s essentially impossible to be 100% original, but that doesn’t mean you cant try your damnedest to make your ideas as close to original as they can get without getting overcomplicated.
When designing characters, mix up the body shape and facial features.
This one is kind of specific, but still important since character design is an important element of illustration. If you don’t vary things up you’re cruisin’ for a bruisin’ from your professors and peers. And frankly, its boring as hell when someone’s characters all look the same. This is something I see a lot, and I can never get attached to an individual character cause they all looked the same! I found that it happens a lot with male characters, they all have defined abs to some degree and perfectly toned arms and honestly, it gets boring when all of someone’s male characters have the same body type. As for face, there is literally no excuse. There are SO MANY KINDS OF FACES MAN. Round, rectangular, circular, heart-shaped, squared. People can have hooked noses, upturned noses, tiny cute noses. Even eyebrows- arched, flat, thick, waxed, faint, or bold. You’re allowed to have preferences for what kind of bodies you like to draw, but don’t be afraid to branch out!
Develop your own style.
As an artist, you need your own style. Imitating other artist’s styles isn’t going to get you far in school or the real world, and chances are, your peers will call you out if your style looks too much like another established artist’s. In order to make a living and gain clients you need a style that you make unique, taking inspirations and aspects from other styles and squishing them together to make one amazing art style baby. Your art style will probably be the deciding factor in whether or not your client hires you!
Tracing references is OK when appropriate.
As long as it isn’t for a published or commissioned piece, there is absolutely no harm in tracing references. In your down time take some pictures of yourself or find some online and go ahead and trace ‘em. Really pay attention to how the body actually is, how the perspective on legs work, how that hand is foreshortened. Do this enough and you’ll find yourself thinking about all that when you’re drawing normally!
There will always be students better than you, you just gotta accept it.
It’s just a fact of life, unfortunately. When you’re a freshman, you’re in classes with only freshman for your foundation year. You and your peers are all on the relatively same level. What had affected me starting my second year (and I didn’t realize it until much later) was that now that I was in classes with upperclassmen, who had a year or two’s worth of experience on me, I felt as id my art was not up to par. It’s easy to forget your classmates are not just from your grade anymore, especially in electives. All of the electives I took had mostly Juniors and a few Sophomores, and my work always didn’t quite have that polish and finesse to it yet that the upperclassmen’s did have. It’s just a fact of life that you’ll always be up against artists who are more skilled than you , but thats because they have more or different experiences. You have to keep in mind that you can’t compare yourself to them, since it isn’t fair to you that you’re comparing yourself to someone who may have 3+ years on you.
Learn realism to some extent- figures, animals, everything.
You don’t have to like it, but you can always tell when an artist never learned it because their figures are always off. There is a difference between stylizing and not knowing, and it’s almost always evident. You can see it in the way hands are drawn, noses are rendered, and how they shape and place breasts. Do pages of body studies focusing on hands, feet, leg muscles, back arches, faces, all kinds of stuff. You’ll thank yourself later.
Your professors and peers will know when you don’t put in your best effort.
They’ll know when you aren’t pushing yourself because you’ll make fundamental mistakes. Slightly imperfect coloring, wiggly linework that wasn’t done quite carefully enough, not bothering to fix those damn feet in the finish. They always know, somehow...even if you’re careful with your laziness.
Buying expensive materials is usually worth it.
It may cost more but your work will benefit from it, and they last so, so much longer. I had to buy 3 brushes when my techniques class was doing watercolor, and in total they costed over $100. I found as I used them that since they were hair brushes and not synthetic, they held so much more pigment and water, and I could get a much finer tip. I was incredibly lucky that my professor provided the paint, which could go up to $20 a tube for some colors with the brand he had. Paper is also something worth splurging on, because let me tell you I have had disastrous effects when using shitty (coughCANSONcough) watercolor paper. The 9x12 paper block I bought for class was $30, and it was the best paper i’ve ever worked on. Absolutely worth the money and I will be buying that brand for projects from now on. And the best thing about all these is that they’ll last forever!
You NEED to find ways to get excited about a project you hate, because you’re gonna have to do a lot of them.
If you don’t find ways to get excited about projects you’re not too thrilled to do, you’ll never succeed. I learned this in my freshman year very fast, because man oh man were there some projects I couldn’t have cared less about. If you can, gear the project towards one of your interests without compromising the purpose or assigned subject.
I hope this advice can help some folks! Art school is a lot of tough love, and a lot of stepping 300 yards out of your comfort zone (sometimes by force). But they key is to not be afraid of trying new things! You’ll find things you absolutely hate doing, and will never want to do ever again if you can help it, and you’ll find things that you’ll love to do. It’s all about keeping an open mind!
Keep drawing, keep learning, keep creating.
#advice#life lessons#art#art advice#college#art school#not art#artist#learning#tough love#long post#critique
11 notes
·
View notes
Last Seen Blogs

obvious-captain-rogers
Let Me Tell You A Thing

cometstarfalls
CometStarFalls


anidealmuslimah
An Ideal Muslimah

gem-of-legends
Untitled