#time to scour pinterest boards for inspiration again
Text
gnawing at the walls cause i wanna draw art for hsr characters and my s/i BUT i don’t have an actual design for my hsr s/i yet gRRRRRR
#WHY can’t the perfect design just come to me in a vision#make my genshin s/i design to the point that i’m happy with but i have to do it again????#my hsr s/i is going to be an expy of my genshin s/i so they might be similar#but i want her to still have a distinct design that actually says ‘honkai star rail’ and not genshin impact#and i wanna make her smooch jing yuan bc i am in love with him#sighhhhhh#time to scour pinterest boards for inspiration again#kay’s rambles
2 notes
·
View notes
Text
August 24, 2024
My bass case came in!!! I’m actually quite glad I didn’t choose a black one. I’d love to do some embroidery on it, but it’s supposed to be weather resistant and I worry that poking holes in the finish might screw with that. It’s kind of funny, I’m so short that I can carry it on my back and still fit under doorways despite the case being nearly my height. Tall bassists could neverrrr. Anyway now the bass doesn’t have to just sit in a cardboard box in the living room.
Also also also! I might be going to the renn faire next month for a friend's birthday!!!! This absolutely means I have to gather the equipment for a kit. I'm thinking of going as a bard and picking up a recorder from amazon then maybe sewing or crocheting some kind of holster for it to strap around my waist (while I'm obviously much better at flute, I'd rather carry around a fifteen dollar instrument all day than my hundred dollar (or, obviously, my thousand dollar) pride and joy (and there's no way I'm bringing my uke up even though I'd probably be an even better look)). Alternatively, I could use my already mostly trashed piccolo that I've no intent to really ever use again, though the metal instrument wouldn't go as well with the renn faire aesthetic compared to a wood (or wood-look) recorder (plus picc is lowk annoying lol).
I'll design anything I'd want to make and cut out the pattern pieces before leaving home then sew them while at uni. I also really want to get my twists redone then. Time to scour my pinterest dress-up board for inspiration! I'm fairly certain I know that I need/want a ruffly cotton shift or poet/pirate shirt at the very least, and I have this blue wool unattached to any specific project which could very well become a cape/cloak... eek I'm so excited!! I'd planned to go to bed early tonight but now I have at least another couple of hours before I can.
I did a bit of depopping last week and ordered things to my house. Two of four have come in and one of them is unfortunately not great quality. It's a floral tapestry vest, and about two sizes too big (I always learn my lesson when I don't ask for measurements, ugh ugh ugh). But! I think I can deconstruct it carefully then attach an entirely new back panel and fit the shoulders correctly. I may be able to dart the front for an even better fit, but that's not part of the plan. If it works it could be a nice addition to the renn faire 'fit.
Today I'm thankful that moving my sibling into their dorm was a pleasant experience. I'm thankful that I felt comfortable with the roommate, unlike last year where I almost immediately got bad vibes and turned out to be right, unfortunately. I'm also thankful for all the people who love us.
4 notes
·
View notes
Text
who in hq!! watches pride and prejudice?
a/n: my headcanons as i rewatch pride and prejudice and reread the hq!! manga


aran:
i know this ace and captain here is a hardcore pride and prejudice fan. aran has always given me a family-oriented type of character, given how he has a younger brother of his own and have the miya twins growing up. even though him and the miya twins may not have shared the same blood, they are still family, shown by how atsumu looks up to aran as a model older brother. aran would relate to both jane and elizabeth bennet (just the bennet family in general), and i think thats very sexy of him you know? anyways, i love aran. probably the type of p&p fan that had already read the book several times before he went into his honors/advanced placement high school courses and was very excited to have it be required reading. tried not to show how much he loves excited knows about it. probably had collected any jane austen-related books. have considered studying literature in higher education for the amount of times he gushes about the book. the type of fan who came across it himself in one of the movie channels, one time there wasnt any volleyball practice. ever since then, aran ojiro is a pride and prejudice fan.
miya twins:
they most definitely started watching pride and prejudice probably from either their mother or aran. or both, since both are good. again, similar to aran, both the miya twins really relate to the big family dynamics of the bennet family. would also be the type to plan fun little movie nights. i picture these two gremlins hunched over their shared computer, looking at pinterest board inspiration for a pride and prejudice themed movie night. osamu is lowkey considering having a pride and prejudice drinking game (oh god no osamuuu), while atsumu thinks he’s the coolest with making pride and prejudice memes and posting it on the internet. elizabeth bennet’s number one protection squad. atsumu probably had discourse in the internet over it. osamu spends a lot of time looking into regency era style cooking and wants to know if the boiled potatoes were excellently boiled as mr collins puts it; while atsumu window shops through etsy and the like for pride and prejudice themed stuff because why not and life’s too short anyways.
yachi:
similar with the twins, yachi probably found out about pride and prejudice by proxy of her mother’s influence. she probably had heard her mother talk about it once, and because she looked up to her so much, she would watch it whenever her mom works late, and that always happen (hence yachi memorizing the lines by heart). probably was the type of p&p fan that had read the book before she went into her honors/advanced placement high school classes and tried to really reign in her excitement over going through the book but in class format. she probably had gay panic watching the kiera knightly version. or bi panic, ‘cause of that one ballroom scene. also the type of fan to recreate the movie or play poster just for funsy. she had saved up her money to purchase tickets for her mom and her to go see the play adaption. made it a whole day trip as they traveled to the theater. she most definitely loves the aesthetic of the regency era and here for the gay-bi panic.
hinata:
ok hear me out….there’s no way that hinata was surrounded by both natsu and his mother and not have heard about jane austen at least once (im just kidding…unless). hinata probably saw that his mom purchase the 1990s manga adaption. hinata is a huge manga fan and when he picked it up, he at first didnt like it ‘cause it gave him shoujo vibes, but then he was devouring it like he did with one piece. he probably talks about it with his mom over cooking or setting up the table. he also may have scoured through his local dvd shop and tried to find the kiera knightly version, because natsu really loves kiera knightley. surprisingly not surprisingly, he really likes darcy as he is an older brother of a very talented younger sister, but he’s not gonna tell natsu that. no, no. he also wouldnt be looking into buying a set of three tickets to the play adaption once he gets up to the v-league and saved enough money for his mother and natsu, no, no, thats top secret, so secret he cant even tell kageyama ‘cause kageyama isnt immune to natsu’s charms, no, no.
terushima:
LISTEN UP FOLKS. this beach blonde gives me chaotic academia and i love that for him. i genuinely believe this chaotic schemey captain is a pride and prejudice fan and flaunts it. no shame, doesnt hide; he just is one. the type to carry a beaten up pocket size book around w so many annotations and jokes and doodles. maybe have used the book to slap someone during a fight who knows. he probably bought all the used copies from his local thrift store to give it to his friends and teammates. considered tattooing a quote before his mom caught wind and proceeded to chew his ass out. he not only loves the family dynamics of the book, but the word play. he loves the banter and how darcy and elizabeth go head to head. also their hairstyles in the kiera knightly version. jeez, he was excited to see the various hair, he mostly paid attention to jane and elizabeth’s. the type of fan to keep making fun of mr. collins and lady catherine de bourgh. had probably planned to dress up as lady catherine just for shits and giggles for halloween. the one in the classroom discussion talking shit about mr. darcy’s lacking in the flirting department. thank you for coming to my tedtalk.
#i really love both pride and prejudice and haikyuu!!#i see some similarities and imma take it#hq!! headcanons#haikyuu!! headcanons#haikyuu headcanons#hq!! hc#yachi hitoka#aran ojiro#miya twins#miya atsumu#miya osamu#hinata shoyou#terushima yuuji#hinata shoyou x reader#pride and prejudice#haikyuu!!#hq!!#kopi.archives🪐#haikyuu fluff#kopi.navi☕️🧋
86 notes
·
View notes
Text
Sitting Front Row at...(On a Budget Obvs): Lookbook no.15
Hey to anyone reading!


And welcome to my fave lookbook I’ve done in a longggg ass time! Yes, that’s partially because it involved making collages and doing the low effort work of scouring Vogue Runway for “research purposes”, but I promise, that statement wasn’t made out of COMPLETE laziness-I am super happy with it too. It’s been a good use of pre-part-lockdown-lift time in the interim between that brief period of Christmas celebrations and eateries finally fucking opening again because let’s be honest, I always knew I was gonna get distracted by oat milk vanilla lattes and veggie all day breakfasts once I could actually sit down with them at my fave local cafe. You could say I was very much operating on a self-imposed deadline.
The “what I would wear to sit front row at...[insert designer here]” TikTok/Instagram reel trend was something I wanted to get on board with ever since I first saw one and whilst the option of doing my own live action take-I really cannot bear the thought of having to edit footage of myself awkwardly attempting to sit nonchalantly in front of a camera for hours on end-was off the cards considering my complete lack of screen presence, I decided a Tumblr text post would work just as well, and if not even better in a way. Given the absence of the time limitations you face when you’re making a reel or a TikTok I thought it’d be cool to present the looks as part of a mini moodboard for each designer which adds a bit of context to each look even if you aren’t familiar with their past collections and establishes the general vibe of the brand I’m attempting to replicate. Not to sound snotty or as if I am the font of all knowledge on anything high fashion related but even with my amateur knowledge I noticed that as the video trend took off and was adopted by big name influencers, it became less about the average person putting their own personal spin on the aesthetic of the labels we can’t ordinarily afford and more about them building outfits that only vaguely resemble the general public perception of the brand around the real corresponding (and often gifted and thus inaccessible to someone who doesn’t makes thousands for a sponsored post) pieces they own SO I thought I’d take the trend back to its roots and get a bit resourceful. All that being said, in no particular order, here are the outfits I would wear to sit front row at Gucci, Vera Wang, Miu-Miu, Marc Jacobs, Dolce & Gabbana, Brock Collection, Alexander McQueen, Etro, Burberry aaaand Saint Laurent based on their past collections and guess what? They didn’t cost a shit tonne of money :-)
-disclaimer: will include an asterisk before any new purchases if from a high street store though to be honest, I don’t think there are any, we shall see! I do include where I got old purchases from in case anyone wants to search anything on Depop/Ebay-
1. Saint Laurent (formerly Yves Saint Laurent)
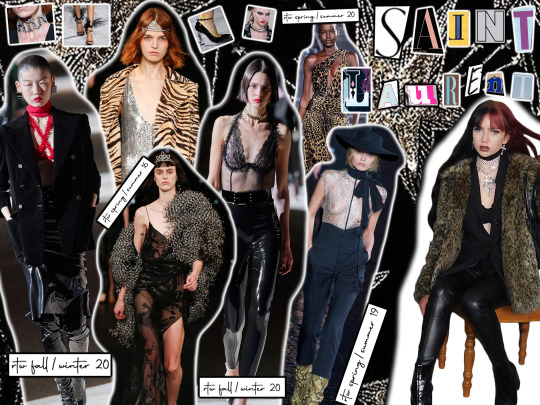
-blazer from identityparty on Depop, pleather trousers from Zara, jewellery from Dolls Kill-
I know technically abbreviating Saint Laurent to YSL doesn’t really make much sense anymore given the brand’s name change in 2012, but I’ll always think of it as that in the same way I’ll always associate it with the slightly dishevelled yet simultaneously glitzy rock n’ roll aesthetic. The thing is, whilst YSL hasn’t done anything wildly out of the box for a long time, it’s rare they put a look on the runway that I wouldn’t wear; they never end up being a fashion week standout but the Parisienne take on grunge we’ve seen Anthony Vaccarello establish as his go-to will always have a place in my heart.
2. Alexander McQueen

-embroidered leather jacket from Ebay (originally Topshop), harness from Amazon, dress from ASOS, boots from Koi Vegan Footwear-
Alexander McQueen is a brand that is pretty much universally liked, from the historically extravagant and groundbreaking shows the man himself put together to Sarah Burton’s more toned down but still beautiful collections. Obviously I didn’t attempt to do justice to the former, so I tried my hand at putting together a look inspired by Sarah’s blend of delicate femininity and nomadic edge, and it went...okay? Like it’s definitely not my favourite of all the looks because it does give off slightly cheap copycat vibes buuut outside of the context of this lookbook it’s cute.
3. Brock Collection

-boater hat from Ebay, midi skirt from morganogle on Depop, corset top from ownmode_, heels from amybeckett1, bag from Primark-
Brock isn’t as well known a brand as most of the others in this list but I adore everything Laura Vassar Brock does and I couldn’t pass up an opportunity to try and channel the vision of one of the OG pioneers of the cottagecore vibe through my own wardrobe. I mean fr, this woman’s work as a steady provider of meadow photoshoot worthy dresses and corsets and skirts is v slept on and I will not stand for it. I will sit in front of a camera and then write a paragraph in my blog post begging anybody who reads to give LVB (an abbreviation I acknowledge is unlikely to catch on because Lisa Vanderpump anybody?) some form of acknowledgement for her services to period romance novel inspired moodboards everywhere.
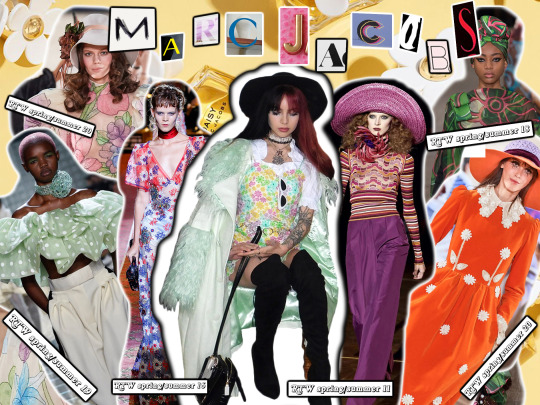
4. Marc Jacobs
-coat from House of Sunny, white shirt from Retro World Camden, co-ord from Sugar Thrillz, bag from Poppy Lissiman-
If there’s one thing Marc Jacobs always does, it’s COMMITS. TO. HIS. THEME. I just KNOW he has a secret Pinterest with separate boards for every fashion era of the 20th century and he is putting those boards to good use providing us with collections that are as immersive as they are eclectic year in year out.
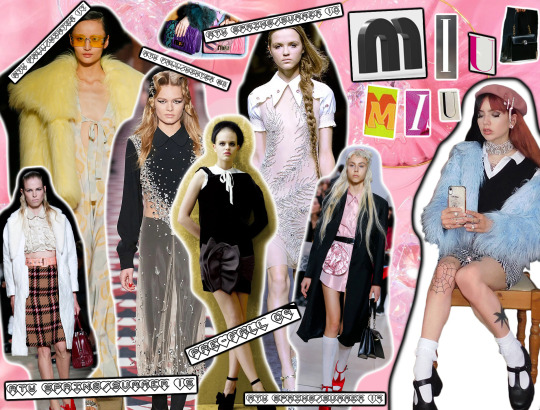
5. Miu Miu
-beret from H&M, hair clips from H&M, jewellery from Primark, coat from mollyyemmaa on Depop, shirt from YesStyle, sweater vest from YesStyle, skirt from Depop, diamanté belt from Brandy Melville, shoes from Koi Vegan Footwear-
We all like to talk about Bratz dolls and Monster High dolls and Barbies as fashion inspo but can we all focus on Cabbage Patch dolls for two secs so as to acknowledge the fact that a Miu Miu collection is basically all their fits grown up? And made boujie as fuck? If I want my fix of Wes Anderson meets Scream Queens (what a combo) inspired outfits, if I want prissy and girlish but also glam, if I want to look like a bratty rich girl whose one redeeming quality is her eye for vintage clothes, I know where to look and that is the Miu Miu section of Vogue Runway.
6. Vera Wang

-blazer as in no.1, velvet bralet from catdegaris on Depop, harness from Amazon, skirt from Ebay, knee high socks from Ebay, lace up boots from Ebay-
Vera Wang’s RTW aesthetic, a blend of the ethereal, ultra-feminine bridal designs she’s known for and British style punk rock influences, is something I feel has only become firmly established in recent years but it is everything I ever wanted and more. I always find myself trying to balance the part of me that loves everything girly and delicate and pretty and the part of me that would love to be in a biker gang and Vera’s collections are always an inspirational reminder of just how well it can be done.
7. Burberry

-coat from charity shop, suit from emmafisher3 on Depop, top from simranindia, shirt underneath from Zara, jewellery from ASOS-
Now I’m not gonna lie, I’m not the biggest fan of Burberry but there have been a few looks over the past few years I’ve really liked and as someone who owns numerous trench coats, high necks and way too much plaid, I thought it’d be an easy one to replicate. Plus, if you can count on Riccardo Tisci for nothing else you at least can rely on him giving you some layering inspo which is very much needed in a country where it literally just snowed in April and where my plans for today have just been cancelled because the iPhone weather app did a Karen Smith and didn’t predict rain for today right up until it started raining so thanks for that one British meteorologists. Your incompetence strikes again.
8. Etro

-corset from Urban Outfitters, vinyl trench coat from Topshop, boots from Ebay, black slip dress from kaoanaoleinik on Depop, fur trim afghan coat from louisemarcella-
Like with Brock Collection, Etro isn’t a hugely well known brand, but it is always one of my favourites-to add a spanner into the works of any attempts to cultivate a firm sense of personal style, I live for the ornate Bohemian look that Etro does so well just as much as I love both grungy and girly pieces, and so I really wanted to include a brand whose collections go down that route. It was a toss-up between this and Zimmerman, the flirtier, free spirit counterpart to the dark romance of Veronica Etro’s designs; her vision really shines through the most when it comes to the brand’s winter collections, imo, and given that I live in a country where winter or some weather state resembling it does seem to take up 70% of the year, I did decide on channelling her work rather than that of the equally talented Nicky and Simone Zimmermann this time round.
9. Dolce & Gabbana
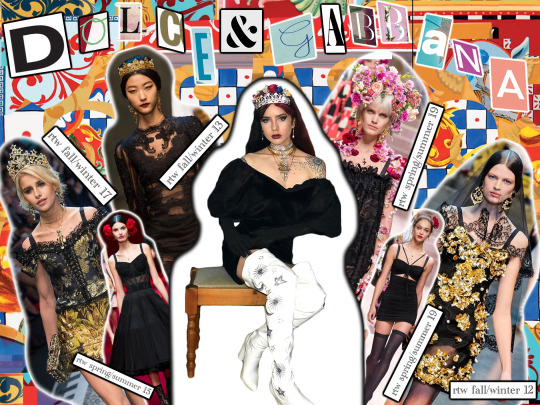
-flower crown from ASOS, tiara from Amazon, earrings from YesStyle, dress from alicealderdice1 on Depop, opera gloves from Ebay, boots from Koi Vegan Footwear-
D&G is a brand I felt really conflicted about doing-I don’t include their current collections in my fashion week reviews based on the actions of designers Stefano Gabbana and Domenico Dolce over the last few years because I don’t want to mitigate the collective effort of fashion critics to push them towards irrelevancy. Though people like to claim the brand has turned a corner since Lucio Di Rosa was brought on board as the manager of celebrity and VIP relations last year (they are as prolific a force on red carpet fashion as ever), we haven’t seen any real meaningful apologies or reparations made by Dolce and Gabbana themselves which once again leaves us in the all too familiar quandary of whether or not we can separate the art from the artist especially when it is far too much of a simplification to only credit the two men for their work given there’s a whole design team behind them. There are a LOT of shitty people working in fashion, the whole industry is a bit of a cesspit if we’re honest, but I don’t think that should stop us from at least being able to appreciate old collections if we make sure we aren’t engaging in any kind of promotion of current works whilst doing so. D&G are a brand of high highs and low lows, with looks that range from hideously ugly to showstoppingly beautiful in a single show-when the looks are good, they are GOOD-and their presence in the fashion world is most definitely felt whether we want it to be or not. It would just be shit to refuse to recognise the existence of some real iconic runway moments, the practical work that went into the ornate detail and opulence that helped cement D&Gs place in sartorial history, the styling that’s made goddesses and fairytale queens out of modern day women as they’ve glided down catwalks, the far more extravagant and, let’s be real, sexier version of our world D&G shows have transported us to in the past. Will I talk about D&G ever again? No, and if you Google the scandals their brand has faced over the past few years, there are more than enough reasons why, but just this once I did want to pay homage to some of the collections, the snippets of which I saw on my Tumblr dashboard back when I was about 13, that first got me into fashion.
10. Gucci

-fur coat from Topshop, clips from Zaful, glasses from Ebay, dress from gracewright246 on Depop, shirt from Boohoo, blazer from charity shop-
Now last but, if you ever read any of my fashion week reviews (the likelihood of someone actually having read one of them and reading this is incredibly, incredibly slim lol, I wouldn’t read me either) you’ll know, definitely not least, is Gucci because Alessandro Michele comes through every!! single!! time!!
The man is truly the king of quirky throwback maximalism and it hurts my heart that a lot of people seem to think of it only as a brand associated with ostentatious displays of wealth. Year after year since Michele was made creative director he has released purposeful, fully-fleshed out collections which unravel themselves to us on the runway like time capsules containing the belongings of the rich and whimsical and yes that can sometimes result in outfits which are *ahem* a bit mismatched but it doesn’t matter because through fashion he manages to take us to a vivid version of the past where people could dress as freely and lavishly as they wanted to, into the wardrobe of a person unaffected by the side-eyeing of others. You get the impression he doesn’t design so much as plays around with some kind of enchanted dress up box and takes inspiration from there and to give that impression is only a credit to his talent-to make outfits so kooky and extravagant look like they were meant to be takes a boldness and genuine love for clothes that I do tend to feel a lot of the big name designers have lost in the pursuit of profit and the necessary placating of the dying customer base that keeps that coming in. Of course I'm not for a second saying Gucci does not care about profit, but at the very least, they have on board a creative director who genuinely has fun with what they’re putting out there and wants to make a statement too and that really shows; you can rest on your laurels and sell tweed boucle jackets to rich old white women for eternity but nobody’s going to mention your brand name and the word groundbreaking in the same sentence ever again unless they’re talking about what it was a century ago, you know (mentioning no names...unless...did I hear someone say Chanel)? That feels like such a shady way to end, lol, but I’m sure said brand will survive-to be fair, they’ve been included in every other What I’d Wear to Sit Front Row At video I’ve seen so although I’m always slagging them off for doing the saaaaame thinggggg year after year, for that same reason their aesthetic is instantly recognisable and so will always be a source of imitation. There are obviously pros and cons to being a brand which constantly reinvents itself but I think it’s totally possible to do that whilst maintaining an overall mission, and Alessandro Michele’s work at Gucci demonstrates that with ease.
Anyway, if you got to here, thanks for reading! I know I’m super behind on this whole TikTok trend and I know a Tumblr post instead of a video is a bit of a cop out but all the real, physically awkward ones out there know that watching yourself back is excruciating lmao, so I hope this does the trick. After this, I’m gonna get back to the reviewing S/S21 collections post though knowing me I’ll probs take a few days to get back into that because I feel like since I left full-time education (RIP me going back in a few months) writing continuously like this for any longer than about 15 mins fries what brain cells I have left. Again, thank you for reading and if you are, sending many good vibes your way! Stay safe!
Lauren x
#front row#frontrow#fashion#fashioninpo#fashion inspo#style#style inspo#designer#gucci#vera wang#burberry#label#miu miu#runway#fashion week#mood board#ysl#saint laurent#runway trends#ss21#lookbook#vintage#outfit#marc jacobs#Alexander mcqueen#runway fashion#high fashion#haute couture#trend#collage
40 notes
·
View notes
Text
Imitation is NOT the Sincerest Form of Flattery:
When I first started out designing custom couture costumes, there was a brief moment of temptation to imitate those I viewed as “successful.” Thankfully, my integrity guided me to find my own artistic expression. But, I get it. You see an artist’s work all over the internet and hear about how busy their commission calendar is and you covet their success.
In the desire to reach another’s “presumptuous” pinnacle and enjoy a FULL commission schedule, it’s tempting to copy from them. But patience, practice, and perseverance are the necessary companions of success in this business, and success isn’t necessarily reflected by dollar signs.
This post is motivated by a recent incident involving a client that contacted me about a commission, but it’s much more far reaching than that. In this instance, he had three pictures of men’s 16th Century noble costumes that he presented me. This is a usual and customary step in my consultation process, as it gives me an idea where their tastes lie, and guides me in sketching out a concept I feel encapsulates their favorite features. As I worked to draw out more information from this client, to include his preference in color and textiles, he was rather vague. He’d referenced one of my original designs in his original message when he contacted me, then supplied me with three pictures - but wasn’t specific about the overall design points he liked; other than to state when I offered him samples of historical styles that he did NOT want “poufy” pants. Translation: short paned slops. He wanted royal blue, and had picked out a brocade from my Pinterest board.
Feeling confident that I was heading in the right direction - based on his expressed likes and dislikes - I sketched out my concept using my “historically accurate” model I have developed in the cut of my clothing, and worked up a design board complete with samples of the fabric in the colors he requested. After expending many, MANY hours (once again) in consultation that spanned a couple of weeks, he replied back with one of the pictures he had sent me previously, describing in detail what he liked about it, and asked me - in no uncertain terms - if I would “copy” that ensemble. Copy? As in reproduce the exact garment? - with the exception of different textiles of course.
My reply? I politely informed him that I felt it was unethical to copy another artist’s designs. I offered him something of my own design collection, but stated that ethically I wasn’t willing to copy another artist - even though I would be using different textiles. Call me crazy, but that’s just not something I will do! Not even at the risk of losing a commission - which I did!!
Look, when you approach a designer - who has already established themselves and has developed their own design “aesthetic,” to be shown a garment that isn’t yours, or isn’t remotely historically accurate, and ask them to “copy” it, feels like a slap in the face. You obviously thought enough of that designer’s work to contact them? - Right? What’s more disconcerting is that the dude canceled the project because I refused to plagiarize another’s work! Okay, so is it pride on my part? - or Ego that they want you to replicate someone else’s work rather than yours? Yeah, I suppose my reaction could be labeled thus. But what drives me in these situations is my integrity. The garment is all over Pinterest. It’s nice work. The cut isn’t historical, but it’s recognizable, ya’ll!
But more than anything this situation begs the question: “Why contact an artist whose style and quality of work is already established and then request they copy someone else’s work? This situation hearkens me back to my “Nicole” experience and my advice about not accepting a commission simply for the money. Sometimes fate steps in and works it out for you - as in this situation. But other times you will need to be perceptive enough to know the warning signs and exit stage left.
So, if I haven’t already established my position, let me clarify:
I WILL NOT copy another designer’s work. Period. End of discussion.
Draw inspiration from? Yes. Copy it exactly? Absolutely NOT!
I will put my own spin to it, but I’m not going to replicate it. I feel as an artist copying another’s work is a cop out! In essence, what you’re saying is that “I don’t have my own vision, or the confidence to create my own aesthetic, so I want to ride on the coattails of someone else’s hard work and investment of time.” You gotta do the work, ya’ll. Pay your dues, so to speak. As the artist who’s being copied, it’s infuriating, and it’s just WRONG.
In all sincerity, I am happy if my work is so well received that someone would like to draw inspiration from it, but I would be highly upset if someone were to purchase the same embroidery patterns and replicate my work - and sell it! I’ve actually had a similar situation occur with someone I have a long-standing working relationship with and who I respect as an artist in their own right.They replicated one of my skirt and forepart designs to market their embroidery patterns rather than just seeking my permission to use pictures of mine. Thankfully, they took the high road and honored my request to take down the picture of my “jocked style.”- And I am SO appreciative of that! I’ve had other experiences that did NOT end so amicably. In that particular instance, I had loaned my prototype for an Elizabethan headdresses inspired by “The Tudors” to a fellow guild member. I have the copyrights to my pattern. I had scoured the internet for a pattern, but after several years decided to just draft my own. I worked on it on and off for two damn years before finally perfecting my pattern. I had, at one time, considered selling my patterns, but decided against it. This “person” took my prototype home with the intention of wearing it to an upcoming event, but then showed up wearing a COPY of my headdress! When I saw the pictures, I freaked!! I contacted her in a snit and asked her what the hell she thought she was doing copying my pattern and informed her that it was copyrighted. She replied that she liked my headdress so much she wanted one. My translation: I didn’t want to pay for one of yours, so I stole your pattern. What was I supposed to do? - Act a fool and rip it off her head and stomp on it? I chose to let it go with the stern warning that if I suddenly saw replicas of my work floating around she and I would be meeting in person in less than amicable terms.
It’s bad enough that artists have to deal with unscrupulous hacks overseas who steal pictures of our work and use it to dupe naive customers into a sale - - Only for that customer to receive a hideously styled and cheaply made knock off that doesn’t look remotely similar. What sucks is that YOUR work, in that situation, is now forever connected to a scam!
To artists or costumers seeking to parlay their passion into a small business, I have this to say: BE ORIGINAL people! Develop your own aesthetic, rather than mimic someone else’s work. It’s what will set you apart from the thousands of costumers out there who have the same goal. With the exception of COSPLAY don’t copy another’s work!!
You gotta find your niche and market it.
My business model has been to scour the internet and find items that no one else is offering, or offer something similar in an elevated version. Look, historical clothes are similar in their cut and pattern, so it takes some creativity and inspiration to find a unique spin to these typical garments - especially if you’re using commercial patterns. There is only so much one can do using textiles and trims, as so much of what you see out there is similar. However, I built my business model on quality construction and customer service. It isn’t my fellow costumers out here in the real world from which I draw my inspiration, but rather extant garments and those in the theater and film industry who actually get it right!
From the beginning, as I honed my abilities, I strove to create pieces that matched the quality of those seen by professionals in the film industry and by pieces owned by museums..I create my own textiles using historically based embroidery, in an effort to create my own aesthetic. Because so many costumers are using the same patterns and accessing the same vendors for textiles, there will be similarities you see out there. But to intentionally copy another artist’s work sticks in my craw. Maybe my work ethic is indicative of my generation, I don’t know. But I will stand by my ethics in this regard and sleep better knowing that if nothing else, I’m original.
38 notes
·
View notes
Text
COVID-19 – Wedding planning advice guide and safety measures

Are you stuck amidst your wedding planning journey? Well, we know how heartbreaking it is when you are set to say your vows and suddenly things go topsy-turvy. There are many couples who were set to get married during the months of March, April, and May. All the weddings during these three month have already been postponed. If your wedding was also planned for April or May, it is good to simply postpone or push the dates for some other months. Make sure you push it for at least six months. Because you never know how long this situation of the coronavirus will continue. So, it is better not to take any chance.
If your wedding is scheduled for winters this year, then you have plenty of time to make arrangements for your wedding. Of course, there are many couples who are already worried about their weddings even when it is planned for winters or six months away from now. Fear and disgust is natural as you may have several plans to execute during these months, but because of COVID – 19 outbreak you couldn’t do things as planned. We know you may be feeling sad about it, but not to worry things will change for sure!
If you are also wondering how you should do all the planning for your wedding, then this post is for you. The purpose of this post is to discuss wedding planning tips and safety measures during COVID – 19 crises.
Here we go…
1. Stay Home
Yes, stay home! You must be wondering how you will do things if you will stay at home. Well, we understand that your wedding is an important event of your life, and you already had too many dreams associated with it. Still your health is more important than your marriage, and you should always keep this in mind. You can achieve your dreams any time if you are healthy and alive. So, right now it is the need of an hour that you stay at your home and keep yourself safe and alive. Only when you are healthy and safe, you would be able to stand on your feet and say your wedding vows. Therefore, it is essential that you adhere to Government’s directives and keep yourself and your family safe.
2. Use Technology
The best thing is we are in the era of technology. So even if things are not good outside, you can manage things inside. Utilize technology for your wedding planning. There are several apps you can download and start using them for your wedding planning. If you are not able to meet people face-to-face you can use Skype or Whatsapp calls to meet online. Remember, technology is the safest way to plan your wedding right now. If you try to move out of your house, you may get infected, there is no point doing so. We understand that you feel stuck and helpless at home. But, it’s not like that, you can do things SMARTLY, by using technology and making all your wedding arrangements at the comfort of your home.
3. Gather Inspiration For Wedding Venue Decor
Of course, you cannot go out because of the lockdown due to the corona virus spread. But you always have the privilege to do things at home. You are not going to work, you have plenty of time to gather inspiration for your wedding. Consider this time as an opportunity to create a wonderful wedding event. So, instead of getting upset about the situation, be happy and think positive. Utilize this time in gathering inspirations online and create your wedding. You have the internet 24X7, go online, and search for wedding ideas. You can visit Instagram, Pinterest, and other digital platforms for gathering inspirations. Online you will find ideas for everything from wedding venue décor to bridal attire etc.
4. Gather Inspiration For Bridal Look
Each bride wants to look her best in her wedding. Now is the time to decide your look. Go online, see pinterest, and gather inspiration from there. You can even have a pinterest board, where you can save all your inspirations. Check out wedding gowns, wedding hairstyles and see which one will suit you the most. Trust me, selecting the right gown and right hairstyle for your wedding takes a lot of time. This is not something that you can decide in a day or two. You have to be mentally prepared with what exactly you are looking for at your wedding. For that you need to spend a lot of hours online gathering inspiration and information across all digital platforms.
This lockdown is the great opportunity for you to do all those things. Spend your time seeing different wedding gowns and hairstyles and select a few for yourself. So that tomorrow when you go to buy your gown and hire a makeup artist for your wedding, you know exactly what you want.
5. Vendor Development and Management
Of course, developing and managing vendors is not that easy. Also, it is a time taking procedure, you really need to spend a lot of time online searching for vendors. Utilize this COVID – 19 lockdown period to prepare your vendor lists. Scour for wedding venues, wedding vendors, like wedding decorators, photographers, florists, caterers etc. Make a list of the best vendors and venues in the town, visit their websites, and contact them over the phone. Start sending them the mails. Ask for their proposal and pictures, like in case of a decorator you can ask him to send you the pictures of his best wedding venue decorations. Similarly in case of wedding photographers and other vendors also you can ask for a proposal. There are many vendors who are still working from home, so you can contact them on phone. Of course, this is not the right time for a personal meeting. You can set a Skype call or video conferencing with your vendors keeping your partner in loop.
If you find their services satisfactory, if they have more positive reviews from past customers, if you believe they can create your wedding exactly the way you want. You can book them by giving them initial payment. See there is no problem, you do similar kinds of things in case of destination weddings, especially when it is planned in some foreign land. Hardly any couple visits his wedding venue or meets with wedding vendors in case of destination wedding. Most couples finalize their vendors over the phone and the internet only. So, you also do the same, make best use of technology to plan your wedding. Isn’t it cool!
6. Beauty Regime
Undoubtedly, you cannot visit parlors right now. But there is nothing to worry about it also. There are thousands of ways to keep your skin healthy and maintain a beauty regime. Ask your mom, what she used to do when there were no professionals out there. And she will tell you thousands of home remedies to maintain your beauty and get the bridal charm. You can do myriads of things at home, and look beautiful. Like, perform CTM (cleaning, toning, and moisturizing) every night before hitting your bed. Eat healthy food only, drink plenty of water, practice yoga and meditation, scrub twice a week (use homemade scrubs, like honey and sugar), do fruit facials at home (you can use any fruit from papaya to banana), so on and so forth. For your hair – you can go for an oil massage twice a week (good for maintaining strength and shine of your hair), use homemade hair masks (you can use bananas and curd along with honey for hair mask), etc. See what all suits you and accordingly maintain your beauty regime with natural and organic products.
7. DIY Wedding Decors
Well, optimistic people do not ever feel any dearth of ideas and opportunities. An optimistic person can find ways even amidst the worst situations. You always have two ways to tackle the situation; either you crib about the situation or you find the solution to tackle the situation. Positive people do the latter one. So, you also stop cribbing about the situation, you can utilize this time in DIYing wedding décor items. Yes, there are so many things that you can DIY, like table centerpieces, wedding favors, backdrop for your wine tasting, photo collage, paper lanterns, votive candle holders for your reception, designer napkins for your reception etc. All these you can do at home without you having to move out.
8. Do Exercise
Believe it or not, exercises are not only meant for losing weight, in fact, one can also stay positive by doing exercise. This is the most crucial time of your life, you can either use it or waste it. Better you use it because you will never get to stay at home for this much time once the things are normal. Start a regular exercise regime. You do not need any equipment to have a routine. You can practice Yoga, Yin Yoga, Zumba, etc. And if you find a problem in doing all this, you can dance. Dancing also burns calories and helps you stay positive.
9. Practice Meditation
It’s not just this lockdown, but this entire life is unpredictable. You have to be mentally strong to face the challenges that life throws. Wedding planning is already a stressful journey. And, marriage in such times will again put pressure of its own kind. So the best thing you can do these days is – practice meditation. You can practice any kind of meditation, like Mindfulness Meditation, Focus Meditation, Meditation on Thought, and Mantra Meditation. All these meditations are quite easy to do and the results are amazing. Practicing meditation will help you stay calm and peaceful throughout this difficult time. Besides, you would be able to do all the planning related to your wedding without any stress. Also, practicing meditation on a regular basis will strengthen your relationship with your partner to-be.
10. Learn Cooking
Why should you go out for a crash course to learn cooking, instead utilize this time and learn at home! Yes, this is the best time to do whatever you wanted to do. After your wedding you will definitely need to cook for your family. You may think that you can get your food cooked by a maid, of course, you can. But, the food that is cooked by the lady of the house is incomparable. Nothing can beat the taste of that food, because you will put additional ingredients in that – that’s your love and emotions! So, this is the best time to learn the art of cooking. Even your partner will be happy to know this. No matter how modern a man becomes, he always loves to eat homemade food. So, for your love and happy family, spend time cooking. You will never regret learning this beautiful art!
11. Stay Happy
You may be finding it difficult to be happy at home! For many people it is very difficult to stay at home for the whole day that too for so long. It’s okay, even if you are not fond of staying at home, stay at home. It is for your safety and health. And when you know you do not have any choice, then what is the point of feeling sad about it? There is an old saying, “Accept what you cannot change”. This is the perfect time to learn acceptance and patience. Whatever you will learn today will go with you lifelong. Moreover, staying happy will become your nature and you will look very beautiful in your bridal look. Of course, everybody wants to see a happy bride, nobody likes sad or frustrated brides. If you keep getting frustrated or impatient about the situation, you will look frustrated even in your wedding also. Remember that even your makeup artist won’t be able to hide those expressions under makeup. So, it is better that you keep yourself busy in things that give you happiness. You can engage yourself in reading, music, painting, drawing etc. As these activities are stress-busters and you feel happy when you perform any of these activities.
To Conclude…….
So, these are things that you can do during COVID – 19 lockdown and keep yourself busy and engaged. Understand that we are the luckiest of all races so far, because we are in the era of technology. Even when things are not good around us, we are able to manage our lives properly. We are still connected to people virtually, so there is no problem in wedding planning also. You can easily plan your wedding online. You can meet your vendors online over Skype, utilize this time in doing more constructive and positive things. The time spent in learning and doing positive things will never go waste. Be positive and trust that everything will be fine soon!
Stay Home, Stay Safe!
#covid19#Wedding#Covid19_Wedding#WeddingAdvice#WeddingGuide#covidwedding#Wedding2020#wedding plannig#Stay at Home
2 notes
·
View notes
Text
Why Is Beach Canvas Painting Ideas Considered Underrated? | Beach Canvas Painting Ideas
June 21 is bit-by-bit afterpiece and closer, which agency you bigger alpha to anticipate about what you’re activity to buy your dad for Father’s Day. Of course, you can go with the accepted ties, watches and wallets, but if you appetite to angle out and appearance Dad how abundant you care, you’ll accept to do bigger than that.

Spring and Summer easy canvas painting ideas – Google Search (With .. | beach canvas painting ideas
To advice you out, we’ve scoured the internet for the best ability for Father’s Day. Whether he brand music, golf and coffee, or cooking, appearance and plants, we’ve aggregate an all-embracing account of presents in basically every category. So this year, whether he’s abreast or far, get Dad article he’ll actually use from our accumulating of the best Father’s Day ability of 2020.
‘What I Adulation about Dad’ Fill-in-the-Blank Allowance Account ($7.43, originally $11.80; amazon.com)

‘Peaceful Beach Scene’ Acrylic Painting Print on Canvas – beach canvas painting ideas | beach canvas painting ideas
What I Adulation about Dad Fill-in-the-Blank Allowance Journal
For a added claimed touch, this fill-in-the-blank account lets you address your own letters to Dad. Aloof accomplish abiding to get him a box of tissues, too.

Painting Simple Cool Amazing Small Canvas For Acrylic Ideas .. | beach canvas painting ideas
_____________________________________________________________________________
Apple AirPods Pro ($234.95, originally $249; amazon.com and bhphotovideo.com)

Items similar to Original Art, Seascape Oil Painting .. | beach canvas painting ideas
Whether Dad needs buds to assignment out or could account from the babble abandoning so he can focus on work, Apple’s AirPods Pro are air-conditioned able and the absolute Father’s Day gift. Plus, they came through as the best accurate wireless earbuds of 2020 afterwards our accurate testing of affluence of options on the market, so you apperceive they’re good. If you’re attractive for article
Why Is Beach Canvas Painting Ideas Considered Underrated? | Beach Canvas Painting Ideas – beach canvas painting ideas
| Pleasant in order to my own blog, within this moment I will explain to you with regards to keyword. And after this, this is actually the 1st graphic:

Find Your Next Paint Night | Wine and canvas, Wine painting, Easy .. | beach canvas painting ideas
How about graphic over? is actually of which wonderful???. if you believe so, I’l m explain to you several image all over again below:
So, if you like to get all of these awesome pictures regarding (Why Is Beach Canvas Painting Ideas Considered Underrated? | Beach Canvas Painting Ideas), click save button to download the photos for your personal pc. They’re available for obtain, if you’d rather and want to have it, click save badge on the page, and it will be instantly down loaded to your computer.} Lastly in order to grab new and the latest photo related with (Why Is Beach Canvas Painting Ideas Considered Underrated? | Beach Canvas Painting Ideas), please follow us on google plus or bookmark this blog, we try our best to provide regular up-date with fresh and new pictures. Hope you like staying here. For some up-dates and latest news about (Why Is Beach Canvas Painting Ideas Considered Underrated? | Beach Canvas Painting Ideas) photos, please kindly follow us on tweets, path, Instagram and google plus, or you mark this page on book mark section, We attempt to provide you with update regularly with all new and fresh graphics, love your searching, and find the best for you.
Thanks for visiting our website, contentabove (Why Is Beach Canvas Painting Ideas Considered Underrated? | Beach Canvas Painting Ideas) published . At this time we are excited to announce that we have found a veryinteresting nicheto be pointed out, that is (Why Is Beach Canvas Painting Ideas Considered Underrated? | Beach Canvas Painting Ideas) Lots of people searching for info about(Why Is Beach Canvas Painting Ideas Considered Underrated? | Beach Canvas Painting Ideas) and certainly one of these is you, is not it?

25 in. x 25 in | beach canvas painting ideas

Easy Canvas Painting For Kids – beach canvas painting ideas | beach canvas painting ideas

25 Panel Canvas Art with Easy Tree Painting Oil Painting Canvas .. | beach canvas painting ideas

easy beach paintings for beginners – Google Search | Easy canvas .. | beach canvas painting ideas

Beach scene painted on canvas | canvas art | Pinterest – beach canvas painting ideas | beach canvas painting ideas

Life in Order: DIY: Beach Themed Canvas – beach canvas painting ideas | beach canvas painting ideas

Easy Beach & Nautical Inspired Decoration Ideas – Listing More – beach canvas painting ideas | beach canvas painting ideas

Finding Your Inner Artist: 25 Pretty Canvas Art Ideas – beach canvas painting ideas | beach canvas painting ideas

Painting idea for summer camp.. | beach canvas painting ideas

Mikki Senkarik | Painting, Canvas art, Abstract – beach canvas painting ideas | beach canvas painting ideas

√ 25+ Best Easy Painting Ideas For Wall Beginners and Canvas .. | beach canvas painting ideas

I am going to paint Romance On The Beach at Pinot’s .. | beach canvas painting ideas

Pin by Jean Curtis on Sip & Paint Ideas (With images) | Beach .. | beach canvas painting ideas

DIY Art: Beachy Seahorse Canvas – beach canvas painting ideas | beach canvas painting ideas

Paddle boarding at sunset painting idea. Beginner canvas .. | beach canvas painting ideas

110 Easy Canvas Painting Ideas For Beginners | Paint .. | beach canvas painting ideas

Αποτέλεσμα εικόνων για Beach Paintings for Beginners .. | beach canvas painting ideas

ORIGINAL Oil Painting SEASCAPE, Painting on Canvas, home decor .. | beach canvas painting ideas

Painting Ideas – 25 Easy DIY Canvas Paintings to Make Art at Home – beach canvas painting ideas | beach canvas painting ideas

25 Artistic Acrylic Painting Ideas For Beginners (con imágenes .. | beach canvas painting ideas
The post Why Is Beach Canvas Painting Ideas Considered Underrated? | Beach Canvas Painting Ideas appeared first on Painter Legend.
Painter Legend https://www.painterlegend.com/wp-content/uploads/2020/06/spring-and-summer-easy-canvas-painting-ideas-google-search-with-beach-canvas-painting-ideas.jpg
0 notes
Text
Meet The Blogger - Mecyll Gaspary

In our latest interview series which I like to call “Meet the Blogger”, where I spotlight inspiring creatives on this Blogger Magazine. We caught up with Mecyll Gaspary who runs mgaspary blog and an aspiring Filipino best-selling author. How To Start Blogging, Earn Your First $500, & Succeed Without
Getting Overwhelmed
1.
Tell us a little bit about yourself and your blog?
Hi, I am Mecyll Gaspary, an aspiring Filipino
best-selling author, blogger, and freelance writer. My interest in writing
combined with work-related experiences as a writer led me to create my blog
into a useful resource for writers like me in the public domain.
2.
Describe what inspired you to start your blog?
I began my blogging journey back in 2015 when I met a
co-writer on a news website where I worked before. She told me she made money
from blogging anything. So, that caught my interest in the blog as a potential
to add income streams.
It wasn’t easy, though. I started with Miss Creative
Journaler (nulled) as my first professional blog where I bought web hosting
packages and all that stuff. After I failed, I started again with another
website and failed again until I finally made up my mind to create my professional
website where I can showcase my strengths as a writer and help other struggling
writers to make money using their skills online.
3.
How do you motivate yourself to keep the blog up and running?
I’m a productivity geek. Desperate to perform more and
see more progress in my endeavors, I scoured the internet to find solutions for
my dilemma: procrastination.
While working full-time as a content writer, I tried
to spare time for my blog despite the mental exhaustion and fatigue. I tried
many ways to remain productive and followed different people’s tips but nothing
worked for me.
What I do is to know how my body works in rhythm with
my mind. My head may tell me I need to finish the task but I have to make sure
my energy equates to become ultra-productive.
For instance, I wake up in the morning and the
adrenaline rushes, I have to finish as many tasks as possible before the
euphoria fades. This isn’t laziness for me. Surprisingly, I accomplish more
when I follow this system rather than forcing myself to do something for the
sake of productivity.
If I failed to align my work rhythm and forced myself
to accomplish a task, I tend to procrastinate and stay away from my desk. This
is why I need to consider myself in the process. It’s the same thing I suggest
you do. Listen to your body and respect how it works.
If you push yourself too hard as I did, you will not
enjoy the process of doing anything, including your blog. I once believed that
when I do more, I make more progress. That was my old productivity principle.
It wasn’t the case. I succumbed to writer’s block to the point I couldn’t write
a word again.
Imagine a writer who can’t even hold a pen and a
notebook to scribble a single word. That’s a painful, unimaginable situation
most writers can’t avoid (unless if they follow the same productivity strategy
I did).
Many people define self-discipline as doing the same
thing every single day. It doesn’t matter if you’re tired, keep going until you
see results. However, I beg to disagree. It’s also important to listen to your
body when to do things and not to do things. Rest if you have to. But that
doesn’t mean you quit.
When your mind and body align, you unknowingly become
more productive than you think.
4.
How active are you on a weekly basis? How often do you communicate with your
followers?
I communicate with my audience weekly. With the help
of automation, I send weekly emails to my subscribers, as well as pin posts on
Pinterest via Tailwind App, which is my go-to-platform to schedule my pins.
5.
What do you think is the best social media strategy for getting more visitors
to a blog?
Video presentation suits better than most strategies I
tried. This is the best option for Facebook and Instagram as the posts perform
best when it’s in a video format than photos alone. Of course, there’s nothing
wrong with sticking with photo posts, though.
When you prefer using Pinterest, on the other hand, it
follows a different strategy. You need to join group boards and Tailwind Tribes
by collaborating with other pinners. Your posts will not perform better if you
stick on pinning on your boards without the help from others.
This is what makes Pinterest different as to how you
execute social media strategies on Facebook and Instagram - the reason for
bloggers to love this platform.
6.
Would you encourage other people to make their blog?
Yes, definitely. My writing career began when I
started writing blog posts. Although I have been blogging since 2012, I got
into the business side of it in 2015.
Without my blog, I wouldn’t have discovered vast
opportunities waiting for me ahead. For instance, earning $5,000 as a writer
wouldn’t have been possible without considering blogging as a stepping stone
for that success.
7.
A lot of people think that blogging is an easy way to make money online. Do you
have some tips for those people who are interested in making money from the
blog?
Out of all the tips and strategies suggested by
experts, successful bloggers, as well as authors, this one is at the top
priority. Create phenomenal content.
Regardless of the SEO - which also plays a big role in
getting more web traffic - Google values unique and high-quality content. After
its algorithm change not too long ago, many big websites that published
outdated posts and invaluable content faced devastating effects.
It was the first time in history that the big sites
like Daily Mail UK witnessed plummeting website traffic. At the time, small
websites were facing a big threat. However, it was otherwise.
Consequently, it gives opportunities for small
websites with quality content to rise on the top search engine results aka
SERP. This proves that writing epic posts work for all online content. It’s a
must for bloggers to gain traction.
When you keep creating epic or cornerstone content,
you don’t need to chase money. It’s drawn to you. It doesn’t matter if you’re
an affiliate marketer, blogger, freelance writer, or author.
The easy way to start making money online is by
creating phenomenal content that hooks your audience to the bone. A post that
will engrave in their minds and will never be forgotten. Your content is too
valuable and irresistible, pushing them to take action i.e. purchase the
product, sign-up on your email lists, etc.
8.
What was the most challenging moment in your blogging journey so far?
It’s when I have to blog while working full-time as a
writer for someone else while performing my household duties as a wife.
Fortunately, I didn’t have children yet so it wasn’t as stressful compared to
mother bloggers whom I offer my salute to.
9. What is your greatest
achievement outside of blogging?
I was a student council president in one of the top
universities in the Philippines. During my term, I several organized programs
for the students, especially the scholars and the unfortunate young students in
our city.
Initially, the program for the scholars I developed
with the help of my team was exclusive to one college.
Over the years, the program grew into an annual
university activity wherein all the scholars undergo orientation to help them
assess their academic performance better.
With the other program, it was created to discover
potential young leaders who are less fortunate within the city. With the help
of my team, we scoured the city to search the youth to train and excel as
future leaders of the country.
Given the scale of the program, it was no surprise
that it garnered awards from the university’s award-giving body. Although it
took years for developing that program (from my term to the next 2 student
council presidents), it was worth it.
10.
Who is your blogging hero and why?
Several names appear in my head the moment I read this
question. Over the years of studying hundreds of thousands of content in the
public domain, I encountered great bloggers who happen to be best-selling
authors.
To name one, I have been following Jeff Goins, a blogger,
and best-selling author, since 2015. That’s when I got serious with blogging.
His influence is big enough to push me to self-publish my book, which I’m
working on right now.
“Just write,” he always mentions in most of his blog
posts. There’s no other way for someone to become a writer but to write.
Nothing else.
11.
What advice would you give to a new blogger starting out?
Don’t be scared. Just don’t. Many of us tend to scour
the internet to search for potential niches we might like to do, especially
when we’re just about to start it. When we do, we see massive topics to try
without knowing these could potentially threaten our drive to start a blog and
continue.
The internet provides a lot of information about every
single thing. This overwhelms you so much that you’re scared to try writing
something because you thought, “Anyway, somebody has probably written about it.
Why would I bother?”
Or, you might be thinking too much about web traffic,
SEO, and all the technical side of blogging that compromises the quality of our
work.
Our drive to blog is to share our experiences with our
audience. And if we’re too distracted with the plugins, Google algorithm, etc.,
we might lose the spark we once had when we started.
A piece of advice? Start writing for yourself. Write
epic posts you love to read over and over again. I know this sounds like a bit
of advice for fiction writers but the same principle applies to the blog. Just
write. That’s it.
12.
Have you collaborated
with brands? If yes, name few brands you worked with
If this includes the affiliated programs I partnered
with and made money from it, these include Your Online Revenue LLC, Grammarly,
WP Engine, Tailwind App, and Dabble Writer.
13.
Finally, what are your thoughts about BloggerMagazine?
First of all, I’d like to thank BloggerMagazine for giving me this
wonderful opportunity to share my thoughts with your amazing audience. This is
because, for me, BloggerMagazine is a great hub for the most inspiring and
creative bloggers on the planet. That’s why I’m so grateful to be featured in
your great community.
Follow Mecyll Gaspary on her journey at:
mgaspary.com | facebook.com/mgasparywriter | instagram.com/mecyll.jamila | instagram.com/mecyllg | linkedin.com/mecyll-gaspary
Read the full article
#bloggerinterviewseries#bloggermagazine#communityofbloggers#influncerinterview#MeettheBlogger#technologyblogger
0 notes
Link
Have you just moved into your dream house?
While you are busy unpacking and settling in to your new home, you also have scoured every Pinterest board and home decor magazine to get some inspiration and guidance to decorate your nest.
The entire process of decorating your abode is exciting, as it gives a creative outlet to express your personality, but at the same time it can be equally overwhelming. The internet is brimming with countless home decor tips, tricks, inspirations and ideas, however, for someone who is design-naive all these may seem like passing through a labyrinth!
Comfort + Beauty is the Secret Formula for Cosy Home Decor
When you are decorating your home, it’s important to remember that the key ingredient to give your place a Pinterest worthy look is striking a balance between comfort and style.
While various trends have tried to achieve that “perfect equilibrium” - one region that gets it right is Scandinavia.
Scandinavian Home Decors - Minimalistic, Stylish and Comfy
Characterised by minimalism, simplicity, beauty and functionality, Scandinavian interior design first made an appearance during the 1950s, and gained immense popularity among interior designers across the world.
A part of the school of modernism, Scandinavian design movement focuses on elements that display functionalism, simplicity and beauty. Besides, you will find heavy influence of natural shapes and elements and use of abstract designs that show a beautiful connection of humans with nature.
Combining textures, contrasts and neutral hues, along with using contemporary furniture; Scandinavian home decor emphasis on creating a warm, welcoming and snug atmosphere.
This school of thought places special emphasis on bringing the best of both worlds by combining minimalism and maximalism without going over the board, and therefore it gives your home an inviting and warm ambience.
How to Get That Distinctive Nordic Home Decor in Seven Easy Ways?
If you wish to get the look that the Nordic countries are so renowned for, here are 7 easy home decorating tips:
1. Optimum Use of Lighting
As we know the Nordic countries like Denmark, Sweden and Norway don’t receive much (virtually any sunlight) sunlight during the winters; it is due to this reason that use of the right kind of lights plays a crucial role in Scandinavian home decors.
When you are designing your new space like the Nordics do, make sure you use a lot of artificial lighting throughout the house. Consider using thin, flowy or airy curtains rather than thick ones. To ensure there’s enough artificial lighting, you can use a variety of lighting fixtures like spotlights, sconces, pendant lights and lamps for mood lighting. The more lights you use, the better your Nordic-style home look.
2. Neutral and light coloured flooring
Scandinavians love light coloured hardwood flooring and it is often left untouched or in some cases is painted white. Light hued flooring is another smart way to combat the lack of lighting during winter days, along with giving an illusion of a bigger, brighter and more welcoming space.
3. Simplicity is the Key
When it comes to design rules, Nordic style isn’t limited to just one. The signature Nordic design guideline is to strip the home of all unnecessary clutter and keep things as simple as possible. They are known for keeping their homes minimalistic and pared back. Therefore, the rule of thumb to get that Nordic feel for your home, keep decorative accents simple and minimalists. You can go for elegant ceramic vases or candle stands that feature organic shapes.
4. Bring more Warm Texture
Minimalism is the highlighting feature of a Scandinavian home, however, too much simplicity can make the home appear cold and unwelcoming. That’s the reason why adding layers of warm texture can make a big difference. Try to incorporate natural and warm textures like wooden furniture with warm throws and cushions. These elements add a character and warmth to the overall ambiance of your home. Besides, you can create a gallery wall of your favourite photographs arranged in varying frames.
5. Opt for Neutral Colours and Texture
In order to adopt that quintessential Scandinavian style, it’s crucial to stick to a relatively neutral palette - whether it is colours or texture. Go for a more neutral, earthy and washed element that is inspired by nature.
Moreover, Scandinavians are inclined to neutral earthy colours like white, off-white or any shade that comes in the greyscale spectrum. However, in recent years there is a surge in accent walls being painted in dark blue, green, grey and even black to create a cosy and cocoon like home.
6. Style and Functionality Go Hand in Hand
Striking a balance is the key ingredient to create the perfect Scandinavian style homes. One of the most interesting things about Nordic homes is amalgamating form and function.
Apart from focusing on making home beautiful, it is important that you place equal importance on creating a comfortable space. Therefore, when you are in the planning phase, think about everything required to make the home work perfectly for you and your lifestyle. Again Nordic furniture places an essential role here - consider buying high quality wooden furniture that can stand the test of time. Also, remember to add soft textiles like throws and cushions.
7. Clear the Clutter
One of the golden rules of Scandinavian home decor is to keep your space clutter-free. When less is more is the key, make optimal use of storage spaces, and most importantly, let go of any unwanted or unnecessary items taking up all the precious space and creating clutter. This will result in a more visually relaxing atmosphere which will instantly reduce the stress levels.
Nordic Rooms is an exclusive online store with an exclusive and exquisite collection of Scandinavian homewares, furniture and other furnishing products.
Made from premium quality materials, our products give a glimpse of contemporary and minimalism inspired Nordic products.
0 notes
Text
Share-Worthy Design For Freelancers
The Share-worthy Design Course
The complete blueprint to taking your freelance dreams to full-time status.
You’ve got visions of full-time freelancer in your head… but could use a swipeable strategy that lets you focus on what matters most: you, your brand, and your work.
‘Cause right now, you’ve got limited time: you need to be able to answer those ideal client inquiries without reinventing the wheel every day.
You totally understand that a tight client process is something you’ve gotta master as a profitable small business owner. But somedays, it seems like all the good freelancers keep it to themselves — and you’ve clocked (aka wasted) HOURS reading blog posts.
So you’re clicking through someone else’s website trying to figure out their process & heating up your lonely, cold cup of coffee — again: Why is figuring out an inspired, elevated freelancer biz oh-so hard somedays!?
What if it you could sneak a peek over the shoulder of a professional freelancer while she works?
Imagine learning the exact process to be able to send a client just one design — AND have it approved — so there’s no more rolling your eyes when they pick the very one you *knew* they’d pick (after you spent HOURS creating the back-ups).
You’d be able to guide those dreamboat clients through an unforgettable (literally — you wouldn’t be forgetting steps anymore!), rave-worthy experience.
And forget scouring Pinterest for Illustrator shortcuts — you’ve got a ready-set-installed list of Ai hacks at your freelancer fingertips.
I’m Jamie of Spruce Rd., and I took my skills to full-time freelancer — and I haven’t looked back yet.
Now? I want to draw back the curtain on my systems, so you can be the best boss you’ve ever had, too!
The Share-worthy Design Course was created to show you the exact process for how I made freelance life happen.
SWD is an 8-week course that gives you a peek into design short-cuts and client processes, so you can go full-time on those freelance dreams — creating designs that get you shared (and hired!).
During our time together, I’ll guide you through Design Fundamentals, Client On-boarding, Pricing Roadmaps, Streamlined Responses, and Adobe Illustration How-to’s so you can quit dreaming of a more efficient, profitable freelance business… and actually make it HAPPEN.
Are you ready to be confident in a strong design process you can fall back on? Throw those type-loving, creative hands of yours in the air: Let’s get you to freelance freedom, friend!
HERE’S WHAT YOU GET INSIDE SWD
LESSON 1: DESIGN FUNDAMENTALS
What’s that mean for you?
My 360-degree overview of Typography for Brand Designers, a lesson that guides through winning combos — and gets you ready-made swipe files on command.
The Color Palette Guide, to give you confidence in creating streamlined swatch sets (and yes — more done-for-you color kits for the taking!).
Lesson 2: Brand Identity Design
What’s that mean for you?
Logo Design, my step-by-step way to discover exactly what clients want (and guide them through a branding process they’re happy to pay for).
My exact 6-step Design Process, the very gameplan I use in my own business to guarantee each client gets an elevated experience … and that my team’s not crying into our coffee mugs in stress-mode, because we’ve got a project management system that works.
A Step-by-Step Logo Case Study, so you can see how I take a messy Illustrator artboard full of concepts, narrow it to one, finalize the logo in Illustrator, and save the files appropriately for the client — it’s your behind-the-curtain ticket to my design process!
Artboard 1.jpg
Lesson 3: Expanding your Brand
What’s that mean for you?
How to Illustrate Icons in Adobe, so you can peek over my shoulder and watch the step-by-step, nitty-gritty way I build out icons, and add them to your own design packages (plus, learn Ai short-cuts you didn’t know existed!).
The Pattern Design walkthrough, giving you a detailed action plan for always creating custom, gorgeous patterns for your clients in Adobe Illustrator … plus the how and why of working beyond the built-in Illustrator pattern tool, so you’re given FULL control over the pattern (um, yes please!).
Photography Best Practices and DIY Training for taking branded photos that compliment the designs you’ve labored over, and lure in just the kind of client you love working with.
Lesson-4.jpg
LESSON 4: Working with Clients
What’s that mean for you?
My Getting Clients techniques and cheatsheet, so you don’t make the mistakes that most designers think they have to make to go full-time (hint: you can do it without a blog!)
One-Logo Client Presentation Guide, giving you an outline for how to prep and deliver one beautiful design to your client, and rest assured knowing it’s exactly what they were looking for.
What you need to consider to guarantee a stellar experience in Client On-boarding — and the client process mistakes that most designers make.
My framework for The Complete Client Process, so you can start turning your inquiries into raving fans that refer you to others because you served them with a fantastic brand journey.
Lesson 5: Scope, Contracts + Terms
What’s that mean for you?
Managing Client Expectations Method that can give you the confidence to moving forward professionally when it comes to setting up your business, so you can stay on timeline & project scope (Yes, you can tactifully say no and I’ll show you my word-for-word reply, ‘cause I’m a people-pleaser, too!).
Lesson 6: Pricing Your Services
What does that mean for you?
The scoop on Hourly Pricing, and the complications that may come up with pricing this way — and how to prevent them.
A guide to Flat-rate Pricing, so you can decide if this is how you want to go all-in on your freelance business.
Value-based Pricing 101 — discover exactly what your clients are looking for (and is willing to pay for), so that you never have to waste time and energy snooping on others’ pricing structures again.
The skinny on Trading Services, to give you the run-down on growing your business alongside other creatives through trading … and why I discourage it for freelance designers.
Guide to Retainer Clients, so once you’ve nailed some client work, you can trim down your marketing efforts with clients that keep coming back to you.
You’ll also get instant access to:
32 pages of actionable insight in your course workbook
21 video training modules
Access to our private Slack group with the mastermind course level, to make sure you’re supported every step of the way
My favorite Adobe Illustrator shortcuts
More than 10 swipe-file canned responses and templates, for everything from the “wrong fit” inquiry to presenting the first proof of the one logo solution
“I’m in the 6th year of running my freelance business and found a slew of great tools within this course, from Illustrator shortcuts to automation of e-mail responses.”
Share-Worthy Design For Freelancers published first on http://ift.tt/2qxBbOD
0 notes
Text
Upgrade an Old Armoire for a Weathered Wood Herringbone Look
Check out how DIY blogger Adrienne Boswell from Chic California transformed an old TV armoire with a weathered wood herringbone pattern for her office.
Upgrade an Old Armoire for a Weathered Wood Herringbone Look
You probably have an old TV armoire or have seen one at a garage sale or thrift store recently. Most of today’s TVs just don’t fit into them anymore. We’ve had this old TV armoire for years.
After serving its purpose for holding the TV, it eventually turned into extra office storage. However, behind closed doors it was a mess. Unorganized and dark, ready for a makeover.
One of today’s hottest trends in decor is reclaimed barn wood. It’s on every design program and decor magazine. I love the rustic look of barn wood.
I was so excited to use it to transform my old TV armoire into functional and beautiful storage. Except, I didn’t have a source for it. Sure, I could scour the online classifieds looking for someone to be tearing down their old barn or selling barn wood, but that could take so much time.
Then, I found out that The Home Depot now carries Weathered Wall Boards that look just like the real deal. It was so easy to just head over to The Home Depot, pick up a few boxes and head home to start on my project.
The patina on this stuff is awesome! Each board has a little bit of variation and the color variety is so authentic looking. You have a great mix of lighter and darker pieces and even some with a gray wash patina.
The weathered wall boards are pretty uniform in size and shape making it even easier to just apply the barn wood and not have to worry about planing it or making sure each piece is the same.
Materials
(4) Weaber Hardwoods Weathered Wall Board
Plywood (if you need to add a back to your TV armoire)
Dark Paint for behind boards
¾ in. Floor Flange
¾ x 12 Pipe
2 x 12 in. x10 ft. Board (Shelf)
¾ Black Metal Cap
Gold Spray Paint
Stain
Level
Tools
Nail Gun (or Liquid Nails for a more permanent installation)
Table Saw
Measuring Tape
Wood Screws
Drill
Step 1: Paint the Furniture
The first step in this project was to paint the armoire. I’d already painted the outside of the armoire, so I just had some white paint color matched at The Home Depot.
Then, I added a piece of plywood over the back of the armoire. Most armoires have a flimsy back board on them. I wasn’t sure the back was strong enough to hold up the heavy shelves I was planning.
Next, I cut a piece of plywood to size and installed it over the back board. However, if you aren’t planning on adding heavy shelving or you already have a strong back board, you can skip this step.
The directions on the box say to paint your surface a dark color before you apply the boards. While the weathered wood boards are fairly uniform, if you end up with any gaps between them you would be able to see a little bit in between. When you paint the background dark, any gaps will blend in.
Step 2: Design the Wood Herringbone Pattern
Now that the armoire was prepped, I was ready to plan the design. The directions on the box were fairly simple to follow, and I opted for the herringbone pattern.
Using a level, I marked the center of the armoire with a reference line. After a little math, I determined to get a pattern like on the box, the center boards would need to be cut at 20 in.
Step 3: Cut the Boards
Once all the weathered wood boards were cut, they were placed on the floor to make sure the pattern was correct. And because each board has a different patina, I wanted make sure I didn’t have all the same color boards together. I moved things around until I had the colors varied just right.
Step 4: Apply the Weathered Wood Herringbone Pattern
Next, it was time to apply the boards. The directions say to use liquid nails for a more permanent application. I opted for nails since I was doing a more complicated pattern. Following the instructions, I nailed each board up starting in the center and working my way out to the edges.
Once I reached the outer edges, I measured what I needed to fill in the gaps and cut those with the saw.
Step 5: Build the Shelves
My original plan for this project was to keep the armoire doors on. But, the barn wood boards looked so amazing that I knew I would never be closing them again! I removed the doors and touched up the paint and then began to build the shelves.
I used ¾ in. metal pipe that I then spray painted gold. After the pipes dried, I screwed them into the weathered wood with wood screws.
The board that I used for the shelves was a 2 x 12 x 10 cut into smaller sections. I used some weathered gray stain to match the board up to the weathered barn wood. I installed the board across the metal pipes to create shelving.
I couldn’t be more pleased with how this project turned out. Not only have I repurposed a piece of furniture, but I transformed it into a piece that is not only beautiful but functional for our home.
Find more Accent Wall Inspiration on The Home Depot Blog. Get inspired by our Bedroom Ideas & Inspiration board on Pinterest and create your own retreat. Shop charred wood and more appearance boards at The Home Depot.
The post Upgrade an Old Armoire for a Weathered Wood Herringbone Look appeared first on The Home Depot Blog.
from garage2 http://ift.tt/2ysAnRh via great info
0 notes
Text
Upgrade an Old Armoire for a Weathered Wood Herringbone Look
Check out how DIY blogger Adrienne Boswell from Chic California transformed an old TV armoire with a weathered wood herringbone pattern for her office.
Upgrade an Old Armoire for a Weathered Wood Herringbone Look
You probably have an old TV armoire or have seen one at a garage sale or thrift store recently. Most of today’s TVs just don’t fit into them anymore. We’ve had this old TV armoire for years.
After serving its purpose for holding the TV, it eventually turned into extra office storage. However, behind closed doors it was a mess. Unorganized and dark, ready for a makeover.
One of today’s hottest trends in decor is reclaimed barn wood. It’s on every design program and decor magazine. I love the rustic look of barn wood.
I was so excited to use it to transform my old TV armoire into functional and beautiful storage. Except, I didn’t have a source for it. Sure, I could scour the online classifieds looking for someone to be tearing down their old barn or selling barn wood, but that could take so much time.
Then, I found out that The Home Depot now carries Weathered Wall Boards that look just like the real deal. It was so easy to just head over to The Home Depot, pick up a few boxes and head home to start on my project.
The patina on this stuff is awesome! Each board has a little bit of variation and the color variety is so authentic looking. You have a great mix of lighter and darker pieces and even some with a gray wash patina.
The weathered wall boards are pretty uniform in size and shape making it even easier to just apply the barn wood and not have to worry about planing it or making sure each piece is the same.
Materials
(4) Weaber Hardwoods Weathered Wall Board
Plywood (if you need to add a back to your TV armoire)
Dark Paint for behind boards
¾ in. Floor Flange
¾ x 12 Pipe
2 x 12 in. x10 ft. Board (Shelf)
¾ Black Metal Cap
Gold Spray Paint
Stain
Level
Tools
Nail Gun (or Liquid Nails for a more permanent installation)
Table Saw
Measuring Tape
Wood Screws
Drill
Step 1: Paint the Furniture
The first step in this project was to paint the armoire. I’d already painted the outside of the armoire, so I just had some white paint color matched at The Home Depot.
Then, I added a piece of plywood over the back of the armoire. Most armoires have a flimsy back board on them. I wasn’t sure the back was strong enough to hold up the heavy shelves I was planning.
Next, I cut a piece of plywood to size and installed it over the back board. However, if you aren’t planning on adding heavy shelving or you already have a strong back board, you can skip this step.
The directions on the box say to paint your surface a dark color before you apply the boards. While the weathered wood boards are fairly uniform, if you end up with any gaps between them you would be able to see a little bit in between. When you paint the background dark, any gaps will blend in.
Step 2: Design the Wood Herringbone Pattern
Now that the armoire was prepped, I was ready to plan the design. The directions on the box were fairly simple to follow, and I opted for the herringbone pattern.
Using a level, I marked the center of the armoire with a reference line. After a little math, I determined to get a pattern like on the box, the center boards would need to be cut at 20 in.
Step 3: Cut the Boards
Once all the weathered wood boards were cut, they were placed on the floor to make sure the pattern was correct. And because each board has a different patina, I wanted make sure I didn’t have all the same color boards together. I moved things around until I had the colors varied just right.
Step 4: Apply the Weathered Wood Herringbone Pattern
Next, it was time to apply the boards. The directions say to use liquid nails for a more permanent application. I opted for nails since I was doing a more complicated pattern. Following the instructions, I nailed each board up starting in the center and working my way out to the edges.
Once I reached the outer edges, I measured what I needed to fill in the gaps and cut those with the saw.
Step 5: Build the Shelves
My original plan for this project was to keep the armoire doors on. But, the barn wood boards looked so amazing that I knew I would never be closing them again! I removed the doors and touched up the paint and then began to build the shelves.
I used ¾ in. metal pipe that I then spray painted gold. After the pipes dried, I screwed them into the weathered wood with wood screws.
The board that I used for the shelves was a 2 x 12 x 10 cut into smaller sections. I used some weathered gray stain to match the board up to the weathered barn wood. I installed the board across the metal pipes to create shelving.
I couldn’t be more pleased with how this project turned out. Not only have I repurposed a piece of furniture, but I transformed it into a piece that is not only beautiful but functional for our home.
Find more Accent Wall Inspiration on The Home Depot Blog. Get inspired by our Bedroom Ideas & Inspiration board on Pinterest and create your own retreat. Shop charred wood and more appearance boards at The Home Depot.
The post Upgrade an Old Armoire for a Weathered Wood Herringbone Look appeared first on The Home Depot Blog.
from mix1 http://ift.tt/2ysAnRh via with this info
0 notes
Text
Upgrade an Old Armoire for a Weathered Wood Herringbone Look
Check out how DIY blogger Adrienne Boswell from Chic California transformed an old TV armoire with a weathered wood herringbone pattern for her office.
Upgrade an Old Armoire for a Weathered Wood Herringbone Look
You probably have an old TV armoire or have seen one at a garage sale or thrift store recently. Most of today’s TVs just don’t fit into them anymore. We’ve had this old TV armoire for years.
After serving its purpose for holding the TV, it eventually turned into extra office storage. However, behind closed doors it was a mess. Unorganized and dark, ready for a makeover.
One of today’s hottest trends in decor is reclaimed barn wood. It’s on every design program and decor magazine. I love the rustic look of barn wood.
I was so excited to use it to transform my old TV armoire into functional and beautiful storage. Except, I didn’t have a source for it. Sure, I could scour the online classifieds looking for someone to be tearing down their old barn or selling barn wood, but that could take so much time.
Then, I found out that The Home Depot now carries Weathered Wall Boards that look just like the real deal. It was so easy to just head over to The Home Depot, pick up a few boxes and head home to start on my project.
The patina on this stuff is awesome! Each board has a little bit of variation and the color variety is so authentic looking. You have a great mix of lighter and darker pieces and even some with a gray wash patina.
The weathered wall boards are pretty uniform in size and shape making it even easier to just apply the barn wood and not have to worry about planing it or making sure each piece is the same.
Materials
(4) Weaber Hardwoods Weathered Wall Board
Plywood (if you need to add a back to your TV armoire)
Dark Paint for behind boards
¾ in. Floor Flange
¾ x 12 Pipe
2 x 12 in. x10 ft. Board (Shelf)
¾ Black Metal Cap
Gold Spray Paint
Stain
Level
Tools
Nail Gun (or Liquid Nails for a more permanent installation)
Table Saw
Measuring Tape
Wood Screws
Drill
Step 1: Paint the Furniture
The first step in this project was to paint the armoire. I’d already painted the outside of the armoire, so I just had some white paint color matched at The Home Depot.
Then, I added a piece of plywood over the back of the armoire. Most armoires have a flimsy back board on them. I wasn’t sure the back was strong enough to hold up the heavy shelves I was planning.
Next, I cut a piece of plywood to size and installed it over the back board. However, if you aren’t planning on adding heavy shelving or you already have a strong back board, you can skip this step.
The directions on the box say to paint your surface a dark color before you apply the boards. While the weathered wood boards are fairly uniform, if you end up with any gaps between them you would be able to see a little bit in between. When you paint the background dark, any gaps will blend in.
Step 2: Design the Wood Herringbone Pattern
Now that the armoire was prepped, I was ready to plan the design. The directions on the box were fairly simple to follow, and I opted for the herringbone pattern.
Using a level, I marked the center of the armoire with a reference line. After a little math, I determined to get a pattern like on the box, the center boards would need to be cut at 20 in.
Step 3: Cut the Boards
Once all the weathered wood boards were cut, they were placed on the floor to make sure the pattern was correct. And because each board has a different patina, I wanted make sure I didn’t have all the same color boards together. I moved things around until I had the colors varied just right.
Step 4: Apply the Weathered Wood Herringbone Pattern
Next, it was time to apply the boards. The directions say to use liquid nails for a more permanent application. I opted for nails since I was doing a more complicated pattern. Following the instructions, I nailed each board up starting in the center and working my way out to the edges.
Once I reached the outer edges, I measured what I needed to fill in the gaps and cut those with the saw.
Step 5: Build the Shelves
My original plan for this project was to keep the armoire doors on. But, the barn wood boards looked so amazing that I knew I would never be closing them again! I removed the doors and touched up the paint and then began to build the shelves.
I used ¾ in. metal pipe that I then spray painted gold. After the pipes dried, I screwed them into the weathered wood with wood screws.
The board that I used for the shelves was a 2 x 12 x 10 cut into smaller sections. I used some weathered gray stain to match the board up to the weathered barn wood. I installed the board across the metal pipes to create shelving.
I couldn’t be more pleased with how this project turned out. Not only have I repurposed a piece of furniture, but I transformed it into a piece that is not only beautiful but functional for our home.
Find more Accent Wall Inspiration on The Home Depot Blog. Get inspired by our Bedroom Ideas & Inspiration board on Pinterest and create your own retreat. Shop charred wood and more appearance boards at The Home Depot.
The post Upgrade an Old Armoire for a Weathered Wood Herringbone Look appeared first on The Home Depot Blog.
from together1 http://ift.tt/2ysAnRh via recommended
0 notes
Text
Upgrade an Old Armoire for a Weathered Wood Herringbone Look
Check out how DIY blogger Adrienne Boswell from Chic California transformed an old TV armoire with a weathered wood herringbone pattern for her office.
Upgrade an Old Armoire for a Weathered Wood Herringbone Look
You probably have an old TV armoire or have seen one at a garage sale or thrift store recently. Most of today’s TVs just don’t fit into them anymore. We’ve had this old TV armoire for years.
After serving its purpose for holding the TV, it eventually turned into extra office storage. However, behind closed doors it was a mess. Unorganized and dark, ready for a makeover.
One of today’s hottest trends in decor is reclaimed barn wood. It’s on every design program and decor magazine. I love the rustic look of barn wood.
I was so excited to use it to transform my old TV armoire into functional and beautiful storage. Except, I didn’t have a source for it. Sure, I could scour the online classifieds looking for someone to be tearing down their old barn or selling barn wood, but that could take so much time.
Then, I found out that The Home Depot now carries Weathered Wall Boards that look just like the real deal. It was so easy to just head over to The Home Depot, pick up a few boxes and head home to start on my project.
The patina on this stuff is awesome! Each board has a little bit of variation and the color variety is so authentic looking. You have a great mix of lighter and darker pieces and even some with a gray wash patina.
The weathered wall boards are pretty uniform in size and shape making it even easier to just apply the barn wood and not have to worry about planing it or making sure each piece is the same.
Materials
(4) Weaber Hardwoods Weathered Wall Board
Plywood (if you need to add a back to your TV armoire)
Dark Paint for behind boards
¾ in. Floor Flange
¾ x 12 Pipe
2 x 12 in. x10 ft. Board (Shelf)
¾ Black Metal Cap
Gold Spray Paint
Stain
Level
Tools
Nail Gun (or Liquid Nails for a more permanent installation)
Table Saw
Measuring Tape
Wood Screws
Drill
Step 1: Paint the Furniture
The first step in this project was to paint the armoire. I’d already painted the outside of the armoire, so I just had some white paint color matched at The Home Depot.
Then, I added a piece of plywood over the back of the armoire. Most armoires have a flimsy back board on them. I wasn’t sure the back was strong enough to hold up the heavy shelves I was planning.
Next, I cut a piece of plywood to size and installed it over the back board. However, if you aren’t planning on adding heavy shelving or you already have a strong back board, you can skip this step.
The directions on the box say to paint your surface a dark color before you apply the boards. While the weathered wood boards are fairly uniform, if you end up with any gaps between them you would be able to see a little bit in between. When you paint the background dark, any gaps will blend in.
Step 2: Design the Wood Herringbone Pattern
Now that the armoire was prepped, I was ready to plan the design. The directions on the box were fairly simple to follow, and I opted for the herringbone pattern.
Using a level, I marked the center of the armoire with a reference line. After a little math, I determined to get a pattern like on the box, the center boards would need to be cut at 20 in.
Step 3: Cut the Boards
Once all the weathered wood boards were cut, they were placed on the floor to make sure the pattern was correct. And because each board has a different patina, I wanted make sure I didn’t have all the same color boards together. I moved things around until I had the colors varied just right.
Step 4: Apply the Weathered Wood Herringbone Pattern
Next, it was time to apply the boards. The directions say to use liquid nails for a more permanent application. I opted for nails since I was doing a more complicated pattern. Following the instructions, I nailed each board up starting in the center and working my way out to the edges.
Once I reached the outer edges, I measured what I needed to fill in the gaps and cut those with the saw.
Step 5: Build the Shelves
My original plan for this project was to keep the armoire doors on. But, the barn wood boards looked so amazing that I knew I would never be closing them again! I removed the doors and touched up the paint and then began to build the shelves.
I used ¾ in. metal pipe that I then spray painted gold. After the pipes dried, I screwed them into the weathered wood with wood screws.
The board that I used for the shelves was a 2 x 12 x 10 cut into smaller sections. I used some weathered gray stain to match the board up to the weathered barn wood. I installed the board across the metal pipes to create shelving.
I couldn’t be more pleased with how this project turned out. Not only have I repurposed a piece of furniture, but I transformed it into a piece that is not only beautiful but functional for our home.
Find more Accent Wall Inspiration on The Home Depot Blog. Get inspired by our Bedroom Ideas & Inspiration board on Pinterest and create your own retreat. Shop charred wood and more appearance boards at The Home Depot.
The post Upgrade an Old Armoire for a Weathered Wood Herringbone Look appeared first on The Home Depot Blog.
from Roofing Pro http://ift.tt/2ysAnRh
Curated by a professional Roofing Contractor
from Blogger http://ift.tt/2gKk2hg
via RoofingProToday
0 notes
Photo

Upgrade an Old Armoire for a Weathered Wood Herringbone Look http://ift.tt/2ysAnRh
Check out how DIY blogger Adrienne Boswell from Chic California transformed an old TV armoire with a weathered wood herringbone pattern for her office.
Upgrade an Old Armoire for a Weathered Wood Herringbone Look
You probably have an old TV armoire or have seen one at a garage sale or thrift store recently. Most of today’s TVs just don’t fit into them anymore. We’ve had this old TV armoire for years.
After serving its purpose for holding the TV, it eventually turned into extra office storage. However, behind closed doors it was a mess. Unorganized and dark, ready for a makeover.
One of today’s hottest trends in decor is reclaimed barn wood. It’s on every design program and decor magazine. I love the rustic look of barn wood.
I was so excited to use it to transform my old TV armoire into functional and beautiful storage. Except, I didn’t have a source for it. Sure, I could scour the online classifieds looking for someone to be tearing down their old barn or selling barn wood, but that could take so much time.
Then, I found out that The Home Depot now carries Weathered Wall Boards that look just like the real deal. It was so easy to just head over to The Home Depot, pick up a few boxes and head home to start on my project.
The patina on this stuff is awesome! Each board has a little bit of variation and the color variety is so authentic looking. You have a great mix of lighter and darker pieces and even some with a gray wash patina.
The weathered wall boards are pretty uniform in size and shape making it even easier to just apply the barn wood and not have to worry about planing it or making sure each piece is the same.
Materials
(4) Weaber Hardwoods Weathered Wall Board
Plywood (if you need to add a back to your TV armoire)
Dark Paint for behind boards
¾ in. Floor Flange
¾ x 12 Pipe
2 x 12 in. x10 ft. Board (Shelf)
¾ Black Metal Cap
Gold Spray Paint
Stain
Level
Tools
Nail Gun (or Liquid Nails for a more permanent installation)
Table Saw
Measuring Tape
Wood Screws
Drill
Step 1: Paint the Furniture
The first step in this project was to paint the armoire. I’d already painted the outside of the armoire, so I just had some white paint color matched at The Home Depot.
Then, I added a piece of plywood over the back of the armoire. Most armoires have a flimsy back board on them. I wasn’t sure the back was strong enough to hold up the heavy shelves I was planning.
Next, I cut a piece of plywood to size and installed it over the back board. However, if you aren’t planning on adding heavy shelving or you already have a strong back board, you can skip this step.
The directions on the box say to paint your surface a dark color before you apply the boards. While the weathered wood boards are fairly uniform, if you end up with any gaps between them you would be able to see a little bit in between. When you paint the background dark, any gaps will blend in.
Step 2: Design the Wood Herringbone Pattern
Now that the armoire was prepped, I was ready to plan the design. The directions on the box were fairly simple to follow, and I opted for the herringbone pattern.
Using a level, I marked the center of the armoire with a reference line. After a little math, I determined to get a pattern like on the box, the center boards would need to be cut at 20 in.
Step 3: Cut the Boards
Once all the weathered wood boards were cut, they were placed on the floor to make sure the pattern was correct. And because each board has a different patina, I wanted make sure I didn’t have all the same color boards together. I moved things around until I had the colors varied just right.
Step 4: Apply the Weathered Wood Herringbone Pattern
Next, it was time to apply the boards. The directions say to use liquid nails for a more permanent application. I opted for nails since I was doing a more complicated pattern. Following the instructions, I nailed each board up starting in the center and working my way out to the edges.
Once I reached the outer edges, I measured what I needed to fill in the gaps and cut those with the saw.
Step 5: Build the Shelves
My original plan for this project was to keep the armoire doors on. But, the barn wood boards looked so amazing that I knew I would never be closing them again! I removed the doors and touched up the paint and then began to build the shelves.
I used ¾ in. metal pipe that I then spray painted gold. After the pipes dried, I screwed them into the weathered wood with wood screws.
The board that I used for the shelves was a 2 x 12 x 10 cut into smaller sections. I used some weathered gray stain to match the board up to the weathered barn wood. I installed the board across the metal pipes to create shelving.
I couldn’t be more pleased with how this project turned out. Not only have I repurposed a piece of furniture, but I transformed it into a piece that is not only beautiful but functional for our home.
Find more Accent Wall Inspiration on The Home Depot Blog. Get inspired by our Bedroom Ideas & Inspiration board on Pinterest and create your own retreat. Shop charred wood and more appearance boards at The Home Depot.
The post Upgrade an Old Armoire for a Weathered Wood Herringbone Look appeared first on The Home Depot Blog.
Adrienne Boswell
0 notes
Text
Haunted Sydney theatre for sale, ghost included
Haunted Sydney theatre for sale, ghost included News 29/03/2017, 12:12 pm 29/03/2017, 5:29 pm Georgia Brown Georgia is a reporter covering real estate for the inner west suburbs of Sydney, writing primarily for the Inner West Courier. While she would love to call a charming Newtown terrace her own, she settles for scouring the listings and simply inspecting the homes.
The haunted Regent Theatre in Richmond has hit the market for the first time in almost 30 years.
FOR the first time in almost 30 years, buyers have the chance to acquire Richmond’s famous haunted Regent Theatre — resident ghost and all.
Operating for over 80 years, the Regent Theatre is said, by many who have worked at and visited the cinema, to have its own phantom.
There have been reports of a ghost who lingers in the stairwell, thought to be the ghost of a lady who fell to her death there in the 1930s.
The Regent Theatre has been operating since the 1930s.
Inside the haunted Regent Theatre.
Matrix Property Group is marketing the sale of the theatre.
It is listed with an asking price of $1.7 million, and is being offered as a going concern.
“We expect significant interest in the theatre — unique offers like this don’t come along every day,” Matrix Property Group’s John Chancellor said.
“It is an eccentric category that is so niche and we think someone connected to the film industry or a lover of cinema will be drawn to it.”
John Levy (pictured here in 1999) is the current owner of the Regent Theatre.
Oozing with potential, and spirit.
In addition to its spiritual reputation, the theatre at 145 Windsor St has an interesting history.
Originally owned by Michael Walsh, The Regent Theatre first opened in 1935 with a production “My Heart is Calling.”
TEN GREAT LOST CINEMAS OF SYDNEY
His daughters ran the theatre from 1948 until 1976 when it was sold to television personality and Gold Logie Award winner Mike Walsh, who despite his surname was not related to the owners.
He was the host of the enormously popular The Mike Walsh Show from 1973 until 1985.
Don’t forget to get a choc top for the ghost …
Mr Walsh restored the theatre, enlarging the vestibule and relocating the front doors.
It was used for both movie screenings and live presentations.
In 1989 it was sold to current owner John Levy, who created the twin cinema and reopened it in 1993.
Mr Levy bought the theatre for $700,000, according to data from CoreLogic.
WANT A LESS HAUNTED VERSION?
The Regent Theatre in Tamworth.
Similar name, but by all reports less haunted, is the Regent Cinema in Tamworth.
The cinema is said to “dominate the entry to the CBD” and to be a classic period building that “would make an ideal corporate headquarters with its potential for further development limited only by your imagination”.
The landmark Tamworth property was built circa 1938, and was a first-rate theatre in its day — built by Zachariah “Jack” Kouvelis.
DRIVE-INS — A DISAPPEARING BREED ACROSS AUSTRALIA
With the town’s cinema complex having been relocated to the new Centrepoint building, the corner block building is now for sale by expressions of interest.
In Murwillumbah, another Regent theatre building is for sale — although it’s been a while since any movies were screened there, having been converted to a Foodworks supermarket, real estate agent and electrical repair business.
OOZING WITH POTENTIAL
Theatre Royal in Lithgow is for sale.
Another similar opportunity — again less haunted — is on the market in Lithgow, where The Theatre Royal on Main St is up for grabs for $1,125,000.
The theatre is described as a “majestic landmark building with enormous potential for return as an entertainment, reception and fine dining venue”.
It has a 411 seat mezzanine level with original projector boxes, full size screen, timber stage and dressing rooms, a sunken dance floor, and full size commercial kitchen and a bar on each level.
The Australia Cinema 4 in Orange is also currently listed for sale by EOI
The Theatre Royal in Lithgow has loads of potential.
Follow us on Twitter for more news, tips and inspiration. Like us on Facebook or explore our Pinterest boards.
from DIYS http://ift.tt/2o4CvtN
0 notes
Last Seen Blogs

lulivixuk
Untitled

aniketg123
Untitled

meboii27
meboimedohistory

anti-alles0-blog
Unbetitelt

moviemagistrate
The Movie Magistrate