#ts3tutorial
Explore tagged Tumblr posts
Visit Tumblr Blog
Explore Tumblr blogs with no restrictions, modern design and the best experience.
Last Seen Tumblr Blogs


Fun Fact
There were a total of 171.5 billion posts on Tumblr in 2019.
Text
youtube
Went ahead and updated my tutorial because I've been getting more questions lately than usual and my old tutorial used Maya. I'm glad so many people are trying to learn to convert! I hope this helps answer any questions. I'm also here to answer all questions as always 💗
@nakiri88 @simbianstudios @ghouzlss

165 notes
·
View notes
Text
I just shared a guide to optimizing worlds and lots in The Sims 3! This guide addresses some of the community's most under-reported issues related to object limits and lot sizes for optimization and performance improvements in open worlds in The Sims 3. I hope you enjoy it, find it useful, and would be incredibly interesting to open a dialogue from this thread so that together, as a community, we can build a guide with best practices for developing optimized worlds for The Sims 3.
Also, if you try any of the ideas offered and are interested in providing feedback, any information is welcome and will contribute to the material we just wrote.
It has a summary for lazy people, so if you don't want to read everything, just read the summary xD
READ HERE
159 notes
·
View notes
Text

Thanks for answering @greenplumbboblover! I hope this helps!
2 notes
·
View notes
Note
Thanks for answering @sims3tutorialhub! I hope this helps!
Hello! and thank you for answering my question! I saw that yesterday someone asked how to make certain special occult clothes, and I tried to follow your method, but I didn't find the occult menu for werewolves, mermaids, alien, etc. (like below). Can you help, please…
- [Anonymous]
Do you mean the same as what they are doing in this thread?
5 notes
·
View notes
Text
*Pay Attention - Part 2 - Tutorial*
I was about to go back to my business and quietly leave y'all with a word of wisdom but the very next package I opened raised my hackles. So here we go, hold on to your seat.
Disclaimer for younger/sweeter - followers - this has language in it because I'm pissed... I apologize in advance.
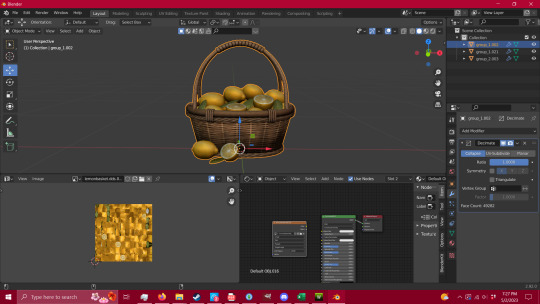
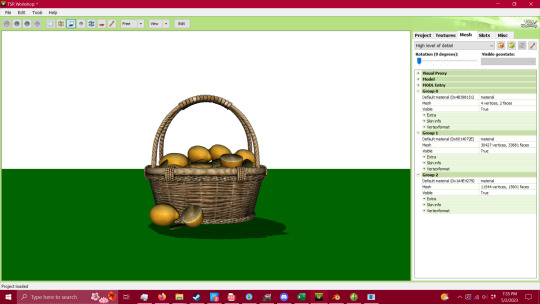
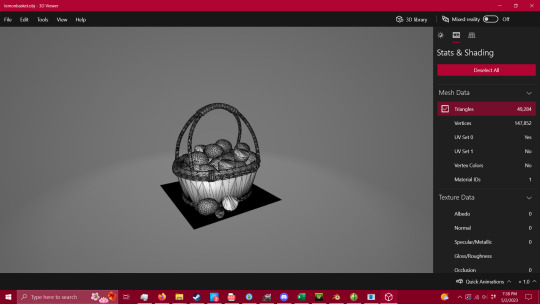
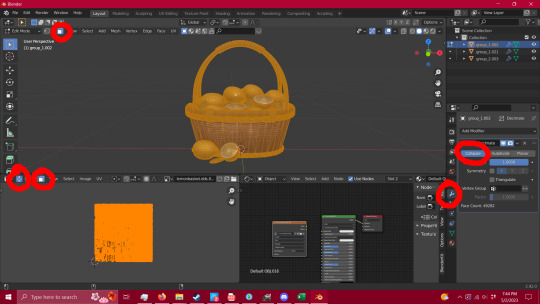
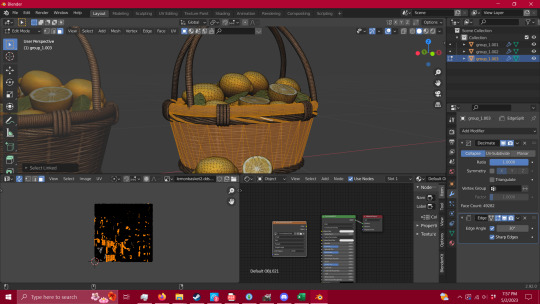
49,282 Polycounts. That's 50K for a fucking basket!!!
It's pretty, it's beautiful, and I downloaded it because it's everything you could want out of a basket of lemons... whoever created it did an outstanding job... for a movie production.
NOT PC GAMES.
So let's fix it - and let's hold our creators and converters to a higher standard or send them along to a different platform where they can create without our bitching.
First off, there's 3 or 4 ways you can check polycounts.
1 - TSRW under Mesh tab
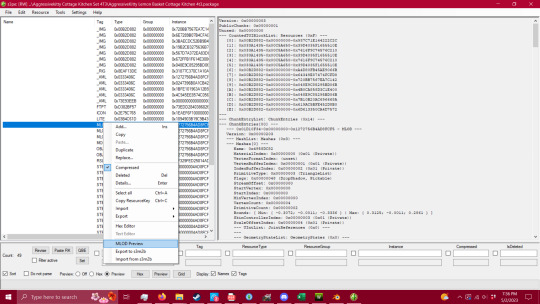
2 - S3PE (Pretty sure you have to have an addon to do this - I'll try to find it when I'm done and add the link) Under MLOD, right click and go down to Preview. It'll open up a window and you can view the model and the polycount.

3 - 3D Viewer on your computer
4 - Blender or Milkshape

Now that we have the ability to check our polycount - we're gonna fix this mesh. I'm not going to show you how to package it, there are other tutorials for that part, but this is VITAL to having a healthy game, and honestly, being a creator or converter for this game. I do understand that you have to have the knowledge before you can fix a problem, so here it is - literally handed to you in a basket. I also understand that there are creators/converters who don't post polycounts because they're afraid people won't download it - that is inexcusable. If that's the case then you will eventually be boycotted by the players who know better.
Alright, so step one - you're going to want to get into blender after exporting your mesh. You're going open the modifier properties and add a decimate modifier (the wrench circled in red, and the add modifier drop down menu).
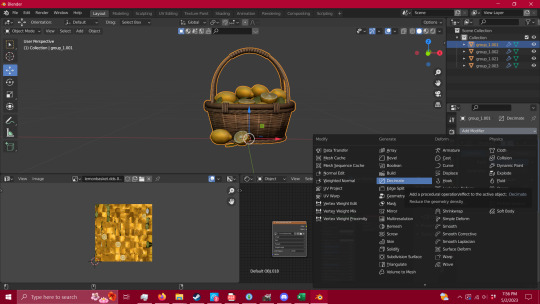
Keep it in Collapse, not un-subdivide. It's gentler on the mesh itself and you'll get a lot farther with it. You're also going to want your UV map to match what you're doing with your mesh, in case you need it for selection (I'll explain that in a minute) and have faces tagged so the selection is easier.
Now that you have that set up, you're gonna want to remove unnecessary vertices. See the shadows on the bottom of the basket? Here's how to fix that - hit tab, press A to select everything, and then go to MESH/MERGE/BY DISTANCE. This removed 16,900 loose vertices that didn't need to be there.
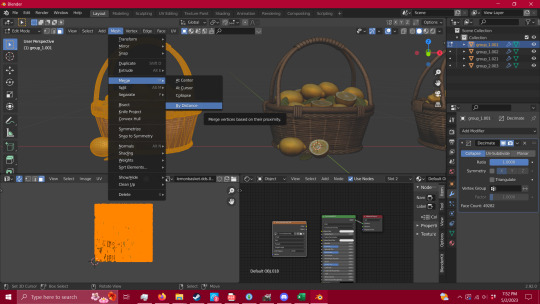
Go back to your modifiers and add an edge split modifier and hit apply.
Boom - no shadows.
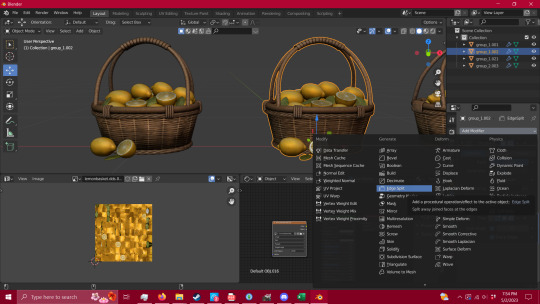
Now that that is all done you're going to go in to edit mode (tab) and press L while hovering over what you're wanting to select. This is going to select all of the islands in your UV, and it's the fastest way (that I've found) to quickly select pieces of your mesh.
When you have your whole group selected (you can also figure out at this point what pieces need alternate textures or groups for TSRW later in your packaging process) you're going to hit P-Selection. That's gonna split whatever you have selected into a separate group.

Now, you can do that to however many pieces you see fit, but for this I'm just gonna stick with two - the lemons and the basket itself. You're going to click the blue Ratio box - and type in .5 and hit enter. That will collapse your polycount in half - (you can move that ratio box lower if you wish, but this way is the gentlest way possible and I've gotten better results. So play with it and see for yourself if you wish to. ) - Now repeat the process until your mesh starts to lose quality, I tend to stop there unless I can push it a bit further without making it look bad.
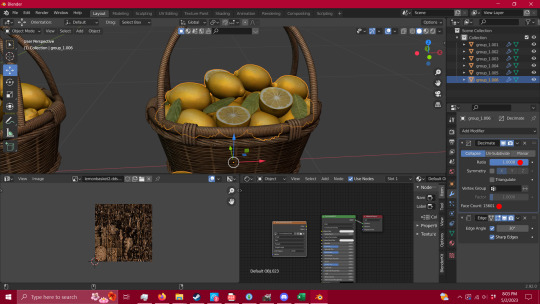
Now repeat that process with all groups.
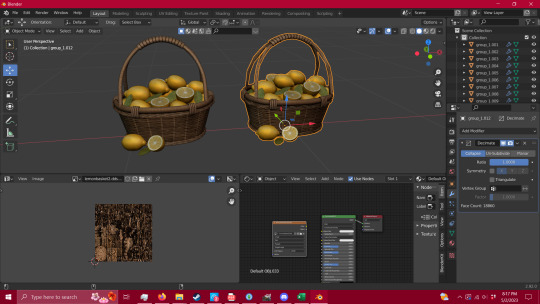
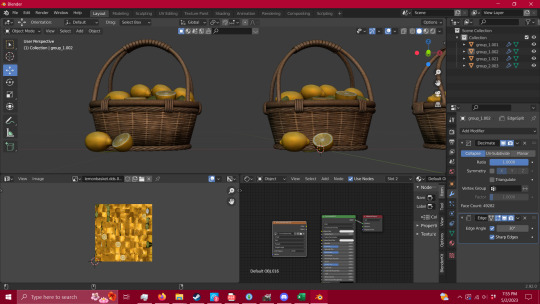
Given that this particular mesh was such high polycount and an intricate mesh, I could only manage to get it from 49,282 faces (polys) down to 18,860. This is absolutely not okay for TS3 - and I'm using as a lesson rather than using something that I can get down to an okay level - because this is what you're going to run into when getting meshes that start in the tens of thousands of polys. THIS IS NOT MEANT FOR TS3, it's beautiful, yes, but you are putting people's equipment at risk by advertising a mesh for a 13 year old game without disclaiming that it's dangerous for it.
This tutorial will absolutely work for most objects, and I've used this process for a couple of years now with success, but you have to be able to decide what you're willing to put into TS3. We have all of these tutorials for reducing lag in this old as dirt game, but NONE of that matters if you're carrying objects like this - no matter how pretty they are.
If you need it that bad, figure out how to make a version of it that CAN look as good as this with a little less detail (think the spirals in the wicker that is actually meshed rather than just textured), or ask a creator to make something for you.
If you have any questions, please feel free to ask. If I have the time, I try to help whoever comes into my inbox. If I can't help, there is a hoard of creators out there that probably can.
So have fun, CHECK YOUR CONTENT, and keep your computer safe.
And creators/converters - do better.
Edit to add - to the creators/converters who do put out their polycounts, or a disclaimer of high poly/photo use only - thank you. I do understand the need for high poly objects for photo-op purposes, and I'm not here to attack anyone's preferred gaming style. I just want people to be safe while they play, as there are those who don't know what they're putting into their games. Let's help ensure that everyone has a chance to play whether they're experienced creators or regular game-players.
Edit to add 2 -
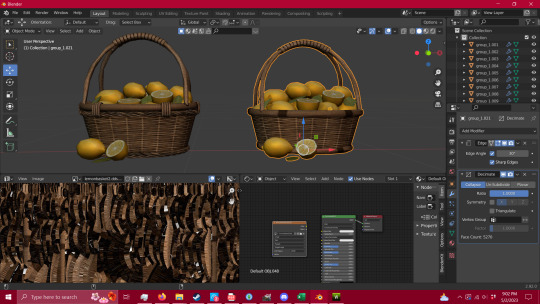
To add a bit of context - I was able to get the reduced mesh even further by removing some of the intricate details of the mesh, to create a simpler version. This is now down to 5,270 - and it could be lowered even further by removing the top of the handle - which is 1700 by itself because it's spiraled. So when you're dealing with a high mesh object such as this, pay attention to what's really adding weight, and if you can replace/remove it without taking too much away. The shadows can be fixed in gimp as well.
358 notes
·
View notes
Text
(GUIDE) FUNCTIONAL RESTAURANT IN TS3 WITHOUT THE STORE SET
What you need: Only Into The Future Expansion Pack.
UPDATE 10/16/2022 : You don't need the table and to change the lot type, just have the ITF refrigerator in any kind of community lot you want and the waiters will spawn after a few minutes. I tried it recently in Monte Vista and it works. The options for ordering food will only appear when the waiters arrive in the lot.
I don't really know why it never worked in my other saves and worlds if I didn't also put the ITF table and change the lot type, but it seems that only the ITF refrigerator is enough...
-----
Did you know that you can have a functional restaurant in The Sims 3 without having to use the store set? All you need Is Into The Future.
I've seen people go crazy with the store set reporting a different problem each time, so I thought "but why?" Not many people know about this feature of ITF, but now I will explain how it works.
First of all, you don't need to be in the future to have it, but you can create it in any world you want. To do this you have to:
Choose a community lot (of any type).
Have this ITF refrigerator shown in the photo in your restaurant (community lot).
Decorate at will. Table, chairs and other furniture and decorations are at your choice, the only obligatory items is the refrigerator.
Save the lot, get back to live mode with your family and enjoy the functional restaurant! If the lot is located in Oasis Landing, the waiters will be robots, but in a normal world, the waiters will be humans. To order click on the table. Waiters will take a couple of minutes to spawn.
EXTRA: All this is mod and cc free, but if you want to see what you order (with preview images, not just the name of the food) use this mod! (For some reason it will give script error every time you travel, at least it does to me, but don't worry, isn't harmful.)

10 notes
·
View notes
Text
If CC Magic stops to work, there are two possible reasons:
1. It crash`s sometimes when you try to import the same CC twice. Move the content from Downloadsfolder and try to open CC Magic again. If it`s working now, than you have the issue I described and you must sort out which CC you already have installed. You can use the 50/50 method or go through it one by one. I never had a crash for another reason and I rebuild and imported stuff a million times!
2. It stopped working when you update your Game to the 1.69 patch and you have to change the language of your entire game in the registry because CC Magic doesn`t support other languages as english above the 1.67 patch. There are Tutorials for this - just google how to change the language of the Game.
7 notes
·
View notes
Text
Kat von D: Shade + Light eye contour palette RGB


Left to right is 1, 2 & 3. I used a custom eye shadow used on pictures, this one by Gosik, and included a screenshot of the channels.
1.

2.

3.

Enjoy!
54 notes
·
View notes
Text
Tutorial: Adding MPREG moprhs
Okay, decided to do a picture tutorial rather than a video one. This method I've found is rather easy and is really the only way I've been able to make mpreg clothing.
NOTE: Use male clothing meshes, not female, or else the mesh will have boobs on it and the only way to remove them is through editing the actual mesh! Also, you cannot add morphs to an EA mesh this way! Only use custom content and not store content
What you'll need:
TSRW
Meshing Toolkit
This file
I'll be adding the mpreg morph to Peacemaker's tank top in this tutorial.
Step 1: Open TSR Workshop and select 'Create New Project'

Step 1a: Select 'New Import'

Step 2: Select 'Browse'. In the window that pops up, set either .package or .sims3pack as the file type (depends on what type the clothing is) and then find it and select it. Hit 'Next'

Step 3: On the next screen, you can give the file whatever 'Project Name' you want, just make it unique. You don't have to change the 'Title' or 'Description'. Hit 'Next'. Hit 'OK'

Step 4: After the mesh loads, double click the 'Categories' tab. Scroll down and click the 'Valid For Maternity' box. Take this time to make sure that all the other categories you want the mesh to appear under are selected (Everyday, Formal wear, Athletic, etc.)

Step 5: Go to the 'Mesh' tab (at the top). Click on the blank selection and select 'High level of detail'.

Step 6: Click the export button (box with red arrow). Name the file whatever you want. I generally name mine mpreg1. Save it to a folder where you are keeping all your mpreg things or if you're like me, just send it to the desktop.

Step 7: Open Mesh Toolkit. Select the 'Auto tools for WSO' tab. Hit 'Select file' for 'WSO mesh to modify'. Select the file you just exported from TSRW. For 'Reference Mesh', select the file I had you download at the beginning (amFullBodyNude_high.wso).

Make sure that both of these options are ticked!

Click on 'Do assignments and save'. Replace the old exported file with this new file. After saving the file, you can exit Mesh Toolkit.
Step 8: Return to TSRW. Click on the import button (box with green arrow). Select file you just saved in Mesh Toolkit.

Hit 'Yes'.

'Yes'

Step 9: Go to 'Edit' and select 'Project Contents'.

Hit 'Export' and then 'To .package'. This will export the mesh as a .package file, so name it what you want the name of the actual download to be.

Once it finishes exporting, hit ok, you're done! Now all you have to do is test the mesh in game!
On occasion, this method will not work with a mesh (looks wonky in game). Sometimes redoing the process fixes this, sometimes it doesn't. This is the only way I've found that works 90% of the time with adding mpreg morphs.
If anyone has any questions, please do not hesitate to ask me!
40 notes
·
View notes
Text
♡Pixicat shoes Tutorial♡

Check out Pixicats tumblr, she has a lot of shoes and they are all very cute! Works for sims 3 with all expansion packs
● Her tumblr: pixicat.tumblr.com
How to download on macbook (Youtube tutorial):
● https://www.youtube.com/watch?v=msFuuwg9pyM
happy simming ◕‿◕*)/
0 notes
Text
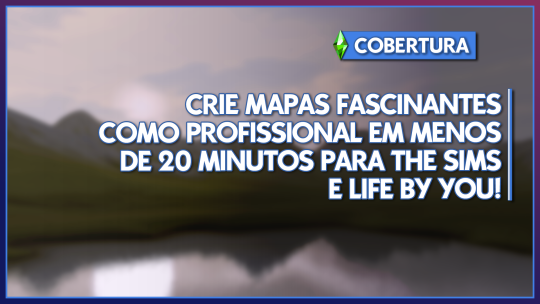
IN ONE HOUR I'll teach you how to create AMAZING maps for TheSims3, in less than 20 minutes. Maps that look like they took years to build, you will love. I will open the black box and share everything with you! https://youtu.be/CHYBNugBrH4
14 notes
·
View notes
Text
my herooooooo!!!!
youtube
Went ahead and updated my tutorial because I've been getting more questions lately than usual and my old tutorial used Maya. I'm glad so many people are trying to learn to convert! I hope this helps answer any questions. I'm also here to answer all questions as always 💗
@nakiri88 @simbianstudios @ghouzlss
165 notes
·
View notes
Note
I meant grass from this post of yours. https://www.tumblr.com/simaddix/670649541167644672/grasses-for-download?source=share She would look great between the trees in the world. Unless of course it is possible to make it available for CAW. Thank you for such a quick answer))
Oh, well that's simple enough.
You can use any CC in CAW as long as your framework is set up. That's why all of my testing photos come out of CAW, because it's a 1000 times faster to load than the game (especially with all of your CC in there).
Hope that helps!
8 notes
·
View notes
Text
Tutorial Time: For beginners
@dhalsims commented on my post [Hi, lovely :D] and I thought I’d show you through a post instead of a private message [no hoarding knowledge you beasts!] This is a super simple method that Luna used to use when she was still in the community. If you ever pop open one of her models, you’ll see the textures are just simple images, and I was always baffled how she did it. When I first started modeling, I tried [and failed, and failed again] to create models from images and they either looked like a hot mess or they were wayyyy up there in polycount from trying to get every nook and cranny.
I wrote this as if you’re just starting out in blender before, so if you’re more advanced please forgive my rambling.
So, here I introduce, the knife tool in blender [I don’t use milkshape, so please don’t ask lol]
Why on earth would I want to cut something to make something? Shh, let me know you.
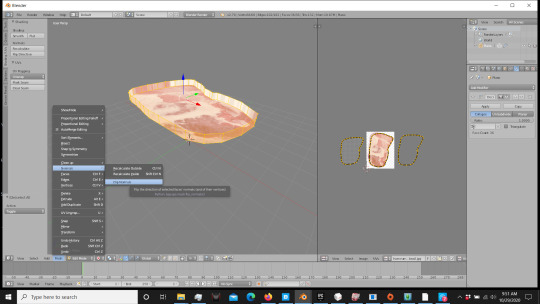
You’re gonna start with this:
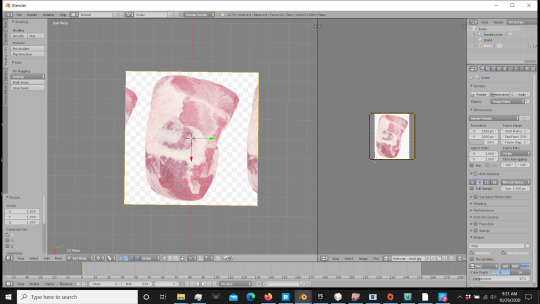
Yep, that’s it. Add a plane, UV map it so you can put the texture on it. I scaled mine so it wasn’t stretched, so just figure out the general size you’d like and hit edit mode for that plane. On the left side of the screen you’re going to want the tools section. Look down the list until you find the knife button.
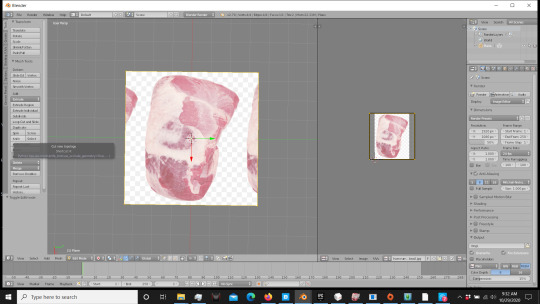
Click it, and it’s going to give you a little knife with a green dot. Go around your image and trace the shape with the knife tool using small clicks. [Note, every click will be a vertice]
Trace your shape all the way around the edge, and when you connect the last one, you’re gonna have a string like thing. Don’t panic, just hit enter once those are connected and you have the random line attached to your mouse. It’s going to give you a cut-out like this.
Well crap, you say at the giant hole in your picture... No, just wait. Patience.
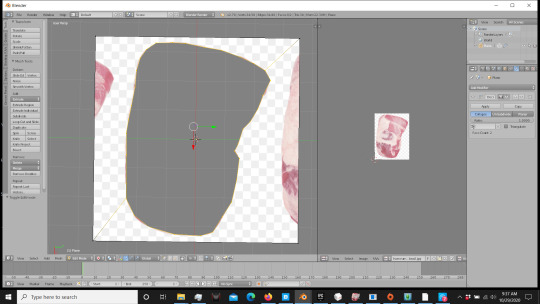
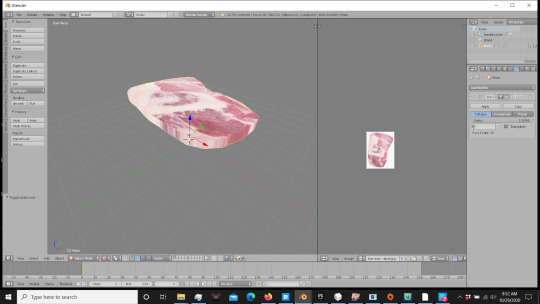
Select the vertices around your basic shape. [Shift/Alt Right click people, don’t be like me when I started and select every vertice by itself. Save yourself time.]
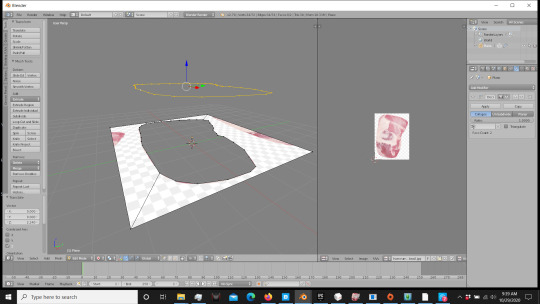
Now, you can do this 2 ways. Either duplicate those vertices, or [in edit mode] press P/Selection to remove those vertices from the plane. Either method will do.
Now press F to fill in that space, and unwrap it. No need to go marking seams, just press unwrap, it’ll match the shape.

Press E to extrude that down. If it’s gone wonky, right click to release it and use your blue arrow to move it straight down so it’s not at an angle.
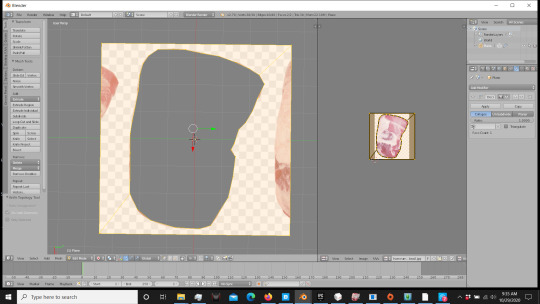
You now have a basic shape. Hold on, there’s a few more bits. Go ahead and delete that plane, you won’t need it anymore. [Remember if it’s attached to the mesh, select the vertices of the plane and then delete]
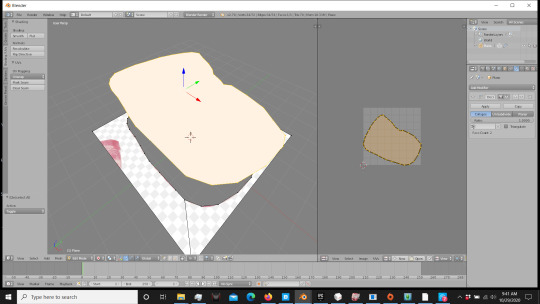
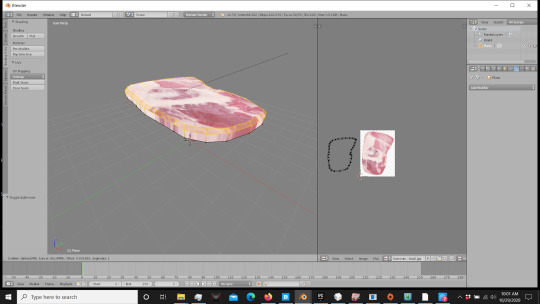
If your mesh looks like this [ignore the UV mapping, I fiddled with mine] just go to MESH in Edit mode, and go up to NORMALS. Hit Flip Normals to get it to flip directions.
Like so:
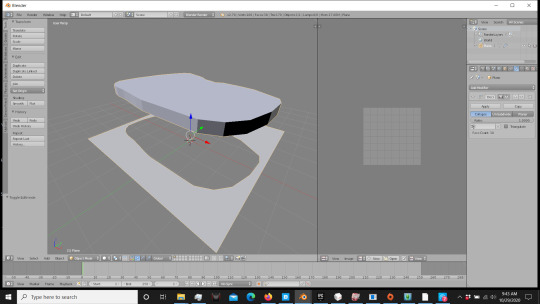
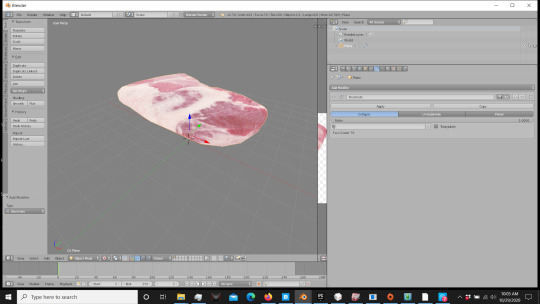
Now the rest is UV mapping and getting it to where you like it for your textures. I’m not going to go over that here, but I highly recommend watching videos and studying UV mapping. On a platform like the sims, you can do amazing things with textures without having astronomical polycounts. Now one more thing, to give your mesh a little oomph, you can bevel. One pieces like this, I use it regularly as meat isn’t supposed to be flat. Select the top of your mesh, and hit ctrl/B. Be gentle, it’ll take off with you. Drag that out until you have a slight bevel to your edge.

As you can see, since you UV mapped it beforehand, it already added that in for you.
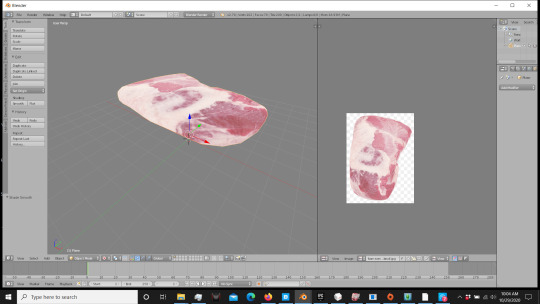
And there you have it. A simple mesh, with textures straight from google image search. AND: Look at that number! :D [70]
Now go do great things! (: And tag me so I can see your CC! :D
NOTE: I am not an expert. There are other methods that you can use to do similar projects, there are methods that will get you more detailed results, but for a low poly, game-ready item, this is how I do it. If this helps you, let me know I did something for the world today :D [Kidding, but kind of...? lol] I hope it helps, and happy modding!
Cheers. -SimAddix
580 notes
·
View notes
Text
Mini Tutorial!
Got a question about applying additional maps to textures so I'm gonna write a quick (ish) tutorial on how to add those maps to make your objects/textures pop!
I'm going to assume in this tutorial that you already have your maps. I haven't mastered creating my own yet, so that's something that may come later if I ever get it down correctly.

We're gonna start with a rock texture. This is already a decent texture, but we're gonna add a bit of finesse.

Starting with your normal map. We all know the infamous purple/blue of the map, and it does have its purpose, but for this instance we're gonna go ahead and nuke that out. Go to your Hue-Chroma tab and knock that chroma setting all the way down to zero. (You can also change the image to black and white if that's easier for you)
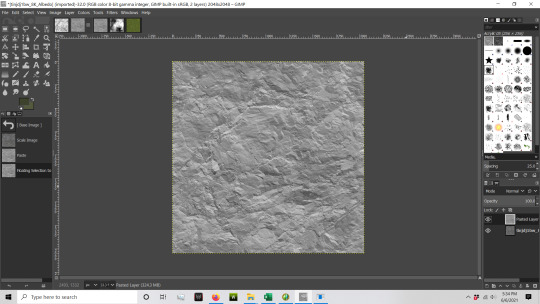
Now copy and paste that over your rock texture, and add it to a new layer. Then, you're gonna move your mouse up to the Mode:Normal selection right above your layers. For the purpose of this tutorial we're gonna choose overlay without question, but I highly recommend you play with those settings, because depending on what texture you're going with (sand/grass/rock) the different settings can give you different or better results.


After that you're gonna repeat the same process with the AO map. This time, I'm gonna choose Multiply instead of Overlay. (The overlay will brighten the image considerably, and you can alter the brightness/contrast of it to dim it down while still maintaining the shadows/highlights, but the multiply setting gives you the exact same results, so... it saves yourself some time and steps.)
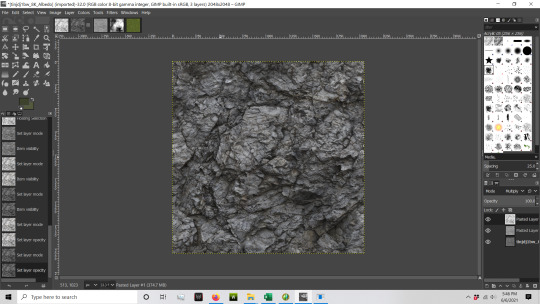
Now you can also fiddle with the opacity settings, which will give you softer results while also giving you some definition. It doesn't have to be all or nothing. After this point, you should right click your layer (the one right above your base/bottom layer) and merge down one at a time. (Don't flatten image, I've had it revert to the original too many times so I don't even bother anymore.)
Here's the comparison between the original and the finished. Not so flat and boring anymore. DEPTH!
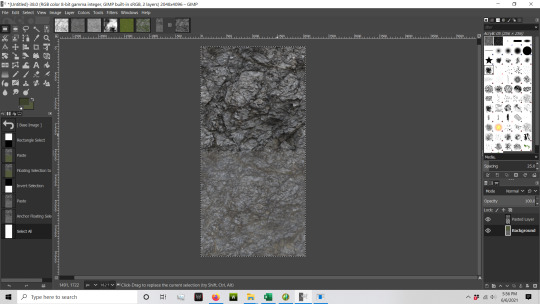
I would recommend altering your color, tiling, or any other corrects after you apply your layers, as often adding in the maps can change the coloring/contrasts quite drastically.
Also, if you play around with those dandy settings over there that I mentioned earlier, you can do neat things like this with your newly built textures:

Pretty nifty, huh?
Now, go make pretty stuff! Hope this helps (;
67 notes
·
View notes
Text
TUTORIAL: How to copy and paste terrain in CAW
We’ve all been there; we’ve sculpted a mountain to perfection only to realize later on down the road... the waterfall needs to be on the other side of the damn thing.
Or; I LOVE this piece of the world, but the rest is crap. How I wish I could just pick it up and move it to the world I like much better.
Well, now you can. Actually, you always could, but if you're like me and have missed this capability for the last ten years, don't feel bad. You're not alone.
Now, it's ACTUALLY SIMPLE to do this:
Step one: Open a world you want to copy terrain from and export the height map, OR go online to our friend google, and type in terrain party. You can download terrain from here and it will give you a height map to use. I’m going to use appaloosa plains for an example.
Step two: Open YOUR world and export height map.
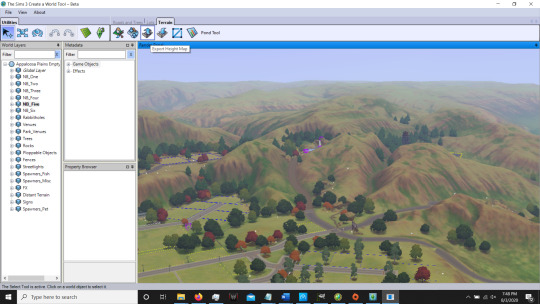
Go to: [Documents/Electronic Arts/The Sims 3 Create A World Tool/UserToolData/Height Maps] to open the height maps in GIMP or Photoshop. One is free, the other is not. I personally chose the free stuff.
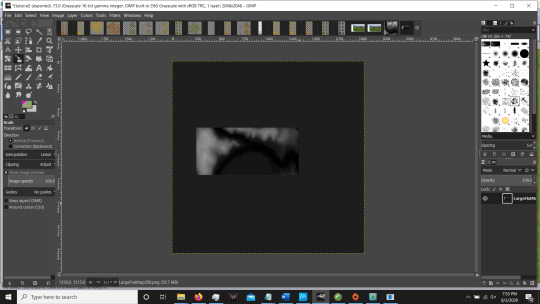
Now use your selection tools and pick out a section of height map you want to “copy”. Once you’ve got that, go over to YOUR height map, and paste it down in the general area you want it and scale it down, make it giant, whatever you desire at the moment. Now, go up to [colors] and hit CURVE. This handy little tool is going to save you minutes in lifting or lowering that terrain to match yours. Just move the scale to where it semi matches the color to your ground, and then adjust the brightness to where you like it. You can also use the heal tool to smooth that out but I recommend doing it after you use the curve tool. [Don't worry about this too much at the moment, YOU CAN COME BACK, I promise].


Now before you go fiddling for hours, jump back into CAW.
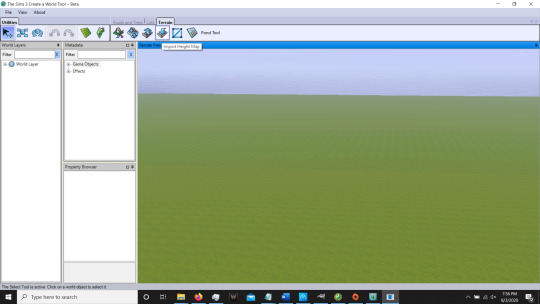
Click [import height map] and... holy crap somethings growing!
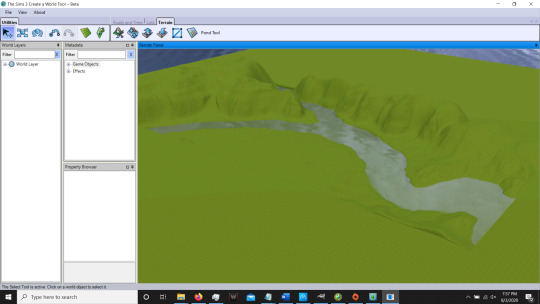
Look at that, it's your photoshopped ground. Sweet! Now, the settings you started the world with are going to effect how this looks. Do you have a super scary spike monster coming out of your ground? It's cool, so did I. Breathe. Go back into photoshop/GIMP, grab your curve tool, and lowwweerrr that brightness level down. If you're an overachiever like me and have your height set to 300 or higher, then you're probably gonna have spiky monsters. In that case, you're gonna want to basically match the two colors together, with the brighter just SLIGHTLY elevated. If you're sitting at a comfy 100-200, you'll need to brighten that up a bit.
Jump back into CAW, and YES you can REIMPORT that map again. [It's fine, really, i did this like a million and one times and nothing burst into flames. Just do it.. there ya go]. Now, depending on what you're wanting, a smooth look or a jagged unworldly look, you can run your smoothing tool [or go back into photoshop, whichever you prefer] and smooth that out a bit.
Decide you need that whole mess facing the opposite direction? Cool, go into photoshop, and FLIP IT. Need it wayyyy over there? Cool, copy and paste it Wayyyy over there. Need 4 of them instead of one? Copy.. and... paste. Simple.
Have fun, and as always, enjoy your game.
Cheers. -SimAddix
62 notes
·
View notes