#tutorial for Create pagination in php
Explore tagged Tumblr posts
Visit Tumblr Blog
Explore Tumblr blogs with no restrictions, modern design and the best experience.
Last Seen Tumblr Blogs


Fun Fact
The KCSC sent more than 20K requests to delete posts related to prostitution and porn to Tumblr from January to June 2017.
Text
TOP 10 ADVANTAGES OF USING LARAVEL FRAMEWORK

Laravel is one of the most popular frameworks that offer custom software development. This framework has got the highest stars on Github, which mentions that more than 56000 developers are currently using it across the globe for responsive web development. Based on Github’s report, it’s quite evident that you have ample choices if you want to hire Laravel developer for your online presence.
However, before choosing any framework, it’s essential that you know its pros and cons well. Otherwise, you won’t be able to make the best out of your project. Therefore, we are sharing the top ten advantages of using the Laravel framework for custom software development. Based on these advantages, you can create a plan that aligns with your business goals and your industry niche by discussing it with your Laravel development company
Before we explain the advantages of the Laravel framework to you, here is a snippet of the Laravel framework and its possibilities
What is Laravel and What are its Uses?
Laravel is a free and open-source PHP framework based on MVC architecture that offers effortless web and app development. Taylor Otwell founded this framework, which got released in June 2011. The latest version of the framework is 8.16.1. Laravel is suitable for developing complex and large websites.
Though Laravel is a bit complex as compared to the other PHP frameworks, it is the most suitable one when it comes to developing extremely powerful web applications. Laravel provides expressive tutorials (Laracasts), documentations and boasts a huge community to assist the developers worldwide.
Some of the vital features of the Laravel framework are Bundles, Query Builder, Reverse Routing, Eloquent ORM, Application Logic, IoC, Migrations, Class Auto Loading, Blade Templating Engine, Automatic Pagination and more. The ORM and routing allow one to develop modern applications with sheer perfection.
The Top 10 Advantages of Using Laravel Framework:
1. Fixing Security Vulnerabilities: Be it any web application, the development phase causes some sort of technical glitch that can be a real threat to security vulnerabilities. Some of the most vulnerable elements are cross-site scripting, SQL injection and site request forgery. Laravel can help you secure your web app with its fanatically guarded codebase.
2. Mail Service Integration: Today, it’s essential for businesses to send service emails to the customers after every event, be it registration or purchase. Laravel makes it better for the SwiftMailer library with its simple, clean API to perform the task. Moreover, Laravel can provide drivers for Mailgun, SMTP, SparkPost and a lot more platforms.
3. Authorization Process: For every app, authorization of the users is a common aspect, which makes the owners sure that the users are authentic people. It helps them to secure their purchase options from unauthorised buyers. Laravel’s authentication process is quite advanced and yet simple, which anyone can implement and use with ease.
4. Faster Application: Recent studies show that users prefer fast-loadable and high-responsive apps on every platform. A slow app can be the reason for the loss of revenue for any business and hence, Laravel can provide the best solution. It comes with in-memory caches such as APC and Memcached and also ensures multiple cache configurations.
5. Built with Testing: For any Laravel development company, the process of testing apps is like a cakewalk. Laravel comes with in-built testing features with PHPUnit and hence it offers speedy and error-free testing every time. There are convenient helper methods in this framework that allow expressive testing of complex large apps.
6. Configuration Error: User experience is partially dependent upon the way an app can handle errors. In many apps, users click the Submit button and then errors are identified. It helps the users to understand which steps are taken wrong and should be corrected. For Laravel, error and exception handling are two of its best features.
7. Queue Service: When an app gets more traffic, it has to handle an excessive number of message requests per second. Now, if the app is developed with an ordinary framework, there are chances of data loss or higher expense. With the unified API system of Laravel, there is no reason to worry. The process of sending messages and emails speeds up in this framework.
8. URL Routing Configuration: The users usually use URL links to see something specific such as the service page or a contact form. If the web app doesn’t have URL routing, it won’t be able to show that exact page and instead will show an error. Laravel uses app/Http/routes.php files to identify URL routes and respond quickly to users’ requests.
9. Separation of Codes: If you hire Laravel developer for your business, you will get to know about this advantage in detail. Laravel is an MVC framework, which can separate business logic code from presentation code. As a result, Html Layout Designers do not need to interact with developers while changing the UI/UX of a web page.
10. Task Scheduling: Every web app requires a task scheduling system to track and manage all its ongoing tasks. Earlier, developers had to generate Cron entries to schedule tasks each time but today, Laravel allows the developers to command schedule tasks within the framework and generate a single Cron entry in the server.
If you are planning for a full-stack Laravel app development, therefore, looking for a Laravel development company to partner with, look no further than us. We, Idiosys Technologies, are one of the most eminent web and app development companies providing a plethora of services including Laravel app development. Headquartered in Kolkata, we basically provide web development, app development and marketing solutions to a huge number of multi-national and start-up companies from India, Canada, the USA, Germany, Australia, Brazil, the UK and Panama. Our expertise and long experience in the industry has made us one of the top web development and IT companies in India. You can hire the most efficient Laravel developers’ team and Laravel framework experts from our company to boost your online presence. So, why wait anymore? Contact us today to know the best deals we can offer you.
0 notes
Link
#How to Create pagination#How to Create pagination in PHP#Create pagination in PHP#How to Create pagination using PHP and MySQLi#tutorial for Create pagination in php
0 notes
Text
Become a WordPress Developer: Unlocking Power With Code

Learn PHP, JavaScript, WordPress theming & the WP REST API to Create Custom & Interactive WordPress Websites. Become a WordPress Developer: Unlocking Power With Code What you’ll learn: Why code is the key to building whatever you can imagine with WordPressThe ability to write PHP to manipulate the data of a WordPress siteThe ability to write JavaScript to add on-the-fly interactivity to a WordPress siteHow to code your own new custom block types for the "Gutenberg" Block EditorThe skills, knowledge and vocabulary to work professionally as a WordPress developer Requirements: Basic WordPress knowledge (how to create a blog post, etc...)A basic understanding of HTML (e.g. "p" is for paragraph, "h1" is for headline, etc...)No CSS knowledge required (although it helps to understand that CSS is used to add style & design to a page)No JavaScript knowledge required (although it helps to understand that JS is used to add interactivity to a page) Become a WordPress Developer: Unlocking Power With Code Description: Unlock the full power of WordPress and go beyond "just a blog platform" by learning how to code completely custom WordPress powered sites. Updated for 2019: A new 3 part lesson on coding our own custom block type for the new "Gutenberg" Block Editor in WordPress. I've spent the last 12 years studying WordPress, PHP, and JavaScript and now I'm here to teach you everything I know. Come along on this journey with me and become a WordPress developer. Together we will build a website for a fictional university and along the way we will: Install WordPress on your personal computer so you have a private playground copy of WordPress to practice and experiment with Get introduced to the PHP language (this is what powers WordPress) Set Up a New Theme (You'll learn how to convert any HTML template into a living breathing WordPress theme) Create Custom Post Types and Custom Fields Relate pieces of content with each other (e.g. a professor and a program) Learn the basics of (object-oriented) JavaScript Leverage the WP REST API Learn to use JavaScript to communicate with the WordPress back-end on-the-fly Let visitors sign up for a basic account on our site Build a "My Notes" feature (user specific single page application with real-time CRUD actions) Let users "like" or "heart" a professor (update the professor's like count on-the-fly) Deploy our website live up onto the web for the entire world to view And much more! This course may be brand new, but this isn’t my first time teaching. I’ve led training sessions for Fortune 500 companies and I’ve already helped over 17,000 people on Udemy and received the following feedback: "Brad definitely has some of the best techniques to embed the lesson into your mind… hands down these are the best tutorials I have had the opportunity to view." "Presentation is concise without being tedious… you honestly feel that you have a thorough understanding of the subject." "… explained the process. Not memorize this or that, he explained the process. If you're looking to take a course to understand the foundations of creating websites, look no further." Become highly valuable and relevant to the companies that are hiring WordPress developers; in one convenient place alongside one instructor. If you're ready to begin coding custom websites - I'll see you on the inside! Who this course is for: Developers who want to use WordPress as a true Content Management System and not "just a blog platform." Those looking to learn the PHP and JavaScript languages. People who want to learn about the "REST API" which allows us to interact with WordPress data on-the-fly in realtime. Anyone interested in custom post types, custom fields, and creating relationships between various content types. Who is the target audience? Developers who want to use WordPress as a true Content Management System and not "just a blog platform."Those looking to learn the PHP and JavaScript languages.People who want to learn about the "REST API" which allows us to interact with WordPress data on-the-fly in realtime.Anyone interested in custom post types, custom fields, and creating relationships between various content types. Course content of Become a WordPress Developer: Unlocking Power With Code: Total Lecture:47 Welcome to the Course! What is a Dev Environment? (Your First Installation) If You're Unable to Install Local by Flywheel First Taste of PHP Note for Local by Flywheel Users Creating a New Theme PHP Functions PHP Arrays Quick Note: Classic Editor vs Default Editor The Famous "Loop" in WordPress Header & Footer Convert Static HTML Template into WordPress Quick Note: Avoiding Caching (CSS & JS) During Dev Interior Page Template Parent & Children Pages To Echo or Not To Echo Menu of Child Page Links A Few Quick Edits / Improvements Navigation Menus Blog Listing Page (index.php vs front-page.php) Blog Continued Blog Archives (archive.php) Custom Queries Blog: Few Quick Edits & Improvements Note on Gulp Preparing For Automation: What is a Command Line? Workflow and Automation (Part 1) Tip: If Your "localhost:3000" Loads Very Slowly... Workflow and Automation (Part 2) Custom Post Types Displaying Custom Post Types Quick Timeout: Misc Updates Custom Fields Ordering (Sorting) Custom Queries Manipulating Default URL Based Queries Past Events Page (Custom Query Pagination) Creating Relationships Between Content Displaying Relationships (Front-End) Quick Program Edits Professors Post Type Featured Image (Post Thumbnail) Featured Image Sizes & Cropping Page Banner Dynamic Background Image 16 more sections Become a WordPress Developer: Unlocking Power With Code course Created by Brad Schiff Last updated 8/2019 English Read the full article
#Developer#HTML#JavaScript#PHP#WordPresstheming#WordPressWebsites#WPRESTAPI#Udemy Free#udemy free courses#udemy courses online#Free courses#udemy#webcourses
0 notes
Text
How to Use Yajra Datatables in Laravel 9 Application

User data display is a fundamental necessity for web development. This tutorial's main goal is to show you how to use Yajra Datatables, a third-party package, to generate Datatables in Laravel. This Laravel datatables tutorial demonstrates how to construct yajra datatables in Laravel while also teaching us the necessary techniques. We will work to eliminate any ambiguity that may have surrounded your creation of the Laravel datatables example. We'll look at a laravel datatables AJAX example and a laravel Bootstrap datatable simultaneously. Consider a scenario where you are presented with thousands of records and must manually search through each one to find the information you need. Doesn't seem easy, does it? To manage the data dynamically in the table, Datatables provides easy search, pagination, ordering, and sorting functions, in my opinion making our task less dreary. A plug-in driven by jQuery, also known as the Javascript library, is called DataTables. It is a remarkably adaptable tool that adds all of these subtle and cutting-edge features to any static HTML table. It was created on the principles of progressive and dynamic augmentation.
Features
- Pagination - Instant search - Multi-column ordering - Use almost any data source - Easily theme-able - Wide variety of extensions - Mobile friendly Even though we will only be using a few functionalities, such as search, sort, and pagination, we will attempt to integrate these elements with aesthetically pleasing HTML tables that are robust from a UI/UX standpoint.
Table of Contents
- Install Laravel App - Install Yajra Datatables - Set Up Model and Migrations - Insert Dummy Data - Create Controller - Define Route - Create View
Install Laravel App
In general, deploying a new Laravel application is the main emphasis of our initial step. Install the sacred canon by executing the artisan command listed below. composer create-project laravel/laravel laravel-yajra-datatables --prefer-dist cd laravel-yajra-datatables
Install Yajra Datatable Package
Yajra Datatables Library is a jQuery DataTables API for Laravel 4|5|6|7, and I wonder whether you've heard of it. By taking into account the Eloquent ORM, Fluent Query Builder, or Collection, this plugin manages the server-side operations of the DataTables jQuery plugin through the AJAX option. The following command should theoretically assist you in installing the Yajra DataTable plugin in Laravel. composer require yajra/laravel-datatables-oracle Expand the basic functions of the package, such as the datatable service provider in the providers section and the alias inside the config/app.php file. ..... ..... 'providers' => 'aliases' => ..... ..... Continue by running the vendor publish command; this step is optional. php artisan vendor:publish --provider="YajraDataTablesDataTablesServiceProvider"
Set Up Model and Migrations
Run a command to generate a model, which contains the database table's schema. php artisan make:model Student -m Add the following code to the file database/migrations/timestamp create students table.php. public function up() { Schema::create('students', function (Blueprint $table) { $table->id(); $table->string('name'); $table->string('email')->unique(); $table->string('username'); $table->string('phone'); $table->string('dob'); $table->timestamps(); }); } Open the Student.php file in app/Models and add the schema to the $fillable array. Read the full article
#howtouseyajradatatablesinlaravel9#laravel9datatablesajaxexample#laravel9datatablesexample#laravel9installyajradatatables#laravel9yajradatatablesexample#laravel9yajradatatablesserversiteserverside
0 notes
Text
Codeigniter Tutorial for Beginners
What is CodeIgniter?
You spend a lot of time writing the same code over and again when developing a web application. Frameworks provide you a place to start and reduce the amount of code you'll need to create a website.
CodeIgniter is a PHP-based framework, however it is not a PHP replacement. You don't have to abandon PHP just because you're learning CodeIgniter. PHP is a server-side scripting language that may be used to create dynamic web applications.
CodeIgniter includes libraries, a clear interface, and a logical structure for accessing these libraries, as well as plug-ins, helpers, and other resources that make it easier to solve difficult PHP functions while retaining high performance. It shortens the time it takes to create a fully interactive, dynamic website by simplifying the PHP code. It requires PHP 5.2.6 or higher, as well as MySQL 4.1 or higher.
Why you should use CodeIgniterIf you're looking for a framework with a minimal footprint, look no further.
A high level of performance is required.
I'm looking for a framework that doesn't require any setting.
I'm looking for a framework that doesn't rely on the command line.
I'm looking for a framework that doesn't need me to follow stringent code guidelines.
To achieve a more streamlined code structure.
Features of CodeIgniterBecause of its many features and benefits, the
CodeIgniter framework
is in high demand among PHP developers. A web application built with CodeIgniter operates well and quickly. It offers a comprehensive set of features for creating a dynamic web application from the ground up.
Important Features
It is completely free to use
It is free to use because it is licenced under the MIT licence.
The MVC pattern is followed.
Model-View-Controller is used, which separates the logic and presentation elements. The controller receives the request, the model performs the database activity, and the views present the output.
However, with standard PHP scripting, each page represents MVC, which adds to the complexity.
It's light.
It is very light in weight. The CodeIgniter core system only requires a tiny library; however, more libraries may be added dynamically in response to your demands. As a result, it is quick and light in weight.
Create URLs that are optimised for search engines.
CodeIgniter generates clean and search engine friendly URLs. Instead of using a query-based technique, it uses a segment-based approach.
Libraries built-in
It includes comprehensive packet libraries that enable all web-related functions such as database access, form validation, email transmission, image manipulation, and email transmission.
Some other Features
Security and XSS Filtering
File uploading, session management, pagination, data encryption
Flexible URI Routing
Zip encoding class
Error logging
Full page caching
Localization
This
Codeigniter tutorial
is beneficial for both experienced developers and beginners who want to learn how to build websites with creativity and ease using the Codeigniter framework.
0 notes
Text
How to create Pagination using dirPagination directive in Angularjs?
How to create Pagination using dirPagination directive in Angularjs?
Today now in this post i will show you How to create Pagination using dirPagination directive in Angularjs?We know that angularjs pagination is not simple as like laravel, code php etc, because we need to manage this with JS. Now in this tutorial i will give an example of how we can build a simple pagination in our angularjs application. Now in this example i will use dirPagination directive to…
View On WordPress
0 notes
Text
How to telescope installation and configuration in laravel?
Hello to all! Now in this article, i will talk about laravel telescope installation. i will use how to install telescope laravel? So in this article i will goes to detailed descriptive on telescope installation and configuration step by step. I will look at example of telescope installation and configuration. So Let’s start with laravel telescope tutorial.
So now in this tutorial, i will show you how to telescope installation and configuration in laravel 5.8 ,laravel 6, laravel 7 and laravel 8 version.
Laravel Telescope is a debug assistant for laravel project. Whenever you will write code it is very hard to debug and find the error in your application manually. Telescope will provides access to the requests coming into your application, exceptions, log entries, database queries, model watch, catch, redis, queued jobs, mail, scheduled tasks and more in one place.
So, now here i will give you a very simple step of how to install telescope in your laravel app and also how it looks after install.
Read Also : PHP AngularJS CRUD with Search and Pagination Example From Scratch
Install Laravel Telescope Package
Install telescope for with following command:
composer require laravel/telescope
you can also install for specific environment:
composer require laravel/telescope --dev
Read Also : How to Autocomplete Textbox in Laravel 8 with Ajax?
Install Telescope
after install this package, we have to also install telescope by using following command that will create migration files and configuration file.
php artisan telescope:install
now let’s run following command to create tables for telescope.
php artisan migrate
now you are ready to run telescope. so let’s run project:
php artisan serve
open bellow url
localhost:8000/telescope/requests
Read Also : How to Get Selected Option Text in Vue JS ?
What features provide by telescope?
Requests
Commands
Schedule
Jobs
Batches
Cache
Dumps
Events
Exceptions
Gates
Logs
Mail
Models
Notifications
Queries
Redis
Views
Thanks For reading. Hope it will help you . Also you can follow us on Facebook
0 notes
Photo

Real-Time Stock Market Data With the marketstack API
To make sound financial decisions, you need a reliable, up-to-the-minute source of real-time stock market data.
You want the same source of data used by Microsoft, Amazon, Credit Suisse, and Uber.
The good news is you don't have to be a major player to have this data in real time.
Whether you're an individual, small business, financial advisor, or developer, the marketstack API gives you access to real-time, intraday, and historical stock data from 72 global stock exchanges, including Nasdaq, the New York Stock Exchange, and the London Stock Exchange.
You too can now deliver real-time, intraday, historical stock, or end-of-day market data to your website and to your clients and create satisfying user experiences.
It's simple and cost-effective: let me introduce you to marketstack.
What Is the marketstack API?
marketstack is a popular, easy-to-use REST API interface that delivers real-time, intraday, and historical stock market data.
The API is powered by cutting-edge technology and a scalable cloud infrastructure capable of handling several million API requests per hour with ease.
You can search from 125,000+ worldwide stock tickers, collected from 72 global exchanges, including Nasdaq and the NYSE.
Using the marketstack REST API, you will be able to obtain end-of-day and intraday data, as well as historical market data for the last 30 years.
With the marketstack API, you can:
query for real-time, intraday, and historical stock market data
define multiple stock symbols
retrieve extensive data from about 72+ stock exchanges
access 125,000+ stock tickers from more than 50 countries
retrieve information on time zones, currencies, and more
Why Use the marketstack API?
It Uses JSON
marketstack uses the lightweight JSON format, and HTTP GET for all the requests. API queries are easy to create and to interpret.
Integration With Multiple Languages
The API integrates with widely used programming languages and platforms: PHP, Python, jQuery, Node, Go, and Ruby.
Scalable
The marketstack API can scale with your information and data demands. It can easily handle spikes and increases in your daily queries.
Bank-Grade Security
Client data is protected by a layer of heavy security. Each bit and byte sent to and from the marketstack API is encrypted using industry-standard 256-bit HTTPS encryption.
Reliable Information Sources
Stock market data provided by the marketstack API is licensed and sourced from multiple high-authority market data providers around the world.
Proof in Numbers
Trusted by 30,000 companies and 75 universities.
Documentation
The marketstack API comes with extensive and detailed documentation.
How It Works
The marketstack API is built upon a RESTful and easy-to-understand request and response structure.
API requests are always sent in the URL string with a series of required and optional HTTP GET parameters.
API responses are provided in lightweight JSON format.
Quick Tutorial
Here is an example of the information returned from a marketstack API query.
It's very easy to get set up and start using marketstack. This short tutorial will show you how.
To get started, first sign up for a free account at marketstack. Once you've registered, you'll be taken to the marketstack API quick start screen. From here, you can get your API key and try some example API queries.
Now you can perform a request. Using your API key and the example queries shown in the quick start guide, you can look up stock prices and other information. For example, let's perform a single request for Apple stock.
The quick start guide shows the following format for the query.
Click the example to try the request, or enter it into your address bar:
http://api.marketstack.com/v1/eod?access_key=YOUR_ACCESS_KEY&symbols=AAPL
Be sure to copy your access key into this URL to try it. If your API request was successful, the marketstack API will return pagination information as well as a data object, which contains a separate sub-object for each requested date/time and symbol.
Note that requests you make on the free plan are not encrypted, so you must use the HTTP protocol for free requests. If you try to use HTTPS, you will get the message that "Your current subscription plan does not support HTTPS encryption". If HTTPS is important to you, then you'll need to go with a paid plan.
You can learn more from the official marketstack documentation, including code examples for JavaScript, PHP, Python, and more.
Pricing
marketstack has several market data subscription plans.
Free: You get 1,000 data requests per month without paying anything. This applies for all supported stock tickers and exchanges. It does not offer intraday data, and you are restricted to one year of historical data. No credit card is needed to register.
Who is this plan best for? It's best for beginners wanting to test the waters and see how marketstack works.
Basic: gets you 10,000 requests per month, support for intraday data, access to ten-year historical data, HTTPS encryption, a commercial license, and more. At the time of writing, this plan is $9.99 per month, or $7.99 if billed yearly.
Who is this plan best for? For those who have seen how marketstack works and want to get serious using it.
Professional (Most Popular): With this plan, you get real-time updates, full historical data, up to 100,000 requests per month, and technical support.
Business: This plan gives you all the tools you will ever need, for up to 500,000 monthly requests, real-time updates, and direct support.
Enterprise: If none of the other plans are adequate, you can get custom pricing that is tailored to your needs.
Conclusion
marketstack is trusted by 30,000 companies and 75 universities. This is a big mark of approval. The interfaces for requests and responses are easy to use, and there is detailed documentation that explains all the API parameters.
Try it out today with a free API key!
by Franc Lucas via Envato Tuts+ Code https://ift.tt/33sCP9Q
0 notes
Text
How to Create Pagination using AngularJS in PHP
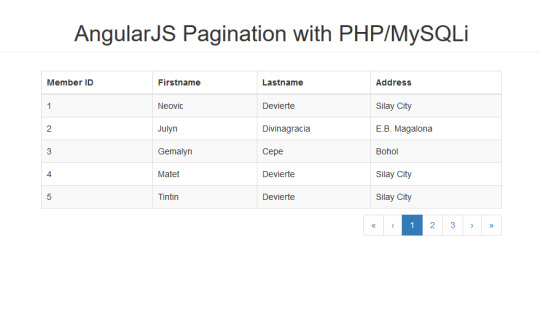
How to Create Pagination using AngularJS in PHP with Source Code Getting Started on Pagination using AngularJS in PHP I've used CDN for Bootstrap and Angular JS in this tutorial, so you need an internet connection for them to work. This tackles on how to create pagination using angularjs in php. I'm going to use an external js for pagination which you can view using this link. This is included in the downloadable of this tutorial. I have also created a simple pagination using php and mysql in this link. Please click here. Creating a Database First, we're going to create our database and insert sample data. 1. Open phpMyAdmin. 2. Click databases, create a database and name it as angular. 3. After creating a database, click the SQL and paste the below codes. See image below for detailed instruction. CREATE TABLE `members` ( `memid` int(11) NOT NULL AUTO_INCREMENT, `firstname` varchar(30) NOT NULL, `lastname` varchar(30) NOT NULL, `address` text NOT NULL, PRIMARY KEY(`memid`) ) ENGINE=InnoDB DEFAULT CHARSET=latin1; INSERT INTO `members` (`memid`, `firstname`, `lastname`, `address`) VALUES (1, 'Neovic', 'Devierte', 'Silay City'), (2, 'Julyn', 'Divinagracia', 'E.B. #angularjsandcodeignitercrud #angularjscrudexamplephp #angularjscustompaginationdirective #angularjspaginationbootstrap #angularjspaginationdirective #angularjstablepaginationjsfiddle #angularjswithphpbackend #angularjswithphpbackendexample #angularjswithphpprojects #customdirectiveforpaginationinangularjs #custompaginationinangularjs #paginationangularjs #paginationcontrolsproperties #paginationinangularjs #paginationinangularjsdemo #paginationinangularjsgithub #paginationusingangularjsinphp #simplepaginationinangularjs Read the full article
0 notes
Text
Adding a Custom Welcome Guide to the WordPress Block Editor
I am creating a WordPress plugin and there is a slight learning curve when it comes to using it. I’d like to give users a primer on how to use the plugin, but I want to avoid diverting users to documentation on the plugin’s website since that takes them out of the experience.
What would be great is for users to immediately start using the plugin once it’s installed but have access to helpful tips while they are actively using it. There’s no native feature for something like this in WordPress but we can make something because WordPress is super flexible like that.
So here’s the idea. We’re going to bake documentation directly into the plugin and make it easily accessible in the block editor. This way, users get to use the plugin right away while having answers to common questions directly where they’re working.
My plugin operates through several Custom Post Types (CPT). What we’re going to build is essentially a popup modal that users get when they go to these CPTs.
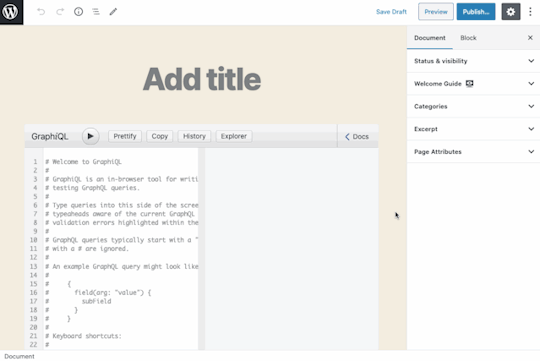
The WordPress block editor is built in React, which utilizes components that can be customized to and reused for different situations. That is the case with what we’re making — let’s call it the <Guide> component — which behaves like a modal, but is composed of several pages that the user can paginate through.
WordPress itself has a <Guide> component that displays a welcome guide when opening the block editor for the first time:

WordPress displays a modal with instructions for using the block editor when a user loads the editor for the first time.
The guide is a container filled with content that’s broken up into individual pages. In other words, it’s pretty much what we want. That means we don’t have to re-invent the wheel with this project; we can reuse this same concept for our own plugin.
Let’s do exactly that.
What we want to achieve
Before we get to the solution, let’s talk about the end goal.
The design satisfies the requirements of the plugin, which is a GraphQL server for WordPress. The plugin offers a variety of CPTs that are edited through custom blocks which, in turn, are defined through templates. There’s a grand total of two blocks: one called “GraphiQL client” to input the GraphQL query, and one called “Persisted query options” to customize the behavior of the execution.
Since creating a query for GraphQL is not a trivial task, I decided to add the guide component to the editor screen for that CPT. It’s available in the Document settings as a panel called “Welcome Guide.”

Crack that panel open and the user gets a link. That link is what will trigger the modal.
For the modal itself, I decided to display a tutorial video on using the CPT on the first page, and then describe in detail all the options available in the CPT on subsequent pages.

I believe this layout is an effective way to show documentation to the user. It is out of the way, but still conveniently close to the action. Sure, we can use a different design or even place the modal trigger somewhere else using a different component instead of repurposing <Guide>, but this is perfectly good.
Planning the implementation
The implementation comprises the following steps:
Scaffolding a new script to register the custom sidebar panel
Displaying the custom sidebar panel on the editor for our Custom Post Type only
Creating the guide
Adding content to the guide
Let’s start!
Step 1: Scaffolding the script
Starting in WordPress 5.4, we can use a component called <PluginDocumentSettingPanel> to add a panel on the editor’s Document settings like this:
const { registerPlugin } = wp.plugins; const { PluginDocumentSettingPanel } = wp.editPost; const PluginDocumentSettingPanelDemo = () => ( <PluginDocumentSettingPanel name="custom-panel" title="Custom Panel" className="custom-panel" > Custom Panel Contents </PluginDocumentSettingPanel> ); registerPlugin( 'plugin-document-setting-panel-demo', { render: PluginDocumentSettingPanelDemo, icon: 'palmtree', } );
If you’re experienced with the block editor and already know how to execute this code, then you can skip ahead. I’ve been coding with the block editor for less than three months, and using React/npm/webpack is a new world for me — this plugin is my first project using them! I’ve found that the docs in the Gutenberg repo are not always adequate for beginners like me, and sometimes the documentation is missing altogether, so I’ve had to dig into the source code to find answers.
When the documentation for the component indicates to use that piece of code above, I don’t know what to do next, because <PluginDocumentSettingPanel> is not a block and I am unable to scaffold a new block or add the code there. Plus, we’re working with JSX, which means we need to have a JavaScript build step to compile the code.
I did, however, find the equivalent ES5 code:
var el = wp.element.createElement; var __ = wp.i18n.__; var registerPlugin = wp.plugins.registerPlugin; var PluginDocumentSettingPanel = wp.editPost.PluginDocumentSettingPanel;
function MyDocumentSettingPlugin() { return el( PluginDocumentSettingPanel, { className: 'my-document-setting-plugin', title: 'My Panel', }, __( 'My Document Setting Panel' ) ); }
registerPlugin( 'my-document-setting-plugin', { render: MyDocumentSettingPlugin } );
ES5 code does not need be compiled, so we can load it like any other script in WordPress. But I don’t want to use that. I want the full, modern experience of ESNext and JSX.
So my thinking goes like this: I can’t use the block scaffolding tools since it’s not a block, and I don’t know how to compile the script (I’m certainly not going to set-up webpack all by myself). That means I’m stuck.
But wait! The only difference between a block and a regular script is just how they are registered in WordPress. A block is registered like this:
wp_register_script($blockScriptName, $blockScriptURL, $dependencies, $version); register_block_type('my-namespace/my-block', [ 'editor_script' => $blockScriptName, ]);
And a regular script is registered like this:
wp_register_script($scriptName, $scriptURL, $dependencies, $version); wp_enqueue_script($scriptName);
We can use any of the block scaffolding tools to modify things then register a regular script instead of a block, which gains us access to the webpack configuration to compile the ESNext code. Those available tools are:
The WP CLI ‘scaffold’ command
Ahmad Awais’s create-guten-block package
The official @wordpress/create-block package
I chose to use the @wordpress/create-block package because it is maintained by the team developing Gutenberg.
To scaffold the block, we execute this in the command line:
npm init @wordpress/block
After completing all the prompts for information — including the block’s name, title and description — the tool will generate a single-block plugin, with an entry PHP file containing code similar to this:
/** * Registers all block assets so that they can be enqueued through the block editor * in the corresponding context. * * @see https://developer.wordpress.org/block-editor/tutorials/block-tutorial/applying-styles-with-stylesheets/ */ function my_namespace_my_block_block_init() { $dir = dirname( __FILE__ );
$script_asset_path = "$dir/build/index.asset.php"; if ( ! file_exists( $script_asset_path ) ) { throw new Error( 'You need to run `npm start` or `npm run build` for the "my-namespace/my-block" block first.' ); } $index_js = 'build/index.js'; $script_asset = require( $script_asset_path ); wp_register_script( 'my-namespace-my-block-block-editor', plugins_url( $index_js, __FILE__ ), $script_asset['dependencies'], $script_asset['version'] );
$editor_css = 'editor.css'; wp_register_style( 'my-namespace-my-block-block-editor', plugins_url( $editor_css, __FILE__ ), array(), filemtime( "$dir/$editor_css" ) );
$style_css = 'style.css'; wp_register_style( 'my-namespace-my-block-block', plugins_url( $style_css, __FILE__ ), array(), filemtime( "$dir/$style_css" ) );
register_block_type( 'my-namespace/my-block', array( 'editor_script' => 'my-namespace-my-block-block-editor', 'editor_style' => 'my-namespace-my-block-block-editor', 'style' => 'my-namespace-my-block-block', ) ); } add_action( 'init', 'my_namespace_my_block_block_init' );
We can copy this code into the plugin, and modify it appropriately, converting the block into a regular script. (Note that I’m also removing the CSS files along the way, but could keep them, if needed.)
function my_script_init() { $dir = dirname( __FILE__ );
$script_asset_path = "$dir/build/index.asset.php"; if ( ! file_exists( $script_asset_path ) ) { throw new Error( 'You need to run `npm start` or `npm run build` for the "my-script" script first.' ); } $index_js = 'build/index.js'; $script_asset = require( $script_asset_path ); wp_register_script( 'my-script', plugins_url( $index_js, __FILE__ ), $script_asset['dependencies'], $script_asset['version'] ); wp_enqueue_script( 'my-script' ); } add_action( 'init', 'my_script_init' );
Let’s copy the package.json file over:
{ "name": "my-block", "version": "0.1.0", "description": "This is my block", "author": "The WordPress Contributors", "license": "GPL-2.0-or-later", "main": "build/index.js", "scripts": { "build": "wp-scripts build", "format:js": "wp-scripts format-js", "lint:css": "wp-scripts lint-style", "lint:js": "wp-scripts lint-js", "start": "wp-scripts start", "packages-update": "wp-scripts packages-update" }, "devDependencies": { "@wordpress/scripts": "^9.1.0" } }
Now, we can replace the contents of file src/index.js with the ESNext code from above to register the <PluginDocumentSettingPanel> component. Upon running npm start (or npm run build for production) the code will be compiled into build/index.js.
There is a last problem to solve: the <PluginDocumentSettingPanel> component is not statically imported, but instead obtained from wp.editPost, and since wp is a global variable loaded by WordPress on runtime, this dependency is not present in index.asset.php (which is auto-generated during build). We must manually add a dependency to the wp-edit-post script when registering the script to make sure it loads before ours:
$dependencies = array_merge( $script_asset['dependencies'], [ 'wp-edit-post', ] ); wp_register_script( 'my-script', plugins_url( $index_js, __FILE__ ), $dependencies, $script_asset['version'] );
Now the script setup is ready!
The plugin can be updated with Gutenberg’s relentless development cycles. Run npm run packages-update to update the npm dependencies (and, consequently, the webpack configuration, which is defined on package "@wordpress/scripts") to their latest supported versions.
At this point, you might be wondering how I knew to add a dependency to the "wp-edit-post" script before our script. Well, I had to dig into Gutenberg’s source code. The documentation for <PluginDocumentSettingPanel> is somewhat incomplete, which is a perfect example of how Gutenberg’s documentation is lacking in certain places.
While digging in code and browsing documentation, I discovered a few enlightening things. For example, there are two ways to code our scripts: using either the ES5 or the ESNext syntax. ES5 doesn’t require a build process, and it references instances of code from the runtime environment, most likely through the global wp variable. For instance, the code to create an icon goes like this:
var moreIcon = wp.element.createElement( 'svg' );
ESNext relies on webpack to resolve all dependencies, which enables us to import static components. For instance, the code to create an icon would be:
import { more } from '@wordpress/icons';
This applies pretty much everywhere. However, that’s not the case for the <PluginDocumentSettingPanel> component, which references the runtime environment for ESNext:
const { PluginDocumentSettingPanel } = wp.editPost;
That’s why we have to add a dependency to the “wp-edit-post” script. That’s where the wp.editPost variable is defined.
If <PluginDocumentSettingPanel> could be directly imported, then the dependency to “wp-edit-post” would be automatically handled by the block editor through the Dependency Extraction Webpack Plugin. This plugin builds the bridge from static to runtime by creating a index.asset.php file containing all the dependencies for the runtime environment scripts, which are obtained by replacing "@wordpress/" from the package name with "wp-". Hence, the "@wordpress/edit-post" package becomes the "wp-edit-post" runtime script. That’s how I figured out which script to add the dependency.
Step 2: Blacklisting the custom sidebar panel on all other CPTs
The panel will display documentation for a specific CPT, so it must be registered only to that CPT. That means we need to blacklist it from appearing on any other post types.
Ryan Welcher (who created the <PluginDocumentSettingPanel> component) describes this process when registering the panel:
const { registerPlugin } = wp.plugins; const { PluginDocumentSettingPanel } = wp.editPost const { withSelect } = wp.data;
const MyCustomSideBarPanel = ( { postType } ) => {
if ( 'post-type-name' !== postType ) { return null; }
return( <PluginDocumentSettingPanel name="my-custom-panel" title="My Custom Panel" > Hello, World! </PluginDocumentSettingPanel> ); }
const CustomSideBarPanelwithSelect = withSelect( select => { return { postType: select( 'core/editor' ).getCurrentPostType(), }; } )( MyCustomSideBarPanel);
registerPlugin( 'my-custom-panel', { render: CustomSideBarPanelwithSelect } );
He also suggests an alternative solution, using useSelect instead of withSelect.
That said, I’m not totally convinced by this solution, because the JavaScript file must still be loaded, even if it isn’t needed, forcing the website to take a performance hit. Doesn’t it make more sense to not register the JavaScript file than it does to run JavaScript just to disable JavaScript?
I have created a PHP solution. I’ll admit that it feels a bit hacky, but it works well. First, we find out which post type is related to the object being created or edited:
function get_editing_post_type(): ?string { if (!is_admin()) { return null; }
global $pagenow; $typenow = ''; if ( 'post-new.php' === $pagenow ) { if ( isset( $_REQUEST['post_type'] ) && post_type_exists( $_REQUEST['post_type'] ) ) { $typenow = $_REQUEST['post_type']; }; } elseif ( 'post.php' === $pagenow ) { if ( isset( $_GET['post'] ) && isset( $_POST['post_ID'] ) && (int) $_GET['post'] !== (int) $_POST['post_ID'] ) { // Do nothing } elseif ( isset( $_GET['post'] ) ) { $post_id = (int) $_GET['post']; } elseif ( isset( $_POST['post_ID'] ) ) { $post_id = (int) $_POST['post_ID']; } if ( $post_id ) { $post = get_post( $post_id ); $typenow = $post->post_type; } } return $typenow; }
Then, ,we register the script only if it matches our CPT:
add_action('init', 'maybe_register_script'); function maybe_register_script() { // Check if this is the intended custom post type if (get_editing_post_type() != 'my-custom-post-type') { return; }
// Only then register the block wp_register_script(...); wp_enqueue_script(...); }
Check out this post for a deeper dive on how this works.
Step 3: Creating the custom guide
I designed the functionality for my plugin’s guide based on the WordPress <Guide> component. I didn’t realize I’d be doing that at first, so here’s how I was able to figure that out.
Search the source code to see how it was done there.
Explore the catalogue of all available components in Gutenberg’s Storybook.
First, I copied content from the block editor modal and did a basic search. The results pointed me to this file. From there I discovered the component is called <Guide> and could simply copy and paste its code to my plugin as a base for my own guide.
Then I looked for the component’s documentation. I browsed the @wordpress/components package (which, as you may have guessed, is where components are implemented) and found the component’s README file. That gave me all the information I needed to implement my own custom guide component.
I also explored the catalogue of all the available components in Gutenberg’s Storybook (which actually shows that these components can be used outside the context of WordPress). Clicking on all of them, I finally discovered <Guide>. The storybook provides the source code for several examples (or stories). It’s a handy resource for understanding how to customize a component through props.
At this point, I knew <Guide> would make a solid base for my component. There is one missing element, though: how to trigger the guide on click. I had to rack my brain for this one!
This is a button with a listener that opens the modal on click:
import { useState } from '@wordpress/element'; import { Button } from '@wordpress/components'; import { __ } from '@wordpress/i18n'; import MyGuide from './guide';
const MyGuideWithButton = ( props ) => { const [ isOpen, setOpen ] = useState( false ); return ( <> <Button onClick={ () => setOpen( true ) }> { __('Open Guide: “Creating Persisted Queries”') } </Button> { isOpen && ( <MyGuide { ...props } onFinish={ () => setOpen( false ) } /> ) } </> ); }; export default MyGuideWithButton;
Even though the block editor tries to hide it, we are operating within React. Until now, we’ve been dealing with JSX and components. But now we need the useState hook, which is specific to React.
I’d say that having a good grasp of React is required if you want to master the WordPress block editor. There is no way around it.
Step 4: Adding content to the guide
We’re almost there! Let’s create the <Guide> component, containing a <GuidePage> component for each page of content.
The content can use HTML, include other components, and whatnot. In this particular case, I have added three <GuidePage> instances for my CPT just using HTML. The first page includes a video tutorial and the next two pages contain detailed instructions.
import { Guide, GuidePage } from '@wordpress/components'; import { __ } from '@wordpress/i18n';
const MyGuide = ( props ) => { return ( <Guide { ...props } > <GuidePage> <video width="640" height="400" controls> <source src="https://d1c2lqfn9an7pb.cloudfront.net/presentations/graphql-api/videos/graphql-api-creating-persisted-query.mov" type="video/mp4" /> { __('Your browser does not support the video tag.') } </video> // etc. </GuidePage> <GuidePage> // ... </GuidePage> <GuidePage> // ... </GuidePage> </Guide> ) } export default MyGuide;

Hey look, we have our own guide now!
Not bad! There are a few issues, though:
I couldn’t embed the video inside the <Guide> because clicking the play button closes the guide. I assume that’s because the <iframe> falls outside the boundaries of the guide. I wound up uploading the video file to S3 and serving with <video>.
The page transition in the guide is not very smooth. The block editor’s modal looks alright because all pages have a similar height, but the transition in this one is pretty abrupt.
The hover effect on buttons could be improved. Hopefully, the Gutenberg team needs to fix this for their own purposes, because my CSS aren’t there. It’s not that my skills are bad; they are nonexistent.
But I can live with these issues. Functionality-wise, I’ve achieved what I need the guide to do.
Bonus: Opening docs independently
For our <Guide>, we created the content of each <GuidePage> component directly using HTML. However, if this HTML code is instead added through an autonomous component, then it can be reused for other user interactions.
For instance, the component <CacheControlDescription> displays a description concerning HTTP caching:
const CacheControlDescription = () => { return ( <p>The Cache-Control header will contain the minimum max-age value from all fields/directives involved in the request, or "no-store" if the max-age is 0</p> ) } export default CacheControlDescription;
This component can be added inside a <GuidePage> as we did before, but also within a <Modal> component:
import { useState } from '@wordpress/element'; import { Button } from '@wordpress/components'; import { __ } from '@wordpress/i18n'; import CacheControlDescription from './cache-control-desc';
const CacheControlModalWithButton = ( props ) => { const [ isOpen, setOpen ] = useState( false ); return ( <> <Button icon="editor-help" onClick={ () => setOpen( true ) } /> { isOpen && ( <Modal { ...props } onRequestClose={ () => setOpen( false ) } > <CacheControlDescription /> </Modal> ) } </> ); }; export default CacheControlModalWithButton;
To provide a good user experience, we can offer to show the documentation only when the user is interacting with the block. For that, we show or hide the button depending on the value of isSelected:
import { __ } from '@wordpress/i18n'; import CacheControlModalWithButton from './modal-with-btn';
const CacheControlHeader = ( props ) => { const { isSelected } = props; return ( <> { __('Cache-Control max-age') } { isSelected && ( <CacheControlModalWithButton /> ) } </> ); } export default CacheControlHeader;
Finally, the <CacheControlHeader> component is added to the appropriate control.

Tadaaaaaaaa 🎉
The WordPress block editor is quite a piece of software! I was able to accomplish things with it that I would have been unable to without it. Providing documentation to the user may not be the shiniest of examples or use cases, but it’s a very practical one and something that’s relevant for many other plugins. Want to use it for your own plugin? Go for it!
The post Adding a Custom Welcome Guide to the WordPress Block Editor appeared first on CSS-Tricks.
Adding a Custom Welcome Guide to the WordPress Block Editor published first on https://deskbysnafu.tumblr.com/
0 notes
Text
Adding a Custom Welcome Guide to the WordPress Block Editor
I am creating a WordPress plugin and there is a slight learning curve when it comes to using it. I’d like to give users a primer on how to use the plugin, but I want to avoid diverting users to documentation on the plugin’s website since that takes them out of the experience.
What would be great is for users to immediately start using the plugin once it’s installed but have access to helpful tips while they are actively using it. There’s no native feature for something like this in WordPress but we can make something because WordPress is super flexible like that.
So here’s the idea. We’re going to bake documentation directly into the plugin and make it easily accessible in the block editor. This way, users get to use the plugin right away while having answers to common questions directly where they’re working.
My plugin operates through several Custom Post Types (CPT). What we’re going to build is essentially a popup modal that users get when they go to these CPTs.
The WordPress block editor is built in React, which utilizes components that can be customized to and reused for different situations. That is the case with what we’re making — let’s call it the <Guide> component — which behaves like a modal, but is composed of several pages that the user can paginate through.
WordPress itself has a <Guide> component that displays a welcome guide when opening the block editor for the first time:

WordPress displays a modal with instructions for using the block editor when a user loads the editor for the first time.
The guide is a container filled with content that’s broken up into individual pages. In other words, it’s pretty much what we want. That means we don’t have to re-invent the wheel with this project; we can reuse this same concept for our own plugin.
Let’s do exactly that.
What we want to achieve
Before we get to the solution, let’s talk about the end goal.
The design satisfies the requirements of the plugin, which is a GraphQL server for WordPress. The plugin offers a variety of CPTs that are edited through custom blocks which, in turn, are defined through templates. There’s a grand total of two blocks: one called “GraphiQL client” to input the GraphQL query, and one called “Persisted query options” to customize the behavior of the execution.
Since creating a query for GraphQL is not a trivial task, I decided to add the guide component to the editor screen for that CPT. It’s available in the Document settings as a panel called “Welcome Guide.”

Crack that panel open and the user gets a link. That link is what will trigger the modal.
For the modal itself, I decided to display a tutorial video on using the CPT on the first page, and then describe in detail all the options available in the CPT on subsequent pages.

I believe this layout is an effective way to show documentation to the user. It is out of the way, but still conveniently close to the action. Sure, we can use a different design or even place the modal trigger somewhere else using a different component instead of repurposing <Guide>, but this is perfectly good.
Planning the implementation
The implementation comprises the following steps:
Scaffolding a new script to register the custom sidebar panel
Displaying the custom sidebar panel on the editor for our Custom Post Type only
Creating the guide
Adding content to the guide
Let’s start!
Step 1: Scaffolding the script
Starting in WordPress 5.4, we can use a component called <PluginDocumentSettingPanel> to add a panel on the editor’s Document settings like this:
const { registerPlugin } = wp.plugins; const { PluginDocumentSettingPanel } = wp.editPost; const PluginDocumentSettingPanelDemo = () => ( <PluginDocumentSettingPanel name="custom-panel" title="Custom Panel" className="custom-panel" > Custom Panel Contents </PluginDocumentSettingPanel> ); registerPlugin( 'plugin-document-setting-panel-demo', { render: PluginDocumentSettingPanelDemo, icon: 'palmtree', } );
If you’re experienced with the block editor and already know how to execute this code, then you can skip ahead. I’ve been coding with the block editor for less than three months, and using React/npm/webpack is a new world for me — this plugin is my first project using them! I’ve found that the docs in the Gutenberg repo are not always adequate for beginners like me, and sometimes the documentation is missing altogether, so I’ve had to dig into the source code to find answers.
When the documentation for the component indicates to use that piece of code above, I don’t know what to do next, because <PluginDocumentSettingPanel> is not a block and I am unable to scaffold a new block or add the code there. Plus, we’re working with JSX, which means we need to have a JavaScript build step to compile the code.
I did, however, find the equivalent ES5 code:
var el = wp.element.createElement; var __ = wp.i18n.__; var registerPlugin = wp.plugins.registerPlugin; var PluginDocumentSettingPanel = wp.editPost.PluginDocumentSettingPanel;
function MyDocumentSettingPlugin() { return el( PluginDocumentSettingPanel, { className: 'my-document-setting-plugin', title: 'My Panel', }, __( 'My Document Setting Panel' ) ); }
registerPlugin( 'my-document-setting-plugin', { render: MyDocumentSettingPlugin } );
ES5 code does not need be compiled, so we can load it like any other script in WordPress. But I don’t want to use that. I want the full, modern experience of ESNext and JSX.
So my thinking goes like this: I can’t use the block scaffolding tools since it’s not a block, and I don’t know how to compile the script (I’m certainly not going to set-up webpack all by myself). That means I’m stuck.
But wait! The only difference between a block and a regular script is just how they are registered in WordPress. A block is registered like this:
wp_register_script($blockScriptName, $blockScriptURL, $dependencies, $version); register_block_type('my-namespace/my-block', [ 'editor_script' => $blockScriptName, ]);
And a regular script is registered like this:
wp_register_script($scriptName, $scriptURL, $dependencies, $version); wp_enqueue_script($scriptName);
We can use any of the block scaffolding tools to modify things then register a regular script instead of a block, which gains us access to the webpack configuration to compile the ESNext code. Those available tools are:
The WP CLI ‘scaffold’ command
Ahmad Awais’s create-guten-block package
The official @wordpress/create-block package
I chose to use the @wordpress/create-block package because it is maintained by the team developing Gutenberg.
To scaffold the block, we execute this in the command line:
npm init @wordpress/block
After completing all the prompts for information — including the block’s name, title and description — the tool will generate a single-block plugin, with an entry PHP file containing code similar to this:
/** * Registers all block assets so that they can be enqueued through the block editor * in the corresponding context. * * @see https://developer.wordpress.org/block-editor/tutorials/block-tutorial/applying-styles-with-stylesheets/ */ function my_namespace_my_block_block_init() { $dir = dirname( __FILE__ );
$script_asset_path = "$dir/build/index.asset.php"; if ( ! file_exists( $script_asset_path ) ) { throw new Error( 'You need to run `npm start` or `npm run build` for the "my-namespace/my-block" block first.' ); } $index_js = 'build/index.js'; $script_asset = require( $script_asset_path ); wp_register_script( 'my-namespace-my-block-block-editor', plugins_url( $index_js, __FILE__ ), $script_asset['dependencies'], $script_asset['version'] );
$editor_css = 'editor.css'; wp_register_style( 'my-namespace-my-block-block-editor', plugins_url( $editor_css, __FILE__ ), array(), filemtime( "$dir/$editor_css" ) );
$style_css = 'style.css'; wp_register_style( 'my-namespace-my-block-block', plugins_url( $style_css, __FILE__ ), array(), filemtime( "$dir/$style_css" ) );
register_block_type( 'my-namespace/my-block', array( 'editor_script' => 'my-namespace-my-block-block-editor', 'editor_style' => 'my-namespace-my-block-block-editor', 'style' => 'my-namespace-my-block-block', ) ); } add_action( 'init', 'my_namespace_my_block_block_init' );
We can copy this code into the plugin, and modify it appropriately, converting the block into a regular script. (Note that I’m also removing the CSS files along the way, but could keep them, if needed.)
function my_script_init() { $dir = dirname( __FILE__ );
$script_asset_path = "$dir/build/index.asset.php"; if ( ! file_exists( $script_asset_path ) ) { throw new Error( 'You need to run `npm start` or `npm run build` for the "my-script" script first.' ); } $index_js = 'build/index.js'; $script_asset = require( $script_asset_path ); wp_register_script( 'my-script', plugins_url( $index_js, __FILE__ ), $script_asset['dependencies'], $script_asset['version'] ); wp_enqueue_script( 'my-script' ); } add_action( 'init', 'my_script_init' );
Let’s copy the package.json file over:
{ "name": "my-block", "version": "0.1.0", "description": "This is my block", "author": "The WordPress Contributors", "license": "GPL-2.0-or-later", "main": "build/index.js", "scripts": { "build": "wp-scripts build", "format:js": "wp-scripts format-js", "lint:css": "wp-scripts lint-style", "lint:js": "wp-scripts lint-js", "start": "wp-scripts start", "packages-update": "wp-scripts packages-update" }, "devDependencies": { "@wordpress/scripts": "^9.1.0" } }
Now, we can replace the contents of file src/index.js with the ESNext code from above to register the <PluginDocumentSettingPanel> component. Upon running npm start (or npm run build for production) the code will be compiled into build/index.js.
There is a last problem to solve: the <PluginDocumentSettingPanel> component is not statically imported, but instead obtained from wp.editPost, and since wp is a global variable loaded by WordPress on runtime, this dependency is not present in index.asset.php (which is auto-generated during build). We must manually add a dependency to the wp-edit-post script when registering the script to make sure it loads before ours:
$dependencies = array_merge( $script_asset['dependencies'], [ 'wp-edit-post', ] ); wp_register_script( 'my-script', plugins_url( $index_js, __FILE__ ), $dependencies, $script_asset['version'] );
Now the script setup is ready!
The plugin can be updated with Gutenberg’s relentless development cycles. Run npm run packages-update to update the npm dependencies (and, consequently, the webpack configuration, which is defined on package "@wordpress/scripts") to their latest supported versions.
At this point, you might be wondering how I knew to add a dependency to the "wp-edit-post" script before our script. Well, I had to dig into Gutenberg’s source code. The documentation for <PluginDocumentSettingPanel> is somewhat incomplete, which is a perfect example of how Gutenberg’s documentation is lacking in certain places.
While digging in code and browsing documentation, I discovered a few enlightening things. For example, there are two ways to code our scripts: using either the ES5 or the ESNext syntax. ES5 doesn’t require a build process, and it references instances of code from the runtime environment, most likely through the global wp variable. For instance, the code to create an icon goes like this:
var moreIcon = wp.element.createElement( 'svg' );
ESNext relies on webpack to resolve all dependencies, which enables us to import static components. For instance, the code to create an icon would be:
import { more } from '@wordpress/icons';
This applies pretty much everywhere. However, that’s not the case for the <PluginDocumentSettingPanel> component, which references the runtime environment for ESNext:
const { PluginDocumentSettingPanel } = wp.editPost;
That’s why we have to add a dependency to the “wp-edit-post” script. That’s where the wp.editPost variable is defined.
If <PluginDocumentSettingPanel> could be directly imported, then the dependency to “wp-edit-post” would be automatically handled by the block editor through the Dependency Extraction Webpack Plugin. This plugin builds the bridge from static to runtime by creating a index.asset.php file containing all the dependencies for the runtime environment scripts, which are obtained by replacing "@wordpress/" from the package name with "wp-". Hence, the "@wordpress/edit-post" package becomes the "wp-edit-post" runtime script. That’s how I figured out which script to add the dependency.
Step 2: Blacklisting the custom sidebar panel on all other CPTs
The panel will display documentation for a specific CPT, so it must be registered only to that CPT. That means we need to blacklist it from appearing on any other post types.
Ryan Welcher (who created the <PluginDocumentSettingPanel> component) describes this process when registering the panel:
const { registerPlugin } = wp.plugins; const { PluginDocumentSettingPanel } = wp.editPost const { withSelect } = wp.data;
const MyCustomSideBarPanel = ( { postType } ) => {
if ( 'post-type-name' !== postType ) { return null; }
return( <PluginDocumentSettingPanel name="my-custom-panel" title="My Custom Panel" > Hello, World! </PluginDocumentSettingPanel> ); }
const CustomSideBarPanelwithSelect = withSelect( select => { return { postType: select( 'core/editor' ).getCurrentPostType(), }; } )( MyCustomSideBarPanel);
registerPlugin( 'my-custom-panel', { render: CustomSideBarPanelwithSelect } );
He also suggests an alternative solution, using useSelect instead of withSelect.
That said, I’m not totally convinced by this solution, because the JavaScript file must still be loaded, even if it isn’t needed, forcing the website to take a performance hit. Doesn’t it make more sense to not register the JavaScript file than it does to run JavaScript just to disable JavaScript?
I have created a PHP solution. I’ll admit that it feels a bit hacky, but it works well. First, we find out which post type is related to the object being created or edited:
function get_editing_post_type(): ?string { if (!is_admin()) { return null; }
global $pagenow; $typenow = ''; if ( 'post-new.php' === $pagenow ) { if ( isset( $_REQUEST['post_type'] ) && post_type_exists( $_REQUEST['post_type'] ) ) { $typenow = $_REQUEST['post_type']; }; } elseif ( 'post.php' === $pagenow ) { if ( isset( $_GET['post'] ) && isset( $_POST['post_ID'] ) && (int) $_GET['post'] !== (int) $_POST['post_ID'] ) { // Do nothing } elseif ( isset( $_GET['post'] ) ) { $post_id = (int) $_GET['post']; } elseif ( isset( $_POST['post_ID'] ) ) { $post_id = (int) $_POST['post_ID']; } if ( $post_id ) { $post = get_post( $post_id ); $typenow = $post->post_type; } } return $typenow; }
Then, ,we register the script only if it matches our CPT:
add_action('init', 'maybe_register_script'); function maybe_register_script() { // Check if this is the intended custom post type if (get_editing_post_type() != 'my-custom-post-type') { return; }
// Only then register the block wp_register_script(...); wp_enqueue_script(...); }
Check out this post for a deeper dive on how this works.
Step 3: Creating the custom guide
I designed the functionality for my plugin’s guide based on the WordPress <Guide> component. I didn’t realize I’d be doing that at first, so here’s how I was able to figure that out.
Search the source code to see how it was done there.
Explore the catalogue of all available components in Gutenberg’s Storybook.
First, I copied content from the block editor modal and did a basic search. The results pointed me to this file. From there I discovered the component is called <Guide> and could simply copy and paste its code to my plugin as a base for my own guide.
Then I looked for the component’s documentation. I browsed the @wordpress/components package (which, as you may have guessed, is where components are implemented) and found the component’s README file. That gave me all the information I needed to implement my own custom guide component.
I also explored the catalogue of all the available components in Gutenberg’s Storybook (which actually shows that these components can be used outside the context of WordPress). Clicking on all of them, I finally discovered <Guide>. The storybook provides the source code for several examples (or stories). It’s a handy resource for understanding how to customize a component through props.
At this point, I knew <Guide> would make a solid base for my component. There is one missing element, though: how to trigger the guide on click. I had to rack my brain for this one!
This is a button with a listener that opens the modal on click:
import { useState } from '@wordpress/element'; import { Button } from '@wordpress/components'; import { __ } from '@wordpress/i18n'; import MyGuide from './guide';
const MyGuideWithButton = ( props ) => { const [ isOpen, setOpen ] = useState( false ); return ( <> <Button onClick={ () => setOpen( true ) }> { __('Open Guide: “Creating Persisted Queries”') } </Button> { isOpen && ( <MyGuide { ...props } onFinish={ () => setOpen( false ) } /> ) } </> ); }; export default MyGuideWithButton;
Even though the block editor tries to hide it, we are operating within React. Until now, we’ve been dealing with JSX and components. But now we need the useState hook, which is specific to React.
I’d say that having a good grasp of React is required if you want to master the WordPress block editor. There is no way around it.
Step 4: Adding content to the guide
We’re almost there! Let’s create the <Guide> component, containing a <GuidePage> component for each page of content.
The content can use HTML, include other components, and whatnot. In this particular case, I have added three <GuidePage> instances for my CPT just using HTML. The first page includes a video tutorial and the next two pages contain detailed instructions.
import { Guide, GuidePage } from '@wordpress/components'; import { __ } from '@wordpress/i18n';
const MyGuide = ( props ) => { return ( <Guide { ...props } > <GuidePage> <video width="640" height="400" controls> <source src="https://d1c2lqfn9an7pb.cloudfront.net/presentations/graphql-api/videos/graphql-api-creating-persisted-query.mov" type="video/mp4" /> { __('Your browser does not support the video tag.') } </video> // etc. </GuidePage> <GuidePage> // ... </GuidePage> <GuidePage> // ... </GuidePage> </Guide> ) } export default MyGuide;
Hey look, we have our own guide now!
Not bad! There are a few issues, though:
I couldn’t embed the video inside the <Guide> because clicking the play button closes the guide. I assume that’s because the <iframe> falls outside the boundaries of the guide. I wound up uploading the video file to S3 and serving with <video>.
The page transition in the guide is not very smooth. The block editor’s modal looks alright because all pages have a similar height, but the transition in this one is pretty abrupt.
The hover effect on buttons could be improved. Hopefully, the Gutenberg team needs to fix this for their own purposes, because my CSS aren’t there. It’s not that my skills are bad; they are nonexistent.
But I can live with these issues. Functionality-wise, I’ve achieved what I need the guide to do.
Bonus: Opening docs independently
For our <Guide>, we created the content of each <GuidePage> component directly using HTML. However, if this HTML code is instead added through an autonomous component, then it can be reused for other user interactions.
For instance, the component <CacheControlDescription> displays a description concerning HTTP caching:
const CacheControlDescription = () => { return ( <p>The Cache-Control header will contain the minimum max-age value from all fields/directives involved in the request, or "no-store" if the max-age is 0</p> ) } export default CacheControlDescription;
This component can be added inside a <GuidePage> as we did before, but also within a <Modal> component:
import { useState } from '@wordpress/element'; import { Button } from '@wordpress/components'; import { __ } from '@wordpress/i18n'; import CacheControlDescription from './cache-control-desc';
const CacheControlModalWithButton = ( props ) => { const [ isOpen, setOpen ] = useState( false ); return ( <> <Button icon="editor-help" onClick={ () => setOpen( true ) } /> { isOpen && ( <Modal { ...props } onRequestClose={ () => setOpen( false ) } > <CacheControlDescription /> </Modal> ) } </> ); }; export default CacheControlModalWithButton;
To provide a good user experience, we can offer to show the documentation only when the user is interacting with the block. For that, we show or hide the button depending on the value of isSelected:
import { __ } from '@wordpress/i18n'; import CacheControlModalWithButton from './modal-with-btn';
const CacheControlHeader = ( props ) => { const { isSelected } = props; return ( <> { __('Cache-Control max-age') } { isSelected && ( <CacheControlModalWithButton /> ) } </> ); } export default CacheControlHeader;
Finally, the <CacheControlHeader> component is added to the appropriate control.

Tadaaaaaaaa

The WordPress block editor is quite a piece of software! I was able to accomplish things with it that I would have been unable to without it. Providing documentation to the user may not be the shiniest of examples or use cases, but it’s a very practical one and something that’s relevant for many other plugins. Want to use it for your own plugin? Go for it!
The post Adding a Custom Welcome Guide to the WordPress Block Editor appeared first on CSS-Tricks.
source https://css-tricks.com/adding-a-custom-welcome-guide-to-the-wordpress-block-editor/
from WordPress https://ift.tt/30KQMi4 via IFTTT
0 notes
Text
Laravel Profile Page & Pagination | Laravel 5.4 tutorial | PHP
Laravel Profile Page & Pagination | Laravel 5.4 tutorial | PHP
[ad_1]
In this video I’ll show you how to create a profile page for each user, as well display a list of all users with a pagination. We’ll use bootstrap 5.4, and I’ll be covering everything from adding a username column to a profile with information about the user.
Basically your users will be able to see a users profile page, and be able to use a in-build laravel pagination to find users with.
View On WordPress
1 note
·
View note
Text
10 Reasons why Laravel is the best PHP framework for 2019

1. Object Oriented Libraries –
One of the strongest reasons of laravel to stand out among other PHP frameworks is its pre – installed object oriented libraries, which are not available in other frameworks. Also it has many advanced features such as, resetting the password, monitoring active users, Cross Site Request Forgery Protection, encryption, Bcrypt hashing etc.
2. MVC-
Another strongest feature of laravel is that it works on MVC architecture. It has multiple in- built functionalities. MVC helps to improve the performance and also better documentation.
3. Packaging System-
Packages are the most ideal approaches to speed up the development process. A packaging system manages not only libraries but also multiple support software that assist the web applications to automate the task. Laravel has a new feature which is Automatic Package Discovery. It automatically detects the packages that users want to install.
4. Authentication and authorization-
It becomes easy and simple to implement authorizing technique in Laravel. Controlling the access to resources is not difficult in Laravel. Using very few artisan commands application will be configured with secure authentication and authorization.
5. Artisan-
Artisan is a command line interface of laravel. As a result, this helps developer to get free from creation of proper code skeleton. You can extend not only the functionality but also the capability of Artisan by using new custom commands. Some common uses of Artisan are seeding boilerplate code for migrations, models and new controls, managing database migrations, package assets etc.
6. Task Scheduling-
Task scheduling is important in every project. Scheduler in Laravel does the programmatic scheduling of periodically executed tasks. This scheduler is called by Corn frequently and Laravel calculates scheduled tasks and executes all the pending tasks. And in that manner, Laravel does managing and scheduling of tasks very easily.
7. Template Engine-
Template engine of laravel is Blade. It permits the developers to write their plain PHP code. Blade, combines one or more templates with a data model to produce the resulting views. Blade helps to write a multi- language application. It is very fast and it caches the compiled perspectives. It helps to build effective designs and include partials to beat redundancy in multiple documents.
8. Testing and security-
It allows unit testing so that user can conveniently test the application. It allows to run hundreds of tests so that to verify new changes done by developers are not breaking anything in web application. This feature also allows developers to write unit- tests for their own code.
Laravel uses Bcrypt hashing algorithm for creating an encrypted password. Laravel includes some security features such as Encryption, authentication users, protecting routes, HTTP Basic Authentications, configuration, storing passwords, password reminders and reset. Here, password will not save as a simple text in DB. Every time when new user log-in, a token is generated so that hackers could not get access to unauthorized web page.
9. Laracasts Tutorials-
Laravel offers Laracasts, which has many free as well as paid tutorial videos in order to help developers to learn. Expert and experienced instructors made these videos. So programmers will effectively learn and develop in progressive way.
10. Pagination-
It paginates all data from database. As a result it gives the best development- friendly environment. Pagination gives benefit to apply different styles and also to change URL parameter. It is combined with Eloquent ORM hence it provides a flexibility for the use of big databases.
Final Words-
These are some important features that makes Laravel the best PHP framework. Also it has a strong community support. Laravel is scalable. And it also helps in fast and cost- effective software delivery.
Do you need to develop a website for your business? We have a dedicated team that believes in benefits and effectiveness of using Laravel framework. Develop a website with Solace that will help you to set you on your way to success of business. Contact us for your effective website development to stand out in the market.
0 notes
Text
Node.js, Express, MongoDB & More: The Complete Bootcamp 2019

Description
Do you want to build fast and powerful back-end applications with JavaScript? Would you like to become a more complete and in-demand developer? Then Node.js is the hot technology for you to learn right now, and you came to the right place to do it! Welcome to the Complete Node.js, Express and MongoDB Bootcamp, your fast track to modern back-end development. This course is the perfect all-in-one package that will take you from a complete beginner to an advanced, highly-skilled Node.js developer. Like all my other courses, this one is completely project based! And not just any project: it's a complete, beautiful and feature-rich application, containing both a RESTful API and a server-side rendered website. It's the most fantastic and complete project that you will find in any Node.js course on the internet! By building this huge project, you will learn all the skills that you need in order to plan, build and deploy your own modern back-end applications with Node.js and related technologies. (Actually, if you feel like exploring the project, you can do so at www.natours.dev. And this is only a small part of the project! Log in with "[email protected]" and password "test1234") After finishing this course, you will: 1) Be building you own fast, scalable and powerful Node.js RESTful APIs or web applications; 2) Truly understand how Node.js works behind the scenes; 3) Be able to work with NoSQL data and model data in real-world situations (a hugely important skill); 4) Know how modern back-end development works, and how all the different technologies fit together (hard to understand from scattered tutorials and videos); 5) Have experience in professionally-used tools and libraries like Express, Mongoose, Stripe, Sendgrid, Atlas, Compass, Git, Heroku, and many more; 6) Have built a complete application, which is a perfect starting point for your own applications in the future. Please note that this course is NOT for absolute web development beginners, so you should already be familiar with basic JavaScript. NO back-end experience required though! It's an absolutely full-packed, deep-dive course with over 40 hours of content! Since this is the "Complete Node.js Bootcamp", the course is crammed with tons of different technologies, techniques, and tools, so that you walk away from the course as a complete Node.js developer. That's why the course turned out to be over 40 hours long. But if that sound like too much for you, don't worry, there are videos or entire sections that you can safely skip. Here is exactly what you're gonna learn: Fundamentals of Node.js, core modules and NPM (Node Package Manager) How Node.js works behind the scenes: event loop, blocking vs non-blocking code, event-driven architecture, streams, modules, etc. Fundamentals of Express (Node.js framework): routing, middleware, sending responses, etc. RESTful API design and development with advanced features: filtering, sorting, aliasing, pagination Server-side website rendering (HTML) with Pug templates CRUD operations with MongoDB database locally and on the Atlas platform (in the cloud) Advanced MongoDB: geospatial queries, aggregation pipeline, and operators Fundamentals of Mongoose (MongoDB JS driver): Data models, CRUD operations, data validation, and middleware Advanced Mongoose features: modeling geospatial data, populates, virtual populates, indexes, etc. Using the MVC (Model-View-Controller) architecture How to work with data in NoSQL databases Advanced data modelling: relationships between data, embedding, referencing, and more Complete modern authentication with JWT: user sign up, log in, password reset, secure cookies, etc. Authorization (user roles) Security: best practices, encryption, sanitization, rate limiting, etc. Accepting credit card payments with Stripe: Complete integration on the back-end and front-end Uploading files and image processing Sending emails with Mailtrap and Sendgrid Advanced error handling workflows Deploying Node.js application to production with Heroku Git and GitHub crash course And so much more! Why should you learn Node.js and take this course? If you want to learn Node.js and modern back-end development, then there is no doubt that this course is for you! It's the biggest Node.js course on the internet, it has by far the most complete course project, and offers the most in-depth explanations of all topics included. And even if you already know some Node.js, you should still take this course, because it contains subjects that are not covered anywhere else, or not in the same depth! But maybe you're not yet convinced that Node.js really is the right technology for you to learn right now? Well, first, Node.js will allow you to use your JavaScript skills to build applications on the back-end. That itself is a huge gain, which makes your full-stack development process so much easier and faster. Plus, popularity and opportunities for Node.js are off the charts. It's a modern, proven and reliable technology, used by tech giants (and 6-figure-salary-paying-companies) like Netflix, PayPal, Uber, and many more. Node.js really is what you should invest your time in, instead of outdated technology like PHP. In summary, if you already know JavaScript, learning Node is the logical next step for you! It will make you a better, more versatile and complete developer, which will ultimately boost your opportunities in the job market! And I created this course to help you do exactly that! It really is the course I wish I had when I was first learning back-end development with Node.js and all related technologies. And this is what you get by signing up today: Lifetime access to 40+ hours of HD quality videos. No monthly subscription. Learn at your own pace, whenever you want; All videos are downloadable. Learn wherever you want, even without an internet connection! Friendly and fast support in the course Q&A whenever you have questions or get stuck; English closed captions (not the auto-generated ones provided by Udemy); Course slides in PDF format; Downloadable assets, starter code and final code for each section; Lots of small challenges are included in the videos so you can track your progress. And now, I hope to welcome you as a new student in my course! So click that "Enroll" button right now, and join me in this adventure today! But if you're not 100% sure yet, just go ahead and watch the promo video to take a look at the course project. I promise you will be amazed :) Read the full article
0 notes
Text
Wooxon - WooCommerce WordPress Theme
New Post has been published on https://babesgobananas.com/wooxon-woocommerce-wordpress-theme/
Wooxon - WooCommerce WordPress Theme


Wooxon Compatible with RTL Language, WC Vendors, WC Vendors Pro, Dokan & WC Marketplace for multi-vendor platform, Also Compatible BuddyPress
Wooxon – is a professional online store WooCommerce WordPress theme, built exclusively for online shopping and It was built for any online digital store…
Wooxon design & functionality suited for men store, women store, clothing store, electronics shop, furniture store, hi-tech store, watch store, book store, cosmetics shop, luxury jewelry, Sunglass shop, Cycling shop, vendor based marketplaces, affiliate websites. Wooxon come with advanced features eCommerce websites like Multi Vendor Amazon, Alibaba, Flipkart, AliExpress etc. Multi vendor base ecommerce webpage need to contact other vendor so Wooxon fully capable with BuddyPress Social Networking
You can choose between different header and footer, change typography, Woocommerce shop setting and blog settings and create unique page layouts with WPBakery page builder premium plugin, which comes free as a part of the theme.
Let’s experience this awesome and to explore more features in this theme. We are sure that our Wooxon theme love in first sight.


General Features
Absolutely no programming skills required
Creative modern minimalistic design
Dedicated Support
Detailed documentation
Video tutorials (available on YouTube)
Drag and drop page builder
Highly customizable
RTL Language Support
Built with latest web technologies
Effortless updates via Envato Toolkit
Child theme for advanced customization
Exclusive built-in Plugins Quick view, Currency Switcher, Newsletter Popup
Custom made WordPress widgets area
Slider Revolution and WP-backery Visual Composer integrations
Extensive theme settings panel
Cross-browser compatibility
Retina ready and high resolution
Woocommerce full functionality control
Tested with WordPress multisite
Layout
Boxed, float box and Full-width layouts
Masonry, Mixed, Parallax and fixed layouts
Mobile optimize Design and layout perfectly works with mobile
Considerably improved WooCommerce widgets
Customized layout for newsletter
Left, right and sidebars
Control sidebars as you want every page
Performance
Demos with grade A in loading speed!!!
SEO optimized
Exceptional integration of touchable devices
Ultra smooth and ultra efficient parallax effect
Ecommerce Featured
Shop page
Shop Grid and list
Ajaxified filtering
Product layout combination 3 different type
1, 2, 3, 4 and 5 column
Sidebar Control
Possible shop page slider, product shortcode
Toggle widget minicart normal and canvas
Ajaxified add to cart hover
Ajaxified wishlist page
Ajaxified Compare page
Ajaxified Product quick view
Ajaxified WooCommerce pagination
New Product base with date control
Single products
Four different product details for different purposes
Gallery of images
Featured video
Supper Zoom effect
Variable product selection with gallery variable product
Size guide and Delivery return policy
Custom tabs 2 enable disable every product
Image attribute type in addition to text attribute type
Add to product compare icon
Add to wishlist icon
Social sharing icon
Improved shortcodes & widgets
Product brand image and list
Product Category image and list
Recent products
On-sale products shortcode
Featured products shortcode
Top rated products shortcode
Product categories shortcode
Best selling products shortcode
Order tracking form
Terms and conditions
Without use Third Party Plugin
Built-in WP Native Mega menu with image configure
Built-in Instagram Widget & Shortcode
Built-in Newsletter Popup
Built-in Product Quick view
Built-in Currency switcher multi currency
Built-in Ajax Login & registration
Built-in Product Brand
Built-in Product single Page
Custom tabs
Size guide
Built-in Custom post type slug change like testimonial
Built-in Unlimited widgets area
Built-in Offline page when maintenance mode
Plugins supported
Multi Vendor Platform:
Dokan
WC Vendors
WC Marketplace
Multi vendor Feature:
Sidebar Controlling
Profile Banner and Cover photo
WC vendor & WC Marketplace shop page vendor label option single page after cart button
Single page product tabs Seller details information
Single page WC Marketplace vendor Report from option
Other all option similar to Multi vendor demo site
Social Networking:
BuddyPress Fully Integration with Wooxon
Header and Footer
Header
7 different type layout
Vertical menu enable disable
Mega menu 2,3,4,5 column
Change your specific color as you want background, font color, hover color
Topbar
Topbar top Menu left side
Topbar left side Theme currency switcher enable disable
Topbar inner enable area (custom html works & shortcode)
WPML plugin language, Currency Switcher
Change your specific color as you want background, font color, hover color
Footer
Footer different type possible: You can configure as you want
Footer bottom: Like as: center mode, 2 column mode and lot of option to configure your text image social icon
Footer inner (3 step widget) enable, disable: You configure your widgets here: 1,2, 2/3,3,4, column possible
Change your specific color as you want: background, font color, hover color
Post and Page Layout
Possible left, right and both sidebar possible
Header
Theme option override that page
Header different layout and some featured
Breadcrumb
Theme option override that page
Custom title
Custom background image fixed
Body content possible container (custom:1140px you can set your size) and container fluid
Footer
Theme option override that page
Footer inner, inner top, inner top two possible different column and different widgets
Blog layout
Masonry and Mixed, list layouts
1,2,3,4 columns
Advance meta
Post Image, Gallery Video, Link, Quoit Native configure WP
Social Shearing
Custom category selection
Support System [Max 6 to 24 Turnaround Support]
Fast and friendly support even best to other author. Ask your questions using our Ticket System on. https://themepiko.com/forums/ if face error issue theme send screenshort. We would happy to help you solve any issues. If you would like to suggest a new layout, question and ideas please feel free sent me a e-mail through my profile page.
Demo site
We would happy to help you solve any issues. please feel free sent me a mail through my profile page.
Images All Images are use only demo purpose
PSD only Include logo(ai) Map Marker(ai)
Changelog
# v1.2 ## 04/18/19
### if WooComece plugins 3.6.1 version acive. you need to update our theme and plugins pikoworks core, pkoworks custom post type, pikoworks switcher.### *fix: quantity number issue product *fix: ajax login issue *fix: capability issue woocommerce 3.6x *update: WPbakery Latest version *update: Slider Revolution latest version *fix other minor css issue.
# v1.1 ## 02/26/19
*Added: new demo furniture. *fix: post format meta box issue *fix: php 7.3 warning remove *Capable: WordPress version 5.1 *Capable: woocommerce version 3.5 issue *update: WPbakery Latest version *update: Slider Revolution latest version *fix other minor css issue.
# v1.0.3 ## 12/19/18
* fix php wearing issue read more button * fix sticky menu responsive & enable mobile * fix Gutenberg editor issue, * fix ajax login issue * fix other some minor css issue
# v1.0.2 ## 12/14/18
* capability WordPress 5x * fix WPML plugins switcher * fix responsive issue * fix sticky menu * fix Gutenberg editor issue * fix product search column issue * update widgets demo data * update theme option data * update WPBekery page builder latest version
# v1.0.1 ## 11/28/18
* Fix some minor css responsive issue. * update widgets demo data * update WPBakery Page Builder latest version
- Initial Release
Source
0 notes
Text
Moodie Multi-Purpose WordPress Theme
New Post has been published on http://wpelegant.com/moodie-multi-purpose-wordpress-theme/
Moodie Multi-Purpose WordPress Theme

Moodie Multi-Purpose WordPress Theme http://themeforest.net/category/wordpress/creative


Latest updated 19 JUN 2014 please see the update below
Demo preview pages loading slowly sorry for this because we’re using Multi-site with sharing hosting, it will loading more faster for single site.
Moodie Multi-Purpose WordPress Theme
Moodie is a Multi-Purpose WordPress Theme, you can use this theme as Business , Agency or Portfolio website, It’s modern design built with HTML5 and CSS3, built-in theme option framework so you can easily to customize beyond your idea and also this theme is responsive.
Page Builder with Drag and Drop blocks you can easily to create page like whatever you want,it’s simple but more powerful there’re 22 blocks available for you, here is tutorial how to use it http://www.screenr.com/iI87
Homepage block active if you don’t want to use page builder it is easy for you to tick the block via theme options to show up on the homepage for example : tick ” portfolio block ” then the homepage will show only porfolio block.
Number counter you can use it counter to your client number, your resolution issue etc.
Full screen slider / Video + Parallax background + etc made your site nice looking and appealing.
Highlight color The light green highlight colors you can choose whatever color you think that suit for your website it’s very simply just choose the color via theme options.
SEO We create this Theme using heading tag ” H1 , H2 , … H6 ” for title that is the best way to practice helping search engines to list your site.
Localization This theme including .mo/.po files so you can edit to any language.
Documentation file + Demo XML These will guide you on how to set up the theme and its demo content.
New homepage and header see now

Theme Features :
Compatible with the Latest WordPress Version
Number counter jQuery
Page Builder drag and drop
Wysija Newsletters plugin integrated
200+ Font Awesome
Demo-XML included
Parallax Background for content
Custom post type ( Support both image and video ) plugin
Responsive layout for ipad , iphone …
3 different homepage types, 2 portfolios layouts, etc
Localization supported
Responsive pricing table
Animated skill bar
Short-codes generator plugin
Built-in Theme Option Panel
Testimonials animation
Pagination
Image hover effects
Highlight color ( All light blue color you can change to any color via theme option)
More than 7 widgets
600+ google font
10+ pages
Google Map with Marker
Pretty Photo
Portfolios filter
Cross Browser Compatible
And much more
Credits :
+ Video preview
Video preview by Team Nine.
Video preview by The Cgbros.
Video preview by Ultravideofull.
+ Demo Image
Images are for demonstration purposes only and replaced with placeholder images in the download file
http://creattica.com/
You can purchase photo here
Daniele Zedda
Aurimas Adomavicius
+ Patterns
http://www.kollermedia.at/pattern4u
http://www.dinpattern.com/category/patterns/
+ Icons
http://fortawesome.github.io/Font-Awesome/3.2.1/icons/
http://iconsweets.com/
http://damieng.com/creative/icons/silk-companion-1-icons
http://www.graphicrating.com/2009/06/19/quartz-icon-pack/
Changelog
19 Jun 2014 – V 1.1
Add new homepage + header and new blog.
Fixed css issue.
Update documentation.
File change:
functions/js.php js/custom.php js/jquery.carouFredSel-6.2.1-packed.js ( New file added ) css/style.php css/base.php includes/theme-options.php header-home_2.php( New file added ) index2.php( New file added ) home5.php ( New file added )
10 Jun 2014 – File still be V 1.0
Fixed jQuery conflict.
Fixed css issue.
File change:
functions/js.php js/custom.php css/style.php css/base.php includes/theme-options.php header-home.php contact.php home4.php ( New file added ) home-pagebuilder.php ( New file added ) js/jquery.color.js ( New file added ) lib/plugins/revslider.zip ( New file added )
More Premium Themes By Decneo:


34
Check WordPress Theme
0 notes