#upload files to amazon s3
Explore tagged Tumblr posts
Visit Tumblr Blog
Explore Tumblr blogs with no restrictions, modern design and the best experience.
Last Seen Tumblr Blogs


Fun Fact
70% of Tumblr users say the Dashboard is their favorite place to spend time online.
Text
Working with Django File Storage Systems
Mastering Django File Storage: Local and Cloud Integration
Introduction Handling file uploads and storage is a common requirement in web applications. Django provides a flexible framework for managing files, allowing developers to store files on the local filesystem or integrate with various cloud storage services. This article will guide you through working with Django’s file storage systems, covering both local and cloud storage…
#Amazon S3#cloud storage#Django file storage#Django file uploads#Django S3 integration#local file storage#Python web development
0 notes
Text
Learn how to seamlessly transfer files from your local machine to Amazon S3, AWS's robust cloud storage solution.
1 note
·
View note
Video
youtube
Complete Hands-On Guide: Upload, Download, and Delete Files in Amazon S3 Using EC2 IAM Roles
Are you looking for a secure and efficient way to manage files in Amazon S3 using an EC2 instance? This step-by-step tutorial will teach you how to upload, download, and delete files in Amazon S3 using IAM roles for secure access. Say goodbye to hardcoding AWS credentials and embrace best practices for security and scalability.
What You'll Learn in This Video:
1. Understanding IAM Roles for EC2: - What are IAM roles? - Why should you use IAM roles instead of hardcoding access keys? - How to create and attach an IAM role with S3 permissions to your EC2 instance.
2. Configuring the EC2 Instance for S3 Access: - Launching an EC2 instance and attaching the IAM role. - Setting up the AWS CLI on your EC2 instance.
3. Uploading Files to S3: - Step-by-step commands to upload files to an S3 bucket. - Use cases for uploading files, such as backups or log storage.
4. Downloading Files from S3: - Retrieving objects stored in your S3 bucket using AWS CLI. - How to test and verify successful downloads.
5. Deleting Files in S3: - Securely deleting files from an S3 bucket. - Use cases like removing outdated logs or freeing up storage.
6. Best Practices for S3 Operations: - Using least privilege policies in IAM roles. - Encrypting files in transit and at rest. - Monitoring and logging using AWS CloudTrail and S3 access logs.
Why IAM Roles Are Essential for S3 Operations: - Secure Access: IAM roles provide temporary credentials, eliminating the risk of hardcoding secrets in your scripts. - Automation-Friendly: Simplify file operations for DevOps workflows and automation scripts. - Centralized Management: Control and modify permissions from a single IAM role without touching your instance.
Real-World Applications of This Tutorial: - Automating log uploads from EC2 to S3 for centralized storage. - Downloading data files or software packages hosted in S3 for application use. - Removing outdated or unnecessary files to optimize your S3 bucket storage.
AWS Services and Tools Covered in This Tutorial: - Amazon S3: Scalable object storage for uploading, downloading, and deleting files. - Amazon EC2: Virtual servers in the cloud for running scripts and applications. - AWS IAM Roles: Secure and temporary permissions for accessing S3. - AWS CLI: Command-line tool for managing AWS services.
Hands-On Process: 1. Step 1: Create an S3 Bucket - Navigate to the S3 console and create a new bucket with a unique name. - Configure bucket permissions for private or public access as needed.
2. Step 2: Configure IAM Role - Create an IAM role with an S3 access policy. - Attach the role to your EC2 instance to avoid hardcoding credentials.
3. Step 3: Launch and Connect to an EC2 Instance - Launch an EC2 instance with the IAM role attached. - Connect to the instance using SSH.
4. Step 4: Install AWS CLI and Configure - Install AWS CLI on the EC2 instance if not pre-installed. - Verify access by running `aws s3 ls` to list available buckets.
5. Step 5: Perform File Operations - Upload files: Use `aws s3 cp` to upload a file from EC2 to S3. - Download files: Use `aws s3 cp` to download files from S3 to EC2. - Delete files: Use `aws s3 rm` to delete a file from the S3 bucket.
6. Step 6: Cleanup - Delete test files and terminate resources to avoid unnecessary charges.
Why Watch This Video? This tutorial is designed for AWS beginners and cloud engineers who want to master secure file management in the AWS cloud. Whether you're automating tasks, integrating EC2 and S3, or simply learning the basics, this guide has everything you need to get started.
Don’t forget to like, share, and subscribe to the channel for more AWS hands-on guides, cloud engineering tips, and DevOps tutorials.
#youtube#aws iamiam role awsawsaws permissionaws iam rolesaws cloudaws s3identity & access managementaws iam policyDownloadand Delete Files in Amazon#IAMrole#AWS#cloudolus#S3#EC2
2 notes
·
View notes
Text
Storing images in mySql DB - explanation + Uploadthing example/tutorial
(Scroll down for an uploadthing with custom components tutorial)
My latest project is a photo editing web application (Next.js) so I needed to figure out how to best store images to my database. MySql databases cannot store files directly, though they can store them as blobs (binary large objects). Another way is to store images on a filesystem (e.g. Amazon S3) separate from your database, and then just store the URL path in your db.
Why didn't I choose to store images with blobs?
Well, I've seen a lot of discussions on the internet whether it is better to store images as blobs in your database, or to have them on a filesystem. In short, storing images as blobs is a good choice if you are storing small images and a smaller amount of images. It is safer than storing them in a separate filesystem since databases can be backed up more easily and since everything is in the same database, the integrity of the data is secured by the database itself (for example if you delete an image from a filesystem, your database will not know since it only holds a path of the image). But I ultimately chose uploading images on a filesystem because I wanted to store high quality images without worrying about performance or database constraints. MySql has a variety of constraints for data sizes which I would have to override and operations with blobs are harder/more costly for the database.
Was it hard to set up?
Apparently, hosting images on a separate filesystem is kinda complicated? Like with S3? Or so I've heard, never tried to do it myself XD BECAUSE RECENTLY ANOTHER EASIER SOLUTION FOR IT WAS PUBLISHED LOL. It's called uploadthing!!!
What is uploadthing and how to use it?
Uploadthing has it's own server API on which you (client) post your file. The file is then sent to S3 to get stored, and after it is stored S3 returns file's URL, which then goes trough uploadthing servers back to the client. After that you can store that URL to your own database.

Here is the graph I vividly remember taking from uploadthing github about a month ago, but can't find on there now XD It's just a graphic version of my basic explanation above.
The setup is very easy, you can just follow the docs which are very straightforward and easy to follow, except for one detail. They show you how to set up uploadthing with uploadthing's own frontend components like <UploadButton>. Since I already made my own custom components, I needed to add a few more lines of code to implement it.
Uploadthing for custom components tutorial
1. Imports
You will need to add an additional import generateReactHelpers (so you can use uploadthing functions without uploadthing components) and call it as shown below
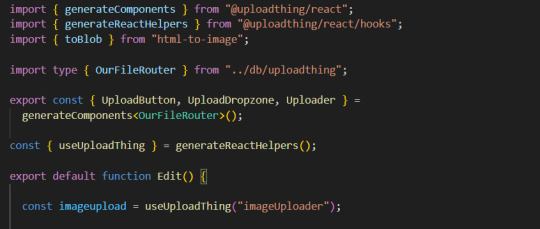
2. For this example I wanted to save an edited image after clicking on the save button.
In this case, before calling the uploadthing API, I had to create a file and a blob (not to be confused with mySql blob) because it is actually an edited picture taken from canvas, not just an uploaded picture, therefore it's missing some info an uploaded image would usually have (name, format etc.). If you are storing an uploaded/already existing picture, this step is unnecessary. After uploading the file to uploadthing's API, I get it's returned URL and send it to my database.

You can find the entire project here. It also has an example of uploading multiple files in pages/create.tsx
I'm still learning about backend so any advice would be appreciated. Writing about this actually reminded me of how much I'm interested in learning about backend optimization c: Also I hope the post is not too hard to follow, it was really hard to condense all of this information into one post ;_;
#codeblr#studyblr#webdevelopment#backend#nextjs#mysql#database#nodejs#programming#progblr#uploadthing
4 notes
·
View notes
Text
The Power of AI and Human Collaboration in Media Content Analysis

In today’s world binge watching has become a way of life not just for Gen-Z but also for many baby boomers. Viewers are watching more content than ever. In particular, Over-The-Top (OTT) and Video-On-Demand (VOD) platforms provide a rich selection of content choices anytime, anywhere, and on any screen. With proliferating content volumes, media companies are facing challenges in preparing and managing their content. This is crucial to provide a high-quality viewing experience and better monetizing content.
Some of the use cases involved are,
Finding opening of credits, Intro start, Intro end, recap start, recap end and other video segments
Choosing the right spots to insert advertisements to ensure logical pause for users
Creating automated personalized trailers by getting interesting themes from videos
Identify audio and video synchronization issues
While these approaches were traditionally handled by large teams of trained human workforces, many AI based approaches have evolved such as Amazon Rekognition’s video segmentation API. AI models are getting better at addressing above mentioned use cases, but they are typically pre-trained on a different type of content and may not be accurate for your content library. So, what if we use AI enabled human in the loop approach to reduce cost and improve accuracy of video segmentation tasks.
In our approach, the AI based APIs can provide weaker labels to detect video segments and send for review to be trained human reviewers for creating picture perfect segments. The approach tremendously improves your media content understanding and helps generate ground truth to fine-tune AI models. Below is workflow of end-2-end solution,
Raw media content is uploaded to Amazon S3 cloud storage. The content may need to be preprocessed or transcoded to make it suitable for streaming platform (e.g convert to .mp4, upsample or downsample)
AWS Elemental MediaConvert transcodes file-based content into live stream assets quickly and reliably. Convert content libraries of any size for broadcast and streaming. Media files are transcoded to .mp4 format
Amazon Rekognition Video provides an API that identifies useful segments of video, such as black frames and end credits.
Objectways has developed a Video segmentation annotator custom workflow with SageMaker Ground Truth labeling service that can ingest labels from Amazon Rekognition. Optionally, you can skip step#3 if you want to create your own labels for training custom ML model or applying directly to your content.
The content may have privacy and digitial rights management requirements and protection. The Objectway’s Video Segmentaton tool also supports Digital Rights Management provider integration to ensure only authorized analyst can look at the content. Moreover, the content analysts operate out of SOC2 TYPE2 compliant facilities where no downloads or screen capture are allowed.
The media analysts at Objectways’ are experts in content understanding and video segmentation labeling for a variety of use cases. Depending on your accuracy requirements, each video can be reviewed or annotated by two independent analysts and segment time codes difference thresholds are used for weeding out human bias (e.g., out of consensus if time code differs by 5 milliseconds). The out of consensus labels can be adjudicated by senior quality analyst to provide higher quality guarantees.
The Objectways Media analyst team provides throughput and quality gurantees and continues to deliver daily throughtput depending on your business needs. The segmented content labels are then saved to Amazon S3 as JSON manifest format and can be directly ingested into your Media streaming platform.
Conclusion
Artificial intelligence (AI) has become ubiquitous in Media and Entertainment to improve content understanding to increase user engagement and also drive ad revenue. The AI enabled Human in the loop approach outlined is best of breed solution to reduce the human cost and provide highest quality. The approach can be also extended to other use cases such as content moderation, ad placement and personalized trailer generation.
Contact [email protected] for more information.
2 notes
·
View notes
Text
The Accidental Unlocking: 6 Most Common Causes of Data Leaks

In the ongoing battle for digital security, we often hear about "data breaches" – images of malicious hackers breaking through firewalls. But there's a more subtle, yet equally damaging, threat lurking: data leaks.
While a data breach typically implies unauthorized access by a malicious actor (think someone kicking down the door), a data leak is the accidental or unintentional exposure of sensitive information to an unauthorized environment (more like leaving the door unlocked or a window open). Both lead to compromised data, but their causes and, sometimes, their detection and prevention strategies can differ.
Understanding the root causes of data leaks is the first critical step toward building a more robust defense. Here are the 6 most common culprits:
1. Cloud Misconfigurations
The rapid adoption of cloud services (AWS, Azure, GCP, SaaS platforms) has brought immense flexibility but also a significant security challenge. Misconfigured cloud settings are a leading cause of data leaks.
How it leads to a leak: Leaving storage buckets (like Amazon S3 buckets) publicly accessible, overly permissive access control lists (ACLs), misconfigured firewalls, or default settings that expose services to the internet can inadvertently expose vast amounts of sensitive data. Developers or administrators might not fully understand the implications of certain settings.
Example: A company's customer database stored in a cloud bucket is accidentally set to "public read" access, allowing anyone on the internet to view customer names, addresses, and even financial details.
Prevention Tip: Implement robust Cloud Security Posture Management (CSPM) tools and enforce Infrastructure as Code (IaC) to ensure secure baselines and continuous monitoring for misconfigurations.
2. Human Error / Accidental Exposure
Even with the best technology, people make mistakes. Human error is consistently cited as a top factor in data leaks.
How it leads to a leak: This can range from sending an email containing sensitive customer data to the wrong recipient, uploading confidential files to a public file-sharing service, losing an unencrypted laptop or USB drive, or simply discussing sensitive information in an insecure environment.
Example: An employee emails a spreadsheet with salary information to the entire company instead of just the HR department. Or, a developer accidentally pastes internal API keys into a public forum like Stack Overflow.
Prevention Tip: Implement comprehensive, ongoing security awareness training for all employees. Enforce strong data handling policies, promote the use of secure communication channels, and ensure devices are encrypted.
3. Weak or Stolen Credentials
Compromised login credentials are a golden ticket for attackers, leading directly to data access.
How it leads to a leak: This isn't always about a direct "hack." It could be due to:
Phishing: Employees falling for phishing emails that trick them into revealing usernames and passwords.
Weak Passwords: Easily guessable passwords or reusing passwords across multiple services, making them vulnerable to "credential stuffing" attacks if one service is breached.
Lack of MFA: Even if a password is stolen, Multi-Factor Authentication (MFA) adds a critical second layer of defense. Without it, stolen credentials lead directly to access.
Example: An attacker obtains an employee's reused password from a previous data breach and uses it to log into the company's internal file sharing system, exposing sensitive documents.
Prevention Tip: Enforce strong, unique passwords, mandate MFA for all accounts (especially privileged ones), and conduct regular phishing simulations to train employees.
4. Insider Threats (Negligent or Malicious)
Sometimes, the threat comes from within. Insider threats can be accidental or intentional, but both lead to data exposure.
How it leads to a leak:
Negligent Insiders: Employees who are careless with data (e.g., leaving a workstation unlocked, storing sensitive files on personal devices, bypassing security protocols for convenience).
Malicious Insiders: Disgruntled employees or those motivated by financial gain or espionage who intentionally steal, leak, or destroy data they have legitimate access to.
Example: A disgruntled employee downloads the company's entire customer list before resigning, or an employee stores client financial data on an unsecured personal cloud drive.
Prevention Tip: Implement robust access controls (least privilege), conduct regular audits of user activity, establish strong data loss prevention (DLP) policies, and foster a positive work environment to mitigate malicious intent.
5. Software Vulnerabilities & Unpatched Systems
Software is complex, and bugs happen. When these bugs are security vulnerabilities, they can be exploited to expose data.
How it leads to a leak: Unpatched software (operating systems, applications, network devices) contains known flaws that attackers can exploit to gain unauthorized access to systems, where they can then access and exfiltrate sensitive data. "Zero-day" vulnerabilities (unknown flaws) also pose a significant risk until they are discovered and patched.
Example: A critical vulnerability in a web server application allows an attacker to bypass authentication and access files stored on the server, leading to a leak of customer information.
Prevention Tip: Implement a rigorous patch management program, automate updates where possible, and regularly conduct vulnerability assessments and penetration tests to identify and remediate flaws before attackers can exploit them.
6. Third-Party / Supply Chain Risks
In today's interconnected business world, you're only as secure as your weakest link, which is often a third-party vendor or partner.
How it leads to a leak: Organizations share data with numerous vendors (SaaS providers, IT support, marketing agencies, payment processors). If a third-party vendor suffers a data leak due to their own vulnerabilities or misconfigurations, your data that they hold can be exposed.
Example: A marketing agency storing your customer contact list on their internal server gets breached, leading to the leak of your customer data.
Prevention Tip: Conduct thorough vendor risk assessments, ensure strong data protection clauses in contracts, and continuously monitor third-party access to your data. Consider implementing secure data sharing practices that minimize the amount of data shared.
The common thread among these causes is that many data leaks are preventable. By understanding these vulnerabilities and proactively implementing a multi-layered security strategy encompassing technology, processes, and people, organizations can significantly reduce their risk of becoming the next data leak headline.
0 notes
Text
dizzy Nulled Script 5.0

Download dizzy Nulled Script – The Ultimate Content Monetization Platform Are you looking for a powerful, versatile, and free way to build a revenue-generating platform for content creators? The dizzy Nulled Script is your gateway to launching a full-featured digital marketplace without spending a fortune. With this free script, you can empower creators, sell exclusive content, and generate income—all from a beautifully designed and professionally coded system. What is dizzy Nulled Script? The dizzy is a premium PHP-based solution developed to help users create a content-sharing and monetization platform similar to OnlyFans, Patreon, or Buy Me a Coffee. It allows creators to upload images, videos, stories, and other digital content, offer subscriptions, and interact with their followers through a feature-rich dashboard. Best of all, you can now access the dizzy for free and take full advantage of its powerful tools—without paying for a license. Technical Specifications of dizzy Nulled Script Framework: Laravel 8+ Database: MySQL Frontend: Bootstrap 5, jQuery File Uploads: Amazon S3 and local storage support Payment Gateways: PayPal, Stripe, Bank Transfer, and more Languages: Multi-language support Device Compatibility: Fully responsive on all devices Top Features and Benefits By choosing the dizzy Nulled Script, you’ll gain access to an incredible suite of features that will take your content-sharing platform to the next level: Subscription System: Creators can set monthly fees and offer exclusive content to paying subscribers. Live Notifications: Users receive real-time alerts for messages, follows, and interactions. Private Messaging: Secure one-on-one communication between users and creators. Multi-Currency Support: Sell content globally without limitations. Content Scheduling: Creators can schedule posts for maximum engagement. Monetization Tools: Tips, pay-per-view content, and donation buttons. Who Can Benefit from dizzy Nulled Script? The dizzy Nulled Script is ideal for developers, entrepreneurs, and digital marketers who want to create a personalized space for creators. Whether you’re launching a new niche platform or offering creators a new way to earn, this script offers flexibility, performance, and control. It’s also perfect for influencers, educators, coaches, and artists who want to share exclusive content with a loyal community—and get paid for their creativity. How to Install and Use dizzy Nulled Script Getting started with the dizzy is straightforward, even for beginners. Simply download the package, upload it to your server, and follow the built-in installation wizard. Here's a quick overview: Unzip the downloaded package to your web server directory. Set up a MySQL database and configure your .env file with the appropriate credentials. Run the installation script by visiting your domain. Follow the on-screen instructions to complete setup. Log in to your admin dashboard and start customizing your platform! No advanced coding skills? No problem. The script is well-documented and user-friendly, making it easy to configure even for non-developers. FAQs About dizzy Nulled Script Is dizzy Nulled Script safe to use? Yes, when downloaded from a trusted source, the dizzy Nulled Script is thoroughly tested and secure. Always ensure you're using the latest version for optimal performance and safety. Can I customize the dizzy Script? Absolutely. The script is fully open-source and built on Laravel, giving you full control over its appearance, features, and integrations. Is it legal to use the nulled version? While using a nulled script may violate licensing agreements with the original developer, many users choose to explore nulled options to evaluate the platform before purchasing. We encourage you to support developers if the tool adds value to your business. Conclusion If you’re serious about launching a content monetization platform without the hefty price tag, the dizzy is your ideal solution.
Rich in features, easy to use, and completely free when downloaded from our trusted source, this script will help you build a thriving community of creators and subscribers in no time. Ready to expand your digital toolkit? Explore more nulled plugins to power up your web projects with ease. For an advanced WordPress page builder, check out the elementor nulled pro version—also available for free!
0 notes
Text
Integrating ROSA Applications with AWS Services (CS221)
In today's rapidly evolving cloud-native landscape, enterprises are looking for scalable, secure, and fully managed Kubernetes solutions that work seamlessly with existing cloud infrastructure. Red Hat OpenShift Service on AWS (ROSA) meets that demand by combining the power of Red Hat OpenShift with the scalability and flexibility of Amazon Web Services (AWS).
In this blog post, we’ll explore how you can integrate ROSA-based applications with key AWS services, unlocking a powerful hybrid architecture that enhances your applications' capabilities.
📌 What is ROSA?
ROSA (Red Hat OpenShift Service on AWS) is a managed OpenShift offering jointly developed and supported by Red Hat and AWS. It allows you to run containerized applications using OpenShift while taking full advantage of AWS services such as storage, databases, analytics, and identity management.
🔗 Why Integrate ROSA with AWS Services?
Integrating ROSA with native AWS services enables:
Seamless access to AWS resources (like RDS, S3, DynamoDB)
Improved scalability and availability
Cost-effective hybrid application architecture
Enhanced observability and monitoring
Secure IAM-based access control using AWS IAM Roles for Service Accounts (IRSA)
🛠️ Key Integration Scenarios
1. Storage Integration with Amazon S3 and EFS
Applications deployed on ROSA can use AWS storage services for persistent and object storage needs.
Use Case: A web app storing images to S3.
How: Use OpenShift’s CSI drivers to mount EFS or access S3 through SDKs or CLI.
yaml
Copy
Edit
apiVersion: v1
kind: PersistentVolumeClaim
metadata:
name: efs-pvc
spec:
accessModes:
- ReadWriteMany
storageClassName: efs-sc
resources:
requests:
storage: 5Gi
2. Database Integration with Amazon RDS
You can offload your relational database requirements to managed RDS instances.
Use Case: Deploying a Spring Boot app with PostgreSQL on RDS.
How: Store DB credentials in Kubernetes secrets and use RDS endpoint in your app’s config.
env
Copy
Edit
SPRING_DATASOURCE_URL=jdbc:postgresql://<rds-endpoint>:5432/mydb
3. Authentication with AWS IAM + OIDC
ROSA supports IAM Roles for Service Accounts (IRSA), enabling fine-grained permissions for workloads.
Use Case: Granting a pod access to a specific S3 bucket.
How:
Create an IAM role with S3 access
Associate it with a Kubernetes service account
Use OIDC to federate access
4. Observability with Amazon CloudWatch and Prometheus
Monitor your workloads using Amazon CloudWatch Container Insights or integrate Prometheus and Grafana on ROSA for deeper insights.
Use Case: Track application metrics and logs in a single AWS dashboard.
How: Forward logs from OpenShift to CloudWatch using Fluent Bit.
5. Serverless Integration with AWS Lambda
Bridge your ROSA applications with AWS Lambda for event-driven workloads.
Use Case: Triggering a Lambda function on file upload to S3.
How: Use EventBridge or S3 event notifications with your ROSA app triggering the workflow.
🔒 Security Best Practices
Use IAM Roles for Service Accounts (IRSA) to avoid hardcoding credentials.
Use AWS Secrets Manager or OpenShift Vault integration for managing secrets securely.
Enable VPC PrivateLink to keep traffic within AWS private network boundaries.
🚀 Getting Started
To start integrating your ROSA applications with AWS:
Deploy your ROSA cluster using the AWS Management Console or CLI
Set up AWS CLI & IAM permissions
Enable the AWS services needed (e.g., RDS, S3, Lambda)
Create Kubernetes Secrets and ConfigMaps for service integration
Use ServiceAccounts, RBAC, and IRSA for secure access
🎯 Final Thoughts
ROSA is not just about running Kubernetes on AWS—it's about unlocking the true hybrid cloud potential by integrating with a rich ecosystem of AWS services. Whether you're building microservices, data pipelines, or enterprise-grade applications, ROSA + AWS gives you the tools to scale confidently, operate securely, and innovate rapidly.
If you're interested in hands-on workshops, consulting, or ROSA enablement for your team, feel free to reach out to HawkStack Technologies – your trusted Red Hat and AWS integration partner.
💬 Let's Talk!
Have you tried ROSA yet? What AWS services are you integrating with your OpenShift workloads? Share your experience or questions in the comments!
For more details www.hawkstack.com
0 notes
Text
How to Build a YouTube Clone App: Tech Stack, Features & Cost Explained
Ever scrolled through YouTube and thought, “I could build this—but better”? You’re not alone. With the explosive growth of content creators and the non-stop demand for video content, building your own YouTube clone isn’t just a dream—it’s a solid business move. Whether you're targeting niche creators, regional content, or building the next big video sharing and streaming platform, there’s room in the market for innovation.
But before you dive into code or hire a dev team, let’s talk about the how. What tech stack powers a platform like YouTube? What features are must-haves? And how much does it actually cost to build something this ambitious?
In this post, we’re breaking it all down—no fluff, no filler. Just a clear roadmap to building a killer YouTube-style platform with insights from the clone app experts at Miracuves.
Core Features of a YouTube Clone App
Before picking servers or coding frameworks, you need a feature checklist. Here’s what every modern YouTube clone needs to include:
1. User Registration & Profiles
Users must be able to sign up via email or social logins. Profiles should allow for customization, channel creation, and subscriber tracking.
2. Video Upload & Encoding
Users upload video files that are auto-encoded to multiple resolutions (360p, 720p, 1080p). You’ll need a powerful media processor and cloud storage to handle this.
3. Streaming & Playback
The heart of any video platform. Adaptive bitrate streaming ensures smooth playback regardless of network speed.
4. Content Feed & Recommendations
Dynamic feeds based on trending videos, subscriptions, or AI-driven interests. The better your feed, the longer users stay.
5. Like, Comment, Share & Subscribe
Engagement drives reach. Build these features in early and make them seamless.
6. Search & Filters
Let users find content via keywords, categories, uploaders, and tags.
7. Monetization Features
Allow ads, tipping (like Super Chat), or paid content access. This is where the money lives.
8. Admin Dashboard
Moderation tools, user management, analytics, and content flagging are essential for long-term growth.
Optional Features:
Live Streaming
Playlists
Stories or Shorts
Video Premiere Countdown
Multilingual Subtitles
Media Suggestion: Feature comparison table between YouTube and your envisioned clone
Recommended Tech Stack
The tech behind YouTube is serious business, but you don’t need Google’s budget to launch a lean, high-performance YouTube clone. Here’s what we recommend at Miracuves:
Frontend (User Interface)
React.js or Vue.js – Fast rendering and reusable components
Tailwind CSS or Bootstrap – For modern, responsive UI
Next.js – Great for server-side rendering and SEO
Backend (Server-side)
Node.js with Express – Lightweight and scalable
Python/Django – Excellent for content recommendation algorithms
Laravel (PHP) – If you're going for quick setup and simplicity
Video Processing & Streaming
FFmpeg – Open-source video encoding and processing
HLS/DASH Protocols – For adaptive streaming
AWS MediaConvert or Mux – For advanced media workflows
Cloudflare Stream – Built-in CDN and encoding, fast global delivery
Storage & Database
Amazon S3 or Google Cloud Storage – For storing video content
MongoDB or PostgreSQL – For structured user and video data
Authentication & Security
JWT (JSON Web Tokens) for secure session management
OAuth 2.0 for social logins
Two-Factor Authentication (2FA) for creators and admins
Analytics & Search
Elasticsearch – Fast, scalable search
Mixpanel / Google Analytics – Track video watch time, drop-offs, engagement
AI-based recommendation engine – Python + TensorFlow or third-party API
Media Suggestion: Architecture diagram showing tech stack components and flow
Development Timeline & Team Composition
Depending on complexity, here’s a typical development breakdown:
MVP Build: 3–4 months
Full Product with Monetization: 6–8 months
Team Needed:
1–2 Frontend Developers
1 Backend Developer
1 DevOps/Cloud Engineer
1 UI/UX Designer
1 QA Tester
1 Project Manager
Want to move faster? Miracuves offers pre-built YouTube clone app solutions that can cut launch time in half.
Estimated Cost Breakdown
Here’s a rough ballpark for custom development: PhaseEstimated CostUI/UX Design$3,000 – $5,000Frontend Development$6,000 – $10,000Backend Development$8,000 – $12,000Video Processing Setup$4,000 – $6,000QA & Testing$2,000 – $4,000Cloud Infrastructure$500 – $2,000/month (post-launch)
Total Estimated Cost: $25,000 – $40,000+ depending on features and scale
Need it cheaper? Go the smart way with a customizable YouTube clone from Miracuves—less risk, faster time-to-market, and scalable from day one.
Final Thoughts
Building a YouTube clone isn’t just about copying features—it’s about creating a platform that gives creators and viewers something fresh, intuitive, and monetizable. With the right tech stack, must-have features, and a clear plan, you’re not just chasing YouTube—you’re building your own lane in the massive video sharing and streaming platform space.
At Miracuves, we help startups launch video platforms that are secure, scalable, and streaming-ready from day one. Want to build a revenue-generating video app that users love? Let’s talk.
FAQs
How much does it cost to build a YouTube clone?
Expect $25,000–$40,000 for a custom build. Ready-made solutions from Miracuves can reduce costs significantly.
Can I monetize my YouTube clone?
Absolutely. Use ads, subscriptions, tipping, pay-per-view, or affiliate integrations.
What’s the hardest part of building a video streaming app?
Video encoding, storage costs, and scaling playback across geographies. You’ll need a solid cloud setup.
Do I need to build everything from scratch?
No. Using a YouTube clone script from Miracuves saves time and still offers full customization.
How long does it take to launch?
A simple MVP may take 3–4 months. A full-feature platform can take 6–8 months. Miracuves can cut that timeline in half.
Is it legal to build a YouTube clone?
Yes, as long as you’re not copying YouTube’s trademark or copyrighted content. The tech and business model are fair game.
1 note
·
View note
Text
How Long Does It Take to Learn Cloud Computing?

It’s 2025. Most tech roles — from app development to data analytics — mention “cloud” in the job description. Whether you’re a student, a working professional, or someone switching careers, you’ve probably wondered:
“How long will it take me to actually learn cloud computing?”
The short answer? Anywhere between 30 to 90 days — depending on your learning path, goals, and support system.
But before we talk timeframes, let’s understand what cloud computing really is.
☁️ What is Cloud Computing? (In Simple Terms)
In the old days, companies needed large rooms filled with servers to host websites or run software. That meant high costs, physical space, and endless maintenance.
Cloud computing changed everything.
Today, companies rent computing power, storage, and tools from cloud service providers over the internet. This means:
No need to buy hardware
Scale up or down anytime
Pay only for what you use
Every time you use Google Drive, stream Netflix, or upload a file to Dropbox — you’re using the cloud.
🧑💻 Who Uses Cloud Computing?
Everyone — from startups to governments. Industries like banking, healthcare, education, logistics, and media all rely on the cloud for flexibility, speed, and cost-efficiency.
And that’s exactly why cloud professionals are in such high demand.
🌐 The 3 Major Cloud Platforms (You Only Need to Start with One)
Amazon Web Services (AWS)
Microsoft Azure
Google Cloud Platform (GCP)
👉 Most beginners choose one platform to start with. Later, multi-cloud skills come naturally.
🗓️ So, How Long Does It Really Take to Learn Cloud Computing?
Here’s a breakdown from beginner to job-ready:
Learning StageTime NeededUnderstand cloud basics2–3 weeksLearn one cloud platform (AWS/Azure/GCP)4–6 weeksPractice hands-on projects2–4 weeksPrepare for certifications6–8 weeksBuild resume + apply for jobs2–3 months (total path)
✅ Total: 60–90 days, if you learn consistently with real guidance.
🎓 How NareshIT Helps You Learn Cloud — Without Getting Overwhelmed
We understand that learning cloud from scratch can feel overwhelming. That’s why NareshIT’s cloud programs are designed specifically for beginners, freshers, and working professionals who want structure, mentorship, and results.
🔹 AWS Cloud Training — From Basics to Certification
Duration: 60 Days
Topics: EC2, IAM, Lambda, S3, VPC
Outcome: AWS Cloud Practitioner + Associate Architect
Perks: Live labs, real projects, mock interviews
🔹 Microsoft Azure Course — Admin, DevOps & More
Duration: 45 Days
Topics: VMs, Blob Storage, Azure AD, DevOps with multi cloud in Kphb .
Certifications: AZ-900 & AZ-104
Best For: System Admins, career switchers, IT support
🔹 Google Cloud (GCP) Course — Build with AI & Big Data
Duration: 30 Days
Topics: Compute Engine, IAM, App Engine, BigQuery
Certifications: Associate Cloud Engineer
Best For: Data science, Python learners, analytics-focused roles
📅 New Batches Just Opened at NareshIT 👉 Click here to view our cloud training schedules Choose from online, offline, and fast-track options.
🔍 What Makes NareshIT Different?
🧑🏫 Mentors with real cloud project experience
🧪 Hands-on labs, not just slides
🎓 Certification prep + resume building
💬 Live doubt-clearing sessions
💼 Placement guidance after course completion
Whether you’re studying on weekends or starting full-time, we’ll help you move from theory to hiring room.
🚀 Final Thoughts: The First Step Matters Most
You don’t need a fancy degree to start. You don’t need to be a tech wizard. You just need to begin — with a structured path and the right support.
At NareshIT, we’ve trained over 100,000 learn
#CloudComputing#LearnCloud#AWS#Azure#GoogleCloud#CloudCertifications#DevOps#TechCareers#ITTraining#NareshIT#Upskill#CareerGrowth
0 notes
Text
Creating a Scalable Amazon EMR Cluster on AWS in Minutes

Minutes to Scalable EMR Cluster on AWS
AWS EMR cluster
Spark helps you easily build up an Amazon EMR cluster to process and analyse data. This page covers Plan and Configure, Manage, and Clean Up.
This detailed guide to cluster setup:
Amazon EMR Cluster Configuration
Spark is used to launch an example cluster and run a PySpark script in the course. You must complete the “Before you set up Amazon EMR” exercises before starting.
While functioning live, the sample cluster will incur small per-second charges under Amazon EMR pricing, which varies per location. To avoid further expenses, complete the tutorial’s final cleaning steps.
The setup procedure has numerous steps:
Amazon EMR Cluster and Data Resources Configuration
This initial stage prepares your application and input data, creates your data storage location, and starts the cluster.
Setting Up Amazon EMR Storage:
Amazon EMR supports several file systems, but this article uses EMRFS to store data in an S3 bucket. EMRFS reads and writes to Amazon S3 in Hadoop.
This lesson requires a specific S3 bucket. Follow the Amazon Simple Storage Service Console User Guide to create a bucket.
You must create the bucket in the same AWS region as your Amazon EMR cluster launch. Consider US West (Oregon) us-west-2.
Amazon EMR bucket and folder names are limited. Lowercase letters, numerals, periods (.), and hyphens (-) can be used, but bucket names cannot end in numbers and must be unique across AWS accounts.
The bucket output folder must be empty.
Small Amazon S3 files may incur modest costs, but if you’re within the AWS Free Tier consumption limitations, they may be free.
Create an Amazon EMR app using input data:
Standard preparation involves uploading an application and its input data to Amazon S3. Submit work with S3 locations.
The PySpark script examines 2006–2020 King County, Washington food business inspection data to identify the top ten restaurants with the most “Red” infractions. Sample rows of the dataset are presented.
Create a new file called health_violations.py and copy the source code to prepare the PySpark script. Next, add this file to your new S3 bucket. Uploading instructions are in Amazon Simple Storage Service’s Getting Started Guide.
Download and unzip the food_establishment_data.zip file, save the CSV file to your computer as food_establishment_data.csv, then upload it to the same S3 bucket to create the example input data. Again, see the Amazon Simple Storage Service Getting Started Guide for uploading instructions.
“Prepare input data for processing with Amazon EMR” explains EMR data configuration.
Create an Amazon EMR Cluster:
Apache Spark and the latest Amazon EMR release allow you to launch the example cluster after setting up storage and your application. This may be done with the AWS Management Console or CLI.
Console Launch:
Launch Amazon EMR after login into AWS Management Console.
Start with “EMR on EC2” > “Clusters” > “Create cluster”. Note the default options for “Release,” “Instance type,” “Number of instances,” and “Permissions”.
Enter a unique “Cluster name” without <, >, $, |, or `. Install Spark from “Applications” by selecting “Spark”. Note: Applications must be chosen before launching the cluster. Check “Cluster logs” to publish cluster-specific logs to Amazon S3. The default destination is s3://amzn-s3-demo-bucket/logs. Replace with S3 bucket. A new ‘logs’ subfolder is created for log files.
Select your two EC2 keys under “Security configuration and permissions”. For the instance profile, choose “EMR_DefaultRole” for Service and “EMR_EC2_DefaultRole” for IAM.
Choose “Create cluster”.
The cluster information page appears. As the EMR fills the cluster, its “Status” changes from “Starting” to “Running” to “Waiting”. Console view may require refreshing. Status switches to “Waiting” when cluster is ready to work.
AWS CLI’s aws emr create-default-roles command generates IAM default roles.
Create a Spark cluster with aws emr create-cluster. Name your EC2 key pair –name, set –instance-type, –instance-count, and –use-default-roles. The sample command’s Linux line continuation characters () may need Windows modifications.
Output will include ClusterId and ClusterArn. Remember your ClusterId for later.
Check your cluster status using aws emr describe-cluster –cluster-id myClusterId>.
The result shows the Status object with State. As EMR deployed the cluster, the State changed from STARTING to RUNNING to WAITING. When ready, operational, and up, the cluster becomes WAITING.
Open SSH Connections
Before connecting to your operating cluster via SSH, update your cluster security groups to enable incoming connections. Amazon EC2 security groups are virtual firewalls. At cluster startup, EMR created default security groups: ElasticMapReduce-slave for core and task nodes and ElasticMapReduce-master for main.
Console-based SSH authorisation:
Authorisation is needed to manage cluster VPC security groups.
Launch Amazon EMR after login into AWS Management Console.
Select the updateable cluster under “Clusters”. The “Properties” tab must be selected.
Choose “Networking” and “EC2 security groups (firewall)” from the “Properties” tab. Select the security group link under “Primary node”.
EC2 console is open. Select “Edit inbound rules” after choosing “Inbound rules”.
Find and delete any public access inbound rule (Type: SSH, Port: 22, Source: Custom 0.0.0.0/0). Warning: The ElasticMapReduce-master group’s pre-configured rule that allowed public access and limited traffic to reputable sources should be removed.
Scroll down and click “Add Rule”.
Choose “SSH” for “Type” to set Port Range to 22 and Protocol to TCP.
Enter “My IP” for “Source” or a range of “Custom” trustworthy client IP addresses. Remember that dynamic IPs may need updating. Select “Save.”
When you return to the EMR console, choose “Core and task nodes” and repeat these steps to provide SSH access to those nodes.
Connecting with AWS CLI:
SSH connections may be made using the AWS CLI on any operating system.
Use the command: AWS emr ssh –cluster-id –key-pair-file <~/mykeypair.key>. Replace with your ClusterId and the full path to your key pair file.
After connecting, visit /mnt/var/log/spark to examine master node Spark logs.
The next critical stage following cluster setup and access configuration is phased work submission.
#AmazonEMRcluster#EMRcluster#DataResources#SSHConnections#AmazonEC2#AWSCLI#technology#technews#technologynews#news#govindhtech
0 notes
Text
Hướng dẫn dùng dịch vụ bên ngoài để giảm tải cho website
💖👉🍀 Amazon S3, Wasabi hay Cloudflare R2 là object storage ➔ chúng không dùng để lưu trực tiếp database (SQL). ➔ Chúng chỉ dùng lưu file: ảnh, video, file backup, object file… không lưu dữ liệu kiểu MySQL real-time. ✅ Nếu mục tiêu của bạn là giảm tải cho SQL ➔ sẽ có những hướng tối ưu hóa thật sự chuyên sâu như sau: 1. 🚀 Đẩy uploads / media / backup file ra Amazon S3 / Wasabi / R2 WordPress: dùng…
0 notes
Text
Tìm hiểu về Amazon S3 - Giải pháp lưu trữ đám mây hàng đầu cho doanh nghiệp
Trong thời đại số hóa, nhu cầu lưu trữ dữ liệu một cách an toàn, linh hoạt và hiệu quả ngày càng trở nên cấp thiết. Một trong những dịch vụ lưu trữ đám mây phổ biến và mạnh mẽ nhất hiện nay chính là Amazon S3. Vậy S3 là gì? Nó mang lại lợi ích gì cho doanh nghiệp? Hãy cùng tìm hiểu chi tiết trong bài viết dưới đây.
Amazon S3 là gì?
Amazon S3 (viết tắt của Simple Storage Service) là dịch vụ lưu trữ đám mây do Amazon Web Services (AWS) cung cấp. Với khả năng lưu trữ dữ liệu không giới hạn, S3 cho phép người dùng lưu trữ và truy xuất bất kỳ lượng dữ liệu nào, bất kỳ lúc nào, từ bất cứ đâu trên thế giới.
Dữ liệu được lưu trữ trong các "bucket" (xô), và người dùng có thể tùy chỉnh quyền truy cập, quản lý phiên bản, mã hóa và thậm chí tích hợp với các công cụ khác trong hệ sinh thái AWS.
Lợi ích của việc sử dụng S3
Tính linh hoạt cao
Với Amazon S3, bạn có thể lưu trữ từ vài kilobytes đến hàng terabytes dữ liệu mà không cần lo lắng về hạ tầng vật lý. S3 phù hợp với mọi loại hình doanh nghiệp, từ startup đến các tập đoàn lớn.
Khả năng mở rộng không giới hạn
Không giống như các giải pháp lưu trữ truyền thống, S3 cho phép bạn mở rộng dung lượng lưu trữ một cách liền mạch mà không cần nâng cấp phần cứng.
Bảo mật mạnh mẽ
Amazon S3 hỗ trợ mã hóa dữ liệu khi truyền và khi lưu trữ. Ngoài ra, bạn có thể thiết lập quyền truy cập chi tiết thông qua IAM (Identity and Access Management), giúp kiểm soát chặt chẽ ai có quyền đọc, ghi hay xóa dữ liệu.
Tích hợp dễ dàng
S3 tích hợp tốt với hầu hết các dịch vụ AWS như EC2, Lambda, CloudFront, giúp bạn dễ dàng xây dựng các ứng dụng web, phân phối nội dung, hoặc phân tích dữ liệu lớn.
Chi phí hợp lý
Bạn chỉ trả tiền cho những gì bạn sử dụng. S3 có nhiều lớp lưu trữ khác nhau như Standard, Infrequent Access, Glacier,... giúp tối ưu chi phí theo nhu cầu truy cập dữ liệu.
Những ứng dụng phổ biến của S3
Lưu trữ file website: Hình ảnh, video, CSS, JavaScript,...
Backup và khôi phục dữ liệu: Dùng làm nơi lưu trữ dữ liệu sao lưu định kỳ.
Lưu trữ log và dữ liệu phân tích: Kết hợp với các công cụ như Amazon Athena, Redshift để phân tích dữ liệu lớn.
Truyền tải và phân phối nội dung đa phương tiện: Kết hợp với Amazon CloudFront để tăng tốc độ tải nội dung.
Cách bắt đầu với Amazon S3
Để sử dụng Amazon S3, bạn chỉ cần:
Tạo tài khoản AWS.
Truy cập dịch vụ S3 từ AWS Console.
Tạo bucket mới.
Upload dữ liệu và thiết lập quyền truy cập.
Tích hợp vào hệ thống hoặc ứng dụng của bạn.
Việc cấu hình và triển khai S3 khá đơn giản, và bạn có thể tìm thấy hàng loạt hướng dẫn chi tiết từ AWS hoặc cộng đồng lập trình.
Lưu ý khi sử dụng Amazon S3
Giám sát chi phí thường xuyên: Vì tính linh hoạt cao nên nếu không theo dõi, chi phí có thể tăng nhanh.
Đặt chính sách lifecycle hợp lý: Tự động chuyển dữ liệu cũ sang lớp lưu trữ rẻ hơn như Glacier để tiết kiệm chi phí.
Đảm bảo bảo mật: Không để bucket ở chế độ public trừ khi cần thiết.
Kết luận
Amazon S3 là một giải pháp lưu trữ đám mây mạnh mẽ, linh hoạt và bảo mật cao, rất phù hợp cho nhu cầu lưu trữ dữ liệu của các cá nhân, tổ chức và doanh nghiệp. Nếu bạn đang tìm kiếm một nền tảng lưu trữ an toàn, đáng tin cậy và dễ tích hợp, thì S3 chính là lựa chọn không thể bỏ qua.
Thông tin chi tiết: https://vndata.vn/cloud-s3-object-storage-vietnam/
0 notes
Text
Integrating Webhooks with Popular Services: How to Connect to Slack, GitHub, and More
Hey, fellow tech enthusiasts!
It’s always cumbersome to manually sync data between your favorite services. So, integrating webhooks into your workflow can considerably augment automation and efficiency. Let's find out how to connect webhooks with popular services like Slack, GitHub, and more, as well as explore the basics of webhooks.
What Are Webhooks?
The term webhook was coined by Jeff Lindsay in 2007 from the computer programming term hook. A webhook is a method in web development of augmenting or altering the behavior of one application to deliver real-time data to another whenever a specific event occurs with custom callbacks. These callbacks may be managed, maintained, and modified by third-party users who don’t require being affiliated with the originating website or application.
It's as good as a messenger that transfers information from one service to another, allowing them to converse with each other flawlessly. Imagine it as your app’s style of giving a friendly jab to another app, conveying,” Hey, it just happened! Unlike conventional APIs, which need relentless polling to check for new data, webhooks push information automatically by webhooks, making them more effective and timelier.
Setting Up Webhooks for Slack:
After covering the basics of webhooks, let's march to set up a webhook for Slack!
Setting up webhooks for Slack is a powerful way to incorporate your application with the popular communication platform. Whenever a specific event occurs, a webhook is a callback URL that gets notifications from Slack, such as a new message or user update. Setting up a webhook in Slack needs your workspace settings.
Here is a step-by-step guide:
Create a new app for your workspace by navigating to the Slack API Portal.
Under the “integrations” tab, select Incoming Webhooks and click “Add New Webhook to Workspace.”
A webhook URL will be received that can be used to send notifications to your applications.
As per your need, this allows you to customize and extend Slack’s functionality.
For receiving signals from various services, this setup is mostly useful, ensuring the team always remains informed in real-time.
Connecting Webhooks to GitHub:
GitHub's webhook integration enables automatic notifications when events happen on GitHub, such as when someone opens a pull request or pushes a commit in a repository that your app can access.
To connect webhooks to GitHub, you'll need to follow these steps:
Go to your GitHub repository and click on "Settings."
Select "Webhooks" from the left-hand menu and click "Add webhook."
Insert the payload URL provided by the service you wish to notify (e.g. a Slack webhook URL).
Optionally, choose a data format in the Content type drop-down menu.
Select the webhook events (like pushes, pull requests, or issues) you want to receive.
Save the webhook and perform a test action to confirm it's working correctly.
This will allow you to receive notifications about events and updates on code changes, pull requests, and more, enhancing collaboration and response times by connecting with services like Slack in your GitHub repository.
Other Popular Integrations
Beyond Slack and Github, Webhooks provides a wide range of integration possibilities. Here are some remarkable examples:
One prominent example is Zapier, a platform that allows users to connect over 1,000 different web services, including Gmail, Google Drive, Mailchimp, and Trello, and apps like Microsoft Teams, Outlook Calender Google Calender, One Drive, and SharePoint. For automated file uploads and downloads, webhooks can also be integrated with Dropbox, Amazon S3, and other cloud storage services.
Gmail: To receive notifications for new emails, set up webhooks, enabling prompt responses.
Trello: Ensures you’re always abreast of project progress by receiving alerts for card movements or updates.
Facebook Apps: To receive real-time updates on user interactions, integrate webhooks that enhance engagement strategies.
HubSpot-A comprehensive AI-powered customer platform to automate sales workflows and integrate with customer relationship management (CRM).
Asana: To streamline team collaboration, connect with project management tools like Asana or Jira.
ChatGPT API: A turning point for webhooks:
The integration of the ChatGPT API has indeed manifested as a significant game changer for webhooks. In modern web development, the real-time notifications and updates enabled by webhooks have become increasingly decisive. The embracing of the ChatGPT API in webhooks acknowledges for more scalable and capable communication between applications, transforming the way developers build and integrate services. A new possibility has come to the fore due to the paradigm shift for real-time data exchange, user engagement, and automation, making webhooks a necessary tool for any modern web application. Because of this, the ChatGPT API has set a new benchmark for webhook-based integrations.
Tailored to your specific needs, you can create a cohesive and automated workflow by leveraging these integrations.
Conclusion:
The communication of your application can be transformed by embracing webhooks, leading to more proficient and responsive operations. Not binding by anything the possibilities are vast and impactful whether you're connecting Slack, GitHub, or other services.
Stay Ahead of the Curve:
At Coredge.io , we're vehement about assisting businesses in staying ahead of the curve when it comes to the latest tech trends. Whether you're looking to learn more about webhooks, APIs, or conversational AI, we've got you covered.
Follow us for more insights and updates on the world of tech!
0 notes
Text
Using AWS Lambda for Serverless Computing: A Real-World Example

In recent years, serverless computing has become one of the most transformative trends in cloud computing. AWS Lambda, Amazon Web Services’ serverless compute service, has emerged as one of the key tools for building scalable, event-driven applications without the need to manage servers. In this post, we’ll walk through a real-world example of using AWS Lambda for serverless computing, highlighting the key benefits and how you can use Lambda to simplify your infrastructure.
What is AWS Lambda?
AWS Lambda is a compute service that allows you to run code without provisioning or managing servers. You upload your code (usually as a function), set the trigger, and Lambda takes care of everything else—auto-scaling, high availability, and even fault tolerance. This makes it an ideal solution for building microservices, processing data streams, automating tasks, and more.
Real-World Example: Building an Image Resizing Service
Let’s dive into a practical example of how AWS Lambda can be used to build a serverless image resizing service. Suppose you run a website where users upload images, and you want to automatically resize these images for different use cases—like thumbnails, profile pictures, and full-size versions.
Step 1: Create an S3 Bucket for Image Storage
The first step is to create an Amazon S3 bucket, where users will upload their images. S3 is an object storage service that is highly scalable and integrates seamlessly with AWS Lambda.
Step 2: Create the Lambda Function
Next, you’ll create a Lambda function that performs the image resizing. The code for this function is typically written in Python, Node.js, or another supported runtime. Here's an example Python function that resizes an image using the Pillow library:
import boto3
from PIL import Image
import io
s3 = boto3.client('s3')
def lambda_handler(event, context):
# Get the S3 bucket and object key from the event
bucket_name = event['Records'][0]['s3']['bucket']['name']
object_key = event['Records'][0]['s3']['object']['key']
# Download the image file from S3
img_obj = s3.get_object(Bucket=bucket_name, Key=object_key)
img_data = img_obj['Body'].read()
img = Image.open(io.BytesIO(img_data))
# Resize the image
img_resized = img.resize((128, 128)) # Resize to 128x128 pixels
# Save the resized image back to S3
out_key = f"resized/{object_key}"
out_buffer = io.BytesIO()
img_resized.save(out_buffer, 'JPEG')
out_buffer.seek(0)
s3.put_object(Bucket=bucket_name, Key=out_key, Body=out_buffer)
return {'statusCode': 200, 'body': 'Image resized successfully'}
This function does the following:
Downloads the uploaded image from the S3 bucket.
Resizes the image to 128x128 pixels.
Uploads the resized image back to the S3 bucket under a new path (e.g., resized/{object_key}).
Step 3: Set Up an S3 Event Trigger
AWS Lambda works seamlessly with other AWS services, like S3. To automate the image resizing process, you can set up an S3 event notification that triggers your Lambda function every time a new image is uploaded to the bucket. This is configured within the S3 console by adding an event notification that calls your Lambda function when an object is created.
Step 4: Testing the Lambda Function
Now that the Lambda function is set up and triggered by S3 events, you can test it by uploading an image to the S3 bucket. Once the image is uploaded, Lambda will automatically process the image, resize it, and store it in the designated S3 path.
Step 5: Monitor and Scale Automatically
One of the biggest advantages of using AWS Lambda is that you don’t have to worry about scaling. Lambda automatically scales to handle the volume of events, and you only pay for the compute time you use (in terms of requests and execution duration). AWS also provides monitoring and logging via Amazon CloudWatch, so you can easily track the performance of your Lambda function and troubleshoot if needed.
Key Benefits of Using AWS Lambda for Serverless Computing
Cost Efficiency: With AWS Lambda, you only pay for the execution time, meaning you don’t incur costs for idle resources. This is ideal for applications with variable or unpredictable workloads.
Auto-Scaling: Lambda automatically scales to handle an increasing number of events, without needing you to manually adjust infrastructure. This makes it well-suited for burst workloads, like processing thousands of images uploaded in a short period.
No Server Management: You don’t need to manage the underlying infrastructure. AWS handles provisioning, patching, and scaling of the servers, allowing you to focus on your code and business logic.
Event-Driven: Lambda integrates with many AWS services like S3, DynamoDB, SNS, and API Gateway, enabling you to build event-driven architectures without complex setups.
Quick Deployment: With Lambda, you can deploy your application faster, as there’s no need to worry about provisioning servers, load balancing, or scaling. Upload your code, set the trigger, and it’s ready to go.
Conclusion
AWS Lambda simplifies serverless application development by removing the need to manage infrastructure and enabling automatic scaling based on demand. In our image resizing example, Lambda not only reduces the complexity of managing servers but also makes the application more cost-effective and scalable. Whether you’re building a microservice, automating tasks, or handling real-time data streams, AWS Lambda is a powerful tool that can help you develop modern, cloud-native applications with ease.
By embracing serverless computing with AWS Lambda, you can build highly scalable, efficient, and cost-effective applications that are ideal for today's fast-paced, cloud-driven world.
To know more about AWS Lambda Enroll Now:
AWS Training In Chennai
AWS Course In Chennai
AWS Certification Training In Chennai
0 notes
Text
BeDrive Nulled Script 3.1.5

Discover the Power of BeDrive Nulled Script – The Ultimate File Sharing & Cloud Storage Solution If you're searching for a powerful, user-friendly, and reliable cloud storage solution, look no further than the BeDrive Nulled Script. Designed for modern entrepreneurs, developers, and tech-savvy users, this high-performance platform offers seamless file sharing and secure cloud storage at your fingertips—without breaking the bank. What is BeDrive Nulled Script? The BeDrive Nulled Script is a premium file sharing and cloud storage platform developed using cutting-edge web technologies. It's the perfect alternative to mainstream services like Google Drive and Dropbox, offering the same robust functionalities with full control over your data. With its clean user interface and rich feature set, BeDrive is an ideal solution for startups, SaaS providers, and digital product marketplaces. Why Choose BeDrive Nulled Script? Getting your hands on the BeDrive Nulled Script means unlocking the full potential of a premium cloud storage system—entirely free. Whether you're hosting large files, collaborating with teams, or managing private user folders, BeDrive handles it all with efficiency and style. Thanks to its nulled version, users can enjoy premium features without the hefty licensing fees, making it a go-to choice for budget-conscious innovators. Technical Specifications Backend: Laravel Framework (robust, secure, and scalable) Frontend: Vue.js for a fast and interactive UI Database: MySQL or MariaDB supported Storage: Compatible with local storage, Amazon S3, and DigitalOcean Spaces File Types: Supports documents, videos, images, and compressed files Security: User authentication, folder permissions, and file encryption Key Features and Benefits Multi-user Support: Allow multiple users to register and manage their own files securely. Drag-and-Drop Upload: Easy file uploads with a modern drag-and-drop interface. File Previews: View PDFs, images, and videos directly within the platform. Folder Organization: Create, rename, and manage folders just like on your desktop. Sharing Options: Share files publicly or privately with time-limited links. Advanced Admin Panel: Monitor user activity, storage usage, and platform performance. Popular Use Cases The BeDrive Nulled Script is incredibly versatile. Here are just a few ways you can use it: Freelancers: Share deliverables securely with clients and collaborators. Agencies: Manage and distribute digital assets for projects and campaigns. Online Communities: Offer cloud storage features as part of a paid membership site. Startups: Launch your own file-sharing or backup service without building from scratch. Installation Guide Setting up the BeDrive Nulled Script is quick and hassle-free. Follow these steps to get started: Download the full script package from our website. Upload the files to your preferred hosting server. Create a new MySQL database and import the provided SQL file. Run the installation wizard to complete setup and admin configuration. Start uploading and sharing your files instantly! Make sure your hosting environment supports PHP 8.0 or later for optimal performance. FAQs – BeDrive Nulled Script 1. Is the BeDrive Nulled Script safe to use? Yes, the script is thoroughly tested for safety and performance. We recommend using secure hosting and regular updates to keep your platform safe. 2. Do I need coding knowledge to use it? No, the platform is designed to be user-friendly. However, basic web hosting knowledge will make installation and customization easier. 3. Can I monetize my BeDrive installation? Absolutely! Add premium user plans, integrate ads, or offer subscription models to monetize your cloud service. 4. What if I face issues during setup? We provide comprehensive installation documentation, and our community is always ready to help you troubleshoot any challenges. Download BeDrive Nulled Script Now Unlock the full potential of premium cloud storage for free with the BeDrive .
No hidden costs, no licensing fees—just powerful tools at your command. Looking for more great tools? Check out our vast library of nulled plugins to boost your digital projects. Also, if you're searching for top-quality WordPress themes, don’t miss the avada nulled theme—another fan-favorite you can grab for free!
0 notes