#useHistory
Explore tagged Tumblr posts
Visit Tumblr Blog
Explore Tumblr blogs with no restrictions, modern design and the best experience.
Last Seen Tumblr Blogs


Fun Fact
Post activity is at the highest at 4:00 pm EDT; notes peak at 10:00 pm EDT.
Text
React Router Installation and Configuration
A Comprehensive Guide to React Router: Installation and Configuration
React Router is an essential library for creating dynamic and navigable single-page applications (SPAs) in React. It enables developers to map different URLs to specific components, allowing users to navigate between pages without the need to reload the entire application. In this article, we will cover the installation and basic configuration of React Router, setting you up to create efficient and user-friendly web applications.
1. Why Use React Router?
React Router is widely used in React applications due to its flexibility and powerful features. It allows you to:
Manage Navigation: Seamlessly handle navigation between different components or pages.
Dynamic Routing: Create dynamic routes that respond to user inputs or interactions.
Nested Routes: Organize your application with nested routes, allowing complex UI structures.
Easy Redirection: Implement redirections and conditional rendering based on user actions or authentication status.
2. Installation of React Router
To start using React Router, you first need to install it. React Router has different packages for web and native applications. For web applications, you'll use react-router-dom. Follow these steps to install React Router in your React project:
Install React Router: Open your terminal in the root directory of your React project and run the following command:
npm install react-router-dom
Or if you're using Yarn: yarn add react-router-dom
Update Your React Project: Ensure that your React project is up-to-date with the latest versions of React and React DOM to avoid any compatibility issues.
3. Basic Configuration of React Router
Once installed, you can configure React Router in your application. Here’s how you can set up basic routing:
Import BrowserRouter: In your index.js or App.js file, import BrowserRouter from react-router-dom. This component wraps your entire application and enables routing.
import { BrowserRouter as Router } from 'react-router-dom';
Create Routes: Define your routes within the Router component using Route components. Each Route specifies a path and the component that should render when the path matches the URL.
import { Route, Switch } from 'react-router-dom'; import Home from './components/Home'; import About from './components/About'; function App() { return ( <Router> <Switch> <Route exact path="/" component={Home} /> <Route path="/about" component={About} /> </Switch> </Router> ); }
<Switch>: Ensures that only one route is rendered at a time.
<Route>: Defines individual routes; the exact prop ensures the route only matches the specified path exactly.
Linking Between Routes: To navigate between different routes, use the Link component from react-router-dom instead of traditional anchor tags.
import { Link } from 'react-router-dom'; function Navbar() { return ( <nav> <Link to="/">Home</Link> <Link to="/about">About</Link> </nav> ); }
4. Advanced Configuration
React Router offers advanced configurations, such as nested routes, route parameters, and programmatic navigation.
Nested Routes: To create nested routes, simply nest Route components within each other.
Route Parameters: Use parameters in paths to capture dynamic values from the URL.
Programmatic Navigation: Use the useHistory or useNavigate hooks to navigate programmatically within your components.
5. Conclusion
React Router is a robust tool for managing navigation in React applications. With simple installation and configuration, you can create a fully navigable single-page application. By understanding the basics of routing and how to implement them, you can enhance the user experience and create more dynamic web applications. As you become more familiar with React Router, you can explore its advanced features to further optimize your application’s navigation.
#reactjscourse#job support#react js online training#placement service#reactjs#reactnativecourse#web development#web design
0 notes
Text
You can learn ReactJS easily, Here's all you need to get started:
1.Components
• Functional Components
• Class Components
• JSX (JavaScript XML) Syntax
2.Props (Properties)
• Passing Props
• Default Props
• Prop Types
3.State
• useState Hook
• Class Component State
• Immutable State
4.Lifecycle Methods (Class Components)
• componentDidMount
• componentDidUpdate
• componentWillUnmount
5.Hooks (Functional Components)
• useState
• useEffect
• useContext
• useReducer
• useCallback
• UseMemo
• UseRef
• uselmperativeHandle
• useLayoutEffect
6.Event Handling
• Handling Events in Functional Components
• Handling Events in Class Components
7.Conditional Rendering
• it Statements
• Ternary Operators
• Logical && Operator
8.Lists and Keys
• Rendering Lists
• Keys in React Lists
9.Component Composition
• Reusing Components
• Children Props
• Composition vs Inheritance
10.Higher-Order Components (HOC)
• Creating HOCs
• Using HOCs for Reusability
11.Render Props
• Using Render Props Pattern
12.React Router
• <BrowserRouter>
• <Route>
• <Link>
• <Switch>
• Route Parameters
13. Navigation
• useHistory Hook
• useLocation Hook
State Management
14.Context API
• Creating Context
• useContext Hook
15.Redux
• Actions
• Reducers
• Store
• connect Function (React-Redux)
16.Forms
• Handling Form Data
• Controlled Components
• Uncontrolled Components
17.Side Effects
• useEffect for Data Fetching
• useEffect Cleanup
18.AJAX Requests
• Fetch AP
• Axios Library
Error Handling
19.Error Boundaries
• componentDidCatch (Class Components)
• ErrorBoundary Component (Functional
Components)
20.Testing
• Jest Testing Framework
• React Testing Library
21. Best Practices
• Code Splitting
• PureComponent and React.memo
• Avoiding Reconciliation
• Keys for Dynamic Lists
22.Optimization
• Memoization
• Profiling and Performance Monitoring
23. Build and Deployment
• Create React App (CRA)
• Production Builds
• Deployment Strategies
Frameworks and Libraries
24.Styling Libraries
• Styled-components
• CSS Modules
25.State Management Libraries
• Redux
• MobX
26.Routing Libraries
• React Router
• Reach Router
0 notes
Text
Implement back link to previous link from where user came in React Project.
0 notes
Photo

React router with hooks ( useHistory useParam useLocation ) ☞ https://bit.ly/2AKAZVP #reactjs #javascript
1 note
·
View note
Text
0 notes
Text
React router dom history push

#React router dom history push how to#
#React router dom history push install#
Note: You can only use () function inside the component page that already listed on your project route, or simply use the withRouter() HOC if the component is not available in the route list. You can navigate to another path by using a. This is also the only way to access history in Class Components, which aren’t compatible with hooks. React Router (react-router-dom) is one of the most popular React libraries with over 46k stars on GitHub and nearly 7 million downloads per week on npmjs. Let’s say we want to move to the dashboard page, all we need to do is: class M圜omponent extends React.Component ) Version 4 of React Router doesn’t include a useHistory hook, so you’ll have to pass down the history object via props. history.push(path, state) Depending on your requirements, you may want to pass update as part of the location state, or the query string.
Consider we have a component, on click of a button we want to get redirected to a '/product' route and pass a product details along with the route, later display the product details on the.
It takes the first argument as a destination path and a second argument as the state. The second parameter in the history.push() method is actually known as the location state. We can pass data in route using browser's History API, which is possible in React through a custom hook useHistory () available in react-router-dom. The history.push() function belongs to react-router-dom and used to move from the current page to another one.
#React router dom history push install#
If you find yourself using both, it’s OK to get rid of React Router since you already have it installed as a dependency within React Router DOM. Use the following command from a terminal window to generate the project directory, then navigate inside the project directory and install required dependencies to add React Router v6 library: npx create-react-app react-router-v6-example cd react-router-v6-example yarn add history react-router-domnext. In other words, you don’t need to use React Router and React Router DOM together.
#React router dom history push how to#
In this article, you will learn how to use in your react project. React Router DOM contains DOM bindings and gives you access to React Router by default.
1 note
·
View note
Text
How I have created QUIZ-APP using React and MUI
Lets Create a Quiz App in React JS and Material UI with support of over 22 Categories.
React-Quiz-App
How to apply css to show the fullscreen Image;
.app {
background-image : url();
min-height : 98.5vh;
border : 8px solid #39445a;
}
File structure
Component
Pages
Creating the HOME PAGE of QUIZ Page
1.Import the TextField from @material-ui/core
import axios from "axios";
import { useState } from "react";
import { BrowserRouter, Route, Switch } from "react-router-dom";
import "./App.css";
import Footer from "./components/Footer/Footer";
import Header from "./components/Header/Header";
import Home from "./Pages/Home/Home";
import Quiz from "./Pages/Quiz/Quiz";
import Result from "./Pages/Result/Result";
<TextField
style = {{marginBottom : 25 }}
label="Enter your Name",
varient="outlined"
/>
//For outlined property Enter your name Field
<TextField
select
style = {{marginBottom : 30 }}
label="Select Category",
varient="outlined"
>
{
Categories.map((cat) => (
<MenuItem key={cat.category} value={cat.value}> {cat.category}
</MenuItem>
))}
//Menuitem will drag the all data from the cat.categories and Select Menu are MenuItem
</TextField>
We can similarly do for Selecting Easy, Med and Difficult.
Add Button comoponent using
<Button varient="contained" color="primary" size="large" onclick={handleSubmit}>Start Quiz
</Button>
Now, create a handleSubmit event on Home upon clicking the Button.
handleSubmit = () =>{
if(!category || !difficulty || !name){ //Validation
setError(true);
return;
}else{
setError(false); // If false only then
fetchQuestions(category, difficulty);
history.push('/') //ON BTN CLICK
}
};
In order to use history.push('/'), we should have to import useHistory Hooks from react-router. This would help to redirect to page on button click.
State Hooks in Home.js
const [category, setCategory]=useState("");
const [difficulty, setDifficulty]=useState();
const [error, setError] = useState(false);
// No error by Default
const history = useHistory();
return(
<div className = "content">
<div className = "settings">
<span style={{fontSize : 30}}>Quiz Details</span>
<div className = "settings_select">
{
{error && <ErrorMessage> Please Fill all the Fields </ErrorMessage>
//error are boolean value. So, if error is true then display
<ErrorMessage> Please Fill all the Fields </ErrorMessage>
}
</div>
</div>
</div>
)
Now Let's create <ErrorMessage> Component inside of Component/ErrorMessage/ErrorMessage.js
ErrorMessage.js
const ErrorMessage = ({}) => {
return(
<div
style={{
}}
>
{children} = "Please Fill all the Fields "
// Children prop is come from <ErrorMessage> Please Fill all the Fields </ErrorMessage>
</div>
);
};
export default ErrorMessage;
App.js
Let's call ques from the api :
function App(){
const fetchQuestions = async(category='', difficulty='')=>{
const {data} = await axios.get(https://opentdb.com/api.php?amount=10${category && `&category=${category}`}${difficulty && `&difficulty=${difficulty}`}&type=multiple`);
};
setQuestions(data.results);
}
return(
<Router>
<div className="app">
<Header />
//We shouldn't have to put Header cause it include on each page
<Switch>
<Route path="/" exact>
<Home
name={name}
setName = {setName}
fetchQuestions = {fetchQuestions}
</Route>
<Route path="/quiz" >
<Quiz
name={name}
questions = {questions}
setScore = {setScore}
</Route>
<Route path="/result">
<Result name={name} score={score} />
</Route>
</Switch>
</div>
<Footer />
</Router>
)
Quiz.js
import {useEffect} from "react";
import {CircularProgress} from @material-ui/core;
const Quiz = ({name,score,questions, setQuestions, setScore}) => {
const [options, setOptions] = useState();
const [currQues, setCurrQues ] = useState();
useEffect(()=>{
setOptions(questions && handleShuffle([
questions[currQues]?.correct_answer,
...questions[currQues]?.incorrect_answer,
/*
...questions[currQues]?.incorrect_answer will spread all the three incorrect options individually
*/
]);
);
},[questions, currQues];
// It means that, everytime the currentQues changes, it will swap the option
Alert! [Incase of not putting dependencies currQues, it will not update OPTIONS.
const handleShuffle = (optionss) = >{
return optionss.sort(()=>Math.random-0.5)
}
return(
<!__ All of UI Goes Here JS part complete -->
<div className="quiz">
<span className="subtitle">Welcome, {name}
</span>
{
question ? (
<>
<div className="quizInfo">
<span>{questions[currQues].category}</span>
<span>Score : {score} </span>
Here, category means, either computer, science, and arts etc and currQues gives index.
<Question
currQues={currQues}
setCurrQues={setCurrQues}
questions={questions}
options={options}
correct={questions[currQues]?.correct_answer}
score={score}
setScore={setScore}
setQuestions={setQuestions}
/>
</>
) :
//This is loader if content NOT ready
(<CircularProgress style={{margin : 100}}
color : inherit;
size : {150}
thickness : {1}
/> )
}
</div>
)
};
export default Quiz;
Question.js
Requirements:
⦁ Current ques
⦁ Ability to set the current ques
⦁ current option
⦁ Correct options
⦁ All of the ques
⦁ Score and setScore
⦁ On Quit terminate
Question.js
import { Button } from "@material-ui/core";
import { useState } from "react";
import { useHistory } from "react-router";
import "./Question.css";
import ErrorMessage from "../ErrorMessage/ErrorMessage";
const Question = ({
currQues,
setCurrQues,
questions,
options,
correct,
setScore,
score,
setQuestions,
}) => {
const [selected, setSelected] = useState();
const [error, setError] = useState(false);
const history = useHistory();
const handleSelect = (i) => {
if (selected === i && selected === correct) return "select";
else if (selected === i && selected !== correct) return "wrong";
else if (i === correct) return "select";
};
/*
Here, This logic is applicable incase,
1) if selected=== i === correct then return select.
2) if selected=== i !== correct return wrong
3) if i === correct then return select.
Here, we have created 2 css class named select and wrong. On correct hit the className="singleOption select" whereas upon wrong choose className="singleOption wrong"
*/
const handleCheck = (i) => {
setSelected(i);
if (i === correct) setScore(score + 1);
setError(false);
};
const handleNext = () => {
if (currQues > 8) {
history.push("/result");
} else if (selected) {
setCurrQues(currQues + 1);
setSelected();
} else setError("Please select an option first");
};
const handleQuit = () => {
setCurrQues(0);
setQuestions();
};
return (
<div className="question">
<h1>Question {currQues + 1} :</h1>
<div className="singleQuestion">
<h2>{questions[currQues].question}</h2>
<div className="options">
{error && <ErrorMessage>{error}</ErrorMessage>}
{options &&
options.map((i) => (
<button
className={`singleOption ${selected && handleSelect(i)}`}
key={i}
onClick={() => handleCheck(i)}
disabled={selected}
>
{i}
</button>
))}
</div>
<div className="controls">
//controls class have gap and space around style property
<Button
variant="contained"
color="secondary"
size="large"
style={{ width: 185 }}
href="/"
onClick={() => handleQuit() || handleQuit }
>
Quit
</Button>
<Button
variant="contained"
color="primary"
size="large"
style={{ width: 185 }}
onClick={handleNext}
>
{currQues > 20 ? "Submit" : "Next Question"}
</Button>
</div>
</div>
</div>
);
};
export default Question;
Finally , Now Create the result.js
Result.js
import { Button } from "@material-ui/core";
import { useEffect } from "react";
import { useHistory } from "react-router";
import "./Result.css";
const Result = ({ name, score }) => {
const history = useHistory();
useEffect(() => {
if (!name) {
history.push("/");
}
}, [name, history]);
return (
<div className="result">
<span className="title">Final Score : {score}</span>
<Button
variant="contained"
color="secondary"
size="large"
style={{ alignSelf: "center", marginTop: 20 }}
href="/"
>
Go to homepage
</Button>
</div>
);
};
export default Result;
0 notes
Text
100%OFF | Full Stack Development: React (React Hooks) and Spring Boot

Welcome to the world’s best Online resource for Learning React and Spring Boot.
React is one of the Most Popular and Most Loved front-end library for building User Interfaces.
On the other hand, Spring is one of the Most Popular and Widely used Java framework for building enterprise web applications.
Spring Boot is a tool to create Spring-based applications quickly and easily. In fact, it is the go-to approach for building Microservices in Java.
Everyone wants to learn React and Spring Boot, this is because companies switching from Angular to React and already companies using React in their production applications. So this is the Best time to learn Full stack development with React and Spring Boot.
How about bringing this together and build a full-stack application with React and Spring Boot?
Isn’t it awesome!
Let’s find out in this course.
We will create a Full-stack Notes application from the group up and all the way up to deploy to the Production server.
Along the way, you will learn –
Creating a spring boot application in the Spring tool suite IDE
Creating REST endpoints for an API
Adding style to react components
Adding bootstrap to react application
Adding a validation to HTML form
Learn how to use hooks such as useState(), useEffect(), useHistory(), useParams() and man more
Learn how to perform the database operations such as Create, Read, Update and Delete
Learn how to integrate React with Spring boot
Most importantly you will learn how to deploy React and Spring boot application to a live webserver
You can show your work to friends and colleagues
I will keep adding more and more features to this course so that you can learn how to scale the application over a period of time.
If you are interested in learning React and Spring Boot, then check out the free preview lectures and enroll in the course.
Who this course is for:
Anyone who wants to learn full stack development with React and Spring boot
Anyone who wants to learn building the RESTful API with Spring boot
Anyone who wants to learn integrating React and Spring boot
Anyone who wants to learn deploying React applications to live server
Anyone who wants to learn deploying Spring boot application to live server and connect to production database
[ENROLL THE COURSE]
0 notes
Text
To Better Understand React Router
As I worked through phase 2 at Flatiron school, studying React, I felt it helped me understand JavaScript better. I made my way through this phase and was able to comprehend more about it than I expected. I was able to complete my final project and do my final review. During this review I found out I knew less about React than I thought, and I am thankful that my reviewer was able to point this out to me. This way I could go back and learn what I need to, to be able to know how React really works. I struggled with describing what React Router is and how it works when I was asked. So I would like to discuss what I have learned and have this blog as a reference to look back on if a reminder is needed.
To start, I now know React Router is a client-side routing library, "...React are libraries with prewritten code snippets that we can use and reuse to build applications." - Khan, Shahzad, et al. So it is this prewritten code that you can use for routing to different components within your application. It is client-side because the client/user handles when and where the routing takes place. React Router actually contains components and hooks that do that job and that is the prewritten code. Both these components and hooks work with the components you have created in your code. How they do this is with conditional rendering components based on the URL. If the current URL matches with what your components path is then it will display it. Also, uses JavaScript for programmatic navigation, programmatic meaning, "of, relating to, resembling, or having a program" - Merriam-Webster. If there is a link clicked to a certain page, it then changes the URL for that page, and updates/displays that page without requesting for a new HTML document. Or, it can also change the URL, and display a new page without the user clicking on a link. As mentioned before, it manages all of these tasks and actions with the prewritten components and hooks. I will now discuss some and how they work.
You first need to have react-router-dom installed in order to use React Router. Then it must be imported like so:

BrowserRouter is a component and is also the base for your whole app's routing. Doing that declares how you will be using React Router. You would want to wrap this around your whole app component, so that it can contain all the other components and hooks. You could also just use Router instead of Browser Router to shorten it up.
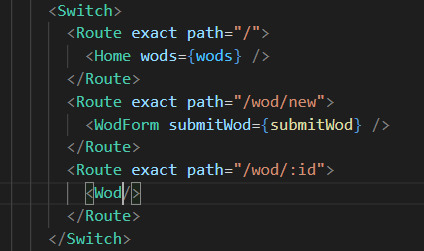
Next, you have your Route and Switch component for handling routing to your components. Route is given a path attribute which is given a certain URL, and it says if the current URL matches the path render the child component, your component. You then want to wrap all of your Route components within your Switch component. This is because if not, any of the routes that match the current URL all will render. Switch says to only render the first Route that matches, so yes the order you put them in is important. If it was not used a good example of what could happen is it would always render a home page because its URL usually is similar to the other's. It is recommended to move that Home component to the bottom of the others. The Switch definitely gives more predictable behavior. To keep from also rendering components with URL partial matches you can give your Route component an attribute of exact. This will only render if the URL matches exactly with the path. Some of my code for example:
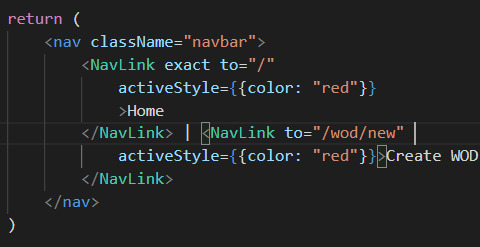
Using Link and NavLink components are what is going to make these Routes conditionally rendered. These both render a link or <a> to the DOM, when it is clicked, it changes the URL, re-renders Routes, and then displays the component whose path matches that new URL. Link is good for standard hyperlinks, where NavLink is better for a navigational bar. What makes it good for the bar is that you can add styling attributes to it. Like adding an active style to show which link is currently selected.
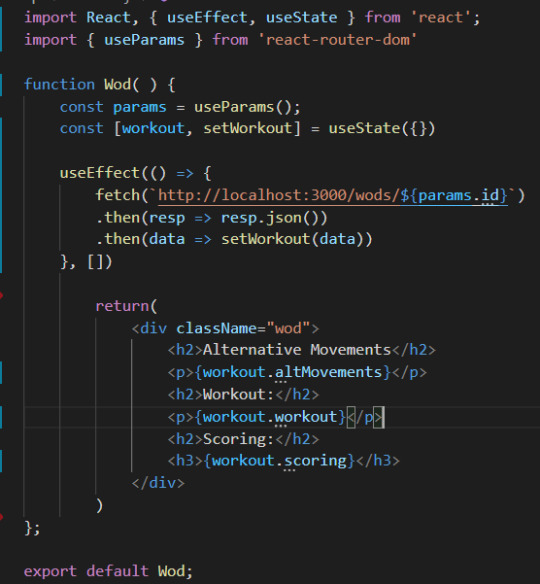
There is as well two hooks that can be used to get parts of a URL dynamically, the useRouteMatch and useParams hooks. This can be useful for when you have a component that gets rendered multiple time with different dynamic info. Or as well as nested information. For both hooks you want to create a variable; const match = useRouteMatch() and const params = useParams(). useRouteMatch returns an object with info about currently matched route and is good for nested info. useParams returns key/value pairs of the URL's parameters and is good for grabbing one specific component out of many. This is done usually by the components id. In my code below Wod stands for workout of the day. My Wod component gets rendered for each workout that comes from my JSON file. I used params to grab the to match the components path and single out specific workouts. So then it will only display that workout and the info that goes with it.
Finishing it off, we have a hook that can help give your app programmatic navigation. The hook is called useHistory and it can navigate the user to a new page based on any event that gets triggered, not just a click. For example, if the user logs out you can have it redirect them to the log in or home page. There is, as well, a component that is good for conditional rendering. The Redirect component does as it sounds, redirects the user to a new location. You can use this to redirect the user to the home page if a certain component is not found when an event is triggered, and other uses for it as well.
To conclude, having gone back and reading through lessons at Flatiron I know have a better understanding of React Router, and the hooks and components that make it up. I am thankful to my reviewer for assigning me to this, because now I feel more confident in using React. I also now know how to take better notes and plan to really make sure I understand all the material by the time of my next review. I hope this may help others if not just only me! Have fun coding all!
Sources:
“Programmatic.” Merriam-Webster.com Dictionary, Merriam-Webster, https://www.merriam-webster.com/dictionary/programmatic. Accessed 16 Sep. 2021.
Khan, Shahzad, et al. “What Is a JavaScript Library?” General Assembly Blog, General Assembly, 31 Mar. 2021, generalassemb.ly/blog/what-is-a-javascript-library/.
0 notes
Photo

"Programmatically navigate with React Router v5" will teach you how to programmatically navigate with RRv5 using Redirect and history.push from the useHistory Hook https://t.co/kGPsitftoF
0 notes
Link

React as a framework
React has been out in the world of web development for quite some time now and its position as a tool for agile web development has steadily strengthened in recent years. Especially after the announcement and release of the new hook api/concept, writing components has never been easier. Although the team behind react and the huge community have tried to train and explain the concepts of the framework in an impressive way, I still see some pitfalls and common mistakes that were made while working with it. I kept a list of all the mistakes I saw over the last years related to react especially with using hooks. In this article I want to show you the most common ones and I will also try to explain in detail, why I think they are mistakes and a suggestion for doing it in a cleaner way.
Disclaimer
Before we start with the list, I have to say that most of the following things are not fundamental mistakes or don't look wrong at first glance, and also most of them are unlikely to affect the performance or apperance of the application. Probably nobody would notice, except for the developers working on the product, that something is wrong here, but I still believe that good quality code can lead to a better developer experience and thus to a better product. As with any software framework or library, there are millions of different opinions about it. Everything you see here is based on my personal opinion and should not be considered a general rule. If you have a different opinion about her, I would love to hear it 🌟
1. Using useState when no rerender is needed
One of the core concepts of react is dealing with state. You can control your entire data flow and rendering through the state. Each time the tree is rendered again, it is most likely tied to a change in the state. With the useState hook you can now also define your state in function components, which is a really neat and easy way how to handle states in react. But it can also be misused as we see in the following example. For the next example we need a bit of explanation, suppose we have two buttons, one button is a counter and the other button sends a request or triggers an action with the current count. However, the current number is never displayed within the component. It is only required for the request when you click the second button.
This is dangerous ❌
function ClickButton(props) { const [count, setCount] = useState(0); const onClickCount = () => { setCount((c) => x + 1); }; const onClickRequest = () => { apiCall(count); }; return ( <div> <button onClick={onClickCount}>Counter</button> <button onClick={onClickRequest}>Submit</button> </div> ); }
The problem ⚡
At the first sight, you might ask what is exactly the problem with that? Isn't what what the state was made for? Sure you are right, this will work just fine and probably there will be never a problem with that, however in react every state change will force a rerender for that component and most likely its children, but in the above example since we never use that state in our render part, this will end up being an unnecessary render every time we set the counter, which can impact the performance or could have unexpected side effects.
The solution ✅
If you want to use a variable inside your component which should keep its value between rendering but also don't force a rerender, you can use the useRef hook. It will keep the value, but doesn't force the component to rerender.
function ClickButton(props) { const count = useRef(0); const onClickCount = () => { count.current++; }; const onClickRequest = () => { apiCall(count); }; return ( <div> <button onClick={onClickCount}>Counter</button> <button onClick={onClickRequest}>Submit</button> </div> ); }
2. Using router.push instead of a link
This might be a very easy and obvious one and not really related to react itself, but I still see it quite a lot when people writing react components. Let's say you will write a button and with clicking the button the user should be redirected to another page. Since its a SPA, this action will be a client-side routing mechanism. So you will need some kind of library for doing that. In react the most popular one is react-router and the following example will use that library. So adding a click listener will redirect the user to the desired page right?
This is dangerous ❌
function ClickButton(props) { const history = useHistory(); const onClick = () => { history.push('/next-page'); }; return <button onClick={onClick}>Go to next page</button>; }
The problem ⚡
Even though this would work just fine for most of the users, there is huge problem when it comes to accessibility here. The button will not be marked as linking to another page at all, which makes it nearly impossible to be identified by screen readers. Also could you open that in a new tab or window? Most likely not.
The solution ✅
Linking to other pages with any user interaction should as far as possible be handled by the <Link> component or a normal <a> tag.
function ClickButton(props) { return ( <Link to="/next-page"> <button>Go to next page</button> </Link> ); }
Bonus points: it also makes the code a lot more readable and shorter!
3. Handling actions via useEffect
One of the best and most thoughtful hooks introduced by React is the "useEffect" hook. It enables the processing of actions related to prop or state changes. Despite its helpful functionality, it is also often used in places where it may not be needed. Imagine a component that fetches a list of items and render them to the dom. In addition, if the request is successful, we would like to call the "onSuccess" function, which is passed on to the component as a prop
This is dangerous ❌
function ClickButton(props) { const [loading, setLoading] = useState(false); const [error, setError] = useState(null); const [data, setData] = useState(null); const fetchData = useCallback(() => { setLoading(true); callApi() .then((res) => setData(res)) .catch((err) => setError(err)) .finally(() => setLoading(false)); }, []); useEffect(() => { fetchData(); }, [fetchData]); useEffect(() => { if (!loading && !error && data) { props.onSuccess(); } }, [loading, error, data]); return <div>{data}</div>; }
The problem ⚡
There are two useEffect hooks, the first one is handling the api call on the initial render and the second one will call the onSuccess function, by assuming when there is no loading, no error, but data in the state, it must have been a successful call. Make sense right? Sure for the first call this is true and probably will never fail. But you also loose the direct connection between the action and the function that needs to be called. Also there is no 100% guarantee that this case will only happen if the fetch action has succeeded and this is something we as developers really don't like.
The solution ✅
A straight forward solution would be to set the "onSuccess" function to the actual place where the call was successful:
function ClickButton(props) { const [loading, setLoading] = useState(false); const [error, setError] = useState(null); const [data, setData] = useState(null); const fetchData = useCallback(() => { setLoading(true); callApi() .then((fetchedData) => { setData(fetchedData); props.onSuccess(); }) .catch((err) => setError(err)) .finally(() => setLoading(false)); }, [props.onSuccess]); useEffect(() => { fetchData(); }, []); return <div>{data}</div>; }
Now it is quite clear at the first sight when the onSuccess is called, exactly in the success case of the api call.
4. Single responsibility components
Composing components can be hard. When is it time to split a component into several smaller components? How do you structure the component tree? All of these questions arise every day when working with a component-based framework. However, a common mistake in designing your components is to combine two use cases into a single component. Let's take an example of a header that shows either a burger button on mobile devices or tabs on desktop screens. (The condition will be handled the the magical isMobile function, which is not part of this example 🧙)
This is dangerous ❌
function Header(props) { return ( <header> <HeaderInner menuItems={menuItems} /> </header> ); } function HeaderInner({ menuItems }) { return isMobile() ? <BurgerButton menuItems={menuItems} /> : <Tabs tabData={menuItems} />; }
The problem ⚡
With this approach the component HeaderInner is trying to be two different things at once and we all learned from Mr. Jekyll, being more than one thing at a time isn't really ideal. Also it makes it even hard to test or to reuse the component at other places.
The solution ✅
Bringing the condition one level up, makes it easier to see what the components are made for and that they only have one responsibility, being a Header, Tabs or a BurgerButton and not trying to be two things at once.
function Header(props) { return ( <header>{isMobile() ? <BurgerButton menuItems={menuItems} /> : <Tabs tabData={menuItems} />}</header> ); }
5. Single responsibility useEffects
Remember the times, where we only had the componentWillReceiveProps or componentDidUpdate methods to hook into the rendering process of a react component? It is bringing back dark memories and also realizing the beauty of using the useEffect hook and especially that you can have as much as you want of them. But sometimes forgetting and using a "useEffect" for several things brings back those dark memories. For example, imagine you have a component that fetches some data from the backend in some way, and also displays breadcrumbs depending on the current location. (Using again react-router for getting the current location.)
This is dangerous ❌
function Example(props) { const location = useLocation(); const fetchData = useCallback(() => { /* Calling the api */ }, []); const updateBreadcrumbs = useCallback(() => { /* Updating the breadcrumbs*/ }, []); useEffect(() => { fetchData(); updateBreadcrumbs(); }, [location.pathname, fetchData, updateBreadcrumbs]); return ( <div> <BreadCrumbs /> </div> ); }
The problem ⚡
There are two use cases, the "data-fetching" and "displaying breadcrumbs". Both are updated with an useEffect hook. This single useEffect hooks will run when the fetchData and updateBreadcrumbs functions or the location changes. The main problem is now, we also call the fetchData function when the location changes. This might be a side effect we haven't thought of.
The solution ✅
Splitting up the effect makes sure, they only are used for one effect and the unexpected side effects are gone.
function Example(props) { const location = useLocation(); const updateBreadcrumbs = useCallback(() => { /* Updating the breadcrumbs*/ }, []); useEffect(() => { updateBreadcrumbs(); }, [location.pathname, updateBreadcrumbs]); const fetchData = useCallback(() => { /* Calling the api */ }, []); useEffect(() => { fetchData(); }, [fetchData]); return ( <div> <BreadCrumbs /> </div> ); }
Bonus Points, the use cases are now also logically sorted within the component.
Conclusion
There are many pitfalls when writing components in react. It is never 100% possible to understand the whole mechanism and to avoid every little or even big mistake. But making mistakes is also important when learning a framework or programming language and probably nobody is 100% free of these mistakes. I think sharing your experience with that can be very helpful for others or prevent them from making them. If you have any questions or wait, I don't think this is a mistake, please write to me, I would love to hear your opinion.
0 notes
Link
新刊 書籍:Webディレクションの新・標準ルール 改訂第2版 - 現場の効率をアップする最新ワークフローとマネジメント (アマゾン)
グーグルのUX指標「Core Web Vitals (コアウェブバイタル) 」とは?LCP/FID/CLSを解説 (フェレット)
グーグル画像検索が、IPTCメタデータから抽出したクリエーターや著作権などのライセンス情報を表示 (海外SEO情報ブログ)
Windows 10 Homeで旧Edgeを使う方法 (Rriver)
React Flow - Reactでノード型インタフェースを実装する (MOONGIFT)
Create React App + React Router入門 (4) フックuseRouteMatchとuseHistoryを使う (Fumio Nonaka)
アドビColor新機能「色覚異常対応」が便利!問題となる色の組み合わせを簡単に修正できるアクセシビリティツール (コリス)
「エンジニアリングをもっと理解してくれ」はダメ!? 伊藤直也氏に聞く、ビジネス界で重宝されるエンジニアとは (外資就活)
君は真に理解しているか?z-indexとスタッキングコンテキストの関係 (ICS MEDIA)
クラス不要で基本的なスタイルを提供するCSSフレームワーク「Basic.css」 (かちびと)
0 notes
Text
The Hooks of React Router
React Router 5 embraces the power of hooks and has introduced four different hooks to help with routing. You will find this article useful if you are looking for a quick primer on the new patterns of React Router. But before we look at hooks, we will start off with a new route rendering pattern.
Before React Router 5
// When you wanted to render the route and get router props for component <Route path="/" component={Home} />
// Or when you wanted to pass extra props <Route path="/" render={({ match }) => <Profile match={match} mine={true} />}>
When using the component syntax, route props (match, location and history) are implicitly being passed on to the component. But it has to be changed to render once you have extra props to pass to the component. Note that adding an inline function to the component syntax would lead to the component re-mounting on every render.
After React Router 5
<Route path="/"> <Home /> </Route>
Note that there is no implicit passing of any props to the Home component. But without changing anything with the Route itself, you can add any extra props to the Home component. You can no longer make the mistake of re-mounting the component on every render and that's the best kind of API.
But now route props are not being passed implicitly, so how do we access match, history or location? Do we have to wrap all components with withRouter? That is where the hooks steps in.
Note that hooks were introduced in 16.8 version of React, so you need to be above that version to use them.
useHistory
Provides access to the history prop in React Router
Refers to the history package dependency that the router uses
A primary use case would be for programmatic routing with functions, like push, replace, etc.
import { useHistory } from 'react-router-dom'; function Home() { const history = useHistory(); return <button onClick={() => history.push('/profile')}>Profile</button>; }
useLocation
Provides access to the location prop in React Router
It is similar to window.location in the browser itself, but this is accessible everywhere as it represents the Router state and location.
A primary use case for this would be to access the query params or the complete route string.
import { useLocation } from 'react-router-dom'; function Profile() { const location = useLocation(); useEffect(() => { const currentPath = location.pathname; const searchParams = new URLSearchParams(location.search); }, [location]); return <p>Profile</p>; }
Since the location property is immutable, useEffect will call the function every time the route changes, making it perfect to operate on search parameters or current path.
useParams
Provides access to search parameters in the URL
This was possible earlier only using match.params.
import { useParams, Route } from 'react-router-dom'; function Profile() { const { name } = useParams(); return <p>{name}'s Profile</p>; } function Dashboard() { return ( <> <nav> <Link to={`/profile/ann`}>Ann's Profile</Link> </nav> <main> <Route path="/profile/:name"> <Profile /> </Route> </main> </> ); }
useRouteMatch
Provides access to the match object
If it is provided with no arguments, it returns the closest match in the component or its parents.
A primary use case would be to construct nested paths.
import { useRouteMatch, Route } from 'react-router-dom'; function Auth() { const match = useRouteMatch(); return ( <> <Route path={`${match.url}/login`}> <Login /> </Route> <Route path={`${match.url}/register`}> <Register /> </Route> </> ); }
You can also use useRouteMatch to access a match without rendering a Route. This is done by passing it the location argument.
For example, consider that you need your own profile to be rendered at /profile and somebody else's profile if the URL contains the name of the person /profile/dan or /profile/ann. Without using the hook, you would either write a Switch, list both routes and customize them with props. But now, using the hook we can do this:
import { Route, BrowserRouter as Router, Link, useRouteMatch, } from 'react-router-dom'; function Profile() { const match = useRouteMatch('/profile/:name'); return match ? <p>{match.params.name}'s Profile</p> : <p>My own profile</p>; } export default function App() { return ( <Router> <nav> <Link to="/profile">My Profile</Link> <br /> <Link to={`/profile/ann`}>Ann's Profile</Link> </nav> <Route path="/profile"> <Profile /> </Route> </Router> ); }
You can also use all the props on Route like exact or sensitive as an object with useRouteMatch.
Wrapping up
The hooks and explicit Route comes with a hidden advantage in itself. After teaching these techniques at multiple workshops, I have come to the realization that these help avoid a lot of confusion and intricacies that came with the earlier patterns. There are suddenly far fewer unforced errors. They will surely help make your router code more maintainable and you will find it way easier to upgrade to new React Router versions.
The post The Hooks of React Router appeared first on CSS-Tricks.
The Hooks of React Router published first on https://deskbysnafu.tumblr.com/
0 notes
Text
React Project(WODs)
This post will be about my final project, using React, of phase 2 at Flatiron school. I have had a lot of fun learning React and feel as though it almost better helped me understand JavaScript. At the same time though there were parts that I struggled with as well. Specifically, working with POST requests and forms, at first, challenged me for awhile.
Furthermore, for my project I created a web page that lists out different WODs, workout of the day, also includes alternative movements for the workout and even create your own WOD. Created the frontend using create-react-app to get the starting code. Then used a JSON server template provided by Flatiron for the backend. Within my frontend there is six components, App, Navbar, WodForm, Home, WodDescription, and Wod. App being the top component of all the others. App consists of all my fetch requests, GET and POST, state for JSON data, and renders out the Navbar, WodForm, Wod, and Home components, this is also all wrapped by router and gives all the routes to each of these.
My Navbar component uses NavLink to display links to both the Home page and Create WOD page. I gave them both an activeStyle so that when you are on that page the NavLink text turns red for that page. Next, is my Home component which takes the JSON data as a prop called wods. I created a variable to map through wods, which then renders the WodDescription component, and passes down each wod to it. My Home component is what displays WodDescription. WodDescription takes the wod and displays the workout, and how it will be scored. There is also a button that will take you to that specific WOD with alternative movements, if say, they are too difficult or heavy. I used the useHistory hook in order for it take you to that specific WOD that the button is on. Also, I had to incorporate string interpolation with wod.id in accordance with history.push.
My Wod component, as mentioned before, will display only the one WOD whose id matches with the url id. It will show the alternative movements, as well as, the workout and how it will be scored. I also had to pass wods down as a prop from the app, but I instead used find() method. Which returns the value of the first element in the provided array that matches the testing function. Within that method I used the useParams hook to compare its id, which is the URL’s id, and find the wod that has a matching id. I did also have to use parseInt() on the params because it was a string and I needed it to be an integer.
To complete this post, I will explain my WodForm component where I worked on one of the more challenging coding parts with React, for me. As I mentioned earlier all my fetch requests are done within my App component. So, I passed down my POST request to the WodForm component. This component is made up of a formData state variable, a handleChange function, handleSubmit function, and a form for submitting and POSTing this new WOD. The inputs use the handleChange function to get what the user types for both the workout and how it will be scored. Give these inputs a value of data.whicheverkeyitis. The form is given an onSubmit equal to the handleSubmit function. The handleSubmit function calls the POST request function and passes down the formData. This POST request then adds this workout to all the other already existing workouts set in the state. All in all, this is my project and I enjoyed watching the code work and do what I wanted it to in the browser, that is always a really good feeling!
0 notes