#userssam: tutorial
Explore tagged Tumblr posts
Visit Tumblr Blog
Explore Tumblr blogs with no restrictions, modern design and the best experience.
Last Seen Tumblr Blogs


Fun Fact
The total number of visits Tumblr.com received during January 2021 is 327 million.
Note
Hi, i love Regina gifset especially the text
https://www.tumblr.com/itwasmagic/749567705846251520/i-am-what-i-am-cause-you-trained-me?source=share
would you please post a tutoria for making this text with those colors?
hi! thank you so much, I've never been asked to do a tutorial before 🥹🥹 this is pretty easy but i overexplain things so if it doesn't make sense just let me know!
&& please let me know if this worked ok for you!
*assuming whoever is reading this already knows how to make a gif in photoshop*
I'm pretty sure I used the font Elephant for this set that you linked.
tl;dr if you have a lot of photoshop/text editing knowledge already: create a layer of text > duplicate it > select the bottom layer > go to blending options > add a stroke > ok that > set the layer fill to 0% > reposition the layer a couple of nudges to one side and a couple of nudges down > select the top text layer > go to blending options > add a drop shadow > add a gradient > ok that > set the top layer to difference > enjoy <3
if you want a more in depth tutorial with screenshots:
add your text to your gif with whichever font, size and placement you like
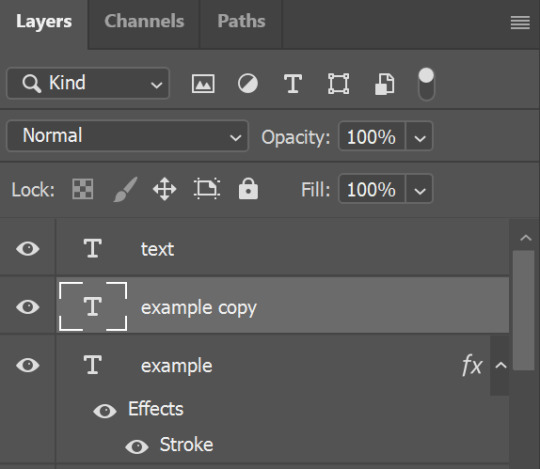
make sure the first text layer you want to edit is selected and press ctrl+J to create a copy of the layer (or right click > duplicate layer... > ok)
select the first text layer again

double click the layer (or right click > blending options), tick the stroke box and use these settings:
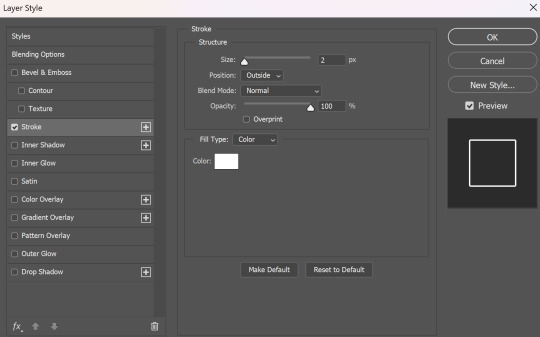
press ok
change the fill to 0% (leave the opacity at 100% because you still want the layer itself with the stroke/outline to be opaque but you want the text colour/filled in part of the layer to be transparent)

make sure the 'move' tool is selected

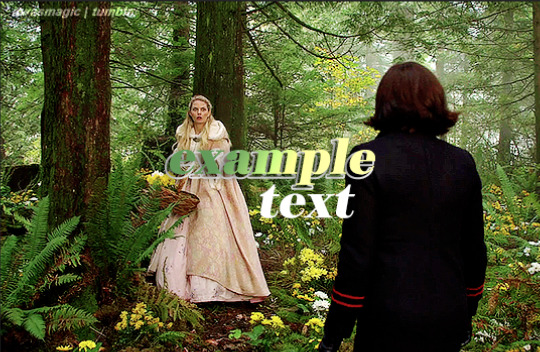
use the arrow keys on your keyboard to move the text layer with the stroke (i did 3 to the left and 3 down but do whatever works with your chosen font and size (edit: i think i moved it a few nudges right for the original set rather than left just make it up as you go along with me jfngkf)). it should look like this:

select the duplicated layer you made above the first one
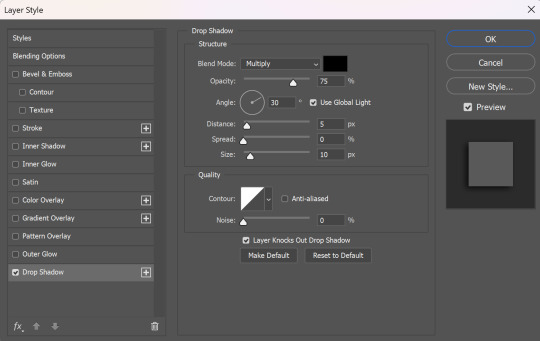
double click the layer (or right click > blending options) and tick the box for drop shadow. I pretty much always use these settings:
then tick the box to add a gradient overlay, it doesn't matter which colours or angle you use, you can play around and adjust it to whatever makes sense with your gif, so if you think the gradient would look better horizontal or vertical or at a different angle, just change the number of degrees it's at until you like it.

click the coloured box next to the option that says 'Gradient:' and this box should pop up:

to change the colours click the little coloured box under the gradient bar you want to change then the box underneath called 'Color:' should light up for you to click on, then either pick a colour or paste in the hex code

for the colours in the set you linked i used #9fb552 for the lighter green and #2f4f2b for the darker green then press ok
if you want to adjust the colour fade, you can drag the coloured squares along the bar or click somewhere just under the gradient bar to add another colour (you could add a third colour or another shade of the same colour, play around until you like how it looks! you can always go back into it at the end and keep adjusting once you can see how the whole thing looks put together.)
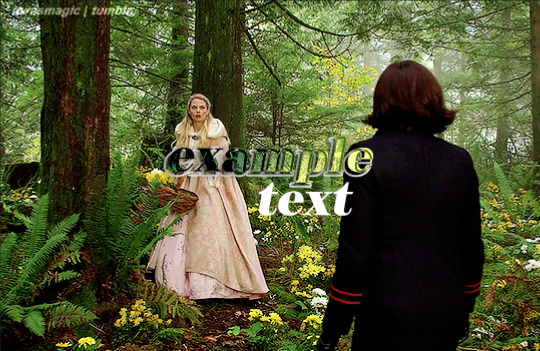
ok everything when you have it how you want it, then your text should look like this:
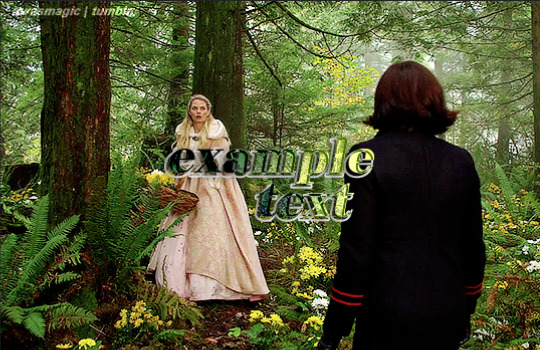
now change the blending on that same layer to 'difference'

the text should now look like this:
*note, the colours may change when they're blended differently, so like i said earlier you can go back and play around with the colours or shade you picked until they match your gif
if you have another text layer you want to look the same rather than repeating all of the steps, duplicate that one too, use the move tool to reposition the lower layer again and right click > copy layer style > right click > paste layer style on the corresponding layers


now when you play your gif, the text should look like this:

and you're done!
#answered#anonymous#userssam: tutorial#gifmaking#resource#tutorial#gif tutorial#text effect tutorial#text tutorial#photoshop tutorial
65 notes
·
View notes
Note
Hi, Regina is my absolute favourite in ouat and you made her stunning in this gifset ✨
I was wondering how did you make glitch effect from green to b&w, Would you please post a tutorial?
Hi! Thank you so much! the start of the tutorial is below the cut but because it's multiple gifs and I could only add so many photos to a post to explain, I have had to split it onto another post but I have put a link at the end when it's time to move onto the next one. :) if anything doesn't make sense or if anyone follows this and it helps, i would love to know either way!
Glitch effect tutorial used on this set below the cut

note: credit to this tutorial which was very helpful when i was making the set but i didn't feel it explained how to do the b&w gif and that's what took me a while to figure out, so if anything on this tutorial isn't clear, that one should also help. this will be slightly different because in my set i made it so the glitch faded into each other and i've added my own flare to it but the basic technique is the same.
create 2 gifs the same size, you can add whatever colouring, sharpening etc you like, one in colour, one in b&w (you can do 2 in colour but for the purpose of this i'm doing one b&w to show how to do both versions).
i'm going to do the b&w gif fading into the colour gif on this tutorial (bc that's just what i started editing first) but obviously if you're making a full set decide which gif you want to fade into which because the first part of the gif will have the glitch effect on the end and the second will have it at the beginning so it will matter for the final outcome of your set
PART 1 - B&W GIF
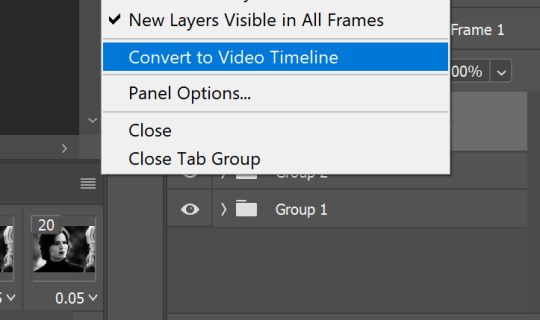
if you edit in frame animation, you must convert your b&w gif to the video animation timeline otherwise the colours will not show up on the glitch effect. you can do this by clicking the lines menu above the frames
i usually colour in frame animation because it plays quicker to preview how it will look and then convert to video to add my sharpening at the end but it's personal preference how you create your gifs.
hold control + select all of your frames > right click > convert to smart object

all of your frames, colouring etc should all be in one frame now, select it > click the lines menu above the animation timeline again > convert frames > flatten frames into clips
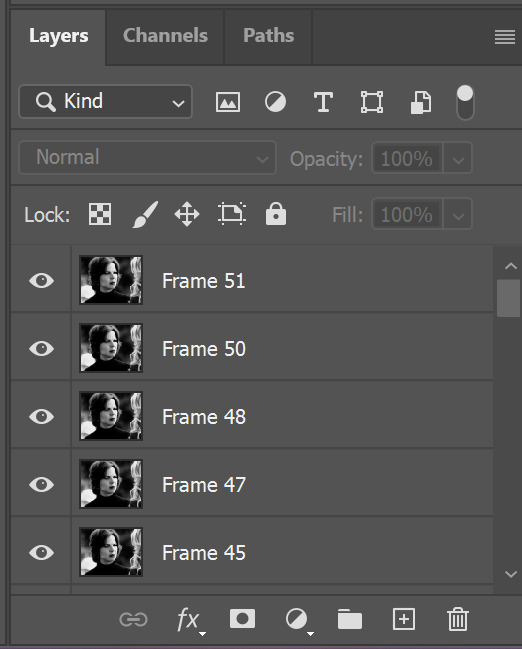
you should now have a longer list of layers that make up each frame of your gif
this is because we need to convert back to frame animation to edit the glitch effect onto individual frames. if you don't flatten the frames to clips the gif will not play when it's converted because 1 layer will equal only 1 frame. it may seem long winded to go back and forth but it makes sure all your colouring is already included in the frames when you make it glitch. if you add the colouring afterwards it will change the colour of the glitch effect or turn it black and white and it won't be very visible (if anyone has an easier way i'm very happy for suggestions, i was just figuring this out as i went and found the glitch didn't work on the b&w gif any other way for me!!)

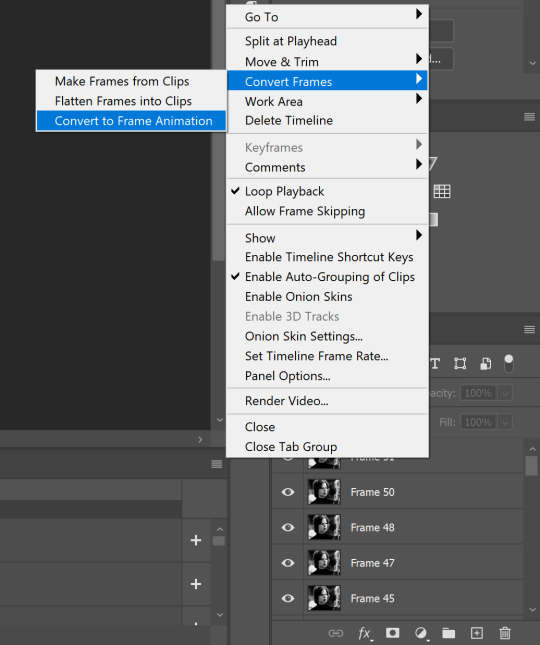
now we go back to the 3 lines menu > convert frames > convert to frame animation
if you get this pop up, press continue. it's fine because we have each of our frames in their own layers now

your frame animation timeline will initially load with just one frame

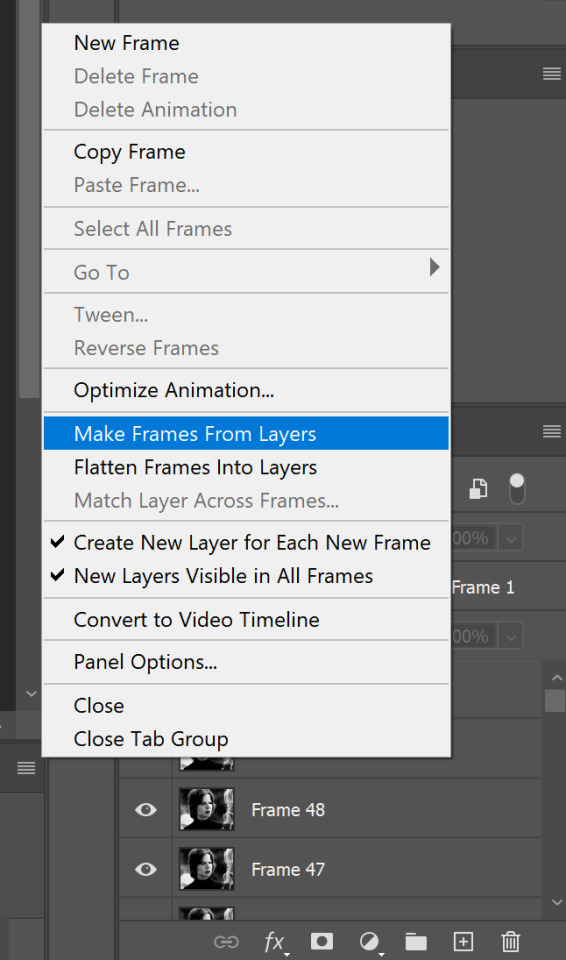
go to the lines menu again > make frames from layers
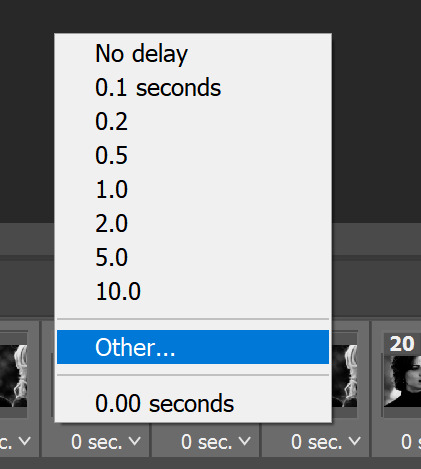
now all of the frames will load, but they will be at 0 seconds (except the first frame) and we need to make them all run at a playable speed, so go back to that same lines menu above the timeline > select all frames > select under any frame where it says 0 sec. > other > i usually put in 0.05 but do whatever works for you

PART 2 - ADDING THE GLITCH EFFECT
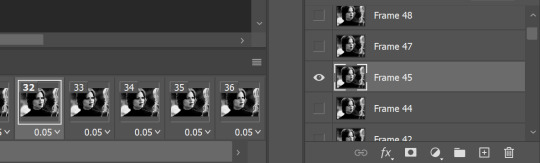
pick a frame about 5 from the end, select it and select the corresponding layer with the eye icon next to it to show it's the one visible
right click > duplicate layer (or just press control + J)
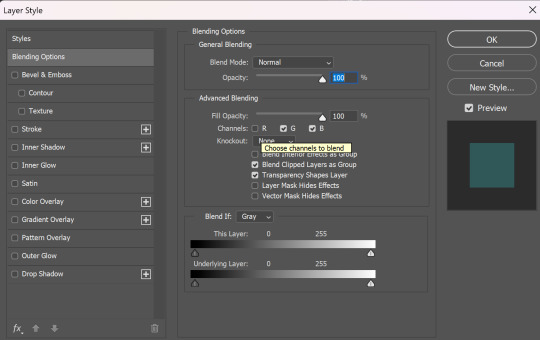
then on the copy of the layer right click > blending options (or double click)
in the advanced blending section, untick R > ok
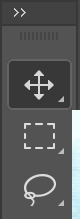
make sure the move tool is selected
now using the arrow keys on your keyboard move that layer either left or right as many notches as you like (i've started out with 10 here)
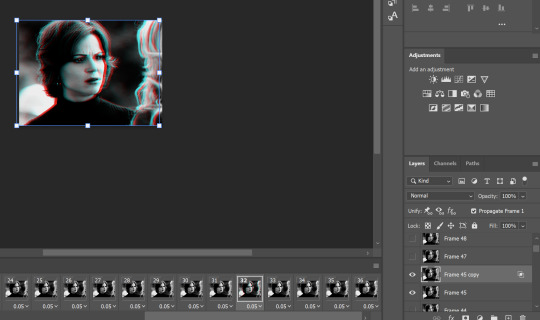
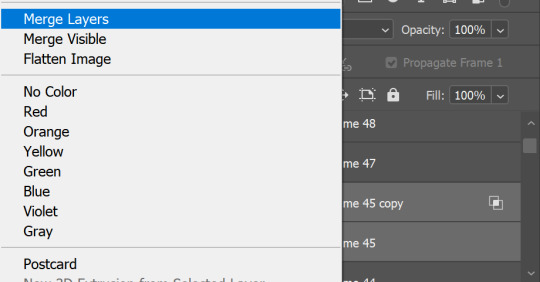
hold control > select both the visible layers

right click > merge layers
now move onto the next frame and corresponding layer and repeat the same process (i have no idea why my ps decided frame 46 doesn't exist so ignore that dkjddj)
if the frame(s) below is still visible, just click the eye to hide it so only the one you're working on and it's copy layer are showing
this time i've moved the layer 6 notches to the right as below
keep going until you get to the end of the animation. you can move each layer as much as you like either side just play around with your gif and do whatever you think looks good! if you want to do more than the last 5 frames or less than them, do that too! just remember that we are also going to put a glitch on the coloured gif then combine them, so the final glitch effect will be longer

when you're done, you might have to go back to the first frame on your animation and hide all of the layers you've just edited because on mine they all visible so the gif won't play
then go back to the end of the gif and make the right layer visible on the right frame again (hopefully this makes sense)


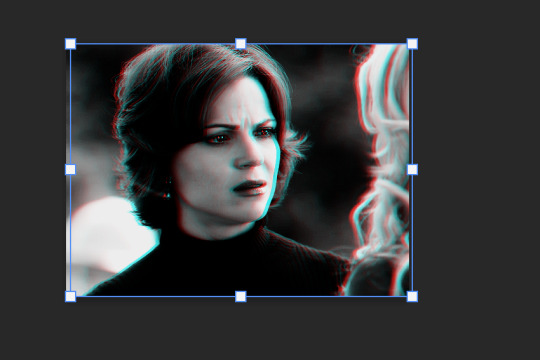
so far, the gif should play something like this

to make it smoother i picked a few frames earlier in the gif, before the start of the glitch at the end to add the same effect to the first frame i edited was number 32 (layer 'frame 45'), so i'm going to add it to frames 25 and 26 as well
then i selected the last frame and layer > filter (at the top of the screen) > blur > motion blur


then pick another frame and corresponding layer > filter > noise > add noise
do this to a couple of frames of your choice with the glitch effect on too, it makes it a little more grunge-y which i think fits with the concept that it's supposed to be glitching/broken


now it looks like this, subtle but in my opinion notably smoother

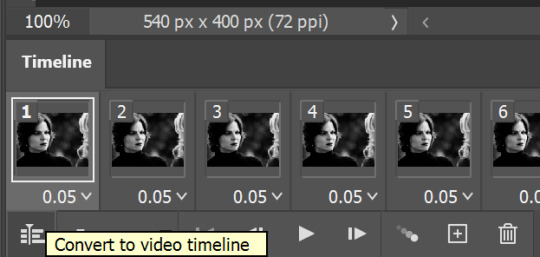
go to the left side of the screen under the frame timeline and click the convert to video timeline button
once i've converted it back to the video timeline, i like to select all of my layers again > right click > group from layers (or select all and control + g). i'm going to rename this b&w so it doesn't get confusing later
I can only add 30 images per post so this tutorial is CONTINUED HERE!
#resource#gifmaking#tutorial#gif tutorial#glitch tutorial#glitch effect tutorial#photoshop tutorial#userssam: tutorial#answered#anonymous
29 notes
·
View notes
Text
THIS TUTORIAL IS CONTINUED FROM THIS POST!
PART 3 - COLOURED GIF
going back to your coloured gif if you are in video animation then repeat the steps from part 1
repeat the steps from part 2 but to the first (rather than the last) 5 frames and corresponding layers (or however many of your choosing) without adding it to the extra frames further down
add the motion blur to the first couple of frames and the noise filter as you please
for the motion blur on the first frame, i did it slightly higher (10 instead of 7) and then slightly less (5) on the second frame so that it fades out
remember to go back to the first frame and make sure the right layers are visible on each frame otherwise it won't play properly
my second gif looks like this

convert to video timeline and make a group out of your layers again. i've renamed the group colour so it doesn't get confusing as i said before

PART 4 - COMBINING THE GIFS
pull the tab for the second gif out into a new window and drag the group with the layers on it into the first gif
it won't be aligned properly, so hold control and drag it into place over the first gif so that it snaps into the right alignment

you will have 2 tracks
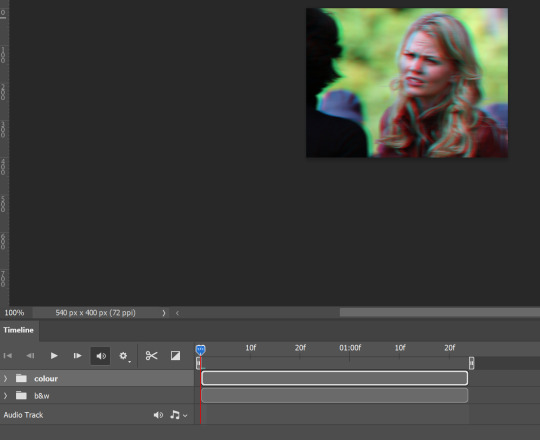
we want the glitch to go from the end of the first gif into the beginning of the second gif so because i made the glitch at the end of the b&w gif, that one is going to stay a the beginning of the timeline
the glitch effect is at the beginning of the coloured gif, so I'm going to drag that along so that it maches up to the end of the first gif to combine them into one smooth running gif

you can use the blue and red marker and drag it along to where the gifs need to match up to make sure there is no blank gap in between

when you play, it should all run as one gif! now you can add any text or anything else you want to include (i've added my watermark for example)

2 notes
·
View notes