#glitch tutorial
Explore tagged Tumblr posts
Visit Tumblr Blog
Explore Tumblr blogs with no restrictions, modern design and the best experience.
Last Seen Tumblr Blogs


Fun Fact
Tumblr Inc. has $15.1M in annual revenue.
Note
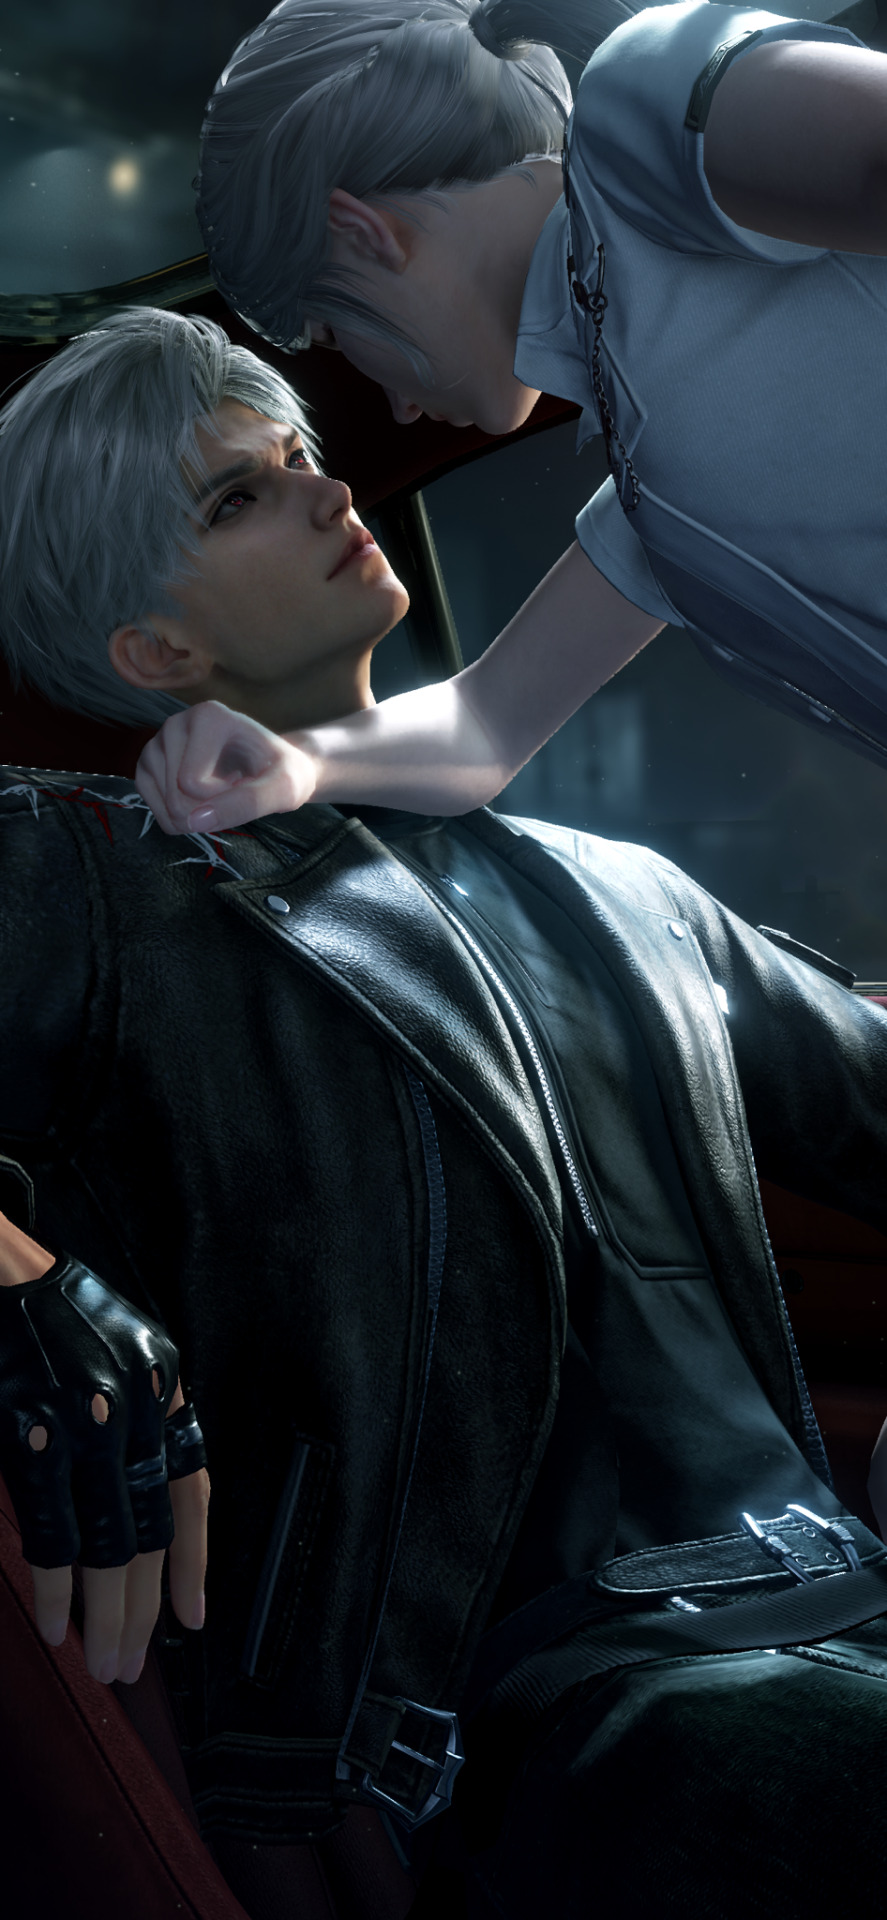
Glitchy effects, teach me yo ways I love that shi
Oh my god hi!!! I love all your interactions with the stickmin community!!1!! I wasn’t expecting you to find me so soon :DDD
Anyways, a lot of my glitch effects are procreate features, so here’s a tutorial for procreate users AND non-procreate users!!
Non-procreate version:


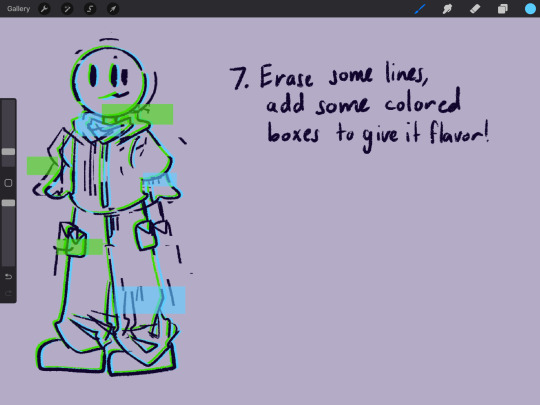
Procreate version:


42 notes
·
View notes
Note
Hi, Regina is my absolute favourite in ouat and you made her stunning in this gifset ✨
I was wondering how did you make glitch effect from green to b&w, Would you please post a tutorial?
Hi! Thank you so much! the start of the tutorial is below the cut but because it's multiple gifs and I could only add so many photos to a post to explain, I have had to split it onto another post but I have put a link at the end when it's time to move onto the next one. :) if anything doesn't make sense or if anyone follows this and it helps, i would love to know either way!
Glitch effect tutorial used on this set below the cut

note: credit to this tutorial which was very helpful when i was making the set but i didn't feel it explained how to do the b&w gif and that's what took me a while to figure out, so if anything on this tutorial isn't clear, that one should also help. this will be slightly different because in my set i made it so the glitch faded into each other and i've added my own flare to it but the basic technique is the same.
create 2 gifs the same size, you can add whatever colouring, sharpening etc you like, one in colour, one in b&w (you can do 2 in colour but for the purpose of this i'm doing one b&w to show how to do both versions).
i'm going to do the b&w gif fading into the colour gif on this tutorial (bc that's just what i started editing first) but obviously if you're making a full set decide which gif you want to fade into which because the first part of the gif will have the glitch effect on the end and the second will have it at the beginning so it will matter for the final outcome of your set
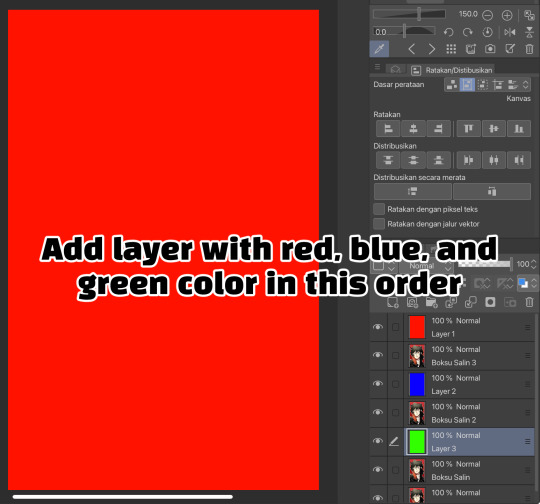
PART 1 - B&W GIF
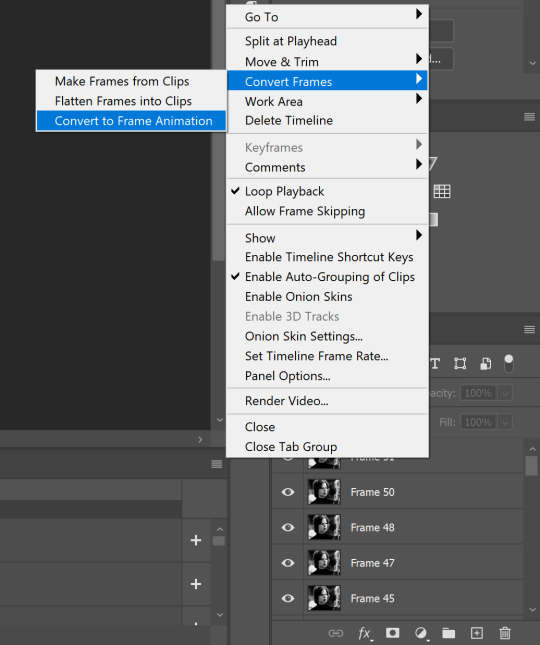
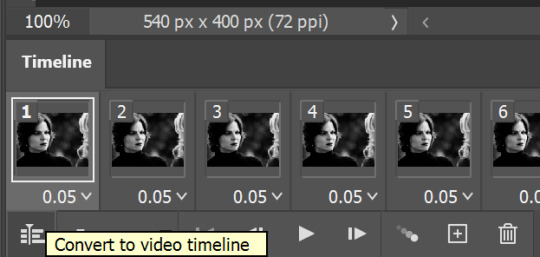
if you edit in frame animation, you must convert your b&w gif to the video animation timeline otherwise the colours will not show up on the glitch effect. you can do this by clicking the lines menu above the frames
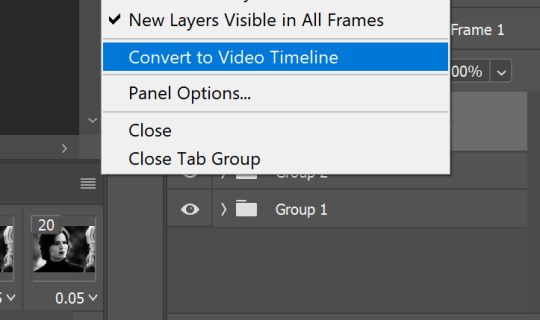
i usually colour in frame animation because it plays quicker to preview how it will look and then convert to video to add my sharpening at the end but it's personal preference how you create your gifs.
hold control + select all of your frames > right click > convert to smart object

all of your frames, colouring etc should all be in one frame now, select it > click the lines menu above the animation timeline again > convert frames > flatten frames into clips
you should now have a longer list of layers that make up each frame of your gif
this is because we need to convert back to frame animation to edit the glitch effect onto individual frames. if you don't flatten the frames to clips the gif will not play when it's converted because 1 layer will equal only 1 frame. it may seem long winded to go back and forth but it makes sure all your colouring is already included in the frames when you make it glitch. if you add the colouring afterwards it will change the colour of the glitch effect or turn it black and white and it won't be very visible (if anyone has an easier way i'm very happy for suggestions, i was just figuring this out as i went and found the glitch didn't work on the b&w gif any other way for me!!)

now we go back to the 3 lines menu > convert frames > convert to frame animation
if you get this pop up, press continue. it's fine because we have each of our frames in their own layers now

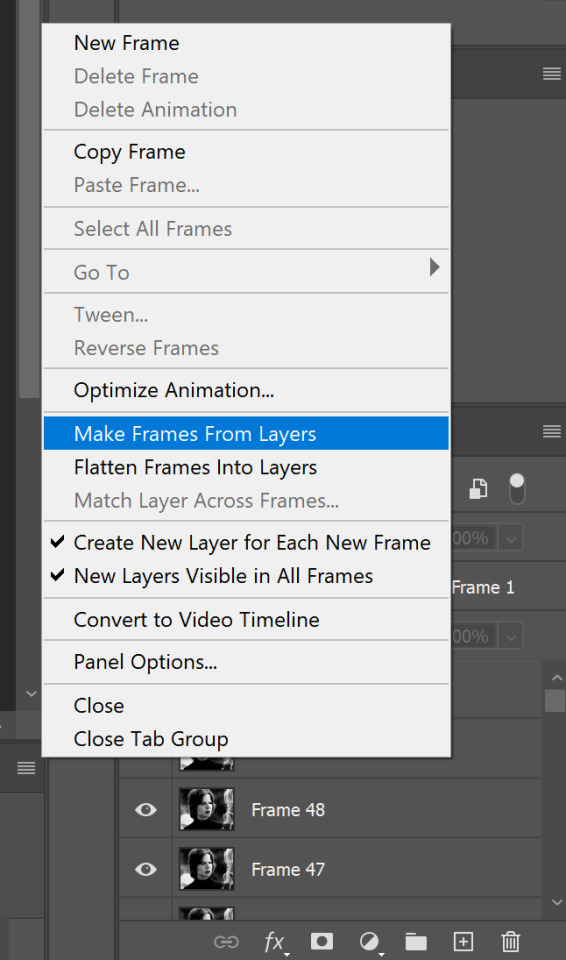
your frame animation timeline will initially load with just one frame

go to the lines menu again > make frames from layers
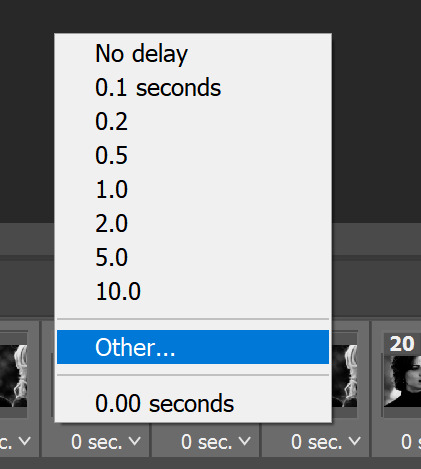
now all of the frames will load, but they will be at 0 seconds (except the first frame) and we need to make them all run at a playable speed, so go back to that same lines menu above the timeline > select all frames > select under any frame where it says 0 sec. > other > i usually put in 0.05 but do whatever works for you

PART 2 - ADDING THE GLITCH EFFECT
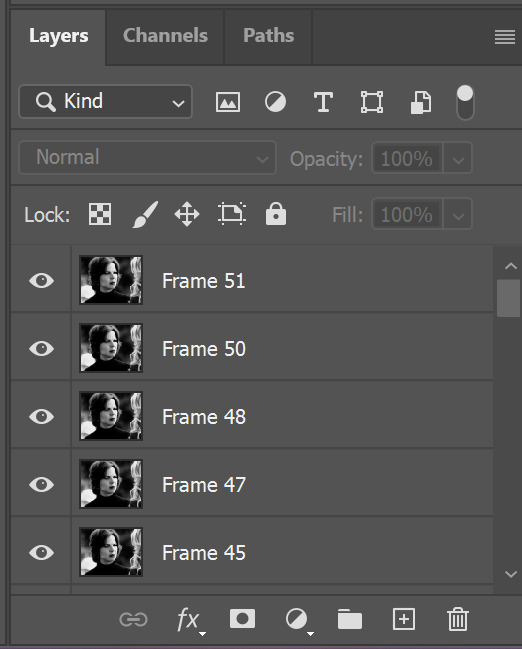
pick a frame about 5 from the end, select it and select the corresponding layer with the eye icon next to it to show it's the one visible
right click > duplicate layer (or just press control + J)
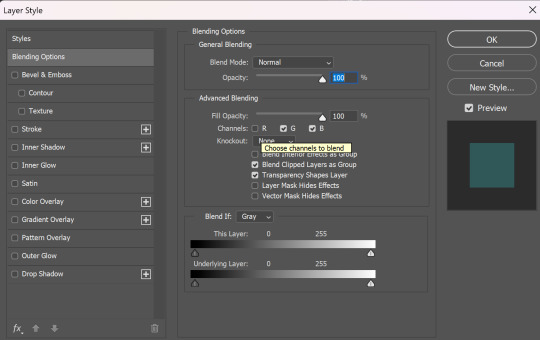
then on the copy of the layer right click > blending options (or double click)
in the advanced blending section, untick R > ok
make sure the move tool is selected

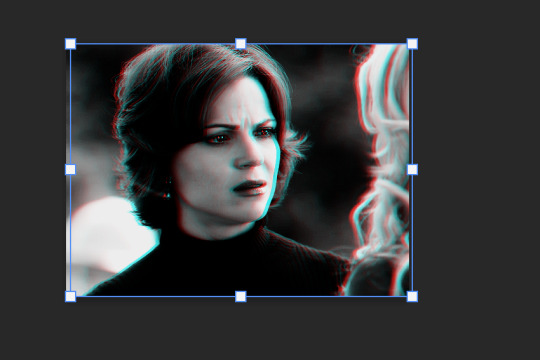
now using the arrow keys on your keyboard move that layer either left or right as many notches as you like (i've started out with 10 here)
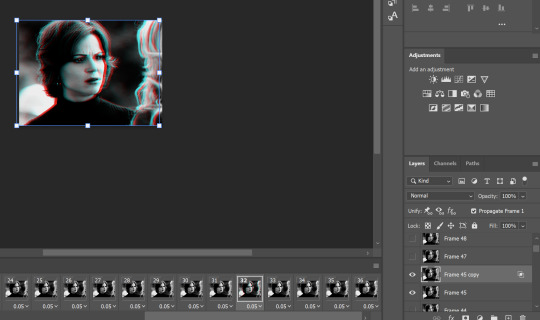
hold control > select both the visible layers

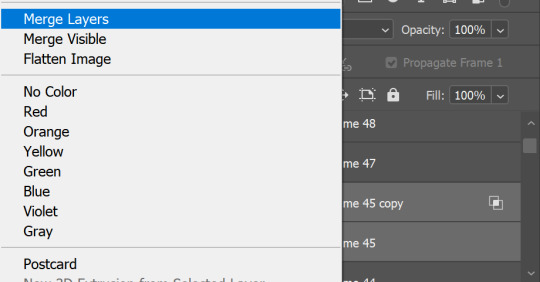
right click > merge layers
now move onto the next frame and corresponding layer and repeat the same process (i have no idea why my ps decided frame 46 doesn't exist so ignore that dkjddj)
if the frame(s) below is still visible, just click the eye to hide it so only the one you're working on and it's copy layer are showing
this time i've moved the layer 6 notches to the right as below
keep going until you get to the end of the animation. you can move each layer as much as you like either side just play around with your gif and do whatever you think looks good! if you want to do more than the last 5 frames or less than them, do that too! just remember that we are also going to put a glitch on the coloured gif then combine them, so the final glitch effect will be longer

when you're done, you might have to go back to the first frame on your animation and hide all of the layers you've just edited because on mine they all visible so the gif won't play
then go back to the end of the gif and make the right layer visible on the right frame again (hopefully this makes sense)


so far, the gif should play something like this

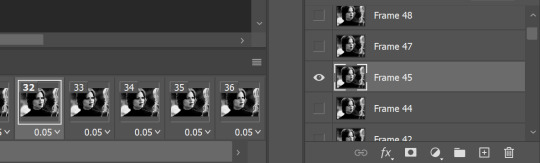
to make it smoother i picked a few frames earlier in the gif, before the start of the glitch at the end to add the same effect to the first frame i edited was number 32 (layer 'frame 45'), so i'm going to add it to frames 25 and 26 as well
then i selected the last frame and layer > filter (at the top of the screen) > blur > motion blur


then pick another frame and corresponding layer > filter > noise > add noise
do this to a couple of frames of your choice with the glitch effect on too, it makes it a little more grunge-y which i think fits with the concept that it's supposed to be glitching/broken


now it looks like this, subtle but in my opinion notably smoother

go to the left side of the screen under the frame timeline and click the convert to video timeline button
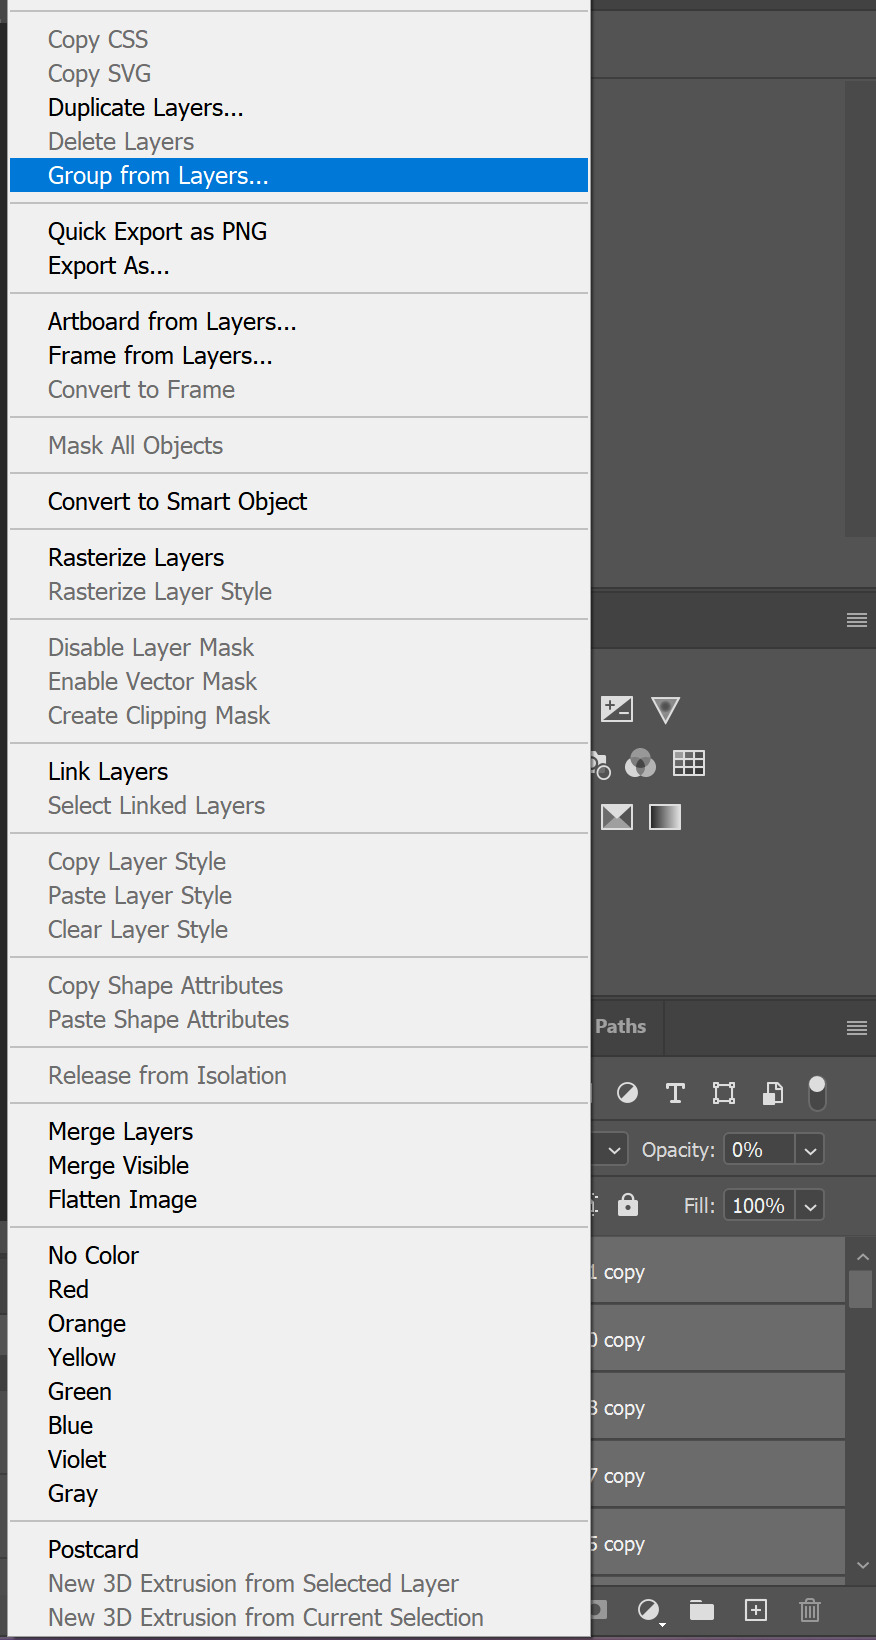
once i've converted it back to the video timeline, i like to select all of my layers again > right click > group from layers (or select all and control + g). i'm going to rename this b&w so it doesn't get confusing later
I can only add 30 images per post so this tutorial is CONTINUED HERE!
#resource#gifmaking#tutorial#gif tutorial#glitch tutorial#glitch effect tutorial#photoshop tutorial#userssam: tutorial#answered#anonymous
29 notes
·
View notes
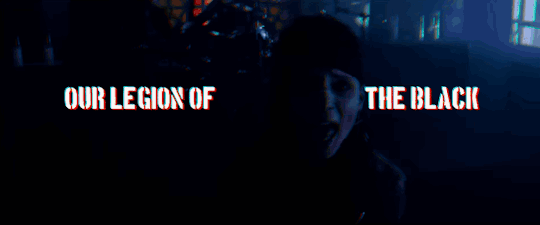
Text
16-Bit Glitch Effect Video Tutorial.
youtube
This is a video, showcasing a tutorial for adding a glitch effect into my game.
This video was found from the AI prompt: How to Create a 8-Bit/16-Bit Glitch Effect In Unreal Engine 5.4 (If it needs things like photoshop to help Unreal Engine 5.4 out just say, if not don't say). Please explain simply, step by step. Please find any tutorial links to this on youtube if you can, if you can't don't bother.
youtube
In this video I am learning from a glitch effect tutorial in order to give my game a retro RPG vibe with post-process materials.
0 notes
Text
Because you can't save progress on them, I feel like someone should write timeloop horror for Tutorial Joe and Tutorial Jane.

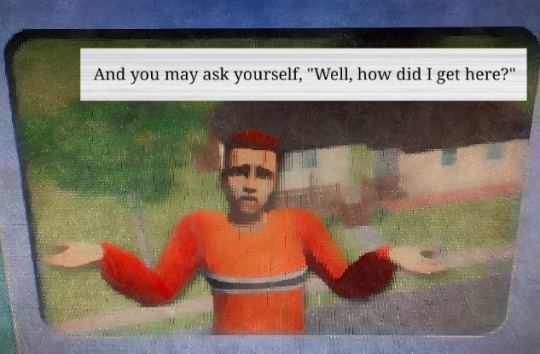


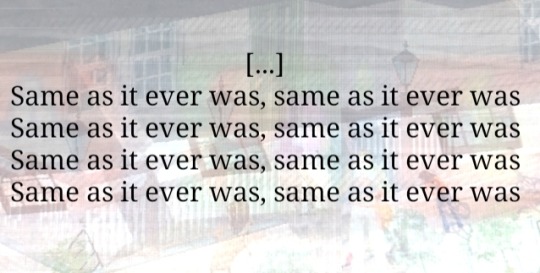
#tutorial joe#tutorial jane#ts2#the sims 2#sims#idk what this is okay <3#once in a lifetime#tw glitch#flashing tw#flashing gif tw#tw flashing gif#tw flashing#tw flickering#undescribed
1K notes
·
View notes
Text

made a rendering tutorial a bit ago since i had a few people asking about it. hope this helps!
since tumblr might butcher image quality, you can download the high quality file here and you can download my brushsets here. im always happy to help with art resources so if anyone else had any ideas in mind for future tutorials please feel free to shoot them my way
#murder drones#uzi doorman#murder drones fanart#glitch productions#md fanart#tutorial#drawing tutorial#color tutorial#art#art resources#my stuff
675 notes
·
View notes
Text
YOUR VISITOR CONTROLLER MIGHT NEED SURGERY
Hello out there!!! If you use Visitor Controller mod for the Sims 2, it might be broken. I am not sure exactly which version I have ... Midge's that allows togas or the older CrispandKerosene's version with personality options.
The personality settings may be broken because I looked at my file today and sure enough, the BHAVs are not referencing personality properly.
Go into the BHAV "Check Personality Flags" inside Visitor Controller in SimPe.
It should look like this:

The highlighted node should not reference any other value but a number higher than 100.
If you see this:

Then it is broken. Personality has to be referenced in hundreds!
You must change it with the Instruction Wizard which is on the right hand side of Plugin view to make Personality features work, as in banning Lazy Sims from a gym.

The first image shows that Sims with a Neat personality lower than 400, which is 0x0190 in hexadecimal, will be banned from the lot.
Repeat for the other personalities lower in the code.
HAPPY SIMMING!!!!
Also, if anyone is interested in a tutorial for adding custom careers to Visitor Controller, let me know!
#sims 2#sims 2 gameplay#sims 2 simblr#sims 2 mods#sims community#ts2#ts2 mods#ts2 glitch#ts2 visitor controller#visitor controller#sims#Sims mods#Sims 2#sims 2 cc#the sims 2#sims 2 screenshots#Simpe#sims 2 tutorials#sims 2 tutorial
109 notes
·
View notes
Text
The Permanent Fix For Counter Texture Glitch
A while ago I posted this tutorial for fixing the counter texture glitch. But it was not perfect and couldn't fix each and every cc counter out there.
I've finally found a fix for that too. Problem was corrupt TXTC resources that needed to be replaced. Now you can download every cc counter that comes in sims3pack and extract them into package and never have the annoying counter texture glitch ever again. Bad news is you have to do it all yourself. But don't worry! it's not that difficult and I've come with pictures.
What you'll need: s3pe, s3oc and texture tweaker 3 - and optionally Sims3Pack Multi Installer or s3ce. The download link for TT3 is in the 3rd post and there's a tutorial here. If you don't have them already, go download them. You can NOT use TSRW for this tutorial since TSRW itself is the problem. :)
First extract the package from the sims3pack using either Multi Installer/Extractor or s3ce. After you have your package file, open it up in s3pe. In my example, I'm using Gosik's New Vintage Kitchen Counter 1. Select the first OBJD resource in the resource list.
Also make sure you have Preview selected at the bottom of the program window in s3pe.
On the right side, you will see the preview of the resource in text. Scroll down until you see the InstanceName.
It's usually counterBaseModern but not always. This is the instance name of the object that this counter is cloned from. In modular objects like counters there are multiple objects. For counters, they are base, top and corner. Keep that in mind for now.
Take a note of or copy the instance name and open s3oc. First, Go to Settings -> Game Folders and make sure game folders are detected. If not, add them manually. You can also define your creator name under the Settings menu. Now, go to Tools -> Search.
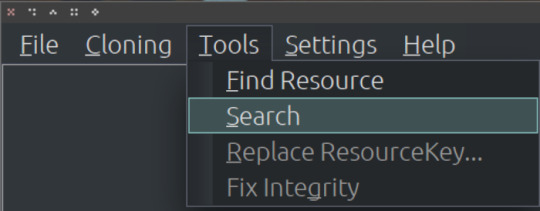
Paste the instance name in the search bar; select Resource Name and hit Search.
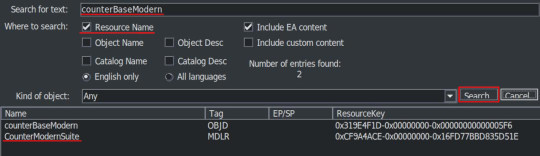
You will have two results: counterBaseModern and CounterModernSuite. I suggest that you clone the suite because it's the modular object that contains all the parts of a counter: base, top and corner. If not, you have to clone every part individually which are counterBaseModern, counterTopModern and counterCornerModern.
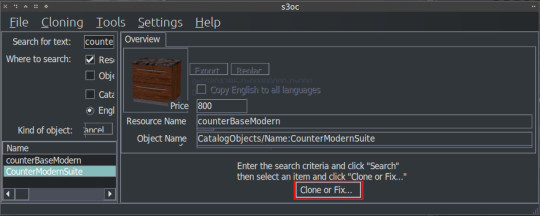
Cloning the Suite makes the process a lot quicker so I'll continue from there. Click on the CounterModernSuite and hit Clone or Fix at the right side.
That will open the cloning interface. Make sure you UNCHECK the Renumber/rename internally. We do NOT want to renumber. Then hit Start.
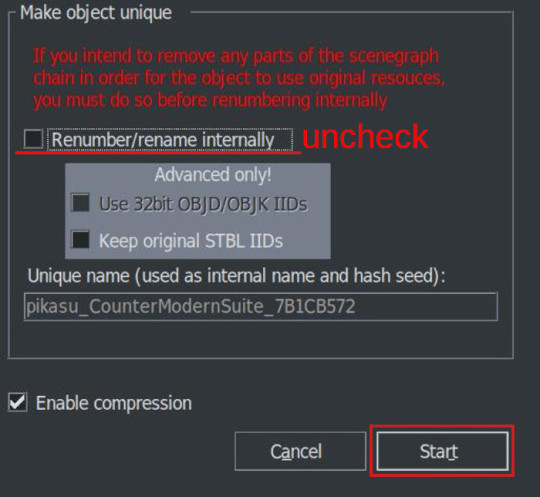
It will ask where you want to save your new package and if you already have a creator name defined earlier it will add it to the package name. If not, it may or may not ask for your creator name. Honestly, I can't remember and I don't think it matters. Anyway, chose a folder - preferably a work folder you created earlier - and keep the name it suggests. It will inform you when it's done.
We cloned our package. Now we need to export the necessary TXTC resources from it. We need the Diffusemap TXTC resource for each part. Start another instance of s3pe and open the package file you've just created which should be something like this: creatorname_CounterModernSuite_someAlphaNumericals.
You'll notice that there are 6 TXTC resources in the resource list. Check the resource names and the Group IDs. You need the DiffuseMap for base, top and corner parts. Click on the resource, then right click and Export.
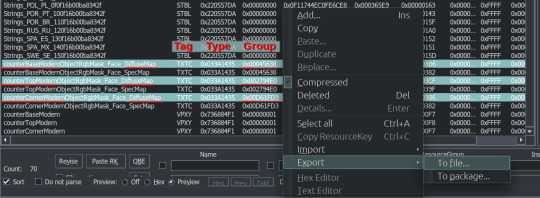
You can export them all at once or create a folder for each if you don't want to get confused. Notice that they all have different Group IDs and names. As we move to the next part keep that in mind.
After exporting, you can close this package. We'll go back to the package we want to fix, in this case, Gosik's New Vintage Kitchen Counter 1. Open the package again or switch to it if it's open in s3pe.
Select the first TXTC resource which is most likely is the DiffuseMap for the base part. Unfortunately, most cc doesn't have a _KEY resource so they don't have resource names. Group ID's come in handy here. For this counter suite Group IDs for parts are like this:
base -> 0x00045638; top -> 0x002794E0; corner -> 0x00D661FD3
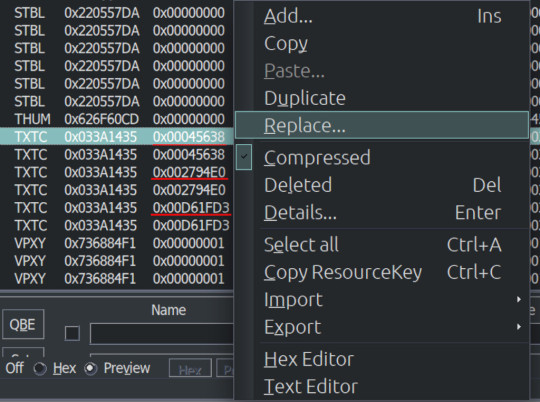
But there are 2 TXTC resources for each Group ID. One of them is SpecMap which is not corrupted. The corrupted one will have a preview like this:
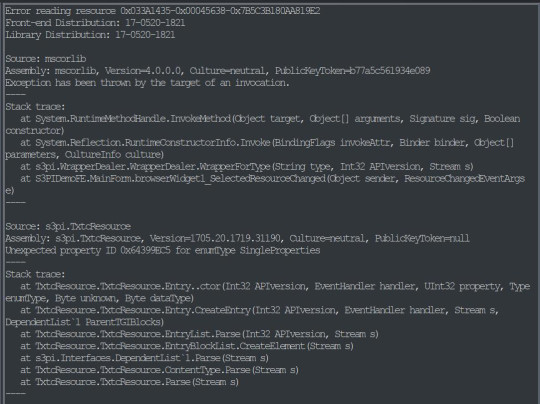
This is simply s3pe telling you it's having an 'Error reading the resource'. My interpretation: The resource is corrupted. So combine this with the right Group ID and right click on the resource and choose Replace. Do not use Import! You need to Replace the resource without changing its instance number. Choose the right resource you exported earlier. Again check the name and Group ID. it should be something like: S3_033A1435_00045638_A85033BB5A059932_counterBaseModernObjectRgbMask_Face_DiffuseMap%%+TXTC
This is for the base object. For top and corner parts, repeat the replacing step with the right resources.
After you replace all the corrupted resources, s3pe will no longer give an error reading those resources when you click on them. And neither will TT3. You will now save your package and close s3pe. A reminder: If the TXTC resources are not corrupted in CC package, skip all and continue as below.
After that you will open your package in TT3 and follow the tutorial here. But a brief rundown would be: select each 'Normal Object' one by one and switch to CASt presets tab after each selection. In this tab, all you have to do is uncheck and then recheck the box next to PatternA and hit Commit. Do it for every preset. Repeat it for every object in the package. Save. Close. Done. :)
For island counters, process is the same but with 4 parts. Base, EndW, EndE and Corner. Also this works for other modular objects like cabinets and sectional sofas.
One last clarification: If the object is cloned from another counter suite, the Group IDs that we used will be different. Also some CC will have Group IDs different from the main object it's cloned from. If that happens, you may need to have a leap of faith.
Usually the order from top to bottom is base, top, corner (counters) and base, endW, endE, corner (islands), starting with the first TXTC resource. So in theory, if you select the corrupt resources from top to bottom, you can replace with that order without the Group IDs.
That's it. I don't think anyone will bother with this. But If you have questions, ask away.
219 notes
·
View notes
Note
Would you recommend the new Nikki game to a newcomer that has 0.0% experience with the series?
I dont think I ever really played anything like it (even though I do tend to dabble with just about everything that isn't horror) and I am curious about it.
Also, is it as bad of a timesink, "Login in every day! Play me, play me, play me!" kind of thing as some other gachas are?

no
#genuinely if you had asked me this like a month ago i would have said yes but the new patch is SUCH a trainwreck#if you start playing now the story will make absolutely 0 sense to you#the current outfits have so many pieces that it’s taking people upwards of 300 pulls to complete one set#and as seen in the screenshot there are bugs that have been just. taking peoples currency.#that in some cases they paid real life money for.#recently there was also a glitch that let you collect a certain currency twice a day#but because all the tutorials suck no one knew it was a glitch. we all assumed it was intentional#and then when they realized they started TAKING AWAY THE CURRENCY of everyone who collected it even though there was NO WAY TO KNOW IT WAS#A GLITCH. it’s so bad bro#i really hope they fix it tbh because i did like the direction the game was headed before this#but rn you should stay as far away as possible lmfao
77 notes
·
View notes
Text


Twitter doodle request dump
#fish fillet duo#princezam#4cvit#bdubs#bdouble0#clownpierce#medeival duo#glitch duo#ashswag#squiddo#skip the tutorial#planetlord#dandelion duo#martyn itlw#bormethius#reddoons
103 notes
·
View notes
Text
The kindled glitch thingy hack still works!
I’ve seen some acc saying it doesn’t work anymore but I just tested it and it’s still there^^
Update: it works but only once. The memory kindled will be the only one with the glitch. Even after closing the app.
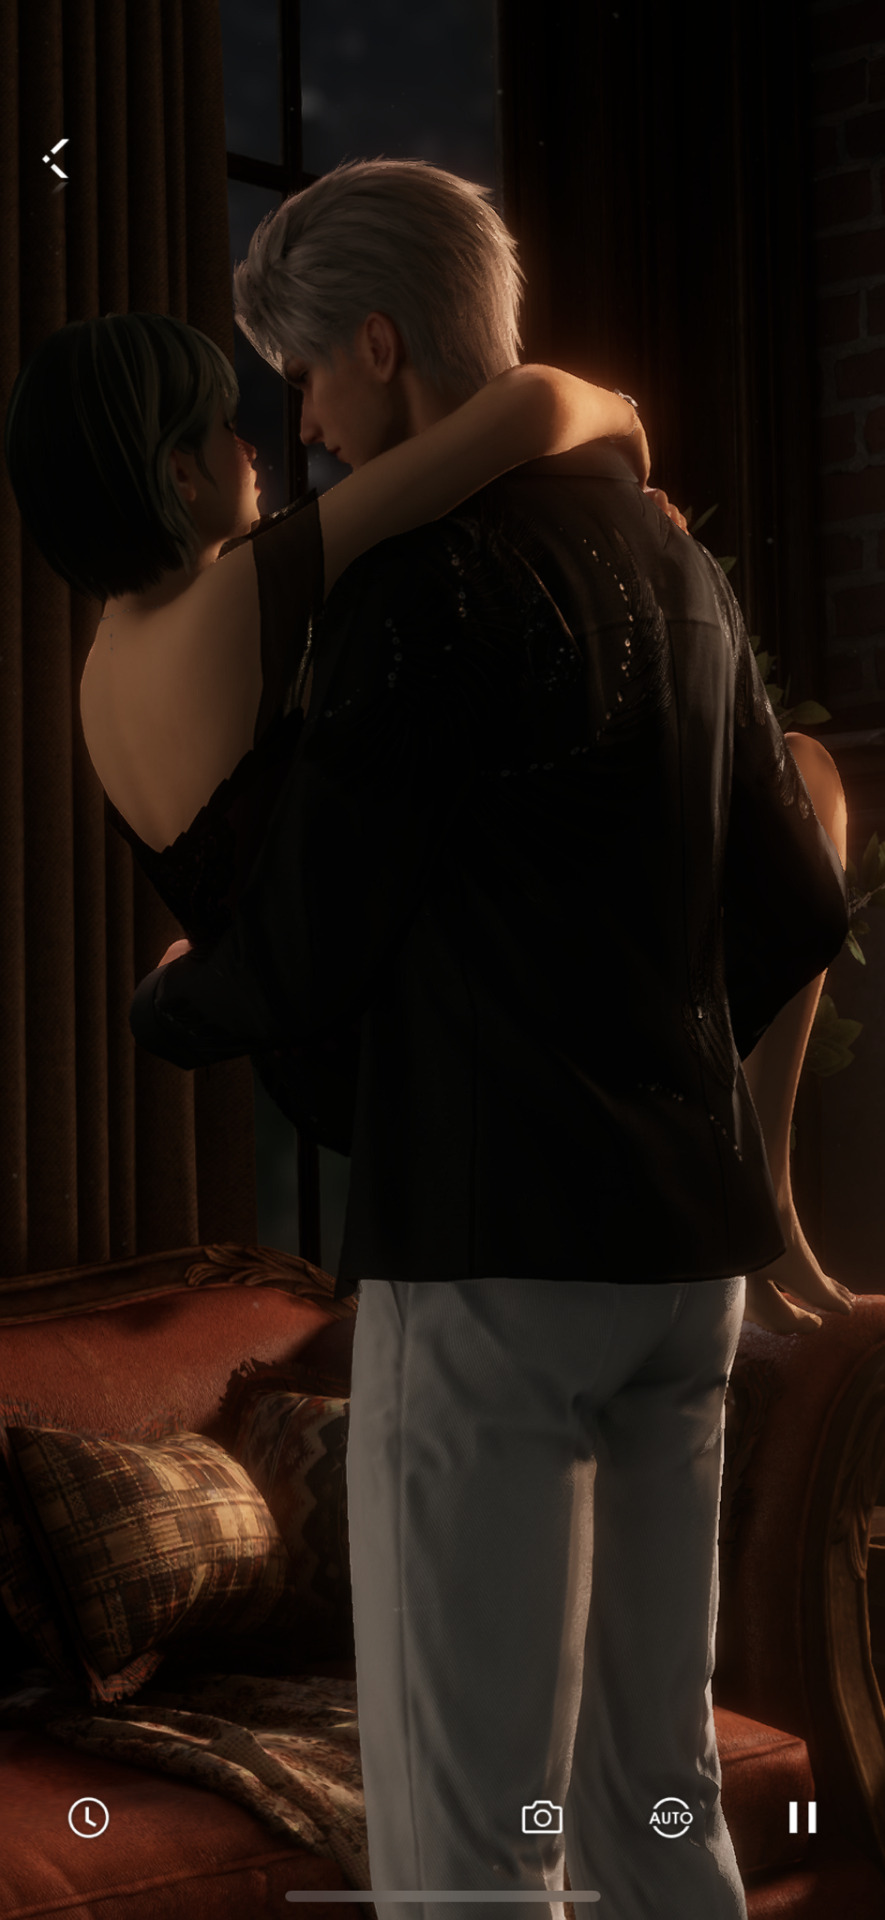
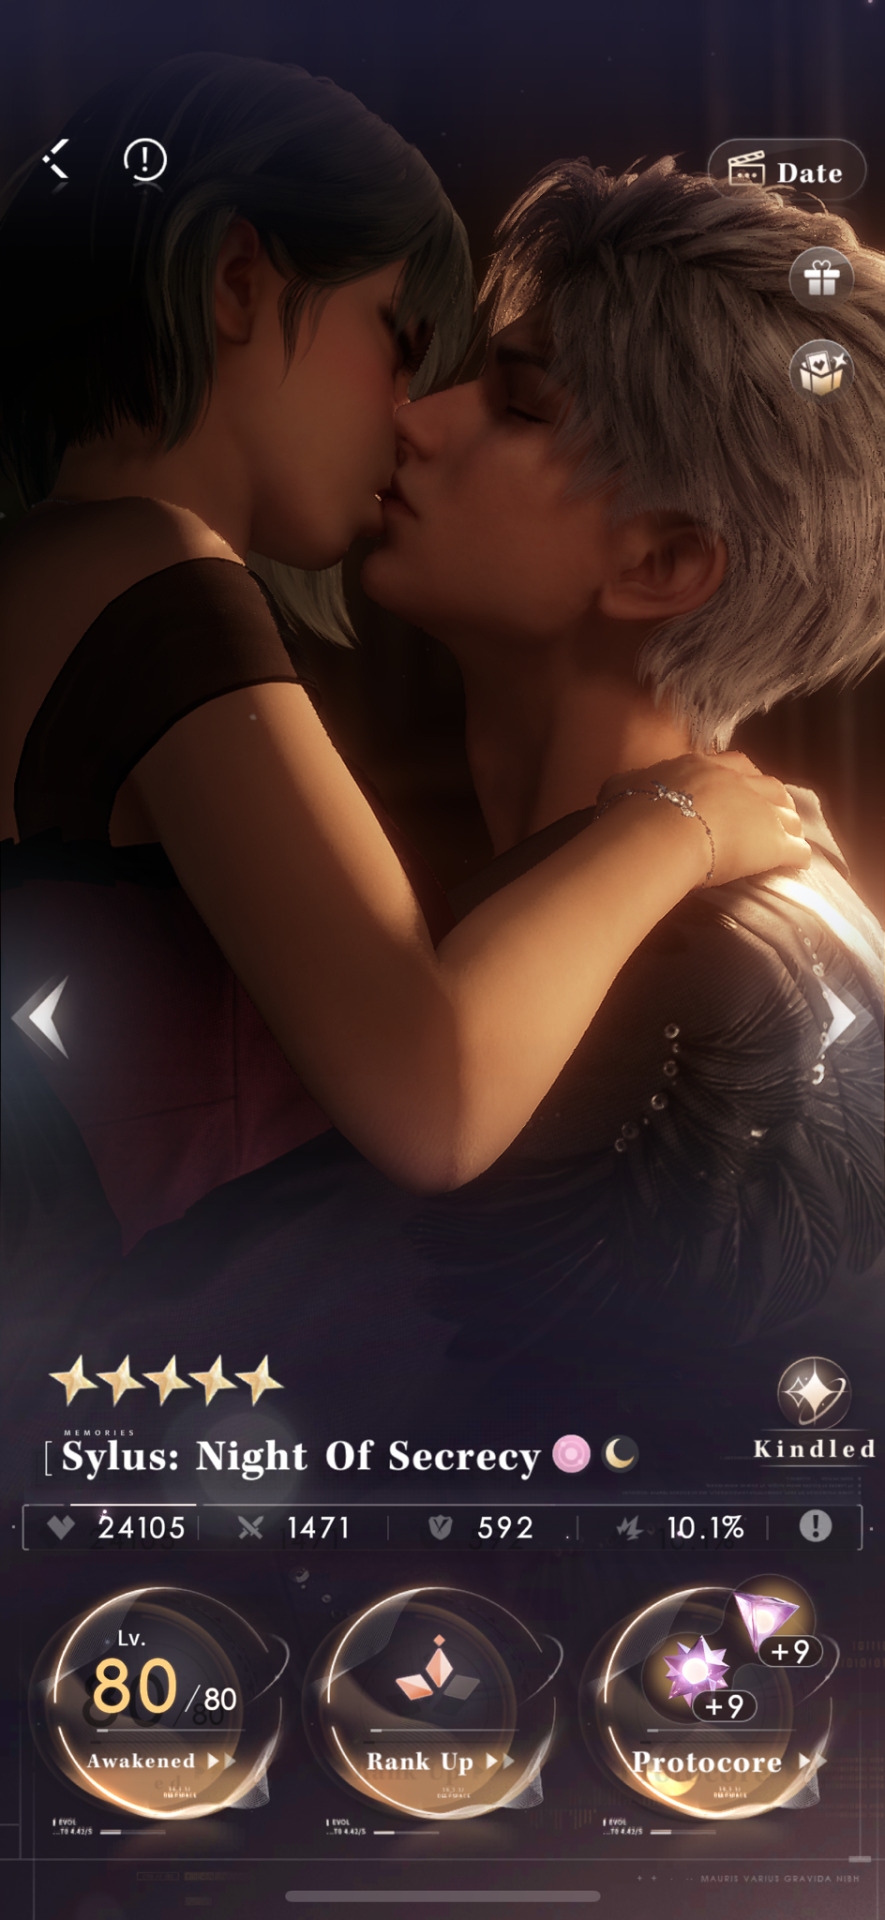

I’ll add a step by step just in case!
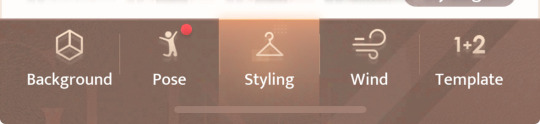
1.- go to the photobooth!
2. Once you open the photobooth, a menu with a row of options is at the bottom. Click on the hanger icon that says “Styling.”
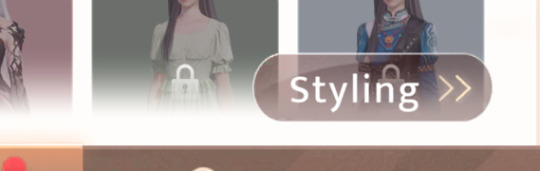
3.- then click on “My closet”.

At the bottom right corner, a button says “Styling”. Press that!
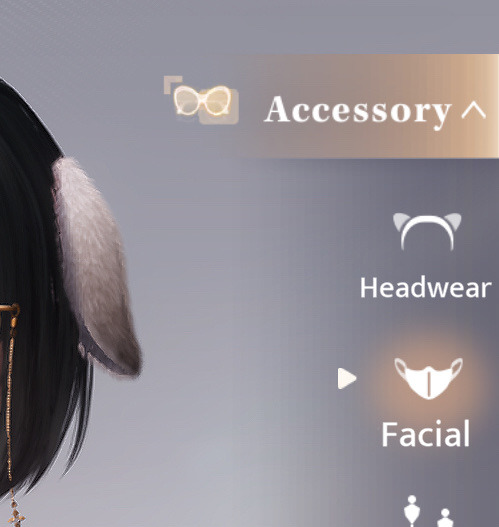
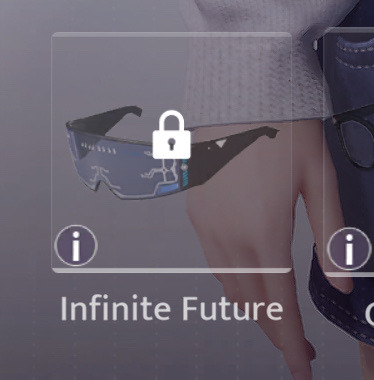
4.- That should take you to hair, outfit and accessory. Click on “Accessory” then on “facial”! Scroll down a little and choose any of the accessories (infinite future glasses best option tbh) that have a lock (2nd picture), then click on the ⓘ icon (the little circle in the bottom left corner of said item).
A square with info about the item and where to get it should show up. Now, click on “Go”
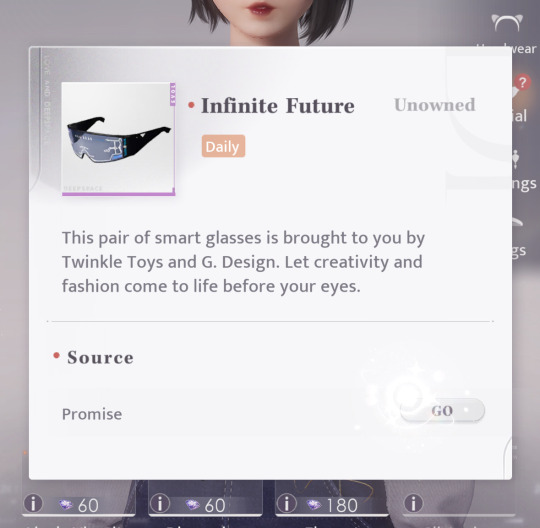
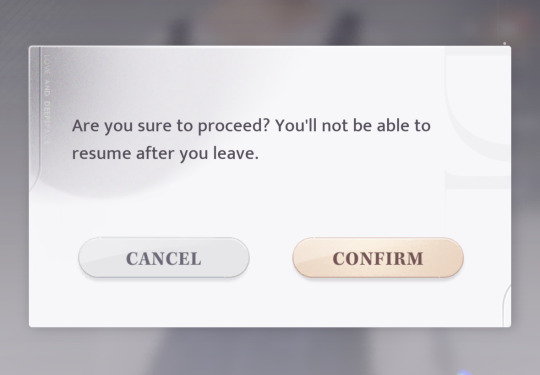
5.- this rectangle will pop up and press “Confirm”.
That’s all! Now, without closing the app, go to any memory and press kindled!
#omi.ds#love and deepspace#l&ds#love & deepspace#lads#lads glitch#lads hack#(also posting this for myself because I always forget it exists)#lads tutorial
73 notes
·
View notes
Note
Looking back at your aurora and sage besties comic (its one of my favorites, only being beaten by were amy and sonic being a Simp) and I've got to ask, HOW DID YOU DO SAGES GLITCHING SO FRANKEN WELL??? IT LOOKS AMAZING AND I PERSONALLY LOVE HOW THOSE GLITCHS TURN RED WHENEVER SHES ON NEFARIOUS TIMING ARVDGDBABA
YOU ARE MY FAVORITE SONIC ARTIST.
...just wanted to say and ask.
You are so kind, thank you! I'm so happy you like them!
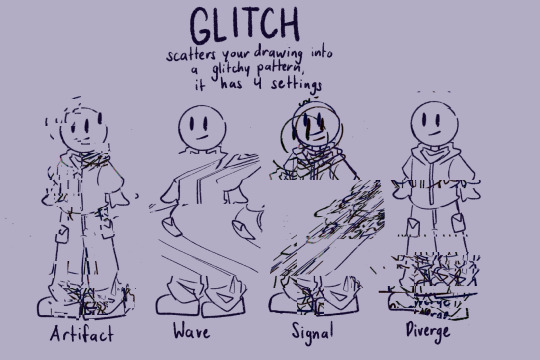
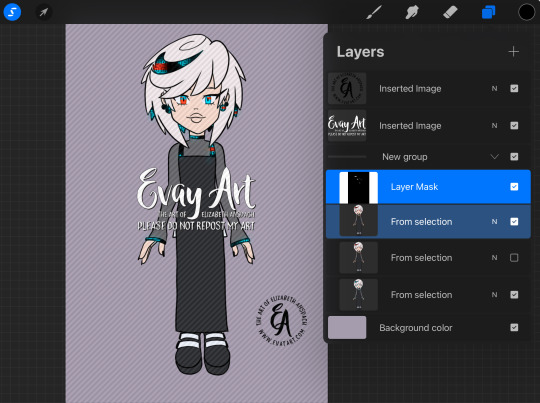
I do a lot of experimenting in Procreate until I find a technique I like. To achieve Sage's glitch, especially if she's doing something a little more wicked so her "red" side is showing, I'll start by drawing her in her blue version and her red version:

I'll select random rectangles from the red version and mask them/cut them out, so she's mostly blue but some red is showing:
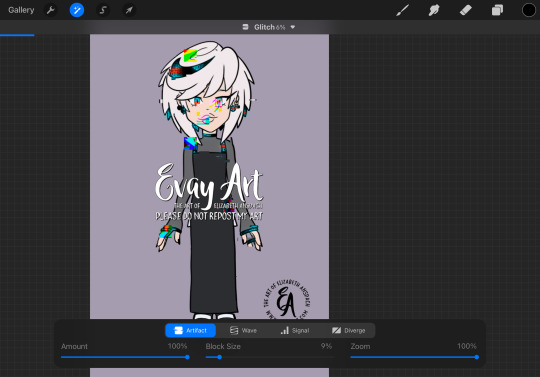
I'll duplicate this layer and keep a copy of the "clean version" and apply effects to the duplicate. In Procreate, I'll use the "Glitch" effect and use the “Artifact” setting and mess with it until it achieves a result I like:
This may take several passes.
I duplicate the layers again, because again I always want to be able to go back if I don't like it. Then I'll play around with "chromatic aberration" under the “displacement” setting. She only needs a little for a subtle glitch effect, but if she's meant to look more menacing then I can go hardcore with it:
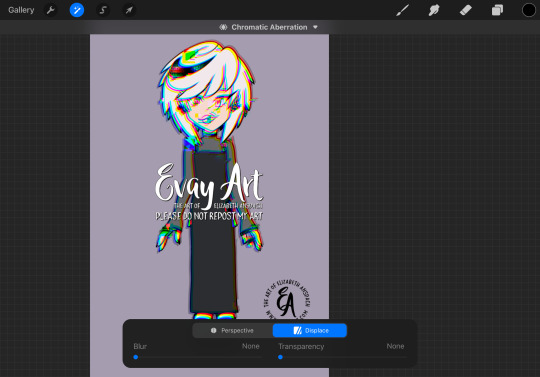
Then, I'll turn that original "clean" layer back on and I mask out the effect layer so only parts of it are coming through. When computers glitch, normally most of the image stays in tact and only some parts are scattered/messy so that's why I only have the effect in some areas.
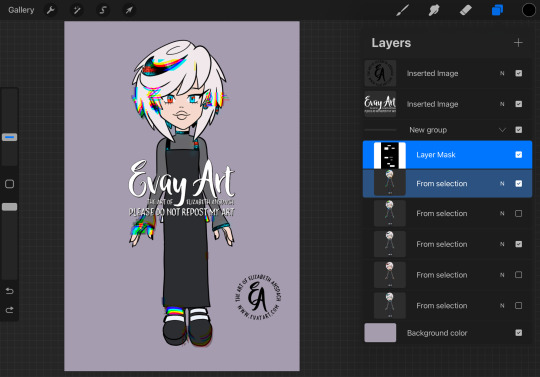
I might even slide bits of those rectangles to the left or right. It's just a matter of playing with it until I like how it looks.
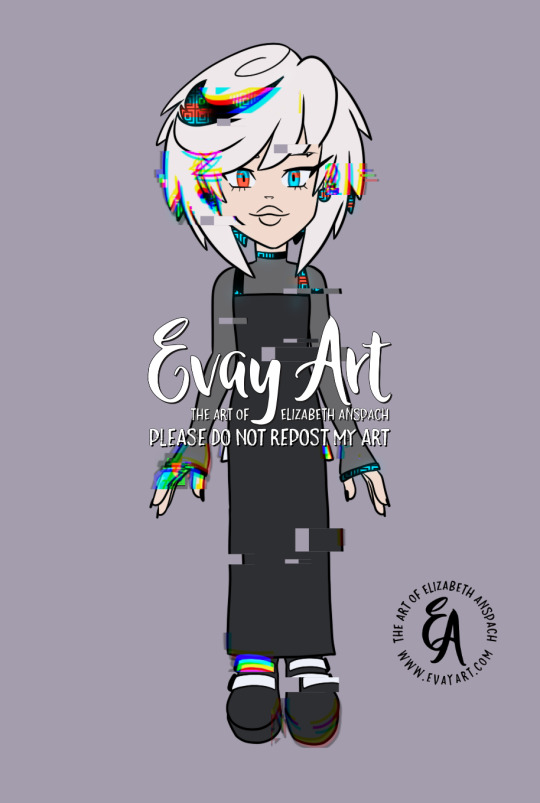
I hope that explanation was easy enough to follow along!
Again, thank you so much! I'm really really happy you enjoy my art and stories 🥰 (and I'm delighted to hear you're a fan of Were!AmyXSimp!Sonic hehehe)
#ask me#evayQA#tutorial#procreate#procreate tips#sage the ai#sage robotnik#sonic trash#art tips#glitch effect
159 notes
·
View notes
Text


I love u bug that lets you change ur hair, I hope they never fix u
#lmk if u need hair glitch tutorial#I think it’s so bs u can’t change ur hair unless illuso is available#love and deepspace#lads sylus#lads caleb#lads zayne#lads rafayel#lads xavier
34 notes
·
View notes
Text
How To Fix The Placement of Eyelashes (In The Glasses Category)
We know the latest Sims 4 patch (2024-08-08) broke the placement of eyelashes found in the glasses category. Here is a method to fix them and place them in the Eyelash category.
NOTE: This is only a placement fix. If your eyelashes conflicted with glasses before and the eyelashes could not be worn at the same time as glasses, you will still have a conflict between the two items. Eyelashes in the glasses category are usually mapped in the same texture space as glasses, so now you will get texture bleeding from the eyelashes to the glasses. This is NOT a fix for that issue. To fix that issue, you'd need to use Blender to move the textures.
For this method, you do not need to know how to use Blender. You need Sims 4 Studio. If you do not have it, you can download it from here.
I've tried this method myself, and it works. Here it is, step-by-step:
In Sims 4 Studio, open the package file (eyelashes) you want to convert. These should be eyelashes in the Glasses category. The easiest way to do this is to find the file in your mods folder and move it to its own folder before you start, so it'll be less difficult to locate. You can also set the properties of package files to open automatically in S4S when you double-click on them. (That's what I've done, because I make a lot of CC)
We'll call this package the original package. Once it is opened in S4S, click on the "Meshes" tab and export the mesh. Save it somewhere you can find it easily
Next, click on the "Textures" tab and export the textures of the swatches you want to add to your package. Make sure you export the "Diffuse" texture (even if you don't export anything else). Save your exported textures somewhere you can easily find them again.
You can also export the custom thumbnail, if your original package has one. You can find it on the right side of the screen on the "Textures" tab. Again, save this in a place where you can easily find it later.
Go to the "Categories" tab and scroll all the way to the bottom. You should see three items; Allow for Random, Restrict Opposite Gender and Restrict Opposite Frame. Make note of which boxes are ticked or unticked in your original package.
Close the original package by returning to the Main Menu of Sims 4 Studio. You don't need to save the original package, as you haven't made any changes to it.
On the main menu screen of S4S, go to the CAS section (bottom left) and choose "Create 3D Mesh" and then click the large blue CAS button.
Search for the base game eyelashes. You should see a drop-down menu called "Part Type" near the top of the window, in the middle. Choose "Eyelashes" from this menu. In the main part of the window, the in-game eyelashes should appear. Click on the one you want, and it should turn blue.
Click the "Next" button.
You will be prompted to save your new package. Give it a name (preferably one that includes your creator name, so you can find it again) and save it in your Mods folder, or whichever sub-folder within your Mods folder that you like to use for CC making.
In your new package, click on the "Meshes" tab and import the mesh you exported from the original package. Look for a dropdown menu where it says "LOD 0" (you have just replaced LOD 0). Now click on "LOD 1" and then import the mesh to this LOD as well. LOD stands for "Level Of Detail" and you might see higher numbered LODs looking degraded. Don't panic. This is normal.
Save your package, but don't close it.
Go back to the "Textures" tab and import the textures you exported from your original package file. You can import the custom thumbnails during this step too.
Save your package again. Do not close it.
In the menu at the top of your Sims 4 Studio window, look for one called "Tools", click on it and scroll down until you see "Modding" and click on that. A sub-menu will appear. Scroll down the sub-menu until you find "Glass Shader (CAS)" and click on that. You should get a notification that X number of shaders have been changed to SimGlass. Click OK.
Save your package.
Go to the "Categories" tab, scroll all the way to the bottom of the window, and make sure the same boxes are ticked/unticked as in your original package. If something is ticked in your new package that was unticked in your original package, this may cause your new item to not show up for one gender or the other once you get it into CAS.
Save one final time.
Open your game and test your package. Your new lashes should appear in the eyelash category in game.
136 notes
·
View notes
Text

And in the end we found our stage We gave these words of strength
#black veil brides#bvb#andy biersack#andy bvb#wretched and divine#wretched and divine bvb#vale#vale bvb#maeve.gif#guy of all time 🖤#valeposting#flashing tw#tw flashing#(if anyone needs a specific tw for these please lmk!!!)#anyway uh yeah new idea dropped#credit given where credit is due shout out to miwtual's glitch tutorial#literally could not have done this gifset without it#fun fact there were about ten different versions of the text i tried before i finally settled on this one#shout out to sam for helping me through my creative block#would love to have the text transition but i am not at that level yet#ok tag rant over now prommy#wait one more actually#IN THIS HOUSE WE LOVE AND APPRECIATE ALL VALE SONGS YES EVEN INCIPIENS AD FINEM#ok now i'm done
57 notes
·
View notes
Note
Hello! I love your art! How do you do the glitchy effect on the lineart?
Hi! Here’s how I make Aberration/glitch effect ✨ I hope it’s helpful~


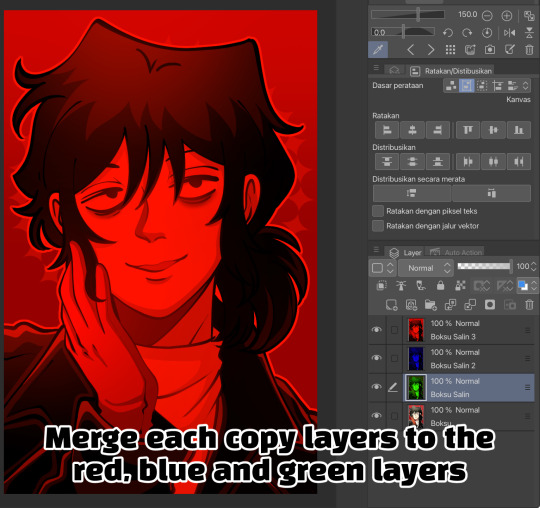


#sabamiso arts#artists on tumblr#illustration#tutorial#art tutorial#tutorials#aberration effect#glitch effect#aberration#glitch#go boksu#bok su go#go bok su#boksu go#married in red#bok su married in red#boksu married in red#racheldrawsthis#studio investigrave
32 notes
·
View notes
Note
What are your tips for trying to find glitches in games? You seem to have a talent for finding them haha
honestly I mostly just learn about them from watching speedruns haha, which has led to me finding a bunch of tutorials and players explaining how certain ones work. for a while with botw if I saw a new glitch I would drop everything to learn it and basically do Nothing But That glitch in various places for hours lol. there are a couple that I found extra fun and still mess with all the time, especially stuff like hinox curse and windbombs
it's been a while since I really added anything to it but I have an old playlist of various glitches I've seen around here:
some of these are much easier to set up than others, and a few are like. hyperspecific. can only be done with one (1) NPC type stuff. but hopefully there's something fun in here to try!!
also botw is just kinda janky in general even without trying to break it (at least on switch 1), sometimes things just get wacky for no particular reason. BUT a couple things off the top of my head that might make the game more Prone To Weird Things:
put ur console in sleep mode rather than shutting it down so that the game doesn't get closed for long periods of time
keep automatic updates off & don't connect to the internet when possible-- updates can roll out randomly (like they pushed v1.8.0 to botw last week after the game's had 0 patches since 2019??? hello)
stables are extra susceptible to having NPCs spawn in sideways or underground lol, especially if it's snowing or if u warp to one while around a bunch of items/enemies. it happens very randomly still though
#thanks for the ask!!!#not a link#ask#anonymous#botw glitches#lowkey one of the many gdocs i was putting together in my peak botw phase was a glitch tutorial sheet#i should revisit that
7 notes
·
View notes