#text tutorial
Explore tagged Tumblr posts
Visit Tumblr Blog
Explore Tumblr blogs with no restrictions, modern design and the best experience.
Last Seen Tumblr Blogs


festiveditl
1K posts


les-blagues-streaming-vf-blog
REGARDER=LES BLAGUES DE TOTO=2020 Streaming VF Complet en Film F
1 post

Fun Fact
Total funding amounts to $125.3M.
Text
GRADIENT TEXT TUTORIAL

HOW TO GET OMBRÉ STYLED TEXT ON TUMBLR
𝜗℘ I got a request on TikTok asking to do a tutorial on gradient text — tumblr doesn’t have an in-app option on doing gradient texts. This is how.
𝜗℘ Sites you can use: image color picker / stuffbydavid (gradient text).
𝜗℘ People say that you have to use a computer for this, which isn’t true. I am able to make gradient text on my phone, but you can use a computer if you want.

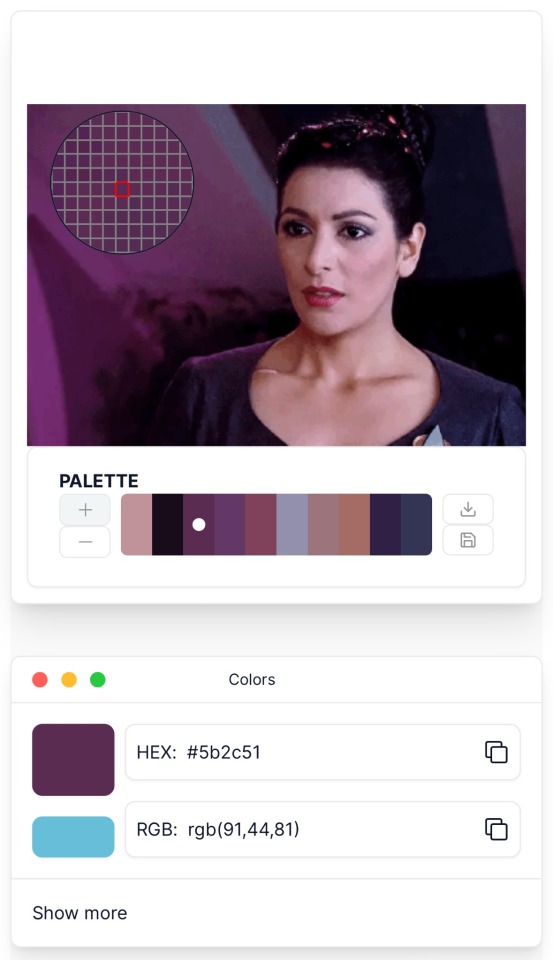
color picking from an image is optional, but highly recommended.
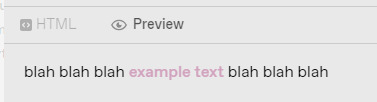
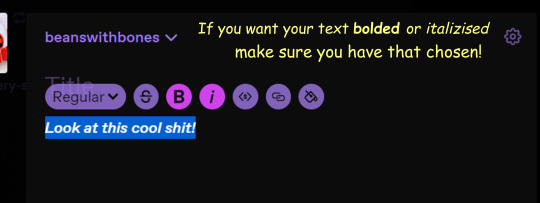
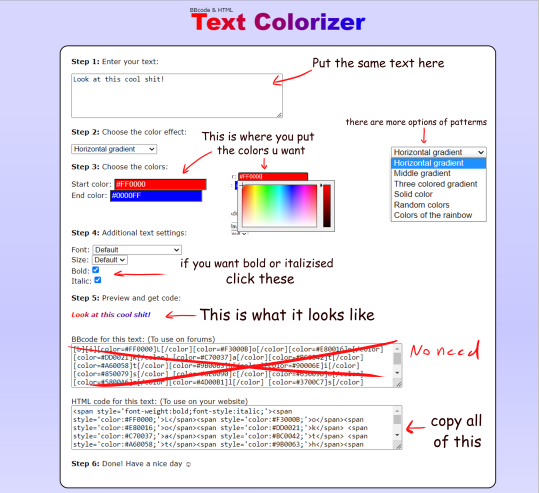
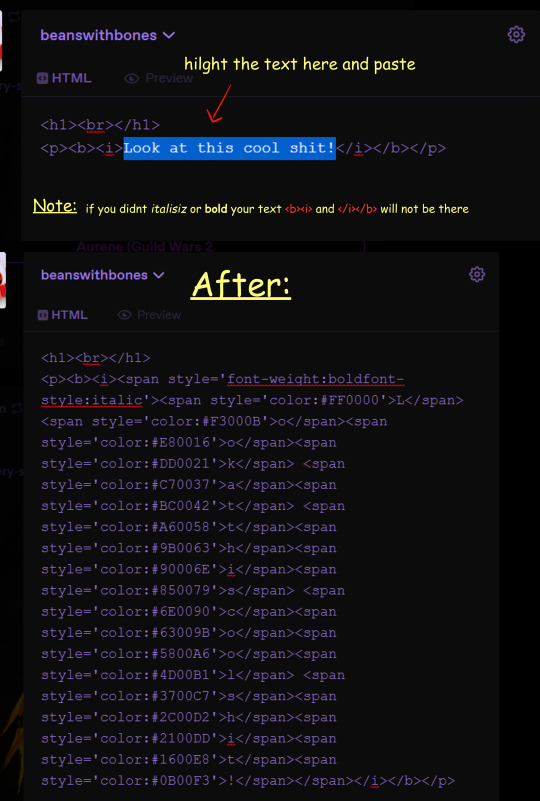
one: put the text you want to color for your tumblr post.
two: change the color of the text to whatever color you want. there are several options on how you want it. pick whatever option you want. the text will automatically generate for you.
three: copy the entire code then press “copy”.
four: go over to tumblr (website, not the app) and click “edit post” (the pencil) or create a new post.
five: click the settings button and change it from “rich text” to “HTML.”
six: paste the code from the gradient text website in the HTML where you want it to go. (I paste it then just save the post to my drafts then edit the text on the app)
#jasper’s tutorials#tutorial#gradient text#ombré text#text#tumblr text#text post#colored text#text tutorial#tumblr blog#tumblr tutorial
255 notes
·
View notes
Text
GRADIENT TEXT TUT

how to get ombré colored text on tumblr <3
꧞ i get a lot of dms and comments asking about how to change the color of your text to colors that tumblr doesn’t have or to an ombré text. this is how
꧞ sites you can use: the one i use // two // three
꧞ you can use your phone for this, but i prefer using the computer. just go to safari to do it instead of the app if you wanna do it on the phone


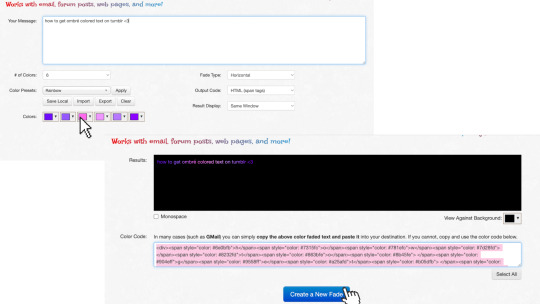
one: copy the text you want to color from your tumblr post then paste it into the websites text box
two: change the color of the text to whatever color you want. with the website i use it allows you to pick presets or you can also customize your own then click generate
three: click the “select all” button and copy the code
four: go over to tumblr and click the edit button on your post
five: click the settings button and change the text editor to "html" then find the html section at the top and click on it
six: paste the code from the color fader website in the html where you want it to go (i paste it at the top and just edit it on my phone by holding text down and moving it)
204 notes
·
View notes
Note
how do you get your text that soft pink shade? tutorial?
BABY PINK TEXT TUTORIAL !
hi babe!! here's a short and hopefully easy to understand tutorial for the text i use in my posts ᥫ᭡
also, just a little disclaimer: the images on this post might not be visible because they exceed the limit of 10 images per post on mobile app. should be fine on a laptop or pc though!!

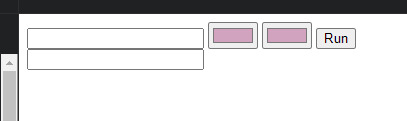
okay firstly, make sure you're using a laptop and open your post in one tab and in a seperate tab open jsfiddle.
you should be able to see this coding somewhere on your screen:
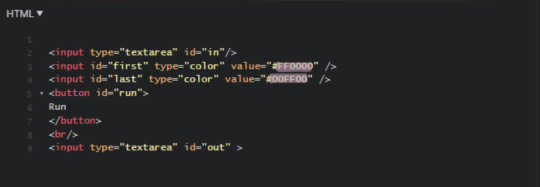
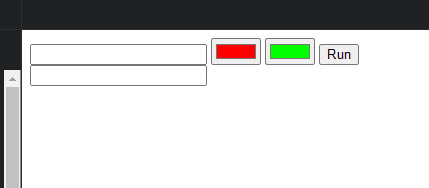
you're gonna replace the two hex-codes (highlighted text) with whichever colours you'd like. to do a gradient, like this, the two codes will be different, but i like to do a solid colour like this so my codes will be the same.
the hex code i use for the baby pink is D2A3BE, or you can use your own. if you don't have a hex code you like yet, you can use the colour picker on this site to find one!
just copy and paste the hex codes into the code so it looks like this:
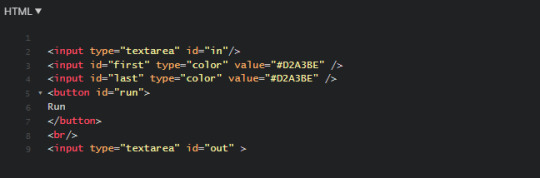
make sure it looks exactly like this. you still need all the spaces, quotations and other code. only change the hex codes.
in the top left of your screen, there should be a "run" button, and when you press it, the colours in the bottom right should change from the default ones to the ones you chose.
next, you're going to open your tumblr post in your first tab.

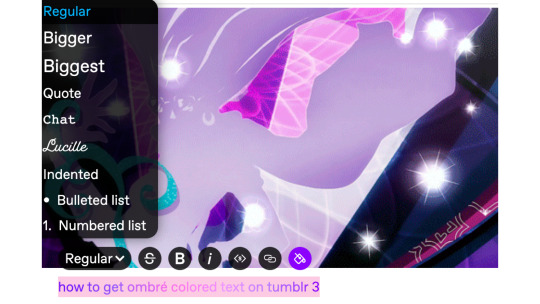
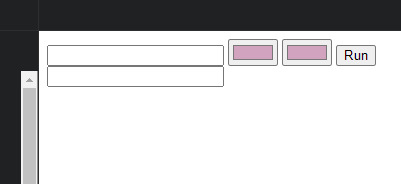
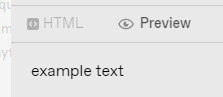
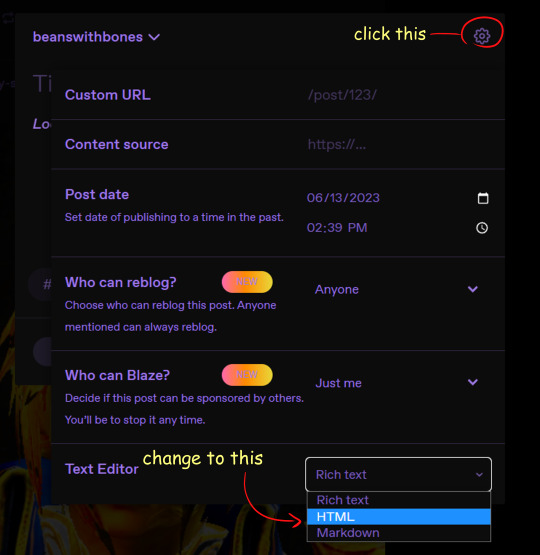
your post will start like this. you'll go to the settings button in the top right (circled) and change the post from rich text to HTML
this will enable coding on the post. you'll still have 'preview' where it will look normal and you can still type and edit the post as you usually would.
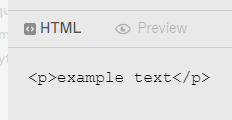
once you've typed something it will show it in the HTML option just in a different way:
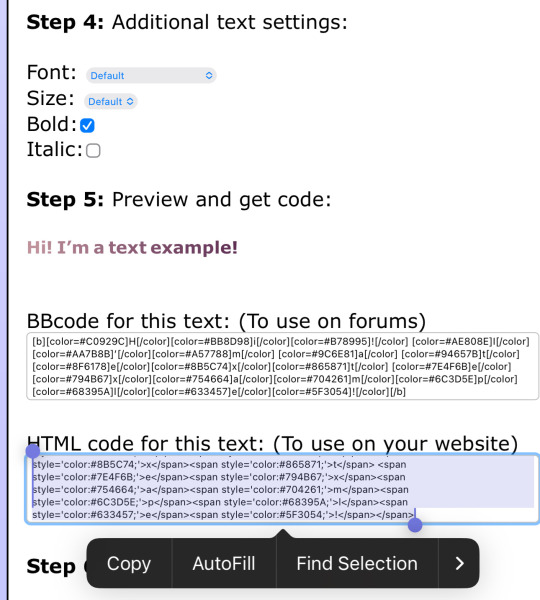
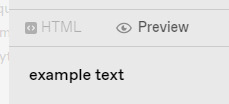
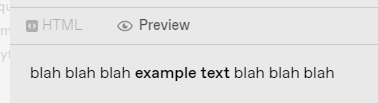
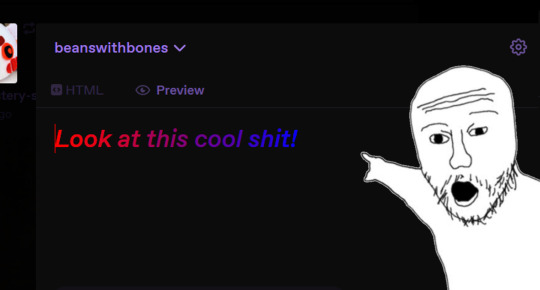
you want to go to the preview page and make sure you've got the text looking exactly as you want it (bold, italic, small, etc.). also note that colours look especially good and show up well when the text is bold. i set mine to bold as an example.
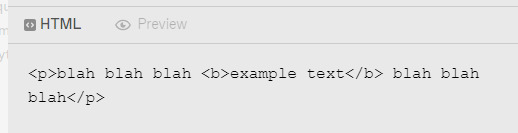
when you switch to HTML it will look something like it does above.
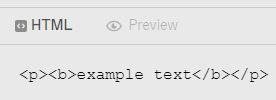
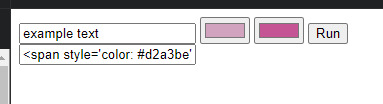
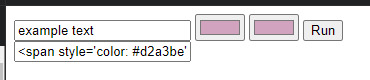
next, you'll copy the text between all the coding prompts (e.g. <p><b> and <b><p>). only copy the text you want to be pink or another colour!! don't highlight any of the coding. then paste it this top box on jsfiddle so it looks like this:
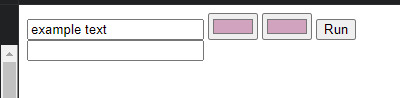
press "run" on the right, and it will spit out a line of code in the second box that will look something like this:
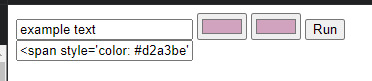
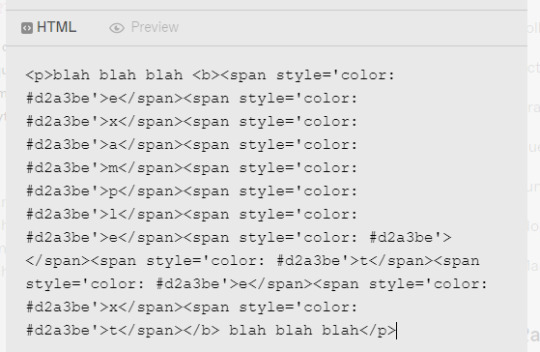
you're gonna copy that line of code and switch over to your tumblr tab. on your HTML version of your post, find the text you're changing and highlight it. then paste the code into that spot. make sure not to highlight any of the surrounding code - only the text you've written and want to change.
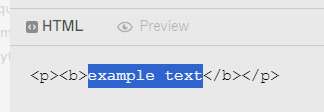
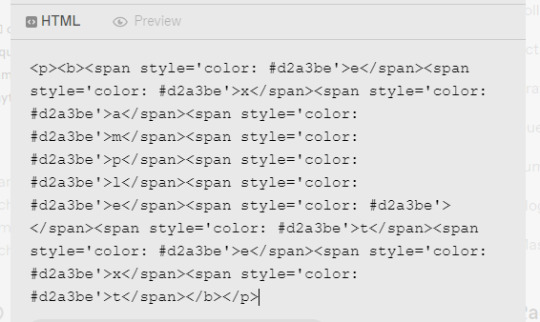
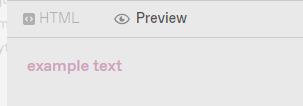
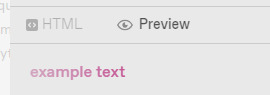
it will look super weird and long because it's colouring each symbol and letter, if you look closely, each letter of "example text" is separated and surrounded by code. when you switch to preview it will look like this:
for gradient, the process is the exact same, but on jsfiddle, when you're replacing the default hex codes with yours, the second hex code you plug in will be different to the one you start with. for example:
this second colour is C45494 btw!!
to do specific text in a paragraph as if bolding it (which i do in a lot of my posts), you just want to find that text in your HTML post, and copy and paste the specific word/s into your top box on jsfiddle, and then proceed as normal. example:

hopefully this helped!! let me know if you have any questions or need me to go over anything ( ˘³˘)
#coloured text tutorial#colored text tutorial#tumblr tutor#text tutorial#text tut#coloured text tut#colored text tut#colored text#coloured text#aesthetic#theme#aesthetic theme#pinterest#pink#hex codes#coding#jsfiddle#dodgesgirl helps#dodgesgirl answers#art donaldson#challengers#mike faist#challengers 2024#challengers movie#mike faist imagines#art donaldson fic#art donaldson smut#challengers smut#mike faist renaissance
191 notes
·
View notes
Note
Hi, i love Regina gifset especially the text
https://www.tumblr.com/itwasmagic/749567705846251520/i-am-what-i-am-cause-you-trained-me?source=share
would you please post a tutoria for making this text with those colors?
hi! thank you so much, I've never been asked to do a tutorial before 🥹🥹 this is pretty easy but i overexplain things so if it doesn't make sense just let me know!
&& please let me know if this worked ok for you!
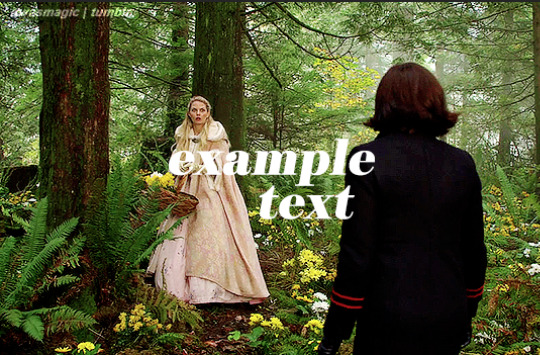
*assuming whoever is reading this already knows how to make a gif in photoshop*
I'm pretty sure I used the font Elephant for this set that you linked.
tl;dr if you have a lot of photoshop/text editing knowledge already: create a layer of text > duplicate it > select the bottom layer > go to blending options > add a stroke > ok that > set the layer fill to 0% > reposition the layer a couple of nudges to one side and a couple of nudges down > select the top text layer > go to blending options > add a drop shadow > add a gradient > ok that > set the top layer to difference > enjoy <3
if you want a more in depth tutorial with screenshots:
add your text to your gif with whichever font, size and placement you like
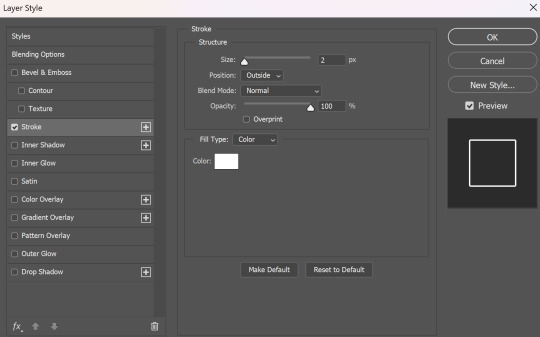
make sure the first text layer you want to edit is selected and press ctrl+J to create a copy of the layer (or right click > duplicate layer... > ok)
select the first text layer again

double click the layer (or right click > blending options), tick the stroke box and use these settings:
press ok
change the fill to 0% (leave the opacity at 100% because you still want the layer itself with the stroke/outline to be opaque but you want the text colour/filled in part of the layer to be transparent)

make sure the 'move' tool is selected

use the arrow keys on your keyboard to move the text layer with the stroke (i did 3 to the left and 3 down but do whatever works with your chosen font and size (edit: i think i moved it a few nudges right for the original set rather than left just make it up as you go along with me jfngkf)). it should look like this:

select the duplicated layer you made above the first one
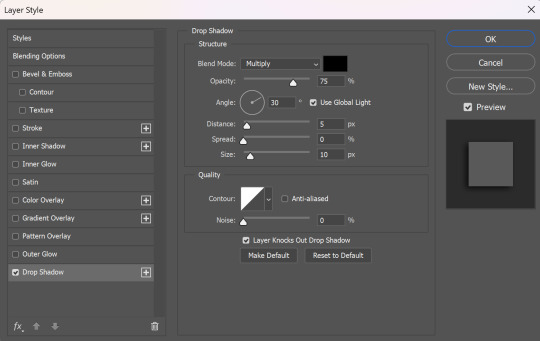
double click the layer (or right click > blending options) and tick the box for drop shadow. I pretty much always use these settings:
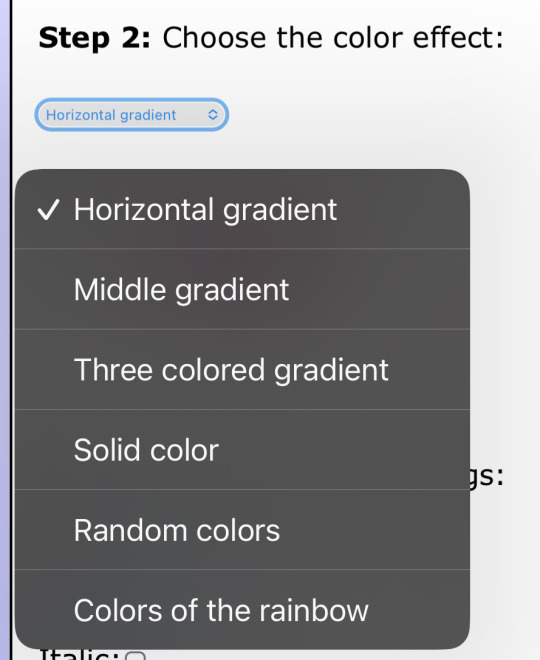
then tick the box to add a gradient overlay, it doesn't matter which colours or angle you use, you can play around and adjust it to whatever makes sense with your gif, so if you think the gradient would look better horizontal or vertical or at a different angle, just change the number of degrees it's at until you like it.

click the coloured box next to the option that says 'Gradient:' and this box should pop up:

to change the colours click the little coloured box under the gradient bar you want to change then the box underneath called 'Color:' should light up for you to click on, then either pick a colour or paste in the hex code

for the colours in the set you linked i used #9fb552 for the lighter green and #2f4f2b for the darker green then press ok
if you want to adjust the colour fade, you can drag the coloured squares along the bar or click somewhere just under the gradient bar to add another colour (you could add a third colour or another shade of the same colour, play around until you like how it looks! you can always go back into it at the end and keep adjusting once you can see how the whole thing looks put together.)
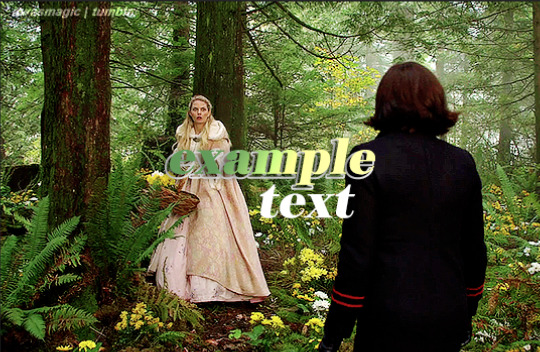
ok everything when you have it how you want it, then your text should look like this:
now change the blending on that same layer to 'difference'

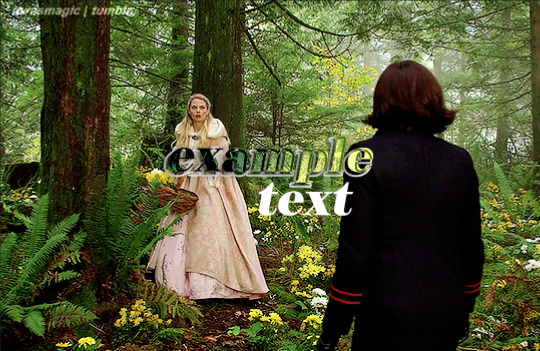
the text should now look like this:
*note, the colours may change when they're blended differently, so like i said earlier you can go back and play around with the colours or shade you picked until they match your gif
if you have another text layer you want to look the same rather than repeating all of the steps, duplicate that one too, use the move tool to reposition the lower layer again and right click > copy layer style > right click > paste layer style on the corresponding layers


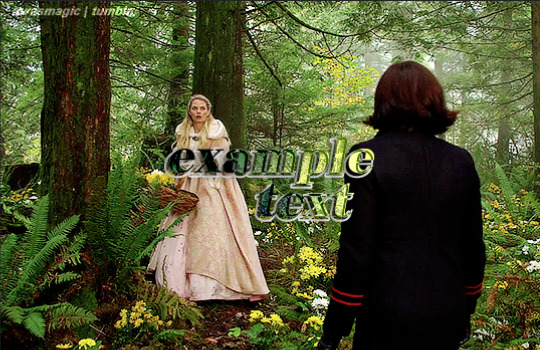
now when you play your gif, the text should look like this:

and you're done!
#answered#anonymous#userssam: tutorial#gifmaking#resource#tutorial#gif tutorial#text effect tutorial#text tutorial#photoshop tutorial
60 notes
·
View notes
Note
charlotte pls tell me how you get that gradient ombre text thing with the html to caption gifsets you taught me a couple years ago but I completely forgot, thank you
hello hello ! this is horrifically late but here you go, 🎀
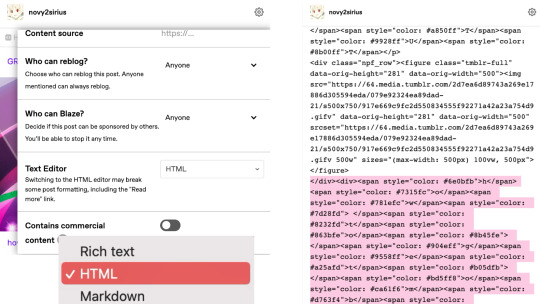
how to get gradient text on tumblr
just use the gear icon at the top of you post

then copy the text you want to change

then open this site and put your text into it and choose your colours

copy the code that it puts into the second box and paste it where the previous text is in the html tumblr tag

should look something like this, you can do this with multiple lines differently, just make sure to only highligh the word and not the code around it.

press preview and voila !! you have cunty colourful text for your post <3
2 notes
·
View notes
Text
very useful!! Above is the full version, but here’s a very over simplified version:
go to this website
use the wheel to find the colors you want and type what you want to make gradient in the top box

Press run. Copy the thing in the bottom box
Delete the text in original post that you changed. Press the gear in the top right, scroll until you see ‘text editor’ and press ‘html’
then, in the spot where the text you deleted was, paste the link in! Press ‘preview’ to make sure it worked. Then: voila! It’s easier to type out the whole post before hand then copy/paste/cut whatever you need.
And in the end: Magic
how to make text in captions gradient or multicolored
I was asked by the lovely @an-idiot-in-a-trenchcoat about how I got the gradient caption to this edit, so I decided to make a mini tutorial! This is my first time doing something like this so if there’s anything that’s confusing, feel free to send me an ask and I will do my best to clarify!
We’re going to learn how to do something like this today:

Keep reading
4K notes
·
View notes
Text
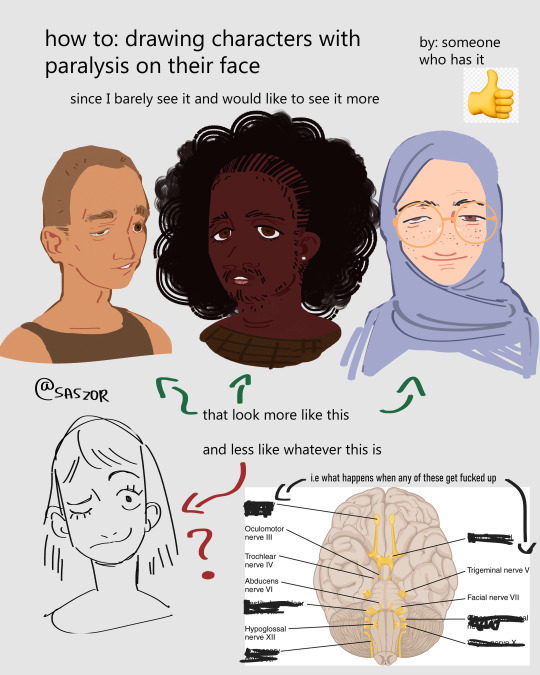

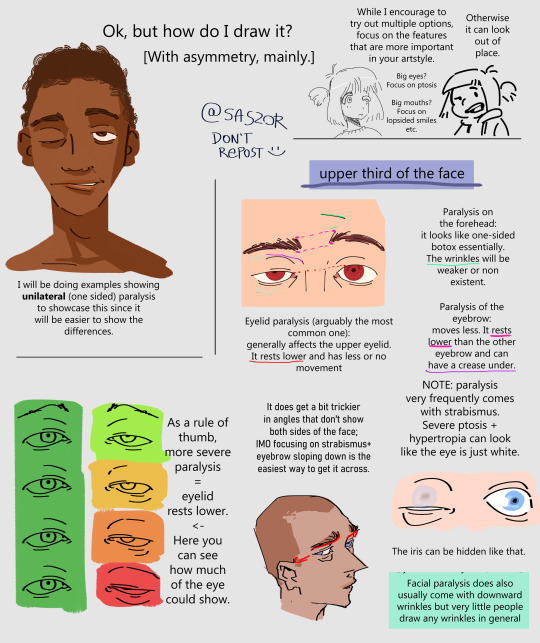
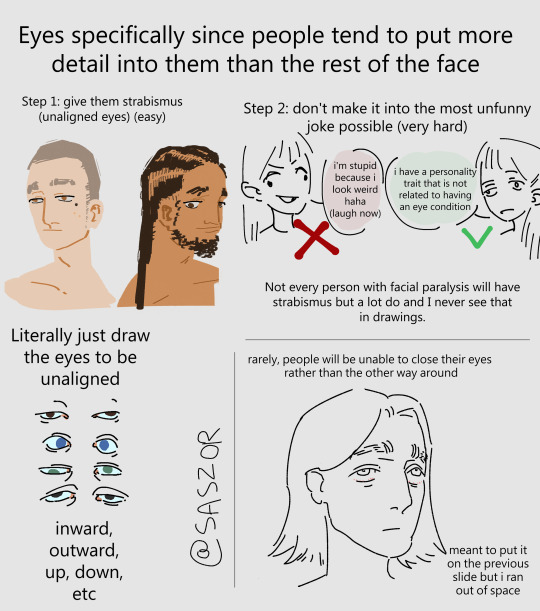
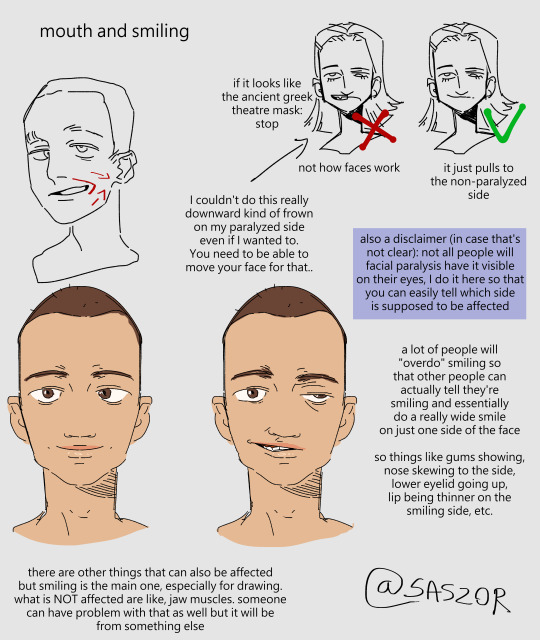
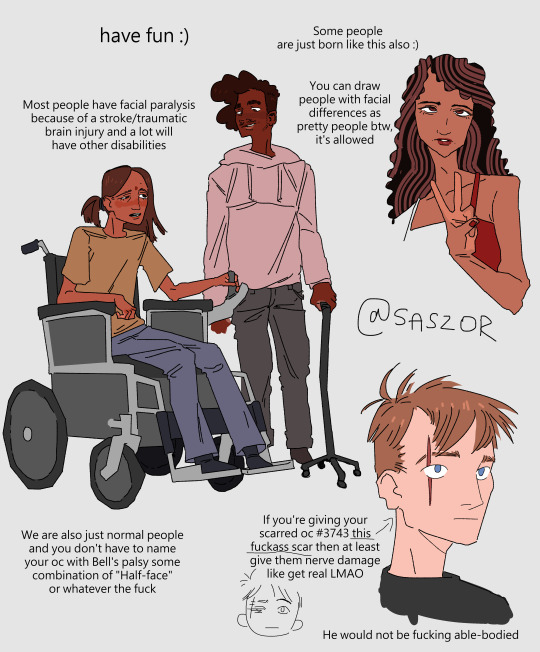
[ID in alt]
Tutorial on drawing characters/OCs who have some sort of facial paralysis. It doesn't cover all possible variants because I was using mirror as my main reference lawl
Keep in mind that this is an introductory drawing tutorial and has some generalizations in it, so not every “X is Z” statement will be true for Actual People 👍
Consider supporting me on ko-fi if you find this to be helpful.
#No 'omg mithrun dungeon meshi' notes that's not even what he has.#my art#artists on tumblr#disabled artist#digital art#id in alt text#art tutorial#drawing disabled characters#facial difference#disabled representation#disabled characters#digital artist#artwork#art on tumblr#art#body positive art#character art#disabled art#original art#personal art#illustration#drawing
24K notes
·
View notes
Text
BEGINNERS GUIDE TO BLUESKY
Hiya! Curious about joining bluesky but intimidated by all the features? Already on bluesky but want to learn more? Then welcome to my quick guide on getting started and navigating bluesky!~
What is Bluesky?
it’s a social media site that’s owned by no single person or company. it's aim is to bring back the early days of twitter before bots, elon musk or algorithms took over. Personally I find the site really cozy, wholesome, and engaging. my Bluesky account for example
What’s unique about Bluesky?
→ CUSTOMIZATION: your timeline is very easy to control. There’s tons of options, so be sure to go through each tab in your settings. some options include: turning off autoplay, changing the order in which threaded replies show, changing DM settings, content preferences and lots of visual app settings.
→ MODERATION LISTS: human made, mass blocklists. These are public lists of accounts that when you subscribe to you automatically block or mute everyone in that specific blocklist. A great way to avoid unwanted content, and interactions. ✦ Moderation lists I recommend will be below the cut
→ STARTER PACKS: recommendation lists on who to follow, made by users. You can even curate your own starter pack of recommendations! ✦ Starter pack recommendations will be below the cut
→ FEEDS: public timelines, basically. There are a lot of feeds you can join, or you can even create your own. I made a feed featuring just my pixel art so it doesn’t get cluttered with text posts or other photos in my media tab. ✦ I’ll post feeds I recommend below and link you to a tutorial on how to create your own feed
→ BLOCKING/MUTING: bluesky has a great blocking system. When you block someone they can no longer see, or interact with you. They also have a feature to make your blog inaccessible unless logged in. you can also mute specific people, delete post replies, and even detach your post from a reblog. You can also mute specific words, phrases, tags etc.
→ NSFW: bluesky allows NSFW content, including artwork, porn, lewds etc. They also have a great moderation page to avoid the content completely, censor the content, or show it if you’d wish. ✦ just go to settings > moderation > toggle on NSFW settings and it’ll let you heavily moderate.
→ LABELS: this is a really cool feature on the site, you can subscribe to certain pages that enable a lot of fun/useful labels that help you in different ways! (like pronoun tags, artist tags etc) ✦ Labels to browse will be posted below
→ COMMUNITIES: the vastly diverse communities really feel like the best parts of tumblr. since you can so heavily curate your experience, it can really feel like a calming oasis. Mine is mostly artists, and other creatives.
there’s also a large community of professional artists, art directors, authors, celebrities, and even the best shitposters from twitter. the app really is what you make of it but it’s thriving right now.
RECOMMENDATIONS & LINKS BELOW ⬎
→ MODERATION LISTS:
HATE SPEECH: NAZIS | MAGA | MAGAv2 | MAGAv3 | TRANSPHOBES & HOMOPHOBES | FAR RIGHT | FAR RIGHTv2 | FAR RIGHTv3 | ELON MUSK FANBOYS | ANTI-BLACK | ANTI-VAX
NFT/AI/CRYPTO: MASTERLIST | AI/NFT | AI/NFTv2 | AI FANBOYS | CRYPTO | NFTs
SPAM/SCAMMERS: SPAMBOTS | BOTS | CONTENT SCRAPERS | CONTENT FARMING
✦ to block or mute everyone in the blocklist at once, click subscribe in the top right corner:

→ STARTER PACKS:
ART: PIXEL ART | PIXEL ARTv2 | WOMEN OF PIXEL ART | BADASS DIGITAL ARTISTS | MAGIC THE GATHERING ARTIST | PAINTERS OF BLUESKY | INDIE COMIC CREATORS | LGBTQIA+ COMIC CREATORS | WEBCOMICS ULTIMATE COLLECTION
GENERAL: WOMEN OF BSKY | AUTHORS | LGBTQ NEWS
SHITPOSTERS: JUNIPER | JUNIPERv2 | MASTERLIST | SCIENCE SHITPOSTERS
✦ for more niche starter packs, use the search function. search your specific interest and ‘starter pack’ and you’ll find some!
→ FEEDS:
DISCOVER | WHATS TRENDING | MENTIONS | ART | TRENDING ART
THE GRAM: a timeline for exclusively image posts from those you follow. no textposts etc. ONLYPOST: similar to the gram, it shows a timeline of only those you follow. no reposts, just original posts. 📌: a way to bookmark posts. just reply with the pin emoji.
✦ there’s tons of others feeds as well! just use the feed tab and you can browse feeds or search for specific ones.
✦ TUTORIAL ON HOW TO CREATE A CUSTOM FEED FOR YOUR ART/POSTS
→ LABELS:
SKYWATCH: most popular label. Lots of useful labels!
AI Labels: identifies AI users, can also enable hiding the posters.
Pronouns: self explanatory but useful. can add a badge with your pronouns!
✦ you can search for additional label bots on bluesky!
OTHER RECOMMENDATIONS:
✦ EXPIRIENCE ENHANCING TOOLS RECS ✦ CLEARSKY: TRACK BLOCKS AND BLOCKLISTS ✦ SKYFEED: CREATE CUSTOM FEEDS EASILY ✦ use the block function often. do not entertain trolls or hate speech. ✦ as well as starter packs, there’s also lists! lists can be used in the same way to create curated lists of accounts. it’s a good way to keep track of specific genres of posters you’re interested in, and finding new ones! ✦ hashtags: use them! they’re beneficial in boosting your post. you can even link hashtags in your bio making you easier to find. another method of making you more visible is if you post an ‘interest’ post! basically just type things you’re interested in and it’ll help people find you / vice versa ! ✦ update your profile first thing, like bio avi etc. make a small post so people know you're real. interact and engage! the communities there are so welcoming!
I think that covers abt everything i wanted to cover! Hope this was helpful and thanks for reading lol
#bluesky#bluesky starter pack#bluesky social#bsky.app#bsky#bsky social#bluesky tutorial#bluesky walkthrough#bluesky app#ooooooooook that took forever lol hope its useful!!!!!!!!#long post#text post
6K notes
·
View notes
Text
a guide to the exoparia
the presence of the exoparia doesnt actually change much for the way we reconstruct most dinosaur groups, however, it changes some minor things for two of the most well known dinosaur groups that should be taken into account:


link to paper: onlinelibrary.wiley.com/doi/full/10.1111/joa.14242
#paleoart#digital art#paleontology#digital artwork#artists on tumblr#palaeoart#digital illustration#sciart#id in alt text#dinosaur#alt text#guide#tutorial#exoparia#tyrannosaur#ceratopsian#scicomm#science communication
797 notes
·
View notes
Text
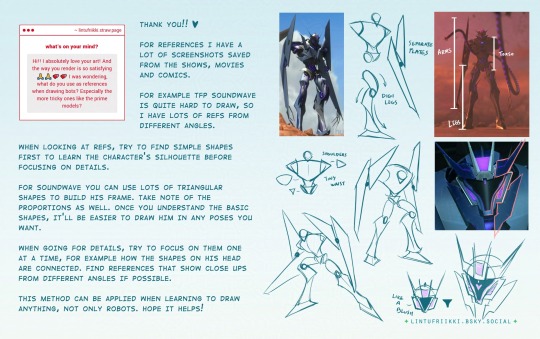
this is generally how i approach complex designs, start simple and then build the details on it. hope you'll find this helpful!
#transformers#maccadam#tfp#soundwave#art tips#art#tutorial#text in description if anyone wants to translate
533 notes
·
View notes
Text


Don't Call Us Dead / Yellowjackets for @jackienatist
#i dont know WHAT yall put in your gifs that prevents text from being fuzzy i did everything all the bougie tutorials told me to do lol#i like this one! i tried like three different typography options and clicked that font by accident but ended up loving it the most#requests are still open#my gifs#lottielee#yellowjackets#laura lee#lottie matthews#usermiles#userbecca#tusercj#yellowjacketsnetwork#yellowjacketsedit#userlindsay#wlwsource#yj
670 notes
·
View notes
Text


🍺(๑///๑) ⊹。˚ Top Form [01.04 BTS]


#top form#top form the series#smartboom#smart chisanupong#boom raweewit#tortigifs#adorable#boom is so frikin cute#i love him#thai bl#bl series#bl drama#im not sure some of this was translated correctly but i did my best#HOWEVER i love the way i colored this and the only thing that could make it better for me is if i could blur the text but#i cant find a tutorial for that
207 notes
·
View notes
Text
#tf2 heavy#tf2 medic#tf2#tf2 fanart#text is just flavour to make it look more screenshotty idk#there's so much wrong with this image but im moving onto other stuff fkjgjkfds#i'll draw other characters soon i promise#ty for the sweet tags on this!!#i'll do a tutorial at some point as this sort of lighting is NOT complicated at ALL im telling you. it's literally just a multiply layer#and a bloom
4K notes
·
View notes
Text
So you wanna make gradient text?
this was originally made just to help a friend but she suggested I post this publicly to help bcs the other tutorials out there aren't very straight forward. with that said pls ignore typos:
↓↓ Site Link ↓↓
↓↓ Site Link ↓↓
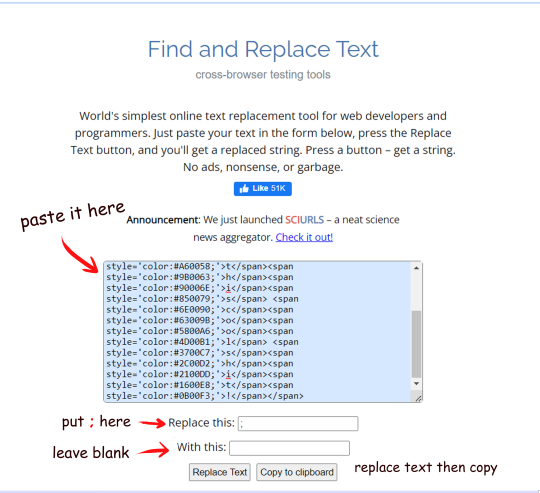
Note: you can still continue typing in the preview
Hope some peeps find this helpful
#tutorial#tumblr#tumblr tutorial#text art#text art tutorial#gradient text#art tutorial#I know its not exactly art but I wanan get this out there to help ppl
4K notes
·
View notes
Text
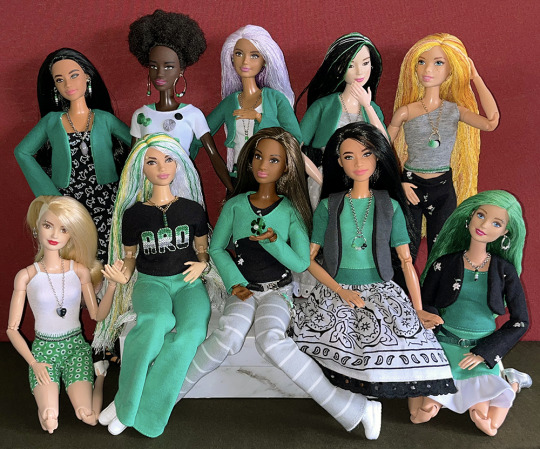
Over the past eighteen months, I've made enough green, white, grey and black clothing pieces to outfit ten Barbie dolls in aro colours. In addition, every doll has earrings, necklaces, belts or embroidery featuring pride stripes. Now I just have to figure out how to make a one-sixth-scale aro pride march display...
(More information about the making of aro-themed doll accessories and clothes is available on my website.)
#aro week#asaw 2025#aromantic#green aro pride flag#sewing#embroidery#cross stitch#pride crafts#needlework#needlecraft#fashion dolls#barbie#pride#link#aro worlds wordpress#image description in alt text#I'll be sharing a tutorial for the floss rehairs later this week
202 notes
·
View notes
Text

It is really funny to me just how full of cope the vim documentation is
#those keys are fully arbitrary with vanishingly small mnemonic value and you fucking know it#to be clear: vim is literally the only thing I use for text editing#but my partner is learning how to use it and we have been dunking on the quality of its tutorial for hours
359 notes
·
View notes