#glitch effect tutorial
Explore tagged Tumblr posts
Visit Tumblr Blog
Explore Tumblr blogs with no restrictions, modern design and the best experience.
Last Seen Tumblr Blogs


Fun Fact
Tumblr’s reach among the 26-to-35-year-olds in the US is 11%.
Note
Hi, Regina is my absolute favourite in ouat and you made her stunning in this gifset ✨
I was wondering how did you make glitch effect from green to b&w, Would you please post a tutorial?
Hi! Thank you so much! the start of the tutorial is below the cut but because it's multiple gifs and I could only add so many photos to a post to explain, I have had to split it onto another post but I have put a link at the end when it's time to move onto the next one. :) if anything doesn't make sense or if anyone follows this and it helps, i would love to know either way!
Glitch effect tutorial used on this set below the cut

note: credit to this tutorial which was very helpful when i was making the set but i didn't feel it explained how to do the b&w gif and that's what took me a while to figure out, so if anything on this tutorial isn't clear, that one should also help. this will be slightly different because in my set i made it so the glitch faded into each other and i've added my own flare to it but the basic technique is the same.
create 2 gifs the same size, you can add whatever colouring, sharpening etc you like, one in colour, one in b&w (you can do 2 in colour but for the purpose of this i'm doing one b&w to show how to do both versions).
i'm going to do the b&w gif fading into the colour gif on this tutorial (bc that's just what i started editing first) but obviously if you're making a full set decide which gif you want to fade into which because the first part of the gif will have the glitch effect on the end and the second will have it at the beginning so it will matter for the final outcome of your set
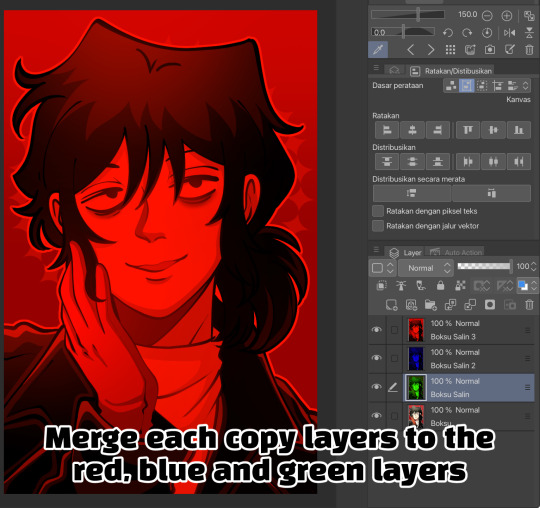
PART 1 - B&W GIF
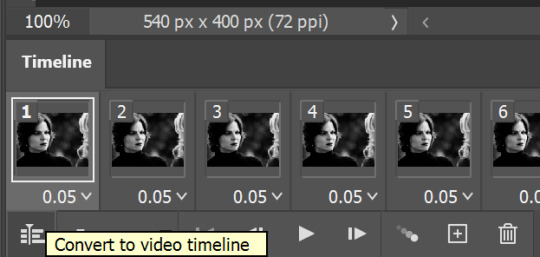
if you edit in frame animation, you must convert your b&w gif to the video animation timeline otherwise the colours will not show up on the glitch effect. you can do this by clicking the lines menu above the frames
i usually colour in frame animation because it plays quicker to preview how it will look and then convert to video to add my sharpening at the end but it's personal preference how you create your gifs.
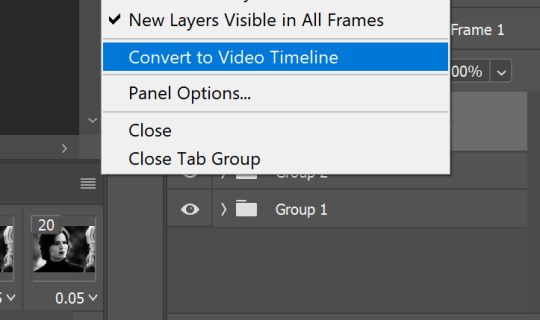
hold control + select all of your frames > right click > convert to smart object

all of your frames, colouring etc should all be in one frame now, select it > click the lines menu above the animation timeline again > convert frames > flatten frames into clips
you should now have a longer list of layers that make up each frame of your gif
this is because we need to convert back to frame animation to edit the glitch effect onto individual frames. if you don't flatten the frames to clips the gif will not play when it's converted because 1 layer will equal only 1 frame. it may seem long winded to go back and forth but it makes sure all your colouring is already included in the frames when you make it glitch. if you add the colouring afterwards it will change the colour of the glitch effect or turn it black and white and it won't be very visible (if anyone has an easier way i'm very happy for suggestions, i was just figuring this out as i went and found the glitch didn't work on the b&w gif any other way for me!!)

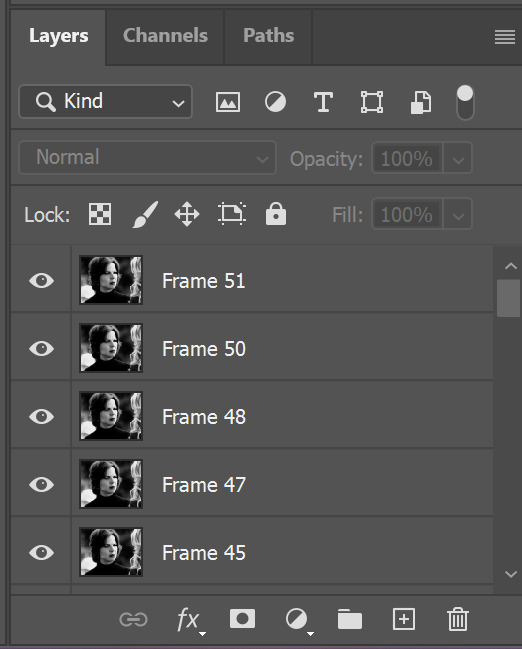
now we go back to the 3 lines menu > convert frames > convert to frame animation
if you get this pop up, press continue. it's fine because we have each of our frames in their own layers now

your frame animation timeline will initially load with just one frame

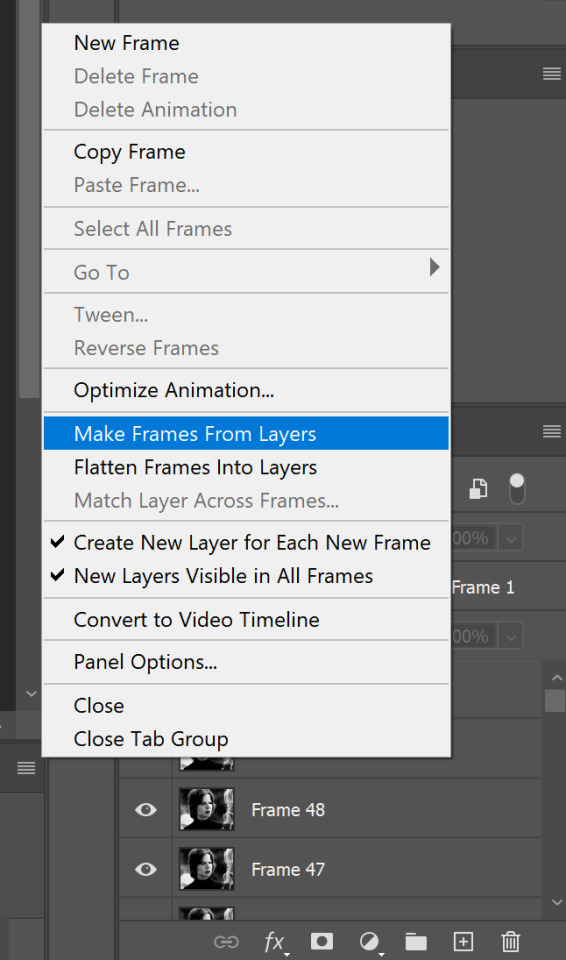
go to the lines menu again > make frames from layers
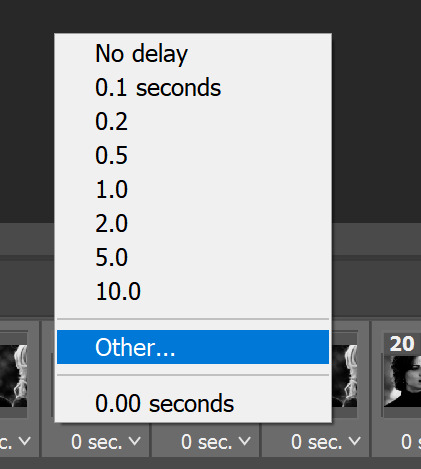
now all of the frames will load, but they will be at 0 seconds (except the first frame) and we need to make them all run at a playable speed, so go back to that same lines menu above the timeline > select all frames > select under any frame where it says 0 sec. > other > i usually put in 0.05 but do whatever works for you

PART 2 - ADDING THE GLITCH EFFECT
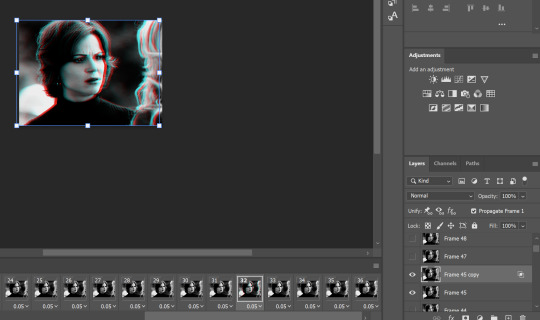
pick a frame about 5 from the end, select it and select the corresponding layer with the eye icon next to it to show it's the one visible
right click > duplicate layer (or just press control + J)
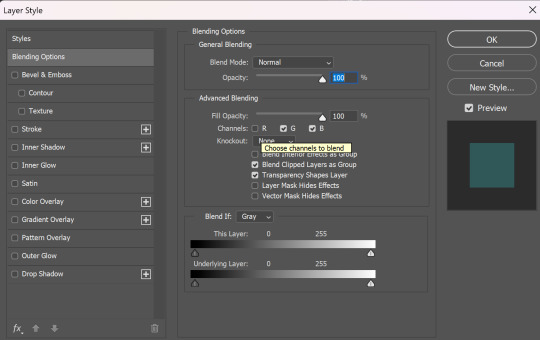
then on the copy of the layer right click > blending options (or double click)
in the advanced blending section, untick R > ok
make sure the move tool is selected
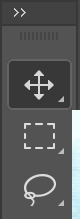
now using the arrow keys on your keyboard move that layer either left or right as many notches as you like (i've started out with 10 here)
hold control > select both the visible layers

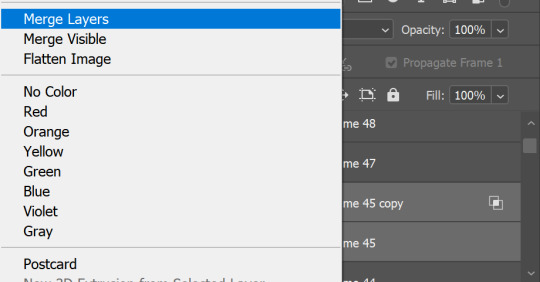
right click > merge layers
now move onto the next frame and corresponding layer and repeat the same process (i have no idea why my ps decided frame 46 doesn't exist so ignore that dkjddj)
if the frame(s) below is still visible, just click the eye to hide it so only the one you're working on and it's copy layer are showing
this time i've moved the layer 6 notches to the right as below
keep going until you get to the end of the animation. you can move each layer as much as you like either side just play around with your gif and do whatever you think looks good! if you want to do more than the last 5 frames or less than them, do that too! just remember that we are also going to put a glitch on the coloured gif then combine them, so the final glitch effect will be longer

when you're done, you might have to go back to the first frame on your animation and hide all of the layers you've just edited because on mine they all visible so the gif won't play
then go back to the end of the gif and make the right layer visible on the right frame again (hopefully this makes sense)


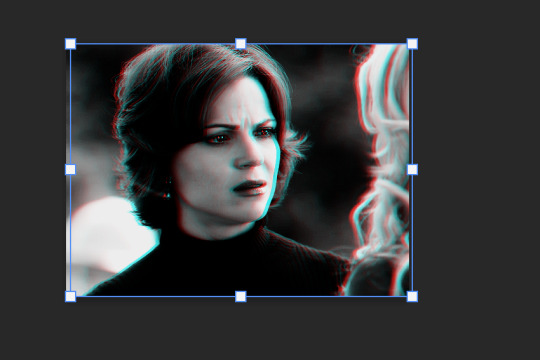
so far, the gif should play something like this

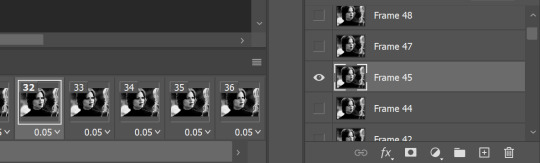
to make it smoother i picked a few frames earlier in the gif, before the start of the glitch at the end to add the same effect to the first frame i edited was number 32 (layer 'frame 45'), so i'm going to add it to frames 25 and 26 as well
then i selected the last frame and layer > filter (at the top of the screen) > blur > motion blur


then pick another frame and corresponding layer > filter > noise > add noise
do this to a couple of frames of your choice with the glitch effect on too, it makes it a little more grunge-y which i think fits with the concept that it's supposed to be glitching/broken


now it looks like this, subtle but in my opinion notably smoother

go to the left side of the screen under the frame timeline and click the convert to video timeline button
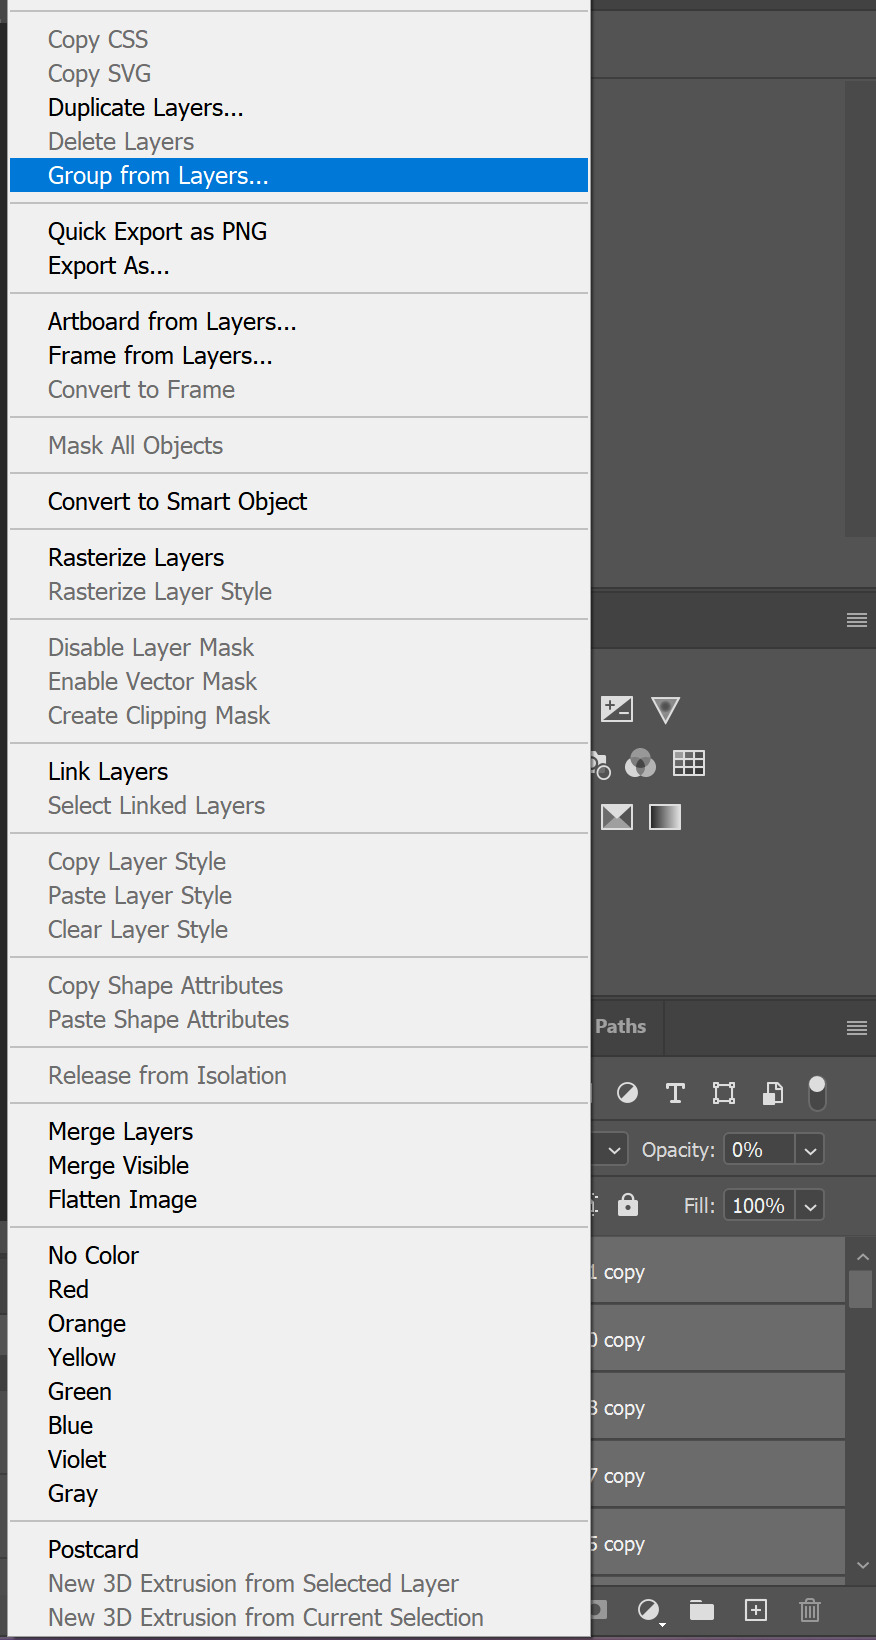
once i've converted it back to the video timeline, i like to select all of my layers again > right click > group from layers (or select all and control + g). i'm going to rename this b&w so it doesn't get confusing later
I can only add 30 images per post so this tutorial is CONTINUED HERE!
#resource#gifmaking#tutorial#gif tutorial#glitch tutorial#glitch effect tutorial#photoshop tutorial#userssam: tutorial#answered#anonymous
29 notes
·
View notes
Note
Looking back at your aurora and sage besties comic (its one of my favorites, only being beaten by were amy and sonic being a Simp) and I've got to ask, HOW DID YOU DO SAGES GLITCHING SO FRANKEN WELL??? IT LOOKS AMAZING AND I PERSONALLY LOVE HOW THOSE GLITCHS TURN RED WHENEVER SHES ON NEFARIOUS TIMING ARVDGDBABA
YOU ARE MY FAVORITE SONIC ARTIST.
...just wanted to say and ask.
You are so kind, thank you! I'm so happy you like them!
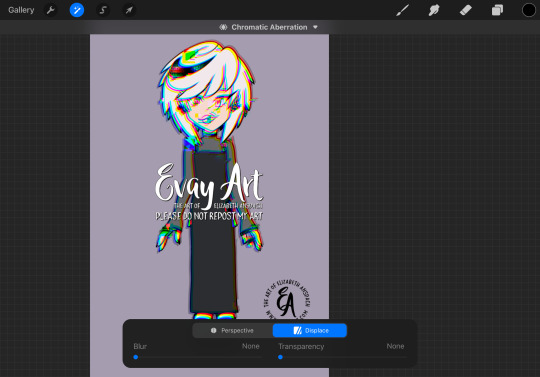
I do a lot of experimenting in Procreate until I find a technique I like. To achieve Sage's glitch, especially if she's doing something a little more wicked so her "red" side is showing, I'll start by drawing her in her blue version and her red version:

I'll select random rectangles from the red version and mask them/cut them out, so she's mostly blue but some red is showing:
I'll duplicate this layer and keep a copy of the "clean version" and apply effects to the duplicate. In Procreate, I'll use the "Glitch" effect and use the “Artifact” setting and mess with it until it achieves a result I like:
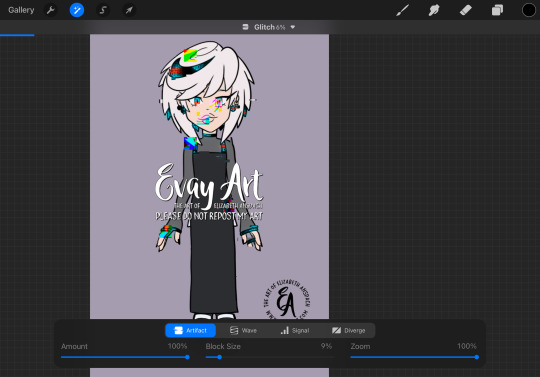
This may take several passes.
I duplicate the layers again, because again I always want to be able to go back if I don't like it. Then I'll play around with "chromatic aberration" under the “displacement” setting. She only needs a little for a subtle glitch effect, but if she's meant to look more menacing then I can go hardcore with it:
Then, I'll turn that original "clean" layer back on and I mask out the effect layer so only parts of it are coming through. When computers glitch, normally most of the image stays in tact and only some parts are scattered/messy so that's why I only have the effect in some areas.
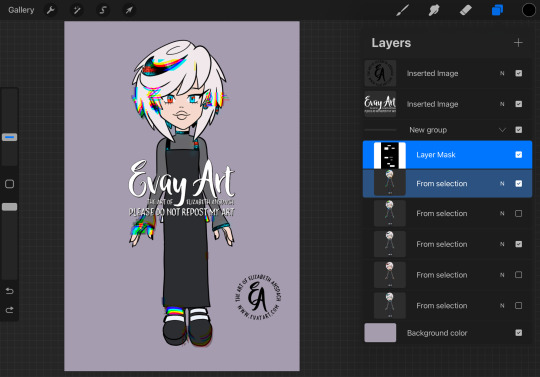
I might even slide bits of those rectangles to the left or right. It's just a matter of playing with it until I like how it looks.
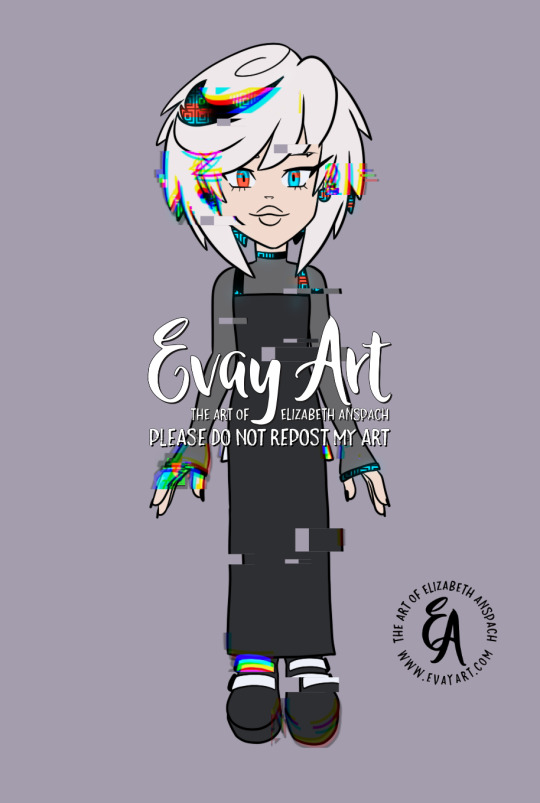
I hope that explanation was easy enough to follow along!
Again, thank you so much! I'm really really happy you enjoy my art and stories 🥰 (and I'm delighted to hear you're a fan of Were!AmyXSimp!Sonic hehehe)
#ask me#evayQA#tutorial#procreate#procreate tips#sage the ai#sage robotnik#sonic trash#art tips#glitch effect
159 notes
·
View notes
Note
Hello! I love your art! How do you do the glitchy effect on the lineart?
Hi! Here’s how I make Aberration/glitch effect ✨ I hope it’s helpful~


#sabamiso arts#artists on tumblr#illustration#tutorial#art tutorial#tutorials#aberration effect#glitch effect#aberration#glitch#go boksu#bok su go#go bok su#boksu go#married in red#bok su married in red#boksu married in red#racheldrawsthis#studio investigrave
32 notes
·
View notes
Text
CSS Text Glitch Animation
#css text glitch effect#text glitch css#text effects#css animation tutorial#html css#css#html#frontend#codingflicks#neduzone#glitch animation html css#code#css3#frontenddevelopment#animated text#animation
8 notes
·
View notes
Text

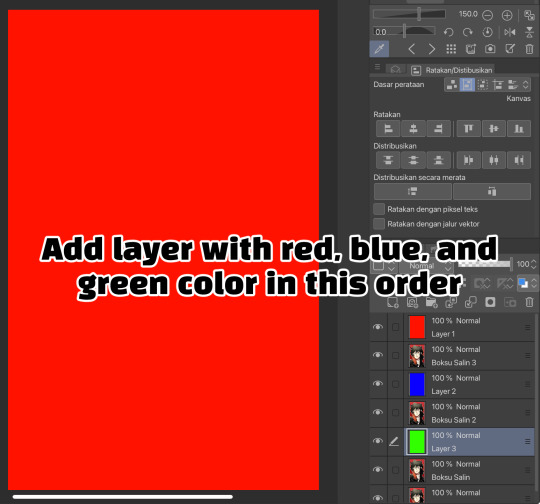
Learn how to create an RGB split effect using Aseprite in this step-by-step pixel art tutorial. RGB split is also known as chromatic aberration, and is commonly found in glitch visual effects.
The idea of the RGB split effect is to split an image into 3 separate images using the red, green and blue colour channels. Then 2 of the images are offset from the centre. For example the red colour channel might be offset to the left, and the blue channel might be offset to the right. Then the 3 images are blended together using a blend mode.
Full tutorial here:
#pixel art#aseprite#ドット絵#gamedev#indiedev#rgb split#chromatic aberration#glitch#visual effect#visual effects#tutorial#art#artists on tumblr#anime
12 notes
·
View notes
Text

As a thank you for so many new followers, here's a brand new edition of my editing resources masterposts ✨ (you can find the previous editions here). Make sure you like or reblog the posts below if they’re from other blogs to support their creators! A friendly reminder that some of these are free for personal use only, so be sure to read the information attached to each resource to verify how they can be used.
Textures & Things:
Collage Kits from @cruellesummer that I find myself using basically every single day
Taylor Swift Wax Seals from @breakbleheavens that I also use literally every day
Rookie Magazine Collage Kits (1, 2, 3, 4, 5, 6, 7, 8, 9, 10)
Scribble Textures & Cross-Outs (1, 2, 3)
GIF Overlays (1, 2, 3)
Film Grain & Noise Textures (1, 2, 3)
Paper Textures (1, 2, 3, 4, 5, 6, 7, 8)
PNG Overlays (Paper, Flowers, Clouds, Stickers, Lips, Vintage Paper, Misc. Symbols)
Halftone, Scan Line, & VHS Noise Textures (1, 2, 3, 4)
VHS Tape Textures by @cellphonehippie
Misc. Texture Packs (1, 2, 3, 4, 5, 6, 7, 8)
Photoshop Effects (Halftone Text Effect, Chrome Effect, Glitch Effect, Ink Edge Effect, Photo Morph Effect)
Fonts:
Badass Fonts (free fonts designed by womxn 🤍)
Open Foundry Fonts
Free Faces
Uncut Free Typefaces
Some Google Fonts I Like: Instrument Serif, DM Sans, EB Garamond, Forum, Pirata One, Imbue, Amarante
Some Adobe Fonts I Like: New Spirit, Ambroise, Filmotype Yukon, Typeka, Big Caslon CC (TTPD Font!)
Some Pangram Pangram Fonts I Like: Editorial Old, Neue World Collection, Eiko, PP Playground
Fonts In The Wild (font-finding resource)
Tutorials & Resources:
Comprehensive Rotoscoping Tutorial (Photoshop + After Effects, great for beginners!) by @antoniosvivaldi
Rotoscoping & Masking Tutorial (After Effects) by @usergif
Texture Tutorial for GIFs by @antoniosvivaldi
Color Control PSD by @evansyhelp (to enhance, isolate, or lighten specific colors)
Cardigan Music Video PSD by @felicitysmoak
Picspam Tutorial by @kvtnisseverdeen
Moving GIF Overlay Tutorial by @rhaenyratargaryns
GIF Overlay Tutorial (+ downloadable overlays!) by @idsb
Icon & Header Tutorial by @breakbleheavens
GIF Blending Tutorial by @jakeperalta
Split GIF Tutorial by @mithrandirl
Guide to Coloring Yellow-Tinted Shots by @ajusnice
Slow Motion After Effects Tutorial (useful for GIFs!)
Gradient Map Tutorial by me!
Misc:
How to Make Your Own Textures by @sweettasteofbitter
How to Report Tumblr Reposts of Your Work by @fatenumberfor
Tips for Accessible Typography
915 notes
·
View notes
Text
Sneezing While Hiding: The Game RELEASE
Here she is! One of the craziest projects I've ever undertaken... and I can't wait to make more!
Disclaimer: This is my first-ever attempt to develop a game... I've literally never done coding or anything before, and this was created in Scratch... that means this is FAR from perfect. There are glitches and issues that I am aware of, but it's at a point where I'm happy releasing it. None of the issues should be game-breaking, but please let me know if you run into any serious problems! Minor glitches though... yeah
ANYWAYS! The game itself is pretty simple. You're hiding in a closet but you have to sneeze. You can choose to stifle, muffle, or holdback your sneezes, but you have to watch the clock and avoid letting your nose get too tickly while keeping quiet enough to stay hidden. There's a brief tutorial option in the game that explains the mechanics in more detail!
This game features nearly 100 sneeze-related sound effects, hand-drawn animations, and a lot of time/effort, so I really hope you enjoy!
PS... I had some super expensive vet bills for my beloved kitty last week, so I'm opening up a ko-fi. Don't feel ANY pressure to donate, but if you want to thank me for my time or commission a custom video check me out: https://ko-fi.com/disastersnz
356 notes
·
View notes
Note
Heyy! If its not too much of an ask, can you explain how you do your "animated panels"? (like the one where frisk and flowey meet gaster). It looks so cool and I wanna try something similar for my own art. Thanks!!!
Heya ! It's absolutely not too much to ask don't worry, of course I can share my secrets 👀
Very simply, I made three versions of the page (One normal, one with Chara, and one super creepy)


Then I put them all in Adobe Premiere Pro (but any other editting software can work), and put a glitch effect on them
I made sure to time the glitches right, to have the effect I wanted (To surprise/scare people with a page that blend in with the other ones, which totally worked so I'm glad :D)
Exported it, the file was a bit too heavy for Tumblr so I compressed it on a random website I found
And bam ! You got it !

(Hope this helps a little, if you need a more detailed tutorial don't hesitate to tell me)
#Very simple process but very efficient one !#I would love to make more animated pages in the future#for the big moments or something#would be cool :D#undertale#undertale au#undertale fandom#undertale alternate universe#gaster's return#undertale comic#art#gaster#gaster undertale#undertale gaster
86 notes
·
View notes
Text
Writing Notes: Glitch Art

Glitch Art - a type of media art where video and image files are already or intentionally corrupted to include glitches, creating a stylized viewing experience. What may look like an imperfection is the end goal and a result of the visual artist’s pixel sorting.
The glitch aesthetic includes:
elongated images,
pixelization,
color degradation, and
double exposure.
How to Create Glitch Art
Consider the following ways to create this unique form of visual art:
Digitally engineer glitches. Video editing software or apps can let you safely play with your hardware without damaging it. You can play with databending in video files in a photo or video editor and add in manufactured, intentional glitches.
Use magnets on screens. You can also play a video on a screen and employ a heavy-duty magnet, holding it close to the front to warp the pixels on the screen. Note that this has the potential to have long-lasting effects on the quality of your screen, so use this tactic wisely.
Work with broken devices. Damaged devices can yield the glitches that glitch artists seek in their media. Busted but still usable DVD and VHS players can warp the presentation of the video.
Forms of Glitch Art
Since glitch art is often not static, it takes forms outside of still .jpegs or .jpgs. Some forms include:
Glitch music: Glitch music involves the playing of distorted records, CDs, cassettes, or sound files that feature glitches, which may include skips or missing moments of music.
Glitch videos: Glitch videos are the most common type of glitch art, and you can create them by damaging e-files or hard media such as DVDs or video tapes. Artists can also warp videos by toying with a VHS or using magnets to distort pixels on the screen.
Glitch websites: These websites with errors coded within can make for more interactive pieces. Glitches spread throughout the website enhance the user experience and operate as a form of art.
A Brief History of Glitch Art
In technology, a digital glitch refers to a malfunction, often in video games or software development.
Intentional glitches: As technology evolved, artists harnessed the creative opportunities glitches presented and began deliberately incorporating them into various formats in the 1970s, popularizing an intentional glitch aesthetic. The Cubist movement influenced many glitch artists.
JODI: In 1994, Joan Heemskerk and Dirk Paesmans started the highly generative art collective JODI, which purposefully coded errors into website pages to display underlying error messages. The movement weny by the name “net.art.”
Global conventions: The glitch moment gained traction in the 2000s. The tech-art collective Motherboard hosted an international symposium for this new media style in 2002 in Oslo, Norway. In 2010, Nick Briz, Evan Meaney, Rosa Menkman, and Jon Satrom led the GLI.TC/H convention in Chicago with tutorials, performances, and screenings.
GIFs: Over the years, conventions have taken place in Minnesota, Croatia, and Iran, showing how popular the art form has become. Today, GIFS (.gifs), in many ways, echo some of the elements of early glitch art, where a single file repeats its media in a cyclical pattern.
Artists can use digital or analog modifications to create this type of modern art.
To produce glitch videos, artists distort pixels by placing large magnets near the screen or artificially create glitches in Photoshop.
Famous glitch artists include Len Lye, Daniel Temkin, Nam June Paik, and Rosa Menkman.
Source ⚜ More: Notes & References ⚜ Writing Resources PDFs
#glitch art#art#writing reference#writeblr#dark academia#literature#writers on tumblr#spilled ink#creative writing#writing prompt#light academia#writing ideas#writing inspiration#writing resources
52 notes
·
View notes
Note
Can ya' make a list of graphic tutorials you have? It be rlly helpful :D /nf

yea! usually you can find them through my #☆ ◟ my resources ! or #lilay tutorial tags but i'll make a list here specific to graphics:
how to colour gifs in capcut
how to use PSDS on photopea
tips for beginner graphic makers (or just general graphic tips)
how to do my glitch transitions
how i make my dividers
how to do a fade transition
how to do a double border + half tone / dots effect on top
how to make it look like the character is popping out of the frame
how i colour in ibis paint
how to put a picture in a frame
how i colour my lace
how i make my gifs transparent
more tips on graphic making
hope this helps!

252 notes
·
View notes
Text


CHAPTER FIVE - the Novacade
“Okay” Chris said, eyes bright as the group stepped back into The realms twilight-lit streets. “Now I have something to show pixel.”
You raised an eyebrow. “Another tree?”
Nick groaned. “If I see another 'super cool' tree I’m logging off.”
“Nope,” Chris replied with a grin. “I’m taking you to the Novacade.”
“The what now?” you asked.
Chris leaned over with a grin. “Only the most aggressively chaotic part of the town realm. It’s like if an arcade and casino had a baby”
Matt threw an arm around your shoulder dramatically. “Just don’t loose all your credits in Skee-Ball of Doom.”
“You make it sound like a scam,” you said.
“It is a scam,” Nick said.
Matt shrugged. “But a fun one.”
The entrance to the novacade shimmered like a portal, all glowing lights and holographic signs flashing things like WIN BIG and LEVEL UP. Inside, the air buzzed with musi and the soft ding! of digital credits being spent and earned.
An NPC avatar handed each of you a neon blue token before letting the four of you step inside. Virtual game booths lined every wall Nick and Chris already sprinted toward a machine called Plushie Royale. Matt tapped your token with his, syncing your credits. “You get a hundred to start. Each game costs between 5 and 20 credits. Win, and you get a reward. Lose, and… well, there’s usually an explosion sound effect.”
“Sounds fair,” you said.
Matt tilted his head toward the nearest booth. “Wanna team up?”
You gave him a sideways glance. “Team up or carry me?”
“Both. Definitely both.”
You and Matt stood side by side racing against a countdown to solve 'passwords'. The game would give you 3 hints and the more passwords you crack the bigger your prize will be. Matt hit a rhythm fast type, enter, type, enter and you kept grinning every time. “You’re terrifyingly good at this,” you muttered.
He shrugged. “Might’ve played this one in secret tutorial mode last night.”
“Are you trying to impress me?” you teased.
“Is it working?”
you smiled. “Dangerously.”
You both won the round. Your prize? +250 Credits and a Healing Potion (Strawberry Flavored).
Meanwhile, Nick was dramatically gripping the joystick of a machine yelling, “GRAB THE CAT! GRAB THE CAT!” at the claw. Chris spammed the drop button. The claw missed completely, picked up a brick, and hurled it at a plush mushroom who screamed and exploded into a pile of stuffing. “NOOO?!”
Chris spotted a machine called Lightsaber Duel he challenged you. and of course, you accepted. Glowing sabers in hand, you stood across from each other on a digital dueling platform. Matt and Nick took front-row seats on the sidelines, cheering like gremlins.
“Loser buys the other a virtual soda,” chris said.
“oh of course” you chuckled and rolled your eyes, you should of expected something like that to come out of Chris’s mouth.
You lunged first, catching chris off guard. He recovered quickly, the sabers clashing in bright of light. where ever the sabers hit made that limb glitch for a few seconds before fixing itself. The fight was fast and flashy more style than substance, but the way he kept circling you, grinning between attacks, made it feel more like a dance than a duel. Finally, you knocked the saber from his hand.
“Okay that was hot… Don’t you think Matt?” Nick smirked. Only to receive a punch in the shoulder and a quiet “shut up”.
You grinned. +100 Credits and a Digital Soda
A few hours past but the hours only feel like mintues as the lights dimmed slightly to indicate “Arcade Closing Soon” your inventory was slightly ridiculous now:


3 potions, a plush bunny, teleportation necklace, cake mix,flowers, 1425 credits and that drink chris still owes her.
Nick had somehow ended up with a cheetah print cap that would fade between colors slowly. Matt had won to pairs of sunglasses one night vison, and the other X-ray vison, he also one a realistic pug plush.
Chris leaned against the exit gate, looking over at you as the arcade’s background music softened. “So, on a scale of 1 to ‘totally nailed the hangout,’ where are we landing?” he said.
You smiled. “I mean… free soda, plushie prizes, and I got to hit you with a lightsaber? That’s a 9.”
He looked pleased with himself but then confused “why not 10?”
“the wasn’t a glowing tree” she smirked teasing.
“OH FOR FUCK SAKEEEE” chris shakes his head sighing.
“I told you guys the tree was cool!” Matt shouts to his brothers.
“Well come on” nick said, nodding toward the exit, “my turn next time… I’ll show you the rooftop skybox.”
And with that, the four of you stepped out into the pixelated night again. prizes in hand, laughter still echoing behind you, and that warm little something still lingering between you and Matt. Something that didn’t need an in-game achievement to feel real.
Tags: @blushsturns @riasturns @iloveduckssm @chrissbxby @sturnobessed @kayskreativeideas @tits4matt @mattsfavho @sturniolobananas1 @courta13 @alexisa78 @chrisissos3xy @sturnobessed @mattschelseaa @norahsturns @dolliraez @jibitzlesscrocs @oopsiedaisydeer @gemzyy @sturniolofruitloop @mattschelseaa @hesvoid34 @phone4pills @spaghettislut1 @sturnslux3 @phone4pills @owenstar @luvsturns @nickssidewitch @ariieeesworld @sugarraez
#sturniolo#sturniolo triplets#matt sturniolo#sturniolo fanfic#chris sturniolo#christopher sturniolo#nick sturniolo#nicolas sturniolo#matthew sturniolo
28 notes
·
View notes
Text
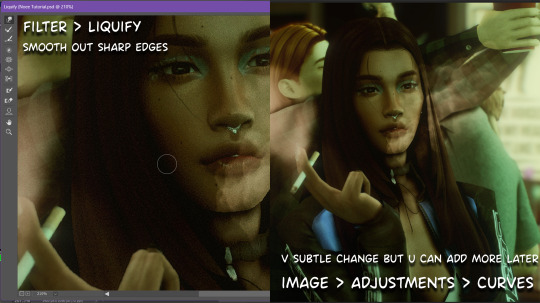
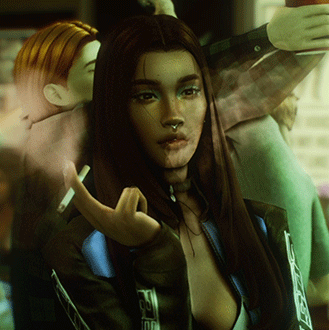
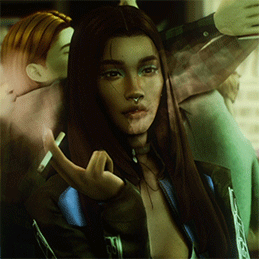
Updated: How I edit my sims 4 screenshots (night-time edition)
A more detailed editing tut so you can understand my process as it may help you, i edited this relatively quickly and usually spend about 1-2hrs editing something...so let's goo.....
Before taking screenshots:
Help yourself as much as you can in-game, I always make sure there is some sort of light source in my pictures or something interesting that I can add to enhance something already there
Understand good/bad composition and add variety by using different angles
I take LOTS of photos just to end up with 1 or 2 good ones

I'll just be using photoshop for this, but i also like to use the procreate app as i'm more confident w it.
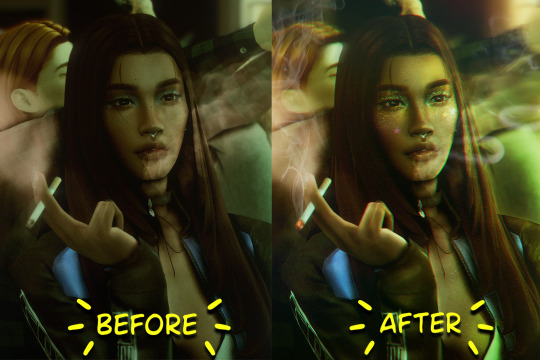
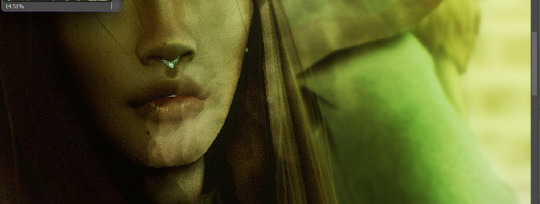
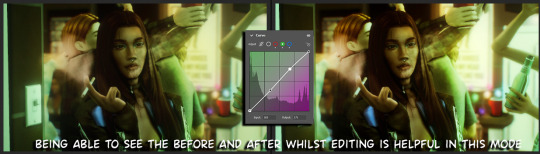
step1: I check if there are any major glitches or hard areas e.g, fingers elbows etc.. that have sharp points and pull them in liquify so they are smooth. Then use curves to change the contrast.
step2: *duplicates image* using the dodge and burn tools (keyboard shortcut: o ) i'll add emphasis to highlights and shadows (be careful with these as the dodge tool can ruin the image if used in excess) *merges image* (i duplicate and merge as i go, utilise using lots of layers so you can go back if you mess up/ want to change the opacity of an effect.)
step3: making light sources POP. *new layer* change blending mode to overlay or soft light and choose a colour you like.

step4: *new layer* draw hair strands. i just use a basic round brush in photoshop and change the hardness or i'll use a sharp caligraphy type brush depending on my sims hair type. (i try not to overdo it as i like maxis hair and don't want it to look too realistic)
step5: i would then add a new layer and set the blending mode to multiply to add more shadows, but i don't feel like i need to at this point.
step6: *duplicates image* go to filter > camera raw filter, i change the "light" and "curve" panels, i like green tints in my screenshots especially the night ones. (this is where all the magic happens really so just adjust all the channels to your liking, lightroom is also really good to use)
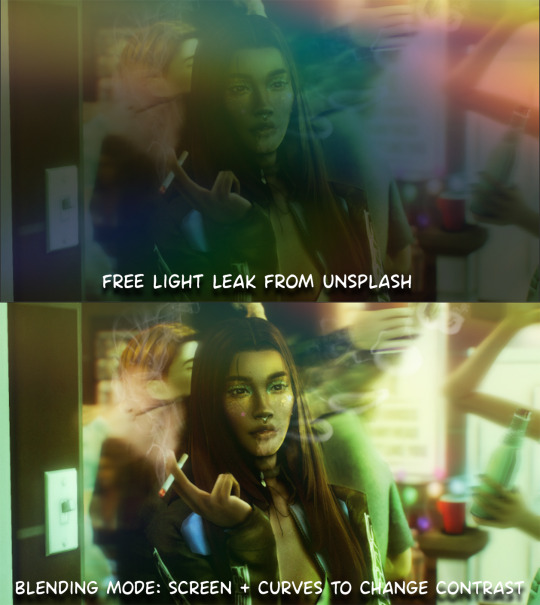
step7: *create new layer* blending mode: screen or linear dodge (add) / makeup and finishing touches! - for this look i'll get stars and glitter pngs off google or unsplash same for the smoke, though if i'm using procreate they have free brushes for that :')

step8: add light leaks as they add some fun dynamic lighting and textures to your screenshots. (i also flip my image horizantally [image > image rotation > flip canvas horizontally] whilst editing as it's like a "fresh pair of eyes" when you've been editing for a while so you can see what looks off)
final step: merge all the layers (though i do merge along the way once i'm happy with something) go to filter > sharpen > smart sharpen. I leave it as the default setting.
extra step if u want: for party pics i might add chromic abberation here is a 60 second tutorial on youtube it makes the pic look cool and trippy.
And you're done!! congrats on surviving. if you have any questions please send them in my ask box so others can see and get help too.
257 notes
·
View notes
Text


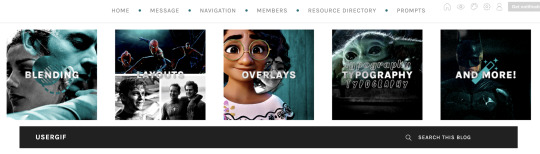
RESOURCE DIRECTORY 2.0 + HOW TO NAVIGATE USERGIF
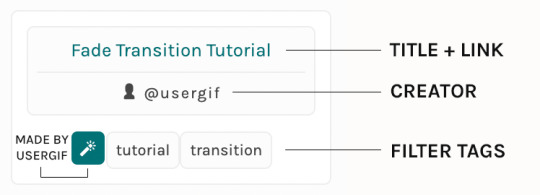
Hello! We hit 10k followers! I want to take this moment to thank all our wonderful followers and the talented members of usergif! We created this blog less than 2 years ago and are constantly blown away by your support and beautiful creations. As a thank-you, we're proud to announce our new and improved resource directory!!! Shout out to arithemes' custom page which allowed us to create a more streamlined and organized directory for everyone to use. Under the cut, you'll find a guide to help you find exactly the resource you're looking for on our blog. Happy gifmaking! :)

THE UPDATED DIRECTORY
All resources are in alphabetical order first by the creator's URL (at the time of entry), then by the resource's title. Each title is a clickable link that'll redirect you to the original post. Beneath that, you'll find the creator's URL and the resource's relevant filter tags:
As always, whenever I add new entries to the directory, you'll see the last date listed on the right side of the blog here:
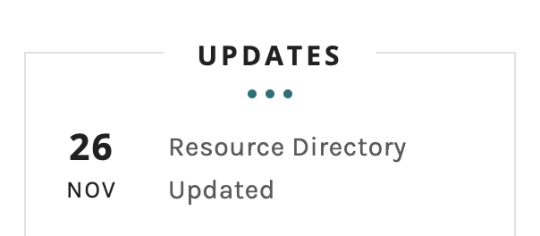
If you don't see one of your recent tutorials listed there, please be patient. I update the directory on a monthly basis, but only add resources that have already exited our queue.
THE FILTERS

Please note: the Source section has exclusive filters, meaning you can only select one at a time. In the Type and Effects sections, you can select as many filters as you want. However, if you select 2 filters in one section, like "animated" and "blending," it'll show results for any resource with either of those tags, not necessarily resources that include both of those tags.
Here's a breakdown of how we categorize our resources:
Source: ↳ all: posted by any creator ↳ usergif: posted by usergif
Type: ↳ all: click this to reset filter selections ↳ action: pre-recorded photoshop functions that can be replayed ↳ basics: non-effects-related resources to help new gifmakers get their feet off the ground (please remember usergif is not a resource for beginner-level gifs and focuses on intermediate to advanced gif effects. however, we thought it would be helpful to keep some basic resources available) ↳ brush: various brush shapes like ripped paper edges or intricate textures ↳ fonts: names and links to fonts or font packs ↳ template: pre-made, downloadable layouts and designs ↳ texture: overlays that add a different finish to a gif such as Ben Day dots (retro comic dots) or glitter ↳ tutorial: any post that provides an explanation for a gif effects process ↳ other
Effect: ↳ all: click this to reset filter selections ↳ animated: an effect that applies movement to an element such as rotating text or wiggling shapes ↳ blending: aka double exposure, this effect combines two or more gifs layered on top of each other ↳ color: specifically for color manipulation, an effect in which the original colors are completely different (e.g. a blue sky colored to look pink) ↳ glitch: an effect where color channels are toggled and layered over the original gif to give a flickering effect ↳ layout: multiple gifs on one canvas like a collage (e.g. hexagon layout) or poster-style templates ↳ overlay: an added element layered above a gif (excluding text) such as a shape, another gif confined to a shape, a texture, etc. ↳ transition: an effect that stylizes the passage from one scene/clip into another, such as a fade, glitch, linear wipe, or motion blur transition ↳ typography: any kind of stylized text added over a gif (does not include basic captions)
You can find examples of all these gif effects via their respective tags on our Nav!
THE SEARCH BAR

This search bar functions the same way as the search bar in the upper right corner of our main blog and the search function on Tumblr's mobile app.
Tumblr search allows you to generate results using keywords found in the body of the post or the tags. So, if you're looking for a post but can only remember it having the word "rotoscoping," you can type that in either in the directory's search or blog's search and find any post on our blog that mentions the exact keyword "rotoscoping."
THE NAV & TAGS
Tags function differently from search keywords as these relate to exact words and phrases found only in the tags, not the body of the post. Our members use tags to categorize original posts and reblogs. Some of our most frequently used tags are listed on our Navigation Page and saved in the mobile search function pictured below:
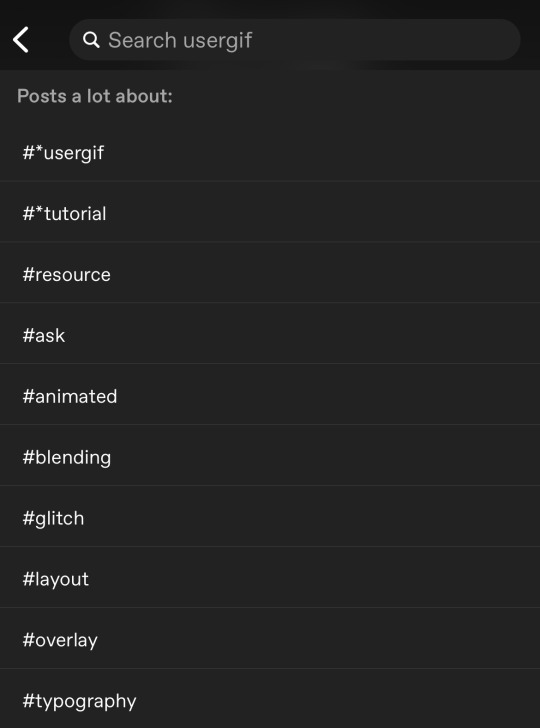
But if you ever want to quickly navigate a tag, simply add /tagged/word to the end of our url to find that tag! For example, if you want to see all the posts we've tagged as a #tutorial, just go to usergif.tumblr.com/tagged/tutorial.
BROKEN LINKS
Whether it's due to a creator frequently changing their url, the absence of an automatic blog redirect, or my own mistakes when coding the directory — you may stumble upon a broken link. Here's what to do:
If a creator has changed their username but their blog doesn't automatically redirect you to the new blog, check if they listed their new user name in the title of their old blog like I did:
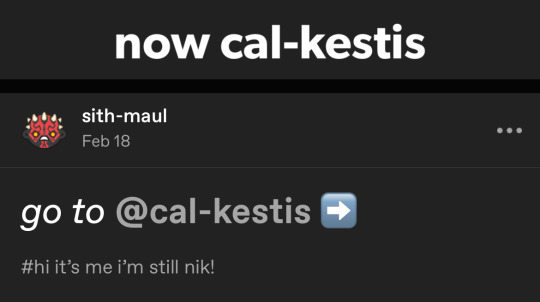
In this case, simply replace the url you landed on with this new url. For example, https://sith-maul.tumblr.com/post/692130400398704640/how-to-make-an-animated-google-search-overlay-a → would become → https://cal-kestis.tumblr.com/post/692130400398704640/how-to-make-an-animated-google-search-overlay-a
However, if you can't figure out the creator's new url or in the case that I messed up the link due to human error, feel free to send us a message so I can help find the source or correct the mistake!
WHERE TO FIND THIS INFO AGAIN
If you ever need to access this guide while using the directory, simply click the "i" button here:

And that's it! We hope this revamped directory is a lot more efficient and helpful. Thank you again for all your support and for helping us reach this follower milestone!
#*usergif#*usergifdirectory#completeresources#usershreyu#userace#uservivaldi#userbecca#usertreena#userzaynab#alielook#usernanda#userhella#userelio#useraish#userabs#tuserabbie#tusermona#usersmia#tuserlucie#usercats
358 notes
·
View notes
Note
You explain yourself much better than most YouTube videos and game guides, how does the companion glitch work? I might just come to you with most of my rdr2 questions... Call you the encyclopedia of Arthur lol
Hello!! I'll try my best to explain, but it's a very tedious glitch to pull off.
When you're in combat and lead enemies to camp, the surrounding gang members appear on your map as temporary "companions" that will protect you and the camp. The glitch exploits this, and let's you have the gang as constant companions on your adventures!
Here's the best tutorial for it if you wanted to watch, but I'll talk you through it anyways!
The glitch itself is really simple, the execution is the difficult part. All you need is your lasso, a random npc, and dynamite arrows.
The best camp to do this glitch in is Horseshoe Overlook, but you can do it in any camp!
First thing you'll need is your bow equipped with dynamite arrows. You can use regular dynamite, but the arrows are much more effective.
Then hogtie an npc and put it on your horse to bring to camp. Don't go inside camp with the npc otherwise you'll get kicked out, just park your horse outside the camp boundary.
Take the npc and carry it along the main walkway into camp, but make sure you don't get too close, you want to stay just outside of the main camp area.
Put the npc down and leave it to free itself from the hogtie, equip your bow with dynamite arrows ready.
Once the npc is free, you'll get a pop up warning you that an enemy is close to camp. That's a good sign! Once the npc starts shooting you, you'll get another pop up saying that an enemy has been led to camp, and as soon as you see that pop up, shoot the ground beneath you with the dynamite arrow to kill yourself.
Once you respawn, immediately set up a camp.
Trust me, it will take a lot of trial and error, but if you've done it right, gang members should be running towards you once you're up!
You can get literally any of the gang, even Jack or Cain, it's very random but very fun!
The gang who follow you will ride their own horses alongside you and will shoot alongside you too, they'll keep ya safe <3
#I had dutch hosea john sean javier and charles today when I tried it again#it was so fun#we went to blackwater and went crazy#they protect you that well!#you can just survive blackwater!#I highly recommend#<3#rdr2#asks#mick squeaks
31 notes
·
View notes
Text
did u know the affinity suite has a six month free trial, no card needed? stumbled* into it and have been slowly teaching myself how to vector in designer
(*this is not hashtag sponsored, i legit did stumble into it and have been having fun, a+ marketing affinity)
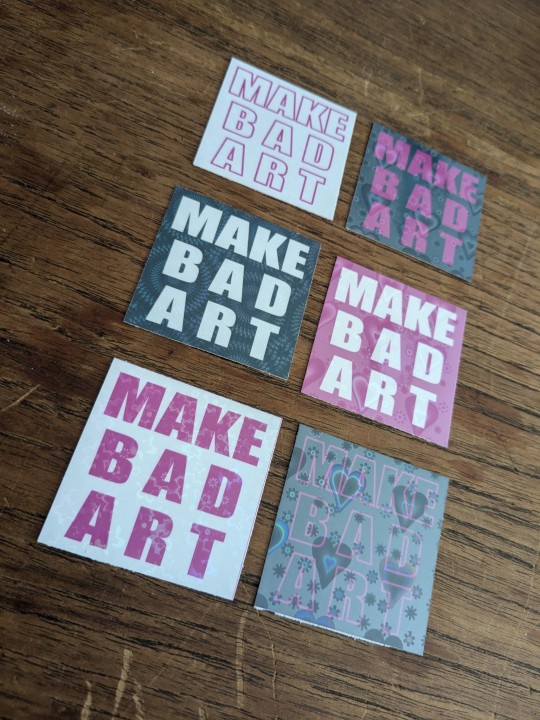
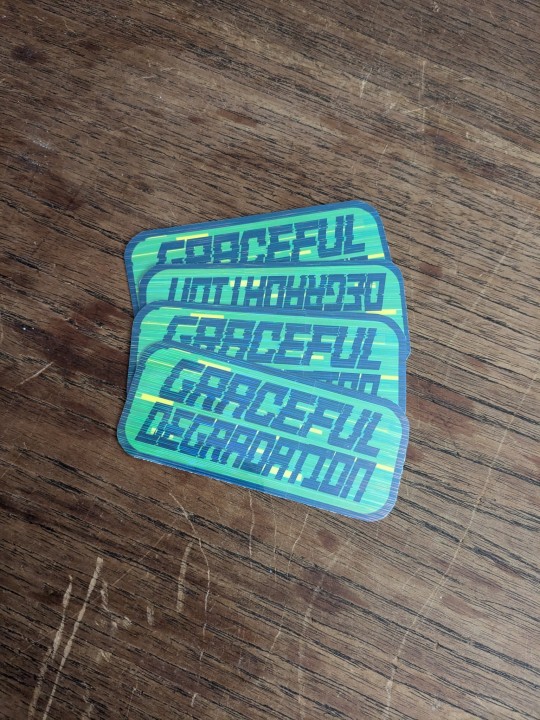
these bad boys are STICKERS and involved a lot of trial and error
> MAKE BAD ART stickers measure apx 2"x2" and are home printed, laminated with holo film, and hand cut
the og black with white text was perhaps not ideal to start with, i definitely chewed through a lot of ink troubleshooting, but the end result makes me very happy. they're a lil janky but full of love, and truly fit the goal of making bad art
> GRACEFUL DEGRADATION stickers measure 3"x2" and are a love letter (love sticker?) to several of my favorite people, because i have a type and that is type includes chronically ill techno wizards
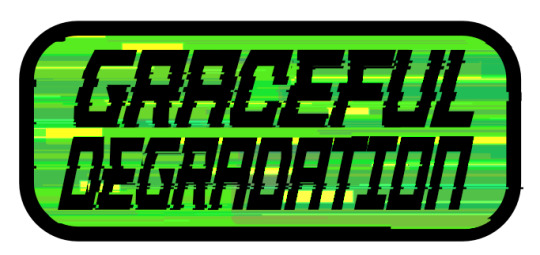
@craftsbyrom helped me a ton with some explanation on how to create the glitch effects i desired via a bespoke text based tutorial (why do those not exist anymore), which i then layered with this streaky holo film following the direction of the glitches. the end result is super cool!!
font was made by the typography artist yutaONE (insta: @/yuta_ptv_jp )
you can find these guys listed on my ko-fi shop for a couple bucks each, along with a bunch of other fun goodies
#cybercore#punk art#queer artist#graceful degradation#handmade stickers#diy#mochi rambles#mochi crafts#mochi makes stickers#mochi makes graphics#graphic design
43 notes
·
View notes
Note
AU where the world of MHA is a full dive MMO, with top heroes also being the best players.

My Hero Online is the newest hit Full Dive MMO based around a world of Superheroes and special powers. The game advertises itself on not only Full Dive gameplay but the customizable 'Quirk' system that allows you to create your own unique superpower by combining thousands of preset parts. E-Sports are a big deal, with a national leaderboard.
Midoriya wants the game due to a strong desire for escapism on account of junior-high bullying. Why is he being bullied in a No-Quirks(?) AU, you might ask, if you've never been to middle school. When he finally gets it, he's approached in-game during the tutorial by another player, inviting Midoriya to a 'secret area.' Midoriya, not really being a gamer before this, doesn't know enough to spot the red flags.
The 'secret area' is out of bounds and not meant for players to be there, but the other player is a hacker. They genuinely meant to hang out and goof around with exploits and cheats, but, uh. There seems to be two digimon-adjacent asks at the top of this post. I hope you weren't attached to your body, Midoriya, because you're about to lose it.
To cut a long story short, Midoriya got grabbed by some kind of glitch entity while logging out of the game (to avoid said entity) and found himself back in his room but, uh, not quite physical anymore. Cyber Sleuth refers to this as a half-cyber body*. I'm taking a few liberties with it though.
Midoriya would actually kind of like his body back though, it's his and he is attached to it. But he's not going to be able to get it back without diving deep into My Hero Online and learning more about what's below its surface.
+1. Midoriya is locked into his first character as a result of the glitched logout that took his body. It also gave him the Quirk, Glitch, which doesn't appear to be a real Quirk that you can create through the character creation system, and seems to border on warping reality within the game. And it might be getting stronger.
*For those of you who've never seen it, the half-cyber body is a blue silhouette of the person covered in a shifting pattern of squares resembling the particle effect used for digital stuff. However, by adjusting some data, this body can be customized to appear normal.
62 notes
·
View notes