#vertical radiators 300mm wide
Text
#interiordesign#bathroom#interior#bathroomdesign#design#home & lifestyle#architecture#homedecor#bathroomremodel#home#vertical radiators#vertical radiators good or bad#vertical radiators uk#vertical radiators vs horizontal#vertical radiators reviews#vertical radiators are they any good#vertical radiators 400mm wide#vertical radiators 1800 x 600#vertical radiators 1200mm high#vertical radiators 300mm wide#vertical radiators 500mm wide#installing vertical radiators#bleeding vertical radiators#vertical radiator installation#vertical radiator not heating up#vertical radiator valves#vertical radiators and#vertical radiator leaking#vertical radiator brackets#designer radiators
1 note
·
View note
Text
Fractal Design Meshify S2 Black Tempered Glass Edition


Fractal is launching the new version of the Meshify case line which is all about airflow, the Fractal Design Meshify S2. Fractal tends to build a more subdued case. Lacking from Fractal's line up are RGB LED-laden chassis. Don't get me wrong, there's a time and a place for RGB LEDs. Fractal has taken lessons learned from their other lines and has incorporated those features in the Meshify S2.
With airflow over aesthetics being the priority for the series, it is easy to see why it is quite popular with enthusiasts and overclockers alike. The Meshify takes what was good about the original design and attempts to improve on it.
Technical Specifications
Meshify S2 Black Tempered Glass Edition
Model Name
FD-CA-MESH-S2-BKO-TGL
Front Panel Color
Black
Dimensions (mm)
L538 x W233 x H455mm
Material
Steel, Metal Mesh, ABS, Tempered Glass
M/B Type
EATX (up to 285mm wide), ATX, mATX, ITX
Front Ports
1 x USB 3.1 Gen 2 Type-C
2 x USB 3.0
Audio I/O
Drive Bays
5.25″
0
3.5″
2 (Convertible to 2.5″ bay)
2.5″
5 (2 x Converted from 3.5” bays)
Expansion Slots
7 + 2 vertical
Fan Slots
Front
3 x 120/140mm (2 x Dynamic X2 GP-14 included)
Rear
1 x 120/140mm (1 x Dynamic X2 GP-14 included)
Top
3 x 120/140mm
Bottom
2 x 120/140mm
Radiator Support
Front
120/240/360mm
Rear
120mm
Top
120/240/360mm
140/280/420mm (max 35 mm MB component height)
Bottom
120/240mm
140/280mm
PSU max length
300mm
Maximum Compatibility
VGA Card Length: Max 440mm with front fans mounted
CPU Cooler Height (From M/B to side panel): 185mm
Cable routing space
23mm
Packaging
The Meshify S2 ships in a thick cardboard box. On the front of the box is a line art depiction of the case as well as the color indicator. Black and White are available at launch. On the rear, an exploded view is available. The sides of the box list the additional features.
Internally, the Meshify S2 is protected from damage during shipping as it is capped with large pieces of Styrofoam. A thin plastic bag covers the case underneath the Styrofoam to protect the case's finish from scuffs and scrapes.

The installation kit is tucked away in one of the 3.5" drive bays on the back of the case. Fractal includes enough screws, zip ties, hard drive dampeners, and other accessories to get your system installed in the case. A user guide and warranty instructions are also included.
A Closer Look At The Meshify S2
The most prominent feature on the "business" side of the case is the tempered glass panel. The sample that I received has a light tint to it making the interior of the case clearly visible. From the factory, the glass, as well as a handful of other parts, are covered with a light plastic film that gives a satisfying feeling when removed.

The front of the case features the Meshify's signature angular mesh panel. The panel can be removed to clean the foam behind it. To remove the mesh panel, you'll need to reach under the lip of the front bezel and press upwards on the catch that releases the mesh panel. There is a layer of foam behind the mesh with acts to absorb sound as well as trap dust, although I'm not sure trapping dust was intended. Either way, it is easy to take off, clean, and reassemble. The front of the case can support a 360mm radiator with a maximum width of 147mm.
Moving up to the top of the Meshify, you'll find the front panel I/O as well as the power and reset buttons. The front I/O include two USB 3.1 Gen-2 ports, a single USB type C, and 3.5mm audio jacks for headphones and microphone.

The top of the Meshify is, well, mesh. This mesh panel pops up by using a button on the rear of the case to release the plastic catches. The panel can be removed to get easy access to the cooling bracket underneath.
The cooling bracket is removable as well. This allows you to install radiators or fans outside of the case and grants easy access to the top of the motherboard. Once the components are in place on the bracket, simply secure it back in place. The top cooling bracket also features a dedicated fill port allowing you to fill your loop without opening the side panels of the case.

On the rear of the case, the power supply is mounted at the bottom of the case. An adapter is included to aid in the installation. 7 horizontal expansion slots, as well as two verticle slots, are available for use. A single 120mm fan is also present on the rear of the case.

Taking a look at the bottom of the case, a removable full-length dust filter held in place by four brackets between the case feet. The chrome plastic case feet have thin rubber pads to keep the Meshify S2 from sliding around the desk.
Internally, the Meshify S2 is wide open. Front to back, the case measures 465mm without the front fans installed and 440mm with. The motherboard tray features a large cutout that gives access to the back of the CPU socket when installing a backplate for CPU coolers. The front section of the case features verticle slots, these are the reservoir mounts. Fractal as also included reservoir brackets to aid in mounting. Rubber grommets are in place at each opening where wires would pass from the component area of the case to the backside of the motherboard tray. Fractal includes three of their Dynamic X2 GP-14 140mm fans. These fans push air at 68.4 CFM at a sound level of 18.9 dBA.

A full-length power supply shroud runs from the font to the back of the case. Not only does this allow you to hide wires and preserve a clean looking case, but the shroud also provides alternate mounting locations for 2.5" drives as well as serves as the mounting location for the vertical GPU mount. For those that prefer large reservoirs, the front panel of the shroud can be removed.
Looking at the top of the case, you can see the removable cooling bracket. This bracket supports a 420mm radiator with a maximum thickness of 35mm

A Closer Look Continued
The backside of the motherboard tray features two 2.5" mounting locations and three 3.5" drive cages. Access to the power supply connectors is provided by a cutout that runs roughly 1/2 the length of the case.

The two 2.5" drive mounts can be removed from the back of the motherboard tray and mounted to the top of the power supply shroud. The three 3.5" drive trays are completely removable when not in use. The design allows them to mount behind the reservoir with little to no interference. The drive trays will also accept 2.5" drives as well. In order to help tidy up cabling, Fractal as included a SATA power extension for 3.5"/2.5" drives installed in these locations.

The Nexus+ PWM fan hub is mounted to the backside of the motherboard tray. The input for the hub comes from the motherboard's PWM header and is powered by a SATA connector. The hub can support three PWM fans as well as six 3-pin fans.

To get the installation started, I chose to start with the power supply. Simply remove the mounting bracket from the back of the case, screw it to the power supply and slide it into place.

Next up I installed the motherboard. All was well and good until I installed the CPU cooler. The cooler I chose to use for this build is EKWB's Predator AIO. The cooler uses 120mm fans, however, as I attempted to install the cooler more towards the center line of the case, the motherboards VRM heatsinks prevented this. Thankfully there are multiple mounting points for 120mm and 140mm fans and radiators.

The rest of the installation went smoothly. Cable routing was made a bit easier as there is ample space behind the motherboard tray. I did find my self wanting longer fan cables to route to the PWM hub, however, an extension fixes this issue. The back side of the case features two velcro strips to help secure cables. Fractal included plenty of zip tie locations, 14 as a matter of fact, to help manage the cables.

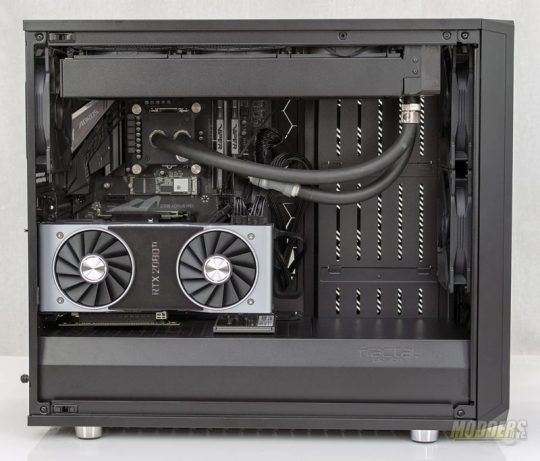
The front side of the case came out pretty clean as well. I chose to use the vertical mount GPU as well as mounted the SSD to the power supply shroud.
Conclusion and Final Thoughts
Putting together a system inside the Meshify S2 was fairly painless. As I mentioned before, I did find myself wanting a little longer cables to the front fans from the Nexus PWM fan hub. An extension did solve this issue and would allow most of the cables to run as a single bundle. That is except for the USB Type-C cable. Depending on the location on your motherboard, it may be a challenge. The pass-through for the motherboard tray and the power supply shroud do a lot to help hide wires and keep things nice and tidy. There's plenty of space for me to get my meat hooks in and out of the case without too much of a challenge. No sharp edges exist inside as I was able to put our system together unscathed.

The cooling performance of the Fractal Design Meshify S2 was perfectly acceptable. I've spent a bit of time with the case over the last couple of weeks and the stock i7-8700K didn't see temperatures in excess of 60°C and the Nvidia RTX 2080TI reached 78°C during heavy gaming sessions. Even during those sessions, the fans were still quiet. The Nexus+ PWM Fan hub was connected to the motherboards CPU_OPT fan header and set to normal in the BIOS. Good airflow through the case helped keep fan noise and temperatures in check.
The Fractal Design Meshify S2 shares its core with another Fractal Design, the Define S2. And why not? Is this bad. For me, I say no. If the design works, then use it. By using the same core, Fractal can produce the cases at a lower cost in both design time and manufacturing. The differences between the two series, the Define series caters to aesthetics more so than airflow whereas the Meshify's focus is on airflow. Granted, in my opinion, the Meshify S2 with its angular front panel looks just as good. I personally have used the Define S2 and like it just fine. Each has their own place. The MSRP for the tempered glass versions will run you $149.99 and the non-glass version will set you back $139.99.
Read the full article
0 notes
Last Seen Blogs

extremelyblack
🍫 Chocolate City Of All Of All Brown Men 🍫

ragnarvk69
Sin título

animeyanderelover
Yandere Blog


casamiabalancacontien
Untitled