#visual studio code json
Explore tagged Tumblr posts
Visit Tumblr Blog
Explore Tumblr blogs with no restrictions, modern design and the best experience.
Last Seen Tumblr Blogs


Fun Fact
Celebrities use Tumblr as well.
Text
Setback overcome!
Node.js is outstanding. There's too much to report right now, but I can say that it's not going to be difficult to get what I want.
Today, I learned to:
Use Express to easily spin up a server and read JSON data from an HTTP POST request.
Include a line in my HTML pages, and use the Fetch API, client-side, to do data scrape into a JavaScript array and then POST that data.
Use Visual Studio Code to debug.
Altogether, this took a little less than two hours, and a lot more happened, but those are the basics of what I accomplished and learned today.
0 notes
Text
Edgaring time!
Tutorial on how to make your own responsive Edgar :D I will try to explain it in really basic terms, like you’ve never touched a puter (which if you’re making this… I’m sure you’ve touched plenty of computers amirite??? EL APLAUSO SEÑOOOREEES).
If you have some experience I tried to highlight the most important things so you won’t have to read everything, this is literally building a website but easier.
I will only show how to make him move like this:

Disclaimer: I’m a yapper.
Choosing an engine First of all you’ll need something that will allow you to display a responsive background, I used LivelyWallpaper since it’s free and open-source (we love open-source).
Choosing an IDE Next is having any IDE to make some silly code! (Unless you can rawdog code… Which would be honestly impressive and you need to slide in my DMs and we will make out) I use Visual Studio!!!
So now that we have those two things we just need to set up the structure we will use.
Project structure
We will now create our project, which I will call “Edgar”, we will include some things inside as follows:
Edgar
img (folder that will contain images) - thumbnail.png (I literally just have a png of his face :]) - [some svgs…]
face.js (script that will make him interactive)
index.html (script that structures his face!)
LivelyInfo,json (script that LivelyWallpaper uses to display your new wallpaper)
style.css (script we will use to paint him!)
All of those scripts are just literally like a “.txt” file but instead of “.txt” we use “.js”, “.html”, etc… You know? We just write stuff and tell the puter it’s in “.{language}”, nothing fancy.
index.html
Basically the way you build his silly little face! Here’s the code:
<!doctype html> <html> <head> <meta charset="utf-8"> <title>Face!</title> <link rel = "stylesheet" type = "text/css" href = "style.css"> </head> <body> <div class="area"> <div class="face"> <div class="eyes"> <div class="eyeR"></div> <div class="eyeL"></div> </div> <div class="mouth"></div> </div> </div> <script src="face.js"></script> </body> </html>
Ok so now some of you will be thinking “Why would you use eyeR and eyeL? Just use eye!“ and you’d be right but I’m a dummy who couldn’t handle making two different instances of the same object and altering it… It’s scary but if you can do it, please please please teach me ;0;!!!
Area comes in handy to the caress function we will implement in the next module (script)! It encapsulates face.
Face just contains the elements inside, trust me it made sense but i can’t remember why…
Eyes contains each different eye, probably here because I wanted to reuse code and it did not work out and when I kept going I was too scared to restructure it.
EyeR/EyeL are the eyes! We will paint them in the “.css”.
Mouth, like the eyeR/eyeL, will be used in the “.css”.
face.js
Here I will only show how to make it so he feels you mouse on top of him! Too ashamed of how I coded the kisses… Believe me, it’s not pretty at all and so sooo repetitive…
// ######################### // ## CONSTANTS ## // ######################### const area = document.querySelector('.area'); const face = document.querySelector('.face'); const mouth = document.querySelector('.mouth'); const eyeL = document.querySelector('.eyeL'); const eyeR = document.querySelector('.eyeR'); // ######################### // ## CARESS HIM ## // ######################### // When the mouse enters the area the face will follow the mouse area.addEventListener('mousemove', (event) => { const rect = area.getBoundingClientRect(); const x = event.clientX - rect.left; const y = event.clientY - rect.top; face.style.left = `${x}px`; face.style.top = `${y}px`; }); // When the mouse leaves the area the face will return to the original position area.addEventListener('mouseout', () => { face.style.left = '50%'; face.style.top = '50%'; });
God bless my past self for explaining it so well, but tbf it’s really simple,,
style.css
body { padding: 0; margin: 0; background: #c9c368; overflow: hidden; } .area { width: 55vh; height: 55vh; position: absolute; top: 50%; left: 50%; transform: translate(-50%,-50%); background: transparent; display: flex; } .face { width: 55vh; height: 55vh; position: absolute; top: 50%; left: 50%; transform: translate(-50%,-50%); background: transparent; display: flex; justify-content: center; align-items: center; transition: 0.5s ease-out; } .mouth { width: 75vh; height: 70vh; position: absolute; bottom: 5vh; background: transparent; border-radius: 100%; border: 1vh solid #000; border-color: transparent transparent black transparent; pointer-events: none; animation: mouth-sad 3s 420s forwards step-end; } .face:hover .mouth { animation: mouth-happy 0.5s forwards; } .eyes { position: relative; bottom: 27%; display: flex; } .eyes .eyeR { position: relative; width: 13vh; height: 13vh; display: block; background: black; margin-right: 11vh; border-radius: 50%; transition: 1s ease } .face:hover .eyeR { transform: translateY(10vh); border-radius: 20px 100% 20px 100%; } .eyes .eyeL { position: relative; width: 13vh; height: 13vh; display: block; background: black; margin-left: 11vh; border-radius: 50%; transition: 1s ease; } .face:hover .eyeL { transform: translateY(10vh); border-radius: 100% 20px 100% 20px; } @keyframes mouth-happy { 0% { background-color: transparent; height: 70vh; width: 75vh; } 100% { border-radius: 0 0 25% 25%; transform: translateY(-10vh); } } @keyframes mouth-sad { 12.5%{ height: 35vh; width: 67vh; } 25% { height: 10vh; width: 60vh; } 37.5% { width: 53vh; border-radius: 0%; border-bottom-color: black; } 50% { width: 60vh; height: 10vh; transform: translateY(11vh); border-radius: 100%; border-color: black transparent transparent transparent; } 62.5% { width: 64vh; height: 20vh; transform: translateY(21vh); } 75% { width: 69vh; height: 40vh; transform: translateY(41vh); } 87.5% { width: 75vh; height: 70vh; transform: translateY(71vh); } 100% { width: 77vh; height: 90vh; border-color: black transparent transparent transparent; transform: translateY(91vh); } }
I didn’t show it but this also makes it so if you don’t pay attention to him he will get sad (mouth-sad, tried to make it as accurate to the movie as possible, that’s why it’s choppy!)
The .hover is what makes him go like a creature when you hover over him, if you want to change it just… Change it! If you’d rather him always have the same expression, delete it!
Anyway, lots of easy stuff, lots of code that I didn’t reuse and I probably should’ve (the eyes!!! Can someone please tell me a way I can just… Mirror the other or something…? There must be a way!!!) So now this is when we do a thinking exercise in which you think about me as like someone who is kind of dumb and take some pity on me.
LivelyInfo.json
{ "AppVersion": "1.0.0.0", "Title": "Edgar", "Thumbnail": "img/thumbnail.png", "Preview": "thumbnail.png", "Desc": "It's me!.", "Author": "Champagne?", "License": "", "Type": 1, "FileName": "index.html" }
Easy stuff!!!
Conclusion
This could've been a project on git but i'm not ready and we're already finished. I'm curious about how this will be seen on mobile and PC,,, i'm not one to post here.
Sorry if I rambled too much or if i didn't explain something good enough! If you have any doubts please don't hesitate to ask.
And if you add any functionality to my code or see improvements please please please tell me, or make your own post!
98 notes
·
View notes
Note
hey i love your ISAT script site!! i'm wondering if you have the dialogue around the wish ritual anywhere? (the folding leaf and such - iirc there were two different books/essays in the game about it). and also wondering if you have like, a datamined text file anywhere? or is it all hand-transcribed?? thanks!!!
that was actually pretty highly requested dialogue (i know i've copy pasted it on isatcord TWICE lmao) so this ask gave me the impetus to whip it up!
here's a WIP page with it, for you!
(there's something really funny in reading fanfiction and knowing the writer cross-referenced my script, ngl.)
AS FOR THE FILES....
The game is actually entirely unencrypted, because insertdisc5 has mercy upon us. If you own the game on steam, you can open them up yourself, no problem, which is what i've been doing.
They're under Windows/Programs/steamapps/common/In Stars and Time/www/data
What you find here is precisely 217 map files, which contain the dialogue for all locations in the game. All dialogue NOT tied to a location (items, events that happen in multiple places, all dialogue in battles) are in Common Events, which is one huge fucker.
If you open them up, you will find a lot of intelligible code.
This is what it looks like in Visual Studio Code, which is the program I write my website in. I copy-paste all dialogue by hand, but thank god i do NOT need to transcribe anything. (I think Codacheetah did that for the og Loopchats document, which, dear god Coda, what are you doing).
Since actually knowing what goes where is super difficult with this, I also use RPGmaker MV (which i have obtained very legally) to make the text easier to parse!
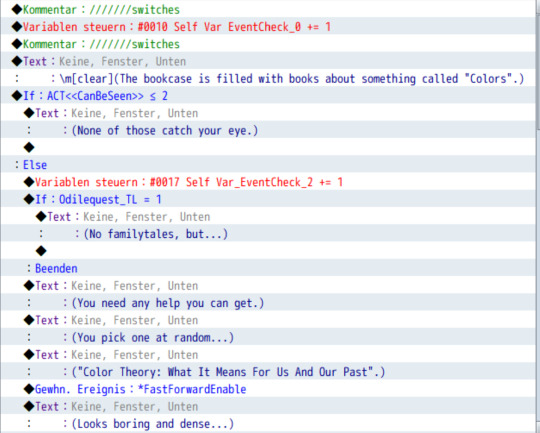
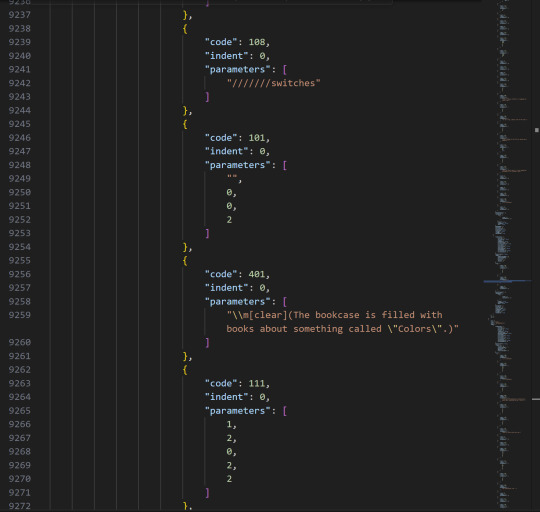
my program is set to german so this is some denglish. But already you can see the when and where of it, for some examples:
Self Var EventCheck is a variable that checks how often a specific event happens. These are subdivided by number on specific dialogue options within a single even tpage.
You also see other variables, like ACT <<CanBeSeen>> which just classifies which act this is in, so the line "(None of these catch your eye.)" only applies from act 2 onwards (which is redundant, since you can only access this bookshelf starting in act 2, but hey).
The upside of RPGmaker is that I can also just go to the room I need and then see which map its on, so I don't need to search through all 217 of those map files.
(When I started this project, I looked at and labelled all map files without using rpgmaker. This is stupid. Do not do this.)

At the very bottom in that little bar, you can see that it says "085: SecretLibrary". 085 is the number of the map file, so the Secret Library Dialogue is in "Map085.json"
(I also list the file source of dialogue on the script site whenever I remember to, so that's what "Source: Map085" refers to.)
If you only want to search what a specific line is, or look up when a word is used, then just searching through the json files is more than enough.
I hope this was helpful!! Enjoy
9 notes
·
View notes
Text
Audio Editing Process
Hey all, just thought I'd make regarding the process I used to make the new audio for the Northstar Client mod I'm working on.
Really quick here are some helpful sites
First, the software. You'll need to download
Audacity
Northstar Client (NC. Also I'm using the VTOL version)
Steam
Titanfall 2
Legion+ (from same site as NC)
Titanfall.vpk (also from NC)
Visual Studio Code(for making changes to .json files if necessary)
And that should be about it for now. Feel free to use whatever audio program you want. I just audacity cuz it's free and easy to use.
NOTE: if you want to skip a lot of headache and cut out the use of Legion+ and Tfall.vpk you can download a mod from Thunderstore.io and then just replace all the audio files with your new ones
This makes pulling a copy of an original unedited file for changes (if necessary) super easy, as well as making the exported file easy to find
Step 1.
First you'll want to get organized. Create a folder for all your mod assets, existing or otherwise and try to limit any folders within to a depth of one to make them easier to navigate/find stuff.
Example being:
<path>/mod_folder
|-->voicelines_raw (place all your audio in here)
|-->voicelines_edited (export to this folder)
|-->misc (add however many folders you need)
Above is an example of a folder with a depth of 1
First select your audio from the file you created earlier and import it into Audacity
Step 2.
Put any and all audio into their proper folder and open Audacity.
For my project I need to have some voicelines made seperately for when inside the titan, and when outside.
These instances are prefaced with a file tag "auto" and looks like this
diag_gs_titanNorthstar_prime_autoEngageGrunt
Inside "audio" in the mod folder you will see a list of folders followed by .json files. WE ONLY WANT TO CHANGE THE FOLDERS.
Open an audio folder and delete the audio file within, or keep it as a sound reference if you're using Legion+ or Titanfall vpk.
Step. 3
Edit your audio
Click this button and open your audio settings to make sure they're correct. REMINDER 48000hz and on Channel 2 (stereo)
As you can see I forgot to change this one to channel two but as another important note you'll want to change the Project Sample rate with the dropdown and it's pictured and not just the default sample rate.
In this example I needed to make the voiceline sound like it was over a radio and I accomplished that by using the filter and curve EQ. This ended up being a scrapped version of the voiceline so be sure to play around and test things to make sure they sound good to you!
Afterwords your audio may look like this. If you're new, this is bad and it sounds like garbage when it's exported but luckily it's an easy fix!
Navigate to the effects panel and use Clip Fix. play around with this until the audio doesn't sound like crap.
Much better! Audio is still peaking in some sections but now it doesn't like it's being passed through a $10usd mic inside a turbojet engine.
Next you'll need to make sure you remove any metadata as it will cause an ear piercing static noise in-game if left in. Find it in the Edit tab.
Make sure there's nothing in the Value field and you're good to go!
Export your project as a WAV and select the dedicated output folder
Keep your naming convention simple and consistent! If you're making multiple voicelines for a single instance then be sure give them an end tag_01 as demonstrated in the picture above.
Step 4.
You're almost done! Now you can take audio from the export folder and copy+paste it right into the proper folder within the mod. You can delete the original audio from the mod folder at any time.
Also you won't need to make any changes to the .json files either unless you're creating a mod from scratch
NOTE: As of right now i have not resolved the issue of audio only playing out of one ear. I will make an update post about this once I have found a solution. Further research leads me to believe that the mod I am using is missing some file but recreating those is really easy once you know where to look. Hint: it's in the extracted vpk files
#modding#mods#titanfall#titanfall 2#titanfallmoddy#audio editing#northstar client#northstar#vpk#legion+
2 notes
·
View notes
Text
Tech Toolkit: Tools and Platforms That Power Innovation at Hack4Purpose
Hackathons are fast-paced environments where ideas become working solutions in just 24 to 48 hours. But no team can build impact-driven innovations without the right set of tools. At Hack4Purpose, participants come from diverse backgrounds, bringing ideas that span across domains like health, education, sustainability, fintech, and more.
To succeed, teams often leverage a combination of development frameworks, design tools, project management platforms, and data resources. This blog breaks down some of the most commonly used technologies and essential tools that have powered past Hack4Purpose winners.
1. Tech Stacks That Deliver Under Pressure
At Hack4Purpose, most participants prefer lightweight, fast-to-deploy stacks. Here are some popular choices:
Front-End:
React.js – For rapid UI development with reusable components
Vue.js – Lightweight alternative preferred for simplicity
Bootstrap / Tailwind CSS – For quick, responsive styling
Back-End:
Node.js + Express.js – Fast setup for APIs and scalable backend
Flask (Python) – Popular for data-heavy or ML-integrated apps
Firebase – Excellent for authentication, real-time database, and hosting
Databases:
MongoDB – Great for quick setup and flexibility with JSON-like documents
PostgreSQL – Preferred for structured, scalable applications
Teams often choose stacks based on familiarity and ease of integration. Time is tight, so tools that require minimal configuration and have strong community support are the go-to choices.
2. Design and Prototyping Tools
User experience plays a major role in judging at Hack4Purpose. To create intuitive, impactful interfaces, teams rely on:
Figma – For UI/UX design, wireframing, and team collaboration in real time
Canva – Ideal for pitch deck visuals and quick graphics
Balsamiq – Used for low-fidelity wireframes to validate ideas early on
Even non-designers can contribute to the visual workflow thanks to these user-friendly tools.
3. Project Collaboration and Task Management
Efficient teamwork is critical when time is limited. Here are some platforms used for coordination and project management:
Trello – Simple Kanban boards to track tasks and deadlines
Notion – All-in-one workspace for notes, docs, and task lists
GitHub – For code collaboration, version control, and deployment pipelines
Slack / Discord – For real-time communication with mentors and teammates
Some teams even use Google Workspace (Docs, Sheets, Slides) for pitches and research collaboration.
4. AI & Machine Learning APIs
Several winning projects at Hack4Purpose integrate AI and ML to solve social problems, often using:
Google Cloud Vision / NLP APIs – For image and text processing
OpenAI (GPT or Whisper APIs) – For content generation, summarization, and voice-to-text apps
Scikit-learn / TensorFlow Lite – When developing custom models
Teams usually import pre-trained models or use open-source datasets to save time.
5. Open Data Sources & APIs
Hack4Purpose encourages building data-driven solutions. Teams frequently use open data platforms to ground their ideas in real-world insights:
data.gov.in – Government data on agriculture, health, education, etc.
UN Data / WHO APIs – For global health and development metrics
Kaggle Datasets – Ready-to-use CSV files for quick prototyping
By combining real data with impactful ideas, projects often resonate more with judges and stakeholders.
6. Pitch and Demo Tools
Presentation is everything at the end of the hackathon. To deliver compelling demos, teams often turn to:
Loom – For screen-recorded demo videos
OBS Studio – For streaming or recording live app walkthroughs
Google Slides / PowerPoint – To deliver clean, impactful pitches
Many teams rehearse their final pitch using Zoom or Google Meet to refine delivery and timing.
Final Thoughts: Prepare to Build with Purpose
At Hack4Purpose, technology isn’t just used for the sake of innovation—it’s used to solve problems that matter. Whether you’re developing a chatbot for mental health, a dashboard for climate data, or an e-learning platform for rural students, having the right tools is half the battle.
So before the next edition kicks off, explore these tools, form your dream team, and start experimenting early. With the right tech stack and a clear sense of purpose, your idea could be the next big thing to come out of Hack4Purpose.
0 notes
Text
The Best IDEs for JavaScript Developers in 2025

2025's Most Popular IDEs for JavaScript Development
The Best IDEs for JavaScript Developers in 2025. JavaScript remains among the most sought-after programming languages, fueling everything from web development to mobile applications and server-side apps. As a JavaScript developer, the right Integrated Development Environment (IDE) can dramatically boost your productivity, automate your workflow, and enhance the quality of your code. Many robust IDEs in 2025 meet various development requirements, whether it's front-end, back-end, or full-stack development. In this article, we'll discuss the top IDEs for JavaScript developers in 2025, including their features, advantages, and applications. 1. Visual Studio Code (VS Code) Overview: Microsoft's Visual Studio Code is still among the top IDEs for JavaScript programmers, and it doesn't look to be slowing down anytime soon in 2025. It's lightweight, open-source editor that is full of robust features that simplify code authoring and make it more efficient. Key Features: IntelliSense: Auto-completion and smart suggestions for JavaScript, HTML, CSS, and more. Integrated Terminal: Execute your Node.js scripts and tests within the IDE itself. Extensions: Huge repository of extensions to add functionality to JavaScript frameworks such as React, Angular, and Vue.js. Debugging Support: Comprehensive built-in debugger for client-side and server-side JavaScript code. Git Integration: Integrated version control through Git. Why It's Great for JavaScript Developers: VS Code is a favorite among JavaScript developers due to its high performance, customizable options, and large community support. Whether you're developing front-end libraries or back-end frameworks, VS Code has the flexibility to fit your requirements. 2. WebStorm Overview: WebStorm is an IDE by JetBrains built specifically for JavaScript and web development in general. It's a high-end product with sophisticated features and full support for JavaScript frameworks. Key Features: Smart Code Completion: Intelligent code completion support that offers intelligent code completion for JavaScript, TypeScript, and mainstream libraries and frameworks (e.g., React, Angular, Node.js). Refactoring Support: Refactoring capabilities to assist you in cleaning up and optimizing your code. Built-in Features: In-built support for tools such as Git, terminal, test runners, and Docker. Framework Support: Very good default support for up-to-date frameworks, such as React, Vue.js, Angular, etc. Test Integration: Direct integration support with JavaScript testing libraries such as Jest, Mocha, and Karma. Why It's Great for JavaScript Developers: WebStorm has a full-featured set of tools that are ideal for developers who require a one-stop-shop solution. Its extensive understanding of JavaScript libraries and frameworks makes it a great tool for serious, large-scale JavaScript development projects. 3. Sublime Text Overview: Sublime Text is a light but powerful text editor that has a strong following among developers. Although it's not an IDE, its speed, extensibility, and simplicity make it a great option for JavaScript developers in 2025. Key Features: Speed and Performance: Famous for being fast and light, Sublime Text enables developers to code with little lag. Customizability: Editor is extremely customizable with a huge set of plugins that can be accessed through the package manager. Multi-caret Editing: Enables you to edit multiple lines of code at once for more efficiency. Cross-Platform: Runs smoothly on Windows, macOS, and Linux. Syntax Highlighting: Syntax highlighting support for JavaScript, JSON, HTML, CSS, and many more. Why It's Great for JavaScript Developers: Sublime Text is ideal for developers who want a minimalist style but still need robust features such as syntax highlighting, multi-caret editing, and the capacity to add third-party packages to enhance functionality. It's particularly beneficial for developers of smaller JavaScript projects or scripts. 4. Atom Overview: Atom, developed by GitHub, is an open-source text editor that is highly customizable and popular among web developers. It offers a sleek user interface and an array of features that make it ideal for JavaScript development. Key Features: Hackable: Atom is highly customizable through plugins and themes, allowing you to tailor the editor to your workflow. Built-in Git Support: Direct Git integration for version control and collaboration. Package Manager: Having an easy way to install packages to include additional features (e.g., linters, debuggers, and integration with other tools). Collaboration Tools: Such things as Teletype for collaborative coding in real-time, which is perfect for group projects. Why It's Great for JavaScript Developers: Atom's flexibility and extensibility make it an excellent choice for developers who need a customizable environment. While it may not be as feature-rich as some of the other IDEs, its vibrant community and integrations allow you to enhance the IDE to suit your development needs. 5. Eclipse Theia Overview: Eclipse Theia is an open-source IDE that's intended to give you a cloud and desktop development experience. It wants to offer you the same experience as Visual Studio Code but with all its components based on web technologies. Key Features: Cloud-Native: Designed to be used both in the cloud and on your desktop, with a uniform experience across platforms. Modular: Very modular, so you only install the bits you need to do JavaScript development. Git Integration: Complete Git integration, allowing you to conveniently work with your repositories within the IDE. Customizable: Similar to VS Code, Theia accommodates extensions and plug-ins for further functionality. Why It's Great for JavaScript Developers: Eclipse Theia is an excellent option for developers who require flexibility and scalability for their development environment. It's most suitable for those who prefer a cloud-based IDE or want to work using a fully open-source environment. Its flexibility also makes it ideal for huge projects or teams, or even large enterprises. 6. Brackets Overview: Brackets is a free, open-source IDE that is specifically designed for web development. It is light and geared towards front-end developers, which makes it a great option for coding in JavaScript, HTML, and CSS. Key Features: Live Preview: See changes to your JavaScript, HTML, and CSS code instantly in the browser while you code. Preprocessor Support: Preprocessor support built right in for preprocessors such as Sass and LESS. Inline Editors: A nice feature that lets you edit CSS right inside your HTML file. Extension Library: A good choice of extensions to tailor Brackets for JavaScript coding. Why It's Great for JavaScript Developers: Brackets is perfect for developers who spend most of their time working on front-end JavaScript, particularly on web design and UI projects. Live preview and inline editing enable them to easily speed through designs and front-end code iterations. Conclusion Selecting the proper IDE. The Best IDEs for JavaScript Developers in 2025 can make a huge difference in your development speed, productivity, and overall experience. Visual Studio Code and WebStorm are still the favorites among most JavaScript developers in 2025 because of their feature set, extensibility, and great support for new frameworks. But for those who care about performance and minimalism, Sublime Text and Atom are excellent alternatives. For a cloud-native or collaborative solution, Eclipse Theia presents a promising future-proof option. If you are concentrating on front-end development, Brackets is still a favorite. The Best IDEs for JavaScript Developers in 2025, ultimately, relies on your needs, the project complexity, and your workflow preferences. Experiment with a couple of these choices and find out which one works best for you. Happy coding! Read the full article
0 notes
Text
Code Like a Pro: 10 Must-Have VS Code Extensions for 2025 Visual Studio Code (VS Code) continues to dominate the development world in 2025 as one of the most flexible and feature-rich code editors available. Its real strength lies in its extensions, allowing developers to tailor their workspace for maximum productivity. In this article, we’re highlighting the 10 essential VS Code extensions for developers in 2025, curated to enhance your coding experience across web, backend, DevOps, and cloud-based development. Criteria for Selection The extensions featured in this article were chosen based on: Popularity & Ratings on the Visual Studio Code Marketplace. Practical Functionality that streamlines everyday development tasks. Community Support & Updates ensuring long-term reliability. Impact on Productivity, including faster debugging, better code quality, and easier collaboration. This list is curated for a broad range of developers: web developers, full-stack engineers, DevOps professionals, and beyond. Top 10 Essential VS Code Extensions for Developers in 2025 1. Prettier – Code Formatter Primary Functionality: Automatic code formatting. Key Features: Supports multiple languages (JavaScript, TypeScript, CSS, HTML, JSON, etc.). Enforces consistent style across your team. Integrates with Git hooks. Use Cases: Automatically format your code on save to keep it clean. Install & Use: Search for “Prettier - Code formatter” in the Extensions tab or install it via Prettier Marketplace Page. Configuration Tips: Add a .prettierrc config file for project-wide formatting rules. 2. ESLint Primary Functionality: JavaScript and TypeScript linting. Key Features: Detects syntax and style issues. Auto-fix functionality for many issues. Customizable rulesets. Use Cases: Ensure clean, consistent code in large projects. Install & Use: Install via ESLint Marketplace Page. Configuration Tips: Use eslint --init to generate your config file quickly. 3. Live Server Primary Functionality: Launch a local development server with live reload. Key Features: Auto-refreshes the browser when you save changes. Supports HTML, CSS, JavaScript. Use Cases: Ideal for frontend developers working with static files. Install & Use: Install from Live Server Marketplace Page and click "Go Live" in the status bar. Configuration Tips: Customize the default port and browser in settings.json. 4. GitLens – Git Supercharged Primary Functionality: Enhances Git capabilities in VS Code. Key Features: Inline blame annotations. History and commit navigation. Side-by-side diffs and visual file history. Use Cases: Great for tracking changes and understanding code evolution. Install & Use: Available on GitLens Marketplace Page. Configuration Tips: Enable code lens for inline author info at the top of functions. 5. Bracket Pair Colorizer 2 Primary Functionality: Colorizes matching brackets. Key Features: Nested brackets get unique colors. Enhances code readability in deeply nested code. Use Cases: Especially useful in languages like Python, JavaScript, and C++. Install & Use: Get it from the Marketplace Page. Configuration Tips: Customize color settings in settings.json for better visibility. 6. Auto Rename Tag Primary Functionality: Automatically renames matching HTML/XML tags. Key Features: Saves time editing HTML, JSX, and XML. Use Cases: Quickly update tags in large HTML files. Install & Use: Install from Auto Rename Tag Marketplace Page. Configuration Tips: Works seamlessly with HTML and JSX files out of the box. 7. Code Spell Checker Primary Functionality: Highlights spelling errors in code comments, strings, and documentation. Key Features: Multi-language support. Personal dictionary feature.
Use Cases: Prevent embarrassing typos in documentation and comments. Install & Use: Find it on the Marketplace Page. Configuration Tips: Add common project terms to .cspell.json. 8. Docker Primary Functionality: Manage Docker containers, images, and registries. Key Features: Build and run containers directly from VS Code. Visual UI for managing Docker assets. Use Cases: Perfect for DevOps and containerized development. Install & Use: Get it via the Docker Extension Marketplace Page. Configuration Tips: Integrate with Docker Compose for advanced workflows. 9. Remote – SSH Primary Functionality: Develop on remote machines over SSH. Key Features: Seamlessly code on remote Linux servers. Works with local VS Code UI. Use Cases: Great for working with cloud-based dev environments. Install & Use: Install from Remote - SSH Marketplace Page. Configuration Tips: Store SSH targets in ~/.ssh/config for quick access. 10. IntelliSense for Specific Languages (e.g., Python, Java, C++) Primary Functionality: Smart code completions based on language semantics. Key Features: Offers autocompletion, method suggestions, and parameter hints. Integrates with language servers (e.g., PyLance for Python). Use Cases: Enhances coding experience for language-specific tasks. Install & Use: Example: Python Extension, C++ Extension. Configuration Tips: Enable IntelliSense features like auto-imports in settings.json. Benefits of Using VS Code Extensions VS Code extensions offer numerous benefits, including: Increased Productivity: Automate repetitive tasks and get more done in less time. Improved Code Quality: Catch errors and enforce coding standards with linters and formatters. Streamlined Workflows: Integrate with tools like Git, Docker, and SSH directly in your editor. Enhanced Collaboration: Consistent formatting and intelligent annotations improve team workflows. Staying Updated with Extensions To keep your extensions updated: Go to the Extensions view, and click the "Update" button if visible. Use Ctrl+Shift+P → "Extensions: Check for Updates". Explore trending extensions from the VS Code Marketplace. Conclusion With the right VS Code extensions, your development environment becomes more powerful, responsive, and tailored to your workflow. The 10 extensions listed above are tried-and-tested tools that can dramatically boost your coding productivity in 2024. Explore, experiment, and customize your setup to match your development style. And don't forget to share your favorite VS Code extensions with the developer community! Suggested External Links: VS Code Marketplace Official VS Code Documentation ✅ Note: All extensions listed are actively maintained and compatible with the latest VS Code 2025 version.
0 notes
Text
I despise dotnet with all my heart. Literally nothing works ever. IDE full of ghost errors, basic http calls don't work because ??????, no console log, can't even read a local JSON file, Microsoft discontinued Visual Studio for Mac, build breaks for quite literally no reason and you have to rebuild the entire app extremely simple code pasted from StackOverFlow causes errors.
I miss JavaScript.
0 notes
Text
Show how to extend ADF capabilities with serverless Azure Functions.
Extending Azure Data Factory (ADF) Capabilities with Serverless Azure Functions
Azure Data Factory (ADF) is a powerful data integration service, but sometimes you need additional logic beyond its built-in activities. This is where serverless Azure Functions come in.
By integrating Azure Functions with ADF, you can extend its capabilities to handle complex transformations, custom data processing, and external system interactions.
1. Why Use Azure Functions with ADF?
ADF provides built-in activities for data movement and transformation, but some scenarios require custom processing, such as: ✅ Custom Data Transformations — Processing JSON, XML, or proprietary data formats. ✅ Calling External APIs — Fetching data from web services or third-party APIs. ✅ Triggering External Workflows — Sending notifications or integrating with other Azure services. ✅ Performing Complex Validations — Running business logic before inserting data into a database.
2. Setting Up an Azure Function for ADF
Step 1: Create an Azure Function
1️⃣ Navigate to the Azure Portal → Create a Function App. 2️⃣ Choose Runtime Stack (e.g., Python, C#, Java, Node.js). 3️⃣ Deploy the function using Azure CLI, Visual Studio Code, or GitHub Actions.
Step 2: Write a Sample Azure Function
Here’s an example of an HTTP-triggered Azure Function in Python that transforms JSON data before loading it into a database.import json import azure.functions as funcdef main(req: func.HttpRequest) -> func.HttpResponse: data = req.get_json() # Example: Convert all values to uppercase transformed_data = {key: value.upper() for key, value in data.items()} return func.HttpResponse(json.dumps(transformed_data), mimetype="application/json")
Step 3: Deploy and Obtain the Function URL
Once deployed, copy the Function URL for integration with ADF.
3. Integrating Azure Function with ADF
Step 4: Create an ADF Pipeline
1️⃣ Go to Azure Data Factory → Create a new Pipeline. 2️⃣ Add a Web Activity to call the Azure Function. 3️⃣ Configure the Web Activity:
Method: POST
URL: Paste the Function App URL
Headers: { "Content-Type": "application/json" }
Body: JSON payload required by the function
Step 5: Process the Function Response
Use Data Flow or Copy Activity to store transformed data in Azure Blob Storage, SQL Database, or another destination.
4. Example Use Cases
✅ Dynamic Filename Generation — Generate filenames dynamically before loading files into Azure Blob. ✅ Data Validation Rules — Validate input records before processing in ADF. ✅ Calling Third-Party APIs — Fetch real-time stock prices, weather data, or other external information. ✅ Triggering Notifications — Send alerts via email or Microsoft Teams after data processing.
5. Monitoring and Scaling
Use Application Insights for logging and monitoring function execution.
Scale automatically with consumption-based pricing, reducing infrastructure costs.
Conclusion
By integrating Azure Functions with ADF, you can enhance its capabilities, automate workflows, and handle complex data transformations efficiently.
WEBSITE: https://www.ficusoft.in/azure-data-factory-training-in-chennai/
0 notes
Text
Learn Full Stack Development with Spring Boot and Angular
Full stack development is a powerful skill, enabling developers to create seamless and scalable applications by integrating front-end and back-end technologies. Combining Spring Boot for back-end development with Angular for the front-end provides a robust framework for building modern web applications. This guide will walk you through learning full stack development with these two technologies.
Why Choose Spring Boot and Angular?
Spring Boot
A Java-based framework that simplifies the creation of production-ready applications.
Provides built-in configurations to reduce boilerplate code.
Offers excellent support for REST APIs and database management.
Angular
A TypeScript-based front-end framework by Google.
Enables the development of dynamic, single-page applications (SPAs).
Offers features like two-way data binding, dependency injection, and a component-based architecture.
By integrating Spring Boot and Angular, you can create full stack applications that are efficient, scalable, and maintainable.
Prerequisites
Before diving into Spring Boot and Angular, ensure you have a basic understanding of:
Java and Object-Oriented Programming (OOP) concepts.
TypeScript and JavaScript fundamentals.
HTML, CSS, and basic front-end development.
Familiarity with RESTful APIs and database concepts.
Setting Up Your Development Environment
For Spring Boot
Install Java Development Kit (JDK).
Set up an Integrated Development Environment (IDE), such as IntelliJ IDEA or Eclipse.
Add Maven or Gradle for dependency management.
Use Spring Initializr to bootstrap your Spring Boot project.
For Angular
Install Node.js and npm (Node Package Manager).
Install the Angular CLI using the command: npm install -g @angular/cli
Set up a code editor like Visual Studio Code.
Key Concepts to Master
Back-End with Spring Boot
Creating REST APIs
Use annotations like @RestController, @RequestMapping, and @PostMapping.
Implement services and controllers to handle business logic.
Database Integration
Use Spring Data JPA with Hibernate for ORM (Object-Relational Mapping).
Work with relational databases like MySQL or PostgreSQL.
Security
Implement authentication and authorization with Spring Security.
Use JWT (JSON Web Tokens) for secure communication.
Testing
Write unit tests with JUnit and integration tests using MockMvc.
Front-End with Angular
Component-Based Architecture
Learn to create reusable components with Angular CLI.
Manage application state and communication between components.
Routing and Navigation
Use the Angular Router to create SPAs with multiple views.
HTTP Client
Communicate with back-end APIs using Angular’s HttpClientModule.
Forms and Validation
Implement reactive forms and template-driven forms.
Validate user inputs effectively.
Integrating Spring Boot and Angular
Set Up Cross-Origin Resource Sharing (CORS)
Configure Spring Boot to allow requests from the Angular front-end.
Connect Front-End and Back-End
Use Angular’s HttpClient to send requests to Spring Boot endpoints.
Serve Angular from Spring Boot
Build the Angular project and place the output in the Spring Boot static directory.
Deploy the Application
Use tools like Docker to containerize the application for deployment.
Fullstack course in chennai
Fullstack development course in chennai
Fullstack training in chennai

0 notes
Text
JavaScript Node.js PowerShell JSON Repeat
Lately, I've taken a lot of time to reacquaint myself with JavaScript usage in Node.js. Specifically, I'm learning all the basic things I enjoy doing in PowerShell: File manipulation (list, read, write) and data manipulation (parse, extract, interpret, summarize).
Specifically, my favorite thing is to see something of interest on a website and/or analyze a website's requests in the Network tab of DevTools (CTRL+SHIFT+I). It has to be something useful. Such things can be scraped for data I might want. The way I do that is in the Network tab of DevTools (Chrome, MS Edge). Looking at a request, I can right click and get the PowerShell (or other code) that would give me that exact same information in Windows Terminal. Then, I typically do an ad-hoc script to get what I want.
Current Web Scrape++ Project
The project that has my interest at the moment is one where I'm taking all the text of a copyrighted version of the Bible, then using DOM queries and JavaScript to get just the verse numbers and verse text per chapter from the HTML. It sounds as complicated as it is, but it's the kind of thing I do for fun.
Node.js comes into play when I want to loop through all the HTML I've pulled and sanitized. The sanitization wasn't easy. I kept only the HTML with actual Bible text - which reduced the HTML payload to less than 2% its original size. That part was in PowerShell and Visual Studio Code. But I digress.
Using the Console of DevTools, I already have the JavaScript I'll need to pull what I want from the HTML file data into an array of "verse" objects, which I can then easily translate to JSON and write out.
Next, my goal is to take the data, store it as JSON files, and then manipulate it with PowerShell. For instance, I wonder what it looks like if I replace the word "Lord" with "Earl" or "Duke". As silly as that sounds, that's the entire modus operandi for my project, which has been maybe as much as 6 to 8 hours. The rest probably won't take that long, but each step has to be pursued with the smallest steps I can think to make. (There's no use looping 1189 chapters / files of HTML text to get erroneous stuff, so I go small and then large.)
2 notes
·
View notes
Text
VeryUtils JavaScript Excel Editor Source Code License for Web Developers
VeryUtils JavaScript Excel Editor Source Code License for Web Developers.
✅ JavaScript Spreadsheet: A Comprehensive, Flexible Excel Editor The VeryUtils JavaScript Spreadsheet is a powerful and versatile JavaScript Excel Editor, designed to provide web developers with seamless data analysis and visualization capabilities, akin to those found in Microsoft Excel. This feature-rich tool ensures compatibility with Microsoft Excel file formats, delivering a highly intuitive user interface that simplifies complex data management tasks.
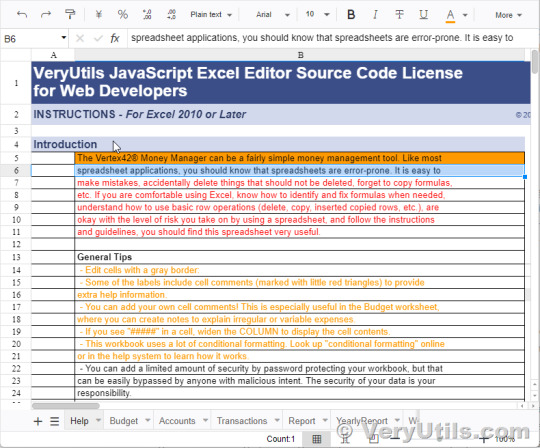
✅ Overview The VeryUtils JavaScript Spreadsheet is a robust control for organizing and analyzing data in a tabular format. It offers all the essential Excel features, including data binding, selection, editing, formatting, resizing, sorting, and both importing and exporting Excel documents. Whether you're building a simple data entry form or a complex data analysis tool, this JavaScript Spreadsheet makes it easy to deliver a high-performance, user-friendly experience.
✅ Why Choose the VeryUtils JavaScript Spreadsheet? High Performance: Optimized for handling large datasets, the JavaScript Spreadsheet is designed to load massive amounts of data efficiently. With row and column virtualization, users can view and interact with data on demand, ensuring smooth performance even with extensive datasets.
Seamless Data Binding: The JavaScript Spreadsheet supports seamless data binding with various local and remote data sources such as JSON, OData, WCF, and RESTful web services. This flexibility is made possible through the integrated data manager, allowing developers to connect and display data effortlessly.
Hassle-Free Formatting: Formatting cells and numbers in the JavaScript Spreadsheet is straightforward, with support for conditional formatting to highlight specific data ranges based on custom conditions. This feature enhances data readability and analysis, making it easier to identify trends and outliers.
Transform Data into Charts: The built-in chart feature allows users to convert spreadsheet data into visually appealing charts, providing an intuitive way to understand and present datasets.
Wide Range of Built-In Formulas: The JavaScript Spreadsheet comes with a comprehensive library of formulas, including cross-sheet references. The built-in calculation engine ensures accurate and efficient formula computations, making it easy to perform complex calculations within your application.
Customizable Themes: With a variety of built-in themes such as Fluent, Tailwind CSS, Material, and Fabric, the JavaScript Spreadsheet offers a modern and attractive design. Developers can further customize these themes using the online Theme Studio tool to match their application's look and feel.
Globalization and Localization: The JavaScript Spreadsheet supports globalization and localization, allowing users to format dates, currency, and numbers according to their locale. This feature ensures that your application can cater to a global audience.
✅ Interactive Features Clipboard Operations: Just like in Microsoft Excel, the JavaScript Spreadsheet supports cut, copy, and paste operations. Users can choose to paste values or formulas with or without formatting in a new range, enhancing the ease of data manipulation.
Undo and Redo: The undo and redo feature allows users to revert or reapply changes within the spreadsheet. Developers can customize the limit of these operations to suit the application's needs.
Context Menu: A context menu appears when a cell, row header, column header, or sheet tab is right-clicked, improving user interaction and making the JavaScript Spreadsheet more intuitive to use.
Cell Comments (Notes): The component provides options to add, edit, and delete cell comments, making it easier to annotate and collaborate on data within the spreadsheet.
Resize and Autofit: The resize and autofit features help users adjust row heights and column widths, ensuring that data is displayed neatly and efficiently.
Smooth Scrolling: Even with large datasets, the JavaScript Spreadsheet offers a smooth scrolling experience, enhancing usability and ensuring that users can navigate through their data effortlessly.
✅ Open and Save Capabilities Excel and CSV Import: The JavaScript Spreadsheet supports importing Excel documents (.xlsx, .xls) and CSV files, ensuring data accuracy, styles, and formats are preserved during the import process.
Excel and CSV Export: Users can easily export data from the JavaScript Spreadsheet to Excel or CSV formats, maintaining data accuracy, styles, and formats, making it easy to share and analyze data outside the application.
✅ Accessibility Keyboard Navigation: The JavaScript Spreadsheet ensures that every cell is accessible via keyboard commands, supporting major features like selection, clipboard, and editing. This keyboard accessibility is crucial for creating highly accessible applications.
Screen Reader Support: With complete WAI-ARIA accessibility support, the JavaScript Spreadsheet offers high-contrast visuals and valid UI descriptions, ensuring that visually impaired users can access the spreadsheet using assistive technologies like screen readers.
Right-to-Left (RTL) Support: The right-to-left rendering option enhances the user experience and accessibility for RTL languages, allowing developers to cater to a broader audience.
✅ Additional Features Touch-Friendly and Responsive: The JavaScript Spreadsheet is optimized for touch gestures, enabling users to swipe through sheets on mobile devices. Its responsive design ensures a consistent user experience across mobile phones, tablets, and desktop devices.
Developer-Friendly APIs: The Spreadsheet's rich set of client-side APIs allows developers to customize the UI and control its behavior according to user requirements, making it a highly adaptable component.
Print Functionality: The JavaScript Spreadsheet includes printing capabilities, allowing users to print single or multiple sheets directly from the application, providing a convenient way to produce hard copies of data.
The VeryUtils JavaScript Excel Editor is an all-in-one solution for web developers looking to implement comprehensive spreadsheet functionality in their applications. With its high performance, extensive feature set, and developer-friendly tools, it is the ideal choice for building powerful, data-driven web applications.
0 notes
Text
Part 4: How to use EF Core with MongoDb in Blazor Server Web Application
In part 4 of the series, I'm going to show you how to use EF Core with MongoDb in Blazor Server Web Application.
Articles in this series:
Part 1: Getting started with Blazor Server Web App Development using .NET 8
Part 2: How to implement Microsoft Entra ID Authentication in Blazor Server Web App in .NET 8
Part 3: How to implement Multilanguage UI in Blazor Server Web App in .NET 8
Part 4: How to use EF Core with MongoDb in Blazor Server Web Application
Part 5: How to show Dashboard with Radzen Bar and Pie Chart controls in in Blazor Server Web App
Part 6: How to support Authorization in Blazor server web app when using Microsoft Entra ID authentication
Part 7: How to implement Radzen Grid Control with dynamic paging, filtering, shorting in in Blazor Server Web App
Part 8: How to implement Data Entry form in Blazor server web app
Part 9: How to use SignalR to show real time updates in Blazor server web app
Entity Framework Core (EF Core) is a popular Object-Relational Mapper (ORM) framework for .NET applications. While primarily designed for relational databases, it has expanded its capabilities to support NoSQL databases, including MongoDB. This article will guide you through the process of using EF Core with MongoDB in your .NET 8 projects
Introduction
Before diving into the code, it's crucial to understand the nuances of using EF Core with MongoDB. Unlike relational databases, MongoDB is a NoSQL database, meaning it doesn't adhere to the traditional table-row structure. This introduces certain limitations and differences in how EF Core operates with MongoDB compared to relational databases.
In Part 1 of this series, I've explained the development environment setup for this article, that I will repeat here for the users who have not gone through it.
Before we start
In order to follow along with this articles, you will need:
.NET 8 SDK and .NET 8 Runtime installation
If you are planning to use Visual Studio 2022, make sure you have all latest updates installed (v17.8.2)
Install MongoDb Community Server, MongoDb Compass, and Mongodb version of Northwind database (Covered in this blog)
You may need Microsoft Azure (trial will also work) to setup Entra ID App in Azure and configure it to use
If you are fan of command line tools or want to know more about the tooling, see ASP.NET Core Blazor Tooling
How to setup MongoDB for development on windows
If you are not familiar with setting up MongoDB for development on windows, here is a quick walkthrough of what you will need:
Go to MongoDB download center and download MongoDB Community Server MSI package and install.
Next you will need MongoDB compass MSI and install it. You will need this tool to connect with your MongoDB Community Server and do the database administration related activities. If you are familiar with Microsoft SQL Server world, MongoDB compass is like SQL Server Management Studio of MongoDB world.
Next, download MongoDB Command line Database Tool which we will need to import an existing sample database.
We will be using a sample existing database called Northwind that I've downloaded from here
Import Northwind Mongodb Database
Open MongoDB Compass and connect to localhost:27017 which is a default port when you install MongoDB Server on windows.
Click on the databases in the left navigation and create a new database with name northwind and collection sample.
Go to github repository here in your browser, click on code in the top right and then download zip menu to download the zip file.
Extract MongoDB command line database tools zip file
Open mongo-import.sh inside the root folder and change the mongoimport keyword with the actual full path of mongoimport.exe that is part of MongoDb command line database tools zip file. The resulting line will look like below: "C:\temp\import\mongodb-database-tools\bin\mongoimport" -d "$1" -c "$collection" --type json --file "$file"
Open command prompt and go to root folder where you have mongo-import.sh file and run command ./mongo-import.sh northwind
If everything is done correctly, you will see console message that displays the json file name and the number of documents imported.
If you switch back to MongoDB Compass, select northwind database and click on the refresh at the top right corner of the sidebar, you will see collections like customers, employees etc.
We are going to use this sample database to build something interesting that makes sense and has a real-life use cases instead of just a sample table with a few fields.
Setting Up the Project
Create ASP.NET Core Blazor Server Web Application
Start visual studio and select create new project.
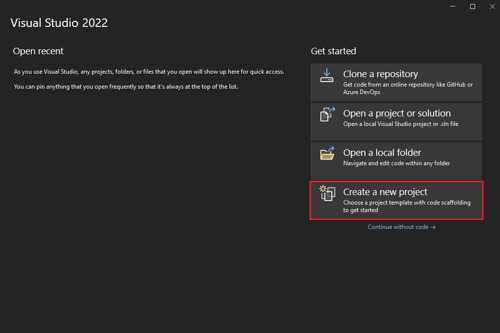
In the Create a new project window, type Blazor on the search box and hit Enter.
Select the Blazor Web App template and select Next.

In the Configure your new project window, enter BlazorAppPart4 as the project name and select Next.
In the Additional information window, select .NET 8.0 (Long Term Support) in the Framework drop-down if not already selected and click the Create button.
Build and run the application once so that you have your application url that you can copy from the browser and save it for later.
Add the nuget package
Open Tools > nuget package manager > Nuget package manager console and type following command:
install-package MongoDb.EntityFrameworkCore
view rawPackageManager.ps hosted with ❤ by GitHub
This will install all the necessary files needed for accessing northwind database that we created in MongoDb using Entity Framework Core Code First.
Add Model for Customer table
In the example northwind database, there is already a customers table with some data in it. We are going to display the first name and last name of the customer. So, let's create a folder in the root called Model and add new file called Customer.cs that contains following class definition.
using MongoDB.Bson;
using MongoDB.Bson.Serialization.Attributes;
using MongoDB.EntityFrameworkCore;
namespace BlazorAppPart4.Model
{
[Collection("customers")]
public class Customer
{
[BsonId]
public int Id { get; set; }
[BsonElement("last_name")]
public string? LastName { get; set; }
[BsonElement("first_name")]
public string? FirstName { get; set; } }}
view rawCustomer.cs hosted with ❤ by GitHub
Create Entity Framework Core AppDbContext class
Next, we are going to create a new class called AppDbContext that inherits from DbContext class of entity framework core. Add another cs file called AppDbContext.cs in the models folder and paste following code.
using Microsoft.EntityFrameworkCore;
namespace BlazorAppPart4.Model
{
public class AppDbContext: DbContext
{
public DbSet<Customer> Customers { get; init; }
public AppDbContext(DbContextOptions options) :
base(options)
{
}
protected override void OnModelCreating(ModelBuilder modelBuilder)
{
base.OnModelCreating(modelBuilder);
modelBuilder.Entity<Customer>();
}
}
}
view rawAppDbContext.cs hosted with ❤ by GitHub
Create Customer Repository
Next, we want to use repository pattern to ensure data access code is separate and testable. Add another folder in the root of your project called Repositories and add a new cs file called ICustomerRepository.cs with below code:
using BlazorAppPart4.Model;
namespace BlazorAppPart4.Repositories
{
public interface ICustomerRepository
{
Task<List<Customer>> GetAllAsync();
}
}
view rawICustomerRepository.cs hosted with ❤ by GitHub
Once you are done, add 1 more file called CustomerRepository.cs with below code:
using BlazorAppPart4.Model;
using Microsoft.EntityFrameworkCore;
namespace BlazorAppPart4.Repositories
{
public class CustomerRepository : ICustomerRepository
{
private readonly AppDbContext _db;
public CustomerRepository(AppDbContext db)
{
_db = db;
}
public async Task<List<Customer>> GetAllAsync()
{
return await _db.Customers.ToListAsync();
}
}
}
view rawCustomerRepository.cs hosted with ❤ by GitHub
Create AppSettings.json settings
The AppDbContext context will require MongoDb connectionstring and database name. It is recommended to create an application wide setting section in the AppSettings.json. Open your AppSettings.json and 'AppConfig' section from below. I'm showing my full AppSettings.json file for your reference:
{
"AppConfig": {
"Database": {
"ConnectionString": "mongodb://localhost:27017",
"DatabaseName": "northwind"
}
},
"Logging": {
"LogLevel": {
"Default": "Information",
"Microsoft.AspNetCore": "Warning"
}
},
"AllowedHosts": "*"
}
view rawAppSettings.json hosted with ❤ by GitHub
Create AppConfig class for settings
Add AppConfig.cs class in your project and then add below code in the class definition:
namespace BlazorAppPart4
{
public class AppConfig
{
public AppConfig() {
Database = new DbConfig();
}
public DbConfig Database { get; set; }
}
public class DbConfig { public string? ConnectionString { get; set; }
public string? DatabaseName { get; set;
}
}
}
view rawAppConfig.cs hosted with ❤ by GitHub
Configure Dependencies in Program.cs
Next, we want to configure dependency injection so that Repository and AppDbContext classes that we created in our project can be injected where required. Here is my Program.cs:
using BlazorAppPart4;
using BlazorAppPart4.Components;
using BlazorAppPart4.Model;
using BlazorAppPart4.Repositories;
using Microsoft.EntityFrameworkCore;
var builder = WebApplication.CreateBuilder(args);
// Add services to the container.
builder.Services.AddRazorComponents()
.AddInteractiveServerComponents();
var appConfig = builder.Configuration.GetSection("AppConfig").Get<AppConfig>();
if (appConfig == null)
{
throw new InvalidOperationException("Db connectionstring not found");
}
builder.Services.AddDbContext<AppDbContext>(options =>
options.UseMongoDB(appConfig.Database.ConnectionString ?? "", appConfig.Database.DatabaseName ?? ""));
builder.Services.AddTransient<ICustomerRepository, CustomerRepository>();
var app = builder.Build();
// Configure the HTTP request pipeline.
f (!app.Environment.IsDevelopment())
{
app.UseExceptionHandler("/Error", createScopeForErrors: true);
// The default HSTS value is 30 days. You may want to change this for production scenarios, see https://aka.ms/aspnetcore-hsts. app.UseHsts();
}
app.UseHttpsRedirection();
app.UseStaticFiles()
;app.UseAntiforgery();
app.MapRazorComponents<App>()
.AddInteractiveServerRenderMode();
app.Run();
view rawProgram.cs hosted with ❤ by GitHub
Please note on line 13 above, we are reading our AppSettings.json section called AppConfig and then convert it to AppConfig class object. On line 18, we are configuring Entity Framework Core MongoDb data access connection string. On line 21, we are resolving the customer repository. The other part of the file has no changes.
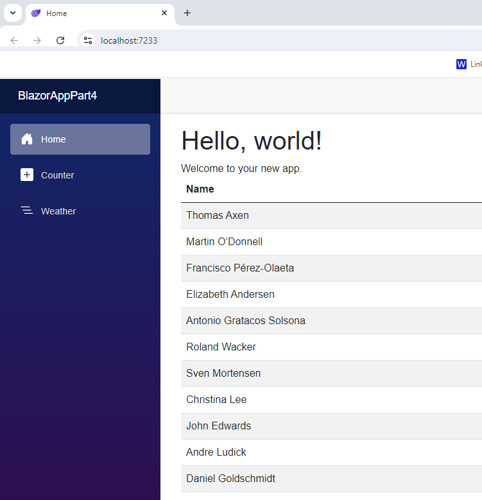
Show customers
And finally, open Components/Pages/Home.razor and replace the content of the file with below:
@page "/"
@using BlazorAppPart4.Repositories
@using BlazorAppPart4.Model
@inject ICustomerRepository customerRepo
@rendermode RenderMode.InteractiveServer
<PageTitle>Home</PageTitle>
<h1>Hello, world!</h1>
Welcome to your new app.
@if(customers.Any())
{
<table class="table table-striped table-responsive">
<thead>
<th>Name</th>
</thead>
<tbody>
@foreach (var cust in customers)
{
<tr>
<td>
@cust.FirstName @cust.LastName
</td>
</tr>
}
</tbody>
</table>
}
else{
<p>No customers found</p>
}
@code {
List<Customer> customers;
protected override async Task OnInitializedAsync()
{
customers = await customerRepo.GetAllAsync();
}
}
view rawHome.razor hosted with ❤ by GitHub
Here is the output of the whole exercise
Conclusion
In this article, we covered the step by step tutorial of How to use EF Core with MongoDb in Blazor Server Web Application of the blazor web app development series.
Ready to unlock the full potential of Blazor for your product development? Facile Technolab, top Blazor Development Company in India providing Blazor development services can help you bring your vision of product mvp to reality.
0 notes
Text
🌟 10 Must-Have Android Development Tools & Libraries That Will Revolutionize Your Coding Game! 🚀

As an Android developer, having the right set of tools and libraries can significantly enhance your productivity and the quality of your applications. In this blog post, we'll explore ten essential tools and libraries that will take your Android development to the next level.
1. Android Studio
The official Integrated Development Environment (IDE) for Android development, Android Studio is packed with features like code editing, debugging, and testing tools. With its robust IntelliJ IDEA foundation, it provides a seamless and powerful environment for building high-quality Android apps.
Key Features:
Intelligent code editor with auto-completion
Advanced code refactoring and analysis tools
Visual layout editor
Built-in emulator for testing
Support for Kotlin, Java, and C++
2. Kotlin
Kotlin is a modern, statically typed programming language that is fully interoperable with Java. It offers concise syntax, improved type inference, and enhanced null safety, making it a favorite among Android developers.
Key Benefits:
Reduced boilerplate code
Improved readability and maintainability
Fully supported by Google for Android development
3. Retrofit
Retrofit is a type-safe HTTP client for Android and Java, developed by Square. It simplifies the process of making API calls, handling responses, and parsing JSON data.
Key Features:
Easy integration with REST APIs
Supports request and response serialization
Built-in support for authentication and headers
4. Room
Room is a part of the Android Jetpack suite, providing an abstraction layer over SQLite to allow fluent database access while harnessing the full power of SQLite.
Key Features:
Simplified database operations
Compile-time verification of SQL queries
Integration with LiveData and Flow for reactive programming
5. Dagger
Dagger is a fully static, compile-time dependency injection framework for Java and Android. It helps manage complex dependency graphs in large applications.
Key Benefits:
Compile-time validation of dependencies
Reduction in boilerplate code
Improved performance with optimized generated code
6. Glide
Glide is a fast and efficient image loading library for Android. It focuses on smooth scrolling and supports fetching, decoding, and displaying video stills, images, and animated GIFs.
Key Features:
Memory and disk caching
Automatic image resizing and transformations
Simple API for loading images from various sources
7. Firebase
Firebase is a comprehensive app development platform provided by Google. It offers a suite of cloud-based tools and services to help you build high-quality apps.
Key Features:
Real-time database and Firestore for data storage
Authentication services
Analytics for tracking user behavior
Cloud messaging for push notifications
8. RxJava
RxJava is a library for composing asynchronous and event-based programs using observable sequences. It helps manage asynchronous operations in a clean and concise way.
Key Benefits:
Simplifies threading and scheduling
Composable operations for handling complex asynchronous logic
Integration with Retrofit for API calls
9. LeakCanary
LeakCanary is a memory leak detection library for Android. It automatically detects memory leaks in your app and provides detailed information to help you fix them.
Key Features:
Automatic detection and reporting of memory leaks
Easy integration and setup
Detailed leak trace to identify the source of the leak
10. Espresso
Espresso is a testing framework for Android that makes it easy to write reliable user interface tests. It provides a simple and consistent API to simulate user interactions.
Key Features:
Fast and reliable UI tests
Automatic synchronization with the UI thread
Support for writing concise and readable tests
Conclusion
Incorporating these tools and libraries into your Android development workflow will not only improve your coding efficiency but also enhance the performance and quality of your applications. Whether you're a seasoned developer or just starting, these must-have tools will revolutionize your coding game and help you build better Android apps. Happy coding! 🚀
Feel free to share your experiences with these tools or suggest any other essential tools in the comments below!
#AndroidDevelopment#CodingTools#DevLibraries#MobileDev#AndroidTips#AppDevelopment#DeveloperTools#CodeBetter#TechInnovation#ProgrammingEssentials
0 notes
Text
How BigQuery Data Canvas Makes AI-Powered Insights Easy

A Gemini feature in BigQuery, the BigQuery Studio data canvas provides a graphical interface for analysis processes and natural language prompts for finding, transforming, querying, and visualising data.
A directed acyclic graph (DAG) is used by BigQuery data canvas for analysis workflows, giving you a graphical representation of your workflow. Working with many branches of inquiry in one location and iterating on query results are both possible with BigQuery data canvas.
BigQuery data canvas
The BigQuery data canvas is intended to support you on your path from data to insights. Working with data doesn’t require technical expertise of particular products or technologies. Using natural language, BigQuery data canvas and Dataplex metadata combine to find relevant tables.
Gemini in BigQuery is used by BigQuery data canvas to locate your data, build charts, create SQL, and create data summaries.
Capabilities
BigQuery data canvas lets you do the following:
Use keyword search syntax along with Dataplex metadata to find assets such as tables, views, or materialized views.
Use natural language for basic SQL queries such as the following:
Queries that contain FROM clauses, math functions, arrays, and structs.
JOIN operations for two tables.
Visualize data by using the following types graphic types:
Bar chart
Heat map
Line graph
Pie chart
Scatter chart
Create custom visualizations by using natural language to describe what you want.
Automate data insights.
Limitations
Natural language commands might not work well with the following:
BigQuery ML
Apache Spark
Object tables
BigLake
INFORMATION_SCHEMA views
JSON
Nested and repeated fields
Complex functions and data types such as DATETIME and TIMEZONE
Data visualizations don’t work with geomap charts.
A ground-breaking data analytics tool, BigQuery data canvas, a Gemini in BigQuery feature, streamlines the whole data analysis process from data preparation and discovery to analysis, visualisation, and collaboration – all in one location, all within BigQuery. You may ask questions in both plain English and a variety of other languages about your data using the BigQuery data canvas, which makes use of natural language processing.
Because sophisticated SQL queries don’t need to be developed using this easy method, data analysis is now accessible to both technical and non-technical people. You may examine, modify, and display your BigQuery data using data canvas without ever leaving the environment in which it is stored.
This blog post provides a technical walkthrough of a real-world scenario utilising the public github_repos dataset, along with an overview of BigQuery data canvas. Over 3TB of activity from 3M+ open-source repositories are included in this dataset. We’ll look at how to respond to inquiries like:
In a year, how many commits were made to a particular repository?
In a particular year, who authored the most repositories?
Over time, how many non-authored commits were applied?
Which users, at what time, contributed to a certain file?
You’ll see how data canvas manages intricate SQL operations from your natural language prompts, such as joining tables, extracting particular data items, unnesting fields, and converting timestamps. We’ll even show you how to use just one click to create intelligent summaries and visualisations.
BigQuery data canvas quickly overview
BigQuery data canvas is mostly used for three types of tasks: finding data, generating SQL, and generating insights.Image credit to Google Cloud
Find Data
To locate data in BigQuery using a rapid keyword search or a natural language text prompt, use data canvas.
Generate SQL
Additionally, you may use the BigQuery data canvas to have SQL code written for you using natural language prompts powered by Gemini.
Create Insights
At last, use a single click to uncover insights concealed within your data! Gemini creates visualisations for you automatically so you can see the story your data is telling.
Using the BigQuery data canvas
Let’s look at an example to help you better understand the potential impact that the BigQuery data canvas can have in your company. Businesses of all kinds, from big corporations to tiny startups, can gain from having a better grasp of the productivity of their development staff. Google Cloud will demonstrate in this in-depth technical tutorial how to leverage data canvas and the public dataset github_repos to provide insightful results in a shared workspace.
You’ll learn how data canvas simplifies the creation of sophisticated SQL queries by working through this example, which demonstrates how to create joins and unnested columns, convert timestamps, extract the month and year from date fields, and more. Gemini’s features make it simple to create these queries and use natural language to examine your data with illuminating visualisations.
Please be aware that using any LLM-enabled application successfully requires strong prompt engineering abilities, just like using many of the new AI products and services available today. Many people might believe that large language models (LLMs) aren’t very excellent at producing SQL right out of the box. However, in our experience, Gemini in BigQuery via data canvas may produce sophisticated SQL queries using the context of your data corpus if you use the appropriate prompting mechanisms. It is evident that data canvas uses natural language queries to decide the ordering, grouping, sorting, record count limitation, and SQL structure.
The github_repos dataset, which is 3TB+ in size and can be found in Bigquery Public Datasets, comprises information in numerous tables regarding commits, watch counts, and other activity on 3M+ open-source projects. We want to look at the Google Cloud Platform repository for this example. As always, before you begin, make sure you have the necessary IAM permissions. In addition, make sure you have the necessary rights to access the datasets and data canvas in order to run nodes properly.
Using data canvas makes it simple to explore every table in the github_repos dataset. Here, Google Cloud evaluate schema, details, and preview data in one panel while comparing datasets side by side.Image credit to Google cloud
After choosing your dataset, you can hover over the bottom of the node to branch it to query or join it with another table. The dataset for the following transformation node is shown by arrows. For clarity, you can give each node a name when sharing the canvas. You can delete, debug, duplicate, or run all of the nodes in a series using the options in the upper right corner. Results can be downloaded, and data can be exported to Looker Studio or Sheets. In the navigation panel, you can also inspect the DAG structure, restore previous versions, and rate SQL suggestions.
Google examine four main facets of their data while examining the github_repos dataset. They will attempt to ascertain the following:
1) The total number of commitments made in a single year
2) The quantity of written repos for a specific year
3) The total number of non-authored commits that were applied throughout time
4) Determine how many user commits there have been for a specific file at a specific time.
Utilise BigQuery data canvas to simplify data analysis
It might be challenging to interpret data for a new project or use case when working with large datasets that span multiple disciplines. This procedure can be streamlined by using data canvas. Data canvas helps you work more efficiently and quickly by streamlining data analysis using natural language-based SQL creation and visualisations. It also reduces the need for repetitive queries and lets you plan automatic data refreshes.
Read more on Govindhtech.com
#BigQuery#bigquerydata#BigQuerydatacanvas#Dataplexmetadata#GeminiinBigQuery#generatingSQL#GoogleCloud#LargeLanguageModels#googlecloudplatform#datacanvas#cloudcomputing#news#technews#technology#technologynews#technologytrends#govindhtech
0 notes
Text

AWS Glue is a fully managed extract, transform, and load (ETL) service designed to make it easier for businesses to prepare and integrate data for analytics, machine learning, and application development.
It simplifies the process of combining and analyzing data from multiple sources by automating common data preparation tasks.
Key Features of AWS Glue for ETL and Data Integration:
Serverless Architecture AWS Glue is serverless, meaning there is no infrastructure to manage.
It automatically provisions the necessary resources, scales as needed, and charges only for the resources used.
ETL Automation AWS Glue provides a graphical interface and automated code generation to simplify creating and managing ETL jobs.
Developers can write their own scripts using Python or Scala, or use the Glue Studio visual interface for a no-code/low-code experience. Data Cataloging The AWS Glue Data Catalog automatically discovers, organizes, and indexes metadata about your data.
This makes it easier to locate, manage, and query datasets across a wide range of AWS and external services.
Integration with Other AWS Services AWS Glue seamlessly integrates with services like Amazon S3, Redshift, RDS, and DynamoDB.
This allows businesses to build comprehensive data pipelines using familiar AWS tools.
Support for Various Data Sources AWS Glue supports structured and semi-structured data sources, such as relational databases, JSON files, and CSV files. It can handle on-premises and cloud-based data seamlessly.
Flexible Job Scheduling Glue allows scheduling ETL jobs at regular intervals or triggering them based on events.
This flexibility ensures that your data pipelines are timely and reliable.
Support for Complex Workflows AWS Glue workflows enable orchestration of multiple ETL jobs and dependencies, helping businesses manage sophisticated data integration pipelines.
Why AWS Glue Matters for Businesses:
AWS Glue empowers businesses to:
Save time by automating data preparation tasks.
Reduce costs with its pay-as-you-go model.
Enable faster decision-making by integrating and preparing data for analytics quickly.
Simplify compliance by organizing data and metadata.
By leveraging AWS Glue, organizations can unlock the full potential of their data, driving insights and innovation with minimal operational overhead.
WEBSITE: https://www.ficusoft.in/aws-training-in-chennai/
0 notes