#which is now no longer a render option in maya
Text
back when i was learning to 3D model in autodesk maya like 9 years ago, the first personal project i did to keep me motivated was making ahab's crosshairs (ie eridan's harpoon gun) and when i finished it i was happy enough with it to post a render to deviantart
well i found the file again recently and saw how shoddy my construction was, so i went to go look for some reference pics to fix some of it only to find that my render from 2014 is apparently now one of the top google image results

#homestuck#my greatest contribution to the fandom ig lmao#i may be a lil close to revealing my actual name by posting this but oh well this will simply be unrebloggable#the deviantart acct was made in a time when i still used my real name on here so whatever#but srsly the model had so many edges and vertices that just did not line up at all. you just cant tell bc of how i lighted it#the only thing that sucks about remaking it now is that the scope texture used the car paint from mental ray#which is now no longer a render option in maya#so i have to find a new shiny material for it that looks nicely metallic#or slap some bump map texture on a phong or smthng#rose speaks
1 note
·
View note
Text
Week 8 - Digital Iteration
This week's tutorial was really interesting and entertaining. One of my personal hobbies is digital rendering (mainly in Blender), but it was really nice to go out of my comfort zone to a program I have only ever used once before. When I opened 3ds Max for the first time, I noticed how similar the interface looked to Maya. Being Autodesk programs natively, it made sense, but it was nice to have some element of familiarity.
During my year 10 and 11 high school holidays I completed a Cert IV in digital design for games and film. That coursed used Maya and Unreal Engine 4, so I had a bit of experience with the interface and principles of polygon modelling. However, 3ds max was probably one of the popular programs which I had the least experience with; so it was still a hugely informative and insightful process trying to adapt my knowledge between programs.
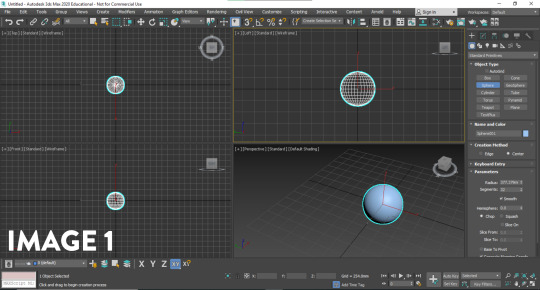
I started with the primitives menu, and imported a sphere into the workspace. I initially found myself struggling with the interface. There are a lot of options and features which are not necessary when learning the basics of a program. When starting to learn any 3d program, I often find myself spoiled for choice, and perhaps even too overwhelmed. I was very glad when the tutorial suggested hiding some superfluous menus from view, as I felt that it really cleared up the screen. After aligning the views (Image 1), I experimented with the modifiers tab.
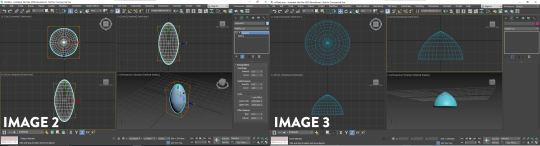
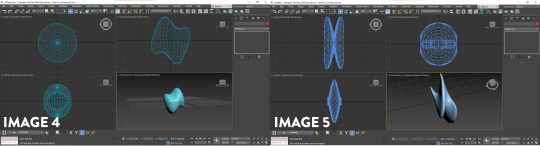
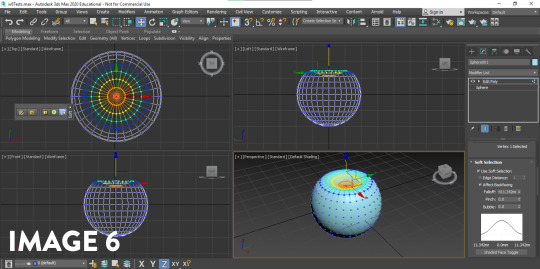
The modifiers in 3ds max were really interesting to play around with. Working with meshes can sometimes be a tedious and particular process, but it was really enjoyable creating something with no end goal in mind. I liked how using a squeeze modifier (Image 2) could generate an egg shape with the sphere primitive, and how the melt, twist and wave modifiers (Images 3, 4 and 5) could be pushed to the mesh extremes. When working with a mesh, the topology is important to the quality of the final form. As the entire object is constructed of tris and quads, the way they are situated on the model, and their resolution play an important role in what you see. For example, the more I increased the twist modifier, the more I could see the vertices sticking out of the shape. It goes to show that unless the resolution is increased, there are limitations to the modifiers usage, as they can 'break' your model.
The modifiers in 3ds Max are very different to the ones in blender, I definitely feel like in any 3D program, anything you can create in one is attainable in the other; however 3ds max has a lot of mesh deformation modifiers out of the box. Although I thought these created really interesting and abstract shapes which I certainly enjoyed, I realised that I couldn't think of many instances where I would use some of the modifiers on a real project, but I think they are really valuable for niche tasks.
My favourite part about the exercise was learning poly modelling in 3ds Max. Poly modelling is a core part of most 3d modelling programs; and the skills are usually transferrable between. There are some really fantastic modelling tools in 3ds max which make the process of modelling enjoyable. I had a look around my desk for some quick and interesting forms I could make, and started with a really simple apple using the sphere I had in the viewport. I utilised the 'soft select' (Image 6) feature to move many verts at once, to create the top and bottom crease in the apple where the stem travels. To create the stem, I used the cylinder primitive and used the taper/bend modifier to create a curved and natural form (Image 7).

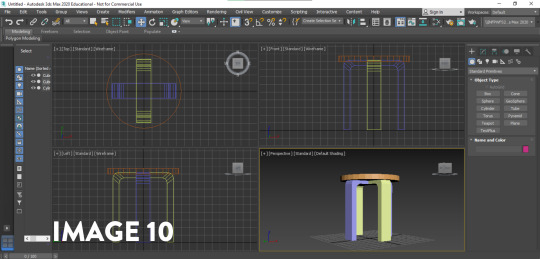
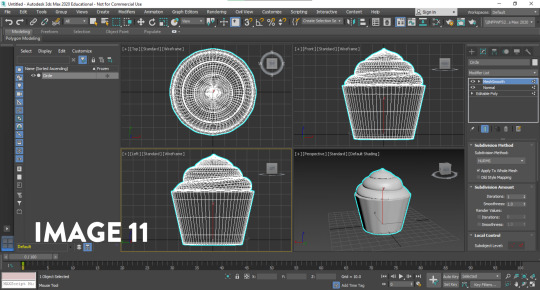
Next, I used the cylinder primitive and used the scale and extrusion feature to get the barrel of a pen. To create the tip of the pen I target welded the vertices together to get the point. I created a new cube primitive to create the clip on the pen, and extruded it (Image 8); also creating a bevelled edge to round it out slightly. Using the same techniques, I also made a stool from my room (Image 9). I really wanted to experiment with as many features as I could in these exercises, so with each 'sketch' I tried to focus on a tool I hadn't used before - as it felt like the best way to improve (Image 10). Still getting comfortable with the Poly Modelling in 3ds max, I also made a cupcake (Image 11) from the basic cylinder primitive to try and improve my modelling quality and speed; making simple extrusions, scaling the rings in, rotating them to get the icing layers. I played around with NURMS subdivision on the mesh to smooth it out, and was really happy with the results.

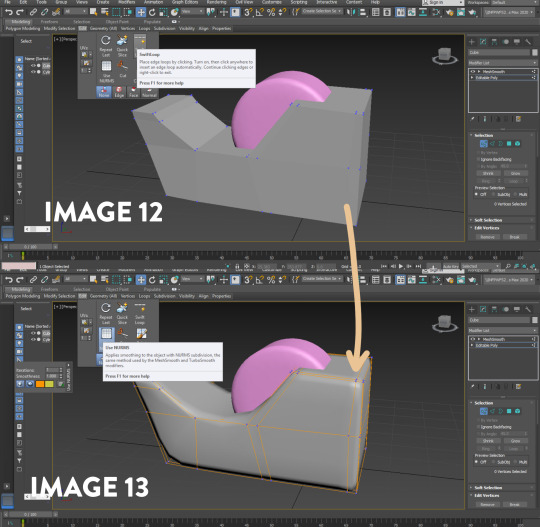
Finally, I wanted to use all the skills in conjunction, as well as using a tool which really sped up the workflow. I knew from Blender and Maya that loop cuts sped up the process, but I could not find them in 3ds max. After researching the issue on different forums, I found that it went under a different name; Swift loop Though it was very basic problem solving, it goes to show that these skills and programs have transferrable knowledge; and doing a simple search of your problem can lead to new ways of solving them. Swift loop was really useful in creating a loop cut between two parallel edges; adding more geometry for manipulation. When creating the tape dispenser, I noticed that the subdivision was rounding the model out too much, to the point where it no longer registered as a tape dispenser. So I used the swift loop feature to create loop cuts close to the bordering edges to reduce the interpolation between the curve (Images 12 and 13). This taught me that the subdivision modifiers aren't just something that can be added to a model to instantly make it look better; they require some manipulation and editing to get the desired effect.
I found 3ds max challenging but really interesting and insightful. As I am familiar with other programs of similar nature, it took me a while to get out of my own head; using shortcuts and hotkeys from the other programs and wondering why it wouldn't work. Overall, I think that its really rewarding to pick up another program, as it expands my skills and approach to modelling. If I were to redo this activity, I think I would try and make some more complex forms now that I have gotten more comfortable with 3ds Max; perhaps moving onto a product or more complex object. I am really looking forward to creating the bottle concepts in 3ds max next week, as I believe it will be another chance to improve my skills.
Thoughts on the Pre-Class activity - Andrew Simpson case Study
I believe that digital modelling and physical models have a closer relationship than people think. Form and Materials are an important part of perception, but there are qualities of both physical and digital modelling provide when compared to one another. Digital models allow for material iteration, simulation and rendering. Physical models allow for the physical contact, and interaction with the end user. When Andrew discusses the importance of materiality, it drives home the necessity of experimentation and versatility in design. The idea of new materials informed new processes in his decision making process, and it lead to different material types being explored.
I found Andrew's discussion on model fidelity really insightful. I perceive high and low fidelity models to represent how close the model is to a refined product. Whilst a high fidelity model would be fantastic to show clients or to use in renders, low fidelity models are required to quickly iterate on concepts and ideas to test the boundaries of the product e.g. material, form, colour. High fidelity models are more refined, and have more time put into them, to explore how the end product will feel for the user.
High fidelity and low fidelity models are both important, and when Andrew talks about the non-uniform relationship of the two in his process, it shows that design is not a linear process; rather a circular one driven by prototyping and feedback. If a high fidelity model still doesn't feel right, faster, low fidelity models can be made testing a range of new ideas; to be taken through the process of design once again.
9 notes
·
View notes
Text
BJJ Floating Mat System DIY Walkthrough
I’m going to share the process of building a floating mat system, from design to sourcing materials and build. I figured I try to take out as much guess work since I had no guidance and had to learn on my own. There were several pieces of the puzzle that came as some small surprises, but hopefully this helps the next person who decided to make the leap to a better mat system. I’m unsure of the process for other countries, but in my case I will detail the process for importing goods into New Zealand – it may differ in other places. I’ll include links to the factory for all the specific mats I ordered in the post.
Towards the end of Sept 2020, just after the Covid-19 lockdown ended in New Zealand, I had an opportunity to expand my BJJ club and sub-lease space in our existing gym we ran out of. I had an elaborate vision of a floating mat system underneath some juicy dollamur mats for use to train in.
I was introduced to the floating mat system years ago when I lived in Los Angeles on a visit to Kron Gracie’s academy in Culver City. I had worked down the street and wanted to congratulate him and have a look around. My friend Ollie Barre worked there and he showed me around, even Kron said hello and mentioned the spring loaded floating mat system to me.
It was about 1/2 a meter high with actual springs under the floor with plywood on top and tatame on top of the ply. It was amazing!
Image courtesy of Kron Gracie Academy Linkedin page
I knew that’s what I wanted but I didn’t have the budget for springs, so I explored other options. After a few searches I came across a couple videos:
How to build the ultimate spring subfloor for your Judo, Jujitsu and Wrestling mats
&
How to build a Bjj subfloor
Foam and ply – sweet I can do that! Let’s measure the space:
9.7m x 4m – pretty decent space!
After the measurement I needed to visualize the build. I knew I had to see it and make something for others to see the vision I had, so I modeled everything out in Maya and made a 3D render:
Concept render
I used real world units to keep everything to spec, that means the units I use in the 3D application are accurate to and equal to the units I would use on the actual build. The sub-floor would be the most difficult thing to explain to a builder, so I did a couple renders of what the underbelly would look like:
14 sheets of plywood with sub-floor foam block layout
Single sheet plywood foam block layout
I began compiling a list of materials I would need:
15 sheets of 2440mm x 1200mm x 12mm non-structural plywood
6 sheets of closed cell polyethylene foam
tons of liquid nail
timber for boxing in – unsure of spec at that time
5cm thick floor mats, tatame finish
21 wall mats @ 183cm x 122cm x 5cm
Living in New Zealand is awesome BUT sourcing some of these materials was going to be difficult and super expensive. I started calling around and emailing different foam companies and dollamur reps. I was getting quotes just for the dollamur mats of $5-6k NZD alone! I found a company that imports foam and was quoted $500/sheet of PE foam! I didn’t even bother looking at the wall mats – it would have cost me closer to 10K to get everything from NZ companies, so I decided to cut out the middle man and source materials myself.
Of course this lead me to Alibaba.com – the Chinese based website that gives people like myself access to factories where these things are typically made. After a few days of searching and multiple emails, I found a factory – Quindao Sanhong Plastic Co, LTD – that appeared to manufacture everything I needed – floor mats, wall mats and PE foam sheets.
It was my 1st time using Alibaba and to be honest I was SUPER dubious. I would be dealing with people outside of the country I lived in which carries a larger sense of the unknown.
I ended up chatting with a service person named Emily. She was incredibly helpful and thorough and made sure she understood what I required. I sent her an absurd amount of photos, videos, all of my renderings of what I had in mind, the measurements and other specs. She talked me into getting a more dense mat (40kg/cbm – a new unit of measurement I was completely unfamiliar with) for both the floor mats and sub-floor mats.
Originally I intended to have that pool noodle type foam, but Emily urged me not to go that route and go for something thicker – the cost was negligible so I went for it. Trusting someone you’ve never met overseas was hard, but I figured I needed to roll the dice.
The floor mat specs I went with were 3 rolls of 9.7m x 1.33m x 5cm with a tatame finish
Link to mats here
Floor mats
Next were the wall mats. I needed 21 wall mats @ 183cm x 122cm x 5cm
Link to mats here
Wall mats
Next was the closed cell sub-floor PE foam. Quindao made 2m x 1m sheets of this stuff, and I needed 6 sheets total to accommodate my space. These were roughly $40USD / sheet so if I got it wrong I figured it wouldn’t be TOO much of a loss.
Link to foam sheets here
This is the pool noodle foam I was expecting, but not what I ended up receiving
Emily was very patient and understand of my reservations in dealing with an overseas factory. After a few more emails and messages I pulled the trigger and made the order. At this stage Emily walked me through the process and gave me a general idea of several unknown import costs. Her estimate on the NZ import tax was very close, but she did inform me there would be other costs she had no way of providing an estimate for.
I forgot to mention that a couple months prior to ordering I had already setup a legit business in anticipation of building my dream in the future. Emily had requested an NZ Import ID so fortunately I was already qualified to apply for a NZ business import ID through NZ Customs. This cost me about $200 to register my business and get an import ID.
After providing all of my information, she came back with a total cost and import tax estimate I would pay on arrival. Freight costs from China to NZ were SUPER cheap – about $80NZD to ship 700kg worth of stuff, so that was fine.
I paid the deposit so the manufacturing could get under way. Once they were finished making all of the mats/materials I would then pay in full prior to loading onto the ship. It took them about 4 weeks to finish everything. At that time there was one final check through that they had all of my correct information and import ID and that was that. The order started on 11/02/2020 and was shipped on 12/08/2020
Because of Covid, there were huge delays with international shipping and unloading, so the wait time was longer than usual. It was supposed to take 40 days but ended up being much longer than that. The mats arrived in NZ the 1st week of February 2021 – phew at least they made it safe!
This is where a lot of the surprises and unknowns came into play. I received an email from some guy at a freight company saying my mats had arrived and I needed to send all of the arrival documents to my broker
Evidently I had to obtain an import broker to forward all of the documents to, which no one makes any mention of. But here’s where things get a little…rackety. I ended up going with EasyFreight brokers who charged me about $200 for their services. They emailed documents from NZ Customs where I then had to pay around $500NZD for the Import Tax.
Once the Import Tax was paid, my mats could then be released BUT…the mysterious freight company who initially emailed me now says I need to pay them $1900NZD before they ship my mats to Wellington. This fee was for unloading the mats from the ship and onto the dock and storing them in a warehouse until all of the documents cleared. This almost doubled the cost of the mats I ordered and by now the total cost was getting close to what I was getting quotes from NZ based companies.
I paid the invoice and they put my mats onto a truck to be shipped down to Wellington to ANOTHER freight company – not directly to me for whatever dumb reason. I contacted the new freight company, had a bit of confusion and back and forth but eventually I ended up having to pay them another $250NZD to ship my mats to the gym. What a racketeering outfit huh?
They delivered the mats and I immediately started ripping up the packaging to have a look at my new goods. I have to say that what I purchased exceeded my expectations. The floor mats where BETTER than what I expected, the wall mats were BETTER than what I anticipated and the sub-floor foam ended up being more closer to memory foam than pool noodle foam. Holy hell we’re gonna have some sweet mats to roll on!
To the build!
After a trip to Bunnings to pickup timber, liquid nail and a few other things, that tallied up to over $1000NZD we were on our way.
The 1st order of business was to cut the foam sheets into blocks. I had originally calculated 7cm x 10cm x 10 cm but when we laid everything out, we’d only be using 2 sheets of foam and would have had to cut relatively tiny blocks. So instead we went with 20cm x 20cm x 10cm blocks – much easier to cut and deal with and even then we had a ton left over (which we made use of by the end of it.
Foam blocks
I worked out the numbers and we did 3 x 5 rows of blocks per plywood sheet
1st row of 8 pieces of 2440mm x 1200mm x 12mm plywood with 15 foam blocks liquid nailed to ply
We had all of the blocks glued to the ply and realized we had HEAPS left over, so we decided to re-jig some things around and use the extra blocks in the spaces inbetween sheets of ply on the seams and corners. This ended up adding an extra level of stability between the ply and would be less likely to damage the mats on top.
Using extra blocks underneath ply seams
Once all the plywood was laid out and the liquid nail given a bit of time to cure, we had to then box everything in to prevent sliding. This required a concrete drill/concrete bit, about 10 dynabolts (basically concrete bolts with anchors), some timber 2 x 4s, more liquid nail and a bit of good old fashioned elbow grease.
We made a mess!
The guys marked where the holes needed to be drilled roughly 1 1/2 meters apart. After the holes were drilled and swept, we laid down a very long 2×4 that was already predrilled with the initial concrete hole drilling. A dynabolt was hammered into the hole as far as it could, then racheted down with a socket wrench to tighten. The 1st piece of timber would be the foundation the other boxing in pieces would be anchored to.
The farside wall was crooked so that meant our sheets were slightly offset on the outside edge. As long as the surrounding box was square, the top layer mats would hide the crooked ply and we’d be fine.
Timber posts are rather expensive in NZ and usually crooked, so we ended up gluing and screwing 2 2×4 together so that 1. they cost less and 2. we could straighten them much easier.
Boxing in almost complete
To secure the 2x4s to the base we used nails and several Stud to Bottom galvanized fixings. We needed to make sure there would be absolutely no flex with the box.
To have a nicer finish, we added a thin layer of finger jointed pine on top of the 2x4s secured with finishing nails. The grain and look of it is much more eye pleasing than the sides of 2x4s and I can stain or paint it later.
Finishing touches on the sub-floor box
We left about a 3cm lip around the box so when the mats sit on top of the ply, the outer frame would contain and lock in the mats from sliding. The mats came very well packaged in three 1.3m x 9.7m x 5cm rolls
1 of 3 mat rolls
We placed extra ply against the walls to create a wedge/spacing for the wall mats. Upon rolling out the 1st roll we realized the wall was not straight…at all, but we made it work. 1st mat down!
The middle roll was relatively easy to to setup and the velcro attachment worked out perfectly.
That tatame finish texture is looking nice!
The final row did prove to be a bit more challenging but we eventually squeezed it into the remaining space. We can do math!!
After a full day of work we got the mats installed. We started at 11am, did a Bunnings run to collect tubes of liquid nail, screws, etc, got to the gym at around 12:30pm and finished just after 1am.
The following weekend we mounted the wall mats which were relatively straight forward. We ran 2 rows of 5m x 18mm pine planks along the wall, one at the top of the wall mats and one mid mat for support. I forgot to take pics but we basically created a support system and something to drill into instead of thick firewall jib.
We finished in the evening, cleaned up and of course we had a roll!
Some after thoughts
I can’t tell you how happy I am with this setup. Having an extra 10cm of foam under the sub floor has made a HUGE difference. It only took about 3 weeks to break in the harshness of new mats, and the tatame finish has been amazing. They aren’t slippery at all and are like heaven to roll on. One thing I would have done, which I most likely will do soon is to place 1 screw into each foam block under the sub floor.
What happens is the vibrations of people moving on the mats will cause the foam blocks to shift if they liquid nail didn’t stick. Not a big deal as we can simply lift the mats/play and move the foam, but that’s the only thing I would have done. Everything else worked out perfectly and I could not be more happy.
I hope this helps anyone who is interested in building something like this. There are a LOT of unknowns that go into importing goods from overseas, but I covered all of the “gotcha” moments along the way. Also I can with full confidence say that Quindao Plastics manufacture high spec and high quality mats/foam. They exceeded my expectations, so you can purchase with confidence. I knew nothing about them, only went by their Trade Assurance certification rating on Alibaba, but who the hell knows what that means? I’m thrilled I rolled the dice – they nailed it!
Reach out if you have any questions
Oss!
BJJ Floating Mat System DIY Walkthrough was originally published on davepreciado
#BJJ#bjj floating mat#bjj tatame#bjj4life#bjjgirls#bjjlife#bjjlifestyle#combatroombjj#dave preciado bjj#dollamur#fight club#jiu jitsu#jiu jitsu times#judo tatame#k-guard bjj#miramar#mma#tatame#UFC#Weta Digital
1 note
·
View note
Text
PowerColor Red Devil RX 6600 XT: Review | Hashrate | Specs | Ethereum

PowerColor Red Devil RX 6600 XT: Review 2021 | Hashrate | Specs | Ethereum - The AMD RX 6600 XT is a video card of the intermediate segment, focused on gamers seeking a board with performance to face FullHD at full quality and high frame rate. After scaling the RDNA 2 architecture for a market focused on 1440p, it's time for owners of 1080p monitors to be given an option to replace midrange cards that are no longer up to the task, such as the still very popular GTX 1060.
The AMD did not work with reference design in this product, and we only have models partner with this chip. In this review we will use the PowerColor Red Devil Radeon RX 6600 XT , a very robust design based on this Radeon chip and with a powerful power and cooling system, as well as an imposing look, typical of the Red Devil line.
Radeon RX 6600 XT GPU graphics cards were announced with a suggested retail price starting at $379 , putting it $50 more expensive than GeForce RTX 3060 12GB and also representing a $100 increase over its predecessor Radeon RX 5600 XT . As we have warned, this is the reference prices of AMD and Nvidia, which have rarely come to reality due to the global economic context. Despite the official price of $329, the cheapest RTX 3060 we found was in the $699 range on Newegg, giving an example of how completely decoupled from reality are the values suggested by GPU manufacturers.
https://www.instagram.com/p/CSSexMWLmEm/embed/
IMPORTANT NOTICE: with the current market making any price comparison impossible, we are left without minimum references to recommend or not a product. Because of this, we will no longer distribute seals and recommendations for analyzed products until the situation normalizes, since cost is a fundamental guide in our interpretation of a product.
RDNA2
The RDNA2 arrives with important leaps in performance and efficiency compared to the previous generation. AMD claims that the new RDNA2-based chips can deliver a performance jump with twice the performance, and an efficiency jump with up to 54% more performance per watt consumed.
AMD's new microarchitecture is still based on the same 7-nanometer lithograph used in first-generation RDNA, for example. Gains were achieved through manufacturing optimization. The result is up to 50% less energy consumption to operate at the same frequencies as the RDNA 1, or at the same consumption level to increase the operating frequency by 30%.
These gains were the result of a series of optimizations, such as increased refinement in frequency variations, higher operating clocks, pipeline redesign, better geometry distribution and tessellation. However, without a doubt, one of the technology that brings the most profound changes is Infinity Cache.
With the increasingly heavy duty cycles, AMD took a different approach from the faster GDDR6X memories and larger interface of the GeForce RTX 30. Bringing the expertise of the processor area with the chipsets, AMD introduced 128MB of memory acting as a cache of level 3. Bringing a concept similar to the Infinity Fabric, present in Ryzen, this technology was named Infinity Cache.
This new technology is also partly responsible for the greater energy efficiency of RDNA2, while also reducing latency by 34%, on average, compared to first-generation RDNA.
Another important new feature is the introduction of dedicated hardware to speed up the Ray Tracing process . For this, AMD implemented one "Ray Accelerator" per computational unit, delivering up to 10x more performance than the software implementation. These units have the objective of calculating the intersections of the tracing of light rays, a process that is completed by the traditional shaders of the computational units. This enables effects such as realistic reflections and dynamic global lighting, with more realistic shadows and lighting.
In addition to Ray Tracing, RDNA2 support features such as Variable Rate Shadding , which makes it possible to devote less processing power to parts of the image; the introduction of Mesh Shaders , a much more efficient implementation of the use of shader resources; and Sampler Feedback , which uses data from the previous frame to more efficiently determine how textures will load. All these features together are essential for better use of hardware and to enable better graphics, with a good level of performance.
The RX 6600 XT
The RX 6700 XT is based on the Navi 23, which brings technologies and features similar to those present in the RX 6900 XT and RX 6800 XT models, but scaled down. This board brings a total of 32 computing units, far from the 80 present on the top of the line RX 6900 XT, and just below the 40 present on the RX 6700 XT. As a result, other structures were also reduced.
The amount of Infinity Cache was reduced to 32MB, while Ray Acelerators, specialized in accelerating processes related to Ray Tracing, are also reduced to 32, because in RDNA 2 microarchitecture we always have one Ray Acelerator per Compute Unit.
In computational units this chip is below the Compute Units count of the RX 5700 XT (40) and RX 5600 XT (36). But in contrast the evolutions of RDNA 2 compared to the first generation brings its advantages, an example is the clocks. The RX 6600 XT boosts up to 2589MHz much higher than the respective 1905MHz and 1560MHz of the RX 5700 XT and RX 5600 XT.
Consumption has also scaled down, with the board operating with just an eight-pin connector and with an estimated total consumption of 160W. The memories suffered advances and setbacks compared to the one used in the predecessor RX 5600 XT, with the memory increased from 6 to 8GB GDDR6, but the memory interface was reduced from 192-bit to 128-bit, with memory bandwidth falling from 288 GB/s to 256GB/s, all this comparing how it was on the RX 5600 XT to how it was on the RX 6600 XT.
Technical comparisons
COMPARATIVE
PowerColor RedDevil RX 6600XTAMD Radeon RX5600 XTNVIDIA GeForceRTX 3060AMD Radeon RX6700 XT
PRICES
Price at launch$279.00 $329.00 $479.00 Updated price$279.00 $479.00
GPU SPECIFICATIONS
Manufacturing process7 nm7 nm8 nm (Samsung)7 nmPCI-Express bus4.04.04.04.0chipNavi 23 XTnavi 10Ampere GA106-300Navi 22 XTGPU clock1968 MHz1130 MHz1320 MHz2321 MHzGPU Clock (Turbo)2589 MHz1560 MHz1777 MHz2581 MHz
MEMORIES SPECIFICATIONS
RAM technologyGDDR6GDDR6GDDR6GDDR6BUS Width Interface128 bit192 bit192192 bitAmount of RAM8 GB6GB12 GB12 GBmemory clock2000 MHz1500/1750 MHz1875 MHz2000 MHzeffective clock16000 MHz12000/14000 MHz15000 MHz16000 MHzBandwidth256 GB/s288/336 GB/s360 GB/s384 GB/s
GENERAL Specificatios
Shading Units2048230435842560TMUs128144112160ROPs64644864Pixel Rate165.7 GPixel/s99.84 GPixel/sec85.30 GPixel/s165.2 GPixel/sTexture Rate331.4 GTexel/s224.6 GTexel/s199 GTexel/s413 GTexel/sFloating point performance21.21 TFLOPS7,188 TFLOPS12.74 TFLOPS13.21 TFLOPS
DESIGN
power pins1x 8 pins1x 8 pins1x 8 pins1x 6 pins + 1x 8 pinsPlate combination supportATNOTNOTATSlot Typetwo slotsdual-slottwo slotstwo slotsboard length267 mm242 mm267 mmTDP160W150 (GPU TBP) W170W230WRecommended font450W450W450W550Wvideo connections3x DisplayPort 1.4, 1x HDMI 2.13x DisplayPort 1.4, 1x HDMI 2.0B3x DisplayPort 1.4, 1x HDMI 2.13x DisplayPort 1.4, 1x HDMI 2.1
RESOURCES
DirectX12 Ultimate12.012 Ultimate12 UltimateOpenCL2.12.02.02.1OpenGL4.64.64.64.6shader6.56.46.56.5
EXTRAS
ExtrasInfinity Cache 96MB
Photos
The Red Devil line is PowerColor's top line and always brings plates with quite imposing design. This Red Devil RX 6600 XT follows the concept of a product with high quality and care in detail. It features a double FAN cooler system, and the already traditional LED with fillets at one end, along with the Red Devil name. It also has a BIOS selector, very traditional on AMD GPU cards.
The board has two power connectors, one 6-pin and one 8-pin. On the back it also has a blackplate with an LED in the form of the logo that references the line.
Like most cards today, it occupies two PCI-Express slots. In the video connections part, three DisplayPort 1.4a and one HDMI 2.1.
system used
We made a change to our graphics card testing platform, now based on an AMD Ryzen 9 5900X processor. Several other high performance components come with this system, such as NVMe SSDs and 32GB RAM clocked at 3200MHz (CL16). Below are some pictures of the card installed on our new video card test bench:
https://www.youtube.com/embed/WiSR-IHhBuc
Before the tests, details of the machine, operating system, drivers and software/games used in the tests:
OUR TESTING MACHINE, APPS AND GAMES WERE UPDATED IN MAY 2021
Machine used in the tests:
- AMD Ryzen 9 processor 5900X- GIGABYTE X570 AORUS Xtreme motherboard- HyperX Predator RGB 32GB (2x16GB) 3200MHz CL16SSD - Kingston KC2500 250GB + 2TB SSD- Cooling system CM MasterLiquid ML360 V2 RGB- Source Power Supply CM v1300W Platinum- Custom CM MasterFrame 700 Enclosure
Operating System and Drivers:- Windows 10 Pro 64 Bits- AMD Catalyst Adrenalin 21.7.x
Applications/Games:
- Adobe Premiere CC 2021 (GPU rendering)- Blender (GPU rendering)- SPECviewpeft 13 (Solid Works/Maya, GPU rendering)- 3DMark (Fire Strike Ultra / Port Royal)- Assassin's Creed Valhalla (DX12 )- Flight Simulator 2020 (DX11)- Forza Horizon 4 (DX12)- Grand Theft Auto 5 (DX11)- Rainbow Six Sieg and (Vulkan)- Red Dead Redemption 2 (Vulkan)- Resident Evil Village (DX12)- The Division 2 (DX12)- Watch Dogs: Legion (DX12)
GPU-ZBelow the main screen GPU-Z showing some key features board techniques.
Overclock
We use AMD Radeon Software to overclock, setting the base clock at 2500MHz and the turbo at 2700MHz. It wasn't possible to raise her standard clocks that much, but otherwise the clocks are quite high. This made it possible to run the tests with stability and complete the full battery. The memories went up from 16GHz to 16.6GHz, the limit to keep the system stable.
NOTE: Overclock at your own risk. Overclocking may result in loss of warranty.
Energy consumption
We started with power consumption tests with all the boards compared. All tests were done with the same system, which gives an exact idea of what each VGA consumes. It is worth noting that the value is the total consumption of the machine and not just the video card, which gives an idea of how much a complete system consumes. Comparisons with tests from other sites can yield very different results due to changes in the systems used.
The tests consist of the minimum consumption of the system, when it is in idle mode after the maximum load test, in this case running 3DMark through Fire Strike Ultra mode.
https://benchmarks.com.br/graficos/v/15033?iframeid=15033
https://benchmarks.com.br/graficos/v/15034?iframeid=15034
NOTE: In the test running the 3DMark application, we considered 5 to 10W as a margin of error, due to the variation that happens when testing the same card.
Temperature
Another very important test when we talk about video cards, the chip temperature. Tests consist of either the system in idle mode or in continuous use.
It is important to note that some cards have a system that turns off the fans when the GPU is not being required, such as when performing simple Windows tasks or even simpler games. Therefore, there are temperatures considerably higher than some models in this situation, but in practice they do not compromise the board. According to the manufacturers, this feature increases the lifespan and consumes less energy. Therefore, there can be large differences in the idle mode temperature, which does not characterize a bad card if the temperature is high.
Why did the board get a lower temperature when overclocked?This is a normal situation on current boards. The rotation of the FANs is faster and consequently they make the GPU cool down faster, in some cases with a lower temperature than in the normal situation.
Why does the reference system cooler board have a lower idle temperature than a theoretically better cooler board?Because current video cards with newer cooler designs tend to turn off the FANs when the temperature drops below numbers like 40, 45 or even 50 degrees, so when the FANs are turned off the tendency is for the GPU not to lower the temperature any more than than the limit that turns off the FANs.
First let's test the cards with the system in idle mode:
https://benchmarks.com.br/graficos/v/15035?iframeid=15035
For the in-use board test, we measured the peak temperature during the Ultra mode tests.
https://benchmarks.com.br/graficos/v/15036?iframeid=15036
NOTE: Temperatures can vary greatly depending on the region of the country, system where the board is installed and test used.
Below are some photos of the plate with a Flir thermal camera, showing the temperature in some parts of the plate body:
Applications
With the increase in applications that take advantage of the processing power of GPUs, we've updated our test battery with some of the most important software on the market.
Adobe Premiere CC 2021Adobe Premiere is a world reference when it comes to video editing software, and in its latest versions it has also taken advantage of the benefit of GPUs to help speed up rendering. Below is the behavior of the compared plates:
https://benchmarks.com.br/graficos/v/15037?iframeid=15037
BlenderAnother nice test to see how the video card behaves in helping with the process of rendering images and videos. Blender stands out for being open to use and also updated with the latest technologies on the market.
https://benchmarks.com.br/graficos/v/15038?iframeid=15038
SPECviewperf 13The professional application test suite is comprised of a comprehensive battery of hardware-intensive scenarios to render diverse uses ranging from architecture, mining, and medicine. We ran two tests, one focusing on performance in Maya and the other in SolidWorks.
https://benchmarks.com.br/graficos/v/15039?iframeid=15039
https://benchmarks.com.br/graficos/v/15040?iframeid=15040
3DMark
And if we talk about benchmarks, we couldn't leave out one of the most iconic tests in the world, especially for video card performance, 3DMark. Our battery consists of three tests, but 2 of them show technologies that only newer board models bring, Ray Tracing (Port Royal) and DLSS (DLSS Feature Test).
We ran the latest version of the app from UL Benchmark (which purchased Futuremark), and all tests consider the default profile setting, with no changes. Below are the results:
https://benchmarks.com.br/graficos/v/15041?iframeid=15041
https://benchmarks.com.br/graficos/v/15042?iframeid=15042
Game tests
Now let's get to what really matters: performance tests on some of the top games on the market.
To help understand the following graphics: Above 60fps is ideal for monitors operating at this frequency. The closer to 30fps, the worse the fluidity becomes and, below 30, the game starts to become "unplayable"
Assassin's Creed ValhallaOpen world game has ample scenarios and a benchmark with a good amount of characters and structures, making it a challenge for both the processor and the video card. The game uses the Ubisoft Anvil engine, an evolution of AnvilNext 2.0 present in the series since Assassi'ns Creed Unity. The version used in Valhalla on PC is based on the DirectX 12 API.
https://benchmarks.com.br/graficos/v/15043?iframeid=15043
https://benchmarks.com.br/graficos/v/15044?iframeid=15044
https://benchmarks.com.br/graficos/v/15045?iframeid=15045
Flight Simulator 2020Microsoft's new flight simulator arrived with immense hype and soon became a reference when it comes to high quality graphics, with incredible scenery bordering on reality at various times, ideal for seeing the behavior of video cards. Despite being a recent game and from Microsoft, the API used is still DX11.
https://benchmarks.com.br/graficos/v/15046?iframeid=15046
https://benchmarks.com.br/graficos/v/15047?iframeid=15047
https://benchmarks.com.br/graficos/v/15048?iframeid=15048
Forza Horizon 4Playground Games' game uses its own graphics engine and, as exclusive for Microsoft systems, is fully developed for DirectX 12. This game stands out for its excellent graphics and the ability to deliver a good level of performance on multiple hardware, including some more limited ones.
https://benchmarks.com.br/graficos/v/15049?iframeid=15049
https://benchmarks.com.br/graficos/v/15050?iframeid=15050
https://benchmarks.com.br/graficos/v/15051?iframeid=15051
Grand Theft Auto VThe game is already a classic and after years it still stands firm as one of the most played games. Based on DirectX 11, it also brings a sense of older graphics engines based on Microsoft's still popular API. It's a very demanding test on processor, and faster memories also have very noticeable impacts. For modern video stages, it's no longer a big challenge.
https://benchmarks.com.br/graficos/v/15052?iframeid=15052
https://benchmarks.com.br/graficos/v/15053?iframeid=15053
https://benchmarks.com.br/graficos/v/15054?iframeid=15054
Rainbow Six SiegeThe Ubisoft game has as high points the use of the Vulkan low level API in its most recent implementation. This Esport demands high frame rates to be played satisfactorily, and is usually one of the most efficient games in achieving this performance in multiple components.
https://benchmarks.com.br/graficos/v/15055?iframeid=15055
https://benchmarks.com.br/graficos/v/15056?iframeid=15056
https://benchmarks.com.br/graficos/v/15057?iframeid=15057
Red Dead Redepmtion 2Game by RockStar, with beautiful graphics is a good reference to measure the behavior of video cards. Our test considers the game running on the Vulkan API, which behaves very well on both AMD and NVIDIA cards.
https://benchmarks.com.br/graficos/v/15058?iframeid=15058
https://benchmarks.com.br/graficos/v/15059?iframeid=15059
https://benchmarks.com.br/graficos/v/15060?iframeid=15060
Resident Evil VillageCapcom's game uses the excellent RE Engine, a graphics engine that delivers interesting results from the PC's high-end hardware to more limited platforms like the Nintendo Switch. Resident Evil 8 highlights complex and richly detailed scenarios, using Ray Tracing to illuminate the scenarios and with features such as FidelityFX available. In tests we take a tour of Castle Dimitrescu, one of the heaviest and most detailed locations in the game.
https://benchmarks.com.br/graficos/v/15061?iframeid=15061
https://benchmarks.com.br/graficos/v/15062?iframeid=15062
https://benchmarks.com.br/graficos/v/15063?iframeid=15063
Tom Clancy's The Division 2The Division 2 uses its own graphics engine developed by Ubisoft Massive, dealing with complex scenarios and large amounts of particles on the screen.
https://benchmarks.com.br/graficos/v/15064?iframeid=15064
https://benchmarks.com.br/graficos/v/15065?iframeid=15065
https://benchmarks.com.br/graficos/v/15066?iframeid=15066
Watch Dogs:Nvidia-supported Legion Game is based on the Disrupt graphics engine and has extensive use of RTX technologies such as DLSS, and also features Ray Tracing, being accelerated by both GeForce RTX and Radeon RDNA 2 hardware. a futuristic London full of geometry and characters, which combined with the light ray tracing effects make it quite a challenge to run the game.
https://benchmarks.com.br/graficos/v/15067?iframeid=15067
https://benchmarks.com.br/graficos/v/15068?iframeid=15068
https://benchmarks.com.br/graficos/v/15069?iframeid=15069
video gameplay
https://www.youtube.com/embed/jUIjuwPZj6Y
Conclusion
The efficiency of the RDNA 2 has scaled well in its reduction for the RX 6600 XT, and we have gains of 10 to 20% over the predecessor RX 5600 XT and a very close performance in many cases with the RX 5700 XT. In the case of Adobe Premiere the 6600 XT proved less efficient even when compared to the 5600 XT, probably due to the memory bandwidth that is now lower. But overall we didn't see this drop, on the contrary as highlighted above.The
Read the full article
0 notes
Text
Simulation 3d Software

Magazine> resources
In the market for 3D modeling software? Here are the best programs out there to make your 3D dreams come true—including 10 free 3D modeling software options!
Ansys engineering simulation and 3D design software delivers product modeling solutions with unmatched scalability and a comprehensive multiphysics foundation. AnyLogic PLE is the only free simulation software that combines discrete event, system dynamics, and agent-based simulation methods so you can model any real-world system or process. 3D Simulation Software Meet your digital workforce. Jack and Jill are the best workers ever. They’re always on time, they never complain, and they’ve been known to put in a 24/7 work week. You’re right: Jack, Jill, and their elite virtual pals aren’t going to produce any physical products for you. General Purpose, includes 2D and 3D magnetics solvers, both static and harmonic. 3D solver is based on the Whitney AV formulation of Maxwell's equations. References edit ^ Hoffmann, J.; et al. What makes it special: Tailored specifically for product design and engineering applications and loaded with tools for simulation and manufacturing. Inventor 3D CAD software offers professional-level 3D mechanical design. The program comes with freeform, direct, and parametric modeling choices.
With 3D modeling software, you can create just about anything. The industry is changing so fast, however, that it can be a little challenging to determine which 3D modeling program is the best for your 3D modeller needs.
We walk you through the 19 best 3D modeling software options on the market right now. Even better? We share 10 free 3D modeling software programs for the budget-conscious 3D artists.
Once you have the right 3D modeling software, you’ll be able to produce stunning 3D designs for your online design portfolio—and featuring such a hot skill is sure to lure in potential clients and employers on the hunt for modeling software experts.
Now, let’s take a look at the best 3D modeling software programs out there!
3d Simulation Software Open Source
Best 3D Modelling Software
1. Autodesk Maya
Type: SubscriptionPrice: $245/month
When you ask any professional 3D modeller in the industry which program they use the most, Autodesk Maya is the most common answer, and for good reason. Most of the leading animation studios use it (Pixar included) due in part to the massive array of powerful tools offered within the package. The last few years have seen some especially amazing new features burst into the limelight such as truly jaw-dropping live rendering.
There’s a catch, though: Maya isn’t cheap, and you’re going to need to learn to use it before you can create much of anything. There’s a lot to learn in 3D modeling programs, and if you can devote the time to truly learn this new artform then every penny you spend on Maya will be worth it. If you want a portfolio that floors clients from the start, this is how to do it.
2. Autodesk Mudbox
Type: SubscriptionPrice: $245/month
In addition to the titan known as Maya, Autodesk also offers Mudbox. It’s one of the easiest 3D modeling software packages on offer, but it’s more aligned to editing and sculpting 3D models using a simple, intuitive and tactile toolset than it is able in doing more complex 3D tasks. You can increase polygon counts on the fly, set up layers, and gradually adjust your 3D models until they are absolutely perfect. Then, built-in functions create textures, paint colors, correct meshes, and produce Normal maps.

You can also create things from scratch with this program, sculpting whatever you choose, but rigging, texturing, and animation are not its focus. To complete those steps, you’ll need Maya or other similar 3D modeling software. Master Mudbox and your design portfolio will be all the richer for it.
3. Houdini
Type: LicensePrice: $1995, $4495, or $499/year
Similar to Autodesk Maya, Houdini is another industry-standard tool that ranks as one of the best 3D modeling software packages available. It uses a different methodology than Autodesk Maya, using a node-based procedural style of production that affords artists a huge amount of control. Similar to Maya, there’s a rather steep curve to learning all the tricks needed to succeed with this modeling software. You won’t be creating masterpieces in 20 minutes, but, with a bit of persistence, you won’t have too much trouble making works of art.
It’s on the expensive side, offering yearly licenses or perpetual purchases of Houdini and Houdini FX, but there is also a free version called Houdini Apprentice available that we’ll detail in the second half of this article. All in all, Houdini is a solid choice for any VFX artist, and will help you create some stunning CGI to make your online design portfolio truly amazing.
4. Cinema 4D
Type: LicensePrice:$480/year to $2,850
Maxon’s Cinema 4D is also a serious competitor and easily among the best 3D modeling software programs you can find. Designed for creating perfect motion graphics, this powerful tool can compete head-to-head with the above entries and hold its own. It can crank out amazing quality that can turn heads, but it’s strongest lead over competitors is a simple one: it’s much (much) easier to learn. This could be a great help in making your design portfolio as gorgeous as possible—trying out a variety of 3D projects is a great way to show your range to clients.
A caveat (and one that will be problematic if you don’t have deep pockets): the cost. With a hefty cost to perpetual licenses (some of which expire), you need to make sure it’s the right choice for you before you commit. Thankfully, they also offer a free trial that lasts a bit longer than a month to help you make the decision (and they offer student licenses at a reduced cost).
5. Modo
Type: Subscription or LicensePrice:$399/year to $1799
To stand out from the crowd, Modo does things a bit differently than the other 3D modeling programs. The Foundry made Modo with art in mind, not just animation, which led to it offering a rather robust and interesting selection of tools. Most notable is how user-friendly it is, allowing neophytes the ability to pick it up with relative ease and become a 3D modeller without years of training.
While it lacks the higher-end tools offered in programs like Autodesk Maya, Maya won’t let you intuitively create great quality renders with a low degree of effort: Modo is easy to pick up and figure out in comparison. Finally, Modo sports a wonderfully powerful rendering engine that is easily on par with other high-end programs, allowing you to create pro-quality on the fly.
6. Autodesk 3Ds Max
Type: SubscriptionPrice:$216/month to $1740/year
Hacer antenna wifi biquad antenna. 3Ds Max has been around for a long time, as far as modeling software goes. It predates almost every other current program by several years and has plenty of performance patches under its belt as a result. It’s one of the most stable 3D modeling programs around (probably the most stable option on Windows, period) and has a gigantic library available that provides access to countless functions that can make the process of modelling less tedious. Many of these mods also make things easier for beginners.
It has a higher price point but offers free student licenses and a trial that allows you access to all of the features the app has to offer for 30 days, which should provide further incentive to give it a go and wow your clients.
7. ZBrush
Type: LicensePrice:$895
When it comes to sculpting amazing creatures, people, and places, there are no competitors that come anywhere even close to ZBrush. It’s a staple in VFX on movies and television, and there are few 3D modeling programs that can match its stature in the video game designer industry. If you’re into 3D printing, this is definitely your go-to option: nothing beats ZBrush for making vinyl toys or action figures. You will need training on the various tools and features to make the most of ZBrush, but know that this training is absolutely worth it.
8. Rhinoceros
Type: LicensePrice:$995
Uninhibited design is the focus of Rhinoceros, providing all the tools and features you would expect in the best 3D modelling software, but with an easy-to-learn toolset that allows you to get cracking right away. It’s compatible with just about everything and has a well-designed rendering engine that can process even complex animations without unexpected slowdown.
It’s free for 90 days, after which point you’ll need to purchase a license to continue taking advantage of its features and power. It’s worth a look, especially if you want something simple to grasp and get started with.
9. Substance Designer
Type: LicensePrice:$19.90/month and up
There are many steps to 3D model creation, and producing realistic textures can be very time-consuming and involved. Enter Substance Designer, one of the most powerful and astounding texture creation applications there is. It can generate some truly astonishing surfaces for your models, and the resulting texture maps will turn your creations into extremely detailed art that not only looks realistic but saves you a ton of time fiddling with bits and bobs.
If you’re serious about becoming a 3D modeller, you owe it to yourself to at least give it a try. We guarantee that the results will please you, and afterwards, you won’t want to use anything else for your skinning and texturing.
Free 3D Modeling Software
If you’re on a fixed income and can’t afford to shell out hundreds of dollars for a full license but still want to learn the skills needed to become a 3D modeller, you’re in luck: there are some free 3D modeling software options out there as well, and many are quite powerful and capable of producing professional-grade content.
10. Blender
The king of the castle among free 3D modeling software is, without a doubt, Blender. It’s been around since 2002 and is quite polished. Running on every major operating system, it provides all the tools you expect in modeling software, including rigging, texturing, sculpting, UVing, and animation. With a solid rendering engine, it has proven itself time and again when compared to the fancier programs out there.
As an added bonus, it’s open-source! This means that there are constant improvements and available add-ons for new functionality are not only common, but always free of charge. This puts a lot of power in your hands. If you can’t swing an expensive license for Maya, this is the next best thing.
11. Daz Studio
Recently made free to all, Daz Studio is accessible to newcomers as well as experienced 3D modellers, and is focused around creating art using people, animals, and other assets from their list. Unlike most other entries on the list, this is more akin to a posing tool than one designed to create high-end 3D models for production.
While the program itself is totally free, be advised that a lot of the content on their marketplace is not: this means that to really make the most out of it, you’ll still need to plunk down a bit of cash. If you are in it to make art rather than animation for your portfolio, you can’t really go wrong: a large amount of content is available right from the start, and anything you make is royalty-free!
12. SkethupFree
A surprisingly easy 3D modeling software option,SketchUp works on every major operating system—it will even run smoothly on your Chromebook!
You can draw, set orbits, and combine elements to create true 3D art with ease in a natural, sketch-based approach. Through Sketchup, you can draft some cool home layouts, furniture, and isometric art without needing to create primitives and extrude for hours. This is super-handy for those looking into becoming an interior designer. You’re also spared the rigor of rigging, and the annoyance of UV maps as well. This is a great tool for those more looking to make cool art.
13. Sculptris
Sculptris has a lot going for it: it has, for example, some of the sculpting power of Zbrush (but none of the price associated with it). It’s the absolute best free 3D modeling software for sculpting; nothing else even comes close to it. Within a few short minutes, you’ll be able to figure out the way the controls operate; even pint-sized artists have no problem, and can get to creating silly faces in no time.
3d Simulation software, free download
While it can produce some truly neat models, you will still need another 3D program to make the most out of it. If you are looking for a way to make insanely awesome sculpts and feel like a master 3D modeller without shelling out for Zbrush, nothing else available can compare.
14. Houdini Apprentice
SideFX’s Houdini is a great program—one of the best free 3D modelling software options on our list, in fact. Equipped with all the power and flexibility offered by the paid version of the program, Houdini Apprentice will allow you to learn to use all its features without shelling out the $2,000 required for the pro version. Personal projects are totally fine, but without a license, you’ll still need to purchase the full version to make use of it for commercial purposes.
15. Vue
Vue is known for being the 3D modeling software of choice for creating amazing 3D landscapes. Compelling worlds are a breeze to shape, and it even has numerous features bundled in to make sure your creations don’t look too real. Camera lens distortions, depth of field and anti-aliasing strategies all combine to give a huge amount of control to your scene and how it renders.
The catch? You won’t be able to save in the same format compatible with the paid version, and your files will be auto-watermarked to avoid the use of assets in commercial products.
16. Autodesk Maya
If you want a chance to learn the best 3D modeling software on the market, you have that opportunity: Autodesk Maya offers a 30-day trial to everyone interested in checking out what it has to offer. Students can even enjoy a student license for the duration of their studies. This gives you plenty of time to hone your abilities and master the program by the time you’re serious about using it professionally.
The only limit you have with the free version is a simple one: you can’t use the assets you create in commercial products.
17. FreeCAD
FreeCAD is still in active development, but it already has tons of cool features. As far as free 3D modelling software goes, it’s hard to beat something with this many useful tools. Thanks to parametric models, you’re able to define shapes based on properties (and even other objects), which means you can recalculate entire sections on-demand.
18. MakeHuman
With a simple UI, MakeHuman allows budding 3D modellers to easily design humanoid characters with a suite of useful and intuitive tools. As simple 3D modelling software goes, it’s extremely focused and serves a single purpose: character design. If you’re looking to dive into the pools of 3D art this is a great place to start. Within a few minutes you’ll be able to figure out how to combine meshes and create interesting personalities for use in your next project.
19. OpenSCAD
Less about the artistic and more about the functionality, OpenSCAD is entirely intended for the more technical side of 3D asset production. Through programming and math, this program excels at producing exact replicas of your designs in a 3D printer, making it an exceptional option for anyone who is looking to make devices and toys rather than character models and creatures.
Don’t Forget to Upload Your Creations to Your Online Portfolio!
If you’re looking to cut your teeth in this fun and relatively new art form, now is definitely the right time to do it: the gaming industry is booming; and VFX are used in just about everything we consume online, on TV, and on the big screen. And clients love finding designers that you can keep up in this 3D modeling software realm.
Once you’ve created some awesome new pieces of work, make sure to upload them to your online portfolio. If you don’t have one, just use a website builder to build one in minutes. Pick an online portfolio that comes with stylish templates along with designer-friendly features like client proofing, so your clients can proof designs, right on your website.
You can create entire worlds in 3D modeling software—now go have fun!
*Need some more design inspiration?
A Guide To Graphic Designer Salaries—And How To Negotiate Them
14 Neat Ways To Boost Your Typography Skills
63 Extremely Cool Adobe Illustrator Tutorials
*
Get the best of Format Magazine delivered to your inbox.
Simulation means copying the action of a real-time process over time.
It requires software which represents the key features, characteristics, and functions of selected areas of a process.
Simulation software develops real case phenomena with a set of mathematical derivations and formulas.
For instance, a teacher can explain a scenario with the help of relevant or clinical examples.
This software helps a person to understand a scenario with simulation without actually executing the operation.
The Best Simulation SoftwareCompared (in full)
Rna 3d Simulation Software
Consider the following simulation software carefully while taking your needs into account. By the end, you will know which one is right for your business.
1. AUTODESK
Autodesk is American software by Multinational Corporation which develops software to be used by engineers, architects, designers in construction, media, manufacturing and entertainment industry. It was released in 1980 in the United States.
It was best known for AutoCAD, but now it is used for multiple purposes. Similar to AutoCAD, Autodesk provides a free trial version to qualified students and teachers through the Autodesk Education Community. This software is very well known for color grading, visual effects, game development, and editing. You can also use it for film creation.
Autodesk is one of the best simulation software. It delivers better designs and develops solutions for digital prototyping.
Key features of Autodesk
3D rendering and shading
Suitable color management
Additional look development shading nodes
Improved vector graphics workflow
Enhanced look development
Easy and quick setup
2D and 3D drafting
Personalized drawing and modelling
2. Simul8
SIMUL8 simulation software is preferred for its cost reduction feature. This software aims at reducing cost and maximizing efficiency. It is used for planning, re-engineering, design, manufacturing, production, logistics and in-service systems.
It aims to identify bottlenecks and evaluate operational decisions before real execution. It makes it easy to apply statistical methods and derive outputs.
Key features of SIMUL8
High production rate
High capacity of production equipment
Fast and flexible modeling
Good simulation results
Building creative productivity
Displays visual logic
Fast results
3. MathWorks
This software is privately owned by American Corporation and was released in 1984. It specializes in providing mathematical computing solutions. Simulation software helps in predicting the action of a system. You can evaluate a new design, check for problems and test a model under various conditions to get output. The main products under MathWorks include MATLAB and Simulink.
It is comparatively less expensive to create and simulate models than building and testing prototypes. Hence, we can easily test different designs before building one in hardware. We can further connect and integrate the design fully in the system. It provides the user with time-based simulation, event-based simulation and physical-systems simulation.
Key features of MathWorks
Dynamic system behavior
Parallel computing
Easy algorithm development
Embedded code generation
Rapid prototyping
Data acquisition and analysis
Verification, validation and testing
4. Arena
Arena is discrete event simulation software that works with SIMAN processor for simulations. Its recent achievements include providing significant enhancements in the field of animation and design.
This software provides high-level flexibility and functionality to meet the needs of the user. It does not work on a trial and error or guessing basis; the user gets the right output in one try.
It provides specific and unique events every time and they are flexible and activity-based.
Arena has been the top simulation software for the last 30 years.
Key features of Arena
Flowchart modeling methodology
Complete range of statistical distribution
Realistic 2D and 3D animation design
Reduce operating costs
Increase profitability through operations
Reduce delivery time
Diagnose and eliminate bottlenecks
5. FLEXSIM
This simulation software makes it possible to optimize and study any system in any industry. It is in a category of discrete event simulation tools developed by Flexisim Software Products. It was released in 1993 in the USA. It uses little or no computer code. Most of the work is done with arrays or drop-down lists and property windows to customize user-required models. Flexisim supports user-oriented design.
You can build models by dragging and dropping already defined 3D objects.
Key features of Flexisim
Manufacturing: job shop, assembly line
Logistics and distribution: supply chain design, storage layout
Transportation: system traffic flow, custom traffic congestion
Material handling: packaging and warehousing
Networking data flow
Mining processes
6. Simulations Plus
This software provides simulation and modeling to improve productivity across different areas. Simulations Plus provides solutions for biochemical, pharmaceutical, chemical, cosmetics and herbicide industries. It supports specific product software such as GastroPlus, MembranePlus, ADMET, DDDPlus, KIWI etc.
Key features of Simulations Plus
Dynamic system behavior
Increase profitability through operations
Flowchart modeling methodology
Wide verification, validation and testing
Higher production capacity
3D rendering and shading
7. SIMULATION X
This software is a computer-aided engineering application which can be run on Microsoft Windows. It was released in mid-1980s and was developed on the concept of discrete network application.
The user can choose from 1D, 2D or 3D as per requirements and obtain results as needed. The simulations require parameters and build libraries with integration. The software includes signal blocks, mechanics, fluid power and power transmission. It is used for designing, analyzing and modeling complex systems and transforms them into simpler solutions.
It offers ready-to-use simulation models and pre-configured components. It serves quick results and builds interfaces with Microsoft entries.
You can get the software on a trial basis for students and faculty.
Key features of SimulationX
Efficient integration of simulation programs
Rapid control prototyping
Code compilation schemes
Wide scripting features
Reliable productivity
Code export
8. Schneider Electric Software
This software specializes in energy management and automation solutions. It is a French-based corporation software that's been in use since 1967.
The software provides solutions by unlocking profitability, maximizing output, and minimizing costs related to design. It optimizes efficiency and increases productivity. It is comparatively less expensive to create and simulate models than to build and test prototypes. Users can easily test different designs before building the real thing in hardware. Afterwards they can connect and integrate the design fully in the system.
Key features of Schneider Electric Software
Exposure to markets and strategy
Maximizes business performance
Conserves energy and power resources
Scalable and powerful management software
Saves time
Flowchart modeling methodology
Minimizes cost
9. Exa
Exa software is a provider of Computer-aided engineering. The product it provides is called PowerFlow. It was released in 1991. The main aim of Exa Services is to provide you with solutions fast. Qualitative product people like engineers, designers and architects can rely on this software for accurate results.
It has top brands associated with it such as NASA, JAGUAR, TESLA, ONROAK AUTOMOTIVE etc. It is used in various fields such as aerospace design (in-cabin comfort), avionics cooling and system thermal management.
Key features of EXA software
Supports Exacloud
Supports commercial, aerospace as well as automotive industries
Improves design effiiency
Improves engineering processes
Connects to the real world
Clinical performance
Conclusion:
Simulation software is necessary when we want to understand how systems work without actually designing prototypes. Users can tweak and modify models to see how they behave in real life.
Boba fett bounty hunter game. As you evaluate the software discussed here think about your particular industry and needs.
You May Also Like:
0 notes
Text
Olivia Pope: When Keeping It Real Goes Wrong (#Scandal S7)
NB: This essay is now available as a free PDF download
Olivia and Mellie had a riot of a scene in “Pressing The Flesh” (702), which I enjoyed, but was not the one that left the most indelible impression. The presidential bedroom scene was filled with pithy quips about the sexist double standards befalling women in powerful positions, and the crucible of expectations in which they are enmeshed. It was also a reminder that being in those spaces does not make them original, just rare. I bring up that scene because the themes it contains are connected to the ones in another scene that impressed me. They are themes which this essay explores: the meaning of success for women in patriarchal institutions; and a denial of feminine values being the price of power in those spaces.

Olivia walks into a male space (the bathroom) with ease, comfortable inhabiting spaces not created with her in mind. She is there to leverage blackmail against President Rashad, should he not wish to comply with the proposed nuclear treaty. For the second episode in a row, Olivia threatens the adolescent family member of a man to get him to play ball. Her father, former Command, spent a lifetime playing this kind of ball, and even once had it played against him. The man she still loves had this kind of ball played against him. Even she has had this type of ball played against her, both as the leveraged ‘object’ (kidnapping), and the leveraged ‘subject’ (S3-5). Having earlier told Mellie that being in these positions of power does not make her original, Olivia, in this moment, lives up to her own words. She believes her end is right, no matter how dark the means, she is justified. There is nothing original about her behaviour in this moment. Chiefs of Staff and Vice Presidents before her have gone down this same road. I’m sure they were all self-righteously convinced. Self-delusion is a heck of a thing. Yet, Olivia imagined that as head of B6-13 and HBIC in the White House, things were going to be different. She would be the key to setting the nation on the right path, and Mellie was her conduit. She, as her father proclaimed of himself, was the lynchpin in making “democracy possible” (302). Now that B6-13 was under her wing (the source of the blackmail), she couldn’t lose. Or could she. She gets called “The Devil”, something her father, Rowan, has been labelled (“Even the Devil Deserves a Second Chance” (507)). Rashad turns Olivia’s own words back to her (like a mirror):
“You’re right, Ms. Pope. Actions do speak louder than words. And this? This tells me your country is still sticking its nose where it doesn’t belong your actions tell me America is still sticking its nose where it doesn’t belong.” When Olivia warns President Rashad not to let his pride get in the way of progress (this, too will come back at Liv), He tells her that Ambassador Marashi warned him about her as the devil who threatened his child. This, Rashad says, “tells me everything I need to know about your character”. Rashad leaves. Having failed with this blackmail attempt, a dejected Olivia catches a glimpse of herself in the mirror and quickly looks away, hanging her head. She is unable to look at her own image in the bathroom’s mirror:

Destination Syndrome
Olivia: “I am a person. I am not a hen. I am not a prize… And I have a business to run, people to support. A life to lead. A desire to wake up and face myself in the mirror every day. Oh, and oh…once I fixed a presidential election, and I’d like a chance to right that wrong. …This is not about you. My whole life is not about you. I have goals. I have DREAMS! I did this for me. …I have to take care of myself. I have to protect my people. I can’t spend all my time worrying about you. This whole house worries about you: what you want, what you need. It has to be about what I want and what I need.”
Ever since I wrote about the scene above from “We Do Not Touch the First Ladies” (312), I have waited to know what Olivia dreams of (we’ve seen it three times (406, 410, 610). Waited to hear, or see her goals defined (is she there yet?). Waited for the moment she looks in the mirror and feels good about what is reflected back at her. We’re both still waiting.
Two things stick out for me, in the present, from Olivia’s words above: the mentioning of personhood and self-care, as well her relationship with Fitz needing to be about her emotional needs as well. But Olivia has never been able to articulate what she wants, and certainly not to Fitz (while he was president), so fulfilment was not possible in that regard. She runs before she can ever reach that point. Secondly, as I outlined in my pre-season 7 video, Olivia no longer feels like a person to me, nor to some of the characters in the show. She’s missing now, Quinn reminded us in 614, and upon which even self-centred Mellie picked up (“She’s there, but she’s not there” (519)).
Olivia has now helped someone else realize their dream of being the first woman POTUS, but is CoS her dream? Or is it a path she was encouraged to pursue as the only option to take back her power? In many ways, Olivia is still trying to recover some sense of self she once knew, before the original sin of Defiance. The presidential election she colluded to steal, led to two subsequent elections she did not earn. But much like America’s unwillingness to contend with its original sin (slavery) as the root of its continued racial problems, Olivia will never recover some authentic sense of self, or be able to look herself in the mirror until she tackles the ‘why’ of Defiance. The ‘why’, as I have suspected since S2, is not really about her version of loving Fitz (though she did/does). As she says to Fitz in the The Decision (610)’s alternate universe, “[I didn’t agree to fix the election because] it would have destroyed us”. And while that understanding is developed by Olivia after the fact, I cannot help think, subconsciously, that in choosing to Fix the election, Olivia chose power and chaos (a think that stokes the fire of the Popes (512)). The why of Defiance was connected more to Olivia’s lack of self-knowledge and the replacement of that with external goals. Olivia wanted the White House back then, badly. Her life circumstances had not damaged her enough to actually murder for it back then (517, 616). She has wanted the White House since law school (504), so she could impact policy and affect change. This woman does not like to fail when she sets herself a goal. It brings her shame.
Olivia now has the position she has been coveting, one which she complained was taken from her by Fitz (520). To boot, she has inhabited a second position (Command) to ensure that no one can take anything from her ever again. But Olivia has still been taken from herself. Emotionally disemboweled and disconnected, there is no balance to her power in the present. This has been the case ever since her kidnapping, the very purpose of which was to render her an object, not a person (410). With her PTSD having gone unaddressed, Olivia has instead filled her life with a fake world in which she will never feel internally validated, but instead be too consumed with perpetual chaos to ponder this lack of satisfaction, let alone making it a priority to address.
Maya: “You sure do love a problem. You’re so vain. It’s always about you, isn’t it? The problems you create, so you can solve them. The power you wield, so that you can feel important. Did your father and I not tell you you were special enough when you were little? Did we not give you enough hugs? Baby, this uppity fantasy world you’ve decided to be a part of, it’s not real, Boo. You need to come on back down to this planet where the world doesn’t revolve around you…” (You Can’t Take Command, 422)
Olivia has made it so the world does revolve around her, by becoming its sun and moon. Even the men with whom she exchanges sex for stress relief are to revolve around her. Even the new president has a similar charge in Olivia’s envelope filled world:

She’s the boss. She sets the rules.
Olivia may inhabit ultimate positions of power inside the White house, but she does not have control over the White House, it has control over her. Her power in these roles is illusory. But if we stay with the idea that Olivia ‘has it all’, the question now is: upon reaching the peak of this mountain, is there some other destination she is trying to reach? Does she imagine that once she’s done with the go-round at the White House in 4-8 years, that she will suddenly be a person capable of being her authentic self with another, let alone with herself? There will be opportunity costs.
Olivia is brilliant, beautiful and impeccably put together, but she is mostly façade. Happiness and satisfaction are states of being that manifest within, not destinations which one can reach. Wherever Olivia goes, she will always be there. As historian, Thavolia Glymph says, “…freedom is often reified as a ‘thing’ or ‘place’ that one can ‘obtain’ or ‘go to’. But freedom is not separate from the understandings and intuitions of those who seek it”[1]. Claiming the full humanity of her black femininity cannot be relegated to the White House alone. No one in the previous administration found freedom there, except FDR in that pool. But it is gone now, and it makes me wonder if Olivia ever felt emotionally unburdened when she swam. Does she still do it now, or is she too emotionally disconnected to bother. I hope to find out.
A Witness to Her Life
In a short video, Yours and Mine[2] , Beyonce talks about needing something real in order to make her many accomplishments matter. That without that witness to one’s life, accomplishments fail to validate one’s life. Without something real, people are more compelled toward addiction (chaos). I thought back to 701, when Olivia is having dinner with Rowan. While it was delicious to see the tables turned in some ways, Rowan has never been a witness to Olivia’s adult life. He cannot behold her because his relationship with her is grounded in incessant scrutiny and manipulation. She receives his instruction and dictation about achievement and black excellence, but not emotional support.
Alice Walker, reflecting on a speech she gave, in 1979, to a room of largely Black women, concerning our alarming suicide rates, laments “Not one of them said one word about why young women of colour were killing themselves. They could take the black woman as invincible…, but there was no sympathy for that which ended in defeat. Which meant there was no sympathy for struggle itself—only for ‘winning’”[3]. In The Last Supper (408), Rowan says something similar to Olivia:
Rowan: “I haven't been a perfect father, Olivia, I know that. I want you to know that I know that. I want you to know that I've always wanted the best for you. I wanted you to be the best. Because, to me, you always were. Now, I... I didn't have a... a role model for how to be a dad, and I stumbled. I know that. I got angry when I shouldn't have. I focused too much on how you did rather than how you were doing it. I didn't say enough how important it was to me, when you were trying, that you were struggling, because it was. Because I should've understood because that's what I was doing. Trying. And struggling.”
As poignant as it reads, this, too, is a manipulation of his because this acknowledgment Olivia has long sought is used as a preamble to murder, and proof of his continued need for her obedience. He tells her to never choose another man over him. How can Olivia be the ‘best’ if it is only defined on Rowan’s terms and not her own. He cuts off every path that doesn’t lead to him being right. Though Rowan is the one seemingly under Olivia’s thumb as Command, he is still dictating limitations for her about what she can achieve and who she is able to be. Their relationship is anchored in fear; fear of failure. One cannot see or be seen in such a relationship. One cannot grow in such a relationship.
Jake, too, cannot be a witness to Olivia’s life. He has literally been created by Rowan (518), and insinuated into Olivia’s life as an extension of Rowan, to infiltrate that which a father should not control: his daughter’s sexual and romantic life. (This is the reason for the incest references that proliferate the second half of S5). Olivia cannot keep it real with Jake because he is fake. She doesn’t even know his real name or backstory! From their initial meet-cute in 214, to their short-lived ‘convenient, safe, secure, easy’ (sounds like a Staples commercial) arrangement (701), Jake’s purpose in Olivia’s life has always been predicated on a denial of the real.
Having someone who truly sees you is one of the most powerful things you can experience. This means a person who sees your faults, struggles and inconsistencies and doesn’t use them against you, but, through grace, supports your striving to be better. Supports your efforts to contribute something good to the world, and not just selfishly to their own life. The generosity of such a person can make you feel safe. There is liberty in this kind of safety because it is shelter, not confinement.
We can connect with people on multiple emotional levels, but what matters is the authenticity of those connections. Olivia may no longer be spinning, but does she know the difference between spin and the truth anymore? Whether at OPA or the White House, Olivia’s job is public relations. It is her responsibility to make things seem other than they really are. To mask and evade. Because she fears that which is within (because she cannot control it), she sometimes brings the spin of her public relations to her private relationships. Olivia has no truth in her life right now. Everyone in her life is being kept at arm’s length, and probably in the misguided belief that this is how one conveys authority and power. You know, being a ‘boss’. Even during “family” time with dad, Olivia instructs Rowan to ask her about work. Because, what else is there for her? Her life is busy, but not full.
A consistent criticism I have of Olivia Pope is that she has no friends. No emotional anchors. She shares her life with no one. Everyone in her life is connected to her work. Fitz, as a now ex-president becomes the exception, for the first time. He doesn’t need intervention and handling anymore. We’ll see where that leads for Olivia.
I used to fear that Shonda would make Olivia into Christina from Grey’s Anatomy—a character whose true love was her work. I am not saying that a woman enjoying her work is wrong, or that she needs a romantic other (side note: a woman wanting the love of a man does not make her less strong, or less of a feminist because no one says that about women who have romantic relationship with other women). I realized Shonda likely won’t make Olivia--her first lead black woman character—into Christina, because Olivia’s greatest satisfaction does not seem to come from the work she does, though she finds in it purpose and direction. Besides, Christina did have a witness to her life: Meredith. Shonda has referred to Olivia and Fitz as the Meredith and Christina of Scandal[4]. Theirs is the central, meaningful relationship on the show. It’s real. Olivia’s current world has purpose and direction, but it is one constructed to replace what’s real.
Patriarchal Fear of the Feminine

Audre Lorde, in her work on feminism and intersectionality, frequently talks about women identified women (WIWs). This is not necessarily a reference to lesbianism, or even to feminism. WIWs are women who are connected to and value the feminine within themselves and others. It is also possible, though much more rare, to find women identified males. Far more common are male identified women. A society that values (white) male attributes and (white) maleness as the default of humanity compels women and gender queer people to adopt these values in order to survive, or be valued by society. Some feminist rhetoric, particularly ones lacking an intersectional frame, advocate for a lot of male, patriarchal values to be embodied by women as the path to personal success and liberation. But, in the words of Audre Lorde, “The master’s tools will never dismantle the master’s house”[5] . Investing in the master’s tools simply ensures that (white) patriarchal values remain primary: profit, property, and violence and domination as stand ins for power.
Olivia is barely a woman identified woman these days. She is primarily a male-identified woman (so is Mellie, for the record). The speech she delivers to Mellie in the Oval (701) is a most recent quintessential example of labelling something feminist because it is said by women in competition with men.

What that speech establishes is Olivia’s domination (as the boss), which requires Mellie subservience as a soldier who carries out her orders (“you do not ignore me”; “I am always right”). This, Olivia, declares is the only path to success for the first female president. Success is manifested in Mellie becoming a statue people can gaze upon. To top it off, both women are wearing pantsuits, which we, as the audience, are supposed to take as a nod to Hillary Clinton. However, the nod to her is aesthetic and superficial because HRC is a woman identified woman. Her definition of success is about the difference she can make in peoples’ lives, not the monuments that would be erected in her name. Olivia used to be focused on giving people second chances (308), but that now seems obscured.
Olivia is disconnected from herself because she has been raised, primarily by a man who, scorned by love and damaged by white supremacy, came to see the rejection of the feminine, through the embrace of patriarchy, as a path of success for black people in America, despite its terrible historical track record. He has even bragged about the fact that he was raising his daughter to feel as entitled to the world as any white man (504). We should all feel that the world is ours instead making ourselves small under dominating structures. To summarize a quote from Crissles of The Read podcast, Black people are not trying to be whit. I don’t want to be a white man, but I don’t want to be punished because I am not one either. Rowan’s way of teaching his daughter to feel this entitlement was to behave in destructive ways like white males, for whom the end always justifies the means. His values, and definitions of power and weakness are an infestation in her life (much like the character Jake in this show):
Rowan: “you can either stand there like a 12-year-old and lecture me about morality or, even worse, rat [me and Jake] out in the name of justice or you can take your cue from us and get yourself some power... Real power... 1600 Pennsylvania Avenue power. You think you have that now, but you're standing on the sidelines, screaming at the referee like a sad, drunk parent at a high-school football game. If you're okay with that, by all means. But I know my daughter as I know my son, and I know that won't suffice.” (It’s Hard Out Here for a General, 510).
Morality and justice are for 12-year olds (the age of Olivia’s arrested emotional development). Running the world is true power. Parenting and other identities are weak. Again, the master’s tools will never dismantle the master’s house. For black women to define success in the same terms as white patriarchal men is a means to their destruction, not liberation.
Rowan finally showed Olivia respect when she had gotten into the Oval again (“and you didn’t do it as First Lady” (614)). To him that Oval is the source of real power. It is no accident that it has only been inhabited by men—real and fictional—before Mellie. Previously, he praised Olivia’s ability to fleece power from Fitz when she was in the White House, instead of imagining a situation in which, gee, power is willingly shared. As I have said before: “Rowan’s comments often interrogate Olivia’s black feminine identity (the questioning and manipulation of her sexuality), seeking to have ultimate control over the representation of that identity and those with whom it is associated”. Rowan le Olivia down this path with Mellie (510). And in the absence of any other kind of power, Olivia held onto it like a life raft (“This all has to mean something. Otherwise why did I do this to you [Jake]? To myself?” (605).
Olivia has no female relationships that are not connected to her job, and her primary relationships have been with men. Most importantly (for me), she has no black women in her life. Having been abandoned by her mother, who was kept captive as punishment, by Rowan, it is obvious to me the dearth of Maya’s presence has left a lacuna in Olivia’s life, which has been filled mostly by maleness, to her detriment. She is outwardly successful, but inwardly she’s lacking. The lack of, specifically black, feminine presence in Olivia’s life is directly connected to her fear of real commitment to Fitzgerald Grant.
I know what you are thinking: girl, how the hell you figure that Olivia’s missing black mama has anything to do with choosing some white man? Let me explain.
Fitz as Symbolic of the Feminine
Self-knowledge has been a process for Fitz, and he is still coming into his own. I would not have expounded upon his femininity as a strength a few seasons ago. Though he has always been emotional, in the early seasons, he and the circumstances of the Olitz relationship were often too emotionally intense to sustain. However, his sense of self is no longer tethered to Olivia, he’s in a better position to emotionally support her. Consider this essay a plate of potato salad, from the cookout, that I am bringing to him.
Fitz has grown to embrace the feminine within himself. In a world that values his identity above all others, it is feminine qualities upon which he draws, internally, for strength, support and growth. His rejection of his father’s brute definitions of success and masculinity, as well as his unapologetic emotional centre are evidence of this for me. He cares for Olivia’s well-being, safety and happiness, often the only person to enquire about these things. And he does this even when their relationship was platonic. The giving of Doux Bébé (417) and his rescue attempts during her kidnapping (410-13), thwarting her plans to martyr herself for her father’s crimes (611) serve as just a few examples. As the most consistent feminine presence in Olivia’s life, he has been the only one to penetrate (no pun intended) something real and truthful inside her
Fitz has connected to an erotic power inside Olivia that has little to do with his magic stick. It has to do with the desire for home and a domestic aspect to her life. A place where she can practice authentic love and feel safe. Vermont is a metaphor for that, not necessarily a literal space in which those things will be realized. Wanting those things is not the same as confining one’s life. It is a recognition of the expansiveness of the interior life, and of private identities that are not conjured through public or representational roles. It is a space of retreat and self-determination. In Out of the House of Bondage, historian Thavolia Glymph explains that during Reconstruction, black women “pursued citizenship, land ownership, femaleness (denied through white patriarchy), and private leisure time. ‘Most of all,’ writes Glymph, ‘they claimed the right to determine for themselves what all of this meant’ (Loc. 4105). These acts of reclaiming the self had far-reaching political and socio-economic consequences, the echoes of which are still felt today.”[6] Formerly enslaved women attempted to live and define, in confining political circumstances, full public and interior lives, which were denied to them for so long.
As Audre Lorde tells us, the erotic is our deepest desire, and it comes from a deeply feminine place. It is connected to community, not denial and ascetism. The erotic is not to be confused with sensation, a plasticized version Olivia has tried out in several models (Jake, Russell, Curtis, even Edison). The erotic’s power is so great, that Olivia repeatedly runs from it. It is not accident that a woman raised to prioritize male modes of success would be afraid of embracing this type of feminine power. Olivia has been taught to fear the feminine and devalue it as weak, and it is partly because society sees it as weak. As I said earlier, living in such a society, women are compelled to reject feminized traits, making themselves small or more male-oriented just to survive. In her television interview about her relationship with President Fitzgerald Grant (505), Olivia repeatedly indicates that falling in love with him was a weakness. It disrupted her life and threatened her success.
Of the interview, I commented that “by painting to the public her love affair as an unfortunate failure on her part, Olivia cast herself as a woman who had fallen prey to cupid’s fate. Her resilience, her strength were no match. She’s already wrestled, so please don’t ask her to try again. She’s incapable of not loving Fitzgerald Grant. Loving is the one thing outside her grasp of control. The chink in her armour.”
So, loving is a failure. It is a flaw because it is outside the sphere of Olivia’s control (“You can’t fix the fact that I love you”—Fitz, 220). Olivia’s life is about control, the exercising of which shows domination. And domination is what? A means of showing power. Women are often to ones taught to aspire to love while men are not. hey are taught to acquire property, including women and children. We see a gender role reversal (in some ways) with the Olivia and Fitz character. However, the devaluation of love as a feminine quality, whose value pales in comparison to political power, is still very present. Olivia chose the latter, and so did Mellie. In this world, love isn’t power; it threatens it, as Olivia so reminded Mellie, after some bow chicka wow wow with Marcus (602). I do not blame Olivia for thinking this way. These values have been instilled in her by a man and a society that does not value women, or their feminine traits, except where it helps men: managing the home, bearing children, sex. Olivia was kidnapped, treated as a bargaining chip, threatened with rape, and treated like a problem to be eliminated, all because of love. Since then, Olivia has grown to see loving Fitz as a kind of sacrifice that limits her potential.
Maya and the Black Feminine Absence
Rowan put Maya in a cell and literal hole to contain her, though he supposedly loved her. Once her black feminine presence was relegated, Maya’s absence from the home led to Rowan sending Olivia away, never to live there again (301). Olivia never had a sense of ‘home’ after that. Olivia, therefore, did not grow up to value anything domestic, especially as a necessity from which everyone has benefitted, but few value, including many women. Maya worked and took care of Olivia (306), as many black women have had to do. With Maya’s removal from the home, Olivia lost an important role model at a crucial juncture for transitioning from adolescence (she was 12) to womanhood. Her values were replaced by those of the people inhabiting the fancy white, European boarding schools she was made to attend. Sure, she gained social and cultural capital, but she lost something, too.
First Ladies Problems
I did not want Olivia living in the East Wing when she and Fitz were together in season 5. I thought it was too much, too soon. However, I am also convinced that much of Olivia’s argument with Fitz in 509, and subsequently casting him as the villain in their breakup, was profoundly dishonest in some ways. It still bothers me more than I am comfortable admitting. Then I thought about the immense power fear has over people. Here’s a revolutionary idea: what if Olivia found herself liking some aspects of being First Lady, and was afraid of the threat to who she thought she was, and what she’s been taught she should become? She even said she was good at it. I don’t like being good at things I hate. I go out of my way to be bad at them so no one expects me to do those things (shhhh, don’t tell my wife).

Olivia tells Mellie in 511 that she left the White House (and Fitz) because she was scared. But, she starts wearing dresses after leaving the WH; replaces her bed with a four-poster one like the one in the East Wing; she regales Vanessa, Jake and Rowan about the details of a cake she buys from a bakery (514). These are all influences from her time in the domestic realm of the East Wing. Olivia has fetishized normalcy and domesticity as something she is incapable of, since she pushed Stephen to propose to Georgia (101). She is afraid of her own desire.
Think about it. Rowan mocked and shamed Olivia when she told him Fitz wanted to make her his First Lady (301). He told her that was a useless position, and that Secretary of State or Chief of Staff were much more valuable. Mellie, in typical white feminist form, grew to see it as the seat of her oppression (503), even though she aspired to the position since the age of ten (208). She tells Olivia to expect the same confinement (503), which pissed me off because it assumed Olivia wanted what she wanted. Mellie picks interesting times to assert her difference from Olivia, and her sameness at other times.
In a great bout of irony, now that Olivia is Chief of Staff, she still has to field typical FLOTUS questions because there’s no one in that role. Why doesn’t Olivia, as Chief of Staff, insist on hiring someone to help the WH Social Secretary?

Instead she complains to Cyrus that she has to pick out China patterns. Hmmm, like she was doing here
While it is an antiquated position, my point is that the FLOTUS position is not without importance, but it is devalued specifically because of its association with the feminine. It is the feminine for which women are persecuted, even as men’s self-actualization is tied to this very thing. Perhaps they are simply resentful that not everything is within their control.
Fitz and the life associated with him is but one representation of the erotic. Olivia has to embrace this power within herself before she can engage Fitz as a witness to her life. To get there requires reconciliation of feminine, masculine and queer identity traits as powerful and valuable assets she possesses, not just her intellect. Contrary to the Enlightenment thinkers, mankind is more than a thinking, rational being. She is an emotional one, too.
Reconciliation of the Self
Accomplishments and other people cannot make you happy. That is a job that can only be fulfilled by the self. If happiness is internally derived, and comes from accessing the truth of our feelings, then happiness, too, is a feminized feeling. In a world that values power in terms of domination (‘big dog’ status), violence (blackmail and threats), and the ability to withstand pain (pushing things down with alcohol and sex), it is no wonder Olivia does not value it enough to make happiness a mission she pursues.
Maya: “I could not make you happy because happiness was not the mission”—(Tick Tock, 615)
Olivia cannot define what she wants because wanting is desire. Desire comes from a space of truth within us. It is a spiritual place. Olivia’s self-abnegation means she has pushed that away, thinking it leaves her power open to vulnerability. In addition to telling us that the aspiration to feel nothing is a place of “grave immobility” (it leaves you stuck)[7] , Audre Lorde also tells us that Black women, in America, have traditionally had compassion for everybody else except ourselves[8]. Olivia’s own mother conjured a similar sentiment:
Maya:“Damn shame. I tell you... being a black woman. Be strong, they say. Support your man, raise your man, think like a man. Well damn, I gotta do all that? Who’s out here working for me, carrying my burden, building me up when I get down? Nobody. Black women out here trying to save everybody and what do we get? Swagger jacked by white girls wearing cornrows and bamboo earrings. Ain’t that a bitch? But we still try. Try to help all y’all. Even when we get nothing. Is that admirable or ridiculous? I don’t know.” (Tick Tock, 615)
Olivia still thinks its admirable enough to stake her very sense of self on it. But it will be ridiculous if she doesn’t let anyone else share her burdens and her joy.

I think I know a guy. Facetiousness aside, I also mean this in terms of friendships, familial relationships and the relationship with the self—the most important one.
Let me summarize Mahatma Beyonce again[9]. She says that everyone is not good at everything. Even the great Olivia Pope. Depending on one other is what we are meant to do as humans, for we do not thrive in prolonged isolation. Olivia is not accessing an entire part of herself to which she is entitled. Beyonce goes on to expound that when you grow up, you’re no longer afraid of going to certain places, in your mind and your body, that may make you feel uncomfortable. You’re no longer afraid of the unknown. And it all starts with looking at yourself in the mirror and liking the person staring back at you. I want that for Olivia. I hope she still wants it for herself.
____________________________________________
Enjoyed this essay? You can download a free PDF here:
____________________________________________
[1] Glymph, Thavolia. 2008. Out of the House of Bondage: The Transformation of the Plantation Household. loc. 320. Cambridge: Cambridge University Press. Kindle.
[2] Beyonce. 2014. https://youtu.be/x4pPNxUzGvc. Video
[3] Walker, Alice. 1979 “Looking to the Side and Back”. In Search of Our Mother’s Gardens: Womanist Prose. (1983). Loc. 4467-4555. San Diego: Harcourt Brace Jovanovich. Kindle.
[4] Entertainment Weekly, September 2015.
[5] Lorde, Audre. 1979. “The Master’s Tools Will Never Dismantle the Master’s House.” Sister Outsider: Essays and Speeches. 1984. Freedom, CA: The Crossing Press Feminist Series. 110-113.
[6] Glymph, Thavolia. 2008. Out of the House of Bondage: The Transformation of the Plantation Household. Cambridge: Cambridge University Press. In Pow, K. 2018. Forthcoming article.
[7] Lorde, Audre. 1979. “Uses of the Erotic: The Erotic as Power.” Sister Outsider: Essays and Speeches. 1984. Freedom, CA: The Crossing Press Feminist Series. 53-59.
[8] Lorde, Audre. 1979. “Sexism: An American Disease in Blackface” Sister Outsider: Essays and Speeches. 1984. Freedom, CA: The Crossing Press Feminist Series. 60-65.
[9] Beyonce. 2014. https://youtu.be/x4pPNxUzGvc. Video
63 notes
·
View notes
Text
Hey,
I hope everybody is staying as healthy as possibly and is keeping away from the COVID-19. Miss being able to go into an actual school and visit with my person in person but we are making the best of what we can. Today we held our presentations with the class where we broke down how own take on something media related and how we would accomplish said task. I would like to share with you what lead up to what I was able to bring to class today.
First it started with researching and finding something cool to present to the class. At this point I had already made my demo reel and felt like it didn’t reflect enough 3D in it so then I made the decision to do something related to 3D so that not only could I use it as an assignment but I can also use it in my reel. So as I was doing some research I came across this awesome individual on YouTube that I believe goes by the name of Fattu.
Here is a few of his links:
Fattu Tutorials on YouTube: https://www.youtube.com/channel/UC6SWCKmOGEUp82OdTV9fQkw
Fattu Tutorials Official Website: https://www.fattututorials.com/
Definitely check him out! He does some super awesome work!
After watching some of his videos I cam up with the concept of doing also a 3D Liquid Simulation. At STI we all use Maya but since I saw some of my other peers dipping into other 3D softwares I thought it would also be beneficial to do something in a different 3D software that what I’m normally comfortable with. I made multiple renders during my research, practicing, and overall duration of my endeavors through this project and do know that this dragged on a little bit longer because the pandemic happened in the middle of this assignment or assignments. I am combining two assignments into one with this. 1st is the How To Presentation for Media Presentation and then there is 2nd which is a Procedural Video for Digital Media Production. Here are some of those renders….
youtube
This was the first one I did and wasn’t set on it yet.
youtube
That is why this video was made because I was looking for something liquid based but didn’t know what yet.
youtube
I even tried to do something as complex as this but it would have taken 2 weeks or more to render out all the pngs plus when i brought what little pngs did render out into after effects and got this….i wasn’t really happy with how it was turning out so I dropped that idea and came back to just pouring of the liquid over text….
youtube
youtube
It was super fun making these renders. I wish our school would have given us more options with 3D software other than Maya but I will continue in Maya after this and try to make something as awesome. When I was originally practicing to remember how to do this it was very difficult not to render out everyone that I made lol. There were just turning out so cool to me.
Now with this assignment we had to create a handout that would follow our on screen presentation to the class. Here is the one that I made….

Now as you can see at the bottom of my handout there is a link that guides you to a more detailed version of the instructions. Here is that link….
https://mrwilson3d.wordpress.com/2020/04/03/3d-liquid-simulation-detailed-instructions/
And because I like going that extra mile here is the detailed instructions in image format…
This slideshow requires JavaScript.
Making these detailed instructions wasn’t that bad though. I simply did it in Microsoft PowerPoint. I switched the layout to be paper size and just added the words and threw a picture into it and PowerPoint does the rest. I LOVE how PowerPoint as Design Ideas because made this process a breeze.
Well that’s really all I have for you in this blog. I did mention that I am going to be creating a Procedural video of this project for another class so I will get that done today and probably share my thoughts with you all on that tomorrow.
Have a Great Weekend!!! & Don’t forget to WASH YOUR HANDS!!!
Until next time,
Lance Wilson
How To Presentation Aftermath Hey, I hope everybody is staying as healthy as possibly and is keeping away from the COVID-19.
0 notes
Text
FMP
Since this was an open brief, I decided to enhance my 3D tracking and comp skills. I like rendering things out from my and compositing them in Nuke so most of my ideas were designed around that process.
Ideas:
Losers:
My main idea was the idea I presented in the pitch, ‘Losers’, a 30 sec - 1 min World War 1 short film depicting lives of the young soldiers on the British and the German side. The goal was to explore their emotional roller coaster as the war progressed, starting from the feeling of patriotism and excitement to enlist to the hatred and resentment of the war.
This is a big scale project which would’ve involve a lot of CG assets and crowds, as well as ideally having a built trench set alongside some costumes. It was very expensive and I tried to find ways to fund it but it just didn’t work it. It was £400 to rent 4 full world war 1 costumes for a week, I couldn’t find anyone willing to help me with the trench set which meant that it would have to be mostly CG. Even though I planned this project and had a good idea where it was going, I decided to probably save it for later and move on to my next options.


Losers story board.
K.Academy:
Another concept that I developed was K.Academy which stands for killer academy, this was also a concept for my advanced compositing brief but I didn’t want to rush it because I want it to be well done, even now I don’t think that I have the dedication to execute, since it will require a lot of actors, some set design and props, so I decided not to follow it and save it for another time. I did go as far as drawing up a storyboard though.
K.Academy story board.


Hemomancer:
Inspired by the League of Legends character, Vladimir, this project was going to portray his story and his abilities which is one of a Hemomancer, controlling their own blood and using it as a weapon.

Fluid simulation is a big part of this project and so is costume design. Both areas that I don’t have access too. I would really love to complete a project on this character though since I find his story interesting and the character so appealing with his unique power.
Death From Above


This the project that I decided to execute for my second year fmp.
The concept behind this project was unclear at first, I knew that I wanted to do something with swords in the sky and coming down. Inspired by Kayle from the game ‘League of Legends’.
Inspiration:


And also inspired by the character Erza Scarlet from the anime ‘Fairy Tail’ in her Heavens Wheel form.

Also some setting and final output inspirations.


Concept:
I came up with a rough concept of a someone being chased and targeted by a group of people. Until they eventually surround him in a field where he sits on a rock calmly. They charge him but he doesn’t break his stance. As they’re about to strike him swords come down from the sky smiting them all and the victim walks away as if nothing has happened.
I started thinking about the time periods and what I want the environment to look like. Originally I was leaning towards the asian side, Japanese and Chinese architecture, as well was making the protagonist a Japanese/Chinese monk.
I even looked at potential costumes for the role.

I found this one being sold for £120 for the full thing. But I don’t have that amount just to spend on a costume.
I thought about not making the character into a monk but into a ninja since I found a cheap “professional Ninja suit” for £30.

In the end I decided to wear my Arabian garment and maybe combine it with a hoodie and a scarf.
Swords:
Since the character uses his powers to bring the swords down from the sky I wanted to show the swords dwelling in the sky and also coming down through a birds-eye view shot. Inspired by this shot from a Gintama title sequence.


I started to expierment with the swords design, would I want a variation in the swords, so a lot of models just floating in the sky, or have them all be the same model.


I then decided that it would best to have a variation within the swords to add to the divine power that the protagonist posses, that he called upon many swords from all over the world to defend himself.
After I made that decision I went around and downloaded 3D models of swords and bought them in a scene together.

The perspective view in Maya were very useful.

To give the swords a little bit of dynamics and character I wanted them to rotate and bounce up and down to not just look like a 2D image. I considered using the MASH network in Maya which does that automatically and you could adjust the speed and height, the problem is that it cannot read more than one model. So I had to figure out another way.
Ignorantly I used a cylinder shape and tried to align the swords around it.


But then I realised that I could just use a ring curve and it won’t use up any geometry space and I found it much easier to work with.


Using the birds-eye view also helped me place the swords in a organised position so they wouldn’t be all over z-space.

I come up with a rotation animation and individual animations on the swords individually.
youtube
I then duplicated the first layer and expanded it, added more swords to fit the circumference, as well as animating each individual sword again because animations doesn’t get passed on with duplicates.

These swords were going to be used for two shots, the establishing “swords in the sky shot” and the “birds-eye view” shot.
I was considering adding volume into the scene to not make it look flat and dull, there are two different ways to do this in Maya, by using AI fog or using a fluid container with some smoke volumes that are shaped like clouds.


I started playing with the AI fog, trying different settings and angles.
Even though it looks great I didn’t think that it was suitable for the scene and the project in general because it’s way to thick, the only way to increase the opacity was by pushing it further and this just made it even less transparent, so no background would be able to pass through it.

Coincidentally I was playing around with a 3D model I found online and I stumbled on Maya’s fluid presets, they had different versions of skies and stuff like that. So I applied it to the scene.

I thought it worked really well so I decided to keep it and use it.
Since the Swords in the sky shot was first, I worked on it first.

This is it fresh out of Maya with just a sky to light it. I rendered with AOVs so I could tweak certain elements separately without giving a full grade to the shot.

I boosted the emission which is the red lights on the swords and the brightness of the volume, this was a problem since the volume was giving of emission, so whenever I would tweak the emission, the volume would change as well. So I had to just balance the two.

Final colour grade to match the warmth of the scene.
For the Birds eye view shot I took the same approach and was faced with the same problem that the volume was changing along side the emission.
So I had to grade it accordingly.

Raw out of Maya.


Radial blur on the volume to depict speed.

Final.
Environment:
This was my first time making a natural environment within Maya, since there was going to be a camera move I thought it would look better to have CG setting rather than a 2D projected setting, especially for nature.
I also looked at other CG environment to see what is achievable with a 3D render.


These are from League of Legends Season 9 trailer, Awaken. I really like how the cg environment looks, the lightning and the particles, it feels very full and rich.
In my head I wanted the protagonist to be sitting on a rock in the middle of a field. I headed over to skethfab and turbosquid to find 3D models of rocks and I came across the perfect one, it had a flat surface on top and was photo-scanned so it looked stunning.

This was so perfect because it would reasonable to sit on it since it got a nice flat surface.
Next I was experimenting with different materials for the plane. I looked into using PBR materials from textures.com. These textures come with height and normal maps that give the texture an extra authentic and bumpy feel.

But the height map will sometimes look weird and push the plane above it’s original position so I had to tweak the settings.
I decided on a leafy ground texture that will serve as a nice base for the floor.

It allowed me to blend in the cg grass well. I experimented with different types of grass in maya.


Short grass.

I also edited the plane to give it look more like a landscape rather than a flat ground.

Maya also has a bunch of tree presets that you could in later on and change the leaves. I did this by using an atlas sheet to create the sakura trees which are scattered around the environment plane.


Slightly longer grass.

I decided to add more trees.

Made the grass denser, added some flowers and more trees.
Decided to add a fence just to give the foreground more character. I got the fence from sketchfab.com, it originally was a single piece with two poles, but I manipulated the faces and duplicated it to make it stretch out across the scene.


I also played around with different lighting using aronld’s viewport to see it change and compare different light setups. Originally I used a hdri to light up the scene, but then I switched it up to a physical sky to give it an extra sunset feel.

Since one of the shots is facing the character I was figuring out what to put behind him.


I played around with cliffs but they just didn’t fit in. I don’t want it to look like it was made in a 3D program and i feel like the cliff is giving it away.
I decided to add more trees and maybe add some sort of a peasant looking house behind him.

Some tests for the birds eye view shot with extra trees behind the rock.


3D view of the plane.
The plane would be used in two shots, the Birds eye view shot and the tracking shot.
Birds eye view, plane:

Raw Maya render.

Defocused.

Radial Blur.
Tracking Shot environment.

Raw Maya render.

Grade and colour correct using a ramp mask.

Defocus.
I wanted to give the scene some depth so I decided to add a foreground element.


And then I blurred the living soul out of it.
For the tracking shot, something that’s troubling me is thinking about what to place in the horizon and beyond the hills, so I started to look at some field images online for references.


This image shows how things are lit, since there is a cloud above the hill in the distance its darker than the wheat field in the foreground.


Mountains are almost like a sillohaoite since they’re so far away and lose their colour and detail due to atmospheric effect. There’s also another hill that we could only see the left side of and its coloured different.

Matte painting I created in photoshop. I projected it onto a sphere to give it some sort of a realistic movement.

Environment final, merged all together.
Crowds:
Since the protagonist was being chased by a group of people I found more convenient to use a 3D crowd sim software. It was easier than hiring or finding a bunch of extras, dressing them up, working around their schedule, and achieving that bird eye view shot would’ve been tricky. But in a 3D crowd sim program you, the creator, have full control on camera angle and there are no problems with the sims schedules.
I used Golaem crowds, since they had a free student version. Golaem crowds is a node based plugin for Maya which uses the Maya particle system to scatter a bunch of models around. In the node editors you could assign behaviours to the characters and can make them human like, assigning constraints, barriers and colliders to the characters, I didn’t really dive that deep into it I just found out how to create a basic running crowd sim.

I had some experince with it before, but it had their watermark on it, so I had to ask the to remove it.

Success!

The agents being read into Maya.

Rendered scene of the crowd in the environment and light.
The plugin only works on windows so I had to export the plan and camera from the Maya Mac and open it on a windows mac, then to reduce render time I only rendered out the soldiers along their shadows. This also gives creative control on the environment.


Raw.

Grade and colour correct.

Defocus.
Merging the Bird eye shot.

I added a noise layer with a masked shape around it to give the illusion that clouds are zooming past. I also sped the time up by 1.75 to make it feel faster.
Final grade:
I wanted the over all feel to the piece to be warm, with the main characters being reds and oranges with highlights of greens to hit the sunset setting that I was going for.

Tracking shot final grade.

Swords in the sky final grade.

Birds eye view final grade.
Evaluation
Overall on this project I reached goals and milestones that I thought I wouldn’t be able to reach yet, the first CG environment that I created was pretty decent, also the matte painting matched it well. But it still lacked some realism when it comes to the trees, the leaves on some trees were weird because there was an overpopulation of leaves on a branch, the branches and the barks looked kind of flat but other than that it was ok. My maya workflow has gotten better, with lighting and applying textures correctly from models that I have downloaded from online, this is what made this piece really pop, the red glows on the swords.
Other things that I would change is the the cg clouds movements, I will drag them upwards whilst the camera and the swords are going downwards to give the speeding and zooming down effect.
I would also like to learn more about crowd simulations because the ones that I did in this piece, the crowds kind of looked funky up and close, also some agents would run through each other, in the future I would like to learn about setting constraints to the agents and have them interacting with each other.
I also didn’t get to execute all the shots that I wanted because of time and laziness I guess, every day that I’ve taken of could’ve been dedicated to a missing shot.
In conclusion I am not to mad with the final results of this project, I learnt a lot as well as experimented a lot. Improvements need to be made to the things that I have listed above and I need to dedicate myself more to my work to complete a project fully.
0 notes
Text
Week 23- Weekly Summary

Day 1- Character design
Today I was introduced to a Maya sculpting workshop using both Maya and Mudbox. This initial workshop was to get used to using the tools and methods to sculpt and create a character from cubes and rectangles. As I have grown accustomed to Maya sculpting through the radio task I welcomed this new challenge with open arms. The first task was to create three cubes for each part of the body and morph them using the various cutting and extruding tools to create shoulder and legs as well as a neck. This then became the base of the character. I found that using these tools where quite challenging especially with the multi cut tool as this would. Highlight other areas I did not want to cut. In addition , I did not want to create my character I am basing my maquette and drawings on until I fully understand the software. So I was mainly focusing on creating a character which utilised all aspects of the software.
The next task was to smooth the character and change the amount of planes available. The mother the amount of planes the easier it was o sculpt with the sculpting tools on maya. I found this difficult at first as I had made my character too small for the actually brushes. SO I increased the size of the character and began to try and work out how the tools work. I decided to create a visor like head which resembled a hammerhead shark. While also adding a shell on the characters back. I found that I should have extruded these aspects of the character before morphing the planes as this would have gave me better control and precision when creating. As I had just morphed the plane this would detract from the overall animation of the character later in the pipeline.
The next aspect of the workshop was to import the character into mud box . Mud box is a sculpting software that aids character and prop creation . I found this software quite easy to use as I imported a low resolution version of my character into the software and began extruding the same aspects that I had in Maya. I am looking forward to creating my sloth in both these softwares and I will continue to watch tutorials on how to improve my modelling techniques and processes within software like Maya, Mud box and z brush.
Day 1 - Character design maquette
Today I finalised sculpting my sloth Maquette and it is now ready to be baked to set. I found the sculpting process really rewarding as I could see the shape of the character show through with each addition of super sculpt. I found that the refinement process was the best part of the experience due to the level of detail I could achieve. I used a knife to create the fur for the sloth cutting into the clay to give texture . I then decided that I would do this all over the sloth instead of smoothing the clay . I found smoothing the clay difficult as it was too thin and it would reveal some of the tinfoil from the skeleton. I used smaller pieces of clay to add further detail to the face including the eyes and snout for the face. I also added little detail like the bandana and extra pieces of hair onto of the head. Overall I am happy with how the maquette turned out and I cannot wait to paint the finished product.
Day 1 - Mystery box
Today I began to finalise the ending of the mystery box project. I am happy with how this project is turning out as I feel I have correctly created a sneaking walk with the right sense of balance and timing as well as a jump that shows a shocked reaction . The ending of the mystery box cycle is that the character will hold his hands up and drop to the floor much like a suspect would when getting caught by the police. I tried to emphasise the timing and emotion of this by having the character place his hands to his head in disbelief at first before resuming to place them behind his head. I feel this works well as it complements the piece showing that he was incapable of achieving his goal of stealing what was inside the mystery box. To improve this I want to achieve a crying emotion like his hands and head are shaking as he is distraught at being caught. For this I could add more key frames moving the shoulder up and down swell as the body back and forth this could give the emotion I want.
Next I decided to fix the key frames around the waist of the walk as there was too many and the character didn’t have a flow to the sneak. With advice from John I decided to distinguish a clear up , down a passing with the waist. This then allowed me to elaborate and add more key frames to smooth out the animation. With the adjusted waist this added more weight to the overall walk of the character this then played emphasis on the sneak.
Furthermore , I also started to look at the lighting for the full scene. I moved the previous lights backwards as their intensity was to strong when rendered. I found that having this three light setup gave the best angles to show the characters movement and emotion. To further improve this I am going to research how to add a moving light into the animation itself. This spotlight will follow the character to the box and be placed directly on him when he is caught this creates the illusion that someone is chasing him.
Day 2 - Showreel project brief
Project overview
The showreel will be 75 to 90 seconds long and is an introduction to the post production process. Using adobe premier to edit your showreel together. For the research aspect of the project I will research three successful and three unsuccessful professional industry standards animation showreels.
Intro and Outro cards
Name
Title Nua first year showcase/Showreel 2019
Logo: Optional
Animator
Showreel examples
Jez pennington Showreel
Ameal Isnard
Hilde Buiter
Bianca Ansems
Stephen Anderson
Richard Phelan
Samuel Mclean
Neerachar sophol
Gustaf Lindstrum- Not a great showreel
Possibly the best ever showreel
Music- only use music that you have permission to use . Be aware of copyright
Cut to the beat
Choose music that fits style- check lyrics
Fade out
Can include
-Life drawing
-Concept art
-Character design
-Storyboards
l
Day 2 - Media in industries
Helen Schroeder Lecture/Talk on careers- Pre-production work
Introduction
Has tried multiple disciplines. Helen explained how competitive character animation is and that if that is what you want to do you have to be completely driven and focused on that goal. This is instead of jumping between roles and jobs. She also explained that jumping and changing job roles can also help establish a career as it helps find what you want to specialise in.
Developing career
At the start of her studies she focused heavily on stop motion animation. So in her work at university she focused heavily in the stop motion genre. She then through her final third year film got an internship in model making. She then became an animation intern on Dragon in 2007.This helped her become recommissioned as a freelance animator and model maker. As she was working for the same company she decided to focus heavily on the animation aspect instead of becoming a model maker splitting and letting go of the opportunities that this created to pursue stop motion animation.
Aardman storyboarding course
This was a professional course and a foot in the door to a major studio. This allowed her to work on the storyboards for Arthur Christmas. This helped her get the job in animating Arthur in cg but she took a stocktake and because of her family did not pursue a future in La where she could work on the larger films.
Teaching and freelance
Helen then decided to teach at NUA and worked freelance doing storyboarding for Tv and freelance.Helen worked for Hurst animation and was paid per scene.She also storyboarded for a Flora campaign. She then got back to storyboarding for Aardman on early man but was cut from the project because of travelling and working remotely. She then worked on Watership Down and worked remotely and continues to do that to this day.
Key skills and take ways from talk:
Be adaptable
Be profesional
Don’t be arrogant limits further opportunities
Keep to deadlines and promises
Be reliable
Have a collaborative attitude
Be positive
If able select jobs carefully and value yourself
Helen also mentioned Annecy animation festival in France which allows opportunities forms he major studios for work.
Day 3 - Mystery box
Today I fixed the lighting on my mystery box project. I wanted to ensure that the lighting would cover the entire screen highlighting the shadows and shapes of the character so I used four lights. These four lights acted as a base to light the character from all angles. I kept the intensity of these lights low as I wanted to give the impression that the character is trying to steal something from the mystery box. I also introduced a spotlight that would be mobile. This movement established a sense of urgency in the characters walk as he is clearly not trying to be caught or seen. I like the way the light pans around the scene before fixing on the box when the character is caught. This helps present the sense of shock and anguish on the characters face.
Furthermore, I also fixed the initial issues on the first few steps of the sneak cycle. I found that by removing key frames gave a more fluid sense of music instead of having fixed positions for the up and downward poses in the animation. I found the most issue in the second step as the waist had failed to move as the step progressed . To fix this I moved the waist upwards on the passing pose as this would add continuity to the up pose. I then fixed the positioning of the legs and removed the keyframes I no longer needed. This left me with 3 main key frames which I could clearly distinguish each pose. In addition on the first two steps especially the legs of the character began to pop when the animation was changed to spline. To combat this I moved the waist of the character down on the keyframes where this happened. This helps to contribute to a realistic and smooth sneak cycle.
Finally, I rendered out my mystery box animation in Maya to see what the character would look like when lit. This gave me a great sense of what could be improved with the animation as a whole as I could see an almost finished article. This was a long process to render but I found that the outcome was rewarding and I am looking forward to completing more CG animation in the future.
Day 4 - Lip-sync workshop and brief introduction
Today I was introduced to the lip-sync brief. I have to create a 10 second lip synced animation over a given clip. I chose the swan clip out of the two as I felt this would give me the best range of facial expression for animation. There is a distinct change in tone as the character goes from explaining what the animal looked like to the sarcastic explanation that it is a swan.
To start I added the audio file into tv paint and began to write in the notes section the sounds I could hear when scrubbing through the timeline. I then decided to roughly draw each of the mouth shapes from reference to give me a wide range of structures and shapes to display the sounds. I then selected all the mouth types and created a brush so I could easily stamp the varying shapes to fully portray the sounds on the key frames. Next I drew out the head of the character as well as the nose and eyes. I will later begin to animate the eyes but for the first iteration I decided that they will be in a fixed position for the scenes entirety. I began to stamp the mouths on in relation to my notes and adjusted their size so they can fit within the face.
To improve this iteration I need to focusing on moving the chin of the character as it is fixed throughout the animation. I also want to emphasis the emotion of the character through the eyes so in the next pass begin to move the eyes and the eyebrows to fully convey a sense of the character talking. In addition with the shift in tone I will develop new mouth types to show the change in expression with the character. This will help shift the message of the character to sarcasm and draw the eye of the viewer.
Day 5 - Maya lighting and rendering induction
Today I had an introduction and workshop to lighting and rendering in Maya . This workshop showed how to optimise render time through the amount of lights and shadows cast in the scene. To do this we used a totem poll as an object to light. We added Arnold lights as this was the rendering software. There was a range of lights from area lights to larger lights for skies and oceans.I also learned how to import lights from photos around the scene. This allowed for still images to be placed in the background. This also gave the option of removing the image but keeping the light source and setting on the object. I think this would be useful when importing a character into a scene or sequence as it would give realistic lighting.
0 notes
Text
PowerColor Red Devil RX 6600 XT: Review | Hashrate | Specs | Ethereum

PowerColor Red Devil RX 6600 XT: Review 2021 | Hashrate | Specs | Ethereum - The AMD RX 6600 XT is a video card of the intermediate segment, focused on gamers seeking a board with performance to face FullHD at full quality and high frame rate. After scaling the RDNA 2 architecture for a market focused on 1440p, it's time for owners of 1080p monitors to be given an option to replace midrange cards that are no longer up to the task, such as the still very popular GTX 1060.
The AMD did not work with reference design in this product, and we only have models partner with this chip. In this review we will use the PowerColor Red Devil Radeon RX 6600 XT , a very robust design based on this Radeon chip and with a powerful power and cooling system, as well as an imposing look, typical of the Red Devil line.
Radeon RX 6600 XT GPU graphics cards were announced with a suggested retail price starting at $379 , putting it $50 more expensive than GeForce RTX 3060 12GB and also representing a $100 increase over its predecessor Radeon RX 5600 XT . As we have warned, this is the reference prices of AMD and Nvidia, which have rarely come to reality due to the global economic context. Despite the official price of $329, the cheapest RTX 3060 we found was in the $699 range on Newegg, giving an example of how completely decoupled from reality are the values suggested by GPU manufacturers.
https://www.instagram.com/p/CSSexMWLmEm/embed/
IMPORTANT NOTICE: with the current market making any price comparison impossible, we are left without minimum references to recommend or not a product. Because of this, we will no longer distribute seals and recommendations for analyzed products until the situation normalizes, since cost is a fundamental guide in our interpretation of a product.
RDNA2
The RDNA2 arrives with important leaps in performance and efficiency compared to the previous generation. AMD claims that the new RDNA2-based chips can deliver a performance jump with twice the performance, and an efficiency jump with up to 54% more performance per watt consumed.
AMD's new microarchitecture is still based on the same 7-nanometer lithograph used in first-generation RDNA, for example. Gains were achieved through manufacturing optimization. The result is up to 50% less energy consumption to operate at the same frequencies as the RDNA 1, or at the same consumption level to increase the operating frequency by 30%.
These gains were the result of a series of optimizations, such as increased refinement in frequency variations, higher operating clocks, pipeline redesign, better geometry distribution and tessellation. However, without a doubt, one of the technology that brings the most profound changes is Infinity Cache.
With the increasingly heavy duty cycles, AMD took a different approach from the faster GDDR6X memories and larger interface of the GeForce RTX 30. Bringing the expertise of the processor area with the chipsets, AMD introduced 128MB of memory acting as a cache of level 3. Bringing a concept similar to the Infinity Fabric, present in Ryzen, this technology was named Infinity Cache.
This new technology is also partly responsible for the greater energy efficiency of RDNA2, while also reducing latency by 34%, on average, compared to first-generation RDNA.
Another important new feature is the introduction of dedicated hardware to speed up the Ray Tracing process . For this, AMD implemented one "Ray Accelerator" per computational unit, delivering up to 10x more performance than the software implementation. These units have the objective of calculating the intersections of the tracing of light rays, a process that is completed by the traditional shaders of the computational units. This enables effects such as realistic reflections and dynamic global lighting, with more realistic shadows and lighting.
In addition to Ray Tracing, RDNA2 support features such as Variable Rate Shadding , which makes it possible to devote less processing power to parts of the image; the introduction of Mesh Shaders , a much more efficient implementation of the use of shader resources; and Sampler Feedback , which uses data from the previous frame to more efficiently determine how textures will load. All these features together are essential for better use of hardware and to enable better graphics, with a good level of performance.
The RX 6600 XT
The RX 6700 XT is based on the Navi 23, which brings technologies and features similar to those present in the RX 6900 XT and RX 6800 XT models, but scaled down. This board brings a total of 32 computing units, far from the 80 present on the top of the line RX 6900 XT, and just below the 40 present on the RX 6700 XT. As a result, other structures were also reduced.
The amount of Infinity Cache was reduced to 32MB, while Ray Acelerators, specialized in accelerating processes related to Ray Tracing, are also reduced to 32, because in RDNA 2 microarchitecture we always have one Ray Acelerator per Compute Unit.
In computational units this chip is below the Compute Units count of the RX 5700 XT (40) and RX 5600 XT (36). But in contrast the evolutions of RDNA 2 compared to the first generation brings its advantages, an example is the clocks. The RX 6600 XT boosts up to 2589MHz much higher than the respective 1905MHz and 1560MHz of the RX 5700 XT and RX 5600 XT.
Consumption has also scaled down, with the board operating with just an eight-pin connector and with an estimated total consumption of 160W. The memories suffered advances and setbacks compared to the one used in the predecessor RX 5600 XT, with the memory increased from 6 to 8GB GDDR6, but the memory interface was reduced from 192-bit to 128-bit, with memory bandwidth falling from 288 GB/s to 256GB/s, all this comparing how it was on the RX 5600 XT to how it was on the RX 6600 XT.
Technical comparisons
COMPARATIVE
PowerColor RedDevil RX 6600XTAMD Radeon RX5600 XTNVIDIA GeForceRTX 3060AMD Radeon RX6700 XT
PRICES
Price at launch$279.00 $329.00 $479.00 Updated price$279.00 $479.00
GPU SPECIFICATIONS
Manufacturing process7 nm7 nm8 nm (Samsung)7 nmPCI-Express bus4.04.04.04.0chipNavi 23 XTnavi 10Ampere GA106-300Navi 22 XTGPU clock1968 MHz1130 MHz1320 MHz2321 MHzGPU Clock (Turbo)2589 MHz1560 MHz1777 MHz2581 MHz
MEMORIES SPECIFICATIONS
RAM technologyGDDR6GDDR6GDDR6GDDR6BUS Width Interface128 bit192 bit192192 bitAmount of RAM8 GB6GB12 GB12 GBmemory clock2000 MHz1500/1750 MHz1875 MHz2000 MHzeffective clock16000 MHz12000/14000 MHz15000 MHz16000 MHzBandwidth256 GB/s288/336 GB/s360 GB/s384 GB/s
GENERAL Specificatios
Shading Units2048230435842560TMUs128144112160ROPs64644864Pixel Rate165.7 GPixel/s99.84 GPixel/sec85.30 GPixel/s165.2 GPixel/sTexture Rate331.4 GTexel/s224.6 GTexel/s199 GTexel/s413 GTexel/sFloating point performance21.21 TFLOPS7,188 TFLOPS12.74 TFLOPS13.21 TFLOPS
DESIGN
power pins1x 8 pins1x 8 pins1x 8 pins1x 6 pins + 1x 8 pinsPlate combination supportATNOTNOTATSlot Typetwo slotsdual-slottwo slotstwo slotsboard length267 mm242 mm267 mmTDP160W150 (GPU TBP) W170W230WRecommended font450W450W450W550Wvideo connections3x DisplayPort 1.4, 1x HDMI 2.13x DisplayPort 1.4, 1x HDMI 2.0B3x DisplayPort 1.4, 1x HDMI 2.13x DisplayPort 1.4, 1x HDMI 2.1
RESOURCES
DirectX12 Ultimate12.012 Ultimate12 UltimateOpenCL2.12.02.02.1OpenGL4.64.64.64.6shader6.56.46.56.5
EXTRAS
ExtrasInfinity Cache 96MB
Photos
The Red Devil line is PowerColor's top line and always brings plates with quite imposing design. This Red Devil RX 6600 XT follows the concept of a product with high quality and care in detail. It features a double FAN cooler system, and the already traditional LED with fillets at one end, along with the Red Devil name. It also has a BIOS selector, very traditional on AMD GPU cards.
The board has two power connectors, one 6-pin and one 8-pin. On the back it also has a blackplate with an LED in the form of the logo that references the line.
Like most cards today, it occupies two PCI-Express slots. In the video connections part, three DisplayPort 1.4a and one HDMI 2.1.
system used
We made a change to our graphics card testing platform, now based on an AMD Ryzen 9 5900X processor. Several other high performance components come with this system, such as NVMe SSDs and 32GB RAM clocked at 3200MHz (CL16). Below are some pictures of the card installed on our new video card test bench:
https://www.youtube.com/embed/WiSR-IHhBuc
Before the tests, details of the machine, operating system, drivers and software/games used in the tests:
OUR TESTING MACHINE, APPS AND GAMES WERE UPDATED IN MAY 2021
Machine used in the tests:
- AMD Ryzen 9 processor 5900X- GIGABYTE X570 AORUS Xtreme motherboard- HyperX Predator RGB 32GB (2x16GB) 3200MHz CL16SSD - Kingston KC2500 250GB + 2TB SSD- Cooling system CM MasterLiquid ML360 V2 RGB- Source Power Supply CM v1300W Platinum- Custom CM MasterFrame 700 Enclosure
Operating System and Drivers:- Windows 10 Pro 64 Bits- AMD Catalyst Adrenalin 21.7.x
Applications/Games:
- Adobe Premiere CC 2021 (GPU rendering)- Blender (GPU rendering)- SPECviewpeft 13 (Solid Works/Maya, GPU rendering)- 3DMark (Fire Strike Ultra / Port Royal)- Assassin's Creed Valhalla (DX12 )- Flight Simulator 2020 (DX11)- Forza Horizon 4 (DX12)- Grand Theft Auto 5 (DX11)- Rainbow Six Sieg and (Vulkan)- Red Dead Redemption 2 (Vulkan)- Resident Evil Village (DX12)- The Division 2 (DX12)- Watch Dogs: Legion (DX12)
GPU-ZBelow the main screen GPU-Z showing some key features board techniques.
Overclock
We use AMD Radeon Software to overclock, setting the base clock at 2500MHz and the turbo at 2700MHz. It wasn't possible to raise her standard clocks that much, but otherwise the clocks are quite high. This made it possible to run the tests with stability and complete the full battery. The memories went up from 16GHz to 16.6GHz, the limit to keep the system stable.
NOTE: Overclock at your own risk. Overclocking may result in loss of warranty.
Energy consumption
We started with power consumption tests with all the boards compared. All tests were done with the same system, which gives an exact idea of what each VGA consumes. It is worth noting that the value is the total consumption of the machine and not just the video card, which gives an idea of how much a complete system consumes. Comparisons with tests from other sites can yield very different results due to changes in the systems used.
The tests consist of the minimum consumption of the system, when it is in idle mode after the maximum load test, in this case running 3DMark through Fire Strike Ultra mode.
https://benchmarks.com.br/graficos/v/15033?iframeid=15033
https://benchmarks.com.br/graficos/v/15034?iframeid=15034
NOTE: In the test running the 3DMark application, we considered 5 to 10W as a margin of error, due to the variation that happens when testing the same card.
Temperature
Another very important test when we talk about video cards, the chip temperature. Tests consist of either the system in idle mode or in continuous use.
It is important to note that some cards have a system that turns off the fans when the GPU is not being required, such as when performing simple Windows tasks or even simpler games. Therefore, there are temperatures considerably higher than some models in this situation, but in practice they do not compromise the board. According to the manufacturers, this feature increases the lifespan and consumes less energy. Therefore, there can be large differences in the idle mode temperature, which does not characterize a bad card if the temperature is high.
Why did the board get a lower temperature when overclocked?This is a normal situation on current boards. The rotation of the FANs is faster and consequently they make the GPU cool down faster, in some cases with a lower temperature than in the normal situation.
Why does the reference system cooler board have a lower idle temperature than a theoretically better cooler board?Because current video cards with newer cooler designs tend to turn off the FANs when the temperature drops below numbers like 40, 45 or even 50 degrees, so when the FANs are turned off the tendency is for the GPU not to lower the temperature any more than than the limit that turns off the FANs.
First let's test the cards with the system in idle mode:
https://benchmarks.com.br/graficos/v/15035?iframeid=15035
For the in-use board test, we measured the peak temperature during the Ultra mode tests.
https://benchmarks.com.br/graficos/v/15036?iframeid=15036
NOTE: Temperatures can vary greatly depending on the region of the country, system where the board is installed and test used.
Below are some photos of the plate with a Flir thermal camera, showing the temperature in some parts of the plate body:
Applications
With the increase in applications that take advantage of the processing power of GPUs, we've updated our test battery with some of the most important software on the market.
Adobe Premiere CC 2021Adobe Premiere is a world reference when it comes to video editing software, and in its latest versions it has also taken advantage of the benefit of GPUs to help speed up rendering. Below is the behavior of the compared plates:
https://benchmarks.com.br/graficos/v/15037?iframeid=15037
BlenderAnother nice test to see how the video card behaves in helping with the process of rendering images and videos. Blender stands out for being open to use and also updated with the latest technologies on the market.
https://benchmarks.com.br/graficos/v/15038?iframeid=15038
SPECviewperf 13The professional application test suite is comprised of a comprehensive battery of hardware-intensive scenarios to render diverse uses ranging from architecture, mining, and medicine. We ran two tests, one focusing on performance in Maya and the other in SolidWorks.
https://benchmarks.com.br/graficos/v/15039?iframeid=15039
https://benchmarks.com.br/graficos/v/15040?iframeid=15040
3DMark
And if we talk about benchmarks, we couldn't leave out one of the most iconic tests in the world, especially for video card performance, 3DMark. Our battery consists of three tests, but 2 of them show technologies that only newer board models bring, Ray Tracing (Port Royal) and DLSS (DLSS Feature Test).
We ran the latest version of the app from UL Benchmark (which purchased Futuremark), and all tests consider the default profile setting, with no changes. Below are the results:
https://benchmarks.com.br/graficos/v/15041?iframeid=15041
https://benchmarks.com.br/graficos/v/15042?iframeid=15042
Game tests
Now let's get to what really matters: performance tests on some of the top games on the market.
To help understand the following graphics: Above 60fps is ideal for monitors operating at this frequency. The closer to 30fps, the worse the fluidity becomes and, below 30, the game starts to become "unplayable"
Assassin's Creed ValhallaOpen world game has ample scenarios and a benchmark with a good amount of characters and structures, making it a challenge for both the processor and the video card. The game uses the Ubisoft Anvil engine, an evolution of AnvilNext 2.0 present in the series since Assassi'ns Creed Unity. The version used in Valhalla on PC is based on the DirectX 12 API.
https://benchmarks.com.br/graficos/v/15043?iframeid=15043
https://benchmarks.com.br/graficos/v/15044?iframeid=15044
https://benchmarks.com.br/graficos/v/15045?iframeid=15045
Flight Simulator 2020Microsoft's new flight simulator arrived with immense hype and soon became a reference when it comes to high quality graphics, with incredible scenery bordering on reality at various times, ideal for seeing the behavior of video cards. Despite being a recent game and from Microsoft, the API used is still DX11.
https://benchmarks.com.br/graficos/v/15046?iframeid=15046
https://benchmarks.com.br/graficos/v/15047?iframeid=15047
https://benchmarks.com.br/graficos/v/15048?iframeid=15048
Forza Horizon 4Playground Games' game uses its own graphics engine and, as exclusive for Microsoft systems, is fully developed for DirectX 12. This game stands out for its excellent graphics and the ability to deliver a good level of performance on multiple hardware, including some more limited ones.
https://benchmarks.com.br/graficos/v/15049?iframeid=15049
https://benchmarks.com.br/graficos/v/15050?iframeid=15050
https://benchmarks.com.br/graficos/v/15051?iframeid=15051
Grand Theft Auto VThe game is already a classic and after years it still stands firm as one of the most played games. Based on DirectX 11, it also brings a sense of older graphics engines based on Microsoft's still popular API. It's a very demanding test on processor, and faster memories also have very noticeable impacts. For modern video stages, it's no longer a big challenge.
https://benchmarks.com.br/graficos/v/15052?iframeid=15052
https://benchmarks.com.br/graficos/v/15053?iframeid=15053
https://benchmarks.com.br/graficos/v/15054?iframeid=15054
Rainbow Six SiegeThe Ubisoft game has as high points the use of the Vulkan low level API in its most recent implementation. This Esport demands high frame rates to be played satisfactorily, and is usually one of the most efficient games in achieving this performance in multiple components.
https://benchmarks.com.br/graficos/v/15055?iframeid=15055
https://benchmarks.com.br/graficos/v/15056?iframeid=15056
https://benchmarks.com.br/graficos/v/15057?iframeid=15057
Red Dead Redepmtion 2Game by RockStar, with beautiful graphics is a good reference to measure the behavior of video cards. Our test considers the game running on the Vulkan API, which behaves very well on both AMD and NVIDIA cards.
https://benchmarks.com.br/graficos/v/15058?iframeid=15058
https://benchmarks.com.br/graficos/v/15059?iframeid=15059
https://benchmarks.com.br/graficos/v/15060?iframeid=15060
Resident Evil VillageCapcom's game uses the excellent RE Engine, a graphics engine that delivers interesting results from the PC's high-end hardware to more limited platforms like the Nintendo Switch. Resident Evil 8 highlights complex and richly detailed scenarios, using Ray Tracing to illuminate the scenarios and with features such as FidelityFX available. In tests we take a tour of Castle Dimitrescu, one of the heaviest and most detailed locations in the game.
https://benchmarks.com.br/graficos/v/15061?iframeid=15061
https://benchmarks.com.br/graficos/v/15062?iframeid=15062
https://benchmarks.com.br/graficos/v/15063?iframeid=15063
Tom Clancy's The Division 2The Division 2 uses its own graphics engine developed by Ubisoft Massive, dealing with complex scenarios and large amounts of particles on the screen.
https://benchmarks.com.br/graficos/v/15064?iframeid=15064
https://benchmarks.com.br/graficos/v/15065?iframeid=15065
https://benchmarks.com.br/graficos/v/15066?iframeid=15066
Watch Dogs:Nvidia-supported Legion Game is based on the Disrupt graphics engine and has extensive use of RTX technologies such as DLSS, and also features Ray Tracing, being accelerated by both GeForce RTX and Radeon RDNA 2 hardware. a futuristic London full of geometry and characters, which combined with the light ray tracing effects make it quite a challenge to run the game.
https://benchmarks.com.br/graficos/v/15067?iframeid=15067
https://benchmarks.com.br/graficos/v/15068?iframeid=15068
https://benchmarks.com.br/graficos/v/15069?iframeid=15069
video gameplay
https://www.youtube.com/embed/jUIjuwPZj6Y
Conclusion
The efficiency of the RDNA 2 has scaled well in its reduction for the RX 6600 XT, and we have gains of 10 to 20% over the predecessor RX 5600 XT and a very close performance in many cases with the RX 5700 XT. In the case of Adobe Premiere the 6600 XT proved less efficient even when compared to the 5600 XT, probably due to the memory bandwidth that is now lower. But overall we didn't see this drop, on the contrary as highlighted above.The
Read the full article
0 notes
Text
The Touryst arrives on Xbox One and PC
Back in December 2019, Shin’en Multimedia wowed us with a unique Switch exclusive: The Touryst. Defined by a stunning voxelised engine with a beautiful post-process pipeline, The Touryst looked like nothing we’d really seen before and now it is available to play on Xbox One, Xbox One X and PC, arriving day one on Game Pass. I highly recommend that you check it out.
The idea behind The Touryst is extremely straightforward – it’s an exploration-based adventure that has you travelling between various islands, solving mysteries that lie beneath the surface. What’s wonderful about the game is the sense of discovery and exploration. At no point does The Touryst tell you what to do, or bring up a large pointer ordering you where to go. With that in mind, figuring out what the game expects from you is half the fun.
And it’s all delivered with that remarkable engine. Yes, the aesthetic is ‘voxelised’ but everything is still built from triangles, though the game worlds themselves are built using a tool known as MagicaVoxel. This makes it very easy to craft environments, which are then given a visual boost via Maya and injected into the game. A voxel-like aesthetic typically brings Minecraft to mind, and while The Touryst has a similar simplicity, the islands can be rich and dense in detail. The deferred lighting system is simply sublime with a wonderful dynamic range.
On Switch, Shin’en delivered a nigh-on perfect 60 frames per second and achieved this via dynamic resolution scaling with outdoor areas typically rendering at 810p to 900p with 1080p more common in the internal spaces. In mobile mode, resolution tended to vary between 612p and the display’s native 720p. There are few surprises with Xbox One consoles: The Touryst runs at 1080p on the standard console, scaling up to full 4K on the Xbox One X. Just like the Switch version, there is no anti-aliasing – and this is by design, as pixelated edges are an essential part of the game’s look, which would not benefit from today’s post-process or temporal AA.
To see this content please enable targeting cookies.
Manage cookie settings
John Linneman and Rich Leadbetter discuss the wonderful Xbox One and PC ports of The Touryst.
On PC, you can select your own preferred resolution of course but curiously, there is an anti-aliasing option. By design, The Touryst is relatively light on GPU resources, so Shin’en’s chosen AA technique is brute-force super-sampling, which is to say that if you run at native 4K with AA enabled, the game is actually rendering internally at 8K instead and downscaling to your display resolution. In most other respects, The Touryst is essentially the same as the Switch version – just stripped of a dynamic resolution scaling system that is no longer required.
The one exception is shadow map resolution and associated resolution, which is significantly improved. Xbox One X and the PC version support 4096×4096 shadow maps with three cascades, which drops to 3584×3584 on the standard Xbox One. There’s refinement then, but fundamentally, The Touryst doesn’t really need improved shaders, extended draw distances or higher precision post-process pipelines. These ports from Switch deliver superb results simply from a push to higher resolution and improved shadow quality – though it would be interesting to see actual native 8K or indeed ray tracing added to a prospective Xbox Series X conversion. Shin’en Entertainment tells us that these conversions were all about getting to grips with DX12 – so why not DXR too?
All of which leads us on to performance, where perhaps not surprisingly, a game architected to run at 60 frames per second on Nintendo Switch runs flawlessly on Xbox One and Xbox One X. The only controversy surrounds the PC version, which does not support frame-rates in excess of 60 frames per second. Indeed, the game actually launched in a state that demanded that PC users at higher refresh rates dial back refresh rate to 60Hz before the game would boot. This has been addressed in a patch: the game will now play on a high refresh rate screen. However, it’ll still be operating at 60fps – it’s how the game was architected and there are no plans for this to change.
Regardless, it’s great to see a firm traditionally associated with Nintendo exclusives branch out to other platforms and the results here are impressive. This port is a cleaner, crisper rendition of one of my favourite games of 2019 that has lost none of its charm in the transition to PC and Xbox One. It’s also a remarkably small download (around 550MB) and in common with the Switch game, there are no real loading times whatsoever. It’s beautifully slick in every way and I highly recommend playing it.
from EnterGamingXP https://entergamingxp.com/2020/08/the-touryst-arrives-on-xbox-one-and-pc/?utm_source=rss&utm_medium=rss&utm_campaign=the-touryst-arrives-on-xbox-one-and-pc
0 notes
Quote
Autodesk has released Maya 2020: the latest update on its 3D modelling, animation, visual effects and 3D rendering software. I've been using Maya for almost two decades now. I remember the days when you needed a Silicon Graphics machine to run it, which was expensive enough, but coupled with the price of a Maya licence you had to spend a small fortune. I'm not sure if the unobtainable price made it a more desirable application, but everyone I knew wanted to work with it.
Thankfully, prices dropped over the years and now Maya is much more affordable, although many still think it's too expensive, especially when compared to other applications like Blender and Cinema 4D (both of which appear, along with Maya, on our guide to the best 3D modelling software).
Since its early days, Autodesk has released updates annually. These usually saw new tools and features being added to its arsenal; these features were welcome additions, but were often aimed more at higher-end animation and simulation work.
Over the past few years, maybe even longer, we have seen a shift in the direction Autodesk have taken with the updates. They are now more focused on improving existing systems and implementing features voted on by the community. This has transformed Maya into a much better, all-round application which continues to evolve and improve in a more focused way.
With Maya 2020, Autodesk continue this trend of listening to their users to implement much-needed quality-of-life features. They also enlisted Blue Sky Studios to help mold the animation tools, which have also seen a huge upgrade in this release.
Maya 2020: Features and performance
Autodesk boast over 60 new animation features, with the biggest being improvements to the animation cache playback. Originally introduced in 2019, cache playback allowed animators to view their work in real time with little or no need for constant playblasts. This was the idea anyway, but it came with limitations. The first was a lack of dynamics support, so it couldn't be used alongside these systems. Image planes still relied on legacy systems, so they were slow and hogged memory, and it wasn't as efficient when used with dense geometry.
These issues have all been addressed and make for a smoother experience. Dynamics support is included, using a new layered evaluation system. nParticles, nCloth and nBodies are now supported, with nHair, Bifrost FX and muscle systems coming later.
High-resolution geometry or subdivision surface models that used Smooth Mesh were not efficient enough in 2019. They used a lot of memory and were slow to cache. In 2020, the base mesh is stored while smoothing is now handled on the GPU.
Speaking of the GPU, another big update this year is Arnold 6 with full GPU rendering support, based on the NVIDIA OptiX ray-tracing engine. This has been in beta for a while but it's nice to see a full release. I've been using this more and more since I installed 2020 – it's so fast, although I am running an NVIDIA Quadro RTX 4000 so I'm not sure how it would run on lower-end cards. I no longer need to render to see model and shader updates, as they are visible in the viewport in, almost, real time.
Finally, Maya has the ability to retopologise the densest of models
On the modelling side of things, Autodesk have given us Remesh and Retopology tools. "It's about time!" I hear you scream. When combined, these tools will enable clean, quad-based topology but it has limitations. As good as the resulting models are, there are no options to dictate edge flow, so for game art there would still be a lot of clean-up needed.
Animators can now see past and future movement with the new ghosting preview tool
It seems Autodesk are now taking full advantage of the GPU as it's being used on many other tools to help speed up workflow. The Proximity Wrap tool, which is new to Maya, is an advanced version of the Wrap tool. It too uses the GPU to help calculate how the influenced geometry manipulates the surface model, making for smoother interactions. I'm looking forward to experimenting with this on future facial rigs and custom muscle systems.
With Maya 2020, animation has seen significant improvements, as has rigging
While we are on the subject of rigging, another new addition I am personally excited about is the introduction of matrix-driven workflows. These are a series of nodes and attributes that make rigs cleaner and less cluttered. With the offsetParentMatrix attribute, constraints could be used less and less, meaning the art of rigging is more streamlined.
The one issue I do have with the new rigging tools is they aren't backwards compatible. I have many clients who still use Maya 2017 and 2018, so for me, these shiny new nodes aren't an option just yet.
Should you upgrade to Maya 2020?
There is so much to be excited about with this release, and I haven't even covered the modelling and speed improvements. All in all, Maya 2020 is an essential upgrade if you're an animation studio. With all the new updates, it could save you a lot of time on your projects.
http://damianfallon.blogspot.com/2020/04/maya-2020-review.html
0 notes
Text
From 4.3GHz All-Core Overclocking to SMT Scaling: A Comprehensive Review of the AMD Threadripper 3990X
AMD has spent the last three years rewriting the rules of desktop performance. On Friday, the microprocessor manufacturer launched its AMD Ryzen Threadripper 3990X, the world’s first single-socket 64-core CPU. I’ve already written a teaser for this article and gone over some of my early thoughts on the CPU, but here’s where we dig into the data on the chip and see what the reports can tell us.
Under the right circumstances, the Ryzen Threadripper 3990X offers incredible performance. In unoptimized workloads, it’s flat or even declines against the Ryzen Threadripper 3970X. I’ve spent a great deal of time putting the CPU through its paces, looking for scenarios where it succeeds and analyzing where it falls flat. I also threw it outside in 12-degree Fahrenheit (-11C) air and overclocked it using the Asus Zenith II Extreme, just for fun. We’ll talk about that, too. I may have missed the world record to an enterprising individual with liquid nitrogen, but the CB20 score I hit would still qualify this system for second-place according to HWBot.
I’m going to assume you’re aware of the Threadripper 3990X and have read our 3970X review, plus the 3990X launch discussion from last week.
The Windows Thread Scheduler
One issue affecting our Windows 10 results is the fact that the OS doesn’t scale above 64 threads very effectively. The OS splits CPU workloads into processor groups, with up to 64 threads assigned to each group. Some applications provide their own thread schedulers, but applications that don’t are often capped at ~50 percent CPU usage on the 3990X. Linux scaling is generally better; Rob Williams at Techgage has more data on this. 3D rendering applications are easily the strongest use-category for the 3990X, which puts up its strongest scaling figures in these applications. There have been reports that Windows 10 Enterprise may offer better scaling, but our contacts at AMD indicated there’s no reason for a user to run Windows 10 Enterprise when buying a 3990X. The official guidance from AMD is that Windows 10 Pro is enough.
The (Lack of) Intel Competition
We reached out to Intel to inquire if the company would provide Xeon server CPUs to benchmark against the 3990X, but the company has opted not to sample against the AMD CPU. While these comparisons wouldn’t align on price, they would have allowed us to compare top-end solutions from both companies. Without the option to draw on Xeon, our comparison vehicle was limited to the Core i9-10980XE.
At ~$1000, the 10980XE cannot be considered fair competition for the $4000 3990X, but it’s the closest Intel CPU we have, and I wanted to give some indication of how it stacked up. Because different applications have such different responses to high core count CPUs, there are cases where the 10980XE matches or outperforms the 3990X. More cores are not always better, even today.
Results Formatting, Test Setup
This review has a larger footprint than my typical coverage, and I’ve subdivided the results into several different categories. Our standard suite of tests compares the top Threadripper and Core i9-10980XE (along with the Ryzen 9 3950X where possible) in a wide range of applications. The next section discusses SMT scaling on the 3990X specifically, with some specific evaluations in applications like DaVinci Resolve using the Puget Systems Extended Benchmarks for that application. Finally, the overclocking section discusses our OC results, with a little help from Mother Nature.
All testbeds were equipped with 64GB of DDR4-3600 in four sticks of RAM. XMP was enabled on both the AMD and Intel systems, but the Intel Cascade Lake required a DDR4-3200 RAM clock, not DDR4-3600. Both Intel and AMD systems were benchmarked with a Corsair MP600 SSD, though the AMD system used the drive in PCIe 4.0 mode, while the Intel rig was limited to PCIe 3.0.
An RTX 2080 was used to provide GPU testing in all cases, with Nvidia GeForce Game Ready Driver 442.19. The latest UEFI images were loaded on all motherboards.
A few application-specific notes before we get started: I’ve included MATLAB results here. MATLAB favors Intel by default for reasons we discuss in far more detail in this article. I’ve benchmarked AMD’s with the “Cripple AMD” instructions both enabled (default) and disabled.
We’ve also added a significant prosumer / workstation workload. Puget Systems distributes their own extended benchmark suite for various applications, including DaVinci Resolve. These tests don’t kid around — the 8K DaVinci Resolve suite requires a GPU with up to 20GB of VRAM, which precluded us from testing it. AThe free trial of DaVinci Studio was used, which does impact the performance of one H.264 benchmark according to Puget, but the test results we present are accurate relative to that version of the application and the same workload ran in software on all of the CPUs we tested. I have data from Agisoft Metashape as well, but I realized late on Sunday that I need to re-check those results.
Arnold Render CPU Benchmark – Antonio Bosi
Special thanks to Antonio Bosi, who designed our Maya 2020 Arnold Render CPU benchmark by modifying a scene from his existing test suite. Antonio maintains his site with a number of Arnold Render tutorials, personal art, and 3D models for download. The tweaked version of the standard Fast benchmark scaled about four percent better than the default flavor, and, at 1.4x scaling over the 3970X, delivered our strongest render uplift between the two CPUs.
05_030_A
We also downloaded a number of Blender scenes for test rendering, all of which were used in the Blender open movie “Spring.” Two screenshots of representative animation frames are shown above and below:
03_005_A
Test Results
Tests included: 7zip, Blender (stand-alone benchmark and full application), Cinebench R15 and R20, Handbrake 1.31, Indigo Bench, Maya 2020, Neat Bench, POV-RAY 3.7, and a Qt compile benchmark using MSVC 2019.
We see two different performance profiles in these results. In some applications — generally rendering applications — the 3990X is 1.3x – 1.4x faster than the 3970X. Some tests, like V-Ray, predict even stronger scaling. We’ve benchmarked a range of rendering applications to demonstrate that in many cases, existing software does take advantage of these capabilities. In some cases, like Arnold Render, the 3990X even comes close to proving cost-effective against the 10980XE, which takes 3.63x longer to render our test scene and costs 25 percent as much. We’ll also examine a renderer that doesn’t scale in our SMT section.
Outside of rendering applications, the 3970X is generally a better choice, especially given that it’s more cooperative with the regular version of Windows 10. Inside rendering applications, particularly at the professional level, the improved performance might be worth it to creatives with cash to burn.
I’ve fallen back to using slideshows for this article because of the amount of data, but a few of our results don’t fit well in that format for various reasons. Our MATLAB benchmark was provided by Intel for testing the Core i9-10980XE’s performance. The table below summarizes MATLAB performance on AMD hardware versus Intel.
MATLAB is an application that doesn’t scale past 64 threads on Windows 10 Pro. As a result, the 3990X is slower than the 3970X with SMT enabled because its baseline clocks are lower, even in 32-core mode. We’ve seen several examples of this.
The Blender 1.0Beta2 benchmark is based on an older version of Blender (2.79) and runs more slowly than the current flavor (2.81). It also crashes on the 10980XE for unknown reasons (the 10980XE doesn’t have this problem in the actual application). Blender is a solid win for the 3990X, and while we don’t see our best scaling in this renderer, the 3990X renders between 25 – 35 percent faster than the 3970X in these scenes.
SMT Scaling
Our standard test suite explored performance scaling between the 3970X and 3990X, generally finding that the 3970X is the stronger option for the typical user, but with specific improvements in certain workloads for the 3990X. Now we’re going to take a look at the SMT scaling question under Windows 10.
Tests included: Blender, DaVinci Resolve (Puget Systems), Keyshot 9, Maya 2020, Maxwell Render 4.2.
There are only a handful of applications that show performance declines when SMT is enabled, but Maxwell Render 4.2 definitely does. Unfortunately, the “Benchwell” scene included in Maxwell Render 4 will no longer load in Maxwell Render 5, so I was unable to test if the same problem occurs in the newest version of the test. Turning SMT off gives the 3990X a win over the 3970X, but not enough to justify the cost of the CPU.
Other tests, however, showed consistent scaling from enabling SMT, and benefited from its use. We rendered an extensive series of Blender scenes (Junk Shop, Spring, Agent 327, and Mr. Elephant), all of which show varying responses to SMT use. I ran a number of additional test renders that don’t appear here, just to keep the data set manageable, and the general performance improvement in Blender in the professional-level renders available via Blender Cloud is a very consistent 1.3 – 1.4x. Keyshot scales a bit less, at roughly 1.2x-1.25x.
In DaVinci Resolve 16, Intel doesn’t win, but it does win the price/performance category. The 3990X scales a bit off the 3970X, but I don’t know that many people would pay 4x more for a 1.16x performance gain. It might very well come down to which specific codec and media settings you were editing, since the 3990X does show larger gains over the 10980XE in a few specific tests.
Intel, therefore, definitely still makes a case for its own utility and relevance in these workloads. The 3970X and 3990X have carved out real territory for themselves, but they aren’t a slam dunk in every situation.
Overclocking Performance
17 years ago, literally to the day, on February 10 2003, AMD launched the Athlon XP 2500+, 2800+, and 3000+. To overclock the 3000+ — and because we all knew at the time that it couldn’t match the Pentium 4 at default clock — I stuck it outside to OC it, and pushed the CPU up to 2.6GHz, 1.2x over stock. I never did it again until this past weekend. This article was originally supposed to run on Friday, but I’m tickled that it’s actually running today, because having the dates align this perfectly is fun. The 3990X is a rather good overclocking CPU, if my single sample is anything to go by, and the fact that this article is running on the same day is just icing on the cake.
How’d I do it? Simple. I stuck the entire system outside in 12F / -11C air. I actually experimented with testing the system inside, by putting the CPU radiator + fan assembly up against a window screen, so the cooler could draw directly from the outside air. This worked to a point, but it didn’t provide the cooling I wanted. Solution: Outdoor overclocking.
Besides, that sounds better than “Bathroom overclocking.”
Who has had two thumbs and is unhappy this idea didn’t work? Me, that’s who.
I started my testing at an all-core 3.7GHz and 1.4v, but this was too much voltage for the Asus Zenith II Extreme. The OCP protection on the motherboard would kick off halfway through stress tests. Lowering the voltage to 1.35v produced better results. I ran the complete Blender Benchmark 1.0Beta 2 suite at 3.6, 3.7, 3.8, and 3.9GHz all-core, lowering the voltage at each step.
At 3.9GHz and 1.33v, I decided to leap. I knew that an all-core 4GHz wouldn’t break the 32K mark, which is where I needed to be to beat the (now second-highest) score. I dialed in 4.1GHz and she POSTed… but my score was still too low. Since I wrote my article on Friday, the world record has been claimed by someone with a 5.3GHz overclock, and I knew I wasn’t going to hit that, but I thought I just might manage to take second place.
At this point, it’s about 1:30 AM on Sunday morning. Anyone driving past would have observed a remarkable sight — a brilliant (because of course both the motherboard and RAM are LED-equipped) star shining in my front yard. Had they come closer, they would have marveled at the sturdy, unassuming, and unexpectedly extremely valuable nightstand stoutly holding about $6000 in computer equipment out of everything computer equipment is never supposed to touch.
I considered this. I contemplated the wisdom of testing extremely expensive hardware at night, in the open air. I thought about snow and wind, and contemplated the fact that I was running markedly less voltage than I had used to maintain a stable 3.7GHz OC.
If you want to be good at overclocking, you have to understand it as an art. Systems don’t just become randomly unstable. There’s an order and a hierarchy. Systems need to POST, boot, and then run benchmarks. The longer and more rigorous the test you can run, the greater the chance the overclock is stable. I knew the 3.7GHz all-core was stable enough to run through a fair number of tests, and that 3.9GHz had been stable through Blender. I knew I couldn’t be too far off hitting the motherboard’s overcurrent protection, however. The CPU idled at 6C in the frozen wasteland of my… front yard, but under load, she was already hitting 67C. Overclocked CPUs are often far more thermally sensitive than their stock-clocked counterparts, and 67C was more than I was comfortable with already.
Any time you push a CPU to the outer edge of the envelope (and here, that could mean anything from a stock cooler to LN2), you’re dancing on the head of a pin. It’s a gamble that you can tune the CPU just enough to eke out a test result without impacting performance in a way that kills the net effect of your improvement.
CPU power dissipation increases with TDP, but it increases much more strongly as a result of voltage. I gambled that I’d reduced the VRM load enough that she could handle a 4.3GHz all-core at 1.3275v, even though I’d seen the machine hard-off at 4GHz and 1.4v.
Keep in mind, we’re talking about a CPU clock that’s about 1.26x higher than where I’d estimate the 3990X’s clock sits on a regular basis, and we’re talking about doing it on 64 CPU cores at once. All-core 4.3GHz = 275.2GHz. 0.275THz. Yeah, it starts with a decimal. Don’t care.
I felt like Han Solo reaching for the hyperspace levers on the Millennium Falcon, if Han had been the biggest damn nerd on Earth. My hands were freezing, my ears were numb, my front yard sounded like a hair dryer, and the rig had already spooked a dog walking by. It was time to see what she had. I typed “43,” hit “Save and Exit,” and crossed my fingers. She POSTed. Booted.
Took a second-place world record in Cinebench R20 and in Cinebench R15, though I’m still working on the submission process to HWBot.
I’ve been a reviewer for 18.5 years. I’ve tested systems valued at over $10,000. I’ve never tested a CPU that could be called the second-fastest at anything on the planet. Even knowing that my own record will soon be broken by 3990X owners with LN2 and exotic cooling setups that don’t rely on the weather, even knowing that the result was simply in a benchmark, there’s something undeniably cool about that.
I don’t think people are going to get 4.3GHz overclocks out of the 3990X on a regular basis, but lower clocks seem eminently possible. The results above show that they can provide a sustained benefit and the voltage required to maintain an AC 3.7GHz is clearly well below 1.3275v, given that I used that same voltage to hit 4.3GHz. I’ll leave it to manufacturers like Boxx to figure out what the possibilities are, but these test results imply they might be good.
In the right workloads, for the right buyer, overclocking the 3990X could make good sense. My performance improved by 10 – 17 percent moving from stock to 3.7 AC.
Conclusion
The 3990X is not the CPU for everyone. It doesn’t scale well enough to objectively justify its price, unless you shop in markets where price is no object. Even assuming better scaling from Linux or Enterprise Windows, it’s unlikely that enough applications would benefit to make the chip an objective improvement for many buyers.
All of this is completely normal for products at the top of a product stack. The Intel Xeon W-3265 is a 24-core chip at 2.7GHz base / 4.4GHz boost. The Xeon W-3275 is a 28-core CPU at 2.5GHz base / 4.4GHz boost. The W-3265 costs $3349. The W-3275 is $4449. That’s a 1.32x price increase for a 1.17x increase in core count. The Xeon Platinum 8280 is a $10,009 CPU with 28 cores, the Xeon Platinum 8270 is a $7405 CPU with 26 cores. Nobody blinks when Intel prices parts this way, even though there’s no workload on Earth where an 8280 is going to deliver a reasonable uplift over the 8270 with just two extra cores.
But the 3990X isn’t trying to be all things to all people. It’s the laurel wreath. It’s a victory lap. The 3970X is the CPU that’s actually intended to go toe-to-toe with what Intel has to offer; it’s the 3990X that clinches the deal, for the AMD customer for whom money is no object.
As for the significance of that? This is the first time in 15 years that AMD has had a product that competed for the “money is no object” segment in the first place. You have to go back to the days of dual-core Opteron and Athlon 64 FX, when AMD was facing off against Prescott and Smithfield, to find a time when AMD was so confident of its endgame to launch a part in this kind of position. Other reviewers, with access to more expensive Xeons than I have, have confirmed that AMD wins benchmarks against $20K worth of Xeon CPUs in multiple areas. That’s the kind of performance disparity that can make even the “Money is no object” crowd sit up and take notice.
Well played.
Now Read:
The AMD 3990X Pre-Review and Overclocking World Record Attempt
Intel, AMD Both Claim Wins Based on New Market Share Data
AMD Crushes on Earnings on Strength of 7nm
from ExtremeTechExtremeTech https://www.extremetech.com/computing/305965-from-4-3ghz-all-core-overclocking-to-smt-scaling-a-comprehensive-review-of-the-amd-threadripper-3990x
from Blogger http://componentplanet.blogspot.com/2020/02/from-43ghz-all-core-overclocking-to-smt.html
0 notes
Text
Social Security won’t be able to pay full benefits by 2035
WASHINGTON — If Congress doesn’t act soon, tens of millions of Americans will only receive about three-quarters of their Social Security benefits when they retire.
Social Security’s trust funds will be tapped out by 2035, according to an annual report released Monday by trustees of the government’s two largest entitlement programs, the other being Medicare. That’s one year later than last year’s report projected.
The new projection doesn’t mean retirees will no longer get checks in 16 years. But the program will at that point only have enough revenue coming in to pay three-quarters of promised benefits through the end of 2093.
The trustees urged lawmakers to act quickly to assure Americans they’ll be able to get their full retirement benefits.
“Lawmakers have a broad continuum of policy options that would close or reduce the long-term financing shortfall of both programs,” wrote Treasury Secretary Steven Mnuchin along with three other trustees, including Alex Azar, secretary of Health and Human Services, in their report to Congress.
But lawmakers have long punted on addressing Social Security problems, which would likely entail raising payroll taxes, curtailing benefits or some combination of both.
During the 2016 campaign, President Donald Trump said he wouldn’t touch Social Security. He didn’t believe he’d need to since his plan to boost economic growth to at least 4% would take care of Social Security’s long-term solvency.
The strong economy has not mitigated the entitlement’s fiscal issues. And the federal government’s deficit has grown, in part because of the 2017 Republican tax cuts.
Also, for the first time since 1982, Social Security’s total cost is expected to exceed its total income in 2020 and continue that way through 2093. This is two years later than projected in last year’s report.
The program would be financed with a combination of interest income and drawing down on the trust funds’ assets until 2035 when the reserves are depleted. Social Security’s costs are expected to rise for the next 20 years as the large Baby Boom generation retires and then remain fairly constant.
At the end of 2018, the Social Security program provided benefits to about 63 million people, mainly retired workers, but also their dependents and their survivors, as well as disabled workers and their dependents.
In terms of Medicare, which covers nearly 60 million Americans, the trustees project that the trust fund for Part A, which covers hospital and nursing home costs for seniors, will be depleted in 2026, the same as last year’s projections. It will then only be able to cover a large share — but not all — of the benefits.
The trust funds for Medicare Part B, which covers doctors’ visits and outpatient services, and Part D, which offers prescription drugs coverage, will remain adequately financed into the “indefinite future.” They are paid for by a combination of enrollees’ premiums, which covers about a quarter of the cost, and money from general federal revenue. The law requires automatic financing of these benefits.
Medicare’s future has become a central focus of the 2020 presidential campaign, with several Democratic candidates looking to expand it to younger Americans or to create a universal health care system called Medicare for All.
Trump administration officials and Republican lawmakers took the opportunity to blast the idea of broadening Medicare in their comments on the report.
“Instead of trying to expand Medicare into a universal entitlement that even covers wealthy Americans of working age, as some have proposed, we need to fulfill Medicare’s promise to our seniors,” Azar said, noting that the President wants to extend Medicare’s solvency by lowering prescription drug costs and basing provider payments on value rather than on services rendered.
Government watchdogs urged Congress policymakers to set aside their partisan differences and protect benefits for current and future retirees.
“Efforts should be taken now and phased in over time to slow the growth of health costs in Medicare and restore sustainable solvency to Social Security,” said Maya MacGuineas, president of the Committee for a Responsible Federal Budget. “But every day that passes, the problem gets bigger and the solutions become more difficult to implement.”
from FOX 4 Kansas City WDAF-TV | News, Weather, Sports https://fox4kc.com/2019/04/22/social-security-wont-be-able-to-pay-full-benefits-by-2035/
from Kansas City Happenings https://kansascityhappenings.wordpress.com/2019/04/22/social-security-wont-be-able-to-pay-full-benefits-by-2035/
0 notes
Text
3D CAD Software
In addition, it also includes options for editing images. 3D modeling software is essentially a requirement for virtually any game developer's toolkit, and there are tons of different alternatives. There are several free 3D modeling software available with basic capabilities.
Obviously, several different software can bring you all of the tools you will need to produce the model that you dream about. Select the very best software for the job You have to pick the very best software for designing packaging for your merchandise. Computers also employed for home gaming are great because it is going to guarantee you have the latest graphics and audio cards. The very first thing you ought to do when thinking about purchasing a new laptop computer is to pick a few various laptop computers you may want then make an effort to compare the characteristics to see exactly which one has the most value relative to cost.
If you're looking free 3d model creator software, here we're presenting some practical 3D modeling software that you may use free of charge. Also like Maya, it's extremely costly but will supply you with almost all the tools which you will require as an expert designer. Find out all of the modeling and design tools that you want.
The program is mostly targeted at beginners, therefore it is ideal for first-time game designers or little game development studios. All things considered, it is a free, easy-to-use program that is much less muscular than Open SCAD but remains simpler to approach. It is not the simplest to learn. however, it's possibly the single most powerful animation program on the planet. Many 3D modeling programs include extra functionalities like texture painting, animation, and, in some instances, even rendering. Zee TV Hindi programs play an important part in furthering the worldwide footprints of the India TV market.
When getting prepared for the year ahead, it's a great idea to fill in the gaps in your software collection, especially whenever there is so much fantastic software you are now able to find online free of charge. Quite numerous 3D designing software can be found in the market which demands various levels of expertise to operate. When sent via email outside the office, it's available to quite a high number of systems and outside users. You will find more details on our SolidWorks tutorial, however, be mindful. Indeed, obtaining a nice and precise overview of a technical project before the manufacturing procedure will enable you to adjust and polish your parts efficiently. Utilizing visualization software or 3D modeling software with amazing visualization options will be able to help you to have a better overview of your undertaking.
Download the most recent version of the greatest software, games, programs, and apps in Muvizu is a simple to use software application which lets you make 3D animated movies on your house computer. You will certainly discover the software package that will fit your undertaking. Currently, it's the very best package out there for my requirements. So it's a great package for photographers to get.
In the last decade or so (maybe somewhat longer, based on your perspective), 3D printing has come to be decidedly more accessible.
A basketball simulation model can be very expensive and outputs might not be as worthy as expected. To accomplish this, modeling and simulating are essential and you'll require 3D CAD software with advanced capabilities. Rhino 3Dis an important tool in regards to 3D modeling. The models are given below. You may even edit the consequent 3D model, to bring a cape or another article of clothing, before printing out your distinctive edition.
0 notes
Video
vimeo
Rain, Condensation droplets, Rivulets flowing over Hard Surface - Houdini RnD from Artkill on Vimeo.
RnD of Houdini particles flowing over a hard surface model to simulate a condensation/rain/rivulet/droplet effect. This is part of a larger RnD project I'll render & upload shortly (this is one section of a larger flying object - a cloud seeding drone).
Partly inspired by Mark Theriault's Sucker Punch Intro Breakdown using Pflow (vimeo.com/39161208) and having just starting making the switch for fx from Maya to Houdini, this was one of those "I wonder if I can do that now in Houdini" things that I just had to try. I remember years ago doing something similar in Maya and it taking a heck of a lot longer! This effect took about a week of tweaking.
The sim is basically just a popnet which relies on an SDF volume (isoOffset) for surface interaction and uses a voppop (VEX) to control the "drip off threshold". Once I had a working method, I then used 3 duplicate variations for the different rivulets (trail SOP) and finally added a random scatter SOP for some extra motionless droplets. As the final shot won't be so closeup, I have to option of increasing/decreasing the uniform sampling of the SDF to fit.
When all this is done , I'll hopefully be taking this RnD further with a rain-on-a-window-pane high-detail/realism sim.
Thanks to SpencerL for advice on the initial VEX methodology.
I go into a bit more detail on the fundamentals of this effect on Od|Force here:
forums.odforce.net/index.php?/topic/17684-rain-condensation-droplets-rivulets-flowing-over-hard-surface-rnd/
0 notes
Last Seen Blogs

makeupbykristacom-blog
Makeup by Krista

cherryblossomn9062
DaintyDucklingDreams

g9lvtxgh86
로투스작업대여【 FM821。COM 】해외

snowbunnyprotocol
♠Snowbunny Protocol♠

shakelikeshakira
She wolf in disguise