#why does tumblr make an image the same width of a post automatically
Explore tagged Tumblr posts
Visit Tumblr Blog
Explore Tumblr blogs with no restrictions, modern design and the best experience.
Last Seen Tumblr Blogs


Fun Fact
130K people were victims of a chain letter scam that affected Tumblr in May 2011.
Text
man how do I make my reaction images not so ding dang BIG??
#😭😭😭#why does tumblr make an image the same width of a post automatically#it’s nice sometimes but sometimes I want the pic to be small!!!!#HOW????¿¿¿#girl help I don’t understand anything anymore
30 notes
·
View notes
Note
hii would you be kind enough to share how you edit your gameplay posts? :) also stupid question… what did you mean by keyboard shortcuts? is it like Ctrl C & Ctrl V thing??? or am I just dumb
ok so long post but here is how i edit! With visuals, some of my settings, and other tips
This may seem like a really long process at first glance but the shortcuts really cut down half the time.
I edit in rows of my screenshots, typically grouping them by post or multiple small posts.

The first thing I do is crop. My crop ratios for my posts are 7:5 for landscape and 4:4.5 for portraits.
The next thing I do is run topaz clean. I could set up a keyboard shortcut for topaz clean but I'd have to pick my preset anyways. Now for the rest of the photos I have open, I can use my most recent filter with Ctrl+Alt+F, instead of opening topaz clean and the preset every time. It will automatically use the last topaz clean preset instead.
Here are my topaz clean settings. Shout-out to the other simblrs' topaz clean settings I stared at to understand and find a starting point of what I should use for sims screenshots (mostly @sojutrait <3)
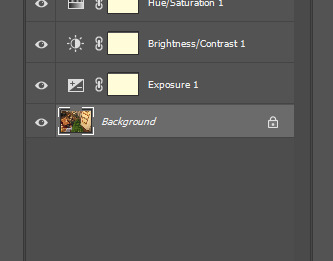
Next is my adjustment layers. I typically use brightness, exposure, and saturation. There isn't a set formula for it but here's my general method. I don't use shortcuts for adjustment layers because I'll being selecting my settings in the same space anyways.
if the screenshot isn't that bright from the get-go I'll use brightness first. If it is well lit, I will only use exposure.
I use exposure rather than brightness to brighten images and to improve highlights, add a glow-y effect, add vibrancy, and also add a little saturation.
It's pretty easy for me to tell what is too much but I suggest picking how much you want and doing a little less. The amount varies a lot per image (+0.11-0.67)
I only use a little saturation (+1-8) since I already get a lot from my gshade. Or I just don't use it
If a screenshot starts off too saturated I'll adjust the curve or lower the contrast a tiny bit instead of lowering saturation.
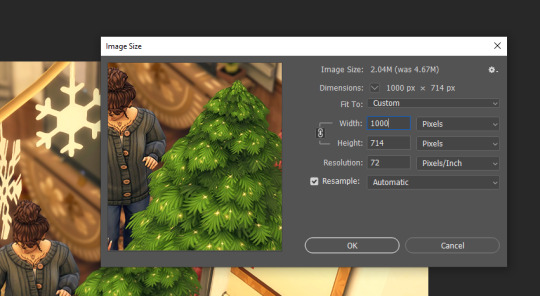
Then I resize the image to 1000px using the shortcut Ctrl+Alt+I. I don't resize the portrait crops because they are already at about 900px from the crop anyways. The purpose of resizing is so tumblr does not slightly blur the preview images as it does with pictures of a large size. You don't need to click on the field for width it will automatically select it. Just enter your amount and press enter.
If I am adding in a speech bubble, psd, notif, etc. I will do it AFTER I resize. Placing it on the smaller image will keep it sharper. I like to put my psds and such underneath my adjustment layers but if they are too overexposed I'll put them at the top and make a clipping layer (left click on the layer for the drop-down) for the overlay to match the brightness of the image.
Next part is important for my process. Before I move on to the next image in the row I will make sure I select the background layer (it makes sense later)
I don't save the image at this point!
I repeat the process for the rest of the images that I've opened and then I go back to the first image.

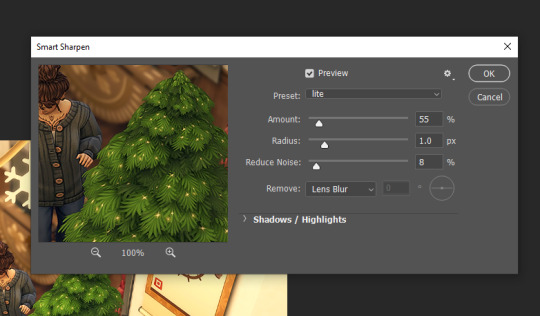
This time I use the smart sharpen filter. Here's my presets settings. I won't use smart sharpen on zoomed out exterior shots sometimes because it makes it a little crunchy. I made sure I selected the background layer before so the smart sharpen goes on the actual image and not any of the adjustment/overlay layers.
Then I save as with Ctrl+Alt+S. I'll talk about saving more further down and why I don't use quicksave.
So now I can just quickly go through every image opened using Ctrl+Alt+F (filter) and then Ctrl+Alt+S (save as). The reason I do it this way is so I can use the recent filter shortcut instead of switching back and forth between filters for every image. Again you could make a shortcut for your filters, but you will then have the filter's settings open every time. It also gives me a chance to take another look at the edits and see if there is anything I want to change after seeing it again.
After that I'll choose close all, select a new row of images, and repeat the process.
Other info
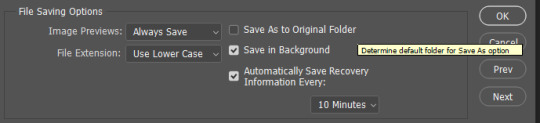
Why save as and not quick save? If you don't know, you can assign a keyboard shortcut to quick export as png. I don't use this because it doesn't follow the "save as to original folder" setting being toggled off. So you'll have to select the folder you want to save to everytime.
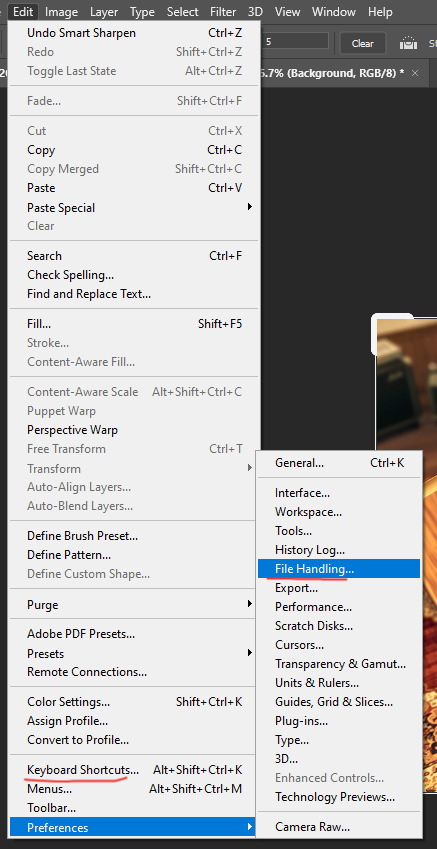
So I toggle off the "save as to original folder" and use the save as shortcut. After your first save to the folder you want, it will remember the folder you just saved to and that you saved as a png. Then you can just quickly press enter twice through the save as and png format option prompts. The original folder setting is in file handling (where to find file handling is under the next question)
Making a keyboard shortcut? You can view all shortcuts by menu and insert your own shortcuts for ones that don't have one or for preference. Just make sure you don't overwrite another shortcut you care about. You can also just see the shortcuts displayed in the drop-down menus next to the option.
please leave any questions in my ask box and not in the replies!
82 notes
·
View notes
Photo
so here’s my disclaimer: I hardly know what I'm doing. This is my glued together homemade giffing method that I’ve created over months of just random experimentation and bits and pieces from all kinds of tutorials. there are probably better or more correct ways to do a lot of these things! this also isn’t a completely universal tutorial, some of the specifics are geared towards giffing skam, specifically skam france.
I gif in photoshop cc 2020 on a macbook. Some things like keyboard shortcuts and little things about the photoshop interface will probably vary if you are on a pc/ other version of photoshop!
this is very long and very unprofessional, but I hope there is something in here that someone will find helpful!
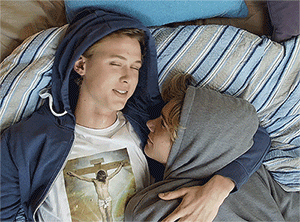
we’ll be going from this:
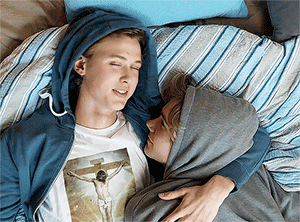
to this:

up to date as of October 25, 2020
downloading clips
selecting what part you’re going to gif
cropping
my action for resizing, converting to a smart object, and sharpening
coloring
exporting and setting the delay
tldr tips
1. downloading clips
4k video downloader (which you can get for mac or pc here) is great for things posted to youtube, especially from skam france because all the clips are on their youtube with no weird geoblocks or anything! it’s really easy, you just have to open the clip in youtube, copy the link, and go into the program and hit paste link. I like to put on smart mode first and set the destination folder so all my clips go into the place I want.
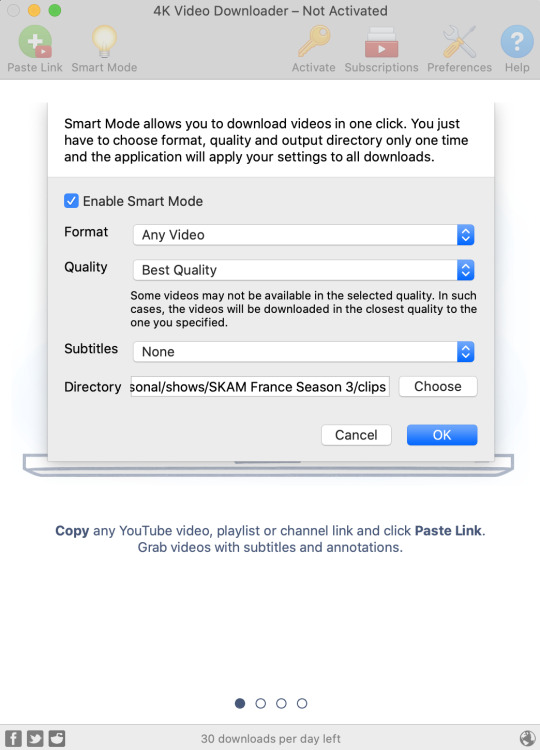
There is a 30 video per day download limit, so if you’re thinking you really want to gif lots of stuff from the show, and want a big chunk or a full season it’s definitely worth hunting for a mega or google drive with full episodes to download because it’s just less hassle! I might come back to this post later and compile a list of all of those, but for now if you type “[remake] no subs google drive” or “[remake] no subs mega” into a google search, you’ll probably find something! the all of skam website has no subs for several remakes, but not all!
If you don’t have enough space on your computer to be keeping full seasons, I know there are methods to get screencaps without having to download (generally for giffing movies and regular tv I think this is a common method), but I’ve never done it so I’ll redirect you to this tutorial that explains it! you should probably just go there for the whole thing tbh it’s much more coherent than this, but I digress.
2. selecting the piece of the video you want to gif
now that you’ve got your episode or clip you’ll want to just open it in photoshop! if you go the screen capping route the way to do that is a bit wonky, so you can keep following the tutorial I linked above and join back in here at coloring if you like!
if the timeline at the bottom doesn’t pop up automatically you can go to window > timeline and turn it on! now you can use the scrubber bar thing to find the moment you want to gif!
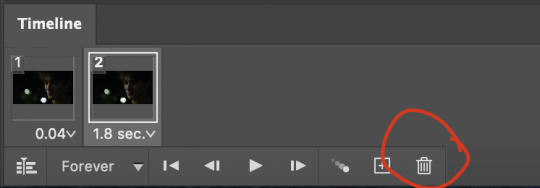
The advantage of this over screen capping is you can scrub with more precision. the arrows circled in blue below let you jump only one frame, where in screen capping I'm pretty sure you can only go by ten second or one minute intervals.
I usually drag the scrubber as close as I can to the start of the shot/moment I want to use, fiddle with the arrows circled in blue below to jump forward or back one frame at a time until I'm at the first frame I want. I move the left grey handle to the scrubber and then I hit the play button and let the whole shot/moment play. Pause and repeat the shuffling with the arrows until you’ve landed on the last frame you want to use and move the other grey handle.
the moment you want to use should be between your handles (it’ll look like what I have circled in red), and if you hit play, you should see the thing you want to gif playing on loop above the timeline. the speed will probably be weird, but we’ll deal with that at the end.

now I recommend doing command or control + s to save your gif as a psd (photoshop document). this is a working, editable file which means if photoshop crashes you can open your file right back up and keep working as long as you’re hitting command or control + s at regular intervals as you work. later we’ll go through exporting in gif format that can actually be uploaded to tumblr.
3. cropping
next I crop out any logos or black space at the top and bottom. Just click on the crop tool on the lefthand side of the screen, drag the edges and hit enter when you’re done. you can of course crop out more than just that, but regardless of what you crop out, now is the time to do it.
you can set an aspect ratio for your crop at the top of the screen if you’d like to be positive that all the gifs in your set will be the same:

4. my trusty action: resizing, converting to a smart object, and sharpening with one click
Now is when I use an action I made that does all the resizing, converts to a smart object, and sharpens. I’ll take you through the steps so you can conceptually get what’s going on, but I highly recommend using the actions window to record your process as you follow along so you have this action as well. It easily shaves at least 5-10 minutes off of the whole process, and these steps will be the same every time.
here’s how you make an action: go to window > action and open the action panel. click the plus symbol to start recording a new action:
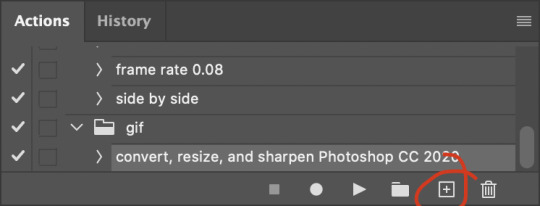
in the window that pops up, give it a name and hit record:

now just continue with the steps below, and it will save them!
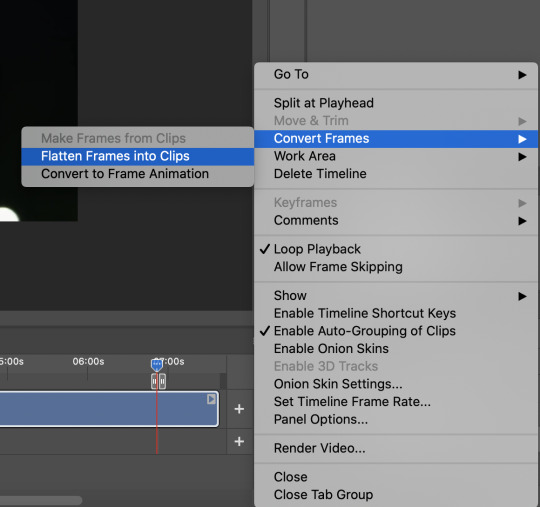
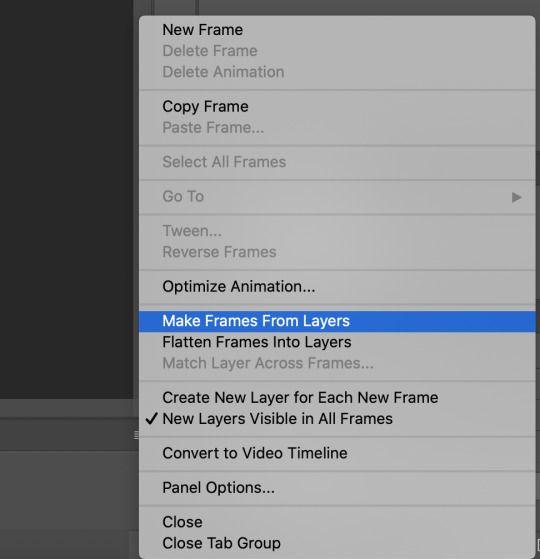
first you flatten frames to clips (I think it says flatten to layers on older versions of photoshop). this is in the menu at the top right corner of your timeline:
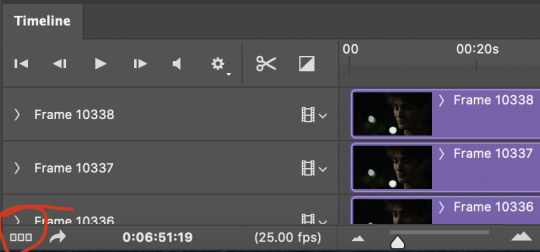
next you convert to frame animation by clicking on the symbol in the bottom left, circled in red:
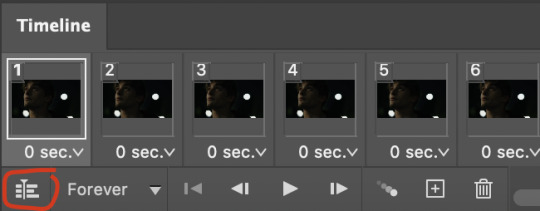
if there is more than one thing in the frame animation, delete the extra one. you don’t need to keep the last one but it won’t let you remove it until there are other frames in there. also go into your layers and delete video group 1 and its contents. don’t ask me why these steps are necessary, I don’t really know, but I’ve noticed it sometimes gets wonky if you don’t do this:

now you want to make frames from layers and delete that first frame that was there before:
then we return to the timeline:
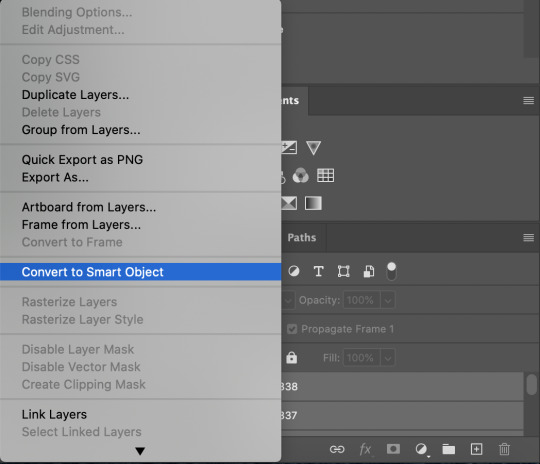
use command + option + a (control + alt + a for pc I'm pretty sure) to select all layers and then right click within your layers window and select convert to smart object. It’s important to convert to smart object after you go back to the timeline, or the gif won’t move:
next I resize. gifs for tumblr should be 540 pixels wide. for recording your action you should just go into image > image size and only change the width to 540 in case you ever have gifs cropped to different aspect ratios. don’t touch the height, let constrain proportions figure it out!

now, here’s what our base gif looks like, no sharpening, no coloring:
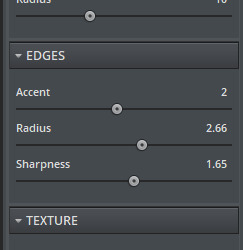
now to sharpen. go to filter > sharpen > smart sharpen. this is up to personal preference, but my go to settings are:
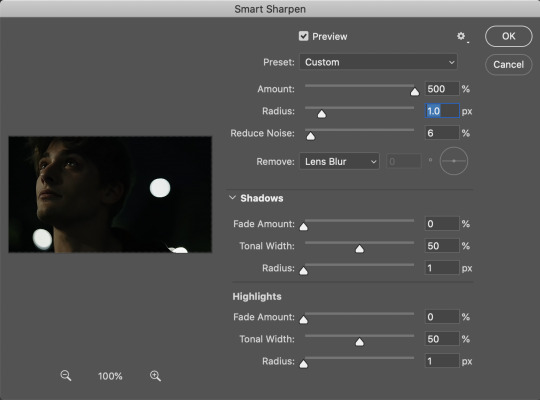
this is what we have after sharpening:

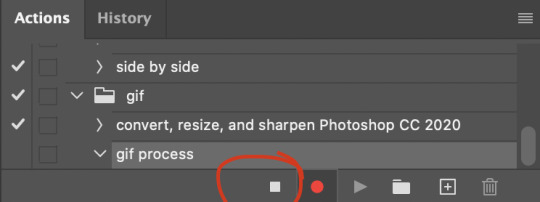
now is when you can stop recording your action.
just press the stop button in the action window:
this action is pretty much universal and after I select the moment the gif will be and crop however I want, I use it on every gif I make! so although this initial setup is tedious, now you’ll never have to do these steps again, and the process is magically much quicker.
5. it’s time to jump into coloring!
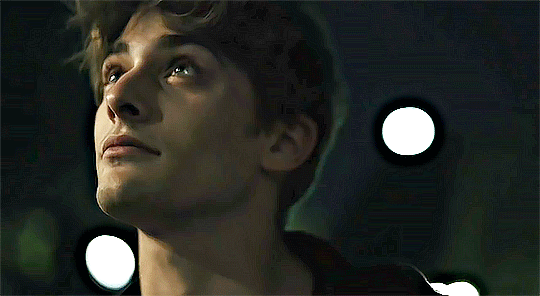
I typically start with exposure and sometimes some brightness/contrast. with really dark gifs like this, you kind of have to make it worse before you make it better. I did this:
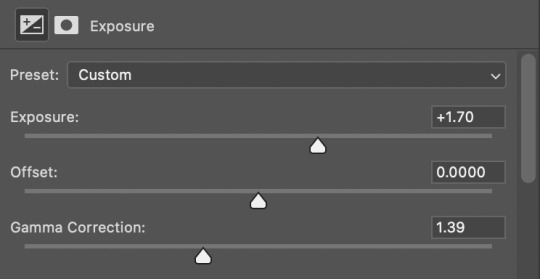
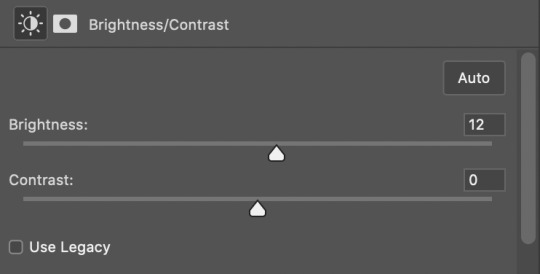
now the gif looks like this:
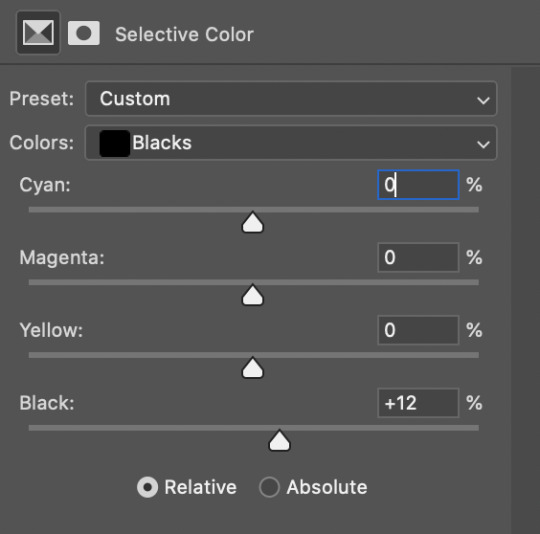
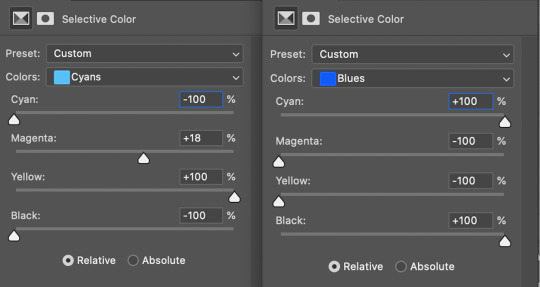
we have some static and some ugly bits, and this is where selective color comes in to fix it! boost blacks like this:
and now your gif looks like this:

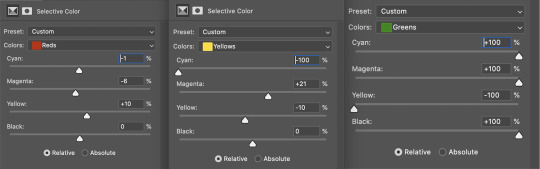
the skin tone is looking a little sickly and weird, so I go into the yellows and reds in my selective color layer to fix it! I also messed with the greens here because I didn't want color in the background (that part is totally optional and just up to your preference):
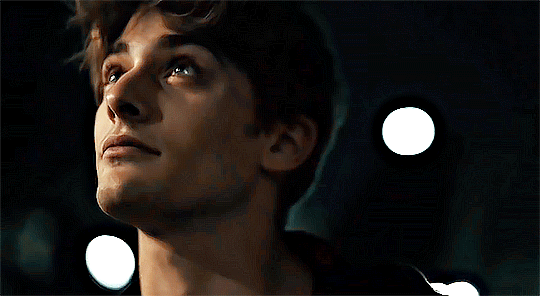
now we have this:
to really take the color 100% out of the background, I did one more separate selective color layer for cyan (again, I just felt like it but this is optional!):

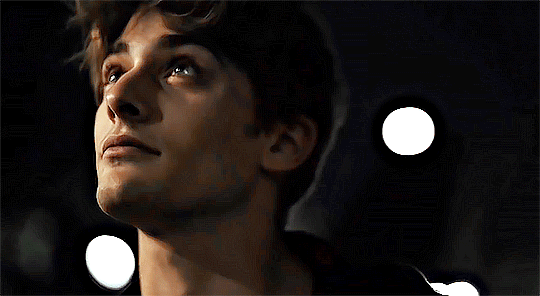
and now the finished gif:
there’s lots of fun extra things you can add like text and tints and overlays and all that I won’t get into, but feel free to reach out for help on those types of things!
this gif was certainly not the most complicated to color. some ridonkulously dark clips (*cough cough* vendredi 20h27 *cough cough*) take tons and tons more effort than this and a lot of the time you’ll want to use color balance layers and vibrance layers and all of that to mess with your coloring.
with all of this coloring business, I really just learned by doing. I don’t know all the technical purposes of each type of adjustment layer, and I tend to stay away from curves just because I find them confusing and annoying. The bottom line is that you should always experiment and find out whatever coloring works for you and run with it! I’m sure every gif maker you talk to does things at least a little differently!
I highly recommend taking the time to go through all the types of adjustment layers and just move the sliders around to see what they do! That’s honestly one of the best ways to learn and decide what you like!
6. now to export and adjust the delay!
the keyboard shortcut for exporting on mac is command + option + shift + s, control + alt + shift + s for pc, otherwise you can go to file > export > save for web
my settings are here:
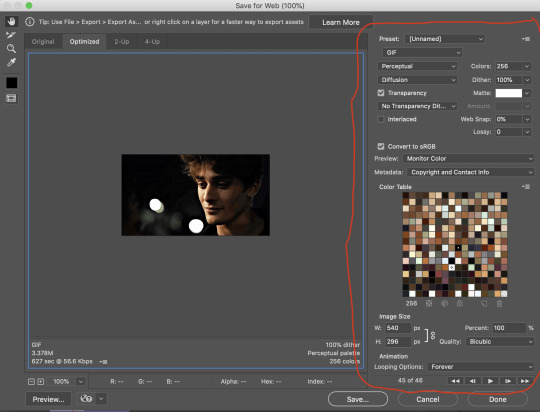
the settings only need to be configured once! otherwise just hit save and follow the pop ups to choose where to save and what name you want to give your gif. Since you saved as a psd way back, that will be the name it’s automatically given, but call it whatever you want!
then I adjust my delay by opening the gif I just exported (not the psd, the .gif file) and using one of my delay actions. I’ve made an action for each delay between 0.05 (real time) and 0.08 (really slow mo for certain super short shots, typically for more ~artsy~ sets).
all my action does is select all frames:
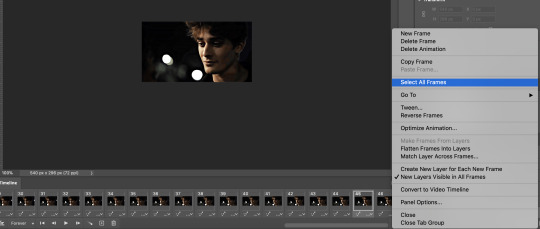
adjust the delay (which will differ based on whether you want them slowed down and by how much):

for reference, this is a 0.05 delay:
and this is a 0.08 delay
now you just export the same way you did before!
remember if you’re recording this as an action, you don’t want to touch the file name, just say yes when it asks if you want to replace the file. if you always save your gifs to the same place, your action will now enable you to override any gif with the incorrect delay with the correct one with one click!
7. tldr: the main tips
for downloading 4k video downloader works well for non geoblocked youtube videos, the all of skam website is another place you can look to download with no subs, here’s the screen capping method if you don’t want to download
The main way I combat dark lighting is to bump exposure to the right, gamma correction to the left, and then enhance black in a selective color layer. The amount of these three adjustments will vary gif to gif. I know lots of people use curves, but I find them really confusing for some reason, so this is my method! As my graphics teacher likes to say: there are always at least 3 different ways to reach the same result!
there’s a little bit of additional coloring on this one, but here’s another before and after example so you can get an idea of how those steps get you a better lit result without making the lighter parts super over exposed:

besides those three steps, you have free rein to use the other selective color channels, as well as color balance, vibrance, hue/saturation, etc. to restore color that was lost or to change the colors altogether! mess around with it and have fun experimenting!
7a. bonus coloring tip:
sometimes you can make use of selective color to completely alter an isolated color in your gif. You can get very adventurous with this, but here's a simple example of changing blue tones to teal (I got away with these gifs being longer because they were in rows of two in the set I posted them in. I'm too lazy to trim frames so I can put them here at 540 px without going over the 10mb limit so just ignore the quality ok):
7b. actions, actions, actions!
if you find yourself doing a certain thing over and over, always record it as an action. the amount of time they will save you is honestly really impressive.
You can duplicate actions, so, for example, if you have different sharpening preferences for different shows or scenes, you can duplicate your gif process action and go into the steps, double click smart sharpen, and alter it however you want!
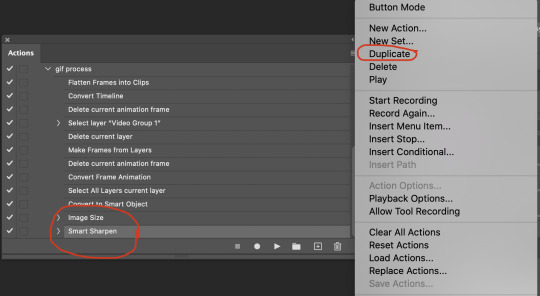
This could also be good to do for the different widths for tumblr if you ever do sets with rows of two or three! Duplicate actions is also how I made my actions that set delay at 0.05, 0.06, 0.07, and 0.08!
when in doubt, always make an action! it’s worth minimizing the tedious bits of the process as much as possible so you can focus on the fun part of seeing your awesome gifs come to life! any little task you find yourself doing often, make an action!
and for now that’s all I have. if any of this made no sense, if you want to suggest a correction or addition I could make, if you’re ever curious how I did something on any gifs I post, or if you have any other sort of questions, feel free to send me an ask or a dm! if I can’t answer your questions I’ll be happy to try to direct you to someone who can or a tutorial to help! again, I'm no expert, not even close, but I hope at least one person will find one thing in this mess that helps.
#this got . so long omg#mystuff#mytutorial#gif tutorial#tutorial#resources#fellow gif making peeps feel free to correct me or give input on how to improve or add to this tutorial!
31 notes
·
View notes
Text
°˖✧◝(⁰▿⁰)◜✧˖° The Queen Does A PS Tutorial: Tumblr Size Limits! °˖✧◝(⁰▿⁰)◜✧˖°
In this tutorial, I will show you how to adjust a GIF so it stays under Tumblr’s 3MB upload size.
What You’ll Need:
Mac
Photoshop (I’m using PS CC 2019)
Knowledge on how to make a GIF (my tutorials can be found, here)
As always, if you find this tutorial helpful, please like/reblog and consider donating to a good cause over < HERE >
Long Video = A Lot of Frames = A Big GIF File ✧ ✧ ✧ ✧ Solution: Skip Frames ✧ ✧ ✧ ✧
Note: I’m assuming you’re making your GIF using the standard “video frames to layers” method...
So you open up Photoshop, do your usual ‘File > Import > Video Frames to Layers > select your video file’ routine and are met with this little warning window:
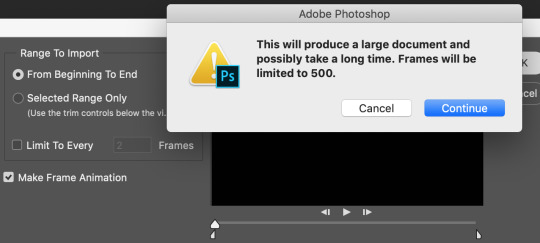
This should be your first sign that your GIF File size will be bigger than 3MB. If you click continue, it’ll only load the first 500 frames of the clip— which, depending on the length of the clip, could be 1/2 of the video or less. Save yourself a future headache and skip frames!
1. Check the box that’s next to “Limit To Every 2 Frames”. Play around with the number. I’ve gone as high as 7 frames and have produced good-to-excellent quality GIFs.
Tip: If you select the standard 2 Frames, I recommend changing the frame speed to anything between 0.07 and 0.1 seconds. (Speed will vary with each video/clip.) Tip: If you change to 7 Frames, I recommend changing the frame speed to anything between 0.12 and 0.2 seconds. (Speed will vary with each video/clip.)
If you still get that warning window, try shortening your clip by selecting the “Selected Range Only” option and moving the little tickers under the video preview so that ONLY the specific scene/reaction will be converted to frames. You can also try deleting frames after the conversion is complete.
Tip: My preference is to keep GIFs under 100 frames; you can make excellent quality GIFs with as little as 15 frames. (I’ve gotten away with as little as 8 frames).
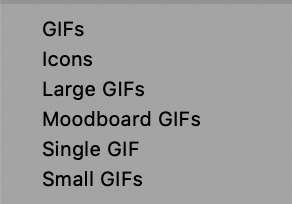
✧ ✧ ✧ ✧ ✧ ✧ ✧ ✧ Type of GIFs ✧ ✧ ✧ ✧ ✧ ✧ ✧ ✧
Alright, so now that you’ve converted your clip to frames, it’s time to take into consideration what kind of GIF you want to make. While the file type is the same for all (.GIF), there are at least three types of GIFs/GIF Projects to take into consideration when making GIFs.
1. GIFs for GIF Packs or Reactions aka RP GIFs.


There isn’t a set dimension size for these and honestly, it depends on the clip/scene. Sometimes you’ll get a full screen focusing on the FC of your choice. Other times, they’ll be stuck in between two other FCs or in the background. My preference tends to be 268px wide and 150px height. For smaller GIFs, I use 177px wide and 150px height. For GIF Icons, I use 100px wide and 100px height— GIFtangles and smaller dimensions are a thing now, so play around with small dimensions. Just be sure that the GIF is visible and clear (know when too small is too small....)
Tip: The more you crop out of the clip (kind of like I did in that 2nd GIF), the smaller your GIF File Size will be. If you insist on having more than 50 frames in your GIF, then I absolutely recommend cropping as much as possible from the scene/images that is NOT relevant to what/who you’re GIFing. ie. background, other people, etc. Tip: Don’t make GIFs wider than 268px; they will automatically stretch (to 540px wide) and distort in posts. The height can be as large as you like, but avoid making stretched GIFs like this (original dimensions were 300px wide by 200px height):
Tip: Do not make GIFs 540px wide (or wider). I get it. They’re a nice aesthetic...for photosets and edits. But you’ll be limiting yourself a lot if you make RP GIFs that large. Trust me, save yourself future frustration and stick to small/medium GIF sizes. Tip: To avoid making GIFs like this one:

Use the Crop tool’s W x H x Resolution setting. Not only will it save you time when making GIFs, it’ll also keep your GIFs looking proportionally correct. Press the C key on your keyboard (or clip on the crop tool from the left panel). At the top, you’ll notice a new tool bar with a drop down that looks like this:

I think the default is Ratio. Click the drop down and select the W x H x Resolution setting. The first box is your width. The second is your height. The third is the resolution. I think the default is 72 and will automatically be 72 regardless of whether or not you enter something in the box.
Do yourself the added favor of saving whatever numbers you enter as a preset— click the drop down again, select “New Crop Preset” and then either rename it or just save it as is. Here’s preview of my presets:
2. GIFsets aka Photosets.
a. They come in a wide set of varieties. #1 and the most common type is the 2 x 4/5 photoset. Kind of like > this one < If you’re doing a full scene (with or without captions), I recommend making all of the GIFs 268px wide. Remember to make all GIFs the same height!
b. Second to follow is the 2 x 2 photoset. Kind of like > this one < Again, I recommend making all GIFs 268px wide and the same height. (For square-like GIFs, make the height 268px.)
c. Third are probably “moodboard” GIFs like > this set < They tend to strictly follow a 3 x 3 photoset format. I recommend cropping GIFs with 177px width and 177px height.
d. Full width Photosets. I love these and I typically do these for small scenes. They look like > this one < In order to avoid the GIFs from getting stretched too much or pixelated, the width should be 540px. Since your dimensions will be bigger, this means that each GIF will be bigger in file size and therefore limits just how “long” you can make each GIF. I’m not saying that it’s impossible to make a 540px GIF with 80 frames; but it will take some tinkering. My recommendation is to limit the amount of frames you use either by skipping frames or by limiting yourself to a max of like 60 frames.
3. Edits
This includes GIFs with special coloring, captions, or inspo/musings ON THE ACTUAL GIFs. They can look like > this < or > this < Since you’re adding additional stuff to the GIFs, you’re automatically making the GIFs larger in size. Again, I recommend skipping frames or keeping your length short by doing a max of like 60 frames.
✧ ✧ ✧ ✧ ✧ ✧ ✧ ✧ Coloring ✧ ✧ ✧ ✧ ✧ ✧ ✧ ✧
Easiest way to shrink size is to restrict your coloring. The more colorful the GIF, the bigger the file size. Most people opt to make black and white GIFs. Others like myself just tinker on the “Save for Web” pop-up.
These are my usual settings (and you’ll note that the color table is FULL):

Tip: Try restricting the colors. Click the drop down next to “Colors:” and select 128. 64 is the lowest I ever go and the lowest I recommend as this is the point where you’ll notice quality changing. — I only recommend restricting coloring as a last resort. Tip: You’ll note that you can also change the GIF dimensions here! Try making the GIF smaller. Make sure the link is connected, or else you’ll end up with a funky looking GIF.
✧ ✧ ✧ ✧ ✧ ✧ ✧ ✧ GIF Optimization ✧ ✧ ✧ ✧ ✧ ✧ ✧ ✧
GIF Optimizers help reduce GIF size by doing all of the above (and more)! They reduce size by limiting colors, skipping frames, adding/removing dithering and noise, and lastly, by optimizing transparency.
The most popular site for this is EZGIF. Here’s another: GIFGIFs Optimizer.
✧ ✧ ✧ ✧ ✧ ✧ ✧ ✧ Questions ✧ ✧ ✧ ✧ ✧ ✧ ✧ ✧
When all else fails and you find yourself stuck with a huge .GIF file or are unwilling to sacrifice quality/GIF or video length:
Ask yourself, would it really be that hard to split the GIF into 2-4 GIFs? Why not make a GIF set? How about cropping everything to focus on one FC/specific thing? Or how about making the GIF’s dimensions a little smaller?
If you’re still in rut, you can always feel free to drop the GIF in my submissions and ask for help.
Well, that’s all folks; happy GIF making! Don’t forget to like and/or reblog if you found this tutorial helpful and consider donating to a good cause over < HERE >!
#tutorial#rph#photoshop tutorial#gif makers#dearindies#( mine. )#( my resources. )#( my tutorials. )
19 notes
·
View notes
Note
Hello! I'm a bit new to making pixel art and I was curious if you have any suggestions on picture sizes that will maintain resolution on tumblr? I've found that it's very difficult to size pixel art in a way that doesn't make it look like garbage once it's uploaded.
oh, lovely anon, you’ve stumbled upon the greatest bane to any pixel artist’s existence: resolution when posting... especially on Tumblr.
see, Tumblr does this nightmare thing where it super-anti-aliases (ie, ‘blurs’ the boundaries between colors) pictures. this is unnoticeable in photography (usually), but most artists, even non-pixel artists, hit this struggle. it’s why so many of us will mention at least periodically ‘click for full resolution’ - it makes a huge difference in visible quality.
to answer your question, though, my best advice is just to make sure your final resolution is of HD quality! my process usually simplifies down to this:
1) make the art in ‘1x’ resolution (widest dimensions usually don’t go beyond 300px for ‘detailed’ pixel art, for me - 320 tends to be my max, but ‘smaller’ sprites may cap at 120 pixels, etc etc)
2) when exporting the art, i choose to multiply it’s size (i use Asesprite, a pixel art program with this option built in, but if you’re in photoshop/etc, you can choose to multiply the resolution by whole numbers, and choose no anti-aliasing as an option for this to keep it from blurring). in general, you’ll probably want to make the ‘final resolution’ at least greater that 1000px on one side, but you can play with what works for you.
that’s really about it! showing pixel art as ‘large’ as i or other pixel artists do is really about expanding the sprite size (not the canvas size). sometimes you’ll see pixel artists have multiple versions in the same picture, too, for comparison. i usually have the ‘big version’ in the photo post, and then the 1x version below in the text entry area, where it won’t get distorted.
Extra Tip: if you ONLY want to show the 1x resolution - or 2x, but still <500px wide - then just put your image in a text post! the downside to this is that you won’t be able to click on it to ‘zoom in’/isolate the image, but if that’s the size you want anyways, you should be fine.
Warning regarding this technique-
unless you’re sure to make your canvas ~500 px wide, Tumblr mobile, hell app that it is, will not show the 1x resolution properly. Tumblr has built-in coding that automatically tries to expand the image to fit the width of the post window, so... weight your choices, basically.
a Tumblr text post is 500 px wide (though sometimes 540, so... godspeed), so if you make the canvas 500 px wide and then export it - with your sprite still at it’s normal small dimensions within that - then it should combat this issue. it’s just frustrating extra hoops is all. =v=;;;
#night answers#on pixel art#pixel art tips#hopefully this helps!#basically it boils down to 'make your sprite at the resolution that looks good within the art program#then export it to be big to avoid the worst of the anti-aliasing in a photo post#Anonymous
45 notes
·
View notes
Note
Heyyy. how do you do that image of 'The Dervoe Legacy'??? I'm thinking of starting my own legacy too. Any tipssss maybe?
How cool! I’ll definitely want to have a look at that legacy!

If you mean the ‘’banner’’ above, I used GIMP for editing. It’s a jpeg file that I simply add in to my picture edits. I like to post everything in one picture just so tumblr wouldn’t mess up the picture quality! The picture size is 1280x 200 which is a good width to have on tumblr. I simply make a plain background, add the font and paste the pictures on top of the whole thing, resizing them according to the size of the banner of course. I might do a proper tutorial with pictures on how I make it later on, in case there’s more interest :)
For tips on editing the font and much more, check out these tutorials!
Other tips for starting a legacy in general are: (in my opinion)
⦁Do not take any stress about it
⦁ Play your legacy whenever you feel like it and in your own pace
⦁ Follow your own rules or pre-written ones, for example the ones here, here or here (there are so many more, some more known and others unknown. This list includes a ton of them)
⦁ Try to keep the gameplay exciting for yourself! For me, something that happens way too often would be me starting a new legacy, then getting bored before I reach generation two and just quitting the whole thing. So try to keep it fun for yourself and avoid feeling pressured to play.
⦁ If you want to document it on tumblr for example, edit pictures as you go! Editing pictures alongside playing seems to work best for me! I want to find a balance between editing pictures and actually playing, that way I feel like my captions are much more genuine (because whenever I post a picture I am unaware of what will happen next). Of course, if you want to make it more ‘’storylike’’ it might be better to ‘’be in control’’ of where the legacy is going. Another thing that I have done in the past is having so much fun playing the save, I end up taking heaps of screenshots and when I have to post something I feel extremely unmotivated to edit anything because of the crazy number of pictures I have to go through. Also, I probably won’t remember why I took a certain screenshot so captioning them makes it difficult.
⦁ Follow other legacies and simblrs! It’s awesome to be inspired by someone else and that can really motivate you to continue to evolve your own legacy!
⦁ Decide on your writing style! Do you want to keep it funny? Dramatic? Or maybe focus on storytelling? It can be good to decide on what way you want to go with the legacy in advance.
⦁ Put time on your editing! Everyone has their own editing style and that’s great! It wouldn’t be much fun if every simblr had pictures that looked all the same. It’s good to think about how you want your editing to be presented, and remember, it is entirely up to you. Good looking pictures do attract more notes so working on the editing can be good! When I edit I use a combination of GIMP (which you can get for free by clicking the link) and Lightroom, you can try it for free here. And I use photoshop CS5 occasionally. Getting photoshop does not automatically make your pictures pretty, so if you do decide to go for an editing software such as photoshop, be sure to check out tutorials online and do lots of practicing! Another free editing site that I do recommend is Picmonkey
⦁ And last but not least, have fun with it!!
I could say so much more so maybe I’ll make a proper tutorial/post about this later on, hopefully this helped though ❤ And good luck with starting your own legacy!
39 notes
·
View notes
Text
How to Easily Embed Videos in WordPress Blog Posts
Do you want to embed videos in your WordPress blog posts? Videos bring life to your website, and they are a great way to increase user engagement.
WordPress makes it super easy to embed videos from video hosting sites like YouTube, Vimeo, Facebook, Twitter, and many others.
In this beginner’s guide, we will show you how to easily embed videos in WordPress blog posts, pages, and sidebar widgets.
How to Embed Videos in WordPress Blog Posts and Pages
WordPress comes with a great feature called auto-embeds which allows your website to automatically get the embed code from popular video hosting services like YouTube, Vimeo, etc.
All you need to do is paste the video URL into the WordPress editor.
For example, you can copy the YouTube URL for a video that you want to embed.
Next, edit the WordPress post or page where you want to add the video, and simply paste the URL in the content area.
As soon as you paste the video URL, WordPress will fetch the embed code and display the YouTube video inside the content editor.
You can now save your post and click on the preview button to see the embedded video in your blog post.
Wasn’t that easy?
After you have added the video, you can change its settings from the block toolbar and settings column on the right.
You can adjust the video width, make it full-width, change alignment, and more. You can also add a caption and preserve the video’s aspect ratio on mobile devices.
WordPress can only do auto-embeds for white-listed video services. For other websites, you will still have to obtain the embed code and then paste it in your blog posts.
Here is a list of white-listed video services for auto embeds in WordPress:
Amazon
Animoto
Cloudup
CollegeHumor
Crowdsignal
Dailymotion
Facebook
Flickr
Hulu
Imgur
Instagram
Issuu
Kickstarter
Meetup.com
Mixcloud
Reddit
ReverbNation
Screencast
Scribd
Slideshare
SmugMug
Someecards
SoundCloud
Speaker Deck
Spotify
TED
Tumblr
Twitter
VideoPress
Vimeo
WordPress.tv
YouTube
If you want to add a video from a website outside this list, then you will need the full HTML embed code for the video.
Simply copy the HTML code provided by the video website and paste it inside a ‘Custom HTML’ block in the editor.
Embed Videos in WordPress Using Old Classic Editor
If you are still using the old WordPress classic editor, then you can embed the videos the same way.
Simply copy the URL from a video hosting service like YouTube, and paste it in the editor. If you are using the visual editor, then you will see a preview of the video.
However, you will not be able to use the width adjustment and other options that you can use in the new WordPress block editor.
How to Embed Videos in WordPress Sidebar Widgets
Just like a WordPress page or post, you can also embed videos in WordPress sidebar widgets.
Simply go to Appearance » Widgets page and add the ‘Text’ widget to a sidebar. See our article on how to add and use widgets in WordPress.
Inside the widget settings, you need to paste the video URL in the content area. WordPress will automatically fetch the embed code and display the video preview.
Don’t forget to click on the ‘Save’ button to store your widget settings.
You can now visit your website to see the video embed in the WordPress sidebar widget.
Why can’t I upload the videos to WordPress?
Well you can, but we do not recommend you to do so.
Most small blogs use shared WordPress hosting accounts, and videos can take up a lot of server resources. If your video got tons of traffic, then your website is more likely to crash.
Secondly, you are missing out the traffic from YouTube users.
YouTube is not only the biggest video hosting site, but it is also the world’s second most popular search engine, and the second most popular social network right after Facebook.
If you don’t want to upload your videos to YouTube, then you can try Vimeo or DailyMotion. See our comparison of YouTube vs Vimeo to see which platform is better for your needs.
For more on this topic, take a look at our article on why you should never upload a video to WordPress.
WordPress Video Embed Plugins
By default, you don’t need to use a plugin to embed videos in WordPress. However, you may want to use plugins to improve video viewing experience on your website.
Following are a few plugins that you may want to try.
1. YouTube Subscribe Bar
YouTube Subscribe Bar shows a YouTube subscribe button below your YouTube video embeds in WordPress. It also fetches your YouTube subscriber count to add social proof and encourage more users to subscribe.
We first created it to promote WPBeginner’s YouTube channel on this website. Many of our users asked us to share how we did this, so we decided to release it as a free plugin.
2. Envira Gallery
By default, WordPress does not come with embedded video gallery feature. If you wanted to show a video gallery on a page, then you’ll need a plugin to do that.
Envira Gallery is one of the best photo gallery plugins for WordPress. It also comes with a videos addon which allows you to create beautiful video galleries with lightbox popup support.
3. Lazy Load for Videos
Video embeds load scripts from external websites, which has a small impact on page load speed and performance.
Lazy Load for Videos solves this problem by only loading the video image on page load. It loads embed code only when the user clicks on the play button. See our tutorial on how to add lazy load for videos in WordPress.
We hope this article helped you learn how to easily embed videos in WordPress blog posts. You may also want to see our list of the must have WordPress plugins for all websites.
If you liked this article, then please subscribe to our YouTube Channel for WordPress video tutorials. You can also find us on Twitter and Facebook.
The post How to Easily Embed Videos in WordPress Blog Posts appeared first on WPBeginner.
😉SiliconWebX | 🌐WPBeginner
0 notes
Text
How to Easily Embed Videos in WordPress Blog Posts
Do you want to embed videos in your WordPress blog posts? Videos bring life to your website, and they are a great way to increase user engagement.
WordPress makes it super easy to embed videos from video hosting sites like YouTube, Vimeo, Facebook, Twitter, and many others.
In this beginner’s guide, we will show you how to easily embed videos in WordPress blog posts, pages, and sidebar widgets.
How to Embed Videos in WordPress Blog Posts and Pages
WordPress comes with a great feature called auto-embeds which allows your website to automatically get the embed code from popular video hosting services like YouTube, Vimeo, etc.
All you need to do is paste the video URL into the WordPress editor.
For example, you can copy the YouTube URL for a video that you want to embed.
Next, edit the WordPress post or page where you want to add the video, and simply paste the URL in the content area.
As soon as you paste the video URL, WordPress will fetch the embed code and display the YouTube video inside the content editor.
You can now save your post and click on the preview button to see the embedded video in your blog post.
Wasn’t that easy?
After you have added the video, you can change its settings from the block toolbar and settings column on the right.
You can adjust the video width, make it full-width, change alignment, and more. You can also add a caption and preserve the video’s aspect ratio on mobile devices.
WordPress can only do auto-embeds for white-listed video services. For other websites, you will still have to obtain the embed code and then paste it in your blog posts.
Here is a list of white-listed video services for auto embeds in WordPress:
Amazon
Animoto
Cloudup
CollegeHumor
Crowdsignal
Dailymotion
Facebook
Flickr
Hulu
Imgur
Instagram
Issuu
Kickstarter
Meetup.com
Mixcloud
Reddit
ReverbNation
Screencast
Scribd
Slideshare
SmugMug
Someecards
SoundCloud
Speaker Deck
Spotify
TED
Tumblr
Twitter
VideoPress
Vimeo
WordPress.tv
YouTube
If you want to add a video from a website outside this list, then you will need the full HTML embed code for the video.
Simply copy the HTML code provided by the video website and paste it inside a ‘Custom HTML’ block in the editor.
Embed Videos in WordPress Using Old Classic Editor
If you are still using the old WordPress classic editor, then you can embed the videos the same way.
Simply copy the URL from a video hosting service like YouTube, and paste it in the editor. If you are using the visual editor, then you will see a preview of the video.
However, you will not be able to use the width adjustment and other options that you can use in the new WordPress block editor.
How to Embed Videos in WordPress Sidebar Widgets
Just like a WordPress page or post, you can also embed videos in WordPress sidebar widgets.
Simply go to Appearance » Widgets page and add the ‘Text’ widget to a sidebar. See our article on how to add and use widgets in WordPress.
Inside the widget settings, you need to paste the video URL in the content area. WordPress will automatically fetch the embed code and display the video preview.
Don’t forget to click on the ‘Save’ button to store your widget settings.
You can now visit your website to see the video embed in the WordPress sidebar widget.
Why can’t I upload the videos to WordPress?
Well you can, but we do not recommend you to do so.
Most small blogs use shared WordPress hosting accounts, and videos can take up a lot of server resources. If your video got tons of traffic, then your website is more likely to crash.
Secondly, you are missing out the traffic from YouTube users.
YouTube is not only the biggest video hosting site, but it is also the world’s second most popular search engine, and the second most popular social network right after Facebook.
If you don’t want to upload your videos to YouTube, then you can try Vimeo or DailyMotion. See our comparison of YouTube vs Vimeo to see which platform is better for your needs.
For more on this topic, take a look at our article on why you should never upload a video to WordPress.
WordPress Video Embed Plugins
By default, you don’t need to use a plugin to embed videos in WordPress. However, you may want to use plugins to improve video viewing experience on your website.
Following are a few plugins that you may want to try.
1. YouTube Subscribe Bar
YouTube Subscribe Bar shows a YouTube subscribe button below your YouTube video embeds in WordPress. It also fetches your YouTube subscriber count to add social proof and encourage more users to subscribe.
We first created it to promote WPBeginner’s YouTube channel on this website. Many of our users asked us to share how we did this, so we decided to release it as a free plugin.
2. Envira Gallery
By default, WordPress does not come with embedded video gallery feature. If you wanted to show a video gallery on a page, then you’ll need a plugin to do that.
Envira Gallery is one of the best photo gallery plugins for WordPress. It also comes with a videos addon which allows you to create beautiful video galleries with lightbox popup support.
3. Lazy Load for Videos
Video embeds load scripts from external websites, which has a small impact on page load speed and performance.
Lazy Load for Videos solves this problem by only loading the video image on page load. It loads embed code only when the user clicks on the play button. See our tutorial on how to add lazy load for videos in WordPress.
We hope this article helped you learn how to easily embed videos in WordPress blog posts. You may also want to see our list of the must have WordPress plugins for all websites.
If you liked this article, then please subscribe to our YouTube Channel for WordPress video tutorials. You can also find us on Twitter and Facebook.
The post How to Easily Embed Videos in WordPress Blog Posts appeared first on WPBeginner.
from WPBeginner https://www.wpbeginner.com/beginners-guide/how-to-easily-embed-videos-in-wordpress-blog-posts/
0 notes