#width to height ratio of the image is technically correct
Explore tagged Tumblr posts
Visit Tumblr Blog
Explore Tumblr blogs with no restrictions, modern design and the best experience.
Last Seen Tumblr Blogs


Fun Fact
There are dozens of funny blogs to kill time on Tumblr.
Photo

48 notes
·
View notes
Text
Tire Size Chart Explained for Choosing the Right Fit Fast
Understanding Tire Size Markings at a Glance
Tire size markings like “225/65R17” reveal crucial dimensions: width, sidewall aspect ratio, construction type, and wheel diameter. A tire size chart breaks these elements down visually, ensuring the best fit and performance match for your specific vehicle and driving style. Matching tire sizes to your vehicle improves handling, fuel economy, and safety across different driving conditions.
Each segment of a tire code contains specific information:
225 – the width of the tire in millimeters
65 – the aspect ratio (sidewall height as a % of width)
R – radial construction
17 – rim diameter in inches
Understanding this breakdown helps you interpret tire size charts quickly and confidently.
What Is a Tire Size Chart and Why Use It?
A tire size chart is a tool that converts the alphanumeric code on your tire into measurable dimensions and compatibility references. It assists drivers, mechanics, and auto enthusiasts in comparing tire options based on:
Section width
Aspect ratio
Rim diameter
Overall tire diameter
Load index and speed rating (sometimes included)
The image below visually maps a sample tire size chart, labeling every key component from width to diameter.
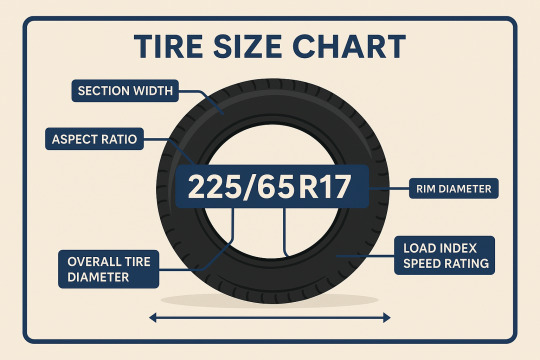
This visual chart enhances understanding, making it easier to match tires for your car model, terrain type, or weather condition.
How to Choose the Right Tire Size for Your Vehicle
Choosing the right tire size involves more than just reading sidewall codes. According to the National Highway Traffic Safety Administration (NHTSA), incorrect tire sizes can affect braking distance, fuel efficiency, and overall control—especially in emergency maneuvers.
To pick the correct size:
Check the driver’s side door placard or owner’s manual – it lists factory-recommended tire sizes.
Use a tire size comparison chart – to find compatible alternatives if the original size is unavailable.
Stick to the diameter – Total wheel + tire diameter should remain close to the original to avoid speedometer inaccuracies or suspension issues.
Quote from Goodyear Technical Advisor Jim Davis:
“Staying within 3% of the original tire diameter ensures safety and drivability across most conditions.”
Key Tire Size Terms You Need to Know
Tire codes include various prefixes and measurements that affect performance and fit:
P: Passenger vehicle
LT: Light Truck – thicker sidewalls for heavier loads
T: Temporary spare tire
R: Radial construction (standard in most modern tires)
ZR: High-performance tire capable of higher speeds
A metric tire like “225/65R17” differs from an LT-metric tire such as “LT265/70R17” in load capacity and application. Tire size charts often provide side-by-side comparisons of these codes to help identify correct usage.
Metric vs. LT: What’s the Difference?
One common source of confusion in tire selection is the difference between metric (P-metric) and LT-metric tires. Metric sizes are designed for passenger vehicles and prioritize comfort and fuel efficiency, while LT tires are for trucks and SUVs carrying heavier loads.
Tire Type
Example
Best For
Load Range
Ride Comfort
P-Metric
225/65R17
Sedans, crossovers
Standard
Smoother
LT-Metric
LT265/70R17
Trucks, SUVs, towing
Higher
Firmer
This table helps clarify when each type is appropriate, so you don’t sacrifice safety or comfort.
Can You Use a Different Tire Size Than Recommended?
Yes—but only within limits. Experts recommend staying within a 3% total diameter difference from the original size. Going beyond that can:
Throw off your speedometer
Cause rubbing against the fenders or suspension
Lower your fuel economy
Void manufacturer warranties
Pro Tip: If upgrading to larger or wider tires (commonly called “plus sizing”), use a tire size calculator or compatibility chart to ensure proper clearance and performance balance.
Where to Find and Verify Your Tire Size
Your vehicle’s correct tire size is printed on:
The sidewall of your current tires
The driver’s door placard
The owner’s manual
The glove compartment door (some vehicles)
Also, tire retailers like Tire Rack, Discount Tire, and Firestone offer online tire size tools based on your vehicle’s year, make, and model.
0 notes
Text
GIF Tutorial for Beginners
People keep asking me to teach them how to make gifs and I end up writing them long confusing messages, so I figured maybe it’s time to just write up an actual clean tutorial instead! This is supposed to be for total beginners! (Or people who want to switch to a new process that I’ve curated and streamlined over 8 years of making gifs.) I’ll try to keep this as barebones as possible, and won’t include all the advanced stuff I usually add. I hope it’s easy enough to follow, and I’ll include some links at the end for more stuff. I really do think it’s better to make a few simple gifs before doing more complicated stuff though, just to get used to it!
There will be three sections in this tutorial: #1 Basics - How to make a gif in PS at all #2 Sharpen - How to use sharpen/denoise filters in an easy way #3 Colouring - Just a few very basic adjustment layers
What you need:
A video (most common formats should work, although .mkv doesn’t always)
Photoshop (I use PS CC 2018 - this one because I'm morally opposed to Adobe’s subscription model - but versions aren’t super different from each other)
In the end, you should hopefully be able to make something like this:

This is gonna be so long. Sorry. You can make a gif with just part #1! The rest is just to make it look better.
#1 Basics
If any of the tools/functions aren’t where they should be for you, your best bet is googling it, you might need to change something in your preferences!
Make sure to save your PS file... often. PS has a tendency to crash, especially on laptops.
First, you need to get the video file. I recommend a shorter video, a few minutes long, if it’s longer you might want to cut it into shorter parts beforehand. This is just because PS’s video import tool sucks.
I chose the Butter MV, specifically Jungkook’s body roll at 1:24 because that’s what I want to look at for the duration of this tutorial. No further questions, thanks.
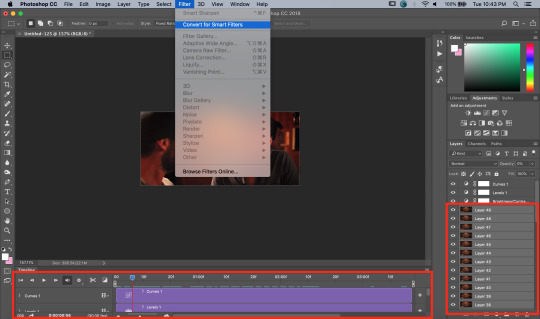
1. Open PS, go to File > Import > Video Frames to Layers

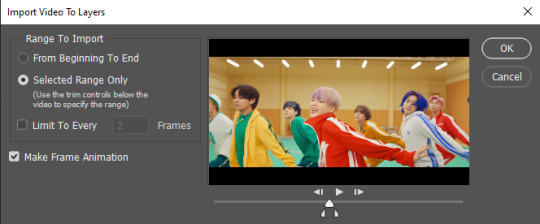
2. In the little pop-up, choose the part of the video that you want to gif. This will import every frame of the video into PS as a layer, so it has to be a relatively short part, or it’ll take ages (and gifs can’t be that big anyway). Now you can also see why it’s almost impossible to select the correct part if the video is too long.
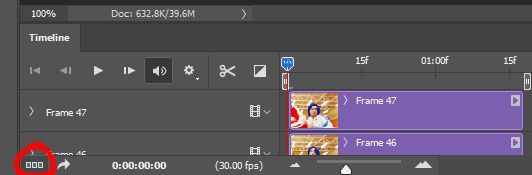
The little controls at the bottom are for trimming, the one in the middle just for the preview. Make sure “Make Frame Animation” is selected! Then click OK.
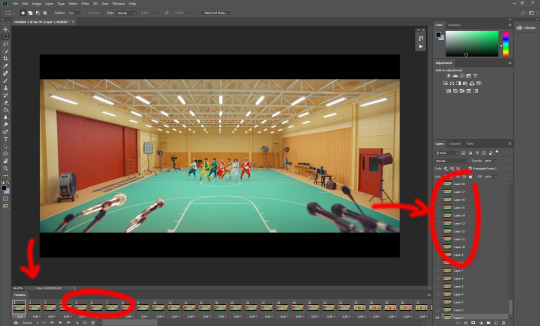
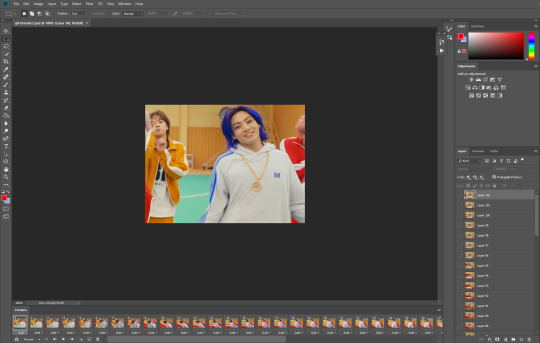
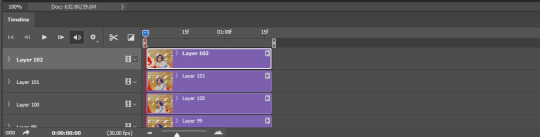
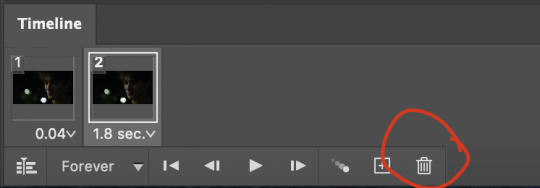
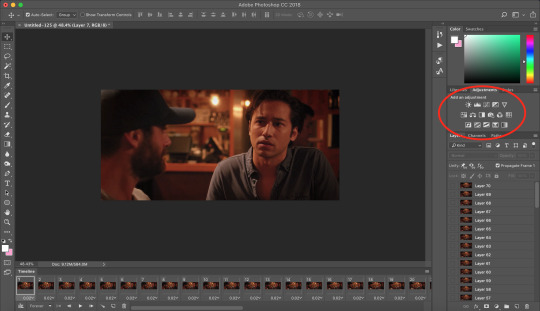
3. Now you have your layers, and you have a frame animation! On the right are your layers, that’s where we’ll apply the colouring etc. later on. On the bottom, that’s your timeline or frame animation - that’s what the gif will be in the end! So if you delete frames, the layers will still be there, but they won’t show up in the gif. If you click on a frame, you can see the little eye checkmark on the layer that’s currently visible.
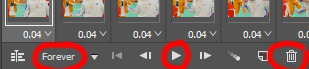
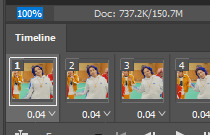
4. The timeline controls at the bottom that are relevant right now: set to “forever” so the gif will loop, you can play the animation with the play button, and you can delete the selected frame(s). The number on each frame is the speed of the gif, depending on the video I usually set it to 0.05 or 0.06 (photoshop lies to you when you play the animation, the only way to test this is to open the finished gif, preferably on tumblr or wherever you want to upload it).
5. As you can see, the animation starts a bit before the actual part that I want, so go ahead and delete all the frames in the animation that you don’t want! You can delete the corresponding layers too if you want, to make the PS file smaller, but it has no influence on the gif. (Hold Shift to select multiple frames as usual)
6. Next, we’re gonna crop the gif however we want! You can do this with the crop tool in the left sidebar, but with gifs like this where there’s a lot of moving parts, I sometimes just use the selection tool in the left sidebar, like so:
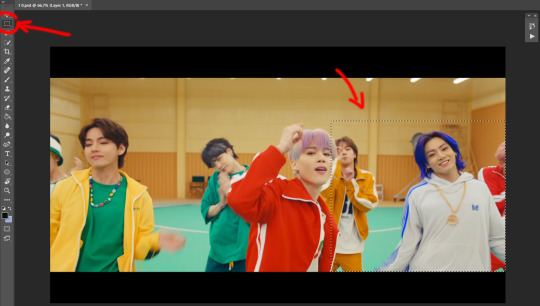
When you click on different frames, the selection stays, and you can check to make sure Jungkook doesn’t suddenly go out of frame if you crop it like that!
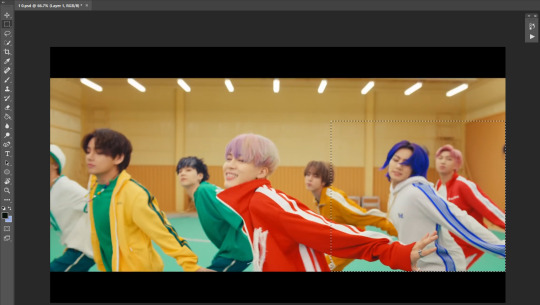
At this point, make sure the selection/crop isn’t smaller than you want the gif to be! For tumblr, what matters is the width (in pixels) of gifs. In the end, the width dimensions on tumblr should be 540px (1 gif per row), 268px (2 gifs per row), or 177/178px (3 gifs per row). Anything else will lead to very shitty resizing!
For this gif I’m going full sized, meaning 540px wide, so I made sure my selection isn’t smaller than that.
Then just go to Image > Crop, and it’s done!
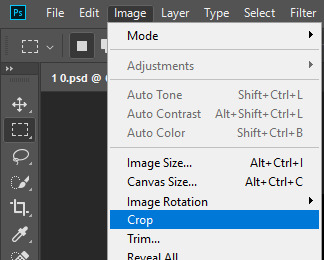
7. Check to see if this is what you want, then resize: go to Image > Image Size to resize the picture. Make sure the little “link” between Width and Height is active (to keep the same aspect ratio), then set the width to 540px or whatever you chose. I always set the resample option to Bicubic.
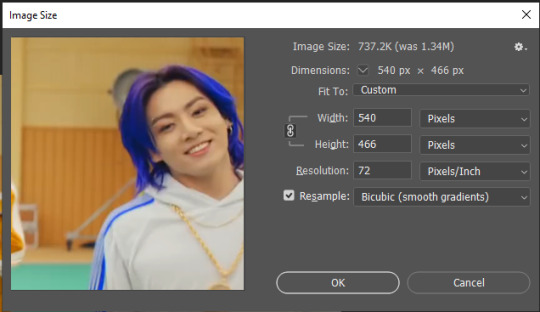
Once that’s done, set the zoom to 100% right above the timeline, to see what it really looks like.
Almost done! A little note about the sizing: width is the important part for tumblr, but if you want to make a whole gif set (especially with more than 1 gif per row!!!) make sure to make all the gifs the same height, otherwise they won’t line up and tumblr will do whatever it wants.
I ended up making mine 540 x 400 and ended up with this:
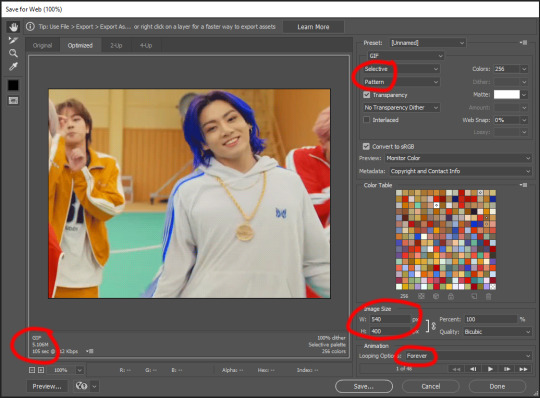
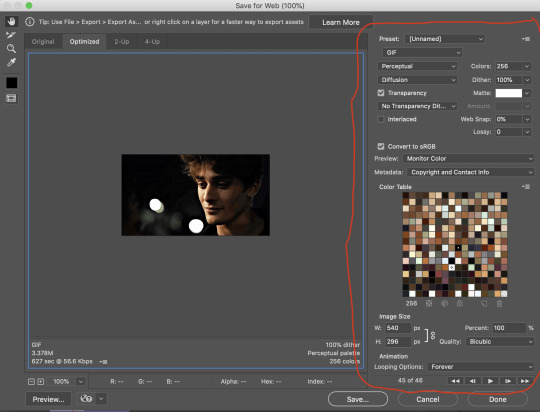
8. Time to save the gif!! Go to File > Export > Save for Web (OR just use the shortcut Ctrl + Shift + Alt + S) (or whatever it is on Mac).
In the pop-up, you can change things about the gif, but most things should already be the way you want it (Image size, Looping option forever). Selective should be the default, just like the rest.
You can choose between Pattern and Diffusion, some gif makers swear on one or the other, I go back and forth.
On the bottom left, you can see the size of your gif. Keep an eye on that! I believe Tumblr allows every single gif to be up to 10mb, but I try to keep mine under 5mb or close to it, because I think tumblr adds compression if it gets closer to 10mb?? Anyway back in my day you couldn’t upload anything over 1mb. You’ll never know our struggles.
Then just save it, and that’s it, you made a gif! Well done!! Here’s the end result:

:)
#2 Sharpen
There are countless ways out there to make gifs as smooth and clean as possible! Here I’ll show you the easiest way, but it also provides a good basis for other methods. The main difficulty is that you you need to sharpen the layers, but you don’t want to 100 layers one by one. So what we’re gonna do is convert the layers into a Smart Object, which functions as one layer!
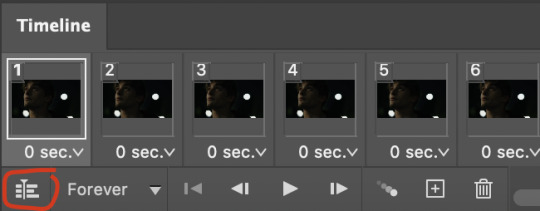
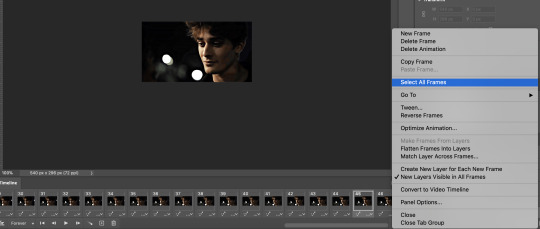
1. Convert the frame animation timeline to a video timeline with the little button right underneath on the left:
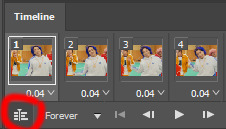
It should look like this, and I’m sorry but I can’t explain this one because I’m not an expert here, but you can just ignore it:
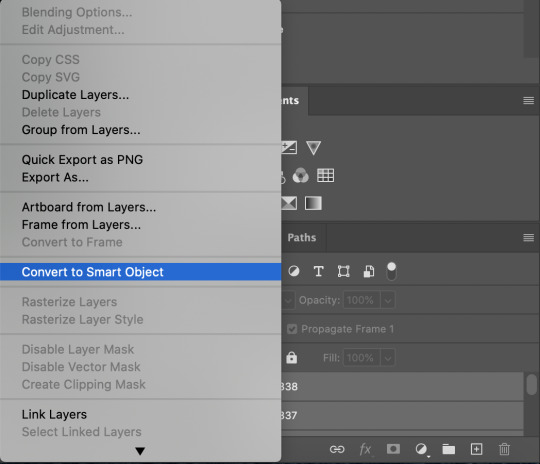
2. Select all layers: Select > All Layers, or just manually.
Then right click on the layers > Convert to Smart Object. Now there’s only one layer left, but don’t worry, the frames are still there!

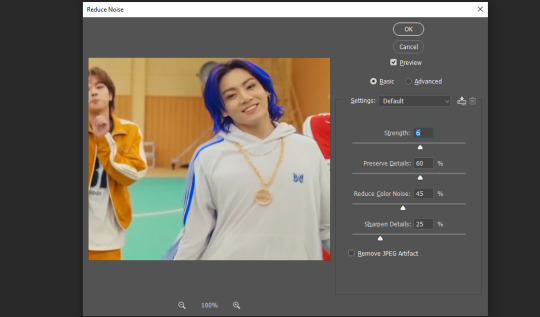
3. De-noise! It reduces noise, takes away some of that grain. More necessary in some videos. It also makes it less sharp, so I do this one first. Filter > Noise > Reduce Noise

My default settings are, Strength: 6, Preserve Details: 60, Reduce Color Noise: 45, Sharpen Details: 25, Remove JPEG Artifact: No. But you can play around, especially with the strength, and see how the little preview looks. Don’t apply too much of it! Or it will look weirdly smooth with no details in the end.
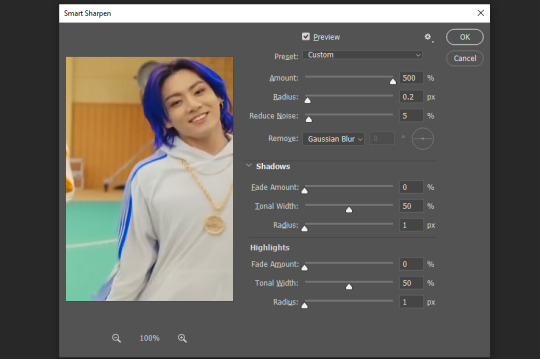
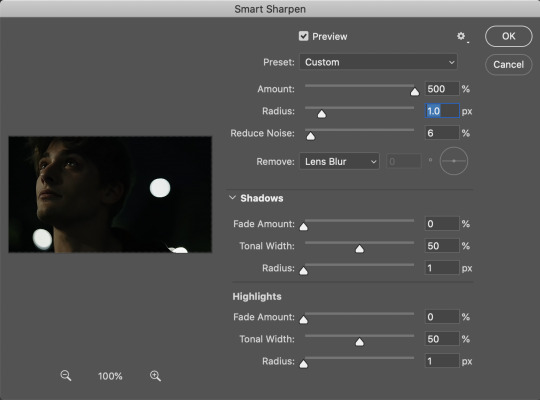
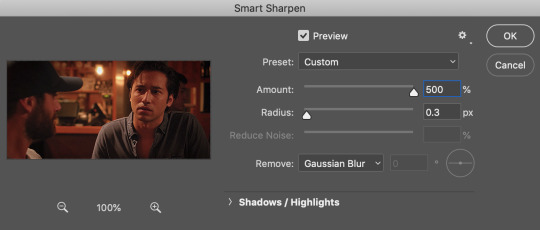
4. File > Sharpen > Smart Sharpen.
Settings: I usually have mine at Amount: 500, Reduce Noise: 5, and Radius at either 0.2 or 0.3, depending on the video. I’ll actually do 0.3 here, because I find it a bit blurry otherwise. If you sharpen more, it can quickly get grainy.
The difference isn’t huge, but here’s a little before and after denoise & sharpen:

5. Technically you can just save it as a gif (save for web) as shown above now, or you can convert it back to a frame animation, which I’d recommend especially if you use certain other sharpening methods (I’ll show you how to convert it back at the end of the colouring part), but for now, let’s go straight to the next part:
#3 Colouring
Now, you CAN do this part right after part #1, still in frame animation, without a smart object. I prefer it like this because sometimes PS acts weird, but if you want to skip the smart object stuff: select all frames, and add the adjustment layers at the very top, above all the other layers. (It only affects selected frames; and it only affects the layers under it.)
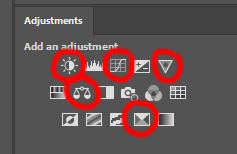
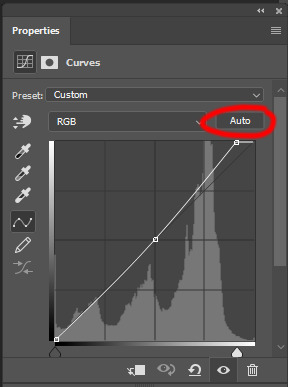
The adjustment layers should be above the layer tray, and these are the ones we’ll use today: Brightness/Contrast, Curves, Vibrance, Color Balance, Selective Color.
All of these are optional! You can do one, or all, or any combination. This is just the very most basic for me to get a gif to a point that I like. I’d recommend sticking to these for a start, but once you get the hang of it, definitely feel free to play around! It’s fun! Every gif maker has different preferences here, too, so there’s tutorials for everything.
1. Curves: Just click Auto, tbh. You can play around, but Auto works fine for me as a start, just to brighten or darken some parts as a base.

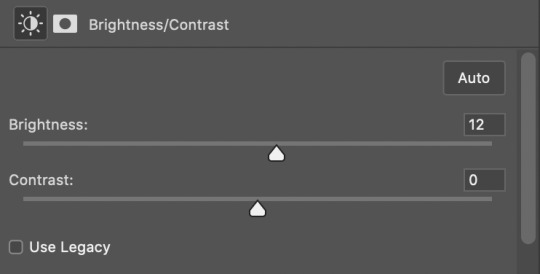
2. Brightness/Contrast: Usually videos are a bit dark, and contrast can help to make it seem sharper AND cut down on gif size, so I usually just up both of them a bit (but not too much! Or it’ll look cheap). Here I put them at B: 19, C: 23


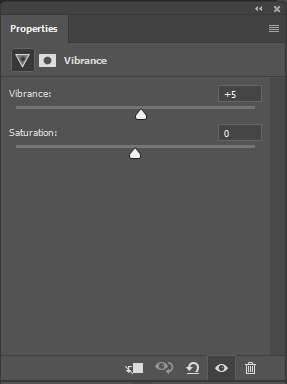
3. Vibrance: I love very vibrant and colourful gifs, so I usually up the vibrance (and sometimes the saturation). This one is already very vibrant, so I only put +5, but if you try to colour, say, a very moody tv show, this can help wonders, especially if you want to work with the colours more later.
If you prefer less vibrant gifs, you can also lower the values here!
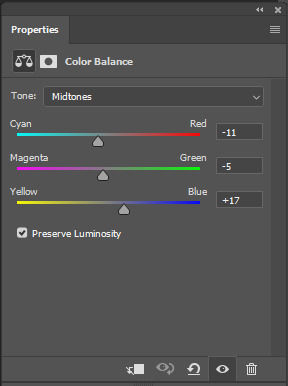
4. Color Balance: getting a bit more complicated now. Often, videos will have a slight yellow or green or blue tint, and this is where you can correct that. This video is a bit yellow, so I added +17 Blue. It was still too warm, so i added -11 Cyan as well. This neutralized the yellow tint, but I wanted some of the reddish tone back, so I added -5 Magenta. I usually do a similar process like that, depending on the tone.
Instead of Midtones, you can also do this for Shadows and Highlights individually.

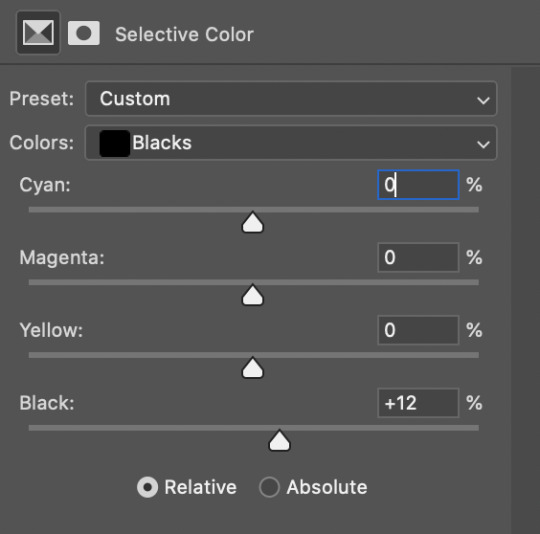
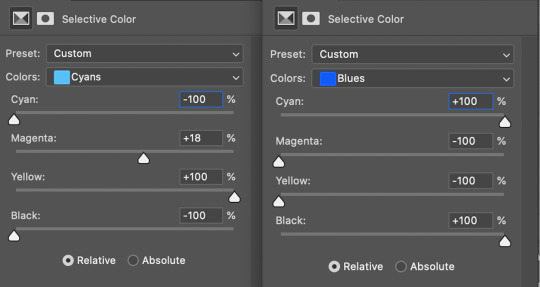
5. Selective Color: now this is the most complicated, but also the most fun to play around in my opinion! Be careful here, if you do something too extreme it’ll look like shit or make the gif super grainy. I some rough goals in mind here: make the blue hair as blue as possible, make their skin tone a bit less pale, and enhance the black and white (which I always do).
You choose a colour at the top, and then add or subtract cyan/magenta/yellow/black values for that colour.
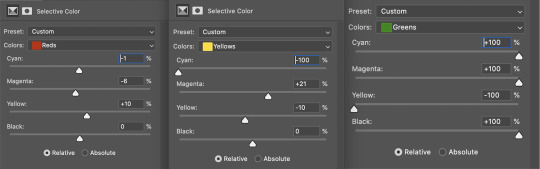
Skin tone: yellow and red. For this gif, I just added black to both, making them darker. Sometimes, if you change one or both those colours for a different part of the gif (for example, if I wanted to make the background less yellow, I’d subtract yellow from the yellows - but then I’d add yellow to the reds, to make the skin tone natural again.)
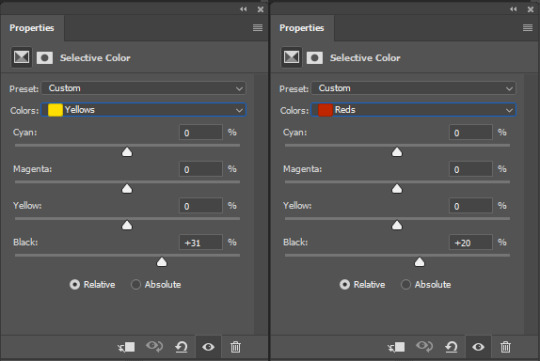

Blue hair: Just ramp up the cyan for the blues. Be careful with putting anything to +100, but here it’s already so bright that it should be fine. His roots are more purple, so I changed the magentas by adding cyan and black, and subtracting magenta and yellow. It’s not super clean, but fine for our purposes.
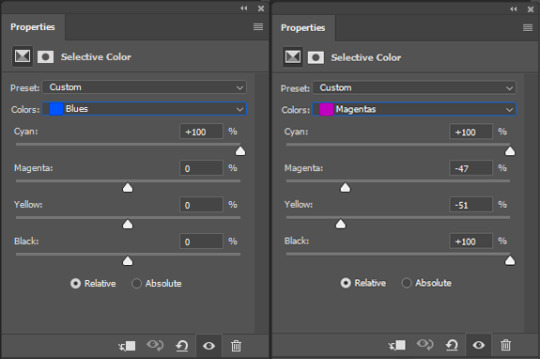

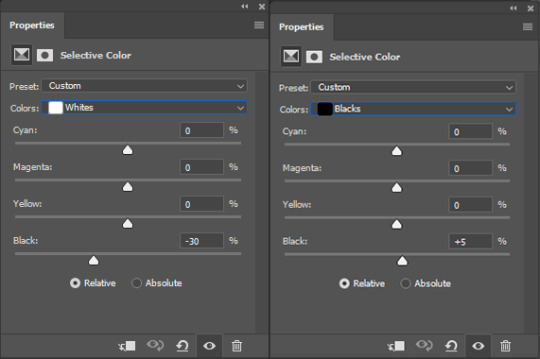
Black/white: depending on the gif, I often either add or subtract black to the whites. Adding makes the highlights less blinding, a bit darker, and flatter (I like to do that if one side of the face is bright white in the sunlight, for example). Subtracting creates contrast, makes it brighter, can wash it out. It can also lessen the gif size, and here it’s mostly just the tracksuit instead of important details, so I subtracted black. For the blacks, I almost always just add a bit of black, to make it more intense. Just like adding contrast, this can make the gif seem sharper and less grainy.

And done!
6. You could just save it as gif now, but as I said, I prefer to convert it back to frame animation timeline first, if only because I like to let it play through before I save it, and it works better for me there than in the video timeline.
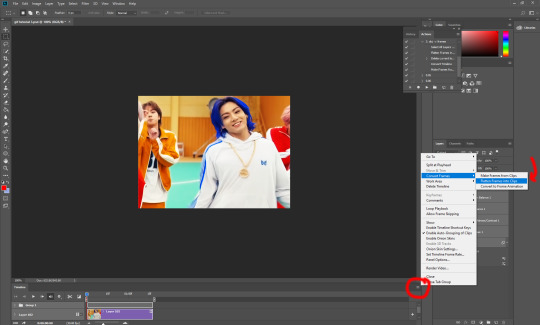
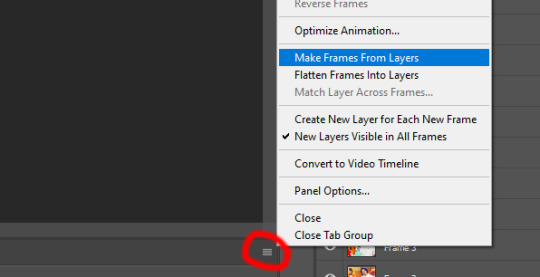
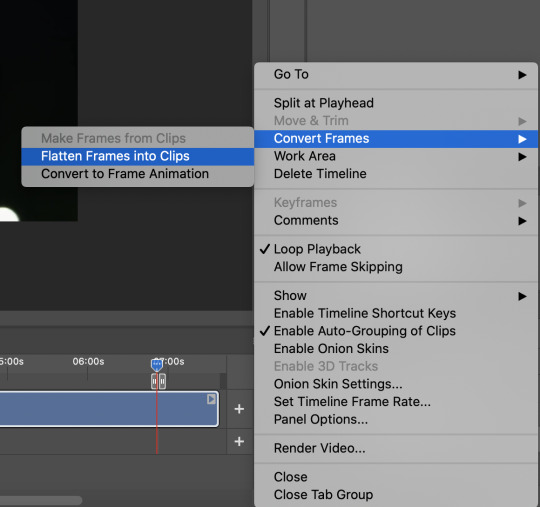
Select all frames, then click the little menu on the top right of the video timeline > Convert Frames > Flatten Frames into Clips
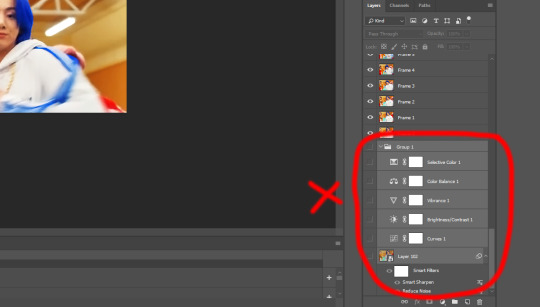
7. When you scroll down to the bottom of the layers now, the old smart object + adjustment layers should be at the bottom, under all the new layers. Delete the old ones, we don’t need them anymore.
8. Convert the timeline back to frame animation, by clicking the little button at the bottom left of the video timeline:
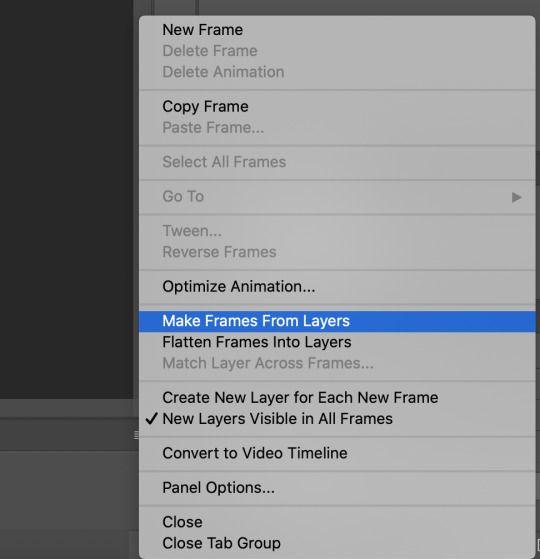
9. Click on the menu top right of the timeline again > Make Frames from Layers
10. Now, just some potential cleaning left to do. Sometimes, there’s a doubled or empty frame or layer at the beginning or end, just delete those as necessary. The timing of the frames is probably off, too, just select all frames and set the delay time to 0.05 (or whatever).
Now your done! Save as gif, and you should get this:
I included some bonus links and tips after this but tumblr ate that whole part so I guess it’s going into a separate post. (Here is is)
Anyway, I tried to make this as easy to follow as possible for beginners, but feel free to send me an ask for clarification anytime. Hope this helps, now go make gifs and have fun!!
#photoshop#tutorial#gif tutorial#ps tutorial#btsgif#*#*tutorial#this took so much longer than i expected i'm not giffing for at least a week now
245 notes
·
View notes
Photo
so here’s my disclaimer: I hardly know what I'm doing. This is my glued together homemade giffing method that I’ve created over months of just random experimentation and bits and pieces from all kinds of tutorials. there are probably better or more correct ways to do a lot of these things! this also isn’t a completely universal tutorial, some of the specifics are geared towards giffing skam, specifically skam france.
I gif in photoshop cc 2020 on a macbook. Some things like keyboard shortcuts and little things about the photoshop interface will probably vary if you are on a pc/ other version of photoshop!
this is very long and very unprofessional, but I hope there is something in here that someone will find helpful!
we’ll be going from this:
to this:

up to date as of October 25, 2020
downloading clips
selecting what part you’re going to gif
cropping
my action for resizing, converting to a smart object, and sharpening
coloring
exporting and setting the delay
tldr tips
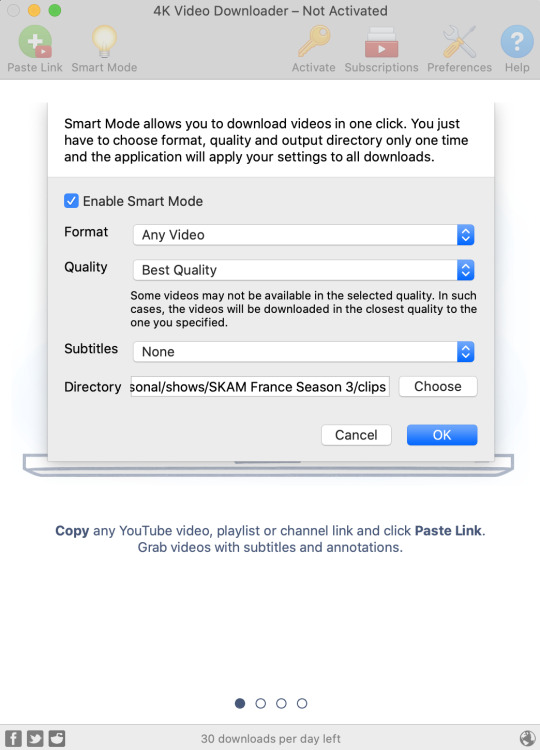
1. downloading clips
4k video downloader (which you can get for mac or pc here) is great for things posted to youtube, especially from skam france because all the clips are on their youtube with no weird geoblocks or anything! it’s really easy, you just have to open the clip in youtube, copy the link, and go into the program and hit paste link. I like to put on smart mode first and set the destination folder so all my clips go into the place I want.
There is a 30 video per day download limit, so if you’re thinking you really want to gif lots of stuff from the show, and want a big chunk or a full season it’s definitely worth hunting for a mega or google drive with full episodes to download because it’s just less hassle! I might come back to this post later and compile a list of all of those, but for now if you type “[remake] no subs google drive” or “[remake] no subs mega” into a google search, you’ll probably find something! the all of skam website has no subs for several remakes, but not all!
If you don’t have enough space on your computer to be keeping full seasons, I know there are methods to get screencaps without having to download (generally for giffing movies and regular tv I think this is a common method), but I’ve never done it so I’ll redirect you to this tutorial that explains it! you should probably just go there for the whole thing tbh it’s much more coherent than this, but I digress.
2. selecting the piece of the video you want to gif
now that you’ve got your episode or clip you’ll want to just open it in photoshop! if you go the screen capping route the way to do that is a bit wonky, so you can keep following the tutorial I linked above and join back in here at coloring if you like!
if the timeline at the bottom doesn’t pop up automatically you can go to window > timeline and turn it on! now you can use the scrubber bar thing to find the moment you want to gif!
The advantage of this over screen capping is you can scrub with more precision. the arrows circled in blue below let you jump only one frame, where in screen capping I'm pretty sure you can only go by ten second or one minute intervals.
I usually drag the scrubber as close as I can to the start of the shot/moment I want to use, fiddle with the arrows circled in blue below to jump forward or back one frame at a time until I'm at the first frame I want. I move the left grey handle to the scrubber and then I hit the play button and let the whole shot/moment play. Pause and repeat the shuffling with the arrows until you’ve landed on the last frame you want to use and move the other grey handle.
the moment you want to use should be between your handles (it’ll look like what I have circled in red), and if you hit play, you should see the thing you want to gif playing on loop above the timeline. the speed will probably be weird, but we’ll deal with that at the end.

now I recommend doing command or control + s to save your gif as a psd (photoshop document). this is a working, editable file which means if photoshop crashes you can open your file right back up and keep working as long as you’re hitting command or control + s at regular intervals as you work. later we’ll go through exporting in gif format that can actually be uploaded to tumblr.
3. cropping
next I crop out any logos or black space at the top and bottom. Just click on the crop tool on the lefthand side of the screen, drag the edges and hit enter when you’re done. you can of course crop out more than just that, but regardless of what you crop out, now is the time to do it.
you can set an aspect ratio for your crop at the top of the screen if you’d like to be positive that all the gifs in your set will be the same:

4. my trusty action: resizing, converting to a smart object, and sharpening with one click
Now is when I use an action I made that does all the resizing, converts to a smart object, and sharpens. I’ll take you through the steps so you can conceptually get what’s going on, but I highly recommend using the actions window to record your process as you follow along so you have this action as well. It easily shaves at least 5-10 minutes off of the whole process, and these steps will be the same every time.
here’s how you make an action: go to window > action and open the action panel. click the plus symbol to start recording a new action:
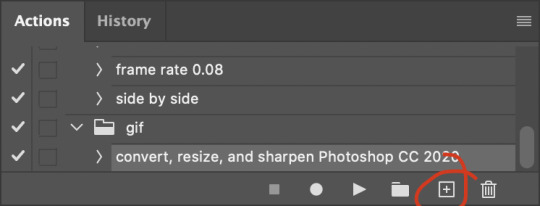
in the window that pops up, give it a name and hit record:

now just continue with the steps below, and it will save them!
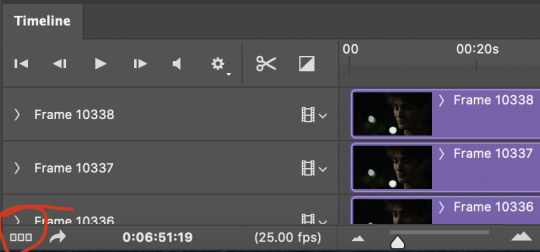
first you flatten frames to clips (I think it says flatten to layers on older versions of photoshop). this is in the menu at the top right corner of your timeline:
next you convert to frame animation by clicking on the symbol in the bottom left, circled in red:
if there is more than one thing in the frame animation, delete the extra one. you don’t need to keep the last one but it won’t let you remove it until there are other frames in there. also go into your layers and delete video group 1 and its contents. don’t ask me why these steps are necessary, I don’t really know, but I’ve noticed it sometimes gets wonky if you don’t do this:

now you want to make frames from layers and delete that first frame that was there before:
then we return to the timeline:
use command + option + a (control + alt + a for pc I'm pretty sure) to select all layers and then right click within your layers window and select convert to smart object. It’s important to convert to smart object after you go back to the timeline, or the gif won’t move:
next I resize. gifs for tumblr should be 540 pixels wide. for recording your action you should just go into image > image size and only change the width to 540 in case you ever have gifs cropped to different aspect ratios. don’t touch the height, let constrain proportions figure it out!

now, here’s what our base gif looks like, no sharpening, no coloring:
now to sharpen. go to filter > sharpen > smart sharpen. this is up to personal preference, but my go to settings are:
this is what we have after sharpening:

now is when you can stop recording your action.
just press the stop button in the action window:
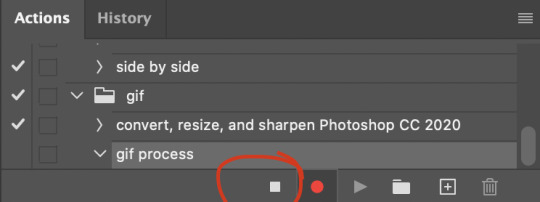
this action is pretty much universal and after I select the moment the gif will be and crop however I want, I use it on every gif I make! so although this initial setup is tedious, now you’ll never have to do these steps again, and the process is magically much quicker.
5. it’s time to jump into coloring!
I typically start with exposure and sometimes some brightness/contrast. with really dark gifs like this, you kind of have to make it worse before you make it better. I did this:
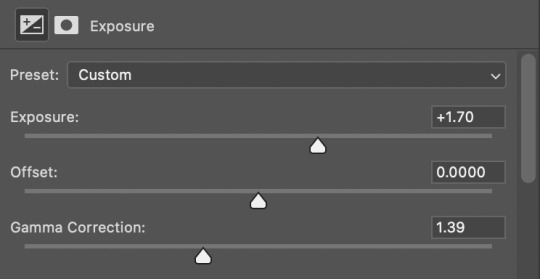
now the gif looks like this:
we have some static and some ugly bits, and this is where selective color comes in to fix it! boost blacks like this:
and now your gif looks like this:

the skin tone is looking a little sickly and weird, so I go into the yellows and reds in my selective color layer to fix it! I also messed with the greens here because I didn't want color in the background (that part is totally optional and just up to your preference):
now we have this:

to really take the color 100% out of the background, I did one more separate selective color layer for cyan (again, I just felt like it but this is optional!):

and now the finished gif:
there’s lots of fun extra things you can add like text and tints and overlays and all that I won’t get into, but feel free to reach out for help on those types of things!
this gif was certainly not the most complicated to color. some ridonkulously dark clips (*cough cough* vendredi 20h27 *cough cough*) take tons and tons more effort than this and a lot of the time you’ll want to use color balance layers and vibrance layers and all of that to mess with your coloring.
with all of this coloring business, I really just learned by doing. I don’t know all the technical purposes of each type of adjustment layer, and I tend to stay away from curves just because I find them confusing and annoying. The bottom line is that you should always experiment and find out whatever coloring works for you and run with it! I’m sure every gif maker you talk to does things at least a little differently!
I highly recommend taking the time to go through all the types of adjustment layers and just move the sliders around to see what they do! That’s honestly one of the best ways to learn and decide what you like!
6. now to export and adjust the delay!
the keyboard shortcut for exporting on mac is command + option + shift + s, control + alt + shift + s for pc, otherwise you can go to file > export > save for web
my settings are here:
the settings only need to be configured once! otherwise just hit save and follow the pop ups to choose where to save and what name you want to give your gif. Since you saved as a psd way back, that will be the name it’s automatically given, but call it whatever you want!
then I adjust my delay by opening the gif I just exported (not the psd, the .gif file) and using one of my delay actions. I’ve made an action for each delay between 0.05 (real time) and 0.08 (really slow mo for certain super short shots, typically for more ~artsy~ sets).
all my action does is select all frames:
adjust the delay (which will differ based on whether you want them slowed down and by how much):

for reference, this is a 0.05 delay:
and this is a 0.08 delay
now you just export the same way you did before!
remember if you’re recording this as an action, you don’t want to touch the file name, just say yes when it asks if you want to replace the file. if you always save your gifs to the same place, your action will now enable you to override any gif with the incorrect delay with the correct one with one click!
7. tldr: the main tips
for downloading 4k video downloader works well for non geoblocked youtube videos, the all of skam website is another place you can look to download with no subs, here’s the screen capping method if you don’t want to download
The main way I combat dark lighting is to bump exposure to the right, gamma correction to the left, and then enhance black in a selective color layer. The amount of these three adjustments will vary gif to gif. I know lots of people use curves, but I find them really confusing for some reason, so this is my method! As my graphics teacher likes to say: there are always at least 3 different ways to reach the same result!
there’s a little bit of additional coloring on this one, but here’s another before and after example so you can get an idea of how those steps get you a better lit result without making the lighter parts super over exposed:

besides those three steps, you have free rein to use the other selective color channels, as well as color balance, vibrance, hue/saturation, etc. to restore color that was lost or to change the colors altogether! mess around with it and have fun experimenting!
7a. bonus coloring tip:
sometimes you can make use of selective color to completely alter an isolated color in your gif. You can get very adventurous with this, but here's a simple example of changing blue tones to teal (I got away with these gifs being longer because they were in rows of two in the set I posted them in. I'm too lazy to trim frames so I can put them here at 540 px without going over the 10mb limit so just ignore the quality ok):
7b. actions, actions, actions!
if you find yourself doing a certain thing over and over, always record it as an action. the amount of time they will save you is honestly really impressive.
You can duplicate actions, so, for example, if you have different sharpening preferences for different shows or scenes, you can duplicate your gif process action and go into the steps, double click smart sharpen, and alter it however you want!
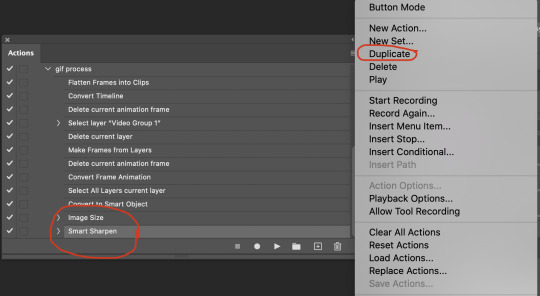
This could also be good to do for the different widths for tumblr if you ever do sets with rows of two or three! Duplicate actions is also how I made my actions that set delay at 0.05, 0.06, 0.07, and 0.08!
when in doubt, always make an action! it’s worth minimizing the tedious bits of the process as much as possible so you can focus on the fun part of seeing your awesome gifs come to life! any little task you find yourself doing often, make an action!
and for now that’s all I have. if any of this made no sense, if you want to suggest a correction or addition I could make, if you’re ever curious how I did something on any gifs I post, or if you have any other sort of questions, feel free to send me an ask or a dm! if I can’t answer your questions I’ll be happy to try to direct you to someone who can or a tutorial to help! again, I'm no expert, not even close, but I hope at least one person will find one thing in this mess that helps.
#this got . so long omg#mystuff#mytutorial#gif tutorial#tutorial#resources#fellow gif making peeps feel free to correct me or give input on how to improve or add to this tutorial!
31 notes
·
View notes
Text
How Do I Make Gifs? - A Photoshop CC Giffing Tutorial
(for @elektrawwf, and anyone else interested in how I make gifs I guess, lol)
So, I feel like I should preface this by saying that I'm certainly no expert on this, nor am I a Professional Giffer™, but I’ve been making gifs for a few years now, and have developed a pretty standard system for doing so. Hopefully it works for you like it’s worked for me! :)
Basic Tutorial Steps:
Step 1 - Recording the scene you want to gif
Step 2 - Importing, deleting, and cropping your gif frames
Step 3 - Adding adjustment layers
Step 4 - Resizing your gif and setting the frame delay
Step 5 - Converting and sharpening your gif
Step 6 - Trimming and saving your gif
BONUS STEP - Adding text (OPTIONAL)
-
Programs Used/Needed:
- QuickTime Player
- Photoshop CC 2018
-
The finished gif that I’ll be making:

This tutorial is VERY screenshot-heavy, so the rest of it will be below the cut. Happy giffing!
STEP 1 - Recording the scene you want to gif.
All gifs start as videos. I use the Screen Recording feature on QuickTime Player to create videos of whatever scenes I want to gif. If you have a Mac, you can find QuickTime in the Applications folder:
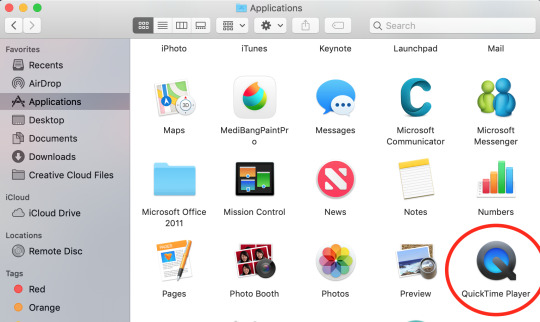
Right click, then select New Screen Recording.
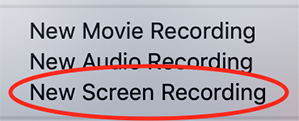
You can then play the scene you want to gif on your computer, and your screen with the video on it will be recorded. Hit the stop button when you want to end the recording, and then save the video.
It’s best to not record more than a minute or two at a time - basically, just record the exact scene that you’re looking for - because the longer the video is, the harder it’ll be to select the portion of it that you need for giffing.
You can technically screen-record any type of video, but I (and most giffers) vastly prefer videos that are 1080p, which is the best kind of HD. That’s why I usually don’t gif things unless I can find them either on Netflix, Youtube (in HD) or the CW site (or NBC, CBS, whatever). There are definitely other (less legal) ways to get your hands on HD videos, but I’m just not super comfortable using those lol.
That being said, 720p videos are usually okay for smaller (268px-wide) gifs - they’re just less ideal (I wouldn’t really recommend using them to make 540px-wide gifs, but you can still technically do it).
STEP 2 - Importing, deleting, and cropping your gif frames.
Now that you have your video, you have to import it into Photoshop. Once you open Photoshop, you need to go to File > Import, then select Video Frames to Layers.
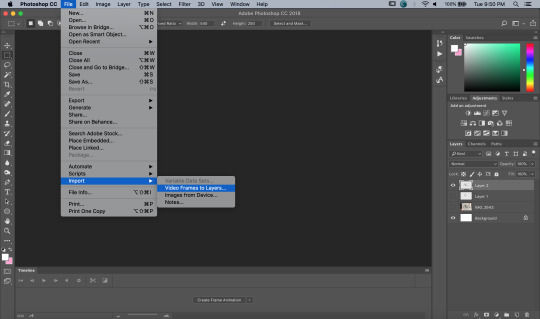
A window will pop up, where you can set the amount of frames that you want Photoshop to import, and select the exact section of the video that you want to import. Here are my settings:
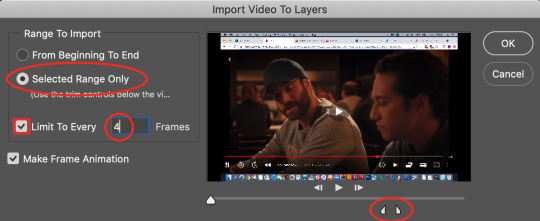
The two little toggles below the video are meant to be dragged around, and you use them to section out the specific Range of the video that you want to turn into a gif. Once you have all of this set up to your liking, hit OK.
-
NOTE: The selection of Limit To Every 4 Frames is more my personal preference than anything else. If you want Really Smooth Gifs, then you can uncheck that box and simply import every single frame in your Selected Range. This is what High Quality Giffers always say to do. Unfortunately, while those gifs do end up really smooth, they also end up being really short, which I don’t particularly like.
So basically, I’m personally willing to sacrifice some smoothness in favor of an increased gif length, but you do NOT have to do that if you don’t want to. Choose whichever option you like best - these Steps work no matter which one you do. (We’ll come back to this later though, once we get to setting the frame delay in Step 4).
-
Okay, back to the tutorial.
Once the scene is imported, you can delete any extraneous frames at the beginning and end of the frame animation Timeline, which can be found at the bottom of the screen.
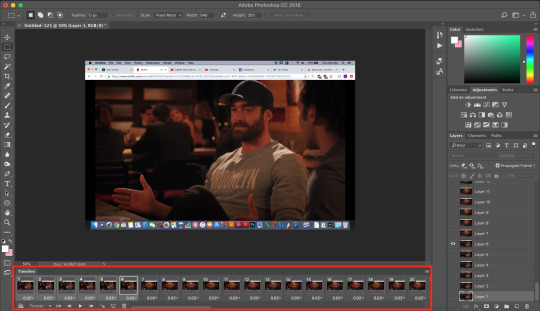
As you can see, I have the first 6 frames selected. Those are the ones I ended up deleting (among some others at the end of the Timeline).
You can also go to the Layers panel on the right, and delete the corresponding layers from there, once you’ve deleted the frames. This isn’t technically necessary, but it might help free up some computing space if you’re deleting a lot of frames.

Next, you need to click the Selection Tool in the top left corner of the screen. Then, set your selection preferences (circled below) as follows:

Style: Fixed Ratio
Width: 540
Height: 250
This is specifically the ratio to set for a 540 x 250px sized gif, which are the dimensions of the example gif I’m making. If you want to place two gifs beside each other in a gifset, each gif needs to be 268px wide. (The heights can be whatever you want them to be.)
Use the Selection Tool to select the area that you want to be your gif, and then go to Image > Crop.

STEP 3 - Adding adjustment layers.
Now it’s time to make your gif look pretty™. For this part, you’ll be using the Adjustments panel above the Layers panel.
Adjustments will affect all the layers below it, so you want to make sure that your adjustment layers are placed above all of your gif layers.

These are the adjustment layers that I used for this specific gif, but they’re also just generally the same three adjustments that I use for every gif I make. (I also usually add a Hue/Saturation adjustment to my gifs, which I set to +15 Saturation, but since this scene was already so heavily saturated, it didn’t need it.)
Here are the specifications for the Brightness/Contrast and Levels adjustment layers:

Regarding the Curves adjustment layer (pictured below), if you click on the RGB dropdown menu, you can single out specific colors in order to color-correct the gif, which I did here (by removing a lot of extra reds and yellows).
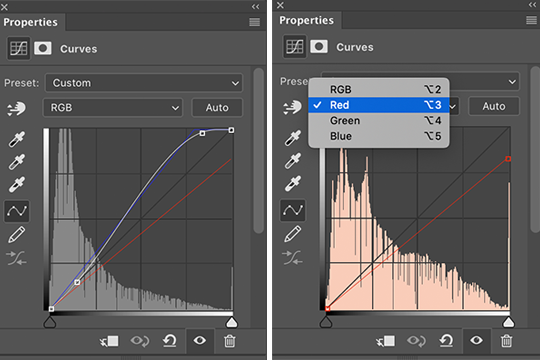
While these are good general adjustment examples, just take note that the values pictured here won’t be exactly the same for every gif, and you need to toggle and play around with them to make every new gif look its best.
Here’s the example scene before any adjustments:

And here’s the scene after my adjustments:

STEP 4 - Resizing your gif and setting the frame delay.
To resize your gif, go to Image > Image Size, and then change the gif’s width (in this example, I change the gif’s width to 540px).
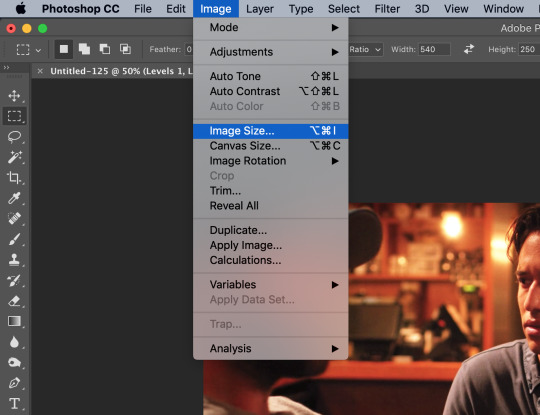

As long as Resample is checked the you’re working with Pixels, the gif should resize properly. Hit OK.
Next, to change the Frame Delay of the gif (basically how fast it goes), look for this button in the right corner of your Timeline, then click it and Select All Frames.

Once all the frames are selected, you can hit one of the little downward arrows next to the 0.02 values, and select Other.
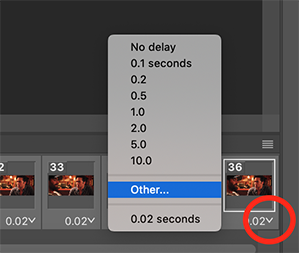
Now you can set your new frame delay. I always set my delay to 0.09 seconds, which produces gifs that are a bit slower than the Professional Gif Standard™. This is due to a combination of personal preference (I just like slower gifs) and an effort to maintain as much smoothness as possible, given how I choose to import my frames.
-
NOTE: Remember the NOTE from Step 2? Now, if you chose to import every frame, rather than “Every 4 Frames” like I do, then you should set your frame delay to 0.04.
Doing so will produce a final gif that looks like this:

Notice how this gif is smoother and faster, but also shorter than my example gif? Yeah. Like I said, whichever style of gif you choose to make is up to your own preference.
STEP 5 - Converting and sharpening your gif.
You never quite realize how blurry a gif really is until you Sharpen it. To do this, you first need to convert your Timeline from a Frame Animation to a solid Timeline. You can do this by making sure all your frames are still selected, and then clicking the Convert to Timeline button in the bottom left corner of the Timeline.

Now your Timeline should look purple, like it does in the picture below.
Next, you need to select all of your layers (MINUS the adjustment layers) on the right side of the screen. Once all of your layers are selected, go to Filter > Convert for Smart Filters.
Once your gif layers have been compressed into a Smart Object (see circle below), you can select Filter > Sharpen > Smart Sharpen.

The first time you select Smart Sharpen, you need to set all the parameters for it. But once you do that the first time, you shouldn’t have to set them again. Basically, make sure your window looks exactly like this one:
Then hit OK.
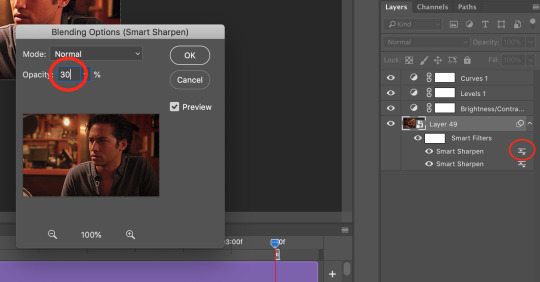
You’re going to do this TWICE (so you’re going to end up with TWO Smart Sharpen layers below your Smart Object layer). Then, you need to click the button to the right of the top Smart Sharpen layer, and change the opacity of that layer to 30%. (Otherwise, your gif will be way over-sharpened.)
STEP 6 - Trimming and saving your gif.
You’re almost done! It’s time to save your gif.
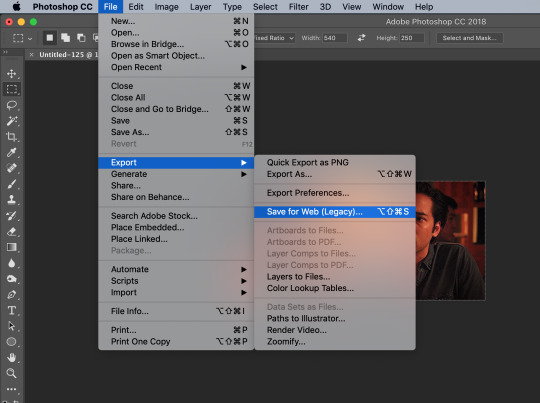
To save a gif, you must go to File > Export > Save For Web (Legacy).
However, this gif has a problem.


This number in the bottom left corner of the Save For Web window tells you the current size of your gif. As you can see, this gif’s size is currently 3.541 MB. That size wouldn’t be a problem if you were intending to upload this gif to Twitter, because Twitter has a gif size limit of 5 MB.
Tumblr, however, only has a size limit of 3 MB. So, to get your gif to work on tumblr, you need to Trim it.
Trimming is the process of changing the length of a gif without actually deleting any part of it permanently. This gives you the freedom to edit your gif and pick the portion of it that you like best.
You can easily trim your gif in the Timeline, by clicking the dragging the Gray Sliders at each end of it (see the arrows below). Wherever you leave the stoppers will become the new beginning and end of the gif. You can make this process more precise by using the Blue Slider (circled below) to choose where you want your stopper to go before you drag it there.

The Timeline pictured here has already been trimmed.
Trimming your gif will often require some trial and error. Whenever you want to check the length of your gif, simply go to Save For Web again and check the amount of MBs in your gif. (Click Cancel if your gif is still too big.)
Once your gif falls below 3 MB, you can finally save it!

The last thing you need to do before saving is change your Looping Options from Once to Forever in the bottom right corner of the window. Then, click Save.
You now officially have a finished gif!
Mine looks like this:

-
BONUS STEP - Adding text (OPTIONAL)
Now, I’ve just shown you how to make and save a gif. But what if you want to add text to that gif? I’ll show yow how to do that too.
First off, you should only add text after the rest of your gif is completely done and ready to be saved (basically, once you’ve already completed Steps 1-5). Then, before you save it, you can click on the Text button on the left side of the screen.
Click on the gif to create a new Text layer, and then type whatever you want. Generally, dialogue captions are placed in the middle of a gif towards the bottom, while other, more artistic types of Text can go wherever you want.
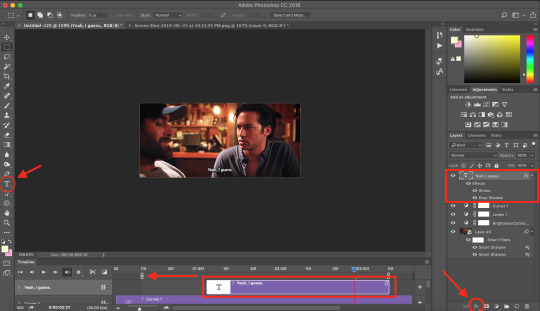
Now that you have a Text layer, you want to make sure of a few things. First, make sure that your Text layer is your TOP layer on the right side of the screen, above all of the Adjustment layers.
Next, you want to make sure that your Text layer spans your entire gif Timeline. Notice how my Text layer (depicted as a purple rectangle in the Timeline) doesn’t reach the Gray Slider on the left? To fix this, simply click and drag the Text layer until it extends past both Gray Sliders.
And finally, I always add Effects to my Text. You can do this by hitting the fx button in the bottom right of your screen. Specifically, I use the Stroke and Drop Shadow effects to make my gif stand out from whatever background it happens to be on.
My Stroke is always set to 1px thick, and my Drop Shadow settings are as follows:

As a final note, if you want your text to look exactly like mine, then you need to use the font Myriad Pro in size 14, which I then italicize and bold. You can also open Window > Characters, and make sure that your preferences look like this:

ALRIGHT. Now that you’ve added your extra text, you can FINALLY go to Step 6 and save your gif.
Now, your finished gif should look like this:

I hope this tutorial was helpful! I tried to be as thorough as possible to avoid any confusion, but if you have any additional questions, you should always feel free to ask me!
Have fun giffing!! :)
#my tutorials#my gifs#idk what else to tag this lol#gif tutorial#personal shit#long post#I'm so sorry to anyone on mobile with no read more
57 notes
·
View notes
Text
Aspect Ratio
When I was working through the technical task I didn't know what an aspect ratio was so this was some of the key points that I found.
Aspect ratios describes the proportional relationships between the images width and height
Different ratios can completely change the viewing experience of the images
The correct way to write an aspect ratio is to write the first number that is associated with the width and then a colon which is followed by the number of the height
X:Y (width always comes first)
If you take a 6x4″ photo the ratio of the image is 3:2 but if you take another image of 8x5.3″ the ratio is still 3:2
So when you look at it the aspect ratio doesn't have much to do with the image size. The ratio is directly determined by the size of the cameras sensor, but most new DSLR’s allow you to change the aspect ratio.
Ratios required for common print sizes
6x4″= 1.5:1 ratio
7x5″= 1.4:1 ratio
10x8″= 1.25:1 ratio
11x8.5″= 1.29:1 ratio
Aspects could cause some problems to images for example, if a subject has been placed too far to the side of the frame this could be lost if the wrong ratio has been used
Could use the ratio to add emotion to the image, as this would add negative space to the image- could give a sense of loneliness or isolation
Could help with the composition in an image. If there is any extra ‘room’ in the photo (this mostly happens with vertical images) there may be too much space with the ratio of 2:3 while the ratio of 4:5 could give a ‘sugar’ fit to the frame. This could make the composition more appealing
If you take an image using the rule of thirds using a 4:5 ratio then using the ratio of 3:2 for print, the composition of the shot may not show the rule of thirds anymore
You could see a dip in the quality when trying to shoot a ratio that is larger than the camera sensors ratio
If your sensor ratio is 4:3 (a micro four-thirds camera) then the best shooting ratio would be 4:3 or 1:1. If you try to shoot 3:2 or 16:9, you may end up having to significantly cropping the image (this will cause a drop in the quality)
Reference
https://phlearn.com/magazine/how-to-know-which-aspect-ratio-to-use-in-your-photography/
0 notes
Text
Covering the angles: How tall is an isometric cube, really?
I'm no art guy. I got really paralyzed when I first started thinking about how to draw a nice RPG-style game. Here are my thoughts.
Firstly, there are lots of tutorials for how to draw different art styles. Maybe you want isometry? If so, I did a little (too much!) math:
... Wait, let me back up.
Types of Parallel Projection Art
Let's ignore proper 3d rendering and talk about designing pixel-based sprites for a video game. You want them to move around the stage, and you don't want them to change size as they get notionally closer to or further from the camera -- you want to draw a Mario sprite and have a platform be "seventeen" marios across and to have both display that way. You know. Video game art (at least, in the pre-modern era).
This is going to be a parallel projection. You have a few choices for how to draw this art:
Isometric

It’s a cube! It’s a cube with three sides showing! Technically my drawing skills aren’t quite good enough to show this to you, but there are secretly two similar-but-distinct things which video games call isometric: a pixel-perfect 2:1 dimetric projection (where that +Z face's diagonal edges are over-two-pixels-then-up-one-pixel-then-over-two-pixels-then-up-one-pixel forever) and the technically correct actual isometric projection, where the pattern is to approximate 26.565 degrees. Horrible. Video games just round up to 30 degrees, which gets us the 2:1 ratio.
Okay. But having put a little bit of estimation in one face, does this force the estimation to pop back out elsewhere? it does indeed! Since we changed the visual corner angle to 60 degrees (or 30 degrees above & below the horizontal) (ed: See this article for the correct numbers, but the actual idea is still correct), we must have changed our viewing angle to hang a little bit lower (30 degrees exactly, instead of the isometrically correct 35.264 degrees, same wikipedia article). Which means the bottom leg of the cube -- the edge between the +X and +Y face -- has some unpredictable length we should actually derive, which determines the overall height of the sprite image which represents it.
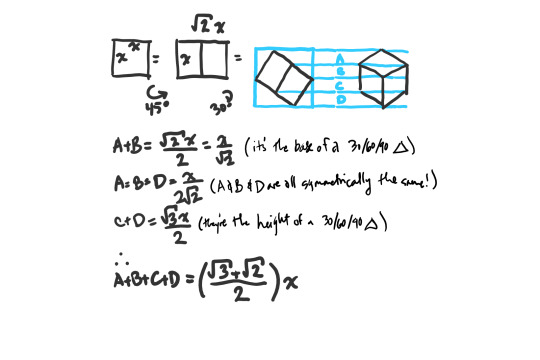
Which is where that diagram from the beginning came from:
.
Since the width of the sprite is sqrt(2) (approx 1.414) times the box's side length, and the height is that formula (sqrt(3)+sqrt(2))/2 (approx 1.573) times the box's side length, we can say that an isometric sprite whose sprite width is u has a height v=1.112*u -- it's 11% taller than it is wide. This adds up fast; for a sprite 32 pixels wide, it should be 35 pixels top to bottom, and those 3 extra pixels force the top of the cube out of alignment with the plane of the bottom, preventing visual illusions like:
youtube
0 notes
Photo

New Post has been published on https://www.hackzhub.com/investment-ideas-for-college-students/
Lyle Advisors Shares Investment Ideas for College Students
We generally think that investment is done by wealthy people; it does not need to be in that way.
Even students must consider how they will use investing in securing their own financial future before they are out earning a full-time salary on their own. Let us look at some top ways suggested by Lyle Advisors for college students to start investing:
Lyle Advisors Investment Ideas
Begin With Stocks
Being a youngster, stocks are an ideal place to begin your investment. Yes, they generally come with high volatility that is one important measure of risk. However, with time, they provide very strong returns, and as you will not be retiring for years, you will just park the money & ride out on stock market correction.
.ue3a3a0c482062e44cfbbb74bff601a46 , .ue3a3a0c482062e44cfbbb74bff601a46 .postImageUrl , .ue3a3a0c482062e44cfbbb74bff601a46 .centered-text-area min-height: 80px; position: relative; .ue3a3a0c482062e44cfbbb74bff601a46 , .ue3a3a0c482062e44cfbbb74bff601a46:hover , .ue3a3a0c482062e44cfbbb74bff601a46:visited , .ue3a3a0c482062e44cfbbb74bff601a46:active border:0!important; .ue3a3a0c482062e44cfbbb74bff601a46 .clearfix:after content: ""; display: table; clear: both; .ue3a3a0c482062e44cfbbb74bff601a46 display: block; transition: background-color 250ms; webkit-transition: background-color 250ms; width: 100%; opacity: 1; transition: opacity 250ms; webkit-transition: opacity 250ms; background-color: #3498DB; box-shadow: 0 1px 2px rgba(0, 0, 0, 0.17); -moz-box-shadow: 0 1px 2px rgba(0, 0, 0, 0.17); -o-box-shadow: 0 1px 2px rgba(0, 0, 0, 0.17); -webkit-box-shadow: 0 1px 2px rgba(0, 0, 0, 0.17); .ue3a3a0c482062e44cfbbb74bff601a46:active , .ue3a3a0c482062e44cfbbb74bff601a46:hover opacity: 1; transition: opacity 250ms; webkit-transition: opacity 250ms; background-color: #2ECC71; .ue3a3a0c482062e44cfbbb74bff601a46 .centered-text-area width: 100%; position: relative; .ue3a3a0c482062e44cfbbb74bff601a46 .ctaText border-bottom: 0 solid #fff; color: #FFFFFF; font-size: 16px; font-weight: bold; margin: 0; padding: 0; text-decoration: underline; .ue3a3a0c482062e44cfbbb74bff601a46 .postTitle color: #000000; font-size: 16px; font-weight: 600; margin: 0; padding: 0; width: 100%; .ue3a3a0c482062e44cfbbb74bff601a46 .ctaButton background-color: #2980B9!important; color: #FFFFFF; border: none; border-radius: 3px; box-shadow: none; font-size: 14px; font-weight: bold; line-height: 26px; moz-border-radius: 3px; text-align: center; text-decoration: none; text-shadow: none; width: 80px; min-height: 80px; background: url(https://www.hackzhub.com/wp-content/plugins/intelly-related-posts/assets/images/simple-arrow.png)no-repeat; position: absolute; right: 0; top: 0; .ue3a3a0c482062e44cfbbb74bff601a46:hover .ctaButton background-color: #27AE60!important; .ue3a3a0c482062e44cfbbb74bff601a46 .centered-text display: table; height: 80px; padding-left: 18px; top: 0; .ue3a3a0c482062e44cfbbb74bff601a46 .ue3a3a0c482062e44cfbbb74bff601a46-content display: table-cell; margin: 0; padding: 0; padding-right: 108px; position: relative; vertical-align: middle; width: 100%; .ue3a3a0c482062e44cfbbb74bff601a46:after content: ""; display: block; clear: both;
READ ALSO: 6 Money Saving Hacks for Buying a Drone
Suppose you have never ever invested in stocks earlier, it appears quite overwhelming from outside. You hear the analysts talking of PE ratios & dividend yields, and concepts that will be fuzzy. There is always somebody pointing to certain obscure technical indicators in “proving” that the market is all about the crash. Forget that and, follow the right tips.
Invest in Art, Antiques, and Collectibles
Collectables are a bit cheap, thus they are the most affordable type of investment for people on the limited means as well as you can learn to go along. However, if you think that it is the simple path to riches, probably you have watched a lot of Cash in the Attic. Investing in the collectibles brings within no instant income, and entirely depends on somebody paying you much more than items that cost you.
There is also an added proviso that the fashions come & go, thus what is desirable today can pass out next year. You have to be the professional in whatever it’s you are collecting; otherwise, you are taken for the ride by people who know what they are doing. Buying & selling online is cheaper than making use of the old-fashioned auction deals and offers you the wider global marketplace.
Learn Any New Skill
You may decide to use money that you need to learn the skill & trust me, you will not regret it. Whether it is tailoring, baking, hairdressing, web design, graphic design, wig making, bead making, and more. It is one kind of investment that you will not regret as the student environment is the best market accessible for you.
You can build the customer base & this will help you after your university. So, when you graduate from college, you can still use it as the side hustle since you can’t completely rely on the monthly income. It will not need a lot of effect on the studies because your customers will factor in the student status.
Put Money in Property
One single investment for many people, and one that you must make when your income enables it, is buying your own house. Historically, the value of the property rises much faster than the inflation and you will clear your mortgage one day. Rents increase yearly and you always will need somewhere to stay.
When you are on a property ladder you will climb up to expensive properties when your income improves. Being an investor, you may go a step further at buy-to-let, having the property that makes income and appreciating in the value.
Peer-to-Peer (P2P) Lending
One alternative to the real estate crowdfunding sites is P2P lending sites. The concept is quite similar, except loans generally tend to be the unsecured personal loans instead of investment loans. In several cases, investors will select a risk level of a loan, with the higher returns that are offered for the higher-risk borrowers.
Open IRA
It may appear like you are jumping a gun just by thinking of an IRA when you are in college. However, IRA will actually be a good opportunity of building future savings if you are earning money with the job, as a lot of students are.
The IRA allows you defer taxes on profits and dividends, or deduct contributions from the taxable income, saving money on the taxes. Also, earlier you begin investing in the tax-advantaged account, the longer you will use the power of compounding for maxing out the account.
.u4970ccce301a9a737010d38fbf687e47 , .u4970ccce301a9a737010d38fbf687e47 .postImageUrl , .u4970ccce301a9a737010d38fbf687e47 .centered-text-area min-height: 80px; position: relative; .u4970ccce301a9a737010d38fbf687e47 , .u4970ccce301a9a737010d38fbf687e47:hover , .u4970ccce301a9a737010d38fbf687e47:visited , .u4970ccce301a9a737010d38fbf687e47:active border:0!important; .u4970ccce301a9a737010d38fbf687e47 .clearfix:after content: ""; display: table; clear: both; .u4970ccce301a9a737010d38fbf687e47 display: block; transition: background-color 250ms; webkit-transition: background-color 250ms; width: 100%; opacity: 1; transition: opacity 250ms; webkit-transition: opacity 250ms; background-color: #3498DB; box-shadow: 0 1px 2px rgba(0, 0, 0, 0.17); -moz-box-shadow: 0 1px 2px rgba(0, 0, 0, 0.17); -o-box-shadow: 0 1px 2px rgba(0, 0, 0, 0.17); -webkit-box-shadow: 0 1px 2px rgba(0, 0, 0, 0.17); .u4970ccce301a9a737010d38fbf687e47:active , .u4970ccce301a9a737010d38fbf687e47:hover opacity: 1; transition: opacity 250ms; webkit-transition: opacity 250ms; background-color: #2ECC71; .u4970ccce301a9a737010d38fbf687e47 .centered-text-area width: 100%; position: relative; .u4970ccce301a9a737010d38fbf687e47 .ctaText border-bottom: 0 solid #fff; color: #FFFFFF; font-size: 16px; font-weight: bold; margin: 0; padding: 0; text-decoration: underline; .u4970ccce301a9a737010d38fbf687e47 .postTitle color: #000000; font-size: 16px; font-weight: 600; margin: 0; padding: 0; width: 100%; .u4970ccce301a9a737010d38fbf687e47 .ctaButton background-color: #2980B9!important; color: #FFFFFF; border: none; border-radius: 3px; box-shadow: none; font-size: 14px; font-weight: bold; line-height: 26px; moz-border-radius: 3px; text-align: center; text-decoration: none; text-shadow: none; width: 80px; min-height: 80px; background: url(https://www.hackzhub.com/wp-content/plugins/intelly-related-posts/assets/images/simple-arrow.png)no-repeat; position: absolute; right: 0; top: 0; .u4970ccce301a9a737010d38fbf687e47:hover .ctaButton background-color: #27AE60!important; .u4970ccce301a9a737010d38fbf687e47 .centered-text display: table; height: 80px; padding-left: 18px; top: 0; .u4970ccce301a9a737010d38fbf687e47 .u4970ccce301a9a737010d38fbf687e47-content display: table-cell; margin: 0; padding: 0; padding-right: 108px; position: relative; vertical-align: middle; width: 100%; .u4970ccce301a9a737010d38fbf687e47:after content: ""; display: block; clear: both;
READ ALSO: Why Learning About Finance Is Important When You Are Young?
Final Words
Being a youngster, you are in a strong position for getting the head start on your wealth-building. When your friends are finding every penny in things like flashy cars or going out each night, you will start creating huge wealth.
0 notes
Text
Gold Below $1,513 Target 1,440 — 1,412 — 1,395 - Economy Slowdown Fears Support Yellow Metal
Gold Below $1,513 Target 1,440 — 1,412 — 1,395 – Economy Slowdown Fears Support Yellow Metal
Gold prices Down on Wednesday as investors booked profits after the metal rose as much as 1 per cent in the previous session on signs of an economic slowdown in the United States, with focus shifting to US jobs data due later this week.
(more…)
View On WordPress
0 notes
Text
Can You Spot Dishonesty in a Politician’s Face?
We’re often told not to judge a book by its cover, but a new study published in the journal Psychological Science finds that some first impressions about honesty may be correct.
Researchers at the California Institute of Technology (Caltech) found that people are very good at detecting an unknown politician’s honesty just by looking at a photo of him. In the study, observers tended to perceive politicians with wider faces as more corruptible.
When the participants were shown photos of politicians they were not familiar with, they made better-than-chance judgments about whether those politicians had been convicted of corruption. Importantly, the participants made these judgments without knowing anything about the politicians or their careers.
“It might be difficult to understand why you can look at others’ faces and tell something about them,” says Chujun Lin, study co-author and Caltech graduate student. “But there is no doubt that people form first impressions from faces all the time. For example, on dating sites people often reject potential matches based on pictures without reading the profile.”
Facial width — technically, the facial width-to-height ratio — has been shown in previous research to be associated with aggressive behavior in men. In other words, men with wider faces have a greater tendency to be aggressive and threatening toward others than do men with thinner faces. Research has also shown that wide-faced men are perceived by others to be more threatening than those with thinner faces.
But while the research shows a connection between facial appearance and corruption, the researchers say it doesn’t necessarily mean that a corrupt-looking politician is more inherently corrupt. In fact, there could be many explanations.
One possibility is that if a face conveys a sense of dishonesty, the politician might be offered bribes more often. Another possibility is that corruptible-looking politicians are not any more corruptible than honest-looking politicians, but because of their looks they are more often suspected of, investigated for, and convicted of corruption.
“If a jury is deciding whether or not a politician is guilty, having a corruptible-looking face might create a negative impression, which might influence the jury’s decision,” says Lin, who adds that the “clean” politicians used in the study might not actually be clean. “Maybe they just haven’t been caught.”
In the first experiment, the researchers collected photos of 72 politicians who held office at the state or federal level. Half had been convicted of corruption and half had clean records. For consistency, all of the politicians included were male and Caucasian. All of the photos were black-and-white, cropped to the same size and featured a frontal, smiling portrait. The images were presented randomly to 100 participants, who were asked to rate each politician on how corruptible, dishonest, selfish, trustworthy, and generous they looked.
An analysis showed that the participants as a group were able to correctly detect the corrupt politicians from the clean politicians nearly 70 percent of the time based on their faces alone.
The second part of the study repeated the first experiment, but used photos of 80 politicians elected to state and local offices in California. Half had violated the California Political Reform Act — a law that regulates campaign finance, lobbying, and politicians’ conflicts of interest — and half had clean records. As before, the findings showed that the volunteers could correctly differentiate the corrupt politicians from the clean politicians nearly 70 percent of the time.
In a third experiment, the researchers used the photos from the first experiment but asked the participants to judge the politicians on a new set of criteria: corruptibility, aggressiveness, masculinity, competence, and ambitiousness.
The findings showed that only corruptibility-related trait inferences (inferences of corruptibility, dishonesty, selfishness, aggressiveness, generosity, and trustworthiness) differentiated corrupt politicians from the clean politicians. Inferences of competence, ambitiousness, or masculinity did not predict the politicians’ records.
In the fourth experiment, the researchers analyzed which of the politicians’ facial structures the volunteers associated with dishonesty and corruption. The faces were broken down into eight measures that described things like distance between the eyes, size of the cheekbones, nose length, and face width.
By comparing the data from those measures against the judgments made by the participants and the records of corruption convictions, the researchers made the discovery that politicians with greater facial-width ratios were more likely to be seen as corruptible.
To double check that face width was truly the characteristic driving these negative perceptions, the researchers gathered photos of 150 politicians and digitally manipulated each into a wide-faced version and a narrow-faced version.
The 450 resulting photos — including the 150 unaltered originals — were shown to 100 participants who were asked, as in the previous studies, to rate each image according to how corruptible the politician looked. And again, face width made the difference. The participants judged the wide-faced versions of the politicians to be more corruptible than their thin-faced counterparts.
“These findings raise many interesting questions for future research,” says Lin. “For example, what is the underlying causal mechanism of the correlation between perceived corruptibility and politicians’ records found in our study? Are politicians who look more corruptible more likely to be suspected, investigated, and even convicted?”
The findings might make a person wonder why corrupt politicians get elected in the first place if people can tell they’re corrupt just by looking at them. But the researchers say that a lot more than just a face goes into how you feel about a person.
“In the real world, you’re not just seeing a photo of a politician. You’re seeing them talk and move,” says co-author Ralph Adolphs, who is on the leadership team of the Tianqiao and Chrissy Chen Institute for Neuroscience. “Their face might make a first impression on you, but there are other factors that can come in and override that.”
Source: California Institute of Technology
from Psych Central News https://ift.tt/2xgkScW via IFTTT
0 notes
Text
Why Does Stucco Crack?
[caption width="480" align="alignleft"]Image Credit: www.mcgarryandmadsen.com[/caption] This article was written by McGarry and Madsen Inspection and was published first on www.mcgarryandmadsen.com
Why Does Stucco Crack?
There are three types of stucco finish walls on Florida homes: stucco on concrete block, Exterior Insulated Finishing System or EIFS (also called synthetic stucco), and stucco on wood frame construction. Stucco over concrete block has limited problems compared to the other two, and EIFS already has well-known and documented moisture intrusion problems, along with lawsuits dating back to the mid-1990s. So let’s look at the defects found in the third type: stucco that is applied over a paper-backed metal lath on wood frame wall construction, which was especially popular in Florida during the building boom of 2004 to 2008.
When buckling, ripples and stains appear in stucco, like in the photo above, homeowners get worried. But the trouble begins with small cracks like the ones shown below, barely visible, that let water into the wall.
The inherent problem with stucco on a wood frame structure is that wood moves around—expanding, shrinking, and sometimes twisting—with changes in humidity. Wood is also somewhat flexible. Stucco, on the other hand, is comparatively stable and stiff, but it expands and contracts with changes in temperature more than wood. When you apply a stucco surface to a wood wall, there must be built-in details to keep the differing movement of the two materials from cracking the less-flexible stucco.
The Florida Building Code uses the ASTM C-926-06 specifications for the application of stucco, which refers to it by the more technically correct name of “Portland Cement-Based Plaster.” The specs are based on these five time-tested standards:The Florida Building Code uses the ASTM C-926-06 specifications for the application of stucco, which refers to it by the more technically correct name of “Portland Cement-Based Plaster.” The specs are based on these five time-tested standards:
1) THICKNESS Stucco should be at applied in three coats, at least 7/8” thick (not including any texture) to resist cracking.
2) FLEXIBLE EXPANSION JOINTS Placed at regular intervals along the wall, they absorb the expansion and contraction of the stucco due to temperature changes. These are also called control joints.
3) WEEP SCREED A weep opening at the bottom of the wall lets any water that penetrates the stucco drain out behind it, instead of getting trapped and rotting the wall framing. When a wood-frame second floor is built on a concrete block first-floor structure, the weep screed will be a strip located at the bottom of the second floor level.
4) CASING BEADS These wrap around anything that penetrates the stucco surface—such as windows, doors, and soffit returns—to provide a gap that can be caulked and prevents hairline cracks that will admit water into the wall.
5) DRIPS At any change of plane from a vertical to a horizontal under-surface of the stucco, a drip edge lets water fall off at the corner and not migrate sideways due to surface tension.
All of this differs dramatically in complexity from the installation of regular siding, which depends on simple down-lapping of smaller pieces of building material for waterproofing, and movement is absorbed by the numerous overlapping joints, plus caulk around doors and windows.
If any of the five anti-cracking measures are ignored, you will have a stucco problem. Maybe not immediately, because it takes a few years for the initial small cracks to let in some water, which rusts the steel lath, and opens the cracks further, letting in even more water...and so forth. But it will happen.
Here’s a listing of how each one of the five can be done wrong:
1) THICKNESS When the total of the three coats of stucco dips below 7/8-inch thick, those areas are more prone to cracking. Sometimes only two coats are applied, with not enough curing time between coats. Also, if the backing paper and lath is sloppily installed, it can create pockets of thin coverage.
2) FLEXIBLE EXPANSION JOINTS The total area of stucco between expansion joints should not exceed 144 square feet, with the additional restrictions that the joints not be more than 18 feet apart along the wall and a length-to-height ratio that does not exceed 2.5 to 1. The expansion joints should be tied to the metal lath only, not attached to the wall sheathing underneath, so that the joints can move independently from the wall structure. Metal lath that is continuous behind the expansion, connecting both panels, defeats the joint. Expansion joints that are placed too far apart or attached directly to the wall sheathing will also not do their job. A crack along the side of an expansion is an indication that it was likely not installed properly.
[caption width="437" align="alignleft"]Image Credit: www.mcgarryandmadsen.com / Mark Cramer[/caption]
3) WEEP SCREED No matter how carefully stucco is installed, some small cracks will appear over time. Trapped water wets the wood structure and starts rot when there is no opening at the bottom of the wall or the opening is obstructed. Some weep screeds have protective tape over the drain holes that should be removed after installation and gets forgotten.
4) CASING BEADS Sometimes they are simply not installed. Without a groove to apply flexible caulk, cracked stucco along the side of a window frame is a common place for the stream of rainwater that runs down the side of a window to enter the wall.
[caption width="484" align="alignnone"]Image credit: www.mcgarryandmadsen.com[/caption]
It begins as in the photo above, but buckling stucco and staining follow over time. The photo below shows typical damage in the wall framing from this defect.
[caption width="437" align="alignnone"]Image Credit: www.mcgarryandmadsen.com / Mark Cramer[/caption]
5) DRIPS They are not as aesthetically pleasing as a simple corner bead where vertical surfaces return back horizontally, but ugly water intrusion damage ensues if a 1/4” minimum drip edge is not installed. The photo below shows the rotted wood sheathing found under the stucco at the corner of an open porch with this defect.
[caption width="437" align="alignnone"]Image Credit: www.mcgarryandmadsen.com / Mark Cramer[/caption]
Other defects that can cause stucco cracking include: not enough fasteners securing the metal lath, undersize fasteners that do not penetrate deep enough into the wall sheathing, improper lapping of the building wrap to the weep screed, and not leaving the required 1/8” gap between sheathing panels. Because many of the defects that allow water entry are concealed by the stucco itself, they cannot be verified without digging into the wall. But their symptoms bloom and spread on the wall surface over time.
It usually takes five to seven years or more from time of construction to see clear signs of distress in stucco walls that are the result of defective stucco installation. But every stucco finish will develop a few hairline cracks, so we recommend checking for them at least once a year, and sealing the cracks with a masonry caulk.
Repainting the walls and touching up the caulking every 7 to 10 years is also a good idea, since paint and caulk are your first layer of protection from water intrusion. Because home builders occasionally claim that inadequate maintenance of the wall finish is a contributing factor in stucco failure claims from their customers, your diligent maintenance may have the added benefit of helping you secure your claim for damage to your home if it is due to defective stucco installation.
When the cracks multiply and get worse, in spite of your maintenance and repairs, we suggest calling a professional inspector for further evaluation. The one you choose should be familiar with the installation standards and have some experience in diagnosing stucco problems, plus carry a couple of moisture sensing tools, such as an infrared camera and an electronic moisture meter, in their tool bag.
If you are wondering why older homes with stucco walls don’t have the same severe cracking problems as outlined above, it is because most of them are stucco over concrete block. The block has a similar rate of expansion and contraction as stucco, and concrete block is more forgiving of a little moisture intrusion. It can absorb and dissipate through evaporation any small amounts of water that penetrate the stucco.
The thickness of stucco, along with sufficient curing time between coats, also makes a stronger surface, and older homes that are of similar stucco-over-metal-lath are more likely to have been done correctly.
###
If you noticed any stucco crack on your home or commercial property and are in need of stucco crack repair contractor please do not hesitate to call Stucco HQ office located near you and schedule a free stucco repair estimate.
98d438fcf3b1f238b53a3bf4da71170f0889317bf5882856b36d7453d8bc457298d438fcf3b1f238b53a3bf4da71170f0889317bf5882856b36d7453d8bc4572POSTLINK98d438fcf3b1f238b53a3bf4da71170f0889317bf5882856b36d7453d8bc457298d438fcf3b1f238b53a3bf4da71170f0889317bf5882856b36d7453d8bc4572 was originally published on www.StuccoHQ.com
0 notes
Photo

New Post has been published on https://image-cars.com/skoda-superb-2018/
SKODA SUPERB 2018
Not so long ago, the Superb 2018 was introduced in the new body. Skoda Superb is able to compete with famous rivals in the struggle for a wealthy buyer. After all, from certain times, business class sedans have ceased to be associated exclusively with German cars. Now such models as shoda superb are almost an example of the correct approach to spending money – an excellent choice for the ratio of price / quality factors. For the sake of justice, it is worth noting that, in fact, the new school Supreb 2018 still has German roots. So, the Czech brand itself belongs to the German concern VAG, which also owns Audi and Volkswagen. So many innovations migrated from there. But at the same time the machine is not devoid of original style and its own uniqueness.
Presentable sedans are characterized by the fact that they are represented by a combination of the most modern technologies. Almost every automaker has to produce a representative of this class. The new offer of Shkoda Superb 2018-2019 in the new body (photo, price and technical characteristics see in this article) of the third generation was presented to the world public in 2015. The design of the car retained its trademark features, in addition, the line was significantly expanded. The minimum equipment is represented by the most necessary options, the offer price is $20 000.
Front Left side of Skoda Superb of 2018 yea
EXTERIOR AND INTERIOR DESIGN
EXTERIOR
Today, the third generation of the mid-sized sedan is already being manufactured, which began its history in the distant 2001, but still enjoys stable demand. Changes affected almost all areas. So, the Skoda Superb 2018 received a modified exterior. Now the silhouette has become even more tight and faceted. Spectacular LED headlights, stylish radiator grille, new front bumper. Appearance underwent point changes, and this did not go to the detriment of the whole image.
And from the rear, the sight is surrounded by spectacular wedge-shaped stop lamps and an inverse rear bumper. In this case, the main difference between the new superb school of 2018 is in the back. So, in a new body the car has ceased to be completed with a two-step lid of a luggage carrier, having turned to a standard liftback. This helped to lower the price slightly. However, the main reason for the return to the classic layout according to marketers was the unclaimedness of this option among the owners.
The updated fashionable exterior of the novelty differs clearly outlined, smooth lines in a combination with sharp corners and lightning stroke stitches. The front part is almost completely covered with straight edges with sharp edges. Head optics, made in the same style, looks strictly and aggressively. To design headlights Czech designers did not spare even the Bohemian crystal.
Rear view of Skoda Superb of 2018 year
The Superb offer was also updated with a new red Velvet Red and 19-inch Acamar wheels. For the Laurin & Klement version, a black roof will be available. The edition of L & K will be more prominent thanks to the gentle, chrome accents, which should emphasize the prestigious character of the Skoda Superb 2018 model year.
The car became more presentable. The restrained style in the back made it more aggressive due to the extra facets. Serious changes undergone the back.
The sedan looks modern and stylish.
INTERIOR
The salon of the superb school of the 2018th model year has not undergone any significant changes (see photo of the salon). Updates touched the steering wheel, dashboard, cockpit. However, an inexperienced motorist at a cursory examination can not reveal the cardinal differences. However, the best is the enemy of the good. And it’s not always worth changing anything if it works perfectly. And in terms of ergonomics or internal comfort, it is really difficult to blame the superb school. Perfectly profiled seats, where you can sit comfortably to the driver of almost any equipment, informative and easily readable instrument panel, excellent overview. To all it is necessary to add enough spacious back seats and a luggage carrier of considerable sizes. And for those who need a bigger luggage space, there is a universal supermarket superb 2018, which has a truly impressive compartment for cargo transportation.
Dashboard view of Skoda Superb of 2018 year
The most important novelty is a new multimedia system with a large touch screen. In the top version now has a 9.2-inch screen (previously there were 8). Just like in the Octavia, they abandoned the classic buttons and pens that were replaced by the touch panel. The new system can offer applications from the ConnectApp package, extensive integration with the smart phone SmartLink + and improved speech recognition. The screen is also enlarged in cheaper versions: from 5 to 6.5 inches and from 6.5 to 8 inches (depending on the equipment).
The design of the interior is very simple:
Three-knuckled steering wheel. In the central part is a large display. Several knobs and blocks with different keys.
At furnish various materials are applied: from textiles to a qualitative natural leather.
Dashboard view of Skoda Superb of 2018 year
TECHNICAL CHARACTERISTICS
The line of engines will be presented by five modern gasoline turbo units equipped with a direct fuel injection system. To ensure the decent technical characteristics of the new Skoda Superb model in 2018, the manufacturer chose three gearboxes: 6-speed non-alternative “mechanics”, 6-band “automatic”, 7-band “robot”. It is obvious that the creators finally managed to significantly reduce fuel consumption. In addition, the dynamic qualities of the car, on the contrary, increased significantly. More information about this you can learn from the video test drive of the new version of Skoda Superb 2018. I was very pleased with the fact that the reliability, endurance of the car became much higher. In equipping all the modifications of the elevator, there are ABS systems, driving stability, and on all wheels there are disc ventilated brakes.
Features we will name:
The increased dimensions of the body. Light weight. Quality suspension.
The rigidity of the body was increased by 15%.
According to the manufacturer, elevatorback will be classified as a medium-sized car, but its overall dimensions hardly differ from those of the business class: length – 486.1 cm; width – 186.4 cm; height – 146.8 cm; ground clearance – 16,4 cm.
Engine view of Skoda Superb of 2018 year
COMPONENTS AND PRICES
Škoda Superb 2018 is considered one of the best cars in its class. First of all, the model attracts attention due to the unique and rather attractive exterior. The basic model is characterized by a combination of quite a large number of different options, but still you can speak about good equipment only when considering the maximum configuration.
Active
Active can be purchased at a price of $20 000 equipment is represented by a combination of the following options: The degree of equipment of the model under consideration is quite high. The scope of delivery includes a reduced spare tire and a quality tool kit, which may be required for self-repair work.
The Czech company is largely focused on the Russian and other markets located in the northern part. That’s why the car is ready for use in the winter. For this, the nozzles that supply water to the windshield are provided with a heating system. At the rear of the cabin there is a 12V outlet. It is also installed in the luggage compartment. They can be used to power various devices. To increase comfort, we use leather braiding The exterior mirrors have an electric control unit and a glass heater. When moving in a cold pair of goals there is a possibility that the surface of the glass is icing. In order to eliminate this problem, electric heating is installed. Front fog lamps are manufactured using modern technology, which significantly improves efficiency. There is a system Start-Stop, which is now very widespread. It allows you to start the engine as soon as possible. The handbrake is represented by an electromechanical design that has an Auto Hold function. Hold the car on the road surface called the system of electronic stability. In addition, there may be a lock differential.
There is in the cabin and air conditioning, due to which the temperature is maintained with the specified parameters in the summer.
Front Right side of Skoda Superb of 2018 year
Ambition
Skoda Superb 2018 in the version of Ambition costs $22 000. Most of the additional options are represented by various decorative elements. Features include the following:
The car has a chrome package. It provides for the use of a fairly large number of different chromium-plated elements when decorating the exterior. In the cabin you can find a multifunctional three-spoke steering wheel. With it you can control the radio or phone. Quite an interesting feature is the highlighting of the space for the feet of the rear of the car. Looks like the effect is quite attractive and interesting. The car is represented by a combination of a large number of different options that are responsible for safety. An example is an installed radar, which determines the distance before the vehicle ahead, active sensors for parking, light and rain. Today in the salon of modern cars you can find an effective climate control system. In the case under consideration, it is 2-zone, it can monitor the most varied parameters of the supplied air.
In the style of aristocrats, 2 umbrellas are included in the package, for which they found a place in the salon.
Front Left side of Skoda Superb of 2018 yea
Style
The Style version is a very complete sentence. The offer price is $25 000. The version is represented by a combination of the following options:
The driver’s seat is represented by a combination of the electric drive and the memory of the set parameters. This provides the required comfort. Front and back elements are installed in the interior lighting. They are represented by a combination of diode elements. In order to determine the features of this equipment, the corresponding thresholds made of plastic are installed. Protect the driver and passengers decided by installing additional airbags for the knees. Front and rear seats are heated. The internal rear-view mirror has an auto-dimming function. The parking of a large enough sedan is facilitated by the parking sensors installed in front and behind. They can identify an obstacle in the way of the vehicle.
A cruise control system is also installed with the radar. Together they provide a constant speed of the car with the condition of the prevailing situation. The installed headlights are bi-xenon. Part of the design was created using diode light sources. Audio preparation is represented by a system that has USB, SD, AUX outputs. In addition, many functions can be controlled by voice commands.
Sportline
Skoda Superb 2018 in the new body is produced in the Sportline version. The offer price is $31 000. It’s not difficult to guess that this version is positioned as a sports offer. Among the features we note:
Modern stylish discs of R18 size are installed. At the finish a rather large amount of carbon is used. This material is characterized by high mechanical characteristics, as well as an attractive appearance. Instead of a conventional steering wheel, a sports lightweight design is installed. On the spokes there are control units for various functions. Pedals have decorative aluminum pads, which are characterized by high protection to mechanical effects.
Right side of Skoda Superb of 2018 year
The maximum complete set
Sedan in the maximum configuration is a bright representative of the representative class. It costs $33 000 and is characterized by additional functions:
Both seats in front have an electric drive, including support for the lumbar region. The salon is equipped with a LED package, represented by a combination of a large number of different light sources. Several additional pillows and curtains of safety are installed. At furnish of seats and many other elements high-quality leather is applied. Quite a lot of attention is paid to anti-theft alarm. It is able to control the salon, to protect the car from theft and towing. An interesting feature can be called a virtual pedal, as well as a blind zone monitoring system and a traffic assistant for the band. A more sophisticated audio system, whose power is 610 watts. It is represented by a combination of 11 speakers and a subwoofer. There is a rear-view camera that can display information on the display located in the center of the console.
Despite the rather high cost of this offer, we note that it can not be called the most complete sedan in its class.
MAIN COMPETITORS
The offer of the Czech car industry has a very large number of serious competitors. They are as follows:
Citroen C5. Nissan Teana. Mazda 6. Opel Insignia Sedan. Honda Accord. KIA Optima. Peugeot 508. Volkswagen Passat.
Some of the above suggestions are much cheaper than the model in question and they have an attractive exterior. The moment that Škoda is part of a large concern determines many features of this offer.
Front Left side of Skoda Superb of 2018 yea
CONCLUSION
If you want to know more details about the new version of the liftback Skoda Superb 2018, then definitely I advise you to watch the video of the test drive. Well, if you are determined to become the owner of this unique car, then it’s time to start studying the operating instructions in detail. Summarizing, we can say with confidence that the main advantages of the machine are: a beautiful, charismatic exterior design; good ergonomics of the driver’s seat; huge salon and trunk; excellent dynamics of acceleration, maneuverability; excellent standard optics; effective braking system; a decent level of noise insulation; low fuel consumption; a wide range of motors, complete sets.
Disadvantages of Skoda Superb 2018: there is no adjustment of steering changes; not very comfortable front seats; not practical, marking upholstery of seats; warming up the cabin is weak; in a severe frost the engine is very slowly warming up.
PHOTOS OF SKODA SUPERB OF 2018 YEAR
Front Left side of Skoda Superb of 2018 yea
Front Right side of Skoda Superb of 2018 year
Front Right side of Skoda Superb of 2018 year
Rear view of Skoda Superb of 2018 year
Front Left side of Skoda Superb of 2018 yea
Front Left side of Skoda Superb of 2018 yea
Front Left side of Skoda Superb of 2018 yea
Front Right side of Skoda Superb of 2018 year
Dashboard view of Skoda Superb of 2018 year
Dashboard view of Skoda Superb of 2018 year
Right side of Skoda Superb of 2018 year
Engine view of Skoda Superb of 2018 year
VIDEOS OF SKODA SUPERB OF 2018 YEAR
youtube
youtube
0 notes
Text
The 2400-lumen brightness of this projector provides a new & unprecedented experience for you.
Specification: Model: 33-06 Technology Type: LCD + LED Display Type: 5.0″ Single LCD Panel Display Technology Native Resolution: 800*480, supports 1080p Brightness: 2400 lumens Contrast ratio: 2000:1 LED lamp life: 50,000 hours Keystone Correction: ±15° vertical manual keystone correction Projection Distance: 1.2 – 5m Projection Screen Size: 30-176 inches Optimal Projector Distance(m): 2.4m Optimal Projection Display Size: 80 inches Aspect Ratio : 4:3/16:9 Audio Formats: MP3/WMA/M4A/AAC Video Formats: AVI/MPG/DAT/MOV/MKV Picture Formats: JPG/JPEG/BMP/PNG Document format: Txt Speaker: 8Ω2W *2 Projection Method: Throwing, Back Projection, Desktop, Ceiling Power Supply: AC 110V~ 240V 50Hz60Hz Power Consumption: 100W Product Dimension:10.6*8.26*4.09in
Package includes: 1 x Projector 1 x Power adapter 1 x Remote control 1 x AV cable 1 x HDMI cable 1 x Lens wiping paper 1 x User Manual
Warm Tips: * A Wireless HDMI Dongle (not included) is required if you connect the projector to Smartphones(which strengthen MHL) and tablets. For Android phones, you wish to have an MHL to HDMI cable; For iPhones & iPads, you wish to have a Lightning to HDMI cable adapter. * To connect the mini video projector to PCs or laptops, please adjust the PC / laptop display resolution to 800*600 or 1024*768, which provides the best clarity. * Dolby is not supported. If there is no sound, please turn off Dolby Digital in Netflix,Apple TV, Blu-Ray players and Fire stick and so on. * When closing the projector, press the power key again. The lamp will turn off. But the fan will still run for 5 minutes. Do not remove the power cord immediately after shutting the projector down, allow 5 minutes for it to cool down. [HIGH DEFINITION DISPLAY IMAGES]: This projector takes the latest LED technology, including 2400-lumen LEDs (70% brighter than others), 50,000-hour lifespan, native 800*480 resolution, and supports resolutions up to 1080p. Will provide you with an awesome viewing experience. Please use the projector in a dark environment only. Not Beneficial for PPTs, Word, Excel or business presentations. [ADJUSTABLE PROJECTION SIZE]: Equipped with 5.0″ Single LCD Panel Display Technology, this home cinema projector displays images between 30 – 176 inches, with a projection distance of 1.2 – 5m. For optimum viewing, we suggest a display image of 80 inches with a 2.5m projection distance. It has a ±15° vertical manual keystone correction. [MULTIMEDIA VIDEO PROJECTOR]: Offered all-digital connectivity (Multimedia inputs*2/AV input*1/VGA input*1/Audio input*1/Audio output*1/HDMI*2), this projector is compatible with TV Box, Amazon Fire TV Stick, PCs, Laptops, Tablets, Speakers, ChromeBook, Blue-ray DVD player, Card Reader, USB Flash Drive, Media players, iPad, iPhone, Android Smartphones (Wireless HDMI Dongle not included). [REDUCED OPERATING NOISE]: Thanks to continued improvements in development, the powerful cooling fan has reduced noise, which translates into less distraction for you when viewing movies or playing games. Don’t block the ventilation-window of the projector and deal with the sufficient ventilation around it (allow a space of 30cm all around) to verify the projector’s performance and reliability. [AFTER-SALES SERVICE]: Backed by a 3-year warranty, you don’t have anything to lose by purchasing this projector. Professional customer service & technical strengthen is available. When you have any problem or questions with your purchase, please feel free to contact us anytime! [amz_corss_sell asin=”B075P6R2XK”]
Projector, TENKER 2400 Lumens Portable Video Projector Mini Home Theater LCD Projector Support 1080p HDMI VGA USB AV for Out door & Indoor Movie Nights, Video Games
The 2400-lumen brightness of this projector provides a new & unprecedented experience for you. Specification:Model: 33-06…
Projector, TENKER 2400 Lumens Portable Video Projector Mini Home Theater LCD Projector Support 1080p HDMI VGA USB AV for Out door & Indoor Movie Nights, Video Games The 2400-lumen brightness of this projector provides a new & unprecedented experience for you. Specification:Model: 33-06…
0 notes
Text
101 FILMMAKING TERMS THAT YOU NEED TO KNOW
*Spoilers Alert*
There are thousands of terms that filmmakers use on set every day. Many articles or books that you read use these terms, so we are going to teach you 101 filmmaking terms, that you need to know. You will be able to impress your friends on the set of your short film.
1. Abby Singer The term ‘abby singer’ is used for the second-to-last shot of the day. It was named after the famed American production manager and assistant film director Abby Singer who worked between the 1950s-1980s.
2. Above the Line The term ‘above the line’ refers to that part of the film’s budget that covers the costs of the major creative talent, the stars, the director, the producer(s) and the writer(s), although films with expensive special effects (example: The Avengers) have more ‘above the line’ budget costs for technical aspects.
3. Ad Lib The term ‘ad lib’ refers to the line of dialogue improvised by an actor during a performance. It can be either unscripted or deliberate. A good example of this is in the movie Anchorman: The Legend of Ron Burgundy (2004), a whole featurette (Wake Up, Ron Burgundy: The Lost Movie (2004) was created because the main actors continuously improvised.
4. Ambience The term ‘ambience’ refers to the atmosphere of the place. It is the feeling or the mood of the setting. It makes the scene feel more real to the audience. It can mirror what the character is feeling internally or externally.
5. Ambient Light The term ‘ambient light’ refers to the light that is already in the scene before adding additional (artificial) light. It is often natural light caused by the sun. If you have reflectors you will have the advantage of using the natural light indoors (the light that comes through the window), or outside.
6. Ambiguity The term ‘ambiguity’ refers to an event in a film that is deliberately left unclear. It can leave audiences confused. Sometimes one or more meanings attached to it. Don’t be mistaken by a cliffhanger, because cliffhangers is a pause between two films. Horror movies use cliffhangers to set up the sequel. The 1980 film The Shining is the perfect example, the audience was left not knowing if Jack was a ghost or not.
7. Anamorphic Anamorphic is a cinematography technique of shooting a widescreen picture on standard 35 mm film. It is also an aspect ratio of 2.40:1. This means that the picture’s width is 2.40 times its height.
8. Antagonist The ‘antagonist’ is the main character who has a conflict with the film’s hero. They usually cause the problem in the story. They can ultimately change the character into the better person at the end. The antagonist isn’t always a person it could also be the protagonist’s fears. Examples of antagonist are the Joker in The Dark Knight (2008), The Ocean in Finding Nemo (2003), and Lord Voldemort in the Harry Potter franchise (2001, 2002, 2004, 2005, 2007, 2009, 2010, 2011).
9. Anti-climax Anti-climax is a disappointing ending to a story as the suspense is being built up so much and the audience can’t wait for it and then all of a sudden the hero kills the villain in one hit, or the villain spontaneously drops dead, or some other random guy shows up and destroys the villain before the hero does anything. In Monty Python and The Holy Grail, the film builds to a point where the Knights and the French are about to battle. If the Knights can get into the castle, they will get the grail, and their quest is over. But, a policeman comes and arrests King Arthur.
10. Anti-hero An anti-hero is a protagonist who lacks attributes found in a hero character. The audience roots for the anti-hero, even though he or she is the ‘bad guy’. Examples of anti-heroes are Dexter Morgan (Dexter), Walter White (Breaking Bad) and much, much more. Both these characters are breaking the law and hold ‘evil’ characteristics, but audiences still love them.
11. Archetype Archetypes can be characters, objects, and place that are recognised in many cultures. Examples of character archetypes are the hero, the villain, and the outcast. Examples of symbolic archetypes are light and darkness, the crossroad, and colours used in the film.
12. Arret ‘Arret’ is a French word for ‘halt’ or ‘Stop’. It refers to a camera technique of stopping the camera, then removing or inserting an object, then restarting the camera, to have the object magically disappear. It was one of the early techniques in silent films.
13. Aside This term refers to when a character breaks the fourth wall. Two great examples are Ferris Bueller’s Day Off (1986) and Deadpool (2016).
14. Asynchronous (sound) This term ‘asynchronous’ refers to an outgoing sound that is mismatched or unsynced with the footage. In professional filmmaking, the camera does not record the audio. When the editor is editing the film they sync up the audio and sometimes it is slightly off.
15. Auteur An auteur is a French word for ‘Author’. In film criticism, used in the terms auteurism or auteur theory. The auteur is the director, auteurs have a distinct style. The auteurs have complete control of the films look and feel, without the film studios changing it. Examples of auteurs are Quentin Tarantino, Steven Spielberg, and Christopher Nolan.
16. Chiaroscuro Chiaroscuro is a notable and contrasting lighting technique, it cast deep/dark shadows. This is often achieved by a spotlight, the roots come from German Expressionism. The early films used candle lights to achieve the effect.
17. Continuity The term ‘continuity’ refers to action moving through multiple shots with interruptions. It can refer to an object, an example is an item of clothing, in one shot the character could be wearing a blue shirt and in the next shot, it is red.
18. Cue The term ‘cue’ is a signal or sign for an actor to start performing. It can come from either another performer, from a director or even from within the script. A cue is often at the end of a character’s line that indicates the other performer to start.
19. Dailies The term ‘dailies’ is the rough cut of the film. The rough cut just puts the shots in order to tell the story, there is no visual effects or colour correction. It is for the director or the producers to review the film. It helps determine if the continuity is correct.
20. Dark Horse The term ‘dark horse’ refers to a little-known movie (usually an independent film or a foreign film) that has been nominated for a major award. An example of some dark horses are Amour (2012), Life Is Beautiful (1998) and The Postman (Il Postino) (1995).
21. Decoupage The term ‘decoupage’ is a French word which refers to the design of the film (the arrangement of the shots). It is the editing process the word means ‘to cut up’.
22. Decouement The term ‘decouement’ refers to the final part of the film, it is the resolution. It is the part of the film’s plot is drawn together and the matters are explained or resolved.
23. Dub The term ‘dub’ refers to the action of putting sound on a film after production. This could be dialogue, sound effects or music. It is commonly used when shooting on location, the wind or other noises that have ruined the audio. It is also referred to adding translating the language to foreign versions of the film.
24. Dystopia The term ‘dystopia’ refers to an imaginary, dehumanised, fearful, bad, oppressive place or landscape, often caused by a major world crisis. It is the opposite of utopia (the ideal place).
25. Ellipsis The term ‘ellipsis’ refers to the shortening of the film’s plot. This can be achieved by the use of transitions (a fade, dissolve, wipe, jump cut, or change of scene), to omit a period of time from the film’s narrative.
26. Epilogue The term ‘epilogue’ refers to the concluding scene in the film in which characters reflect on the preceding events. It is used to bring closure to the work. An example of an Epilogue is in Saving Private Ryan (1998)
27. Eyeline Match The term ‘eyeline match’ is a cut between two shots which creates the illusion of the character, which is in the looking at an object, which is the second shot.
28. Favour on The term ‘favour on’ refers to focusing on or highlighting a specific object within the scene.
29. Fourth Wall The term ‘fourth wall’ refers to the invisible plane through which the film viewer or audience is thought to look through toward the action. The fourth wall separates the audience from the characters.
30. Gel The term ‘gel’ refers to a transparent, tinted coloured sheet of plastic that you place over the light, which is used as a filter for a movie light to create a coloured glow over a scene.
31. Generation The term ‘generations’ refers to the number of the videotape as been copied; second generations means two steps away from the original media master.
32. Hike The term ‘hike’ is a slang word which means ‘to increase’, ‘to raise’ or ‘to promote’.
33. Hitting a Mark The term ‘hitting a mark’ refers to an actor moving to the correct mark (there is usually a ‘T’ shape on the floor.
34. Hold Over The term ‘hold over’ is used by a director telling an actor that he/she has an extra day.
35. Iconography Iconography is used within film studies to describe the themes and various styles in a film, particularly in within the field of genre. We expect to see certain objects on the screen, for example in horror movies you expect to young girls, haunted houses, and contrasting shadow and light in darkened places.
36. Interlude The term ‘interlude’ refers to a film scene or sequence that is not specifically tied to the plot. An example is Harpo Marx’s musical interlude performances of his harp in the Marx Brothers films. 37. Juxtaposition The term ‘juxtaposition’ refers to the contiguous positioning of either two images, characters, objects, or two scenes in sequence, in order to compare and contrast them. For example in Edward Scissorhands, Edward’s dark and grotesque mansion and then the pastel colours.
38. Kick Off The term ‘kick off’ refers to the start of the production or principal of photography.
39. Klieglight ‘Klieglight’ is a powerful carbon-arc lamp that produces an intense light. They are also used for promotional purposes at film premieres.
40. Leitmotif The term ‘leitmotif’ refers to an intentionally-repeated, recurring element or theme associated with a particular person, idea, or action. It can be a repeated sound, shot, bit of dialogue, or piece of music. It helps unify a film by reminding the audience of its earlier appearance.
41. Letterboxing Letterboxing is a technique of shrinking the film image just enough so that its entire width appears on the TV screen, with black areas above and below the image.
42. Lines The term ‘lines’ refers to the dialogue that belongs to a single actor/performer. They are found in the script.
43. Lip Sync Lip Sync is an editing technique, which involves synchronisation between the footage of a conversation and the words on the audio that was recorded on an audio recorder.
44. Locked-Down Shot A ‘locked-down shot’ refers to when the camera is in a fixed position and the action is happening off camera.
45. Logline The term ‘Logline’ refers to the introductory summary of the film. It is usually found on the first page of the script. The logline is read by executives, judges, agents, producers and script-readers. The scriptwriter use loglines to sell their script. It is also known as ‘premise’.
46. Magic Hour The term ‘magic hour’ refers the optimum time for filming romantic or magical scenes due to ‘warm’ and ‘soft’ lighting conditions. This occurs for about 30 minutes around the time of sunset and sunrise. It is also known as ‘golden hour’
47. Mainstream The term ‘mainstream’ refers to Hollywood made films. They have major actors, big budgets, and a big hype. Major studios make these films like Universal, Lionsgate, MGM, 20th Century Fox, Roadshow and etc.
48. Mark There are two means of the term ‘mark’, (1) the name of the clapping of the sticks to sync up the sound and the picture. (2) A bit of tape, a stick or chalk on the ground, which allows the actor/performer where to stand.
49. Mask The term ‘mark’ refers to covering up or blocking out a portion of the frame with blackness.
50. Master Shot The term ‘master shot’ refers to a continuous shot or long take that shows the main action or setting of an entire scene.
51. Match Cut The term ‘match cut’ refers to a transitional technique, which involves a cut in between two unrelated shots. They can be linked by physical, visual or metaphorical similarities.
52. Matte Shot The term ‘matte shot’ refers to the process of combining separate shot together (it is usually actors in the foreground and the setting in the background) one to one shot. This is usually achieved by the use of a green screen.
53. Mise en Scène The term ‘mise en scène’ is a French term for ‘staging’ or ‘putting into the scene or shot’. It is all the elements within the frame (objects, lighting, set design, etc.). They are all deliberately placed to project a meaning.
54. Mixing The term ‘mixing’ refers to the electrical combination of different sounds (music, sound effects or dialogue). This is done after production, once all the recording is complete the editor puts them all together.
55. Money Shot The term ‘money shot’ refers to a scene, image, revelation, or climactic moment that gives the audience “their money’s worth,” may have cost the most money to produce and may be the key to the movie’s success
56. Motif The term ‘motif’ refers to a recurring element in a film. It is repeated in a significant way, for example, a symbol, image, object, word, spoken phrase or line that points out the theme of the film.
57. Non-Sync The term ‘non-sync’ refers to a shot without any synchronised sound (the sound must be added later by the editor. On big Hollywood films, the audio and footage a recorded separately.
58. Obligatory Scene The term ‘obligatory scene’ refers to a clichéd or an expected scene for a specific genre. For example, in romantic or dramatic films you expect a love scene, the solving of a crime in a mystery, a rescue in an action film, etc.
59. Off or Offstage The terms ‘off’ and ‘off stage’ refers to action or dialogue that is performed out of the frame or of the stage (out of sight). It is also referred to off-screen.
60. Off Book The term ‘off book’ refers to when an actor/performer has memorised all their lines and no longer needs their script.
61. Omniscient Point of View The term ‘omniscient point of view’ refers to the narrator who knows or sees everything occurring in the story, including the characters thoughts, actions, places, conversations and events.
62. On or On Stage The terms ‘on’ and ‘on stage’ refers to the visible stage or frame (what the audience can see).
63. 180 Degree Rule The ‘180-degree rule’ is a screen direction rule that applies to the camera operator. There is an imaginary line, the action is on one side and the camera must operate their camera on the other side.
64. One-Liner The term ‘one-liner’ is a short, one-line joke, that contains a punchline.
65. One-Reeler The term ‘one-reeler’ refers to a film that is 10 to 20 minutes long. It is also known as a short film.
66. One-Sheet The term ‘one-sheet’ refers to a typical size of a movie poster.
67. Over-Crank(ing) The term ‘over-crank(ing)’ refers to speeding up a camera’s frame rate. It is to shoot at more than the normal 24 fps (frames per second). It can either be shown in slow motion or fast forward.
68. Overexposed The term ‘overexposed’ refers to a film shot that has more light than usual causing a ‘washed out’ look. They can be deliberately used for flashbacks or dreams.
69. Over The Shoulder Shot ‘Over the shoulder shot’ is a camera technique that is commonly used in films. It is often used when two characters are talking. The camera is behind one of the characters and ‘looking over their shoulder’.
70. Overture The term ‘overture’ refers to the pre-credits or opening credits musical selection that sets the mood and theme of the film.
71. Ozoner The term ‘ozoner’ is a slang term for a drive-in movie.
72. Pace The term ‘pace’ refers to the speed/tempo of the dramatic action, which is usually enhanced by the soundtrack and the speed of the dialogue.
73. Package The term ‘package’ refers to the marketing elements of a film project, such as the script, the stars signed to the film, the director, location and etc.
74. Panning Shot Panning shot is a camera technique, it is a horizontal scan, movement, rotation or turning the camera. It is also known as panoramic shot.
75. Pan and Scan The ‘pan and scan’ is a technique that avoids the ‘letterboxing’ of a widescreen film for a full-framed 4×3 home video or tv picture. The picture is mechanically panned to the side (left or right in a ping-pong effect) to show the missing part – hence, the term pan-and-scan.
76. Pipeline The term ‘pipeline’ to movie projects that are under development or production and scheduled for release in the future.
77. Point of View The term ‘point of view’ is a camera technique, it shows the audience the perspective of the character. You often see this camera technique in horror movies, in a chase scene.
78. Protagonist The ‘protagonist’ is the main character of them film. The protagonist is also known as the hero. The film follows the protagonist throughout the film. The protagonist can be an anti-hero like Dexter Morgan (Dexter), Lou Bloom (Nightcrawler), Driver (Drive), Patrick Bateman (American Psycho) and etc.
79. Pull Back The term ‘pull back’ refers to a camera technique when the camera moves backwards or zooms out from the subject. The opposite of push in.
80. Push In The term ‘push in’ refers to a camera technique when the camera moves toward or zoom into the subject. The opposite of pull back.
81. Rack Focusing The term ‘rack focusing’ refers to a camera technique, the focus changes during one shot. It is also known as selective focusing or pull focus.
82. Red Herring The term ‘red herring’ refers to an instance of foreshadowing that is deliberately placed to make audience suspect an outcome, but the opposite happens. It is often used for humour, irony or other thematic reasons.
83. Redlighted The term ‘redlighted’ refers to a film project that was in production but lost its financial backing. It is also called film in turnaround.
84. Reel The term ‘reel’ refers to a plastic or metal spoon for winding film. The early films were measured in reels (one reel = 10 minutes of running time).
85. Reshoot Contingency The term ‘reshoot contingency’ refers to the funds saved by the producer just in case supplementary shooting are required. This usually happens after test screenings or decisions made by studio executives.
86. Reverse Motion The term ‘reverse motion’ refers to an editing technique, it is created by running the film backwards. It is also known as reverse action.
87. Revisionistic The term ‘revisionistic’ refers to films that have an apparent genre stereotype and then challenge it. Examples of this are the sword-and-sorcery Dragonslayer (1981, UK), and Costner’s Dances With Wolves (1990).
88. Rough Cut The term ‘rough cut’ refers to an early edited version of the film. It has all the pieces of the film assembled in continuous, sequential order, but without any visual effects.
89. Scene Stealing The term ‘scene stealing’ refers to a character who draws more attention than the other characters because of their appearance, actions and/or dialogue. A similar term is ‘chewing up the scenery’.
90. Sepia Tone The term ‘sepia tone’ refers a black and white image that has been converted to a sepia tone or a brownish grey to a dark olive brown colour in order to enhance the dramatic effect.
91. Snipe The term ‘snipe’ refers to any piece of projected footage during the film’s presentation that is not a trailer. For example announcements and theatre promos for the concession stand, courtesy requests and prohibitions.
92. Soliloquy The term ‘soliloquy’ refers to a dramatic monologue that is sometimes expressed as ‘thinking aloud’ dialogue of inner reflection. It is delivered by a character to him or herself, or directly to the audience.
93. Stinger The term ‘stinger’ refers to a surprising last minute dialogue or footage that appears after the end or closing credits. The Marvel Cinematic Universe does this all the time.
94. Subjective Point-of-View The term ‘subjective point of view’ refers to a film where the narrator has a limited point-of-view regarding the characters, events, actions, places, thoughts, conversations, etc. The opposite of the omniscient point-of-view
95. Subplot The term ‘subplot’ refers to a secondary plotline, often complementary but independent from the main plot. It involves secondary characters. A great example is Daredevil (2003), Checkout http://whatculture.com for an in-depth explanation of the subplot of Daredevil and nine other prime examples.
96. Three-Shot The term ‘three-shot’ refers to a medium shot that contains three characters in the same frame.
97. Two-Handler The term ‘two-handler’ refers to a film that only has two characters. These are often independent films.
98. Two-Shot The term ‘two-shot’ refers to a medium shot that contains two characters in the same frame. It is often used to provide a contrast between the two characters.
99. Underexposed The term ‘underexposed’ refers to a film shot that has less light than usual, causing unclear image lacking contrast, it gives it an ominous effect.
100. Walk-Through The term ‘walk-through’ refers to the first rehearsal on the set, to figure out lighting, sound, camera positioning, etc. This is done to make sure everything runs smoothly.
101. Wig-Wag The term ‘wig-wag’ refers to a red warning light that is located above each entrance-exit door on a film set and sound stage. It is designed to flash (with a buzzer sound) to indicate when shooting commences or ends.
That is 101 filmmaking terms you need to know. Now you can impress your friends, co-workers and professors/lecturers. I hope you learnt someone thing knew. If you have any questions click here. Thank you for reading this article and have a beautiful day!
creativecityweb.wordpress.com
https://creativecityweb.wordpress.com/2017/07/02/101-filmmaking-terms-that-you-need-to-know/
0 notes
Text
iPhone XS Max – Technical Specifications
Sharengay Trang Tin Tức Độc Đáo VIDEO iPhone XS Max – Technical Specifications

Languages
Finish
Gold
Space Gray
Silver
Capacity1
64GB
256GB
512GB
Size and Weight2
Width: 3.05 inches (77.4 mm)
Height: 6.20 inches (157.5 mm)
Depth: 0.30 inch (7.7 mm)
Weight: 7.34 ounces (208 grams)
Display
Super Retina HD display
6.5‑inch (diagonal) all‑screen OLED Multi‑Touch display
HDR display
2688‑by-1242‑pixel resolution at 458 ppi
1,000,000:1 contrast ratio (typical)
True Tone display
Wide color display (P3)
3D Touch
625 cd/m2 max brightness (typical)
Fingerprint-resistant oleophobic coating
Support for display of multiple languages and characters simultaneously
The iPhone XS Max display has rounded corners that follow a beautiful curved design, and these corners are within a standard rectangle. When measured as a standard rectangular shape, the screen is 6.46 inches diagonally (actual viewable area is less).
Bạn đang xem: iPhone XS Max – Technical Specifications
Splash, Water, and Dust Resistant3
Rated IP68 (maximum depth of 2 meters up to 30 minutes) under IEC standard 60529
Chip
A12 Bionic chip
Next-generation Neural Engine
Camera
Dual 12MP wide-angle and telephoto cameras
Wide-angle: ƒ/1.8 aperture
Telephoto: ƒ/2.4 aperture
2x optical zoom; digital zoom up to 10x
Portrait mode with advanced bokeh and Depth Control
Portrait Lighting with five effects (Natural, Studio, Contour, Stage, Stage Mono)
Dual optical image stabilization
Six‑element lens
Quad-LED True Tone flash with Slow Sync
Panorama (up to 63MP)
Sapphire crystal lens cover
Backside illumination sensor
Hybrid IR filter
Autofocus with Focus Pixels
Tap to focus with Focus Pixels
Smart HDR for photos
Wide color capture for photos and Live Photos
Local tone mapping
Advanced red-eye correction
Exposure control
Auto image stabilization
Burst mode
Timer mode
Photo geotagging
Image formats captured: HEIF and JPEG
Video Recording
4K video recording at 24 fps, 30 fps, or 60 fps
1080p HD video recording at 30 fps or 60 fps
720p HD video recording at 30 fps
Extended dynamic range for video up to 30 fps
Optical image stabilization for video
2x optical zoom; digital zoom up to 6x
Quad-LED True Tone flash
Slo‑mo video support for 1080p at 120 fps or 240 fps
Time‑lapse video with stabilization
Cinematic video stabilization (1080p and 720p)
Continuous autofocus video
Take 8MP still photos while recording 4K video
Playback zoom
Video geotagging
Video formats recorded: HEVC and H.264
Stereo recording
TrueDepth Camera
7MP camera
ƒ/2.2 aperture
Portrait mode with advanced bokeh and Depth Control
Portrait Lighting with five effects (Natural, Studio, Contour, Stage, Stage Mono)
Animoji and Memoji
1080p HD video recording at 30 fps or 60 fps
Smart HDR for photos
Extended dynamic range for video at 30 fps
Cinematic video stabilization (1080p and 720p)
Wide color capture for photos and Live Photos
Retina Flash
Backside illumination sensor
Auto image stabilization
Burst mode
Exposure control
Timer mode
Face ID
Enabled by TrueDepth camera for facial recognition
Apple Pay
Pay with your iPhone using Face ID in stores, within apps, and on the web
Send and receive money in Messages
Complete purchases made with Apple Pay on your Mac
Learn more about Apple Pay
Cellular and Wireless
Model A1920* FDD‑LTE (Bands 1, 2, 3, 4, 5, 7, 8, 12, 13, 14, 17, 18, 19, 20, 25, 26, 29, 30, 32, 66, 71) TD‑LTE (Bands 34, 38, 39, 40, 41, 46) CDMA EV-DO Rev. A (800, 1900 MHz) UMTS/HSPA+/DC-HSDPA (850, 900, 1700/2100, 1900, 2100 MHz) GSM/EDGE (850, 900, 1800, 1900 MHz)
Model A1921* FDD‑LTE (Bands 1, 2, 3, 4, 5, 7, 8, 12, 13, 14, 17, 18, 19, 20, 25, 26, 29, 30, 32, 66, 71) TD‑LTE (Bands 34, 38, 39, 40, 41, 46) CDMA EV-DO Rev. A (800, 1900 MHz) UMTS/HSPA+/DC-HSDPA (850, 900, 1700/2100, 1900, 2100 MHz) GSM/EDGE (850, 900, 1800, 1900 MHz)
All models Gigabit-class LTE with 4×4 MIMO and LAA4 802.11ac Wi‑Fi with 2×2 MIMO Bluetooth 5.0 wireless technology NFC with reader mode Express Cards with power reserve
Location
Assisted GPS, GLONASS, Galileo, and QZSS
Digital compass
Wi‑Fi
Cellular
iBeacon microlocation
Video Calling5
FaceTime video calling over Wi‑Fi or cellular
Audio Calling5
FaceTime audio
Voice over LTE (VoLTE)4
Wi‑Fi calling4
Audio Playback
Audio formats supported: AAC‑LC, HE‑AAC, HE‑AAC v2, Protected AAC, MP3, Linear PCM, Apple Lossless, FLAC, Dolby Digital (AC‑3), Dolby Digital Plus (E‑AC‑3), Dolby Atmos, and Audible (formats 2, 3, 4, Audible Enhanced Audio, AAX, and AAX+)
Wider stereo playback
User‑configurable maximum volume limit
Video Playback
Video formats supported: HEVC, H.264, MPEG‑4 Part 2, and Motion JPEG
High Dynamic Range with Dolby Vision and HDR10 content
AirPlay Mirroring, photos, and video out to Apple TV (2nd generation or later)6
Video mirroring and video out support: Up to 1080p through Lightning Digital AV Adapter and Lightning to VGA Adapter (adapters sold separately)6
Siri7
Use your voice to send messages, set reminders, and more
Get intelligent suggestions on your Lock screen and in Messages, Mail, QuickType, and more
Activate hands-free with only your voice using “Hey Siri”
Use your voice to run shortcuts from your favorite apps
Learn more about Siri
Xem thêm: 5 Gia Đình Nghèo Kêu Cứu vì Nguồn Nước Bị Ô Nhiễm
External Buttons and Connectors
Volume up/down
Ring/Silent
Side button
Built-in stereo speaker
Lightning connector
Built-in microphone
Power and Battery8
Lasts up to 1.5 hours longer than iPhone X
Talk time (wireless): Up to 25 hours
Internet use: Up to 13 hours
Video playback (wireless): Up to 15 hours
Audio playback (wireless): Up to 65 hours
Fast-charge capable: Up to 50% charge in 30 minutes9 with 18W adapter or higher (available separately)
Built-in rechargeable lithium-ion battery
Wireless charging (works with Qi chargers10)
Charging via USB to computer system or power adapter
Sensors
Face ID
Barometer
Three‑axis gyro
Accelerometer
Proximity sensor
Ambient light sensor
Operating System
iOS 12 iOS is the world’s most personal and secure mobile operating system, packed with powerful features that help you get the most out of every day. See what’s new in iOS
Accessibility
Accessibility features help people with disabilities get the most out of their new iPhone XS. With built-in support for vision, hearing, physical and motor skills, and learning and literacy, you can fully enjoy the world’s most personal device. Learn more about Accessibility
Features include:
VoiceOver
Zoom
Magnifier
RTT and TTY support
Siri and Dictation
Type to Siri
Switch Control
Closed Captions
AssistiveTouch
Speak Screen
Built-in Apps
Camera
Photos
Health
Messages
Phone
FaceTime
Mail
Music
Wallet
Safari
Maps
Siri
Calendar
iTunes Store
App Store
Notes
News
Contacts
Books
Home
Weather
Reminders
Clock
TV
Stocks
Calculator
Voice Memos
Compass
Podcasts
Watch
Tips
Find My iPhone
Find My Friends
Settings
Files
Measure
Free Apps from Apple
Pages, Numbers, Keynote, iMovie, GarageBand, iTunes U, Clips, and Apple Store app are preinstalled.
iMovie
Pages
Keynote
Numbers
iTunes U
GarageBand
Apple Store
Trailers
Apple TV Remote
iTunes Remote
Music Memos
Clips
Shortcuts
Headphones
EarPods with Lightning Connector
SIM Card
Dual SIM (nano-SIM and eSIM)11
iPhone XS and iPhone XS Max are not compatible with existing micro‑SIM cards.
Rating for Hearing Aids
M3, T4
Mail Attachment Support
Viewable document types .jpg, .tiff, .gif (images); .doc and .docx (Microsoft Word); .htm and .html (web pages); .key (Keynote); .numbers (Numbers); .pages (Pages); .pdf (Preview and Adobe Acrobat); .ppt and .pptx (Microsoft PowerPoint); .txt (text); .rtf (rich text format); .vcf (contact information); .xls and .xlsx (Microsoft Excel); .zip; .ics; .usdz (USDZ Universal)
System Requirements
Apple ID (required for some features)
Internet access12
Syncing with iTunes on a Mac or PC requires:
Mac: OS X 10.11.6 or later
PC: Windows 7 or later
iTunes 12.8 or later on Mac and iTunes 12.9 or later on PC (free download from https://bit.ly/35YDlMS)
Environmental Requirements
Operating ambient temperature: 32° to 95° F (0° to 35° C)
Nonoperating temperature: −4° to 113° F (−20° to 45° C)
Relative humidity: 5% to 95% noncondensing
Operating altitude: tested up to 10,000 feet (3000 m)
Languages
Language support English (Australia, UK, U.S.), Chinese (Simplified, Traditional, Traditional Hong Kong), French (Canada, France), German, Italian, Japanese, Korean, Spanish (Latin America, Mexico, Spain), Arabic, Catalan, Croatian, Czech, Danish, Dutch, Finnish, Greek, Hebrew, Hindi, Hungarian, Indonesian, Malay, Norwegian, Polish, Portuguese (Brazil, Portugal), Romanian, Russian, Slovak, Swedish, Thai, Turkish, Ukrainian, Vietnamese
QuickType keyboard support English (Australia, Canada, India, Singapore, UK, U.S.), Chinese – Simplified (Handwriting, Pinyin, Stroke), Chinese – Traditional (Cangjie, Handwriting, Pinyin, Stroke, Sucheng, Zhuyin), French (Belgium, Canada, France, Switzerland), German (Austria, Germany, Switzerland), Italian, Japanese (Kana, Romaji), Korean, Spanish (Latin America, Mexico, Spain), Arabic (Modern Standard, Najdi), Armenian, Azerbaijani, Belarusian, Bengali, Bulgarian, Catalan, Cherokee, Croatian, Czech, Danish, Dutch, Emoji, Estonian, Filipino, Finnish, Flemish, Georgian, Greek, Gujarati, Hawaiian, Hebrew, Hindi (Devanagari, Transliteration), Hinglish, Hungarian, Icelandic, Indonesian, Irish, Kannada, Latvian, Lithuanian, Macedonian, Malay, Malayalam, Maori, Marathi, Norwegian, Odia, Persian, Polish, Portuguese (Brazil, Portugal), Punjabi, Romanian, Russian, Serbian (Cyrillic, Latin), Slovak, Slovenian, Swahili, Swedish, Tamil (Script, Transliteration), Telugu, Thai, Tibetan, Turkish, Ukrainian, Urdu, Vietnamese, Welsh
QuickType keyboard support with predictive input English (Australia, Canada, India, Singapore, UK, U.S.), Chinese (Simplified, Traditional), French (Belgium, Canada, France, Switzerland), German (Austria, Germany, Switzerland), Italian, Japanese, Korean, Russian, Spanish (Latin America, Mexico, Spain), Portuguese (Brazil, Portugal), Thai, Turkish
Siri languages English (Australia, Canada, India, Ireland, New Zealand, Singapore, South Africa, UK, U.S.), Spanish (Chile, Mexico, Spain, U.S.), French (Belgium, Canada, France, Switzerland), German (Austria, Germany, Switzerland), Italian (Italy, Switzerland), Japanese, Korean, Mandarin (China mainland, Taiwan), Cantonese (China mainland, Hong Kong), Arabic (Saudi Arabia, United Arab Emirates), Danish (Denmark), Dutch (Belgium, Netherlands), Finnish (Finland), Hebrew (Israel), Malay (Malaysia), Norwegian (Norway), Portuguese (Brazil), Russian (Russia), Swedish (Sweden), Thai (Thailand), Turkish (Turkey)
Dictation languages English (Australia, Canada, India, Indonesia, Ireland, Malaysia, New Zealand, Philippines, Saudi Arabia, Singapore, South Africa, United Arab Emirates, UK, U.S.), Spanish (Argentina, Chile, Colombia, Costa Rica, Dominican Republic, Ecuador, El Salvador, Guatemala, Honduras, Mexico, Panama, Paraguay, Peru, Spain, Uruguay, U.S.), French (Belgium, Canada, France, Luxembourg, Switzerland), German (Austria, Germany, Luxembourg, Switzerland), Italian (Italy, Switzerland), Japanese, Korean, Mandarin (China mainland, Taiwan), Cantonese (China mainland, Hong Kong, Macao), Arabic (Kuwait, Qatar, Saudi Arabia, United Arab Emirates), Catalan, Croatian, Czech, Danish, Dutch (Belgium, Netherlands), Finnish, Greek, Hebrew, Hindi (India), Hungarian, Indonesian, Malaysian, Norwegian, Polish, Portuguese (Brazil, Portugal), Romanian, Russian, Shanghainese (China mainland), Slovakian, Swedish, Thai, Turkish, Ukrainian, Vietnamese
Definition dictionary support English, Chinese (Simplified, Traditional), Danish, Dutch, French, German, Hebrew, Hindi, Italian, Japanese, Korean, Norwegian, Portuguese, Russian, Spanish, Swedish, Thai, Turkish
Thesaurus English (UK, U.S.)
Bilingual dictionary support with English Arabic, Chinese (Simplified, Traditional), Dutch, French, German, Hindi, Italian, Japanese, Korean, Portuguese, Russian, Spanish
Spell check English, French, German, Italian, Spanish, Danish, Dutch, Finnish, Korean, Norwegian, Polish, Portuguese, Russian, Swedish, Turkish
In the Box
iPhone with iOS 12
EarPods with Lightning Connector
Lightning to USB Cable
USB Power Adapter
Documentation
iPhone and the Environment
Apple takes a complete product life cycle approach to determining our environmental impact. Learn more about iPhone and the Environment
iPhone XS and iPhone XS Max embody Apple’s continuing environmental progress. They are designed with the following features to reduce environmental impact:
Xem thêm: 40 Câu Nói Ý Nghĩa Về Cuộc Sống Mà Bạn Nên Nghe 1 Lần Trong Đời
Arsenic-free display glass
Mercury-free display
Brominated flame retardant–free
PVC-free
Beryllium-free
Recyclable stainless steel
Apple and the Environment Read our Product Environmental Reports for detailed information on the environmental performance of every Apple product.
* To identify your iPhone model number, see https://apple.co/3qGlHqG. For details on LTE support, contact your carrier and see https://apple.co/3hbuT3f. Cellular technology support is based on iPhone model number and configuration for either CDMA or GSM networks.
Available space is less and varies due to many factors. A standard configuration uses approximately 10GB to 12GB of space (including iOS and preinstalled apps) depending on the model and settings. Preinstalled apps use about 4GB, and you can delete these apps and restore them.
Size and weight vary by configuration and manufacturing process.
iPhone XS and iPhone XS Max are splash, water, and dust resistant and were tested under controlled laboratory conditions with a rating of IP68 under IEC standard 60529 (maximum depth of 2 meters up to 30 minutes). Splash, water, and dust resistance are not permanent conditions and resistance might decrease as a result of normal wear. Do not attempt to charge a wet iPhone; refer to the user guide for cleaning and drying instructions. Liquid damage not covered under warranty.
Data plan required. Gigabit-class LTE, LTE Advanced, LTE, VoLTE, and Wi-Fi calling are available in select markets and through select carriers. Speeds are based on theoretical throughput and vary based on site conditions and carrier. For details on LTE support, contact your carrier and see https://apple.co/3hbuT3f.
FaceTime calling requires a FaceTime-enabled device for the caller and recipient and a Wi-Fi connection. Availability over a cellular network depends on carrier policies; data charges may apply.
Standard Dynamic Range video content only.
Siri may not be available in all languages or in all areas, and features may vary by area. Internet access required. Cellular data charges may apply.
All battery claims depend on network configuration and many other factors; actual results will vary. Battery has limited recharge cycles and may eventually need to be replaced by Apple service provider. Battery life and charge cycles vary by use and settings. See https://apple.co/2Tqr7Ke and https://apple.co/3Ajo6fu for more information.
Testing conducted by Apple in August 2018 using preproduction iPhone XS and iPhone XS Max units and software and accessory Apple USB-C Power Adapters (18W Model A1720, 29W Model A1540, 30W Model A1882, 61W Model A1718, 87W Model A1719). Fast-charge testing conducted with drained iPhone units. Charge time varies with environmental factors; actual results will vary.
Qi wireless chargers sold separately.
Use of eSIM requires a wireless service plan (which may include restrictions on switching service providers and roaming, even after contract expiration). Not all carriers support eSIM. Use of eSIM in iPhone may be disabled when purchased from some carriers. See your carrier for details. To learn more, visit https://apple.co/3jwQV2d.
Wireless broadband recommended; fees may apply.
Some features may not be available for all countries or all areas. Click here to see complete list.
Published Date: Apr 15, 2021
Nguồn: https://sharengay.online Danh mục: Đời Sống
iPhone XS Max – Technical Specifications
from Sharengay Trang Tin Tức Độc Đáo VIDEO https://bit.ly/2UqD6HR via IFTTT
0 notes