#wip clamshell box
Explore tagged Tumblr posts
Visit Tumblr Blog
Explore Tumblr blogs with no restrictions, modern design and the best experience.
Last Seen Tumblr Blogs


Fun Fact
Tumblr has a low social media market share in South America.
Text


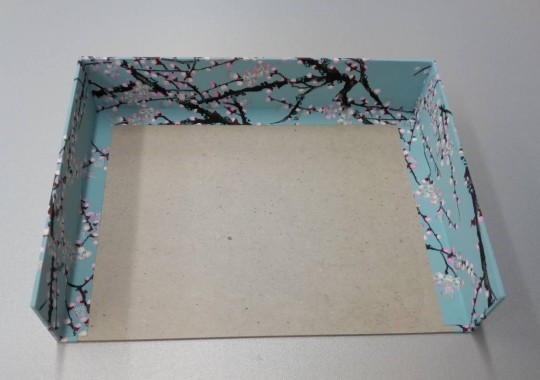
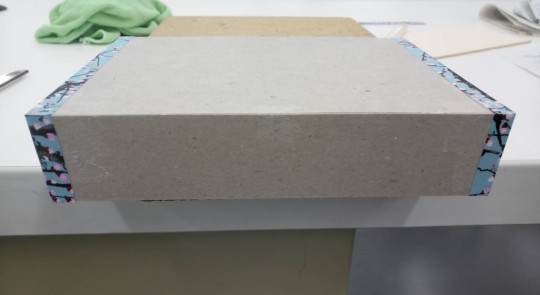
WIP - clamshell box of my binding of Dr. Jekyll and Mr. Hyde
Preparing the boards
There was a lot of meticulous cutting involved. I tried to be as precise as possible and kept all the cut parts because I figured one of the difficult things might be to get all the long and slender parts on the case without getting any skew. So I glued one piece and used cut out parts for spacing.
I feel like the spaced design with black and white spaces (the ones to go and the ones to keep for this design) have appeal too though. So that might be an idea for another design.
One thing I learned with this design was. Check if you have a paper that works with what you're planning. I could have gone with one plain colour, but I wanted a pattern that kind of worked with the paper that was already on the book as well as sort of reflect the inside.
Turned out many did not... especially with the marbled papers it was often hard to discern the title.


26 notes
·
View notes
Photo

Large clamshell box for Heinrich Kunrath’s Ampitheateum Sapientiae Aeternae. Did some block printing for the first time, on vellum! 🦉 . . . #McCallCo #bookbinding #create #craft #craftsmanship #craftsperson #finebinding #theprocess #wip #workinprogress #bookbindingporn #leatherwork #magic #handmade #handmadeisbetter #kunrath #clamshellbox #bespoke https://www.instagram.com/p/CVLWI_3pRmO/?utm_medium=tumblr
#mccallco#bookbinding#create#craft#craftsmanship#craftsperson#finebinding#theprocess#wip#workinprogress#bookbindingporn#leatherwork#magic#handmade#handmadeisbetter#kunrath#clamshellbox#bespoke
4 notes
·
View notes
Text
Custom Pharmaceutical Packaging Boxes | Biotech Packages
Custom Pharmaceutical Packaging Boxes by Biotech Packages In spite of the fact that the pharmaceutical and medicinal gadget packaging the industry is shifted and complex, it's overwhelmed by three primary sorts of bundling:
Restorative work-in-progress (WIP) plate
Pharmaceutical pressing for remedy and over-the-counter (OTC) dissemination
Clean obstruction medicinal gadget bundling
Restorative TrayWIP plate permit pharmaceutical organizations and medicinal gadget makers to securely store and move items all at once. Basically utilized for capacity or to move segments starting with one assembling cell then onto the next, WIP plate can likewise be utilized for conclusive conveyance of pharmaceuticals or medicinal gadgets, for example, syringe barrel plate or electrical parts.
Pharmaceutical Packaging, then again, includes any sort of bundling that contains an OTC pharmaceutical item or medication or medication conveyance gadget, for example, a syringe. This bundling shields the item from harm and sullying during transportation and can be intended to help the end client in the real conveyance of the medication. Pharmaceutical bundling incorporates pill and syringe clamshells, pill and syringe rankle packs and fluid measurement cups.
Numerous therapeutic items — among them heart transplant units, chemotherapy packs, and catheters — require specific clean obstruction restorative gadget bundling. This remarkable kind of bundling secures medicinal gadgets during sanitization, shipping, and all through use in clinics. Numerous implantable items, for example, bone putty and diabetes sedate conveyance gadgets additionally require this sort of bundling.

The Importance of Specifications
Pharmaceutical and medicinal gadget bundling must meet exacting determinations to guarantee tolerant security. After determination improvement, restorative bundling is exposed to thorough testing methodology during which exact necessities and particulars can be tried and affirmed, or, if necessary, dismissed and redeveloped.
Least thickness is regularly the most significant particular for pharmaceutical or medicinal gadget bundling plans. Since three normal sanitization forms — ethylene oxide (EtO) cleansings, gamma disinfection, and autoclave disinfection — slaughter all types of microbes yet are exceptionally cruel on plastic materials, keeping up least thickness is basic to guarantee that the bundling holds its sterility and physical properties. In the event that the sterility of the bundling is undermined, the sterility of the gadget itself is likewise considered endangered. Albeit most bundling has a base the thickness of 0.005 creeps to guarantee it can withstand sanitization and delivery, testing may some of the time show that at least 0.003 inches or even 0.010 inches is adequate.
The evenness or twist of an item is additionally significant. Custom Pharmaceutical Packaging Boxes is frequently heat fixed with Tyvek covers; if the level seal rib is distorted in any capacity, the fruitful fixing can get testing, and seals can get fixed, gambling sullying. At last, tidiness should consistently be considered, as residue or different particles can undoubtedly pollute restorative gadgets. Strong seals help to guarantee neatness.
Numerous non-clinic crisis situations may require extraordinary particulars. In ambulances, for example, the simplicity of transport ought to be considered. Remembering the end client consistently — and guaranteeing sufficient reproductions and testing have been done to completely comprehend the extraordinary needs of specific applications — is fundamental to guarantee the snappy, productive treatment of patients.
Medicinal bundle designWhy We Invest in Medical Device Packaging R&D
Our group's experience remembers working with customers for the restorative gadget industry. We pride ourselves on our nonstop innovative work to help convey lifesaving items to patients around the world.
Our group is dedicated to something other than great bundling; we comprehend that patients' lives rely upon protected, sterile bundling, and at Plastic Ingenuity, we pay attention to that obligation very. For more information CLICK HERE.
0 notes
Photo

WIP clamshell box Making the cover and positioning the boxes
(description and some more wip pics under the cut)
First I assembled the cover with the height cut to size and some newspaper to keep the hinges even. This time the maculatur is on the outside so I was extra careful to smooth away and possible edge. That for I chose newspaper and glued only half of the overlap to the front and back board, so I could rip the loose part off once it was dry. The ripped edge is already less obvious than a cut one and I sanded it down even further (I only should have used paste glue instead of PVA, but it still turned out well enough)

Next came the covering I usuall turn in the long sides first and keep working on them until everything sticks to it’s place. In this case that included the hinge on the inside of the box.

Last was the paper strip to cover the spine area that will be visible in the finished box. I took my time to work in the paper because the hinges just work way better if the paper does not crumple in the hollows.

Finally I added the inside boxes.I start with the outside box, because that one has smaller margins to the edge and is easier to align. I do that and let it dry for a bit. Rushing this step can set the box askew and then it doesn’t close well or looks bad.

The inner box can be guided by the outside box then, so there’s zero chance to position it in a way that hinders the box from closing in the end. I just apply glue, position the inner box in the outer and flip the cover over (I added a long strip of paper to help opening the box again, because that is the part when the inner box can move again and possibly sits a bit askew. If the outer box hasn’t dried enough yet, it can also be pulled lose, depending on how tight a fit the boxes are)

After making sure both boxes are still well aligned I let them dry with some weight to get the whole bottom stick to the cover. Sadly I messed this step up. For some reason I had a huge gap between box and spine when I was done. The cover could slip back and forth and more importantly, the box didn’t do what it was made for, keeping light and dust out!


Troubleshooting I considered my options and came up with:
a) trying to pry off the boxes to set them new and hope there is no visible damage (which is not very likely...)
b) starting from scratch and hope there’s enough of the wave and flower Chiyogami left to get the insides covered (but this was such a neat use for those too-small-to-use-for-a-cover-sized papers)
c) add something to the spine so the gap is closed.
I opted for c and added a panel that would keep the boxes from moving too much (I guess I messed up double: The hinges are too wide, which could have been fixed by positioning the boxes closer to the spine. In which case they would have not been aligned with the front and back board though... ) With the panel I closed that gap from the other side now. I don’t think it looks as ‘fixed’ as it actually is.


#bookbinding#wip clamshell box#clamshell box#box making#troubleshooting#mess fixed#it could have been intentional... XD
16 notes
·
View notes
Photo


WIP clamshell box with inlay for my binding of Diplomatic Relations
Today a few details on how I made the cover and finished the boxes. I wanted to stay true to the colour code so I went mostly for the same materials. More of the WIP under the cut.
Again I made some last minute decisions. First idea was to keep it really simple, but well, that never lasts long when I do have the time. So instead of full paper cover with an inlay (I really want this inlay XD), I went for leather hinges on the outside, so first thing, as most of the time, was paring leather. I find 0,5mm are a nice thickness to work hinges with. I had them thicker and they felt stiff and clumsy, but at this thickness they move smooth and without much resistance..


Next up was covering the spine outside and the. With the hinges on the inside I took extra care to work the paper thoroughly into the joints. Any crease there would hinder the box opening and closing smoothly later.

The cut outs were not exactly a problem, but I did colour the corners to make sure there was no pale cardboard flashing before I dressed the covers or, in this case, the bottom of the box. I cut away most of the paper inside and only left a small ledge to turn in. The process with the cover was done pretty much the same way.

Finally I glued in the boxes and now it all has to dry. Last time I was a bit unhappy with the edges of the boxes not being glued as firmly to the cover as I had liked. I don’t think this will be a problem this time...

#bookbinding#WIP clamshell box#clamshell box#diplomatic relations#boxmaking#clamshell box with inlay#slate veneer inlay
8 notes
·
View notes
Photo

WIP clamshell box for Dry Heat
Again I’m at the inner boxes. Enjoy some detail shots of the covering process.
I wrapped the outside in one go again and folded in the bottom side.
Next I make ALL the cuts I need to cover the box before I start folding in the paper!

This time I went for the front turn in first. Below is the first cut. The angled cut is only to make the corner look a bit more elaborate. It could be cut in a straight line originating from the inside of the cardboard just as well.

This is what the upper corner is cut like. I keep a tiny flap as wide as the cardboard to make sure the cardboard edge of the corner is covered too and the the long cut that looks like going in a straight line from the corner to the edge of the paper, is actually not a straight line but a teensy tiny bit angled in direction of the closed side of the box. That’s to prevent a clearly visible paper edge right at the box edge and also the paper wears down when it’s exposed like that and splits and just doesn’t look nice.

The side gets folded in first. Again there’s a small overlap to the bottom to strengthen connection between the cardboards and make it more sturdy. The small flap is just folded on top of the cardboard. Then the bottom side flap gets folded in, and last the large one to cover the inside panel (? I have no idea what it’s called, I’m just going to call it panel now ^^’)

I forgot to take pictures of how to cut the inside corners at the back, but with only he sides turned in the backside flap looks like this. There will be a little bit more visible of those turn ins, that’s why I decided to cut them a little nicer too with that angled cut.

The only thing left is covering the bottom and the front edge aaand it’s done

These were my original options. I think they all would work, but play on different strengths/ compliment different aspects of the paper.

#bookbinding#WIP#wip clamshell box#clamshell box#chiyogami#inside boxes#also 'yay' I didn't mess up the orientation of the papers
8 notes
·
View notes
Photo

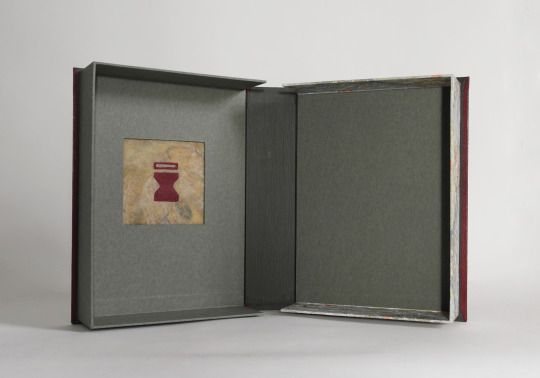
WIP clamshell box with inlay for my binding of Diplomatic Relations
This time I chose a cut out in the case for the clamshell box to give that translucent slate veneer another chance to shine.
To make this work I had to construct the cover with different cardbaords. A thicker one for the backside that won’t have a cut out, and two thinner ones to create the frontside. One of those needs to be as thick at the slate veneer to get an even surface at the end. the other ones just needs to be thick enough to cover any gaps between the veneer and the cardboard evening out its thickness. The cardboard of the backside was chosen in comparison to the thickness of the frontboard to get as close as possible in thickness and give it an even look. (I hope this explanation makes sense... )
I assembled the cover with only the thin frontcover cardboard, cut both covers to size and picked the size and position of the cut out. When that was done I set the second front cardboard (the thicker one) under the frontcover and traced along the cut out.

Now I had th position and size of the cut out. To keep the veneer in place I cut the second carboard with a bigger cut out (I chose about 5mm larger to each side, but the size depends on the seize of the inlay. Mine turned out pretty much the square that I’d wanted, no curves or weird angles, hooray)

I made the cut out and checked the fit before I glued the thicker cardboard on the inside of the cover.
Last I sanded down the outside edge of the thin cardboard,to give it a smoother transition to the inlay instad of the rather steep step I got on the covers of Diplomatich relations.

That was as far as I got today before the aircon gave out and started leaking water into the room, so I had to do damage control.
#bookbinding#boxmaking#clamshell box#wip clamshell box#diplomatic relations#slate inlay#Why does RL have to interfere with my bookbinding? I had other plans today than moping the floor -_-#but well my wheat paste glue needed replacment anyway so I couldn't have finished anyway.
6 notes
·
View notes
Photo
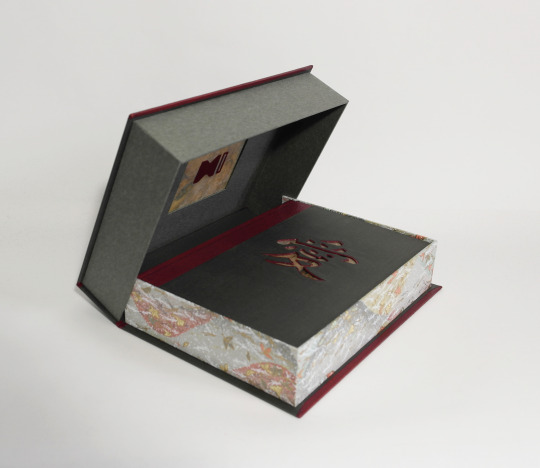


clamshell box for my binding of Diplomatic Relations by Maldoror_chant
Materials used:
cardboard Tsumugi paper Satogami paper Chiyogami paper slate veneer genuine leather (goat)
WIP pictures on my side blog
#bookbinding#Naruto#fanbinding#ficbinding#gaalee#diplomatic relations#maldoror_chant#clamshell box#box making#naturo shippuden
246 notes
·
View notes
Photo


clamshell box for my binding of Diplomatic Relations by Maldoror_chant
Materials used:
cardboard Tsumugi paper Satogami paper Chiyogami paper slate veneer genuine leather (goat)
WIP pictures on my side blog
#bookbinding#box making#clamshell box#naruto#diplomatic relations#maldoror_chant#slate veneer#it's pretty much the same as the first#only with slight alterations
21 notes
·
View notes
Photo


WIP making a clamshell box
(more pictures and desctiption under the cut)
I noticed for a black clothbinding that an open shelf probably isn’t the best place to be. It might get light damage and bleach out, but at the very least it will look dusty all the time. (I noticed when I tried to take clean pictures of it -_-) So part of today went into making a simple clamshell box that will protect it from both as well as from shelfwear. For the box I need two 3 sided boxes one slightly larger than the book the other slightly larger than the first one (actually it should be only that much larger to allow for the boxes to fit inside one another when they are covered with whatever material is used). When gluing the sideparts against the bottom, fixing them with with some adhesive tape in place and checking for the angle with some small weights.

To preven the excess glue from leaving ugly ridges and taking up the space In want my paper in later on, I just take it off carefully with a bonefolder or a scrap piece of cardboard


I covered the sides in one go, measuring out the width needed to cover inside and outside as well as an overlap to the bottom on the inside and outside.

After moisturing the paper (I used Efalin) I started rolling it around the outside. Doing this in one go is a bit challenging because the glue is drying and you’ve got to work quick (hence only a couple of fotos here). The easier, though more time-consuming way is to make it in 3 parts.

I fold in the bottom side first so I can put the box down and have that part safely dealt with. (No threat of messing up or getting glue all over the place from that side of the box anymore).

Next are the sides.I want the short sides in first because there’s more going on there. I have the fronts to cut to shape and tug in as well as the inner corner. Which I want to overlapp a little to reinfroce the connection of the corner there as well as cover the inside corner and keep the cardboard from showing through in the finished box. (Inside bottom corners are always a mess for me though. I need more practice for those again)

Least ist he backside which is merely a flap to fold in by that time.

The front folds are a bit messed up. Usually I’d aim for a lesser angle so the fold in is not that obvious.

By the way, when working with sturdy papers like Efalin, Wibalin, elephanthide paper or Tsumugi (those are only the ones I know of) I always moisture them before adding any glue. It makes them going from this:

to this...

There are a couple of reasons though. - they curl up horribly when moisturized on one side and quite likely ruin the surface by getting glue there (if that’s the first moisture the paper is getting). - they stretch. A LOT! Which can create air pockets where there were none only a moment before and rubbing the in will probably result in wrinkles. - it also gives you way more time to work with your glue. Depending on the watercontent of the glue it will dry more or less quickly. Wheat paste glue for example has a high watercontent and can be worked rather long compared to other glues. PVA mostly does not have that much water and thus dries rather quickly. By moisturing the paper means it doesn’t absorb the water from the PVA that quickly and thus results in a longer ‘open time’ to work with the glue.
#bookbinding#wip#bit of a rushed and patchy job taking the pictures#clamshellbox#clamshellbox inside boxes
12 notes
·
View notes
Photo


WIP clamshell box
Just a few pictures of covering the inner box in three parts, instead of one. With details of the bevel cut cover-paper on... actually everywhere where it could be seen.
I skipped the small strip of cover for the open front though and went for a single sheet covering with the same paper.
8 notes
·
View notes
Photo


WIP clamshell box for Diplomatic Relations
(Recreating a position without the actual object to take measurements)
I wanted the second clamshell box looking pretty much the same as the first one, but of course I forgot to take measurements and had the box already at home. Fortunately I keep cut outs and pretty much everything I take measurements with (mostly strips of paper with marks) until I’m completely done and definitely won’t need them again. That’s why I still had the cut out from the first box with its markings.I marked the middle of both sides placed the cut out accordingly and could trace it for the other box. The rest was the same procedure as before. Tracing, size adjustment, cutting, checking for the inlay to fit. Some gluing together, cleaning up the excess glue.
This time I did a better job of beveling the edges of the outer cut out. I’m not sure I’d do it again though. The edge is difficult to dress with the cover material and prone to get dents. With the fibers roughened up from sanding, the very thin edge left and the glue’s moisture it get’s very soft and I couldn’t apply as much pressure as I’d have needed to for a crisp edge. But I do like the slight slope it creates towards the inlay.

2 notes
·
View notes
Photo

Details on a clamshell box ✨ . . . #McCallCo #bookbinding #create #craft #craftsmanship #craftsperson #finebinding #theprocess #wip #workinprogress #bookbindingporn #leatherwork #magic #handmade #handmadeisbetter https://www.instagram.com/p/CLXIbMjhi47/?igshid=1xje56o9izge3
#mccallco#bookbinding#create#craft#craftsmanship#craftsperson#finebinding#theprocess#wip#workinprogress#bookbindingporn#leatherwork#magic#handmade#handmadeisbetter
3 notes
·
View notes
Video
instagram
Clamshell box for my current work in progress. I have just enough of this stunning blue leather left to make a pocket-sized book, if anybody is interested! I’m offering 15% off through the end of the month. As always, the gorgeous marbled paper was made by @jemmalewismarbling. . . . #McCallCo #bookbinding #create #craft #craftsmanship #craftsperson #finebinding #theprocess #wip #workinprogress #bookbindingporn #diy #leatherwork #magic #handmade #handmadeisbetter https://www.instagram.com/p/B_A1Fk6B5de/?igshid=15g9hap5ls1iz
#mccallco#bookbinding#create#craft#craftsmanship#craftsperson#finebinding#theprocess#wip#workinprogress#bookbindingporn#diy#leatherwork#magic#handmade#handmadeisbetter
1 note
·
View note
Video
instagram
Nothing so satisfying as a good fit. Whether it’s a well-loved book from your collection or one I’ve made you, a clamshell box is a beautiful way to protect a book. I am always accepting commissions! . . . . . #McCallCo #bookbinding #theprocess #wip #process #craftsman #artisan #lostarts #create #magic #bookbindingporn #handmadeisbetter #journal #bookporn #clamshell #fit #custommade https://www.instagram.com/p/B5DoEqmBV_d/?igshid=18f1mi7gammc9
#mccallco#bookbinding#theprocess#wip#process#craftsman#artisan#lostarts#create#magic#bookbindingporn#handmadeisbetter#journal#bookporn#clamshell#fit#custommade
1 note
·
View note
Video
instagram
Clamshell box in progress. Lined with some unusual but very pretty floral paper! . . . . . #McCallCo #bookbinding #theprocess #wip #process #craftsman #artisan #lostarts #create #magic #bookbindingporn #handmadeisbetter #journal #clamshellbox https://www.instagram.com/p/ByiMttchVzN/?igshid=q1hb31y2h06o
#mccallco#bookbinding#theprocess#wip#process#craftsman#artisan#lostarts#create#magic#bookbindingporn#handmadeisbetter#journal#clamshellbox
1 note
·
View note