#withcontext
Explore tagged Tumblr posts
Visit Tumblr Blog
Explore Tumblr blogs with no restrictions, modern design and the best experience.
Last Seen Tumblr Blogs


Fun Fact
Tumblr.com is the 103rd most visited website in the world.
Photo

Today it’s fresh spring rolls! They were pretty yummy but honestly, I miss you @roses_spring_rolls! Counting the days until you reopen in May. #vietnamesestreetfood #withcontext #freshspringrollswithshrimp https://www.instagram.com/p/CN042SprjUJ/?igshid=a4x6zexqkqmw
0 notes
Text
kotlin flow - from android docs
https://developer.android.com/kotlin/flow
In coroutines, a flow is a type that can emit multiple values sequentially, as opposed to suspend functions that return only a single value.
Flows are built on top of coroutines and can provide multiple values. A flow is conceptually a stream of data that can be computed asynchronously. The emitted values must be of the same type. For example, a Flow<Int> is a flow that emits integer values.
There are three entities involved in streams of data:
A producer produces data that is added to the stream. Thanks to coroutines, flows can also produce data asynchronously.
(Optional) Intermediaries can modify each value emitted into the stream or the stream itself.
A consumer consumes the values from the stream.
Creating a flow
To create flows, use the flow builder APIs. The flow builder function creates a new flow where you can manually emit new values into the stream of data using the emit function.
The flow builder is executed within a coroutine. Thus, it benefits from the same asynchronous APIs, but some restrictions apply:
Flows are sequential. As the producer is in a coroutine, when calling a suspend function, the producer suspends until the suspend function returns. (producer 코루틴 블럭 또는 함수를 다 처리 하고 emit될때까지 suspend된다는 이야기)
With the flow builder, the producer cannot emit values from a different CoroutineContext. Therefore, don't call emit in a different CoroutineContext by creating new coroutines or by using withContext blocks of code. You can use other flow builders such as callbackFlow in these cases. (producer안에서 새로 코루틴을 만들거나 withContext를 이용할수 없다)
Modifying the stream
Learn more about intermediate operators in the Flow reference documentation.
Intermediate operators can be applied one after the other, forming a chain of operations that are executed lazily when an item is emitted into the flow. Note that simply applying an intermediate operator to a stream does not start the flow collection.
Collecting from a flow
You can learn more about terminal operators in the official flow documentation.
As collect is a suspend function, it needs to be executed within a coroutine. It takes a lambda as a parameter that is called on every new value. Since it's a suspend function, the coroutine that calls collect may suspend until the flow is closed.
Collecting the flow triggers the producer that refreshes the latest data and emits the result. the stream of data will be closed when the ViewModel is cleared and viewModelScope is cancelled. (collector, consumer 쪽에서의 scope가 종료, 취소되는 경우 flow는 종료, 취소된다.)
Flow collection can stop for the following reasons:
The coroutine that collects is cancelled, as shown in the previous example. This also stops the underlying producer.
The producer finishes emitting items. In this case, the stream of data is closed and the coroutine that called collect resumes execution.
To optimize and share a flow when multiple consumers collect at the same time, use the shareIn operator.
Catching unexpected exceptions
The implementation of the producer can come from a third party library. This means that it can throw unexpected exceptions. To handle these exceptions, use the catch intermediate operator.
collect operator가 catch operator 이후에 있는 경우 when an exception occurs, the collect lambda isn't called, as a new item hasn't been received.
catch can also emit items to the flow. The example repository layer could emit the cached values instead (catch operator안에 emit 메소드를 통해 값을 리턴할수 있다)
Executing in a different CoroutineContext
By default, the producer of a flow builder executes in the CoroutineContext of the coroutine that collects from it(collector의 코루틴 컨텍스트를 기본적으로 producer도 이용하는데 바꾸어야 할때가 생긴다) 기본적으로 viewmodel의 경우 Dispatchers.Main that is used by viewModelScope.
flowOn위에있는 부분만 flowOn CoroutineContext를 이용하게 되고 나머지는 collector coroutine context를 사용하게 된다.
To change the CoroutineContext of a flow, use the intermediate operator flowOn. flowOn changes the CoroutineContext of the upstream flow, meaning the producer and any intermediate operators applied before (or above) flowOn. The downstream flow (the intermediate operators after flowOn along with the consumer) is not affected and executes on the CoroutineContext used to collect from the flow. If there are multiple flowOn operators, each one changes the upstream from its current location.
Convert callback-based APIs to flows
callbackFlow is a flow builder that lets you convert callback-based APIs into flows. As an example, the Firebase Firestore Android APIs use callbacks.
Unlike the flow builder, callbackFlow allows values to be emitted from a different CoroutineContext with the send function or outside a coroutine with the offer function.
(자세한 이해를 위해 따로 공부할 필요가 있다.)
0 notes
Photo

suspend fun learningPathway( scope: Use coroutines in common Android use cases ) { withContext(#KotlinFriday) { startHere(" https://t.co/qPOH4HDa7M ") } }
0 notes
Text
CoroutineがネットワークI/O待ちになったときに他のCoroutineが実行されるのか - Qiita [はてなブックマーク]

CoroutineがネットワークI/O待ちになったときに他のCoroutineが実行されるのか - Qiita

private fun startNetworkEventByCoroutine() { repeat(20) { val taskName = "coroutine#$it" GlobalScope.launch(Dispatchers.Main) { withContext(Dispatchers.IO) { Log.d(tag, "$taskName: start") val response = doNetworkTask() response.use { Log.d(tag, "$taskName: response=" + response.code()) } } Log.d...


from kjw_junichiのはてなブックマーク https://ift.tt/2BFJO0w
0 notes
Text
watchOS 4 Tutorial Part 3: Animation
Update Note: This tutorial has been updated to Swift 4/watchOS 4 by Audrey Tam. The original tutorial was written by Mic Pringle.
Welcome back to our watchOS 4 tutorial series!
In the first part of this series, you learned about the basics of watchOS 4 development by creating your first interface controller.
In the second part of the series, you learned how to add tables to your app.
In this third part of the series, you’ll learn how to use watchOS 4 animations by adding a new check-in interface to your app.
In the process, you’ll learn:
How to create image-based animations.
How to use the watchOS 4 animation API.
And with that, let’s get cracking! ┗(°0°)┛
Note: This tutorial picks up where we left things off in Part 2 of this series. You can either continue with the same project, or download it here, if you want to start fresh.
Getting Started
Open Watch\Interface.storyboard, and drag an interface controller from the Object Library onto the storyboard canvas. With the interface controller selected, open the Attributes inspector, and set Identifier to CheckIn. You do this so you can present the interface controller from within ScheduleInterfaceController.
Next, drag a group onto the new interface controller from the Object Library. Use the Attributes inspector to make the following changes:
Set Layout to Vertical.
Set Mode to Center.
Set the Horizontal Alignment to Center.
Set Height to Relative to Container.
Your interface controller should now look like this:
Next, you’ll build the same label-image-label group that you created for the table row.
Drag another group into the existing group, and make the following changes using the Attributes inspector:
Set Spacing to 4.
Set the Horizontal Alignment to Center.
Set Width to Size To Fit Content.
Set Height to Fixed, with a value of 30 (a little shorter than the table row).
Add a label and an image to this new layout group. You’ll configure the label, then copy and update it, to display the origin and destination of each flight.
Select the image, either in the storyboard or in the document outline. Using the Attributes inspector, make the following changes:
Set Image to Plane.
Set Tint to #FA114F (our pink, again!).
Set Vertical Alignment to Center.
Set Width to Fixed, with a value of 24.
Set Height to Fixed, with a value of 20.
As before, the image isn’t tinted, so you can’t see it against the black background of the interface controller. But you know it’s there.
Select the label, and set its Text to MEL. Next, change its Font to System, with a style of Semibold and a size of 20. Finally, set its Vertical alignment to Center, and check that its Width and Height are both Size To Fit Content.
Copy the label, then paste it next to the image. Change its text to SFO and its Horizontal Alignment to Right. Your interface controller should now look like the following:
Now it’s time to add a huge check-in button!
Adding the Check-In Button
Drag a button from the Object Library onto the interface controller, making sure it’s positioned as a sibling of the group containing the origin and destination labels:
Buttons in WatchKit are incredibly flexible; you can use them with their stock appearance – the way the one you just added looks – or you can turn them into a layout group, and add other interface objects to customize their appearance. That’s exactly what you’re going to do here.
Select the button, and use the Attributes inspector to make the following changes:
Set Content to Group.
Set the Horizontal Alignment to Center.
Set the Vertical Alignment to Center.
Your interface controller should now look like this:
You may have noticed when you changed the Content attribute of the button, a new group appeared in the document outline:
This is what you’re going to use as the background of your custom check-in button. Select this group, and use the Attributes inspector to make the following changes:
Set Color to #FA114F.
Set Radius to 39.
Set Width to Fixed, with a value of 78.
Set Height to Fixed, with a value of 78.
The interface controller should now look like this:
Your check-in button is really starting to take shape. The only thing missing is the label, so you’ll add that next.
Drag a label from the Object Library into the group belonging to the button, and then select it. Once again, make the following changes, using the Attributes inspector:
Set Text to Check In.
Set Font to System, with a style of Semibold and a size of 16.
Set the Horizontal Alignment to Center.
Set the Vertical Alignment to Center.
Your finished check-in interface controller should now look like this:
With the interface complete, it’s now time to create a subclass of WKInterfaceController to manage this controller, and to update ScheduleInterfaceController to show it.
Creating the Controller
Right-click on the Watch Extension group in the Project navigator and choose New File…. In the dialog that appears, select watchOS\Source\WatchKit Class, and click Next. Name the new class CheckInInterfaceController, and make sure it’s subclassing WKInterfaceController, and that Language is set to Swift:
Click Next, and then Create.
When the new file opens in the code editor, delete the three empty method stubs, so you’re left with just the import statements and the class definition.
Next, add the following to the top of the class:
@IBOutlet var backgroundGroup: WKInterfaceGroup! @IBOutlet var originLabel: WKInterfaceLabel! @IBOutlet var destinationLabel: WKInterfaceLabel!
Here, you’re simply adding outlets for the outer-most group and the two labels of the interface you just created. You’ll hook everything up soon.
Next, add the following just below the outlets:
var flight: Flight? { didSet { guard let flight = flight else { return } originLabel.setText(flight.origin) destinationLabel.setText(flight.destination) } }
You know the score by now! Here, you’ve added an optional property of type Flight, which includes a property observer. When the observer is fired, you try to unwrap flight, and if successful, use flight to configure the two labels. This is all familiar territory now, right?
Now you just need to set flight when the controller is presented. Add the following to CheckInInterfaceController:
override func awake(withContext context: Any?) { super.awake(withContext: context) if let flight = context as? Flight { self.flight = flight } }
Again, this should be super familiar by now. You try to unwrap and cast context to an instance of Flight. If that succeeds, you use it to set self.flight, which in turn, triggers the property observer configuring the interface.
Finally, add the following action just below awake(withContext:):
@IBAction func checkInButtonTapped() { // 1 let duration = 0.35 let delay = DispatchTime.now() + (duration + 0.15) // 2 backgroundGroup.setBackgroundImageNamed("Progress") // 3 backgroundGroup.startAnimatingWithImages(in: NSRange(location: 0, length: 10), duration: duration, repeatCount: 1) // 4 DispatchQueue.main.asyncAfter(deadline: delay) { [weak self] in // 5 self?.flight?.checkedIn = true self?.dismiss() } }
Here’s the play-by-play of what’s happening:
You create two constants: one for the duration of the animation and one for the delay after which the controller will be dismissed. Instead of being a Double, delay is an instance of DispatchTime, since you’ll be using it with Grand Central Dispatch.
You load a sequence of images named Progress, and set them as the background image of backgroundGroup. Layout groups conform to WKImageAnimatable, which allows you to use them to play back animated image sequences.
You begin playback of the image sequence. The range you supply covers the entire sequence, and a repeatCount of 1 means the animation will play just once.
WatchKit doesn’t have completion handlers, so you use Grand Central Dispatch to execute the closure after the given delay.
In the closure, you mark flight as checked-in, and then dismiss the controller.
Now you just need to add the images to the project, and hook up the outlets and single action.
Download this zip file, unzip the file, and drag the folder into your Watch\Assets.xcassets.
Make sure you drag the folder, not its contents. This should create a new group in the asset catalog called Progress, containing several image sets:
With the images in place, it’s time to set up the outlets and button action.
Open Watch\Interface.storyboard, and select your new interface controller. In the Identity inspector, change Custom Class\Class to CheckInInterfaceController:
Next, in the document outline, right-click on CheckIn to invoke the outlets and actions popup. Connect backgroundGroup to the outer-most group in the interface controller:
In the storyboard canvas, connect destinationLabel to the label containing SFO, and connect originLabel to the label containing MEL.
Next, connect checkInButtonTapped to the big, round, pink button:
Before you build and run, the final change you need to make is to actually present this interface controller.
Presenting the Controller
Open ScheduleInterfaceController.swift, find table(_:didSelectRowAt:), and replace its contents with the following:
let flight = flights[rowIndex] let controllers = ["Flight", "CheckIn"] presentController(withNames: controllers, contexts: [flight, flight])
Here, you retrieve the appropriate flight from flights using rowIndex, create an array containing the identifiers of the two interface controllers you want to present, and then present them, passing flight as the context to both.
Build and run. Tap a flight, and you’ll see a pair of interface controllers are presented. Swipe left to reveal the check-in controller, then tap the button to trigger the animation and check-in:
This looks great as-is, but it’d be even better if checked-in flights were highlighted on the schedule interface controller, as well. You’ll address that in the next, and final, section.
Highlighting the Flight
Open FlightRowController.swift, and add the following method to it:
func updateForCheckIn() { let color = UIColor(red: 90/255, green: 200/255, blue: 250/255, alpha: 1) planeImage.setTintColor(color) separator.setColor(color) }
Here, you’re creating an instance of UIColor, then using it to set the tint color and color of planeImage and separator, respectively. This method will be called from within an animation closure, so the color change will animate nicely.
Next, open ScheduleInterfaceController.swift, and add the following property below flights:
var selectedIndex = 0
You’ll use this to remember which table row was selected when presenting the two interface controllers. Now you just need to set it when a table row is selected. Add the following just above the call to presentController(withNames:contexts:) in table(_:didSelectRowAt:):
selectedIndex = rowIndex
This sets selectedIndex to the index of the selected table row.
Finally, add the following to ScheduleInterfaceController, just below awake(withContext:):
override func didAppear() { super.didAppear() // 1 guard flights[selectedIndex].checkedIn, let controller = flightsTable.rowController(at: selectedIndex) as? FlightRowController else { return } // 2 animate(withDuration: 0.35) { // 3 controller.updateForCheckIn() } }
Here’s what’s happening in the code above:
You check to see if the selected flight is checked-in. If so, you try to cast the row controller, at the corresponding index in the table, to an instance of FlightRowController.
If that succeeds, you use the animation API on WKInterfaceController to execute the given closure, over a duration of 0.35 second.
In the closure, you call the method you just added to FlightRowController, which changes the color of the plane image and separator of that table row, and provides users with some visual feedback that they’re now checked-in.
Build and run. Follow the same steps as before to check-in for a flight, and you’ll see that when you’re returned to the schedule interface controller, the colors of the plane image and separator on the corresponding table row crossfade to a new color:
Congratulations! You’ve now finished implementing your very first set of WatchKit animations.
Where to Go From Here?
Here is the finished example project from this tutorial series.
In this tutorial you’ve learned how to create two different kinds of WatchKit animation. The first, using an animated sequence of images, and the second, using the animation API on WKInterfaceController. You’re now suitably primed to add plenty of visual flair to your own watchOS 4 apps!
Sadly, this is where we end this tutorial series.
If you have any questions or comments on this tutorial, please join the forum discussion below! :]
If you enjoyed this tutorial series, you’d definitely enjoy our book watchOS by Tutorials.
The book goes into further detail on making watchOS apps and is written for intermediate iOS developers who already know the basics of iOS and Swift development but want to learn how to make Apple Watch apps for watchOS 4.
It’s been fully updated for Swift 4, watchOS 4 and Xcode 8 — get it on the raywenderlich.com store today!
The post watchOS 4 Tutorial Part 3: Animation appeared first on Ray Wenderlich.
watchOS 4 Tutorial Part 3: Animation published first on http://ift.tt/2fA8nUr
0 notes
Photo

Context-Based Programming in Go
Go programs that run multiple concurrent computations in goroutines need to manage their lifetime. Runaway goroutines can get into infinite loops, deadlock other waiting goroutines, or just take too long. Ideally, you should be able to cancel goroutines or have them time out after a fashion.
Enter content-based programming. Go 1.7 introduced the context package, which provides exactly those capabilities as well as the ability to associate arbitrary values with a context that travels with the execution of requests and allows out-of-band communication and information passing.
In this tutorial, you'll learn the ins and outs of contexts in Go, when and how to use them, and how to avoid abusing them.
Who Needs a Context?
The context is a very useful abstraction. It allows you to encapsulate information that is not relevant to the core computation like request id, authorization token, and timeout. There are several benefits of this encapsulation:
It separates the core computation parameters from the operational parameters.
It codifies common operational aspects and how to communicate them across boundaries.
It provides a standard mechanism to add out-of-band information without changing signatures.
The Context Interface
Here is the entire Context interface:
type Context interface { Deadline() (deadline time.Time, ok bool) Done() <-chan struct{} Err() error Value(key interface{}) interface{}
The following sections explain the purpose of each method.
The Deadline() Method
Deadline returns the time when work done on behalf of this context should be canceled. Deadline returns ok==false when no deadline is set. Successive calls to Deadline return the same results.
The Done() Method
Done() returns a channel that's closed when work done on behalf of this context should be canceled. Done may return nil if this context can never be canceled. Successive calls to Done() return the same value.
The context.WithCancel() function arranges for the Done channel to be closed when cancel is called.
The context.WithDeadline() function arranges for the Done channel to be closed when the deadline expires.
The context.WithTimeout() function arranges for the Done channel to be closed when the timeout elapses.
Done can be used in select statements:
// Stream generates values with DoSomething and sends them // to out until DoSomething returns an error or ctx.Done is // closed. func Stream(ctx context.Context, out chan<- Value) error { for { v, err := DoSomething(ctx) if err != nil { return err } select { case <-ctx.Done(): return ctx.Err() case out <- v: } } }
See this article from the Go blog for more examples of how to use a Done channel for cancelation.
The Err() Method
Err() returns nil as long as the Done channel is open. It returns Canceled if the context was canceled or DeadlineExceeded if the context's deadline passed or the timeout expired. After Done is closed, successive calls to Err() return the same value. Here are the definitions:
// Canceled is the error returned by Context.Err when the // context is canceled. var Canceled = errors.New("context canceled") // DeadlineExceeded is the error returned by Context.Err // when the context's deadline passes. var DeadlineExceeded error = deadlineExceededError{}
The Value() Method
Value returns the value associated with this context for a key, or nil if no value is associated with the key. Successive calls to Value with the same key return the same result.
Use context values only for request-scoped data that transitions processes and API boundaries, not for passing optional parameters to functions.
A key identifies a specific value in a Context. Functions that wish to store values in Context typically allocate a key in a global variable and use that key as the argument to context.WithValue() and Context.Value(). A key can be any type that supports equality.
Context Scope
Contexts have scopes. You can derive scopes from other scopes, and the parent scope has no access to values in derived scopes, but derived scopes have access to the parent's scopes values.
The contexts form a hierarchy. You start with context.Background() or context.TODO(). Whenever you call WithCancel(), WithDeadline(), or WithTimeout(), you create a derived context and receive a cancel func. The important thing is that when a parent context is cancelled or expired, all its derived contexts.
You should use context.Background() in the main() function, init() functions, and tests. You should use context.TODO() if you're not sure what context to use.
Note that Background and TODO are not cancellable.
Deadlines, Timeouts, and Cancellations
As you recall, WithDeadline() and WithTimeout() return contexts that get cancelled automatically, while WithCancel() returns a context and must be cancelled explicitly. All of them return a cancel function, so even if the timeout/deadline didn't expire yet, you may still cancel any derived context.
Let's examine an example. First, here is the contextDemo() function with a name and a context. It runs in an infinite loop, printing to the console its name and its context's deadline if any. Then it just sleeps for a second.
package main import ( "fmt" "context" "time" ) func contextDemo(name string, ctx context.Context) { for { if ok { fmt.Println(name, "will expire at:", deadline) } else { fmt.Println(name, "has no deadline") } time.Sleep(time.Second) } }
The main function creates three contexts:
timeoutContext with a three-second timeout
a non-expiring cancelContext
deadlineContext, which is derived from cancelContext, with a deadline four hours from now
Then, it launches the contextDemo function as three goroutines. All run concurrently and print their message every second.
The main function then waits for the goroutine with the timeoutCancel to be cancelled by reading from its Done() channel (will block until it's closed). Once the timeout expires after three seconds, main() calls the cancelFunc() that cancels the goroutine with the cancelContext as well as the last goroutine with the derived four hours deadline context.
func main() { timeout := 3 * time.Second deadline := time.Now().Add(4 * time.Hour) timeOutContext, _ := context.WithTimeout( context.Background(), timeout) cancelContext, cancelFunc := context.WithCancel( context.Background()) deadlineContext, _ := context.WithDeadline( cancelContext, deadline) go contextDemo("[timeoutContext]", timeOutContext) go contextDemo("[cancelContext]", cancelContext) go contextDemo("[deadlineContext]", deadlineContext) // Wait for the timeout to expire <- timeOutContext.Done() // This will cancel the deadline context as well as its // child - the cancelContext fmt.Println("Cancelling the cancel context...") cancelFunc() <- cancelContext.Done() fmt.Println("The cancel context has been cancelled...") // Wait for both contexts to be cancelled <- deadlineContext.Done() fmt.Println("The deadline context has been cancelled...") }
Here is the output:
[cancelContext] has no deadline [deadlineContext] will expire at: 2017-07-29 09:06:02.34260363 [timeoutContext] will expire at: 2017-07-29 05:06:05.342603759 [cancelContext] has no deadline [timeoutContext] will expire at: 2017-07-29 05:06:05.342603759 [deadlineContext] will expire at: 2017-07-29 09:06:02.34260363 [cancelContext] has no deadline [timeoutContext] will expire at: 2017-07-29 05:06:05.342603759 [deadlineContext] will expire at: 2017-07-29 09:06:02.34260363 Cancelling the cancel context... The cancel context has been cancelled... The deadline context has been cancelled...
Passing Values in the Context
You can attach values to a context using the WithValue() function. Note that the original context is returned, not a derived context. You can read the values from the context using the Value() method. Let's modify our demo function to get its name from the context instead of passing it as a parameter:
func contextDemo(ctx context.Context) { deadline, ok := ctx.Deadline() name := ctx.Value("name") for { if ok { fmt.Println(name, "will expire at:", deadline) } else { fmt.Println(name, "has no deadline") } time.Sleep(time.Second) } }
And let's modify the main function to attach the name via WithValue():
go contextDemo(context.WithValue( timeOutContext, "name", "[timeoutContext]")) go contextDemo(context.WithValue( cancelContext, "name", "[cancelContext]")) go contextDemo(context.WithValue( deadlineContext, "name", "[deadlineContext]"))
The output remains the same. See the best practices section for some guidelines about using context values appropriately.
Best Practices
Several best practices have emerged around context values:
Avoid passing function arguments in context values.
Functions that wish to store values in Context typically allocate a key in a global variable.
Packages should define keys as an unexported type to avoid collisions.
Packages that define a Context key should provide type-safe accessors for the values stored using that key.
The HTTP Request Context
One of the most useful use cases for contexts is passing information along with an HTTP request. That information may include a request id, authentication credentials, and more. In Go 1.7, the standard net/http package took advantage of the context package getting "standardized" and added context support directly to the request object:
func (r *Request) Context() context.Context func (r *Request) WithContext(ctx context.Context) *Request
Now it's possible to attach a request id from the headers all the way to the final handler in a standard way. The WithRequestID() handler function extracts a request ID from the "X-Request-ID" header and generates a new context with the request id from an existing context that it uses. It then passes it to the next handler in the chain. The GetRequestID() public function provides access to handlers that may be defined in other packages.
const requestIDKey int = 0 func WithRequestID(next http.Handler) http.Handler { return http.HandlerFunc( func(rw http.ResponseWriter, req *http.Request) { // Extract request ID from request header reqID := req.Header.Get("X-Request-ID") // Create new context from request context with // the request ID ctx := context.WithValue( req.Context(), requestIDKey, reqID) // Create new request with the new context req = req.WithContext(ctx) // Let the next handler in the chain take over. next.ServeHTTP(rw, req) } ) } func GetRequestID(ctx context.Context) string { ctx.Value(requestIDKey).(string) } func Handle(rw http.ResponseWriter, req *http.Request) { reqID := GetRequestID(req.Context()) ... } func main() { handler := WithRequestID(http.HandlerFunc(Handle)) http.ListenAndServe("/", handler) }
Conclusion
Context-based programming provides a standard and well-supported way to address two common problems: managing the lifetime of goroutines and passing out-of-band information across a chain of functions.
Follow the best practices and use contexts in the right context (see what I did there?) and your code will improve considerably.
by Gigi Sayfan via Envato Tuts+ Code http://ift.tt/2votnjq
0 notes
Photo

First time making #vietnamesespringrolls! (Because I desperately miss @roses_spring_rolls!) They were yummy though I want to learn the classic dipping sauce. I learned this recipe from @lister.tracey of @brunswickkitchen #withcontext #contextlearning #vietnamesestreetcooking https://www.instagram.com/p/CNxnh3dL1kf/?igshid=110gi1k06that
0 notes
Text
android kotlin Coroutines
자주 햇갈리던 부분 )
launch, async를 사용할때 새로운 concurrent가 만들어지고 동시 작업이 수행된다. withContext()는 새로 concurrent가 만들어지지 않고 thread만 바꾼다.
nested 된 형태의 coroutines 인경우는 일반 coroutines의 흐름과 좀 다르다. 일반적으로nested된 coroutine의 경우 concurrent하게 진행되는데 nested된 coroutine이 완료될때까지 멈췄다 진행하려는 경우 coroutineScope{}를 이용한 Structured concurrency 를 이용한다.
coroutineScope 나 supervisorScope를 scope builder라고 한다. structured coroutine을 만들때 사용하며 { } 안의 코드가 완료될때 까지 nesting coroutine은 기다린다.
SupervisorJob의 경우 한 coroutine에서 발생한 exception은 propangate되지 않는다. 다른 coroutines은 그대로 작동한다.그래도 exception은 발생하므로 try catch로 처리 가능.
(한 scope에 하나의 coroutines만 있으며 SupervisorJob를 사용한 경우 exception이 발생해도 exception이 raise되지만 프로그램이 멈추진 않는다. )
Job의 경우 한 coroutine에서 발생한 exception은 propangate되며 exception처리를 하지않으면 멈춰버리게 된다. 처리하면 propagate는 멈추고 잘 작동된다.
supervisorjob은 CoroutineScope(SupervisorJob()) 이런식으로 하거나 supervisorScope { }를 통해서만 적용할수 있다.
CoroutineScope 내에서 async가 direct child 인 경우에만 그 안에서 발생하는 exception은 바로 throw되지 않고 await() 호출될때까지 유보된다. direct child가 아닌 경우 바로 throw
exception handler는 아래 조건이 맞을 때만 적용가능하다.
When : The exception is thrown by a coroutine that automatically throws exceptions (works with launch, not with async). Where : If it’s in the CoroutineContext of a CoroutineScope or a root coroutine (direct child of CoroutineScope or a supervisorScope).
launch는 Job을 리턴한다. async는 deferred를 리턴하며 await()을 호출해서 coroutine내 작업을 모두 마무리하게 할수 있으며 Job도 포함하고 있어서 coroutine을 취소 할수도 있다.
나의 추측)
concurrent is started when we use 'launch' or 'async' withContext() is not start new concurrent. it just change thread
launch, async를 사용할때 새로운 concurrent가 만들어지고 동시 작업이 수행된다. withContext()는 새로 concurrent가 만들어지지 않고 thread만 바꾼다. 옮겨진 thread에서의 작업이 완수 될때 까지 기다렸다 진행된다. 예제 코드 아래 참조
import kotlinx.coroutines.* fun main(args: Array<String>){ println("main functions started") val job1 = SupervisorJob() // val scope = CoroutineScope(Dispatchers.Default + job1) val scope = CoroutineScope(job1) runBlocking { // launch되고 밑에 코드들 실행 scope.launch { databasejob1() //databasejob1이 마무리되고 다음실행,withContext()를 사용하더라도 기본적으로 parent scope를 따른다. 바꾸고 싶은경우 launch, async를 이요한다 databasejob2() } scope.launch{ } // 만약 이부분이 1000이었다고 한다면 databasejob1, databasejob2가 끝나기전에 끝나버림 delay(50000L) } } private suspend fun databasejob1(){ withContext(Dispatchers.IO){ delay(2000L) println("databasejob1===================") } } private suspend fun databasejob2(){ withContext(Dispatchers.IO){ delay(2000L) println("databasejob2===================") } }
CoroutineScope()와 coroutineScope{} 의 차이
nested 된 형태의 coroutines 인경우는 일반 coroutines의 흐름과 좀 다르다. 일반적으로nested된 coroutine의 경우 concurrent하게 진행되는데 nested된 coroutine이 완료될때까지 멈췄다 진행하려는 경우 coroutineScope{}를 이용한 Structured concurrency 를 이용한다.
https://stackoverflow.com/questions/59368838/difference-between-coroutinescope-and-coroutinescope-in-kotlin
CoroutineScope() is nothing but a factory of CoroutineScope objects, and a CoroutineScope object is nothing but a holder of a CoroutineContext. It has no active role in coroutines, but it's an important part of the infrastructure that makes it easy to do structured concurrency properly. This comes from the fact that all coroutine builders like launch or async are extension functions on CoroutineScope and inherit its context.
You will rarely, if ever, have the need to call CoroutineScope() because usually you either pick up an existing coroutine scope or have one created for you by other convenience functions (like MainScope on Android) or Kotlin internals.
coroutineScope(), on the other hand, is one of the coroutine builders, which means it executes the block you pass it inside a sub-coroutine. It is basically an alias for withContext(this.coroutineContext) 이것은 부모(nesting) 코루틴 context를 그대로 사용한다는 의미이다. and you should primarily use it when you want to launch one or more background coroutines while you continue some work in the foreground, and then join on the background coroutines when completing the block.
.
.
==========================================================
Best difference between CoroutineScope (Capital C version) vs coroutineScope (Smaller c version), I could figure out and which was easily understandable was correlating them with Unstructured vs Structured concurrency
Let me share an example :
class MainActivity extends Activity { private Button btn; public void onCreate(Bundle b) { setContentView(R.layout.activity_main); btn = (Button) findViewById(R.id.start_btn); btn.setOnClickListener( () -> { // Starting a coroutine in Main scope, to download user data, and will print it CoroutineScope(Dispatchers.Main).launch { int result = downloadUserData() Toast.makeText(applicationContext, "Result : " + result, Toast.LENGTH_LONG).show() }); } private suspend int downloadUserData() { int result = 0; // Here, we use CoroutineScope (Capital C version) which will start a new scope and // launch coroutine in new scope Dispatchers.IO, Not In Parent Scope which is Dispatchers.Main // Thus, this function would directly return without waiting for loop completion and will return 0. 이렇게 하면 nesting하는 parent scope를 그대로 이용하게되고 작업이 순차적으로 진행된다 CoroutineScope(Dispatchers.IO).launch { for (int i = 0; i < 2000; i++) { kotlinx.coroutines.delay(400); result++; } } return result; } }
Output : Result : 0
This is an example of Unstructured Concurrency where it is not guaranteed that child coroutine would complete before returning. Thus, caller/parent coroutine would get wrong value returned by child coroutine. Even, when child coroutine has returned already, child coroutine may be running (in Active state) in the background which may lead to Memory Leaks in certain cases.
Solution :
When we need to communicate between multiple coroutines, we need to make sure Structured Concurrency (Recommended)
This can be done by re-using parent/caller coroutine scope inside child/callee coroutine. This can be achieved by coroutineScope {} (Smaller c) version inside child/callee coroutine.
private suspend int downloadUserData() { int result = 0; // By using coroutineScope (Smaller c version) below, we ensure that this coroutine would execute in the // parent/caller coroutine's scope, so it would make sure that the for loop would complete // before returning from this suspended function. This will return 20000 properly coroutineScope { for (int i = 0; i < 20000; i++) { kotlinx.coroutines.delay(400); result++; } } return result; }
Output : Result : 20000
.
.
.
.
한 scope에 여러개의 coroutines을 사용하는 경우
SupervisorJob의 경우 한 coroutine에서 발생한 exception은 propangate되지 않는다. 다른 coroutines은 그대로 작동한다.그래도 exception은 발생하므로 try catch로 처리 가능.
(한 scope에 하나의 coroutines만 있으며 SupervisorJob를 사용한 경우 exception이 발생해도 exception이 raise되지만 프로그램이 멈추진 않는다. )
Job의 경우 한 coroutine에서 발생한 exception은 propangate되며 exception처리를 하지않으면 멈춰버리게 된다. 처리하면 propagate는 멈추고 잘 작동된다.
Exceptions in Coroutines
https://medium.com/androiddevelopers/exceptions-in-coroutines-ce8da1ec060c
A coroutine suddenly failed! What now? 😱
When a coroutine fails with an exception, it will propagate said exception up to its parent! Then, the parent will 1) cancel the rest of its children, 2) cancel itself and 3) propagate the exception up to its parent. (exception발생시 기본 작동)
-coroutine에서 exception발생하면 기본적으로 children이 있다면 취소되고 자신도 취소된다. 그리고 parent로 propagate된다.
The exception will reach the root of the hierarchy and all the coroutines that the CoroutineScope started will get cancelled too.
While propagating an exception can make sense in some cases, there are other cases when that’s undesirable. Imagine a UI-related CoroutineScope that processes user interactions. If a child coroutine throws an exception, the UI scope will be cancelled and the whole UI component will become unresponsive as a cancelled scope cannot start more coroutines.
What if you don’t want that behavior? Alternatively, you can use a different implementation of Job , namely SupervisorJob , in the CoroutineContext of the CoroutineScope that creates these coroutines.
SupervisorJob to the rescue
With a SupervisorJob, the failure of a child doesn’t affect other children. A SupervisorJob won’t cancel itself or the rest of its children. Moreover, SupervisorJob won’t propagate the exception either, and will let the child coroutine handle it. (그러나 처리 하지 않으면 exception은 위로 올라가진 않으나 throw되고 terminal 에 exception 메시지가 뜨게 된다)
You can create a CoroutineScope like this
val uiScope = CoroutineScope(SupervisorJob())
to not propagate cancellation when a coroutine fails as this image depicts:
If the exception is not handled and the CoroutineContext doesn’t have a CoroutineExceptionHandler (as we’ll see later), it will reach the default thread’s ExceptionHandler. it will make your app crash regardless of the Dispatcher this happens on.
💥 Uncaught exceptions will always be thrown regardless of the kind of Job you use
coroutineScope 나 supervisorScope를 scope builder라고 한다. structured coroutine을 만들때 사용하며 { } 안의 코드가 완료될때 까지 nesting coroutine은 기다린다.
The same behavior applies to the scope builders coroutineScope and supervisorScope. These will create a sub-scope (with a Job or a SupervisorJob accordingly as a parent) with which you can logically group coroutines (e.g. if you want to do parallel computations or you want them to be or not be affected by each other).
Warning: A SupervisorJob only works as described when it’s part of a scope: either created using supervisorScope or CoroutineScope(SupervisorJob()).
CoroutineScope(SupervisorJob()) 이런식으로 하거나 supervisorScope { }를 통해서만 SupervisorJob 기능을 적용할수 있다는 이야기. 이렇게 해야지만 하나의 coroutine에서 exception이 발생해도 다른 sibling coroutines은 원래대로 돌아가고 parent 도 멈추지 않는다.
Job or SupervisorJob? 🤔
When should you use a Job or a SupervisorJob? Use a SupervisorJob or supervisorScope when you don’t want a failure to cancel the parent and siblings.
Some examples:
// Scope handling coroutines for a particular layer of my app val scope = CoroutineScope(SupervisorJob())
scope.launch { // Child 1 }scope.launch { // Child 2 }
In this case, if child#1 fails, neither scope nor child#2 will be cancelled.
Another example:
// Scope handling coroutines for a particular layer of my app val scope = CoroutineScope(Job())
scope.launch { supervisorScope { launch { // Child 1 } launch { // Child 2 } } }
In this case, as supervisorScope creates a sub-scope with a SupervisorJob, if child#1 fails, child#2 will not be cancelled. If instead you use a coroutineScope in the implementation, the failure will get propagated and will end up cancelling scope too.
Watch out quiz! Who’s my parent? 🎯
Given the following snippet of code, can you identify what kind of Job child#1 has as a parent?
위에서 말했듯이 CoroutineScope(SupervisorJob()) 이런식으로 하거나 supervisorScope { }를 통해서만 적용할수 있다.
val scope = CoroutineScope(Job())
scope.launch(SupervisorJob()) { // new coroutine -> can suspend launch { // Child 1 } launch { // Child 2 } }
child#1’s parentJob is of type Job! Hope you got it right! Even though at first impression, you might’ve thought that it can be a SupervisorJob, it is not because a new coroutine always gets assigned a new Job() which in this case overrides the SupervisorJob. SupervisorJob is the parent of the coroutine created with scope.launch; so literally, SupervisorJob does nothing in that code!
Therefore, if either child#1 or child#2 fails, the failure will reach scope and all work started by that scope will be cancelled.
Remember that a SupervisorJob only works as described when it’s part of a scope: either created using supervisorScope or CoroutineScope(SupervisorJob()). Passing a SupervisorJob as a parameter of a coroutine builder will not have the desired effect you would’ve thought for cancellation.
Regarding exceptions, if any child throws an exception, that SupervisorJob won’t propagate the exception up in the hierarchy and will let its coroutine handle it.
Under the hood
If you’re curious about how Job works under the hood, check out the implementation of the functions childCancelled and notifyCancelling in the JobSupport.kt file.
In the SupervisorJob implementation, the childCancelled method just returns false, meaning that it doesn’t propagate cancellation but it doesn’t handle the exception either.
Dealing with Exceptions 👩🚒
Coroutines use the regular Kotlin syntax for handling exceptions: try/catch or built-in helper functions like runCatching (which uses try/catch internally).
We said before that uncaught exceptions will always be thrown. However, different coroutines builders treat exceptions in different ways.
Launch
With launch, exceptions will be thrown as soon as they happen. Therefore, you can wrap the code that can throw exceptions inside a try/catch, like in this example:
scope.launch { try { codeThatCanThrowExceptions() } catch(e: Exception) { // Handle exception } }
With launch, exceptions will be thrown as soon as they happen
Async
When async is used as a root coroutine (coroutines that are a direct child of a CoroutineScope instance or supervisorScope), exceptions are not thrown automatically, instead, they’re thrown when you call .await().
CoroutineScope 내에서 async가 direct child 인 경우에 그 안에서 발생하는 exception은 바로 throw되지 않고 await() 호출될때까지 유보된다.
To handle exceptions thrown in async whenever it’s a root coroutine, you can wrap the .await() call inside a try/catch:
supervisorScope { val deferred = async { codeThatCanThrowExceptions() } try { deferred.await() } catch(e: Exception) { // Handle exception thrown in async } }
In this case, notice that calling async will never throw the exception, that’s why it’s not necessary to wrap it as well. await will throw the exception that happened inside the async coroutine.
When async is used as a root coroutine, exceptions are thrown when you call .await
Also, notice that we’re using a supervisorScope to call async and await. As we said before, a SupervisorJob lets the coroutine handle the exception; as opposed to Job that will automatically propagate it up in the hierarchy so the catch block won’t be called:
coroutineScope { try { val deferred = async { codeThatCanThrowExceptions() } deferred.await() } catch(e: Exception) { // Exception thrown in async WILL NOT be caught here // but propagated up to the scope } }
Furthermore, exceptions that happen in coroutines created by other coroutines will always be propagated regardless of the coroutine builder. For example:
val scope = CoroutineScope(Job())
scope.launch { async { // If async throws, launch throws without calling .await() } }
위의 코드는 CoroutineScope 내에서 async가 direct child 가 아닌 경우에 해당 바로 exception이 throw된다.
In this case, if async throws an exception, it will get thrown as soon as it happens because the coroutine that is the direct child of the scope is launch. The reason is that async (with a Job in its CoroutineContext) will automatically propagate the exception up to its parent (launch) that will throw the exception.
⚠️ Exceptions thrown in a coroutineScope builder or in coroutines created by other coroutines won’t be caught in a try/catch!
In the SupervisorJob section, we mention the existence of CoroutineExceptionHandler. Let’s dive into it!
CoroutineExceptionHandler
The CoroutineExceptionHandler is an optional element of a CoroutineContext allowing you to handle uncaught exceptions.
Here’s how you can define a CoroutineExceptionHandler, whenever an exception is caught, you have information about the CoroutineContext where the exception happened and the exception itself:
val handler = CoroutineExceptionHandler { context, exception -> println("Caught $exception") }
Exceptions will be caught if these requirements are met:
When : The exception is thrown by a coroutine that automatically throws exceptions (works with launch, not with async).
Where : If it’s in the CoroutineContext of a CoroutineScope or a root coroutine (direct child of CoroutineScope or a supervisorScope).
Let’s see some examples using the CoroutineExceptionHandler defined above. In the following example, the exception will be caught by the handler:
val scope = CoroutineScope(Job()) scope.launch(handler) { launch { throw Exception("Failed coroutine") } }
In this other case in which the handler is installed in a inner coroutine, it won’t be caught:
val scope = CoroutineScope(Job()) scope.launch { launch(handler) { throw Exception("Failed coroutine") } }
The exception isn’t caught because the handler is not installed in the right CoroutineContext. The inner launch will propagate the exception up to the parent as soon as it happens, since the parent doesn’t know anything about the handler, the exception will be thrown.
Dealing with exceptions gracefully in your application is important to have a good user experience, even when things don’t go as expected.
Remember to use SupervisorJob when you want to avoid propagating cancellation when an exception happens, and Job otherwise.
Uncaught exceptions will be propagated, catch them to provide a great UX!
.
.
.
.
android kotlin coroutines official docs
https://developer.android.com/kotlin/coroutines
.
아래는 Repository
class LoginRepository(...) { ... suspend fun makeLoginRequest( jsonBody: String ): Result<LoginResponse> { // Move the execution of the coroutine to the I/O dispatcher return withContext(Dispatchers.IO) { // Blocking network request code } } }
.
아래는 ViewModel
class LoginViewModel( private val loginRepository: LoginRepository ): ViewModel() { fun login(username: String, token: String) { // Create a new coroutine on the UI thread viewModelScope.launch { val jsonBody = "{ username: \"$username\", token: \"$token\"}" // Make the network call and suspend execution until it finishes val result = loginRepository.makeLoginRequest(jsonBody) // Display result of the network request to the user when (result) { is Result.Success<LoginResponse> -> // Happy path else -> // Show error in UI } } } }
.
아래는 error handling의 예시
class LoginViewModel( private val loginRepository: LoginRepository ): ViewModel() { fun makeLoginRequest(username: String, token: String) { viewModelScope.launch { val jsonBody = "{ username: \"$username\", token: \"$token\"}" val result = try { loginRepository.makeLoginRequest(jsonBody) } catch(e: Exception) { Result.Error(Exception("Network request failed")) } when (result) { is Result.Success<LoginResponse> -> // Happy path else -> // Show error in UI } } } }
android에서 제시하는 올바른 예시.
withContext(Dispatchers.IO) 는 repository에서 하는 것을 추천한다.
makeLoginRequest is also marked with the suspend keyword. This keyword is Kotlin's way to enforce a function to be called from within a coroutine.
기본적으로 any coroutines launched from viewModelScope run in the main thread.
.
.
.
.
android kotlin coroutines official docs
https://developer.android.com/kotlin/coroutines-adv
.
.
.
.
https://kotlinlang.org/docs/reference/coroutines/composing-suspending-functions.html
async에 대한 설명 async lazy await structured
.
.
.
.
android Coroutines official docs
https://developer.android.com/topic/libraries/architecture/coroutines
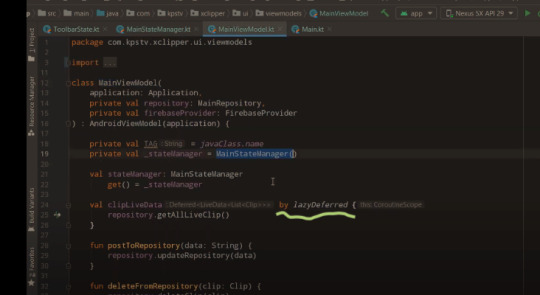
livedata with coroutines 1분30초 매우 간결 안드로이드 운영체제 관리자가 설명https://youtu.be/GUvi1LS_8Kw
위 방���을 좀더 간결하게 한것이 아래아래 그림이다.
아래그림은 필요한 dependency

18분분량 안드로이드 공식 세미나 설명이 부족하나 개념만 대충 잡을수 있음https://www.youtube.com/watch?v=B8ppnjGPAGE&t=795s
.
참고 자료)
emit() 과 emitSource()의 차이점
https://stackoverflow.com/a/58950866/3151712
https://codelabs.developers.google.com/codelabs/kotlin-android-training-live-data-transformations/index.html?index=..%2F..android-kotlin-fundamentals#7
livedata를 일반 data를 wrapper로 감싼 형태 가정하고 그안의 내용만을 수정한 livedata를 얻고자 하는 경우 Transformations를 이용해서 내용을 변경할수 있다.
.
.
.
.
android 와 Coroutines를 같이 사용하는 경우의 유의점 (80% 이해)
https://medium.com/@FreddieWang/some-tips-of-kotlin-coroutines-for-android-developers-f0988fbeb246
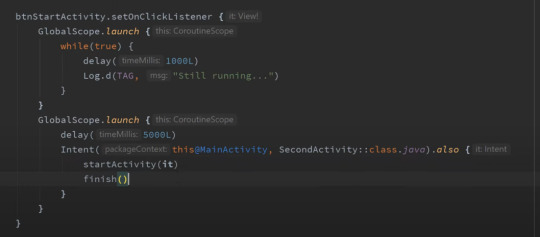
Tip1: Never use GlobalScope to launch the coroutines
According to the official document,
Global scope is used to launch top-level coroutines which are operating on the whole application lifetime and are not cancelled prematurely. Application code usually should use application-defined CoroutineScope, using async or launch on the instance of GlobalScope is highly discouraged.
Instead, we should use Activity, Fragment scope like below.
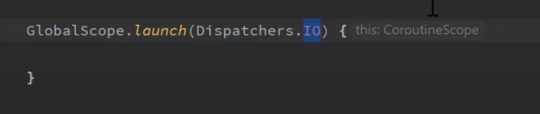
class CoroutineActivity : AppCompatActivity() { // MainScope() = ContextScope(SupervisorJob() + Dispatchers.Main) private val scope: CoroutineScope = MainScope() override fun onDestroy() { super.onDestroy() coroutineContext.cancelChildren() } fun loadSomething() = scope.launch { // code }}
see more explanation about the GlobalScope.
Tip2: Always use SupervisorJob on Android
If you want to run the background task which would throw the exceptions, you may write the function like below
val job: Job = Job()val scope = CoroutineScope(Dispatchers.Default + job)fun backgroundTask(): Deferred<String> = scope.async { … }fun loadData() = scope.launch { try { doWork().await() } catch (e: Exception) { … }}
Unfortunately, it can’t catch the exception, so the app will crash. It is because the backgroundTask would create a child job and the failure of the child job leads to an immediate failure of its parent.
The solution is to use SupervisorJob .
val job: Job = SupervisorJob()val scope = CoroutineScope(Dispatchers.Default + job)fun backgroundTask(): Deferred<String> = scope.async { … }fun loadData() = scope.launch { try { backgroundTask().await() } catch (e: Exception) { … }}
and it only works if you explicitly run the async on the coroutine scope with SupervisorJob. It will still crash the app if the async is launched in the scope of parent coroutine like below.
val job: Job = SupervisorJob()val scope = CoroutineScope(Dispatchers.Default + job)fun loadData() = scope.launch { try { async { … }.await() // this is running in the scope of parent. } catch (e: Exception) { … } // Can’t catch the exception}
if you want to launch the async in the parent scope, you should also assign the coroutine context explicitly.
val job: Job = SupervisorJob()val scope = CoroutineScope(Dispatchers.Default + job)fun loadData() = scope.launch { try { async(scope.coroutineContext) { … }.await() // Now the context is SupervisorJob. } catch (e: Exception) { … } // Can catch the exception now.}
Tip3: Assign the context explicitly for the suspend functions
If we want to make the function “suspendable”, we can just add the suspend for a function like below.
suspend fun doSomething(): Result { // Running for long time return result}
It seems fine, but sometimes it brings implicit errors especially on Android. For example:
suspend fun loadingSomething(): Result { loadingView.show() val result = withContext(Dispatchers.IO) { doSomething() } loadingView.hide() return result}
the loadingView.show() and loadingView.hide() must be running in main thread. Therefore it would crash the application like this
val scope = CoroutineScope(Dispatchers.Default + job)scope.launch { loadingSomething() // oops, it would crash the app.}
So the better way is that we assign the explicit dispatcher for the suspend functions
suspend fun doSomething(): Result = withContext(Dispatchers.IO) { // Running for long time return@withContext result}suspend fun loadingSomething(): Result = withContext(Dispatchers.Main) { loadingView.show() val result = doSomething() loadingView.hide() return@withContext result}val scope = CoroutineScope(Dispatchers.Default + job)scope.launch { loadingSomething() // safe, because loadingSomething would run in main thread.}
So if we assign the dispatcher explicitly, the function is safe and looks concise.
Tip4: Do not cancel the scope job directly.
Assume that we have implemented some job manager.
class JobManager { private val parentJob = SupervisorJob() private val scope = CoroutineScope(Dispatchers.Default + job) fun job1() = scope.launch { /* do work */ } fun job2() = scope.launch { /* do work */ } fun cancelAllJobs() { parentJob.cancel() } }fun main() { val jobManager = JobManager() jobManager.job1() jobManager.job2() jobManager.cancelAllJobs() jobManager.job1() // can't run the job here }
And you would get the error at second job1(). It is because that when we cancel the parentJob , we put the parentJob into COMPLETED state. The coroutines launched in the scope of completed job won’t be executed.
Instead, we should use cancelChildren function to cancel the jobs.
class JobManager { private val parentJob = SupervisorJob() private val scope = CoroutineScope(Dispatchers.Default + job) fun job1() = scope.launch { /* do work */ } fun job2() = scope.launch { /* do work */ } fun cancelAllJobs() { scope.coroutineContext.cancelChildren() } }fun main() { val jobManager = JobManager() jobManager.job1() jobManager.job2() jobManager.cancelAllJobs() jobManager.job1() // No problem now. }
Tip5: Use Android ktx for coroutine scope.
Android KTX has provided some useful extensions for coroutines. It can support lifecycle automatically so we don’t need to do the same thing again. The coroutineContext in lifecycleScope is SupervisorJob() + DispatchersMain.immediate and is cancelled when the lifecycle ended.
But if we need to run the suspended functions in the lifecyleScope. We should still need to assign the context as Tips3 mentioned. Especially the suspended functions include network calls.
lifecycleScope.launch { doSomething() }suspend fun doSomething = withContext(Dispatchers.IO) { // Network calls should not run in main thread}
Tip6: Use async.await() and withContext for different purpose.
If you want to wait for the result from other suspended functions, you have two choices.
Use the async { }.await
val result = async { doSomething() }.await()
2. Use the withContext
val result = withContext(Dispatchers.IO) { doSomething()}
So what is the difference between async.await and withContext??
Let’s check the source code.
public fun <T> CoroutineScope.async( context: CoroutineContext = EmptyCoroutineContext, start: CoroutineStart = CoroutineStart.DEFAULT, block: suspend CoroutineScope.() -> T ): Deferred<T> { val newContext = newCoroutineContext(context) val coroutine = if (start.isLazy) LazyDeferredCoroutine(newContext, block) else DeferredCoroutine<T>(newContext, active = true) coroutine.start(start, coroutine, block) return coroutine }public suspend fun <T> withContext( context: CoroutineContext, block: suspend CoroutineScope.() -> T ): T = suspendCoroutineUninterceptedOrReturn sc@ { uCont ->...}
By the implementation, the async returns a Deferred object and withContext return the value directly.
So the caller of withContext would suspend immediately and wait for the result. The caller of async WOULD NOT suspend immediately. Therefore we can have a conclusion
If you need to run the coroutines sequentially, use withContext
If you need to run the coroutines in parallel, use async
In fact, if you use async.await directly, IntelliJ IDEA would show a warning and suggest you use withContext directly.
Tip7: Use suspendCancellableCoroutine to wrap callback-based interfaces.
Before Kotlin Coroutines is out, there are many projects using the callbacks for async programming. If we want to use Kotlin Coroutines to call the async functions with callback, is there any way to support the callback-based API?
Yes, we can wrap the callback interface by suspendCancellableCoroutine. Here is the example for Android’s CameraDevice.StateCallback
suspend fun CameraManager.openCamera(cameraId: String): CameraDevice? = suspendCancellableCoroutine { cont -> val callback = object : CameraDevice.StateCallback() { override fun onOpened(camera: CameraDevice) { cont.resume(camera) } override fun onDisconnected(camera: CameraDevice) { cont.resume(null) } override fun onError(camera: CameraDevice, error: Int) { // assuming that we don't care about the error in this example cont.resume(null) } } openCamera(cameraId, callback, null) }
This pattern is extremely useful for Android applications because there are many callback-based API in Android frameworks.
References:
Kotlin Coroutines patterns & anti-patterns
StackOverflow discussion
.
.
.
.
https://www.youtube.com/playlist?list=PLQkwcJG4YTCQcFEPuYGuv54nYai_lwil_
basic coroutines사용법, 매우 간단하고 쉽다. 각 10분 분량 1-9 , 10 완료


.
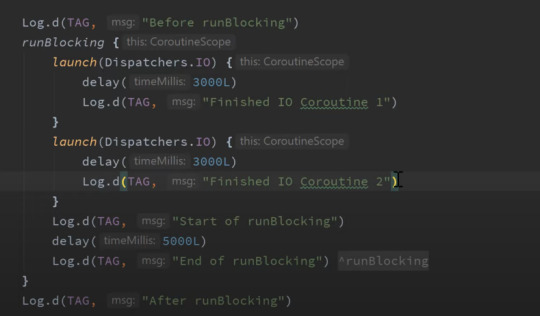

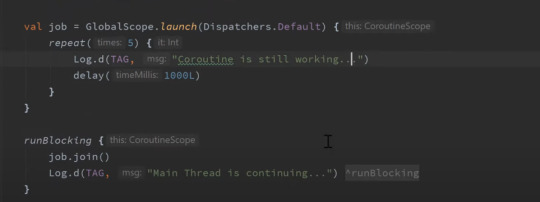
.
job.join()에서 실행되는 것이 아닌 GlobalScope.launch 에서 이미 실행

.

.
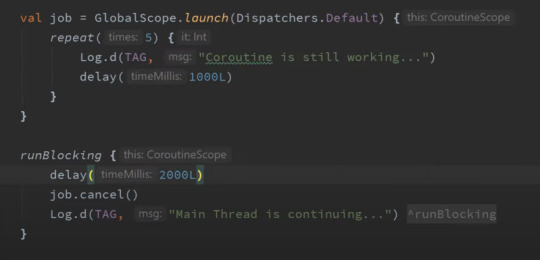
깔끔하게 cancel하는 방법
cancel했지만 그래도 아래와 같이 복잡한 연산을 하는 경우 멈추지 않고 계속 작동한다.
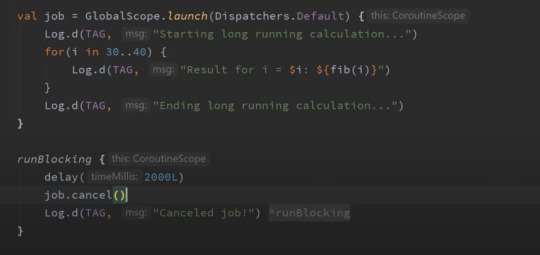
아래는 정확하게 원하는 시점이 아니지만 결국 멈추게 된 경우

.


.
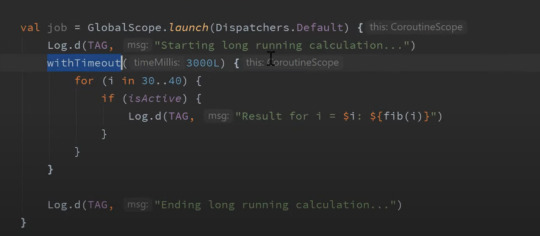
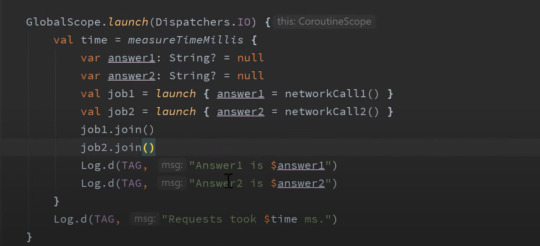
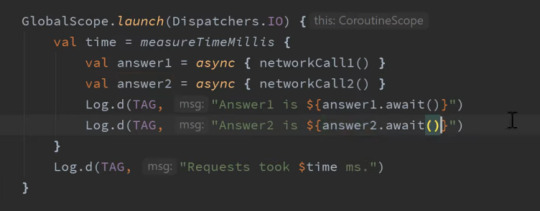
아래는 좋은 방법은 아니다. async를 이용한 방법이 좋다.

.

.
아래는 안드로이드를 위한 lifecycleScope를 이용한 경우
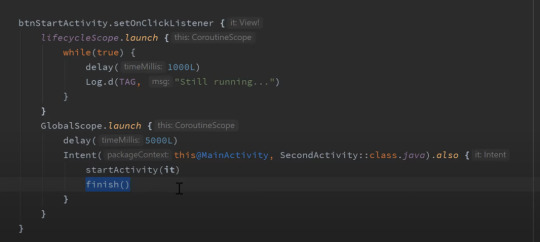
아래는 안드로이드를 위한 lifecycleScope를 사용하지 않은 안좋은 예시
.
retorfit의 일반 방법
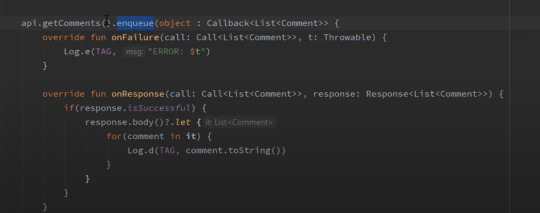
coroutines을 이용한 retrofit

https://youtu.be/S-10lLA0nbk
.
.
.
.
https://youtu.be/F63mhZk-1-Y
codingwithmith 20분 분량
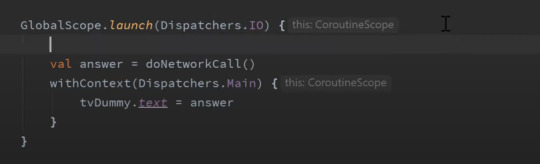
package com.codingwithmitch.coroutineexamples import androidx.appcompat.app.AppCompatActivity import android.os.Bundle import kotlinx.android.synthetic.main.activity_main.* import kotlinx.coroutines.* import kotlinx.coroutines.Dispatchers.IO import kotlinx.coroutines.Dispatchers.Main class MainActivity : AppCompatActivity() { override fun onCreate(savedInstanceState: Bundle?) { super.onCreate(savedInstanceState) setContentView(R.layout.activity_main) button.setOnClickListener { setNewText("Click!") CoroutineScope(IO).launch { fakeApiRequest() } } } private fun setNewText(input: String){ val newText = text.text.toString() + "\n$input" text.text = newText } private suspend fun setTextOnMainThread(input: String) { withContext (Main) { setNewText(input) } } private suspend fun fakeApiRequest() { logThread("fakeApiRequest") val result1 = getResult1FromApi() // wait until job is done if ( result1.equals("Result #1")) { setTextOnMainThread("Got $result1") val result2 = getResult2FromApi() // wait until job is done if (result2.equals("Result #2")) { setTextOnMainThread("Got $result2") } else { setTextOnMainThread("Couldn't get Result #2") } } else { setTextOnMainThread("Couldn't get Result #1") } } private suspend fun getResult1FromApi(): String { logThread("getResult1FromApi") delay(1000) // Does not block thread. Just suspends the coroutine inside the thread return "Result #1" } private suspend fun getResult2FromApi(): String { logThread("getResult2FromApi") delay(1000) return "Result #2" } private fun logThread(methodName: String){ println("debug: ${methodName}: ${Thread.currentThread().name}") } }
위에서 getResult2FromApi는 getResult1FromApi 가 완료된후에 실행된다. 하나의 launch에서 여러개의 suspend function호출은 순차적으로 진행된다. 새로운 concurrent 를 이용해 처리하는 것이 아니다.
.
.
.
.
https://youtu.be/cu0_fHFQGbM
time out codingwithmitch
12분분량
package com.codingwithmitch.coroutineexamples import androidx.appcompat.app.AppCompatActivity import android.os.Bundle import kotlinx.android.synthetic.main.activity_main.* import kotlinx.coroutines.* import kotlinx.coroutines.Dispatchers.IO import kotlinx.coroutines.Dispatchers.Main class MainActivity : AppCompatActivity() { private val JOB_TIMEOUT = 2100L override fun onCreate(savedInstanceState: Bundle?) { super.onCreate(savedInstanceState) setContentView(R.layout.activity_main) button.setOnClickListener { setNewText("Click!") CoroutineScope(IO).launch { fakeApiRequest() } } } private fun setNewText(input: String){ val newText = text.text.toString() + "\n$input" text.text = newText } private suspend fun setTextOnMainThread(input: String) { withContext (Main) { setNewText(input) } } private suspend fun fakeApiRequest() { withContext(IO) { val job = withTimeoutOrNull(JOB_TIMEOUT) { val result1 = getResult1FromApi() // wait until job is done setTextOnMainThread("Got $result1") val result2 = getResult2FromApi() // wait until job is done setTextOnMainThread("Got $result2") } // waiting for job to complete... if(job == null){ val cancelMessage = "Cancelling job...Job took longer than $JOB_TIMEOUT ms" println("debug: ${cancelMessage}") setTextOnMainThread(cancelMessage) } } } private suspend fun getResult1FromApi(): String { delay(1000) // Does not block thread. Just suspends the coroutine inside the thread return "Result #1" } private suspend fun getResult2FromApi(): String { delay(1000) return "Result #2" } }
withTimeoutOrNull, Job
======================================================================================================================
이하는 나중에 확인할 내용들이다.
@synchronized @Volatile Lock Atomic primitives
multi thread에서 안전하게 사용하는 방법을 총정리한 블로그
대충 읽다가 멈춤
https://proandroiddev.com/synchronization-and-thread-safety-techniques-in-java-and-kotlin-f63506370e6d
.
@Volatile
In order to force changes in a variable to be immediately visible to other threads, we can use the annotation @Volatile, a in the following example:
.
Synchronized methods
Java has the synchronized keyword, which can be applied to methods to ensure that only one thread at a time can access them. A thread that enters a synchronized method obtains a lock (an object being locked is the instance of the containing class) and no other thread can enter the method until the lock is released. Kotlin offers the same functionality with the @Synchronized annotation. When applied to a method, it will produce the same bytecode as Java would with the synchronized keyword:
@Synchronizedfun threadSafeFunction() {}
.
synchronized volatile kotlin’s Any Java's Object wait() notify() notifyAll() methods
https://blog.egorand.me/concurrency-primitives-in-kotlin/
.
.
.
.
Kotlin Coroutines patterns & anti-patterns
Coroutines사용시에 좋은 방법 안좋은 방법 예를 들어 보여줌
- 조금 읽다가 멈춤
https://proandroiddev.com/synchronization-and-thread-safety-techniques-in-java-and-kotlin-f63506370e6d
.
.
.
.
Async Operations with Kotlin Coroutines — Part 1
Coroutines 전반에 관한 기초내용 - 나중에 읽어 볼만 하다고 생각
https://proandroiddev.com/async-operations-with-kotlin-coroutines-part-1-c51cc581ad33#:~:text=async%3A%20Async%20coroutine%20builder%20is,to%20get%20the%20eventual%20result.
.
.
.
.
Multi Selection RecyclerView in Android | Code Walkthrough
https://youtu.be/YogGlRYCfp0
.
.
.
.
cancel nested coroutine at once ( 중첩 coroutine을 한번에 cancel하는 방법 )
ref) https://codinginfinite.com/android-kotlin-coroutinescope-example/
class MyViewModel constructor(private val apiService : ApiService) : ViewModel(), CoroutineScope { // 1 // 2 private val job = Job() // 3 override val coroutineContext: CoroutineContext get() = job + Dispatchers.Main // 4 fun executeCalls() { launch(context = coroutineContext) { val firstRequestDeferred = async { apiService.request1() } val secondRequestDeffered = async { apiService.request2() } handleResponse(firstRequestDeferred,await(),secondRequestDeffered.await()) } } // 5 override fun onCleared(){ job.cancel() } }
주의점은 Job이 cancel된 경우 해당 coroutine은 다시 사용할수 없는데 이런경우 다시 Job을 생성해 주어야 한다.
.
.
.
.
.
https://medium.com/l-r-engineering/launching-kotlin-coroutines-in-android-coroutine-scope-context-800d280ebd80
android 에서 coroutine 사용법
0 notes
Photo

Work around Android’s SQLite limitation! We’ve built the withTransaction API, which mimics the withContext API but provides a coroutine context specifically built for safe Room transactions. Dive into the implementation of Room’s withTransaction API ↓ https://t.co/sQaBm4wLqz
0 notes
Text
watchOS 4 Tutorial Part 2: Tables
Update Note: This tutorial has been updated to Swift 4/watchOS 4 by Audrey Tam. The original tutorial was written by Mic Pringle.
Welcome back to our watchOS 4 tutorial series!
In Part 1 of this series, you learned about the basics of watchOS 4 development by creating your first interface controller.
In this second part of the series, you’ll add a table to your app that displays a list of flights.
In the process, you’ll learn:
How to add a new interface controller, add a table to it, and build the prototype row.
How to create a subclass of WKInterfaceController to populate the table, configure the rows, and handle selection.
How to present an interface controller modally, and pass it data to present.
And with that, let’s get going! ┗(°0°)┛
Note: This tutorial picks up where we left things off in Part 1 of this series. You can either continue with the same project, or download it here, if you want to start fresh.
Getting Started
Open Watch\Interface.storyboard, and drag another interface controller from the Object Library onto the storyboard canvas, to the left of the existing Flight controller.
With the new interface controller selected, open the Attributes inspector, and make the following changes:
Set Identifier to Schedule.
Set Title to Air Aber.
Check Is Initial Controller.
Check Activity Indicator On Load is checked.
As with the Flight controller, you set the identifier so you can refer to this interface controller in code. This is the real initial controller for the Watch app, so you set its title, and check the box. This controller loads a table from some data source, so you display the activity indicator.
Now for the interface: drag a table from the Object Library onto the new interface controller:
Select the Table Row Controller in the document outline:
Use the Attributes inspector to set its Identifier to FlightRow. The identifier doubles as the row type when you’re informing the table which rows it should be instantiating, which is why it’s important that you set it.
Building the Row’s Interface
The table row is actually a group, so you can set it up with a layout as complex as you want.
Your first task is to make two changes to the default layout group. In the document outline, select the group inside the table row, then use the Attributes inspector to set Spacing to 6 and Height to Size To Fit Content.
Table rows have a standard, fixed height by default. However, most of the time you’ll want your rows to display all the interface objects you add to them, so it’s always worthwhile changing the Height attribute in this way.
Next, drag a separator from the Object Library into the table row’s group. You won’t be using it to actually separate anything, but just to add a little visual flair to your table row. With the separator selected, use the Attributes inspector to make the following changes:
Set Color to #FA114F (recently used color Air Aber pink).
Set Vertical Alignment to Center.
Set Height to Relative to Container.
Set Adjustment to –4.
The inspector should now look like the following:
The table row suddenly grows to fill the screen! But you’ll fix that now, as you layout the row.
Drag a group from the Object Library onto the table row, to the right of the separator. With the group still selected, change the following attributes in the Attributes inspector:
Set Layout to Vertical.
Set Spacing to 0.
Set Width to Size To Fit Content.
You’ve probably noticed that you’re often manipulating the Spacing attribute; this simply tightens up the space between each of the interface objects in the group, and makes things look a little sharper on the small screen.
Drag another group into the group you just added, and make the following changes:
Set Spacing to 4.
Set Height to Fixed, with a value of 32.
Now the table row is back to a reasonable height!
Next, add a label and an image to this new group. You’ll configure the label, then copy and update it, to display the origin and destination of each flight.
Now you need something to put in that image. Download this image, and add it to Watch\Assets.xcassets. This should create a new image set called Plane, with the actual image in the 2x slot:
You want to tint this image to Air Aber pink, so select the image, then use the Attributes inspector to set Render As to Template Image.
Re-open Watch\Interface.storyboard, and select the image in the document outline. Using the Attributes inspector, make the following changes:
Set Image to Plane.
Set Tint to #FA114F.
Set Horizontal and Vertical Alignment to Center.
Set Width to Fixed, with a value of 24.
Set Height to Fixed, with a value of 20.
Select the label, and set its Text to MEL. Next, change its Font to System, with a style of Semibold and a size of 20. Finally set its Vertical Alignment to Center.
Copy the label, then paste it on the right of the image. Change its text to SFO and its Horizontal Alignment to Right. Your table row should now look like the following:
Note: When you paste the copy of the label, it might stubbornly stick to the left of the image, no matter where you position it in the document outline. But setting its horizontal alignment to right will move it into place.
The interface object hierarchy should now resemble the following:
You’re almost done with the table row’s interface; you just need to add the flight number and status.
Drag another group from the Object Library onto the table row, making sure it’s a sibling of the group that contains the origin and destination labels:
As you continue to build this interface, you’re seeing further examples of how you can use nested groups with mixed layouts to create complex layouts. Who needs Auto Layout?! ;]
Drag two labels into this new horizontal group. Use the Attributes inspector to make these changes to the left label:
Set Text to AA123.
Set Text Color to Light Gray Color.
Set Font to Caption 2.
Set Vertical Alignment to Bottom.
Next, make these changes to the right label:
Set Text to On time.
Set Text Color to #04DE71.
Set Font to Caption 2.
Set Horizontal Alignment to Right.
Set Vertical Alignment to Bottom.
With these final changes, the completed table row should look like this:
Now that the table is set up in Interface Builder, it’s time to populate it with some data.
Populating the Table
The first thing you need to do is create a subclass of WKInterfaceController to control the table.
Right-click on the Watch Extension group in the Project navigator, and choose New File…. In the dialog that appears, select watchOS\Source\WatchKit Class, and click Next. Name the new class ScheduleInterfaceController. Make sure it’s subclassing WKInterfaceController, and that Language is set to Swift:
Click Next, and then Create.
When the new file opens in the code editor, delete the three empty method stubs, so you’re left with just the import statements and the class definition.
Re-open Watch\Interface.storyboard, and select the new interface controller. In the Identity inspector, change Custom Class\Class to ScheduleInterfaceController:
With the interface controller still selected, open the assistant editor, and make sure it’s displaying ScheduleInterfaceController. Next, Control-drag from Table in the document outline to inside the class declaration of ScheduleInterfaceController, to create an outlet:
Name the outlet flightsTable, make sure the type is set to WKInterfaceTable, and click Connect.
Now you’ve set the custom class and created an outlet to the table, it’s finally time to populate the thing!
Close the assistant editor, open ScheduleInterfaceController.swift, and add the following, just below the outlet:
var flights = Flight.allFlights()
Here you’re simply adding a property that holds all the flight information as an array of Flight instances.
Next, add the following implementation of awake(withContext:):
override func awake(withContext context: Any?) { super.awake(withContext: context) flightsTable.setNumberOfRows(flights.count, withRowType: "FlightRow") }
Here, you’re informing the table to create an instance of the row you just built in Interface Builder, for each flight in flights. The number of rows is equal to the size of the array, and the row type is the identifier you set in the storyboard.
Build and run. You’ll see a table populated with several rows, all with our Air Aber pink plane:
But hey! The title is dark gray, not Air Aber’s vibrant pink corporate color. You’ll fix that now.
Open Watch\Interface.storyboard, select the Air Aber interface controller. In the File inspector, change Global Tint to #FA114F.
Build and run. That’s much better!
But now, you’ll notice the rows all display the placeholder text you set in Interface Builder. You’ll fix this next, by adding a row controller to configure the labels for each row.
Adding a Row Controller
WatchKit tables are much simpler than iOS tables: no data source or delegates here! You just need to create a row controller class which, despite its name, is a subclass of NSObject.
Right-click on the Watch Extension group in the Project navigator and choose New File…. In the dialog that appears, select watchOS\Source\WatchKit Class, and click Next. Name the new class FlightRowController. Make sure it’s subclassing NSObject — not WKInterfaceController! — and that Language is set to Swift:
Click Next, and then Create.
When the new file opens in the code editor, add the following to the top of the class:
@IBOutlet var separator: WKInterfaceSeparator! @IBOutlet var originLabel: WKInterfaceLabel! @IBOutlet var destinationLabel: WKInterfaceLabel! @IBOutlet var flightNumberLabel: WKInterfaceLabel! @IBOutlet var statusLabel: WKInterfaceLabel! @IBOutlet var planeImage: WKInterfaceImage!
Here, you’re simply adding an outlet for each of the labels you added to the table row. You’ll connect them shortly.
Next, add the following property and property observer, just below the outlets:
// 1 var flight: Flight? { // 2 didSet { // 3 guard let flight = flight else { return } // 4 originLabel.setText(flight.origin) destinationLabel.setText(flight.destination) flightNumberLabel.setText(flight.number) // 5 if flight.onSchedule { statusLabel.setText("On Time") } else { statusLabel.setText("Delayed") statusLabel.setTextColor(.red) } } }
Here’s the play-by-play of what’s happening:
You declare an optional property of type Flight. Remember, this class is declared in Flight.swift which is part of the shared code you added to the Watch Extension in the previous tutorial.
You add a property observer that is triggered whenever the property is set.
You exit early if flight is nil: it’s an optional and you want to proceed with configuring the labels only when you know you have a valid instance of Flight.
You configure the labels using the relevant properties of flight.
If the flight is delayed, then you change the text color of the label to red, and update the text accordingly.
With the row controller set up, you now need to update the table row to use it.
Open Watch\Interface.storyboard, and select FlightRow in the document outline. Using the Identity inspector, set Custom Class\Class to FlightRowController.
In the document outline, open all the groups in FlightRow, then right-click on FlightRow to invoke the outlets and actions popup:
You can drag this popup to the right, so you can see all the objects in FlightRow.
First, connect planeImage to the image in the table row and separator to the separator. Next, connect the remaining outlets according to the list below:
destinationLabel: SFO
flightNumberLabel: AA123
originLabel: MEL
statusLabel: On time
The final step is to update ScheduleInterfaceController, so it passes an instance of Flight to each row controller in the table.
Open ScheduleInterfaceController.swift, and add the following to the bottom of awakeWithContext(_:):
for index in 0..<flightsTable.numberOfRows { guard let controller = flightsTable.rowController(at: index) as? FlightRowController else { continue } controller.flight = flights[index] }
Here, you’re iterating over each row in the table using a for loop, and asking the table for the row controller at the given index. If you successfully cast the controller, you’re handed back an instance of FlightRowController. Then you set controller.flight to the corresponding flight item in the flights array. This triggers the didSet observer in FlightRowController, and configures all the labels in the table row.
It’s time to see the fruits of your labor: build and run. You’ll see your table rows are now populated with the relevant flight details:
And now for the final part of this tutorial: when a user taps on a table row, ScheduleInterfaceController should pass the corresponding flight as the context to the flight details interface you created in the previous tutorial, then present it.
Responding to Row Selection
The first thing you need to do is override the WKInterfaceTable method that’s responsible for handling table row selection.
Add the following to ScheduleInterfaceController:
override func table(_ table: WKInterfaceTable, didSelectRowAt rowIndex: Int) { let flight = flights[rowIndex] presentController(withName: "Flight", context: flight) }
Here, you retrieve the appropriate flight from flights, using the row index passed into this method. You then present the flight details interface, passing flight as the context. Remember the name you pass to presentController(withName:context:) is the identifier you set in the storyboard, in the previous tutorial.
Now, as promised in Part 1, you’ll update FlightInterfaceController, so it uses context to configure its interface.
Open FlightInterfaceController.swift, and find awake(withContext:). Find this statement:
flight = Flight.allFlights().first
And replace it with the following:
if let flight = context as? Flight { self.flight = flight }
Here, you try to cast context to an instance of Flight. If it succeeds, you use it to set self.flight, which will in turn trigger the property observer, and configure the interface.
For the final time in this tutorial, build and run. Tap on a table row, and you’ll now see the flight details interface presented modally, displaying the details of the selected flight:
Congratulations! You’ve now finished implementing your very first table, and have populated it using real data. Nice work!
Where to Go From Here?
Here is the finished example project from this tutorial series so far.
In this tutorial, you’ve learned how to add a table to an interface controller, build the table row interface, create a row controller, handle table row selection, present another interface controller, and even pass contexts. Phew! That’s a lot to cram into 20 minutes or so.
So, where to next? Part 3 of this tutorial, of course! There, you’ll learn all about animation in watchOS.
If you have any questions or comments on this tutorial, please join the forum discussion below! :]
If you enjoyed this tutorial series, you'd definitely enjoy our book watchOS by Tutorials.
The book goes into further detail on making watchOS apps and is written for intermediate iOS developers who already know the basics of iOS and Swift development but want to learn how to make Apple Watch apps for watchOS 4.
It's been fully updated for Swift 4, watchOS 4 and Xcode 9 — get it on the raywenderlich.com store today!
The post watchOS 4 Tutorial Part 2: Tables appeared first on Ray Wenderlich.
watchOS 4 Tutorial Part 2: Tables published first on http://ift.tt/2fA8nUr
0 notes
Text
Audio Recording in watchOS Tutorial
This is an abridged chapter from our book watchOS by Tutorials, which has been completely updated for Swift 4 and watchOS 4. This tutorial is presented as part of our iOS 11 Launch Party — enjoy!
In watchOS 2, Apple introduced a new API to play and record multimedia files on the Apple Watch. In watchOS 4, Apple greatly improved the multimedia API and created great opportunities to build innovative apps and enhance the user experience.
In this tutorial, you’ll learn about watchOS 4’s audio recording and playback APIs and how to use them in your apps. You’ll add audio recording to a memo app so that users can record and review their thoughts and experiences right from their wrists. Let’s get started!
Getting Started
Download the starter project for the tutorial here.
The starter project you’ll use in this tutorial is called TurboMemo. Open TurboMemo.xcodeproj in Xcode and make sure the TurboMemo scheme for iPhone is selected. Build and run in the iPhone simulator, and you’ll see the following screen:
Users can record audio diaries by simply tapping the plus (+) button. The app sorts the entries by date, and users can play back an entry by tapping it.
Try adding some entries to create some initial data.
Now, stop the app and change the scheme to TurboMemoWatch. Build and run in the Watch Simulator, and you’ll see the following screen:
The Watch app syncs with the iPhone app to display the same entries, but it doesn’t do anything else yet. You’re about to change that.
Note: TurboMemo uses Watch Connectivity, which is covered in depth in Chapter 16 and Chapter 19.
Audio Playback
There are two ways you can play an audio file in watchOS. You can either use the built-in media player, or build your own. You’ll start with the built-in media player as it’s simpler and more straightforward. In the next section, you’ll build your own media player.
The easiest way to play a media file is to present the built-in media player controller using the presentMediaPlayerController(with:options:completion:) method of WKInterfaceController. All you have to do is to pass in a file URL that corresponds to the index of the row selected by the user in WKInterfaceTable.
Open TurboMemoWatchExtension/InterfaceController.swift, find the implementation of table(_:, didSelectRowAt:) and update it as follows:
// 1 let memo = memos[rowIndex] // 2 presentMediaPlayerController( with: memo.url, options: nil, completion: {_,_,_ in })
Going through this step-by-step:
You get the selected memo by passing the selected row index to the array of memos.
You present a media player controller by calling presentMediaPlayerController(with:options:completion:) and passing in the URL of the selected memo. You can optionally pass in a dictionary of playback options. Since you don’t want any particular customization at this point, you pass nil. In the completion block, you can check playback results based on your specific needs. Because the API requires a non-nil completion block, you simply provide an empty block.
That’s it! Build and run the app. Tap on a row in the table and you can now listen to the memos!
Note: To learn more about playback options and playing video files, check out Chapter 21: Handoff Video Playback.
Building an Audio Player
The media player controller in watchOS is great for playing short media files but it comes with limitations: As soon as the user dismisses the player, playback stops. This can be a problem if the user is listening to a long audio memo, and you want to continue playing the file even when the user closes the media player.
The built-in media interface can’t be customized either. So if you want more control over the playback and appearance of the media player, you need to build your own.
You’ll use WKAudioFilePlayer to play long audio files. WKAudioFilePlayer gives you more control over playback and the rate of playback. However, you’re responsible for providing an interface and building your own UI.
Note: Apps can play audio content using WKAudioFilePlayer only through a connected Bluetooth headphone or speaker on a real device. You won’t be able to hear the audio using WKAudioFilePlayer either in watchOS simulator or via Apple Watch speaker. Therefore, to follow along with this section, you’ll need an Apple Watch that’s paired with Bluetooth headphones.
The starter project includes AudioPlayerInterfaceController. You’ll use AudioPlayerInterfaceController as a basis for your custom audio player. But before you go there, while you’re still in InterfaceController, you can rewire the code to call the AudioPlayerInterfaceController instead.
Once again, find the implementation of table(_:didSelectRowAtIndex:) in InterfaceController.swift, and update it as follows:
override func table( _ table: WKInterfaceTable, didSelectRowAt rowIndex: Int) { let memo = memos[rowIndex] presentController( withName: "AudioPlayerInterfaceController", context: memo) }
Make sure you place the existing code entirely. Here, instead of using the built-in media player, you call your soon-to-be-made custom media player. If you build and run at this point, and select a memo entry from the table, you’ll see the new media player that does … nothing! Time to fix that.
Open AudioPlayerInterfaceController scene in TurboMemoWatch/Interface.storyboard. AudioPlayerInterfaceController provides a basic UI for audio playback.
This has:
titleLabel which is blank by default
playButton that’s hooked up to playButtonTapped().
a static label that says Time lapsed:.
interfaceTimer that is set to 0 by default.
Now, open AudioPlayerInterfaceController.swift and add the following properties at the beginning of AudioPlayerInterfaceController:
// 1 private var player: WKAudioFilePlayer! // 2 private var asset: WKAudioFileAsset! // 3 private var statusObserver: NSKeyValueObservation? // 4 private var timer: Timer!
Taking this line-by-line:
player is an instance of WKAudioFilePlayer. You’ll use it to play back an audio file.
asset is a representation of the voice memo. You’ll use this to create a new WKAudioFilePlayerItem to play the audio file.
statusObserver is your key-value observer for the player’s status. You’ll need to observer the status of the player and start playing only if the audio file is ready to play.
timer that you use to update the UI. You kick off the timer at the same time you start playing. You do this because currently there’s no other way to know when you’re finished playing the audio file. You’ll have to maintain your own timer with the same duration as your audio file.
You’ll see all these in action in a moment.
Now, add the implementation of awakeWithContext(_:) to AudioPlayerInterfaceController as follows:
override func awake(withContext context: Any?) { super.awake(withContext: context) // 1 let memo = context as! VoiceMemo // 2 asset = WKAudioFileAsset(url: memo.url) // 3 titleLabel.setText(memo.filename) // 4 playButton.setEnabled(false) }
Again, taking this line-by-line:
After calling super as ordinary, you know for sure the context that’s being passed to the controller is a VoiceMemo. This is Design by Contract!
Create a WKAudioFileAsset object with the voice memo and store it in asset. You’ll reuse the asset to replay the same memo when user taps on the play button.
Set the titleLabel with the filename of the memo.
Disable the playButton until the file is ready to be played.
You prepared the interface to playback an audio file, but you haven’t done anything to actually play it. You’ll kick off the playback in didAppear() so that playback starts when the interface is fully presented to the user.
Speaking of didAppear(), add the following to AudioPlayerInterfaceController:
override func didAppear() { super.didAppear() prepareToPlay() }
Here, you simply call a convenient method, prepareToPlay(). So let’s add that next:
private func prepareToPlay() { // 1 let playerItem = WKAudioFilePlayerItem(asset: asset) // 2 player = WKAudioFilePlayer(playerItem: playerItem) // 3 statusObserver = player.observe( \.status, changeHandler: { [weak self] (player, change) in // 4 guard player.status == .readyToPlay, let duration = self?.asset.duration else { return } // 5 let date = Date(timeIntervalSinceNow: duration) self?.interfaceTimer.setDate(date) // 6 self?.playButton.setEnabled(false) // 7 player.play() self?.interfaceTimer.start() // 8 self?.timer = Timer.scheduledTimer( withTimeInterval: duration, repeats: false, block: { _ in self?.playButton.setEnabled(true) }) }) }
There’s a lot going on here:
Create a WKAudioFilePlayerItem object from the asset you set earlier in awake(withContext:). You have to do this each time you want to play a media file, since WKAudioFilePlayerItem can’t be reused.
Initialize the player with the WKAudioFilePlayerItem you just created. You’ll have to do this even if you’re playing the same file again.
The player may not be ready to play the audio file immediately. You need to observe the status of the WKAudioFilePlayer object, and whenever it’s set to .readyToPlay, you can start the playback. You use the new Swift 4 key-value observation (KVO) API to listen to changes in player.status.
In the observer block, you check for the player’s status and if it’s .readyToPlay, you safely unwrap duration of the asset and continue. Otherwise, you simply ignore the change notification.
Once the item is ready to play, you create a Date object with the duration of the memo, and update interfaceTimer to show the lapsed time.
Disable the playButton while you’re playing the file.
Start playing by calling player.play(), and at the same time, start the countdown in the interface.
Kick off an internal timer to re-enable the playButton after the playback is finished so the user can start it again if they wish.
That was a big chunk of code, but as you see, it’s mostly about maintaining the state of the WKAudioFilePlayer and keeping the interface in sync.
Note: Unfortunately, at the time of writing this tutorial, currentTime of WKAudioFilePlayerItem is not KVO-complaint so you can’t add an observer. Ideally, you would want to observe currentTime instead of maintaining a separate timer on your own.
Before you build and run, there’s one more thing to add!
When the timer is up and playButton is enabled, the user should be able to tap on Play to restart playing the same file. To implement this, find the implementation of playButtonTapped() in AudioPlayerInterfaceController.swift and update it as follows:
@IBAction func playButtonTapped() { prepareToPlay() }
It’s that simple! Merely call the convenient method, prepareToPlay(), to restart the playback.
Next, build and run, and select a voice memo from the list. The app will present your custom interface. The interface will automatically start playing the audio file, and once it’s stopped, the Play button will be re-enabled and you can play it again.
If you have more than one item to play, such as in a playlist, you’ll want to use WKAudioFileQueuePlayer instead of WKAudioFilePlayer and queue your items. The system will play queued items back-to-back and provide a seamless transition between files.
Background Audio Playback
In watchOS, very much like in iOS, you can specify that your app should use background audio. This lets the system prepare to take over and continue playing the audio file if a user dismisses your media player.
To declare support for background audio, you’ll update the Info.plist for the Watch app. Open TurboMemoWatch\Info.plist, select the Information Property List entry and tap the + button:
Change the value of the new key to UIBackgroundModes. Make sure its type is Array and then expand the key and add a new value named audio. Xcode will most likely change the values to more readable versions:
Adding this key lets the Watch app continue running for the purpose of playing audio. If the key is not present, playback ends when the user stops interacting with your app.
Recording Audio
One of the most exciting features of watchOS is its access to the microphone. Being able to add a voice memo to Turbo Memo on the Apple Watch is definitely something users will appreciate — so let’s do it!
When you start recording, it’s the Watch app that does the recording and has access to the microphone. Prior to watchOS 4, the WatchKit extension had to provide a shared container using App Groups to which both could read and write, allowing the Watch app to write the audio and the WatchKit extension to grab it.
Even though the WatchKit extension code was bundled and copied to the Apple Watch along with the Watch app itself, from the system’s standpoint, they were still two separate processes that were sandboxed within their own containers. In other words, the Watch app and the WatchKit extension didn’t share the same sandbox!
New in watchOS 4, thanks to Unified Process Runtime, both the Watch app and the WatchKit extension run in the same process so they both have access to the same sandbox.
Note: The good news is that if you’re dropping support for watchOS versions prior to watchOS 4, you can simplify your code by removing the code related to communication between App Groups and your app’s container. The bad news is that if you want to have a backward-compatible watchOS app, you need to enable App Groups. To learn more about App Groups, check out the “Sharing Data with Your Containing App” section of Apple’s App Extension Programming Guide: apple.co/1I5YBtZ
The starter project includes a menu item called + Voice that’s accessible in the app’s main interface by force-touching the screen:
In code, it’s hooked up to addVoiceMemoMenuItemTapped() in InterfaceController.swift, and currently does … (surprise) nothing.
It’s time to tune up this code and do some recording.
Open InterfaceController.swift, find the empty implementation of addVoiceMemoMenuItemTapped() and update it as follows:
// 1 let outputURL = MemoFileNameHelper.newOutputURL() // 2 let preset = WKAudioRecorderPreset.narrowBandSpeech // 3 let options: [String : Any] = [WKAudioRecorderControllerOptionsMaximumDurationKey: 30] // 4 presentAudioRecorderController( withOutputURL: outputURL, preset: preset, options: options) { [weak self] (didSave: Bool, error: Error?) in // 5 guard didSave else { return } self?.processRecordedAudio(at: outputURL) }
This is the action method you’ll call when a user wants to add a new voice memo. Here’s what you’re doing:
Create a new URL by calling MemoFileNameHelper.newOutputURL() which is a convenient helper module. All it does is that it generates a unique file name based on the current date and time, appends .m4a as the file extension to it, and creates a URL based on user’s documentDirectory on the current device — it’s a shared code between the iPhone and the Watch app. This is basically where you’ll save the audio file.
Configure presets for the recorder. See below for more information on the presets you can use.
Create an options dictionary to specify the maximum duration of the recording session. Here, it’s 30 seconds.
Present the system-provided audio recording controller.
In the completion block, if the audio file is successfully saved, you pass it on to a helper method, processRecordedAudio(at:) which will then broadcast it to the iPhone app and update your data source for the interface table.
When you present an audio recording controller, there are a number of things you can specify. First, the preset you select determines the sample and bit rates at which the audio will record:
NarrowBandSpeech: As its name implies, this is a good preset for voice memos and voice messages. It has a sample rate of 8 kHz, and it records at a bit rate of 24 kbps with an AAC codec and 128 kbps with an LPCM codec.
WideBandSpeech: This preset has a higher sample rate of 16 kHz, and it records at a bit rate of 32 kbps with an AAC codec and 256 kbps with an LPCM codec.
HighQualityAudio: This preset has the highest sample rate at 44.1 kHz, and it records at a bit rate of 96 kbps with an AAC codec and 705.6 kbps with an LPCM codec.
You can also specify various recording options:
WKAudioRecorderControllerOptionsMaximumDurationKey: You can set the maximum duration of recorded audio clips by passing in a TimeInterval value in seconds. There’s no maximum recording time if you don’t set a value for this key.
WKAudioRecorderControllerOptionsAlwaysShowActionTitleKey: You can use this key to pass either true or false to modify the behavior for showing the action button. If you specify false, the audio recorder controller shows the button only after the user has recorded some audio. By default, the action button is always visible.
WKAudioRecorderControllerOptionsActionTitleKey: You can use this key to pass in a String to customize the display title of the button that the user taps to accept a recording. By default, the button’s title is Save.
WKAudioRecorderControllerOptionsAutorecordKey: By passing a Boolean value for this key, you can change the automatic recording behavior of the audio recorder controller. If you set it to true, once the controller is presented, it automatically starts recording; otherwise, the user has to tap on the record button to start recording. The default value is true.
That’s it! Build and run. Bring up the contextual menu using the force touch gesture and tap on the + Voice button. The app will present you with an audio recording controller. Tap the Save button, and you’ll have recorded your first voice memo on an Apple Watch, using your own code!
If you try recording on a real device, the very first time you present the system-provided audio recording controller, watchOS will ask for the user’s permission.
Very much like in iOS, the user should grant access to the microphone on the Watch. However, unlike iOS, you don’t explicitly ask for user’s permission as there’s no API for that. Instead, the watchOS uses the NSMicrophoneUsageDescription key in the iPhone’s app to present the appropriate UI and ask the user for their permission. If user doesn’t grant access, the audio recorder will still work, but it will only record silence!
Note: At the time of writing this tutorial, the watchOS simulator doesn’t present the dialog asking for the user’s permission. The iPhone simulator, on the other hand, does present the permission dialog.
Where to Go From Here?
You can download the completed project for the tutorial here.
The audio recording and playback API of watchOS 4 makes it possible to deliver a smooth multimedia experience on the Apple Watch even when the paired iPhone isn’t in proximity. This is a technology with endless possibilities.
If you enjoyed what you learned in this tutorial, why not check out the complete watchOS by Tutorials book, available in our store?
Here’s a taste of what’s in the book:
Chapter 1, Hello, Apple Watch!: Dive straight in and build your first watchOS 4 app — a very modern twist on the age-old “Hello, world!” app.
Chapter 2, Designing Great Watch Apps: Talks about the best practices based on Apple recommendations in WWDC this year, and how to design a Watch app that meets these criteria.
Chapter 3, Architecture: watchOS 4 might support native apps, but they still have an unusual architecture. This chapter will teach you everything you need to know about this unique aspect of watch apps.
Chapter 4, UI Controls: There’s not a `UIView` to be found! In this chapter you’ll dig into the suite of interface objects that ship with WatchKit–watchOS’ user interface framework.
Chapter 5, Pickers: `WKInterfacePicker` is one of the programmatic ways to work with the Digital Crown. You’ll learn how to set one up, what the different visual modes are, and how to respond to the user interacting with the Digital Crown via the picker.
Chapter 6, Layout: Auto Layout? Nope. Springs and Struts then? Nope. Guess again. Get an overview of the layout system you’ll use to build the interfaces for your watchOS apps.
Chapter 7, Tables: Tables are the staple ingredient of almost any watchOS app. Learn how to set them up, how to populate them with data, and just how much they differ from `UITableView`.
Chapter 8, Navigation: You’ll learn about the different modes of navigation available on watchOS, as well as how to combine them.
Chapter 9, Digital Crown and Gesture Recognizers: You’ll learn about accessing Digital Crown raw data, and adding various gesture recognizers to your watchOS app interface.
Chapter 10, Snapshot API: Glances are out, and the Dock is in! You’ll learn about the Snapshot API to make sure that the content displayed is always up-to-date.
Chapter 11, Networking: `NSURLSession`, meet Apple Watch. That’s right, you can now make network calls directly from the watch, and this chapter will show you the ins and outs of doing just that.
Chapter 12, Animation: The way you animate your interfaces has changed with watchOS 3, with the introduction of a single, `UIView`-like animation method. You’ll learn everything you need to know about both animated image sequences and the new API in this chapter.
Chapter 13, CloudKit: You’ll learn how to keep the watch and phone data in sync even when the phone isn’t around, as long as user is on a known WiFi network.
Chapter 14, Notifications: watchOS offers support for several different types of notifications, and allows you to customize them to the individual needs of your watch app. In this chapter, you’ll get the complete overview.
Chapter 15, Complications: Complications are small elements that appear on the user’s selected watch face and provide quick access to frequently used data from within your app. This chapter will walk you through the process of setting up your first complication, along with introducing each of the complication families and their corresponding layout templates.
Chapter 16, Watch Connectivity: With the introduction of native apps, the way the watch app and companion iOS app share data has fundamentally changed. Out are App Groups, and in is the Watch Connectivity framework. In this chapter you’ll learn the basics of setting up device-to-device communication between the Apple Watch and the paired iPhone.
Chapter 17, Audio Recording: As a developer, you can now record audio directly on the Apple Watch inline in your apps, without relying on the old-style system form sheets. In this chapter, you’ll gain a solid understanding of how to implement this, as well as learn about some of the idiosyncrasies of the APIs, which are related to the unique architecture of a watch app.
Chapter 18, Interactive Animations with SpriteKit and SceneKit: You’ll learn how to apply SpriteKit and SceneKit in your Watch apps, and how to create interactive animations of your own.
Chapter 19, Advanced Watch Connectivity: In Chapter 15, you learned how to set up a Watch Connectivity session and update the application context. In this chapter, you’ll take a look at some of the other features of the framework, such as background transfers and real-time messaging.
Chapter 20, Advanced Complications: Now that you know how to create a basic complication, this chapter will walk you through adding Time Travel support, as well giving you the lowdown on how to efficiently update the data presented by your complication.
Chapter 21, Handoff Video Playback: Want to allow your watch app users to begin a task on their watch and then continue it on their iPhone? Sure you do, and this chapter will show exactly how to do that through the use of Handoff.
Chapter 22, Core Motion: The Apple Watch doesn’t have every sensor the iPhone does, but you can access what is available via the Core Motion framework. In this chapter, you’ll learn how to set up Core Motion, how to request authorization, and how to use the framework to track the user’s steps.
Chapter 23, HealthKit: The HealthKit framework allows you to access much of the data stored in user’s health store, including their heart rate! This chapter will walk you through incorporating HealthKit into your watch app, from managing authorization to recording a workout session.
Chapter 24, Core Location: A lot of apps are now location aware, but in order to provide this functionality you need access to the user’s location. Developers now have exactly that via the Core Location framework. Learn everything you need to know about using the framework on the watch in this chapter.
Chapter 25, Core Bluetooth: In watchOS 4, you can pair and interact with BLE devices directly. Learn how to send control instructions and other data directly over Bluetooth.
Chapter 26, Localization: Learn how to expand your reach and grow a truly international audience by localizing your watch app using the tools and APIs provided by Apple.
Chapter 27, Accessibility: You want as many people as possible to enjoy your watch app, right? Learn all about the assistive technologies available in watchOS, such as VoiceOver and Dynamic Type, so you can make your app just as enjoyable for those with disabilities as it is for those without.
One thing you can count on: after reading this book you’ll have all the experience necessary to build rich and engaging apps for the Apple Watch platform.
And to help sweeten the deal, the digital edition of the book is on sale for $49.99! But don’t wait — this sale price is only available for a limited time.
Speaking of sweet deals, be sure to check out the great prizes we’re giving away this year with the iOS 11 Launch Party, including over $9,000 in giveaways!
To enter, simply retweet this post using the #ios11launchparty hashtag by using the button below:
Tweet !function(d,s,id){var js,fjs=d.getElementsByTagName(s)[0],p=/^http:/.test(d.location)?'http':'https';if(!d.getElementById(id)){js=d.createElement(s);js.id=id;js.src=p+'://platform.twitter.com/widgets.js';fjs.parentNode.insertBefore(js,fjs);}}(document, 'script', 'twitter-wjs');
We hope you enjoy this update, and stay tuned for more book releases and updates!
The post Audio Recording in watchOS Tutorial appeared first on Ray Wenderlich.
Audio Recording in watchOS Tutorial published first on http://ift.tt/2fA8nUr
0 notes