#wordpress media library http error
Explore tagged Tumblr posts
Visit Tumblr Blog
Explore Tumblr blogs with no restrictions, modern design and the best experience.
Last Seen Tumblr Blogs


Fun Fact
The “We are the 99%” Tumblr blog became the slogan for the Occupy Wall Street movement.
Text
Slider Revolution v6.7.18 Responsive WordPress Plugin
https://themesfores.com/product/slider-revolution-responsive-wordpress-plugin/ Slider Revolution v6.7.18 Responsive WordPress Plugin Slider Revolution 6 is a new way to build rich & dynamic content for your websites. With our powerful visual editor, you can create modern designs in no time, and with no coding experience required. Hero Sections Pro-Level Websites Hypnotizing Sliders Special FX High-End Design Visual Freedom Stunning visual elements such as sliders & carousels Eye-grabbing hero sections that stand out Whole websites that could win you awards Full web pages that glue visitors to the screen Rich and dynamic content your clients will LOVE Better usability Work faster & more efficiently Eye-friendly dark user interface Improved loading times Create Sliders & Carousels, Hero Headers, Content Modules, Full Websites, Dynamic Solutions, and Special FX with our amazing Add-Ons. Your secret weapon to creating responsive WordPress sliders, web pages & stunning visuals even with zero experience. 200+ templates to get you started on your responsive content or 2000+ element library to turn your raw ideas into stunning visuals included in our online library. Cutting-edge designs. Easily customized. Your secret weapon to creating responsive WordPress sliders, web pages & stunning visuals even with zero experience. 200+ templates to get you started on your responsive content or 2000+ element library to turn your raw ideas into stunning visuals Note: The Product is Activated. Import the templates and add-ons manually. It has been reported that some add-ons are not working You can First Download Templates and Download Addons Slider Revolution – Responsive WordPress Plugin Please note that any digital products presented on the themesfores website do not contain malicious code, viruses, or advertising. Slider Revolution v6.7.18 Changelog Opening a WordPress media modal fails because the editor script overwrites the _ variable Notice occurs in post based sliders, as $attr1 is undefined Advanced transitions fail on websites using subdomain as CDN Gutenberg block preview not available Gutenberg editor glitches on mouse enter and hover Gutenberg template not updating after disabling blank page Slider Revolution settings on WordPress pages are stuck on the top Bottom margin issues on fixed slider scroll processes where the Slider is higher than the page Exporting modules with advanced transitions ignore the predefined values Sometimes glitches occur in the media library after triggering dropdowns in module editor Carousel height jumps when a slide comes in focus after latest update 6.5.14 and 6.5.13 Console logs and errors are visible in some rare cases Animation issues on menu in some older templates Opening a WordPress media modal fails because the editor script overwrites the _ variable Notice occurs in post-based sliders, as $attr1 is undefined Advanced transitions fail on websites using a subdomain as CDN Gutenberg block preview not available Gutenberg editor glitches on mouse enter and hover Gutenberg template not updating after disabling blank page Slider Revolution settings on WordPress pages are stuck on the top Bottom margin issues on fixed slider scroll processes where the Slider is higher than the page Exporting modules with advanced transitions ignore the predefined values Sometimes glitches occur in the media library after triggering dropdowns in the module editor Carousel height jumps when a slide comes into focus after the latest update 6.5.14 and 6.5.13 Console logs and errors are visible in some rare cases Animation issues on the menu in some older templates https://themesfores.com/product/slider-revolution-responsive-wordpress-plugin/ #PageBuilder #WordpressPlugins
0 notes
Text
Integration Boomi

Boost Your Blog’s Reach and Efficiency: Integrating with Boomi
In the world of dynamic content and seamless user experiences, integrating your blog with a powerful integration platform like Boomi can unlock a new level of automation and reach. In this blog post, we’ll delve into why you should consider Boomi integration for your blog, how to set it up, and real-world examples to inspire you.
Why Integrate a Blog with Boomi?
Content Syndication: Automatically push your blog posts to other platforms like social media, email newsletters, or content aggregators, extending your reach exponentially.
Data Enrichment: Connect your blog to your CRM, marketing automation tools, or internal databases to pull in relevant information and provide a more personalized experience for readers.
Cross-Platform Promotion: Sync your blog with your website’s other sections, promoting related content, products, or services.
Workflow Automation: Trigger notifications when new posts are published, schedule updates, or route inquiries based on blog topics.
Analytics and Reporting: Gather valuable data on readership, engagement, and traffic sources to shape your content strategy.
Getting Started: Setting Up Your Blog Integration
Boomi’s intuitive, low-code interface makes connecting your blog to other applications straightforward. Here’s a basic outline:
Choose Your Blog Platform: Most common blogging platforms, like WordPress, Blogger, or self-hosted solutions, are compatible.
Identify Connectivity: Determine how your blog platform exposes data – does it offer an API, RSS feeds, or other integration methods?
Select Target Systems: Decide where to push your blog content or the data you want to pull in (e.g., social media, CRM, analytics tools).
Boomi Connectors: Find the appropriate connectors for your blog platform and target systems. Boomi offers an extensive library of pre-built connectors.
Build the Integration Process: Design a process in Boomi’s visual interface that handles data mapping, transformation, and any logic required for your integration.
Test and Deploy: Thoroughly test your integration for errors before deploying it.
Practical Examples of Boomi Blog Integrations
Social Media Syndication: Automatically publish your new blog posts on Facebook, Twitter, LinkedIn, etc., the moment they go live.
Email Newsletters: Create a Boomi process to curate newsletter content directly from your blog, saving you time on content creation.
CRM Integration: Enrich lead profiles in your CRM with information based on the topics they read on your blog, allowing for more targeted communication.
E-commerce Integration: Add product links or featured products to your blog posts that are relevant to the content, driving sales.
Feedback and Comments: Integrate your blog’s commenting system with a customer support platform to manage input effectively.
Important Considerations
Security: Always prioritize data security when integrating your blog with other systems.
API Usage: Be mindful of any API rate limits imposed by your blog platform or the target systems.
Data Consistency: Ensure data formats and structures are consistent across your integrated systems.
Embracing Integration for Your Blog’s Success
Boomi’s powerful capabilities and ease of use make it an excellent choice for streamlining blog workflows and maximizing your content’s impact. Consider your blog’s specific needs and start with a few simple integrations to experience the benefits firsthand.
youtube
You can find more information about Dell Boomi in this Dell Boomi Link
Conclusion:
Unogeeks is the No.1 IT Training Institute for Dell Boomi Training. Anyone Disagree? Please drop in a comment
You can check out our other latest blogs on Dell Boomi here – Dell Boomi Blogs
You can check out our Best In Class Dell Boomi Details here – Dell Boomi Training
Follow & Connect with us:
———————————-
For Training inquiries:
Call/Whatsapp: +91 73960 33555
Mail us at: [email protected]
Our Website ➜ https://unogeeks.com
Follow us:
Instagram: https://www.instagram.com/unogeeks
Facebook: https://www.facebook.com/UnogeeksSoftwareTrainingInstitute
Twitter: https://twitter.com/unogeek
0 notes
Text
20 years a blogger

It's been twenty years, to the day, since I published my first blog-post.
I'm a blogger.
Blogging - publicly breaking down the things that seem significant, then synthesizing them in longer pieces - is the defining activity of my days.
https://boingboing.net/2001/01/13/hey-mark-made-me-a.html
Over the years, I've been lauded, threatened, sued (more than once). I've met many people who read my work and have made connections with many more whose work I wrote about. Combing through my old posts every morning is a journey through my intellectual development.
It's been almost exactly a year I left Boing Boing, after 19 years. It wasn't planned, and it wasn't fun, but it was definitely time. I still own a chunk of the business and wish them well. But after 19 years, it was time for a change.
A few weeks after I quit Boing Boing, I started a solo project. It's called Pluralistic: it's a blog that is published simultaneously on Twitter, Mastodon, Tumblr, a newsletter and the web. It's got no tracking or ads. Here's the very first edition:
https://pluralistic.net/2020/02/19/pluralist-19-feb-2020/
I don't often do "process posts" but this merits it. Here's how I built Pluralistic and here's how it works today, after nearly a year.
I get up at 5AM and make coffee. Then I sit down on the sofa and open a huge tab-group, and scroll through my RSS feeds using Newsblur.
I spend the next 1-2 hours winnowing through all the stuff that seems important. I have a chronic pain problem and I really shouldn't sit on the sofa for more than 10 minutes, so I use a timer and get up every 10 minutes and do one minute of physio.
After a couple hours, I'm left with 3-4 tabs that I want to write articles about that day. When I started writing Pluralistic, I had a text file on my desktop with some blank HTML I'd tinkered with to generate a layout; now I have an XML file (more on that later).
First I go through these tabs and think up metadata tags I want to use for each; I type these into the template using my text-editor (gedit), like this:
<xtags>
process, blogging, pluralistic, recursion, navel-gazing
</xtags>
Each post has its own little template. It needs an anchor tag (for this post, that's "hfbd"), a title ("20 years a blogger") and a slug ("Reflections on a lifetime of reflecting"). I fill these in for each post.
Then I come up with a graphic for each post: I've got a giant folder of public domain clip-art, and I'm good at using all the search tools for open-licensed art: the Library of Congress, Wikimedia, Creative Commons, Flickr Commons, and, ofc, Google Image Search.
I am neither an artist nor a shooper, but I've been editing clip art since I created pixel-art versions of the Frankie Goes to Hollywood glyphs using Bannermaker for the Apple //c in 1985 and printed them out on enough fan-fold paper to form a border around my bedroom.

As I create the graphics, I pre-compose Creative Commons attribution strings to go in the post; there's two versions, one for the blog/newsletter and one for Mastodon/Twitter/Tumblr. I compose these manually.
Here's a recent one:
Blog/Newsletter:
(<i>Image: <a href="https://commons.wikimedia.org/wiki/File:QAnon_in_red_shirt_(48555421111).jpg">Marc Nozell</a>, <a href="https://creativecommons.org/licenses/by/2.0/deed.en">CC BY</a>, modified</i>)
Twitter/Masto/Tumblr:
Image: Marc Nozell (modified)
https://commons.wikimedia.org/wiki/File:QAnon_in_red_shirt_(48555421111).jpg
CC BY
https://creativecommons.org/licenses/by/2.0/deed.en
This is purely manual work, but I've been composing these CC attribution strings since CC launched in 2003, and they're just muscle-memory now. Reflex.
These attribution strings, as well as anything else I'll need to go from Twitter to the web (for example, the names of people whose Twitter handles I use in posts, or images I drop in, go into the text file). Here's how the post looks at this point in the composition.
<hr>
<a name="hfbd"></a>
<img src="https://craphound.com/images/20yrs.jpg">
<h1>20 years a blogger</h1><xtagline>Reflections on a lifetime of reflecting.</xtagline>
<img src="https://craphound.com/images/frnklogo.jpg">
See that <img> tag in there for frnklogo.jpg? I snuck that in while I was composing this in Twitter. When I locate an image on the web I want to use in a post, I save it to a dir on my desktop that syncs every 60 seconds to the /images/ dir on my webserver.
As I save it, I copy the filename to my clipboard, flip over to gedit, and type in the <img> tag, pasting the filename. I've typed <img src="https://craphound.com/images/ CTRL-V"> tens of thousands of times - muscle memory.
Once the thread is complete, I copy each tweet back into gedit, tabbing back and forth, replacing Twitter handles and hashtags with non-Twitter versions, changing the ALL CAPS EMPHASIS to the extra-character-consuming *asterisk-bracketed emphasis*.
My composition is greatly aided both 20 years' worth of mnemonic slurry of semi-remembered posts and the ability to search memex.craphound.com (the site where I've mirrored all my Boing Boing posts) easily.
A huge, searchable database of decades of thoughts really simplifies the process of synthesis.
Next I port the posts to other media. I copy the headline and paste it into a new Tumblr compose tab, then import the image and tag the post "pluralistic."
Then I paste the text of the post into Tumblr and manually select, cut, and re-paste every URL in the post (because Tumblr's automatic URL-to-clickable-link tool's been broken for 10+ months).
Next I past the whole post into a Mastodon compose field. Working by trial and error, I cut it down to <500 characters, breaking at a para-break and putting the rest on my clipboard. I post, reply, and add the next item in the thread until it's all done.
*Then* I hit publish on my Twitter thread. Composing in Twitter is the most unforgiving medium I've ever worked in. You have to keep each stanza below 280 chars. You can't save a thread as a draft, so as you edit it, you have to pray your browser doesn't crash.
And once you hit publish, you can't edit it. Forever. So you want to publish Twitter threads LAST, because the process of mirroring them to Tumblr and Mastodon reveals typos and mistakes (but there's no way to save the thread while you work!).
Now I create a draft Wordpress post on pluralistic.net, and create a custom slug for the page (today's is "two-decades"). Saving the draft generates the URL for the page, which I add to the XML file.
Once all the day's posts are done, I make sure to credit all my sources in another part of that master XML file, and then I flip to the command line and run a bunch of python scripts that do MAGIC: formatting the master file as a newsletter, a blog post, and a master thread.
Those python scripts saved my ASS. For the first two months of Pluralistic, i did all the reformatting by hand. It was a lot of search-replace (I used a checklist) and I ALWAYS screwed it up and had to debug, sometimes taking hours.
Then, out of the blue, a reader - Loren Kohnfelder - wrote to me to point out bugs in the site's RSS. He offered to help with text automation and we embarked on a month of intensive back-and-forth as he wrote a custom suite for me.
Those programs take my XML file and spit out all the files I need to publish my site, newsletter and master thread (which I pin to my profile). They've saved me more time than I can say. I probably couldn't kept this up without Loren's generous help (thank you, Loren!).
I open up the output from the scripts in gedit. I paste the blog post into the Wordpress draft and copy-paste the metadata tags into WP's "tags" field. I preview the post, tweak as necessary, and publish.
(And now I write this, I realize I forgot to mention that while I'm doing the graphics, I also create a square header image that makes a grid-collage out of the day's post images, using the Gimp's "alignment" tool)
(because I'm composing this in Twitter, it would be a LOT of work to insert that information further up in the post, where it would make sense to have it - see what I mean about an unforgiving medium?)
(While I'm on the subject: putting the "add tweet to thread" and "publish the whole thread" buttons next to each other is a cruel joke that has caused me to repeatedly publish before I was done, and deleting a thread after you publish it is a nightmare)
Now I paste the newsletter file into a new mail message, address it to my Mailman server, and create a custom subject for the day, send it, open the Mailman admin interface in a browser, and approve the message.
Now it's time to create that anthology post you can see pinned to my Mastodon and Twitter accounts. Loren's script uses a template to produce all the tweets for the day, but it's not easy to get that pre-written thread into Twitter and Mastodon.
Part of the problem is that each day's Twitter master thread has a tweet with a link to the day's Mastodon master thread ("Are you trying to wean yourself off Big Tech? Follow these threads on the #fediverse at @[email protected]. Here's today's edition: LINK").
So the first order of business is to create the Mastodon thread, pin it, copy the link to it, and paste it into the template for the Twitter thread, then create and pin the Twitter thread.
Now it's time to get ready for tomorrow. I open up the master XML template file and overwrite my daily working file with its contents. I edit the file's header with tomorrow's date, trim away any "Upcoming appearances" that have gone by, etc.
Then I compose tomorrow's retrospective links. I open tabs for this day a year ago, 5 years ago, 10 years ago, 15 years ago, and (now) 20 years ago:
http://memex.craphound.com/2020/01/14
http://memex.craphound.com/2016/01/14
http://memex.craphound.com/2011/01/14
http://memex.craphound.com/2006/01/14
http://memex.craphound.com/2001/01/14
I go through each day, and open anything I want to republish in its own tab, then open the OP link in the next tab (finding it in the @internetarchive if necessary). Then I copy my original headline and the link to the article into tomorrow's XML file, like so:
#10yrsago Disney World’s awful Tiki Room catches fire <a href="https://thedisneyblog.com/2011/01/12/fire-reported-at-magic-kingdom-tiki-room/">https://thedisneyblog.com/2011/01/12/fire-reported-at-magic-kingdom-tiki-room/</a>
And NOW my day is done.
So, why do I do all this?
First and foremost, I do it for ME. The memex I've created by thinking about and then describing every interesting thing I've encountered is hugely important for how I understand the world. It's the raw material of every novel, article, story and speech I write.
And I do it for the causes I believe in. There's stuff in this world I want to change for the better. Explaining what I think is wrong, and how it can be improved, is the best way I know for nudging it in a direction I want to see it move.
The more people I reach, the more it moves.
When I left Boing Boing, I lost access to a freestanding way of communicating. Though I had popular Twitter and Tumblr accounts, they are at the mercy of giant companies with itchy banhammers and arbitrary moderation policies.
I'd long been a fan of the POSSE - Post Own Site, Share Everywhere - ethic, the idea that your work lives on platforms you control, but that it travels to meet your readers wherever they are.
Pluralistic posts start out as Twitter threads because that's the most constrained medium I work in, but their permalinks (each with multiple hidden messages in their slugs) are anchored to a server I control.
When my threads get popular, I make a point of appending the pluralistic.net permalink to them.
When I started blogging, 20 years ago, blogger.com had few amenities. None of the familiar utilities of today's media came with the package.
Back then, I'd manually create my headlines with <h2> tags. I'd manually create discussion links for each post on Quicktopic. I'd manually paste each post into a Yahoo Groups email. All the guff I do today to publish Pluralistic is, in some way, nothing new.
20 years in, blogging is still a curious mix of both technical, literary and graphic bodgery, with each day's work demanding the kind of technical minutuae we were told would disappear with WYSIWYG desktop publishing.
I grew up in the back-rooms of print shops where my dad and his friends published radical newspapers, laying out editions with a razor-blade and rubber cement on a light table. Today, I spend hours slicing up ASCII with a cursor.
I go through my old posts every day. I know that much - most? - of them are not for the ages. But some of them are good. Some, I think, are great. They define who I am. They're my outboard brain.
37 notes
·
View notes
Text
WordPress HTTP error when uploading images?
Encountering an error is one of the most damaging things to your workflow. It automatically decreases your productivity. There are times when you see a WordPress HTTP error when uploading images. This error usually occurs when you try to upload an image to your WordPress website and use the built-in media uploader for that. Although this built-in tool usually uploads single and multiple media files very smoothly but in rare cases, it starts showing errors. Visit: https://www.wewpyou.com/http-error-when-uploading-images-to-wordpress/
#HTTP Error When Uploading Images to WordPress#wordpress http error image upload#wordpress media library http error#http error uploading image wordpress
0 notes
Link
Live Stream: Feb 2, 2023 | Integrating OpenAI with a custom block. Part One | WordPress Tutorial
0 notes
Text
May 23, 2018
News and Links
Protocol
Latest core devs call. Lane’s notes.
Latest Casper standup
Jaynti Kanani: getting block times down in Plasma through propose and commit periodic checkpoints
Kelvin Fichter: Proving UTXO Sum Validity for Mass Exits
Vitalik Buterin: Network latency based “clocks” and their limits
blob serialization code
Github issue for using libp2p in the future, eg sharding
Pisa: 3rd party agent to solve the monitoring problem for state channels. Academic paper from Patrick McCorry, Surya Bakshi, Iddo Bentov, Sarah Meiklejohn, and Andrew Miller
Stuff for developers
Nick Johnson announces the first Solidity Gas Golfing Contest to write gas optimized code
Register .test domain with ENS on Rinkeby
Loom’s ZombieChain: An EOS-Like DPoS sidechain
Solidity-cli: compile Solidity faster and easier
uPort’s code to pay gas for users
React starter kit integrated with Drizzle
What it’s like to go from decentralized dev back to centralized development work
Superblocks online IDE
Truffle v4.1.11: upgrade to solc v0.4.24
Connext v0.2 implements Perun’s virtual channel code
the Aragon developer portal (and tutorial)
Learning Solidity from a Java dev’s perspective
Ecosystem
Dan Finlay: why build a new society on blockchain?
Glen Weyl and Vitalik Buterin: Liberation Through Radical Decentralization
uPort to rewrite some of its JavaScript libraries as php for a Wordpress plugin
Latest “Open Source Block Explorers” call
Etherscan has a bunch of new tools: dex order book, dex tracker, gas tracker, Swarm search
A beginner’s explanation of gas
Ideo on designing for blockchain
ECF: mapping out all the grants available in the greater Ethereum ecosystem
EthPrize on the learnings from their developer interviews: better documentation, better debugger, getting data off the chain, error codes, tooling, etc. Great work by Robbie Bent, Sina Habibian, Andy Tudhope and Josh Stark.
An EthMemphis writeup. FedEx is getting into our space.
ENS dispute resolution: Forced bribes
Live on mainnet
Dharma protocol is now live on mainnet. Borrow and lend ERC20 tokens, write a debt relayer, be an underwriter, build your own debt agreement, etc. Dharma launch promo vid.
FunFair’s first fate channel on mainnet
Governance and Standards
ERC721 is in “last call” so there’s a decent amount of discussion.
EIP1108: “proposes a 10x reduction in the gas cost for the ECADD precompile, 20x for ECMUL, and a 14x reduction in the per-pairing cost of the pairing check precompile” due to faster implementation
EIP1109: Remove call costs for precompiled contracts
ERC1081: standard bounties (updated)
ERC1115: decentralized user authentication standard
ERC1111: introspective metadata definition disclosure
ERC1102: opt-in web3 access
EIP1098: Cross-client encrypt/decrypt
Discussion on ERC712 using eth_signTypedData as a human readable standard
Project Updates
Akasha update with their Colored Essence token model
Mysterium updated roadmap
Following a tuni from Fiji to Brooklyn with Viant’s supply chain tracker
What’s next for Livepeer
The crazy things people are building on Decentraland
Pangea fractional tokenized real estate rebrands to Meridio
Coinbase acquires Paradex. GDAX rebrands as CoinbasePro
Neufund’s registration is open
Why and how Gnosis is addressing key management with Gnosis Safe
Get your github login as a subdomain on <githubname>.gitcoin.eth. Also, the bounties going up from the Ethereum Foundation’s grant.
TheNextWeb Q&A with Golem’s Julian Zawistowski
Kauri update on its documentation competition
Interviews, Podcasts, Videos, Talks
Lane Rettig and Alex Beregszaszi talk eWasm on Zero Knowledge
Rob Habermeier presents Parity Substrate
Kraken’s Jesse Powell with Laura Shin
Jacob Eberhardt talk on his zkstark tooling ZoKrates
Jarrad Hope on how Status is implementing a decentralized org
Etherisc at NYC Ethereum
NYC Blockchain week Ethereum panel with Joseph Poon, Kelvin Fichter, Jae Kwon, Vitalik Buterin and Karl Floersch
Joseph Lubin on Crypto101
Deconomy: Vitalik Buterin and Vlad Zamfir talks
Video interview of Decentraland founders
Tokens
An overview of TCR design patterns
Venture bonding: funding network effects on donations and bounties
Jacob Horne on the playful future of NFTs
Decentralizing the minting of NFTs
New decentralized business models from Etherisc
DaoX - an implementation of DAICO
CFTC advisory for exchanges trading “virtual currency” derivatives. This takes me back to the days of holding a series 3 license.
NAASA announces “Operation Cryptosweep” of 32 enforcement actions against fraud plus the recent inquiries from the NY AG’s office (though he has now resigned in scandal). I’ve never heard of any of those 32, but the WSJ reports they’re saying it is the “tip of the iceberg.” SEC Chairman Clayton’s statement applauding them.
There’s also the WSJ report categorizing many ICOs as having red flags.
General
Polkadot POC1. Still aiming for q3 2019 launch
Parity discontinues its Parity ICO Passport Service (PICOPS) due to GDPR
Seasteading floating islands and crypto is a libertarian fantasy
Jump Trading’s crypto desk is their largest trading desk
Steve Wozniak compares Ethereum to apple
WSJ profiles crypto-friendly banks. The WSJ also says Coinbase and IvyKoin met with regulators about bank licenses. Just writing that gave me flashbacks to my days filling out banking regulatory applications to dozens of regulatory agencies.
HTC building a blockchain phone called Exodus. [Reminder, media sites need the Brave browser. Here’s my referral code]
Comparing enterprise blockchains: Ethereum v R3 v Hyperledger
Dates of Note
Upcoming dates of note:
May 25 - 27 -- EthBuenosAires hackathon
May 28 -- Zeppelin’s zepcon0 conference (Buenos Aires)
June 1 -- Blockchain for Social Impact Conference (Washington, DC)
June 28 -- BuildEth (San Francisco)
June 30 -- Solidity Gas Golfing challenge deadline
July 14-15 -- FEM governance meetings in Berlin
September 7-9 -- EthBerlin hackathon
Oct 5-7 -- TruffleCon in Portland
Oct 30 - Nov 2 -- Devcon4 (Prague)
If you appreciate this newsletter, thank ConsenSys
I'm thankful that ConsenSys has brought me on and given me time to do this newsletter.

Editorial control is 100% me. If you're unhappy with editorial decisions, blame me first and last.
Shameless self-promotion
Here’s the link to share: http://www.weekinethereum.com/post/174197272063/may-23-2018 Most of what I link to I tweet first: @evan_van_ness
I also have an Ethereum podcast on the Bitcoin Podcast network.
This newsletter is supported by ConsenSys, which is perpetually hiring if you’re interested.
Did someone forward this email to you? Sign up to receive the weekly email (box in the top blue header)
10 notes
·
View notes
Link
Numerous things can prove detrimental to your workflow than seeing a big error. the very fact can’t be denied that WordPress does an interesting job keep things uncomplicated and secure; however, once you encounter an HTTP error while Uploading Images to Media Library or a broken image using the built-in media uploader, all of your efforts go down the drain. Are you seeing an HTTP error while uploading images, pdf, video, or other media to WordPress?
0 notes
Photo

Online Marketing Tools for Small Business http://www.incomejunctions.com/wp-content/uploads/2021/08/Blog-Header-1200x600-px-5.jpeg
Online Marketing Tools
Online marketing is like a tree - it is the process of strategically positioning oneself online with a product or service in mind by tapping into the most relevant channels the internet has to offer. The methods and techniques used for online marketing include
Search engine optimization (SEO)
Search engine marketing (SEM)
Pay-per-click (PPC) advertising
Email marketing
Social media marketing
webinars
A/B testing & website optimization
Content marketing
Video marketing
Marketing automation
Customer relationship management (CRM)
Affiliate marketing
Online marketing tools is designed to speed the tedious process of content creation so you can take on other essential aspects of your business!
SEO Tools
LongTailPro
LongTailPro is a powerful and easy to use SEO tool that helps you optimize your content for SEO to get your website to rank higher. From the keyword research function to the keyword rank tracker, you'll be able to find keywords that will help you hit your target audience. This is definitely an SEO tool that you need in your arsenal.
5 / 5
Get Longtail Keyword Ideas from Head Terms YES
Be ahead of search and spy your competitors
yes
Keep your content updated with Rank Tracker
yes
Find your untapped & missing backlinks opportunities
yes
SemRush
Semrush helps you find the right keywords so that you can create the right type of content and get the right traffic to your site. is a great tool for SEO, social media and content marketer's. You can use it to do competitor research, SEO, keyword analysis, PPC, and social media marketing from one place.
5 / 5
Use keyword research tool to discover keywords YES
Find topics that resonate with your audience
yes
Analyze your competitors' Marketing strategy
yes
Optimize social ads and build your most effective social media strategy
yes
GuinRank
GuinRank is a tool that helps you find micro niches in Google. This niche tool helps you find high-quality keywords that you can include in your content to help you rank higher in search engines. It is a great tool to use to find the right words to use and the tool also shows you how to make sure you have the most important words in your content.
4 / 5
Find micro niches that have little to no competition YES
Identifies under-utilized content on your post
yes
Optimizer tool identifies major gaps in your content
yes
Find new, proven keyword opportunities for your organic search
yes
Labrika
LABRIKA IS A GAME-CHANGING SEO SERVICE THAT ALLOWS YOU TO PERFORM A COMPREHENSIVE SEO AUDIT ON YOUR SITE IN A MATTER OF MINUTES. NOT ONLY DOES IT PROVIDE A DETAILED REPORT OF YOUR SITE IN A SINGLE LOCATION. LABRIKA HELPS YOU FIND THE MOST DAMAGING SEO ERRORS AND STREAMLINE MY SEO OPTIMIZATION WORKFLOW WITH A COMPREHENSIVE AND EASY TO UNDERSTAND REPORT.
4 / 5
Checks over 200+ critical Seo ranking factors YES
Help focus on fixing the most damaging SEO errors
yes
Schedule routine SEO Auditor checks
yes
Create completely white-label SEO Auditor reports for your clients
yes
Digital Marketing Tools
Blogely
Blogely is the ultimate tool for content creators. It helps you organize your blogs, sites, and content in one place. From there, the app allows you to distribute your content across different sites like WordPress, Medium, Shopify, blogger, Joomla, and Drupal. Blogely also has an SEO optimization feature, which will help you organize your content and keywords more efficiently.
4 / 5
Simple SEO Optimization Score YES
Collect SERP results with questions and statistics
yes
Detailed SEO score for competitor and keyword
yes
Strengthen your writing with choice of restructured sentences generated by AI
yes
Posttoplan
POSTOPLAN is a great tool to plan, organize, and publish content to social media platforms. it's very affordable. The tool's service lets you seamlessly publish content on Facebook, Twitter, LinkedIn, Instagram, Telegram, and WhatsApp. You can use it to monitor different social networks, view analytics, generate leads, maintain several accounts at once, and read comments.
4 / 5
Add any number of accounts in social networks YES
Graphics editors with library with 5,000+ photos
yes
Preview publications before post content
yes
Communicate with subscribers in your Social Inbox in one place
yes
Social Media Tools
Canva
Canva is a simple to use design tool that is great for non-designers such as myself. I needed to make some graphics for my blog and Canva has a wide variety of templates, fonts, colors, and graphics that you can use to create them. You'll be amazed at how quickly and easily to create some very professional looking graphics.
4 / 5
Resize your designs for any platform YES
Animate a design, remove backgrounds
yes
Over 420,000 customizable premium templates
yes
Unlock access to over 75 million+ premium images and video
yes
Crello
Crello is the easiest way to create amazing videos and graphics.
With Crello you can create professional designs in minutes! Crello includes 50k+ free templates, and can also create video slideshows and music videos.
Crello also provides the best photo editor, The design tools are super-simple to use and SUPER-STACKED with TEMPLATES.
4 / 5
Outstanding visuals with Photo editing YES
Animate any element on the artboard
yes
Make an your own icons and awesome design
yes
Add music to any picture, animation, or MP4 video in minutes
yes
0 notes
Text
Content Management System
For my Content Management System assignment, I chose to use the Twenty Twenty-One theme created by WordPress. I created my child theme by following the instructional videos on Moodle, with the help of Atom and FileZilla along the way. First off, I changed the background colour of my WordPress site to a light pink colour, hex code #e2baba. I was able to do this customization in the Colors & Dark Mode tab in the child theme customizer section on WordPress. I decided not to add a background image as it would take over the entire background, and I personally liked the clean style of the site. I customised the menu section in my header to have four primary menus. These are Home, About, Blog, Contact. I will discuss these further below.
At the footer of my site, I have 3 widgets. These are Pages; i.e. the primary menu links, Latest Posts; with my 4 latest posts, and finally Socials; with a link to my Tumblr Blog, my LinkedIn and my email. I have one plugin running on my site, that is called Happy Forms and is located on my contact page.
I added additional CSS to have all h2 text white. I liked how this broke up the titles of the blog with the blog text. Additionally, I added CSS in the Additional CSS tab to have no text decoration, except for when the mouse is hovering over or it’s active. Unvisited and visited links are white, while hovering the mouse over a link will make it grey and selecting it will turn it black. I did not choose to change the font as I personally liked the Helvetica font that came with the twenty twenty-one theme.
In the home section, it is a static page. At the top sits my Name and Student number, which is also the title of my site and subtitle. To the right I have my custom menus situated to the right of the header. Beneath this I have the introduction to my site, “A Space for Web Authoring” in a white colour. Beneath this block I have placed a photo of myself with my name, student number and my location. This is enclosed by a black box.
Then, I have my latest blog posts in order from newest to oldest. Each blog is inside a black border box and they go from left to right, 3 across, from newest to oldest. I have cut them short, giving snippets of 50 words. If the blog post is over 50 words a white “Continue Reading” clickable link appears and this allows the reader to read the full blog post. I did not add feature images to the blocks as not all blog posts have images and I did not like the inconsistency of the feed if only some boxes had images.
In the about section, I have 2 short paragraphs about me in a white Helvetica typeface. Underneath, I have my favourite quote by B.J. Neblett. One difficulty I ran into was that although the block is a quote block, the block does not close the quote. It only has opening quotation marks, but does not add the closing quotation marks. Adding my own quotation marks does not match the opening quotation marks.
Moving onto the blog section, the blogs go from newest to oldest. The blogs have a h2 heading in white, with a short snippet of the blog post, followed by a “Continue Reading” link in white. Underneath, each blog post has a published date, as well as Categories, which are clickable and help in filtering content for readers of the blog. I did not add feature images as I did not like how some blog posts had images and some did not. I wanted a consistent feel to my blog section. In each blog post, readers can leave a comment on the blog article. Additionally, they can navigate to the next or previous blog post. I put all of my images in the blog posts in a black box to frame the images nicely. Finally, in the contact section, I have my HappyForms plug-in that asks the user for their name, email and what they would to send me.
In terms of challenges I encountered during this assignment, I had some difficulty in uploading images to my media library. I was continually receiving the following error message: “Unable to create directory wp-content/uploads/2021/01. Is its parent directory writable by the server?”
After some research, altering permissions and creating new folders in FileZilla, I finally was able to upload the images for my WordPress website. Other challenges were having
the correct password for my site, as my password was changed by Griffith College and I had to reach out to retrieve a new one. Overall, it was an extremely enjoyable assignment.
Check it out here: https://knuth.griffith.ie/~s3056916/wordpress/
0 notes
Text
How to fix Http error uploading image wordpress?
HTTP Error When Uploading Images to WordPress-First of all before wordpress http error image upload you should wait a few minutes and then try uploading your image file again. This error is sometimes caused by slow network, unusual traffic and low server resources, which are automatically fixed on most WordPress hosting servers fix wordpress media library http error. ... After that, retry uploading the file Read Complete article visit: https://www.wewpyou.com/http-error-when-uploading-images-to-wordpress/
#HTTP Error When Uploading Images to WordPress#wordpress http error image upload#wordpress media library http error#http error uploading image wordpress
0 notes
Photo

https://www.wpplatformhelp.com/wordpress-help/how-to-fix-image-upload-issue-in-wordpress/
How to Fix Image Upload Issue in WordPress
youtube
Some users may have an issue with their WordPress where they can’t uploaad any images and the images in the media library were broken. This is an error that can come from a ussye with file permissions. In this video, we will show you how to fix the image upload issue in WordPress.
If you liked this video, then please Like and consider subscribing to our channel for more WordPress videos.
Text version of this tutorial: http://www.wpbeginner.com/wp-tutorials/how-to-fix-image-upload-issue-in-wordpress/
Follow us on Twitter: http://twitter.com/wpbeginner
Checkout our website for more WordPress Tutorials http://www.wpbeginner.com/
Summary of this Tutorial:
Start by connecting to your site using a FTP client.
Go to “wp-content” directory and right click on the ‘uploads’ folder.
Select file permissions and set the numeric value to 744.
If that does not work set them to 755.
Ensure Recurse into subdirectories is checked. source
0 notes
Video
youtube
7 skills for web developers
Web development is one of the fastest growing industries. In fact, it's predicted to grow 13% until 2026.
The figure also shows that there's (and will) be a lot of work to follow. But do you have the skills to stand out in the competition and get the job of your dreams?
There are many skills you will need to develop and create successful websites. Here are the 7 most important web development skills you need!
1.HTML / CSS As a web developer, you will need to understand the basics of coding and markup languages.
https://en.wikipedia.org/wiki/Web_developer
Of all markup languages, Hypertext Markup Language (HTML) is the standard.
The actual HTML forms every web page on the Internet as we know it. How a website functions depends on how the developer writes the HTML.
But for your site to actually render as a web page, you'll rely on CSS.
You cannot write HTML without CSS
Cascading Style Sheets (CSS) interpret documents written in markup language. They are a more stylized representation of the HTML language.
https://www.w3schools.com/html
CSS also describes how an HTML document will look visually like a web page. It sets the bricks for the font, color, and overall layout of the website.
Think of it this way: HTML builds the skeleton of a web page. CSS gives the website its style and look.
Most basic web development skills require mastery of HTML and CSS. Don't neglect their importance!
2.JavaScript Once you master HTML and CSS, you'll eventually want to learn JavaScript.
JavaScript is a higher level programming language. It makes the website more interactive and functional. Create a website for the future
The web development industry is taking off. Standards are growing higher and more rigid. And with that, there will be higher expectations for the websites you create and the customers you work for.
JavaScript will allow you to create a better experience for web users. With JavaScript, you can write special features directly to your web pages. These include (but are not limited to) a search bar, social media and video share buttons.
JavaScript complements HTML. Although HTML forms a basic web page, JavaScript gives it more life and functionality.
3.Photoshop As a web developer, you'll want to know your way around Photoshop. It will not only make your life easier, but also help you perform better and faster.
You'll have a lot of fun to edit, design and stylize your website with Photoshop. You can even design some banners and logos for clients throughout your career.
But your Photoshop skills will extend far beyond appearance.
Once you master Photoshop, you won't just learn how to translate and design code. You will also create multiple website mockup.
So in other words, you'll be mainly using Photoshop for website planning.
4.WordPress Nearly 75 million websites operate on WordPress alone. That's over 25% of the internet altogether.
WordPress is a free content management system. It's also great for both beginners and for established web developers too.
It is relatively easy to use because you can edit and modify web pages, add plugins, and run error testing. There is also a Yoast feature that will help you with SEO.
You will want to develop your website building skills using other platforms. But WordPress is not just a standard but also a linchpin in the web development world.
5. Analytical skills If your web developer skills are strong, you will create successful websites. But there is a marketing aspect for jobs that few people really understand.
Of course, the most successful websites are the most functional.
But consumer behavior is always changing. So your design, coding and development skills will always evolve to delight the ever-changing consumer.
Hence, web developers need a strong understanding of the consumer. Especially web consumers.
You will meet a wide range of audiences, niche markets and customers throughout your career. If you can understand your consumers as a whole, it will only help you create sales websites. Know your audience
There are several ways to understand web consumers. But the most concrete way to understand them is to hone their online behavior.
And that's where web analytics tools come in.
Fortunately, there are many tools available in the market to help you collect web stats. For example, there are Google Analytics, MOZ Keyword Explorer, and SEMRush.
With statistics on the web, you will better understand your specific target audience. Web statistics will tell you which keywords users search for and how long they stay on your site.
It's access to the mind and interests of your target audience. And with all this knowledge, you can create more engaging websites.
6.SEO Search engine optimization (SEO) is the driving force of modern marketing.
https://en.wikipedia.org/wiki/Search_engine_optimization
Nowadays, websites need SEO to attract traffic and secure leads. Most modern consumers find products and services through online searches. Sites that do not implement SEO will not render high enough on search engine results pages.
Page upload speed, domain name reliability and keyword content are just some of the SEO skills web developers can (and should) learn. Increase traffic to every website you create
Web developers can apply SEO to help their website rank better and attract more traffic.
find us: Search engine optimization, Web search engine, Nofollow, Web crawler, Google Search, Meta element, PageRank, Digital marketing, Web software, Digital media, Human–computer interaction, Online services, Information science, Computing, Technology, Information retrieval, Communication, Web crawlers, Advertising agencies, Web development, Information technology, E-commerce, Online databases, Web 2.0, Indexes, Aggregation websites, Search engine software, Cyberspace, Websites, Internet search, Web scraping, Internet, Internet search engines, Hypertext, World Wide Web, Spamdexing, Online advertising, Search engine marketing, Web services, Web technology, Marketing, Marketing software, Software, Search engine indexing, Business, Mass media, Human activities, Multimedia, Media manipulation, Cultural globalization, Digital technology, Search engine results page, Directories, Backlink, Reference works, Web applications, Pay-per-click, Bing (search engine), Electronic publishing, Centralized computing, Computer networks, Media technology, Information economy, Website, Computer archives, Google Penguin, Promotion and marketing communications, Service industries, Robots exclusion standard, Human communication, Information technology management, Advertising, Google Hummingbird, Web directory, Communication design, Data management, Googlebot, Spamming, Internet ages, Sitemaps, Intertextuality, Artificial intelligence, Index (publishing), Tag (metadata), Human–machine interaction, Web analytics, Wikipedia, Affiliate marketing, Site map, Canonical link element, Wikidata, History of Google, Web traffic, Public sphere, HTML element, Link farm, Metadata, Internet ethics, Computer data, Noindex, Chromium (web browser), Targeted advertising, Cloaking, Business economics, Local search engine optimisation, User interfaces, Written communication, Cybercrime, Lawsuit, Complaint, Web search query, Software development, Yahoo!, Web portals, Google, Digital marketing companies of the United States, Larry Page, Internet Protocol based network software, Library science, Information retrieval organizations, Alternate reality, Mobile search, Local search (Internet), Sergey Brin, Matt Cutts, Information management, Danny Sullivan (technologist), Software engineering, Databases, Alphabet Inc., Web content, Computer networking, Hypertext Transfer Protocol clients, Applications of cryptography, Wikimedia Commons, Telecommunications, Internet fraud, Social media marketing, Publishing, User agent, Domain name, Marketing strategy, Video search engine, Computer file, Design, Seznam.cz, Blog, Wikimedia Foundation, Network service, DMOZ, Digital display advertising, Social media, Mathematical optimization, Wikiversity, Internet technology companies of the United States, Google services, Grey hat, Google Panda, Keyword density, Ad blocking, Internet forum, Web developer, World Wide Web, Internet, Information technology management, Information economy, Digital media, Human–computer interaction, Information science, Digital technology, Information technology, Cyberspace, Technology, Web development, Software development, Hypertext, Software engineering, Software, Computing, Human activities, Product development, Computer programming, Technology development, Systems engineering, Computer engineering, Web application, Multimedia, Web software, Software project management, Programmer, Cultural globalization, Media technology, Computers, Electronic publishing, Web design, Intellectual works, User interfaces, Communication, JavaScript, Computer science, Information Age, Web technology, Mass media, Electronics industry, PHP, Websites, Web template system, Web 2.0, Information management, Wikipedia, Scripting language, Human communication, Server-side scripting, Application software, HTML, Active Server Pages, Adobe ColdFusion, Single-page application, Software architecture, Web server, Wikidata, React (web framework), JQuery, Internet ages, Ember.js, AngularJS, ColdFusion Markup Language, Computer data, System software, Web applications, Cascading Style Sheets, Intertextuality, Management, Centralized computing, Human–machine interaction, Wikimedia Commons, Front-end web development, Website, Business, Wikimedia Foundation, Design, Database, Online services, Java (programming language), Open-source movement, Web service, Python (programming language), Free content, Computer-related introductions, Server-side, Wikiversity, World Wide Web Consortium standards, Server (computing), Software framework, Front and back ends, Ruby (programming language), Information and communications technology, Artificial intelligence, Web standards, Software design, Free software, Perl, Computer networking, Systems science, Hypertext Transfer Protocol, Employment, IT infrastructure, World Wide Web Consortium, Knowledge representation, Systems architecture, Public sphere, Information retrieval, Computer-mediated communication, Distributed computing architecture, Wide area networks, PDF, Programming paradigms
0 notes
Text
How to Build a Blog with Gatsby and Netlify CMS – A Complete Guide
In this article, we are going to build a blog with Gatsby and Netlify CMS. You will learn how to install Gatsby on your computer and use it to quickly develop a super fast blog site.
You are also going to learn how to add Netlify CMS to your site by creating and configuring files, then connecting the CMS to your site through user authentication.
And finally, you'll learn how to access the CMS admin so that you can write your first blog post.
The complete code for this project can be found here.
Here's a brief introduction to these tools.
What is Gatsby?
Gatsby is a free and open-source framework based on React that helps you build fast websites and web apps. It is also a static site generator like Next.js, Hugo, and Jekyll.
It includes SEO (Search Engine Optimization), accessibility, and performance optimization from the get-go. This means that it will take you less time to build production-ready web apps than if you were building with React alone.
What is Netlify CMS?
Netlify CMS is a CMS (Content Management System) for static site generators. It is built by the same people who made Netlify. It allows you to create and edit content as if it was WordPress, but it's a much simpler and user-friendly interface.
The main benefit of Netlify CMS is you don't have to create markdown files every time you want to write a post. This is useful for content writers who don't want to deal with code, text editors, repositories, and anything to do with tech - they can just focus on writing articles.
Alright, without any further ado, let's start building the blog!
But before we get going, a quick heads up: This guide requires prior knowledge of JavaScript and React. If you are not comfortable with these tools yet, I've linked the resources at the end of the article to help you brush up on those skills.
Even if you're new to those technologies, I tried to make this guide as simple as I was able so you can follow along.
How to set up the environment
Before we can build Gatsby sites, we have to make sure that we have installed all the right software required for the blog.
Install Node.js
Node.js is an environment that can run JavaScript code outside of a web browser.
It is a tool that allows you to write backend server code instead of using other programming languages such as Python, Java, or PHP. Gatsby is built with Node.js and that's why we need to install it on our computer.
To install Node.js, go to the download page and download it based on your operating system.
When you are done following the installation prompts, open the terminal and run node -v to check if it was installed correctly. Currently, the version should be 12.18.4 and above.
Install Git
Git is a free and open-source distributed version control system that helps you manage your coding projects efficiently.
Gatsby starter uses Git to download and install its required files and that's why you need to have Git on your computer.
To install Git, follow the instructions based on your operating system:
Install Gatsby CLI
Gatsby CLI (Command Line Interface) is the tool that lets you build Gatsby-powered sites. By running this command, we can install any Gatsby sites and the plugins we want.
To install Gatsby CLI, open the terminal and run this command:
npm install -g gatsby-cli
Once everything is set up successfully then we are ready to build our first Gatsby site.
How to build a Gatsby site
In this guide, we're going to use the default Gatsby starter theme, but you're free to choose any themes on the Gatsby starter library. I personally use the Lekoart theme because the design is minimalist and beautiful, and it has a dark mode.
In the terminal, run this command to install the new Gatsby blog:
gatsby new foodblog https://github.com/gatsbyjs/gatsby-starter-blog
Note for Windows users: If you encounter "Error: Command failed with exit code 1: yarnpkg" while creating Gatsby site, see this page to troubleshoot it. You may have to clean up dependencies of old yarn installations or follow the Gatsby on Windows instructions.
What's does this command line mean exactly? Let me explain.
new - This is the command line that creates a new Gatsby project
foodblog - This is the name of the project. You can name it whatever you want here. I named this project foodblog as an example only.
The URL (https://github.com/gatsbyjs/gatsby-starter-blog) - This URL specified points to a code repository that holds the starter code you want to use. In other words, I picked the theme for the project.
Once the installation is complete, we'll run the cd foodblog command which will take us to the location of our project file.
cd foodblog
Then we'll run gatsby develop that will start running on the local machine. Depending on the specs of your computer, it will take a little while before it is fully started.
gatsby develop
Open a new tab in your browser and go to http://localhost:8000/. You should now see your new Gatsby site!

How a Gatsby starter blog homepage looks
Now that we've created the blog, the next step is to add Netlify CMS to make writing blog posts easier.
How to add Netlify CMS to your site
Adding Netlify CMS to your Gatsby site involves 4 major steps:
app file structure,
configuration,
authentication, and
accessing the CMS.
Let's tackle each of these stages one at a time.
How to set up the app's file structure
This section deals with the file structure of your project. We are going to create files that will contain all Netlify CMS codes.
When you open your text editor, you will see a lot of files. You can read this article if you are curious about what each of these files does.
├── node_modules ├── src ├── static ├── .gitignore ├── .prettierrc ├── gatsby-browser.js ├── gatsby-config.js ├── gatsby-node.js ├── gatsby-ssr.js ├── LICENSE ├── package-lock.json ├── package.json └── README.md
Do not worry about all these files — we are going to use very few of them here.
What we are looking for is the static folder. This is the folder where it will form the main structure of the Netlify CMS.
If your project does not have Static folder, then create the folder at the root directory of your project.
Inside the static folder, create an admin folder. Inside this folder, create two files index.html and config.yml:
admin ├ index.html └ config.yml
The first file, index.html, is the entry point to your CMS admin. This is where Netlify CMS lives. You don't need to do styling or anything as it is already done for you with the script tag in the example below:
<!doctype html> <html> <head> <meta charset="utf-8" /> <meta name="viewport" content="width=device-width, initial-scale=1.0" /> <title>Content Manager</title> </head> <body> <script src="https://unpkg.com/netlify-cms@^2.0.0/dist/netlify-cms.js"></script> </body> </html>
The second file, config.yml, is the main core of the Netlify CMS. It's going to be a bit complicated as we are going to write backend code. We'll talk more about it in the configuration section.
How to configure the back end
In this guide, we are using Netlify for hosting and authentication and so the backend configuration process should be relatively straightforward. Add all the code snippets in this section to your admin/config.yml file.
We'll begin by adding the following codes:
backend: name: git-gateway branch: master
Heads up: This code above works for GitHub and GitLab repositories. If you're using Bitbucket to host your repository, follow these instructions instead.
The code we just wrote specifies your backend protocol and your publication branch (which is branch: master). Git Gateway is an open-source API that acts as a proxy between authenticated users of your site and your site repository. I'll explain more what this does in the authentication section.
Next up, we will write media_folder: "images/uploads". This will allow you to add media files like photos directly to your CMS. Then you won't need to use a text editor to manually add media and all that.
media_folder: "images/uploads"
Make sure you created a folder called images in the admin folder. Inside the images folder, create an uploads folder as this is the place where you'll host your images.
Configure Collections
The collections will define the structure for the different content types on your static site. As every site can be different, how you configure the collection's settings will differ from one site to another.
Let's just say your site has a blog, with the posts stored in content/blog, and files saved in a date-title format, like 2020-09-26-how-to-make-sandwiches-like-a-pro.md. Each post begins with settings in the YAML-formatted front matter in this way:
--- layout: blog title: "How to make sandwiches like a pro" date: 2020-09-26 11:59:59 thumbnail: "/images/sandwich.jpg" --- This is the post body where I write about how to make a sandwich so good that will impress Gordon Ramsay.
With this example above, this is how you will add collections settings to your Netlify CMS config.yml file:
collections: - name: "blog" label: "Blog" folder: "content/blog" create: true slug: "---" fields: - {label: "Layout", name: "layout", widget: "hidden", default: "blog"} - {label: "Title", name: "title", widget: "string"} - {label: "Publish Date", name: "date", widget: "datetime"} - {label: "Body", name: "body", widget: "markdown"}
Let's examine what each of these fields does:
name: This one is used in routes like /admin/collections/blog
label: This one is used in the UI (User Interface). When you are in the admin page, you will see a big word "Blog" on the top of the screen. That big word "Blog" is the label.
folder: This one points to the file path where your blog posts are stored.
create: This one lets the user (you or whoever has admin access) create new documents (blog posts in this case) in these collections.
slug: This one is the template for filenames. , , and which are pulled from the post's date field or save date. is a URL-safe version of the post's title. By default it is .
The fields are where you can customize the content editor (the page where you write the blog post). You can add stuff like ratings (1-5), featured images, meta descriptions, and so on.
For instance, in this particular code, we add curly braces {}. Inside them we write label with the value "Publish Date" which will be the label in the editor UI.
The name field is the name of the field in the front matter and we name it "date" since the purpose of this field is to enter the date input.
And lastly, the widget determines how the UI style will look and the type of data we can enter. In this case, we wrote "datetime" which means we can only enter the date and time.
- {label: "Publish Date", name: "date", widget: "datetime"}
You can check the list right here to see what exactly you can add. If you want, you can even create your own widgets, too. For the sake of brevity, we'll try to keep things simple here.
Enable Authentication
At this point, we are nearly done with the installation and configuration of Netlify CMS. Now it's time to connect your Gatsby site to the CMS by enabling authentication.
We'll add some HTML code and then activate some features from Netlify. After that, you are on the way to creating your first blog post.
We are going to need a way to connect a front end interface to the backend so that we can handle authentication. To do that, add this HTML script tag to two files:
<script src="https://identity.netlify.com/v1/netlify-identity-widget.js"></script>
The first file to add this script tag is the admin/index.html file. Place it between the <head> tags. And the second file to add the tag is the public/index.html file. This one also goes in between the <head> tags.
When a user logs in with the Netlify Identity widget, an access token directs them to the site homepage. In order to complete the login and get back to the CMS, redirect the user back to the /admin/ path.
To do this, add the following code before the closing body tag of the public/index.html file:
<script> if (window.netlifyIdentity) { window.netlifyIdentity.on("init", user => { if (!user) { window.netlifyIdentity.on("login", () => { document.location.href = "/admin/"; }); } }); } </script>
With this, we are now done writing the code and it's time to visit Netlify to activate authentication.
Before we move on, you should Git commit your changes and push them to the repository. Plus, you will have to deploy your site live so you can access the features in the Enable Identity and Git Gateway section.
Deploy your site live with Netlify
We are going to use Netlify to deploy our Gatsby site live. The deployment process is pretty straightforward, quick, and most importantly, it comes with a free SSL (Secure Sockets Layer). This means your site is protected (you can tell by looking at the green lock on the browser search).
If you haven't signed up for the platform, you can do it right here. When you've finished signing up, you can begin the deployment process by following these 3 steps.
Click the "New site from Git" button to create a new site to be deployed. Choose the Git provider where your site is hosted. My site is hosted on GitHub so that's what I will choose.
Choose the repository you want to connect to Netlify. The name of my Gatsby site is "foodblog" but you have to pick your own project name.
The last one asks how you would like Netlify to adjust your builds and deploy your site. We are going to leave everything as it is and we will click the "Deploy site" button. This will begin deploying your site to live.
Once the deployment is complete, you can visit your live site by clicking the green link that has been generated for you on the top left of the screen. Example: https://random_characters.netlify.app.
With this, the world can now view your site. You can replace the weird URL with your custom domain by reading this documentation.
How to enable Identity and Git Gateway
Netlify's Identity and Git Gateway services help you manage CMS admin users for your site without needing them to have an account with your Git host (Like GitHub) or commit access on your repository.
To activate these services, head to your site dashboard on Netlify and follow these steps:
Go to Settings > Identity, and select Enable Identity service.

In the Overview page of your site, click the "Settings" link.

After clicking "Settings", scroll down the left sidebar and click the "Identity" link.

Click the "Enable Identity" button to activate the Identity feature.
2. Under Registration preferences, select Open or Invite only. Most of the time, you want only invited users to access your CMS. But if you are just experimenting, you can leave it open for convenience.

Under the Identity submenu, click the "Registration" link and you'll be taken to the registration preferences.
3. Scroll down to Services > Git Gateway, and click Enable Git Gateway. This authenticates with your Git host and generates an API access token.
In this case, we're leaving the Roles field blank, which means any logged-in user may access the CMS.

Under the Identity submenu, click the "Services" link.

Click the "Enable Git Gateway" button to activate the Git Gateway feature.
With this, your Gatsby site has been connected with Netlify CMS. All that is left is to access the CMS admin and write blog posts.
How to access the CMS
All right, you are now ready to write your first blog post!
There are two ways to access your CMS admin, depending on what accessing options you chose from the Identity.
If you selected Invite only, you can invite yourself and other users by clicking the Invite user button. Then an email message will be sent with an invitation link to login to your CMS admin. Click the confirmation link and you'll be taken to the login page.
Alternatively, if you selected Open, you can access your site's CMS directly at yoursite.com/admin/. You will be prompted to create a new account. When you submit it, a confirmation link will be sent to your email. Click the confirmation link to complete the signup process and you'll be taken to the CMS page.
Note: If you cannot access your CMS admin after clicking the link from the email, the solution is to copy the link in the browser starting with #confirmation_token=random_characters and paste the link after the hashtag "#", like this: https://yoursite.com/admin/#confirmation_token=random_characters. This should fix the problem.
If everything goes well, you should see your site's admin dashboard:

Netlify CMS admin.
You can create your new post by clicking the "New post" button.
When you're ready to publish your post, you can click the "Publish Now" button to publish it immediately.
When you hit the publish button, the post file is automatically created. Then it will add to the changes with the commit message based on the name of the post along with the date and time of publishing. Finally, it will be pushed to the host repository, and from there your post will be seen live.
You can view the changes by looking at the commit message in your host repository.
After waiting for a few minutes, your new post should be live.
One more thing
The last thing to do is clean up the sample articles. To delete these posts, go to the blog files in your text editor and delete them one by one. Make sure you check your terminal when deleting them so that there will be no issues on your site.
Once all the sample posts are cleared out, commit these changes and push them to the repository.
And now, you are all done! You can now create your new posts from the comfortable CMS dashboard and share your stories to the world.
Summary
In this guide you have learned how to:
Create a Gatsby blog site
Added the Netlify CMS to your Gatsby site by creating and configuring files
Enable user authentication by activating Identity and Git Gateway
Access your site's CMS admin
Publish your first post powered by Gatsby and Netlify CMS
By the end of this guide, you should now be able to enjoy writing blog posts with a fast website and simple content editor. And you probably don't have to touch the code unless it needs further customization.
There is still more to cover about Gatsby and Netlify CMS. One of the best ways to learn about them is to go through their documentation.
I hope you found this guide beneficial, and happy posting!
Check out my blog to learn more tips, tricks, and tutorials about web development.
Cover photo by NeONBRAND on Unsplash.
Resources for JavaScript and React
Here are some resources that may help you to learn JavaScript and React:
JavaScript
React
0 notes
Text
How to use S G Optimizer plugin in wordpress
If you’re looking for the SiteGround SG Optimizer plugin review, you have landed on the right page.
SG Optimizer is a custom caching and performance improvement plugin for WordPress users developed by SiteGround.
This plugin will help you speed up WordPress site within just a few clicks and achieve better scores in Google PageSpeed Insights and GTMetrix.
Recently, the SiteGround team added many features to the SG Optimizer Plugin, including frontend optimization, media optimization, and server environment optimization.
With these changes, it’s now one of the best caching plugins for WordPress users, especially SiteGround customers.
In this article, I have reviewed the SG Optimizer plugin and shared the best settings to achieve better performance.
Table of Contents
SG Optimizer Plugin Review
I used SuccessPixel.com to evaluate the SG Optimizer plugin’s performance, instead of setting a demo site because this site is already hosted on SiteGround hosting.
Currently, I’m using the SiteGround GrowBig plan with GeneratePress Premium and 15 WordPress plugins.
So you can see the real-life performance of SG Optimizer and how it stands against the top caching plugins such as WP Rocket.
SG Optimizer Performance Test
I analyzed the page speed of SuccessPixel.com before and after installing the SG Optimizer plugin, and the results are shocking.
➤ Before
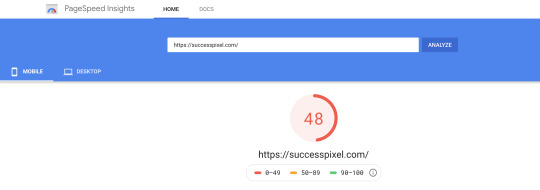
GPSI Mobile Score Before Installing SiteGround SG Optimizer
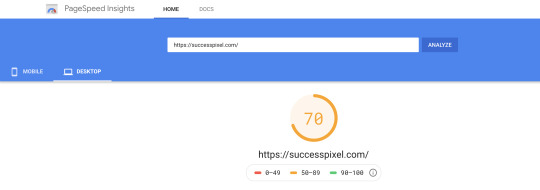
GPSI Desktop Score Before Installing SiteGround SG Optimizer
GTMetrix Score Before Installing SiteGround SG Optimizer
➤ After
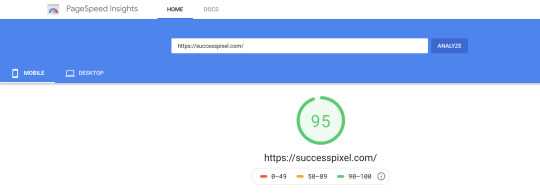
GPSI Mobile Performance Score After Installing SG Optimizer
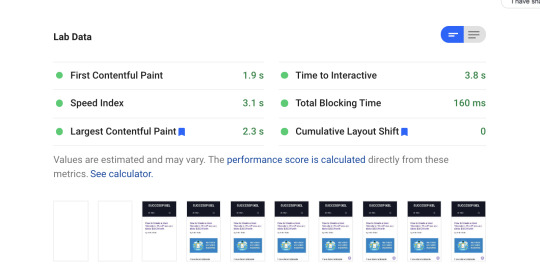
GPSI Mobile Performance Lab Data After Installing SG Optimizer
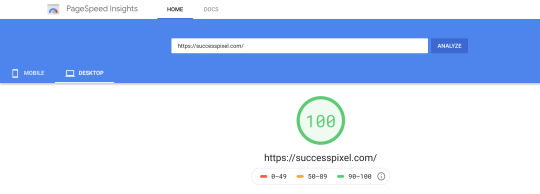
GPSI Desktop Performance Score After Installing SG Optimizer
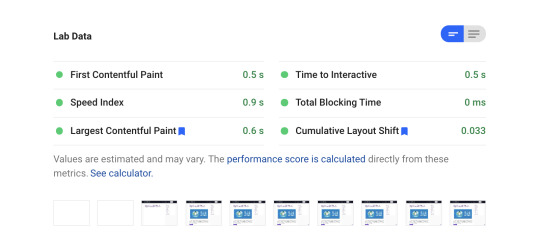
GPSI Desktop Performance Lab Data After Installing SG Optimizer
GTMetrix Score After Installing SiteGround SG Optimizer
You can see a clear difference in the website performance after adding SG Optimizer to my site.
The Best Settings for SG Optimizer Plugin
To ensure the fastest site speed and best user experience, you need to enable a few options in the SG Optimizer plugin.
Don’t worry!
Setting up the SG Optimizer plugin is quite simple.
You just need to toggle the options under each tab to activate the specific modules.
Let’s see how to do that and speed up your WordPress site.
1. SuperCacher Settings
SuperCacher is a custom caching solution developed by SiteGround.
Enabling the SuperCacher improves the site speed and also handles more hits.
SiteGround offers three different levels of caching:
NGINX Direct Delivery
Dynamic Cache
Memcached
The SiteGround Startup plan users can access only the SuperCacher level 1.
However, the GrowBig and GoGeek plan users can access all three levels of SuperCacher.
SiteGround claims that a website using all three levels of SuperCacher can handle 100x more hits than a regular site without a caching mechanism.
If you haven’t a SiteGround user yet, I recommend you to pick either GrowBig or GoGeek plan.Buy SiteGround WordPress Hosting
Now, let’s discuss the best SuperCacher settings for your site.
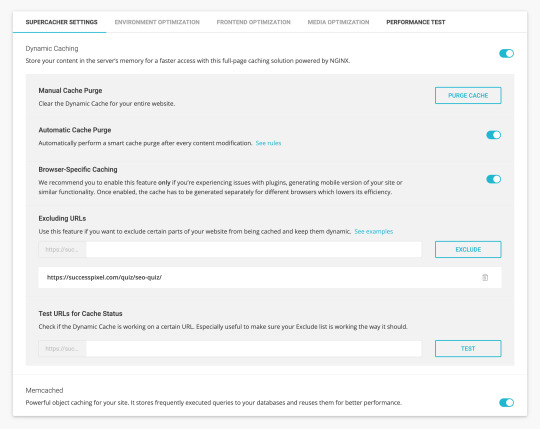
SG Optimizer SuperCacher Settings
Please note that the SuperCacher Level 1, i.e., NGINX Direct Delivery is available on all SiteGround WordPress hosting plans.
With NGINX Direct Delivery SiteGround serves most of the static resources, including images, JS, and CSS on your website directly through NGINX to achieve the fastest page speed possible.
You can enable this option by visiting your SiteGround account and navigating to the Site Tools > Speed > Caching.
The Dynamic Caching and Memcached options are available in the SiteGround account as well as under SG Optimizer SuperCacher Settings.
The dynamic caching is a full-page caching solution powered by NGINX that stores your content in the server’s memory for faster access.
Memcached is an advanced object caching solution that stores frequently executed queries to the databases and reuses them to achieve better performance.
I recommend you to get the benefit of both caching solutions to improve your page loading speed.
2. Environment Optimization
The Server Environment Optimization tab helps you configure various options to ensure the best performance.
➤ Enable HTTPS
This option helps you enable a proper HTTPS configuration and forces a secure connection to the site.

SG Optimizer Enable HTTPS
You can also fix the insecure content errors by rewriting the insecure requests for resources.
➤ WordPress Heartbeat Optimization
Enabling this option allows the SiteGround SG Optimizer to control WordPress Heartbeat API.
The WordPress Heartbeat API checks for the page edits every 15 seconds or scheduled tasks after every 60 seconds.
Such activities generate high CPU usage when you are logged into the WordPress admin panel or have multiple tabs open for a longer period.
The SG Optimizer WordPress Heartbeat Optimization option allows you to run these checks less frequently or disable them.
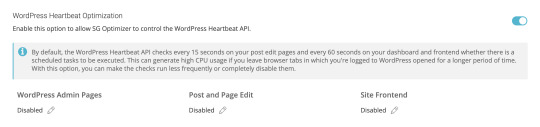
SG Optimizer WordPress Heartbeat Optimization
➤ DNS Pre-fetch for External Domains
DNS pre-fetching for external domains saves DNS lookup time for resources loaded from these domains.
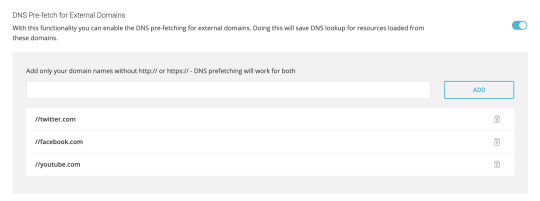
SG Optimizer DNS Pre-fetch for External Domains
If you embed tweets, YouTube videos, Vimeo videos, Facebook Like Box, Amazon affiliate links, or any content that requires external resources to be fetched to render a web page, add these domains under the DNS pre-fetch option without HTTP:// or HTTPS://.
➤ Scheduled Database Maintenance
Enabling the Scheduled Database Maintenance option clean up your database to keep it small and optimized.
If you activate this option, SG Optimizer will execute the following tasks every 48 hours:

SG Optimizer Scheduled Database Maintenance
Perform Database Optimization for MyISAM tables.
Remove all page and post revisions.
Delete all automatically created post and page drafts.
Delete all posts and pages in your Trash permanently.
Delete all comments marked as Spam.
Delete all expired Transients.
You’ll find more options such as PHP Version Selector, Gzip Compression, and Browser Caching.
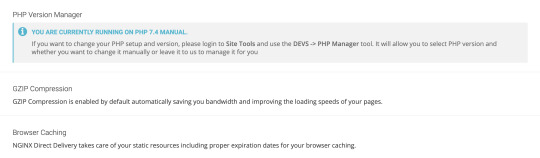
SG Optimizer PHP Version Manager Gzip Compression Browser Caching
By default, SiteGround offers the most stable PHP version and enables Gzip Compression & Browser Caching for every site to ensure the best server environment.
3. Frontend Optimization
This tab allows you to optimize the frontend code to ensure faster speed without compromising on mobile aesthetics.
Here are the best settings for SG Optimizer Frontend Optimization.
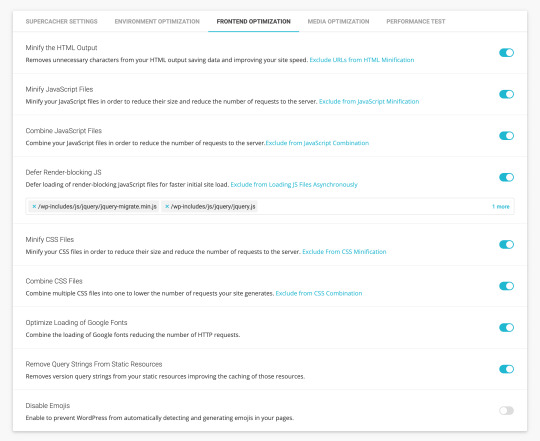
SG Optimizer Frontend Optimization
➤ Minify the HTML Output
This option removes unnecessary characters from the HTML output saving data and enabling faster site loading time.
➤ Minify JavaScript Files
This option helps in the minification of the JavaScript files to reduce their size and the number of requests to the server.
➤ Combine JavaScript Files
Combining the JavaScript files is another great way to reduce the number of requests to the webserver.
➤ Defer Render-blocking JS
You can defer the loading of non-critical render-blocking JavaScript files to ensure faster initial site load.
This way, users don’t need to wait for a long time before the page loads in their browser.
If you find any render-blocking JS file in the Google PageSpeed Insights report, include it under the box provided below the Defer Render-blocking JS option.
➤ Minify CSS Files
Minification of CSS files reduces their size and the number of requests to the server.
➤ Combine CSS Files
If CSS minification breaks your site’s layout, combine multiple CSS files into one file to lower the number of requests to the server.
➤ Optimize Loading of Google Fonts
Adding Google Fonts generate extra HTTP requests.
However, you can combine the loading of Google fonts, reducing the number of HTTP requests.
I recommend you to use system fonts or host Google Fonts locally to improve the website performance.
➤ Remove Query Strings From Static Resources
Enabling this option removes query strings from the static resources improving the caching of those resources.
You don’t need to edit the .htaccess file or install an additional plugin to get this functionality.
➤ Disable Emojis
Disabling emojis prevents WordPress from automatically detecting and creating emojis in your pages.
Since emojis are engaging elements, I suggest turning this option OFF.
4. Media Optimization
This tab allows you to optimize media content, including images and videos, with some advanced features.
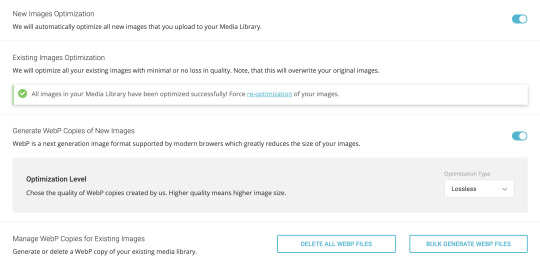
SG Optimizer Image Optimization
➤ New Images Optimization
SG Optimizer plugin automatically compresses all new images that you upload to the Media Library if this feature is turned ON.
As a result, your images consume less space and get downloaded faster when the client requests these images.
➤ Existing Images Optimization
Enabling this option optimizes all existing images on your website with minimal to no loss in quality.
Please note that this action will overwrite your original images.
➤ Generate WebP Copies of New Images
WebP is a next-generation image format with superior lossless and lossy compression. Most modern browsers, including Google Chrome and Safari support WebP.
You can create WebP copies of new images to reduce the image sizes served in the browser.
SG Optimizer allows you to choose the optimization type, i.e., lossless or lossy, depending on the desired image quality and page speed.
➤ Manage WebP Copies for Existing Images
This option allows you to generate or delete WebP copies of your existing media files in bulk.
➤ Lazy Load Media
Lazy loading is a major speed optimization technique that loads images and other media files only when they are needed to be visible in the browser.
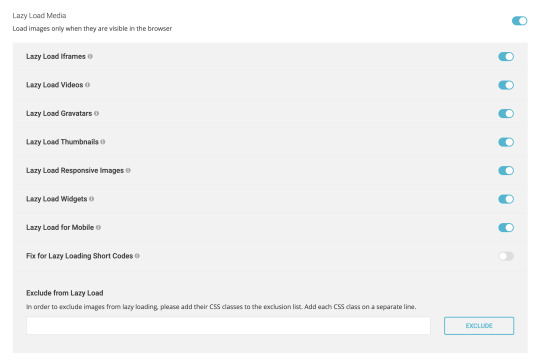
SG Optimizer Lazy Load Media
SG Optimizer plugin allows lazy loading for responsive images, videos, iframes, Gravatars, thumbnails, widgets, and mobile media library.
You can also fix lazy loading for short-codes or exclude images from the lazy load.
5. Performance Test
Once you have optimized your website using the SG Optimizer plugin, you can test its performance with a built-in tool powered by Google PageSpeed.
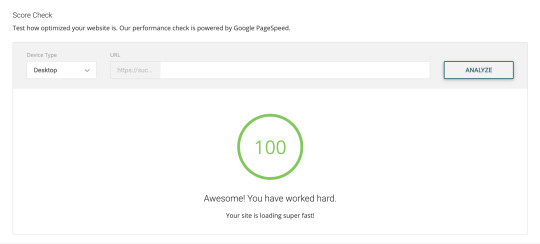
SG Optimizer Performance Score Check
You can analyze the homepage or any URL for desktop vs. mobile speed with this feature.
SG Optimizer vs WP Rocket vs Other Plugins
Adding SG Optimizer plugin to your WordPress site can eliminate a bunch of plugins, including WP Rocket, WP-Optimize, WP Super Cacher, and ShortPixel.
SG Optimizer offers an all-in-one solution for Caching, Environment Optimization, WordPress Heatbeat Optimization, DNS Pre-fetch, Image Optimization, Code Minification, and Frontend Optimization.
Plus, it’s available in the official WordPress plugin library for free of cost.
Non-techies may need to install multiple WordPress plugins to achieve the functionalities mentioned above.
While a few plugins are freely available across the web and in the WordPress plugin library, others come with premium fees.
Overall, SG Optimizer is the best WordPress caching and performance optimization plugin.
Since the SG Optimizer plugin is designed to work best with SiteGround servers, I recommend you to purchase SiteGround WordPress hosting to achieve the best possible performance.
The post How to use S G Optimizer plugin in wordpress appeared first on The Coding Bus.
from WordPress https://ift.tt/2EvbWrP via IFTTT
0 notes
Text
WordPress Real Physical Media 1.2.5 Premium – Media Folders & SEO Rewrites
WordPress Real Physical Media folder structure into your file system not only gives you a better file structure when working with an FTP client, but a more descriptive file path. This SEO optimization will drive traffic directly to your website from image search engines!
Demo WordPress Real Physical Media Plugin
WordPress Real Physical Media Plugin Features
Physically restructures all uploads
Moves new uploads directly
Removes special characters
SEO-optimized descriptive path names
SEO URL redirections protect you from errors
Works with all files in your media library
You are independent from this plugin
You can physically arrange all folders already created with Real Media Library
Set up an additional upload suffix
Allows extra long media URL paths
Built-in high performance file structure rewrite queuing system
Enabled automatic queuing tracks every file movement
Optionally, set up a cron job that processes the queue in the background without blocking you while editing the website.
Import categories/folders from third-party media library folder plugins
Supports WordPress Multisite
GPDR/DSGVO
Download WordPress Real Physical Media Plugin
Note: If you are having trouble with Free Download WordPress Real Physical Media Plugin Premium, try to disable AdBlock for the site or try another Web Browser. Disabling AD blocker or change Web Browser not help to you please contact us.
Download WordPress Real Physical Media Plugin
https://ift.tt/32WBCab
0 notes
Photo

How to fix HTTP Error WordPress Image Upload?
When something gets wrong during a file upload process in WordPress, you’ll get a message of HTTP error WordPress Image Upload. This happens when the users try to add any sort of file or image to the media library. While encountering this error, users always search for the quick and reliable troubleshooting solutions to this error. So, here’s a step by step guide from following which you can easily fix the problem immediately:
#WP500#HTTP Error WordPress Image Upload#WordPress White Screen of Death#WordPress Error Log#WordPress Admin Login#Technology#SMO#News
0 notes