#zero hp modules
Explore tagged Tumblr posts
Visit Tumblr Blog
Explore Tumblr blogs with no restrictions, modern design and the best experience.
Last Seen Tumblr Blogs


Fun Fact
In 2020, 44% of users from Denmark used Tumblr daily.
Text
A terribly designed Eurorack accessory!

This is intended to be a handheld gate/trigger generator — basically, a quick and dirty way to put a "high" signal (+4.5V) into any Eurorack CV or gate input. It's nearly the simplest possible way to do it, just running a 9V battery through a switch, then to a ÷2 voltage divider, and out to a jack. Hold the bottle with the jack on the bottom and your thumb over the button, plug in a cable, and gate away.
Now, if I had a battery holder for three AA or AAA batteries, I would have done it the simplest way. And if I needed a consistent voltage, this is the wrong way to do it; you'd really want to use a 5V regulator or maybe a zener diode. But I'm intending the output to go into Eurorack gate inputs, which are usually fine with anything above the CMOS level of 3.5V, so I don't need that level of complication.
In fact, I'm intending to use this specifically on a CMOS input, the "Reset" inputs of the MidCentury Modular "Dividers" module I recently built. The "Reset" input there on either counter will reset the count to the first step. But, if it's configured (with a jumper) to skip the gate-to-trigger conversion circuit, holding that gate high will also hang the counter, making it a sort of clock suspend; I want to manipulate that directly, so having a remote switch to hold for that will be fun.
#synth diy#eurorack#modular synth#zero hp modules#i am sort of expecting to have a problem with switch bounce#but again on the reset and hang use case that's not too important
2 notes
·
View notes
Text
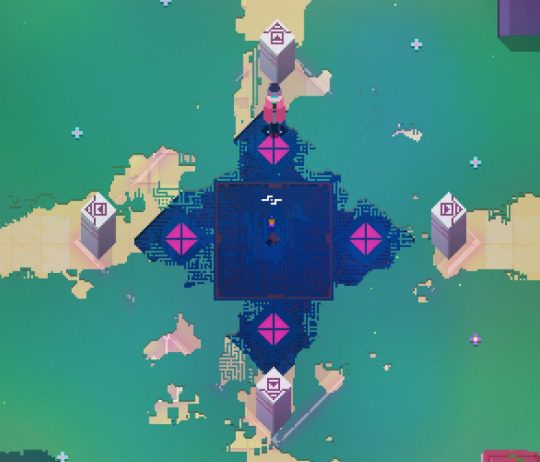
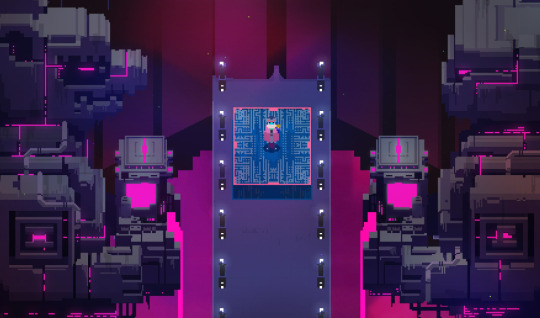
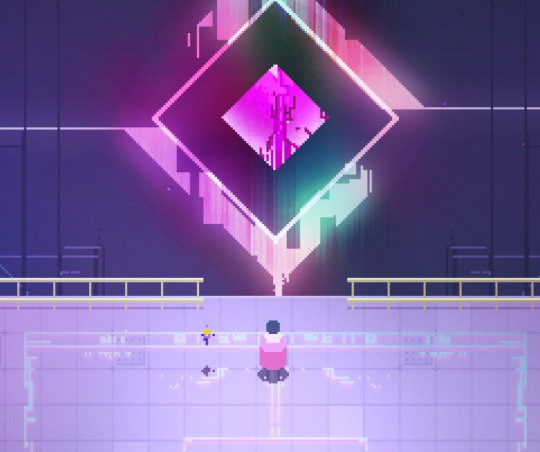
Major Endgame Spoilers for Hyper Light Drifter under the cut! 💠
tl;dr to mutuals: play Hyper Light Drifter this is a threat <3
GET OUTTA HERE JACKASS!!! AND TAKE YOUR STUPID PLAGUE WITH YOU!!!!!!!!!!!!!!!

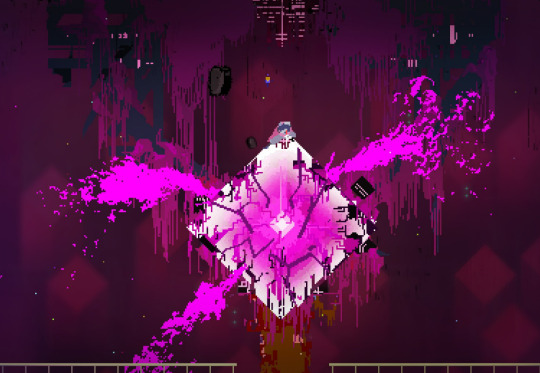

i LOVE how all of Judgement's attacks are understandable when you learn them but they're major scare tactics meant to intimidate the player when you first see them!!! not sure whether that aspect was intentional but it's very thematic. also very nice of them to dump a ton of HP packs right before the boss lmao, i went in there fully prepared though. Guardian's cloak, Blue Cloak's sword and Librarian's SyCom.
also the fact Drifter's HP drops to one after the fight and the stamina bar is zero here. very nice attention to detail but also fuck you devs that made me nearly cry :(
but nearly around 24 hours! that's not that bad for a first playthrough where i also aimlessly backtracked a lot! i feel like doing each area along with their respective 100% took me about four hours each, which again is also very fitting considering the themes for four in this game and how it means Death in certain cultures. the added extra was stuff like Soccer Kid and the Arena in Central Zone as well as the Library.

i also. hm. did NOT realize you only got two HP in NG+ and I think three in Alt. that'll suck to play as Alt but i can manage it. her attacks are cool. never doing NG+ though because two HP is sometimes a 1-hit kill. i'll just settle for rushing through keys on Standard and getting my outfits back again if i ever need to lmao. at least i have a quick way to do purple cloak now.
but yeah final verdict;
really enjoyed the game! <3 nearly as much as Hollow Knight! it'll be a fun game to revisit sometimes, might even become a yearly replay for me now that i know the maps and skills better.
i do agree with the fact that the game gets easier once you get a few upgrades, and a fully kitted out Drifter will barely struggle once you learn enemies' attack patterns. also that getting used to multi-dash is very important. still, this was a fun game to blind play.
i can't even really say i hated any of the areas except maybe Horde Mode which doesn't really count.
favourite area aesthetically was Lake because i'm a sucker for water areas but the Crystal Forest was my fave gameplay wise because of the crystals giving you free ammo and also just being a neat interaction. South wasn't much of a struggle except for the enemies, though i feel like it felt a bit small. not entirely a bad thing though, it was a nice switch up. i think i died the most on Hierophant but that was just because it was my first boss (and admittedly brutal with it's patterns for a newbie), but North had some of the easier enemies once i got used to them. fuck the Lake enemies, but i admit i made that hard on myself by not going back and getting the reflect upgrade stuff when i had the money, those help out a ton against the enemies.
toughest 8 module challenge room was probably South if only because of the machine guns enemies. i might've struggled more with them if i hadn't already seen them in the Horde Mode beforehand.
favourite gun is the basic pistol for it's speed, though crystal shotgun was useful for Horde Mode. (i know at least two hours of playtime were because i didn't realize stuff like the rifle was needed to trigger some switches...) my aim is also complete dogshit in this game lmao. walked right out of the Stormtrooper Academy with flying colours in this one lads.
for someone with chronic coughing, i can relate to poor Drifter a lot with it omg aaaaaa. also the elements of illness and inevitable death were hitting some personal points for me due to family members but it wasn't a bad experience. i felt at some points frantic during fighting. resigned when getting stuck into bullshit deaths. yet a constant willingness to push forward and not give up because what else is there to do but learn and experience. good feelings from a game that i resonated a lot with the gameplay!
Drifter is the new blorbo. :) also he got the Immortal Cell and killed Judgement and lived and everyone's cured now and we're ignoring the rest of that. we don't look at that. <3 it's okay just don't address it. :) smiles.
#hyper light drifter#hyper light drifter spoilers#hld spoilers#spoiler warning#spark's drifter adventures#spark talks about nothing of relevance#flashing warning#flashing images#<- just in case for the video!#now onto Breaker methinks! even if it's still in EA apparently it's shaped up since it's few bad reviews#i think i'll have a check out of it anyways for funsies and to support devs
8 notes
·
View notes
Text
Herald of Torag: The Grand Defender
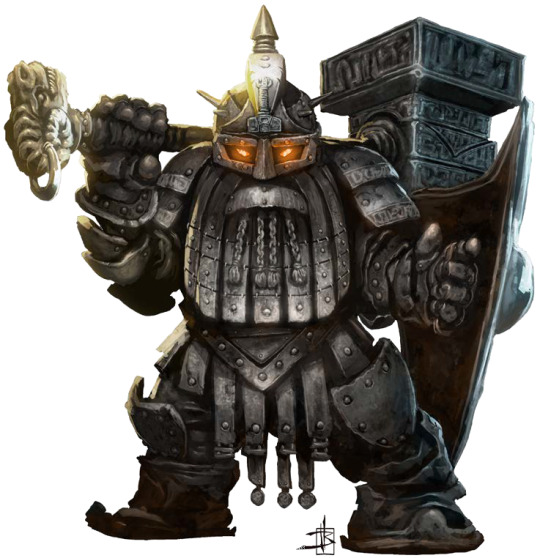
CR 15
Lawful Good Huge Construct
Inner Sea Gods, pg. 310
Among the strangest (and least creatively named) of the Heralds, the Grand Defender is one of the rare few Heralds that did not begin their existence as a mortal follower or an elevated celestial, instead being literally crafted by their god's own two hands. In this case, if you couldn't tell by the title nor his physical appearance, the God of the Forge (and of dwarves in general), Torag. He's even stranger than most other divine constructs, though, because the Grand Defender was built with an explicit and bizarre purpose: as a tomb for the bodies of Torag's chosen dwarven heroes.
Given how the Defender is Huge, and dwarves are Small, one can only come to the conclusion that they're all jammed into its limbs and torso to form into some kind of corpse Voltron. Just... rattling around in there as it moves, hopefully so secure they don't actually move that much when it attacks. What do you think happens if it loses and then regains a limb? Does it teleport the bodies back into itself? Does Torag launch a rescue mission for what is essentially one of his most holy relics to inter them in his Herald again? Did he ever consider a less risky location? Who's to say; the poor thing's lore block is literally a sentence long, and it hasn't appeared in any AP or module, thus our information on it is tragically limited.
But if its lore block is tiny, that must mean its statblock is impressive, right? Well...
It's just an Iron Automata with some extra bells and whistles. Before you go clicking off this page, please know they're amusing bells and whistles... but it's a little disappointing to see "this ability works like it does for the Iron Automata" be pasted onto two of its four unique powers. It's an Automata Except Bigger, and with sapience so it can adjust its tactics on the fly.
It should give you a fair idea of what to expect from it, at least: A smash mook with no magic and very little defenses besides those conveyed by its Construct typing. It's got pathetically low saves (+6/+5/+8), low HP for its level (157 while most other Heralds are pushing 180 or 200), and no immunities or resistances besides it gains by being a Construct... oh, and the Iron Automata's complete Immunity to Magic, making it significantly more resilient than its statblock would suggest. Suddenly, its low saves and zero elemental resistances make a little more sense, as few offensive spells can actually pierce this impervious shield, and almost no common debuffs can work on a Construct. Electricity damage from a magic effect may slow it and prevent it from using its Full-Attack, but any magic trying to bring fire against it heals it instead, turning the most popular damage type against its holders.
It's got DR 15/Adamantine as its standard, but it's got an amusing ability called Ablative Armor that turns it into a towering, hammer-wielding matryoshka doll: As a standard action, the Defender can shed its outermost layer of metal to reveal another, very slightly smaller version of itself underneath that's made out of a different metal, swapping its DR to another source to thwart attempts to damage it. It can swap between DR 15/Adamantine, /Cold Iron, or /Silver at will, and whatever damage type its DR is bypassed by is also what types of DR its own weapons can bypass, letting it pierce several common resistances. Ablative Armor also shields it from the same death most Constructs would suffer at 0 HP, shutting down but not dying unless its body is fully destroyed and torn to pieces. 1d4 hours after it's slain, its armor automatically triggers, revealing yet another Defender under the first while restoring half its HP and allowing it time to either retreat and recover or stalk after its destroyers to end them.
Fun fact: Any armor shed from its person crumbles to powder 1d4 minutes later to prevent it from just generating infinite raw material. The only way to stop it from dissolving entirely is if the Grand Defender eats it, but we'll get to THAT tidbit later.
For now, the Grand Defender is tremendously resilient and doesn't die unless you take special precautions to put it down permanently... but on the downside, it's also the slowest Herald by a country mile, having only a 30ft movespeed. This is somewhat made up for by its immense 15ft space and 15ft reach, but its ability to keep enemies in that range is extremely limited. Stand Still is reliable due to its +31 CMB, but it can only use the feat once per round, because despite having Combat Reflexes, it has a Dexterity score of 9, meaning it can't even use the extra Attacks of Opportunity! It's got to be really choosy about when and on whom it uses Stand Still, if it even gets to do so in the first place because, again, it's got no mobility beyond its 30ft movespeed, no magical movement methods, and no capacity for Stealth beyond its ability to look like a statue when it doesn't move, so its options for getting the drop on the party are also limited. If someone doesn't want to be in melee with it and it can't catch them in its radius during the surprise round, there's virtually no way for it to force them back towards it.
And you don't want to be nearby, in case it wasn't obvious. That massive hammer deals 3d6+11 damage upwards to 4 times a round with accuracy that's a step above most of the other Heralds, allowing it to sacrifice some of it to pour into Power Attack. Its warhammer deals triple damage on a critical hit, and four blows a round make it likely to see one every odd round, or even every round if you're especially unlucky. That immense threat radius also means its Great Cleave feat can make its turns look down right comical if it's got enough targets around to let it spin and spin and spin.
Besides its hammer, it's got the poisonous cloud of an Iron Automata, exhaling a 10ft cloud of toxic gas into an adjacent space once every 1d4 rounds as a free action. Anyone who enters or begins their turn in the cloud must make a DC 19 Fortitude save or take 1d4 Con damage a round for 4 rounds... but that's not the only weapon it's got coming out of its mouth, which is an admittedly unusual sentence. Even more unusual is the Defender's novel breath weapon: Hammer Storm. This 30ft cone is made up of, as the name suggests, warhammers, blasting everyone who fails a DC 19 Reflex save for 15d6 damage and sending them flying directly away from the Defender, potentially pushing them into hazardous terrain.
These regurgitated warhammers are perfectly mundane in function and, interestingly, do not disappear, allowing creature to pick one up and wield it (the ability specifically creates 24 hammers). These leavings are what the Grand Defender uses as its ranged option, its Throw Anything feat letting it huck the weapons like lawn darts at distant or airborne foes. Hammer Storm is normally only usable once a day, but the Defender can recharge the ability by taking a minute to consume the regurgitated warhammers or an equivalent amount of metal from any source (including the shell that drops off of it when it uses Ablative Armor), allowing the Defender to recycle metal scraps or the armor of its foes into weapons for its people. One must wonder if the dwarves interred inside are actually dead and not just banging away on tiny forges to create the hammers or the next layer of the Defender.
You can read more about it here.
34 notes
·
View notes
Text

If Bryophyta called as bad operator, why is his niche so good for me?
I clearly remember the first time he was released on CN and GL server, people just called him a bad operator judging by his class traits, skills, and modules without proper discussion on how to deal with. He has been in my main unit for more than 10 months and I think he is a decent operator compared to older ones (Swire, Pallas, Whislash).
So this is my opinion about his kit
His kit is more focused on supporting operators close to him while allowing him to do two jobs simultaneously: provide additional defense and deal funny damage. Okay, his damage is mediocre, at least he is able to dish out casters and weak elites all by himself. Then what about how his defensive kit works? This is what people never ask me or any Bryophyta users.


Bryophyta's kit is mixed with Swire's talent and Pallas' S3 logic, allowing him to switch target priority on buffing. (Not only Bryophyta and Pallas, Arturia also has this gimmick). This includes his S2 skill logic.

So, what makes Bryophyta hard to use?
Talent and Skill 2 description is too long to read.
Hidden target priority mechanics that are not explained in-game.
Splitting buff while blocking enemies.
Weak visual QoL on his default skin, especially when his S2 is active. There are no indicators of whose target he chose.
Funny Weak damage on mid-high DEF enemies.
No flat DEF buff, it means his usage benefits on buffs rather than debuffs.
Class trait weakness: Mediocre defensive stats, especially base HP. This makes him vulnerable against arts damage.
Can't buff Ambushers and Summons.
Then, how do I deal with his weakness?
Understand his talent and hidden target priority first.
His talent says: "Grant +DEF to melee allies in surrounding 8 tiles. If he blocks any enemies, he gains +DEF". The game doesn't explain his buff would full switched to himself while blocking enemies. So if he is not block any enemies, he gives his buff to any melee operator close to him. If he blocks any enemy or no melee operator around, he would eat the buff alone. It means: Always put him on safe ground tile.
Skill 2, Perseverance of Soil and Stone/ Earthen Tenacity, shares a similar gimmick. The only difference is his targeting become more complex compared to his talent. This is how his S2 targeting works: Last deployed + High-block count > High-block count > Low-block count > Self This means you need to be cautious about deployment order or else his buff gone wrong.
Different than Whislash who is only buffing 3-block+ melee operators, Bryophyta can buff 1-block and 2-block melee operators.
His talent and S2 also target Flagbearers (Saileach, Wanqing, Elysium, Myrtle) and Liberators (Mlynar, Tequila) while their block count is lost. The buff is not affected by operators with higher taunt, so he always prioritizes the last deployed high-block count melee operators.
Can't buff zero-DEF operators like Crushers (Ulpian, Hoederer, Windchimes, Quartz). Don't put him alone with Crushers.
Self stunlock on S2 actually doesn't bother the gameplay if the map is not crowded. You can add DPS blocker in front of him or any ranged DPS to clear weaker mobs. So both Bryophyta and his buffed melee operator can focus on stronger enemies.
Due lack of weak visual QoL, it's hard to see buffed operators. His upcoming skin, Vibrant, fixes this issue.


Things I like about Bryophyta's so-called bad kit, his weakness is not so bad instead making many combos or tricks. These are my combos:
Blaze S2 for AFK with Bryo's S1 or Gavial Alter S2/ S3 with Bryo's S2
Reapers and Juggernauts; he can prevent them from taking much physical damage. Good synergies with Executor Alter's S2 and S3.
Duelists (Eunectes, Aurora, Cement); letting them concentrate on blocking high-physical damage enemy.
Perfect synergies with Bison: Bison gave him flat defense, Bryo buffs Bison. Jessica Alter S3 also grants him small amount of defense buff.
Can aid Viviana, Lessing, and Skadi. He also can aid Thorns (but not Silverash).
Funny Tequila-Bryo combo. This only my personal fun combo.
Many combos if you making more experiments with him.
In conclusion, Bryophyta is created for the player who needs a melee support with the possibility of creative strategy options. No matter he is good or bad, Bryophyta stays Bryophyta.
#arknights#i'm gladly thank to tumblr allowing me to yap#not a great analysis but yeah i created my yap readable
9 notes
·
View notes
Text
Are you ready to return to The Wood?
The Wood surrounds and divides the realm and anyone (or anything) that has not yet sworn fealty. The Wood is not one forest, but all forests. The Root is the realm of mystery and horror underneath, and does not care for the petty divisions overground.
Cairn is the DriveThruRPG Platinum Best Selling adventure game about exploring a dark and mysterious Wood filled with strange folk, hidden treasure, and unspeakable monstrosities. Character generation is quick and random, adventures are tense and reward careful exploration, and combat is frantic and deadly. The first edition rules are freely available here, and should be familiar to any fans of Knave and Into the Odd.
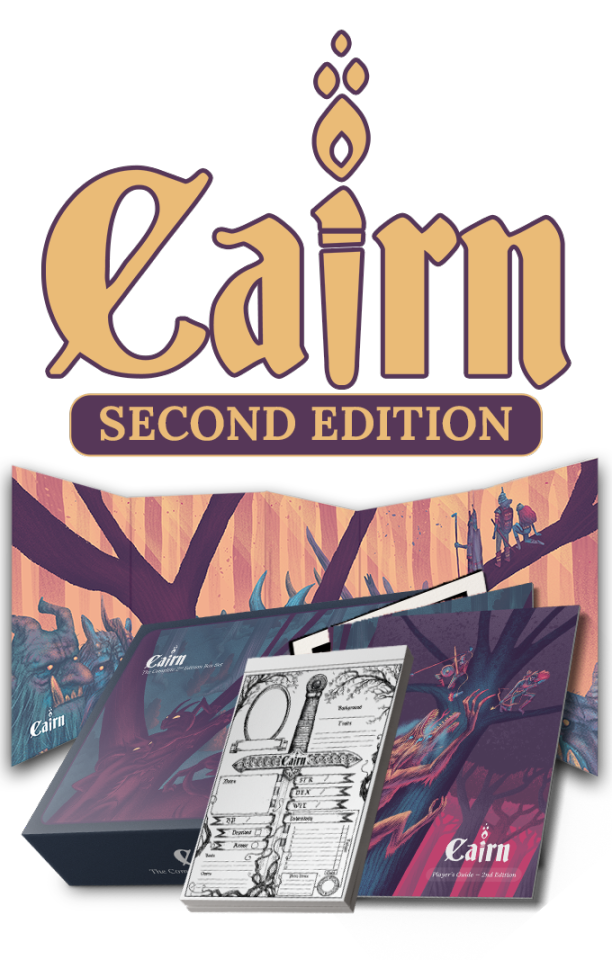
The definitive second edition has been freshly revised and developed, and includes an expanded Player’s Guide, a brand new Warden’s Guide, and a new adventure Trouble in Twin Lakes in a robust and lavishly illustrated boxed set packed with useful gaming tools.

Digital mockups, final presentation may differ.
If you’re looking for a rules-light, player-forward system for classic fantasy roleplaying, look no further. Cairn 2E includes everything you need to get started with a minimum of setup and zero hassle. A simple 3-stat system and roll-under d20 resolution makes it familiar to old-school gamers and new players alike, marrying the best of the OSR and 5E mechanics.


The first edition of Cairn was a simple, 24-page Player's Guide that provided the basics of character creation and dice mechanics. For the second edition, we've greatly expanded upon and clarified the rules for players, starting with the backgrounds. Each character background now includes its own unique set of equipment, abilities, history, and relation to the world of Cairn. With 20 backgrounds and 36 possible ways to build each, that means over 700 different characters can be made before gameplay even begins.
While Cairn 2E is bigger, bolder, and weirder than its predecessor, it remains as simple and easy to jump into. Character creation is a quick, four-step process:
1) First, roll or choose a background from such creative possibilities as the Beast Handler or Fungal Forager. 2) Now, roll or choose from an array of tables to fill out your specialties, histories, and magical equipment. 3) Roll 3d6 to determine each of your three Attribute Scores—Strength, Dexterity, and Willpower—and 1d6 for your Hit Protection, or HP. 4) Lastly, you'll name your character, determine their age, and array them with a selection of traits and bonds to establish their place in the world.
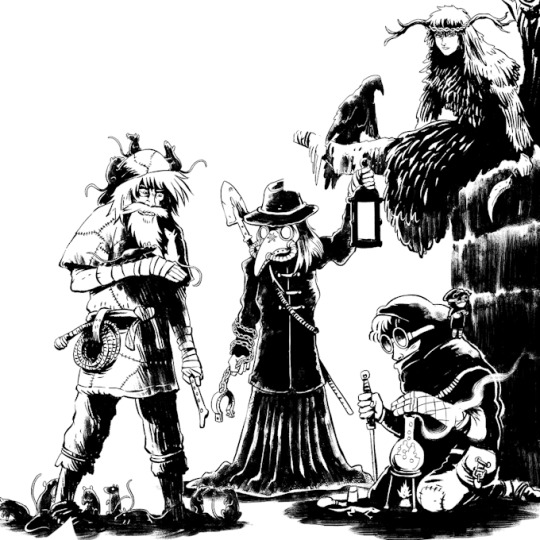
A Beast Handler, Bonekeeper, Half-Witch, and Aurifex take a quick break from dungeon delving.
The Player's Guide is a 5.5" x 8.5" perfect bound softcover of approximately 92 pages.


In addition to the expanded Player's Guide, the Cairn 2E Boxed Set comes with a dedicated Warden’s Guide, which includes everything you’ll need to create, populate, and manage a game in the world of Cairn. Inside you’ll find:
Advice and guides on designing and running a forestcrawl, pointcrawl, or dungeon delve
A bestiary of strange and foul creatures your players will encounter in the Woods and Roots
Spellbooks and relics, magical artifacts from a bygone age with their own strange powers and personalities
Rules for character advancement through personalized quests, downtime activities, and relationships with the people and creatures of the world
The world of Vald, Cairn’s first detailed setting and the perfect place to begin your adventure
And much more!

With a few rolls of the dice, you can now generate entire sessions worth of content for adventures in the dark forests of The Woods, the stygian depths of the Roots, or even spruce up existing modules for a classic dungeoncrawl. Or perhaps your players would prefer to spend that session in town, following up on leads and training up their skills to better tackle the next leg of their quest. In the Warden’s Guide, you’ll find everything you need to really bring the world of Cairn to life.
The Warden's Guide is a 5.5" x 8.5" perfect bound softcover of approximately 120 pages.


Trouble in Twin Lakes
Two weeks ago, Aldra, the beloved butcher of Isthmus Town, suddenly vanished without a trace. Some days later, a local teen reported seeing a man swallowed up by the earth near Deadmill. Others have also gone missing. Now, the townsfolk are left wondering: Who might be next? Trouble in Twin Lakes is the first in a brand new series of adventure for Cairn, set in and around the Twin Lakes area. Trouble in Twin Lakes is a 5.5" x 8.5" saddle stitched zine of approximately 24 pages.
The Adventure Anthology
We've got THREE more adventures in the works as stretch goals. At a certain funding level, these three adventures will be collected and printed together as The Adventure Anthology, and included in each boxed set.


Digital mockups, final presentation may differ.
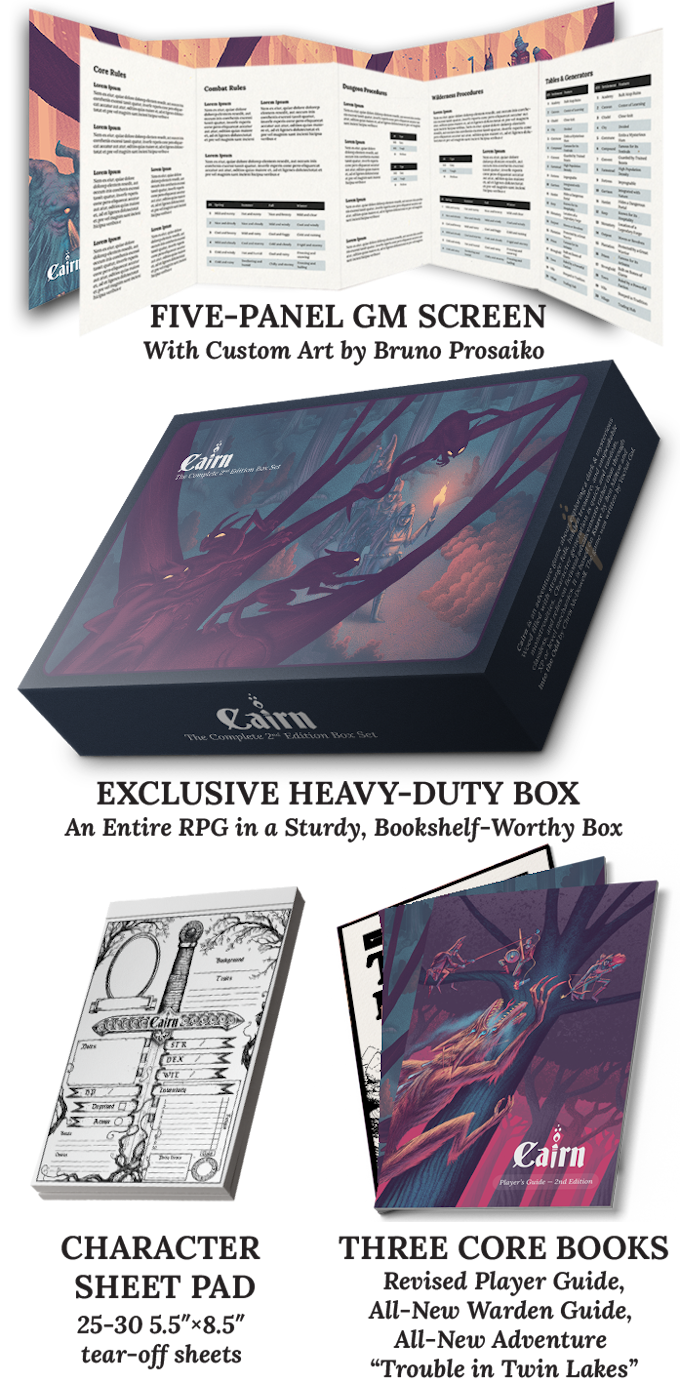
A first for Cairn and exclusive to this boxed set, the Warden's Screen is meant to inspire and inform in equal measure. It features a new, full-size illustration by Bruno Prosaiko on the front and tables galore on the back to help Wardens run their best game of Cairn ever! We're hard at work behind the scenes to determine the most relevant and useful information to put on this board, and our final design will be revealed in a future update.
The Warden's Screen contains five 5.5" x 8.5" panels made of thick gameboard, with art on the outside and reference text and tables on the inside.

Digital mockup, final presentation may differ.
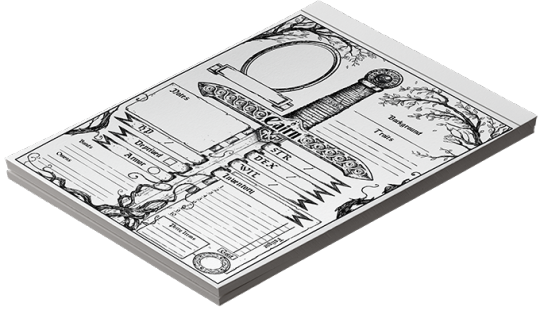
The new Cairn 2E Character Sheet Pad feature art by Licopeo and are perfectly designed to show off your character's skills, stats, and assets. Backers at the Cairn 2E Boxed Set tier will get a whole pad of sheets that can be torn off as needed (useful in case of a sudden TPK).

Digital mockup, final presentation may differ
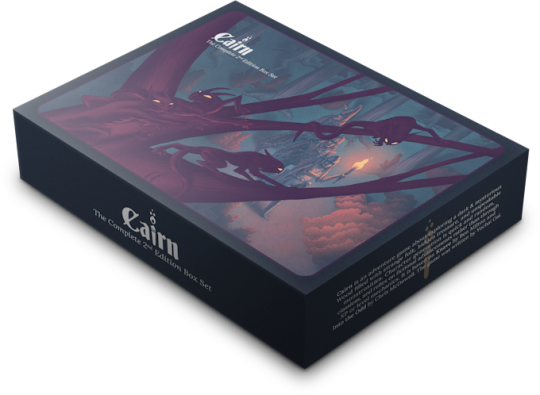
Collectors and enthusiasts will appreciate the robust box with unique art from acclaimed artist Bruno Prosaiko. Made of sturdy cardboard made to withstand years of intense gaming sessions, it'll contain everything you need to run a game of Cairn: just supply pencils, dice, and friends.
The Cairn 2e box also includes a handy lift ribbon inside, to access all your books and papers easily without needing to upend the whole box!
======================
Kickstarter campaign ends: Fri, April 26 2024 3:00 PM BST
Website: [Space Penguin Ink] [twitter] [instagram]
16 notes
·
View notes
Text
Sometimes it's fun to just find a cheese strategy, even if that strategy isn't the fastest at dealing damage or what not. "The Immortal" my friend I have bad news for you.
I'm a really bad fighting game player. I subscribe to the School

OF NO BLOCK!
To explain this cheese for people who aren't aware and are wondering why my friends here aren't getting sandblasted to death, "The Immortal" has an interesting AI quirk where the attack he uses is dependent on the tile your unit is on, not whether or not he can hit them. If the enemy is on one of the ranged tiles around the map, he will hit them with his sand blast.
But if they're on a melee tile, he will always use his axe swing. This means that melee units with 0 Block can actually attack him with impunity. This means that Ambusher and Dollkeeper Specialists are at zero risk of dying to him and can freely whittle away at his HP.
There are two risks however: the first is the weather, so it might be a good idea to have a Healing Defender (like Saria) to keep their HP up. I had Thunderstorms and that can kill operators deployed, which will restore 12,000 HP to the boss, which is not great. As long as Saria doesn't damage the boss, she won't be attacked by him too. You might even be able to use her S3 instead of her S2, I haven't tested that yet.
The second is that _one_ of the Ore Guardians will decide to waltz his ass in the middle. We hate this guy. It's not super likely he kills anyone straight out since he'll also be whittled down, but importantly, it's annoying as shit. Once you see him, it's a good idea to block it with either Jaye or Lappland (since Silence turns off the retaliatory Arts damage iirc) and kill it off.
Ambushers:
Ethan: Ethan can actually damage The Immortal with his S2, but he'll only do about 250-360 damage with each swing depending on his Module progress and this is assuming E2 Max Level and Mastery 3. You'll want to use his S1 instead, because The Immortal actually has 0 RES and so the 100 Arts damage per second will be a much higher DPS.
Manticore: Manticore barely misses the 1000 DEF mark for her normal attacks to do damage, so it's best to use her S2 for this stage. She won't contribute all that much to DPS outside of doing a lot of damage to the Core Guardian, so she's not the most useful here.
Kirara: This might actually be one of the best stages for Kirara in the game, which is absolutely hilarious to think about. We've done it. We've finally broken Kirara. I'm not entirely sure whether her S1 or S2 is better, I think her S1 has better overall DPS than her S2, but her S2 boosts her survivability in the stage and she's pretty easy to position for the bonus.
Mizuki: Mizuki is actually the only Ambusher who can deal more than chip damage with his normal attack (only 97 though), but he does so much Arts damage its not really a fair comparison. You can use either his S1 or his S2 on this map, depending on which one you find has better DPS against a lone enemy.
Dollkeeper:
Bena: With Dollkeeper's, their skills don't tend to matter because they pretty much always instantly die. You might be able to get some use out of her S2, but Bena is more important due to the fact that her Substitute deals Arts damage, and a fully upgraded Bena can deal about 800 per attack, which is pretty reasonable.
Kazemaru: With proper timing, Kazemaru might actually be able to deal some damage with S1, but the big draw is the burst damage she gets off of her Substitute being summoned. This being said, she won't contribute that much damage even with her Module since the Substitute does physical damage and is just barely under 1000 ATK. Like Manticore, she's not really needed.
Specter the Unchained: This probably will not be surprising, but she's easily the best Dollkeeper for this bit. While it's highly unlikely that she'll survive to use her skills (even with the help of Gladiia and Skadi) her best one is obviously her S2, and she'll even do pretty good damage with it. Her Substitute is one of the big damage dealers here, as a full rotation will do about 17,000 damage and gradually wear him down. Skadi's Mod Y will also be a big help her for increasing her damage output.
I don't have everyone maxed out, so I can't say if this cheese can kill him within the 5 minutes for the stage. If not, it can get a good idea to supplement with a high damage Operator (they need to deal at least 12,000 damage in order to be worth it).
15 notes
·
View notes
Text
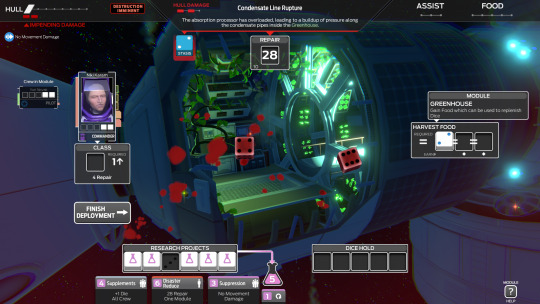
Tharsis (2016, I told you most of the games I play are older) is basically a single player dice & card game, except everything is managed by your computer instead of with actual dice and cards.

Time for another rambling game rec!
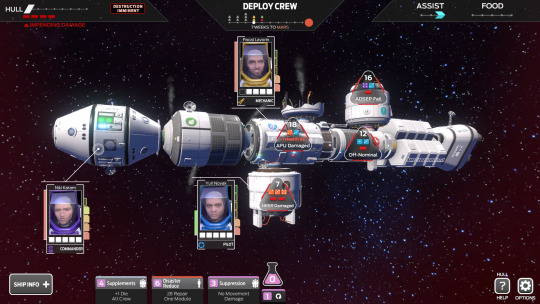
A bizarre transmission, not from any known source, originating from the Tharsis crater on Mars, instigates the first manned mission to Mars. The Iktomi, enroute to the red planet, encounters a micrometeor shower that severely damages the ship. One of the crew is killed, the ship's pantry is destroyed, and the remaining crew have to survive the trip to Mars as systems continually fail.
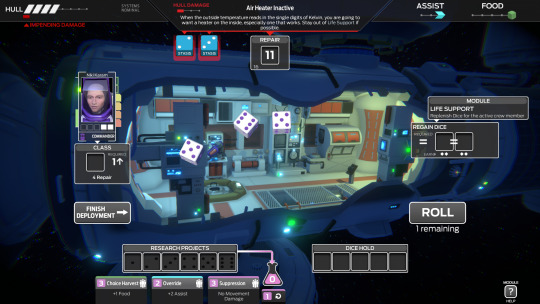
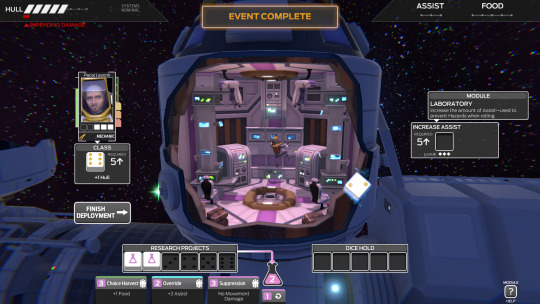
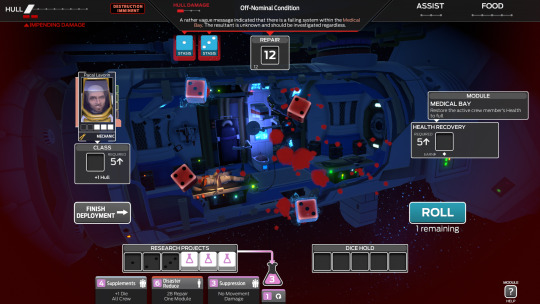
Each week, new systems failures occur in one of the seven remaining modules of the ship. Your crew each have a certain number of dice, up to five, to resolve the issue by adding values together to meet a specific "repair" target goal. Dice can also be assigned to crew member ablities, which have an immediate effect, ship module abilities, which affect stats that carry over from one turn to the next, or research, which can be spent on randomly drawn projects for an immediate effect ranging from regaining dice to massive repairs to a module or the ship's hull.
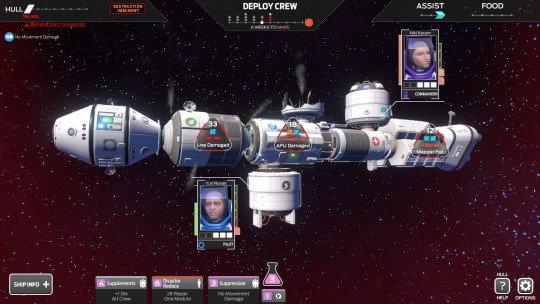
After assigning your remaining crew to repair these modules, the week ends and any remaining emergencies have their effects applied (damaging the hull, reducing everyone's dice pool, injuring everyone) unless the effect is to disable the pod itself, which is an ongoing effect until it's repaired.
After damage is assessed, it's time to prepare for the next week.
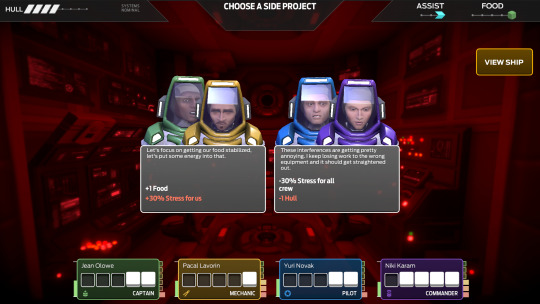
Your crew is divided on how to prepare for the next week, and you have to choose what plan to follow. Every plan has a positive effect and, depending on the stress level of the crew proposing it, a negative effect that gets applied to the other option. You'll see here that if I pick the first option, I get one food, but those two crewmembers become more stressed. If I pick the second plan, everyone's stress reduces, but ship's hull takes damage.
The things you have to track from turn to turn:
HULL: If the ship's hull reaches zero, everyone gets to experience the joy and wonder of the cosmos close-up! Game over.
ASSIST: You can hold up to three ASSISTs. At the end of every week, you gain one, up to that maximum. Every time you roll a penalized result (Stasis, Damage, or Void) when repairing a module, it removes one ASSIST instead of doing that effect, until you're out of ASSISTs. You don't get to choose which effects get canceled by an assist.
FOOD: At the end of each turn, crew lose a single die from their dice pool, to a minimum of one. A single unit of food can be spent to restore three dice to a single crewmember's pool, to a maximum of three.
MEAT: You start the game with three meat. This meat can be substituted for food, HOWEVER - the meat is sourced from dead crewmembers. Committing cannibalism permanently lowers a crewmember's max HP by one. Crewmembers who have committed cannibalism have their dice permanently bloodstained to represent this. Once you run out of meat, you can choose to sacrifice a crew member in order to get three more meat at the cost of some stress and OH YEAH A DEAD CREWMATE.
HP: Each crewmember has 1-6 HP. Leaving a damaged module costs 1HP. Some damaged modules do HP damage to all crew at the end of the week. Rolling a DAMAGE result on a die does 1HP. If there are two damage dice in a module with the same number, rolling that number does 2HP damage. Found that out the hard way.
DICE: Every crewmember has 1-5 dice to roll to resolve an emergency, use their or a module's effect, or commit to research
STRESS: Every crewmember has a stress level. The more stressed they are, the worse their ideas at the end of the week are, the higher the penalty for not choosing their choice is. Managing stress is important to avoid cumulative penalties as you go.
RESEARCH: You can store up to 6 dice in research. Each must have a different roll on it, so you can allot a 1 to the 1 slot in research but as long as that's there, you can't allot any more 1s. There are three research projects at any time, with costs anywhere from 1 to 6 levels of research. These have immediate effects and can be huge game changers. Selecting one removes X number of dice from the research pool starting from the lowest value up (from left to right, essentially), or you can burn one level of research to reshuffle your choices.
That's it.
Keep the crew alive and the ship intact until they reach Mars and you win the game! In the main story scenario, you have 10 weeks until you reach mars. Other scenarios, under "Missions" have different objectives. At the end, win or lose, you're scored based on what actions you've taken, how many events are left unmanaged, whether or not you've committed cannibalism (and how many times), etc.
The story, parsed out before each week of gameplay in the main story mode, is easy to predict, but it's not the reason I play. I don't play to find out what's on Tharsis, I already know that. I play to find out how badly screwed I can be and whether or not I can come back from it.

oh shit
please please please please please

oh, I am SO screwed now


It's very highly chance-based, but there's a fair amount of strategy to it, as well. Just... don't get attached to the concept of victory.

Really.

just don't
just...


...don't.

*sigh*

welp.


This is fun.
#tharsis#losing is fun sometimes#holy shit what a shitty run to demonstrate the game with#wow#just#WOW
0 notes
Text
Module 7 Assignment
Question 1:
1.1) Define the relationship model between the predictor and the response variable:
Between the predictor and the response variable, there is a positive linear relationship. This is inferred by calculating the correlation value of 0.7282365 by using the code 'cor(x,y)'.
1.2) Calculate the coefficients:
To find the coefficients, I stored 'lm(y~x)' in 'Regression' and then input the code 'Regresion$coefficients'. It calculated a = 19.205597 and b = 3.269107.
Question 2:
2.1) Define the relationship model between the predictor and the response variable:
The relationship model between the predictor variable "waiting" and the response variable "discharge" can be expressed as 'discharge = a+ b* waiting'. a = the value of "discharge" when the "waiting" time is zero and b = the rate of change in "discharge" for a unit change in "waiting" time. This is a simple linear regression.
2.2) Extract the parameters of the estimated regression equation with the coefficients function:
Using the code 'lm(formula = discharge~waiting), the coefficient are calculated as followed:
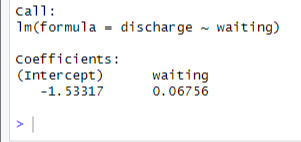
Therefore, the estimated regression equation is:
discharge = -1.53317 + 0.06756 * waiting
2.3) Determine the fit of the eruption duration using the estimated regression equation.
If the waiting time since the last eruption was 80 minutes, then we can determine the eruption duration to be 3.87163 using the estimated regression equation below.
-1.53317 + 0.06756 *80 = 3.87163
This is a good fit because the coefficient of the predictor variable "waiting" is positive, meaning that as the waiting time increases, the discharge also increases. Because "discharge" is negative, we know that the discharge will never be zero (even if the waiting time is zero), which also fits.
Question 3:
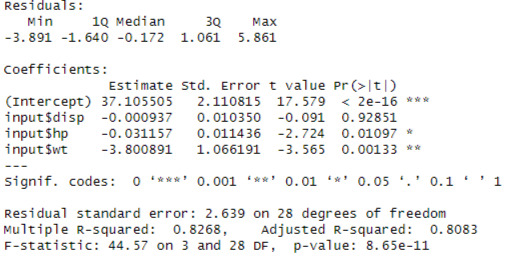
Examine the relationship Multi Regression Model as stated above and its Coefficients using 4 different variables from mtcars (mpg, disp, hp, and wt). Report on the result and explanation of what does the multi-regression model and coefficients tell about the data?
The coefficients are:

The regression model would look like this:
Y = 37.105505 - 0.000937 - 0.031157 - 3.800891
The p-value of 8.65e-11 tells us that there is a significant relationship between Miles per gallon and Horsepower as well as Miles per gallon and Weight. Looking at the results below, we can believe that Displacement has no significant relations as the p-value is greater than its level of significance.
Question 4:

According to the fitted model, the predicted metabolic rate for a body weight of 70 kg is 1305.394 kcal/24hr.
0 notes
Text
I haven't heard of this module, but I'm super on board for making the death powerful and interesting. I think involving the paladin's god is a great plan! If the curse is "you will die, and soon", maybe you can't reverse it, but maybe you can pick your moment? Perhaps the God and the paladin could make a deal so that when it's time, they get to go out in a blaze of divine glory instead of merely dying? They hit zero HP and they WILL die at the end of the scene, but UNTIL then they get to keep fighting and nothing can stop them? They can help their friends one final time? I dunno, I'm spitballing here, but there's definitely more interesting stuff to do than just die.
I'm learning the hard way that DMs on Reddit are woefully lacking in imagination. I'm running the Tomb of Annihilation and I have a player with the Death Curse, so I'm trying to find ways to make that interesting, or at least not just kill them outright.
I'm being told that I should just let them die.
Like, really? All my instincts are screaming to me that there's a way to make this cool, even if death will be the end. They're a paladin, maybe I could get their god involved? Could lycanthropy help them out? Vampirism? Maybe I could build a magic item that would slow down the effects? How would any of this work mechanically in a way that respects how deadly the curse is while also giving the player some new options?
Is there anyone on here whose run the module and handled a similar situation, or just has a cool idea I can riff off of?
61 notes
·
View notes
Text
Conversion Corner: Star Fox Starships part 1
The Arwing
Ever-expanding our horizons when it comes to conversion work, today we’re going to look at converting starships from a beloved video game franchise over to Starfinder, more specifically from the 3D starfighter games with an arcade-style mission layout and usually branching paths: Star Fox.
There’s a lot to love about Star Fox as a franchise, and also a lot to dislike, such as how the latest two major games in the series were one that took the branching paths too far and turned the game into a weird soap opera drama of convoluted relationships, and Star Fox Zero, another retelling of the original Star Fox story with different stages and fights, bogged down by an overly ambitious control and presentation scheme.
But we’re not here to cry about the franchise’s woes, we’re here to look at some of the more iconic starcraft in the franchise and apply them to the rules of Starfinder. No matter who or what anthropomorphic animals step up to the controls of these craft, we’ll see exactly what they have to offer.
First off, we’ll be looking at the most iconic vessel in the franchise: The Arwing.
The Space Dynamics Arwing was developed under exclusive contract with the Star Fox mercenary team, and is the very top-tier of small, single-pilot craft in the Lylat system, able to punch way higher than it’s weight class (especially if we consider that, if it’s length of 5 “space meters” is analogous to actual meters, the craft is actually smaller than the smallest average “tiny” sized Starfinder starships by about a meter and some change). It sports twin laser cannons, a tracking explosive weapon system (and the ability to fire tracking globes of plasma as well, but I think that would be a bit overpowered in Starfinder), as well as a compact but speedy engine, a G-Diffusor system that not only negates the effects of G-forces of flight even in atmosphere, but also helps power the shielding. It also possesses a pair of variable wings that are kept back during space travel, but can be opened fully to help maneuver while in atmosphere.
With the help of the standard Arwing, as well as it’s various upgraded and customized versions over the years, the Star Fox team has been something of a four-fighter armada supporting the Lylat system’s fleets against all manner of foes.
Space Dynamics Arwing – Tier: 3
Tiny Interceptor Speed 8; Maneuverability Perfect (turn 0); Drift — AC 16; TL 16 HP 30; DT —; CT 6 Shields Basic 30 (front 8, port 7, starboard 7, aft 8) Attack (Forward) Light Plasma Cannon 2d12, High Explosive Missile Launcher 4d8 Power Core Pulse Brown (90 PCU) Drift Engine none Systems data net, horacalchum defensive countermeasures , mk 3 mononode computer, mk 4 armor, mk 4 defenses, siccatite armor, Training interface modules: (Primary fighting style (gunner), Deadly Aim, Mobility) Modifiers +3 to any one check, +2 Piloting, +4 Computers (sensors only); Complement 1
Total BP: 92
For this build, I wanted to emulate as much of the Arwing as I could. Sadly, the homing plasma ball of 64 and onward cannot be properly emulated since there are no tracking weapons in the game that are not limited fire. Also, it’s worth noting that I’m flavoring the plasma cannon as the fully upgraded twin lasers, since tiny starfighters can only have two front weapon mounts. Sadly, even in the tightest scale of starship combat, none of the explosive weapons cover a radius, so we have to make do with the high explosive missile launcher.
I chose having a data net based on the assumption that, just like in the games, a more science-oriented squadmate like Slippy Toad providing scanning details on enemy vessels, while the strong mononode computer is there to help shore up the skill checks of the minor crew actions that the pilot may need to take while focusing on shots or advanced piloting. The training interface modules assume that Fox has the ranged soldier build from the Pop Culture Builds I did of him a while back, and are a great way to spend build points to grant additional benefits that perfectly emulate the tendency of Arwings to be used to strike weak points for massive damage and avoid enemy strikes even up close. The horacalchum countermeasures and siccatite armor are meant to help further represent the elusive nature of the Arwing, as well as it’s ability to move freely in atmosphere with ease.
The Arwing is an impressive beast on its own, easily top of the line for a one-man craft. Individual pilots have been shown to even improve upon the design, crafting a machine that works the best for them.
18 notes
·
View notes
Text
Fabfilter Pro Q 3 License Key Free

Fabfilter Pro Q 3 License Key Free Code
Fabfilter Pro Q 3 License Key Free
FabFilter Pro Q-3.17 Crack & License Key Download (2021) Fabfilter VST free download. Multimedia tools downloads - FabFilter Pro-Q by FabFilter Software Instruments and many more programs are available for instant and free download. Fabfilter pro q VST free download.
FaBFilter Pro Q is probably the device you use the most when mixing and working, so you need a top-notch add-on. With FabFilter Pro-Q 3, you get the best possible sound quality, a broad overview of features, and a clean, creative interface for easy use. It is a VST engine sound module with unusual sound mixing techniques.
FabFilter Total Bundle License Key consists of all crucial keygen units which contact for to get the free get right of access to this software program. Moreover, Fabfilter pro q 3 split free download newest sound manufacturing program is usually consists of 14 plugins that could work on Microsoft Home windows and macOS products.
Fabfilter Total Bundle VST Crack (Win) Download. FabFilter Total Bundle Crack is intended to become your sound shaping tool. This 24-band dynamic equalizer allows subtle optimizations and extreme frequency sculptures, both with an analog natural phase and with a precise digital linear phase.
FabFilter Pro Q-3.17 Crack & License Key Download (2021)
Fabfilter VST free download. Multimedia tools downloads - FabFilter Pro-Q by FabFilter Software Instruments and many more programs are available for instant and free download.
Fabfilter pro q VST free download. Most people looking for Fabfilter pro q VST free downloaded: FabFilter Pro-Q. FabFilter Pro-Q is designed to create sound bands, select and edit multiple bands at once. FabFilter Pro-L.
Dec 9, 2018 - FabFilter recently released the Pro-Q 3 — an update to their flagship equalizer plugin. Its predecessor, the Pro-Q 2, was already an incredible. Videos about FabFilter Pro-Q Learn more about FabFilter Pro-Q's features and functions.
FabFilter Pro-Q 3 Crack (VST) License Key Free Download (2021) FabFilter License Key offers everything that the demanding engineer can do: FabFilter Total Bundle 2020 is here, complete set of all FabFilter plug-ins excellent sound quality audio processing and music production. May also like Idoo FabFilter Pro-Q 3 Crack from here.
FabFilter Pro-Q 3 Crack the best method for sound creation. This 24-band dynamic equalizer allows subtle tweaks as well as intense frequency sculpting in both analog and digital phase modes. Let snare drums break, let vocals louder, or even fit one of the tracks to another with the EQ curve. You also get an infinite variety of philter types, center- and left-right processing modes, and support for Dolby Atmos. Pro-Q 3 could be the last EQ plugin you ever need to complete with the Auto Gain feature. Thanks to its versatile new features, it’s easy to create a top drawer mix with Pro-Q 3. Take advantage of support from Dolby Atmos, smart per band speakers. FabFilter Pro License Key removes inappropriate frequencies using an LP / HP brick wall philter pitch.
One compressor plug-in that has received rave reviews for its sound character and delicious versatility is FabFilter Pro-C 2. Pro-C 2 offers an innovative user interface, flexible side training and routing options, and offers you high quality compression and useful presets depending on the program.
There’s also a philter type of Flat Tilt. The creation of sonic space is a piece of cake with Pro-Q 3 — its modernized spectrum analyzer gives an indication of collision frequency, while the over-the-top Spectrum Grab feature provides labels for critical peaks. Improved EQ Match lets you match another Pro-Q 3 instance’s post spectrum in your session. Moreover, automatic gain now involves the weighting of the channels and an assessed correction of dynamic gain, leading to a better overall gain.

FabFilter Pro Q 3 Crack & Torrent + License Time Download
In the FabFilter Pro-Q 3 Crackplug-in, there is a Natural Phase mode with a distinctly analog atmosphere, in addition to a very clear-cut mode for the linear phase. The natural phase mode corresponds to an analog equalizer’s magnitude response and phase response without unwanted audible stimuli. When you start boosting strongly, digital EQs begin to display their true colors, and Pro-Q 3 is the most striking.
Fabfilter Free Download
FabFilter Pro Crack is famous for an audio plugin VST application. It has special and useful mastering tricks and techniques to mix an audio sound. The quality of music production is boosted but after the complete implementation of VST, VST3, AU, AAX, and other AudtioSuites reliably. It is an option to customize the platform for your consequences. So, you can equalize the sound and audio voice. Hence, it is removing these types of tactical terms using the professional suite. This is a complete suite within a transparency control and goes to peak performance due to a true limiter.
FabFilter Pro Q 3 Crack & Keygen Download (Mac + Windows)
Fabfilter Pro Q 2 Download
Sweetwater mixing engineers know that your EQ frequencies have a big effect on your combination. You will note a decrease in energy and enthusiasm and may not know why, if you cut the frequency that falls in line with the key to the song which you mix. With Pro-Q 3, the Piano Roll view shows you at once the variety of notes you work in, making it possible to make more musical choices and sound mixes.
You alter the overall volume level of this track if you make substantial boosts or cut to an EQ. In the FabFilter Pro Keygen-Q 3 plug-in, the Auto Gain mode compensates the key performance by how you boost or cut. You can do this without disrupting the overall balance of the mix if an EQ adjustment is required after setting the basic mix levels. Auto Gain mode Pro-Q 3 involves channel weighting and the expected dynamic gain correction, which increases overall gain adjustment.
FabFilter Pro Bold Features:
Complete EQ and plug-in philter
Smart pro-band speaker selection support for Dolby Atmos
LP / HP philter pitch brick wall removes unwanted frequencies actively
The indication of frequency collision makes sonic space brisk
Overhauled spectrum seizure functionality includes labels to identify important peaks
Auto gain consists of channel weighing and a complex adjustment.
Bell, Notch, High / Low Shelf, High / Low Cut, Tilt Shelf, and Flat Tilt are the most common forms of philter.
EQ Match helps you to balance another Pro-Q 3 in your session with a post spectrum
Mid- and left-right per-band modes allow you to more accurately EQ your mix
Improved EQ band menu with Dynamic Creation, Inverting Gain, etc.
Pick from Linear Phase transparent operation or Natural Phase analog sound mode.
The Zero Latency mode makes it perfect for monitoring or live use
Unbelievably sensitive audio monitoring with up to 24 EQ bands
Pick frequencies with Piano Roll View based on musical note values
The maximum depth is 96dB per octave for all types of philters
Technical Specification:
Software Type: EQ and Filters
Platform: Mac & PC
Upgrade/Full: Full
Download/Boxed: Download
Bit Depth: 64-bit
Format: AAX Native, VST, VST3, AU, AudioSuite
Requirements – Mac: Intel Core 2 Duo or higher, 4GB RAM minimum, OS X 10.9 or later
Requirements – PC: Intel Core 2 Duo / AMD Athlon 64 X2 or higher, 4GB RAM minimum, Windows 7 SP1 or later
How to install FabFilter Pro-Q 3 Cracked Edition?
First of all, download the latest version from our link.
Now, extract the setup using a new edition WinRAR.
So, run the setup and wait for full installation.
No, do the button and enjoy it for a lifetime.
FabFilter Pro Crack + Keygen 2021 Download
FabFilter Pro Crack is a plugin that will interact with its incomparable sounds and user interface. Voice and VST32 sound quality is now available. It is the advancement of a new generation to perfectly organize music content. However, you can engage in EQ plugins and play professional functions
To create Bass Gorilla keyword and critical planning as you wish. It is the perfect data arrangement and sound mix for music lovers. So how difficult is it here? Nothing special. First, it interacts with your equation and the best evaluation technique. Also, there is a great and impressive interface to share your ideas with your latest music. This is fast and efficient. Because it revealed the tools of the master.
FabFilter Pro keygen offers everything the discerning engineer can do iT Total Bundle is here, a complete set of all it plug-ins, excellent sound quality, audio processing, and music production. You may also like Idoo Video Editor Crack Version from here. It Pro Download is a powerful audio editing tool that will allow you to shape your audio files and comes with the highest quality end product possible.
The quality of the audio files depends on many factors. Quality can be influenced by many plugins. The equalizer is by far the most popular way to improve sound quality. It is an equalizer that comes as an audio plug-in and is very easy to use.
Fabfilter Pro Q 3 License Key Free Code
FabFilter Pro Serial Key is designed to help you achieve your sound in the fastest possible way. Via the large interactive EQ display, you can create bands where you need them and select and edit multiple bands at once. Unique features like Spectrum Grab, Full Screen Mode, and EQ Match will speed up your workflow even more.
It is designed to help you achieve your sound in the fastest possible way. Via the large interactive EQ display, you can create bands where you need them and select and edit multiple bands at once. Unique features like Spectrum Grab, Full-Screen Mode, and EQ Match will speed up your workflow even more.
FabFilter Pro Crack
It quickly became my first-choice EQ plug-in, and I’ve spent much of the last four years happily putting Pro-Q in the insert slots. If I’m honest, in fact, it hadn’t actually occurred to me that there might be ways to make it even better. Then themselves, however, have not been so accommodating, and Pro-Q version 2 offers a positive deluge of new features.
FabFilter Pro License Key is a plug-in that interacts with you to match its unmatched sounds and user interface. It is now available for VST and VST32 to create quality sounds. It’s about the advancement of a new generation to perfect the organization of music content. However, you can participate in the EQ plugin and play its Pro features to send your sounds and critical planning of Bass Gorilla stuff as you like.
FabFilter Pro Keygen is a very useful tool, but it also has its serious side. The linear phase mode makes it suitable for the master bus, and it also has left-right and middle side modes. The EQ range extends down to 10 Hz and up to 30 kHz, and together with the crisp EQ curves, this makes it ideal for cutting inaudible frequencies that take up headroom.
In use, it feels precise and clear, with frequencies cut when desired, and with boosted frequencies clearly audible with very tight Q settings. Raising the high-end adds what it should rather than an undue edge. All of this results in clear, defined mixes when used on each channel, for which the low CPU load makes it suitable. It’s not as comprehensive as, say, DMG’s Equilibrium, which offers a wide range of EQ characters, among other things. But Pro-Q 2 has no glaring omissions, although it is not so specified as to detract from its immediacy.
FabFilter Pro Crack Key Features
Fully support VST, VST3 with Full HD video/audio units.
Here is full support for native AAX formats.
Known for the MAC / Windows operating system.
This is the final synthesizer that works basically through the app stores.
This plugin has a flexible drag and drops modulations.
There is such a nice oscillator for tuning the multi-interactive displays.
FabFilter Crack perfectly controls your sounds, including the power of tools.
However, it includes advanced sidechain options as well as accurate measurement.
High-quality audio with nice plug-in and synthesis effects.
Fabfilter Pro Q 3 License Key Free
System Requirement
For Windows Vista, XP, 7,8.1,8 and Windows 10 too, both (32/64 bit)
Nothing special more than that.
How to install FabFilter Pro Crack?
First of all, download FabFilter Crack.
Then run Crack and generate the license key.
Now it’s done.
Complete installation procedure.
Then enjoy
You may also like Adobe After Effects Crack Full Version Download (2021)
1 note
·
View note
Text
Scoundrel - 6* Dollkeeper
Switches to his bat form (animation is hissing at the enemy that just "killed" them and then putting on the cloak) to deal high single-target damage
Skills are all randomness-based; a crit skill that has an utterly absurd multiplier at a 10% chance (something like 1200%) but actually deals less damage then a regular hit normally, Arts damage mode that hits random targets for a random number of hits and a skill that lets him stack a random buff on himself every time she kills an enemy, extending the skill duration as they do so. All skills can be activated as their Mr Cards persona and are vastly more powerful when doing so at the cost of stopping their Dollkeeper health regeneration; putting them at risk of being retreated for real as Mr Cards has no doll to fall back on.
Talent increases the chances of crit damage every time you don't get a crit. Effect is increased as Mr Cards, increased further for every bat on the field.
Caeru - 5* Executor
Single-target assassination Executor; takes down high priority targets, then bolts.
Skills inflict long-lasting DoT poison effect while heaping movement debuffs and ATK debuffs on the target; makes that target a non-threat. Or has incredibly high stackable-poison DPS at the cost of being made of paper and folding with any hit, so you need to prevent the enemy from retaliating while they do their job.
Lark - 5* Merchant
Nondamage Merchant; heals and increases allies' stats as DP is consumed.
Can block, stun and bind with skills but damage is always zero.
Louise - 6* Trapmaster
Can use Mirror Traps that induce Fingerking possession on enemies, causing them to attack each other.
Can use skills to increase the strength and reach of Mirror Traps, use Mirror Traps to bring Parabola into the battlefield and turn them into strong and evasive summons, or increase own strength every time a Mirror Trap is triggered. Third skill forces a single Mirror Trap but utilizes the incredibly strong Knot of Tails on it; forcing you to possess a resilient enemy to use as a "shell" to take advantage of its incredibly strong Arts attacks (and strangely enough, staggering teamwide buffs to Zalak Operators?)
Academic - 4* Medic
"we have Warfarin at home."
Can stop healing and start draining health of allies. When this is done she will convert the damage into an ATK buff for her allies based on how low their HP was at the skill's end. This incentivizes you to put a ton of people around her to experiment on and not give them any other support. Gambling with your allies' lives, basically.
Fragile but can give an "extra life" effect once with her talent. She also gives taunt to the Operator she is currently healing to ensure this life won't go to waste.
Yearning - 6* Executor
The latest in a line of busted ass alters.
Inflicts Chill on hit no matter what. Insane damage bonuses against Frozen enemies. Also chills allies near her every 5 seconds or so.
Self-heals when killing frozen enemies. Deals Chill when killing frozen enemies. Replenishes skill duration when killing frozen enemies. Essentially everything in her kit makes her need constant supplies of frozen enemies to keep turning into corpses. Gnosis is her bestest friend.
Explodes once she dies for even more Chill. With her module she redeploys herself in the same spot after dying to keep hitting enemies and making her own death into more fuel for the eternal freeze empire.
Acts like the picture below in regards to everyone else at Rhodes Island

for the court record; im still not sure if the scoundrel would be a dollkeeper or a chain caster. i do however know that caeru is irrefutably executor coded.
and also lark is a merchant. this is also inarguable.
8 notes
·
View notes
Photo


A look at D&D’s Curse of Strahd
From about October 2018 to August 2019, I led a group of four friends through Curse of Strahd, the latest campaign book featuring a dive into the realm of Dungeon & Dragon’s most famous vampire, Strahd von Zarovich. It went well, and it was an interesting experience for me as a Dungeon Master, since this was my first time using one of Wizards of the Coast’s official modules. In the past I’ve always come up with my own homebrew adventures, and I still homebrewed a good chunk of Curse of Strahd, remixing characters and formulating story twists on the fly once I learned the ebb and flow of my group.
One of the things I love most about D&D, however, is that such behavior is encouraged, and pretty much all of the major 5th Edition releases outright tell DMs that they shouldn’t hesitate to make a campaign “their own” by only following the book when necessary. Thus, the version of Curse of Strahd that my players ran through was an experience specifically tailored to them - one where a motley crew known as the “Well-Doners” (like a well done steak...or a stake to the heart of a vampire!) were sucked into Strahd’s strange valley of Barovia and forced to ally together for the sake of survival...aided by a few key comrades, including a funny gnome mage who’d lost his magical mojo, the reincarnation of Strahd’s lost love, a grumpy monster hunter and a massive ranger and his dwarf wife. If I ever run Curse of Strahd again for another group, it’s very likely that many of these key comrades - as well as the general crux of the adventure - will turn out completely different.
To all enterprising DMs who might wish to run Curse of Strahd for their own groups, it’s worth first noting that this is very much a Ravenloft campaign. Ravenloft is the setting that sprouted from the 1983 module of the same name, originally devised by Tracy and Laura Hickman and then expanded upon during the heyday of D&D 2nd Edition. In a nutshell, it’s D&D’s horror setting, and the horror is very much steeped in the gothic tradition, with a heavy dollop of foes inspired by the Universal Monster Movies of the 1920s to 50s, sprinkles of Eastern European creepiness and a dash or two of dark romance to complete the mix. I quite like this combination because it reminds me of the melancholy yet deeply beautiful world of Mordavia in Quest for Glory IV: Shadows of Darkness, one of the formative experiences of my youth and a game that has a great soundtrack for the backdrop of any Ravenloft campaign. (Interestingly, Quest for Glory creators Lori and Corey Cole were D&D players before they went on to design computer games, which means that the gothic realm of Mordavia surely is a clear descendant of Ravenloft.)
But horror of any variety isn’t necessarily everyone’s cup of tea, and certain parts of Curse of Strahd - if run straight from the book - can veer quite sinister, because Barovia is ultimately a crappy place presided over by a crappy undead warlord. The introductory adventure of the module, dubbed “Death House,” actually deals with ghostly children who’ve died of starvation in a haunted manor due to the cultist ways of their mad parents. It’s entirely possible to make these kids untrustworthy antagonists in order to emphasize that the Ravenloft setting simply does not mess around, but since I was running this campaign for a group of four new players whose prior experience with D&D ran the gamut from limited to absolutely zero, I decided to make them into a spooky but still likable duo who could “possess” the players’ characters and offer sassy running commentary on the monsters infiltrating the manor. Like Casper but with a tad more snark, in other words - and the endearing nature of the children made the moment where my players had to lay their corpses to rest and confront their sad origins all the more compelling.
This act of balance - between ensuring that players recognize this as a dark adventure but also making sure that just enough light and humor alleviates the depression - is one that I tried to perform during every session of our game, and I’d encourage future Curse of Strahd DMs to do the same. I’d also encourage enterprising Dungeon Masters to perform a similar balancing act on the monsters and scenarios that permeate the adventure - specifically on the ones in the Death House opener as well as Strahd himself.
Death House, more specifically, is described in the book as a means to help the party quickly progress from levels 1 to 3, but played as is, it’s quite possible for players to get absolutely curb-stomped by everything within the manor - particularly a “final boss” that they’re technically not supposed to engage with, at least in a fair manner. Veteran RPG fans might relish the challenge, which is more reminiscent of Call of Cthulhu than D&D, but newbies might not like having to re-roll a character because their first one got wrecked by a Shambling Mound after only a few hours of play. So, retool Death House to suit the needs of your party - in my case, I limited the encounters somewhat to prevent a steady drip of HP and also gave my players a few tips on how to beat tricky baddies via those aforementioned ghost kids.
The opposite strategy goes for Strahd von Zarovich himself, who might be the big bad of Barovia but is surprisingly squishy when confronted by a hardy group of level 8 or 9 players, especially if they’ve found all the fancy sunlight-shooting artifacts of the adventure that can limit his powers. I can’t count the number of posts I’ve seen on the D&D Reddit or a Curse of Strahd Facebook group I’m in where frustrated DMs have written something like “Strahd was killed by my players within two rounds, where did I go wrong” - and in order to circumvent this from happening in the last session of a shared storytelling experience that had nearly spanned a year, I took a heavy pair of tweezers to Strahd’s stats and gave him three forms, each with their own HP. The first was his regular vampiric self, the second was him riding on his Misty Steed-summoned horse Bucephalus, and the third was basically Strahd going into berserker mode with black angel wings bursting from his back. (I stole the concept art of Satan from Castlevania: Lords of Shadow 2 for that. Worked perfectly!)
Speaking of Castlevania, I drew inspiration from the recent Netflix series - which I’ve written about here and here - when it came to developing Strahd’s actual personality, because even though the book updated his original Bela Lugosi-esque appearance into something more regal and fantasy-inspired, his essence is still something of a two dimensional bad guy, and the fact that one of his eternal missions in undeath is to make the reincarnation of his original lover fall for him is a problematic pill to swallow in 2019, even if it is meant as an ode to Dracula’s obsession with Mina Harker in Bram Stoker’s original novel. And so I decided to make my version of Strahd similar to the depressed, weary-of-life Dracula in Netflix Castlevania, turning him into a vampire of complexities - a guy who’s been immortal for so long that he almost wants the players to kill him, a man who believes he’s entitled to the love of a woman yet somewhere deep down realizes the inherent selfishness of that belief, and a lord who’s grown bored with his kingdom yet can’t quite relinquish the power he’s held over it for centuries. My Strahd, in other words, was still a bad dude, but at least a somewhat deeper bad dude that the cardboard cutout as presented in the book, and one of my players even described him as “a little like Kylo Ren,” which I took as a compliment.
Before I wrap this up, I’d like to return to the concept of the balancing act with regards to the structure and scope of Curse of Strahd, which is a true sandbox adventure. Players are not required to visit half of the locations outlined in the book, and the replayability factor is high, because the various artifacts that you need to defeat Strahd, as well as the specific non-player characters likely to assist you along the way, are dependent on a tarot card reading that occurs near the start of the adventure. The locations that I found the most important for my players were the towns of Barovia and Vallaki, the Wizard of Wines Winery, Yester Hill, Van Richten’s Tower, the Ruins of Berez, and Castle Ravenloft itself. Other groups online swear by Krezk, a third town that my players never bothered to visit (though I would have urged them to go there if we’d had any clerics or paladins in the party, since Krezk is a town with a giant church), and the Amber Temple, the lair where Strahd obtained his undead powers (a place I feel is best suited for players of neutral or evil-leaning alignments). Your mileage may vary, but if you’re going to DM this module, one of the best bits of advice I can give would be to see which locations your players are naturally inquisitive about, and then focus on those. Exploring every nook and cranny of Barovia can quickly turn into a slog otherwise.
With all this in mind, I think it’s time for the so-called “Well-Doners” to leave the world of gothic horror behind for a bit. They’ve somehow managed to find their way back to their home plane and the city of Waterdeep, and only one of the party was infected with a seemingly fatal curse after their stay in Ravenloft. What further quests await, I wonder, and what new campaign book will I hack apart to suit my players’ tastes? That’s for me to know, for them to find out, and for another long blog post examination...sometime in 2020, hopefully!
All photographs taken by me.
3 notes
·
View notes
Video
youtube
Brabus 800 The $394K Based on the Mercedes-AMG S63
Luxury auto tuner Brabus has introduced a new custom build based on the 2018 Mercedes-AMG S63.
Brabus calls the refined model the 800. In typical Brabus fashion, it tweaks the power considerably. Of course, that’s exactly what Brabus is known for—taking high-end, high-performance cars and releasing their potential from the constraints of standard production. The 800 includes the Brabus B40S power kit, with two new turbos.
The vehicle’s performance specs are amped up to 800 HP and 737 lb-ft of torque; the car can move from zero-to-62 mph leap of just 3.1 seconds, and reach a top speed of 186 mph. The standard S63 4L V8 pumps out 603 horsepower and 664 lb-feet of torque, and can get to 62 MPH in 3.5 seconds.
Brabus didn’t just improve the vehicle’s specs, though. In fact, Brabus added a number of luxury touches to give the vehicle a custom look.
New additions include a carbon front lip, front skirt additions, rear spoiler, rear skirt, and rear diffuser, and a custom exhaust. Other Brabus touches include a custom suspension module, bespoke brakes, and new 21-inch Monoblock M wheels. The interior features ventilated seats, custom floor mats, custom steering wheel, fine leather trim, and more.
Available for $394,000.
I wanted to share my love for cars with everyone! Make Sure To like, Comment, Share And Subscribe to AUTOO BUZZZ
1 note
·
View note
Text
hp printer support
hp printer support Between high-profile ransomware attacks and recurrent knowledge breaches, enterprise knowledge security is within the headlines like ne'er before. meaning it is also at the front of people's minds like ne'er before. Keeping knowledge safe has quickly become a high priority for any organization that is involved regarding the privacy of its own data similarly as its public name.
The importance of the print surroundings all told this hasn't gone unmarked. in line with a 2019 report from Quocirca, about to common fraction of organizations rank print jointly of their high 5 security risks. And over three-quarters of them area unit boosting their disbursal on network printing solutions that provide options like secure printing so as to assist minimize knowledge loss.
In most print environments, you will find 3 common vulnerabilities:
1. Central points of attack: With ancient print infrastructures like print servers, you've one device handling printing for a complete pool of users. From a print security position, that is simply a similar as swing all of your eggs in one basket. Hackers WHO wish access to a fashionable pot of information will simply target the task queues or caches on the print servers.
Furthermore, print servers' single points of failure prohibit print availableness. once the server goes offline, thus will printing.
2. written document exposure: skunk prints a private email, gets distracted and forgets to choose it up. Then somebody else finds that written email sitting within the printer's output receptacle and simply happens to browse it, leading to ample embarrassment.
We've all seen one thing like that happen. perhaps we've been guilty of it ourselves. And what is worse, generally it's over simply a private email. It can be personal company memos or documents description serious 60 minutes shake-ups or classified product.
3. Lack of unified oversight: this may embody everything from unpatched server code and superannuated drivers to workers having the ability to print virtually something, together with confidential documents, while not risk of detection. while not the tools for comprehensive oversight, admins have restricted ability to stay tabs on the state of the print surroundings and what is happening across it.
If print security is thus vital, what is the holdup? With such a large amount of organizations in danger from one or a lot of of those vulnerabilities, you'd suppose that they'd be ramping up print security while not skipping a beat. however exaggerated security does not essentially return fast or simple.
For example, if you decide on to implement secure printing, you will need some reasonably secure unleash mechanism. that usually involves rolling out a lot of infrastructure at a time once everyone's making an attempt to seek out infrastructure reduction solutions.
There's conjointly the lingering issue with print servers. Unless you ditch your print servers permanently, there is not any thanks to absolutely eliminate problems with single points of attack. you keep your single points of failure, too, that makes high-availability printing more durable to realize.
Print security with reduced infrastructure and high availableness printersupport is exclusive among network printing solutions as a result of it helps you to have print security while not sacrificing high-availability printing and conjointly reduces infrastructure. It combines stable, simple direct-IP printing with centralized management to make a strong, secure serverless infrastructure.
So what will that seem like on the ground?
Eliminate print servers: printersupport internet Stack (on-prem) and printersupport SaaS (formerly PrinterCloud) offer full-featured printing with zero want for print servers—even in giant and distributed organizations. By obtaining obviate print servers, you take away all of their security and availableness shortcomings in one fell swoop. Experience full oversight: A centralized admin console helps you to manage and monitor each side of the print surroundings intuitively from one pane of glass. The common driver repository makes it simple to stay drivers consistent and up to this point across the organization. Audit print activity: printersupport's elective print auditing module will mechanically generate reports and alerts. that permits admins to stay tabs on print activity and shine a lightweight on antecedently dark corners of the print surroundings. Implement easy-to-use secure printing: wish secure printing that does not rag your finish users? Among many alternative unleash mechanisms, PrinterLogic offers a Print unleash App for iOS and golem. With the app, finish users will firmly execute unfinished print jobs right from their smartphones. higher still, it does not need any additional infrastructure. And if you've Associate in Nursing existing badge or card system, great. printersupport will integrate seamlessly therewith too. With printersupport, you get the enterprise-grade security your organization must defend its print knowledge. however it does not stop therewith. you furthermore may get infrastructure reduction and high-availability printing as well.
Just consider however things went down with EPIC Management (read the case study here). Secure unleash printing is notoriously powerful to implement in attention organizations. And yet, hp printer support, EPIC Management was able to produce a solid chain of custody for its protected health data (PHI) whereas conjointly simplifying its print surroundings.
To see what it's wish to have print security with all the benefits and none of the trade offs, sign in for a Printer Logic demo nowadays. you'll be able to check it in your own print surroundings freed from charge for thirty days.
Quick Live Support
1 note
·
View note