
threadly-intent
4 posts
Exploring fibre arts and slow fashion
Don't wanna be here? Send us removal request.
Statistics
We looked inside some of the posts by threadly-intent and here's what we found interesting.
Average Info
Notes Per Post
20
Likes Per Post
19
Reblog Per Post
1
Reply Per Post
0
Time Between Posts
29 days
Number of Posts By Type
Text
4
Last Seen Tumblr Blogs


Fun Fact
28.6 is the average number of monthly visits per US mobile user.
Text
3D Printed Angel Wings

Like a lot of home weavers, I almost never have help when it comes to warping my loom. After fumbling through a few attempts to just 'make it work', I came across this tensioner and these angel wings.
I wanted something more permanent and solid than the first version, but I live in a condo and don't have space for anything remotely like an actual woodworking shop, so despite being very simple, the woodworking required by the 2nd version ruled it out for me.

I do however have a 3D printer and sawing down a few dowels is definitely on the list of things I can get away with doing on my balcony without attracting the wrath of my strata.
Since I already had some dowels left from making my rigid heddle loom (here's the tutorial I followed), I based my design to use what I already had on hand.

The first version didn't have these small pegs to hold the brackets in place, but their addition in version 2 was simple and completely effective. The final brackets are very quick and easy to pop on and off the loom, but stay securely on when in use.

If you have access to a 3D printer and would like to make your own, I've made the files available on Thingiverse for free.
#loom weaving#textiles#fiber art#textile art#3d printing#weaving tools#freebie#giveaway#free#weaving tool#weaving
1 note
·
View note
Text
First foray into slow stitch

I found the slow stitch process so peaceful and in line with the mindfulness I've been trying to inject into my creative practice. Big thanks to Lyn for starting me on a new style that I don't think I would have otherwise tried. I went a little unconventional with a close crop and a pretty loose mounting in a float frame to preserve the translucency of the silk and organza. I could have been neater, but it didn't feel right to be too fussy in the finishing.

This piece now lives with the model in the source photo, who I recently discovered owns what I think is the biggest collection of my paintings, from back when I did such things! **chef's kiss**
15 notes
·
View notes
Text
Baby Wrap
So baby wraps are a whole thing that I have been aware of but never needed to really know about. Since I picked up weaving over the pandemic, I'd heard more about them, either as a bit of crossover from weavers who are deep into the whole baby wrap culture (it is very much its own subculture!) or from friends of mine who have little ones and made comments about how desirable hand woven wraps are.

When my friend reached out after her new baby to ask if I would consider weaving her a wrap I decided to give it a shot, we have similar enough taste and I know her well enough I was pretty confident I'd have fun with this and I was 100% right!
Just check out those colours up there, glorious!


I was lucky enough to start this project at the same time as I was working through a gradient class over at warp and weave and of course as a huge dork, I promptly decided to do a gradient based on φ My warping mill is only big enough to accommodate half the warp at a time so we get to see the warm and cool halves on their own

It turns out that getting a really clean selvedge and width is way harder across a 4m length vs something like a scarf or dish towel. I pride myself on my selvedges, especially with how new I am to weaving, but there were several times I found myself wishing for a temple to help me out. Luckily after finishing and blocking nothing seemed too wonky so I will probably continue my temple-less weaving ways


I have yet to get the whole length into one photo, which is a shame as I really love how subtle the weft gradient ended up being, but these photos give an idea.
I'm really happy with how this one turned out and I'll be carrying a lot of new knowledge and experience with me into my next project.
One last new addition to my routine: I tried using a small magnetic whiteboard with magnet placeholder for tracking my position while threading & treadling this time, and so far it is my favourite method. The only weaving mistakes I made were when I'd really get into the zone and forget a weft colour change... lots of unweaving to get through whenever that happened!
1 note
·
View note
Text
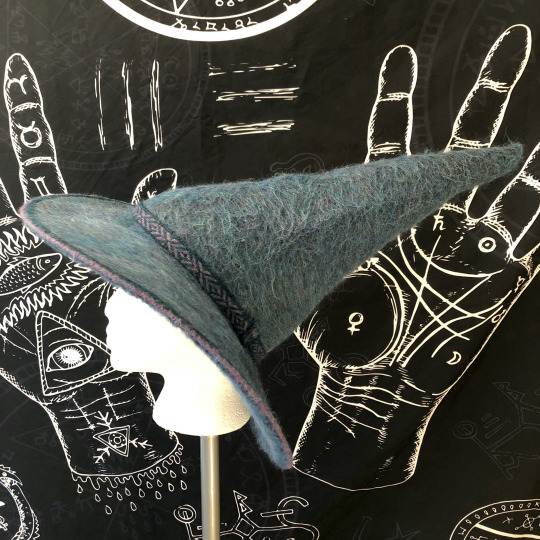
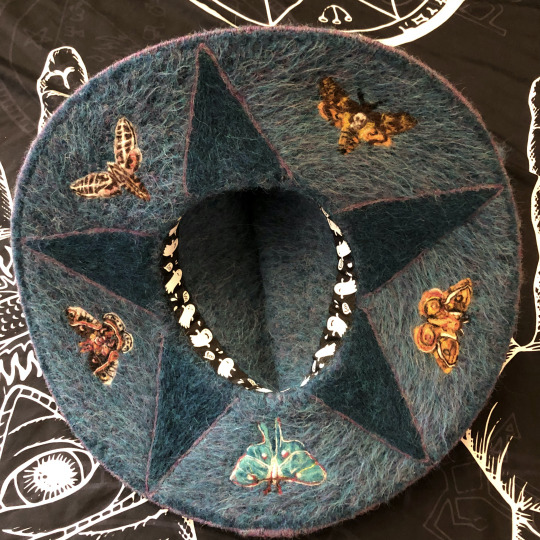
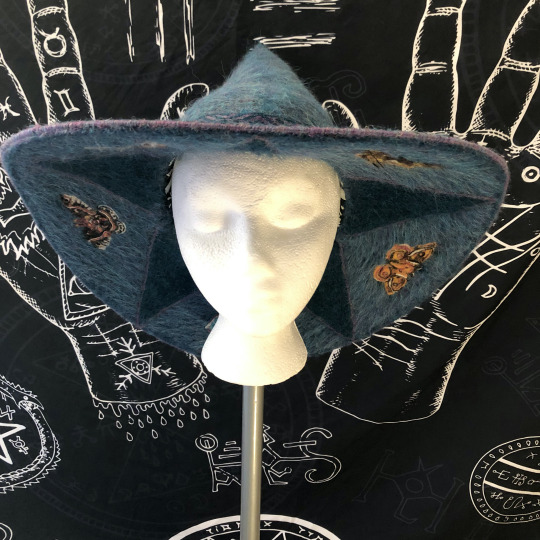
The Witchiest Hat
Lately I’ve been very inspired with the intersection of fashion and fibre art. I also have always had a love of anything costume-y and witch hats in particular are the thing I seem to re-do again and again.
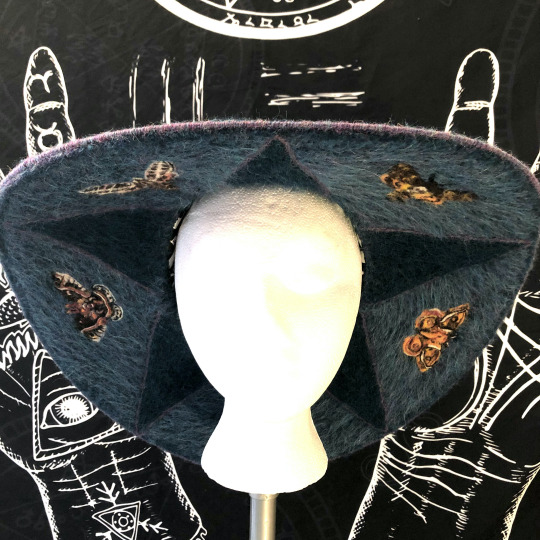
So when my sister in-law asked me to make her “the witchiest witch hat,” well I was literally bursting with ideas.
and what could be witchier then building a hat from the yarn up?

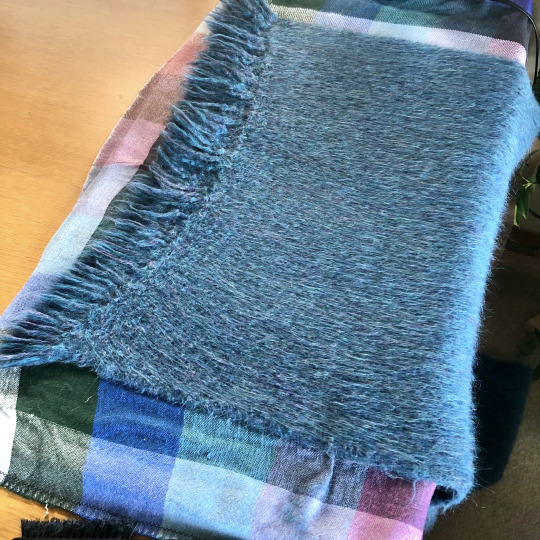
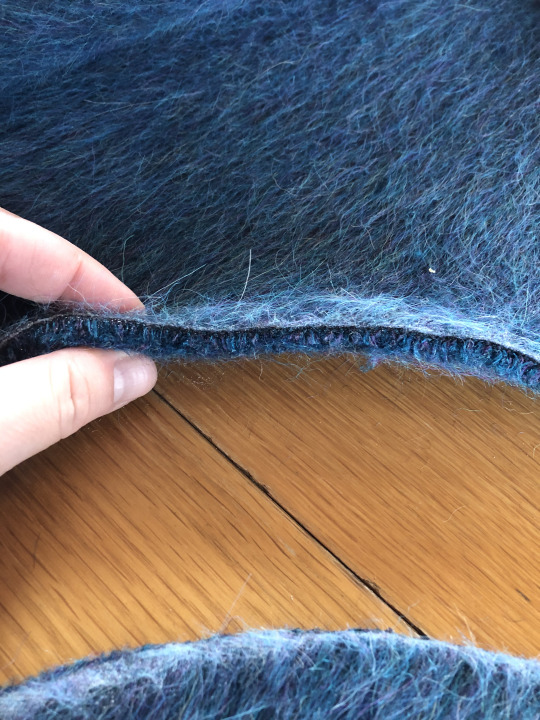
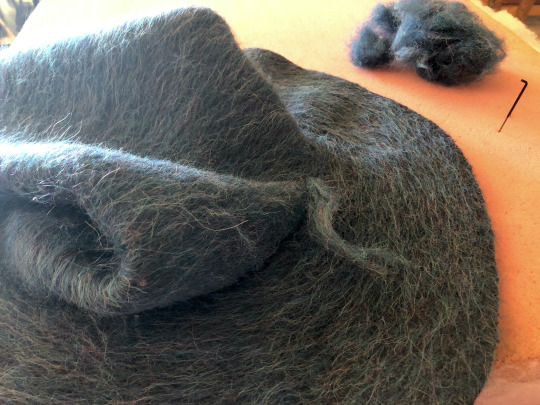
I knew I wanted a very full felt with a lot of dimensionality, so I started with 3 colours of Gist’s 3/10 Alpaca randomly alternated in the warp of a 8 shaft satin weave. I used a 3/60 black merino as my weft. I’d run several felting tests with both yarns and found this combo gave a felt so thick and full it is almost like working with a buttery soft hide. This stuff is almost 1/4″ thick uncompressed. The looser Alpaca fibres also give the felt a full, super fine pile.
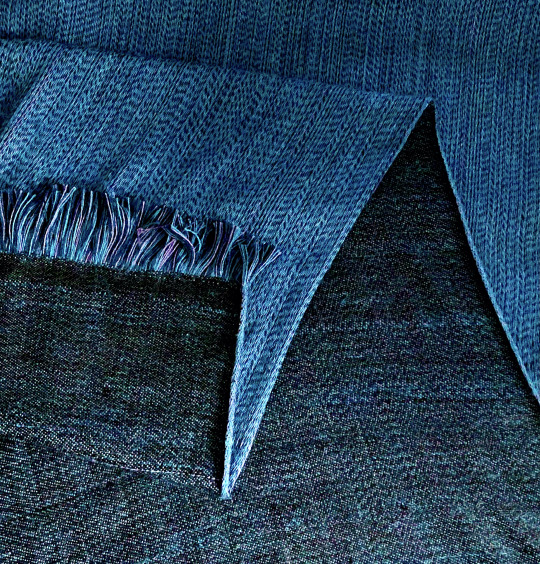
I liked the resulting fabric enough that I will probably make it again for throw blankets. The weight, drape and softness would be perfect. The incredible unwashablility is a definite down side. This stuff LOVES to felt.
This is also our first peek at my camera having a really hard time capturing the colour. It’s an effect I did deliberately because I love using colour theory to make weirdly saturated neutrals, and what’s more magical than weird, shifty colours? I didn’t really think about the fact it would be nearly unphotographable. I did my best to correct it, but sometimes it’s a real blue/gold dress situation.
Not sure if this would count as boiling, fulling or felting but basically I just wet felted the hell out of it until there was no more shrinkage left. Once fully dry I used a boar bristle brush to brush the pile along the grain line and gave everything a full steam and press to set it
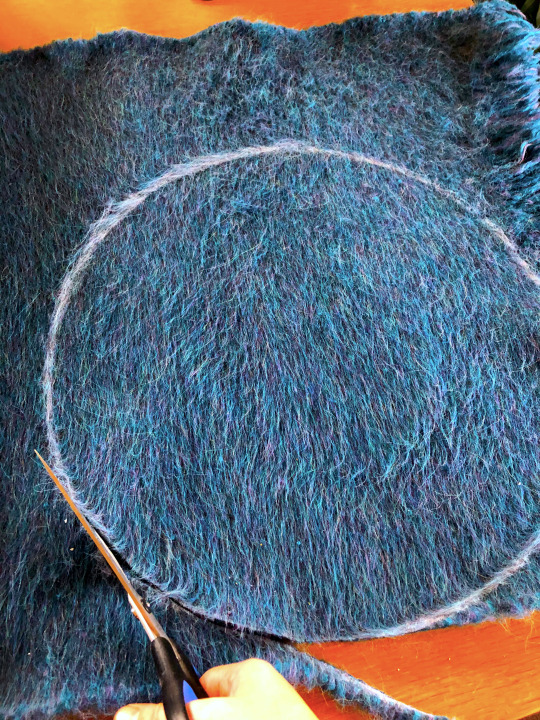
The most nerve wracking part was definitely cutting out the pieces. I was triple checking every measurement and line.
Just check out how ridiculously thick and plush this felt is. Worth the trouble if you have a loom and like to sew this sort of thing. Would make amazing teddy bears too!
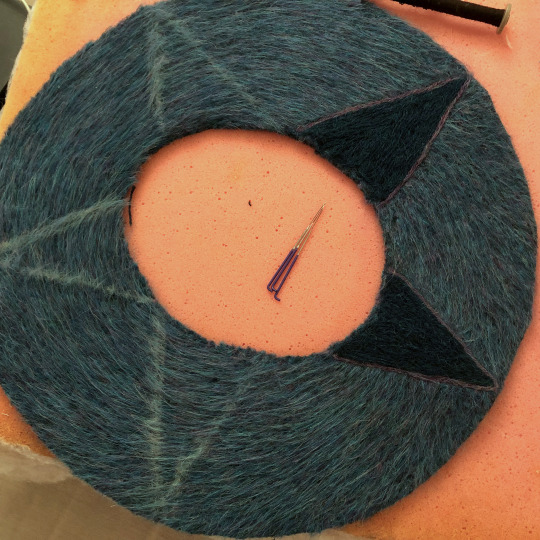
So this is why I wanted such a insanely thick felt. I got weirdly obsessed with the idea of decorating just one side of the brim, while keeping the brim a single layer and not using paint... Also I really wanted to try needle felting decorative elements onto a sheet of felt, like a felted embroidery kinda deal.
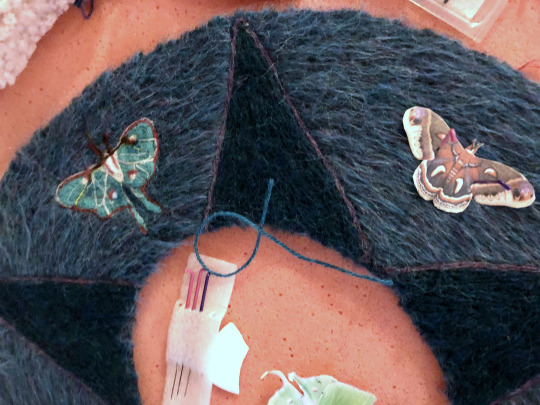
I’ve also been loving the moths on everything trend and moths also seemed like the most obvious thing to put on an entirely woolen item.
For reference, I printed out photos I got from the net, using a photo editor to cut out the moths and make sure they were all the same size. This way I could trace around and then use the image as a rough guide.
I felt like a butterfly collector pinning the print outs to the felt.
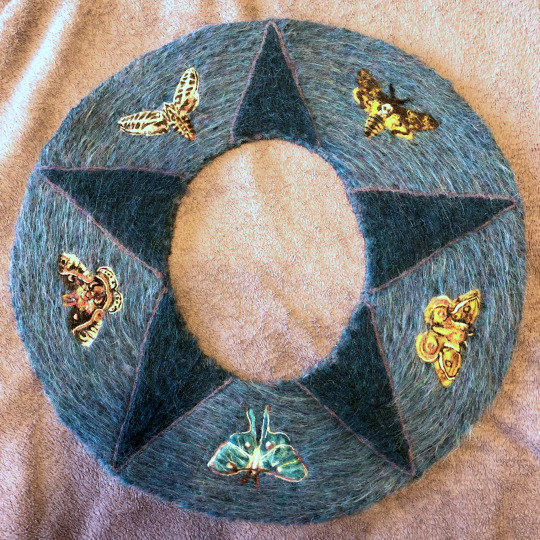
It was so hard to only pick 5 moths, which I think means I need to do some more moth themed things in the near future...
Next I sewed the brim and crown together, felting over the seam on both sides. Notice how you can’t see any of the lower detail on this side of the brim.
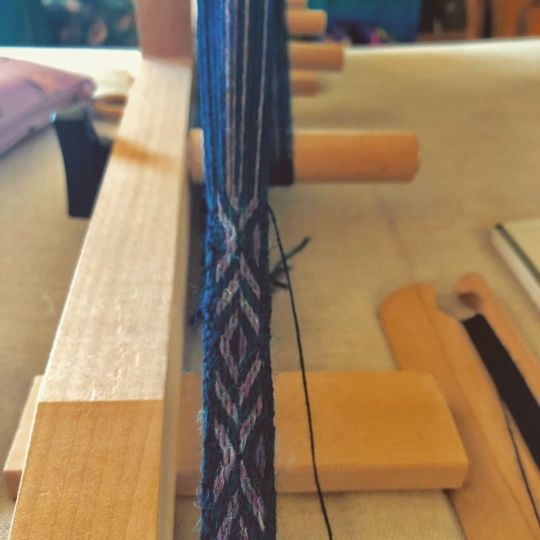
Guess I’d better weave a hat band! I was experimenting to find something geometric but slightly off-seeming. As non-Euclidian as can be managed in 8 tablets or less. The centre also kind of reminds me of the logo from Reboot which is a definite bonus.
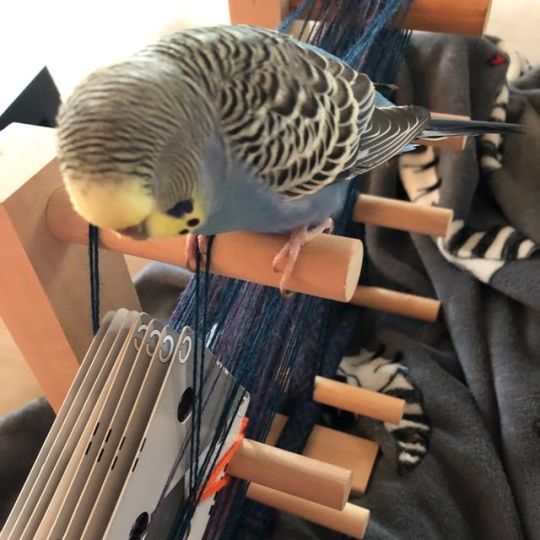
brb her budgeness needs attention
I have a thing where I like to sew the hat band and the crown ribbon at the same time. This is probably a terrible practise, but the symmetry of it makes me happy.
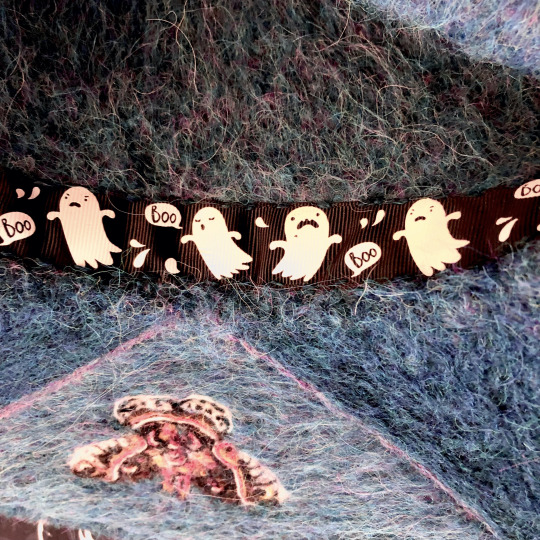
Also I absolutely had to use this ghost ribbon as soon as I saw it. I like to think that they’re the starter ghosts since a brand new hat wouldn’t be haunted naturally yet. In the actual, practical purpose, this ribbon will keep the wool around the crown from stretching with wear so this hat will keep fitting for years to come.
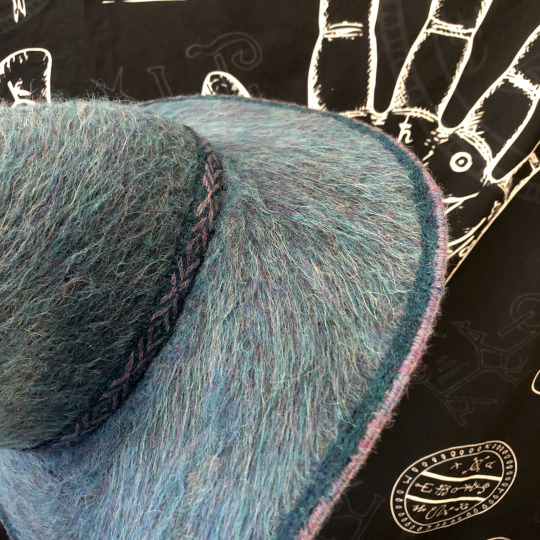
The felt is stiff enough that it could almost hold the full brim shape on its own, but I like having more control than that, so using a button hole stitch, I wrapped some heavy duty millinery wire and sewed it to the brim. My stitches weren’t as tidy as they could have been, and I wanted to add a bit more structure to that area, so I felted in more alpaca fibre as an accent stripe.
So that's how I made this witch hat! Feel free to try making your own. The whole process took me about 2 months, so not a weekend project by any means, but I can’t resist a project like this every now and again. I could see it being a lot faster with a full wet felting with roving method, but headspace is 100% weaving rn so that’s what I went with. If you do make a hat inspired by this, please tag me, I’d love to see it!!
#witchyvibes#witchcore#witch core#cottage witch#handmade#handwoven#needle felting#felting#feltcraft#slowfashion#fiberart#fiber art
3 notes
·
View notes