
wynterrolls
Wynter Escapade
Game guides compiled from different sources (for my forgetful self). Kinda like Feynman Technique. Yeah.
29 posts
Don't wanna be here? Send us removal request.
Last Seen Blogs

wanderingwaves-blog-blog
Curious Traveler

mafia-voidmin
Hello?


hatzuikhaz-art
HatzuiKhaz Is crying over SISVS

schnuron
Snuron
Text
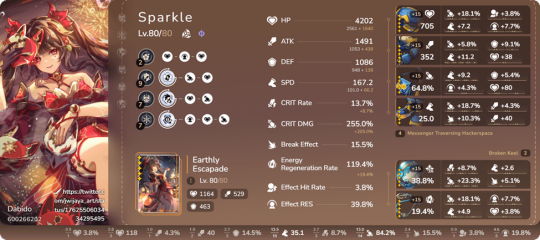
Φ SPARKLE | Honkai: Star Rail TL;DR Build


Role: Buffer Support
Relic Set
4pc Messenger Traversing Hackerspace or 4pc Eagle of Twilight Line (ideal set)
2pc Messenger Traversing Hackerspace / 2pc Guard of Wuthering Snow / 2pc Longevous Disciple (most efficient to farm)
Planar Ornament Set
2pc Broken Keel
2pc Fleet of Ageless
2pc Penacony, Land of Dreams (Optional)
Main Stats
Head = HP
Glove = ATK
Body = Crit DMG
Boots = Speed (SPD)
Orb = HP% or DEF% (ideal, but could be whatever as long as it has SPD substats)
Rope = Energy Regeneration Rate (ERR)
Sub Stats
SPD
Crit DMG
Optional: Effect RES
Endgame Stats to aim:
Minimum Crit DMG = 150%
Ideal Crit DMG = 200+%
SPD options: no SPD (if slow Sparkle); 160+ SPD (if fast Sparkle); varies (if middling Sparkle, check here to know more about SPD.)
Optional: Effect RES = 30% (for Broken Keel req.); 50+% (to resist crowd-control to some degree)

Sparkle Rotations
NOTE: With or without ERR planar (e.g. Penacony), Sparkle could get her ultimate up in same turns.
[Recommended] Using ERR rope: x3 Skill > Ultimate (3-turn Ultimate)
Using ERR rope + S5 Memories/S5 Cogs: x2 Basic + x1 Getting Hit > Ultimate (2-Turn Ultimate)
Light Cones
To know the damage difference between each light cone, check the tables below the cut.
Earthly Escapade 5★
Planetary Rendezvous 4★
But the Battle Isn't Over 5★
Past and Future 4★ [S5]
Carve the Moon, Weave the Clouds 4★
Dance! Dance! Dance! 4★

— Sparkle Kit TL;DR —
Basic Attack deals Quantum DMG to enemy.
Skill: Gives Crit DMG and advance forward (AF) on 1 ally
Ultimate: Gives Cipher to all allies; gain 4 skill points (SP) for team
Cipher – more DMG boost for each Talent stack
Talent: 1 ally use 1 SP = 1 stack = all allies gain DMG boost; max 3 stacks; max SP = 7 SP
Technique: Gives Misdirect on allies; Gain 3 SP at start of battle if misdirect is up
Misdirect – units will not be detected for 20 sec
— How to Play Sparkle in Simplified Form —
Sparkle buffs any crit DPS especially SP-intensive DPS and follow-up DPS. Her buffs last until the next turn of the DPS, which is good for follow-up attacks and ultimate dmg cast in between DPS end turn and DPS next turn. Since she’s a universal buffer, she could work in any crit team setup, but her SPD would vary depending on the allies she’ll have in the team.
Sparkle Gameplay in Razor Language:
Optional: Debuffer applies debuff on enemies before Sparkle turn.
Sparkle uses skill on DPS.
DPS takes turn to deal damage.
Repeat two more times to get her Ultimate.
Use ultimate during DPS turn.
Profit. ( •_•)👍
Sparkle Ultimate: Use Sparkle ultimate during DPS turn. This will ensure that her ultimate buffs last for 3 turns instead of only 2 turns.
NOTE: Sparkle's technique invisibility doesn't scare the trotters away in adventure domains. (Trotter powercreep!)
— Pulling Priority: E1 > E2 > S1 —
* Calcs from iSUMMON = Increase from E0S0 (Solo DMG calc with Dr. Ratio + Sparkle):
E1S0 = 16.01%
E2S0 = 33.09%
E0S1 = 13.30%
E1S1 = 31.44%
E2S1 = 50.80%
Counterargument: S1 Sparkle LC is like a DPS relic. Basically, if your harmony unit is SP+, they could give your entire team with 48 crit value (CV) when Mask passive is up. (You could also use this for your DPS Yukong, but you didn’t hear that from me.)
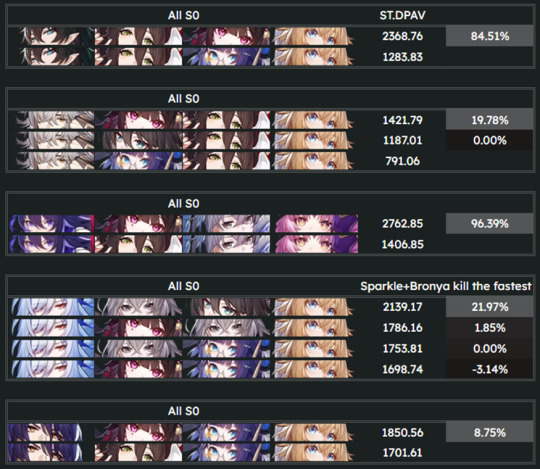
— Theoretical Simulation Calcs —
Light Cone Comparison Difference
* Calcs done by iSUMMON = Increase from LC without DMG boosts (Solo DMG calc with Seele + Sparkle)
S1 Sparkle signature LC (Earthly Escapade) = 14.99%
S5 Past and Future = 14.11%
S1 Bronya signature LC (But the Battle Isn't Over) = 13.23%
S4 Past and Future = 12.35%
S1 Ruan Mei signature LC (Past Self in Mirror) = 10.58%
S3 Past and Future = 10.58%
S5 Planetary Rendezvous = 10.58%
S4 Planetary Rendezvous = 9.26%
S2 Past and Future = 8.82%
S3 Planetary Rendezvous = 7.94%
S1 Past and Future = 7.05%
S2 Planetary Rendezvous = 6.61%
S1 Planetary Rendezvous = 5.29%
— How much boost does Sparkle bring to different hypercarry teams? —
* Calcs from Hunterkee
— Sparkle SPD synergy with her Teammates —
Fast Sparkle = 160+ spd
Slow Sparkle = Sparkle spd is lower than DPS spd (e.g. DPS = 135 spd, Sparkle = 134 spd)
Middling Sparkle = spd is less than debuffer; spd varies with other tricky harmony units
Hyperspeed Sparkle = for minmaxer and speedrunners; uses Dance x3 LC and Eagle set/Messenger set on allies; 151.4 to 184 spd
Reasoning:
Fast Sparkle enables DPS to use other boots besides SPD instead. DPS could focus more into getting ATK (or HP for Blade) and crit substats instead.
Slow Sparkle enables this rotation: DPS dmg > Sparkle skill > DPS dmg
Middling Sparkle is considered if she is paired with debuffer that needs to debuff the enemy first before DPS deal dmg or with tricky harmony units that has turn-limited buffs (e.g. Yukong).
Hyperspeed Sparkle is for 0-cycling MoC. To learn more about this, better watch this instead.
— Minimum SPD of DPS for Sparkle’s Advance Forward —
* Table from Braxophone’s Sparkle Build Guide

NOTE: To know more minimum DPS speed for Sparkle Advance Forward, check out this calculator made by kylefrs.
— Sparkle SPD Breakpoints to achieve 3-turn Ultimate —
* List from “the dude who refused to be mentioned” TC-er (with some minor additions)

— Sparkle and Bronya —
Sparkle + Bronya in same team will lead to these rotations.
Fast Bronya, Slow Sparkle: Bronya skill > DPS dmg > Sparkle skill > DPS dmg
Fast Sparkle, Slow Bronya: Sparkle skill > DPS dmg > Bronya skill > DPS dmg
Fast Sparkle, Slow Bronya (Special Case): Sparkle skill > Bronya skill > DPS dmg
Special Case: Speedtuning is ruined due to your DPS being delayed. If Sparkle is faster than Bronya and DPS is pushed forward and sits after Bronya, then this enables you to stack buffs from Sparkle and Bronya first before DPS deals damage in their turn.
Recommendation: Build Sparkle to be faster than Bronya. Reasons are the following:
Sparkle have higher base SPD = easier to build SPD
This setup enables two cases for your team to have.
Fast Sparkle = more turns = faster ultimate uptime to supply SP for team
— Sample Sparkle Team Showcase in Practice —
NOTE: Team Order = Highest SPD (Fastest) to Lowest SPD (Slowest)
Fast Sparkle + Slow DPS
Sparkle + Dan Heng Imbibitor Lunae Team – sample showcase done by Zetto Genshin here. [Team order: Ruan Mei (146) > Huohuo (142) > Sparkle (132) > DHIL (110)]
Sparkle + Jing Yuan Team – sample showcase done by Ravelika here. [Team order: Tingyun (178) > Sparkle (160) > Fu Xuan (141) > Jing Yuan (103)]
Sparkle + Dr. Ratio Team – sample showcase done by tecknit here. [Team order: Silverwolf (163) > Sparkle (162) > Huohuo (143) > Dr. Ratio (111)]
Slow Sparkle
Sparkle + Serval Team – slow Sparkle tech explained; sample showcase done by Dreamy here. [Team order: Tingyun (176) > Ruan Mei (121) > Serval (106) > Sparkle (103)]
Hyperspeed Sparkle
Sparkle + Jingyuan Auto Team – 4pc Messenger on Huohuo and Ruan Mei allows Sparkle to have 3 turns in 1st cycle 2nd wave; sample showcase done by Sleepy here. [Team order: Sparkle (172) > Ruan Mei (158) > Huohuo (149) > Jing Yuan (101)]
Sparkle + Ruan Mei for Dual DPS Team
Sparkle with Jing Yuan + Clara Team – Sparkle 1st skill is used on Clara to help JY to 0-cycle SAM; sample showcase done by Sleepy here. [Team order: Sparkle > Ruan Mei > Jing Yuan > Clara]
Sparkle with Jingliu + Blade team – sample showcase done by WyattSkyy here. [Team order: Ruan Mei (142) > Jingliu (128) > Blade (124) > Sparkle (123)]
Sparkle with Himeko + Herta Team in Pure Fiction - sample showcase done by xNaya here. [Team order: Sparkle (163) > Ruan Mei (162) > Herta (114) > Himeko (100)]
Sparkle + Bronya
Sparkle + Bronya for Serval and Blade Team – rotation: Sparkle skill > DPS dmg > Bronya skill > DPS dmg; sample showcase done by Kekon here. [Team order: Sparkle (161) > Bronya (160) > Fu Xuan (137) > Serval (120); Sparkle (161) > Bronya (160) > Fu Xuan (137) > Blade (101)]
Sparkle + Bronya for Jingliu Team – sample showcase done by MMOJACKX57 here. [Team order: Ruan Mei (150) > Sparkle (146) > Bronya (132) > Jingliu (105)]
Sparkle + Bronya for Welt Team - sample showcase done by xNaya here. [Team order: Sparkle (163) > Ruan Mei (162) > Bronya (162) > Welt (110)]
Sparkle + Bronya for Himeko Team – stacking Sparkle and Bronya buffs before Himeko ultimate; sample showcase done by MVI Lab here.
Mono Quantum Team Variations
Sparkle + Qingque Team – sample showcase done by Lv.999 SilverWolf here. [Team order: Silverwolf (168) > Sparkle (163) > Fu Xuan (140) > Qingque (105)]
Sparkle + Xueyi Team – sample showcase done by Lv.999 SilverWolf here. [Team order: Silverwolf (168) > Sparkle (163) > Fu Xuan (145) > Xueyi (118)]
Slow Sparkle + Seele Team – sample showcase done by Datee here. [Team order: Silverwolf (161) > Fu Xuan (152) > Sparkle (136) > Seele (119)]
Sparkle with Debuffer
Fast Sparkle + Slow Debuffer Team – Silverwolf slower than Sparkle; sample showcase done by RegisDev here. [Team order: Sparkle (157) > Silverwolf (137) > Fu Xuan (136) > Qingque (100)]
Fast Sparkle + Slow Debuffer Team – Pela ultimate is held off before Sparkle pushes DHIL forward; sample showcase done by Hyrion here. [Team order: Sparkle (162) > Pela (141) > Fu Xuan (129) > DHIL (102)]
Slow Sparkle + Fast Debuffer for Xueyi Team - sample showcase done by Datee here. [Team order: Silverwolf (154) > Fu Xuan (152) > Sparkle (148) > Xueyi (103)]
Sparkle Buff Priority
Ruan Mei/Sparkle/Yukong for DHIL Team - sample showcase done by MMOJACKX57 here. [Team order: Ruan Mei (149) > Sparkle (141) > Yukong (138) > DHIL (127)]
Triple Support Team Variations
Sparkle + Bronya + Tingyun for Jingliu Team - sample showcase done by Ryaroryn here. [Team order: Tingyun (168) > Sparkle (165) > Bronya (164) > Jingliu (105)]
Sparkle + Tingyun + Hanya for Jing Yuan Team – Hanya uses Dance x3 LC; sample showcase done by Tyl here. [Team order: Tingyun (167) > Hanya (167) > Sparkle (162) > Jing Yuan (99)]
Sparkle in Unconventional Team
Sparkle with DoT Team – Sparkle pushes BS forward before Kafka detonate; sample showcase done by xNaya here. [Team order: Sparkle (163) > Ruan Mei (162) > Kafka (151) > Black Swan (112)]
Practical Consensus:
Fast Sparkle is most common speed for Sparkle. Slow Sparkle is possible due to Ruan Mei’s talent and having triple buffers in team. Middling Sparkle is considered due to certain conditions.
Debuffers (e.g. Silverwolf and Pela) is recommended to be faster than Sparkle to ensure that the debuffs were placed on the enemies first before Sparkle pushes forward the DPS to deal DMG.
If debuffer is slower than Sparkle, there are instances that DPS comes before debuffer and debuff on enemy already expires or ultimate of debuffer isn’t up yet. To counter this, save the ultimate of debuffer before the DPS next turn.
Depending on team allies, she needs to align her SPD with them. For example, in MMOJACKX57’s showcase, Sparkle is in middle of Ruan Mei and Yukong.
Considering Ruan Mei’s skill that buffs allies’s weakness break efficiency and Slow Yukong’s 2-turn buffs won’t affect other units’ buff priority, when Sparkle pushes up the DPS, Yukong buffs applied to Ruan Mei basics and IL enhanced basic ATKs, while Ruan’s skill improves DPS weakness break efficiency.
Hyperspeed Sparkle works when there are SPD and advance forward boosters. For example, in Sleepy’s showcase, 4pc Messenger on Huohuo and Ruan Mei when they used their ultimate allows 172 SPD Sparkle to have 3 turns in 1st cycle 2nd wave, which means she reached pseudo-200.1 spd.
Sparkle + Ruan Mei enables dual DPS setups. Sparkle being SP generator for the team gives both DPS SPs to work around with and Ruan Mei acts as pseudo-sustain with her weakness break extension on enemies.
Sparkle also works with DoT Teams because her Talent stacks, Cipher, and A2 Trace could boost their DoT DMG and DoT allies tend to be SP-intensive as well.
DPS with SPD boost in their kits is recommended to have Sparkle speed be slower than DPS speed. Example would be Seele that has a base 115 speed with 25% SPD boost in her kit, which equates to base 143 spd. It is recommended to have Sparkle be slower than Seele, so this means 142 and less SPD is optimal for Sparkle in Seele team.
With Sparkle in team, sustains (healers or shielders) are either placed as fastest or slowest in team. If DPS is slowest in team (i.e. wearing ATK boots), sustain could be faster than DPS, so if Sparkle pushed DPS forward, sustain is still slowest.
— Sample Sparkle Builds for Reference —
Fast Sparkle Build by u/FIDGET_SPINNER_XD
-1SPD Sparkle Build for Seele by u/Informal_Avocado2685

Slow Sparkle Build used with Bronya by u/FamiliarAerie3229

Sources
Sparkle Build Guide by Gladius
Sparkle Build Guide by GuobaCertified
Sparkle Build Guide by SevyPlays
Sparkle Build Guide by Braxophone
Sparkle CN Analysis by MrPokke
Sparkle Technique with Trotter by u/Khaista-
Sparkle Speedtuning Guide by caelym
Sparkle Speedtuning Guide by Rainn
Speed Simplified ft. Sparkle by Sweetily
Sparkle Team and Synergy by GuobaCertified
Sparkle + Bronya Team Guide by Rainn
Sparkle Calculations by Hunterkee
Sparkle Light Cone DMG Calculations by iSUMMON
E1 vs S1 Sparkle Analysis by iSUMMON
HSR General Character Guide 2.0
Sparkle Speed Calculator by kylefrs
Sparkle + IL Gameplay Showcase by Zetto Genshin
Sparkle Gameplay + Jing Yuan Showcase by Ravelika
Sparkle Gameplay + Dr. Ratio Showcase by tecknit
Slow Sparkle Gameplay Showcase by Dreamy
Sparkle + Yukong Gameplay Showcase by MMOJACKX57
Sparkle + Debuffer Gameplay Showcase by Datee
Sparkle + Serval/Blade Gameplay Showcase by Kekon
Sparkle + Jingliu Gameplay Showcase by MMOJACKX57
Sparkle + Welt Gameplay Showcase by xNaya
Sparkle + Himeko Gameplay Showcase by MVI Lab
Sparkle + Qingque Gameplay Showcase by Lv.999 SilverWolf
Sparkle + Xueyi Gameplay Showcase by Lv.999 SilverWolf
Sparkle + Seele Gameplay Showcase by Datee
Fast Sparkle + Slow Debuffer Team Gameplay Showcase by RegisDev
Fast Sparkle + Slow Debuffer Team Gameplay Showcase by Hyrion
Sparkle Gameplay Showcase by Ryaroryn
Sparkle Gameplay Showcase by Tyl
Sparkle + Jingyuan Auto Team Gameplay Showcase by Sleepy
Sparkle with Jing Yuan + Clara Team Gameplay Showcase by Sleepy
Sparkle with Jingliu + Blade team by WyattSkyy
Sparkle with DoT Team Gameplay Showcase by xNaya
Sparkle with Himeko + Herta Team Gameplay Showcase by xNaya
Sparkle Build Showcase by u/FIDGET_SPINNER_XD
Sparkle Build Showcase by u/Informal_Avocado2685
Sparkle Build Showcase by u/FamiliarAerie3229
Uploaded on Patch 2.0
➥ Back to my HSR masterlist.
Author’s Note:
I don’t understand the whole speedtuning stuff about Sparkle build and how her teammates should have their speeds align with Sparkle speed, hence I compiled this guide to clear up my confusion. By creating this, I kinda get an idea that Sparkle speed is more than just 160/134 spd or nothing.
(Also, compressing her GIF banner is a pain... I had to compress it several times just to fit in the max 10mb limit for GIFs.)

Update Log
03/04/2024 - Uploaded this post.
03/05/2024 – Added xNaya’s gameplay showcases; added Sparkle GIF; added DoT Team explanation in Practical Consensus
03/14/2024 – Added sustain placement in Practical Consensus; added GuobaCerified’s Sparkle Team Synergy and Rainn’s Sparkle + Bronya Team Guide in Sources; added kylefrs’s Sparkle Speed Calculator; placed Sparkle + Bronya explanation in their own category
03/23/2024 - Reformatted the table for Sparkle 0c/wave 2 SPD requirements
#wynterrolls#hsr build#hsr#honkai star rail#honkai star rail build#sparkle#sparkle build#hsr sparkle#honkai star rail sparkle#hsr sparkle build#honkai star rail sparkle build#hsr lightcone#honkai star rail lightcone#hsr relic#honkai star rail relic#hsr builds#honkai star rail builds#sparkle guide#honkai star rail guide#hsr guide#𓂀 speaks#dan heng il#hsr seele#hsr bronya#qingque#xueyi#dr ratio#hsr jing yuan#jing yuan#jingliu
10 notes
·
View notes
Text

Writer's Info
adult | human | shifting between INTP-T and ISTP-T (MBTI results are varying)
formerly known as unadulteratedwynterescapade, changed username to @wynterrolls
creates game guides by compiling different sources; guides are limited to games I played; posts are mostly lengthy and joined with Maths
started creating guides to clear out my bookmarks; ends up having more bookmarks for sources
tried to create unique hashtags to easily find my posts in search bar, but can't find all my posts in search results
hashtags (if you could find my posts): #𓂀 speaks | #wynterrolls
Goal: Make over 100 posts to get the Top Poster Club Badge.
Masterlist Links
✒ Honkai: Star Rail Masterlist
✒ Otome Game Masterlist

🍀 2024 by @wynterrolls. All rights reserved. Comments, likes, and reblogs are highly appreciated. Thanks!
#bio#wynterrolls#masterlist#masterpost#navigation#master list#𓂀 speaks#game guide#video games#mobile games#otome#dating sim#honkai star rail
1 note
·
View note
Text
HSR FAQ 𖡻 How long to max upgrade a light cone?

Answer (Calcs below the cut.)


Same procedure with what I did in “How long to max upgrade a character?” post. I’ll calculate here how long a F2P player can upgrade a single light cone with their limited resources.
Conditions:
Max Trailblaze Power (TP) = 240 per day
Equilibrium Level 6, Trailblaze Lv 70
Starting from scratch = means no items in bag (broke F2P)
Considering only the low end drop rate @ highest difficulty
Drop Rate @ highest difficulty
These rates are based from the Domain Drop Rate sheet linked below. I just considered the low end to know the max results.

Three rarities of light cones are considered in the calcs. Each require different amount of materials, hence the need to consider all 3 rarities.
3-star light cone
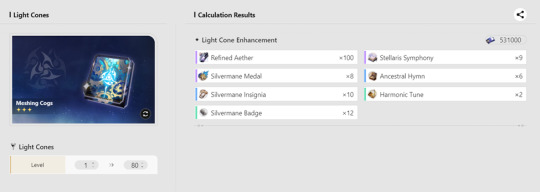
In written format, this is what cogger materials are called as:
Credits
LC EXP 4* = Refined Aether
Crimson Trace 4* = Stellaris Symphony
Crimson Trace 3* = Ancestral Hymn
Crimson Trace 2* = Harmonic Tune
Gold Trace 4* = Silverman Medal
Gold Trace 3* = Silvermane Insignia
Gold Trace 2* = Silvermane Badge
4-star light cone

In written format, this is what 4* DH LC materials are called as:
Credits
LC EXP 4* = Refined Aether
Crimson Trace 4* = Arrow of the Starchaser
Crimson Trace 3* = Arrow of the Demon Slayer
Crimson Trace 2* = Arrow of the Beast Hunter
Gold Trace 4* = Silverman Medal
Gold Trace 3* = Silvermane Insignia
Gold Trace 2* = Silvermane Badge
5-star light cone
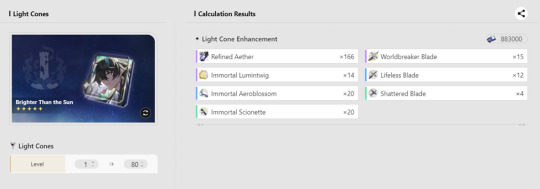
In written format, this is what 5* DH signature LC materials are called as:
Credits
LC EXP 4* = Refined Aether
Crimson Trace 4* = Worldbreaker Blade
Crimson Trace 3* = Lifeless Blade
Crimson Trace 2* = Shattered Blade
Gold Trace 4* = Immortal Lumintwig
Gold Trace 3* = Immortal Aeroblossom
Gold Trace 2* = Immortal Scionette
In table form, this is what the materials will be called as.
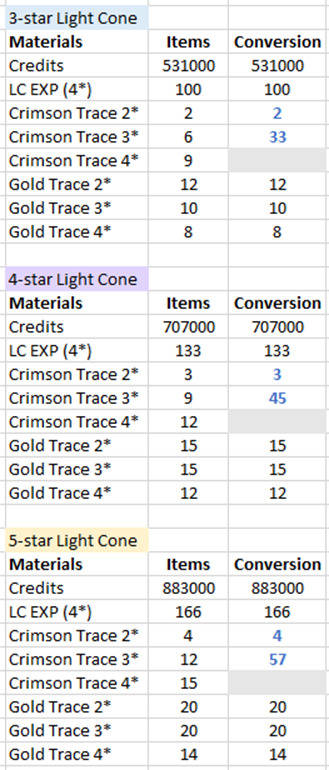
NOTE: I converted 4* Crimson Trace materials into 3* ones for ease of computation. Since I’m considering the low-end drop rate, I’m not including 4* drop average in the calcs.
Among the items listed here in this table, the Gold Trace Materials are not suitable to farm with TP. [Source: Golden Calyx runs, overworld enemies in map, SU runs, and sending characters in Assignments]
Now, for the calculations, I’ll do same to what I did in the Character Upgrade post.
Explanation: In the drop rate table above, each run gives different kinds of item drops. To simplify the values in order to have uniformity in the calcs, I converted the number of drop items in accordance to the value of the highest rarity drop.
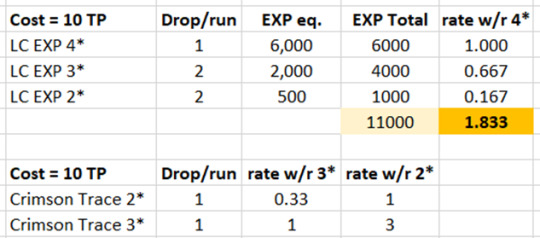
Notations:
rate w/r 4* = rate with respect to 4* EXP = EXP / (EXP of 4*)
rate w/r 3* = rate with respect to 3* crimson trace = (2* drop) / 3
rate w/r 2* = rate with respect to 2* crimson trace = (3* drop) * 3
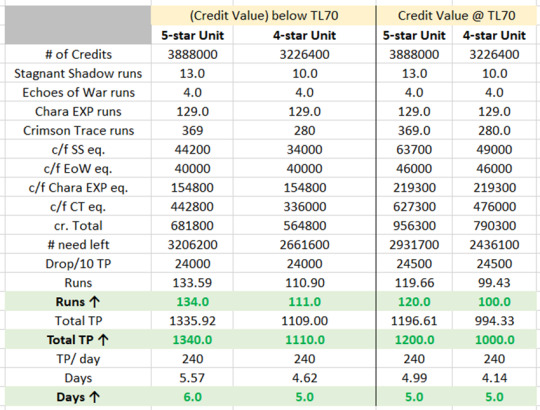
Which leads to this calc:
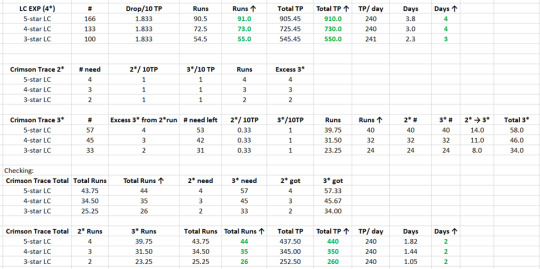
NOTE: Runs ↑, Days ↑, and Total TP ↑ are rounded up values.
Last would be the credits. Since the first two runs (LC EXP and Crimson Trace) drop credits as well, I deducted those values and computed the remaining credits needed.

NOTE: I created two columns for credit values because once you hit Trailblaze Level 70, the Trailblaze EXP is converted into credits instead. Rate is 1 Trailblaze EXP = 10 credits.
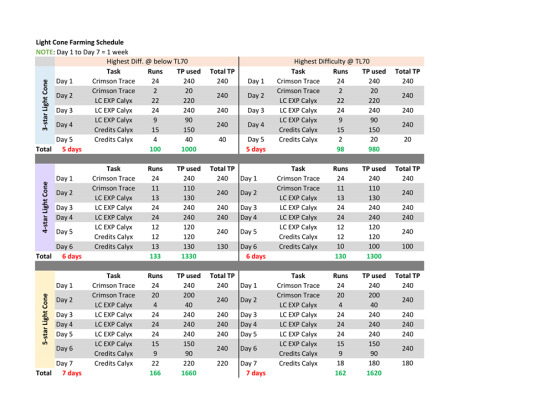
I’ve placed the summary above, but if you want a Light Cone Farming Schedule, here.

Sources
Hoyolab Leveling Calculator for HSR Light Cones
Inventory Materials in HSR Hoyowiki
Honkai: Star Rail Domain Drop Rates
Light Cone EXP in HSR Wiki Fandom
Uploaded on Patch 2.0
➥ Back to my HSR masterlist.
Author’s Note
Ok. Good luck farming. ( •_•)👍

Update Log
02/17/2024 – Uploaded this post.
#honkai star rail#hsr#honkai star rail build#hsr build#honkai star rail lightcone#hsr lightcone#hsr builds#honkai star rail builds#hsr ascension#honkai star rail relic#hsr relic#hsr danheng#hsr imbibitor lunae#dan heng#imbibitor lunae#dan heng honkai star rail#dan heng il#𓂀 speaks#coggers#meshing cogs#light cones#light cone
2 notes
·
View notes
Text
HSR FAQ 𖡻 How long to max upgrade a character?

Answer (Calcs below the cut.)


I’m curious how much time it is going to take me to grind for the materials to max out a single unit in this game, but I can’t find any post that talks about this, so I’ll create one here. Only their ascension and trace materials in this post.
Since I’m F2P in the game and F2Ps take the longest time to grind for a character, I’ll use this situation to estimate the time needed.
Conditions:
Max Trailblaze Power (TP) = 240 per day
Equilibrium Level 6, Trailblaze Lv 70
Starting from scratch = means no items in bag (broke F2P)
Considering only the low end drop rate @ highest difficulty
Drop Rate @ highest difficulty
These rates are based from the Domain Drop Rate sheet linked below. I just considered the low end to know the max results.

For 5-star unit, I’ll use Dan Heng Imbibitor Lunae as example. Here is a screenshot of his material requirements to fully max him from Lv1 to Lv 80 with Traces 6/10/10/10.
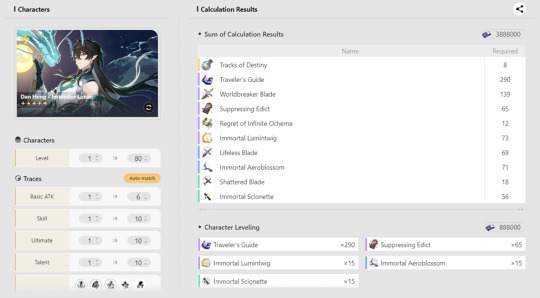
In written format, this is what DHIL’s materials are called as:
Credits
Character EXP 4* = Traveler’s Guide
Stagnant Shadow Drop = Suppressing Edict
Echoes of War Drop = Regret of Infinite Ochema
Crimson Trace 4* = Worldbreaker Blade
Crimson Trace 3* = Lifeless Blade
Crimson Trace 2* = Shattered Blade
Gold Trace 4* = Immortal Lumintwig
Gold Trace 3* = Immortal Aeroblossom
Gold Trace 2* = Immortal Scionette
Tracks of Destiny
For 4-star unit, I’ll use Dan Heng as example. Same procedure to his 5-star form done above.

In written format, this is what his materials are called as:
Credits
Character EXP 4* = Traveler’s Guide
Stagnant Shadow Drop = Storm Eye
Echoes of War Drop = Destroyer’s Final Road
Crimson Trace 4* = Arrow of the Starchaser
Crimson Trace 3* = Arrow of the Demon Slayer
Crimson Trace 2* = Arrow of the Beast Hunter
Gold Trace 4* = Squirming Core
Gold Trace 3* = Glimmering Core
Gold Trace 2* = Extinguished Core
Tracks of Destiny
In table form, this is what the materials will be called as:
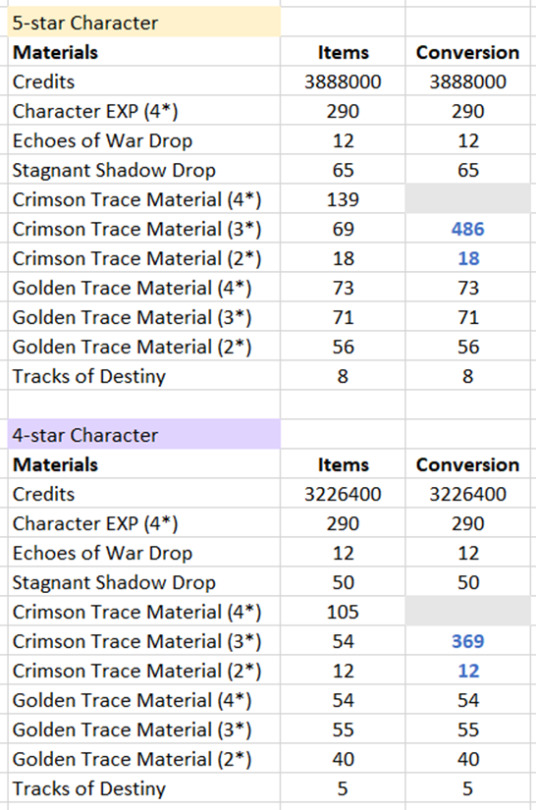
NOTE: I converted 4* Crimson Trace materials into 3* ones for ease of computation. Since I’m considering the low-end drop rate, I’m not including 4* drop average in the calcs.
Among the items listed here in this table, these items are not suitable to farm with TP:
Tracks of Destiny [Source: Simulated Universe (SU) weekly rewards, monthly shop item, and from events]
Gold Trace Materials [Source: Golden Calyx runs, overworld enemies in map, SU runs, and sending characters in Assignments]
Now, for the calculations, the easiest to calc first are the Echoes of War drops and Stagnant Shadow drops. These two have constant drops so no need to explain.
NOTE: Runs ↑, Days ↑, and Total TP ↑ are rounded up values.

Next would be Character EXP and Crimson Trace materials. In the drop rate table above, each run gives different kinds of item drops.
To simplify the values in order to have uniformity in the calcs, I converted the number of drop items in accordance to the value of the highest rarity drop.

Notations:
rate w/r 4* = rate with respect to 4* EXP = EXP / (EXP of 4*)
rate w/r 3* = rate with respect to 3* crimson trace = (2* drop) / 3
rate w/r 2* = rate with respect to 2* crimson trace = (3* drop) * 3
Which leads to this calc:

Last would be the credits. Since the first four runs (Echoes of War, Stagnant Shadow, Character EXP, and Crimson Trace) drop credits as well, I deducted those values and computed the remaining credits needed.
NOTE: I created two columns for credit values because once you hit Trailblaze Level 70, the Trailblaze EXP is converted into credits instead. Rate is 1 Trailblaze EXP = 10 credits.
I’ve placed the summary above, but if you want an Ascension and Trace Farming Schedule, here.


Sources
Hoyolab Leveling Calculator for HSR Characters
Inventory Materials in HSR Hoyowiki
Honkai: Star Rail Domain Drop Rates
Character EXP in HSR Wiki Fandom
Uploaded on Patch 2.0
➥ Back to my HSR masterlist.
Author’s Note
Similar post to this one but for light cone here. Ok. Good luck farming. ( •_•)👍

Update Log
02/17/2024 – Uploaded this post.
02/20/2024 - Added the link for light cone post.
#honkai star rail#hsr#honkai star rail build#hsr build#honkai star rail lightcone#hsr lightcone#hsr builds#honkai star rail builds#hsr ascension#honkai star rail relic#hsr relic#hsr danheng#hsr imbibitor lunae#dan heng#imbibitor lunae#dan heng honkai star rail#dan heng il#𓂀 speaks
3 notes
·
View notes
Text
˳༄꠶ BLACK SWAN | Honkai: Star Rail TL;DR Build


Role: DoT DPS
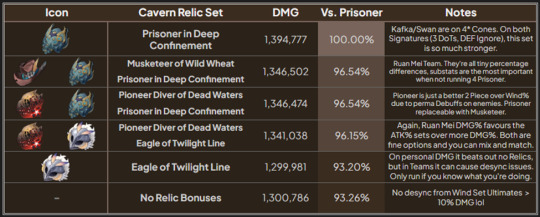
Relic Set (More options below the cut)
4pc Prisoner in Deep Confinement
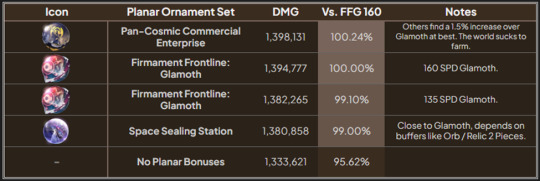
Planar Ornament Set
Pan-Cosmic Commercial Enterprise
Firmament Frontline: Glamoth (More efficient to farm)
Space Sealing Station
Main Stats
Head = HP
Glove = ATK
Body = Effect Hit Rate (EHR) or ATK%
Boots = Speed or ATK%
Orb = Wind DMG% or ATK%
Rope = ATK%
Sub Stats
EHR
ATK% or ATK
SPD
Endgame Stats to aim:
Needed EHR = 120% EHR
Minimum Total ATK = 3000
Speed Options: no SPD (if slow BS); 134+ to 145+ SPD (if using Ruan Mei or SPD buffers); 155+ (if fast BS)

Black Swan Rotation
Assuming your BS doesn’t get hit by enemies:
Using ATK% rope: 4x Skill > Ultimate (4 turn ultimate)
Using ATK% rope: 3x Skill + 2x Basic > Ultimate (5 turn ultimate)
Using Tutorial LC: 3x Skill > Ultimate (3 turn ultimate)
Light Cones
To know the damage difference between each light cone, check the tables below the cut.
Reforged Remembrance 5★
Good Night Sleep Well 4★
Incessant Rain 5★
It's Showtime 4★
Eyes of the Prey 4★
Fermata 4★ [S5]
Before the Tutorial Mission Starts 4★ [S5]

— Black Swan Kit TL;DR —
All Basic Attack, Skill, and Ultimate deal Wind DMG on enemies.
Arcana = deals Wind DMG and Wind DoT damage at start of enemy turn
Arcana stack = increase DoT dmg%; max of 50 stacks; resets at enemy turn
Basic Attack: Chance to apply an Arcana Stack for each DoT on enemy.
Skill: Chance to apply DEF shred and Arcana stack.
Ultimate: Applies Epiphany on all enemies for 2 turns.
Epiphany = more DoT dmg% and Arcana effects are considered as Wind Shear, Bleed, Burn, and Shock; Arcana stacks don’t reset as long as Epiphany is on enemy.
Talent: when enemies enter battle, applies DoT; each DoT enemy gets, chance to get Arcana stack
If 3+ Arcana stacks = chance to apply Arcana stacks on adjacent targets
If 7+ Arcana stacks = DEF ignore on target and adjacent targets
Technique: chance to apply Arcana stacks on target at start of battle
— How to Play Black Swan in Simplified Form —
Black Swan can’t detonate any DoTs. Her DoT damage depends on enemy speed = backloaded damage. Her kit revolves entirely around increasing the damage enemies take from DoTs at beginning of their turns, by increasing the Arcana stacks on them.
She needs another DoT unit to apply DoTs on enemy and to trigger DoTs outside of enemies’ turns (e.g. Kafka, E4 Sampo, E6 Luka, or Guinaifen’s ultimate). This is possible when Epiphany is on enemies, since her Arcana stacks can also be triggered by other DoT units.
Black Swan Gameplay in Razor Language:
Other DoT units take turns before BS, they apply DoT on enemy
BS takes turn to use skill or basic attack
Enemy gets Arcana stacks from DoTs and DEF shred (if used skill)
Enemy turn starts, DoT DMG and Arcana gets triggered; Arcana stacks reset.
Profit. ( •_•)👍
Black Swan using Ultimate: Use Black Swan’s ultimate first before her DoT allies detonate their own DoT DMG (e.g. using their Ultimate).
— Pulling Priority: E1 > S1 > E2 —
* Calcs from iSUMMON = Increase from E0S0 (Solo DMG calc):
E0S1 = 15.64%
E1S0 = 31.25%
E1S1 = 51.78%
* Calcs from Hunterkee = Increase from E0S0 (Team DMG calc):
E0S1 = 7.71%
E1S0 = 23.27%
E2S0 = 2.28%
— Trace Priority: Talent > ATK/EHR/Wind DMG > Others —
* Calcs from Gladius’s Build Guide:
Ascensions first to unlock the trace nodes below
Talent = 7.65%
ATK / EHR / Wind = 3.05%
Skill = 1.88%
Ultimate = 1.86%
Basics = 1.57%
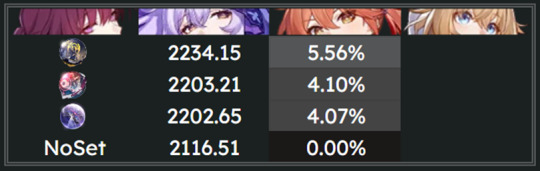
— Theoretical Simulation Calcs —
Relic Set Comparison Difference
From Hunterkee: None.
From Bonk:
From GuobaCertified:
Planar Ornament Set Comparison Difference
From Hunterkee:
From Bonk:
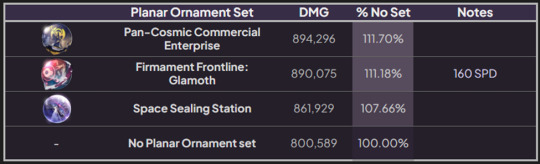
From GuobaCertified:
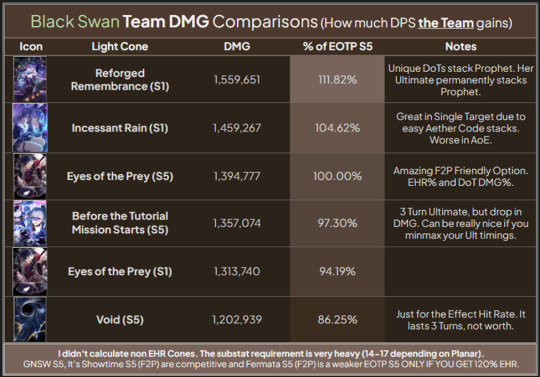
Light Cone Comparison Difference
From Hunterkee:
From Bonk:

From GuobaCertified:
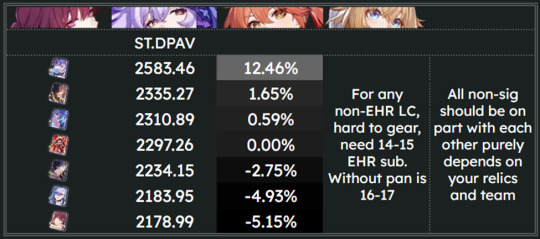
Theoretical Consensus:
Their calcs are mostly focused in stacking speed on their units.
In Hunterkee’s calcs, the speed ranges from 147 to 163 spd, where the healer is the fastest, while depending on the team comp, Guinaifen is the slowest.
The speed ranges from 153 to 162 spd in Bonk’s calcs, where Kafka and the healer are the slowest, while Ruan Mei is the fastest.
In GuobaCertified’s simulations, the speed ranges from 163 to 168 spd, where Ruan Mei is the fastest, while Kafka is the slowest.
Amongst the three calcs, Hunterkee’s is closer to home because that’s mostly the speed range that F2Ps and low-spender players can achieve for their character builds. GuobaCertified’s, however, looks something you’d only see in whale builds or minmax builds. In all 3 simulations, Black Swan’s speed is somewhere in the middle.
— Does she need Kafka? —
BS could work without Kafka, but BS needs another unit that would trigger her DoTs outside the enemies’ turns. BS loses a lot of damage if her damage only relies on enemies’ turns, with no one to detonate her DoTs outside their turns.
— How much boost does Black Swan bring to Kafka DoT teams? —

From Hunterkee’s calcs, Black Swan brings about 19% boost against single-target enemy and 33% boost on AoE.
— ATK% or SPD on boots? —
Slow BS = ATK% boots
Fast BS = SPD boots
BS in Pure Fiction = SPD boots
Reasoning:
MoC has a limit of 10 cycles for you to defeat the enemies. Whether you use ATK% or SPD boots on her, Black Swan needs time to gain stacks to deal more DoT damage on enemies’ turn start.
However, Pure Fiction needs you to clear the enemies at faster rate. This means you need to clear out the first 5, before the next 5 could spawn in. This is where SPD boots would be more advantageous for her to act more turns before the enemies.
Also, SPD boots if you need to reach the SPD threshold for Glamoth set.
NOTE: There’s this discussion about building Fast BS, Slow BS, and “Classical SPD” BS. “Classical SPD” BS means her having 134 SPD. The post is written by u/L0wpriority here and a counterargument was posted by u/guobacertified here. To know what goes on in their talks, better check those links instead.
However, for me, I’d say to build your BS’s SPD according to what her allies’ SPD are. I’ve linked below some showcase for BS teams and the team order of each. I also explained how those teams are formed and worked together in the Practical Consensus below.
— ATK% or Wind DMG% on orb? —
Wind DMG% orb if no Ruan Mei; ATK% orb if Ruan Mei is in team. Difference is minimal.
Damage difference:
From Hunterkee’s calcs: 0.06%
From Guoba’s: 1.48%-2.75%
— Black Swan Team Showcase in Practice —
NOTE: Team Order = Highest SPD (Fastest) to Lowest SPD (Slowest)
Black Swan + Kafka + Ruan Mei
Fast Black Swan + Slow Kafka DoT team – sample showcase done by Ikatsu here. [Team order: Ruan Mei > Black Swan > Kafka > Lynx]
Slow Black Swan + Fast Kafka DoT team – sample showcase done by Dreamy here. [Team order: Ruan Mei > Tingyun > Kafka > Black Swan]
Black Swan Triple DoT team in Pure Fiction – sample showcase done by Ikatsu here. [Team order: Kafka > Ruan Mei > Sampo > Black Swan]
Black Swan without Kafka using other DoT allies
Black Swan + Guinaifen DoT team – sample showcase done by Moon here. [Team order: Asta > Guinaifen > Ruan Mei > Black Swan]
Black Swan + Sampo DoT team – sample showcase done by Ikatsu here. [Team order: Ruan Mei > Black Swan > Sampo > Lynx]
Black Swan + Luka DoT team – sample showcase done by Lv.999 Silverwolf here. [Team order: Huohuo > Luka > Silverwolf > Black Swan]
Black Swan without Ruan Mei using other SPD buffers
Black Swan F2P team - sample showcase done by Ikatsu here. [Team order: Guinaifen > Asta > Black Swan > Lynx]
Black Swan with Asta as SPD support – sample showcase done by Moon here. [Team order: Asta > Fu Xuan > Black Swan > Sampo]
Black Swan Hypercarry
Black Swan Hypercarry team – sample showcase done by Ikatsu here. [Team order: Ruan Mei > Tingyun > Black Swan > Lynx]
E1S1 Black Swan Hypercarry team – sample showcase done by Sleepy here. [Team order: Tingyun > Ruan Mei > Hanya > Black Swan]
Black Swan as Debuffer
Black Swan as debuffer for Dr. Ratio team – this could work if you use BS for her DEF shred only (and you have Ruan Mei in your team); sample showcase done by Rehoo and EdenPlays.
E1 Black Swan as debuffer for Jing Yuan team – E1 Black Swan is like 5* Pela (but with RES reduce instead of DEF shred) for fire, lightning, physical, and wind; sample showcase done by Sleepy here.
Black Swan as debuffer for Blade team – not sure if BS in this showcase is E0 or E1, but BS acts as debuffer for him regardless; sample showcase done by Exodus here.
Black Swan using Freeze Mechanics
Black Swan Freeze team – sample showcase done by Hyrion here. [Team order: Luocha > Pela > Ruan Mei > Black Swan]
Practical Consensus:
In teams with Ruan Mei, Black Swan speed in team showcase mostly ranges from 134 to 140+, while her teammates are ranging from 129 to 153 spd. Sustains are mostly either the slowest or fastest in the team. Other DoT allies are positioned either before or after Black Swan.
Ruan Mei is mostly used in Black Swan teams. This could be explained by Ruan Mei’s talent where she could reduce the SPD needed by Black Swan. With the enemies having 158 spd and reducing to 154 spd due to break, instead of needing 155 spd for Black Swan, she could settle with 145 spd instead.
Asta is used as alternative for Ruan Mei in F2P teams because she could increase the SPD of allies with her ultimate. Both Ruan Mei and Asta are positioned before Black Swan.
But, if no Ruan Mei in team, Black Swan is mostly built with slow build, with her DoT allies stacking as much DoTs as possible for her Arcana stacks. If BS is built with fast build (e.g having 155+ spd), this could alleviate the SP usage of the team because she could opt to use Basics instead.
Black Swan DMG relies on enemy turns, thus avoid using slow debuffs and imprisonment on enemies in her teams. However, she could utilize freeze mechanic and Ruan Mei’s break delay because despite freezing the enemies, the enemies still take their turn before being pushed back to take another later turn. This means that the enemies get two DoT turn triggers after getting frozen.
Some teams are quirky, but eh, it doesn’t matter. As long as their team could 3-star the stage, why make a problem out of it?
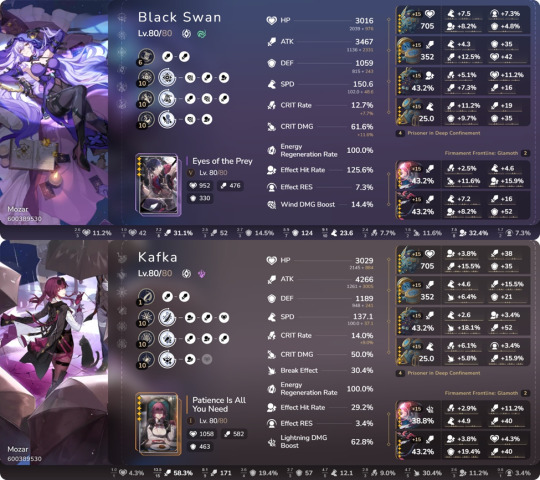
— Sample Black Swan Builds for Reference —
Fast Black Swan Build by u/-lightningstr1ike-
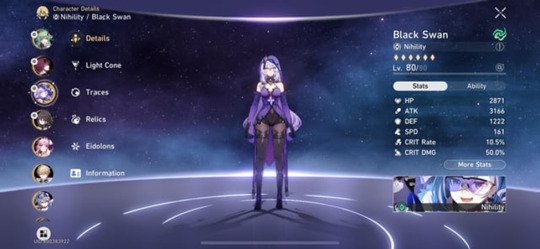
Fast Black Swan and Slow Kafka Builds by u/Mozaary
Sources
Black Swan Build Guide by Moon
Black Swan Build Guide by SevyPlays
Black Swan Build Guide by Braxophone
Black Swan Build Guide by Gladius
Black Swan Build Guide by GuobaCertified
Black Swan E1 vs S1 Analysis Video by iSUMMON
Black Swan’s Calculations by Hunterkee
Black Swan’s Calculations by Bonk
Black Swan Light Cone and Relic Comparison by Guoba Certified and Kygen
Black Swan E1 vs S1 Analysis Sheet by iSUMMON
2.0 Banner Warp Advice and Insights [Credits: @.regnum771 (Victor Charlie), @kuratine (Houseplant - EN), @soul_fish (Soul Fish), @1orange (1orange), @darkangel]
Black Swan Team Variations by Ikatsu
Zero Speed Swan and 200 Speed Kafka by Dreamy
Black Swan and Guinaifen Team Showcase by Moon
Black Swan and Luka Team Showcase by Lv.999 Silverwolf
Black Swan and Dr. Ratio Team Showcase by Rehoo
Black Swan with Dr. Ratio and Pela Team Showcase by EdenPlays
Black Swan with Asta and Sampo Team Showcase by Moon
Black Swan Freeze Team Showcase by Hyrion
E1S1 Black Swan Hypercarry Team Showcase by Sleepy
E1 Black Swan and Jing Yuan Team Showcase by Sleepy
Black Swan and Blade Team Showcase by Exodus
Fast Black Swan Build Showcase by u/-lightningstr1ke
Fast Black Swan and Slow Kafka Build Showcase by u/Mozaary
Fast BS, Slow BS, and Classical SPD BS Discussion by u/L0wpriority
Counterargument post on Fast BS, Slow BS, and Classical SPD BS Discussion by u/guobacertified
Uploaded on Patch 2.0
➥ Back to my HSR masterlist.
Author’s Note:
I compiled this guide because I don’t understand the talks about Black Swan kit whenever I would go lurk around in HSR-focused servers. Also, I needed something to convince myself that my F2P self can’t afford her for my DoT team. 😂

Update Log
02/10/2024 - Uploaded this post.
02/11/2024 – Added Moon’s BS + Asta team, Hyrion’s BS Freeze team, and Ikatsu’s BS Triple DoT team in Team showcase part; added Asta and freeze mechanic explanation in Practical Consensus part; added Gladius’s Build Guide in sources; added Trace priority; added the discussion links for Fast BS, Slow BS, and Classical SPD BS in ATK% or SPD on boots? part
02/13/2024 – Added classification in Team Showcase in Practice; added Sleepy’s BS Hypercarry team and BS + Jingyuan team in Team Showcase part; rephrased recommended SPD in Endgame stats; added ATK% in Body main stat
02/14/2024 – Added Exodus’s BS + Blade team in Team showcase part
02/23/2024 - Replaced the line dividers
02/29/2024 – Added GuobaCertified's and iSUMMON's video links in Sources
#hsr build#hsr#honkai star rail#honkai star rail build#black swan#black swan build#hsr black swan#honkai star rail black swan#hsr black swan build#honkai star rail black swan build#hsr lightcone#honkai star rail lightcone#hsr relic#honkai star rail relic#hsr builds#honkai star rail builds#black swan guide#honkai star rail guide#hsr guide#𓂀 speaks#hsr jing yuan#jing yuan#honkai star rail jing yuan#honkai star rail pela#hsr pela#pela#ruan mei#ruan mei hsr#honkai star rail ruan mei#hsr kafka
15 notes
·
View notes
Text
HSR FAQ 𖡻 How much CRIT RATE is enough for your DPS?

Answer
High Investment:
Single-hit DPS or low-hit count DPS = at least 80% to 85% crit rate (achievable if you have lightcone that has crit passive or you have good crit rolls in your relic substats); [more than 85% would be on whale territory or hardcore minmax territory already]
Multi-hit count DPS = 70% crit rate
Good enough Investment:
Single-hit DPS or low-hit DPS = 70% crit rate
Multi-hit count DPS = 60% crit rate
Low Investment:
Single-hit DPS or low-hit DPS = 60% crit rate
Multi-hit count DPS = 50% crit rate

Explanation
To start off, I've always wondered why are the results of my damage calculations tend to be low values when compared to the damage calcs done by other people. As you can see from my previous attempts on rubbing my 2 braincells together and dealing with numbers in my Yukong and Pela TLDR builds, the values are pretty low.
I know I've followed the process done in the sample damage calculations provided in the sources, but I simply can't replicate the same big dmg numbers you see in other calcs.
Then one day, while I'm scrolling around in Dr. Ratio Mains subreddit, I've come across a post asking about the ideal crit% for E0S1 Dr. Ratio, and one of the answers there caught my eye. The answer of u/Bajuu mentioned that Dr. Ratio is a low hit count DPS like Seele so that he should be built with at least 80% crit rate.
However, I don't know what "low hit count DPS" means, so I went ahead and searched around in Google and the official HSR subreddit what it means but to no avail, it didn't gave me any answer nor clue, so as a last resort, I asked in a help channel in official HSR Discord server, in which two people (viasvias and skylow1112) have answered my question at last.
They mentioned that low hit means low attack tick per attack. An example for this is that when it comes to Seele ultimate, it only has 1 attack tick, while Jing Yuan's Lightning Lord deals multiple attack ticks.
(Sample images below showing Seele ult showcase from u/solidus_snake256 and Jing Yuan's LL showcase from Nerf1352.)

I asked as well if the number of attack ticks are specified in the trace multipliers or kit of the character, however, they answered that it wasn't mentioned and that it could only be seen in actual gameplay.
This means there's no way for me to know how many attack ticks each unit have by just reading their kit in the game. I have to use them in trial battle first to know how many attack ticks does their kit have when they deal damage.
-
On the day of writing this post, I saw a similar post asking what is the minimum crit rate for Dr. Ratio, and upon checking the comments, the answer made by u/Minute_Fig_3979 also has similar answer above.
They mentioned that there are two types of damage dealers - single hit or low hit count DPS and multi-hit count DPS. However, their answer mentioned more about the recommended crit rate for each type. Low hit count DPS needs higher crit rate in order to make up for their lack of multi-hit, while multi-hit count DPS could settle with lesser crit rate and further invest more into other stats due to their multi-hit nature.
Think of this scenario.
When dealing damage against a single enemy, if your DPS only deals 1 hit count like Seele, you'd want them to at least deal crit hit on this one chance so that all the efforts of setting up the buffs on them and debuffs applied to enemies won't go to waste. By building higher crit rate, this gives you higher chance so that your low hit count DPS could at least crit.
However, when it comes to multi-hit count DPS like Jing Yuan, even if you have lesser crit rate than the low hit count DPS, his Lightning Lord would have more chances of dealing crit hits at the enemy. So instead of hyper-investing crit rate on your Jing Yuan, that you'd need to do with your Seele, you could allocate the relic substat rolls into getting more ATK% and crit dmg for him.
-
Example of low-hit count:
Seele's Ultimate (1 tick)
Dr. Ratio's Skill, Follow-up Attack (FuA), and Ultimate (1 tick each)


4* Danheng Ultimate (1 tick)
Blade's Ultimate (1 tick)

Jingliu's Ultimate (1 tick)

Blade's Talent (3 ticks)
-
Example of multi-hit count:
Jing Yuan's Lightning Lord
Dan Heng - Imbibitor Lunae's 3EBA and Ultimate


Topaz's Skill and FuA Talent

Jingliu's Enhanced Basic Attack

-
The recommended crit rate varies a lot according to who is answering the question. So I'll just create some kind of simplified categorization for the variety of recommendations.
High Investment:
Single-hit DPS or low-hit count DPS = at least 80% to 85% crit rate, achievable if you have lightcone that has crit passive or you have good crit rolls in your relic substats (more than 85% would be on whale territory or hardcore minmax territory already)
Multi-hit count DPS = 70% crit rate
Good enough Investment:
Single-hit DPS or low-hit DPS = 70% crit rate
Multi-hit count DPS = 60% crit rate
Low Investment:
Single-hit DPS or low-hit DPS = 60% crit rate
Multi-hit count DPS = 50% crit rate
-
With the two sources of answer above, I think I now have an idea as to why my earlier dilemma has those small value results.
Calcs made by other people have considered multiple factors affecting their calculations.
having team mates in the calc
calculating the team dmg output in rotation-based setup
having considered the speed and action value of teammates that would affect the SPD and AV of the character you are calculating
(probably, not sure) considering the number of attack ticks of units in actual gameplay in the calculations.
These are just some of the reasons as to why my calcs from before are on the lower side, but it doesn't mean that my calcs are wrong. I just happened to consider only the most basic dmg conditions compared to them using complex dmg conditions in their theorycrafting, hence the results I got are low values only.

Source
Minimum Crit Rate Question by u/EthansFin
Seele 100k Damage - Simulated Universe by u/solidus_snake256
Jing Yuan Everyday Damage Showcase by Nerf1352
Ideal Crit% for E0S1 Question by u/HaakMilk
2.6m Blade Ultimate DMG Showcase by Kan~
Jingliu Build 4 Set Quantum vs 4 Set Ice Damage Comparison by Areha
Topaz 4pc Grand Duke vs 2P Fire 2P ATK Damage Comparison by Areha
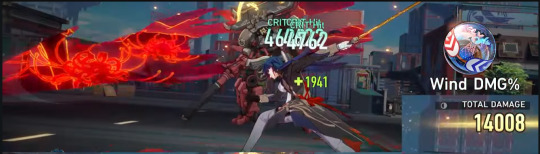
Dan Heng DMG Progress by ☆rui☆
DHIL + 1870% Crit Damage | Swam Disaster by fatty flip
Blade Wind DMG% vs HP% Planar Sphere Damage Comparison by Areha
Dr. Ratio Trial Gameplay by Mr.Nothing Gaming
Uploaded on Patch 1.6
➥ Back to my HSR masterlist.

Update Log
01/15/2024 - Uploaded this post
01/16/2024 - Added a scenario that describes the difference between low-hit count DPS and multi-hit count DPS
#honkai star rail#honkai star rail build#hsr#hsr build#honkai star rail builds#hsr builds#honkai star rail guide#hsr guide#hsr speed#𓂀 speaks#hsr crit rate#honkai star rail crit rate#how much crit rate#HSR FAQ#hsr seele#hsr dr. ratio#hsr danheng#hsr imbibitor lunae#hsr jing yuan#hsr jingliu#hsr blade#hsr topaz#seele#dr. ratio#veritas ratio#dan heng#imbibitor lunae#dan heng il#blade#jingliu
15 notes
·
View notes
Text
HSR FAQ 𖡻 HP%/ATK%/DEF% or Outgoing Healing Boost (OHB) for chest relic?

Answer
Type of body relic piece that gives most healing amount to least:
HP-scaling healer = 5* OHB body > 4* OHB body > 5* HP% body
ATK-scaling healer = 5* OHB body > 4* OHB body > 5* ATK% body
DEF-scaling healer = 5* OHB body > 4* OHB body > 5* DEF% body

Explanation
I know the feeling of grinding the Passerby domain and not getting the OHB body for healers. The build guides are saying to use OHB body for them, but RNG says no.
In this post, I'll make a comparison calculation between the two in order find out how much difference would the healing amount each type would give.
Assumptions:
I'll be using rainbow-set with the healers. This means that there would be no additional set effect that could add to healing amount. This is to ensure that each different-scaling healers would be equal when it comes to constants.
I'll also use 3* Multiplication lightcone stats without considering the passive in the calculation. (cause we are broke f2ps)
Constants would be the relic main stats for head, hand, boots, and rope. Variable would be main stat for body and orb and the max stats of 3* LC.
The comparison would be between using 5* HP%/ATK%/DEF% body, 5* OHB body, and 4* OHB body.
At the time of this writing, there are only HP and ATK scaling healers available. However, in this post, I'll include a hypothetical computation for a DEF-scaling healer, in case HYV decides to release one in future. I made this assumption due to the fact that in Genshin Impact, there are DEF-scaling healers released in game.
Max Lv 80, Trace Lv 6/10/10/10
There are no ATK, ATK%, HP, HP%, DEF, and DEF% substats (because healer set likes to roll into crits, break effect, EHR, and effect res)
Constants:
Main Stat Values from Relic and Ornament Pieces
Head = 705.6 HP
Glove = 352.8 ATK
Boots = 25 SPD
Rope = 19.4 ERR%
Variables:
Body
5* body = 34.56 %OHB
4* body = 23.0033 %OHB
43.2 ATK%
43.2 HP%
54 DEF%
Sphere
43.2 ATK% (for ATK-scaling healers)
43.2 HP% (for HP-scaling healers)
54 DEF% (for DEF-scaling healers)
3* Multiplication LC max stats
HP = 952
ATK = 317
DEF = 198
— Healing Amount Calculation —


For ATK-scaling healers, I'll use Luocha's numbers here as an example.

Luocha's Max Base ATK = 756 ATK
3* Multiplication LC max base ATK = 317 ATK
+ATK% from traces = +28% ATK
from Lv 1 = +4% ATK
from Lv 80 = +8% ATK
from A3 = +4% ATK
from A4 = +6% ATK
from A5 = +6% ATK
Healing Amount
from Skill = 60% ATK + 800
from Talent = 18% ATK + 240
Case 1: using 5* OHB body
Total ATK = (756 + 317) * (1 + 0.28 + 0.432) + 352.8 = 2189.776 ATK
Healing from Skill = (2189.776 * 0.60 + 800) * (1 + 0.3456) = 2844.418 HP
Healing from Talent = (2189.776 * 0.18 + 240) * (1 + 0.3456) = 853.3253 HP
Total Healing Amount from Case 1 = 3697.743 HP
Case 2: using 4* OHB body
Total ATK = (756 + 317) * (1 + 0.28 + 0.432) + 352.8 = 2189.776 ATK
Healing from Skill = (2189.776 * 0.60 + 800) * (1 + 0.230033) = 2600.124 HP
Healing from Talent = (2189.776 * 0.18 + 240) * (1 + 0.230033) = 780.0373 HP
Total Healing Amount from Case 2 = 3380.162 HP
Case 3: using 5* ATK% body
Total ATK = (756 + 317) * (1 + 0.28 + 0.432 + 0.432) + 352.8 = 2653.312 ATK
Healing from Skill = (2653.312 * 0.60 + 800) * (1) = 2391.987 HP
Healing from Talent = (2653.312 * 0.18 + 240) * (1) = 717.5962 HP
Total Healing Amount from Case 3 = 3109.583 HP
% Difference between these 3 Cases:
Case 1 Total Heals = 3697.743 HP (100%)
Case 2 Total Heals = 3380.162 HP (91.41%)
Case 3 Total Heals = 3109.583 HP (84.09%)
From these results, when it comes to healing amount for ATK-scaling healers:
[5* OHB body] > [4* OHB body] > [5* ATK% body]
For the HP-scaling healers, I'll be using Bailu's numbers here as an example, because Natasha's traces have additional OHB, unlike Bailu's.

Bailu's Max Base HP = 1319 HP
3* Multiplication LC max base HP = 952 HP
+HP% from traces = +28% HP
from Lv 1 = +4% HP
from Lv 80 = +8% HP
from A3 = +4% HP
from A4 = +6% HP
from A5 = +6% HP
Healing Amount
from Skill = 11.7% max HP + 312
from Ultimate = 13.5% max HP + 360
from Talent 1 (ally with invigoration got hit) = 5.4% max HP + 144
from Talent 2 (revive) = 18% max HP + 480
Case 1: using 5* OHB body
Total HP = (1319 + 952) * (1 + 0.28 + 0.432) + 705.6 = 4593.552 HP
Healing from Skill = (4593.552 * 0.117 + 312) * (1 + 0.3456) = 1143.014 HP
Healing from Ultimate = (4593.552 * 0.135 + 360) * (1 + 0.3456) = 1318.862 HP
Healing from Talent 1 = (4593.552 * 0.054 + 114) * (1 + 0.3456) = 487.1769 HP
Healing from Talent 2 = (4593.552 * 0.18 + 480) * (1 + 0.3456) = 1758.483 HP
Total Healing Amount from Case 1 = 4707.536 HP
Case 2: using 4* OHB body
Total HP = (1319 + 952) * (1 + 0.28 + 0.432) + 705.6 = 4593.552 HP
Healing from Skill = (4593.552 * 0.117 + 312) * (1 + 0.230033) = 1044.846 HP
Healing from Ultimate = (4593.552 * 0.135 + 360) * (1 + 0.230033) = 1205.592 HP
Healing from Talent 1 = (4593.552 * 0.054 + 114) * (1 + 0.230033) = 445.3357 HP
Healing from Talent 2 = (4593.552 * 0.18 + 480) * (1 + 0.230033) = 1607.456 HP
Total Healing Amount from Case 2 = 4303.229 HP
Case 3: using 5* HP% body
Total HP = (1319 + 952) * (1 + 0.28 + 0.432 + 0.432) + 705.6 = 5574.624 HP
Healing from Skill = (5574.624 * 0.117 + 312) * (1) = 964.231 HP
Healing from Ultimate = (5574.624 * 0.135 + 360) * (1) = 1112.574 HP
Healing from Talent 1 = (5574.624 * 0.054 + 114) * (1) = 415.0297 HP
Healing from Talent 2 = (5574.624 * 0.18 + 480) * (1) = 1483.432 HP
Total Healing Amount from Case 3 = 3975.267 HP
% Difference between these 3 Cases:
Case 1 Total Heals = 4707.536 HP (100%)
Case 2 Total Heals = 4303.229 HP (91.41%)
Case 3 Total Heals = 3975.267 HP (84.44%)
From these results, when it comes to healing amount for HP-scaling healers:
[5* OHB body] > [4* OHB body] > [5* HP% body]
For DEF-scaling healers, I'll just create a hypothetical kit which is based from how the kits of ATK and HP scaling healers were formed.

Max Base DEF = 600 DEF
3* Multiplication LC max base DEF = 198 DEF
+DEF% from traces = +28% DEF
Healing Amount
from Skill = 20% max DEF + 500
from Ultimate = 30% max DEF + 800
Case 1: using 5* OHB body
Total DEF = (600 + 198) * (1 + 0.28 + 0.54) = 1452.36 DEF
Healing from Skill = (1452.36 * 0.20 + 500) * (1 + 0.3456) = 1063.659 HP
Healing from Ultimate = (1452.36 * 0.30 + 800) * (1 + 0.3456) = 1662.769 HP
Total Healing Amount from Case 1 = 2726.428 HP
Case 2: using 4* OHB body
Total DEF = (600 + 198) * (1 + 0.28 + 0.54) = 1452.36 DEF
Healing from Skill = (1452.36 * 0.20 + 500) * (1 + 0.230033) = 972.3066 HP
Healing from Ultimate = (1452.36 * 0.30 + 800) * (1 + 0.230033) = 1519.962 HP
Total Healing Amount from Case 2 = 2492.268 HP
Case 3: using 5* DEF% body
Total DEF = (600 + 198) * (1 + 0.28 + 0.54 + 0.54) = 1883.28 DEF
Healing from Skill = (1883.28 * 0.20 + 500) * (1) = 876.656 HP
Healing from Ultimate = (1883.28 * 0.30 + 800) * (1) = 1364.984 HP
Total Healing Amount from Case 3 = 2241.64 HP
% Difference between these 3 Cases:
Case 1 Total Heals = 2726.428 HP (100%)
Case 2 Total Heals = 2492.268 HP (91.41%)
Case 3 Total Heals = 2241.64 HP (82.21894%)
From these results, when it comes to healing amount for DEF-scaling healers:
[5* OHB body] > [4* OHB body] > [5* DEF% body]

Sources
Relic Stats
ATK Calculation
HP Calculation
DEF Calculation
Healing Amount Calculation
Lightcone Stat List
Uploaded on Patch 1.6
➥ Back to my HSR masterlist.

Update Log
01/01/2024 - Uploaded this post.
#𓂀 speaks#hsr#honkai star rail#hsr relic#honkai star rail relic#hsr guide#honkai star rail guide#hsr builds#hsr build#honkai star rail build#honkai star rail builds#outgoing healing boost#hsr luocha#luocha#bailu#hsr bailu
3 notes
·
View notes
Text
Obey Me (OG) Newbie Guide


Author's Note
There are multiple guides for this game existing already. Most could be found in Obey Me sub-Reddit or by searching in Google. Since the game is already 4 years old, this game has finished the main storyline and already moved on to a new prequel game called Obey Me Nightbringer (NB). Obey Me (OG) is still up and running at the time of this writing, since they run the events in both OG and NB, so if you want to still play this game, then that's up to you. Keep in mind though that this game is grindy.
In this post, I'll make a concise guide that will help new players (hopefully) traverse in the game. As always, this guide isn't only from my own experience, because I'm going to include tips from different sources here. The links for the sources could be found at the bottom of this post. I've created this guide with the idea that this is my game notes just in case I forgot about this game.
When starting an account
You can't reroll account in this game thru normal means.
It's not recommended to reroll in this game since you'll get a free UR Asmodeus card in mail but, if you're like other players who want to reroll just to get a card of their favorite guy or you want to get ahead by having more UR cards early in the game, then here are the steps.
Play the tutorial by skipping dialogues until you get a 10-pull. The cards you'll get is fixed.
Keep skipping until you clear 1-6.
Click the home button and go to mail after being bombed with announcements. Claim all. (You'll get enough to do a 10-pull.)
Roll in Nightmare. Preferably in event banner.
If you don't like the results, create transfer code for this account. (Walkthrough on how to setup Transfer Password here.)
Close the app in this phone.
Have a second phone or an emulator (e.g. Bluestacks) with Obey Me app.
Open the Obey Me app in the second phone or emulator.
From the title screen, click Transfer Data > Enter Transfer Code > Input your Transfer Code and Transfer Password > Tap Transfer
Once done, the account is now transferred to the second phone/emulator. Close the app.
You could use the first phone to create another account again.

All about UR or UR+ cards
UR/UR+ cards are the endgame goal to collect in the game. The difference is that UR+ cards either have outfit for character or moving background, while UR cards don't. Both have similar power level.
UR/UR+ card is the highest rarity. SSR cards could work for early game, but would need to be replaced once you reach harder content in game.
There are two types of cards needed to create a team - demon cards and memory cards. Demon cards can be obtained from Chapter A, any event banners, or event reward ladder, while Memory cards from Chapter M, from event reward ladder, or from shard farming in hard mode in lesson 61+. Chapter A and Chapter M are considered standard banners in game.
NOTE: You can't have 2 demon cards of the same character in 1 team. You need to have varying characters for each attribute.
Different ways to obtain UR/UR+ cards:
free pull in Chapter A for demon cards
free pull in Chapter M for memory cards
[RECOMMENDED] pulling in event banners with devil points (DP) or demon vouchers (DV)
[NOT RECOMMENDED] pulling in Chapter A and Chapter M with DP or DV
buying UR card shards in Akuzon with raven (Akuzon > Exchange Raven > Piece of Card)
grinding past events in Lonely Devil for UR cards
UR memory card shard grinding in hard mode of Lesson 61+
UR memory card from limited-time event login rewards (happens during holidays or anniversaries)
UR demon card from 10-pull birthday banner
** It is advised to save up the DP and DV for the limited-time event banners.
** It is advised to save up DP or DV enough for a 10-pull before your birthday. The date you write as your birthday will have a special 10-pull banner that will guarantee a UR card.
NOTE: You need 80 card pieces and 60,000 grimm to form a single UR card.
Surprise Guest
Surprise Guest randomly comes out after you manually battle a stage. One of the 3 guys in the demon cards you used will appear. Getting their 3 interactions right make them gain intimacy points.
Their preferred touch interactions after battles can be found here. Better go look at the list yourself because the options are many.
You can also get gifts when you get a heart reaction for all 3 interactions. You could get 6 gifts per day. Gifts include:
2 AP x10
2 Grimm x1,000
2 Raven x1
There are several ways to obtain gift items for characters during Surprise Guest:
can be bought in Akuzon > Items > Present, costs DP
[RECOMMENDED] can be bought in Akuzon > Exchange Raven > Present, costs raven
reaching certain point requirement in event reward ladders
unlocking gift nodes of Devil's Tree from cards (Click here to find out more.)
possible reward from sending characters in :D Jobs
** To know more about intimacy, click here to check Thal Fox's in-depth guide on intimacy.
** Here's the updated link for the Lesson Intimacy Bonuses.
All about Devil Points (DP)
Devil Points are premium currency used in game and can be bought using real money.
From one-time DP sources [free]:
unlocking gift nodes in Devil's Tree in cards (Click here to know the specific cards.)
clearing the boss stages in each lesson, DP found in To Do > Total > Tasks
reaching certain point requirements in event reward ladder
clearing the missions in To Do > Total
clearing the missions in To Do > Demons
claiming event login rewards (happens during holidays and anniversaries)
From recurring DP sources:
completing To Do > Daily (18 DP)
claiming Day 8 and Day 14 rewards in Attendance card for non-VIP players (10 DP)
claiming Day 8 and Day 14 rewards in VIP Login Bonus for VIP players (30 DP)
TIP: To do the level up card x3 and upgrade devil tree x5 daily mission, do these using N, R, SR, and SSR cards you have. You could easily get these missions done with minimal grimm cost.
All about Demon Vouchers (DV)
Demon vouchers are used to pull in Chapter A and Chapter M in Nightmare. These can also be used in limited-time event banners.
Ways to obtain DV:
unlocking gift nodes in Devil's Tree in cards. (Click here to know the specific cards.)
buying DV in Akuzon > Exchange Raven > Nightmare, costs 45 raven
completing missions in To Do (Click here to know what specific missions rewards DV.)
claiming event login rewards (happens during holidays and anniversaries)
reaching certain point requirement in event reward ladders
buying the flash sales with DP
TIP: Save enough DP to buy these flash sales. To learn more about these sales, click here to check out Thal Fox's comparison guide on different flash sales.
[PRIORITY] Level Up sale - costs 99 DP
Solomon's Summoning Sale - costs 150 DP
You Got This Set L - costs 500 DP
** Congratulations Set Flash Sale (Level Up sale) does not occur until the player has reached level 15. From that point, the sale will appear:
Every five levels from levels 15-40 (15, 20, 25, 30, 35, 40)
Every three levels from levels 43-58 (43, 46, 49, 52, 55, 58)
After reaching level 58, the sale will be made available at every level increase.
All about Grimm
Grimm is used for upgrading card level, unlocking Devil's Tree nodes, and pulling in Chapter G. This is a scarce resource if you are a F2P so you need to allocate this carefully on the cards you only want to use and level up.
Ways to obtain grimm:
sending characters in :D Jobs
doing x3 or x5 of the latest battle stages you've cleared
claiming Day 2 and Day 10 rewards in Attendance card for non-VIP players (7,000 grimm)
claiming Day 2 and Day 12 rewards in VIP Login Bonus for VIP players (30,000 grimm)
completing missions in To Do
unlocking Devil's Tree gift nodes in cards (Click here to know the specific cards.)
participating in event ranking
reaching certain point requirement in event reward ladders
buying the Congratulations set flash sale (Level Up sale)
buying the AP recovery set flash sale (appears every 12 hrs)
TIP: Unlock Ristorante Six as fast as you can so you could earn the max grimm you could get.
All about AP
AP is used to battle stages. Without it, you can't do anything in the game. Replenish rate is 1 AP = 5 min.
NOTE: It is strongly advised not to hoard APs by letting your AP bar capped. Better spend the APs to let the AP bar replenish itself.
From one-time AP sources:
buying the Congratulations Set flash sale (Level Up sale)
completing missions in To Do > Total
completing missions in To Do > Demons
participating in event ranking
claiming event login rewards
unlocking Devil's Tree gift nodes in cards (Click here to know what specific cards.)
reaching certain point requirement in event reward ladders
From recurring AP sources:
288 AP from natural regen (if no sleep, awake for 24 hours straight)
20 AP from Surprise Guest gifts
50 AP from watching x5 ads daily
50 AP from AP exchange in Friend list
30 AP from 12pm - 2pm Fridge Mission (local time)
30 AP from 6pm - 8pm Fridge Mission (local time)
30 AP from To Do > Daily
60 AP from claiming Day 4 and Day 12 rewards in Attendance card for non-VIP players
200 AP from claiming Day 3 and Day 13 rewards in VIP Login Bonus for VIP players
200 AP from buying the AP Recovery Set flash sale (appears every 12 hrs)
All about Raven
Raven is used to buy items in Akuzon > Exchange Raven. Pretty good resource to grind for if you need specific items.
Sources to obtain raven:
claiming Day 6 reward in Attendance card for non-VIP players (1 raven)
claiming Day 6 reward in VIP Login Bonus for VIP players (10 raven)
pulling in Chapter G with 27000 grimm until you max the skill level of your N, R, and SR cards, the next pull with max skill level would convert the card into raven
unlocking Devil's Tree gift nodes in cards (Click here to know the specific cards.)
potential reward from sending characters in :D Jobs
reaching certain point requirement in event reward ladders
All about :D Jobs
:D Jobs is where you can obtain grimms, Surprise Guest gifts, raven, keys, and daggers, and increase intimacy points for characters you send.

TIP: Always send the characters in :D Jobs.
All about Daggers
Daggers are used to uncap the max level of card. This is done in order to increase the power level of the card, to be used in harder lessons in main story.
For example, UR/UR+ card has max level of 100. You need 10 daggers of same sin attribute with the card, 100,000 grimm, 100 gems of main sin attribute, and 100 gems of secondary sin attribute of card in order to increase the max level of this card. Each uncapping of max level of card is increased by +10 levels.
Ways to obtain daggers:
potential reward from sending characters in :D Jobs
reaching certain point requirement in event reward ladders
maxing out the Surprise Guest encounters for rewards in To Do (1500 max per character)
participating in Otaku Boot camp (Do they still run this in OM OG?)
All about Devil's Tree Items
Devil's Tree items are needed to unlock the nodes in Devil's Tree.
Ways to obtain the said items:
doing the Akuber orders (each day has corresponding sin attribute)
completing missions in To Do
reaching certain point requirement in event reward ladders
unlocking Devil's Tree gift nodes in cards (Click here to find the cards.)
grinding the hard mode stage for RNG drop of items
All about Lonely Devil
Lonely Devil is a mode where you could rerun the past events in game. You could unlock a past event using LD tickets or by paying 10 DP.
Players who have missed their desired rewards from the event ladders rerun this event in order to continue what they have started. The total points acquired from previous run is saved and could be continued on your next run of same event. The event rerun lasts for 4 days. However, cheat cards don't work in here.
Lonely Devil is a great way to obtain UR memory cards in the game. Daggers could also be obtained here.
Ways to obtain LD tickets:
unlocking Devil's Tree gift nodes in cards (Click here to know the specific cards.)
reaching certain point requirements in event reward ladders
potential event login reward (happens on holidays or anniversaries)
** To know more about Lonely devil, click here to view the in-depth guide of u/SeriousLatte.
All about D-energy
D-energy is used to increase the chances you could have in capped battle stages. Battle stages that have x3 cap are event stages and hard mode stages. Using one D-energy gives 3 battles. If you run out of D-energy, 5 AP will be used to get 3 more battles.
Ways to obtain D-energy:
unlocking Devil's Tree gift nodes in card (Click here to know the specific cards.)
buying the Congratulations set flash sale (Level Up sale)
reaching the certain point requirement in event reward ladders
All about Card Mechanic and Total Power
UR/UR+ cards have max level 100 and could be uncapped until you reach max level 200. SSR cards has max level 80 and could be uncapped until you reach max level 160.
Each card rarity has their own power level that is used in battle stages. This part will be further explained in a separate post (because I think I'm almost reaching the 30 max image cap in a post). I will link the post here later on.
All about Lesson Summaries for Obey Me (OG) Main Story
If you don't want to grind the main story and just want to read the whole story, here's the link for the lesson summaries for lesson 1 to lesson 80.
Miscellaneous Info
You can drag your finger across the hearts that appear on screen during battle instead of tapping them individually. WAY more effective.
Choosing quick clear x3 or x5 on battles only gives EXP to player level, not including the card level, but you still get grimm and rewards.
Save glowsticks. Rainbow glowsticks are the more powerful buffs in battle.
You don't need to complete all daily missions in To Do. Just clear 7 missions in order to get the 18 DP daily.
You can leave your rewards sitting for as long as you want, and collect them whenever.
AP will carry over when you level up.
You can edit the game's graphics settings if you have lag. Just go up to the top right corner and hit the settings gear.
Work towards building a deck that covers all colors with a variety of characters, both demon cards and memory cards alike.
Try to keep your in-use cards (your deck, as opposed to your overall collection) evenly leveled.
Don't forget to level your memory cards. They are also important in total deck power.
Daily server resets at midnight JST or UTC+9. Convert into your local time to know when it will reset in your location.
Useful Resources
Resources to look into to know more about this game.
https://karasu-os.com/
https://obeymewiki.com/
https://obey-me.fandom.com/wiki/Obey_Me!_Wiki
Sources
Banner Image Source
How to reroll in the game using emulator by u/Guilty-Ticket
How to reroll in the game using second phone by u/AngelicaLily
How to setup Transfer Password walkthrough video by Obey Me Official
Transfer Data from Fandom Wiki
Surprise Guest
Devil Tree Rewards from karasu-os.com
Intimacy Guide by Thal Fox
Obey Me Flash Sales by Thal Fox
Flash Sale from Wiki
Obey Me Guide from VN Guides Wordpress
The Hidden 68 DV in OM by Thal Fox
F2P Guide to Obey Me! by u/gniehc
Daily Login Bonus from Wiki
How to obtain daggers? Question by u/Master-Computer4437
Ways to farm daggers by u/kindacutekindapunk
Guide on Lonely Devil by u/SeriousLatte
Unlocking a Card's Maximum Level Cap from obeymewiki.com
Using DP for getting more battles answer by u/Clarasiir
10 Tips for people who are starting out by u/RustyBoyo
Lesson Summaries for Obey Me (OG) from obeymewiki.com
Lesson Intimacy Bonuses from Fandom Wiki
Obey Me advice thread from u/LadyBastilla
➥ Back to my otome game masterlist.

Update Log
12/20/2023 - Uploaded this post.
01/01/2024 - Added Player's birthday info
01/27/2024 - Added the reminder line at the top and server reset in Miscellaneous info
17 notes
·
View notes
Text
Is it just me or are the new tumblr users convinced there's a penalty of some kind for using this site like it's meant to be used?
118K notes
·
View notes
Text
Arcana Twilight and Obey Me (OG) Comparison


Background: Obey Me (OG) was officially released on December 11, 2019, while Arcana Twilight was released on August 25, 2022 for worldwide audience. People have said that Arcana Twilight have similar mechanics with Obey Me (OG), but to what extent? I've played both games, so I'll write this comparison.
Disclaimer: The things I would write here would be based on my observation of the game mechanics and features present in both games. I did this post to list down the similarities and difference between both games, and not to cause dissonance between two fandoms.
Similarities
I'll list down the similarities in this format:
[Arcana Twilight feature = Obey Me (OG) feature]
MP = AP
Gold = Grimm
Crystals = Devil Points (DP)
Magic Tickets = Demon Vouchers (DV)
Visit = :D Jobs
Milky Way = Devil's Tree
Sorcerer Cards = Demon Cards
Wish Cards = Memory Cards
Scout = Nightmare
Constellation Room = Chapter A
Wish Room = Chapter M
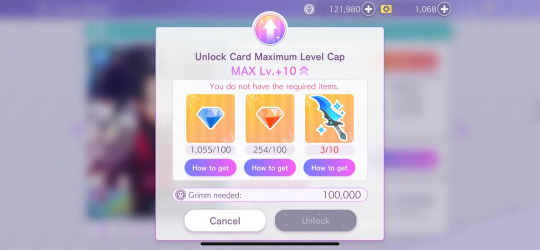
Possession Room = Chapter G
Dressroom = Majolish
Chat = Chat
Calls = Phone
Diary = Devilgram
Mission = To Do
Shop = Akuzon
Magic Academy = Contacts
Stage = Your Tasks
Arcana Club Membership = Akuzon VIP Membership
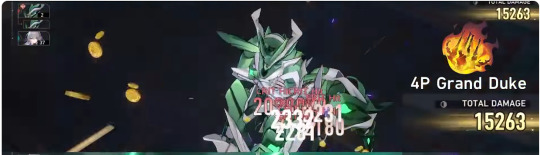
Amplifier Stone = Glow Stick
Summon of Sorcerer = Surprise Guest
Unicorn = Raven

Differences
a. Amount of ads
The very first thing that will greet you when you open the Arcana Twilight is an ad. Both games have ads to support their game mechanics, but the amount of ads you could find in Arcana Twilight is more than those in Obey Me.
The Obey Me ads are mostly there to help the players gain more chances to battle the stages - thru gaining more AP or gaining more battle chances in hard stages or event stages.
The Arcana Twilight ads, however, are mostly found everywhere, since the ads can be used to double the resources drops/gold and to obtain materials and gold if you don't have MP to farm battle stages. You could even use the ads to reduce the time for Visits, which then you don't have to wait long to get gold to upgrade your cards. The ads in this game is like a massive cheat to progress faster thru the game. All you have to do is watch ads and you'll have your resources as reward.
However, there are times wherein forced ads would sometimes pop out after you complete a battle stage in main story or when you'd open the app. If the player wants to opt out of the ads, unfortunately, they can't do so. I'm not sure if the Arcana Club membership implements a "No-Ads" perk though.
As for why are there so many ads in the game? There's a speculation that the reason might be because of this. The link discussed about the reason for why it looks like they are in need of money. Since ads is an option to gain money in a game, they utilized it in order to make money because they are constantly on red. This is actually a good way for free-to-play (F2Ps) players to support the developers if they can't shell out money or buy the Arcana Club membership in the game.
b. Crystal Rewards in Main Story Stages and Daily Missions
One thing you'd notice right away is that in Arcana Twilight, each battle stage rewards 50 crystals for first-time 3-star clear. Then, after you clear out the whole chapter, you'll receive another crystal reward for 3-starring all stages in the chapter. The daily missions give out 50 crystals each day, so it pays the effort to open the game daily and clear out the dailies.
It is completely different from Obey Me (OG), wherein completing each stage in the main story, you'll only receive devil's tree items in the missions and occasionally, you'll get DP for the boss stage you've cleared for the chapter. The daily missions only give out a total of 18 devil points.
c. Events
Obey Me constantly push events every time in the game. There are times when there would be downtime, but it is pretty minimal. The events have story stages and reward ladders that players could opt to grind if they want the UR cards in the event. There are also event cards that is only available in time-limited event banners, which can boost the points for the reward ladder grind.
However, the Pop Quiz or Celestial Blessing events are mostly for spending players and not for F2Ps because of how much resources you need to put into the event just to get the desired rewards from the ladder. F2Ps could join the Birthday event grind but with proper preparation first. But the good news is that the past Pop Quiz and Celestial Blessing events do come back in Lonely Devil and you could rerun the event for a limited time to grind for the rewards as F2P.
Arcana Twilight, on the other hand, has event cards but there is no event story stages nor reward ladders to grind for. The event story is locked behind the event cards from the limited-time banners.
When it comes to limited-time event banners, Obey Me only have demon cards in the banners, whereas in Arcana Twilight, the event banners include both sorcerer card and wish card in the roster. The Obey Me event memory cards are only available in the event reward ladders.
Both games have event banner reruns and Obey Me rerun banners also retain the pity/total summons done from before, so that players could continue their pulls the next time the banner reruns. As for Arcana Twilight, I have no idea if the rerun banners also retain the pity/total summons from previous banner run.
d. Main Story Chapter Updates
There's this joke in the fandom that while Obey Me updates their main story chapter every week, Arcana Twilight gets update every year. It sounds like a joke, but it's not really far-fetch from what happened.
To start off, I'm not a day 1 player. I only started recently so the things I'm writing here are from what I understood in my research. I snooped around the archives of the official Tumblr account of Arcana Twilight and sub-Reddit and found their posts about the chapter additions in the game and noted their timestamps.
Their very first chapter addition is Floor 10, which means that on its initial release, the game has until Floor 9 only. Floor 10 was announced to be added on September 2022, Floor 11 on April 2023, Floor 12 on late October 2023, and recently released, Floor 13 was added on December 2023.
I still haven't reached Floor 13 yet. I stopped at Floor 8 at the time of this writing, because of the requirement needing me to be at least level 30 to proceed to next floor, which I'm currently low-leveled yet for that, so I could only bid my time and make my team stronger for the next floors.
But from what I could tell, the players feel as if they were left with a cliffhanger with the recent addition, with many of them thinking that a lot of questions were left unanswered. They could see the potential of the story in the game but, a lot of lore details weren't really touched on in the story.
I'm not really sure what happened in Floor 13 since I tried to avoid the story spoiler, but this image below is what I saw mostly talked about.

People are either thinking that this ending credit means that the main story of the game is completely finished or that this credit is saying that this floor is the end of Season 1 of main story.
In my opinion, I'm not really sure how to react to this kind of news. I just recently started the game and wrote the newbie guide and card mechanic guide posts just a few days after playing the game, only to find out that the game is probably on it last leg. I'm not really sure what would happen next for this game and I could only wait it out.
e. Inventory
Obey Me (OG) doesn't have an inventory, while Arcana Twilight has one.
f. Friend list
Obey Me (OG) has friend list where you could gain 50 AP by exchanging with friends daily, while Arcana Twilight doesn't have one.
Sources
Reason for the lack of new content by u/No_Economist_7447
10th Floor: New Additional Stage Notice
11th Floor: New Additional Stage Notice
12th Floor: New Additional Stage Notice
13th Floor: New Additional Stage Notice
➥ Back to my otome game masterlist.

Update Log
12/17/2023 - Uploaded the post.
12/17/2023 - Added additional info about ads, events banner, inventory and friend list in Differences
01/29/2024 - Added the reminder line at the top
#arcana twilight#guides#tips#otome game#arcana twilight guide#arcana twilight newbie guides#아르카나트와일라잇#arcana twilight tips#아르트와#artw#obey me shall we date#omswd#obey me (og)#obey me
20 notes
·
View notes
Text
Arcana Twilight Card Mechanic


All about Card Stats
Typically, SSR cards are the endgame goal to collect for the battles. But SR cards will do if you don't really have other cards to use.
SSR cards have level 120 as the max, while SR cards have level 90 as the max. In this link, you'd see the total card power (CP) of each SSR card available in standard banners, and upon checking out the numbers, you could say that a level 120 SSR card has an average of 200k CP.
Below is a list of my level 90 Arcturus SSR sorcerer card stats. (Image can be found in card multiplier part of this post.)
Wind - 32,200
Fire - 36,200
Water - 29,400
Soil - 28,800
Light - 31,400
Total - 158,000
Assuming that the stats of a level 90 SSR card and a level 90 SR card is kind of similar, we could say that a maxed out level 90 SR card could have an average of 150k CP.
I made this assumption because I don't have gold nor materials to level up an SR sorcerer card to max. This could mean that the average number I've said here could be correct or the actual value might be lower than 150k due to rarity difference. (Feel free to correct me in the comments section about this part.)
To test this assumption, I'm showing 4 different cards, 2 sorcerer cards and 2 wish cards with SSR and SR rarities each, and compare the total CP of each card to see difference between these two rarities.
━━ ˖°˖ ☾☆☽ ˖°˖ ━━━━━━━
Below is my SSR Alpheratz sorcerer card with level 30 stats.

Wind = 13,600
Fire = 11,400
Water = 18,300
Soil = 10,000
Light = 10,600
Total = 63,900
Now, here's my SR Vega sorcerer card with level 30 stats.

Wind = 10,450
Fire = 10,200
Water = 11,700
Soil = 11,200
Light = 10,500
Total = 54,050
The two sorcerer cards have a difference of 9,850 CP. An 18.22% difference between the two - almost 20% difference between SSR and SR sorcerer cards.
━━ ˖°˖ ☾☆☽ ˖°˖ ━━━━━━━
Below is my SSR Arcturus wish card with level 90 stats.

Wind = 16,650
Fire = 15,750
Water = 15,850
Soil = 15,150
Light = 19,450
Total = 82,850
Here's my SR Alpheratz wish card with level 90 stats.

Wind = 13,950
Fire = 15,050
Water = 17,360
Soil = 15,050
Light = 15,240
Total = 76,650
The two wish cards have a difference of 6,200 CP. An 8.089% difference between the two - almost 10% difference between SSR and SR wish cards.
━━ ˖°˖ ☾☆☽ ˖°˖ ━━━━━━━
In conclusion, to rephrase my assumption above, a level 90 SR sorcerer card could have an average 125k CP, while a level 90 SR wish card could have an average 75k CP. I got this estimated numbers by removing 20% value for SR sorcerer card CP, and using the level 90 SR wish card CP for the estimate.
━━ ˖°˖ ☾☆☽ ˖°˖ ━━━━━━━
I've made a note on card CP because each battle stage has corresponding recommended opponent CP you need to either match or to be more than it. Preferably, you'd want your team CP to be more than opponent's CP.
Below is an image of Twilight Mode Stage 10-B, where it shows the opponent CP. (The image is from u/Global-Asparagus7156. I haven't reached this floor stage yet.)

Seeing that the opponent's CP is 578,307, theoretically speaking, we could say that having a full team of SR sorcerer and wish cards with max level 90 could still deal with this stage, since with just 3 max SR sorcerer and 3 max SR wish cards alone, you'd have 600k CP already. (125k * 3 cards + 75k * 3 cards = 600k CP)

All about Card Skills
In my newbie guide post, I've mentioned using card with skills that has fast recharge time. In this post, I'll write down the sorcerer card skills from the fastest to the slowest.
Sorcerer card active skills
Decode (7 sec)
Double attack (8 sec)
Skill power up (8 sec)
Shield Deployment (8 sec)
Debuff (9 sec)
Slip (12 sec)
Freeze (13 sec)
Sorcerer card active skills I don't have a card to test on, but based the recharge time on the enemies in battle stage
Recall (8 sec)
Poison (9 sec)
Heal Activation (9 sec)
** I'm not including the wish card skills here because you can't control the activation of these kinds of skills. It will automatically trigger in battle.
All about Card Multipliers
Card multipliers are the attribute buffs in each battle stage. Each battle stage has two attributes that gains buffs, and these buffs could be seen in the card stat details in "team setup".
In this part, I'll show various examples on how card multipliers were applied in a stage. The battle stage we'll use as a litmus test is from normal mode stage 8-3, where the buff attributes are fire and light.
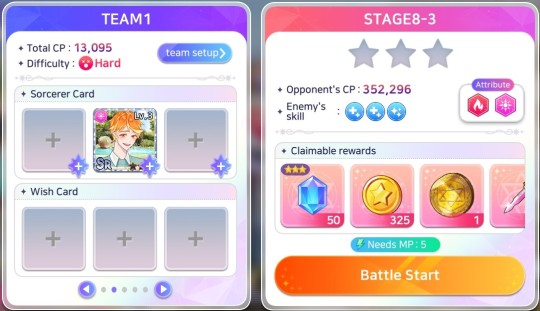
━━ ˖°˖ ☾☆☽ ˖°˖ ━━━━━━━
To start off, we'll have SSR Arcturus fire sorcerer card. These are his stats without any buffs:
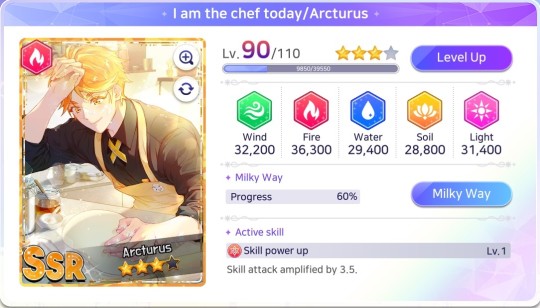
This is the SSR Arcky card stats with buffs:
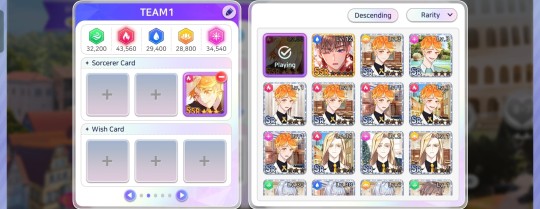
The buffs are applied in his fire and light stats:
Fire = 36,300 → 43,560 = x1.2 = 20% increase
Light = 31,400 → 34,540 = x1.1 = 10% increase
━━ ˖°˖ ☾☆☽ ˖°˖ ━━━━━━━
Another card is this SR Arcturus light sorcerer card. These are his stats without buffs.

This is the SR Arcky card stats with buffs:
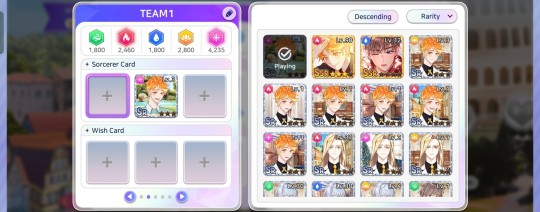
Just like his SSR card, the buffs are applied in his fire and light stats:
Fire = 2,050 → 2,460 = x1.2 = 20% increase
Light = 3,850 → 4,235 = x1.1 = 10% increase
━━ ˖°˖ ☾☆☽ ˖°˖ ━━━━━━━
Another card we'll look into is SR Vega water sorcerer card. These are his stats without buffs:
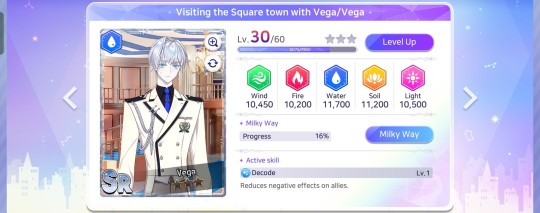
This is the SR Vega water card with buffs:
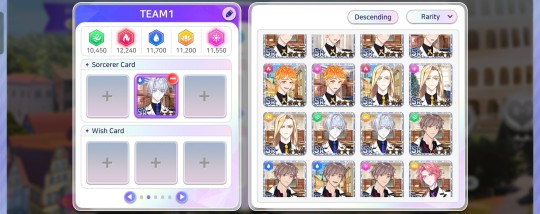
The same with the last two cards above, the buffs are also applied in his fire and light stats.
Fire = 10,200 → 12,240 = x1.2 = 20% increase
Light = 10,500 → 11,550 = x1.1 = 10% increase
━━ ˖°˖ ☾☆☽ ˖°˖ ━━━━━━━
Now we'll look into the wish card multipliers.
To start off, we'll have N Spica fire wish card without buffs:
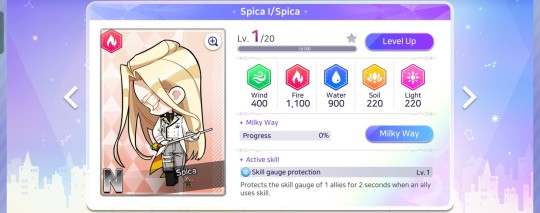
This is N Spica wish card with buffs:

Just like with the previous sorcerer cards, the buffs are applied in his fire and light stats.
Fire = 1,100 → 1,320 = x1.2 = 20% increase
Light = 220 → 242 = x1.1 = 10% increase
━━ ˖°˖ ☾☆☽ ˖°˖ ━━━━━━━
Next, we'll have SSR Arcturus light wish card without buffs:
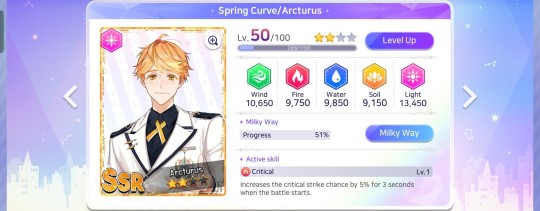
This is his card with buffs now:
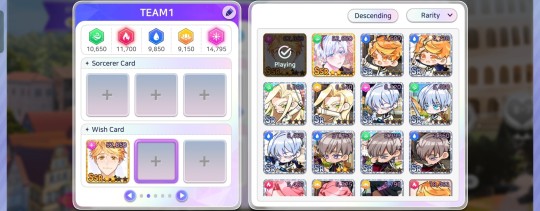
Just like with the previous wish card above, the buffs are applied in his fire and light stats.
Fire = 9,750 → 11,700 = x1.2 = 20% increase
Light = 13,450 → 14,795 = x1.1 = 10% increase
━━ ˖°˖ ☾☆☽ ˖°˖ ━━━━━━━
The last card would SR Alpheratz water wish card. This is his card stats without buffs:

This is his card with buffs:
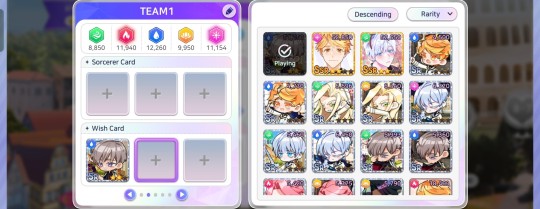
Just like with the previous two wish card above, the buffs are applied in his fire and light stats.
Fire = 9,950 → 11,940 = x1.2 = 20% increase
Light = 10,140 → 11,154 = x1.1 = 10% increase
━━ ˖°˖ ☾☆☽ ˖°˖ ━━━━━━━
TLDR; Regardless of whether the sorcerer and wish card's main stat is the main attribute or secondary attribute or none of the two stage attributes, the attributes that have buffs for this certain stage is still distributed to selected card stats. These stat buffs could aid your team CP in battle stages.
Main stat attribute = 20% increase
Secondary stat attribute = 10% increase
All about Fever Time
This battle mode triggers randomly. I have no idea what are the trigger conditions for this to come out, since whenever this mode would come out on screen, I'm busy tapping the screen to activate the skill burst of my team.
This is what the fever mode trigger looks like in the middle of battle. It is indicated by a yellow star with smiley face.

Once you click on it, it will start the "Fever Time" mode, which then would make rainbow-colored stars to pop out of the screen. If you click on those stars, it could deal damage to enemies' HP bar, which could help your team.


All about Card Battle Tips
What I would write here are the battle strategy I would do in the game. It could work for anyone as long as your total CP is more than the opponent's total CP, at least 50k more than opponent's total CP.
In battle stages in normal or twilight mode that isn't the boss stage, the stage would have a total timer of 30-sec for the whole battle. If your card skills have less than 10-sec recharge time, you could deal skill dmg 3-times within this battle period. This is the reason why it is suggested to use card skills with fast recharge time.
If your total CP is slightly more than enemies' total CP, the strategy here is to counter the first 10-sec skill dmg of the enemies, then let them deal dmg on your HP on the second and third 10sec of the battle. The reasoning for this is that whenever you would counter the enemies' skill, the total skill dmg you can deal on enemies' HP is reduced.
In boss stages in both normal and twilight mode, the stage would have 40-sec total timer. The same tip could be applied here, but you mostly would counter the first two 10-sec skill up, and let the enemy damage your HP for the last two 10-sec skill up.
Annoying card skills enemies use to ruin your 10-sec skill rotation:
Recall - This skill is annoying because it could drain the skill gauge of one of your sorcerers. It has a 35% chance to proc, but from my runs, it most of the time proc. To mitigate this skill, you need to use card skills that has a recharge rate 8-sec or less to counter recall, so that this skill won't have any skill gauge to drain.
Poison - This skill is a DoT (damage over time). This means that besides from the dmg you got from the skill - which you could counter, the poison skill could still deal more dmg on your HP bar outside of the enemies' skill turn. To mitigate this HP loss from poison's DoT, you'll want heal activation in one of your card skills.
Freeze - This skill has the slowest recharge rate, but for a good reason. This skill is pretty OP when it comes to freezing the skill gauge on one of your enemies, which means you could ruin their skill uptime rotation, so that you could deal more dmg on them. The same could be said to your team if your enemies have freeze skill instead. To mitigate this annoying skill, you need to have you cards to have fast recharge skill so it could catch up to other skill ups.
Slip or Sleep - I'm not sure if it is a translation issue, but if you'd read the skill description, you'll see that the skill can inflict sleep on enemies, which will make them immobile for 2.5-sec. This skill is another OP skill to have in your card skills at the cost of slow recharge rate, but you're in bad luck if your enemies deal the same skill on your team. To mitigate this skill, you can't really do anything about it, except to use faster recharge skills to catch up with other skill ups, which is pretty similar tip with freeze skill.
Sources
Arcana Twilight Cards
Arcana Twilight Card Stats from u/Cold-South-2793
Twilight Mode Stage 10-B from u/Global-Asparagus7156
Card Battle Tips from u/nerothearson
Card Battle Tips from u/Goleziyon
A/N: I just learned now that a maximum of 30 images is only allowed per post. I have to replace some line divider images with actual text line dividers. The images in card multiplier part of this post takes up a lot of images from the max limit.
➥ Back to my otome game masterlist.

Update Log
12/15/2023 - Uploaded this post.
12/15/2023 - Corrected my assumption in Card stats part and showed a comparison test between SSR and SR cards.
01/29/2024 - Added the reminder line at the top
#arcana twilight#guides#tips#otome game#arcana twilight guide#arcana twilight newbie guides#아르카나트와일라잇#arcana twilight tips#아르트와#artw
11 notes
·
View notes
Text
Arcana Twilight Newbie Guide


NOTE: The things I'll write here are not from my experience. I'm purely compiling tips I've searched in the internet so it could help me (and probably you) in the game. Think of it as my game notes or something like that.

When starting an account
You get a free 10-pull in the tutorial. There's a chance for you to get SSR card from it, which is the current highest rarity card in game. It is advised to reroll your account if you didn't get any SSR card from that 10-pull.
To reroll account:
Start the game with a guest account
Finish the tutorial and do the 10-pull, if you got the SSR card of the character you like, you could stop here.
Click on the button with three lines at upper right corner
Setting
Customer Support
Delete Account
Restart the game
All about SSR cards
Collecting SSR card is the endgame goal to have. SR cards could work for early game, but would need to be replaced once harder content comes in game.
There are two types of cards needed to create a team - sorcerer cards and wish cards. Sorcerer cards can be obtained from Constellation room in Scout, while Wish cards from Wish room. Constellation room and Wish room are considered standard banners in game.
NOTE: You can't have 2 cards (be it sorcerer cards or wish cards) of the same character in 1 team. You need to have varying characters for each attribute.
There are several ways to get SSR cards:
a. Pull from Constellation and Wish rooms with crystals or magic tickets. (Scout > Constellation/Wish)
b. Pull in Possession Room with 27000 gold. This gives at least 1 SSR card shard per 10-pull (not guaranteed tho). (Scout > Possession)
c. You could grind the SSR card shards in hard stages. The hard stage is called "Twilight mode" in game. (But the catch here is that the shard drop rate is too low. One player tried to grind for one Alpheratz SSR card but it took her 7 months to complete it.)
d. Buying the SSR card shards from shop using 15 or 135 unicorns. (Shop > Exchange shop > Piece of card)
e. Pull from limited event banners with crystals or magic tickets. SSR card shard pity varies according to event banner (e.g. 200, 250, and 300 are the pities from previous event banners). The pity or total summons could be seen in "View Details" button above the "Scout 10 times" button.
** It is advised to save up the crystals for the limited-time event banners.
f. Buying the SSR card shards from the Seasonal Event Shop (Shop > Seasonal Event Exchange Shop > Card Piece). To obtain the currency for this limited-time shop, you must complete the "Seasonal Event Missions".
** One card shard costs 60 event currency each, which means you need 3600 event currency in total. But currently, there is only a total of 2280 event currency in the Seasonal Event Missions, which means you can't buy all 60 shards...
** I can't find more info about the details on event banners. Might update this part later on when I actually experience how the event is done in this game.
NOTE: You need 60 shards and 40,000 gold to form a single SSR card.
Summon of Sorcerer (SOS)
Every time you manual battle the stage, a character would appear in SOS after the battle, regardless if you 3-star or 2-star the stage, and if you got their touch interactions right, you'll get either 1000 gold or 10 MP. There is no cap with the SOS rewards.
Preferred touch actions after battles (SOS):
Alpheratz: Ignore three times
Arcturus and Pollux: Stroke head/face three times
Sirius, Spica, and Vega: tap shoulder three times
** More interaction options here.
There are several ways to obtain gift items for characters during SOS:
can be bought in Contell shop, but availability is random, costs 12,000 gold
can be bought in Shop > Items > Present, costs either 30 or 270 gems
can be bought in Shop > Exchange shop > Present, costs unicorns
by unlocking the first gift node of SSR and SR wish card
by pulling in Possession room in Scout
All about Crystals/Gems
Crystals are premium currency used in game and can be bought using real money.
From one-time crystal sources [free]:
Main story normal mode and twilight mode. Each battle stage gives 50 crystals.
Missions > Sorcerer Mission
Missions > Beginners Event
From recurring gem sources [free]:
Mission > Daily Mission (50 crystals daily)
From Arcana Club [paid]: (Shop > Arcana Club)
2750 crystals when you buy it
total of 2250 crystals over the course of 28 days
NOTE: All R sorcerer cards have first 2 gift space in Milky Way that rewards crystals (70 crystals in total). Worth upgrading those nodes.
All about Magic Tickets
Magic Tickets are used to pull in Constellation and Wish rooms. These can also be used in limited-time event banners.
Buy the discounted 10 magic tickets in shop. A 10-pull costs 2700 gems in Scout, but it is only 2220 gems in Shop. Refreshes every month. (Shop > Items > Scout)
NOTE: All SSR and R Wish cards have magic ticket as the last gift space in Milky Way. Worth upgrading those nodes.
All about Gold
Gold is used to upgrade card levels, to unlock nodes in Milky Way, to buy items in Contell shop, and to pull in Possession Room in Scout.
Different ways to obtain gold:
doing the highest floor stages in battle x3 you have unlocked and opting to watch ad to double the reward
doing the highest floor stages in manual battle for a chance to get 1000 gold from SOS
sending the characters in "Visit"
watching ads from "FREE! +2000 Gold" button
watching ads to make Visits quicker (1 ad = 10 min reduced) and doubling the rewards
watching ads in Contell Shop, but the availability is random
All about Unicorn
Unicorn is used to exchange items in the Exchange shop. (Shop > Exchange)
Different ways to obtain unicorn:
You could get unicorn by pulling in Possession room with 27000 gold. Doing daily 10-pull can give you SSR card shards and levels up the SR, R, and N cards in your roster. Once you have maxed out the skill level of SR, R, and N cards, when you pull those same cards again, it would convert it into unicorn.
Another source of unicorn is from gift nodes in Milky Way of SSR and SR cards, not R cards.
All about Keys
Keys are used for unlocking premium chats and messages.
Ways to obtain keys:
unlocking the level cap nodes of sorcerer and wish cards, any rarity works
giving a gift to a sorcerer during SOS for daily mission
first gift node of N wish card
second to last box on SSR wish card gives 2 keys
All about Milky Way materials
Milky way materials are the items needed to unlock the nodes in Milky Way.
Several ways to obtain the said materials:
by farming the normal mode and twilight mode stages that drops the needed materials
by watching ads and buying with gold in Contell Shop
by sending the sorcerers in Visit
** u/Jeschalen from Reddit shared a spreadsheet that tracks the Milky Way materials in normal mode and twilight mode. Link can be found here.
Miscellaneous information
"1 star picking from Milky Way" in Beginners Event in Mission means unlocking the last node in Milky Way. The purple node with star and has "picking star" subtext.
In Constellations and Wish tabs under Scout, if you look at "View details", you'll see the Scout completion reward. By clicking on "Reward Renewal", you could refresh the summon rewards if you don't like the card rewards without losing your progress. Even after passing the rewards you don't have to claim the pieces right away, you can still change it, but you won't be able to claim the next reward marker until you claim the first one. Refresh is free every 24 hours.
You can get gifts up to 3 times on Friday, Saturday, and Sunday at certain times. For more info, you could check it out here.
SR wish cards give amplifier stones in gift nodes.
All about Main Story Affection Gain
An otome game player and blogger named Nakimushi has compiled a list of chapter dialogue options that give affection gain on sorcerers. Link for Chapter 1 (Part 1) can be found here. The other chapters can be found in a link in the sources below.
All about Card Mechanic
It is worth noting that some card skills have faster charging time (i.e. decode, shield deployment, and skill power up). Use these kinds of cards because the enemy could freeze, put you to sleep, or drain your skill gauge. The card mechanic is further explained here.
All about MP
MP is used to do battle stage. Without it, you can't really do anything in the game, besides watching ads while waiting for MP to replenish. It takes about 5-minutes for 1 MP to regenerate.
There are other sources of MP as well if you are in a pinch:
SR sorcerer cards give 100 MP in the first gift node.
You get occasional 50 MP in mail, but it depends on weekend event.
Doing the battle stage manually and getting the SOS interactions right could give you 10 MP.
Sources
Tips and Info from u/Stardust_Kurisu
SSR card shard grind in Hard Stage by u/Cold-South-2793
1 star picking in Beginner Mission answer by u/oh1liner
Discount Card Upgrade on Weekend Event by u/Cold-South-2793
Summon of Sorcerer (SOS) Interactions by en-serio-te-amo-arcky
How to get more gems answers by u/Applecat-120 and u/Jeschalen
Arcana Club crystal answer by u/throw_away_amethyst
Unicorn source answer by u/No_Economist_7447
Fastest way to get gold by u/Chemical-Remove-4114
Scout rooms and Pieces Tips by u/Cold-South-2793
Tips and info from u/Cold-South-2793
Using 1 SSR card and 3 SR cards in Chapter 8 and 9 by u/Fast_Concentrate3044
How many pieces do I need to get a SSR? Question by u/Woncen
Table of Contents for the Arcana Twilight Main Story Affection Gain in Nakimushi's blog
Weekend event notice from Arcana Twilight Official post
Card skill charging time explanation by u/Serpentarrius
MP regeneration rate answer by u/Affectionate_Log5782
➥ Back to my otome game masterlist.

Update Log
12/11/2023 - Uploaded this post.
12/13/2023 - Added Seasonal Event Card Shard tip
12/14/2023 - Added the gift item from Possession room tip, replaced the line dividers
12/15/2023 - Added about MP info, gold from Contell shop tip, and the link to card mechanic post
12/16/2023 - Rephrased the character note for team setup
12/27/2023 - Corrected the SSR card shard chance info about Possession room 10-pull
01/29/2024 - Added the reminder line at the top
#arcana twilight#guides#tips#otome game#arcana twilight guide#arcana twilight newbie guides#아르카나트와일라잇#arcana twilight tips#아르트와#artw
14 notes
·
View notes
Text
Otome Game Masterlist
Just a list of guides for the otome games I'm currently playing or had played before. Do note that the things I would include here come from different sources, not just from my own experience.

Newbie Guide and Tips
Card Mechanic
Arcana Twilight and Obey Me (OG) Comparison
OBEY ME (OG)
Newbie Guide and Tips
Card Mechanic and Gameplay Roadmap
OBEY ME NIGHTBRINGER (NB)
Newbie Guide and Tips
Card Mechanic
---
🚧 This post is currently under construction.
7 notes
·
View notes
Text
HSR FAQ 𖡻 Speed

TLDR;
Speed breakpoints within 5 cycles (550 AV in MoC):
• 109, 112, 115, and 121 spd = +1 extra turn
• 128, 134, and 143 spd = +2 extra turns
• 146, 156, and 161 spd = +3 extra turns
• 164, 172, and 178 spd = +4 extra turns
• 182 spd to 200 spd = +5 extra turns
• 200.1 spd = +6 extra turns
Choose how many extra turns you want for your DPS to take within 5 cycles. Then you decide what SPD value can you afford to get while still maintaining your desired crit ratio.
Once you've decided the SPD of your DPS, your buffer/debuffer/sustain could have:
SPD of buffer/debuffer/sustain = SPD of dps + 5 spd
** Scroll down below to read about the order priority for buffer/debuffer/sustain/DPS.

Long Text Below
To start off, the MOC requirements now needs 10 cycles max to clear. If we are going to consider that each floor has two halves, each side needs to be cleared within 5 cycles.
This means, when it comes to building your units, you need to consider building some speed into them so they could have extra turns within this 5 cycles.
I know there is this common concept that goes like this:
121 spd = low investment
134 spd = high investment
161 spd = desirable spd for supports
Ever questioned why the recommended speed has this gap in between 134 and 161 spd? Like, why is that a big difference? What do these numbers even mean?
These recommended speeds are actually from speed breakpoints that considers the fastest clear of MOC. This means, it only considers getting 2 turns in cycle 0 if you have 134 spd and getting 4 turns in cycle 1 if you have 161 spd. Those speed breakpoints are just for speedrunning MOC if you already have enough crit ratio for your DPS.
But, since we are going to consider balancing our build with enough required stats and enough speed for max 5 cycles, we are going to breakdown all possible speeds we could aim for and we'll know as well how many extra turns each unit will get if we have these specific speeds.
-
For this, we'll be using this chart from u/Elhant42 from Reddit that showed the speed vs number of turns comparison for each cycles.

The highlighted cells showed the cycles in which we'll have double turns. This means that within 5 cycles, you'll see how many extra turns you'll get if you have a specific speed in your build.
From this chart, you could see that 134 spd is the minimum speed you'll need to have double turn in cycle 0, but overall, within 5 cycles, you'll only have 2 extra turns, which is also achievable with 128 spd.
-
Here's another chart from u/Yamasir which shows the speed breakpoints that is commonly talked about by other HSR players.
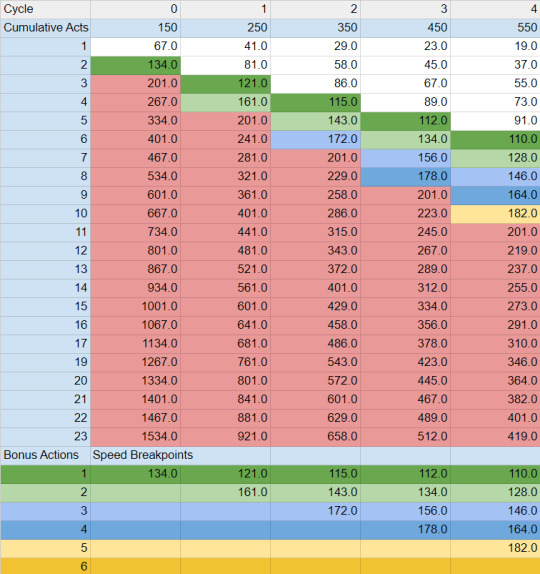
** I only included until cycle 4 here because that is what we're aiming for - 5 cycles, if we are counting cycle 0 as the starting point.
-
Additional chart I recently added (since I only saw this chart late already) is from Hunterkee. The spreadsheet linked below has available SPD vs Cycle charts for 3/5/6/8 cycles. But in this post, I’ll only consider from Cycle 0 to Cycle 4 in his chart.
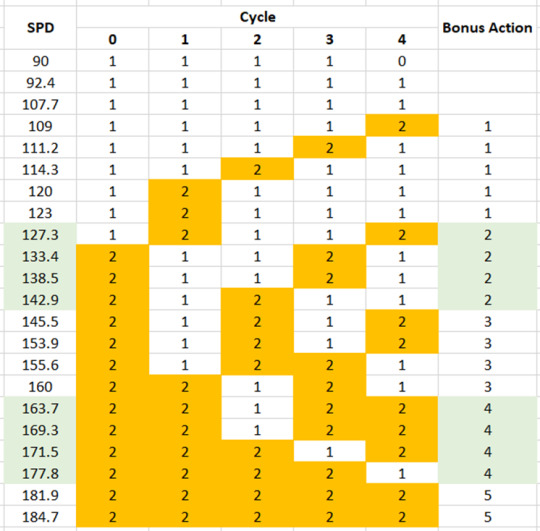
** The charts showed the speed breakpoints down to its decimal places, but in-game we can’t see any decimals, hence I only wrote the values above in whole number. To know the exact decimal points of your speed, you could use this site: https://enka.network/?hsr
-
From the chart, you could see the speed breakpoints that will give extra turns for each cycle. People only consider 121, 134, and 161 since those three speed values gives the most turns at cycle 0 and cycle 1, but there are other speed values we could look into that could be useful to us if we either have more or less than those commonly mentioned three speed values.
Notable speed points we should glean on are these values below. Within 5 cycles, if you have these specific speed values, wherein the starting point is at cycle 1, you'll have these certain cumulative turns:
109 spd = 6 turns, double turn @ cycle 5
112 spd = 6 turns, double turn @ cycle 4
115 spd = 6 turns, double turn @ cycle 3
121 spd = 6 turns, double turn @ cycle 2
128 spd = 7 turns, double turn @ cycle 2/5
134 spd = 7 turns, double turn @ cycle 1/4
143 spd = 7 turns, double turn @ cycle 1/3
146 spd = 8 turns, double turn @ cycle 1/3/5
156 spd = 8 turns, double turn @ cycle 1/3/4
161 spd = 8 turns, double turn @ cycle 1/2/4
164 spd = 9 turns, double turn @ cycle 1/2/4/5
172 spd = 9 turns, double turn @ cycle 1/2/3/5
178 spd = 9 turns, double turn @ cycle 1/2/3/4
182 spd = 10 turns, double turn @ cycle 1/2/3/4/5
200.1 spd = 11 turns, triple turn @ cycle 1, double turn @ cycle 2/3/4/5
At this point, you could already see how the 134 spd and 161 spd is just similar to 128 spd and 146 spd when it comes to number of turns within 5 cycles.
It goes to show how these two values are overused as advice to players and that other speed values weren't really that gleaned on despite having the same number of turns with these two speeds.
-
— What SPD should I get for my DPS/Buffer/Debuffer/Sustain? —
This, my friend, is also my question before. Now, I'll say here what I learned.
The answer is -- it depends on how you want them to act within the cycle limit.
Normally, people would say to get 134 spd for your DPS. But, I would like to rephrase that answer.
Choose how many extra turns you want for your DPS to take within 5 cycles. Then you decide what SPD value can you afford to get while still maintaining your desired crit ratio.
The SPD values to choose from are these:
109, 112, 115, and 121 spd = +1 extra turn
128, 134, and 143 spd = +2 extra turns
146, 156, and 161 spd = +3 extra turns
164, 172, and 178 spd = +4 extra turns
182 spd to 200 spd = +5 extra turns
200.1 spd = +6 extra turns
Now that you have decided how much SPD you can afford to get for your DPS, the SPD of your buffer/debuffer/sustain would depend on the SPD of the DPS.
There's this theorycrafting term called "relative speed breakpoint", which means the allies' spd breakpoints would need to consider the give-and-take of SP economy in the team. Another is “turn relationships” which is about the SPD combos that are impactful/useful for DPS and supports. To learn more about these, you could check the sources below which links to the Reddit posts made by u/EtherealEch0.
But in this post, I'd rather make it simple instead because I'm lazy to do such menial minmaxing of SPD and RNG isn't really that cooperative anyways.
Once you've decided the SPD of your DPS, your buffer/debuffer/sustain could have:
SPD of buffer/debuffer/sustain = SPD of dps + 5 spd
That's it.
TBF, it doesn't really need to be 5 spd, but any number would do as long as the buffer/debuffer/sustain is faster than the DPS.
The reasoning behind it is that the three support roles should do their job first before the DPS action, because the buff on ally and debuff on enemies could greatly boost the dmg done by DPS on enemies.
-
As for the order priority of your team members, they could go in these ways:
Sustain could be the fastest or the slowest in the team. Buffer/debuffer should be faster than DPS.
Sustain > Buffer/Debuffer > DPS
Buffer/Debuffer > DPS > Sustain
Bronya is recommended to be a bit slower than your DPS so the DPS could have double turn with her skill.
Sustain > Debuffer > DPS > Bronya
DPS > Debuffer > Bronya > Sustain
Sub-DPS could either be faster or slower than DPS depending on how the sub-dps kit works. Preferably, Sub-DPS have similar SPD with DPS.
Sustain > Buffer/Debuffer > Sub-DPS > DPS
Buffer/Debuffer > Sub-DPS > DPS > Sustain
Sustain > Buffer/Debuffer > DPS > Sub-DPS
Buffer/Debuffer > DPS > Sub-DPS > Sustain
** Buffer & Debuffer are interchangeable depending on your team.

Sources
Speed spreadsheet: number of turns per 10 and 15 cycles by u/Elhant42
Extended Speed Breakpoint Chart by u/Yamasir
134 SPD is a social construct
Relative speed breakpoint by u/EtherealEch0
How Do Speed and Turn Order Work in Honkai: Star Rail?
SPD vs Cycle Sheet by Hunterkee
Speed
Turn relationships by u/EtherealEch0
Uploaded on Patch 1.5
➥ Back to my HSR masterlist.
Author’s Note:
Back then, when I’m drafting this post, I can’t find any reliable sources for the speed breakpoints (partly because I’m not really part of the TC community). After 3 months, now I could find some more info about it which expands on the topic itself.

Update Log
11/30/2023 - Uploaded this post
02/29/2024 – Added Hunterkee’s SPD vs Cycle Sheet; added more SPD values in the list
#honkai star rail#honkai star rail build#hsr#hsr build#honkai star rail builds#honkai star rail relic#hsr builds#hsr relic#honkai star rail guide#hsr guide#speed#spd#hsr spd#honkai star rail spd#hsr speed#honkai star rail speed#𓂀 speaks
6 notes
·
View notes
Text
【Honkai: Star Rail Build TLDR】
❆ Pela


There are two builds recommended for Pela. First build is focused on her DEF-reduction uptime, while second build is focused on her break dmg from Ultimate.

For Debuffer Build (Recommended!)
[Relic Set 1 = more basic ATK DMG, gets SPD to self, gives ATK buff to allies]
→ 4pc Musketeer of Wild Wheat
→ 2pc Fleet of the Ageless
[Relic Set 2 = more basic ATK DMG, gets SPD + EHR to self]
→ 4pc Musketeer of Wild Wheat
→ 2pc Pan-Galactic Commercial Enterprise
[Relic Set 3 = to keep her squishy HP safe]
→ 4pc Guard of Wuthering Snow
→ 2pc Fleet of the Ageless
[Relic Set 4 = more turns, more SP for team]
→ 4pc Eagle of Twilight Line
→ 2pc Fleet of the Ageless
For Break Effect Build
Cavern Relic Sets [Choose either 4pc or 2pc+2pc]
→ Hunter of Glacial Forest
→ Thief of Shooting Meteor
→ Musketeer of Wild Wheat
Planar Ornament Sets [Choose 1]
→ 2pc Talia: Kingdom of Banditry
→ 2pc Space Sealing Station
** The ranking of each combo sets will be found at the bottom of this post.
Main Stats
→ Head = HP (constant)
→ Hand = ATK (constant)
→ Body = Effect Hit Rate% (EHR%)
→ Feet = SPD
→ Sphere = HP% (for debuffer) / Ice DMG% (for break effect)
→ Rope = Energy Regeneration Rate (ERR)
Sub Stats
→ EHR%
→ SPD
→ HP% (for debuffer build)
→ Break Effect (for break build)
Things to Consider
➤ Without ERR rope, rotation to get her ultimate up would be:
→ using Tutorial event LC, use 3 basic (SP-positive)
→ using any nihility LC, use 4 basic (SP-positive)
➤ With ERR rope, rotation to get her ultimate up would be:
→ using Tutorial event LC + Lv 7 talent, use 2 basic (SP-positive)
→ using any nihility LC + Lv 5 talent, use 3 basic (SP-positive)
** The highlighted ones are the recommended rotations for Pela.
➤ Optional: Build her with 120+ SPD to get the atk buff from Fleet of the Ageless set effect.
Things to Remember
➤ DEF% Reduction in Ultimate and Technique. Ice RES% Reduction in E4. She needs 67% EHR to guarantee these debuffs. She has a base 20% EHR from traces alone, so she only needs 47% EHR more from relic or lightcone stats.
Lightcones
* Lightcone list is from Honkai: Star Rail General Build Guide. Link below in the post. (They did the calcs, so now we have the weapon rankings.)
Before the Tutorial Mission Starts (4☆) [S5]
Incessant Rain (4☆) [S1]
Resolution Shines As Pearls of Sweat (4☆) [S1]
Eyes of the Prey (4☆) [S1]
Void (3☆) [S5]

Additional Block of Text Below
The most recommended build for Pela is to build her with the needed EHR values and the rest of the substats would be for SPD and HP%.
Musketeer of Wild Wheat is a set mostly recommended for her because her rotations is only using basic attacks to get her ultimate up.
The Guard of Wuthering Snow is a niche build that is recommended if you are farming for Quantum set and you get a lot of good Wuthering relic pieces from the same relic cavern. This is niche because you are mostly prioritizing her HP pool over her damage potential.
Eagle of Twilight Line is only recommended for her if you don't need to speedtune her in your team. The purpose of having the Wind set and the SPD boots on her is to guarantee that she'll be having more turns than usual compared to using the other relic sets on her. She can carry the SP economy of your team due to her SP+ nature.
As for the planar ornament sets, only use Pan-Galactic Commercial Enterprise if you are having hard time getting the required 67% EHR for her, but if you can achieve that with only using EHR body and some EHR substats, you could use Fleet of the Ageless instead to give ATK buff for your team.
** Broken Keel & Fleet of Ageless for support usage is explained here.
— Break DMG Calculation —
To start off, break effect is a multiplier that enhances three things:
Break DMG
DoT/Delayed DMG dealt by inflicting Weakness Breaks
Action delay caused by Quantum and Imaginary Weakness Breaks
Since Pela is Ice element, she's isn't capable dealing DoT DMG, but she could deal initial break DMG from both her Basics, Skill, Technique, and Ultimate. The calcs only consider single instance of initial break dmg. So yeah, my values might differ with other break dmg calcs.
** There's a break dmg calc in the sources below, but I didn't used it cause I'm running with my last remaining brain cell when I did my calcs here, but feel free to check that out.


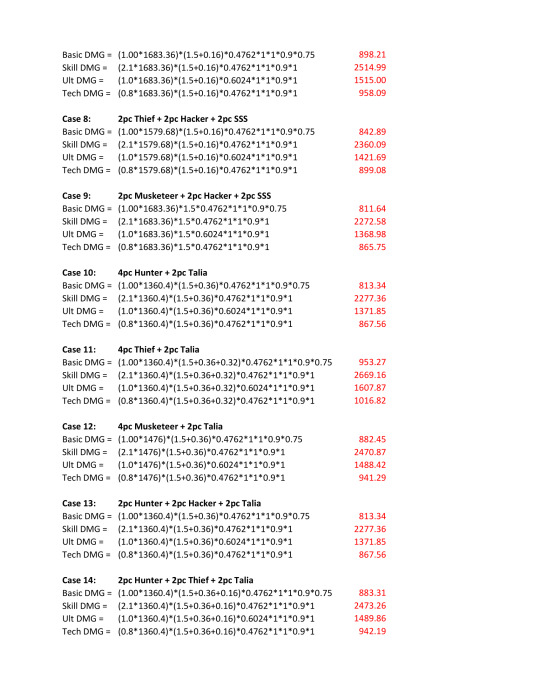


TLDR;
Highest break dmg set = 2pc Thief + 2pc Musketeer + 2pc Talia
Lowest break dmg set:
= 4pc Hunter + 2pc SSS
= 2pc Hunter + 2pc Hacker + 2pc SSS
%Difference between highest break dmg set & lowest debuffer set = ~30%
Sources
Guoba's EHR Guarantees
Honkai: Star Rail General Build Guide
Relic Sets
Relic Stats
Edisonsmathsclub's Energy Requirements Sheet
MrPokke's HSR CN Analysis Sheet
Pela Artwork
Character Toughness Damage
Break Damage Calculator
Normal DoT and Break DoT Calculation Analysis by Nable
Toughness Formula
Uploaded on Patch 1.2
➥ Back to my HSR masterlist.

Update Log
08/29/2023 - Uploaded this post
#honkai star rail#honkai star rail build#hsr build#hsr#hsr pela#honkai star rail pela#pela build#hsr pela build#honkai star rail pela build#honkai star rail relic#honkai star rail lightcone#hsr relic#hsr lightcone#pela guide#honkai star rail guide#hsr guide#pelageya sergeyevna#pela#𓂀 speaks
7 notes
·
View notes
Text
Dan Feng and the High Cloud Quintet


Look at both Dan Feng and Yingxing. They both have couple earrings. 😭
They really are a couple in this animated short.
BUT
Dan Feng x Yingxing ✔️
Dan Heng x Blade ❌
The whole animated short is about Dan Heng wanting to prove a point that he is his own person. He isn't Dan Feng.
From Animated Short: Ichor of Two Dragons | Honkai: Star Rail
#hsr#honkai star rail#dan feng#imbibitor lunae#yingxing#high cloud quintet#baiheng#jingliu#hsr screenshots#jing yuan#blade
30 notes
·
View notes
Text
Dan Heng


From Animated Short: Ichor of Two Dragons | Honkai: Star Rail
31 notes
·
View notes