#Crafting Guide
Explore tagged Tumblr posts
Visit Tumblr Blog
Explore Tumblr blogs with no restrictions, modern design and the best experience.
Last Seen Tumblr Blogs


Fun Fact
Tumblr was created by web developers David Karp and Marco Arment.
Text

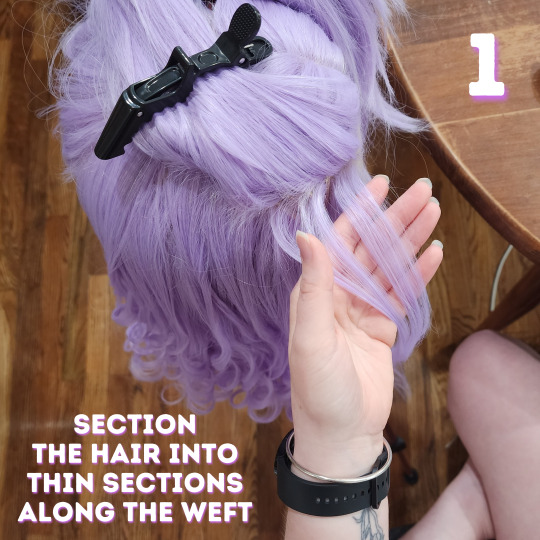


Here is our complete guide to curling a heat safe wig!
We specifically figured out this method worked best when styling this wig for my level 3 Imogen Temult cosplay. She's from campaign 3 of Critical Role. There are many other methods to curl wigs, but this is the one that got the best hold and our desired look on this particular wig! Of course, then I decided to cosplay Imogen at level 13 first and her hair is totally different so this wig is going in storage but at least we got to make a useful tutorial first.
We already have a video version of this tutorial up on our Tiktok and Youtube that we will move over to Tumblr, but honestly I struggle The Most with learning from video tutorials. I prefer things written out so we wanted to make this sort of tutorial as well for accessibility!
Additional tips & all of the products we use are under the cut. Feel free to shoot us a message if you have any questions or want more tutorials on wigs!
What We Use:
Wig: Pastel Purple Wavy Lace Front Synthetic Wig LF5110 from Wig Is Fashion. It technically comes with a curl but we straightened and recurled it differently. Whatever wig you get, just make sure you check that it's heat safe before attempting this!
Silicone Spray: Mane 'n Tail Detangler. Yes, this is technically for horses, but listen, it works SO WELL on synthetic wigs. It keeps it from getting all static-y and tangled. We've only ever used this brand but it works really well so we're def sticking with it.
Setting Spray: Schwarzkopf Got2b Glued Blasting Freeze Spray. This makes sure the curls you spent hours making actually hold!
Crimper: SixRiver Ceramic Waver Hair Tool with 4-in-1 Flat Crimping Iron Plates. This comes with four ceramic crimping plates and Nic uses the one with the "most wiggles" on the lowest setting (320). You can probably use any crimper that goes low enough. Crimp it fast, you aren't holding it like with curls.
Curling Iron: Conair 1 Inch Curling Iron. We use this on "19", whatever that means because it doesn't actually have temperatures. Any curling iron with low enough heat settings will do, you might need to play with settings to make sure you don't melt the hair. Test it on the bottom of the lowest layer of hair where you could cut it off if you melt it. As with curls on human hair, different barrel widths will give you wildly different curl looks.
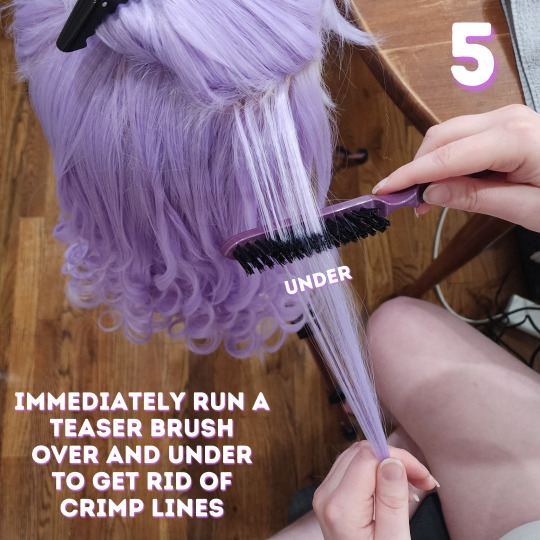
Teaser Brush & Large Tooth Comb: Honestly these probably came with one of our first hair cutting or wig styling kits so ¯\_(ツ)_/¯ Apparently the teaser brush is Revlon branded.
We aren't sponsored by anyone, this is just what we use! Feel free to substitute in anything that you have / know works well with wigs. We hope this helps! Please let us know what other cosplay or crafting tutorials you'd like to see <3
#wigs#wig styling#cosplay#cosplay wigs#critical role#imogen temult#imogen temult cosplay#bells hells#cr3#imogen temult cosplay level 3#nic crafts#work in progress#crafting#craftblr#cosplay wip#buy list#crafting guide#tutorial#how to#cosplay guide#cosplayer#wig#polycraftory
77 notes
·
View notes
Text
🌸✨ Infinity Nikki fans! Are you ready to tackle the Kindled Inspiration: New Bloom's Outfit quest? Step into the enchanting New Bloom Festival! 🌈
Here's your quick guide:
1. Complete the "Sailing Through Lens" World Quest.
2. Find Yayin on the White Jade ship at Florawish.
3. Equip a paper crane accessory (Paired Flight Earrings or Star of Wishes Necklace).
4. Show it to Yayin and unlock rewards! 🎁
Rewards include:
- Shiny Bubbles x120
- Diamonds x30
- Bling x30,000
- Crafting your Cloudborne Cranes Sketch
⚠️ This quest wraps up February 25, 2025! Join in for exclusive rewards! 🎉
#Infinity Nikki#New Bloom Festival#Kindled Inspiration#Yayin Quest#Gaming Guide#Fashion Game#Quest Walkthrough#Mobile Gaming#In-Game Rewards#Paper Crane Accessory#Florawish#Game Tips#Shiny Bubbles#Diamond Rewards#Bling#Crafting Guide#Event Quest#Gamer Community#Gacha Game#Collectibles#Character Customization#Game Events#Limited Time Quest#Nikki Game#Fantasy Fashion#Virtual World#Quest Completion#Game Strategy#Accessory Crafting#New Bloom Outfit
2 notes
·
View notes
Text
🧩 How to Outline Without Feeling Like You’re Dying
(a non-suffering writer’s guide to structure, sanity, and staying mildly hydrated)
Hey besties. Let’s talk outlines. Specifically: how to do them without crawling into the floorboards and screaming like a Victorian ghost.
If just hearing the word “outline” sends your brain into chaos-mode, welcome. You’re not broken, you’re just a writer whose process has been hijacked by Very Serious Advice™ that doesn’t fit you. You don’t need to build a military-grade beat sheet. You don’t need a sixteen-tab spreadsheet. You don’t need to suffer to be legitimate. You just need a structure that feels like it’s helping you, not haunting you.
So. Here’s how to outline your book without losing your soul (or all your serotonin).
—
🍓 1. Stop thinking of it as “outlining.” That word is cursed. Try “story sketch.” “Narrative roadmap.” “Planning soup.” Whatever gets your brain to chill out. The goal here is to understand your story, not architect it to death.
Outlining isn’t predicting everything. It’s just building a scaffold so your plot doesn't fall over mid-draft.
—
🧠 2. Find your plot skeleton. There are lots of plot structures floating around: 3-Act. Save the Cat. Hero’s Journey. Take what helps, ignore the rest.
If all else fails, try this dirt-simple one I use when my brain is mush:
Act I: What’s the problem?
Act II: Why can’t we fix it?
Act III: What finally makes us change?
Ending: What does that change cost?
You don’t need to fill in every detail. You just need to know what’s driving your character, what’s blocking them, and what choices will change them.
—
🛒 3. Make a “scene bucket list.” Before you start plotting in order, write down a list of scenes you know you want: key vibes, emotional beats, dramatic reveals, whatever.
These are your anchors. Even if you don’t know where they go yet, they’re proof your story already exists, it just needs connecting tissue.
Bonus: when you inevitably get stuck later, one of these might be the scene that pulls you back in.
—
🧩 4. Start with 5 key scenes. That’s it. Here’s a minimalist approach that won’t kill your momentum:
Opening (what sucks about their world?)
Catalyst (what throws them off course?)
Midpoint (what makes them confront themselves?)
Climax (what breaks or remakes them?)
Ending (what’s changed?)
Plot the spaces between those after you’ve nailed these. Think of it like nailing down corners of a poster before smoothing the rest.
You’re not “doing it wrong” if you start messy. A messy start is a start.
—
🔧 5. Use the outline to ask questions, not just answer them. Every section of your outline should provoke a question that the scene must answer.
Instead of: — “Chapter 5: Sarah finds a journal.”
Try: — “Chapter 5: What truth does Sarah find that complicates her next move?”
This makes your story active, not just a list of stuff that happens. Outlines aren’t just there to record, they’re tools for curiosity.
—
🪤 6. Beware of the Perfectionist Trap™. You will not get the entire plot perfect before you write. Don’t stall your momentum waiting for a divine lightning bolt of Clarity. You get clarity by writing.
Think of your outline as a map drawn in pencil, not ink. It’s allowed to evolve. It should evolve.
You’re not building a museum exhibit. You’re making a prototype.
—
🧼 7. Clean up after you start drafting. Here’s the secret: the first draft will teach you what the story’s actually about. You can go back and revise the outline to fit that. It’s not wasted work, it’s evolving scaffolding.
You don’t have to build the house before you live in it. You can live in the mess while you figure out where the kitchen goes.
—
🛟 8. If you’re a discovery writer, hybrid it. A lot of “pantsers” aren’t anti-outline, they’re just anti-stiff-outline. That’s fair.
Try using “signposts,” not full scenes:
Here’s a secret someone’s hiding.
Here’s the emotional breakdown scene.
Here’s a betrayal. Maybe not sure by who yet.
Let the plot breathe. Let the characters argue with your outline. That tension is where the fun happens.
—
🪴 TL;DR but emotionally: You don’t need a flawless outline to write a good book. You just need a loose net of ideas, a couple of emotional anchors, and the willingness to pivot when your story teaches you something new.
Outlines should support you, not suffocate you.
Let yourself try. Let it be imperfect. That’s where the good stuff lives.
Go forth and outline like a gently chaotic legend 🧃
— written with snacks in hand by Rin T. @ thewriteadviceforwriters 🍓🧠✍️
Sometimes the problem isn’t your plot. It’s your first 5 pages. Fix it here → 🖤 Free eBook: 5 Opening Pages Mistakes to Stop Making:
#writing#writing advice#writeblr#writers on tumblr#writing tips#writing help#how to write#story structure#writing process#plotting tips#writing guide#writing blog#writing community#writing support#tumblr writing community#writing inspiration#storytelling tips#how to outline#writing resources#novel writing#outline tips#plotting a novel#writing craft#novel planning#write a book#drafting a novel#writing motivation#first draft advice#fiction writing#character arcs
2K notes
·
View notes
Text
"We are going to defeat Dracula with two things: Garlic, and the ✨Power Of Friendship ✨💕💫😻😽😸🥳🫶🤩🥰🥰. Here, I made crucifix Friendship bracelets! 🥰✝️📿" - Abraham Van Helsing, Dracula
#he'd make a great girl guide methinks#also no spoilers pls i haven't finished the book yet 😌 I hope he makes crucifix friendship bracelets though#the power of friendship#friendship is magic#inspirational#quotes#van helsing#abraham van helsing#dracula#friendship bracelets#arts and crafts
754 notes
·
View notes
Text

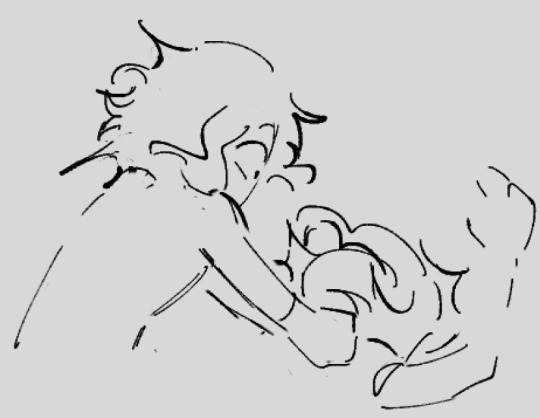
pov: eon tries to explain why eating a star was a good idea, [eon design by @the-bitter-ocean]
bonus:
#the consequences of your actions#in stars and time#isat#isat spoilers#a6se spoilers#isat odile#isat loop#odile loops au#set in: bonnie loops; eon and loop as guides#''look if wish craft trapped us in the loops then wish craft is the way to get out of it. the logic tracks. the loops going over-#to boniface; was in fact; not supposed to happen;''#loop beefing with eon will never be not funny to me#day 85#That's probably enough eon for now; back to working on asks#isat au
481 notes
·
View notes
Text
The summonings for residents of the Infinite Realms are constant. Across space and time they do not change. They require the same strokes in the sigil from past to present and the same breaths needed to chant from one edge of the universe to another.
Danny has always liked this as it has allowed him to see many wonders of history. And to visit many alien planets. He has met all sorts of people and experienced all sorts of events. But he has never experienced something like this. This time, he is summoned to a dying world. The planet exploding as its core devours itself. This time he is faced with two desperate parents pleading for him to save their son. But he can't. Living beings cannot be taken back through the summons. All Danny can do, is promise to guide their son to safety.
#dp x dc#dc x dp#dpxdc#dcxdp#winter's tales#danny guides a baby kal-el to earth where he knows he'll be safe#does he intentionally leave him with the kents?#or do they just happen to stumble upon the craft as he's deciding what to do next?#does danny remain a constant figure in clark's life?#or does he silently check in on the boy from time to time?#that's up to you
690 notes
·
View notes
Note
Hello! I saw your post on plastic bottlecap pins, and I'm curious if you have any ideas regarding the rest of the bottle. In my home, me and my mother use a *lot* of plastic water bottles because the water in my building is very sketchy, and so there's a lot of waste, and it bothers me a lot. I'm really sorry if you've already made a post about this somewhere and I missed it. Thanks for the great content!! :]
Here's a variety of ideas since you said you had a lot of bottles -
Bird feeders/water stations


Sun catchers-

Planters - I'd recommend something like herbs

Crafting in general - (this from a 2liter but I'm sure something similar is achievable with the bottles you have )

These are just some ideas though, I'm sure your beautiful creative brain could figure out a million more ideas!
82 notes
·
View notes
Text
in the affini compact playing runescape would be banned. there's no floret cut version of it it's just vaporized outright
#hdg#human domestication guide#affini#hdg shitposting#floretposting#im currently trying to get a spicy stew to give me a 5 runecrafting boost on my ironman so that i can craft bloodbark#the problem is i don't have a grown up cat so i have to just chase rats#and this is causing me to rapidly go insane#whichever jagex mod invented cat mechanics needs to be put in the device#why the fuck is it the only time gated thing in the game aaaaaaAAAAAAAAAAAAAAAAAAA ok except farming i guess#i hate runecrafting so much i never want to see guardians of the rift again#“craft blood runes for 46k xp an hour” i would rather train agility#at least i got an abyssal lantern at only 250 pulls so gotr was less bad than it wouldve been otherwise#but fuck dude i am not grinding out 800k xp more to go from 76 to 81 rc fuck off#JUST GIVE ME MY GODDAMN BLOODBARK#I HAVE LITERALLY BEEN WORKING TOWARDS THIS FOR OVER A YEAR JAGEX JUST GIVE IT TO ME
86 notes
·
View notes
Text
Getting Started: Junk Journaling
So you want to get started with scrapbooking/junk journaling? This is a craft, like many others, that you can get started on with very little supplies! However, we'll get a little deeper into stuff as well for some additional tips and supplies that might be fun or helpful.
What You Absolutely Need
Scissors / Cutting Implements - If you can, buy a nicer pair of scissors for your own sanity, but any scissors will do starting out! Detail scissors specifically are really helpful. Exacto knives can also be helpful, but you'll also need a cutting mat if you don't already have one. This category is worth investing in because dull scissors are a nightmare.
Adhesive - ZipDry is designed for paper so it doesn't bleed through thin stuff and it dries quick and clear. Double sided tape rolls are also very helpful, especially with large areas or gluing a bunch of stuff quickly. This is an area worth investing in earlier! Thin paper and magazine paper will have bleed through with certain glues.
Notebook/Paper - Use what you have! If you, like me, have a million journals lying around, use that! As you get deeper in, you might find it helpful to specifically look for notebooks that lie flat when opened. You can also use sheets of art paper if you want to go more independent collage style rather than journaling. Watercolor paper/notebooks are nice because they are thicker, but you can use whatever.
Materials to Actually Cut/Glue/Use - Okay, here's where you really can do whatever you want forever and spend as little or as much as you want. You can cut up books and magazines you have on hand. If you have a printer, you can print stuff out! People sell really amazing curated mixed packs of materials (you can support some great shops on etsy doing very cool and niche stuff! If you are really on a budget, amazon sells some bulk packs as well).
Material Tip
If you don't have a husband that works in a mailroom (we are very lucky) and you don't have a lot of magazines on hand, try going to your local post office and dig through the recycling bin! A lot of people will throw out magazines/ads/catalogues there and you might find some gems. You can also get a free trial for some magazines and just cancel once they want to charge you money. Nic finds Vogue and GQ helpful for people. National Geographic can be helpful for backgrounds and animals.
Leveling up details below the cut!
Level Up
Slide Cutter - Make sure you get one with a replaceable blade! Super helpful for bulk cutting out big shapes.
"Okay, but I see people online with fancy stuff and I want to get in on that action!" you may say. Here is some fun stuff to play with!
If you see someone whose junk journaling content you like, you can also just reach out to them! A lot of people are happy to share links to the stuff they use and a lot of junk journalers online run their own shops/have affiliate links to the stuff they use!
Fun Junk Journaling Variety Packs - truly this is where a lot of people spend a lot of money because you can buy all sorts of fun niche packs depending on the vibe/focus you want to go with. You can also buy packs of quotes / letters / sayings. This can be helpful especially when doing character focused stuff. My wife really likes the packs from PengellyCrafts on etsy.
Washi Tape - People really like using washi tape, especially the transparent ones. These can be surprisingly expensive.
Transparent Stickers - These are fun because you can get a lot of detail and layering without intricate cutting. If you are careful with detail cutting you can cut the white border on normal stickers if you can't swing transparent ones.
Stamps - Like transparent stickers, this can add fun depth and layering, though with perhaps slightly less detail. The best part about stamps is that they are infinitely reusable and you can get all sorts of stamp pads. The downside is they are surprisingly expensive. You can even get stamps that help you make backgrounds like stars or wood texture. There are also "container" stamps like jars and bottles that you can put stuff in!
Embossing Powder - You can pair stamps with a glue stamp pad (or get glue markers) to use with embossing powder and a heat gun to create embossed details that add depth and texture. Make sure you are careful about what order you do things in when using heat!
Distress Ink (or Distress Oxide) & Blender/Diffuser - Make things look aged! This is a stamp pad you can use to make any paper or image look older than it is. Make sure you also get the little foam blender they also sell for application since it'll go on too thick if you try to use it directly on the paper.
Wax & Wax Seals - Wax can be fun to play with because it is both an adhesive and also adds dimension. Note: a lot of embossing or wax in a journal can make it hard to close a notebook.
Old Books - You can buy used books or use books that you don't want anymore for backgrounds to cut out words. Things like recipe books and encyclopedias can be especially helpful/vibe-y.
Fun Edges / Frames - You can get scrapbooking scissors or edge punches to add fun details and shapes to paper edge. It just depends on whether you like that look! Something like a simple round edge punch can be helpful.
Have Fun With It
Do you do other crafts, like painting or cricut? You can pair so many different crafts with junk journaling to make a cool multi-media piece. The most important thing to remember is to use what you have and have fun with it! Don't put off starting because you want all the bells and whistles or think you have to spend a bunch of money like the people who create junk journaling internet content! Create joyfully and lean into the chaos.
Please let us know if this guide was helpful and if you'd like a more specific buy list or tutorials on anything! We are here to help make crafting more accessible <3 You got this! Go junk journal!
If you want to see Nic's junk journaling, we are going to queue some in the next few days. Check our pinned post to find our junk journaling tag for inspiration!
#art journal#junk journal#scrapbook#scrapbook journal#mixed media#junk journaling#art journaling#scrapbooking#crafting#nic crafts#getting started#buy list#crafting guide#polycraftory
115 notes
·
View notes
Text
✨ Explore Infinity Nikki with the "Purify Scent in Cavern" quest! 🌿 Begin your adventure in Florawish, prove your skills to Eremita, and uncover the secrets of the cavern! Craft your very own Whim Fragrances and reap fantastic rewards!
Dive into our detailed guide for all the steps you need! 🎮💖
#Infinity Nikki#Nikki Quests#Purify Scent#Florawish#Heartcraft Kingdom#Whim Fragrances#Gamer Guide#Quest Walkthrough#Eremita Quest#Esseling Purification#Treasure Hunt#Cavern Exploration#Crafting Guide#Travelers Musings#Game Rewards#Gaming Community#Mobile Gaming#Adventure Games#Online Gaming#RPG Guide#Game Tips#Level Up#Discover Treasures#Gaming Help#Game Strategy#How To Play#Infinity Nikki Guide#Virtual Adventure#Role Playing Games#Gameplay Tips
2 notes
·
View notes
Text
📊 How to Use Tropes Without Turning Your Story into a YA Checklist
You can tell when a book was written by vibes and TVTropes alone.
It’s got: ☑️ the reluctant chosen one ☑️ the love triangle ☑️ the mysterious brooding boy™ ☑️ the sassy best friend ☑️ the dead parents ☑️ the villain with daddy issues ☑️ the scene where someone says “you don’t know what I’m capable of” and walks away dramatically
And like… that’s fine.
Tropes are tools. But here’s the thing: they are starting points, not story goals.
If your plot reads like it was drafted by a checklist in a Pinterest caption, it might be time to recalibrate. Here's how to actually use tropes without turning your book into a YA Mad Libs generator:
─────── ✦ ───────
🧩 Tropes Are Patterns--Not Presets
A trope is a pattern, not a requirement. It’s not a law. It’s not a plug-and-play feature. And it’s definitely not your plot.
The “enemies-to-lovers” arc? That’s a container. What you put inside it, that’s where the originality lives.
The goal isn’t to avoid tropes. It’s to do something interesting with them.
→ Why are they enemies? → What does the “love” cost them? → What happens if they fail to become lovers?
Tropes don’t carry the story. The conflict does.
─────── ✦ ───────
⚔️ Complicate the Familiar
Here’s a trick: if a trope feels too easy, break it in half.
Examples: → “Reluctant chosen one” → okay, but what if they wanted it, and then hated it once they got it? → “The mentor dies” → cool, but what if the mentor fakes their death to manipulate the protagonist? → “Sassy best friend” → no. Make them real. Give them pain. Give them depth. No more walking punchlines.
Tropes are scaffolding, not shortcuts. Add weight. Add doubt. Add betrayal.
─────── ✦ ───────
🕳️ Interrogate Why You’re Using It
Ask yourself: → Do I love this trope or do I feel like I have to include it? → Am I doing this because I’ve seen it done… or because it serves my story? → Is this trope the only interesting thing about this scene?
If your answer is “because that’s what YA stories do,” delete it. Go deeper.
─────── ✦ ───────
💔 Tropes Aren’t Substitutes for Character Arcs
You can’t use “grumpy x sunshine” and call it development. Tropes are flavors, not meals.
Give us: → Choices with consequences. → Conflicting values. → Character growth that costs something.
Otherwise? Your grumpy guy is just a Pinterest moodboard with a pulse.
─────── ✦ ───────
🧨 Use Reader Expectations Against Them
You want to use a trope and not make it predictable? Weaponize it.
Example: → Start with a love triangle. Let the MC fall hard. Then have both love interests realize they’re in love with each other. → Use the “chosen one” trope… but make it about dismantling that myth entirely. → Introduce the “villain redemption arc” and let them choose to stay bad because it makes more sense for them.
Set up the pattern. Then snap it in half. That’s how you surprise a jaded reader.
─────── ✦ ───────
Final thoughts from your local trope goblin:
→ Tropes aren’t the problem. It’s treating them like a checklist instead of a narrative engine. → A good trope doesn’t make your story good. How you twist it does. → If a story reads like it was built from Tumblr quotes and nothing else—it’s gonna flop.
So go ahead. Use the trope. Then ruin it. Make it weird. Make it hurt. Make it yours.
—rin t. // story mechanic. trope thief. YA bingo card burner. // thewriteadviceforwriters
Sometimes the problem isn’t your plot. It’s your first 5 pages. Fix it here → 🖤 Free eBook: 5 Opening Pages Mistakes to Stop Making:
🕯️ download the pack & write something cursed:
#writing#writing advice#writeblr#writers on tumblr#writing tips#writing help#how to write#story structure#writing process#plotting tips#writing guide#writing blog#writing community#writing support#tumblr writing community#writing inspiration#storytelling tips#how to outline#writing resources#novel writing#outline tips#plotting a novel#writing craft#novel planning#write a book#drafting a novel#writing motivation#first draft advice#fiction writing#character arcs
359 notes
·
View notes
Text
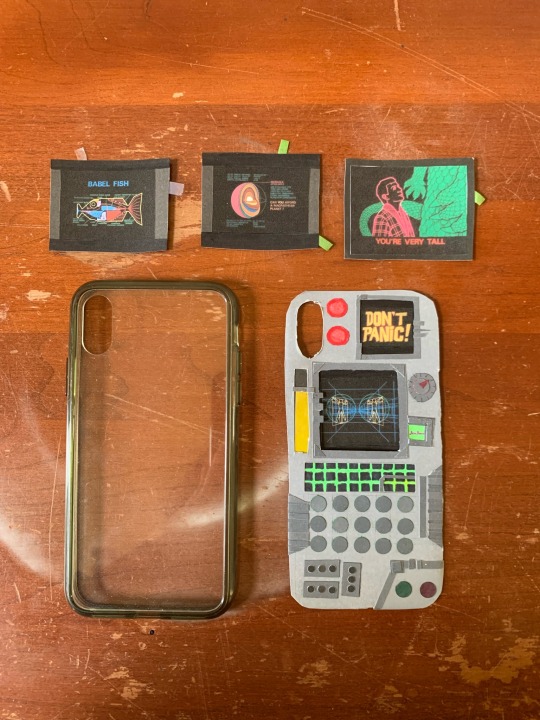
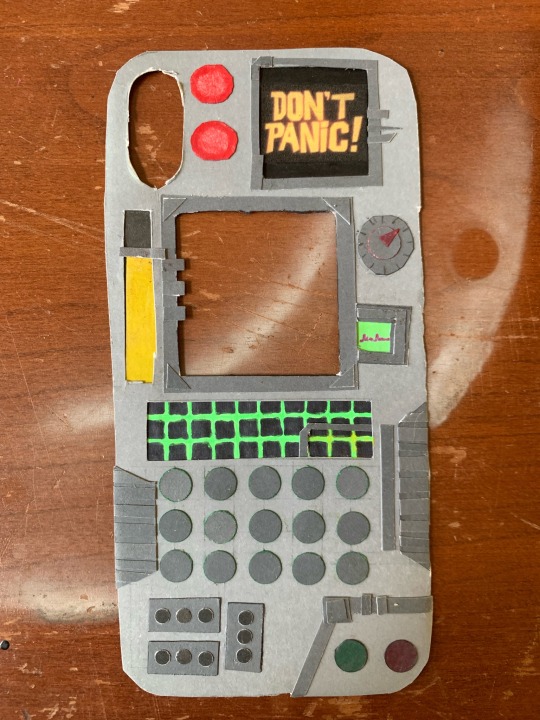
Last winter I made this Hitchhiker’s Guide to the Galaxy phone case and I’ve been waiting for today to share it!
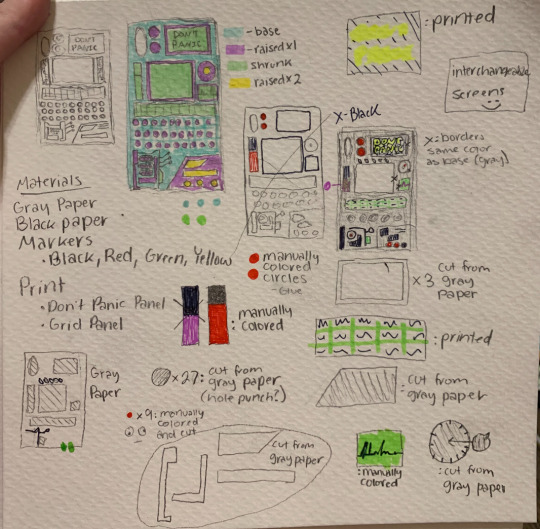
I started with this rough plan. I kinda based it off the one in the tv show but mainly pulled from my own imagination.
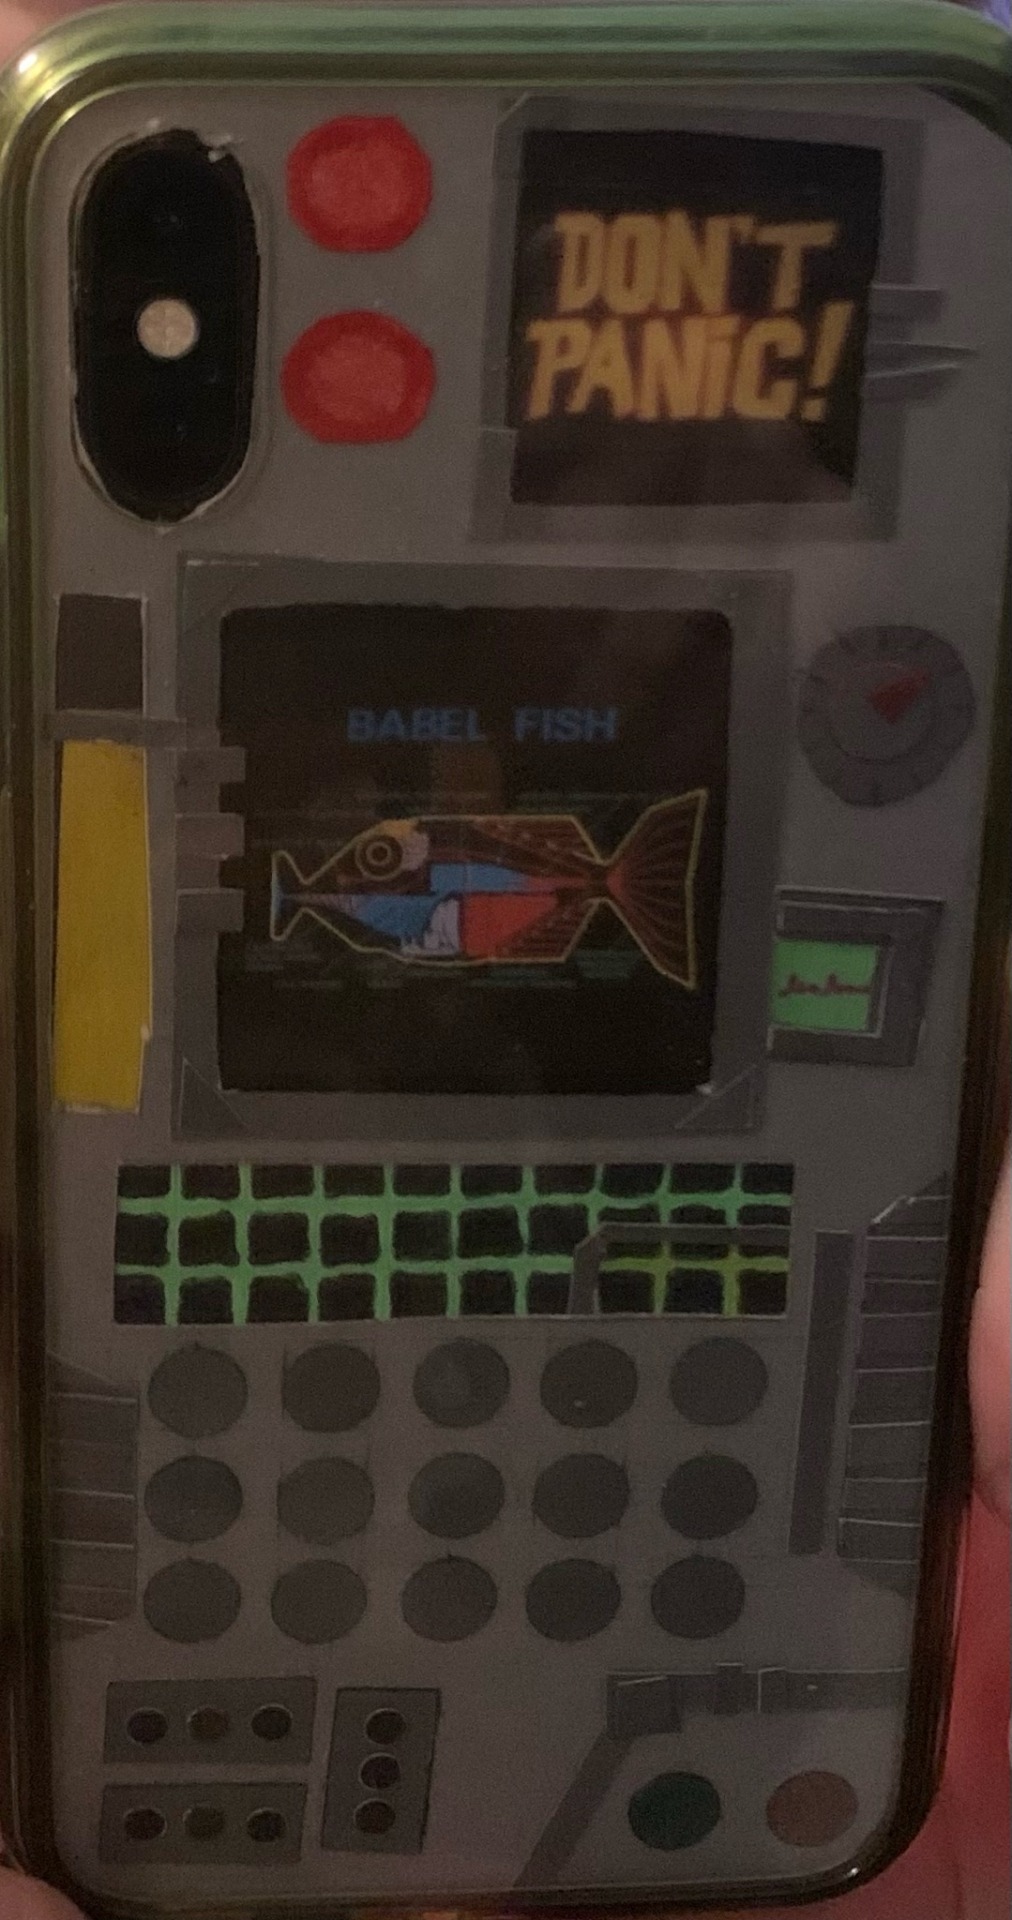

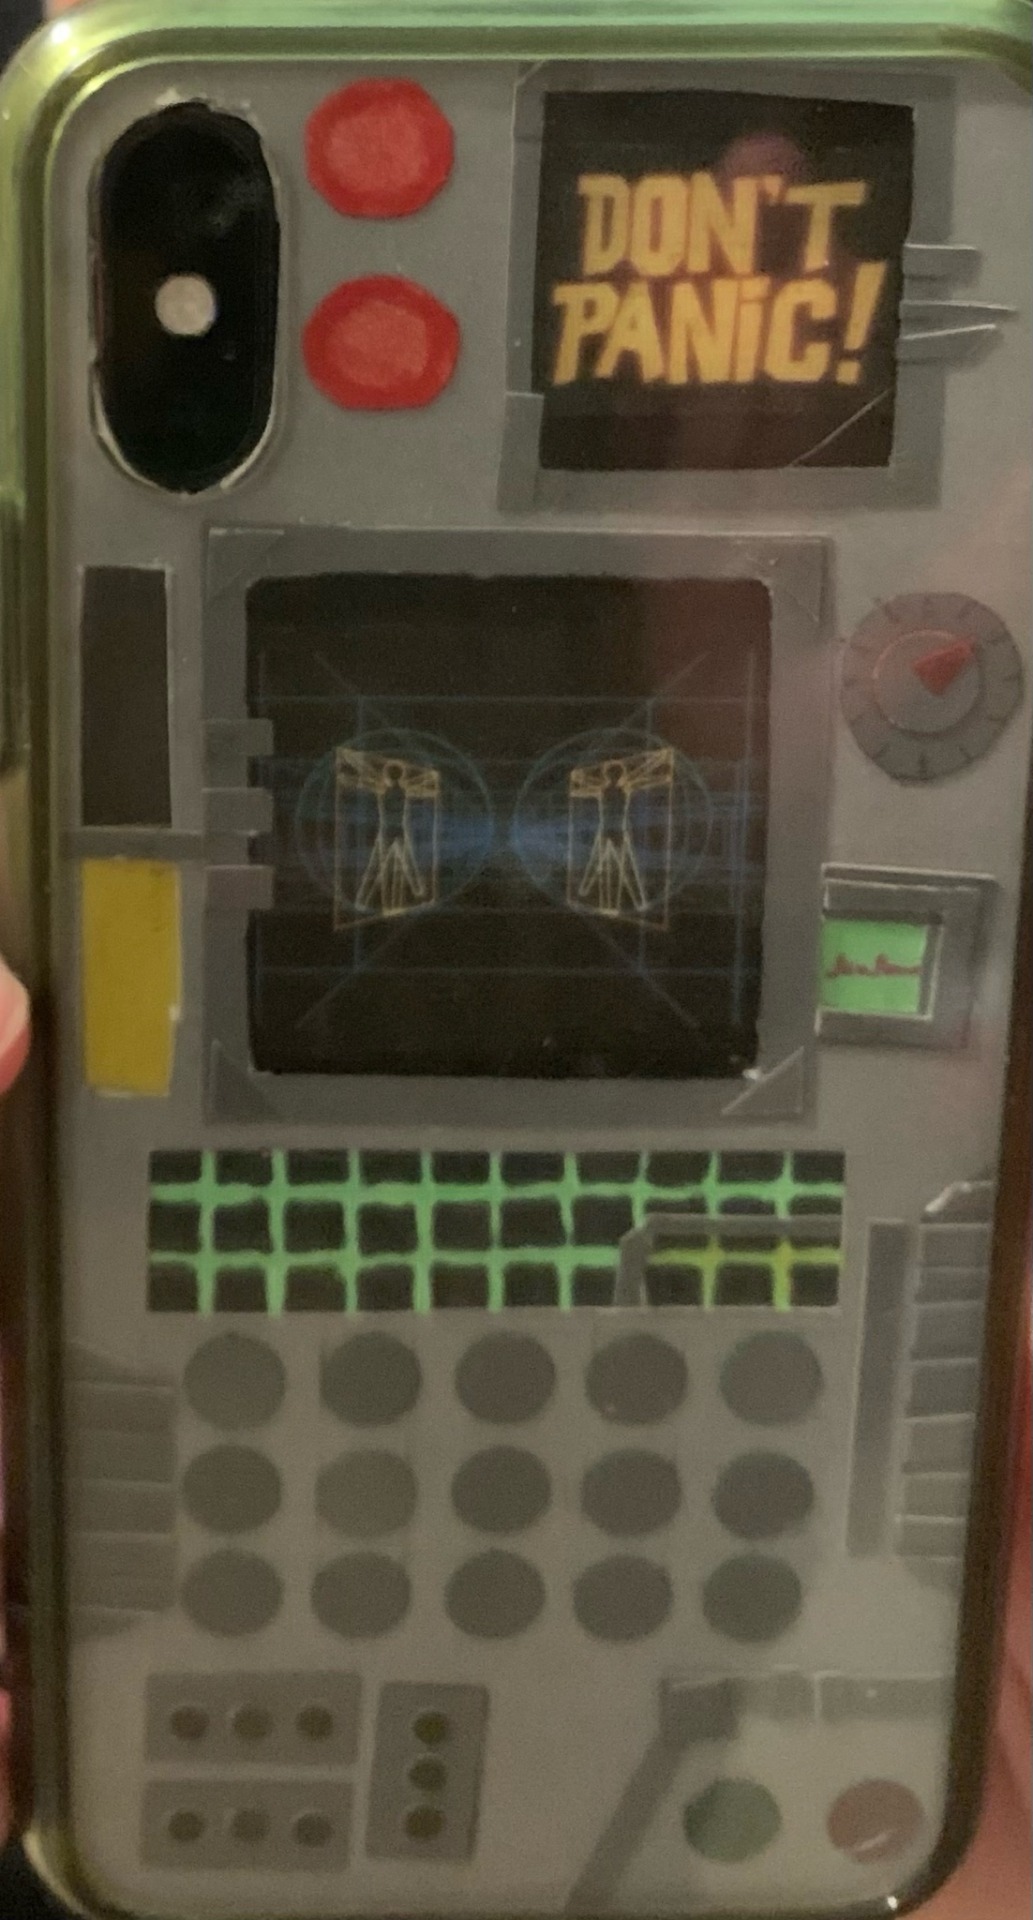
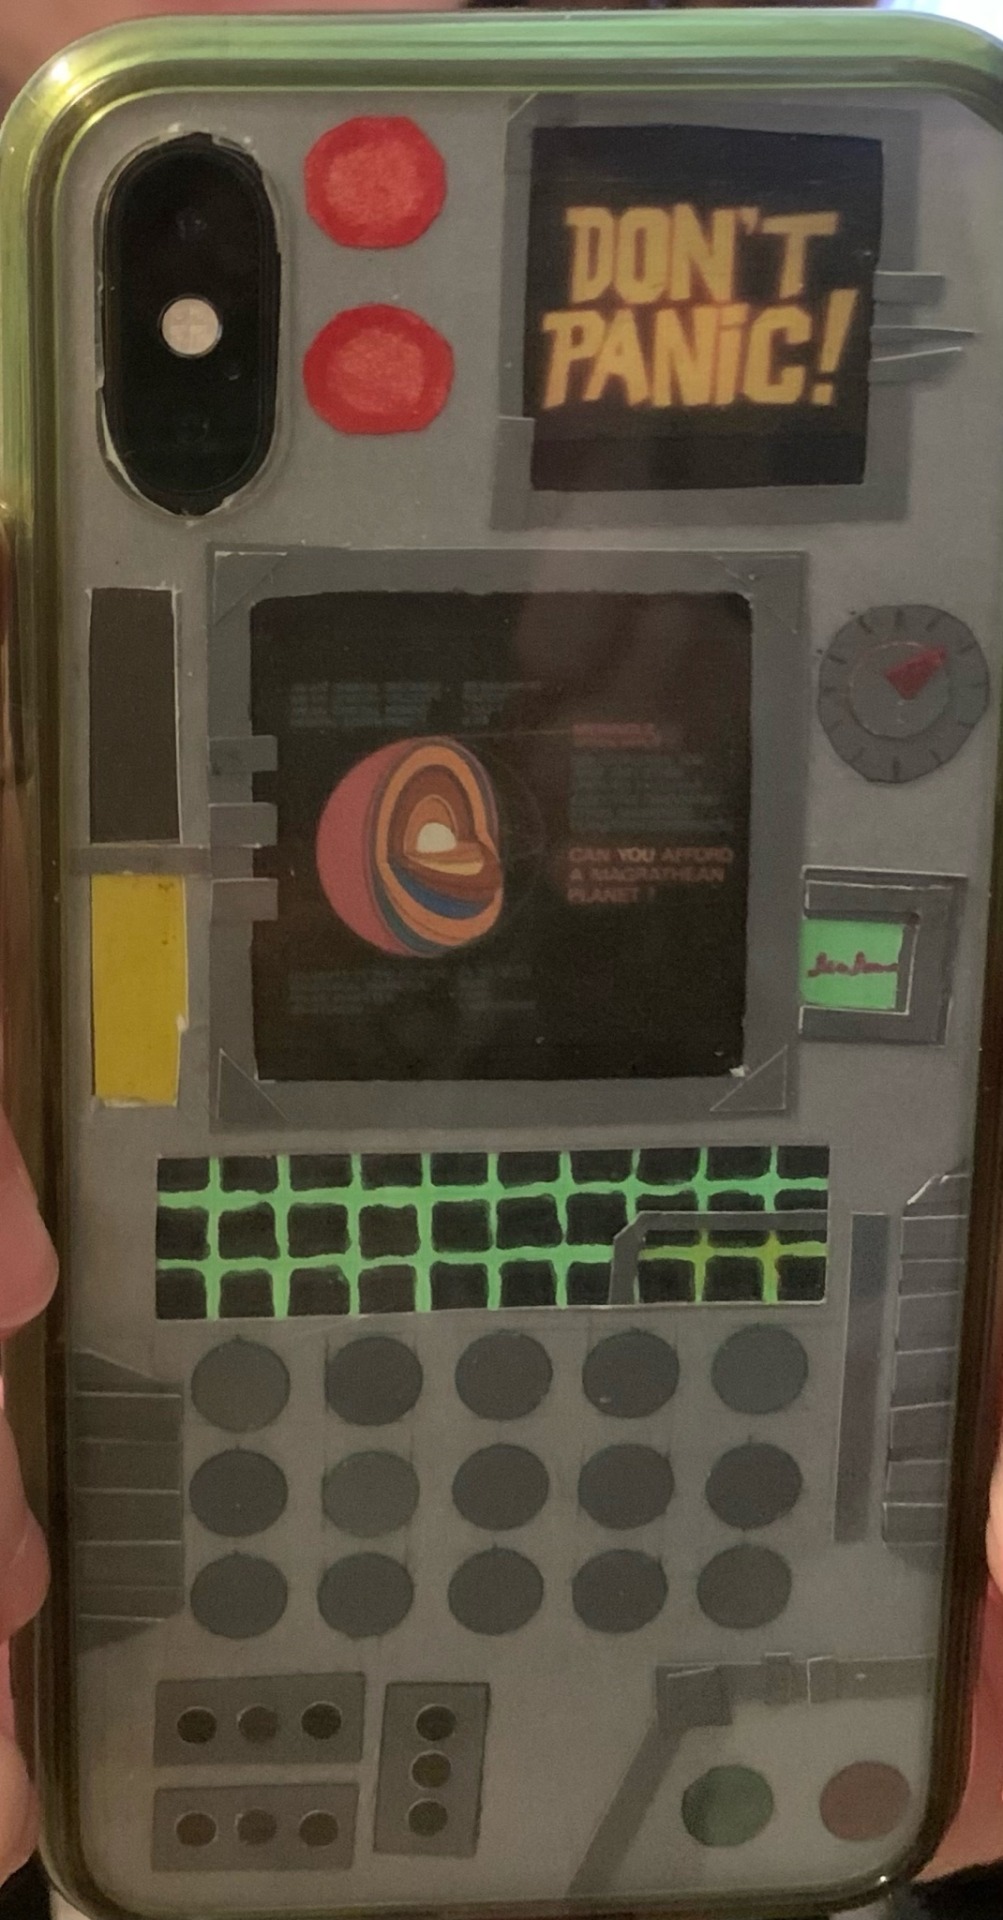
Best part! The interchangeable screen! Right now I have four screens from the tv show. Pinterest has a lot of high quality images of them. I have a few more saved that I’ll eventually size and print. My favorite is the babel fish.
You may also notice the bar on the right moves up and down. It doesn’t do so very elegantly but it was a last minute thought that I really like.
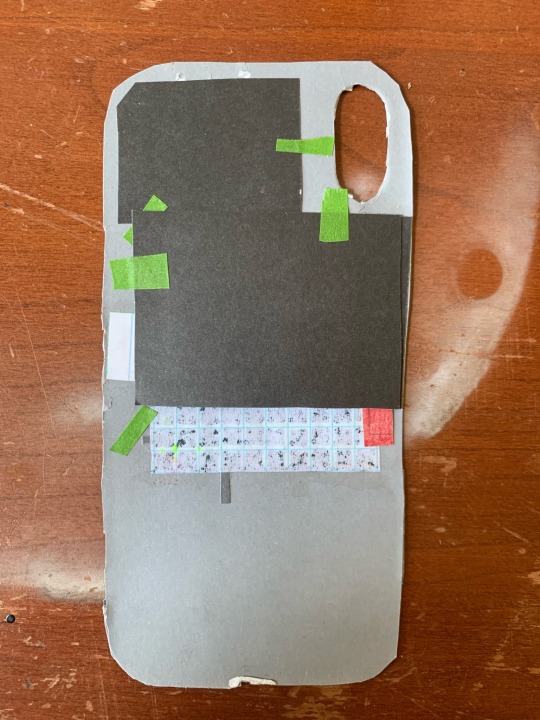
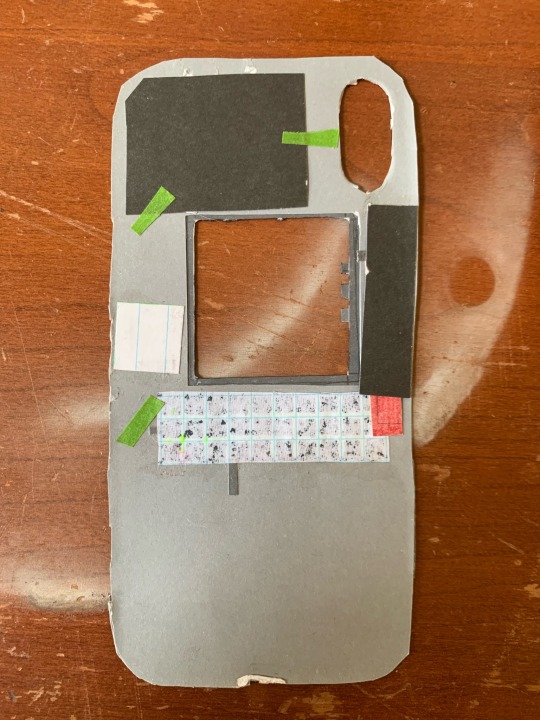
And here’s backstage! I have lots of layers for a more realistic effect. It was my first time doing a paper craft like this so maybe I’ll be able to make an even better one in the future!
Happy towel day!
#h2g2#towel day#may 25#papercraft#diy craft#diy tutorial#the hitchhiker's guide to the galaxy#thgttg#hgttg
216 notes
·
View notes
Text
guess who just speedran through A Good Girl's Guide to Murder and One of Us is Lying, and now is gonna hyperfixate over pipravi, natewyn, addy mf prentiss as a whole, and ashton x eli (what's their ship name???) 😍😍😍
#no joke#these books were goddamn awesome#i didnt even like high school drama very much#that is until i read one of us is lying#sheesh.#also agggtm?#oh my fucking god#its SO GOOD LIKE HOLY SHIT MY FRIENDS WERENT LYING#the mystery is so well crafted in both of these books!#oml#imma go see where to get the remaining books from lmfao 😭#agggtm#a good girls guide to murder#a good girl's guide to murder#holly jackson#one of us is lying#oouil#karen m mcmanus#pipravi#pippa fitz amobi#ravi singh#natewyn#nate macauley#bronwyn rojas#cooper clay#addy prentiss#ashton prentiss#simon kelleher#lmao
116 notes
·
View notes
Text
hey (canadian) sticker enthusiasts. wanna learn how i got a huge box of blank ups labels for free??

here’s what ur gonna do. go on this website: https://www.ups.com/ca/en/shipping/order-supplies.page

ur gonna log in on this bad boy (or create an account, then log in.)
now. when u log in it will probably bring you to a new page. you don't care about this page. go away. go back to the previous page (or just open a new tab with the same link above). if it still asks u to log in just press the log in button again and it'll be like Oh Right hello yea! you're logged in my bad
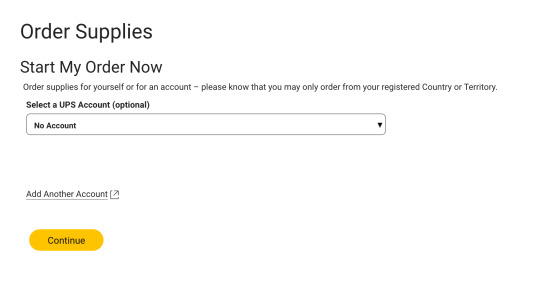
next you're gonna be asked to select a UPS account, it's optional, just say "no account"
now: the motherlode
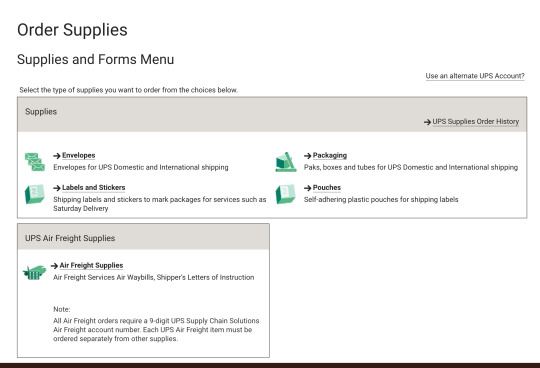
go to labels and stickers, then you're gonna have a bunch of options
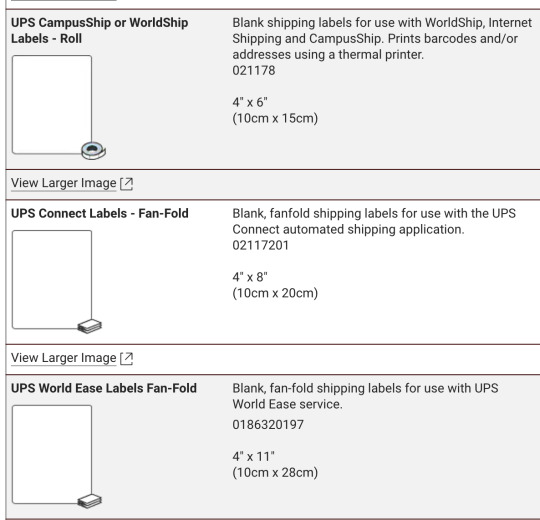
here's the three i got, i recommend the top two. the first option is a roll of labels, middle one is the box of labels at the beginning of this post, and i don't really recommend the bottom one. it's a huge amount of stickers (i cannot emphasize enough it was easily 5x the weight of the box of 4x8 stickers) but here's what they look like:

there's like. stuff on it. and the backing is weirdly cut? idk i do not like them i think it's more advantageous to get the first two!! anyways on the right ur gonna see checkboxes, just check the ones you want then scroll down and press "add selected to order". the page is gonna update and u will see this!!

view ur supplies order, then i wont take a screenshot of this part because it's just like. My Address, but just submit the order and bada bing bada boom it's on its way. i think theres a certain limit on how often u can order (for example i couldn't order more stickers because ive ordered some recently) but like. there's SO MANY who cares i have barely made a dent and i am using them like crazy and giving them to people.
ANYWAYS HAVE FUN! MAKE SHIT!
#punk#stickers#resources#free stuff#how to#guide#diy craft#streetart#remember kids graffiti's only illegal if they see u!#activism#canada#canadian punk#label 228#diy or die#graffiti#patches
56 notes
·
View notes
Text


I REMADE GUIDE‼️(Cardboard edition)
Original comparison under the cut


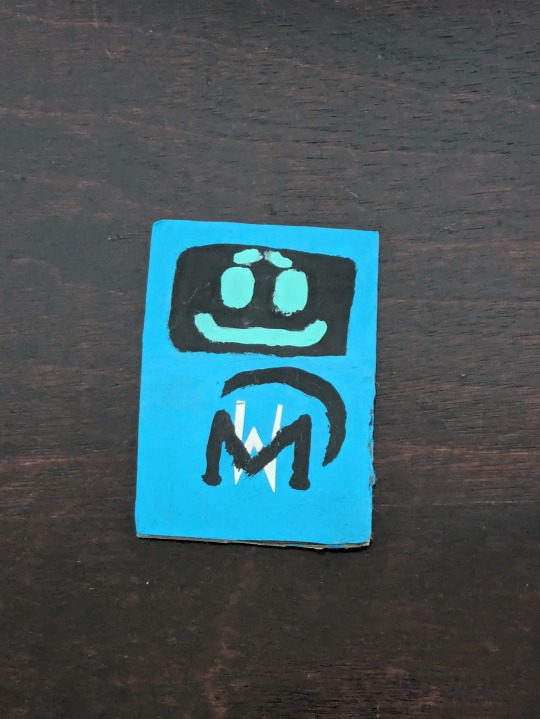
Plus a little baby Guide I made while it dried :]
#the mistholme museum of mystery morbidity and mortality#tmmommm#Guide!!!#🫶🫶#😭😭#Cardboard#Paining#Crafts#arts and crafts#handmade#The paper one is slowly dying 😔#Guide#audio tour guide#Evil crafts#Evilton
46 notes
·
View notes
Text
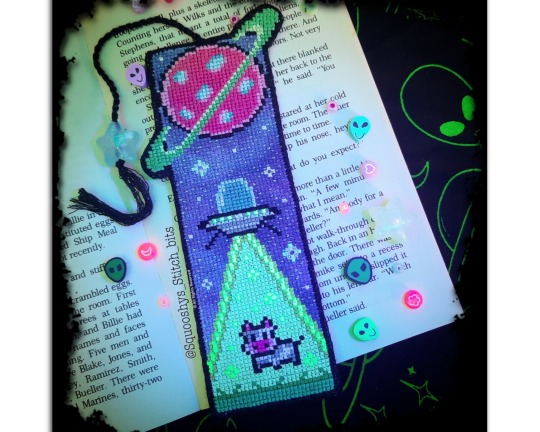
🛸🐄 Don't Panic! 🐄 🛸
Crossstitch designed and Stitched by me 😘
SquooshysStitchBits
#cross stitch#diy#crafts#handcrafted#homemade#etsy#fibre arts#pdf pattern#xstitch#counted cross stitch#pixel art#needlecraft#needlepoint#shameless self promotion#home decor#aliens and ufos#the hitchhiker's guide to the galaxy#bookmark#scifiart#booklr#fanart#glow in the dark
52 notes
·
View notes