#Eye Reference
Explore tagged Tumblr posts
Visit Tumblr Blog
Explore Tumblr blogs with no restrictions, modern design and the best experience.
Last Seen Tumblr Blogs


Fun Fact
Mobile Tumblr US users spend an average of 4.04 minutes per session on the app.
Text
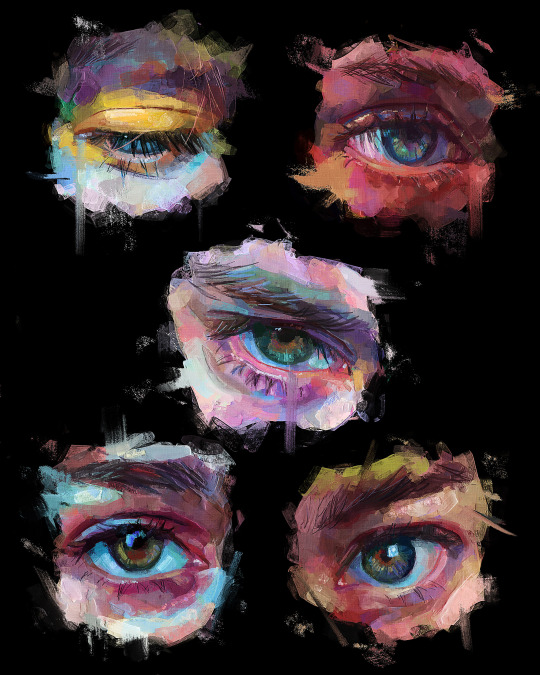
Time taken: 4.1 hours
Reference: Various
💀 Instagram | Youtube | Commissions 💀
329 notes
·
View notes
Text

me and bros eyes side by side
@goobiesnoober is on top i am on the bottom🥶🥶🥶🥶🤞🤞🤞🤞🤞
7 notes
·
View notes
Text

words by ryan ross
#mine#my art#sketchoftheday#sketchbook#unsettling#graphite#eye reference#lyrics#poetry#scrapbook poetry#longing#yearning#gay#artist#artists of tumblr#horror#horror art#eerie#ryan ross#panic at the disco
99 notes
·
View notes
Text
My 3 Ways of Coloring Eyes
I got bored so here’s some quick tutorials on the three ways I color my eyes in IbisPaint.
Eye one is the method I use the most since it fits my art style. Eye three is a method I use when I’m working on more detailed art works. Eye two is a method I recently started using. It’s quick and simple and works pretty well when I’m feeling a little lazy to do completely detailed art works.
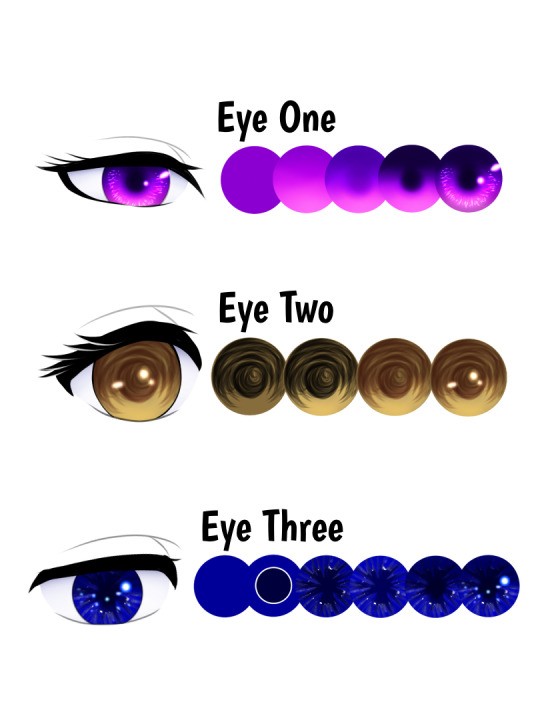
Eye One
Step One: Base Color - Color in the eye with the character's eye color.
Step Two: Screen Effect - Add a new layer and clip it to the base color layer. Set this layer to the Screen effect. The colors you’ll need is the base color, and one or two lighter tints from the base color. If you want to add a fourth color you can. Using the airbrush (trapezoid 60%), color the circle from the middle downwards starting with the base color. With each tint/light color, you’ll want to color closer to the bottom part of the circle to create a gradient.
Step Three: Hard-light Effect - Once step two is complete you can merge the layer with the base one. Create a new layer and clip it then set it to Hard light. Repeat the process of Step two but upwards. Using the base color first color the top half of the circle and the center to create the pupil. Then use one or two more colors darker than the base color and repeat the process.
Step Four: Multiply Effect - After merging the layer for step 3 create a new layer and set it to the multiply effect. Remember to clip it to the base layer. Use the darkest color from step three and/or it’s optional an even darker color. Color in the pupil and the very top part of the eye. You can slowly blend in the darker color by coloring along the edge of the circle or use the blur tool (not the blur effect). Make sure to avoid the pupil if you’re using the blur tool. As seen in Step 5, I also colored around the bottom half of the circle to make the lighter colors appear more on the inner part of the eye.
Step Five: Highlights - After merging the layer from step 4, you can create the final layer and set it to Add. Brushes I used was Dip Pen for the small highlights surrounding the iris and Neon 2 - Add for the bigger highlights. Use two or three colors lighter than the base. The highlights can be any length or size so feel free to experiment as much as you want with the highlights! I mostly drew small and short lines and dots for my highlights. Once you’re satisfied with the highlights you can merge the layer!

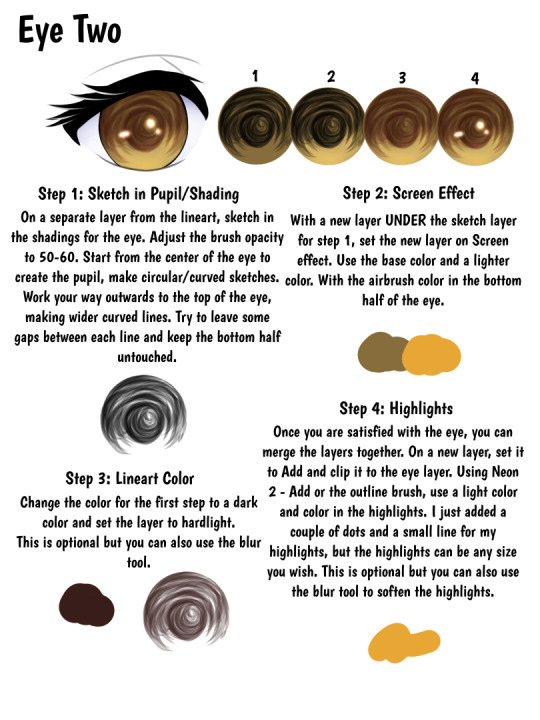
Eye Two
Step One: Sketch in the Pupil - Depending on how you draw your lineart, the sketch for the pupil and shadow will be on a separate layer underneath the lineart layer. Adjust your brush's opacity to 50-60 or however low or high you’d like. Start from the pupil on the center of the eye and create circular or curved sketched lines. Work your way outwards and to the top half of the eye, making wider curved lines. Try to leave some gaps between the lines and keep the bottom half untouched. And don’t focus too much on this half, just make quick sketches it doesn’t have to be perfect!
Step Two: Screen Effect - With a new layer UNDER the sketch layer for step one, set this layer to Screen. Use the airbrush to color the bottom half of the eye. I used the base color and a lighter shade for this step.
Step Three: Sketch Color - Going back to the pupil layer from step one, you’re going to change the color of the sketch to a dark color of the base color. Once you picked out the color set it to hard light. This is optional but you can also use the blur effect. Also optional, you can do mixed colors or another effect besides the hard light one as well for this method. Try experimenting with it!
Step Four: Highlights - After merging the previous layers together you can add a new layer and set it to Add. Use either the Neon 2 - Add or an outline brushes for this step. Use the light color from step 2 or other lighter colors to create the highlights. I just added a couple of dots and a small line for my highlights but the highlights can be any size you like. This is optional but you can also use the blur effect to soften the highlights.
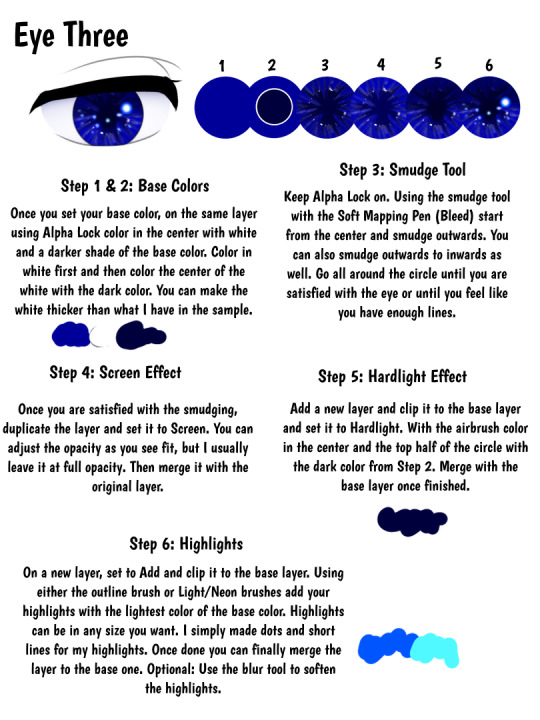
Eye Three
Step One & Two: Base Colors - After picking out your base color, turn on alpha lock and color in the center of the circle with white and a darker shade of the base color. You can do this two ways, color in white first and then the darker color. Or you can color in the darker shade first and then color in white alongside the dark color. You can make the white thicker than what I have shown in the sample. White should be one of the main colors used in this but if you wish to use the lightest tint of the base color in place of white you can do that too!
Step Three: Smudge Tool - Make sure alpha lock is still enabled and using the smudge tool with the Soft Mapping Pen (Bleed) start smudging lines from the center outwards. You can also smudge outwards to inwards as well. Go all around the circle until you are satisfied with the eye or until you feel like you have enough lines. Make sure to adjust the size of the brush to make the lines thin or thick.
Step Four: Screen Effect - Once you’re satisfied with the smudges, duplicate the layer and set it to screen. You can adjust the opacity as you see fit but I usually just leave it at full opacity. Then merge it with the base layer.
Step Five: Hard Light Effect - On a new layer, clipped to the base one set it to hard light effect. With the airbrush color I’m the center of the eye to create the pupil and the top half of the circle. Use the dark color from step 2. If you wish to make the pupil more visible you can color it in more or use a darker color. Once finished, merge the layer to the base.
Step Six: Highlights - On a new layer, set to Add and clipped to the base layer we can add the highlights! Use either the Neon/Light brushes and the Outline brushes to draw the highlights with the lightest tint of the base color. The highlights can be any shape or size you wish. I mostly made dots and short lines for my highlights. This is optional but you can also use the blur effect to soften the highlights.
#ariparri#art tutorial#coloring tutorial#eye tutorial#ibispaint#ibispaint tutorial#eye reference#art tip#art reference#ibispaint tips
19 notes
·
View notes
Text

I don't know why but it gives me some strange satisfaction to edit your photos to the aesthetic ye want it to be
Not just to make them pretty bc they are uncharming but bc to make them flattering to the eye not just for me but maybe some other ppl
2 notes
·
View notes
Text

Been a hot minute since I talk about my Godzilla GODS AND MONSTERS AU project
if you don’t know it’s basically if the Kaijus were ancient gods who were killed by other gods (like Greek gods etc) due to their war on the heavens
although unknown to them the Kaiju had the ability to reincarnate so they become demigod like beings on earth continuing their war and they get bonus human form disguises and I decided to get back onto my project cause I really need to work on this I barely done anything with it
so here is what Godzillas human form looks like in modern day I have to say I’m not disappointed I hope you like it as well
#godzilla au#godzilla art#godzilla#Godzilla gods and monsters AU#art#art reference#eye reference#reference sheet#reference#au
5 notes
·
View notes
Text


give me your complete and unwavering devotion.
#cant have a vampsona without some religious imagery#i love the dynamic of a god and a devotee#a servant completely and utterly devoted to her god and yet a god is nothing without its worshippers#still has that power imbalance yet that necessity of being together#yummiii#also i hope the three wise monkeys reference was clear !!!#its basically telling her to turn a blind eye on others. telling her to avoid having evil thoughts i.e. not being devoted etc#idk does that make sense ??? eh whatever thought it was p cool#𓆩♱𓆪#my art#tw blood#hints of cannibalism if you squint hard enough
10K notes
·
View notes
Text
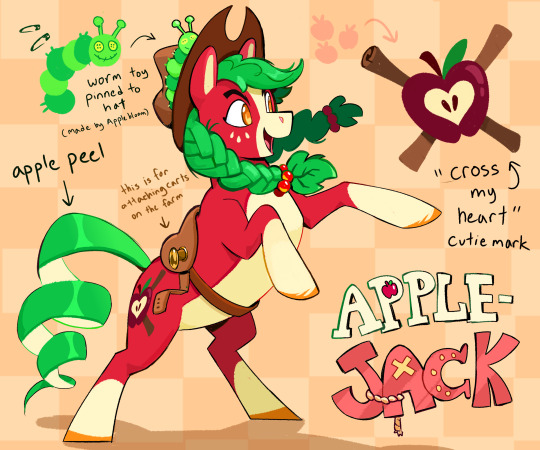


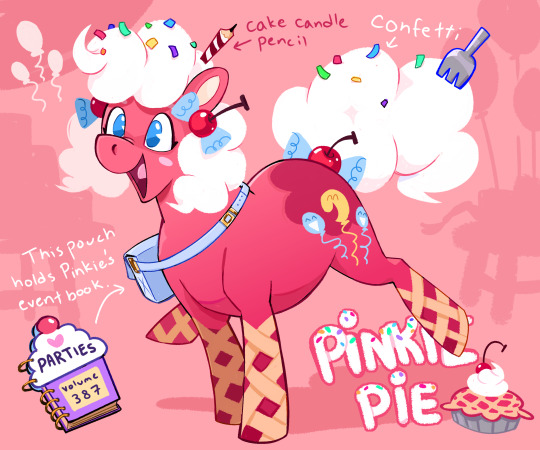
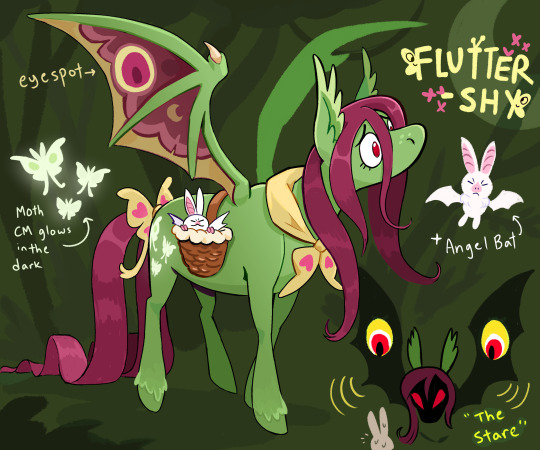
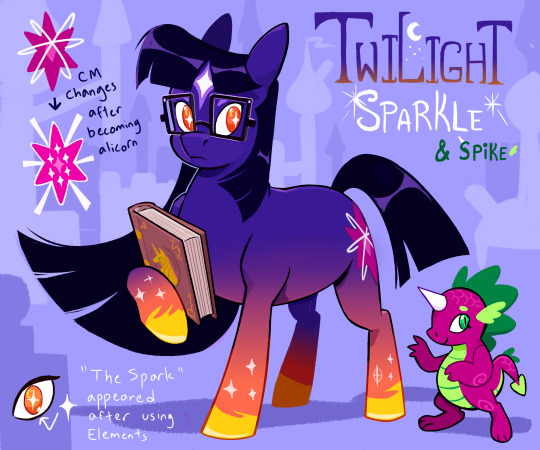
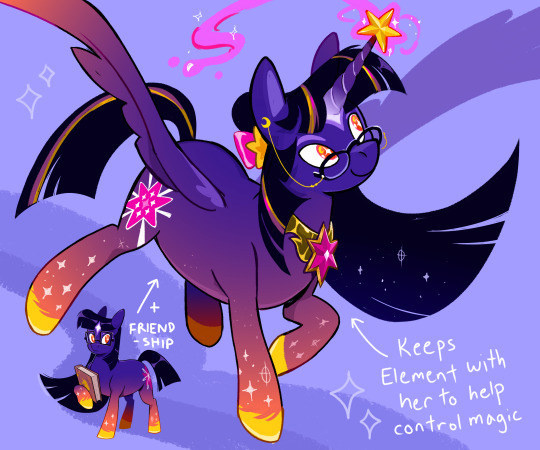
My Mane 6 Redesigns all together! I was going to post them separately but ended up finishing them all before I got around to it lol
#mlp#my little pony friendship is magic#my little pony#mlp fim#mlp redesign#earth pony twilight truthers where are you#bat pony fluttershy truthers where are you#dark color palette rarity truthers where are you#ALL OF YOU RISE WITH ME#im ESPECIALLY an earth pony twilight truther ever since I saw the old G5 concepts#I love the idea that Twilight's bonds with others are her true magic rather than beams or spells and I feel earth pony twi fits that well#since “the five elements brought together creates the sixth element magic“ aka friendship since FIM she embodies ”magic“ in a#more metaphorical sense#the star in her eyes is also a reference to the first ep when twilight says “the spark” ignited inside of her heart#plus the earth pony to alicorn pipeline is so cool and i like the idea of an earth pony being the bearer of the element of magic as a#fun contrast/its unexpected
25K notes
·
View notes
Text

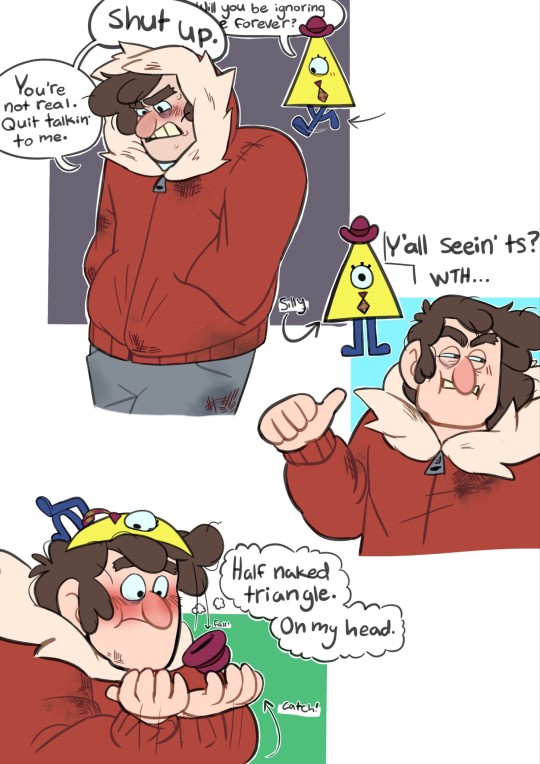
Y'all what if I told you I ship Pyramid Steve with Stan like fr now
#I mean#I definitely shipped it before but since I put genuine effort into this I think I have to say that I ship it even more or I might die#i wish i made the inside of his car grosser 😔#anyway PYRAMID SCHEME PYRAMID SCHEME‼️‼️#idk how to draw the inside of cars and i didn't bother to look up a reference#just sort of guessed and also went off my own car?#i love drawing pyramid Steve so much#cole's art#gravity falls#art#grunkle stan#stanley pines#pyramid steve#pyramid scheme#mullet stan#genuinely you will never see this much effort put into my art ever again 😭🙏#Pyramid Steve: The most colorful Driving Hazard in this dimension!!#He'll pop up outta no where and you'll be blinkin stars outta your eyes for 5 whole minutes!!
5K notes
·
View notes
Text


don't get any big ideas they're not gonna happen
#there will be... a rather nice sequel#everything is a radiohead reference for those with eyes to see#simon ghost riley#john soap mactavish#ghost x soap#ghoap#mellounir art tag
4K notes
·
View notes
Text


Fuck you. Un-bino's your clard.
#i also demagnified his eyes slightly. boy you is so fukcing handsome.#disco elysium#kim kitsuragi#-3 Perception. Blind#+3 Suggestion. Cutiepie buff.#reference#also i guess#my art#it's not but since i did technically do a paint-over... ye
2K notes
·
View notes
Text
“kill them with kindness” wrong. ceaseless watcher gaze your eyes upon this wretched thing👁️👁️👁️👁️👁️👁️👁️👁️👁️👁️👁️👁️👁️👁️👁️👁️👁️👁️👁️👁️👁️👁️👁️👁️👁️👁️👁️👁️👁️👁️👁️👁️👁️👁️👁️��️👁️👁️👁️👁️👁️👁️👁️👁️👁️👁️👁️👁️👁️👁️👁️👁️👁️👁️👁️👁️👁️👁️👁️👁️👁️👁️👁️👁️👁️👁️👁️👁️👁️👁️👁️👁️👁️👁️👁️👁️👁️
#tma#the magnus institute#has this joke been made already#tma shitpost#tma jon#this is about the magnus archives#magnus archive#the magnus archive#the eye#tma the eye#the magnus archives#magnus archives#tma spoilers#jonathan sims#jon sims#ceaseless watcher#the ceaseless watcher#tma reference#tma podcast
27K notes
·
View notes
Text


canon? found dead in a ditch far, far away
i bumped it with my x-wing
#star wars art#dinluke#luke and leia#star wars#luke skywalker#leia organa#din djarin#grogu’s ear and eye mentioned#i’m still fond of the idea of luke and leia growing up together#haven’t seen din’s armor in a hot minute and was too lazy to google the references so don’t expect to be impressed with how it looks#isn’t it crazy that we never got the third season of the mandalorian#⭐️chosen one⭐️ mentioned btw#bo katan kryze#padme amidala#anakin skywalker
5K notes
·
View notes
Text

he's so crazy we can't take him anywhere 😭🤣
#credits to @velinxi bc i referenced her art for this#how atlus felt making the black mask design by far the most visually disturbing horrific thing witnessed by human eyes#what the FUCK is he wearing. what is that fucking OIL SPILL#didnt even BOTHER looking up a reference bc it was so hideous i didnt want to see it again.#“a persona user’s outfit reflects the manifestation of their image of a rebel” IS LOKI SUPPOSED TO BE A FUCKING ZEBRA??????????????#I CANT TAKE IT ANYMORE THEY DID HIM SO DIRTY. WE WENT FROM MARCHING BAND COSPLAY TO GOTH HOMELESS DRAG#ONLY GOOD THING ABT HIS OUTFIT IS THE SERRATED SWORD THAT COMES WITH IT#anyway i genuinely dont give a fuck if this isnt the canon design i refuse to draw his scrappy zebra print bell bottoms and flare sleeves#there is no way this bitch was the one behind all the mental shutdowns he looks like he cant even hold a sword 😭😭 stupid femboy twink😭😭#anyway i digress i loved watching his sanity rapidly deteriorate as he got the deer in headlights stare when he looked at you#anyway akechi flopped with this one 0/10 don't come back like this again#imagine dying in this fit not even the flames of hell would burn hotter than my unadultered rage 💀💀#persona 5#persona 5 royal#p5#p5r#goro akechi#akechi goro#lotus draws
8K notes
·
View notes
Text


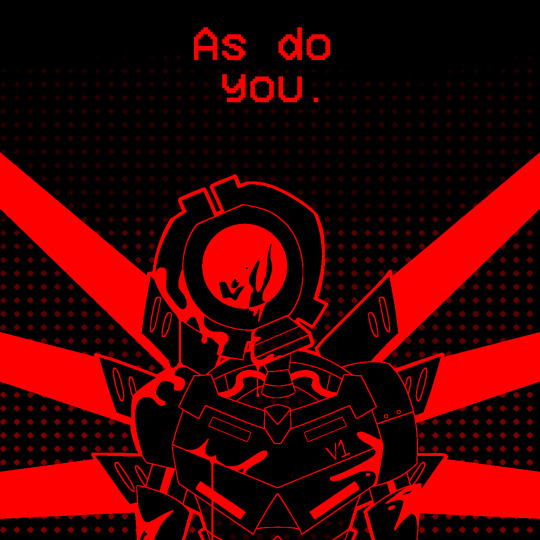


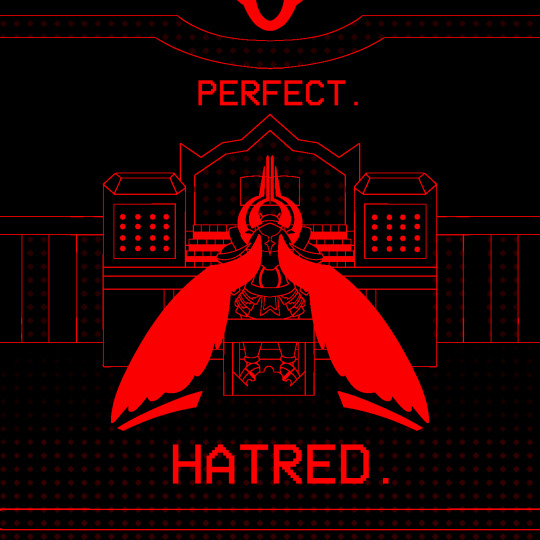
6-2: AESTHETICS OF HATE
#ultrakill#my art#gabriel ultrakill#v1 ultrakill#v1#ultrakill gabriel#swordsmachine#ultrakill fanart#the amount of reference images I used for this is RIDICULOUS#tw eye contact#tw blood#ask to tag
3K notes
·
View notes
Text

For anyone who ever want to draw CJ with their own style but don’t know what to color his eyes
here
(Also if your curious of what’s wrong with his eyes he has sectoral heterochromia I did this as a way to show he is a demigod since I personally imagine demigods have sectoral heterochromia to show their a god or a mortal (kinda like how I headcanon mei and MK having that) but it’s also to show representation with people having heterchromia)
anyways I hope you like it
#monkie kid oc#lmk art#monkie kid#art#lego monkie kid#lmk azure lion#azure lion#eye practice#heterochromia#lmk oc art#lmk ocs#lmk oc#Eye reference#Eye practice#lmk fanfiction#lmk fanfic#lmk journey to hope#Lmk jth#jth lmk
4 notes
·
View notes