#Flange design
Explore tagged Tumblr posts
Visit Tumblr Blog
Explore Tumblr blogs with no restrictions, modern design and the best experience.
Last Seen Tumblr Blogs


Fun Fact
Tumblr has a low social media market share in South America.
Text
Little P.Eng.: Delivering Expert Flange Design Services as per ASME Sec. VIII Div. 1, Appendix 2
Flange design plays a critical role in ensuring the safety and integrity of pressure vessels and piping systems. When it comes to designing flanges as per ASME (American Society of Mechanical Engineers) Sec. VIII Div. 1, Appendix 2 for ABSA (Alberta Boilers Safety Association) submission, it is crucial to rely on the expertise of a trusted engineering firm. Little P.Eng. is a renowned engineering consultancy that specializes in providing comprehensive flange design services. With their deep understanding of ASME codes and regulations, they are well-equipped to assist clients in meeting ABSA requirements with precision and efficiency.
Expertise in ASME Sec. VIII Div. 1, Appendix 2:
Little P.Eng. prides itself on its extensive knowledge and experience in working with ASME codes, specifically Section VIII Division 1. Appendix 2 of this section provides detailed guidelines for flange design, including bolt loads, gasket constants, and allowable flange stresses. Compliance with these specifications is crucial for ensuring the safety and reliability of pressure vessels. The team at Little P.Eng. possesses a deep understanding of this appendix and keeps up-to-date with the latest revisions, ensuring their designs meet the most current standards.
Accurate and Reliable Flange Design:
When it comes to flange design, precision is paramount. Little P.Eng. employs highly skilled engineers who utilize advanced design software and tools to accurately calculate critical parameters such as bolt loads, gasket constants, and flange stresses. By leveraging their expertise and cutting-edge technology, they deliver robust and reliable designs that are tailored to each client's specific requirements. The team ensures that the design complies with the ASME code, meeting the stringent ABSA submission criteria.
Compliance with ABSA Requirements:
ABSA, as the regulatory authority in Alberta, Canada, mandates strict adherence to safety standards for pressure vessels and piping systems. Little P.Eng. understands the ABSA submission process and the specific requirements that need to be met. Their flange design services are customized to comply with ABSA regulations, enabling clients to obtain necessary approvals for their projects. By engaging Little P.Eng., clients can rest assured that their flange designs will undergo a thorough review process, meeting all ABSA requirements.
Collaborative Approach and Client Satisfaction:

Conclusion:
When it comes to flange design services as per ASME Sec. VIII Div. 1, Appendix 2 for ABSA submission, Little P.Eng. stands out as a reliable and experienced engineering firm. Their deep understanding of ASME codes, expertise in flange design, and commitment to compliance with ABSA requirements make them the go-to choice for clients seeking precision and reliability. By partnering with Little P.Eng., clients can ensure the safety and integrity of their pressure vessels and piping systems, while also meeting the necessary regulatory standards.
Keywords:
Flange design, ASME Sec. VIII Div. 1, Appendix 2, ABSA submission, Little P.Eng., pressure vessels, piping systems, compliance, design calculation, bolt loads, gasket constants, flange stresses, safety, engineering firm, precision, reliability, regulatory standards, ABSA requirements, client satisfaction.
Tags:
Meena Rezkallah
Little P.Eng.
safety
piping systems
engineering firm
reliability
client satisfaction
pressure vessels
Flange design
ASME Sec. VIII Div. 1
Appendix 2
ABSA submission
compliance
design calculation
bolt loads
gasket constants
flange stresses
precision
regulatory standards
ABSA requirements
Engineering Services
Pipe Stress Analysis Services
Located in Calgary, Alberta; Vancouver, BC; Toronto, Ontario; Edmonton, Alberta; Houston Texas; Torrance, California; El Segundo, CA; Manhattan Beach, CA; Concord, CA; We offer our engineering consultancy services across Canada and United States. Meena Rezkallah.
#Meena Rezkallah#Little P.Eng.#safety#piping systems#engineering firm#reliability#client satisfaction#pressure vessels#Flange design#ASME Sec. VIII Div. 1#Appendix 2#ABSA submission#compliance#design calculation#bolt loads#gasket constants#flange stresses#precision#regulatory standards#ABSA requirements
1 note
·
View note
Text

Teperosi Man-at-Arms II
#art#illustration#design#drawing#digital art#character design#rpg#dnd#flanged mace#armor#plate#chain#medieval#medieval fantasy#medieval history#historical fantasy#low fantasy#ttrpg
20 notes
·
View notes
Text
Conductor full design

Full design :3
2 notes
·
View notes
Text
Crafting Effective Commercial Signage: A Guide to Design Success
In the bustling world of commerce, where every glance counts and every impression matters, the design of commercial signage holds significant sway. These visual markers not only serve as beacons guiding customers to businesses but also communicate brand identity, values, and offerings in a matter of seconds. Crafting effective Commercial signage design requires a thoughtful approach that considers both aesthetic appeal and practicality. In this guide, we delve into the key elements and principles of designing commercial signage that leaves a lasting impact.
Understanding the Purpose
Before diving into design elements, it's crucial to understand the primary purpose of commercial signage. At its core, signage should attract attention, convey essential information, and ultimately drive action. Whether it's enticing pedestrians to enter a store, promoting a sale, or simply enhancing brand visibility, every aspect of the design should be geared towards achieving these objectives.
Clarity is Key
The most effective signage is clear and concise. From a distance, viewers should be able to quickly grasp the message without any ambiguity. This means using legible fonts, appropriate sizing, and simple language. Avoid cluttering the sign with excessive information; instead, focus on the most critical details that will compel the viewer to take action.
Brand Consistency
Commercial signage serves as a visual extension of a brand's identity. Therefore, it's essential to maintain consistency in design elements such as color palette, typography, and imagery. Consistency fosters brand recognition and reinforces the overall brand image in the minds of consumers. Whether it's a storefront sign, banners, or promotional displays, all signage should align seamlessly with the brand's established visual identity.
Strategic Placement
Designing effective signage goes beyond aesthetics; strategic placement is equally important. Consider factors such as visibility, foot traffic patterns, and surrounding environment when determining the placement of signage. A well-placed sign can significantly increase its effectiveness and attract the attention of the target audience.
Eye-catching Design
In a sea of competing stimuli, it's essential for signage to stand out and grab attention. Eye-catching design elements such as bold colors, unique shapes, and compelling graphics can help achieve this goal. However, it's crucial to strike a balance between attention-grabbing and overwhelming; the design should be visually appealing without being distracting.
Utilize High-Quality Materials
The quality of materials used in signage not only impacts its durability but also reflects the professionalism of the business. Opt for high-quality materials that are suitable for the intended environment and will withstand the elements. Whether it's durable vinyl for outdoor banners or sleek acrylic for indoor signage, investing in quality materials will ensure longevity and maintain the integrity of the design.
Embrace Creativity
While adhering to design principles is essential, don't be afraid to think outside the box and inject creativity into your signage. Experiment with unconventional shapes, innovative materials, or interactive elements to capture the imagination of your audience. Creativity can help differentiate your signage from competitors and leave a memorable impression on viewers.
Test and Iterate
Designing effective signage is an iterative process. Once signage is implemented, monitor its effectiveness and be open to making adjustments based on feedback and performance metrics. Conduct A/B testing if possible to gauge the impact of different design elements or messaging strategies. By continuously refining and optimizing signage, businesses can ensure that it remains relevant and impactful over time.
Conclusion
In the world of commerce, effective signage is a powerful tool for attracting customers, conveying information, and reinforcing brand identity. By following these principles and best practices, businesses can create signage that not only captures attention but also drives action and fosters meaningful connections with their target audience. From strategic placement to eye-catching design, every aspect of signage plays a crucial role in shaping the perception of a business and influencing consumer behavior.
For more details, visit us:
Digital sign outdoor
led light board design
Sign branding
Small Format Signage
0 notes
Text
1,700-Year-Old Writing Kit from Georgia (South Caucasus): this writing kit was found in an unmarked grave located in the foundations of a cathedral, where it lay buried next to the body of a 40-50 year old woman; it's decorated with images of the Greek muses

The unmarked tomb was discovered at Svetitskhoveli Cathedral, which is located in the city of Mtskheta, in modern-day Georgia. The burial site dates back to about 250-350 CE, when Mtskheta served as the capital of Kartli (also known as the Kingdom of Iberia), which covered most of what is now Eastern Georgia.

The tomb lay undiscovered for more than 1,600 years, as it was tucked into the foundations of the cathedral; it contained the body of an unidentified woman in her 40s or 50s, along with an assortment of jewelry and a gilded writing set, which had been placed by the woman's waist. Her identity is still a mystery, but the contents of her tomb suggest that she was a member of royalty and/or nobility.
The writing set contains several different components, including a gilded pen case with the Greek muses depicted across the back, a silver frame depicting three historical figures, an openwork cover made of gold, a gold ink pot, three silver pens, and a small "pencil-box" made of silver.

All nine of the Greek muses are depicted on the pen case. The figures are divided into three rows; each muse is identified by name, and each is depicted with its own unique attributes/objects.

Above: the top row of the pen case is decorated with gilded images of Clio, Euterpe, and Thalia
The three figures in the top row are identified as Clio, Euterpe, and Thalia, which are the muses of history, lyric poetry, and comedy, respectively. Clio is shown holding a slate pencil in her right hand and a book in her left, while Euterpe is depicted with a trumpet and a wind instrument, and Thalia carries a comic mask and ploughshare.

Above: Melpomene, Terpsichore, and Erato
The figures in the second row are identified as Melpomene, Terpsichore, and Erato, who are the muses of tragedy, dance, and romantic poetry. Melpomene carries a tragedy mask, Terpsichore has a lyre in her left hand and a plectrum in her right, and Erato is depicted with a flanged lyre.

Above: Polyhymnia, Urania, and Calliope
The figures in the third row represent Polyhymnia, Urania, and Calliope. Polyhymnia is the muse of song, sacred dance, and mime, and she is depicted with a scroll in one hand and a mask in the other. Urania is the muse of astronomy, so she carries a pointed slate pencil in her right hand and a globe in her left. Calliope is the muse of epic poetry, and she's depicted with a scroll.

Above: the writing kit also includes this silver frame, which features three more figures that are identified as Menander, Homer, and Demosthenes
A small silver frame attaches to the front side of the pen case. That frame is decorated with portraits of Menander, Homer, and Demosthenes, who are identified by the Greek inscriptions above each figure ("MENAN[ΔΡΟΣ], OMEROC, ΔHMOCΘENHC"), though the inscription of Menander's name is partially damaged.
The frame fits neatly around a small ink-pot, which is then fixed to the front of the pen case, along with an openwork cover made of gold.

Above: the openwork cover was crafted from a sheet of gold, and it features an elaborate laurel motif along with a Greek inscription
The cover includes a two-line Greek inscription ("BACIΛEΩC OΥCTAMOΥ TOΥ KAI EΥΓENIOΥ") that can be translated as "king Oustamos-Eugenios" or "kings Oustamos and Eugenios." There is no written record of any king(s) by that name in Kartli, nor in any other part of Georgia, but the written history for this period is sparse, and the names of many Georgian rulers have been lost.
The writing set also includes three silver pens and a "pencil box" made from a pair of silver sheets. One of the silver sheets has a corrugated design that holds the pens in place.

Above: three pens and a silver "pencil-box" are shown on the right, while the openwork cover, frame, ink-pot, and pen case are shown on the left; the "pencil-box" is supposed to slide between the pen case and the other components
The artifacts from this unmarked tomb (along with the ink pots and styli that have been found at other sites nearby) suggest that there was a high level of literacy among the elites of Mtskheta during this period. The burial also contains several artifacts that were likely crafted in foreign workshops, reflecting the significant trade relationships and cultural exchanges that existed between Kartli and the peoples of Colchis, Greece, Rome, Iran, Armenia, Scythia, and the Levant.
Sources & More Info:
Phasis: A Rich Burial from Mtskheta (Caucasian Iberia)
Georgian National Museum: Pen Case
Colors and Stones: Writing Tools from Mtskheta
Greek and Latin Inscriptions from Classical Antiquity in Georgian History: Inscription on a Pen-Case from Mtskheta (p.269)
Hadrian and the Christians: Georgia in Roman Times (1st to 4th Centuries AD)
Phasis: Judicial Practices in Ancient Georgia (p.7)
International Black Sea University: Reinterpretation of a Late Roman Artifact
The Greeks and Romans in the Black Sea: What's in a Name? Who Might be Basilissa Ulpia from Mtskheta?
Journal of the Otar Lordkipanidze Centre of Archaeology: Archaeology of the Roman Period in Georgia
#archaeology#history#artifact#anthropology#georgia#sakartvelo#kartli#caucasus#writing kit#roman#desk set#ancient greece#literacy#writing#svetitskhoveli cathedral#mtskheta#art#metalworking#muses#greek mythology#georgia my beloved#sakartvelo my love
327 notes
·
View notes
Text

Writing Weapons (4): Clubs, Maces, Axes, Slings and Arrows
Clubs & Maces
Maces are refined versions of clubs, usually made from steel and flanged or spiked.
Perfect for smashing and plate armour and for crushing skulls.
When used on horseback, the rider uses continuous swining motion and leans to the side to hit.
Type of Fight Scene: gritty, historical fiction, smashing armour
Typical user: brawny male with broad shoulders nad bulging biceps
Mostly used in: historical fiction - Stone Age to Middle Ages
Main Action: smash, crush, bludgeon, batter
Main motion: downwards
Typical injury: crushed bones, crushed skull
Strategy for lethal fight: crush skull
Disadvantages: heavy, need to get closer to the opponent
Batle Axes
Used by a peasant or lumberjack
Special battle axes are bigger and heavier, with longer handles
A weapons for attack rather than defence, good at cleaving through armour
Can break through enemy shields and kill a charging horse.
They require intense training, so users are highly skilled elite soldiers, often aristocrats.
Types of Fight Scene: gritty, brutal, battles, attack, historical fiction, fantasy fiction, cutting through armour
Typical User: tall brawny male with broad shoulders and bulging biceps, courageous, elite soldier, Viking, Saxon
Mostly Used In: European Dark Ages to Middle Ages
Main Action: cleave, hack, chop, cut, split
Main Motion: downwards
Typical Injury: severed large limbs, split skulls, cleaved torsos
Strategy for Lethal Fight: severe the arm which holds the sword or the shield, or cleave torso from top to bottom, or cut off a lef then split the skull
Disadvantages: big and heavy
Bows and Arrows
They are weapons of mass use. Hundred of arrows are shot at the enemy to inflict as mcuh damagne as possible from a distance.
In the middle of the battle and for close combat, they're useless.
Castles were designed for the use of bows and arrows, with narrow windows called 'archer slits'. The top of the outer walls were desgined so archers could shoot while remaining under cover.
Arrows are relateively cheap and quickly to produce. Tips an be metal or sharpened stone, wood, bone, glass splinters, etc.
Pieces of feather at the end help the arrows fly better, but knowing which part of the feather to attach how and where is much -treasured knowledge.
Characters can learn the basics of archery can be done quickly at an emergency. However, to be really good it takes years of practice.
Most important skill is to be able to shoot many arrows in quick succession.
Stone Slings
Stone slings are cheap to make - it only takes a piece of leather, string and ammunition are simply pebbls lying around.
This makes it good for low-tech historical periods and for characters of all ages and physical capacities.
Doesn't require great physical strength, but a lot of practice is required to achieve accuracy.
Different cultures have different techniques for holding and releasing, none of which includes the continuous frantic whirling around beloved by moview makers. Rotatin is usually done once or twice, or not at all.
(1) the slinger hooks the end of the sling over her fingers (2) holds the hand above the shoulder so the sling's bag with the stone in it hangs down behind her shoulder. (3) flings it straight forward.
Blunders to Avoid
Depicting an axeman as an unkilled brute who chops blindly.
Battles where the archers shoot when sword fighters are already engaged in close fighting
#writing#writers and poets#writers on tumblr#creative writing#helping writers#writeblr#poets and writers#creative writers#let's write#resources for writers#write me#write it#write that down#write for us#writers#writer community#write anything#write every day#writer stuff#write up#writing practice#writing prompt#writing advice#writing inspiration#writing ideas#on writing#writer#writing community#writerscommunity#writers block
922 notes
·
View notes
Text
Eastern Asian weapon design
"...So when you uncork that little runner at the base of it, the chain inside is free to let the head spring out as a surprise move. - And does that actually work in a fight ? - A fight? No no this is for my work out routine."
---
Western European weapon design
"You don't understand we've run out of names two hundred years ago. - No YOU don't understand, this one has an extra spike under the flanged fluke!!"
583 notes
·
View notes
Text


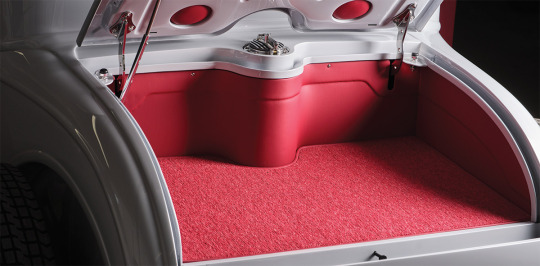


1930 Ford Highboy Coupe
There’s always lots of detail work with any build and this ’30 Ford highboy coupe is no exception. Look closely and you will find Craftworks Fabrication handmade steel motor mounts. The license plate and valve covers were painted by Jeremy Seanor of Luckystrike Designs. He also painted all the accompanying engine and tranny parts. The powdercoat was handled by Pittsburgh Powder Coat while the chrome plating was conducted by Jon Wright’s Custom Chrome Plating.
The chassis is comprised of a Roadster Shop custom frame that was stepped, stretched, and features contoured ’32 Ford-style framerails. It was also then boxed, capped, and has hole punch flared front framehorns. From here the frame is outfitted with a Super Bell 4-inch drop, drilled and plated I-beam axle, low-profile monoleaf spring with Ridetech tubular shocks paired to custom-made drilled billet radius rods from Johnson’s Hot Rod Shop. Steering falls to the Flaming River box and a LimeWorks Hot Rod column topped with a four-spoke Billet Specialties Sprint Car–style leather-wrapped wheel. In back there’s a Currie 9-inch rearend outfitted with 3.70 gears, 31-spline axles, QA1 coilovers, a Pete & Jakes Panhard bar, and a parallel four-link setup. Braking is a combination of disc/drum front to rear. The forward braking dark gray–painted Wilwood Dynalite calipers are neatly hidden behind the Pete & Jakes finned backing plates. While in back the 9-inch is outfitted with 11-inch brakes, this time hidden beneath the SO-CAL Speed Shop finned drums all the while the chassis rides on a full set of 16-inch Dayton wire wheels wrapped with Coker/Excelsior rubber measuring 5.50R16 in front and 7.00R18 in the back.
All hot rods have something fun settled between the ’rails and beneath the hood (well if they have a hood). In the case of our ’30 Ford highboy coupe it sure appears to be a vintage Ford Y-block but after more than a cursory look we begin to see the telltale signs that there’s something more. Indeed, while it may look like a Ford it truly is a 376-inch LSX iron block, with aluminum heads and ARP studs, plus adapter-equipped small-block Ford (Windsor) valve covers all from Don Hardy Race Cars and then assembled by Talik and Marc Mullin. The intake is an Edelbrock LS dual quad with a pair of Thunder AVS EnduraShine carbs dressed in OTB air cleaners. Delivering the gas from the Tanks stainless reservoir is an Earl’s Performance billet fuel pump. More engine accessories include an MSD 6AL box to go along with the MSD billet Ford small-block distributor that functions through a timing cover adapter from Chevrolet Performance all the while using an MSD coil and Lokar vintage plug wires. Powermaster also supplied the alternator and starter, the battery is an XS Power AGM, and a Wegner Motorsports water pump is used as well as a Wegner front accessory drive unit. This 500-plus hp V-8 utilizes custom headers made at Craftworks Fabrication based on Ultimate Headers LS header flanges. The pseudo-Ford small-block is backed up to a TCI StreetFighter 700-R4 with a 2,800-stall speed converter operated by a Lokar shifter. The trans cooler comes by way of Derale Performance and moves the power through a 3-inch-diameter custom-made driveshaft.
216 notes
·
View notes
Text

I posted #3 solo but here's some more:
1: "Kozakura inspired". The patterns of menswear in Japan are really interesting in how subtle they are. Vhaeraun wants a lot of black clothes out of his followers, which I think might lead to a lot of subtle texture and embroidery work.
2: Dress from House Du'thar. This is one of the torn up gowns mentioned in "The Hunger", featuring Felyn'aste with his younger hair. He was really trying to be comfortable as a woman in this era. The dress was so hard to draw since it's campy.
3: Already posted this one. This is something that Felyn would wear day-to-day. Nothing fancy, comfortable enough. Main challenge is getting all your blacks to match.
4: Updated design for Felyn'aste's armor come 5e. This set of armor is called "Fool's Gold" or "Waelsulvir". It was forged by an armorsmith who fled Thay, leading to the fairly distinctive look of spikes and flowing cloth. The knuckles on the gauntlets are often razor sharp, leaving them with a weapon even if they've been divested of the matching flanged mace. Still sketchy since it's not finalized.
38 notes
·
View notes
Text
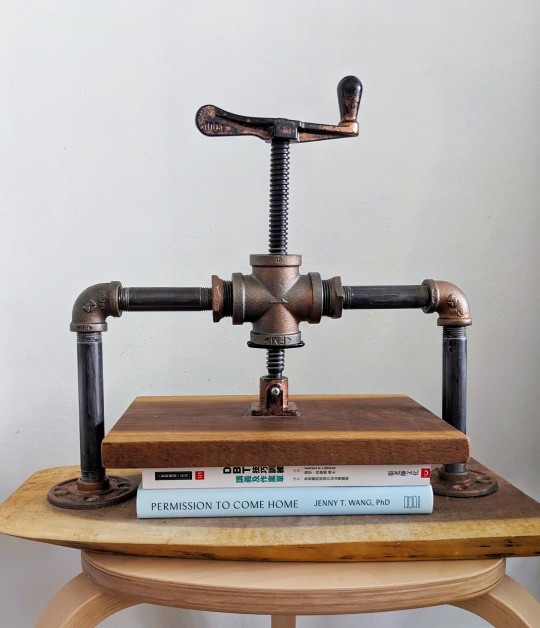
FanFic Pipe Book Press
In 2022, I prototyped an affordable nipping press using black steel pipe fittings. The challenge: To make something under $100, compact, portable, and easy to make without electric tools.
I'm sharing the supply list here (under the cut) with updated thoughts and notes.
Please note that when I've linked to Amazon in this post, I'm using an affiliate link.
Basic Materials
QTY 1 - Press Screw 2 - ½ pipe Mini Flanges 2 - ½ pipe 90° elbow fittings 2 - ½ pipe 4in nipples 2 - ½ pipe 6in nipples 2 - 1x½ pipe hex bushing reducer 1 - 1x1 pipe cross tee 1 - Large hardwood board at least 16"x6" 1 - Smaller hardwood board ~ 9-10" across and at least 6" wide 8 - #8x¾ flat head wood screws
Press Screw The press screw is the crank/long screw in the middle of the nipping press. As of this writing, the most affordable press screws are the one by Pony Jorgenson or the one by ShopFox. For just a little bit more, McMaster Carr sells a beautiful stainless steel hole mount screw clamp from Taiwan.
½ pipe parts These form the bones of this book press. Pipe fittings are designed to be resistant to water pressure and are easy to assemble. You can find some at your local hardware store (cheaper) or order on Amazon. You have the option to use basic black carbon steel pipe or go fancier by using stainless steel. This will likely run you between $40-$65.
Wood & Screws You'll want a hardwood (like Oak, Birch, Walnut, etc.) not a softwood (pine or basswood) for this project to prevent warping. A strong plywood such as baltic birch may work as well. Most hardware stores will cut wood to size for you. The screws are for attaching the pipe to the wood--but, depending on how you want to engineer the press, you could also use bolts.
Additional Supplies
Sandpaper in various grades
Sealant for the pipes (especially if you use pipe that sheds carbon, so you don't stain your books. I used clear coat, you can look into shellac and other finishes that work for you.)
Wood Finish (I used tung oil, you have so many options)
Screwdriver, Hand Drill, or Electric drill
Mallet (if you want to pound the lead screw into the cross pipe
Epoxy to glue the lead screw into the cross, or to affix the base of the screw to the wood.
Optional Upgrades
Use a hole saw to drill through the wood and a forstner bit the size of the flange to run the flange through the wood from the bottom. That way, pressure isn't put on the wood screws and the press will last longer.
Use Rub N' Buff to decorate the press
Use longer nipples, such as 8" or 10" nipples, instead of the 6" to get more daylight.
This press is sized for fanfic binders, but if you want a bigger one you can size up the pipes.
If you can afford thicker wood, especially for the base, you may want to opt for 8/4 wood instead of 4/4 wood.
Happy crafting! Let me know how things go, and if you end up making one, I'd love to see a picture.
147 notes
·
View notes
Text
Unleashing the Potential of Little P.Eng. for ASME B31.3 Process Piping Calculation Services
In the ever-evolving landscape of the process piping industry, ASME B31.3 Process Piping Calculation Services stands as a paramount standard for design, inspection, and construction of process plants. As we delve into the complex world of piping engineering, we encounter Little P.Eng., an innovative engineering consulting firm pioneering the application of these industry standards.
With years of profound expertise and a cutting-edge approach, Little P.Eng. shines as the gold standard in providing ASME B31.3 Process Piping Calculation Services. This article aims to shed light on the instrumental role that Little P.Eng. plays in revolutionizing the field of process piping.
Understanding ASME B31.3 Process Piping Standards:
ASME B31.3, a prominent subsection of the American Society of Mechanical Engineers (ASME) B31 Code for Pressure Piping, is a comprehensive set of guidelines for process piping. It includes various aspects such as materials, fabrication, examination, testing, and much more. Given its criticality, these standards must be implemented with utmost precision and accuracy, an arena where Little P.Eng. truly excels.
Little P.Eng.: Your Reliable Partner for Piping Calculation Services:
As a recognized leader in the engineering consulting sector, Little P.Eng. is fully equipped to handle all facets of ASME B31.3 process piping calculation services. Leveraging the expertise of highly-skilled professionals, the latest technologies, and deep-rooted understanding of ASME standards, Little P.Eng. delivers innovative, accurate, and cost-effective solutions.
Little P.Eng. and Comprehensive Calculation Services:
Little P.Eng.'s range of calculation services spans from pressure design of piping components, flexibility and stress analysis, to support design and selection. Their commitment to precision, comprehensive reports, and prompt delivery, all tied to their deep-rooted understanding of ASME B31.3 standards, ensure that they stay ahead of the competition.
Embracing the Latest Technology:
Little P.Eng. makes optimal use of the latest technologies to provide unmatched ASME B31.3 process piping calculation services. Using state-of-the-art software tools, they simulate, analyze, and validate designs, leading to safe, reliable, and efficient process piping systems.
Customer Satisfaction: Little P.Eng.'s Hallmark:
With a steadfast commitment to customer satisfaction, Little P.Eng. prioritizes its clients' needs at every stage of the project. This results in services that not only adhere to ASME B31.3 standards but also align with the specific requirements of the clients.
Let's delve deeper into the pressure design calculations performed by Little P.Eng. under the ASME B31.3 Process Piping Calculation Services. Here are the key types of pressure design calculations:
Wall Thickness Calculations: One of the most crucial aspects of pressure design calculations involves determining the minimum wall thickness required for pipes to safely contain the pressure. Little P.Eng. uses sophisticated software tools to compute this accurately, factoring in variables like operating pressure, material strength, temperature, and pipe diameter.
Flange Rating Calculations: Little P.Eng. expertly handles the complexity of flange rating calculations, which involve determining the maximum pressure that flanges can handle without leaking. The process considers factors such as temperature, bolting material, gasket type, and flange material.
Branch Connection Calculations: When designing a process piping system, engineers often need to calculate the reinforcements required for branch connections. Little P.Eng. performs these calculations with precision, ensuring the integrity and safety of the piping system.
Expansion Joint Pressure Thrust Calculations: Expansion joints are vital components of process piping systems that accommodate thermal expansion or contraction. Little P.Eng. uses advanced tools to calculate the pressure thrust exerted on these joints, thus ensuring their optimal design.
Safety Valve Reaction Force Calculations: Little P.Eng. also determines the reaction force exerted on safety valves when they open in response to excessive pressure. These calculations are essential for the safe and efficient operation of the process piping system.
Pipe Support Span Calculations: Pipe support span calculations are critical for ensuring that the pipe doesn't sag excessively under its weight and operating conditions. Little P.Eng. performs these calculations meticulously, keeping in mind various factors such as pipe size, material, and temperature.
High-Pressure Piping Design Calculations: For high-pressure piping systems, Little P.Eng. offers specialized calculation services that consider unique challenges such as material selection, joint design, and testing procedures, ensuring the integrity of the system even under extreme pressure conditions.

Conclusion:
The ASME B31.3 Process Piping Calculation Services can be quite challenging to navigate without the assistance of an experienced partner like Little P.Eng. Their meticulous attention to detail, robust understanding of industry standards, and unflinching commitment to quality make them an invaluable asset in the realm of process piping.
Little P.Eng.'s team of expert engineers works tirelessly to stay at the forefront of evolving industry standards, technologies, and market demands, ensuring their clients get the best of what the industry has to offer. With their forward-thinking approach, they not only provide services but also contribute to shaping the future of the process piping industry.
Keywords:
Little P.Eng., ASME B31.3 Process Piping Calculation Services, engineering consulting, process piping industry, process piping standards, pressure design, flexibility and stress analysis, support design and selection, customer satisfaction, Wall Thickness Calculations, Flange Rating Calculations, Branch Connection Calculations, Expansion Joint Pressure Thrust Calculations, Safety Valve Reaction Force Calculations, Pipe Support Span Calculations, High-Pressure Piping Design Calculations.
Tags:
Little P.Eng.
engineering consulting
Expansion Joint Pressure Thrust Calculations
Safety Valve Reaction Force Calculations
High-Pressure Piping Design Calculations
ASME B31.3 Process Piping Calculation Services
process piping industry
process piping standards
pressure design
flexibility and stress analysis
support design and selection
customer satisfaction
Wall Thickness Calculations
Flange Rating Calculations
Branch Connection Calculations
Pipe Support Span Calculations
Engineering Services
Pipe Stress Analysis Services
Piping Design
Located in Calgary, Alberta; Vancouver, BC; Toronto, Ontario; Edmonton, Alberta; Houston Texas; Torrance, California; El Segundo, CA; Manhattan Beach, CA; Concord, CA; We offer our engineering consultancy services across Canada and United States. Meena Rezkallah.
#Little P.Eng.#engineering consulting#Expansion Joint Pressure Thrust Calculations#Safety Valve Reaction Force Calculations#High-Pressure Piping Design Calculations#ASME B31.3 Process Piping Calculation Services#process piping industry#process piping standards#pressure design#flexibility and stress analysis#support design and selection#customer satisfaction#Wall Thickness Calculations#Flange Rating Calculations#Branch Connection Calculations#Pipe Support Span Calculations
0 notes
Text

Bionicle Heroes weapon-design tier list I guess.
Notes below.
Onua's Claw narrowly avoids being in the "just the actual piece" category because the developers actually thought about how it would work as a ranged weapon (the pinhole on the actual piece is recontextualised as a hatch that opens up to release a stickybomb).
The reason both the Ice Sword from PC/Console and the Ice weapon from DS are in the same category is because, while they may initially look similar, and in terms of in-game functionality are almost exactly the same (both work like railguns, with an alt-fire that zooms in), they are in fact completely different aesthetically (the scope on the former is actually a nacelle on the latter, which moves when firing; rather than the "blade" being split and opening when fired, it's a single barrel that releases jets of ice when fired; etc.). The same goes for the Fire Sword and the Fire weapon being in different categories (judging by the way it's angled, as well as maybe some parts of the model that can only be seen in-game (I don't have BHDS installed on my laptop yet so I can't check, but from what I remember the latter appears to be a more gun-shaped variation of the former's design, which is literally just a stylised version of the set piece).
I didn't bother doing the Piraka's weapons, since they'd all just fit into the "just the actual piece" tier. As for the GBA ones, Biosector doesn't have many clear screenshots of those, and The Spriters Resource is unfortunately lacking in terms of that game's sprites.
I've talked about this before but Hewkii's starting weapon in PC/Console is very weird. You'd expect, following the patterns established by the other Toas' weapons, that it would be based on the Foot Extensions, but it isn't; on the upgrade screen it's called "Pohatu's Po-Koro", and it's actually based on the '01 hand piece. And while one could make the argument that the DS version is based on the Foot Extensions, the resemblance is very loose so I didn't count it.
The Energised Fire Sword and Water weapon are crimes against weapon design. The former is just the blade of the set design awkwardly jammed onto an arm-cannon mount, while the latter feels like it was slapped together an hour before the game shipped.
"Uh why didn't you put the Disk Launcher in the 'original design' tier" because it's based on the Disk Launcher. Like the vents on the top and bottom are meant to be the flanges that the flames on the actual piece are attached to, the two tubes above and below the handle are meant to be the two halves of the launching mechanism, and the weapon's barrel is shaped in such a way that it could, in theory, fire a disk. Same with the Proto Piton.
One could make the argument that the Earth weapon in DS is meant to be one of Onua's claws, but heavily abstracted. However, I disagree with this, mainly because of how the fingers are arranged and shaped.
23 notes
·
View notes
Text
OK, with Neve back in the party, it's onward through another Venatori fight, and then--

In the brief silence after the last enemy mage falls, a strange voice echoes through the air. It is not a voice like any Helena has heard before - it is flanged and resonant and dripping with unearthly malice.
And it belongs to the creature standing on the ledge of a shattered building just above them - a creature of winding tentacles beneath a long and skeletal body with more than the recommended number of limbs.


"Chaos. Decay. The past in ruin..." the voice hisses malevolently. "And the last few mortal servants of the Dread Wolf..."

Helena goes suddenly still, horror and terror melding together and surging up and down her spine. She remembers seeing the vague shape of the two blighted gods emerging from the Veil rip in the wake of Solas's botched ritual - but she never got a clear glimpse until this moment, and it is perhaps the most unsettling thing she has ever witnessed.
"Ghilan'nain..."
(A/N: Once again props to the design team here - Ghilan'nain is VERY unsettling; her proportions, tentacles, and movement are all super off-kilter and the whole thing is very atmospheric.)
"We only need one thing from you..." Ghilan'nain hisses. "Surrender it, and you may go."

Between one blink and the next, she jolts forward, close enough that Helena can see the glinting details of the battered mask she wears over her corrupted features.
"Give up the Dread Wolf's dagger."

Involuntarily, Helena's hand goes to the dagger on her hip. The chill at her spine hardens into ice. Ghilan'nain came to find her, here, for the dagger. That means Ghilan'nain knows exactly who she is, and that she would be here.
Perhaps that means Minrathous is burning because of her. Because she has this dagger. Because Varric dragged her into this war.
A sudden surge of guilt and panic rolls through her and she backs up a few steps, her fist white-knuckled around the dagger's hilt. There is, perhaps, a subtle instinct to hurl the dagger towards Ghilan'nain, flee the scene, hope that the city might be spared if the creature is given what she wants.
But no. She gulps down air, steadying herself. Ghilan'nain is at heart just another powerful, corrupted mage. Helena has fought plenty of them, and there is never any point in running. A power-hungry mage, given more power, will only use it to crush those beneath them. There is nothing to do but keep fighting.

"Come get it," she growls.

The eerie curve of Ghilan'nain's long neck twists as she draws back. And there is a strange mocking smile in that unearthly voice as she answers. "By force, then. Whatever remains of you will become my new creations..."

The dragon crashes to the ground in front of them. This, too, Helena has not had a chance yet to examine at close range - but the corruption is now obvious. Blight pustules coat the dragon's scales, its face, its legs and wings. Writhing tentacles drip from its jaws and its ribs.
And in agony and rage it screams, sending a blast of heat forward that almost knocks them off their feet. And then it leaps with a single great beat of its wings to slash its claws down at Helena's face.
15 notes
·
View notes
Note
Is it possible to share some details of how you're rerouting the floor vent through a cage platform? I was expecting to have to do that soon myself, so a reference would be really appreciated...
Yeah, totally! Sorry I took so long to respond. I wanted to get photos of the process and it's been slow-going with all the other things needing my attention.
You can buy a product kit called a toeductor that is specifically designed to route a floor vent through the toe kick under a cabinet. All you need is a jigsaw to cut an appropriate shape hole in your cabinet toe kick. This is best for a low-profile solution.
I, however, wanted a maximalist approach so I did it a little differently. Also I don't have a jigsaw. Also I'm not an HVAC professional so I might have donked this up. Maybe have a professional do your stuff instead of flirting with disaster like I do.
Process and pictures under the cut!
Supplies:
Foil tape for ducting
Duct clamp (optional)
Decorative register that fits on your platform (I went with a 4"x8" rectangle)
Magnetic register screen (optional)
6" flexible duct (I needed about 12" length, your mileage may vary)
Universal register box with flange, 6" duct opening and whatever size your decorative register is (mine is 4"x8" to 6")
Universal register box without flange, 6" duct opening and whatever size your existing floor register is (mine is 4"x10")
Drill and drill bit to make holes
Tool to cut the hole for your register
File to smooth the edges of your register hole
Scraper, if needed
Goof-Off or Goo Gone or whatever cleaner you have that takes off adhesive residue, if needed
Vacuum with hose, if needed
First pop off your old floor register. It should just pull right up. Look down in the floor hole and try to remember the last time you vacuumed in there. Find yourself unable to recall. Feel ashamed. If it's a new house for you, wonder if the previous tenant ever vacuumed in there and decide privately to yourself that they probably didn't. Get the shop vac and really get down in there, knowing realistically that this may be the last time you ever do so.
Assess the existing foil duct tape inside the register. Is it gross and crumpled into sticky wads, or is the seal still good? If needed, scrape off the old tape, clean off any residue, and re-tape any seams with the foil tape to make sure there are no air leaks. Leaky HVAC lines mean you're losing heating/cooling to the crawlspace under your house and that's $$$ literally going into the dirt.
Once your existing floor hole looks good, fit the un-flanged universal box over the existing register box and tape them together inside and out with the foil tape. Be careful, register boxes have sharp edges! Make sure there are no cracks or unsealed seams. I forgot to take pictures of this part. Sorry.
Fit the end of the ducting over the end of the register box. Again, tape around the outside and tape inside for a firm seal.


Now use the flanged universal box to determine where on your platform you'll be re-routing the vent. I'm doing mine in a door for ease of access, but it's personal preference. Place yours wherever works for you, so long as the duct isn't being obstructed and you have good air flow. Use a marker to trace where the hole for the outgoing vent will be. I'm using a PVC platform so I drilled holes along the line I traced and then cut between them with a hand saw. If you have a jigsaw, please use that instead. Clean up the edges with a file or sandpaper as needed.


Attach the flanged universal box to the inside of the hole you made. Use small screws or tacks or 100% silicone sealant to adhere the box to the inside of the cabinet. Seal up any seams with tape to prevent air leaks. You may at this point choose to use a duct clamp instead of foil tape, so that you can more easily access the inside of the duct if you find yourself needing to adhere the register to the box. Attach the other end of the 6" duct to the flanged universal box and tape or clamp it in place.

If you're using a screen like I am to prevent unauthorized snake walkabouts that detour into the HVAC system, pop your decorative register apart and sandwich the screen inside. I had to snip the edges of the screen to make it fit the clips that hold the register together. Do what you gotta.


The decorative register should slot right into the universal register box. If you don't seal it in place, you can pull it out at any time. I did find that the register is a bit heavy, as it is intended for use on the floor, and it fell out of its vertical mount easily. I opted to silicone it in place and use a duct clamp on the ducting and register box as described above.

My register looks slightly crooked in this photo, but in reality it's only because the hole itself is actually slightly crooked. Big sigh.

And we're done! Survey your work, knowing that some HVAC professional somewhere is looking at this post online and slowly shaking their head in horror at the atrocities we have committed.
#snake#snakes#reptile#reptiles#reptiblr#welcome to the house of snakes#snake room#janky construction with OMG Snakes
12 notes
·
View notes
Text

AMG GT R Coupé „The Beast of the Green Hell“.
Back in the days the visual update for the AMG GT coupé and roadster includes new front and tail lamps as well as a new design idiom for the tailpipe trims.
The new light controls of the LED High Performance headlights now display parallels with the AMG GT 4-Door Coupé and therefore further strengthen the AMG GT family connection with the two-door models. A tri-functional, arched light guide takes on the functions of daytime running light, navigation light and turn signals.
The light of the LED tail lights also appears even deeper set and sportier through the dark background.
From the back the new look of the rear apron is striking, its sporty black diffuser insert was redesigned for the AMG GT, AMG GT S and AMG GT C. The twin tailpipe trims are now adapted to the lines of the AMG GT 4-Door Coupé ‑ round on the AMG GT and trapezoidal on the AMG GT S and AMG GT C. The rear design of the AMG GT R keeps its distinctive shape.
The AMG GT and AMG GT S are getting a new black grained sill cover on the bottom section. This makes for an extra-dynamic look. In conjunction with optional exterior packages, trim elements add individual highlights in high-gloss black, matt black, high-gloss chrome or carbon fibre.
Also, on request, the AMG GT and AMG GT S are available with a new y-spoke light-alloy wheel in matt black with a high-sheen finish. In addition, as an option for the AMG GT, AMG GT S and AMG GT C new 10-twin-spoke forged wheels in titanium grey with high-sheen finishes or in matt black with a high-sheen rim flange are available.
Mercedes-AMG One man, one engine Handcrafted by Michael Kübler @f1mike28 in Germany Affalterbach.
Driving Performance is my Passion! Mercedes-AMG the Performance and Sports Car Brand from Mercedes-Benz and Exclusive Partner for Pagani Automobili. Mercedes-AMG Handcrafted by Racers.
The AMG GT high-peformance sports car (fuel consumption combined 12.5-11.4 l/100 km, CO2 emissions combined 284-261 g/km).
#amg#amggt#amggtroadster#amggtr#amggtrpro#amggtrroadster#amggtblackseries#gtr#gtrpro#gtblackseries#beastofthegreenhell#mercedesamg#mercedes#mercedesbenz#affalterbach#onemanoneengine#pagani
9 notes
·
View notes
Text
This is very interesting: a novel CAD package built on a text based file format that should allow you to check files into version control and automate tasks, plus a geometry engine optimized for GPU compute.
It's also got some noteworthy backers, the appeal of this is obvious to anyone who has ever tried to integrate CAD into a larger workflow, it takes a lot of manual shunting of files and tagging of releases and fighting with export formats, even with all the features SolidWorks and Inventor and SolidEdge have added over the years.
It's not parametric, of course, because that's a totally different approach to modelling that's much harder to automate this way. I'm not sure if that's reasonably possible without just doing SVG bullshit.
There's an LLM powered Text To CAD thing where you are meant to be able to just describe an object and get back the CAD for it but at least for now it can only do things that are relatively simple, it feels a little like a crutch to deal with how slow generating simple parts through code CAD can be. Defining an I-beam parametrically is the kind of thing you can do basically without thinking. I guess you'd probably want to have a library of parametrically defined common parts to pull from once you've been doing this for five minutes.

Close but no cigar! It does get the flange and web the right way around. Using inches because I assume it's trained in Freedomheit.
They're keeping their geometry solver closed source, but I'd be interested to see if declarative cad like this takes off in industry, it's a slow moving space but hardware design is increasingly available to startups and small businesses who might be willing to throw away a lot of old CAD philosophy.
A lot of industry uses constructive CAD like this, the US military has BRL-CAD. Never could get my head around it.
27 notes
·
View notes