#Grid Plugins
Explore tagged Tumblr posts
Visit Tumblr Blog
Explore Tumblr blogs with no restrictions, modern design and the best experience.
Last Seen Tumblr Blogs


Fun Fact
The KCSC sent more than 20K requests to delete posts related to prostitution and porn to Tumblr from January to June 2017.
Text
10 Best Free Social Media Plugins for WordPress – Speckyboy
New Post has been published on https://thedigitalinsider.com/10-best-free-social-media-plugins-for-wordpress-speckyboy/
10 Best Free Social Media Plugins for WordPress – Speckyboy
WordPress and social media are a powerful combination. And there are plenty of ways to integrate platforms like Facebook, Instagram, X, or TikTok into your website. You can display social content on your site, allow users to share your content, or add functionality like social logins.
The social platform landscape is also changing. The Fediverse makes it easier to integrate with services like Mastodon or Bluesky. It allows you to publish in multiple places via a unified protocol. The WordPress ecosystem has embraced this model.
Social media’s importance is evident in the number of available plugins. You’ll find options for top platforms that offer a variety of functions. There’s something available for every niche.
With that in mind, let’s look at some top social media plugins for WordPress!
ActivityPub turns your WordPress website into a federated profile. It publishes your content to multiple platforms that support the Fediverse (Mastodon, among others). Followers will then see your blog posts in their feeds. The neat aspect is that your profile name is consistent across federated platforms.
Users follow you on the service of their choice and enjoy your content. It’s a great way to nurture an online community.
This plugin solves a longstanding problem for those posting to multiple social networks. It combines your Facebook, Instagram, Pinterest, and Twitter/X profiles into an attractive grid layout embedded on your site. It creates better awareness of your profiles and ensures users won’t miss anything.
AddToAny is a longtime favorite that makes it easy for visitors to share your content. It works with every social platform you can imagine – there’s also an option to share via email. In addition, you can customize the design and location of the plugin’s sharing UI. This plugin is perfect for taking full control of social sharing.
Open Graph is a protocol for sharing rich content on social platforms like Facebook and Twitter/X. This plugin allows you to customize the Open Graph tags generated by your content.
Thus, content looks how you want when embedded into social media. The plugin works with all WordPress content and integrates with WooCommerce, Yoast SEO, and others.
Posting links to your content across multiple platforms is a pain. Blog2Social makes it easier by automating the process.
The free version works with Bluesky, Facebook, LinkedIn, Threads, and more. There’s also an add-on that works with Twitter/X and a premium version with advanced features. It turns a tedious task into a piece of cake.
WP Social is a suite of tools for adding social media to your WordPress website. First, you’ll find sharing buttons that work with a selection of social platforms. You can customize the layout and services displayed.
A social counter shows how many times your content was shared on a particular service. Lastly, a social login/registration function lets users create an account using one of nine compatible services (Facebook, GitHub, Google, etc.). It may be the only social plugin you need.
You can use Jetpack Social to automate content sharing and increase engagement. Share posts and WooCommerce products automatically and use the included scheduling tools to choose the perfect timing.
The plugin integrates with multiple services and adds helpful tools to the Block Editor. If you have a Jetpack Social plan, you’ll have access to the social image generator feature.
Here’s a plugin that helps spread the word about your WooCommerce products. It adds a custom set of social sharing icons to individual product pages.
Here are options for icon placement, shape, and order. There’s also a handy “copy to clipboard” option so users can grab your product’s URL. The pro version includes a “floating” icon bar, tooltips, and more.
Video creators will love Feeds for YouTube. It’s a tool for easily embedding a YouTube channel into your WordPress website. You can customize the look of your feed and even display multiple feeds.
The plugin will check for new videos hourly (or choose a custom interval), so your site will always show the latest content. The Pro version adds compatibility with live broadcasts via the YouTube Live API.
Use AdTribes to expand the reach of your WooCommerce store. The plugin creates product feeds that integrate with services like Facebook and Google. Filtering options let you choose which products and what product data is included in your feed. Now, customers can view your products right from their social feeds.
Seamlessly Add Social Media to WordPress
Integrating social media into your website has real benefits. For example, embedding a feed adds dynamic content and builds awareness. Even better is that feeds are relatively simple to set up. From there, it’s smooth sailing.
The other big benefit is the opportunity to add functionality. Social logins make it easier for users to register for your site. And product feeds entice users to visit your online shop.
The idea is to reach people where they are. The options above (and the untold number of other social plugins) help you do so. The possibilities are almost limitless.
Social Media WordPress Plugin FAQs
What Are Social Media Plugins for WordPress?
They’re plugins that allow you to connect your WordPress site with various social media platforms. They offer sharing buttons, auto-posting to social media, and allowing you to display your social feeds on your site.
Who Should Use Social Media Plugins?
They’re perfect for website owners who want to improve their social media presence, like bloggers, businesses, and online retailers, or anyone looking to increase their site’s engagement through social media.
Can Social Media Plugins Help in Growing My Site’s Audience?
Yes, by making sharing effortless and displaying your social activity, these plugins can attract more visitors and encourage them to interact with your content.
More Essential Free WordPress Plugins
Related Topics
#ADD#add-on#API#awareness#Blog#buttons#Cake#channel#clipboard#Community#content#creators#data#Design#display#easy#email#Essential WordPress Plugins#Facebook#Features#free plugins#Full#functions#generator#github#Google#Graph#grid#hourly#how
0 notes
Text
How To Use Figma For Web Design
What is Figma?
Figma is a robust web design platform developed for use, with the major objective of designing user interface (UI) and user experience for applications. It allows designers to design and share products, prototypes, and design systems on the web in a collaborative and accessible manner.

The functions of Figma such as real-time team collaborative editing, prototyping, and developer handover phases play a significance in enabling success for teams. It allows vector designing and the use of design systems and libraries which helps maintain design consistency across several projects.
The nature of the application enables the use of Figma by teams irrespective of their geographical location and on any device with the internet, hence allowing for feedback in the design process and eliminating the need to keep several copies of the design file. It is widely used in product designing, designing mobile and web applications, and even prototyping making it a multi-functional product to the designers, developers, and other people involved in the design process.
Figma in web design
Employing Figma in web design means optimization of its design and collaboration capabilities to build web layouts quickly and efficiently, test them, and improve where necessary. This is how it can be used effectively on web projects.
Plugins To Use Figma For Web Design
To simplify the design process activities and help maintain high standards of the design, many Figma plugins have been developed. These are:
Autoflow:
Unsplash:
Iconify:
Content Reel:
Blobs:
Figmotion:
Color Palettes:
Charts:
The utilization of the mentioned plugins can expand the scope of using Figma in web design with productive means of incorporating and adjusting images, icons, animations, and other elements of the design.
#https://digitalanivipracticeb.com/how-to-use-figma-for-web-design/#How To Use Figma For Web Design#What is Figma?#Figma in web design#Set Up a New Project:#Generate Layout Grids#Prototype and Test:#Plugins To Use Figma For Web Design#Frequently Ask Questions
0 notes
Text
youtube
【Adobe After Effects】 グリッドアニメーションを簡単に作ることができるスクリプト『gridRig』🛠️
地味なスクリプトですが、エフェクトのグリッドとは一味違った面白いアニメーションが作れる便利なツールです😆✨
無料で使えるのでぜひ一度お試しあれ🙌
『gridRig』を紹介した動画📹はこちら⬇⬇ https://youtu.be/Ismz30Muqws
#aftereffects#無料#フリー#gridRig#プラグイン#スクリプト#グリッド#グリッドライン#グリッドアニメーション#ae#機能#使い方#エフェクト#おすすめ#便利#動画編集#plugin#script#effect#grid#徹底解説#解説#adobe#adobeaftereffects#free#アフターエフェクツ#ネクスタ#nextist#Youtube
0 notes
Photo

New Post has been published on https://themesnulled.us/essential-grid-v1-5-2-wordpress-plugin/
Essential Grid v1.5.2 – WordPress Plugin
0 notes
Note
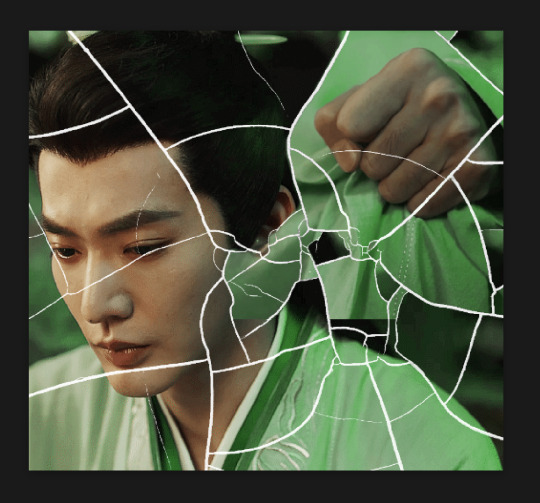
your gifsets are perfect, I'm always in awe of what you can do and you're creativity!!! Could you please explain how you made the broken glass gif with different gif in it on photopea? https://www.tumblr.com/dengswei/754916132337729536/userdramas-creator-bingo-green-asiandramanet?source=share and would it be possible to do something similar with other shapes? Thank you for your lovely creations <33
heyy thanks so much!! and of course! i have to admit the way i do it might be a little bit tedious compared to like everyone else (though i don't know how photoshop users or other photopea users might do it 🤣) okay this is gonna end up being so long because of the way i do it so i'm sorry about that and i hope it makes sense 😭
okay i have to admit i couldn't find the texture i've seen people use for the shattered glass effect so i actually used a photopea default brush from this pack
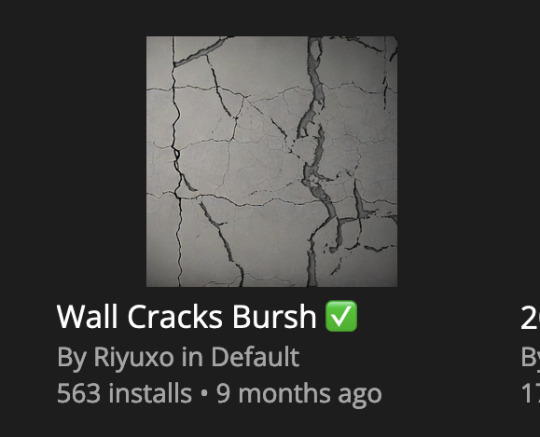
to download the brush set go to window -> plugins -> brush and then search for wall cracks brush (it's literally the only wall related brush set in photopea so it'll show up the moment you download it)
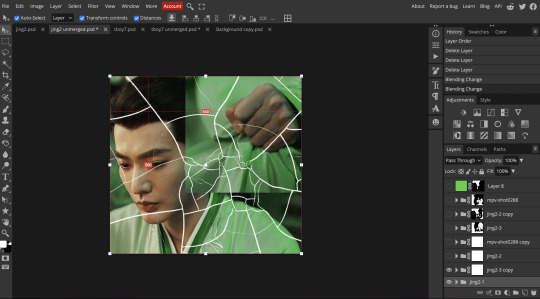
so for the gif i did above i did my giffing the usual way of creating & colouring for different gifs seperatly and then adding them all to one project (it doesn't have to be 4 gifs i just chose 4 because that's what i wanted to show in this gif)
i've done this twice once for this set and another time for this the blood of youth set and i have to say the most important part of this is keep multiple versions of the brush in the position you want as you can so once you've used it to test it out and you like that version keep it because unless you can manage to position the brush in the exact same place every time you're gonna need to reference those (or even use the magic wand tool for it later) and also you need to keep at least a white on black background version for the outline
in the brush pack the one i used was this one: (3564, crack b 9)
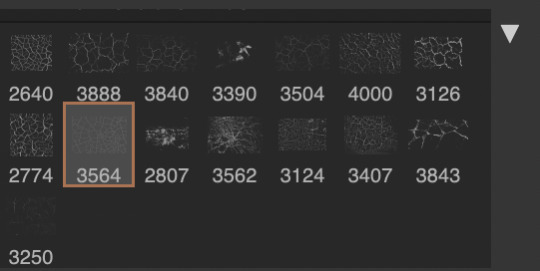
for this part i just say play around with both positioning and sizing of the brush, it automatically opens with the size 3000+ which is fine i think with the tushan jing one (the green gif above) i stuck with that size and just kept clicking around until i got the positioning i wanted (this is another reason why i said what i said in the paragraph above because if the brush size is bigger than 1000 it's doesn't come out in the exact positioning as you expect it too
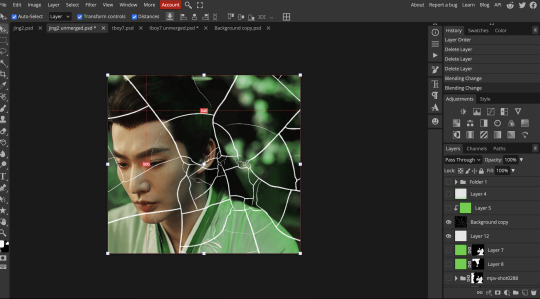
i decide the positioning of the gifs on the way i like the brick brush looking rather than the other way around, this is the positioning i went with if you're curious & would like to use it if that's easier 🤣

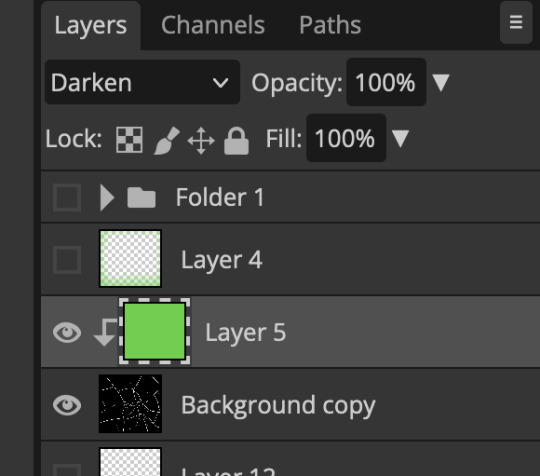
you'll need to keep this as a seperate layer at the top, i had it set to screen and then added a colour fill layer clipped on later so that i had the outline for when i was masking
so to start off i have the base gif which i do nothing to, that stays as it is, with the brush layer above set to screen
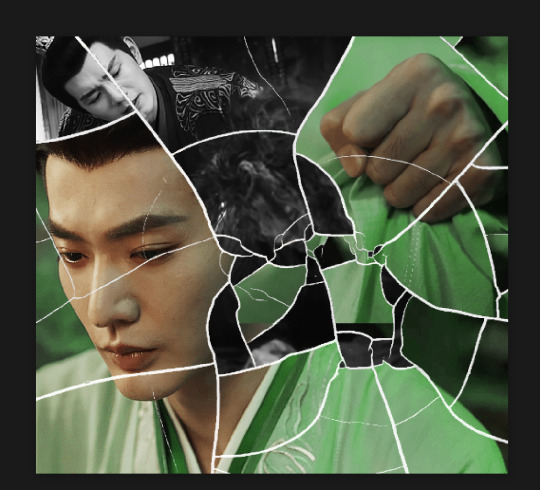
next is where you want to position your other gifs it may benefit to figure this out all at first before doing any of the masking so you know which parts you want to erase and which parts you want to keep
so this is what i decided with my positioning looking at where each of the cracks are
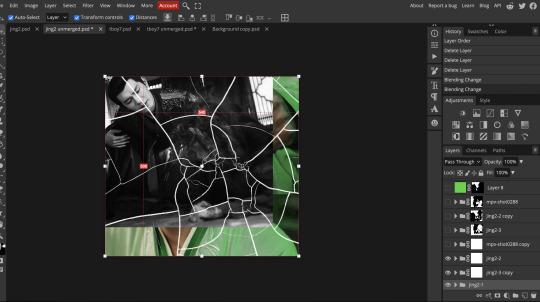
now comes the tedious part, in some ways the way i do this is a lot similar to how i do grid but it's not as easy (for grid photopea automatically locks onto the squares making it easier to mask, here you have to do it all manually)
first put a raster mask on all of the other gifs except for the base gif & use the magic wand tool on the brush layer so you get the outline of the brush and you mask that away from your gif (so if you turned off the brush layer it should look a little something like this: (it's not perfect but it won't matter that much because you should have the original turned on at the end anyway) (you don't have to do this step tbh i just did it because i thought it looked better)
so with the brush layer turned on you can use that as a template to which parts of the cracks you want to erase, you can either use the magic wand or the paint brush tool it really depends on how much of a perfectionist you are and whether or not the sharp edges bother you (plus some of the cracks have small openings so it might erase another part you don't want if you use the magic wand tool so it really is another instance of playing around and seeing what you like, and it might also change once you add the other gifs too)
so this is how it looks after i've done that (notice in the middle you can still see the edge of the gif? that won't matter because one of the other 2 gifs i still have yet to mask will cover that) & just repeat the same thing for the other gifs you want to add
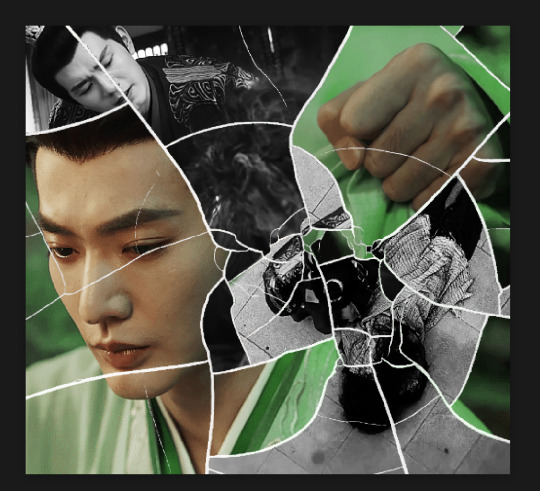
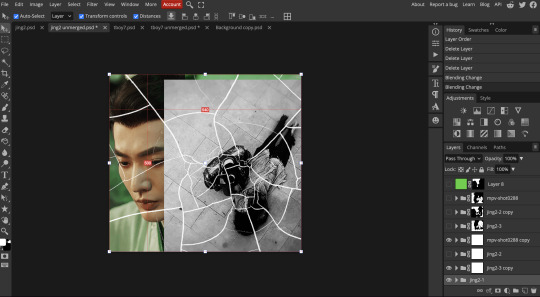
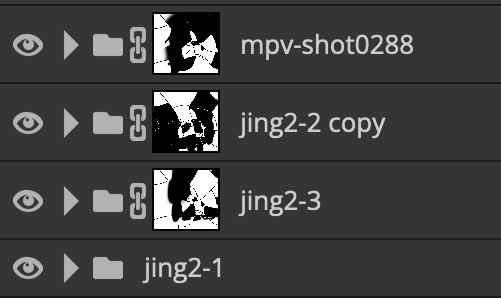
this is how my masking folders look if you're curious
& last but not least i added a green colour fill layer clipped to the brush layer and set that to darken to get the green effect (make sure that the brush layer is still set to screen)
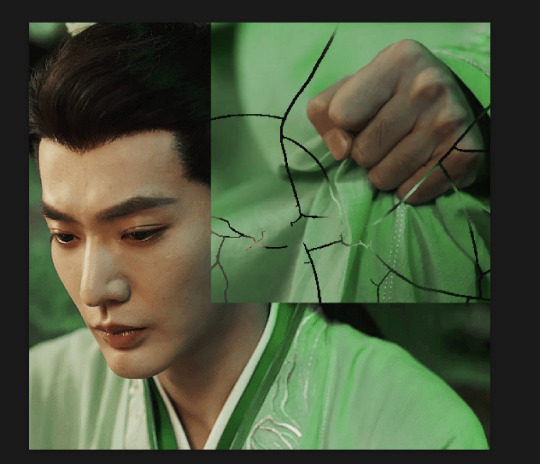
& once you've merged all of the gifs together you should get your desired outcome like the gif above (make sure that all the gifs have the same amount of frames too)
when it comes to other shapes i'm sure you can! like i did a tutorial with the grid version here, i guess it'll just be a lot of trial and error & finding a texture or brush with different shapes to try it out with kinda like how i did with both versions of this (i definitely did it a lot better this time around compared to the first version i did of this)
hopefully this wasn't too long or too confusing, if anything is please feel free to ask me again and i'll try and explain it a little better 🤣
#replies#Anonymous#photopeablr#usergif#tutorials#photopea tutorials#completeresources#mine | tutorials#gif tutorial#photopea#resources#gif resources#gifmakerresource#photopea tutorial#tutorial#gif tutorials
133 notes
·
View notes
Text
How to Add 3D Models to TS3
Required Applications:
Blender - https://www.blender.org/
TSRW - https://www.thesimsresource.com/workshop/
Milkshape & Plugins - https://sims3tutorialhub.tumblr.com/resources
NVIDIA Texture Tools, Photopea, or GIMP (or anything else that allows you to save an image as a .dds file)
Recommended:
S3PE - https://www.simlogical.com/ContentUploadsRemote/uploads/189/ - Used to make = object base game compatible and available in CAW
Sims3Multi Pack Extractor - https://modthesims.info/d/364038/delphy-s-sims-3-pack-multi-extracter-updated-5th-sept-2009.html - Used to convert a sims3pack into a package file
This will also require showtime, since the object we will be cloning will be from that pack. I'm not sure if there's a base game object with a light/illumination map that we can use. If you don't want the windows of the building(s) to light up or anything lighting up on whatever object you are adding then you can try and find a base game object to clone.
Step 1: Export .obj file from Blender
Step 2: Import .obj into Milkshape
Step 3: Rename object in Milkshape to group_0, then export file as .wso (in order to export it as a .wso, you need to have the TSRW plugins for Milkshape installed)
Step 4: Open TSRW - Create New Project - Choose Object
Step 5: Under The Sims 3 choose Uncategorized Objects under Object by Category. In the search bar, type in 'hill' and choose the 'Sign City Hill' object. Name your project (make sure to rename both project name and title)
Step 6: First, choose where you want your object to show in the catalog. I just choose decor (function category) and miscellaneous decor (function sub category). Go to the mesh tab and using the button of the box with the green arrow, import your .wso file. For the first pop-up click yes. For the second, click no.
Step 7: Under Group 0, click on the three dots beside 'material'. This is where you will import your textures. Before doing so, you must make sure the images are in .dds format. Simply add your image into any application that supports importing/exporting .dds files. I personally save with BC3/DXT5 compression and don't keep mipmaps. Some say to save the mipmaps, but because I use 2K textures it adds a lot more to the file to save them so I don't. Once you've got them in the correct format, import them into the object's materials. For the detail map I simply import a small blank white texture. The diffuse is the main color texture, the multiply map is the ambient occlusion map (if you do not have it, I'm pretty sure you can just add a blank white texture too), and the self illumination map is what allows part of the mesh to light up. If you do not want anything to light up you can just add a plain black texture. Click done and exit out once all textures are replaced.
Step 8: Click the drop down that reads 'high level of detail' and choose the shadow lod. Click on the blue arrows beside the import icon. A pop-up will show; check the box under medium detail and click ok. You will see that once you've done that, the object's shadow will change.
Step 9: Click file - save as and save .wrk file (just in case).
Step 10: Export to Sims3Pack
Extra - Make Object Base Game Compatible
1. Convert .sims3pack to .package using Sims3Multi Pack Extractor
2. Open S3PE and open package file you want to edit
3. Find OBJD tag and double click on it
4. Change group number to 0 and click ok.
5. Save package
Extra 2 - Make object appear in CAW
1. Open S3PE and open package file you want to edit
2. Find OBJD tag and highlight it by clicking on it once
3. At the very bottom of the window, click on 'Grid'
4. Click the arrow beside 'CommonBlock' to open the tab
5. Beside the version, change the C to E and click commit
6. Reopen the 'Grid' and go back into the 'CommonBlock' tab. If you scroll down, you will now see 'IsVisibleInWorldBuilder', change it from false to true.
7. Scroll down until you find 'BuildCategoryFlags'. Replace the number with 0x00008000.
8. Click commit and save the file.
Let me know if you have any questions! TSRW is very finicky and sometimes things can go wrong. There are some things that I may not know how to fix, but I will try my best to help.
50 notes
·
View notes
Text
SIMO tutorial in 4 steps


These outfit files could be used to dress NPCs with the help of a script mod such as @phoebejaysims's Boutique Mod
you need :
S3OC
S3PE and the Additional plugins "Grid" wrapper
SimOutfitter
85 notes
·
View notes
Text
Still the wildest find at the computer science section of the library:

same energy as this:

Computer science people fascinate me so much, what kind of things are going on inside the terminal?

(side note: this made me super excited about the next update of my saturation plugin)
The "software engineer to living off the grid in a cabin far away from society" pipeline needs to be studied:

What was the name of that former Gameloft employee again who now makes Instagram videos in a cabin in the middle of the woods?
#computer science#the death of the gods#the new global power grab#Carl Miller#book#library#IT#Azazel Darkthorn#using computers to kill god#books#Voxengo#god#Ben Rogerson#goose farmer#LinkedIn#Feng Yuan#Aleksey Vaneev#Gameloft#Gameloft Live#mathematics#software engineer#techcore#cybercore#webcore#computer#terminal#computercore#corecore#programmer#coding
37 notes
·
View notes
Text
You should get RPG Maker MV right now
Howdy.
If you have any inkling that at some point in the future you might want to try making something in RPG Maker (which I highly suggest! it’s fun!), then you should get RPG Maker MV right now while it’s on sale for just 6 bucks.
RPG Maker is doing one of its big sales that it does once or twice a year, and this time they’ve put RPG Maker MV on 93% off for some reason.
MV is really powerful, widely used, and has amazing community-made plugins to help you make all sorts of games. Not only can you make turn-based RPGs and narrative games, but if you’re willing to dip into plugins, you can make grid-based tactics RPGs, RPGs with real-time action elements, or even card RPGs and deckbuilders akin to Slay the Spire.
There’s some other great choices in the sale if you don’t want MV. If you’re willing to make something a little simpler, you can get their older engine RPG Maker VX Ace for free if you snag it before February 10th.
You can also get RPG Maker MZ, the major release that came after MV, for more than 60% off. This is the version I have the most experience with. It’s extremely similar to MV, so knowledge between MV and MZ is pretty interchangeable.
It looks like everything older than VX Ace is basically 90% off (I might buy them all just to have them lmao). You can also get their other game engine, Pixel Game Maker, on deep discount. That engine’s primarily for making action side scrollers, but I’ve never used it so I can’t attest to whether it’s easy to learn.
I’m a vocal advocate for RPG Maker because I think it’s really fun to use and easy to learn. It’s a great way to get into making games without having programming knowledge.
I have a guide up for how to make MV/MZ games feel more “your own” and less “default” over here, and I’ll probably make some other posts with tips for MV/MZ.
This has been your RPG Maker Deep Discount Public Service Announcement.
18 notes
·
View notes
Note
hi! Love your models alot and was wondering how you uv unwrap them so the pixel art in the texture look /like that/ I also want to incorporate pixel art into my models but the uv unwrapping part really trips me up 🙏
hihi ! yea UV unwrapping can be very tricky and methods vary a lot across model styles, but here's my process:
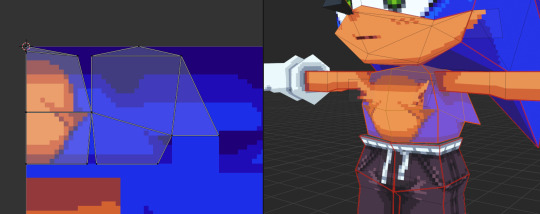
my models are fairly blocky, meaning that (most) shapes can be broken down into a few "sides". here I've used seams to split sonic's body into 4 sides, so i can then easily unwrap it and adjust the UVs. using seams is very very useful to speed up this process, and it keeps things clean.
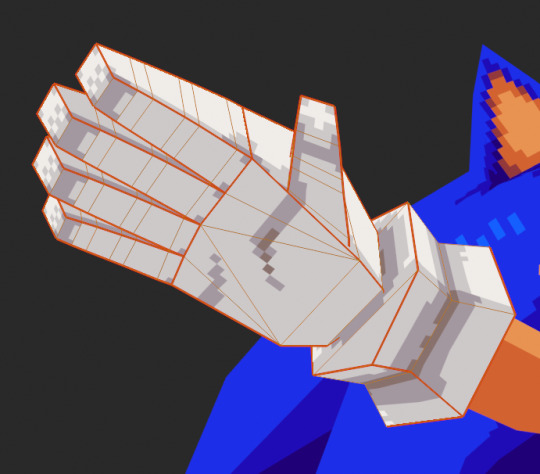
this can be seen very clearly in every character's hands ^ basically turning them into lil papercrafts!
with pixel-art textures specifically, there's a few things to watch for: when you unwrap, blender will sorta just orient the UVs however it wants, so it's important to adjust all your UVs to be upright (or just 90-degree aligned), otherwise you'll end up with diagonal pixels. personally, i have all my UVs snap to pixels (UV -> Snap to Pixels -> Corner) to easily align them and make measuring pixel sizes between UV islands much easier, we don't want mixels!!
^ everything lines up perfectly !
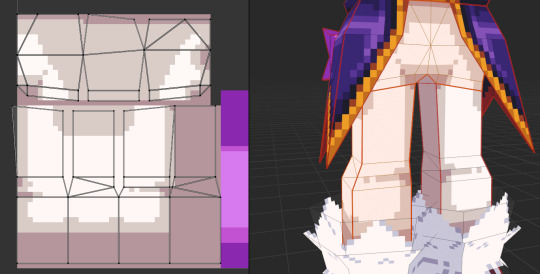
this method does mean that i fiddle with pretty much every polygon to avoid pixel distortion .. a wiser person than i might know a good solution to this pshgjkfd. i try to have a rough pixel size in mind while modelling each part of a model, so that the mesh cooperates well with the textures.
when i start unwrapping a model, i create + assign the texture that i'll use, and then fill it with a checker pattern. this helps a LOT to check for pixel sizes and distortion during the process. then i can just start building the texture on top of this as i go.
i HIGHHLY recommend using the Pribambase blender plugin if you have aseprite for making textures; it links the two programs to let you edit blender textures on the fly, easily make new pixel-art materials, and adjust the world grid to your pixel size. vere good .
101 notes
·
View notes
Text
#https://digitalanivipracticeb.com/how-to-use-figma-for-web-design/#How To Use Figma For Web Design#Figma in web design#Generate Layout Grids#Design Elements and Resources#Prototype and Test#Plugins To Use Figma For Web Design
0 notes
Text
【After Effects】グリッドラインを自由にコントロールできる無料スクリプト『gridRig』 『gridRig』はグリッドラインを作成して自由にコントロールすることができる無料スクリプトになります⬇︎⬇︎ https://nextist.net/after-effects-free-script-gridrig/
#aftereffects#無料#フリー#gridRig#プラグイン#スクリプト#グリッド#グリッドライン#グリッドアニメーション#ae#機能#使い方#エフェクト#おすすめ#便利#動画編集#plugin#script#effect#grid#徹底解説#解説#adobe#adobeaftereffects#free#アフターエフェクツ#ネクスタ#nextist
0 notes
Text

A sketch of Kane and Entity from Lovers Paranoia demo / @loversparanoia. I went through a bit of an emulator madness to play it on my phone (Android). Long story short, if JoiPlay doesn’t cooperate, consider MiceWine; long story long is under the cut. The irony of this happening because of a fictional tech guy is not lost on me.
At first I tried JoiPlay (an RPGM technically-not-emulator with a Ren’Py plugin) like a normal person but the way it handled prompts to press specific keys defeated me: JoiPlay’s virtual keyboard was completely ignored by the game, and the gamepad worked only for Ren’Py shortcuts no matter what I did.
Look up your device’s GPU. If it’s not an Adreno, mentally prepare for none of this to work.
I looked for another compatibility tool and chose MiceWine for now. If you, at your own discretion, decide to use it, here’s what you should do:
Download MiceWine and a RootFS file (you don’t need root access, the file is called that because it’s used to generate a base for OS files — root filesystem). I chose MiceWine v0.3.0 (according to Zerokimchi, v0.3.1 is broken) and MiceWine-RootFS-.feb3603.-aarch64.rat.
Install MiceWine and follow its instructions: allow it access to manage all files, select the RootFS file using the built in file manager. It should be in ‘D:/Download/’.
Download and unpack a Windows release of the game you wish to play! There is a good chance that your file manager can extract ZIP archives but if not, you can use something like ZArchiver.
Launch the game by selecting the EXE file through MiceWine’s file manager. A window with launch settings will pop up. Enable Wine Virtual Desktop! If you have an Adreno GPU, that should be it. If not, try changing the driver from Mesa Turnip Driver to Mesa Android Wrapper in the settings. Confirm the change and wait for about a minute.
It might not work on non-Adreno GPUs. You can try settings mentioned here (Mesa Android Wrapper (Rev 9) 24.2.5, DXVK 1.10.6-Sarek-Stripped-Requirements, and VKD3D 2.14.1 can be downloaded through Settings → Rat Package Downloader). People also mention toggling BOX64_MMAP32 (Settings → Box64 Preset Manager → ‘⋮’ → Edit).

If the game opens, hooray! By the way, you can use save files created in JoiPlay if you move them from ‘[game]/saves/’ to ‘[game]/game/saves/’.
Now to the key press prompts. Solution 1: Resize and move the game’s window (move cursor to the window’s boarder, tap and hold anywhere on the screen, then begin dragging) and open a virtual keyboard (swipe from the left side of the screen to right, select Open Keyboard in the menu).

Solution 2: Use a custom controller overlay.
Go to Settings → Virtual Controller Mapper, click on the ‘+’ icon at the bottom, and name your preset. After confirming, it will appear on the list.
Click ‘⋮’ next to the new preset and choose Edit from a drop down menu. An empty screen with a grid will appear.
Swipe from the left side of the screen to right (the same gesture as for opening a keyboard mid-game) and select Add button.
To edit any button, select it and click on a vague dark shape at the very top right, right in the corner. A window will pop up.
Select a key in Button Mapping. When an overlay is on, tapping on screen to continue no longer works, so I recommend adding ‘Enter’. For Lovers Paranoia specifically, the rest of the buttons should be ‘E’, ‘A’, ‘S’, ‘D’, ‘F’, and ‘Z’. Ask me how I know.

This is what mine looks like. It’s on Dropbox, just in case.
To use the controller in game, scroll down to Selected Virtual Controller Profile in launch settings, and choose yours. When you run the game again, do the left to right swipe, scroll down, and toggle Open/Close Overlay. Now you should be able to get through the quick time event!
Bonus: Sweet revenge after repeatedly dying in JoiPlay. It’s now my headcanon that we poke the Ommetaphobian to make it leave.

5 notes
·
View notes
Text
ok now i've reached a point where there isn't much left for the just planning/outlining phase of lemrana. like its time for THE ENGINE. planning AND testing. once rmmz goes on a sale and i get the grid battle plugin. Be Ready☝️
3 notes
·
View notes
Text
Melodi is my very first attempt at a walk cycle of any kind (and I had to make 8), pixel animation that doesn't already have a skeleton base (Bestia had a base made by NotYourSagi that I used as a foundation and then modified things to make them line up), and utilizing sprite sheets and plugin coding.
I am now fully able to start production on the game proper as well as begin making other character sprites, starting with Cybil and Eliah and then later moving to Eidilon, Mitsu, Clawven and Brandy.
I am also going to make pre-rendered pixel-art backgrounds for each area in the game. The game will not be using the regular RPG Maker format of grid-based tilesets. Everything's gonna be hand-drawn and hand-animated. Everything. Every cutscene, every character animation, every death sequence (yeah you can die in it), every interactable event (and a lot of dialogue choices) will have unique art attached to them, EVERYTHING.
Now y'all might be thinking, "Jay, what if you burn yourself out?"
Look what I made in the last week. I learned to make music, making songs for the game. I learned to do pixel animation and made an 8-directional 6-frame movement and idle animation spritesheet for character movement. I learned shortcuts in Photoshop and Aseprite to speed up the process dramatically. Everything I've done in just a week has made me so motivated and so excited that I don't see myself slowing this train down at all until there's a playable proof of concept demo out there for all to play.
For the most WIP and production updates, please consider joining the Melodi RPG official Discord!
38 notes
·
View notes
Text
i need everybody to do a spirit bomb with me of me working up the energy and enthusiasm to actually start doing something in gb studio https://grimmrobegames.itch.io/dungeoncrawlerplugin
5 notes
·
View notes