#delete duplicate files Google Drive
Explore tagged Tumblr posts
Visit Tumblr Blog
Explore Tumblr blogs with no restrictions, modern design and the best experience.
Last Seen Tumblr Blogs


Fun Fact
The total number of visits Tumblr.com received during January 2021 is 327 million.
Text
#remove duplicated file#Google Drive duplicates#delete duplicate files Google Drive#find duplicate files#clean Google Drive storage#Google Drive organization#cloud storage management#duplicate file finder#duplicate finder#double file finder#eliminate duplicate files#clean up duplicate files#best duplicate file finder#best duplicate finder#duplicate file remover mac#macbook duplicate file finder#scan for duplicate files
0 notes
Text
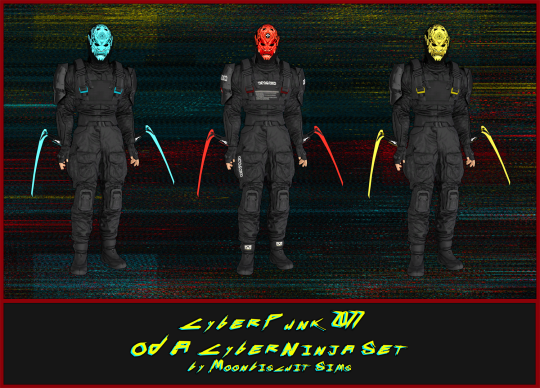
Cyberpunk 2077 - Oda Cyber-Ninja Set (Sims 4 cc)
This set includes the following Cyberpunk 2077 Conversions: 🐱👤 Oda's mask with light emission (hat category):
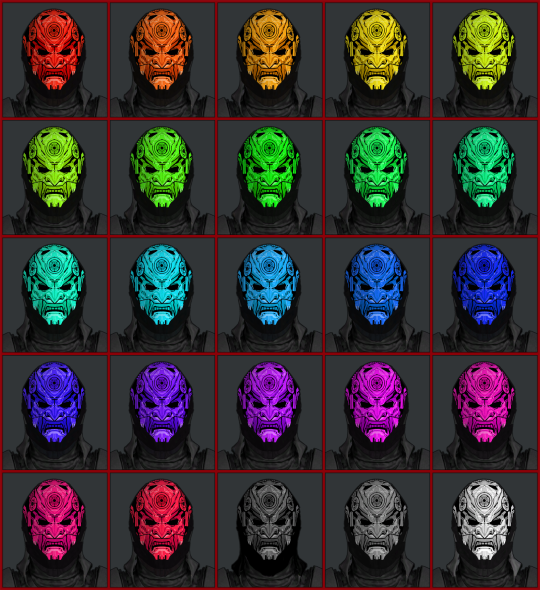

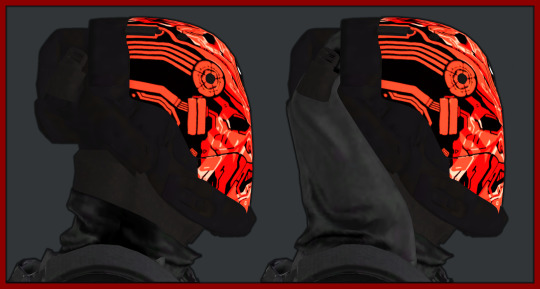
2 variations with and without hood. One is Oda's mask with Arasaka logo with glowing red emission. The other is a plain cyber-ninja mask with no logo and with white light emission in all colours (I couldn't have different coloured emissions in one package so chose white as neutral for the glow). The without hood one is for if you wanna use it with a different or no top, the hood one is only for the jacket version since it looks weird on its own.
🐱👤Oda's Outfit:
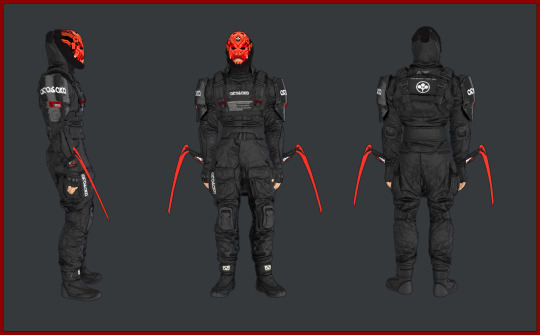
🐱👤Oda's Cyber-ninja jacket (jacket category):
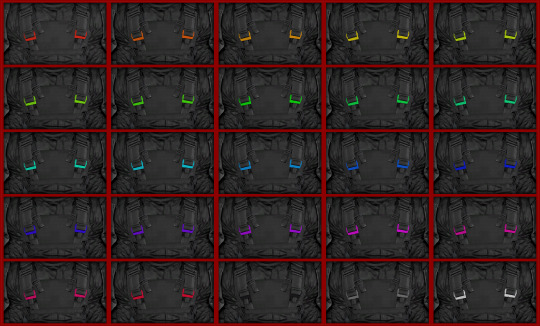
Includes a swatch with all the logos for Oda, and then a lot of plain no logo swatches with coloured buckle detail in all colours. 🐱👤Oda's Cyber-ninja pants + shoes (see above picture, pants category): 2 swatches, with logos and plain. The shoes are attached to the pants 🐱👤Addon recolour of @hamsterbellbelle 's mantis blades (left bracelet category)
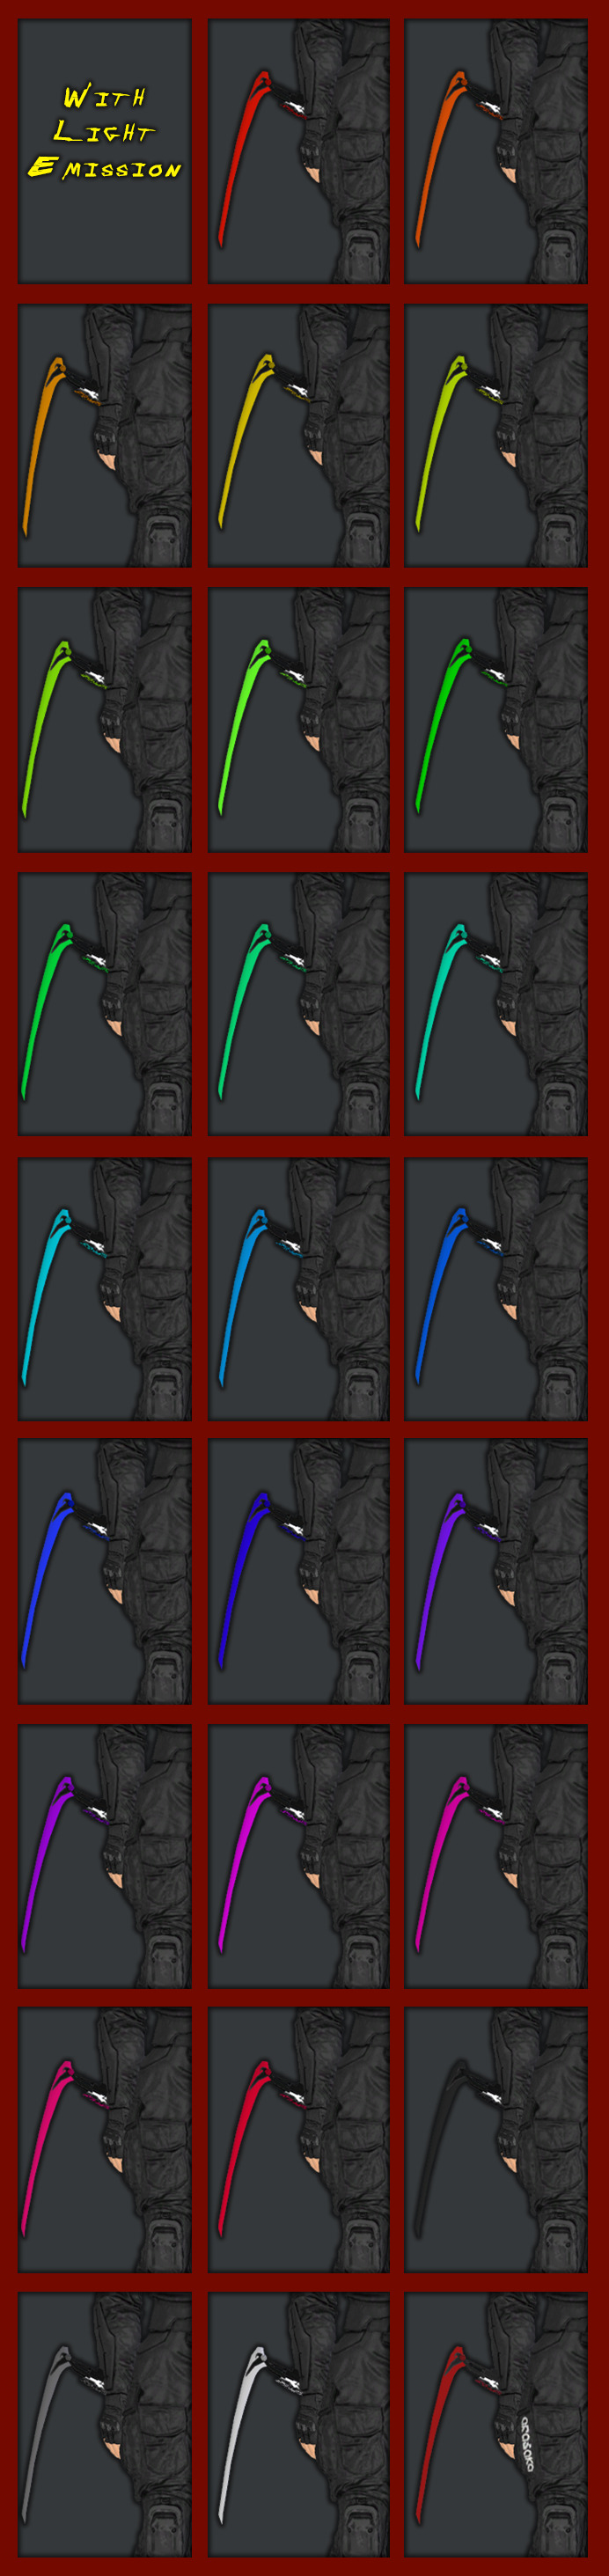
Oda's one has arasaka logo (you can't see with the jacket) glows red and all the colours that glow white, matching the mask and the jacket. The glows are synced. I got explicit permission by hamster to modify the uvs for some things (just so the arasaka logo on oda's one is not backwards lol), but I cloned their package/mesh, so please download the original too to not cause any issues like it missing. I don't know it it requires it or not since I made changes but thank you @hamsterbellbelle o(〃^▽^〃)o 🐱👤DOWNLOAD HAMSTERBELLBELLES BLADES
🐱👤Info, and Issues: -Has normal and specular maps. - Pants are a bit stretching weird between the legs, I couldn't fix it. You see it when sim separates the legs. I think I accidentally merged it somewhere during the process. Sorry - Blurry logos (not all just some). I didn't have any uv space left, and I don't know how to do transparent decal meshes for cas. So i just put them in the texture image and therefore they're a bit blurry on areas where the texture was small. - Textures are hq but I don't play with that mods so no idea if it made a difference. - HIGH POLY, especially the clothing and the jacket. Be mindful of use if you have a crusty laptop that struggles with sims 4 :( I tried my best to optimise the mesh but it is just a very complex outfit and that is after deleting tons of details and things. In my game it runs fine, so hopefully should be ok. - The hood version doesn't perfectly align with jacket where the fabric connected, since I made the hood a separate hat, but you can't tell much. - Cloned package for helmet from Battuu for emission to work, but it shouldn't require this pack since I imported all Lods and textures. I tested without the pack and it appears. However it won't appear if you use the filters, so just find it in the menu with no filters. Any issues or it doesn't show up pls tell me. - weird distortion on buckles on jacket, I tried fixing weights and such but couldn't fix this little bit, it's very small. - Don't forget mesh for the mantis blades and check out hamsters stuff :) one does not play cyberpunk on sims without it 🐱👤PLEASE READ AND RESPECT MY CC TERMS OF USE: - DO NOT REUPLOAD - DO NOT PUT BEHIND PAYWALL OF ANY KIND - DO NOT INCLUDE CC IN ANY DOWNLOADS (link to my download) - DONT CLAIM YOU MADE IT 🐱👤If you would like to consider supporting my work, you can donate to my PATREON , all content is free, but donating would really help me create more

🐱👤DOWNLOAD GOOGLE DRIVE 🐱👤DOWNLOAD PATREON There's a merged file, don't download both merged and separated or you'll have duplicates.
‼‼‼AND REMEMBER!!!! WATCH THE DISTANCE; HE WILL SLICE YOU LIKE FISH!!! 🍣YOU WILL BRING DEATH TO YOUR DOOR 🐱👤 🐱👤 🐱👤
#moonbiscuitsims#moonbiscuitsims4#moonbiscuitsimscc#moonbiscuitsimscyberpunk#moonbiscuitsimscas#the sims 4#ts4#sims 4#ts4 simblr#cyberpunk#cyberpunk 2077#sims 4 cyberpunk#sims 4 cyberpunk cc#cyberpunk sims#sandayu oda#cyberpunk oda#oda cyberpunk#cyberninja#cp2077#cyberpunk2077#cp77
52 notes
·
View notes
Text

i finally hit 1k!!! (no thanks to tumblr glitching my follower count) i'm really glad so many people like the little images i make☺️ to say thank you i prepared a little something! i've put together all the overlays i have downloaded that i use in my gfx as well as the fonts i've collected over the past couple years (and an updated giffing "tutorial"!) love u all hope november is kind to you<33
for starters here is the mega folder with all of my fonts and pngs! below is my semi-updated giffing process along with some of my actions<3
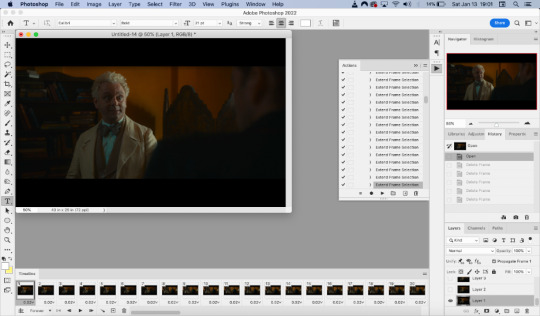
my process is pretty much the same as my old tutorial but now i've changed how i export gifs! my basic process is outlined in the gif below and and i've added 3 of my actions i use almost every time i gif in this google drive! (explanations below) :]

so after i know what clip i want, i put it into vapoursynth (download tutorial) and once that's saved i screencap it. what i do for screencapping is open the mov in mplayer osx extended and hold down shift+command+s but i know there's way easier ways to do it that i haven't figured out yet lol (tutorial i just found here)
once the screencaps are all on my desktop i delete any extras on either end of the clip i want and put them in a folder just so it's easier to load them in to photoshop. to do that, on the home page of photoshop go to file -> scripts -> load files into stack, then from that menu browse -> select all the screencaps you want to use for the gif and click open then ok
after they're all loaded into photoshop this is where i use my first action which just shortcuts all the way to the sharpening being done. once that's done i go to image -> mode -> 16 bits/contrast. this can help if the background is super pixely or anything like that. then i mess around with sharpening if i feel like it's too much. usually i'll change the opacity of the second sharpen layer to 50 and/or change the settings of the first sharpen layer like 200 to 150 or 0.3 to 0.2, whatever i feel like looks best. something i've also learned over the years is that sometimes you let noise do the heavy lifting and don't worry about making it look too sharp. if the gif is still a little bit unsharpened (?), the noise will make it look fine
then i do coloring which is the fun part! like i said, my process is more or less the same as my old tutorial so i'll just skip over that part and if you want more details feel free to check that one out. once i'm done with that i combine it all to a smart object, add noise (usually 1-1.5 these days), and then use my second action!
after the second action does its thing, i select all frames and set the rate. i usually set it to 0.04 for youtube videos and 0.02 or 0.03 for ts files. then, because vs leaves me with duplicate frames, i run my action for duplicates which selects all of the unwanted frames and then go to the hamburger menu just above the timeline -> delete frames. then it's ready to be saved!
#i tried to find a tutorial for how to put actions in ps but i couldn't find one sorry ㅠㅠ#pls do send me an ask or tell me in a rb if there's anything unclear or if you have any issues with anything!#*tutorials#resources#gif resources#gfx resources
21 notes
·
View notes
Text
GIF Tutorial
This is going to be a long post, so I'm going to place the majority of it under the cut.
Disclaimer - There are many ways to make gifs, and this is just one way to make them - it's the process that I have figured out works best for me. I am in no way claiming that this is the "definitive" or "best" way to make gifs. There are probably other, better ways to do things, but because people have asked how I do it, I am sharing my process.
Introduction I use a Mac. I am assuming most of this will also be applicable to those of you using Windows as well. This tutorial is divided into three parts. Here is a video of the following process as well: https://www.youtube.com/watch?v=lBRbWC-iMOM
Actions I use three Actions, that you can download here through my Google drive, if you want. A tutorial for how to install Actions in Photoshop can be found here.
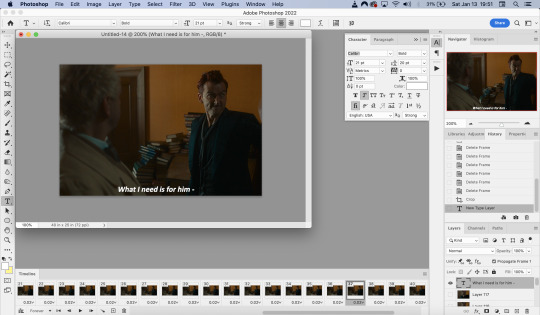
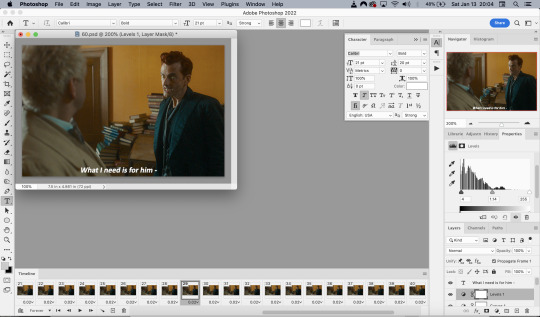
Photoshop Layout I use Photoshop CC, but I used Photoshop CS5 for years, got used to it, so when I upgraded to CC, I arranged it to resemble what I was used to.
I have the following windows open:
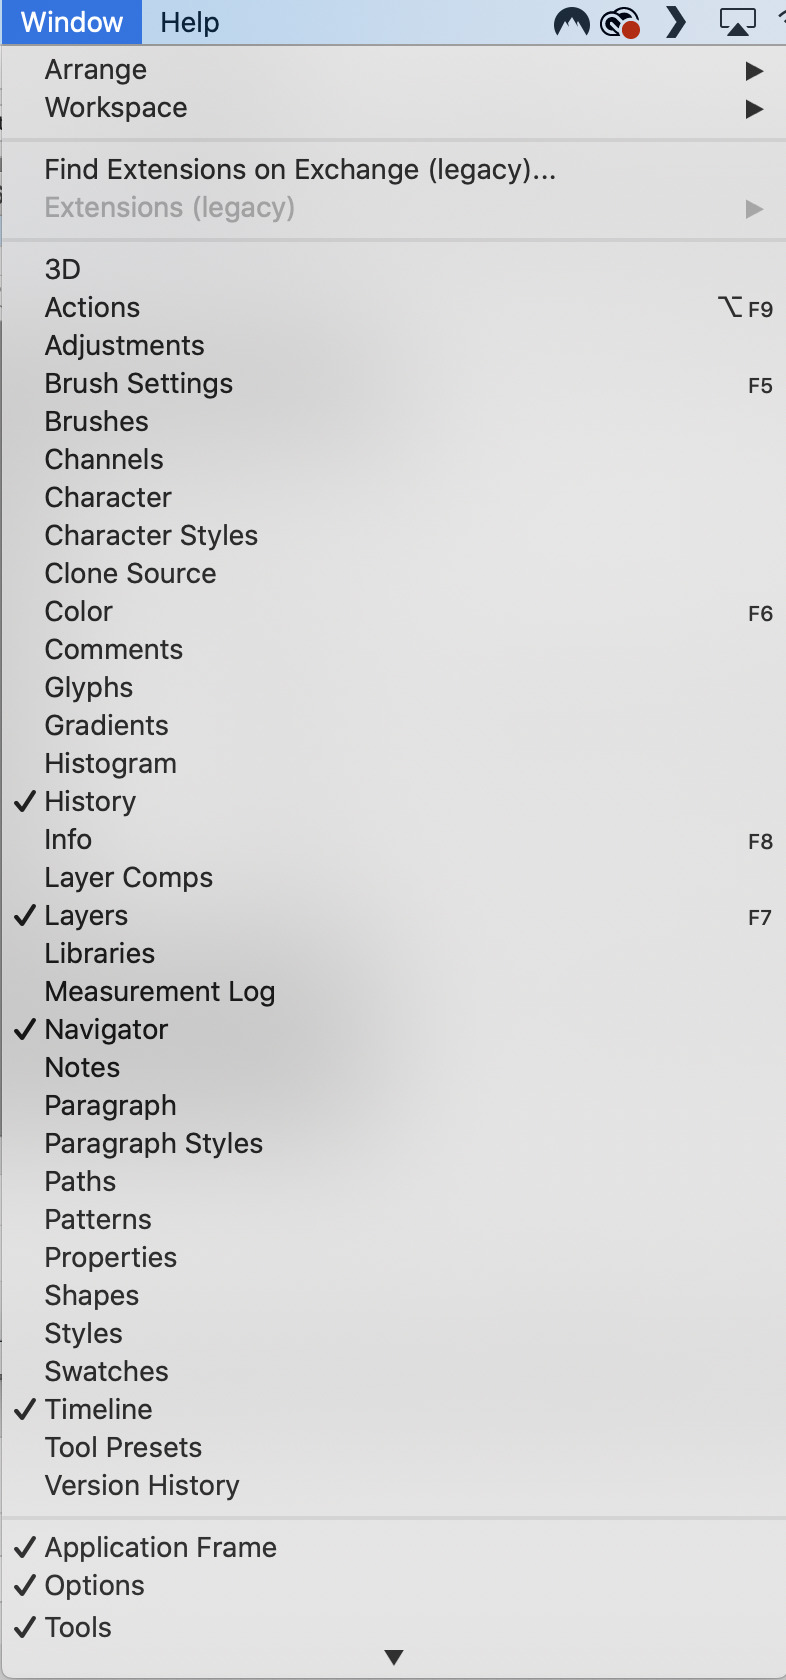
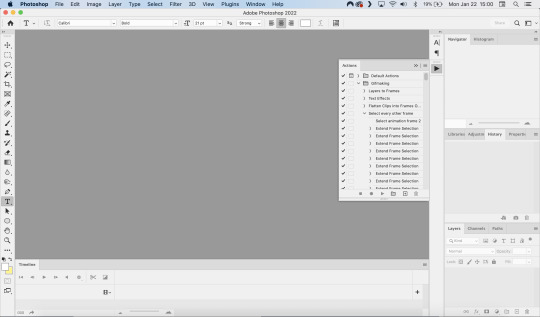
And they are arranged like this:
PART ONE - CLIPPING Part 1 consists of using a screen recorder (i.e., Quicktime) to make short clips of scenes or parts of a scene that you want to make gifs of. I have a Mac, so Quicktime is what I use. For Windows users, I’m sure there are equivalent alternatives that are just as good. Years ago, when I was first starting to make gifs, I frequently heard people refer to KMPlayer as what they used, so that might still be a good option for you if you are a Windows user. The most important part is that it takes high-quality recordings, with as little detail and quality loss as possible.
With this screen recording method, you can make screen recordings of video files that are stored locally on your computer (I use VLC to play videos), or streaming on sites like YouTube, Amazon Prime, Hulu, Disney+, HBO, etc. No downloading of the video is necessary. For some of those websites, if you have trouble with getting it to work, you may have to disable your browser’s hardware acceleration. This process is described here (https://www.theverge.com/23715928/netflix-amazon-prime-screenshot-mac-windows-how-to).
I record the clips with sound, to make it easier to transcribe/write out the dialogue in Photoshop later. When I have recorded all the clips I want, I put the clips into my folder where I store all my clips, and into another folder that is labelled with the episode number so I can remember where each clip came from in order to properly label them later when the time comes to upload them to Tumblr.
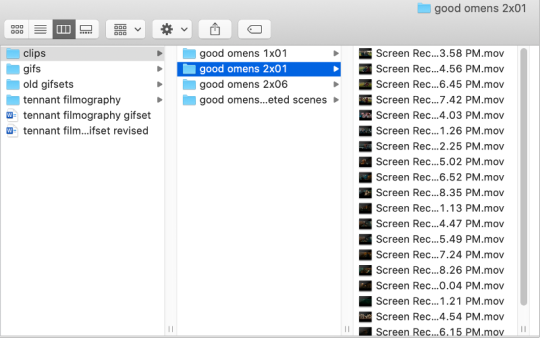
Example: A folder containing clips from Good Omens 2x01
PART TWO: EXTRACTING/MAKING GIFS FROM THE CLIPS
Open video file in Photoshop To do this, click on File > Import > Video Frames to Layers
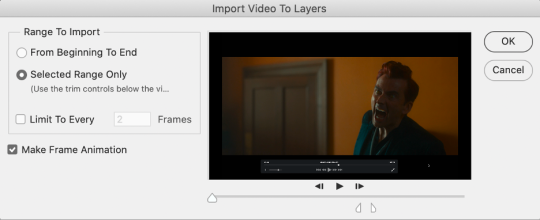
Use the markers to select roughly where you want the gif to begin and end.
With videos that have been clipped with Quicktime (not sure about other programs), the vast majority of the time there are twice as many frames as needed – every other frame is a duplicate. For a smaller gif size and smoother playback, I delete every other frame in the timeline box at the bottom of the screen. I used to do this manually (very time consuming), but now do it with the use of an action that I created that will automatically select every other frame. Downloads and installation instructions for all the actions I use are available above.
To use an action, click on the title of the action, then click the play button at the bottom of the window.
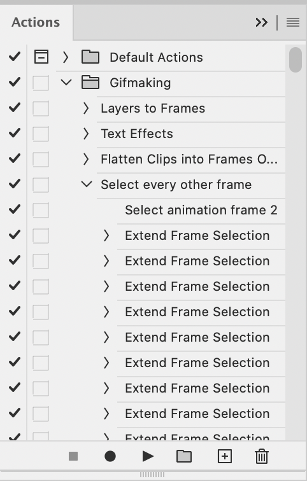
I often get an error message that says “The command ‘Extend Frame Selection’ is not currently available”, but it still works. Just click “stop” and every other frame will be selected.

Click the trash can icon in the timeline window to delete the selected frames.
At this point, you will have half as many frames in your timeline as you did before. You will also likely have extra frames at both the beginning and end of the timeline that you don’t want to be part of the gif – from the previous shot, for example. You can delete those now.
This next step is optional: There will still be some duplicate frames in the timeline that were not deleted earlier. It is not strictly necessary to delete these, and I see many gifmakers who don’t get rid of them. It’s usually not all that noticeable. However, because I’m a bit of a perfectionist, I always go through the timeline frame-by-frame and delete each duplicate. This ultimately will reduce the gif’s file size and make the movement in the gif appear much smoother. I usually find that every fourth or fifth frame is a duplicate. Unfortunately, it’s not always consistent, so using an automated action would not work to make this process go faster.
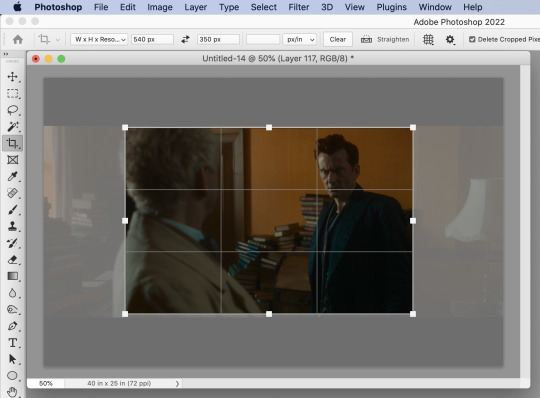
Cropping Once this part is complete, I select the crop tool. I usually make my gifs 540px wide by 350px high. You can change the height to whatever you want, but Tumblr’s max width is 540px. I find the aspect ratio of 540x350px usually allows gifs to feel large, while at the same time not cutting off too much of the sides. Depending on the type of gif I’m making I may adjust this, but generally, if I’m giffing a scene from a TV show or movie, I stick with my standard 540x350px dimensions.
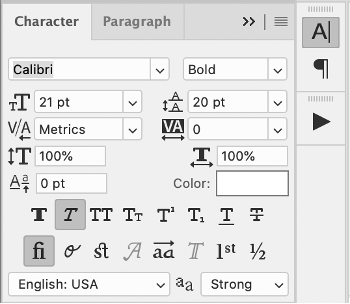
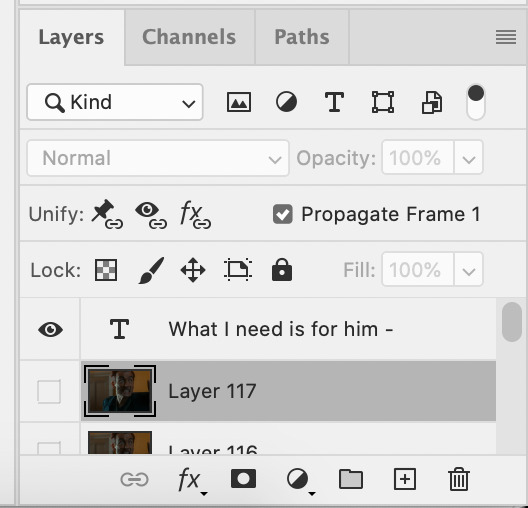
Adding Text Next, I add text. Select the text icon. In the layers window, make sure the top layer is selected, otherwise the text will not show up when you start typing.
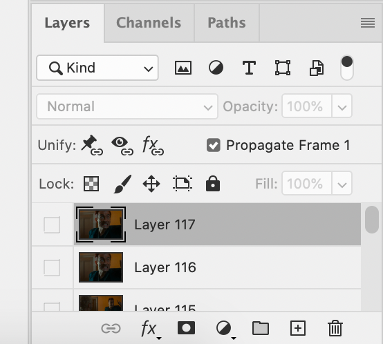
The top layer is selected
These are the font settings I currently use:
If I am just making one gifset, or one or two gifs, I’ll go straight on to the next steps. However, if I’m making a large amount of gifs, I save the gif right now, close out of it, and repeat the steps in this section for the next gifs, so I eventually have an entire folder of “raw” unedited photoshop files that have been cropped and captioned, and just need to be colored, have text effects added, and be sharpened. For me personally, I find I make gifs more efficiently by doing it in this “batch” style process.
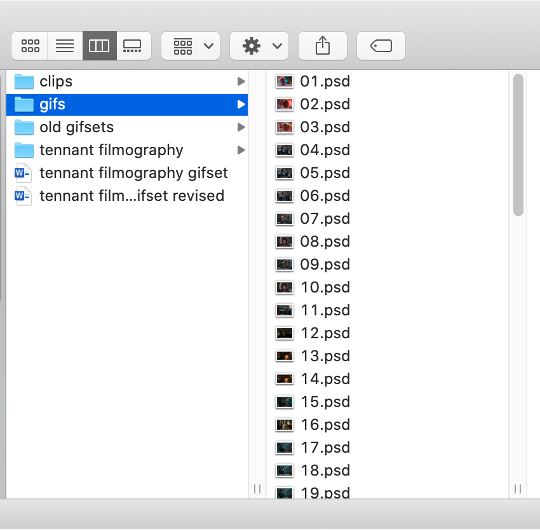
All cropped and unedited gifs (psd files)
PART 3: COLORING, EFFECTS, & SHARPENING
Coloring I do plan on making a separate tutorial on this at some point, but will include a brief summary here. When it comes to coloring, I generally tend to go by a “less is more” attitude. I am not by any means great at coloring, but nonetheless I’ll explain the types of adjustment layers I typically use.
Note: Before making any adjustments, make sure you have the layer directly underneath the text layer selected, as shown in the screencap below, otherwise it will also apply those adjustments to the text, which makes it look weird.
I start with a Curves layer to change the overall brightness/contrast, then a Levels layer to adjust the shadows and highlights, and then a Brightness/Contrast layer to do some final minor tweaks. The only time I ever reuse gif coloring is when they are from the same scene with the same colors, lighting, backgrounds, etc. Every other time, I tailor the adjustment layers to the specific gif.
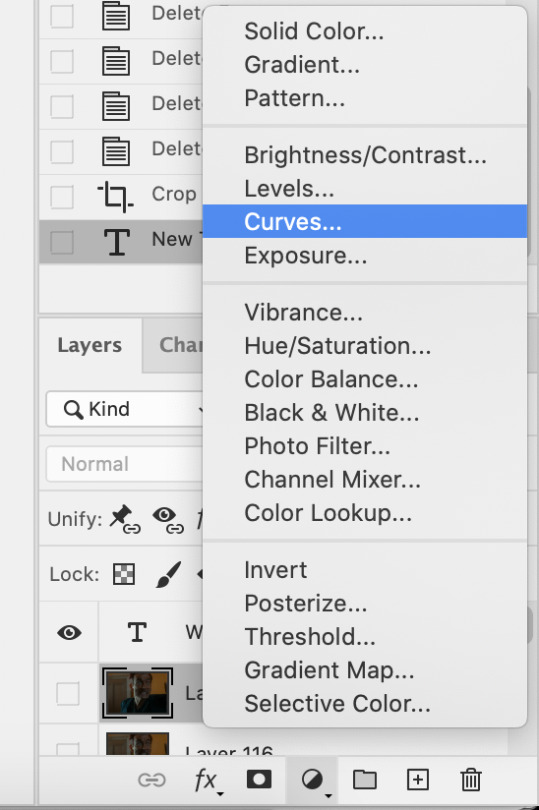
You can add adjustment layers by clicking the half light/dark circle on the bottom of the Layers window.
How the gif looks with both a Curves layer and Levels layer
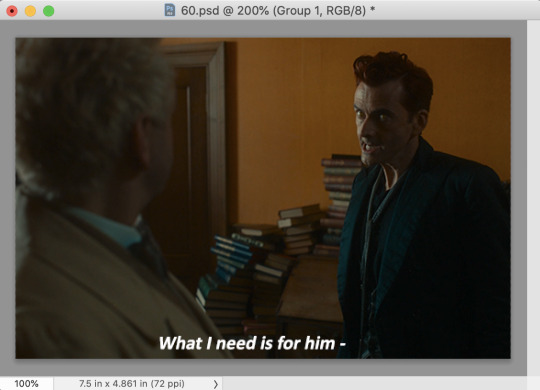
Before adding the adjustment layers
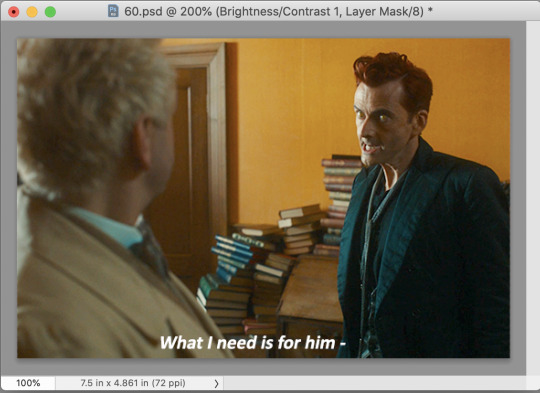
After adding the adjustment layers
A lot of the time, I'll just stick to adjusting the lighting. However, if the colors look gross, or if they are over/undersaturated, I’ll add a Color Balance layer and play around with the settings on that, or use a Hue/Saturation layer and increase/decrease the saturation of specific color channels. It really depends on what you’re going for, and what you think looks good. There is no one “right” way to color a gif.
Text Effects If you are using the Actions I included in the download, you can just run the "Text Effects" action with the text layer selected, and it will do the following automatically. If not, you can do it manually by doing the following.
Right click on the text layer in the Layers window and click on Blending Options.
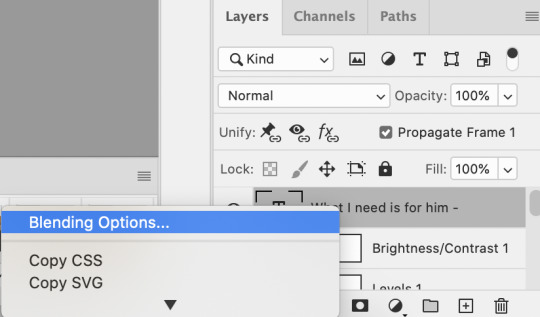
I use a stroke and drop-shadow on my gifs. Here are the settings I use.
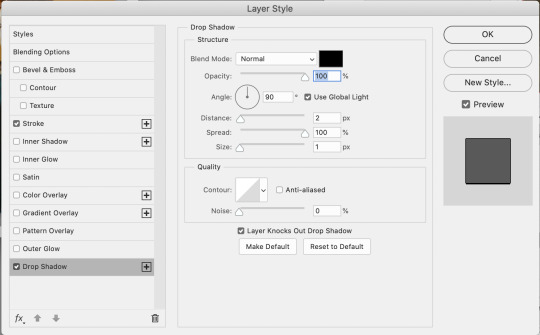
Drop Shadow settings
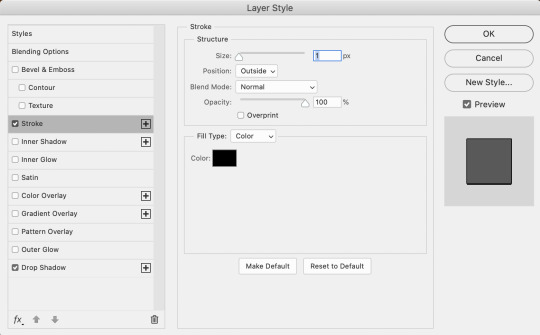
Stroke settings
Next, to center the text, click on the text layer. With the text layer selected on the Layers window, Select All by clicking ctrl+a (Windows) or command+a (Mac). Then click on the "Align horizontal centers" icon in the “Move tool” option menu.
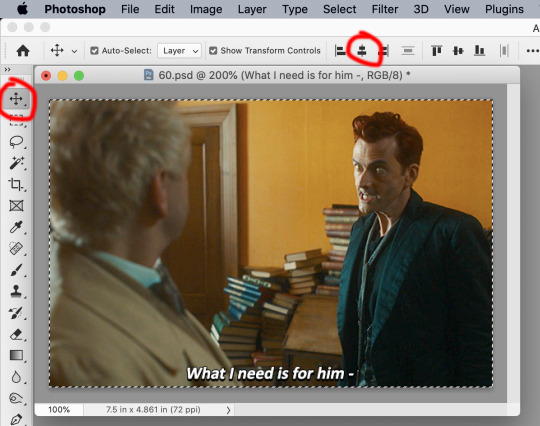
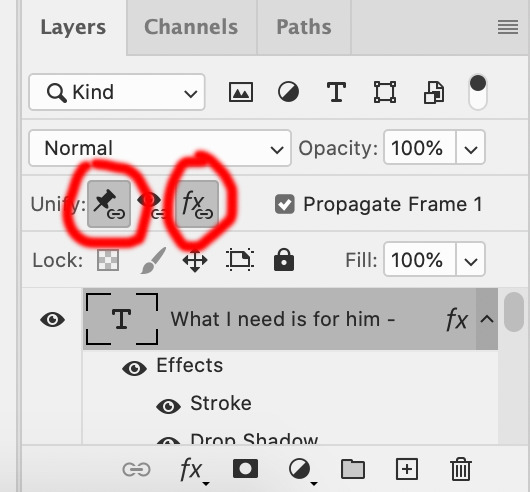
Important – in the Layers menu, make sure the buttons “Unify layer position” and “unify layer effects” are clicked an enabled for the text layer.
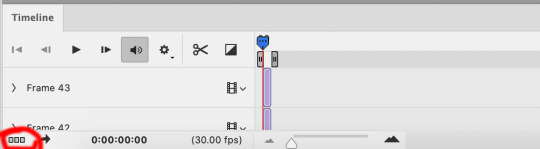
Sharpening Select all the frames in the Timeline window. Then in the lower left-hand corner click “convert to video timeline.”

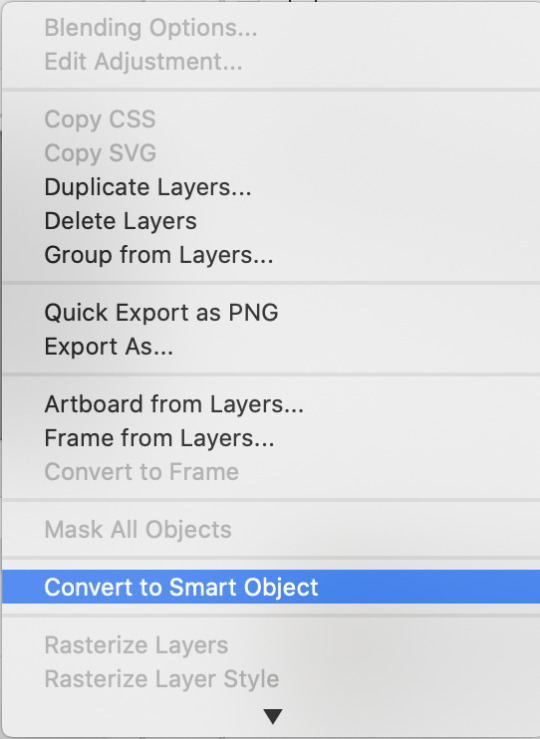
In the Layers window, select all of the frame layers (do not include the text layer or adjustment/coloring layers in the selection) and right click on it. Select “Convert to smart object.”
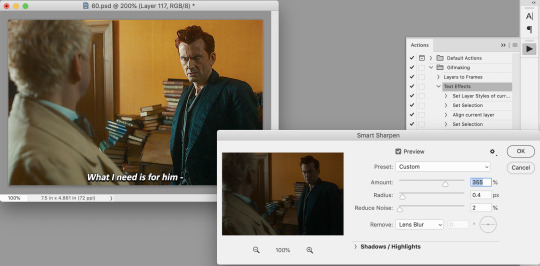
Select Filter > Sharpen > Smart Sharpen. In the same way that coloring can differ depending on the gif, the ideal settings for sharpening can also differ from gif-to-gif. It can really depend on the quality of the source of the gif, like whether it’s HD or not. These are the settings I’m using for the current gif:
If you are using Actions, you can run the "Layers to Frames" Action. If not, do the following:
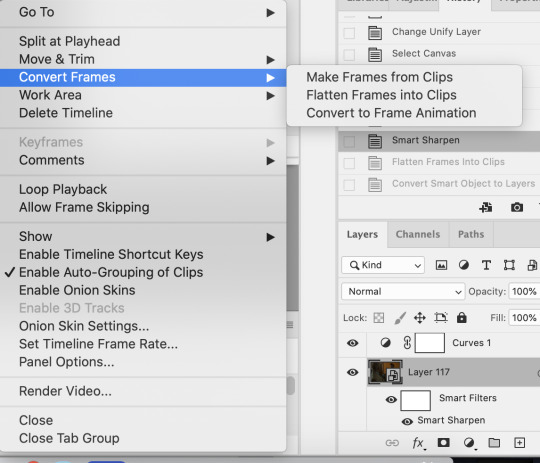
Click on the button circled in red
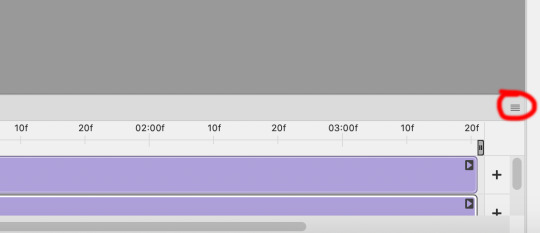
It will open up this menu. Click on "Flatten frames into clips"
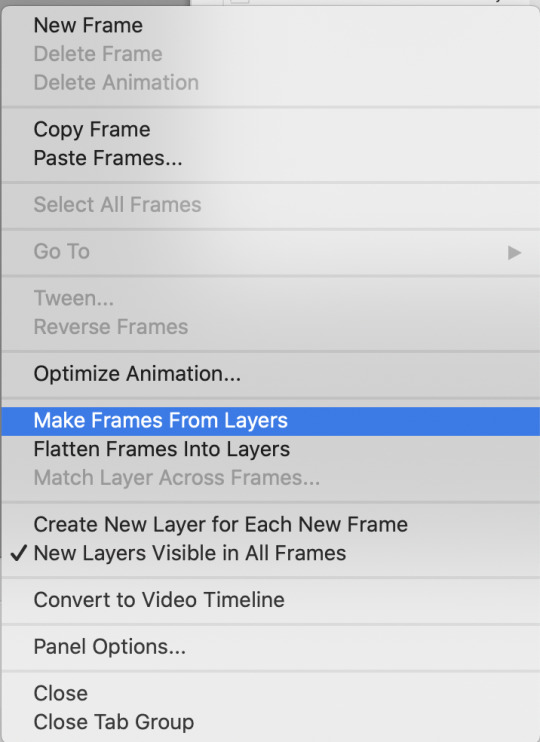
Click the button circled in red, then click "Make frames from layers"
Delete the first couple of "junk" frames
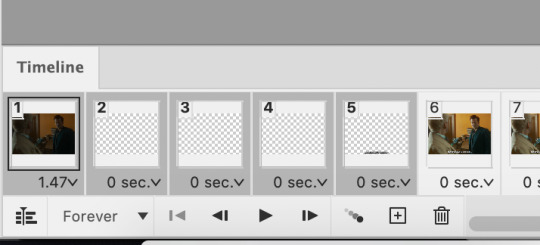
Select all of the frames. Right click on the "0 sec." to change the frame rate. I usually use 0.05, but it might depend on the gif itself.
Exporting Click on File > Export > Save for Web (Legacy)
I cannot add another screencap because I've reached Tumblr's max for this post, but here are the settings I use: Selective Diffusion 256 Colors Dither 100%
You may find that when you try to export your gif, the file size is too big. Tumblr’s gif file size limit is 10mb – try to make it under that – even anywhere in the 9.9mb range. As long as it’s under 10mb, it should work.
To get gifs that are too large to fit under the limit, I usually end up deleting frames from the beginning or end of the gif. If you’re using the 540x350px dimensions, I typically find that the average number of frames I can fit into one gif is between 80-90. Depending on the colors in the gif, it’s sometimes more, sometimes less.
73 notes
·
View notes
Note
After I deleted a bunch of projects (thankfully non-critical, though representing a great deal of work in total) during a recent fresh OS install, I realized that my backup practices are practically non-existent. Any tips or sources on getting started making, and eventually automating, effective backups?
I am stealing the concept here from jwz's backup guide, but I am recommending different tools, focusing on personal files only, and also addressing Windows. jwz's guide is a good reference:
Doing a way, way better job than most people of backing up one single system is very easy. Let us begin.
The most basic step of having decent backups is getting your hands on two external hard drives at least big enough to hold your entire system, and putting a label on them that says "BACKUP ONLY DO NOT USE FOR ANYTHING ELSE I AM BEING FOR REAL HERE"
Once you've got those, plug one into your system wherever it spends the most time. If you have a desktop then that's solved, if it's a laptop hopefully you already have a USB hub you plug it into when you sit down to work or whatever and you can just leave it there.
Now set up regular scheduled backups to that device. On Windows and Mac, there's a built in tool for backing up your system to an external drive. We'll assume that you just want to back up your user files on Windows and Linux, since doing full system backups isn't tricky but is kind of unnecessary.
(Ugh. Windows seems to be trying to phase out Windows Backup and Restore in favour of their File History thing. That's annoying, let me log in to windows and check how this actually works. Mac in the meantime)
Mac has Time Machine. Time Machine is extremely good, and you can tell Time Machine to save its backups to a disk. Point Time Machine at your external hard drive and tell it to schedule a backup however frequently you want. If anything goes wrong in the future, you can ask Time Machine to look at that backup disk and it'll show you a few versions of whatever you backed up there. I'm not a Mac user but I think you can even use Time Machine to transfer between an old computer and a new one.
Windows now has File History which I have never used in my life, they added it after I stopped using Windows. Same idea though, pick some folders and back them up to an external storage device. If anything goes wrong, use File History to go back through that device and find the version of the file you wanted. I don't know if there's still a way to access the older Backup and Restore system.
On Linux, my favoured way to manage simple desktop backups is Deja Dup, a GUI for Duplicity. Duplicity can do a lot more than just backup to a disk, but we'll start there. Install Deja Dup, open it up, and follow the prompts to back up your user files to the external drive. Deja Dup can also do backups to remote storage servers, Google Drive/Onedrive, and commercial storage providers like Amazon and Backblaze. It will even encrypt your backups if you are worried about Amazon spying on your files or whatever. If something goes wrong, point Deja Dup at your backup drive and it will offer you a suite of restore options covering a few versions.
Now, you have a permanently plugged in hard drive that will always get rolling backups you can restore from. These aren't safe from, say, ransomware, or your house burning down, but at least you won't lose anything when you update a computer or accidentally delete something and have an ohshit moment.
Now you take that other drive you bought, and do the same backup you're already doing to that. Now you go put it somewhere else where it's readily accessible and won't be accidentally used for anything, keep it at the office, give it to your dad, whatever. Set a reminder on your phone for once a month. Once a month, go get that drive, run another backup, and put it back. You now have better backups than many medium sized businesses.
This is impractical to scale beyond one PC, but if we're being honest even when I had like half a dozen laptops, only one contained much of value. Back up the system you care about.
Don't worry too much about making sure your backups are space efficient, like, yeah it would be a good idea to exclude game installs and stuff from your backups to save space but if that sounds daunting or time consuming literally do not do it. Decision paralysis is brain poison, just back it up and sort it out later. 2TB external hard drives are cheap.
FURTHER STEPS YOU CAN TAKE:
Easy Cloud backup: Backblaze personal backup on Windows and Mac is $6/month and pretty easy to use. If you are struggling to keep track of a monthly remote backup, or you want an easy remote backup. Backblaze is a reasonably reliable company and one of the Go To Companies in the world of data reliability. Yes, it's a cloud subscription. If you don't want that don't use it.
Network backup: If you have access to a storage server, that can be a good way to make a remote backup without having to shuttle disks around. That could be a physical server if you maintain some kind of lab, or it could be a cloud storage provider like Backblaze B2 or Onedrive or whatever. Deja Dup specifically supports backing up to a lot of different network storage providers, and even if you only have a fifty or sixty gigabytes of network storage on hand, your most essential personal files can probably fit in there.
Drive failures: Eventually one of your drives will fail, either your storage drive or your backup drive. If the storage drive fails, well, that's what the backup is for, go get a replacement and restore from the backup. If your backup drive fails, well, that's why you have two of them. As soon as humanly possible go get a replacement drive, and substitute it in for the dead one.
101 notes
·
View notes
Text
currently working on uploading the files to google drive- it's taken FOREVER. like, four hours. i've had google drive running as a side window on my ipad lol. two videos are waiting to be downloaded, i'll make sure they're all playable and delete any duplicates because i noticed at least one, ill make it public to view then ill link it!
4 notes
·
View notes
Note
Do you ever have the problem of Google Drive duplicating your files? I started my pdf collection and put a grand total of TWO books on there. One has duplicated itself thousands of times so I no longer have space to put any more files. I delete them and more crop up. There is like. no way to stop this shit.
Hey, thanks for reaching out! Strangely, despite the sheer quantity of PDFs I am uploading, resizing, sorting through, etc., .... no? I don't think that's ever happened to me, actually.
I did a little Google-ing and I see that a few recommended fixes are uninstalling and re-installing the GDrive desktop app (if applicable), turning off the sync feature (if turned on), and to ... "remove uploaded item from the source folder"? I'm sure there's other possible fixes out there on the wide web--I hope this issue gets resolved for you soon!
4 notes
·
View notes
Text
What Did I Do Today? Thursday
-Completed 4 Real Estate Tests today (to renew real estate license)
-Deleted footage off iPhone (spent 40 minutes deleting screenshots of TikTok Lives, Google Map screenshots for reminders from last year's backpacking trip, deleted all but the "one" best photo if I had duplicates). This is to prep my iPhone to be clean because I like starting a journey fresh. It's like starting a new book. Nothing from a previous book is directly related to this new book I'm about to read. Then I plan to transfer everything I want save to an external hard drive. Then I will store this HDD at my parent's house. Then wipe my iPhone Photo app CLEAN! Ready for new memories :)
-Watched some podcasts in between phone wiping, to see what I like, don't like, and how to create my content (Ex. Don't just yap just to yap. Get to the point, then get out).
-Finally edited the remaining "San Francisco Brand Ambassador Temp Gig" vlog (and uploaded!) where I rode my bike and took the train to San Francisco. I'm deciding how polished I want my content to be. I noticed some "empty silences" in the video where music or sound effects could work. But I also don't want to polish something so much that's intended to be raw. But I also don't want to be boring. Decisions, decisions.
Personal Note: Today isn't over yet, and usually I do TikTok LIVE in the evening. But I used ChatGPT to really motivate myself to be 100% prepared for my bicycle across America trip. There's not much left for me except wait for my 2nd No-ATM Fee debit card (always good to have a backup travel card), get my bike for the trip as my current bike has no option to shift gears, and clean out iPhone photos and videos to make room for the new ones. Which I am really excited about because I am learning that if I don't edit my vlog of the day that night, I'm never going to edit. So it's sort of a nice thing to basically cut the fat from the videos of the day and live a "post-to-delete" sort of philosophy. Because I posted my videos and photos, I can delete them off my iPhone. I also am realizing, that I do enjoy this diary "text" outlet. Because sometimes I don't feel like making a video. I just want to get my thoughts out. Like wanting to get from USA to Vietnam - I don't care how (train, boat, car, airplane, shark - just get me there).
Yesterday | Wednesday
-Edited my children's book "The Super-Duper Big Secret Rule of Everything!" This took up the majority of my time while at the library. Some of the issues were:
How to ensure the cover art covers the entire page (I still can't figure out)
How to add page numbers at the bottom (I'm intending to use images of numbers and use the Microsoft Word View > Grid to align the page numbers on the bottom
The "Draw Here" box was IMPOSSIBLE to align consistently on each page. Still unsure while. The work around was to use Canva to create a dotted rectangle > export as PNG file > import into Microsoft Word > align with grid. After printing, there still was misalignment.
-Organized and Printed QR Codes for busking and to put on bike while riding
-Organized and Printed "Sleeping Signs." These are the signs where (I'm not sure how to attach yet) I will attach them to my tent when I guerilla camp.
0 notes
Text
Ditch Excel: 8 Reasons It Doesn’t Work for Resource Management

For years, Excel has been the default tool for resource tracking across many organisations. Its accessibility, familiarity, and low cost made it a logical choice—especially when teams were smaller and processes were less complex. But as businesses scale and project demands grow, Excel starts to crack under pressure. When it comes to modern resource management, relying on spreadsheets can cause more harm than good.
Here are eight reasons why it’s time to ditch Excel for resource management and embrace more robust, purpose-built solutions.
1. No Real-Time Updates
Resource allocation is a fast-moving process. Unfortunately, Excel doesn’t offer real-time updates. Any change in availability, assignments, or workloads requires manual input and distribution. This leads to version mismatches, delays in updates, and outdated information being used for key decisions.
2. Version Chaos
How many “final_resource_plan_v7(1)_updated” files have you seen? Excel doesn’t support a centralised system, which results in multiple versions floating around in emails, drives, and desktops. Without a single source of truth, teams work with inconsistent data—and that’s a recipe for conflict and confusion.
3. Limited Collaboration
Resource management is not a one-person job. Project managers, department leads, and HR teams all need to collaborate. Excel makes this difficult. Even with cloud versions like Google Sheets, simultaneous edits can create conflicts or overwrite data, especially with complex formulas and formatting.
4. Human Error is Inevitable
Typos, deleted rows, broken formulas—Excel is prone to manual errors that can have serious consequences. One small mistake in resource capacity or availability can derail timelines or overload key personnel. The more complex the spreadsheet, the higher the risk.
5. No Resource Forecasting
Good resource management isn’t just about today—it’s about planning for tomorrow. Excel lacks forecasting capabilities that help you plan for upcoming demand, future hiring needs, or capacity gaps. Without predictive insights, you’re always reacting instead of proactively managing resources.
6. Difficult to Scale
A growing business comes with growing complexity. Managing hundreds of resources across multiple projects and teams becomes a nightmare in Excel. Files become too large, slow to load, and difficult to interpret. What starts as a simple tool quickly becomes unmanageable.
7. No Workflow Integration
Excel doesn’t integrate with your core project, HR, or financial systems. This means duplication of data entry across platforms, which increases admin overhead and the risk of inconsistencies. Seamless workflows are essential for effective resource management—something Excel just doesn’t offer.
8. Poor Reporting & Analytics
While Excel provides basic graphs and pivot tables, it lacks the interactive dashboards and insights needed to make fast, data-driven decisions. Real-time utilisation metrics, heatmaps, and project-level visibility are critical—but not achievable in spreadsheets.
The Smarter Way Forward
Modern resource management demands real-time visibility, intelligent automation, and seamless collaboration. Excel simply isn’t built for that.
At Kytes, we help organisations replace spreadsheets with an AI-powered PSA + PPM platform that delivers intelligent resource planning, dynamic forecasting, and automated conflict resolution. With Kytes, businesses get a scalable, integrated solution that turns resource chaos into clarity.
0 notes
Text
How to Increase Space in Google Workspace
Google Workspace is a powerful collaboration platform combining Gmail, Google Drive, Google Docs, Sheets, Slides, and other productivity tools. But when your storage is full, you can’t send emails, upload files, or access critical documents.
How to increase space in Google Workspace becomes a critical question for teams and organizations relying on this platform for daily operations.
Primary Reasons You Might Need More Google Workspace Storage
Before we dive into solutions, let’s understand why you might be running out of space:
High Email Volume: Gmail attachments can pile up.
Large Files in Drive: Especially videos, high-res images, or large documents.
Shared Drives: Multiple users contributing data.
Backups & Duplicates: Repeated file versions eat up storage.
Photos in Google Photos: High-resolution photo storage consumes Drive quota.
Upgrade Your Google Workspace Plan to Increase Space
One of the most direct answers to How to increase space in Google Workspace is by upgrading your plan.
Google offers the following options:
Business Starter: 30 GB per user
Business Standard: 2 TB per user
Business Plus: 5 TB per user
Enterprise Plans: Customizable and unlimited options
If your current plan is no longer meeting your needs, it’s time to scale up. At Amyntas, we help businesses analyze usage and suggest the right plan to maximize ROI.
Buy Additional Storage Add-ons
If upgrading your plan isn’t viable, you can purchase buy additional Google Drive storage as an add-on. This is especially useful for individual users or small businesses not ready to jump to the next pricing tier.
Google provides options to buy additional storage blocks, which can be shared across Gmail, Drive, and Photos.
Benefits of Add-on Storage:
No need to change plans
Flexible allocation
Scales with your needs
Ask your Google Workspace reseller like Amyntas to help activate and manage additional storage seamlessly.
Clean Up Unused Files and Emails
Sometimes, the easiest way to free up space in Google Workspace is simply to declutter.
Tips to Reduce Unnecessary Data:
Empty the trash in Gmail and Google Drive
Delete large emails and attachments
Remove duplicate files
Clear unused shared files
Use tools like Google’s storage manager to find large files
This housekeeping can delay the need for more storage and help optimize current space. How to Increase Space in Google Workspace
0 notes
Text
તમારા પીસીમાંથી Duplicate Files કેવી રીતે શોધી અને ડિલીટ કરશો? – સરળ ગુજરાતી માર્ગદર્શિકા

Duplicate files તમારા PC ની storage space ભરશે, system slow કરશે અને organization પણ ���રાબ બનાવશે. આ ફાઈલ્સ ફોટો, ડોક્યુમેન્ટ, વીડિયો કે અન્ય ફોર્મેટમાં હોઈ શકે છે. આજના ટ્યુટોરીયલમાં આપણે શીખીશું કે તમારા Windows પીસીમાંથી duplicate files કેવી રીતે શોધવા અને કાઢી નાખવા (delete) એ સરળ રીતે — ગુજરાતી ભાષામાં.👇
🔍 Step-by-Step: Duplicate Files શોધી કાઢવા અને ડિલીટ કરવા
✅ વિકલ્પ 1: Free Software નો ઉપયોગ (સરળ રીત) 1. Duplicate Cleaner Free - 👉 https://www.digitalvolcano.co.uk/dcdownloads.html - Install કરો અને ફોલ્ડર select કરો જ્યાં તમારે duplicate files સ્કેન કરવા છે - Result આવશે → તમારે select કરીને delete કરવી 2. CCleaner (Free version) - 👉 Tools > Duplicate Finder - Filters લાગુ કરો (ફાઇલ ટાઇપ, સાઇઝ, નામ વગેરે) - Duplicate files શોધીને delete કરો 3. Auslogics Duplicate File Finder - સરળ UI સાથે, beginners માટે perfect - Install કરો → Scan કરો → Duplicate પસંદ કરો → Delete ✅ વિકલ્પ 2: Windows File Explorer થી Manual રીતે સાવધાન: Manual પ્રક્રિયા સમય લે છે અને human error શક્ય છે. - Windows Explorer ઓપન કરો - Folder ખોલો જ્યાં duplicate files હોવાની શક્યતા છે (જેમ કે Downloads, Documents) - View > Sort by > Name or Size - ફોટા કે ફાઈલ્સ visually compare કરીને same હો એવી files delete કરો
��️ Duplicate Delete કરતાં પહેલાં...
- 🤞 હંમેશાં ફાઈલ્સ ચકાસો — બધું Same છે કે નહીં - 🗂️ મૂળ ફાઈલ backup રાખો (specially important documents/photos માટે) - 🚫 System files ક્યારેય manually delete ન કરો
🎁 Bonus Tip:
📁 Google Drive, OneDrive કે Dropbox જેવી cloud storage માં પણ duplicate checker tools છે તેથી cloud clean-up પણ કરી શકો છો! Read the full article
0 notes
Text
How to Delete Pages from PDF on Mac: A Step-by-Step Guide for Professionals
Working with PDF files is an everyday necessity for many professionals, whether you're in legal, finance, design, education, or consulting. Often, these documents include unnecessary pages—appendices, extra forms, or duplicated content—that you might want to get rid of before sharing or archiving. Fortunately, if you're using a Mac, you have several efficient ways to delete pages from PDF Mac without needing complex software or advanced technical skills.
This article walks you through the best methods to remove pages from PDF Mac, using built-in tools and advanced third-party applications. Whether you're looking for a quick edit or advanced batch processing, you’ll find a solution that fits your workflow.
Why Delete or Remove Pages from a PDF?
Before diving into the “how,” let’s consider the “why.” Here are some professional scenarios where removing PDF pages makes sense:
Client Reports: Eliminate draft pages or irrelevant data.
Legal Documents: Remove confidential or outdated clauses.
Marketing Collateral: Update brochures or slide decks with current information.
Educational Content: Share only relevant sections with students or colleagues.
Financial Reports: Exclude internal notes or calculations not meant for distribution.
Understanding how to efficiently delete pages from PDF on Mac can save time, protect sensitive information, and streamline document sharing.
Method 1: Use Preview – The Built-in PDF Tool on Mac
The Preview app is a native macOS utility that offers simple yet powerful PDF editing tools. It's completely free and pre-installed on every Mac.
How to Delete Pages from PDF Using Preview:
Open the PDF:
Double-click the file or open it via Preview (Right-click → Open With → Preview).
Open the Thumbnail Sidebar:
Go to View > Thumbnails or press Shift + Command + D to view all pages.
Select the Pages to Delete:
Click the page you want to remove. To select multiple pages, hold Command and click.
Delete the Page(s):
Press the Delete key on your keyboard or right-click and choose Delete.
Save the File:
Go to File > Save or File > Export as PDF to preserve your edited version.
✅ This method is perfect for quick edits without additional software.
Method 2: Use Adobe Acrobat Pro – Advanced Features for Power Users
If your work involves heavy PDF handling, Adobe Acrobat Pro offers more control over document editing, security, and collaboration.
Steps to Remove Pages from PDF on Mac Using Adobe Acrobat Pro:
Open Adobe Acrobat Pro and load your PDF.
Go to Tools > Organize Pages.
You’ll see page thumbnails—hover over the page and click the trash can icon to delete it.
Select Save As to retain the original file and save the edited one separately.
Key Features:
Delete, rearrange, or rotate pages
Merge multiple PDFs or split one into several
Add password protection or digital signatures
💼 Ideal for professionals in legal, finance, or enterprise roles who need secure and precise document control.
Method 3: Use Third-Party PDF Editors for Mac
There are several third-party PDF editors that allow you to delete or remove pages from PDF on Mac quickly and often with additional tools for annotations, signing, and conversions.
Recommended Apps:
1. PDF Expert by Readdle
Sleek interface and easy navigation
Drag-and-drop pages to reorder or delete
Sync with Dropbox, Google Drive, and OneDrive
2. PDFpen (now Nitro PDF Pro)
Robust editing tools
Built-in OCR for scanned documents
Secure file encryption and annotation
3. Foxit PDF Editor for Mac
Lightweight and fast
Cloud collaboration tools for teams
Excellent value for professional users
How to Delete Pages (General Steps):
Open the PDF file.
Access the page management or thumbnail view.
Select the unwanted pages.
Delete and save/export your final document.
These apps are well-suited for users who work with PDFs daily and need flexibility without the bulk of Adobe Acrobat.
Method 4: Delete Pages from PDF on Mac Using Online Tools
If you’re in a rush or working with a file that doesn’t contain sensitive data, online PDF editors are a convenient option. No installation required.
Popular Tools:
Smallpdf
ILovePDF
PDF24 Tools
Sejda
Steps to Remove Pages:
Visit one of the sites above.
Upload your PDF.
Select the pages to delete.
Click “Apply” and download the edited file.
⚠️ Caution: Avoid uploading confidential or business-sensitive documents to online platforms unless they are encrypted and secure.
Automation Tip: Use Automator to Remove PDF Pages
macOS includes Automator, a workflow tool that can handle repetitive tasks like file renaming, resizing images, or manipulating PDFs.
Use Automator to Remove Pages:
While more technical, you can create a script using Automator or Shortcuts to extract or delete certain pages from PDFs based on page numbers or criteria.
This is useful for batch operations and can be integrated into more complex workflows.
Tips for Professionals Managing PDF Files on Mac
Whether you're using Preview or a robust PDF suite, here are some tips to maintain professional document standards:
Backup Before Editing: Always duplicate your original PDF before making deletions.
Check File Security: Ensure edited PDFs don't expose hidden or redacted information.
Use Naming Conventions: Save versions with clear filenames like Report_Q1_Reviewed.pdf.
Compress After Editing: Use Preview or PDF compressors to reduce file size before sharing.
Validate Before Sending: Double-check page numbers, formatting, and content after edits.
Conclusion:
Professionals across industries handle PDFs every day, and knowing how to delete pages from PDF on Mac can streamline your workflow and eliminate the need for printing or scanning. Whether you need to clean up a draft, remove confidential pages, or prepare a document for presentation, macOS provides several reliable solutions to help you get the job done.
From the simplicity of Preview to the power of Adobe Acrobat Pro or the flexibility of PDF Expert, the choice depends on your editing needs and work volume. You can even use secure online tools or Automator for specialized tasks.
No matter your profession or file size, learning to remove pages from PDF on Mac ensures you maintain professional standards while working efficiently.
0 notes
Text
Have you ever opened your photo folder and instantly felt overwhelmed?
That was me last summer. Between running my e-commerce business, managing product shoots, social media uploads, and storing personal family photos—I had over 12,000 images spread across multiple hard drives, cloud folders, and phone backups. I’d scroll endlessly to find one picture from a shoot or spend hours looking for before-and-after shots for a client. I finally reached a point where I asked myself: Can I pay someone to organize my photos?
The answer? Absolutely, yes. And it’s a total game-changer.
Feeling stuck with complex edits? Clipping path in Photoshop is your secret weapon for clean cutouts and sharp designs. This simple step-by-step guide is perfect for e-commerce, social media, and creatives. 🚀 #PhotoshopBasics #ClippingPathTutorial #DesignHacks #PhotoshopForBeginners #EcommerceTips
✅ What Does It Mean to “Organize Photos” Professionally?
Let’s break it down—when you pay someone to organize your photos, you're hiring a professional (or an image editing service provider) to:
Sort images by date, event, project, or category.
Delete duplicates and blurry or unnecessary files.
Rename files for easy searching (think: “Product_Summer2025_Set1” instead of “IMG_7621”).
Group by albums—for example, all real estate shots from April in one folder.
Back everything up—both locally and in cloud storage.
Sometimes, even add light editing or tagging!
Short Answer: Yes, professionals can help clean up your digital photo mess and make it easy to find what you need—fast.
✨ Why I Decided to Pay for Photo Organization
As a content creator and digital marketer, I juggle files daily. Add in wedding and product photography clients, and it becomes a maze. I needed more time to focus on creative work—not waste hours searching for files. After missing a submission deadline because I couldn’t find the final version of an edited image (yep, it happened), I decided to outsource.
I searched for an image editing service provider who also offered digital asset management. To my surprise, several companies had exactly what I needed.
🛠️ How to Pay Someone to Organize Your Photos (Step-by-Step)
Here’s exactly how I went about it:
Step 1: Assess Your Needs
Ask yourself:
How many photos do you have?
Do you need help with just sorting, or do you want edits too?
Will you need regular help or just a one-time cleanup?
Quick Tip: Make a list of folders or drives you need organized. Having this ready will help your service provider give you a fair quote.
Step 2: Research Image Editing Service Providers
Look for providers that specialize in both photo editing and digital organization. I’ll share some great ones below.
Step 3: Get a Quote & Share Your Files
Most services will ask for a sample or a rough estimate of how many GB/TB of data you need organized. Use tools like WeTransfer, Dropbox, or Google Drive to share files.
Step 4: Review and Approve Folder Structures
The good ones will propose a folder system. For example:
📁 Clients └── 📁 Fashion_Shoot_March ├── Edited ├── RAW └── SocialMedia_Crops
Step 5: Back It Up!
Once organized, make sure you have local and cloud backups.
Short Answer: Start by estimating your photo volume, find a trusted provider, share your files, approve folder naming, and always back it up.
🧠 My Practical Tips for Getting It Just Right
Having gone through this, here’s what helped me the most:
Tag your most important folders before sending them off. It helps the service provider prioritize.
Request before-after samples if they also offer editing.
Use a naming convention you’ll remember, like “EventName_Year_Version.”
Set expectations early—do you want RAW files untouched? Only edited versions sorted?
Short Answer: Be clear about your file types, folder preferences, and backup needs for the best result.
Have you ever opened your photo folder and instantly felt overwhelmed by messy backgrounds or unwanted objects? Learn how to clean up your images and boost your design game with this beginner-friendly guide to making a clipping path in Photoshop. 🎯 #ClippingPath #PhotoshopTips #PhotoEditing #GraphicDesignTools #PhotoshopTutorial
Top 5 Services to Consider (Based on My Experience)
If you’re asking “Who should I trust to organize my photos?”, here’s a quick breakdown of five services I explored and used:
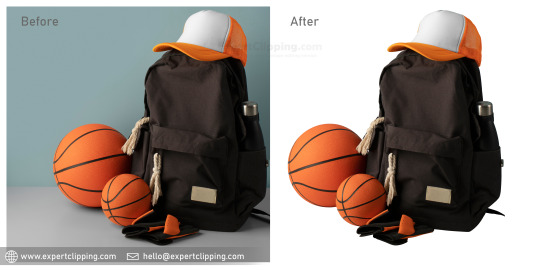
✅ Expert Clipping
Best for: E-commerce brands, wedding photographers, influencers, and real estate agencies Why I recommend them: They’re not just an image editing service provider—they helped me sort over 4,000 product and campaign images in record time. Their team is responsive, fast, and understands the structure creatives need. Use them when: You want file organization + pro-level clipping, retouching, or background removal.
✅ Graphic Solution BD
Best for: Amazon sellers, dropshipping businesses, and apparel designers Why: They offer flexible packages and understand marketplace listing requirements. Great for organizing your photos by platform (Amazon, Etsy, etc.). Use them when: You need product photos grouped by SKU, category, or size chart.
✅ Tech Cloud Ltd
Best for: Corporate clients, ad agencies, and real estate marketing firms Why: They offer bulk file processing and detailed photo tagging—super useful for property developers and ad campaigns. Use them when: You need structure across hundreds (or thousands) of files, with tagging for easy recall.
✅ Photo Expert BD
Best for: Portrait photographers, modeling agencies, and magazine publishers Why: They go deep with facial recognition sorting, retouching, and editorial categorization. Use them when: You need organized client folders, headshots, or model portfolios.
✅ Image Edit Expert
Best for: Social media managers and influencers Why: They’ll help you organize reels, stories, brand shoot assets—even YouTube thumbnails—by campaign. Use them when: You’re managing multiple platforms and want a social content vault ready to go.
🤝 Final Thoughts: Should You Pay Someone to Organize Your Photos?
If you’re a busy photographer, marketer, real estate agent, or just someone drowning in disorganized images—YES, pay someone to organize your photos. It’s not a luxury anymore. It’s a smart way to reclaim your time and make your content workflow 10x smoother.
I used to waste hours searching for files. Now, everything is labeled, backed up, and searchable. I just click, find, and post. That peace of mind? Worth every cent.
Short Answer: Yes—you can (and should) pay someone to organize your photos if your time is better spent creating, selling, or running your business.
Company Information:
Website: https://www.expertclipping.com/
Facebook: https://www.facebook.com/expertclipping
Contact : https://www.expertclipping.com/contact/
Resources: https://www.expertclipping.com/blog/
Youtube: https://www.youtube.com/c/Expertclipping-ec
Twitter: https://twitter.com/expertclipping
Quote: https://www.expertclipping.com/free-quote/
Office Address
UK OFFICE
24 Longbridge Road
Barking Essex IG118tnv
www.expertclipping.co.uk
Phone: 02036093822
24 Longbridge Road
Barking Essex IG118tnv.
E-mail: [email protected]
Phone: +44 02036093822
ITALY OFFICE
168 Belaws, 4th Floor
Via Tolpada 21, 11400
www.expertclipping.com
0 notes
Text
How to Declutter Your Digital Space Without Lifting a Finger (Almost)

Digital clutter is sneaky. One day your phone and laptop are running smoothly, and the next, your desktop looks like a file explosion and your cloud storage is screaming for mercy.
The good news? You don’t need to spend hours cleaning it all up.
If you’ve already peeked at the lazy but genius ways to organize your digital life, this guide takes it a step further. These strategies are so effortless, it’s almost like you're not doing anything at all — just the way we like it.
1. Automate Your Cloud Storage Cleanup
Cloud platforms like Google Drive or Dropbox offer easy-to-use filters and automation tools. You can set them to auto-delete trash, auto-archive old files, or even color-label folders for visual clarity.
Try this lazy trick: Use Google Workspace’s "Storage Management" tool to bulk delete large files, duplicates, and old backups.
2. Use Smart Tools Like “Cleanfox” for Your Inbox
Manual unsubscribing is so last year. Tools like Cleanfox or Leave Me Alone scan your inbox, show you a list of all newsletters and subscriptions, and let you unsubscribe with a swipe or click.
Bonus points: They also show you how much CO₂ you save by decluttering your inbox. Lazy + eco-friendly? Yes please.
3. Schedule Your Phone to Auto-Delete Old Media
Most smartphones let you auto-delete photos, screenshots, or downloaded files after a set period. In iOS, enable Optimize iPhone Storage; on Android, use Files by Google to clean junk files in seconds.
Pair this habit with the mindset from the top 10 lazy but genius ways to organize your digital life, and you’ve got a phone that runs smoother without you lifting a finger.
4. Use “Stack” Apps to Organize Notes and Docs Automatically
Apps like Evernote, Notion, or OneNote allow auto-tagging, sorting, and folder rules.
Lazy Genius Tip: Set up templates or automations so that every new note is filed where it belongs — without you doing it manually.
5. Let Your Browser Clean Itself
Use browser extensions like:
OneTab: Closes all open tabs and saves them in a list
Tab Suspender: Auto-pauses inactive tabs
History AutoDelete: Keeps your browser history from becoming a hoarder's paradise
It’s a solid sidekick to the habits in the top 10 lazy but genius ways to organize your digital life post.
6. Set Recurring Reminders That Actually Work
The key word here is “recurring.” Instead of relying on memory, set monthly 10-minute digital cleanup reminders on your calendar. Automate the repeat, and you’ll never have to remember it again.
Use tools like:
Google Calendar (with reminders and checklists)
TickTick or Todoist (with smart recurring tasks)
Siri or Google Assistant (voice commands FTW)
7. Auto-Sort Downloads Using Folder Rules
Tools like Hazel (Mac) or File Juggler (Windows) can auto-organize your downloads folder based on file type, name, or date.
For example:
Move PDFs to Documents
Send images to Pictures
Trash zip files after 24 hours
This lazy automation turns chaos into calm without constant manual effort.
8. Delete Duplicate Files With a Click
Duplicate files = wasted space. Use tools like:
Gemini 2 (Mac)
CCleaner (Windows)
Duplicate Cleaner Free
These apps scan and clean up your hard drive or cloud storage with minimal interaction — perfect for lazy geniuses like us.
9. Use a Dashboard to See Everything at a Glance
Use Notion or Trello to build a minimalist dashboard of your digital world — to-dos, file links, notes, calendar, and tools all in one spot. Bonus: once it’s built, you just update it here and there.
Pair this with any technique from the top 10 lazy but genius ways to organize your digital life and you’ll become the CEO of calm.
10. Empty the Trash — Automatically
Set your system or cloud service to auto-empty the trash every 30 days. No emotional attachment needed.
Go to your system settings or storage settings (Google Drive, iCloud, etc.) and toggle on the auto-delete function.
Final Thoughts: It’s Not About Working Hard — It’s About Working Smart
Decluttering your digital life doesn't have to be a marathon. With these smart, nearly hands-off hacks, your devices can stay organized while you go do... well, anything else.
Think of this post as a deeper dive into the top 10 lazy but genius ways to organize your digital life — because the lazier the hack, the better the result.
1 note
·
View note
Text
iPhone Storage Full? Find and Remove Duplicate Videos with These 5 Methods If you're an iPhone user who loves capturing moments through video, you've likely encountered a common problem: duplicate videos taking up valuable storage space. Whether from accidental double recordings, shared media, or backed-up content, these duplicates can quickly consume gigabytes of storage without you realizing it. Finding and removing duplicate videos on your iPhone not only frees up precious storage space but also helps organize your media library for easier access and management. In this comprehensive guide, we'll explore various methods to identify and remove duplicate videos on your iPhone, from using built-in features to third-party applications designed specifically for this purpose. By the end of this article, you'll have all the tools you need to efficiently manage your video collection and reclaim your iPhone storage. Why Duplicate Videos Accumulate on iPhones Before diving into solutions, it's helpful to understand how duplicate videos end up on your device in the first place: Multiple photo backups: When restoring from different backups or syncing across multiple services (iCloud, Google Photos, etc.) Accidental saving: Downloading the same video multiple times from messaging apps or emails Screen recordings: Creating screen recordings of videos you already have saved Photo sharing: Receiving the same video from different people via AirDrop, Messages, or social media Manual copying: Duplicating videos when organizing files Identifying these patterns can help you prevent duplicate accumulation in the future. Method 1: Using the Built-in Photos App Apple's Photos app includes a basic duplicate detection feature introduced in iOS 16 that can help you locate identical videos. Here's how to use it: Finding Duplicates with the Photos App Open the Photos app on your iPhone Go to the Albums tab at the bottom of the screen Scroll down to the Utilities section Look for and tap on the Duplicates album The app will automatically display all duplicate photos and videos found on your device For each set of duplicates, you'll see options to Merge the files, which keeps the highest quality version and deletes the others Note: This feature only identifies exact duplicates with identical file data. Similar videos with slight differences won't be detected. Method 2: Using the Files App to Manually Search For more control over the process, you can manually search through your videos in the Files app: Open the Files app on your iPhone Navigate to On My iPhone or iCloud Drive where your videos are stored Tap the List icon (three lines) in the top-right corner to change the view Tap on the dropdown arrow and select Sort by Size to group larger video files together Manually check files with similar sizes and names that might be duplicates Preview videos by long-pressing on their thumbnails To delete a duplicate, swipe left on the file and tap Delete While this method requires more effort, it gives you greater control over which files to keep or remove. Method 3: Third-Party Duplicate Finder Apps For more powerful duplicate detection capabilities, third-party apps offer advanced features and algorithms. Here are some top options: Gemini Photos Gemini Photos by MacPaw is one of the most popular duplicate finders: Download Gemini Photos from the App Store Launch the app and allow it to scan your media library Tap on the Videos section Navigate to the Similar or Duplicates category Review the suggested duplicates and select those you want to remove Tap Delete to remove the selected videos Gemini Photos uses smart algorithms to detect not only identical duplicates but also similar videos, making it more effective than the built-in Photos app. Photo & Video Duplicate Cleaner Another excellent option with a focus on media files:
Download Photo & Video Duplicate Cleaner from the App Store Open the app and grant necessary permissions Tap Scan Now to begin analyzing your library Select the Videos tab to focus only on video duplicates Review the found duplicates and check those you want to delete Tap Delete Selected to remove them This app offers a simple interface specifically designed for finding duplicate media files. Method 4: Using iCloud and Mac for Larger Libraries If you have a large video collection, using a Mac with your iCloud account can provide more powerful tools: Ensure your iPhone is synced with iCloud Photos On your Mac, open the Photos app Click on Albums in the sidebar Scroll to Utilities and select Duplicates Filter to show only videos by clicking on the dropdown menu and selecting Videos Review and merge duplicates as needed The larger screen and additional processing power of a Mac make handling large video libraries much easier. Method 5: Smart Storage Management Using iPhone Storage Recommendations Your iPhone offers smart recommendations to manage storage: Go to Settings > General > iPhone Storage Wait for the analysis to complete Check the Recommendations section Look for suggestions related to large videos or duplicated content Follow the provided options to optimize storage Using Optimize iPhone Storage Feature Enable the optimize storage feature to automatically manage video storage: Go to Settings > Photos Enable Optimize iPhone Storage This keeps full-resolution videos in iCloud while storing smaller versions on your device Tips to Prevent Duplicate Videos Preventing duplicate videos is easier than removing them later: Use iCloud Photos consistently: Don't switch between multiple backup services Check before downloading: Verify if you already have a video before saving it again Use the "Save Image" option carefully: In messaging apps, check if you already have the video Organize regularly: Set a monthly reminder to clean up your video library Use Albums: Create logical albums to better track your content Security Considerations When Using Third-Party Apps When using third-party duplicate finder apps, keep these security tips in mind: Only download from the App Store: Avoid sideloaded apps for handling your personal media Check privacy policies: Ensure the app doesn't upload your videos to external servers Review permissions: Only grant necessary access to your media library Look for reputable developers: Choose apps from established companies with good reviews Conclusion Finding and removing duplicate videos on your iPhone doesn't have to be a tedious task. From using the built-in Photos app's duplicates feature to leveraging specialized third-party applications, you have multiple options depending on your needs and preferences. Regular maintenance of your video library not only frees up valuable storage space but also makes your video collection more organized and accessible. By implementing the preventive measures discussed, you can minimize duplicate accumulation in the future and keep your iPhone running smoothly. Whether you choose to use Apple's native tools or third-party solutions, taking control of duplicate videos will enhance your iPhone experience and ensure you always have space for capturing new memories without worrying about storage limitations.
0 notes
Text
SEO Declining? Your Shopify Site Might Be the Problem!

Is Your Shopify Store Losing Traffic? Let’s Fix That!
You worked hard to set up your Shopify store. You’ve got great products, beautiful images, and a smooth checkout process. But lately, your website traffic is dropping. Sales are slowing down. You’re losing your spot in Google rankings. What’s going wrong?
The truth is, SEO isn’t a “set it and forget it” task. It requires regular updates and maintenance. If your Shopify store isn’t optimized properly, search engines will push you down the rankings. The good news? You can fix it! Let’s dive into the common SEO issues that might be hurting your Shopify store and how to turn things around.
Common Shopify SEO Problems & How to Fix Them
1. Slow Page Speed Is Driving Customers Away
Did you know that 40% of visitors leave a website if it takes more than 3 seconds to load? Google doesn’t like slow websites either! If your Shopify store is sluggish, your rankings will drop.
What’s causing slow speeds?
Large, unoptimized images
Too many apps running in the background
Heavy theme files and unnecessary code
How to fix it:
Compress images without losing quality
Remove unused apps and scripts
Use a lightweight Shopify theme optimized for speed
2. Broken Links & 404 Errors Hurt Your Credibility
Google wants to send users to functional websites. If your site has broken links (leading to 404 errors), it signals poor maintenance, and search engines may lower your ranking.
What’s causing broken links?
Deleted or moved product pages
Outdated links from blog posts
Incorrect internal links
How to fix it:
Regularly check for broken links using free SEO tools
Redirect old URLs to relevant pages
Update outdated blog posts with fresh links
3. Duplicate Content Confuses Search Engines
Shopify stores often suffer from duplicate content issues, which confuse search engines about which page to rank. This happens when multiple URLs lead to the same content.
What’s causing duplicate content?
Product pages with multiple variations (size, color) create duplicate URLs
Copy-pasting product descriptions from suppliers
Poor URL structures
How to fix it:
Use canonical tags to tell Google which page to prioritize
Write unique product descriptions instead of copying from manufacturers
Optimize URL structures for clarity
4. Your Site Is Missing Essential SEO Elements
A well-optimized Shopify store needs the right SEO elements in place. If you’re missing them, search engines might not understand your content.
Common SEO elements you might be missing:
Page titles that include relevant keywords
Meta descriptions that attract clicks
Alt text for images to improve visibility in search results
How to fix it:
Include target keywords naturally in page titles and descriptions
Write compelling meta descriptions (150-160 characters)
Add alt text to every image describing what it shows
5. Lack of Fresh Content Hurts SEO
Google loves fresh content. If your Shopify store hasn’t been updated in months, search engines might think it’s outdated.
How to fix it:
Start a blog with helpful tips, product updates, or industry news
Regularly update product descriptions and categories
Encourage customer reviews (which add fresh user-generated content)
Need Help? We’ve Got Your Back!
SEO can be overwhelming, but you don’t have to tackle it alone. Oyecommerz’s Shopify Maintenance Services ensure your store stays optimized, fast, and search-engine-friendly.
Here’s what we offer:
Regular SEO audits to catch issues early Speed optimization to keep visitors engaged Fixing broken links and redirects for smooth navigation Fresh content strategies to boost rankings Ongoing updates to keep up with Google’s algorithms
Stop losing traffic and sales. Let’s get your Shopify store back on track!
Contact us today for a FREE SEO check-up!
0 notes