#duplicate file remover mac
Explore tagged Tumblr posts
Visit Tumblr Blog
Explore Tumblr blogs with no restrictions, modern design and the best experience.
Last Seen Tumblr Blogs


Fun Fact
Women make up for the other 50% of Tumblr’s audience.
Text
#remove duplicated file#Google Drive duplicates#delete duplicate files Google Drive#find duplicate files#clean Google Drive storage#Google Drive organization#cloud storage management#duplicate file finder#duplicate finder#double file finder#eliminate duplicate files#clean up duplicate files#best duplicate file finder#best duplicate finder#duplicate file remover mac#macbook duplicate file finder#scan for duplicate files
0 notes
Text
My GIF Making process: Screen capturing using MPV player, Organizing files, 3 Sharpening settings, Basic Coloring PSD + Actions set

This is a very long post so heads up.
I’ll try to be as thorough and true as much as possible to the way I make my gifs (I already use Photoshop Actions which I’ve long since set up but now for this tutorial I’m reviewing them to show you the exact steps I’ve learned to create my gifs 😃) and present them to you in a semi-coherent way. Also, please bear with me since English is my second language.
First things first. Below are the things and tools we need to do this:
Downloaded 4K or 1080p quality videos (let’s all assume we know where to get these—especially for high definition movies and tv series—so this post doesn’t get removed, okay? 😛)
Adobe Photoshop CC or the CS versions can work as well, but full disclosure I haven’t created gifs using the CS versions since 2020. I’m currently using Adobe Photoshop 2024.
mpv player. Use mpv player to get those frames/screenshots or any other video player that has a screen grabber feature. I’ve used adapter for the longest time but I’ve switched to mpv because the press to screenshot feature while the video is playing has been a game changer not to mention ultimate time saver for me. For adapter you need to play it in another video player (like VLC player), to get the start and end timestamps of the scene you want to gif which takes me ages before I can even open Photoshop.
Anyway! Please stop reading this post for a moment and head over to this amazing tutorial by kylos. She perfectly tells you how to install and use mpv player, both for Mac and Windows users.
One thing I have to share though, I had a tough time when I updated my MacOS to Sonoma since MPV is suddenly either duplicating frames or when I delete the duplicates the player seems to be skipping frames :/ I searched and found a solution here, though it didn’t work for me lol. My workaround for this in the meantime is decreasing the speed down to 0.70 then start screenshotting—it’s not the same pre Sonoma update but it works so I’ll have to accept it rather than have jumpy looking gifs.
Now, after this part of kylos’ tutorial:

you can continue reading the following sections of my gif tutorial below.
I want to share this little tip (sorry, this will only cater to Mac users) that I hope will be helpful for organizing the screenshots that MPV saved to the folder you have selected. Because believe me you don’t want to go through 1k+ of screenshots to select just 42-50 frames for your gif.
The Control + Command + N shortcut
This shortcut allows you to create a new folder from files you have pre-selected. As you can see below I have already created a couple of folders, and inside each folder I have selected screenshots that I want to include in one single gif. It's up to you how you want to divide yours, assuming you intend to create and post a Tumblr gifset rather than just one gif.

Another tip is making use of tags. Most of, if not all the time, I make supercorp gifs so I tag blue for Kara and red (or green) for Lena—just being ridiculously on brand and all that.
Before we finally open Photoshop, there's one more thing I want to say—I know, please bear with me for the third? fourth? time 😅
It's helpful to organize everything into their respective folders so you know the total number of items/frames you have. This way, you can add or delete excess or unnecessary shots before uploading them in Photoshop.
For example below there are 80 screenshots of Kara inside this folder and for a 1:1 (540 x 540 px) Tumblr gif, Photoshop can just work around with 42-50 max number of frames with color adjustments applied before it exceeds the 10 MB file size limit of Tumblr.

Sometimes I skip this step because it can be exhausting (haha) and include everything so I can decide visually which frames to keep later on. You'll understand what I mean later on. But it's important to keep the Tumblr 10 MB file size limit in mind. Fewer frames, or just the right amount of frames, is better.
So, with the screenshot organization out of the way, let's finally head over to Photoshop.
Giffing in Photoshop, yay!
Let’s begin by navigating to File > Scripts > Load Files into Stack…

The Load Layers window will appear. Click the Browse button next.
Find your chosen screenshots folder, press Command + A to select all files from that folder then click Open. Then click OK.
After importing and stacking your files, Photoshop should display the following view:

By the way, I'll be providing the clip I've used in this tutorial so if want to use them to follow along be my guest :)
If you haven't already opened your Timeline panel, navigate to Windows > Timeline.
Now, let's focus on the Timeline panel for the next couple of steps.
Click Create Video Timeline, then you’ll have this:

Now click the menu icon on the top right corner then go to Convert Frames > Make Frames from Clips

Still working on the Timeline panel, click the bottom left icon this time—the icon with the three tiny boxes—to Convert to Frame Animation
Select Make Frames From Layers from the top right corner menu button.
So now you have this:

Go and click the top right menu icon again to Select All Frames
Then click the small dropdown icon to set another value for Frame Delay. Select Other…

The best for me and for most is 0.05 but you can always play around and see what you think works for you.
Click the top right menu icon again to Reverse Frames.
I think Photoshop has long since fixed this issue but usually the first animation frame is empty so I just delete it but now going through all these steps there seems to be none of that but anyways, the delete icon is the last one among the line of feature buttons at the bottom part of the Timeline panel.
Yay, now we can have our first proper GIF preview of a thirsty Lena 😜

Press spacebar to watch your gif play for the very first time! After an hour and half of selecting and cutting off screenshots! 😛 Play it some more. No really, I’m serious. I do this so even as early (lol) as this part in the gif making process, I can see which frames I can/should delete to be within the 10 MB file size limit. You can also do it at the end of course 🙂
Now, let’s go to the next important steps of this tutorial post which I’ve numbered below.
Crop and resize to meet Tumblr's required dimensions. The width value should be either 540px, 268px, or 177px.
Convert the gif to a Smart Object for sharpening.
Apply lighting and basic color adjustments before the heavy coloring. I will be sharing the base adjustments layers I use for my gifs 😃.
1. Crop and Resize
Click on the Crop tool (shortcut: the C key)

I like my GIFs big so I always set this to 1:1 ratio if the scene allows it. Press the Enter key after selecting the area of the frame that you want to keep.
Side note: If you find that after cropping, you want to adjust the image to the left or another direction, simply unselect the Delete Cropped Pixels option. This way, you will still have the whole frame area available to crop again as needed and as you prefer.
Now we need to resize our gif and the shortcut for that is Command + Opt + I. Type in 540 as the width measurement, then the height will automatically change to follow the ratio you’ve set while cropping.
540 x 540 px for 1:1
540 x 405 px for 4:3
540 x 304 px for 16:9
For the Resample value I prefer Bilinear—but you can always select the other options to see what you like best.
Click OK. Then Command + 0 and Command + - to properly view the those 540 pixels.

Now we get to the exciting part :) the sharpen settings!
2. Sharpen
First we need to have all these layers “compressed” intro a single smart object from which we can apply filters to.
Select this little button on the the bottom left corner of the Timeline panel.


Select > All Layers
Then go to Filter > Convert for Smart Filters
Just click OK when a pop-up shows up.
Now you should have this view on the Layers panel:

Now I have 3 sharpen settings to share but I’ll have download links to the Action packs at the end of this long ass tutorial so if you want to skip ahead, feel free to do so.
Sharpen v1
Go to Filter > Sharpen > Smart Sharpen…
Below are my settings. I don’t adjust anything under Shadows/Highlights.
Amount: 500
Radius: 0.4
Click OK then do another Smart Sharpen but this time with the below adjustments.
Amount: 12
Radius: 10.0

As you can see Lena’s beautiful eyes are “popping out” now with these filters applied. Click OK.
Now we need to Convert to Frame Animation. Follow the steps below.
Click on the menu icon at the top right corner of the Timeline panel, then click Convert Frames > Flatten Frames into Clips
Then Convert Frames > Convert to Frame Animation
One more click to Make Frames From Layers
Delete the first frame then Select All then Set Frame Delay to 0.05

and there you have it! Play your GIF and make sure it’s just around 42-50 frames. This is the time to select and delete.
To preview and save your GIF go to File > Export > Save for Web (Legacy)…
Below are my Export settings. Make sure to have the file size around 9.2 MB to 9.4 MB max and not exactly 10 MB.

This time I got away with 55 frames but this is because I haven’t applied lighting and color adjustments yet and not to mention the smart sharpen settings aren't to heavy so let’s take that into consideration.
Sharpen v1 preview:

Sharpen v2
Go back to this part of the tutorial and apply the v2 settings.
Smart Sharpen 1:
Amount: 500
Radius: 0.3
Smart Sharpen 2:
Amount: 20
Radius: 0.5
We’re adding a new type of Filter which is Reduce Noise (Filter > Noise > Reduce Noise...) with the below settings.

Then one last Smart Sharpen:
Amount: 500
Radius: 0.3
Your Layers panel should look like this:

Then do the Convert to Frames Animation section again and see below preview.
Sharpen v2 preview:

Sharpen v3:
Smart Sharpen 1:
Amount: 500
Radius: 0.4
Smart Sharpen 2:
Amount: 12
Radius: 10.0
Reduce Noise:
Strength: 5
Preserve Details: 50%
Reduce Color Noise: 0%
Sharpen Details: 50%
Sharpen v3 preview:

And here they are next to each other with coloring applied:
v1

v2

v3

Congratulations, you've made it to the end of the post 😂
As promised, here is the download link to all the files I used in this tutorial which include:
supercorp 2.05 Crossfire clip
3 PSD files with sharpen settings and basic coloring PSD
Actions set
As always, if you're feeling generous here's my Ko-fi link :) Thank you guys and I hope this tutorial will help you and make you love gif making.
P.S. In the next post I'll be sharing more references I found helpful especially with coloring. I just have to search and gather them all.
-Jill
#tutorial#gif tutorial#photoshop tutorial#gif making#sharpening#sharpening tutorial#photoshop#photoshop resources#psd#psd coloring#gif coloring#supercorp#supercorpedit#lena luthor#supergirl#my tutorial#this has been a long time coming#guys. i'm BEGGING you. use the actions set - it was a pain doing all this manually again ngl LMAO#i've been so used to just playing the actions#so this has been a wild refresher course for me too 😆
812 notes
·
View notes
Text
About Sims 4 Mod Manager

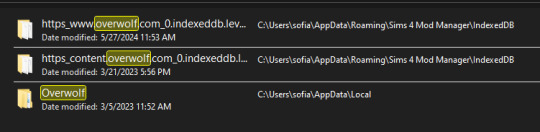
It came to my attention a few days ago that a popular program used for sorting custom content, Sims 4 Mod Manager, is based on Overwolf software. The issue with this is that ad placements on Overwolf programs give a 20-30% cut to Overwolf directly. As stated on their website. I know it is an Overwolf program because you can find Overwolf files within it:
Personally, I do not mind un-obstructive ads on free programs as long as they are vetted by the developer, but I do not want to give Overwolf any money. So I will be kindly contacting the developer via the contacts on his website and ask he divest and use a different avenue with the ads. Maybe moving to github instead. He is also recently released a curseforge integrated app.
If you are to request the divestment, please please do so with respect as to invite people INTO the conversation and not put them in a defensive position. No one likes to listen when they are being threatened or harassed. 🤷♀️
I know many will be disappointed with this news as it is a great, one of a kind program, so I wanted to offer some alternative methods besides manually sorting custom content:
Sims 4 Mod Assistant: A small app used to find duplicates and mod conflicts. Also supports filtering and moving files to other folders. Available on Mod the Sims and Github.
S4Pavir: It's not that pretty, but it can be used to view, remove, and sort cc. Available on Github.
You can also use sims tray importer to sort through cc. Dress your sims in all the cc you want to remove or place build/buy items on a lot. Save the sim/lot to your library and use Sims 4 tray importer to view the list of cc used, and open its file location to delete. Available on Luniversims (.fr)
Sims 4 Studio can also be used to view, edit, and delete cc. Available here.
Let me know of any other methods you know or notify me if there are any issues with these two programs.
Hopefully there is a positive outcome with reaching out to the creator. Please be respectful and you can use my pinned post as a reference for why curseforge is a problem. 🙏
Edit:
Update on Sims 4 Mod Manager
After going through the older versions of Sims 4 mod manager I have found out that Version 1.0.9 Beta (Windows 10, 11 for me) does not have Curseforge ads. I think this is suitable option to use the mod manager without giving direct ad revenue to Overwolf/Curseforge.

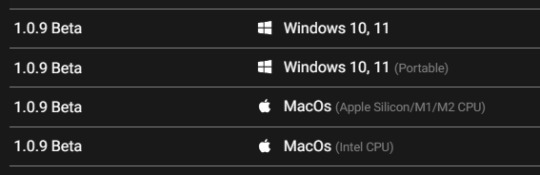
When you go to the Sims 4 Mod Manager site, click other versions and scroll until you find this version. It does not have all the current features, but it works. You can uninstall your current version by searching the app in your start menu (Windows), right click and select 'uninstall', and click 'uninstall' again once you find it in the list that comes up.
(I do not have Mac, so I do not know if the later version 1.1.3 Beta, will also not have ads. If you download it please let me know.) I will update my original S4MM post with this info and also put it in a reblog so hopefully everyone can see this.)
It doesn't have the sort to subfolders option, but my way around that is to sort cc into a "moving folder" and then open your regular file explorer and cut and paste those items to your sub-folder manually. Easy peasy!
551 notes
·
View notes
Text

A quick method to deal with blurry action shots that have Hannibal's quintessential dim lighting + green color grading combo.
Here's the example I'll be using:

Don't get me wrong, I love the look of Hannibal, but the average person doesn't scroll tumblr with their screen brightness on max. Plus, night light filters and blue light glasses add even more yellow to an already heavily filtered show. If you want people to see your gif clearly, you have to edit it at least a little. Especially for extreme shots like this lol.
What I use: macOS 15.1.1 Elmedia Player 8.18 dupeGuru 4.3.1 Topaz Photo AI 3.2.0 Photoshop 25.11.0 LuLu 2.6.3 (optional, but it's nice to block outgoing connections from pirated programs)
Step One: Take Screenshots
Open your video file (1080p preferred) in Elmedia Player and navigate to the first frame of your gif. Hit "Playback > Record a Series of Screenshots" and let it run until you have all the frames you want. Unfortunately for mac users, we have a problem where a lot of duplicate screenshots are taken (like every third screenshot is a duplicate... it's so annoying). To save time later, I use dupeGuru to clean out as many duplicates as I can.
Open dupeGuru and add whatever folder you saved your screenshots to.

Scan the folder, then hit "Mark > Mark All" (you can see here that the program only caught one duplicate, which means more work later. it's not a perfect program -_-)

Hit "Actions > Send Marked to Recycle Bin..." to remove the duplicates from the folder

Step Two: Denoise
At this stage the screenshots are so dark that the noise isn't obvious, but it'll be more noticeable after brightening and sharpening. Here's the difference this step makes later:

Upload all your screenshots to Topaz Photo AI and add a Denoise layer. I normally go with the automatic settings.

Hit "Select All," "Apply > Current Settings," then export all your images. This can take a while depending on how many images you have.

Step Three: Create Frame Animation in Photoshop
If you've read any other gif-making tutorials this part should be familiar, so I'm gonna skim over it.
"File > Scripts > Load Files into Stack"
"Browse..." and select your Topaz output files
"Sort by Name" so they load in the correct order
"Ok"
Once all the layers have loaded, hit "Create Frame Animation" in the Timeline window
Under the Timeline window options menu, hit "Make Frames from Layers," then "Reverse Frames"
This is probably when you want to go through frame-by-frame and delete any remaining duplicates. It's very annoying to have to redo this step if you want to go back and edit your crop size later. (Not that I would know... 🤡)
Step Four: Crop + Resize
Crop, then "Image > Image Size" to adjust the width of your gif. You'll most likely want to use one of the common tumblr image dimensions:
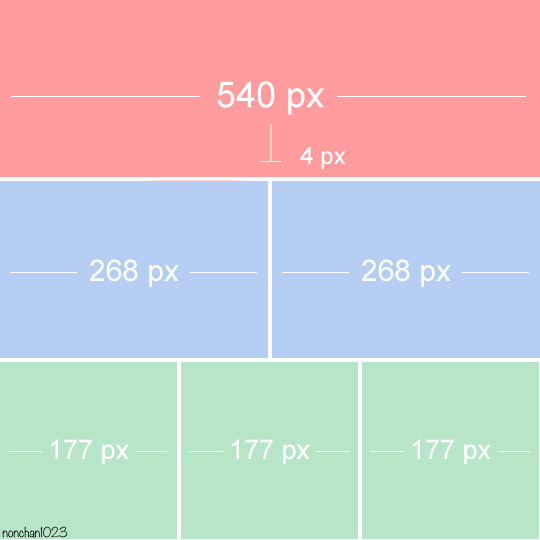
Keep in mind that tumblr's gif size limit is 10 MB. But it's honestly best to keep it under 9.5 MB if you want the gif to load smoothly. A 540x540 px gif can have 40-60 frames while a smaller gif can be longer.
Make sure to add +2 px to whichever width you choose (so 542 px, 270 px, etc), since we'll be adjusting the canvas size later to get rid of transparent border anomalies.
Step Five: Color
The more common order of operations is to sharpen before coloring, but for dark scenes like this, it's kinda silly to sharpen when you can barely see what you're doing, so I like to color first.
Select all your frame layers and make a new group, just to keep them separate from your adjustment layers.
I always start by testing out the Auto Color Correction Options in a Curves adjustment layer. To access them, opt + click on the Auto button. This opens a window with four options.
I like to use a combination of "Enhance Per Channel Contrast" and "Find Dark & Light Colors," though either option can be used to adjust color balance. The important part is selecting "Snap Neutral Midtones" and picking a midtone that brings your gif as close as possible to the desired color balance.

If changing the midtone doesn't affect the color balance, brighten the gif first and try again.
For this gif, "Enhance Per Channel Contrast" removed the bulk of the green filter:

It's still pretty dark, so I brightened up the gif with some more Curves layers:

There's still a lot of purple/blue in Dolarhyde's black leather jacket, so I added another Curves layer and used "Find Dark & Light Colors" to improve the blackpoint:

Now we can up the contrast a little:

Nice! Good enough to move onto sharpening!
SIDE NOTE: The reason I use these Color Correction Options is because simply brightening leaves you with purple/blue shadows and sickly green over-exposed highlights that take ages to color correct. You can see the difference here:

(If you've ever wondered why so many Hannibal gifs have blue shadows, this is why.)
Step Six: Sharpen
This is where you'll want to start implementing actions, which are pre-recorded series of adjustments that you can perform with the click of a button. I mainly use three actions (download here, open the Actions window in PS, open the Action options menu, and click "Load Actions...").
The "frame animation to smart object" action converts the gif to a video timeline so we can apply smart filters.
The "legacy sharpening + high pass" action applies my standard sharpening filters. Not every gif will need the high pass filter, so feel free to change its opacity or delete it altogether. You can also tweak the smart sharpen filters by right clicking them and selecting "Edit Smart Filter..."

3. Once you're happy with the sharpness, the "convert to frame timeline" action turns the gif back into a frame animation. I use a 0.05 s frame delay for most gifs (equivalent to 20 fps; 24 fps is standard for tv/movies). I normally use 0.07-0.08 seconds for action shots, so the gif doesn't whip around so fast. Over 0.1 seconds, it starts to look like stop motion, so I try to avoid that.
Step Seven: Final Adjustments
This is where I fine-tune the colors, mostly using Hue/Saturation layers.
If I use a Color Balance layer, I only make very small adjustments and try to counterbalance them in the other tonal ranges (e.i. adjustments to the Highlights spill over to the Midtones, so I make the opposite adjustments to the Midtones to fix it). But most of the time, I'd rather play around with Curves or Hue/Saturation to fix stuff like that.
Hue/Saturation gives you more control by allowing you to select the exact color range you want to affect. For this gif, I used Hue/Saturation to get rid of the purple introduced around the highlights in Will's hair by the high pass filter.
The eyedropper tool allows you to select the exact color you want to include in the range. Then you can move the bars around until all the colors you don't want to affect are excluded.

Once you have your range selected, you can bring the saturation all the way down and set it to whatever lightness you prefer:

I also reduced cyan's saturation so that Will's shirt wouldn't look quite so blue.

[You could do a lot more to make the colors prettier... but there are other tutorials online for that. 😅]
Step Eight: Export
Once you're happy with your final product, go to "File > Export > Save for Web (Legacy)..."
These are my settings:

You can use Diffusion instead of Pattern if you want. Diffusion is probably better for mobile gif compression, but I like the way Pattern looks on desktop, especially for gifs with smooth gradients. It's a personal preference thing.
Hit "Save..." and you're all done!

This isn't gonna win any gif-making awards, but at least you can see what's happening and the colors don't look wonky. And for Hannibal, I call that a win! 🥲👍
75 notes
·
View notes
Text
Mod Organizing & Load Order Shenanigans

Published: 5-1-2024 | Updated: N/A MOD ORGANIZING During the [first] "pandemic summer," I started reorganizing my game folders. I also started a "conflict management" list, containing all the known conflict info from download pages, new conflicts I discover while playtesting, etc. It's 44 pages long at the moment....a testament to my unapologetic mod addiction. I encourage all simmers to keep a list like this. It’s very reassuring (and handy!) to be able to look up known conflicts or keep track of mods which have been merged (duplicate files can break your game FAST!). **I won’t be able to share mine at this time but most of my info comes from the same pages where I download CC/mods - shout out to the creators who take the time to include this info.
MY LOAD ORDER(S) I number my folders and use mostly lower case filenames to force the load order I want – these were the most important changes I made re: how I maintain a heavily-modded-but-still -very-functional game. With few exceptions, this has been much more effective than keeping track of the number of z's and cases. It also means I don't need to rename downloaded files - I just put them in the right folder. When I played exclusively on mac, I learned that numbering the store cc folders was the ONLY way I could get all the content to work. I never figured out why but I imagine it was because the mac series doesn't include expansions required for some of this content.
DETAILS (the codes) I put that grad school debt...I mean...those grad school research skills to good use and made up my own codes. Here they are... 0= files needed in every save aka my "essentials." These include repair files, shader/UI files, CEPs, global probes (like scriptorium, money globals, inteen checker, inventory checker, etc).
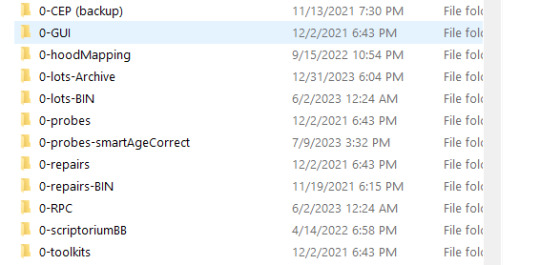
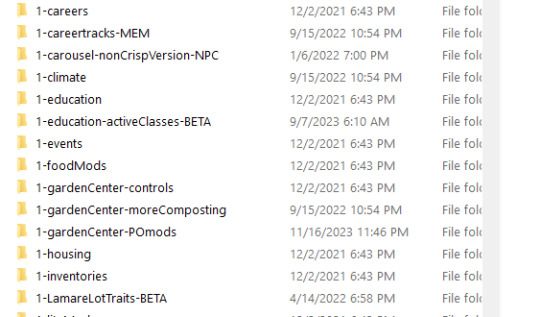
1= mods that do NOT need a load order, some OFB-themed sets I want to keep separate from other CC - like the #co2bellabrand or upcoming #co2cdkseries stuff.
2= mods that require a hard load order. As @episims writes HERE, this only works for mods with non-game-breaking conflicts between them. Only the last mod in the sequence will retain ALL its intended functions. The code for this section goes like this: [number]-[what the mod deals with in-game; i make sure to consider alphabetical order]-[load order number] -name of the mod(s)
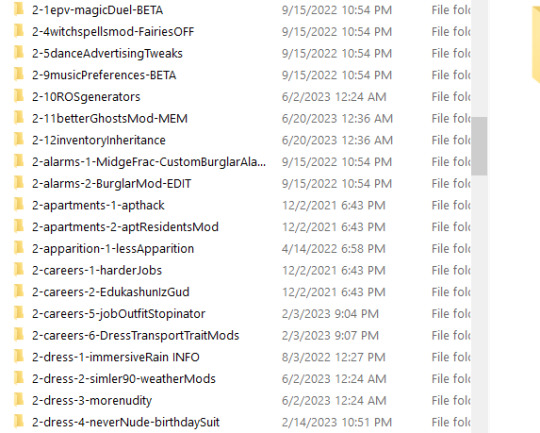
I have several global mods that need to load as close to LAST as possible. These folders all start with "2-z-[load order #]-." The "2" tells me they need to load in a certain order and the "-z" makes them load after all the other #2 folders.
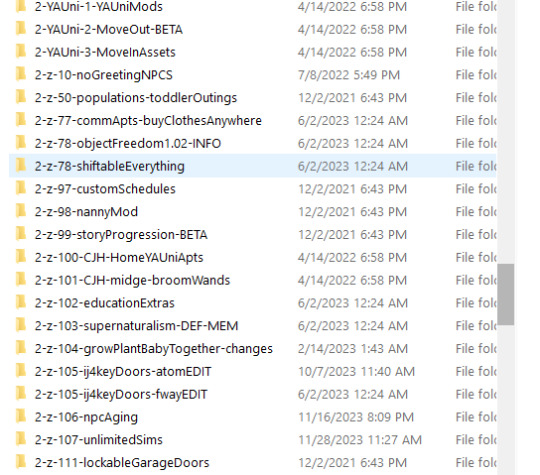
See Object Freedom 1.02 (@fwaysims, 2023) and Shiftable Everything (@lamare-sims, 2022) both load at #78? I don't have them BOTH in game at the same time, but giving them the same number ensures that the right load order stays no matter which one i'm paying with. 3 = build mode and neighborhood deco/defaults
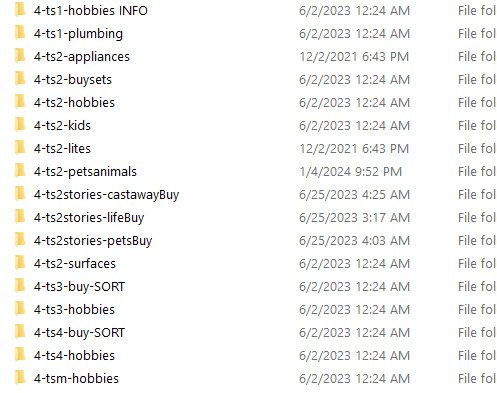
4= buy mode
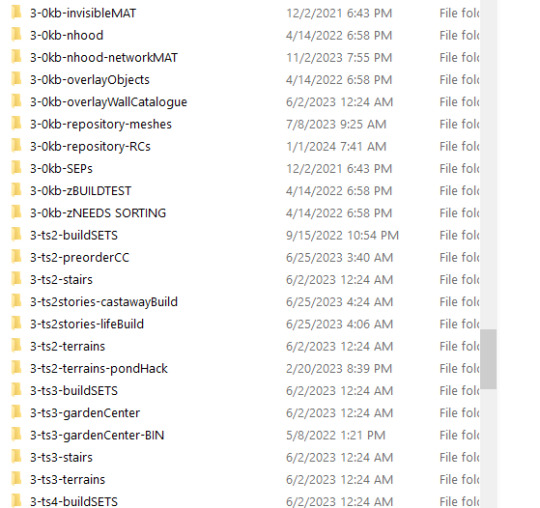
"ts1," "ts3," and similar labels = content that was converted for Sims 2.
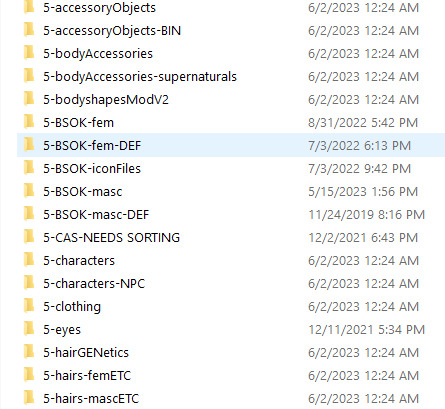
5=CAS/bodyshop
OTHER DETAILS I also label folders with certain "type codes" - these tell me things like whether they add permanent data to my saves (custom memories, careers, foods, etc. do this) or whether they are maxis-match. Here are some examples:
-BIN = mod files which go in the program folders -DEF = default replacement -MEM = this content includes custom memory data -MM = maxis-match or an add-on for default game furniture -ADD = content that is not maxis-match -NPC = this content includes or changes one or more NPCs -FIX or -EDIT = this is a fixed or uniquely edited version of a pre-existing mod -BETA and -TEST = this mod is unfinished and/or a test version Remember, conflicts do not always mean something has to be removed from your game, nor are all conflicts unresolvable. No matter what kind of method(s) you use to organize your game – it’s just important to try/have at least one in the cut.

CREDITS Thanks: Episims, PleasantSims, and all simmers who include load order/conflict notes. Sources: Beyno (Korn via BBFonts), EA/Maxis, Forcing the Load Order of Mods (whoward/Pick’N’MixSims, 2021 via sims2tutorials), Image(s) (Alexander, 2016), Offuturistic Infographic (Freepik).
...Oh and yes...I AM in fact an INTJ/Capricorn.

147 notes
·
View notes
Note
Since you don't see many edits here, and i am a dumbass in editing, could you make a tutorial on it? Like: what apps should we use, what should or shouldn't do, devices, etc. Since i personally worship your editing prowess, i couldn't help myself but ask for your guidance sensei. 🙇♀️
I don't use a "special device" to make my edits, just a computer which can run a videoediting software and Wallpaper Engine correctly (in my case it's an Apple Mac Pro 4,1 from 2009 with upgraded RAM and GPU, and also with Windows 10 installed on it, but that's not important). My server pc build out of my spare parts, and it's serves as a network bridge, and a file storge (like a NAS, or something) to store my personal files, like the assets for the edits on HPP. The way I make my edits, is a different story. I like to put the charaters in different scenarios to make the edit more enjoyable. I usually chose one image from my pre-granarated ones, or I use (if i see a, as i call an edit "suspicious" image here on Tumblr or X) an image from my "Likes", or if I can't find any which is good for the scanario in my head I generate one using PixAI's Ebora Pony XL AI model. Than if I have an image, I put together a static version of the edit in Paint.NET (PaintdotNET). Here I cut down the unnecessary and the broken (weirdly generated hands, .etc) parts of the image, and I remove the background if I'd like to use a different one. Than I chose a stethoscope png what are suitable for the edit, but I recently using the hand with stethoscope one which you can see in my recent edits. I also make some barely visble changes to the main image and the stething image. If it's done, and looks good I save them (the base image, the background, and the steting png separately) in a folder. After that it's time to "animate" the edit, which is just using the Wallpaper Engine's built in Shake effect, if that part is done, I record the animated soundless edit using OBS, which is usually a 5-6 minutes raw mp4 file. Than I put the raw recording into the video editor which is my case is the Wondershare Filmora X. I chose one of the heartbeat and bearthing audios from my server (if it's needed I modify it a bit in Audacity), and speed them up to mach with the animation. I make the breathing way quieter to have the heartbeat in focus, also i duplicate the hb sound to make a stereo effect, which means the I make the left side a bit louder and add more bass to it than the right side, which make a really good heart pulse effect (ROLL CREDITS). Also in here I add some video effects, cut down the unnecessary parts, I cut down the video to 2 minutes to become uploadable for X, than it's time to export it. After I exported the final edit, i check it for mistakes and I fix them if i find any, and the fixed version gonna be uploaded to Tumblr and X. This whole process is 2+ hours usually, but it's could be more for longer and more complex edits. But you doesn't need to follow my way to make edits, if you ever used a photo editor and a video editor before, and you know how put a transparent png on an image, and a greenscreen video on another one, you good to go. There is a lot of ways you can make an edit, so you can chose one which are suitable for you. If you still need help, you can join the Cardio Editor's Hub, there are lot of other people who gladly gives you some tips and tricks. Good luck, have fun! :D
11 notes
·
View notes
Text
Resolving Storage and Internet Issues
Computers are indispensable tools in our daily lives, but they can sometimes present frustrating challenges, such as running out of storage space or losing internet connectivity. These issues can disrupt productivity and cause significant inconvenience. This article explores practical solutions for two common problems: managing a nearly full startup disk on a Mac and addressing internet access issues on a Windows system. By following these steps, users can restore their devices to optimal performance and maintain seamless operation.
Addressing a Full Startup Disk on Mac
When a Mac displays a warning that the startup disk is nearly full, it signals that the primary drive, which houses the operating system and user files, is running out of space. This can lead to sluggish performance, application crashes, and an inability to save new files. How to Fix Your Startup Disk Is Almost Full on Mac begins with understanding the root cause and taking systematic steps to free up space.
The first step is to check how much storage is being used. Navigate to the system menu, select "About This Mac," and click on the storage tab to view a breakdown of space usage. This visual representation helps identify which file categories—such as applications, documents, or media—are consuming the most space. Once you have this overview, prioritize clearing out unnecessary files. Start by emptying the trash, as deleted files often linger there, taking up valuable space. Next, review the downloads folder, where temporary or forgotten files like installers or duplicates tend to accumulate. Deleting these can quickly reclaim space.
Another effective strategy is to manage large files, such as videos or archived projects, which often occupy significant portions of the disk. Use the built-in storage management tool to locate these files and consider moving them to an external drive or cloud storage. For users with extensive photo or video libraries, optimizing storage by enabling cloud-based syncing can offload files while keeping them accessible. Additionally, uninstall unused applications, as they not only consume disk space but may also run background processes that slow down the system.
Clearing system clutter is another critical step. Temporary files, caches, and logs can accumulate over time. Use trusted cleanup tools available in the Mac’s application store to safely remove these without affecting system stability. For advanced users, manually deleting cache files from the library folder can free up space, but caution is advised to avoid deleting essential system files. Regularly performing these maintenance tasks ensures the startup disk remains manageable, preventing future warnings.
Troubleshooting Internet Connectivity on Windows
Losing internet access on a Windows computer can be equally disruptive, whether it’s due to a misconfigured setting, hardware issue, or network problem. How to Fix No Internet Access in Windows involves a step-by-step approach to diagnose and resolve the issue, restoring connectivity efficiently.
Begin by verifying the physical connections. Ensure the Ethernet cable is securely plugged in or that the Wi-Fi adapter is enabled. Restarting the router and modem can resolve temporary glitches, as these devices sometimes encounter conflicts that disrupt connectivity. After rebooting, check the network status in the Windows taskbar. If the system indicates a connection but still shows no internet access, proceed to deeper troubleshooting.
Run the built-in network troubleshooter by accessing the network settings and selecting the option to diagnose problems. This tool automatically detects common issues, such as incorrect IP configurations or disabled services, and applies fixes where possible. If the troubleshooter doesn’t resolve the issue, manually reset the network settings. This can be done by navigating to the network and internet settings, selecting the reset option, and restarting the computer. Be aware that this resets all network adapters, requiring you to reconnect to Wi-Fi networks afterward.
Another potential cause of internet issues is outdated or corrupted network drivers. Visit the device manager, locate the network adapters, and check for any warning indicators. Updating drivers through the system or downloading the latest versions from the manufacturer’s website can resolve connectivity problems. If the issue persists, check for conflicts with security software. Firewalls or antivirus programs sometimes block connections inadvertently. Temporarily disabling these programs can help identify if they are the culprit, but ensure they are re-enabled after testing to maintain system security.
For persistent problems, consider external factors like network congestion or service provider outages. Contacting the internet service provider to confirm the status of the connection can clarify whether the issue is local or network-wide. Testing the connection on another device can also help determine if the problem is specific to the Windows system or a broader network issue.
Proactive Maintenance for Long-Term Performance
Preventing these issues from recurring requires proactive habits. For Mac users, regularly monitoring storage usage and setting up automatic cloud backups can prevent the startup disk from filling up. Scheduling monthly cleanups to remove redundant files and optimizing storage settings ensures the system runs smoothly. For Windows users, maintaining updated drivers and routinely checking network settings can prevent connectivity disruptions. Keeping security software updated and avoiding unnecessary applications also contributes to stable performance.
0 notes
Text
PhotoStick Omni Reviewed: What Pixoneye Tells You Before Buying

In an age where digital memories are invaluable, safeguarding them becomes paramount. Enter the PhotoStick Omni—a device designed to simplify the process of backing up photos and videos across various platforms. But is it truly the solution it claims to be? Let's delve into a comprehensive review of PhotoStick Omni— by Pixoneye .
What Is the PhotoStick Omni?
The PhotoStick Omni is a USB device engineered to automatically detect and back up photos, videos, and other media files from computers, smartphones, and tablets. Its primary allure lies in its plug-and-play functionality, aiming to eliminate the need for manual file sorting and backup processes.
Key Features
Cross-Platform Compatibility: The device is designed to work with Windows, Mac, iOS, and Android devices, making it versatile for various users.
Automatic File Detection: Once connected, the PhotoStick Omni scans the device for media files and backs them up without requiring an internet connection.
Duplicate Removal: It identifies and removes duplicate files, ensuring efficient use of storage space.
Offline Storage: Unlike cloud services, the PhotoStick Omni offers offline storage, providing users with control over their data without relying on third-party servers.
Pricing & Storage Options
The PhotoStick Omni is available in several storage capacities:
32GB: Approximately $59.99
64GB: Approximately $79.99
128GB: Approximately $99.99
256GB: Approximately $149.99
While these prices might seem steep compared to standard USB drives, the added features and functionalities justify the premium for many users.
Performance & Usability
Pros:
Ease of Use: Users appreciate the straightforward setup and operation. As one reviewer noted, "Just plug it in, press the button, and it does the rest."
Efficiency: The device's ability to quickly scan and back up large volumes of media is commendable.
Portability: Its compact design makes it convenient for on-the-go backups.
Cons:
Device Recognition Issues: Some users have reported challenges with their devices not recognizing the PhotoStick Omni, especially with certain iPhone models.
Overheating Concerns: Prolonged use has led to overheating issues for a few users, raising concerns about the device's longevity.
Limited File Type Support: While it excels with photos and videos, backing up other file types might not be as seamless.
Customer Feedback
User experiences with the PhotoStick Omni are mixed:
Positive Feedback: Many users commend its simplicity and effectiveness in backing up media files. One user shared, "It saved me hours of manual backup work."
Negative Feedback: Some users have faced technical issues, such as device recognition problems and overheating during extended use. One reviewer mentioned, "It worked fine initially, but after a while, it started overheating."
Final Thoughts
The PhotoStick Omni presents a compelling solution for individuals seeking an easy and efficient way to back up their digital memories. Its cross-platform compatibility and automatic backup features are significant advantages. However, potential buyers should be aware of possible device recognition issues and overheating concerns.
For those prioritizing simplicity and offline storage, the PhotoStick Omni is worth considering. However, it's essential to weigh its limitations against your specific needs and expectations.
Contact Us
120 Regent St., London W1B 5FE, United Kingdom 02031519420 [email protected] [email protected] [email protected] report a [email protected]
0 notes
Text
How to Delete Pages from PDF on Mac: A Step-by-Step Guide for Professionals
Working with PDF files is an everyday necessity for many professionals, whether you're in legal, finance, design, education, or consulting. Often, these documents include unnecessary pages—appendices, extra forms, or duplicated content—that you might want to get rid of before sharing or archiving. Fortunately, if you're using a Mac, you have several efficient ways to delete pages from PDF Mac without needing complex software or advanced technical skills.
This article walks you through the best methods to remove pages from PDF Mac, using built-in tools and advanced third-party applications. Whether you're looking for a quick edit or advanced batch processing, you’ll find a solution that fits your workflow.
Why Delete or Remove Pages from a PDF?
Before diving into the “how,” let’s consider the “why.” Here are some professional scenarios where removing PDF pages makes sense:
Client Reports: Eliminate draft pages or irrelevant data.
Legal Documents: Remove confidential or outdated clauses.
Marketing Collateral: Update brochures or slide decks with current information.
Educational Content: Share only relevant sections with students or colleagues.
Financial Reports: Exclude internal notes or calculations not meant for distribution.
Understanding how to efficiently delete pages from PDF on Mac can save time, protect sensitive information, and streamline document sharing.
Method 1: Use Preview – The Built-in PDF Tool on Mac
The Preview app is a native macOS utility that offers simple yet powerful PDF editing tools. It's completely free and pre-installed on every Mac.
How to Delete Pages from PDF Using Preview:
Open the PDF:
Double-click the file or open it via Preview (Right-click → Open With → Preview).
Open the Thumbnail Sidebar:
Go to View > Thumbnails or press Shift + Command + D to view all pages.
Select the Pages to Delete:
Click the page you want to remove. To select multiple pages, hold Command and click.
Delete the Page(s):
Press the Delete key on your keyboard or right-click and choose Delete.
Save the File:
Go to File > Save or File > Export as PDF to preserve your edited version.
✅ This method is perfect for quick edits without additional software.
Method 2: Use Adobe Acrobat Pro – Advanced Features for Power Users
If your work involves heavy PDF handling, Adobe Acrobat Pro offers more control over document editing, security, and collaboration.
Steps to Remove Pages from PDF on Mac Using Adobe Acrobat Pro:
Open Adobe Acrobat Pro and load your PDF.
Go to Tools > Organize Pages.
You’ll see page thumbnails—hover over the page and click the trash can icon to delete it.
Select Save As to retain the original file and save the edited one separately.
Key Features:
Delete, rearrange, or rotate pages
Merge multiple PDFs or split one into several
Add password protection or digital signatures
💼 Ideal for professionals in legal, finance, or enterprise roles who need secure and precise document control.
Method 3: Use Third-Party PDF Editors for Mac
There are several third-party PDF editors that allow you to delete or remove pages from PDF on Mac quickly and often with additional tools for annotations, signing, and conversions.
Recommended Apps:
1. PDF Expert by Readdle
Sleek interface and easy navigation
Drag-and-drop pages to reorder or delete
Sync with Dropbox, Google Drive, and OneDrive
2. PDFpen (now Nitro PDF Pro)
Robust editing tools
Built-in OCR for scanned documents
Secure file encryption and annotation
3. Foxit PDF Editor for Mac
Lightweight and fast
Cloud collaboration tools for teams
Excellent value for professional users
How to Delete Pages (General Steps):
Open the PDF file.
Access the page management or thumbnail view.
Select the unwanted pages.
Delete and save/export your final document.
These apps are well-suited for users who work with PDFs daily and need flexibility without the bulk of Adobe Acrobat.
Method 4: Delete Pages from PDF on Mac Using Online Tools
If you’re in a rush or working with a file that doesn’t contain sensitive data, online PDF editors are a convenient option. No installation required.
Popular Tools:
Smallpdf
ILovePDF
PDF24 Tools
Sejda
Steps to Remove Pages:
Visit one of the sites above.
Upload your PDF.
Select the pages to delete.
Click “Apply” and download the edited file.
⚠️ Caution: Avoid uploading confidential or business-sensitive documents to online platforms unless they are encrypted and secure.
Automation Tip: Use Automator to Remove PDF Pages
macOS includes Automator, a workflow tool that can handle repetitive tasks like file renaming, resizing images, or manipulating PDFs.
Use Automator to Remove Pages:
While more technical, you can create a script using Automator or Shortcuts to extract or delete certain pages from PDFs based on page numbers or criteria.
This is useful for batch operations and can be integrated into more complex workflows.
Tips for Professionals Managing PDF Files on Mac
Whether you're using Preview or a robust PDF suite, here are some tips to maintain professional document standards:
Backup Before Editing: Always duplicate your original PDF before making deletions.
Check File Security: Ensure edited PDFs don't expose hidden or redacted information.
Use Naming Conventions: Save versions with clear filenames like Report_Q1_Reviewed.pdf.
Compress After Editing: Use Preview or PDF compressors to reduce file size before sharing.
Validate Before Sending: Double-check page numbers, formatting, and content after edits.
Conclusion:
Professionals across industries handle PDFs every day, and knowing how to delete pages from PDF on Mac can streamline your workflow and eliminate the need for printing or scanning. Whether you need to clean up a draft, remove confidential pages, or prepare a document for presentation, macOS provides several reliable solutions to help you get the job done.
From the simplicity of Preview to the power of Adobe Acrobat Pro or the flexibility of PDF Expert, the choice depends on your editing needs and work volume. You can even use secure online tools or Automator for specialized tasks.
No matter your profession or file size, learning to remove pages from PDF on Mac ensures you maintain professional standards while working efficiently.
0 notes
Text
Apple Certified Experts Recover Data with Precision
Data is more than just files it’s your work, your memories, and your life. When disaster strikes and your data is lost or becomes inaccessible, the last thing you want is guesswork. You need precision, and that’s exactly what Apple Certified Experts deliver. With specialized knowledge, advanced tools, and a deep understanding of Apple’s ecosystem, these professionals are your best chance at restoring your lost data accurately and securely.
The Value of Apple Certification
Not all technicians are created equal. Apple Certified Experts, often referred to as Apple Certified Macintosh Technicians (ACMTs), undergo extensive training and testing to earn their credentials. Their certification ensures they are proficient in diagnosing and repairing Apple hardware and navigating Apple’s proprietary software systems.
This expertise is critical for data recovery. Apple devices—from iPhones and iPads to MacBooks and iMacs—are uniquely designed with custom components and security features that make data access both secure and complex. Without certified knowledge, an untrained technician may inadvertently cause more harm than good.
Why Apple Data Recovery Requires Specialized Precision
Apple’s security-first design is excellent for protecting users’ privacy but poses challenges when recovering lost data. Here are some reasons why Apple data recovery requires such a high level of precision:
Proprietary File Systems: Apple devices use APFS or HFS+—file systems that require deep technical knowledge to interpret and repair.
Soldered SSDs: Many Macs have soldered storage, meaning standard recovery methods won’t work.
T2/M1/M2 Security Chips: These chips encrypt data at the hardware level. Without the correct credentials and tools, access is virtually impossible.
iCloud Integration: Data may be synced, duplicated, or removed from local storage depending on iCloud settings, complicating recovery efforts.
Apple Certified Experts understand these systems intimately. They use Apple-approved diagnostic tools, follow strict protocols, and maintain up-to-date training on the latest hardware and software updates.
When Precision Matters Most
In data recovery, even a small error can result in permanent loss. That’s why precise recovery isn’t just preferred—it’s essential. Here are some situations where expert accuracy makes all the difference:
Accidentally Deleted Files or Photos
Corrupted macOS or Failed Software Updates
Failed System Restores or iCloud Sync Errors
Liquid Damage or Hardware Malfunction
Encrypted Drives or Forgotten Passwords
With Apple Certified Experts, recovery is handled carefully and methodically to avoid data overwriting, physical damage to components, or file system corruption.
Step-by-Step Recovery with Certified Precision
Here’s how Apple Certified Experts approach data recovery:
1. Detailed Diagnosis
Experts begin by assessing your device to identify what caused the data loss. They check for physical damage, file system issues, or software failures. Every detail matters—this helps form the safest and most effective recovery strategy.
2. Secure Data Imaging
If the storage drive is at risk, a full image of the drive is created. This process clones the data bit-by-bit, allowing recovery attempts to be made on the copy—not the original—preserving the integrity of your device.
3. Advanced File Recovery
Using specialized software, experts scan for recoverable files. They rebuild damaged file systems, repair corrupted files, and extract usable data—even from severely compromised drives.
4. Verification and Restoration
Recovered data is tested for usability and consistency. Once verified, it's transferred to a secure destination—like an external hard drive or encrypted cloud storage.
5. Post-Recovery Support
Experts don’t just recover your files—they help you prevent future loss by setting up automatic backups, optimizing storage, and recommending best practices.
Why Clients Trust Apple Certified Technicians
Here’s what makes Apple Certified Experts stand out:
Precision-Driven Process: Every action is calculated and secure.
Higher Success Rates: Their training ensures fewer mistakes and more recoverable data.
Genuine Apple Tools: They use Apple-authorized software and equipment.
Secure Handling: Your data is protected throughout the process.
Clear Communication: Experts explain the issue, the recovery process, and preventive steps.
How to Choose the Right Apple Data Recovery Expert
If you’re facing data loss, look for:
Apple Certification (ACMT or equivalent)
Positive Reviews and Proven Track Record
Transparent Pricing and Diagnostics
Quick Turnaround Times
Data Privacy Guarantees
Avoid general repair shops or third-party tools that aren’t Apple-specific. The risks of permanent damage or data compromise are too high.
Data loss can be devastating but it doesn’t have to be permanent. With Apple Certified Experts, you get more than just recovery; you get peace of mind knowing that your files are being handled with care, precision, and professionalism.
Whether it’s an accidental deletion or a major system crash, trust the experts who know Apple inside and out. They don’t guess—they recover, restore, and protect your most valuable digital assets with unmatched precision.
Apple Certified Experts recover data with precision because every file matters.
#Data recovery Calgary#macbook pro screen replacement#iPhone Battery Replacement#Iphone Repair#Macbook Repair
0 notes
Text
Empty Trash Securely on macOS: Ensuring Data Privacy
In the digital age, data privacy has become a paramount concern for individuals and organizations alike. Whether you're a casual user or a professional handling sensitive information, ensuring that deleted files are permanently erased is crucial. On macOS, simply dragging files to the Trash and emptying it might not be enough to ensure that your data is irretrievable. This article delves into the methods and best practices for Empty Trash Securely on macOS to ensure your data privacy is uncompromised.
Understanding the Basics of Trash on macOS
The Trash on macOS functions similarly to the Recycle Bin on Windows. When you delete a file, it's moved to the Trash, where it stays until you empty it. This provides a safety net, allowing you to recover accidentally deleted files. However, until the Trash is emptied, the files are still present on your disk and can be easily recovered.
How Emptying Trash Works
When you empty the Trash, macOS removes the references to the files from the file system's directory structure, marking the space as available for new data. However, the actual data remains on the disk until it's overwritten by new data. This means that with the right tools, deleted files can be recovered, posing a potential risk to data privacy.
Why Secure Deletion Matters
Secure deletion is vital for several reasons:
Preventing Data Theft: Deleted files can contain sensitive information, including personal documents, financial records, and confidential business data. If these files are not securely erased, they can be recovered by malicious actors.
Compliance with Regulations: Many industries are subject to data protection regulations that require the secure disposal of sensitive information. Failing to comply with these regulations can result in severe penalties.
Personal Privacy: For individuals, secure deletion is essential to protect personal privacy and prevent identity theft.
Methods for Securely Emptying Trash on macOS
There are several methods to ensure that deleted files are securely erased on macOS. These range from built-in features to third-party tools designed for secure data deletion.
1. Using Macube Cleaner
Macube Cleaner is a comprehensive utility designed specifically for Mac users to optimize system performance, manage storage efficiently, and enhance data security. Beyond basic file management, Macube Cleaner offers robust features tailored to Mac environments, including secure file deletion to prevent unauthorized data recovery.
Key Features of Macube Cleaner:
System Junk Cleanup: Identifies and removes unnecessary system files, caches, and logs that accumulate over time, thereby improving system performance.
Large & Old Files Finder: Scans for large files and outdated data, helping users reclaim valuable disk space.
Duplicate Finder: Detects and deletes duplicate files, reducing redundancy and optimizing storage usage.
Privacy Cleaner: Safely erase browsing history, cookies, and other sensitive data to protect user privacy.
File Shredder: Securely deletes files by overwriting them multiple times, ensuring they are irrecoverable by data recovery software.
Scheduled Secure Deletion: Allows users to automate the process of securely deleting files at specified intervals, maintaining system cleanliness and data security.
How To Use:
Step 1: Get Macube Cleaner
First, download Macube Cleaner, a dedicated tool designed to remove unnecessary files from your Mac. This application is tailored to pinpoint and delete redundant files, which can help free up space and enhance your system's speed.
Step 2: Run a Smart Scan
Once Macube Cleaner is launched, initiate a Smart Scan. This powerful feature comprehensively examines your Mac, detecting and listing cache, temporary files, and other data that can be safely deleted. By removing these files, you'll effectively boost your Mac's overall performance.

Step 3: Emptying the Trash
After completing the scan, navigate to the Trash section within Macube Cleaner. Here, you'll find a list of items identified during the scan. To permanently remove these items, simply click on "Clean". If you wish to selectively delete certain files instead, you can choose those specific items before initiating the cleaning process. This ensures that your system remains clutter-free and optimized for better performance.

Pros and Cons
Pros
Enhanced Data Security: Macube Cleaner ensures that deleted files are thoroughly overwritten and cannot be recovered, enhancing overall data security.
Intuitive Interface: It features a user-friendly design that simplifies navigation and usability, making it accessible for all users.
Comprehensive Functionality: In addition to file deletion, Macube Cleaner offers a range of tools for optimizing and maintaining system performance.
Customizable Options: Users have the flexibility to configure shredding passes according to their security needs, providing tailored protection for sensitive data.
Efficiency Boost: By swiftly and effectively removing unnecessary files, Macube Cleaner helps improve system speed and performance.
Cons
Cost Consideration: Macube Cleaner is a paid utility, which may be a factor for users looking for free alternatives.
2. Using Secure Empty Trash (macOS El Capitan and Earlier)
In macOS versions prior to El Capitan, Apple included a feature called "Secure Empty Trash." This option overwrites the deleted files with random data, making them much harder to recover.
How to Use Secure Empty Trash:
Move Files to Trash: Drag the files you want to delete to the Trash.
Secure Empty Trash: Right-click on the Trash icon in the Dock, hold down the Command key, and select "Secure Empty Trash."
Unfortunately, Apple removed this feature in macOS El Capitan and later versions due to changes in how modern storage systems, such as SSDs, handle data.
3. Using Terminal for Secure Deletion
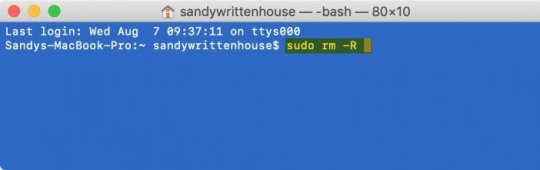
For advanced users, the Terminal offers a powerful way to securely delete files using command-line tools. One such tool is srm, which securely removes files by overwriting them multiple times.
How to Use:
Open Terminal: Launch the Terminal application from Applications > Utilities.
Navigate to File Location: Use the cd command to navigate to the directory containing the file you want to delete. For example:bashCopy codecd ~/Desktop
Securely Delete the File: Use the srm command followed by the filename. For example:bashCopy codesrm filename.txt By default, srm overwrites the file 35 times, ensuring secure deletion. You can adjust the level of security with additional flags, such as -m for a faster but less secure deletion.
4. Encrypting Your Disk with FileVault
Another effective method to protect your data is to encrypt your entire disk using FileVault. While this doesn't directly relate to emptying the Trash, it ensures that even if deleted files are recovered, they cannot be accessed without the encryption key.
How to Enable FileVault:
Open System Preferences: Click on the Apple icon in the top-left corner and select "System Preferences."
Go to Security & Privacy: Click on "Security & Privacy," then select the "FileVault" tab.
Enable FileVault: Click on "Turn On FileVault" and follow the on-screen instructions to encrypt your disk.
Best Practices for Data Privacy on macOS
In addition to securely emptying the Trash, there are several best practices you can follow to enhance your data privacy on macOS.
1. Regularly Clear Browser Data
Web browsers store a significant amount of data, including browsing history, cookies, and cached files. Regularly clearing this data can help protect your privacy.
How to Clear Browser Data:
Safari: Open Safari, click on "Safari" in the menu bar, select "Preferences," go to the "Privacy" tab, and click "Manage Website Data" to remove stored data.
Chrome: Open Chrome, click on the three dots in the top-right corner, select "Settings," go to "Privacy and security," and click "Clear browsing data."
Firefox: Open Firefox, click on the three lines in the top-right corner, select "Preferences," go to "Privacy & Security," and click "Clear Data."
2. Use Secure Passwords and Two-Factor Authentication
Strong, unique passwords and two-factor authentication (2FA) add layers of security to your accounts, making it harder for unauthorized users to gain access.
Password Management Tools:
1Password: A robust password manager that stores and generates strong passwords.
LastPass: Another popular password manager that offers secure password storage and generation.
3. Regularly Back Up Your Data
Regular backups ensure that you can recover your data in case of accidental deletion, hardware failure, or cyberattacks. Use Time Machine or a third-party backup solution to keep your data safe.
How to Use Time Machine:
Open System Preferences: Click on the Apple icon and select "System Preferences."
Go to Time Machine: Click on "Time Machine" and select "Backup Disk."
Select a Backup Disk: Choose an external hard drive or network location for your backups.
4. Stay Updated
Regularly updating macOS and your applications ensures that you have the latest security patches and features. Enable automatic updates to keep your system secure.
How to Enable Automatic Updates:
Open System Preferences: Click on the Apple icon and select "System Preferences."
Go to Software Update: Click on "Software Update" and check the box for "Automatically keep my Mac up to date."
Conclusion
Ensuring data privacy on macOS involves more than just emptying the Trash. Secure deletion methods, disk encryption, regular maintenance, and following best practices are all essential components of a comprehensive data privacy strategy. By taking these steps, you can protect your sensitive information from unauthorized access and maintain your digital privacy.
1 note
·
View note
Text
Empty Trash Securely on macOS: Ensuring Data Privacy
Emptying the trash on your macOS device might seem like a straightforward task, but ensuring that it's done securely is crucial for safeguarding your data privacy. In this article, we'll explore the importance of emptying your trash securely, methods to achieve this on Empty Trash Securely on macOS, and why it matters in today's digital landscape.
Why Empty Trash Securely Matters
When you delete files on your Mac by moving them to the trash bin and then emptying it, you might assume they're gone forever. However, the reality is more complex. Simply emptying the trash in the standard way doesn't permanently erase the data; instead, it marks the space occupied by those files as available for new data. Until that space is overwritten by new information, it's possible for someone with the right tools and knowledge to recover supposedly deleted files.
Macube Cleaner is a comprehensive software tool designed to optimize and enhance the performance of Mac computers. Its primary function is to identify and remove unnecessary files, such as junk files, system caches, and large, obsolete files that clutter your system, slowing it down. Additionally, Macube Cleaner helps manage and uninstall applications, ensuring that no leftover files remain to take up valuable storage space.
The software also features privacy protection by cleaning browsing histories and cookies, safeguarding your personal information. With an intuitive interface, Macube Cleaner allows users to easily perform regular maintenance tasks, ensuring their Mac operates efficiently. This tool is ideal for users looking to free up disk space, improve system speed, and maintain overall Mac health with minimal effort.
Methods to Empty Trash Securely on macOS
Key Features of Macube Cleaner
Junk File Removal: Over time, your Mac accumulates a plethora of junk files, including system cache, application logs, and temporary files. Macube Cleaner scans your system thoroughly to identify and remove these unnecessary files, freeing up valuable disk space and enhancing performance.
Duplicate Finder: Duplicate files can occupy significant storage space without you even realizing it. Macube Cleaner’s duplicate finder feature scans your Mac for identical files, allowing you to delete them and reclaim storage space efficiently.
Large and Old Files: Identifying large and old files that you no longer need can be a tedious task. Macube Cleaner simplifies this process by providing a list of these files, enabling you to decide which ones to keep and which to delete.
Uninstaller: Applications often leave behind residual files even after being uninstalled. Macube Cleaner’s uninstaller feature ensures that all associated files are completely removed from your system, preventing clutter and potential conflicts.
Privacy Protection: Protecting your privacy is paramount in today’s digital age. Macube Cleaner helps you manage and delete sensitive data, such as browsing history, cookies, and login details, ensuring your personal information remains secure.
System Monitoring: Macube Cleaner includes a system monitoring tool that provides real-time insights into your Mac’s performance. You can track CPU usage, memory consumption, and disk activity, helping you identify and address performance bottlenecks.
Benefits of Using Macube Cleaner
Improved Performance: By removing unnecessary files and managing system resources efficiently, Macube Cleaner significantly enhances your Mac’s performance. You’ll experience faster boot times, quicker application launches, and smoother overall operation.
Increased Storage Space: Cleaning up junk files, duplicates, and old files frees up valuable storage space, allowing you to store more important data and applications without worrying about running out of space.
Enhanced Privacy: With robust privacy protection features, Macube Cleaner ensures your sensitive data remains secure. Regularly clearing browsing history and other personal information reduces the risk of unauthorized access.
User-Friendly Interface: Macube Cleaner is designed with user convenience in mind. Its intuitive interface makes it easy for users of all levels to navigate and utilize its features effectively.
Comprehensive Cleaning: Unlike basic cleaning tools, Macube Cleaner offers a comprehensive approach to system optimization, addressing various aspects of system performance and maintenance.
How to Use Macube Cleaner
Installation: Download and install Macube Cleaner from the official website. The installation process is straightforward, with clear instructions to guide you through each step.
Initial Scan: Upon launching Macube Cleaner, perform an initial scan to identify junk files, duplicates, large and old files, and other potential issues. The scan results provide a detailed overview of your system’s health.
Cleaning and Optimization: Review the scan results and select the files you wish to delete. Macube Cleaner categorizes files for easy identification, allowing you to make informed decisions. Use the uninstaller feature to remove unwanted applications and their residual files.
Privacy Protection: Navigate to the privacy protection section to manage and delete sensitive data. Regularly clear your browsing history, cookies, and other personal information to maintain privacy.
System Monitoring: Use the system monitoring tool to keep track of your Mac’s performance in real time. Identify resource-intensive applications and processes, and take appropriate action to optimize performance.
Ensuring Data Privacy in Today's Digital Landscape
In an era where data privacy is paramount, securely emptying your trash on macOS is a fundamental practice. Whether you're disposing of personal documents, financial records, or sensitive business information, ensuring that they cannot be recovered by unauthorized individuals is essential.
By adopting secure deletion practices, you reduce the risk of data breaches, identity theft, and other forms of cybercrime that exploit improperly discarded information. Moreover, compliance with data protection regulations such as GDPR and CCPA often necessitates secure data disposal practices to avoid penalties and uphold consumer trust.
Conclusion
In conclusion, "Macube Cleaner" is not just a task but a critical aspect of maintaining data privacy and security. By understanding the methods available to securely empty your trash bin and implementing them regularly, you can mitigate the risks associated with unauthorized data recovery. Whether you opt for Terminal commands or trusted third-party applications, the goal remains the same: to ensure that deleted files are effectively erased from your system.
Remember, data privacy starts with responsible data management practices. By taking proactive steps to securely empty your trash on macOS, you contribute to a safer digital environment for yourself and others. Stay informed, stay secure, and keep your digital footprint protected.
1 note
·
View note
Text
Xender Fastest All-in-one File Transfer and Sharing App
Xender is an app that permits users to transfer all important files between two devices. application for Android devices. This data transfer app allows users to easily transfer and share files without relying on the internet or Bluetooth connectivity. The application shared a speed of 40Mbps during file sharing. From the original version, you need to watch multiple ads.
And now you can easily download the Xender apk file which comes with a built-in file manager. It supports operating systems like Android, iOS, Tizen, Windows, PC, and Mac. This app is similar to the SHAREit file-sharing app for Android.
Xender APK
Xender APK transfer of various content including photos, videos, music, apps, documents, etc. This is a great application for people who like to share files with others. This will help save the size of your internet data pack and save time wasted — transferring files like slash-speed animation.

Latest Features of Xender
Xender is an amazing app that helps you easily share and send files. Xender uses a local Wi-Fi network to transfer files between up to four smartphones and a PC. You only need to enable your hotspot on one device and connect others to it. If you're joining multiple devices, you can create a group for easy access. File sharing is immediately available via another set of clearly labeled buttons. Here are the latest Features of Xender are:
Fast file transfer
File-sharing technology is a prominent and competitive field. From the portal to your phone, you'll find a variety of apps with the same basic functionality with minor differences in design. Compared to its contenders, Xender seems incredibly straightforward. It emphasizes simplicity and functionality, compacting the most useful technology into an intuitive and lightweight app. Also, unlike most free-charge programs, it does not display any ads in the interface
Xender on the sending device, click Send, and select files to share. On the receiving device, open Xender, click Receive, and wait for the sender's device to appear. Tap the sender's device to establish the connection and start the file transfer.
Free Cross-platform Compatibility
Xender is a free file-sharing tool that emphasizes speed and flexibility. Working across platforms, it uses advanced technology to create a local Wi-Fi network between devices and send content without data charges. This app requires a fraction of the time it would take Bluetooth to perform the same task.
No internet required
With Xender you can transfer files of various types and sizes between mobile devices, without cables, Wi-Fi, or internet connections.
Group Sharing
Xender permits group file sharing. Users can connect multiple devices to share files simultaneously, which is useful for sharing content with friends and family.
Phone Replication
It gives users the ability to duplicate or back up their phone to another device. You just need to install Xender on both devices and then you can easily back up your phone on the other device.
Key Features of Xender APK
● It transfers files through a LAN connection or Bluetooth connection. The transmission speed is about 300 times faster than a Bluetooth connection.
● No internet connection is required to exchange files between two specific devices.
● The design of the application is stunning and impressive and covers all the features of the application, including installation, removal, viewing, opening, and uninstallation.
● Users can easily transfer all important data, such as contacts, photos, images, video games, and messages from one device to another.
● Xender is a free application when two computers without a LAN connection need to exchange files.
● This process supports various formats and sizes of files that need to be exchanged between two specific devices. This includes photos, documents, music files, videos, and software applications.
● Xender is not a complicated process, but an application with a fresh and clean interface, so that all users can easily understand and use the app.
● Application size is reduced with high compression to increase launch speed.
● Interactive control of all files between different technical devices is easy and useful.
How to Use Xender APK?
Xender is an amazing file transfer app that allows sharing files on mobile and desktop. Although Bluetooth technology has improved with the latest version having four times the range and better capacity. Also, transferring large files quickly from one device to another becomes cumbersome. In such a case, Xender comes in handy to transfer a bunch of files without using any mobile data. The app does not require a USB connection or PC software installation to share files.
Xender APK Download
Users can easily download and install this App from our web xenderapk.me. Simply click the download button and install it.
What is Insta Pro 2 APK?
Insta Pro 2 emerges as an innovative alternative to the standard Instagram, created by the team at SamMods. This enhanced version brings the full Instagram experience to users at no cost, boasting a plethora of features and capabilities. It excels in providing enhanced privacy options and a range of exclusive functionalities. A key advantage of Insta Pro 2 APK is its compatibility with Android devices, allowing it to coexist with the original Instagram app without any conflict. For Android enthusiasts, Instagram Pro APK is a breeze to download and use. This version steps beyond the basics, offering a more enriched and engaging interaction with the platform. Users can expect more than just endless scrolling; Insta Pro 2 enhances the overall Instagram journey, making it more enjoyable and feature-rich.
Conclusion
The user interface and user experience are simple and designed in a way that makes sending and receiving files a piece of cake. Xender App can help you to share all your data and it is very easy to use it. At the same time, share this application with all your friends as well as family members who are worried about transferring their data. Use it to transfer all your data and you can easily send movies and big-sized clips to another device. Don’t be late and click on the download button above to get it and start sharing your data.
0 notes
Text
DaVinci Resolve 18.6.2 アップデート 要約
▷「タイムラインの複製が正しい設定を保持するようになりました。」
全文↓
About DaVinci Resolve 18.6
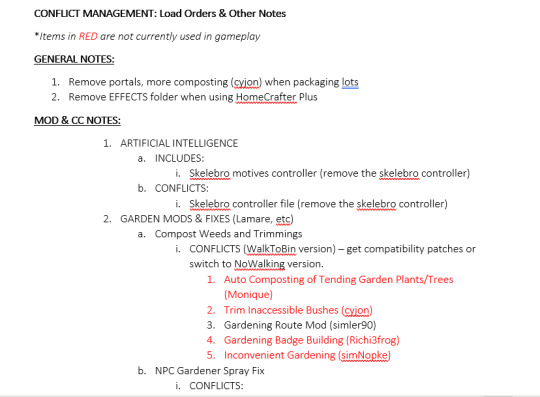
The free version of DaVinci Resolve 18.6 includes all of the same high quality processing as DaVinci Resolve 18.6 Studio and can handle unlimited resolution media files. However it does limit project mastering and output to Ultra HD resolutions or lower. DaVinci Resolve 18.6 only supports a single processing GPU on Windows and Linux and 2 GPUs on the latest Mac Pro.
If you need features such as support for multiple GPUs, 4K output, motion blur effects, temporal and spatial noise reduction, multiple AI-based tools, HDR tools, camera tracker, voice isolation, multiple Resolve FX, 3D stereoscopic tools and remote rendering, please upgrade to DaVinci Resolve 18.6 Studio.
We hope you do decide to upgrade as your facility grows and you do more advanced work!
What's new in DaVinci Resolve 18.6.2
Duplicating timelines now retains the correct settings.
General performance and stability improvements.
Minimum system requirements
Windows 10 Creators Update.
16 GB of system memory. 32 GB when using Fusion.
Blackmagic Design Desktop Video 10.4.1 or later.
Integrated GPU or discrete GPU with at least 2 GB of VRAM.
GPU which supports OpenCL 1.2 or CUDA 11.
NVIDIA/AMD/Intel GPU Driver version – as required by your GPU.
Installing DaVinci Resolve software
Double-click the DaVinci Resolve Installer icon and follow the onscreen instructions. To remove DaVinci Resolve from your system, go to the Programs and Features control panel, select DaVinci Resolve, click on Uninstall and follow the onscreen prompts.
Migrating legacy Fairlight projects to DaVinci Resolve
In order to import legacy Fairlight DR2 projects into DaVinci Resolve, download and install the following utility on your Windows system: https://downloads.blackmagicdesign.com/DaVinciResolve/Fairlight-Project-Importer.zip
After installing the utility, you should see an option to "Import Fairlight Project" in the Fairlight menu in DaVinci Resolve.
Additional information
Please refer to the latest DaVinci Resolve configuration guide for details on Windows support, including certified driver versions for third party hardware. It is available from www.blackmagicdesign.com/support/.
You will also need to download and install the latest Blackmagic Design Desktop Video software for monitoring with your Blackmagic Design video hardware. Desktop Video is available from www.blackmagicdesign.com/support/.
© 2001-2023 Blackmagic Design Pty. Ltd. All rights reserved. Blackmagic Design, Blackmagic, DeckLink, Multibridge, Intensity, H.264 Pro Recorder and "Leading the creative video revolution" are trademarks of Blackmagic Design Pty. Ltd., registered in the U.S.A and other countries. Adobe Premiere Pro, Adobe After Effects and Adobe Photoshop are registered trademarks of Adobe Systems. Avid Media Composer and Avid Pro Tools are registered trademarks of Avid. Apple Final Cut Pro, Apple Motion and Apple Soundtrack Pro are registered trademarks of Apple Computer.
Updated October 09, 2023.
0 notes
Text
How to Repair a Neck Joint in Photoshop
When it comes to photo editing, Photoshop is the undisputed king of the digital realm. Whether you're a professional photographer, an amateur, or just someone who loves taking pictures, there will come a time when you need to enhance or fix an image. One common issue in portrait photography is the dreaded "neck joint" problem, which occurs when a subject's neck is not properly aligned in a composite image. In this article, we'll guide you through the process of repairing a neck joint in Photoshop step by step.
Read More
What is a Neck Joint and Why Does it Occur?
A neck joint, also known as a ghost mannequin effect or an invisible mannequin effect, typically happens when photographing clothing or garments on a mannequin. The goal is to make the clothing look as if it is being worn by an invisible person, showcasing its fit and design without any distractions. To achieve this effect, a garment is usually photographed on a mannequin, and later, the mannequin is removed in post-processing, leaving only the clothing.
However, in some cases, neck joints can become visible in the final image due to errors in alignment or lighting. The result is a disjointed or incomplete appearance, which doesn't look professional and can detract from the overall quality of the image.
Tools You'll Need
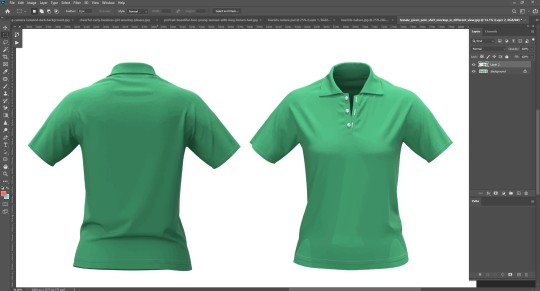
Before we begin, make sure you have Adobe Photoshop installed on your computer. Photoshop is a powerful image editing software that will allow you to effectively repair neck joints in your photos.
Step 1: Open Your Image in Photoshop
Launch Photoshop and open the image that requires a neck joint repair. Go to File > Open, and select your image from your file directory.
Step 2: Duplicate Your Image
It's essential to work on a duplicate layer of your image to preserve the original. In the "Layers" panel, right-click on the background layer and choose "Duplicate Layer." This will create a copy of your image on a new layer.
Step 3: Select the Pen Tool
To create precise selections for your neck joint repair, use the Pen Tool (P). This tool allows you to draw paths that can be used to make accurate selections.
Step 4: Trace Around the Garment
Zoom in on the area around the neck where the neck joint needs to be repaired. Begin tracing around the garment, excluding the neck area. Click to create anchor points and use curves as needed to follow the contour of the clothing.
Step 5: Make a Selection
After you've traced the entire garment, right-click inside the path and select "Make Selection." You can leave the feather radius at 0 pixels for sharp selections.
Step 6: Copy and Paste
Now, press Ctrl+C (or Command+C on Mac) to copy the selected area, and then Ctrl+V (or Command+V on Mac) to paste it. This will create a new layer with only the selected garment.
Step 7: Align and Position
Using the Move Tool (V), position the pasted garment layer over the original layer in such a way that it aligns perfectly. Ensure that the neck area matches seamlessly, eliminating any visible neck joint.
Learn More: Neck Joint Services
Step 8: Mask the Layers
In the Layers panel, select the top layer (the one you pasted) and click the "Add Layer Mask" button at the bottom. This will allow you to hide or reveal parts of this layer as needed.
Step 9: Refine the Mask
Select the Layer Mask and use a soft brush to refine the mask. Paint over areas where the two layers meet to create a smooth and seamless transition. The goal is to blend the neck joint so it's no longer visible.
Step 10: Check for Imperfections
Zoom in and carefully examine the repaired neck area. Look for any imperfections, such as color discrepancies or misalignments. Use the Clone Stamp Tool or the Healing Brush Tool to correct these issues.
Step 11: Add Finishing Touches
Once the neck joint is seamlessly repaired, you can make additional adjustments to the image, such as color correction, retouching, or enhancing the overall appearance to make it more visually appealing.
Step 12: Save Your Image
Once you're satisfied with the result, go to File > Save As and save your image in the desired format (JPEG, PNG, etc.).
Conclusion
Repairing a neck joint in Photoshop may seem like a daunting task, but with the right tools and a step-by-step approach, it becomes a manageable process. Adobe Photoshop provides the necessary features and capabilities to achieve a professional, seamless neck joint repair, allowing your clothing or garment images to look flawless and captivating.
Remember, practice makes perfect. The more you work with Photoshop and hone your skills, the better you'll become at addressing various image editing challenges. If you don't get desired output don't be discouraged. Keep refining your technique, and over time, you'll be able to create stunning images that captivate your audience and showcase your products in the best possible light.
0 notes
Text
That’s it I’m turning this into computer literacy 101
Do:
RUN YOUR UPDATES when prompted. If your computer doesn’t prompt you to update, go to settings and search “updates”. It should take you to a screen that allows you to ready the updates for your computer with a few clicks, and to set your computer to update automatically.
TURN IT OFF NOW AND THEN. I understand not wanting to lose your place in things but at least twice a month you should close all programs and shut down your computer. It helps keep your computer’s programs stable. DO NOT USE THE POWER BUTTON TO DO THIS. USE THE SHUT DOWN OPTION IN THE START MENU UNDER “POWER”.
KEEP IT AS COOL AS POSSIBLE. When I have to run my laptop on a hot day I put it on an ice pack covered with a towel. Use a fan system, use a stand to keep it off the table, anything like that. A hot computer is an unstable system that runs slowly.
RUN A COMPUTER CLEANING PROGRAM. Computers during use will collect cookies, trackers, download duplicate files, etc. avast antivirus has a paid computer scrubber, but ccleaner is a free program that removes junk files and trackers from websites easily and quickly. Run at least bimonthly.
USE A BROWSER THAT HAS ADBLOCK EXTENSIONS AND DOES NOT COLLECT YOUR INFO. USUALLY NON CHROMIUM. Firefox, Opera, and a handful of other browsers can save passwords and favorites without collecting your info to sell, which is what basically every browser that uses Chromium does. Firefox also has extensions like shinigami eyes, dyslexie, forced dark mode, etc.
RUN LITERALLY ANY ANTIVIRUS SOFTWARE. Free avast antivirus, Norton, etc. does not matter but run one of them. If the antivirus deems a site unsafe, trust the antivirus unless you know for sure it is. It will save you many headaches.
Don’t:
CLICK LINKS YOU DON’T KNOW. If you see a link and the URL isn’t one with a website you know of after the www., don’t click it! Leave it alone!
CLICK ANY POPUPS THAT SAY “YOU WON”! Those are scams looking to scrape your info. By clicking that pop up that site can sign you up for subscriptions, charge you money, steal your identity, and more.
TRUST ANY PRODUCT MARKETED, ESPECIALLY ON TIKTOK, FACEBOOK, OR OTHER COMMON SOCIAL MEDIA. They are usually scams. If you truly MUST have a product, make sure the company selling it at least has contact info that actually lands you on the phone with an actual person.
GIVE OUT INFO ABOUT YOURSELF. This includes putting it in your Facebook profile, in your carrd, in your about, in your description. Just don’t do it! Especially if you are a minor! Also? If you are a minor, do not put that in your about! That does not protect you, it places a big old target on your back that you are vulnerable. Operate with this in mind and curate your own experience.
REPLY TO, OPEN, OR CLICK LINKS IN AN EMAIL FROM A PERSON OR SITE YOU DO NOT RECOGNIZE. And oldie but a goodie. Just don’t bother. They’re usually like the pop ups and can sometimes be as bad as downloading malware to your pc.
REPLY TO OR CLICK LINKS FROM PORN BOTS. I’m sorry king, but that sexy girlie is not one of the hot singles in your area. She is a bot looking to scrape your info and passwords.
Links to helpful sites and services:
Ccleaner, a free service to help clean junk files and trackers:
Firefox download link:
Antivirus:
I love my mother and she is the smartest person I know. She’s kind and sensitive and the kind of Christian that doesn’t hate me or want me out of her house for being queer, the kind of Christian more worried about the complications of top surgery than whether God would care.
But one thing she is not is tech literate. I teach her every time I change a setting on her phone, I run her computer’s updates and cleaning programs.
Today she got a skincare scam product off TikTok and I had to teach her that TikTok is scam central and that firming cream does not exist. I love her dearly but then I had to check that she knew not to click on pop ups that say “you won!” And found that apparently she did not know not to do that lmao
35 notes
·
View notes