#duplicate file finder
Explore tagged Tumblr posts
Visit Tumblr Blog
Explore Tumblr blogs with no restrictions, modern design and the best experience.
Last Seen Tumblr Blogs


Fun Fact
Tumblr posted its first advertisements in May 2012 and subsequently earned $13M in revenue.
Text
#remove duplicated file#Google Drive duplicates#delete duplicate files Google Drive#find duplicate files#clean Google Drive storage#Google Drive organization#cloud storage management#duplicate file finder#duplicate finder#double file finder#eliminate duplicate files#clean up duplicate files#best duplicate file finder#best duplicate finder#duplicate file remover mac#macbook duplicate file finder#scan for duplicate files
0 notes
Text
FileBot
FileBot is a free application designed for those with extensive collections of video files, including TV episodes, anime, movies, and more. This utility offers several unique and practical features, such as managing and downloading relevant subtitles, a navigational panel, and lists for various types of media. Thanks to its minimal interface, FileBot allows users to easily organize items into…
#Anime collection management#Checksum verification#Duplicate file finder#File renaming tool#FileBot#Media file organizer#Media metadata editor#Movie database integration#Subtitle downloader#TV show organizer#Video file management
0 notes
Text
Guys, I did it! I'm finally done with redoing my download folder! :) It went from 10GB to 4GB. It started crashing in buymode last night and I ran a duplicate finder which told me I had 6000(!) duplicates. It was a lot of files named blablabla.package.package.package (I have no idea how that happened lol) Since I had to delete those files manually I decided to just start over again, that folder was from years & years ago and contained a lot of files that I wanted to get rid of anyway. Soo, this means I can download some new CC that I've been eyeballing, heh. I also organized it better than the old one so I can find stuff much easier. Off to download some new cc! ;) I also have a couple of WIPS that I wanna finish and I'm free until monday which means I have a lot of time for simming, yay!
64 notes
·
View notes
Text
digital clean-up checklist ⋆.˚🦋༘⋆
an all-inclusive guide for the chaotically digital girlies with a million screenshots and even more tabs open because "i will use this at some point"


1. quick clean (desktop)
start with a clean slate. drag everything on there into a folder called "sort later." we all know that you're going to spend hours looking through them and not actually cleaning, so starting off with a mostly blank desktop is the way to go. we can organize meticulously later.
delete those random duplicate files. you said you would get to them later. you didn't.
empty the recycle bin. i think that's self-explanatory.
2. a bit more thorough clean (finder/file explorer and browsing tabs)
screenshot purge. if you don't remember why you screenshotted it, delete it.
labeled folders are your friend. move important screenshots into labeled folders. move those downloads into labeled folders. put your cat photos in an imaginatively labeled folder: “cat."
close those random tabs. if you haven't looked at the opened tab in 2+ weeks, it's a good sign that you won't need it later either.
control-shift-D. if you're really that afraid to lose "potentially good stuff," just cntrl/cmd-shift-D. this creates a bookmark folder made of all your wonderful once-opened tabs. now, you can have peace of mind when closing the browser for good.
3. very thorough clean (notes app, downloads)
delete those untitled/randomly-made notes. a homework assignment you scanned a month ago? goodbye. grocery lists? gone.
delete those apps. if you haven't opened it in a while, it's probably just using up your phone/laptop storage.
clear the cookies (the website ones.)
go through the sort later folder. now's the best time, y'know?
restart your phone/laptop. since when was the last time you did that?
they say the spaces around you represent your state of mind, so how are our digital spaces any different?
I hope you can spend some time this week cleaning up your phone or laptop. I'm sure future you will thank you for it.
all best wishes, q's playlist
#digital declutter#soft productivity#romanticizing life#self care#mindful living#cozy productivity#tab hoarder#desktop organization#phone declutter#laptop reset#notion aesthetic#getting my life together#reset routine#small habits#life hacks#productivity#girly things#just a girlblog#live laugh girlblog#dream girl#girlblogging#girlblog aesthetic#girlblogger#gaslight gatekeep girlblog#organization#cleaning#qs playlist#q's playlist#that girl
33 notes
·
View notes
Text
Duplicate Frame Deletion: A Likely Unnecessary Tutorial
So… you updated to MacOS Sonoma, and–while it is amazing in many regards for photoshop things–it is a dang bummer and mood killer if you use MPV. However, after slamming my head into a wall trying to change the code on my own, I realized there is a much, much simpler solution to this.
In this tutorial, I will be showing you all how to delete duplicate frames from your gifs, with two options:
duplicate finder
within photoshop
Under the cut because pictures are a visual learner’s best friend!
A quick note:
MPV is odd with this. I’ve not had to do this on 4k capping, but have had to on anything under that. I don’t know the full reasoning, but it mostly looks to be something with the way it is reading frame rate. I know it’s in the code, but could not pinpoint it myself, and these were the only tricks that worked. If you find a better solution, please let me know! It has been rough, otherwise.
Step 1: Cap in MPV as normal
Now, this may be obvious, but make your caps in MPV. For a full tutorial on this, I highly recommend this one by kylos. The only difference between our software and their suggestion is going to be using the newest version of MPV (.0.36 at the time of this), and not the older. This is because there is an issue with MacOS Sonoma and older versions of MPV that prevent it from opening for… Some reason.
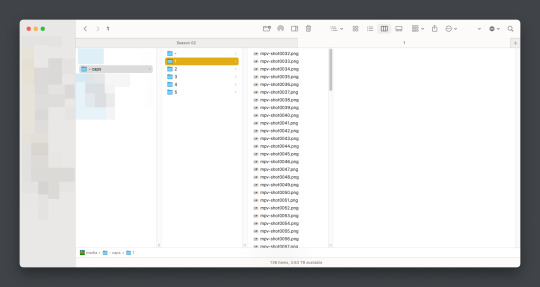
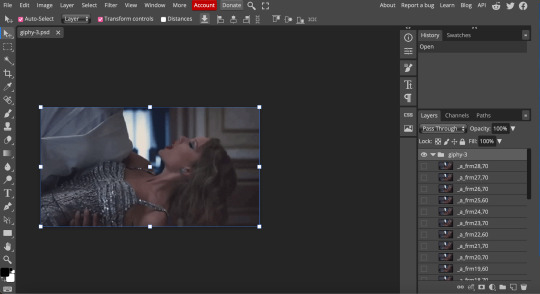
Step 2: Make sure you have your caps
I recommend moving your caps to whatever folder you like for your own ease of use. My biggest rec is to have it in its own folder, with no older folders within the folder. Not really a requirement, but in my mind, it makes the process faster (only true depending on number of files in other folders). You should have something like this (I am doing a scene from TWOT, as it’s one I’ve tested this method on a few times in several instances):
Once there, it’s time for the line split. I recommend option 1 the most (it’s faster, IMO), but again, this is a two option thing.
Option 1: Duplicate File Finder
So, duplicate finders are what they sound like. They are pieces of software that can be used to scan your device (or specific sections of said device), for duplicate files. It does not matter the title of the file, if the system reads it as a copy, it will find it.
There are a number of varieties for this, paid and free. I will not lie, the one I use is a paid version, because I had a huge issue with duplicate files taking up space when I moved to a new device. This also helps a lot with cloud file keeping, in my opinion. But that is beside the point.
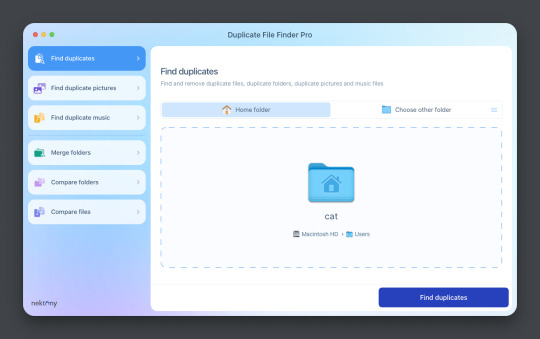
This is Duplicate File Finder Pro, which I got for other reasons, but has been very useful since this became an issue. The free version is sufficient for removing duplicate files found in folders, and that is why I still suggest it. You only need to get the pro if you have other intentions.
Now, onto the next step…
Step 3: Drag and drop the folder
With our folder full of caps, we simply drag and drop it into the application to begin.
Step 4: Click “Find duplicates” and watch the pretty graph roll.
Step 5: Select the duplicate images
You can see here it found the duplicates.
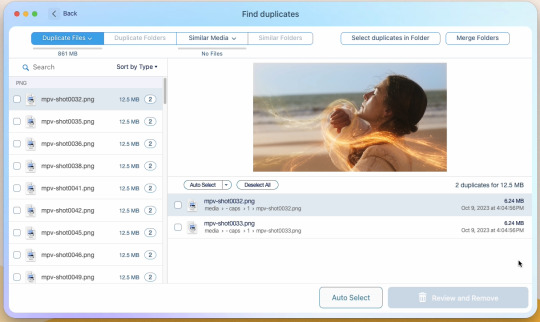
Now, I could go through by hand and click them, but… that’s a lot of time I don’t want to waste. I let it auto select them instead (you can tweak the settings for auto-select, but this is not that tutorial).
Step 6: Select review & remove, complete!
Wham bam! You’re completely set and good to go. Gif as normal~ (all final results at bottom)
Now, of course, maybe you don’t want a duplicate remover. Understandable, so what then? Well…
Option 2: Photoshop & the Changing Frame rate
So, this one is a little more technical. I suggest basic giffing and Photoshop knowledge before attempting.
Step 3: Import folder as you normally would
I believe this works as it would for import video, but I don’t want to say that and be wrong. But load your files in and you’ll be here:
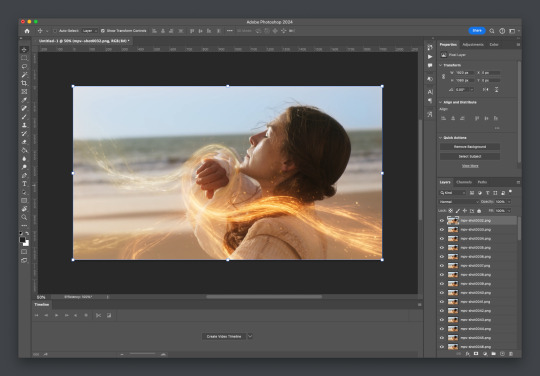
Now create video timeline, make frames from layers, yada yada (kylos’ guide is very good with this if you need help, it’s the same that was linked at the beginning of this). You’ll now be here:
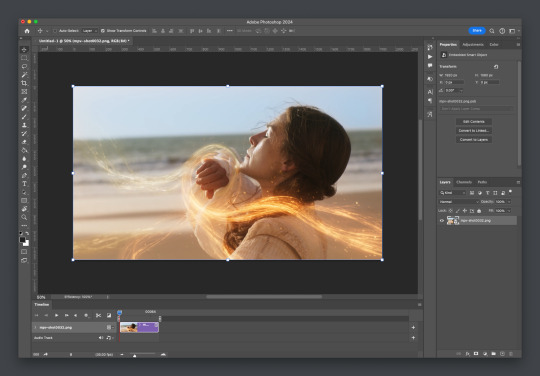
And the actual part of the tutorial you all came here for...
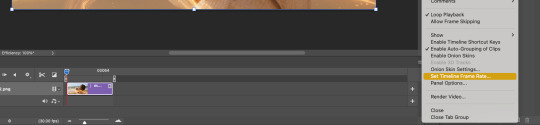
Step 4: Change the frame rate
So, in the bottom, next to the mountains for zooming in on the timeline, you’ll see it reads “30.00 fps.” We need to change this to 60. How? Easy! Click the three lines circled here:
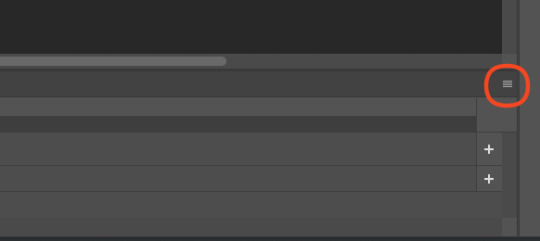
Then click “Set Timeline Frame Rate…”
A little box will pop up, change the 30 to 15 (dropdown or typing, it works the same) and click “OK.”

Your timeline will now be cut in half for length. That’s OKAY. DO NOT PANIC.
(Optional) Step 5: Double Checking
Click play on your gif, and you’ll notice it is no longer duplicate framed! To verify, let’s convert back to frames, just to see…
And it did, success! So make the rest of your gif as normal.
Your final results for the gif will be the following, with the gifs all labeled on what option was taken (or not). These were cropped for uploading and sharpened because of how I am. No coloring applied.

If anything was confusing, please don't hesitate to reach out! I'm happy to help in any way I can on this. My ask is always open. Happy Giffing!
#*tutorial#*ps#photoshop#resources#tutorial#alielook#singinprincess#sophiedevreaux#tuserabbie#tuserheidi#userace#userairi#useraish#userbarrow#userdorksinlove#userhella#userkayjay#userkraina#usermadita#usernik#userrobin#usershale#usersmia#usersray#usertj
178 notes
·
View notes
Text

lovely anons have been requesting a gif tutorial, and while there's plenty photoshop ones out there I think there's only a couple photopea ones (if you dont know photo pea is like an internet photoshop basically) so I thought I'd make a little tutorial on how I do my gifs!
first you're gonna want to use any gif making platform to actually turn your video clip into a gif. I personally use giphy but I know there's a bunch of other platforms for this. then you're just going to open the gif in photo pea either by clicking "open from computer" on the home page or dragging it in from finder (Mac) or files.
IF YOU'RE MAKING A GIFSET: the first thing I do is make sure all of my gifs are the same number of frames. its important to do this if you want all of your gifs to restart at the same time! to do this I just go to the side where all the frames are listed - this one has 29 frames (note: it says 28 on the top frame, but the very first frame is listed as 0, so always add 1 to the top number to know now many frames there are). what I do is find the gif with the least amount of frames and then make all the gifs the same number - depending on what part of the gif I want to keep/delete I'll delete frames from the beginning, end, or both which usually requires some basic math
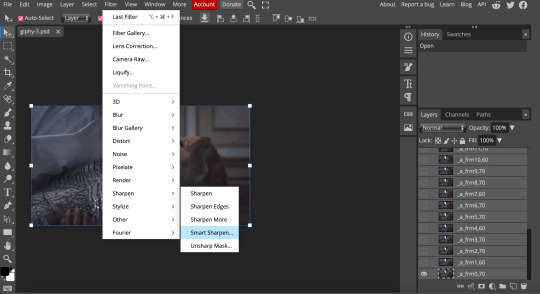
next, I click on the top frame, press shift, and then press on the bottom frame to select all (unfortunately there's no keyboard shortcut for this I don't think). then I'll click filter -> sharpen -> smart sharpen that way I can freely customize the sharpness of each gif depending on it's original quality. usually I do 200% at 0.5 pixels but I'll adjust if necessary.
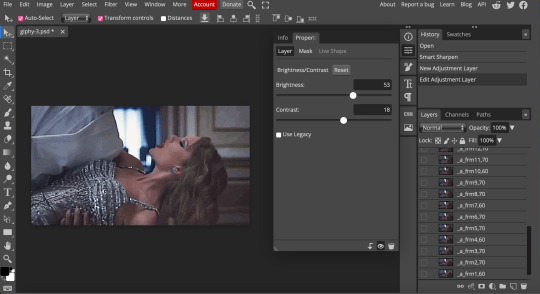
now comes the actual coloring of the gif! all of these will be adjustment layers (layer -> new adjustment layer).
first I'll select the brightness/contrast layer and play around with those settings until it looks good to me.
next, I'll play around with the levels and curves layers until it looks how I want it.

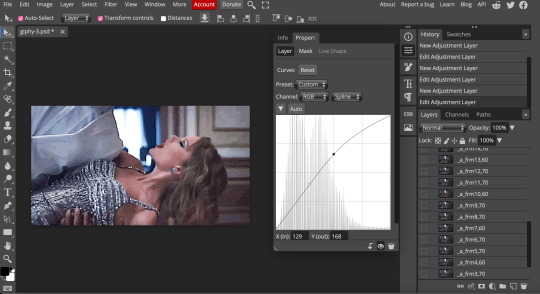
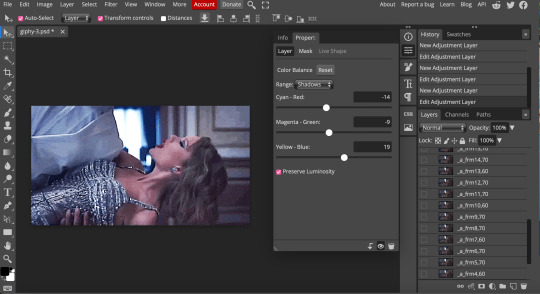
sometimes I'll stop here if it looks good, sometimes I'll play around with the saturation adjustment layer, or in this case I'll edit the color balance to deepen some of the shades that aren't popping out how I want.
IF YOU'RE MAKING A GIFSET: the easiest thing I've figured out for coloring multiple gifs to save time is duplicating these adjustment layers to each gif in the set (layer -> duplicate layer into; it'll prompt you to select the psd you want to add the layers to). when I do this I turn off the visibility for each one and one by one turn them back on (starting with brightness/contrast) and adjust them if necessary.
if I'm not adding text this is where I'll end, but sometimes I like to add texts to more of my creative gifts. usually I'll follow a tutorial (@usergif resource directory has a bunch of good tutorials that can be adapted to photo pea, or I'll just look them up on Tumblr itself). sometimes I like to do things a little simpler, which is what I'll show here.
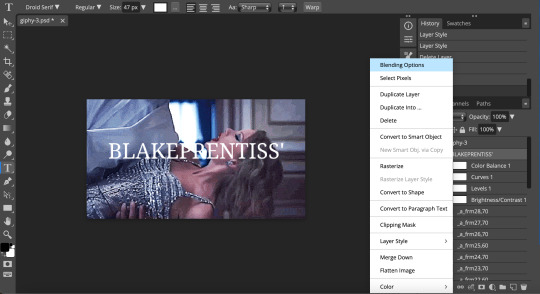
you're going to click on the T towards the bottom on the left sidebar, type put your text, change your font (photopea has a ton and I'm not too picky but you can download fonts from the internet and upload them), as well as color and size (don't forget to select all of the text when you do this!!) then click on the cursor icon to move the text to your desired placement.
then click on the layer in the right sidebar and select blending options.
I'm going to add a stroke of 1px in black to my text and position it to the center. I do this on every text I add to gifs (even if the text is black, which I ended up changing this one to) to add some extra size/detail.
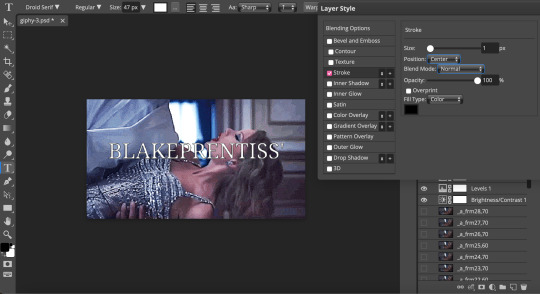
you're more than happy to stop here, but I like to play around with some of the other blending options until I'm satisfied. sometimes I'll lower the fill to 0-30%, or in this case, I changed the blending option to overlay to get the desired effect. (both under blending options)
I followed the same steps with my second row of text, except I changed the font and then warped the text a bit after placing it where I wanted by T -> warp -> arch and changing the settings.

and you're done! file -> export as -> gif to save it! I also like to do this periodically throughout the process to make sure the gif is giffing if you know what I mean

#gif tutorial#photopeablr#photopea#photopea gif tutorial#mine*#tutorial*#tutorial#gif making tutorial#gif making
42 notes
·
View notes
Text

🚀 Crazy Solutions – Free AI Tools for Recruiters (Lifetime Access!) 👉 Register now and get access to these tools – 100% Free for All!
🎯 AI-Powered Tools Available:
🗂️ Free AI Bulk Resume Parser
🗂️ Free AI Resume-to-Job Match
📊 Free AI Bulk Email Parser
🗂️ Free AI Bulk Phone Number Parser
🗂️ Free AI Duplicate Email Finder
🗜️ Free AI ZIP File Converter
🗜️ Free AI Job Description (JD) Generator
✅ …and more!
🔗 Register Now: https://crazysolutions.in/register/
1 note
·
View note
Text
0 notes
Text
0 notes
Text
How to Find Unit Number in Property Finder Listings Instantly:
A Complete Guide for Dubai Property Buyers

In Dubai’s fast-paced and transparent real estate market, having access to precise property details can make or break a deal. Among those key details is the unit number—especially relevant for buyers, investors, and even agents looking to verify property listings or cross-reference ownership. However, finding unit numbers on listing platforms isn’t always straightforward. That’s why knowing how to Find Unit Number in Property Finder Listings Instantly is now more important than ever in 2025.
This guide will walk you through the importance of unit numbers, the challenges users face, and the best tools or methods to reveal them—even when they're not visible at first glance.
Why Are Unit Numbers Important in Dubai Real Estate?
Dubai’s real estate sector is highly regulated, with each unit registered under a unique number through the Dubai Land Department (DLD). This unit number acts like a fingerprint for the property. It can be used to:
Verify the ownership and legal status of the property
Check mortgage or lien status through DLD services
Review exact floor location and floor plans
Match the property listing with official government records
For buyers, it ensures they’re investing in a verified and existing unit. For agents, it prevents the risk of duplicating or falsely listing unavailable properties.
But despite its importance, unit numbers are rarely shown on public listings—largely due to privacy rules and platform limitations.
Challenges of Finding Unit Numbers on Property Portals
On portals like Property Finder, Bayut, or Dubizzle, listings typically show details like community, building name, number of bedrooms, and size. But often, they stop short of revealing the unit number. This creates challenges for:
Verifying that the unit is real and currently on the market
Avoiding fake or duplicated listings
Conducting due diligence when purchasing off-plan or secondary properties
That's where the need to Find Unit Number in Property Finder Listings Instantly comes in. And now, smart tools and tricks can help you do just that.
How to Find Unit Number in Property Finder Listings Instantly
There are several ways you can attempt to retrieve unit numbers, depending on how the listing is structured:
1. Check Attached Brochures or Floor Plans
Sometimes agents upload official developer brochures or building floor plans. These files often contain unit numbers for each apartment or villa. Scrutinize these documents carefully.
2. Contact the Agent Directly
If you see a property you're interested in, call or WhatsApp the agent and request the unit number. Be professional and let them know you're doing due diligence.
3. Use a property finder unit number finder Tool
Several Chrome extensions and AI-based tools have emerged in 2025 that allow users to extract hidden metadata or detect property information embedded in the page. A reliable property finder unit number finder can analyze the HTML of the listing, parse documents, and even reference DLD APIs to suggest likely unit numbers.
These tools are becoming increasingly popular with brokers, investors, and even property tech startups.
Tips for Using a property finder unit number finder Effectively
When using such tools, make sure to:
Only download browser extensions from trusted real estate technology providers
Cross-check results with Dubai Land Department data (via REST App or DLD website)
Always confirm the unit with the listing agent before proceeding with documentation
Keep in mind that while these tools are helpful, they are meant to assist—not replace—manual verification.
Conclusion: Get Ahead with Better Property Insight
In a competitive and digitally driven property market like Dubai, being informed is your greatest advantage. Learning how to Find Unit Number in Property Finder Listings Instantly saves time, increases transparency, and protects you from making the wrong investment. With the rise of smart real estate tools, a reliable property finder unit number finder can help you unlock crucial data and boost your confidence in every deal.
Whether you're an agent working with high-volume listings or a buyer seeking investment property, mastering this process in 2025 gives you a serious edge.
0 notes
Text
Price: [price_with_discount] (as of [price_update_date] - Details) [ad_1] JSL JDTDC 4-IN-1 Photo Backup Stick, the perfect tool for anyone looking to safeguard their cherished memories. Designed for ultimate compatibility, this versatile backup solution works flawlessly with iPhones, iPads, Android devices, and computers. Whether you're a casual smartphone user or a professional photographer, the android Photo Backup Stick ensures your photos and videos are always secure and easily accessible. iPhone backup storage memory stick Compatible with iOS, Android, Windows, and Mac OS. No need for complex setups or additional software. Simply download the iStore Pro app,plug in the stick and start backup your files with ease.The intuitive one-touch backup feature allows you to save all your photos and videos with a single click, making it incredibly user-friendly. Photo finder stick can organizes your files automatically, making it easy to find exactly what you need when you need it.The sleek, lightweight design makes phone photo vault easy to carry with you wherever you go. Whether you’re at home, at work, or traveling, your backup solution is always within reach. Never worry about running out of storage space on your device while capturing memories on the go.Keep your children's precious moments safe without the hassle of cloud storage.Back up your work effortlessly, ensuring that your important files are always within reach.Using this iPhone Photo Backup Stick, you can enjoy hassle-free photo and video backup across all your devices. This iPhone Photo Backup Storage Device intelligently scans for new changes (new videos and photos) and always backup only new changes rather than duplicating the previous photos and vedios as well.With the Photo Backup Storage, your memories are always just a click away. System Requirements - iOS and iPadOS 10.0 or Later| Android OS 6.0 or Later| Windows 7 and Later | Mac OS 11.0 or Later and a Mac with Apple M1 chip or later. (NOTE: iStore Pro Required for Backup). photo backup stick for iphone ipad android pc Compatible with Multiple Devices: Our 4-IN-1 photo backup stick features Lightning, USB-C, Micro USB, and USB 3.0 interfaces, ensuring photo finder stick seamless compatibility with a wide range of devices including iPhones, iPads,most Android phones, tablets, and PCs, Mac computers. Easy to Use and Set Up: Simply download the 'iStore Pro' app. Just plug iPhone backup stick into your device, the iStore Pro software scans your device, finds your media files, and saves them securely on the photo backup storage stick. The intuitive and user-friendly software makes it simple for anyone to back up and retrieve their files, even without technical expertise. Safeguard Your Files & Organized: No more stress about losing data to crashes or cloud errors. JSL JDTDC Photo Stick securely backs up all your files and automatically sorts them into neatly organized folders, making them easy to find whenever you need them. Detect duplicates & Seamless Sharing: This iPhone Photo Backup Storage Device intelligently scans for new changes (new videos and photos) and always backup only new changes rather than duplicating the previous photos and videos as well. This photo stick sharing feature makes it easy to post photos, videos, and files directly to social media platforms, letting you share memorable moments with friends in an instant. Free Up Space: iPhone backup flash drive enables you swiftly and effortlessly back up massive files, freeing up your phone's storage. You can always access your data from the photo backup storage. Easy to use and plenty of storage capacity. Use the iPhone data backup drive to transfer data from an Old Phone to New Phone! System Requirements: iOS and iPadOS 10.0 or Later| Android OS 6.0 or Later| Windows 7 and Later | Mac OS 11.0 or Later and a Mac with Apple M1 chip or later. (NOTE:FREE APP iStore Pro Required for iPhone/iPad/Android/PC/Mac.) Friendly Reminder: If this is your first
time backing up and you have a lot of files, please understand that the photo backup device will need some time to scan your files. Please be patient during this process. [ad_2]
0 notes
Text
તમારા પીસીમાંથી Duplicate Files કેવી રીતે શોધી અને ડિલીટ કરશો? – સરળ ગુજરાતી માર્ગદર્શિકા

Duplicate files તમારા PC ની storage space ભરશે, system slow કરશે અને organization પણ ખરાબ બનાવશે. આ ફાઈલ્સ ફોટો, ડોક્યુમેન્ટ, વીડિયો કે અન્ય ફોર્મેટમાં હોઈ શકે છે. આજના ટ્યુટોરીયલમાં આપણે શીખીશું કે તમારા Windows પીસીમાંથી duplicate files કેવી રીતે શોધવા અને કાઢી નાખવા (delete) એ સરળ રીતે — ગુજરાતી ભાષામાં.👇
🔍 Step-by-Step: Duplicate Files શોધી કાઢવા અને ડિલીટ કરવા
✅ વિકલ્પ 1: Free Software નો ઉપયોગ (સરળ રીત) 1. Duplicate Cleaner Free - 👉 https://www.digitalvolcano.co.uk/dcdownloads.html - Install કરો અને ફોલ્ડર select કરો જ્યાં તમારે duplicate files સ્કેન કરવા છે - Result આવશે → તમારે select કરીને delete કરવી 2. CCleaner (Free version) - 👉 Tools > Duplicate Finder - Filters લાગુ કરો (ફાઇલ ટાઇપ, સાઇઝ, નામ વગેરે) - Duplicate files શોધીને delete કરો 3. Auslogics Duplicate File Finder - સરળ UI સાથે, beginners માટે perfect - Install કરો → Scan કરો → Duplicate પસંદ કરો → Delete ✅ વિકલ્પ 2: Windows File Explorer થી Manual રીતે સાવધાન: Manual પ્રક્રિયા સમય લે છે અને human error શક્ય છે. - Windows Explorer ઓપન કરો - Folder ખોલો જ્યાં duplicate files હોવાની શક્યતા છે (જેમ કે Downloads, Documents) - View > Sort by > Name or Size - ફોટા કે ફાઈલ્સ visually compare કરીને same હો એવી files delete કરો
⚠️ Duplicate Delete કરતાં પહેલાં...
- 🤞 હંમેશાં ફાઈલ્સ ચકાસો — બધું Same છે કે નહીં - 🗂️ મૂળ ફાઈલ backup રાખો (specially important documents/photos માટે) - 🚫 System files ક્યારેય manually delete ન કરો
🎁 Bonus Tip:
📁 Google Drive, OneDrive કે Dropbox જેવી cloud storage માં પણ duplicate checker tools છે તેથી cloud clean-up પણ કરી શકો છો! Read the full article
0 notes
Link
Speedy Duplicate Finder Crack is a fast and efficient tool designed to help users locate and remove duplicate files on their computers. With its advanced scanning algorithms, it quickly identifies identical files, freeing up valuable disk space and improving system performance. Whether you’re managing photos, documents, or large media libraries, Speedy Duplicate Finder ensures a streamlined and clutter-free storage experience.
0 notes
Text
iPhone Storage Full? Find and Remove Duplicate Videos with These 5 Methods If you're an iPhone user who loves capturing moments through video, you've likely encountered a common problem: duplicate videos taking up valuable storage space. Whether from accidental double recordings, shared media, or backed-up content, these duplicates can quickly consume gigabytes of storage without you realizing it. Finding and removing duplicate videos on your iPhone not only frees up precious storage space but also helps organize your media library for easier access and management. In this comprehensive guide, we'll explore various methods to identify and remove duplicate videos on your iPhone, from using built-in features to third-party applications designed specifically for this purpose. By the end of this article, you'll have all the tools you need to efficiently manage your video collection and reclaim your iPhone storage. Why Duplicate Videos Accumulate on iPhones Before diving into solutions, it's helpful to understand how duplicate videos end up on your device in the first place: Multiple photo backups: When restoring from different backups or syncing across multiple services (iCloud, Google Photos, etc.) Accidental saving: Downloading the same video multiple times from messaging apps or emails Screen recordings: Creating screen recordings of videos you already have saved Photo sharing: Receiving the same video from different people via AirDrop, Messages, or social media Manual copying: Duplicating videos when organizing files Identifying these patterns can help you prevent duplicate accumulation in the future. Method 1: Using the Built-in Photos App Apple's Photos app includes a basic duplicate detection feature introduced in iOS 16 that can help you locate identical videos. Here's how to use it: Finding Duplicates with the Photos App Open the Photos app on your iPhone Go to the Albums tab at the bottom of the screen Scroll down to the Utilities section Look for and tap on the Duplicates album The app will automatically display all duplicate photos and videos found on your device For each set of duplicates, you'll see options to Merge the files, which keeps the highest quality version and deletes the others Note: This feature only identifies exact duplicates with identical file data. Similar videos with slight differences won't be detected. Method 2: Using the Files App to Manually Search For more control over the process, you can manually search through your videos in the Files app: Open the Files app on your iPhone Navigate to On My iPhone or iCloud Drive where your videos are stored Tap the List icon (three lines) in the top-right corner to change the view Tap on the dropdown arrow and select Sort by Size to group larger video files together Manually check files with similar sizes and names that might be duplicates Preview videos by long-pressing on their thumbnails To delete a duplicate, swipe left on the file and tap Delete While this method requires more effort, it gives you greater control over which files to keep or remove. Method 3: Third-Party Duplicate Finder Apps For more powerful duplicate detection capabilities, third-party apps offer advanced features and algorithms. Here are some top options: Gemini Photos Gemini Photos by MacPaw is one of the most popular duplicate finders: Download Gemini Photos from the App Store Launch the app and allow it to scan your media library Tap on the Videos section Navigate to the Similar or Duplicates category Review the suggested duplicates and select those you want to remove Tap Delete to remove the selected videos Gemini Photos uses smart algorithms to detect not only identical duplicates but also similar videos, making it more effective than the built-in Photos app. Photo & Video Duplicate Cleaner Another excellent option with a focus on media files:
Download Photo & Video Duplicate Cleaner from the App Store Open the app and grant necessary permissions Tap Scan Now to begin analyzing your library Select the Videos tab to focus only on video duplicates Review the found duplicates and check those you want to delete Tap Delete Selected to remove them This app offers a simple interface specifically designed for finding duplicate media files. Method 4: Using iCloud and Mac for Larger Libraries If you have a large video collection, using a Mac with your iCloud account can provide more powerful tools: Ensure your iPhone is synced with iCloud Photos On your Mac, open the Photos app Click on Albums in the sidebar Scroll to Utilities and select Duplicates Filter to show only videos by clicking on the dropdown menu and selecting Videos Review and merge duplicates as needed The larger screen and additional processing power of a Mac make handling large video libraries much easier. Method 5: Smart Storage Management Using iPhone Storage Recommendations Your iPhone offers smart recommendations to manage storage: Go to Settings > General > iPhone Storage Wait for the analysis to complete Check the Recommendations section Look for suggestions related to large videos or duplicated content Follow the provided options to optimize storage Using Optimize iPhone Storage Feature Enable the optimize storage feature to automatically manage video storage: Go to Settings > Photos Enable Optimize iPhone Storage This keeps full-resolution videos in iCloud while storing smaller versions on your device Tips to Prevent Duplicate Videos Preventing duplicate videos is easier than removing them later: Use iCloud Photos consistently: Don't switch between multiple backup services Check before downloading: Verify if you already have a video before saving it again Use the "Save Image" option carefully: In messaging apps, check if you already have the video Organize regularly: Set a monthly reminder to clean up your video library Use Albums: Create logical albums to better track your content Security Considerations When Using Third-Party Apps When using third-party duplicate finder apps, keep these security tips in mind: Only download from the App Store: Avoid sideloaded apps for handling your personal media Check privacy policies: Ensure the app doesn't upload your videos to external servers Review permissions: Only grant necessary access to your media library Look for reputable developers: Choose apps from established companies with good reviews Conclusion Finding and removing duplicate videos on your iPhone doesn't have to be a tedious task. From using the built-in Photos app's duplicates feature to leveraging specialized third-party applications, you have multiple options depending on your needs and preferences. Regular maintenance of your video library not only frees up valuable storage space but also makes your video collection more organized and accessible. By implementing the preventive measures discussed, you can minimize duplicate accumulation in the future and keep your iPhone running smoothly. Whether you choose to use Apple's native tools or third-party solutions, taking control of duplicate videos will enhance your iPhone experience and ensure you always have space for capturing new memories without worrying about storage limitations.
0 notes
Text
0 notes
Text
Hypercritical: Hyperspace
Today, most Mac users don’t even notice that using the “Duplicate” command in the Finder to make a copy of a file doesn’t actually copy the file’s contents. Instead, it makes a “clone” file that shares its data with the original file.
💬 John Siracusa
🤯 .. count me in the ‘most’ camp - and now. needing to understand this more - even though I still use ‘save as’.
0 notes