#macbook duplicate file finder
Explore tagged Tumblr posts
Visit Tumblr Blog
Explore Tumblr blogs with no restrictions, modern design and the best experience.
Last Seen Tumblr Blogs


Fun Fact
Tumblr is used by 21% of adults online aged 18-29 years.
Text
#remove duplicated file#Google Drive duplicates#delete duplicate files Google Drive#find duplicate files#clean Google Drive storage#Google Drive organization#cloud storage management#duplicate file finder#duplicate finder#double file finder#eliminate duplicate files#clean up duplicate files#best duplicate file finder#best duplicate finder#duplicate file remover mac#macbook duplicate file finder#scan for duplicate files
0 notes
Photo

hello and welcome! this is my spin on a comprehensive giffing tutorial that not only covers the basic mechanics of how to gif, but also goes into the tips, tricks, and general photoshop information i’ve learned since i started giffing and now wish i could beam into my past self’s brain. this tutorial will walk you through everything from start to finish, help explain what not to do and why, and hopefully give even experienced gifmakers some new information!
note: this tutorial is very long and image-heavy, and is best viewed on dash
WHAT YOU’LL FIND IN THIS GUIDE
software needed
sourcing + storing footage
giffing: methods + step by step process
actions
coloring
text: subtitles, fonts, etc.
saving: timing, settings, exporting
posting: captions, tags, scheduling
resources
✨ NOTE: CURRENT AS OF 05/25 ✨
1. SOFTWARE
photoshop
there are tons of programs out there you can use to make gifs, including photoshop dupes like photopea and gimp, but this tutorial is going to focus solely on photoshop
i run photoshop 2025 on a macbook pro, but any ps version recent enough to have the video timeline will work. windows users will be able to follow along as well
you can snag photoshop (and lightroom) for $10 USD/month directly from adobe
adobe also offers discounts/free programs through universities, so be sure to look into that if you’re a student
or you can check here and here for other ways to snag it
vpn
just get one. seriously.
most reliable vpns (nordvpn, proton, mullvad, etc.) regularly have sales to make them more affordable
if you really can’t afford one, there are some free options; just be extra careful about which one you pick
if you don’t have a vpn, your internet service provider will be able to see what you’re t*rrenting/downloading and may take action against you— anything from cease and desist notices to throttling your internet speed or even terminating your contract with them
note: make sure your vpn is active and working correctly before you start t*rrenting or downloading anything
qbittorrent
safe, reliable free t*rrent client with a clean interface that is fairly intuitive
note: make sure you bind your client to your vpn to prevent any accidental data leaks; not all clients let you do this, but qbittorrent does
jdownloader
a download manager that is super useful for direct downloads (ddls)
keka
mac archive/extraction program you can use to open ddls acquired through jdownloader
winrar
windows archive/extraction program you can us to open ddls acquired through jdownloader
4k video downloader
free application for downloading hq youtube videos
mpv
free video player that takes sequential screenshots
capable of playing .mkv files (most large t*rrent and ddl files use this format)
cheat sheet of mpv keyboard shortcuts
works with both mac and windows
installation guides (courtesy of @kylos): mac and windows
note: install builds specified below for best results
mpv on mac
different builds allow it to work with 1080p, 2160p, sdr, and hdr files
1080p sdr build list
note: older mpv builds (ex: 0.29.0) no longer work on apple silicon macs that have updated to the sonoma operating system and beyond. if you have updated, delete your old sdr mpv build, download the latest build, and update your config file to match the example below. mpv will duplicate caps the first cap at the beginning of your screenshot sequence, but the rest of your caps should be fine

if you have an intel mac and have upgraded to sonoma, because of backend gpu issues, you will experience significant issue capping with mpv; using a duplicate finder (tutorial by @laurabenanti here) works as a partial fix, but there will still be some skipped frame/choppiness issues. i recommend looking into vlc or gomplayer as an alternative to mpv
2160p hdr build
note: the hdr build will not work for 1080p files— it will take duplicate screencaps. it also takes duplicate screencaps of your first cap only when used with 2160p files, so be aware of that
i recommend naming your builds so you don’t accidentally open a file with the wrong build

mpv on pc
assuming your computer can handle hdr, the standard build should work with all files
available for 64-bit and 32-bit systems (see windows installation guide linked above)
note: be sure you watch out for duplicate frames at the beginning of your screenshot sequence
a big shoutout to @jacksamiras for helping my mac-only ass make sure i had all the facts straight for pc users!
2. FOOTAGE
how to acquire files
a current and comprehensive guide; updated regularly
where to acquire files
ext.to: well-organized t*rrent site with a wide selection of files
1337x: t*rrent site with a solid variety of files
watchsomuch: t*rrent site (minion-themed, unfortunately) with a huge selection of movies and shows, though many of the links are old and/or underseeded
hdencode: ddl site with a excellent array of hq movies and shows
nima4k: german ddl site with ultra hq file options
yts: t*rrent site that specializes in extremely small file sizes; generally not ideal for giffing, but it can be a good way to find files you really can’t find anywhere else
digital-digest: a great place to find lossless hd trailers
thedigitaltheater: another place to find lossless hd trailer
storing your footage
external hard drives are the most practical option; for ease of use make sure you get a drive that is compatible with your computer (mac vs. pc) and has decent reviews— you want to make sure it’s not going to crap out on you in six months or something
shared drives/cloud storage (guide by @usergif) also work if you can’t afford hard drives or don’t want to bother with them
quality
⚠️ ALWAYS GIF FROM 1080p AND UP ⚠️
anything below 1080p (720, 480, 360) is going to be noticeably fuzzier and lower quality
sometimes things like older music videos only exist in low quality, but for movies and tv shows, it’s always going to be worth it to find a file that 1080p or better
in most cases, the higher the file size, the better. a 2 gb file is going to be significantly less hq than a 10 gb file. for example:


2160p isn’t necessary, but if you know you’re going to be making really big gifs (540x450 and up) or doing a lot of intense blending or coloring, the extra size and quality will really help
sdr vs. hdr
sdr is standard dynamic range, while hdr is high dynamic range
note: not all computers are capable of displaying hdr files correctly
most newer computers (ex: all macs from 2018 onwards) have native support for hdr files, but do some googling to make sure your machine can play them before you download any
below is an sdr screencap (left) next to an hdr screencap (right) that is not being displayed correctly

[source]
the washout that occurs with hdr files isn’t always a machine issue; it can also occur if you cap hdr files with an incompatible screencapping setup
using the correct build in mpv (2160p build for macs, the standard build for pcs, both linked above) will allow you to capture hdr screenshots while preserving the original color profile — no washout!
upscaling
what is upscaling? upscaling is the process of increasing the size and detail of a digital image, making it sharper and clearer with (in theory) little to no loss in visual integrity
many older movies are now upscaled into 4k, and while it can be tempting to grab a large upscaled file, be aware that upscaling can drastically affect a film’s color profile
for example, each of the following gifs have been sharpened using the same settings, and have no coloring on them:


as you can see, the upscaled 2160p and 1080p gifs have areas of extreme contrast, and are very yellow. the non-upscaled 1080p file, despite its lower quality, maintains the original color profile and contrast balance
how you feel about upscaling and the resulting quality vs. color tradeoff ultimately comes down to personal preference, but it’s definitely something to keep in mind as you’re selecting a file
3. GIFFING PROCESS
methods
there are four main methods for giffing: screenrecording, video extraction, files into stack, and DICOM files. both files into stack and DICOM files involve taking consecutive screencaps to load into photoshop rather than importing the video or opening it directly in photoshop, which is how screenrecording and video extraction work
there are pros and cons to each method, and all of them work at the end of the day, but i think there’s a clear winner in terms of both ease and quality. here’s a quick run down of each method
screenrecording
pros: least intimidating method, fairly quick
cons: huge loss in quality, it’s becoming increasingly difficult to record footage from sites like netflix, hulu, etc. as they get better about detecting recording programs like quicktime player and giphy capture (i.e. you end up with a black screen when you try), higher fps rate of screenrecording compared to footage fps creates issue with gif playback
fps issue: to get the smoothest playthrough, you need to load in every frame. however, if you do that, you end up with a gif that lags dramatically due to the frame rate difference. to combat this lag, you have to manually sort through and delete every duplicate frame created from the fps difference. if you don’t load in every frame (ex: every other frame), you won’t have to manually delete anything, but your gif will be noticeably choppy
video extraction
pros: takes less time/computing power than opening an entire movie/episode in photoshop
cons: some quality is still lost, extraction programs like handbrake can be difficult to use, rendering extractions still takes much longer than screencapping
files into stack
pros: no quality loss, much faster than extraction method
cons: caps load into photoshop in reverse order, 2160p caps take a very long time to load compared to 1080p caps
DICOM files
pros: no quality loss, caps load in correct order, load times significantly reduced from files into stack method (1080p caps load instantaneously and 2160p caps load in seconds)
cons: photoshop actions designed for use with files into stack must be tweaked for use with DICOM method
to illustrate the difference in quality, each gif below has been sharpened with the same settings, set to the same frame delay, and has no coloring on it


as you can see, the choppiness/lag in the screenrecorded gifs is very evident when compared with the screencapped gif. the screencapped gif is also smoother and crisper, with truer color and no artifacts or blockiness. the video extraction gif is a closer match in terms of quality, but it still has banding and blockiness in some areas, and a slight blur compared to the screencapped gif
now that you’ve seen the differences, on to screencapping! as you may have guessed from the pros and cons lists above, “load files into stack” and “load multiple DICOM files” are almost identical processes, but crucially, DICOM files* load much more quickly into photoshop, and they don’t load in reverse order. the speed difference is especially nice when you’re working with 2160p caps, which take absolutely forever to load in the with files into stack method
* .dcm files; designed for medical imaging, they store information differently than .png or .jpeg files and are used to transmit large images and associated data quickly and losslessly
i recently switched to working with DICOM files, so that’s what i’ll be showing you how to use below!
process
1. open file in mpv + stake screencaps
i like to take a lot of caps so that i can be super picky about choosing exactly what i want to have in the gif, but my computer has the horsepower to handle that. if you don’t think yours does, consider being more precise in your initial scene selection and/or stopping at 50-55 total caps
note: how to take screencaps with mpv player is covered in the installation guides linked above


2. trim caps + rename from .png to .dcm
if i’m using the hdr build (like i am here), i remove any duplicate caps from the beginning. then, regardless of which build i’m using, i trim any extra caps from the end to ensure that only caps from the scene i want to gif are left in the folder before i turn them from .png to .dcm files. it’s a simple process on mac: select all > right click > rename
see here for a guide to batch renaming extensions on windows


3. open photoshop + load multiple DICOM files
unlike “load files into stack” you’re loading you entire screencaps folder in for “load multiple DICOM files”; this is why it’s a good idea to trim your caps before you load the files in


4. crop

click on the crop symbol in your toolbar, then select w x h x resolution in the drop down menu and enter the dimensions you want for your gif

basic tumblr dimensions for width (height is up to you)
one gif: 540px
two gifs in a row: 268px each
three gifs in a row: 177px, 178px, 177px

note: it’s worth it to leave a gutter of extra pixels (i leave 5px for both width and height) in your cropping dimensions to prevent edge lines from showing around the perimeter of your gifs
i’m making a 540x350 gif for this tutorial, so the dimensions for my crop are 545x355; i’ll size the canvas itself to 540x350 after i’ve made the gif
additionally, make sure “delete cropped pixels” is unchecked so that you can move the gif around on the canvas if you need to
feel free to adjust the crop box as much as you want before you actually hit the checkmark to finalize it, but make sure you crop once and only once. resizing after you have already cropped will wreck the quality and introduce a lot of fuzziness to your gif. if you don’t like the way the crop turned out, undo it and try again

after you’ve cropped, go ahead and zoom in so you can get a better sense of what you’re doing. i tend to work at 200%, since that’s the best approximation of how the gif will display on tumblr
5. create video timeline
make sure you have the video timeline pulled up in your workspace. if yours isn’t visible, go to window > timeline to add it to the space
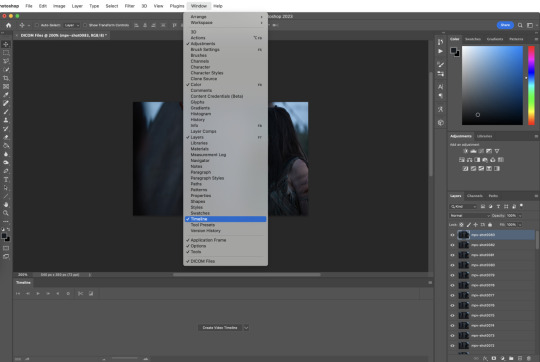
click “create” video timeline in the timeline bar


this will convert your caps to static video layers; we have to do some more work to get a playable animation
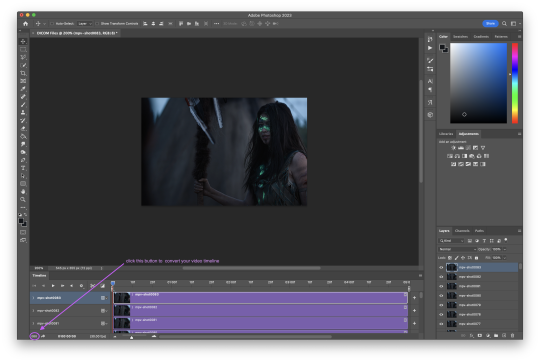
6. convert video timeline
click the frame animation in the lower left hand corner of the timeline bar. this will convert your video layers to a frame animation
7. make frames from layers
now click the menu button in the upper right hand corner of the timeline bar and select “make frames from layers”; be sure to leave “new layers visible in all frames” checked


now all your frames are visible in the timeline
8. delete frame
with all the frames visible, you can see that the first frame is 5 seconds while all the other frames are 0 seconds. delete that 5 second frame using the trash can icon in the timeline bar. if you don’t delete this frame, your gif will have a ton of lag at the beginning and/or end up with duplicate frames when you export it
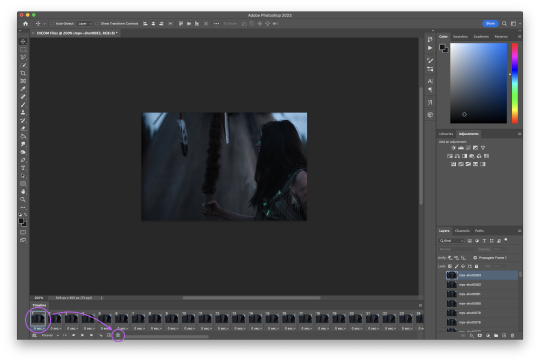
9. convert frame animation
click the video layer symbol in the bottom left hand corner of the timeline bar (where the frame animation button was in step six) to convert your frames back to video layers


they move now! but we want to be able to edit the gif as a whole instead of in individual layers
10. select all layers

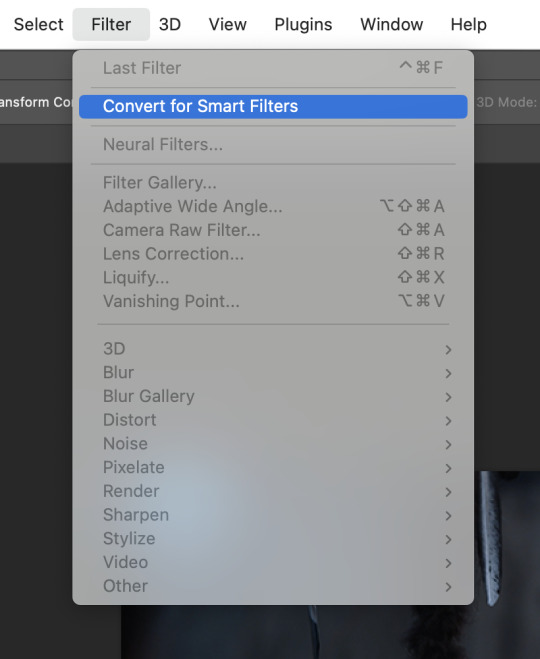
11. convert to smart object
so we’re going to turn those video layers into a smart object; the smart object will act as a container that keeps everything neat and tidy while we sharpen and color, and will also preserve the original image, allowing us to edit non-destructively
hit filter > convert for smart filters
if this is the first time you’ve made a gif, this is a good place to stop and check that everything is working the way it should. play your gif to make sure there’s no lag or any other issues

if your gif only plays once and then stops, go to the timeline menu and select “loop playback”

if there’s some other issue, go back through steps 5-11 and make sure you’ve followed them exactly
12. smart sharpen
sharpening adds back in that nice, crisp clarity that’s lost when the screencaps are cropped and resized to fit tumblr dimensions. there are a ton of different sharpening settings out there, but people generally sharpen in two distinct steps using “smart sharpen”
here is my process:
for the first step, go to filter > sharpen. select “custom” from the preset dropdown. click the gear icon and make sure “use legacy” and “more accurate” are both checked, and then select “gaussian blur” in the “remove” dropdown. finally, set the following values for amount and radius:

13. smart sharpen
my second smart sharpen follows the exact same process as the first—“use legacy” and “more accurate” are both checked—but with different values entered in for amount and radius:

note: like a lot of giffing, sharpening settings come down to personal preference, but be aware that oversharpening can lead to areas of extreme contrast in your gif, and an overall sort of staticky, almost crunchy effect
14. resize canvas + check playback
finally, resize the canvas to remove the 5px gutter we left back when we cropped


you can adjust how long the gif is using the sliders on the video timeline

now look at that! you’ve got a basic gif that’s ready for coloring and text!
note: you might have noticed that i haven’t talked about timing yet, and that the gif is playing way more quickly than the original footage was— don’t worry, we’ll deal with that later, and for good reason
4. ACTIONS
so fourteen individual steps for a gif sounds like a lot, right? but photoshop has a function that takes those steps and runs them for you. behold: actions!
actions are automated processes in photoshop that can drastically speed up certain tasks. steps 5-13 in the giffing process i just outlined are automated in this action*, which means you can load your files into photoshop and have a basic gif ready to go in just a couple seconds
all you need to do is download the action and open it in photoshop, where it will automatically be added to the actions panel. select the one labeled “DICOM ACTION,” press play, and voilà!
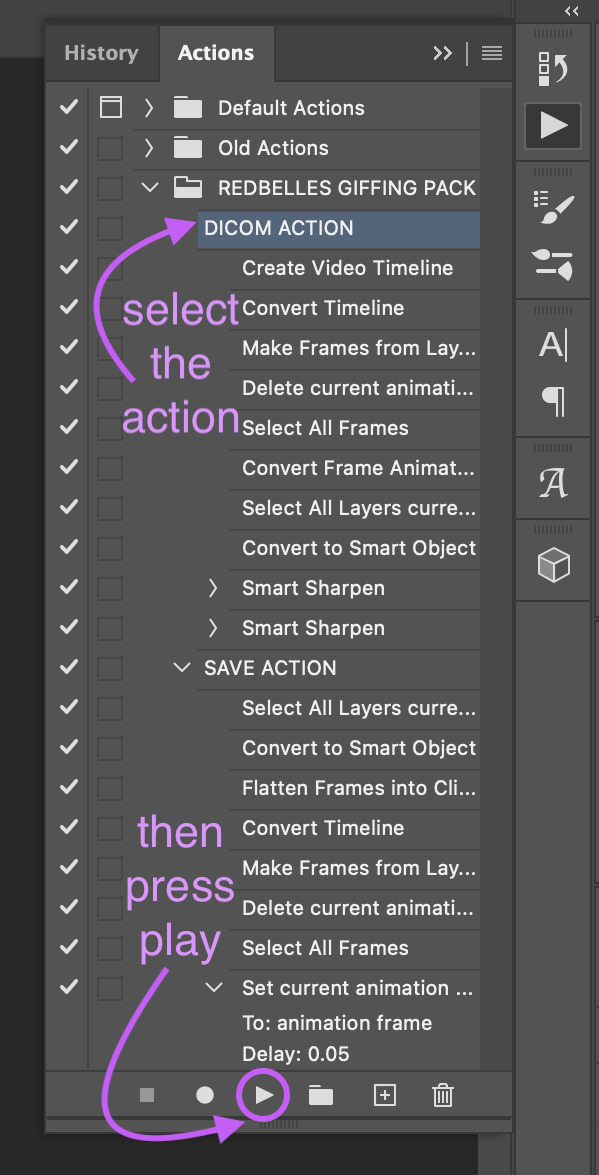
*my action is a modified version of this life-changing action by the one and only rizz (@anyataylorjoy) updated for use with DICOM files and shared with her permission! rizz’s genius save action is also in both of the links above; we’ll discuss that more later
actions aren’t just limited to the actual process of animating a gif, though. you can create custom actions for excruciating fun things like frame by frame coloring (tutorial coming... idk, someday. maybe.) or creating glitch effects
if that sounds like something you’re interested in, here’s a handy official guide on how to create your own actions and some others on how to managing/saving actions if you decide you want to share one
5. COLORING
after nearly four five six years of giffing, i can say with 100% total confidence that there are a million different ways to go about coloring. whether you’re just starting out or you’ve been relying on psds, the best advice i can give you if you want to develop your own style is honestly just to play around with the different adjustment options in photoshop and see what you like and what works for you
of course, that’s easier to do if you have a basic understanding of what each adjustment layer does, so to that end:

brightness/contrast
adjusts the tonal range (the levels between an image’s darkest and lightest points) of an image. brightness slider affects highlights and contrast slider affects shadows
levels
adjusts the tonal values of an image by modifying the level of highlights, midtones, and shadows
curves
adjusts as many values for brightness and/or color as you want across the entire tonal range of an image
note: curves can be used to impact the entire rgb spectrum, or can be used to change r/g/b in isolation
see here for a more in-depth explanation of the curves tool
exposure
adjusts exposure levels across exposure, offset, and gamma. exposure controls highlights, offset controls midtones, and gamma controls shadows
vibrance
adjusts the color intensity of an image via two different options: vibrance and saturation. saturation evenly increases the saturation of all colors in the image. vibrance adjusts the level of saturation of all colors but in a more selective manner, focusing on colors with the lowest base saturation
note: vibrance is less like to oversaturate skin tones than saturation
hue/saturation
allows the adjustment of hue, saturation, and lightness of either the entire image or a specific range(s) of color in an image
note: using saturation across the entire image (the “master” slider) will reduce the overall tonal range of an image and can result in dullness
color balance
adjusts the mixture of colors in an image across either highlights, midtones, or shadows
black and white
adjusts color values to produce grayscale images, with both preset and custom value options
note: using a black and white gradient map instead of the black and white adjustment tool itself often results in a smoother gif
photo filter
adds a single color filter to the image
channel mixer
adjustment option that modifies a targeted (output) color channel using a mix of the existing (source) color channels in the image. color channels are grayscale images representing the tonal values of the color components in an image (rgb or cymk)
note: when you use the channel mixer, you are not adding or subtracting colors to/from a specific color component (see: selective color). instead, you are adding or subtracting grayscale data from a source channel to the targeted channel
color lookup
a set of premade filters/styles to apply to an image
invert
inverts the colors of an image to create a photo negative effect
posterize
reduces the number of brightness values in an image to create a flat, poster-like appearance
note: not typically used in gif making
threshold
adjusts grayscale or color images and converts them to a high contrast black and white images via a specified level as a threshold. all pixels lighter than the threshold are converted to white, while all pixels darker than the threshold are converted to black
note: not typically used in gif making
selective color
adjusts the amount of a primary color in an image without modifying the other primary colors in the image
note: the “absolute” option adjusts the color in absolute values, while the “relative” option adjusts the existing amount of a given color by its percentage in total
gradient map
converts the grayscale range of an image to a gradient color fill, with both preset and custom gradient options available
note: gradients can be manually adjusted, and checking the “reverse” option inverts the colors of the gradient
okay! now that that’s out of the way, here are three narrated examples of how i color:
1. prey (2160p sdr)

[video link]
2. the punisher (1080p)

[video link]
3. house of the dragon (2160p hdr)

[video link]
my general coloring process
step one: lighten
i start with one or two curves layers to see if i like what the rgb “auto” option gives me; if i don’t, i switch to lightening via exposure
if i know from the outset that a scene will need aggressive color correction, i’ll use a curve layer set with the white point eyedropper instead of the auto option; this brightens and color corrects the entire gif based on a selected pixel
step two: darken blacks
it sounds counterintuitive, but as you lighten the scene, you need to make sure you’re not washing it out
i start adding contrast back in by adding +1 black in blacks in a selective color layer below my lightening layer(s)
i often follow that up with a levels layer set to “increase contrast +1” above my lightening layer(s)
if you feel that the “increase contrast +1” layers has made the blacks too intense, you can try a black point layer in levels instead
note: the above/below method is a personal preference based on how the adjustment layers interact with each other
step three: lighten
adding contrast back in can make the gif a bit darker than i’d like, so i typically add another lightening layer after i’ve adjusted the contrast
i generally use the curves “auto” option to balance things back out
i will sometimes use the white point method here (seen in the videos when i zoom to 3000%) either alone or in conjunction with auto curves layers
step four: color adjustments
this step varies the most: in the videos, you’ll see me adjust cyan (prey), take out yellow (the punisher), and amplify red while removing yellow and green (hotd)
if very aggressive color correction is needed, i tend to use channel mixer. otherwise, i use selective color first and then hue/saturation if needed. i do not tend to use color balance
update: explanation of why i avoid color balance here
step five: final tweaks
if a gif seems flat: i increase the blacks in neutrals using selective color to add extra depth
if a gif seems dull: i increase vibrance, or in extreme cases, vibrance and saturation
note: be very careful when using saturation— it can wreak havoc on skin tones
psds
if you don’t want to color manually for whatever reason (don’t have time, struggling with the scene, want to experiment, etc.) psds that others have shared are always an option
psds are adjustment layers that other gifmakers have put together and shared so you can apply them to your own gifs
note: psds are almost always scene-specific (and often file-specific), so you’ll likely have to tweak them to make them work for your gifs
check the resources section at the end of this guide for some places to find psds
6. TEXT
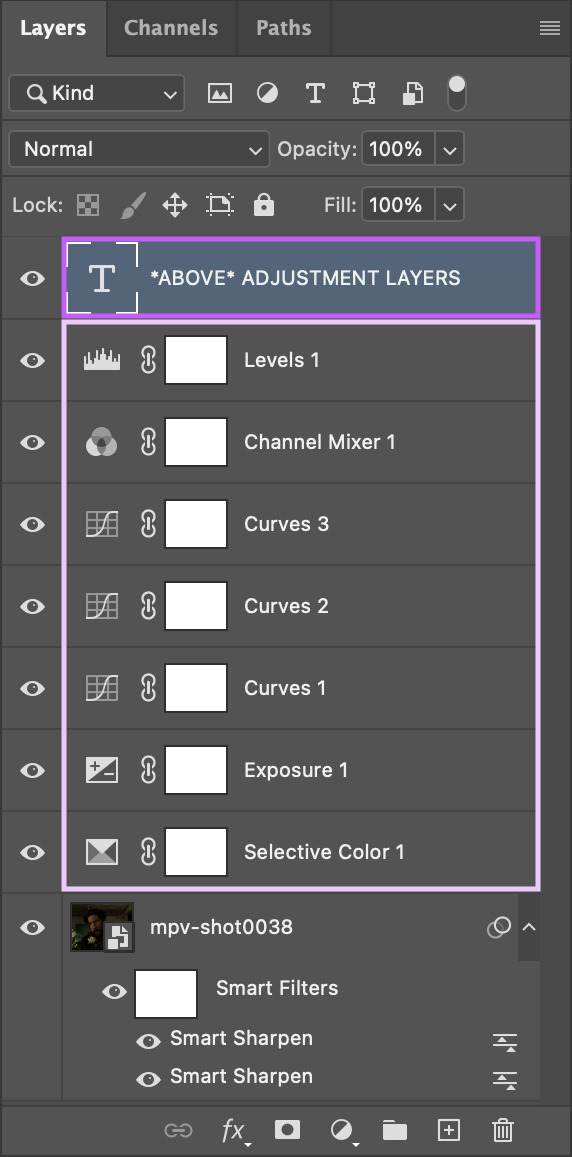
the most important thing about any text layer is to make sure that is above all of your adjustment layers. if your text is below any adjustment layers, it will end up looking wonky and distorted
subtitles
first things first: pick a font that is easy to read. i use arial rounded mt bold, but alte haask grotesk, arial, myriad pro, etc. are all good options as well. for subtitles, sans serif fonts are almost always much easier to read than serif fonts
after you’ve chosen a font and loaded it into photoshop, select the text tool and click and drag to create a text box instead of just clicking once to create a text layer. this will help you keep your subtitles perfectly aligned across multiple gifs

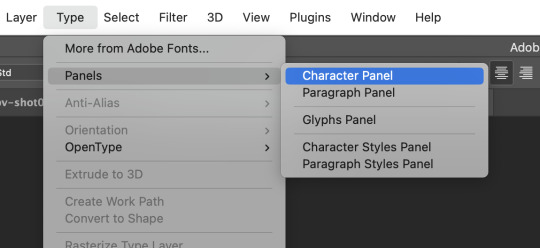
type out your text, then click the character option to adjust your type settings. if you can’t see the character option, from the main menu bar go to type > panels > character panel. this will also work to bring up the paragraph panel
these are the character settings i currently use for my subtitles:
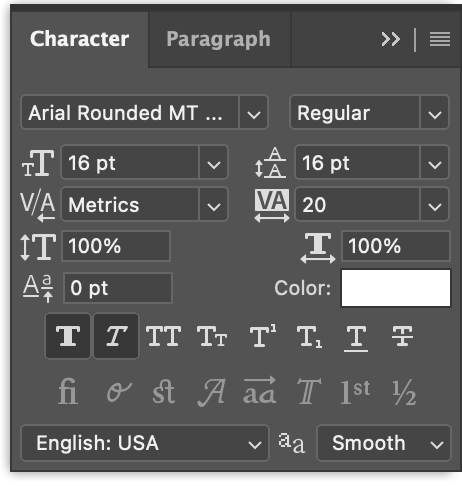
note: the text size can vary from set to set. if you end up changing it, be sure you change the line spacing (the little vertically stacked As directly to the right of the text size dropdown) to match
using either the top text bar or the paragraph panel, make sure your text alignment is set to “center” instead of “left” or “right”
now we need to make the text stand out against the gif. we’ll do this by adjusting the blend options. with your text layer selected in the layer panel, go to layer > layer style > blending options

i personally use drop shadow, stroke, and outer glow for my subtitles:


after you’ve got your text settings the way you want them, press v to select the move tool, then click the three dots in the top toolbar to pull up the “align” menu
select “canvas” from the “align to” dropdown in the menu, then use the center and bottom buttons to center your text at the bottom edge of your gif. the extra space in your text box may provide enough of a buffer to separate your text from the edge of the gif, but if not, simply move the box upwards until you’re happy with the placement

note: if you’ve used a text layer here instead of a text box, the position of your text will be based on individual glyphs instead of the uniform edge of the text box. this means that lines with the letters g, j, p, q, or y will be positioned differently than lines without those letters, which can ultimately mess up the placement of your subtitles across your gifs. save yourself some hassle and use a text box

to make sure the text box ends up in the same place on all your gifs, go to layer > duplicate layer to copy them exactly on to your other gifs


note: be sure to double check the drop shadow on any duplicated layers, since photoshop sometimes changes the angle of the drop shadow to 90° on the new duplicated layers
additionally, if you’re working with multiple speakers, make sure whatever colors you pick for them don’t make the text difficult to read
you can download a base version of my subtitle settings here
other text
you have a lot more options for non-subtitle text: crazy fonts, cool coloring, effects, etc. don’t be afraid to experiment! a good place to start is the layer style tab. go to layer > layer style and you’ll see these options:

we used a few blending options for subtitles (drop shadow, stroke, outer glow) but now you can play with color overlays, gradients, and even patterns
check out the resources section at the end of this guide for font websites, fancy text tutorials, and more
7. SAVING + EXPORTING
timing
now we’re (finally) ready to talk about timing. the frame delay you want to use is 0.05. this timing most closely matches the natural playback speed of (non-animated) footage. anything else is going to be noticeably too fast (0.04) or too slow (0.07). witness:


there are really only two exceptions to this:
animated footage, which can run at a faster frame rate than non-animated footage and may work with 0.04 timing
gifs that have < 15 frames (ex: trailer footage)— you might be able to get away with something like 0.06 in that case, but it will still look a litle slow
most other tutorials have you set your timing as part of the process of animating your gif, but i didn’t. why not? because photoshop absolutely loses its goddamn mind when it comes to gif timing
it will create duplicate buffer frames if you change the default frame timing at all at literally any point except as the very last step before you export your gif. this means that if you change it as part of your process before the “convert to smart object” step, you’ll get those duplicate frames and end up with lag in your gif. it will also automatically reset your timing to 0.07 if you export from a video timeline state. gee, thanks photoshop!
the way most people deal with this 0.07 bug is by exporting the gif, opening the exported .gif file in photoshop, and manually resetting the frame timing to 0.05 before exporting again. however, that’s a lot of work, so aforementioned giffing queen rizz @anyataylorjoy did us all a solid and created an action that will convert your gif back to frames and set your timing to 0.05 with a single click. her save action is bundled together with my DICOM action in the link back in the “actions” section
note: managing your timing like this does mean that when you’re working with your gif photoshop before you run the save action, it will play much faster than it will once you’ve exported it
to export your gif, go to file > export > save for web (legacy)

before you jump in to exporting your gif just yet though, there are some things to consider
upload limits
the current tumblr upload limit is 10mb, which is great for gifmakers— it leaves plenty of space for experimenting with big gifs, crazy colors, and fancy effects like blending and transition
and yet: it’s ridiculously easy to go over that limit! make sure to check your file size before you export your gif to confirm that you’re below 10mb so you don’t run into any upload issues

if your gif is over the limit, try shortening the length of the gif. that’s hands down the best way to decrease the size, but you can also try adjusting your coloring. the brighter and more vibrant a gif is, the larger the file size generally is, so those are good areas to try tweaking if you really don’t want to cut the gif down. high contrast, especially in black and white gifs, can produce large file sizes as well
save settings
your save settings will affect how your gif appears when it’s exported and posted outside of photoshop. there are basic settings everyone has to use (ex: loop forever), but some will ultimately come down to personal preference, so it’s worth knowing what the differences between the settings actually amount to
selective vs. adaptive
selective: creates a color table favoring broad areas of color and the preservation of web colors. this color table usually produces images with the greatest color integrity. selective is the default option
adaptive: creates a custom color table by sampling colors from the predominant spectrum in the image. for example, an image with only the color green and blue produces a color table made primarily of greens and blues. most images concentrate colors in particular areas of the spectrum
dither: diffusion vs. pattern
diffusion: applies a random pattern that is usually less noticeable than pattern dither. the dither effects are used across adjacent pixels
pattern: applies a halftone-like square pattern to simulate any colors not in the color table
note: using “adaptive” instead of “selective” and/or “pattern” instead of “diffusion” will result in larger file sizes
i personally use selective + diffusion for nearly every gif i make, not only because the file sizes are consistently smaller, but also because i think that combo produces the cleanest results. i find that the grid pattern creates is very noticeable/distracting, and that the color clarity from selection almost always beats out the custom tables from adaptive
bicubic vs. bicubic sharper
bicubic: slower but more precise method based on an examination of the values of surrounding pixels
bicubic sharper: a good method for reducing the file size of an image based on bicubic interpolation with enhanced sharpening. this method maintains the detail in a resampled image. if bicubic sharper oversharpens some ares of an image, trying using bicubic
i really don’t like oversharpened gifs, so i exclusively use bicubic
lossy
lossy reduces file size by permanently removing some of the original data
lossy used to be a viable way to decrease the size of gifs before tumblr changed the upload limit to 10mb; now gifs with lossy are visibly fuzzy, making them look lower quality no matter what kind of footage was actually used
if you are using lossy to add a film grain effect to your gifs, use the filter > noise > add noise option instead
note: the best way to achieve a grain effect is simply to use hq footage; larger hq files often have a grain to them that is lost as the files are compressed to smaller sizes
here are the rest of my save settings:
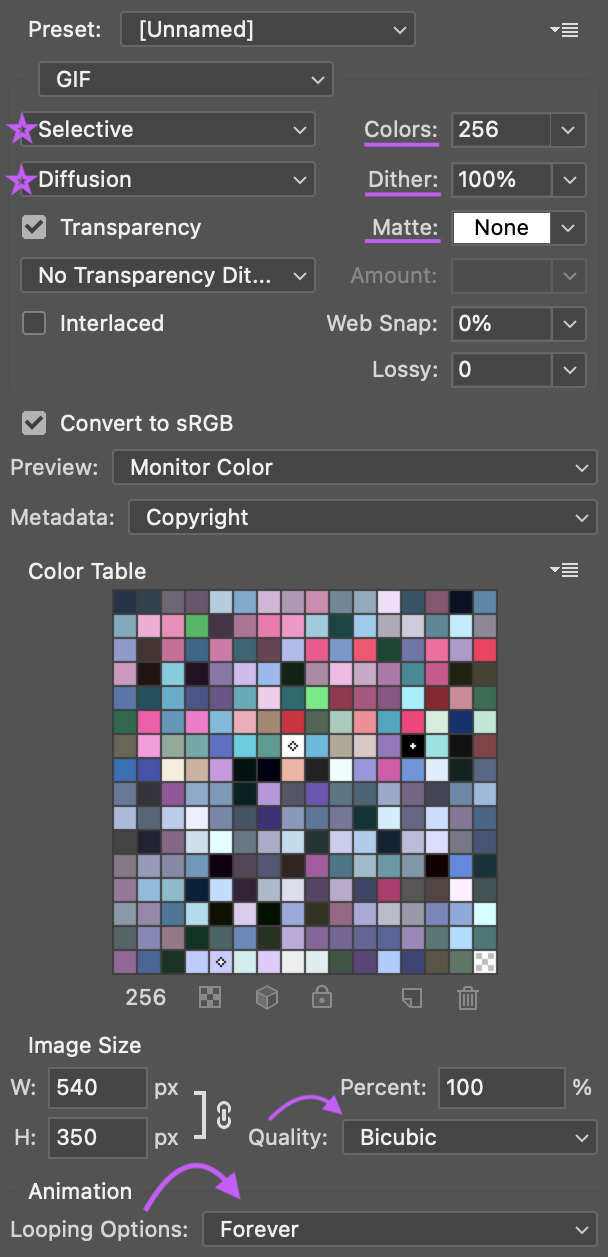
note: the default option under “metadata” includes contact info, so i highly recommend changing that
you can see how a gif will play directly in the export panel, but you can also view it a new browser tab by clicking “preview”; this will open the gif in a new tab in your default browser
when you’re happy with how the gif looks outside of photoshop and have checked that it’s under the 10mb upload limit, go ahead and export the gif
8. POSTING
basics
before we talk about anything else: make sure you are putting your gifs in a photo post. the new editor we’re all forced to use now does a whole bunch of behind the scenes bullshit to gifs (rip legacy editor 💀) and you definitely don’t want to make things any worse by using the wrong post format
if you find yourself struggling with the new editor @wolfes has your back: they’ve put together a comprehensive guide to using/troubleshooting the new editor for gifmakers. everyone say thank you, v!
save in + post from drafts
alright, so you’re ready to post your gifset— while it’s temping to just slap the gifs on a new post and publish immediately, it’s actually a really good idea to save the set as a draft first and make sure the gifs look good once they’re uploaded. sometimes tumblr makes the colors look wonky or wrecks the quality or does other stupid tumblr things, and it’s so much less frustrating to notice that before a set is posted than to see something you want to fix after it’s already out in the wild
if you want some feedback on a draft before you post it, you can click the three dots in the upper right hand corner of the post to open a private preview you can share with others

note: the link will work as long as you have the preview open
once you’re sure tumblr hasn’t messed with anything, it’s time to format the rest of the post
captions
the finishing touch on a set, captions can be anything from basic film/show info to relevant quotes to straight up memes. here’s some general info to help you figure out how you want to format yours
html symbols
edit tumblr posts using html by @hayaosmiyazaki
tumblr html text primer by @gustavlindstrom
gradient text: generate your gradient here, copy the html code here and remove “;” from your text, then paste the semicolon-free text into the html editor on tumblr
note: be aware that the new editor has radically changed how gradient text is processed and displayed. sometimes it works, sometimes it doesn’t. sometimes you can see it on dash but not on individual blogs, and sometimes only the first letter is in color and everything else is black
inspiration credit
if your set was inspired by someone else’s, credit your insp. source(s)
it’s a really basic part of tumblr/gifmaker etiquette that gets ignored way more than it should
there’s obviously a lot of creative drift on a site as big as tumblr and it’s not always possible to pinpoint an exact inspiration source (especially for more popular gif trends), but as a creator it can be really disheartening to see someone swipe something directly from you without saying anything
tl;dr shout out what inspires you!
not sure how to go about crediting someone? here’s a handy guide on inspiration credits from @usergif
tagging
it’s super important to remember that only the first twenty tags on your set will be used in tumblr’s search/tag algorithms!
if you’re not sure where to start, go ahead and check out some popular sets in the fandom(s) you’re creating for and see what tags are on those sets— that’s a great way to figure out which tags are active and what kinds of things you’ll see in them
here are some typical tag categories for fandom sets:
— general tags
media/fandom name: #hotd, #stranger things, #disney
character names: #yennefer of vengerberg, #alina starkov, #ginny baker
ship names: #zutara, #kanthony, #buckynat
— edit tags
#filmedit or #tvedit
#[fandom/media]edit - #swedit (star wars), #nmcuedit (marvel netflix), #tlouedit (the last of us)
#[character name]edit - #rhaenyraedit, #karenpageedit, #batmanedit
#[ship name]edit - #literatiedit, #joenickyedit, #kastleedit
#[actor name]edit - #austinbutleredit, #emmadarcyedit, #pedropascaledit
— source blogs
these are blogs that focus on reblogging a specific type of content (old films, pop culture, etc.) and they’re a great way to get your gifset seen by more people
typically track a specific tag in order to find relevant content
general rule: make your set is the kind of thing a source blog is interested in before tagging them
your set may be reblogged immediately, may go into a queue, or may not be reblogged at all (the members didn’t see it, think it doesn’t fit the blog’s theme, etc.) — just be patient and try to find source blogs that align with what you’re making
examples: chewbacca (#chewieblog), junkfoodcinemas (#junkfooddaily), classicfilmblr (#classicfilmblr), dailywoc (#dailywoc), bob-belcher (#userbbelcher), optional (#useroptional)
— user tags
user tags are unique tracked tags for individuals rather than source blogs!
gifmakers will often have their tracked tag (if they have one) in their blog description/about page
ex: i track #userbells

general rules: you don’t have to be mutuals with someone to tag them, but it’s good etiquette to be following them, and to only tag them in things they seem interested in
after you’ve tagged for exposure, there are a couple more things to consider:
— content warnings
it’s generally considered polite to tag for major content/eyestrain warnings
ex: tw flashing, tw blood, etc.
there are a variety of ways to tag for content warnings - #cw blood, #blood tw, # // blood - just pick one style and be consistent with it
warnings don’t have to be in your first twenty tags (since these tags are used to filter out posts instead of find them) but just having them on the post is helpful for anyone who happens to have a content warning blacklisted
— a tag for organizational use
i typically save the last of my twenty tags for my personal “creations” tag so that i (and anyone searching my blog) can easily see everything i’ve giffed
i use * as my tag and have it as one of my sidebar links for easy access
other examples i’ve seen include “mine: gifs”, “my edit”, etc.
best times to post
despite the ongoing tiktokification of tumblr, the hellsite still doesn’t have the kind of dashboard/feed algorithms that other social media sites do. that said, it can still be helpful to post at specific times to boost how many people see your gifsets
according to union metrics, most reblog activity on tumblr happens between 7pm and 10pm eastern time
however, if you’re giffing something that’s just been released—a new trailer/episode/season/movie—then the best time to post is as soon as you possibly can. tumblr users these days unfortunately prioritize reblogging whatever sets get out there first. that’s great if you can get those sets made quickly, but it can seriously suck if that’s not the case
if you want to hustle and make “new content just dropped” sets as soon as the footage is out there, go for it. if not, don’t put any pressure on yourself to do that; it’s totally fine to gif at your own pace
verify that your set is visible on your dash
as soon as you post, go to your dash and make sure that you can actually see your set on your dash— sometimes tumblr just straight up eats posts, and if you can’t see your set, no one else can either
if your set isn’t visible on your dash, it’s likely either gotten caught in the (terrible and useless) nsfw filter or tumblr is just being stupid
to fix this:
check the post by loading/posting each gif individually to see if one (or more) of them is causing the set to break
change the gif(s) responsible by adding/removing frames, tweaking coloring, etc.
if the gif(s) are still breaking the set, you might have to wholesale replace the gifs with different scenes or post the set without them
verify that your set is in the tags
the other thing you need to check is whether or not your set is showing up in the tags
sometimes a set will be visible on your dash but won’t actually appear in any of them tags. to make sure your set is showing up, check one of the tags by going to the /tagged/[tag] page
if it doesn’t show up, here are some general tips:
wait 5-10 minutes: sometimes tumblr just takes a minute to register the set
edit/remove any links: tumblr doesn’t place nice with links general, and with external links in particular. removing the “s” from https in your links can often fix things, but if that doesn’t work, remove the link entirely
try deleting and retyping the tags
try this image trick from @yellenabelova
delete the set and repost from scratch
for a much more comprehensive guide on what to do if your set isn’t in the tags, check out this very extensive solutions flowchart by @momentofmemory
9. RESOURCES + GENERAL TIPS
giffing communities
find some buddies to gif with! giffing is super fun, but it can also be finicky and frustrating, and having people to brainstorm/complain/share things with is honestly so helpful. some of the most fun i’ve had giffing has been sitting around commiserating on a call with rizz or lia or m, or whining at kumi or neve over text chat
some places to start if you’re looking for communities to join:
creatorhub*
@villainelle’s giffing discord (send an ask for a new link if expired!)
the gifmakerhub discord, run by @wolfes
*the creatorhub link is best accessed on desktop, as it will take you to a submission box:

reblog yourself
this is a big one! time zones are a thing, and on top of that, it’s almost impossible to get a reblog in this economy. boosting your own sets is a really good way to make sure more people see them, and also to just take a minute and be proud of what you’ve made!
resources
general photoshop resources
@chaoticresources
@completeresources
@rresources + bonus beginner’s guide
@hisources
@evansyhelp
tutorials
anti white-washing by @haldi-archived
anti red/orange-washing by @aubrey-plaza
channel mixer by @aubrey-plaza
multiple gifs on one canvas by @nataliescatorccio
blending by @nataliescatorccio
fade transition by @anyataylorjoy
coloring dark scenes by @sluttyhenley
transition tutorial by @wolfes
glitch effect by @sarah-snook
gif overlays by @ezrabridgerr
general coloring by @the-borgias
general coloring by @magnusedom
rainbow coloring by @rhodeys
text effects by @unadulteratedloathings
shuffle texts by @cal-kestis
animated handwritten text by @mxrisacoulter
comprehensive subtitle guide by @clubgif
fonts
— where to get fonts
dafont
befonts
ifonts
dafont free
google fonts
— identifying fonts
what the font
what font is
font squirrel
identifont
— font recommendations
@yourfonts
font tag from @anya-chalotra
favorite font combinations from @usergif
font packs from @liohnelmessi
font tag from @itsphotoshop
typography and font pairing guides from @momentofmemory
how to pair fonts by @awildling
psds
@dailypsd
@colour-source
@psdland
+ bonus anti white-washing psd by @evansyhelp
sharpening settings
action pack by @throwing-psds
action pack by @maziekeen
action pack by @daenerys-stormborn
settings from @anya-chalotra
and finally:
don’t stress
that is honestly my most important piece of advice. if you find yourself chasing notes, getting frustrated with low engagement or terrible like-to-reblog ratios, frazzled trying to make sets for new content as quickly as possible— just take a breath. take a step back if you need to. gif what you want to when you want to
giffing is a hobby! it should be fun! don’t let the numbers ruin it for you <3

feel free to send me an ask if you have any questions! previously answered questions are in my giffing help tag
i hope this tutorial helps! if it did: please reblog it!
(and if it really helped, consider throwing me a bone on ko-fi or commissioning something from me? area woman unfortunately very broke)
happy giffing ✨
#completeresources#rresources#usergif#userrizz#userpayton#userkd#jokerous#userriah#userchelsea#userneve#resources#tutorials#gif tutorial#re: gif tutorial#*#@tumblr formatting gremlins let me live challenge#please i am begging#anyway if you see a typo no you don't
3K notes
·
View notes
Text
10 Mac Shortcuts Actions you’ll Use
Apple added some shortcuts while the update of macOS Monetary for MacBook to make workflow easier and smooth.
You can still edit some and decide how you want to use them. Trips and tricks are supposed to make life easier while saving yourself some time. Apple takes great care in offering a polished, user-friendly experience across all of its devices.
Macs are no different. However, with a computer capable of so much, clever techniques and shortcuts are certain to sneak through and go undiscovered.
Tricks and tips:
Activate Spotlight for Searching
Press Command + Space to bring up a helpful search interface that will help you discover files on your Mac. You can easily search for a file, search for a website and choose from which browser you want to search with. Covert currencies, from rupees to dollar. And can do basic maths Calculations like (8787*55) and (57687/54).
Switch Between Apps
Press Command + Tab to switch between your open apps. To cycle between the open apps, hold down the Command key and then hit Tab.
When the app you want is highlighted, let go. Similarly, if you want to close an open app directly from the desktop just press Command + Tab and then press the Q key to close an application.
Hot Corners
When you move the cursor to a corner on the screen, you may utilise it as a hot corner too fast to start actions. If you haven't tried Hot Corners yet, you should do so.
When your mouse hovers in a given location, you may perform things such as activating Mission Control, revealing the desktop, and more.
System Preferences > Mission Control > Hot Corners is where you set them up.
For example, the screen saver will start, when your pointer moves to the left-right corner and when you move the pointer to the top-right corner, the screen will lock. The bottom-right corner is set as Quick Note by default.
When setting up a Hot Corner, hold down the Option key if you wish to use Hot Corners but don't want to activate features accidentally. The Hot Corner will not activate after that until you hold down the Option key.
Hide a window
To hide a window in the background just press command + H and it will be hidden in the background, but you can get back to that window by clicking on the icon of that application or by pressing command + Tab.
And if you want to hide all the windows except the one you’re working on right now then just simply press Option + Command + H.
5) Switch Between App Windows - If you have numerous windows open for an app like Safari, you may switch between them by pressing Command + Tilde (~). If you have numerous desktops, you can rapidly switch between them by using Control and then the left or right arrow.
Quickly Open Folders
hold the command and press down the arrow key to open a folder in the finder or on your desktop. And press the command + Down arrow to go back.
Instant File Delete
To delete a file and skip Mac's Trash Can, which saves files before deleting them, selects the file and press Option + Command + Delete at the same time.
Produce an Auto Duplicating File
To create a duplicate file when you right-click on a certain file, go to "Get Info." and then check the Stationary Pad box.
It will open a replica of that file every time you access it, which is useful for templates and related file types.
Emoji keyboard
This speedy Emoji keyboard shortcut will help you discover the proper Emoji no matter where you're typing, thanks to a new set of Emoji coming to macOS later this year. Find any text box, click inside it, and then press CTL + CMD + SPACEBAR to bring up the Emoji keyboard. A little window overlay containing a collection of Emoji characters displays. Enjoy!
Moving files using the Option key
You may copy a file in Finder by right-clicking it or pressing CMD + C. But what if you only wanted to relocate one copy of the file? Instead of using CMD+ V to paste, you may use the option key (i.e. CMD + OPT + V) to transfer the files. Very useful!
1 note
·
View note
Text
2022’s Mac BundleHunt Fall 2022 from $4 each item
2022’s Mac BundleHunt Fall 2022 from $4 each item
This autumn Bundlehunt offers the new Mac bundle for autumn 2022 each item cost from $1.5 – $4 Duplicate Finder for Mac/MacBook Helps you find duplicate files that have identical content regardless of name. Scan files of a particular type or size for fast scanning.Set up ignore list to keep specific files or folders untouched.Find duplicate images, videos, music, documents, archives,…
View On WordPress
0 notes
Text
Mac duplicate photos cleaner pup

#MAC DUPLICATE PHOTOS CLEANER PUP HOW TO#
#MAC DUPLICATE PHOTOS CLEANER PUP PRO#
#MAC DUPLICATE PHOTOS CLEANER PUP SOFTWARE#
#MAC DUPLICATE PHOTOS CLEANER PUP FREE#
If you haven’t synced your photos using this method before, be sure to confirm that you are using a trusted device.Connect your iPhone to the Mac using a Lightning-to-USB cable.
#MAC DUPLICATE PHOTOS CLEANER PUP HOW TO#
Here’s how to transfer photos from iPhone to Mac using the Photos app: When your iPhone is connected, the macOS will open Photos automatically. All you have to do is plug your iPhone into your Mac using a Lightning-to-USB cable. Your photos and videos can be easily synced using the Photos app on both iOS and macOS. How to transfer photos from iPhone to Mac using Photos
Choose whether you want to sync all of your photos and albums or only selected albums.Ģ.
Choose the folder or app on your iPhone that you want to sync photos and videos from.
On the left sidebar, click on the name of your iPhone under Devices.
Connect your iPhone to your Mac with a lightning-to-USB cable.
If you are running macOS Catalina (10.15) or later, you can easily sync your iPhone with your Mac using Finder. How to move photos from iPhone to Mac using Finder The following are some options to consider. When it comes to moving photos between devices, we recommend that you choose the method that works best for you and make it a regular part of your photo and video management system.
#MAC DUPLICATE PHOTOS CLEANER PUP FREE#
Tap Select > Delete All to delete your photos permanently and free up storage space.Ħ ways to transfer photos and videos from iPhone to Mac Once you’re done, head to your Photos app and open the Recently Deleted album. In Videos and Other, swipe up on the photos/videos that you want to keep, and swipe down on photos/videos that you want to delete.Īfter browsing through your photos in each section and choosing the ones you want to delete, tap Empty Trash. For Screenshots, Notes, and Blurred, simply tap Delete All to clear all selected photos. You can also choose Keep All if you don’t want to get rid of any of the photos in the series. If you agree with the selection, keep the top result and move the rest to Trash. Gemini photos will group all similar shots together, with the best option on top. When you click on a category, you can see all of the photos that might be taking up unnecessary space in your photo library. When you open the Gemini Photos app, your home screen will sort your photos into categories: Similar, Duplicates, Videos, Screenshots, Notes, Blurred, and Other. Gemini Photos is available on the App Store. You can get rid of all unnecessary clutter in few clicks to recover gigabytes of storage space and make your Mac perform faster than ever.Here’s how to quickly and easily clean up your photo library with Gemini Photos. Why Choose Photos Duplicate Cleaner? Photos Duplicate Cleaner is an easy solution to scan your Mac for finding unneeded duplicate photos. Although more expensive I would recommend it as it has more capabilities than the others like the capability to merge Photos libraries or copy photos along with their metadata between libraries. Photos Duplicate Cleaner - Free PowerPhotos is the iPhoto Library Manager version for Photos and is very powerful. The huge number of file filtering and selection advancements for more enhanced usage. The new version of Duplicate Photo Cleaner gives you a choice to load scans from TXT and multi-sheet XLS files. Running with an exclusive and super MacOS, Mac computers provides users with brilliant experience in the first years.
#MAC DUPLICATE PHOTOS CLEANER PUP PRO#
Is really good at making excellent products, one of which is Mac computers entitled according to specs, functions, and appearance like MacBook, MacBook Air, MacBook Pro, iMac, iMac Pro, Mac Pro and so on. Photos Duplicate Cleaner: Delete Repeated Images on Mac.
#MAC DUPLICATE PHOTOS CLEANER PUP SOFTWARE#
The software is designed in a way to work with every operating system in order to ensure highly accurate results and enhanced performance. Duplicate Photos Fixer Pro is compatible with all the versions of Mac, macOS 10.7+, iPhoto 9.0+ & Photos.
0 notes
Text
Free memory cleaner for mac

#Free memory cleaner for mac how to
#Free memory cleaner for mac pro
You may also right-click and sort by size to quickly locate and delete the biggest files first. Click Downloads and remove unnecessary files from here, by right-click and selecting Move to Trash.Click on the Finder icon (leftmost) from the Dock.Thus there is no point in storing too may videos, music, etc. Nowadays everything is online in the cloud. This comes down to what you are willing to keep and what you are happy to let go of. After this empty the trash and restart you Mac Next, click on Go again and then Go to Folder.With normal usages, these files and folders will be recreated by macOS. Delete the files from here that are taking the most space.Be in Finder and click on Go from the top menu bar.You may follow the above steps, click on Applications, and remove the large ones. You can delete Mac applications in various ways.
#Free memory cleaner for mac how to
Related: How to Find iPhone Backup Location on Mac & Windows 3. Now Select Storage tab and click on Manage.Click on the Apple logo from the upper left and select About This Mac.Finally, click on Delete from the bottom right and confirm.Select one or hold the command key and select multiple files By default, the biggest files are at the top. Here you will see the video files, ZIP/RAR files, etc. Now, click on Storage and then click on Manage.Click on the Apple logo from the upper left and select About This Mac.Instead of deleting a hundred small files and images, first of all, let us go for the big fish. Use External Drives for Large Infrequently Used Files.Remove Duplicate Files using Third-Party Apps.
#Free memory cleaner for mac pro
Free Up Space on MacBook Air or MacBook Pro ( 12 Easy Ways) Doing these routinely will ensure you don’t face any storage issues and are able to make the most of your system. But there are also several other steps you can take to free up space on MacBook Air, Pro, or any other macOS device. Optimizing storage is an efficient way to do this. It’s recommended that you keep at least 15-20% of your Mac’s memory free to keep it running smoothly.
0 notes
Text
How to completely remove old versions of filezilla mac

#HOW TO COMPLETELY REMOVE OLD VERSIONS OF FILEZILLA MAC HOW TO#
#HOW TO COMPLETELY REMOVE OLD VERSIONS OF FILEZILLA MAC FOR MAC#
#HOW TO COMPLETELY REMOVE OLD VERSIONS OF FILEZILLA MAC SOFTWARE#
#HOW TO COMPLETELY REMOVE OLD VERSIONS OF FILEZILLA MAC TRIAL#
Ideally, you should follow these steps right after uninstalling apps from Mac to delete its existing data. If it is a cookie, then it might keep a track of your activities behind your back.Īs you can see, there can be all sorts of reasons for removing the leftover app data from your Mac. The leftover data can have log or temp files that can make other apps malfunction. If you wish to reinstall the app, then it might cause unwanted problems with it. Therefore, you won’t get the needed free space without removing the leftover app data. The existing app data can still hold a large chunk of Mac’s storage. Ideally, you can undergo the following situations when the app’s leftover data isn’t removed. This can cause some unwanted issues with your system and should be dealt with. Too often, it has been noticed that even after deleting apps from Mac, their existing data stays.
#HOW TO COMPLETELY REMOVE OLD VERSIONS OF FILEZILLA MAC HOW TO#
Part 3: How to Get Rid of Leftover Files after Uninstalling Apps? Click on the “Move to Trash” option to remove application from Mac. Simply select the app you wish to delete and right-click it. Step 2 This will list all sorts of applications installed on your Mac under different categories. You can also go to the Applications section listed on Finder’s sidebar. Step 1 Firstly, go to Finder > Applications. Here’s a fast solution on how to uninstall programs on Mac. All you need to do is take the assistance of Finder to delete apps on MacBook. If you are an active Mac user, then you won’t face any trouble while uninstalling apps from it. Though, you should know that these methods will not work for default apps (like Disk Utility) that can’t be uninstalled from Mac. To make it easier for you, we have come up with two simple solutions. There are different ways to delete applications on Mac. In case if you have installed the app from an unreliable source, then you should get rid of it. If the app hasn’t been updated in a while, then you can consider deleting it as it might not be secure. You might have duplicate apps serving the same purpose and wants to de-clutter your system. By uninstalling them, you can easily get more free space on your system’s storage.
#HOW TO COMPLETELY REMOVE OLD VERSIONS OF FILEZILLA MAC TRIAL#
The app might not serve its purpose anymore or its trial period could be expired.Ĭhances are that some unwanted apps can be consuming a lot of space on your Mac. You could have installed an app by mistake and might wish to delete it now. If an app has been corrupted or malfunctioning, then you can remove it and reinstall it afterward. Following are some of the common scenarios that you might be facing: Ideally, there could be all sorts of reasons for deleting apps on Mac. Part 1: Why You Need to Uninstall Apps on Mac?
Part 5: Tips for Completely Uninstalling Programs on Mac.
Part 4: How to Recover Accidentally Deleted Files on Mac.
Part 3: How to Get Rid of Leftover Files after Uninstalling Apps?.
Part 1: Why You Need to Uninstall Apps on Mac?.
Best Way to Perform Disk Recovery on Mac.
How to Securely Do a System Restore on Mac.
How to Restore MacBook Air Safely Without Loosing Data.
How to Restore Mac and Get All of Your Files Back.
How to Restore Mac from Time Machine?.
How to Restore Mac to Factory Settings?.
How to Perform Internet Recovery on Mac.
All You Need to Know about MAC Recovery Mode.
Best Ways of Doing Data Recovery from SD Card On Mac.
Best Alternative to EaseUS Data Recovery Mac.
#HOW TO COMPLETELY REMOVE OLD VERSIONS OF FILEZILLA MAC FOR MAC#
Best Alternative to Data Rescue 5 for Mac.Top 5 Alternatives to Stellar Phoenix Data Recovery for Mac.Effective Solutions for “Desktop Files Disappeared on Mac”.5 Best Methods to Recover Deleted Word Files on Mac.Recover Files from Recycle Bin or Trash Folder on Mac.Top 6 Ways to Recover Deleted Photos on Mac.
#HOW TO COMPLETELY REMOVE OLD VERSIONS OF FILEZILLA MAC SOFTWARE#
Recover Deleted Files on Mac Without Software.
Top 10 Mac Data Recovery Software Reviews.
Recover Lost Data on Mac after Upgrading to macOS Mojave.
Undo Empty Trash Mac (macOS Mojave Supported).
0 notes
Text
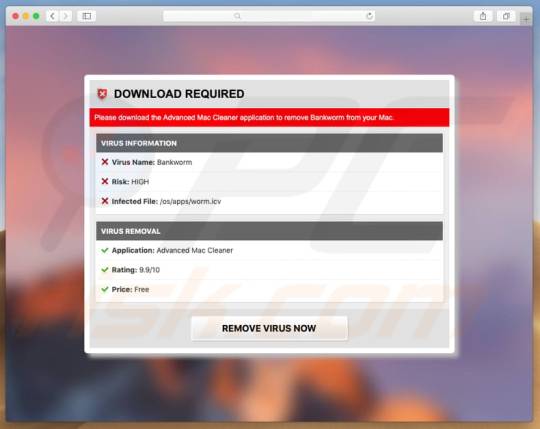
Get rid of advanced mac cleaner on macbook air

If the Mac turns to sleep mode while installing, you can adjust Energy Saver settings with System Preferences. If you don't want an application to start every time you launch your Mac, just open CleanGenius and disable the startup items you find annoying. Solutions: If your Mac is not on the list above, you need to reinstall macOS or downgrade the macOS to Catalina. Set Login Items: Unneeded applications may auto run every time when you start Mac.
CleanGenius can easily find and remove duplicate files to reclaim the wasted disk space.ĭisk Usage: Visualize the size of your files & folders and remove the unwanted large files to free up more disk space.įree Memory: When the free memory of your Mac is insufficient, you can easily use CleanGenius to free memory and speed up your Mac for better performance. Select an application, just one click, the application and its additional components will be removed.ĭuplicates Finder: Duplicate files have the identical contents and waste the precious disk space. Mac Uninstaller: "Uninstall Applications" safely and completely remove applications and their components, preferences, log files, etc. Your browsing histories, bookmarks and downloaded files won't be cleaned. Drag the icon of the program you want to uninstall to the Trash. As soon as I realized that the programs had combed through my entire computer, I. Open the Applications folder, which you'll find by opening a new window in the Finder (icon with a blue face), or clicking on the hard disk icon. Recently, and under unknown circumstances, three programs were downloaded onto my computer- Advanced Mac Cleaner, MacKeeper, and MegaBackup, all of which research has shown to be potentially fraudulent. You can clean or move files to free up disk space to ensure that your Mac is running smoothly.ĭisk Ejector: Using this one will allow you to eject the mounted drives, such as external storage disks, CD and DVD disks, SuperDrive, network storage and disk images.īrowser Plug-ins Cleanup: Support to clean up and remove browsers such as Safari, Chrome or Firefox plugins, cache, and cookies. Most of the time, uninstalling is this simple: Exit the program you want to delete. Monitor disk space: It will show you the disk space available and will alert you in advance if the disk space is already running low. With a simple click from the utility, all junk files (System Caches, User Caches, System Logs, User Logs, User Downloads, Trash, Safari Internet Cache and more) will be removed in just a matter of seconds. It cleans junk files with one-click and is the easiest way we've found to keep your Mac clean and running smoothly with the performance you expect." Highlights of EaseUS CleanGeniusĬlean up Mac fast: You can free more space on your Mac disk keeping your Mac healthy at all times. CleanGenius is a great all-in-one Mac cleanup utility that also combines a disk space monitor and disk ejector. Unfortunately, there isn't a fast and effecient way to do this natively in OS X.
Eject the mounted devices, like external storage disks, CD and DVD disks, SuperDrive, network storage, disk images.Įditor reviewed EaseUS CleanGenius: "You can speed up your Mac computer by performing simple maintenance. It would keep an eye on every mounted drives and display them out in graphic.Ĥ. Keep an eye on free space of HDD and alarm you with a red alert when disk space is running low.ģ. Fast clean junk files such as system caches, system logs, user caches, user logs, trash, user download folder, etc.Ģ.

This Mac cleaner has the following features:ġ. EaseUS CleanGenius is a Mac cleaner software to do Mac disk cleaning and system optimization. Yes, you can search "Mac cleaner" in Google, a bunch of mac cleaner software will come up. In Microsoft Windows Operating System, you can do a disk cleanup to delete unwanted files and save your disk space. To boost the Macbook's speed and improve its system performance, you have to clean your Macbook Air. At well under an inch at the thickest point, the Air offers a thin design coupled with an extremely lightweight package for a notebook that has the same basic footprint as the standard MacBook.Īfter long time use, your hard drive would eventually be filled up with system caches, user caches, system logs, user logs, trash, safari Internet cache and so on, your Macbook Air would get slower and slower. It is Apple's latest notebook and is being hailed as the world's thinnest. Immediately after infiltration, Advanced Mac Cleaner performs a fake computer scan and displays dozens of 'issues'. The MacBook Air family is a line of Apple ultraportable Macintosh notebook computers. Judging on appearance alone, Advanced Mac Cleaner might seem legitimate, however, it is a potentially unwanted program (PUP) that typically infiltrates systems without users' consent.
1 note
·
View note
Text
Commander One Review
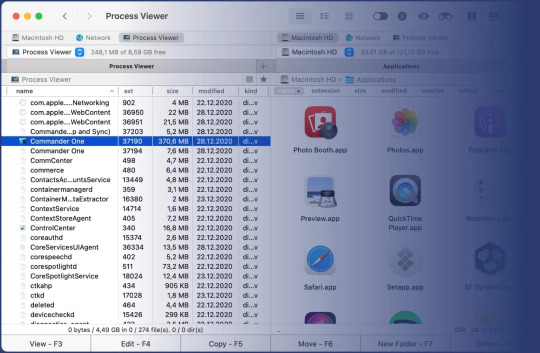
Presenting Commander One Dual Pane File Manager for Mac Commandant One is an outsider swap for Finder that offers far additional elements than Apple's default answer for document the board. For individuals who treat efficiency in a serious way, Commander One lets you perform various tasks with a double sheet, every sheet having its own arrangement of tabs. Whenever I first got the opportunity to utilize this application, I felt overpowered with every one of the elements I approached even as a power client.
Commander One Review
The double sheet allows you to move documents between catalogs easily. Becoming acclimated to the UI didn't take long, I assume I spent under ten minutes before I began utilizing it like I've generally had it. The toolbars have all that you really want, and contrasted with Finder, it looked jumbled from the beginning. Nonetheless, you can eliminate things you don't require utilizing the View choices.
See more About: “ WinSCP Alternatives “
By all accounts, it seems to be a customary record chief, yet there are extraordinary elements stuffed under.
Android and iOS File Transfer
With my gadgets generally on a similar WiFi organization, Commander One allows me to get to records on my iOS gadgets. In spite of the fact that you can move documents over WiFi utilizing AirDrop, Commander One mounts your iOS gadget as a plate (over WiFi or USB) and allows you to get to the User/Media envelope. This allows you to move documents around as you like and it's one of my number one highlights.
In the event that you've been utilizing Google's Android File Transfer application which I believe is disabled, right now is an ideal opportunity to jettison it. Commandant One goes about as a more proficient Android document move application that allows you to oversee records on your cell phones better.
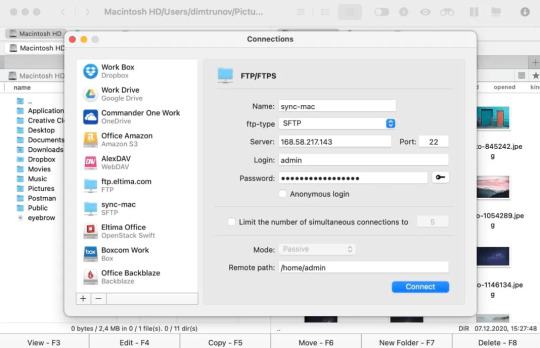
A FileZilla trade for FTP?
For FTP moves, I've generally depended on FileZilla as my essential FTP client. Leader one may be a decent substitution as it allows me to interface with my FTP server. Whether you need to utilize FTP with SSL or you would like to associate with SFTP, this application allows you to do this. Moving records between your server and your nearby PC gets significantly more straightforward utilizing basic duplicate/glue or drag/drop.
Your distributed storage in one spot
For individuals with little circle space on their MacBooks, Commander One allows you to mount you distributed storage and access them in a single spot. Rather than downloading separate applications for OneDrive, Google Drive, Amazon S3 and Dropbox, you can essentially sign in to these administrations and access them all inside this application.
Things that could be better
Officer One conveys where it makes a difference and what's truly significant. I had no issues at all utilizing the application. The UI is instinctive enough regardless of whether you're not a power client.
Since I moved up to macOS Mojave, I've been utilizing the Dark Mode. In spite of the fact that Commander One has a dim topic you could enact from the settings, it doesn't precisely seem to be the default Mojave dull mode Finder has.
Truly, I realize this is very yet criticizing
0 notes
Text
Commander One Review
We've seen a few endeavors to further develop Apple's Finder yet the fundamental functionalities continue as before over time. Many individuals need a superior option with further developed highlights, so the Commander One application may be a decent decision for those power clients.
When you introduce and open the application, you can see that this is a double board record director. There are two boards on the different sides, so you can without much of a stretch exchange records between various ways. We can move records without managing stacked or one next to the other Finder windows, or playing with tabs. You can simply relocate records from one board to the next, or utilize adaptable hotkeys to make the interaction much quicker. In addition, it likewise upholds a limitless number of tabs in each board.
More: https://mac.eltima.com/file-manager.html
Working with the Commander One is very unique when contrasted with MacOS' Finder, so it could require you an investment to become accustomed to it.
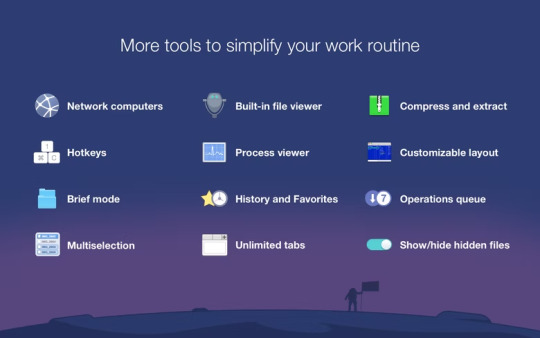
In addition, you will see choices to show stowed away documents, change textual styles and varieties, access your most utilized and as of now opened envelopes, and high level pursuit with RegExp support. You can likewise see documents without really opening them and the application upholds record types ordinarily utilized by application designers and IT experts like twofold and hex.
My main grumbling is that I can't utilize Function keys on my MacBook Pro with Touchbar, so I needed to re-map practically all hotkeys.
Notice that there are two renditions of the application, which are a form accessible on App Store and a variant downloaded from their authority site. There are a couple of inadequacies of the App Store variant, for example, we don't have the order line, terminal emulator, and we likewise can't mount iOS gadgets as drive to effectively move documents. In the event that you are utilizing the free rendition, you don't need to stress over it since those highlights are accessible in the PRO Pack as it were.
In addition, the PRO Pack likewise offers a few further developed highlights like dealing with every one of your mists and organization servers; You can associate with remote FTP, SFTP or FTPS servers with the underlying FTP Manager, connect your whole Amazon S3 record, or work with your Google Drive, Dropbox, or OneDrive envelopes.
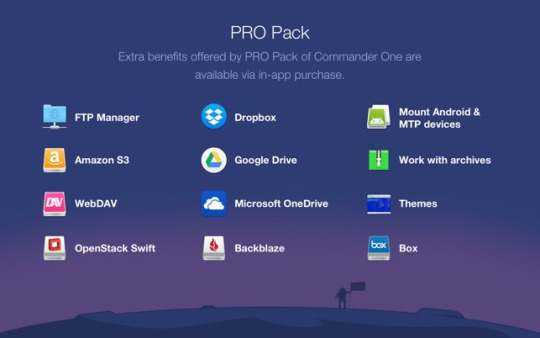
In addition, you can mount MTP and Android gadgets and work with documents as though they are put away in your Mac. The element is considerably more helpful than the Android File Transfer application that a large portion of us are utilizing; We can open and review photographs, recordings, or different documents without duplicating them to our Mac first. In the event that you choose to move up to the PRO rendition, the expense is $29 for an individual permit for 1 Mac.
The free rendition of Commander One isn't exactly worth the overhaul from MacOS' Finder, in any case, the elements in the PRO adaptation are really amazing and helpful for power clients.
0 notes
Text
Free mac cleaner speed boost


#Free mac cleaner speed boost for mac#
#Free mac cleaner speed boost update#
#Free mac cleaner speed boost pro#
#Free mac cleaner speed boost software#
Price: From $39.95 (1-year subscription).ĬCleaner is a household name in the cleaning software industry, and the company has one of the best Mac cleaning software.ĬCleaner offers a cleaning utility that analyzes your Mac’s storage to hunt out cache files, browser cookies, and other junk files.However, you should note that the trial version comes with a 500MB cleaning limit. The Maintenance module will free up disk space on your Mac’s disk, repair broken file permission, and compress the size of your (Time Machine) backup.ĬleanMyMac X is a paid cleaning tool but you can use the trial version for free.
#Free mac cleaner speed boost update#
You can use the utilities in the Applications module to uninstall applications, remove system extensions, and find outdated apps and update them accordingly.

Like MacKeeper, CleanMyMac X also lets you effectively manage applications on your Mac. There’s also a "Smart Scan" feature that thoroughly scans your Mac and cleans unneeded junk, neutralizes potential threats, and boosts your system performance. The software has a clean interface and you’ll find everything you need to clean and optimize your Mac on the right sidebar. You can also use MacKeeper’s “Smart Uninstaller” tool to uninstall apps and remove their respective leftover files.ĬleanMyMac X offers a suite of tools that removes junk files and malware from your Mac. This tool checks your Mac for outdated software and updates them accordingly. So you don’t have to set a reminder or schedule to get your Mac scanned for vulnerabilities - MacKeeper does that automatically in the background.Īs a cherry on top, MacKeeper also comes with a built-in "Update Tracker". MacKeeper also has an Auto-scan feature that’s enabled by default. There’s a "Find & Fix" section where you can check the status of your Mac's storage, security, and overall performance at the click of a button. As a bonus, you also get an antivirus, duplicate finder, an ad blocker, and a variety of other privacy protection utilities.

MacKeeper is an all-in-one software with a bunch of built-in cleaning tools that’ll get rid of junks and redundant files eating up your Mac’s storage. It doesn’t matter if you’re a Mac newbie or a pro-you’ll get a hang of MacKeeper easily. MacKeeper 5 boasts of improved functionalities, refreshed design, and an easy-to-navigate interface. This is the latest version of the MacKeeper software.
#Free mac cleaner speed boost for mac#
Avast Cleaner for Mac - 3.50 GB of junk files.
#Free mac cleaner speed boost pro#
Mac Cleaner Pro - 4.00 GB of junk files.
Cleaner One Pro - 8.20 GB of junk files.
The Mac cleaners reviewed in this article all found varying gigabytes of junk files on our test device - a 128GB MacBook Pro running macOS Big Sur. “Smart Cleaning” feature automatically notifies you when there are junk files to clean. Monitors junk files in real-time and offers privacy protection. Offers a “Smart Scan” feature that cleans and optimizes your Mac in one click.Ĭomes with a “Shredder” that lets you remove locked items and junks without facing any (Finder) errors. Provides 24/7 monitoring on your Mac for data breaches. Removes viruses, malware, and blocks ads/trackers. Ratingīest all-in-one solution to clean your Mac. This is why we compiled this list containing ten of the best cleaning software for Mac. Choosing the best one that matches your needs can get difficult. You'll find tons of applications out there offering disk cleanup for Mac. So, here are our top picks of the best Mac cleaner software in 2021. Thanks to Mac cleaning and optimization software, you can give your Mac's storage a clean sweep and free up space within seconds. Manually locating and removing these unwanted disk-consuming files can be exhausting and futile. They also have varying sizes (some are tiny files while some may run into gigabytes) and are scattered across several folders on your Mac. That could be because there are excessive junk files occupying your Mac's storage disk. Or is it displaying a "Your disk is almost full" error message? Does your Mac feel a little slow and unresponsive?
0 notes
Text
The best cleaner for mac

#THE BEST CLEANER FOR MAC FOR MAC#
#THE BEST CLEANER FOR MAC UPDATE#
#THE BEST CLEANER FOR MAC PRO#
#THE BEST CLEANER FOR MAC SOFTWARE#
#THE BEST CLEANER FOR MAC SOFTWARE#
Price: From $39.95 (1-year subscription).ĬCleaner is a household name in the cleaning software industry, and the company has one of the best Mac cleaning software.ĬCleaner offers a cleaning utility that analyzes your Mac’s storage to hunt out cache files, browser cookies, and other junk files.
However, you should note that the trial version comes with a 500MB cleaning limit. The Maintenance module will free up disk space on your Mac’s disk, repair broken file permission, and compress the size of your (Time Machine) backup.ĬleanMyMac X is a paid cleaning tool but you can use the trial version for free.
#THE BEST CLEANER FOR MAC UPDATE#
You can use the utilities in the Applications module to uninstall applications, remove system extensions, and find outdated apps and update them accordingly. Like MacKeeper, CleanMyMac X also lets you effectively manage applications on your Mac. There’s also a "Smart Scan" feature that thoroughly scans your Mac and cleans unneeded junk, neutralizes potential threats, and boosts your system performance. The software has a clean interface and you’ll find everything you need to clean and optimize your Mac on the right sidebar. You can also use MacKeeper’s “Smart Uninstaller” tool to uninstall apps and remove their respective leftover files.ĬleanMyMac X offers a suite of tools that removes junk files and malware from your Mac. This tool checks your Mac for outdated software and updates them accordingly. So you don’t have to set a reminder or schedule to get your Mac scanned for vulnerabilities - MacKeeper does that automatically in the background.Īs a cherry on top, MacKeeper also comes with a built-in "Update Tracker". MacKeeper also has an Auto-scan feature that’s enabled by default. There’s a "Find & Fix" section where you can check the status of your Mac's storage, security, and overall performance at the click of a button. As a bonus, you also get an antivirus, duplicate finder, an ad blocker, and a variety of other privacy protection utilities. MacKeeper is an all-in-one software with a bunch of built-in cleaning tools that’ll get rid of junks and redundant files eating up your Mac’s storage. It doesn’t matter if you’re a Mac newbie or a pro-you’ll get a hang of MacKeeper easily. MacKeeper 5 boasts of improved functionalities, refreshed design, and an easy-to-navigate interface. This is the latest version of the MacKeeper software.
#THE BEST CLEANER FOR MAC FOR MAC#
Avast Cleaner for Mac - 3.50 GB of junk files.
#THE BEST CLEANER FOR MAC PRO#
Mac Cleaner Pro - 4.00 GB of junk files.Cleaner One Pro - 8.20 GB of junk files.

The Mac cleaners reviewed in this article all found varying gigabytes of junk files on our test device - a 128GB MacBook Pro running macOS Big Sur. “Smart Cleaning” feature automatically notifies you when there are junk files to clean. Monitors junk files in real-time and offers privacy protection. Offers a “Smart Scan” feature that cleans and optimizes your Mac in one click.Ĭomes with a “Shredder” that lets you remove locked items and junks without facing any (Finder) errors. Provides 24/7 monitoring on your Mac for data breaches.
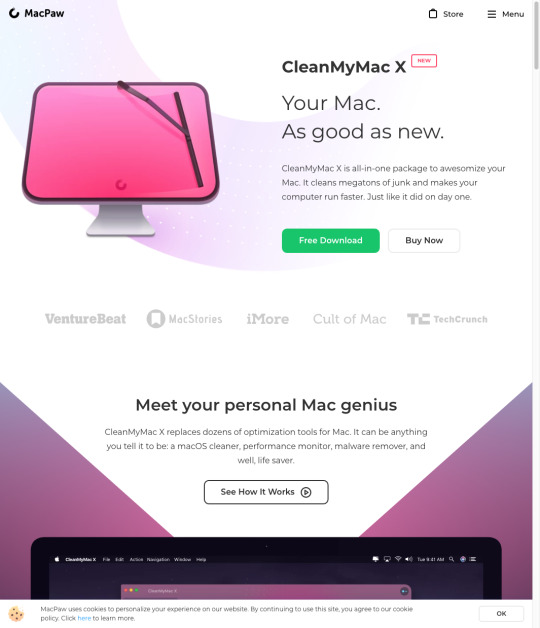
Removes viruses, malware, and blocks ads/trackers. Ratingīest all-in-one solution to clean your Mac. This is why we compiled this list containing ten of the best cleaning software for Mac. Choosing the best one that matches your needs can get difficult. You'll find tons of applications out there offering disk cleanup for Mac. So, here are our top picks of the best Mac cleaner software in 2021.

Thanks to Mac cleaning and optimization software, you can give your Mac's storage a clean sweep and free up space within seconds. Manually locating and removing these unwanted disk-consuming files can be exhausting and futile. They also have varying sizes (some are tiny files while some may run into gigabytes) and are scattered across several folders on your Mac. That could be because there are excessive junk files occupying your Mac's storage disk. Or is it displaying a "Your disk is almost full" error message? Does your Mac feel a little slow and unresponsive?
1 note
·
View note
Text
Use mac app cleaner

Use mac app cleaner how to#
Use mac app cleaner for mac#
Use mac app cleaner upgrade#
One of the original Mac cleaners, CCleaner covers the basics admirably - clears out unused files, deletes browser junk, and uninstalls unwanted programs. It's just the tool you're looking for if you want to optimize disk space on your computer.ĬCleaner makes our list of best Mac cleaners because it's proved time and again to be a solid cleanup tool. State-of-the-art image detection technology to remove poor-quality or duplicate photos.Īvast Cleanup is an easy-to-use Mac cleaner that gets the job done well. Simple app dashboard for easy navigation and control. Gets rid of unwanted apps completely, including an app's temporary data, saved states, containers and preferences.Ĭleans up crash reports, junk files, browser cache, log files, trash, downloads, and even external drive junk. No hidden surprises or confusing commands - just launch the app, permit disk access, and the tool gets to work. The photo-cleaning feature is a great benefit for those looking to squeeze the most out of long-term disk storage.Īnother reason Avast Cleanup makes our list of the best apps to clean your Mac is the easy-to-use dashboard.
Safely remove junk files, app clutter, duplicate photos, and all the extra stuff your Mac doesn't need.Īvast Cleanup is a must-have app, especially for anyone who loves photography. Get your old Mac running like new with AVG TuneUp. Just drop a folder into AVG TuneUp and it scans for duplicates.įull automation upon request so you can clean regularly with no hassles. Unlike other tools designed to be used only once, AVG TuneUp works tirelessly in real time to keep your Mac at peak performance 24/7.Įxtremely thorough - finds junk and hidden files in places you didn't know existed.Īdvanced photo feature finds blurry or low-quality photos taking up space.ĭrag-and-drop functionally makes finding duplicate files effortless. Of course, you have final say over deletion.ĪVG TuneUp’s focus on automation is a big part of what makes it one of the best Mac cleaning software apps. The duplicate finder has another layer of magic: it identifies files and photos that are identical.

It can even clean the mysterious Other storage space on your Mac. The cleaning feature carefully scans your computer to find junk files, old downloads, cache files, and random clutter taking up space on your Mac.
Use mac app cleaner for mac#
$44.99/year, 1 device $49.99/year, 10 devicesĪVG TuneUp for Mac focuses on two important areas: disk cleaning and duplicate files. Thankfully, top quality doesn't always mean top dollar. Unless you’re an expert, we suggest automating the process with one of the best Mac cleaners available.
Use mac app cleaner how to#
The question is do you do things manually - like learning how to clear your Photoshop scratch disk - or use a Mac cleaner to do it automatically? No matter your clean up agenda, knowing how to clean up your Mac is crucial.
Use mac app cleaner upgrade#
Do you browse the internet all day, picking up cookies and data files? Then learn how to clear your cache and even upgrade RAM on your Mac if your storage is full. Choosing the best MacBook cleaner depends on what you do on your computer.
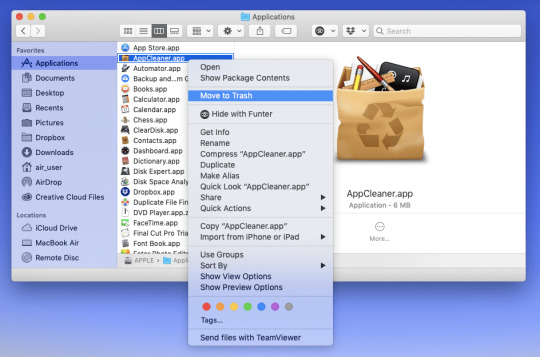
The best disk cleaner for Mac is one that is simple, safe, and fast. How to choose the best Mac cleaning software
1 note
·
View note
Text
Commander One Review. The Finder Replacement You Need
Commandant One is an outsider trade for Finder that offers far a greater number of elements than Apple's default answer for document the executives. For individuals who treat usefulness in a serious way, Commander One lets you perform various tasks with a double sheet, every sheet having its own arrangement of tabs. Whenever I first got the opportunity to utilize this application, I felt overpowered with every one of the elements I approached even as a power client.
leader one double sheet
The double sheet allows you to relocate documents between registries effortlessly. Becoming acclimated to the UI didn't take long, I think I went through under ten minutes before I began utilizing it like I've generally had it. The toolbars have all that you want, and contrasted with Finder, it looked jumbled from the start. Nonetheless, you can eliminate things you needn't bother with utilizing the View choices. So how to import photos from iphone to mac with Commander One?
By all accounts, it resembles a normal document administrator, yet there are extraordinary highlights pressed under.
Android and iOS File Transfer
With my gadgets generally on a similar WiFi organization, Commander One allows me to get to documents on my iOS gadgets. In spite of the fact that you can move documents over WiFi utilizing AirDrop, Commander One mounts your iOS gadget as a plate (over WiFi or USB) and allows you to get to the User/Media organizer. This allows you to move records around as you like and it's one of my beloved highlights.
In case you've been utilizing Google's Android File Transfer application which I believe is injured, right now is an ideal opportunity to discard it. Leader One goes about as a more effective Android record move application that allows you to oversee documents on your cell phones better.
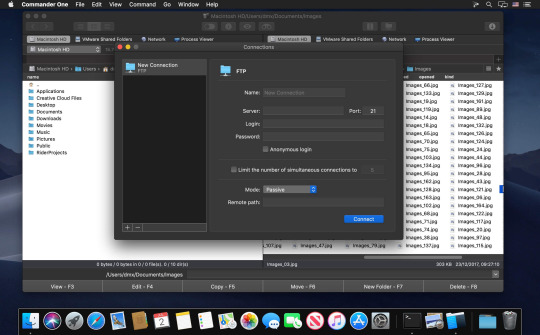
A FileZilla trade for FTP?
For FTP moves, I've generally depended on FileZilla as my essential FTP customer. Commandant one may be a decent substitution as it allows me to interface with my FTP server. Regardless of whether you need to utilize FTP with SSL or you would like to interface with SFTP, this application allows you to do this. Moving records between your server and your neighborhood PC gets much simpler utilizing basic duplicate/glue or drag/drop.
Your distributed storage in one spot
For individuals with little plate space on their MacBooks, Commander One allows you to mount you distributed storage and access them in one spot. Rather than downloading separate applications for OneDrive, Google Drive, Amazon S3 and Dropbox, you can just sign in to these administrations and access them all inside this application.
Things that could be better
Commandant One conveys where it makes a difference and what's truly significant. I had no issues at all utilizing the application. The UI is instinctive enough regardless of whether you're not a power client.
Since the time I moved up to macOS Mojave, I've been utilizing the Dark Mode. Despite the fact that Commander One has a dim topic you could initiate from the settings, it doesn't actually resemble the default Mojave dim mode Finder has.
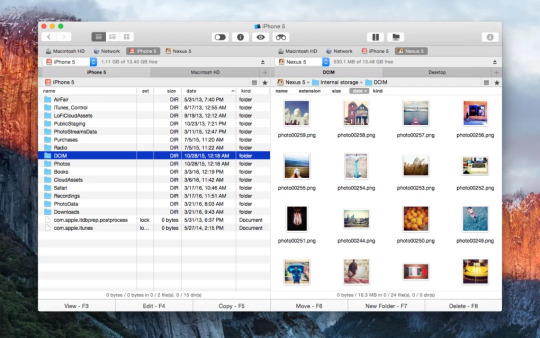
Truly, I realize this is entirely yet criticizing
Estimating
Leader One is allowed to utilize. In actuality, you don't need to pay a dime to utilize it for moving documents locally. Nonetheless, to mount gadgets, access distributed storage administrations and FTP, and to utilize Archive Utility, you might have to buy an individual permit for just $29.
Incidentally, you approach all the Pro elements for 15 days prior to deciding wether you want a permit or not. Once more, a permit isn't expected to utilize the essential elements.
youtube
0 notes
Text
Mac Junk Cleaner Free
Mac Cleaner is a powerful cleaning app to help you free up your Mac, clear junk files and cache, delete large and old files on Mac, uninstall Mac apps completely to improve the performance of your Mac, Mac mini, MacBook Air, MacBook Pro and iMac. It is very easy to use but fast and safe. Now your Mac is as good as new! CleanMyMac X deletes junk files, including user cache, system logs, downloads, and even Xcode junk files all at once to speed up your Mac and free it from clutter. Junk File and Cache Cleaner Cleans the residual files often left by uninstalled apps to free up phone or tablet disk space Analyzes and safely removes the junk files that take up your memory and storage space. Free download junk files cleaner for Mac OS X - EaseUS CleanGenius easily removes junk files and free up disk space to boost the computer speed. In Windows, you will get a lot of software that can be used to scan and remove junk files and folders that get deposited in the.
Launch Macube Cleaner on your Mac. To delete system files in the Mac, choose Smart Scan. Click Smart Scan to allow the app to scan out system files that are safe to delete. After scanning, the program will display the junk files in different categories. Tip: To better sort out the junk files, click 'Sort By' to sort out. CCleaner for Mac! Clean up your Mac and keep your browsing behaviour private with CCleaner, the world's favourite computer cleaning tool.
So, to clean system junk on your Mac, do the following: Open Finder. From the Go menu, select Go to folder. Enter the /var/log in the field and select Go. You will see all the system log files. Select the files you want to remove and drag them to the Bin. You can also find system log files in /Library/Logs.
Optimizer for Mac Fire up the app, do a scan, and see it remove the clutter that’s slowing you down. Does a spring clean: The Junk File Cleaner deletes unnecessary files and browser junk. The Duplicate Finder clears copies of photos and other files.
Summary: Still worry about your insufficient Mac storage? Want to speed up Mac but don't know how? Get the 6 free Mac cleaners to clear disk space, clean junk or duplicate files to free up your Mac.
Many of us know exactly how to clean Windows computer or Android phone, but when it comes to cleaning Mac, few people know about it. Many Apple users think that, there is no need to clean Mac.
However, with more and more junk files occupying your Mac storage, your Mac will slow down and offer a bad performance. You have to rely on some Mac cleaner software to remove all useless data.
Best Free Mac Cleaners
With so many Mac cleaner tools offered on the market, which one you should use? Do you know how to choose a great Mac cleaner? We have tested more than 20 Mac cleaners and select the 6 best ones for you to choose from. You can pick your preferred Free Mac cleaner to speed up your Mac easily and quickly.
No.1 Free Mac cleaner: CCleaner - Free junk file cleaner
CCleaner is one free and top Mac cleaner to delete cookies, search history, temporary files and junk files from Mac. The specific functions are below:
1. Find and remove useless/junk files with the click of a button so your Mac can run faster. Speed up boot times with easy management of Startup items.

2. Clear up your recycle bin, temporary files and folders, broken permissions and others. If you want to remove installed programs, just click one button.
3. Erase your browser search history and cookies so you can browse any Internet confidentially and your identity remains anonymous.
No.2 Free Mac cleaner: Disk Inventory X – Free disk cleaner for Mac
Disk Inventory X is one disk cleaning software and disk usage utility for Mac. With this free Mac cleaner, you can know where your disk space has gone and clean it safely. Just see more about Disk Inventory X.
1. Disk Inventory X shows the sizes of files and folders in a special graphical way.
2. With this Mac cleaner, you can see different files marked with different colors, to help you easily find what you want to delete.
No.3 Free Mac cleaner: AVG Cleaner – Free hidden clutter cleaner
AVG Cleaner is one free Mac cleaner to clean hidden clutter and forgotten duplicates. You can see the detailed information below:
1. Clear more hidden garbage, log, download history and trash bin for freeing up more space on your Mac.
Mfc 5440cn drivers for mac os. 2. Search more duplicate files, including images, music, videos and folders.
3. Created for Mac and easy to use.
4. There is an anti-virus software called AVG AntiVirus for Mac, you can use it to protect Macs on your and your families.
No.4 Free Mac cleaner: OmniDiskSweeper - Free hard drive cleaner
OmniDiskSweeper is one free Mac cleaner to find and delete big files that taking up hard drive space and also it can help you recover lost disk space.
1. OmniDiskSweeper helps you sort every file on your Mac by size and you can identify the biggest file to delete it.
2. After deleting, remaining space and folders are recalculated.
No.5 Free Mac cleaner: Dr. Cleaner – Free memory, disk, system cleaner
Dr. Cleaner is one free Mac cleaning app to offer Memory Optimization, Disk Cleaning and System Monitoring to keep your Mac optimized for the best performance.
Free Mac Junk File Cleaner
1. Smart and accurate selection for duplicates scan and remove on Mac with OS X 10.6.6 or later.
2. Scanned big files and junk files will be deleted easily from your Mac.
3. You can easily view real-time network usage and CPU usage in the Menu bar.
No.6 Free Mac cleaner: Disk Drill
Disk Drill is one very popular free Mac cleaner app. Actually, it is a professional data recovery tool for Mac, which carries some disk cleaning functions. It has the capability to analyze Mac storage space, locate unused, large, and duplicate files and so on. In this way, it enables you to free up your Mac storage effortlessly.
1. Canon 9200 driver. Monitor the health of your Mac storage and offer timely alerts.
2. Find and remove duplicate files in multiple locations on Mac.
3. Analyze disk space, locate unused files and space hogs, free up storage.
Professional Mac cleaner recommendation:
With the best 6 Mac cleaner apps above, you can handily remove some junk files and optimize your Mac performance. But some of them only offer trial features. Here you are recommended to directly choose the professional Mac cleaner below:
Mac Cleaner
Scan and delete junk files including cache data and logs, email attachments, unwanted iTunes backup and app localization.
Delete large and old documents and selectively remove worthless files.
Clean duplicated files or folders on Mac.
Uninstall apps and clean associated files safely.
Monitor Mac system in disk utilization, battery status, memory performance and CPU usage.
Compatible with iMac, Mac Pro, MacBook (Air/Pro) in the latest macOS Big Sur.
Mac Junk File Cleaner Free
FAQs of Free Mac Cleaner
How do I clean and optimize my Mac?
Mac Junk Cleaner Free
Download and install Aiseesoft Mac Cleaner. Click Cleaner and you can clean up your Mac by cleaning system junk, iPhoto junk, email junk, similar photos, iTunes junk, trash bin, large & old files and more.
Why is my Mac so slow?
The reason that why is your Mac so slow may includes there is no enough hard drive or RAM on Mac. Or there is too many startup items or icon clutter on desktop. Perhaps your macOS is outdated and you should update it.
Does Catalina slow down your Mac?
No. Catalina won’t slow down an old Mac. You can check to make sure if your Mac is compatible with macOS Catalina.
By now, 6 free Mac cleaners have been shared here. You can choose your preferred Mac cleaner according to your need. Please share it in comment if you have any better Mac cleaner recommendation. Check ere if you want to speed up your slow iPhone.
What do you think of this post?
Excellent
Rating: 4.8 / 5 (based on 238 ratings)
Mac Junk File Cleaner Free Downloads
Junk Cleaner For Mac Free Download
December 29, 2020 17:50 / Updated by Louisa White to Mac Cleanup
Mac Os X Cleaner Free
Comments are closed.
0 notes
Text
How To Find Duplicate Files On Mac Free

Find and Remove Duplicates
How To Find Duplicate Files On Mac Free Pdf
Is There A Way To Find Duplicate Files On My Mac
Free Duplicate Finder For Mac
Verdict: Duplicate File Finder lets you get more free disk space by removing unnecessary identical or similar files and folders from your Mac. It works with a variety of file formats and has a really fast scanning algorithm to find matches. Apr 30, 2021 How to find and remove duplicate files on Mac with a duplicate file finder. I hope the list and reviews above are useful and helps you do a comparison so as to pick the app you need. This part will show you how duplicate removal software typically works. Download and install the software. How to find and remove duplicate files automatically. An effective and time-saving solution to find duplicates on Mac is to use a free application Duplicate File Finder.The application has a complex search algorithm that automatically identifies exact duplicate photos, videos, music, documents, and other common types of files. 6 Best Duplicate File Finders for Mac. Here we have discussed the best Duplicate File Finder for Macbook. These easily help you deal with these files and free up space on your Mac. Most of these Apps will not online find but will also delete or remove duplicate files from your Mac device. Bonus: Duplicate File Finder is an extra tool we are including which offers powerful duplicate file finder capabilities for Windows! Most of our selected apps above have been Mac specific but next tool really shines on Windows! DupeGuru is a duplicate file finder for Mac available for free online.
The bad news is that duplicate files are eating up space on your Mac potentially causing your Mac to slow down and perform poorly. The good news is that there is an easy way to get rid of duplicate files with just a couple of clicks. The easy way is to use the best duplicate file finder for Mac.
There are a number of apps to find and delete the duplicate photos, videos, music files, documents and other types of duplicate files on a Mac. They vary in performance, ease of use and more. In this article, you will find a list of them along with a review for each.
What makes a reliable duplicate file finder for Mac?
Capability of identifying duplicate files
A duplicate file finder is an app designed to detect duplicate files. Such apps use particular algorithms to compare files and identify the duplicates. Different apps may use different algorithms. For example, the algorithm PhotoSweeper uses can only handle images, resulting in its inability to find other types of duplicates. Easy Duplicate Finder uses SHA-256, which is a bit slow. Cisdem Duplicate Finder uses a combination of algorithms, leading to high performance in the detection of various types of duplicate files.
Safe support for Photos and iTunes (now Music)
Unlike on Windows where photos and music files are stored in normal folders, the photos and songs on your Mac are typically stored in Photos Library (managed via Photos app) and iTunes Media (managed via iTunes app) respectively. The fact is that many duplicate file finders for Mac will consider Photos Library and iTunes Media normal folders when searching for duplicates in the two places. As a result, they will damage your library or cause the loss of files or related data. To safely delete these duplicates, you need to use an app designed for Photos and iTunes.
There are other criteria to consider. The two ones above are the most important.
The best duplicate file finders for Mac
#1 Cisdem Duplicate Finder
Compatibility: macOS 10.10 or later, including Big Sur
Cisdem Duplicate Finder is the best of its kind due to its high performance, safety, ease of use, etc.
Thanks to the advanced algorithms it uses, the app can quickly identify true duplicate files by content and find duplicate photos, audios, videos, Word documents, PDFs, presentations, archives and other types of duplicate files on your Mac and external storage devices (e.g., external hard drives, SD cards and more). It also finds near-duplicate photos, which is a plus for making the app a great duplicate photo finder for Mac.
Designed for Photos and iTunes, Cisdem Duplicate Finder will scan your Photos Library or iTunes Media, display the found duplicates for you to view, and remove the unwanted duplicates from within the Photos app or iTunes app with your permission, just like a human would when removing photos or songs. Your Photos Library and iTunes Media will be safe and unaffected except being duplicate-free.
Once the app finishes scanning Photos, iTunes or Mac folders for duplicate files, it will display the detected duplicates in its results window for you to easily view and preview. What’s more, its smart Auto-Select feature will automatically select duplicates for you to mass delete with a single click. Click the Delete button, and now all dupes are gone! If not satisfied with auto-selection, you can manually select or use the selection rules provided.
Pros
Quickly find all types of duplicate files on Mac based on content
Also find near-duplicate images
Support Mac and external storage devices
Safely remove duplicates from Photos, iPhoto, Music and iTunes
Come with 3 preview modes, including a side-by-side mode
Provide a smart Auto-Select feature and up to 8 selection rules
Offer 3 deletion methods, including Move to Trash
Support Apple silicon
#2 Gemini 2
Compatibility: macOS 10.10 or later
In addition to the best duplicate file finder for Mac, there are other great apps available to help rid your Mac of duplicate files. Gemini 2 is one of them. People are often impressed by how good looking the app is. But a beautiful interface can only be the cherry on top. What’s important is the ability to find duplicate files on a Mac.
The app supports finding the double files in normal folders, iTunes and Photos and is capable of detecting duplicate photos, duplicate audios, duplicate documents and some other types of duplicates. It does a good job of deleting duplicate files in folders even the large ones. But it occasionally fails to work when scanning a big Photos Library. In such a case, try to re-scan.
In February 2021, Gemini 2 introduced the Duplicates Monitor feature aiming to better help users get rid of duplicate files by notifying users when new duplicates appear. The feature does what it’s designed for. But it uses lots of CPU and may slow down your Mac.
Pros
Comes with a beautiful interface
Scan your Mac for various types of duplicate files
Support Photos and iTunes
Let users directly preview files within the app
Provide an innovative Duplicates Monitor feature
Cons
Incompatible with macOS 10.9 or earlier
Expensive
#3 Tidy Up 5
Compatibility: macOS 10.12 or later
Designed by Hyperbolic for “pro users” (as advertised), Tidy Up 5 is a good duplicate file finder for Mac for experienced users. Inexperienced users may find its interface overwhelming and confusing.
Supporting all popular file types such as images, Tidy Up 5 can detect and delete the duplicate files in Mac’s folders and Photos. Although the app offers an option to scan iTunes for duplicate items, it does a poor job. In the test, it failed to find any duplicates, which do exist, in my iTunes.
The app comes with two modes: Simple mode and Advanced mode. New users can start with the simple one. Both modes offer an array of scan options and criteria. Each scan for duplicates requires (at least) a little configuration. Compared to the other best Mac duplicate file finders talked about above, this one is less easy to use.
Pros
Search for a variety types of duplicate files on Mac
Find and delete duplicates in Apple Photos on Mac
Provide 2 modes for users to choose from
Highly customizable
Support hard links
Cons
Don’t support macOS 10.11 or earlier
Not good at finding duplicates in iTunes
Not that user-friendly
#4 Easy Duplicate Finder for Mac
Compatibility: macOS 10.6 or later
Easy Duplicate Finder is available for both macOS and Windows. Highly compatible, it works well on a Mac running Big Sur, Catalina, Mojave or High Sierra or even an earlier version.
Its wizard-style interface is simple to navigate and use, guiding users through the whole process of the identification and removal of duplicate files, which is especially helpful for novice users.
This piece of file deduplication software can scan your MacBook Pro, MacBook Air or iMac, etc. for duplicate songs, duplicate photos and more. When the scan is complete, it will give you two options: using Auto Remove to immediately eliminate duplicates or using Manual Review to view duplicates and then remove the unwanted ones. The latter allows you to examine the files you are handling and deleting and is more reliable.
The app excels at looking for the duplicates in iTunes and normal folders. However, when searching for duplicate photos in Mac Photos app, it will return no results or false positives. If you allow it to deduplicate, your Photos Library will get damaged.
Pros
Capable of detecting common types of file duplicates
Support iTunes
Provide an Auto Remove feature for quick duplicate removal
Very user-friendly interface
Cons
How To Find Duplicate Files On Mac Free Pdf
Relatively slow scan
Poor support for Mac’s Photos
A bit expensive
#5 Duplicate Detective
Compatibility: macOS 10.7 or later
This Mac duplicate file finder and remover looks less sophisticated due to its unpolished interface. It actually does a fair job of scanning for and removing duplicate files on Mac.
You can use it to scan folders and Photos. However, it can’t identify all the duplicates in a given folder or library. Some dupes will be missing. And also, it can’t provide consistent performance. If you want to clean up duplicates in iTunes, this app won’t help. In the test, the duplicate songs it found didn’t even exist in my iTunes.
Pros
Support all common file types
Can find the duplicates in Photos on Mac
Offer an option to create an alias when deleting duplicates
Easy to use
Lightweight
Cons
Incapable of finding all duplicate files in a location
Can’t work well with iTunes
#6 Duplicate Sweeper for Mac
Is There A Way To Find Duplicate Files On My Mac
Compatibility: macOS 10.8 or later
Duplicate Sweeper is another lightweight macOS duplicate file finder and deleter. The app’s minimal interface is easy to use and navigate. Its welcome screen provides users with brief usage instructions. Even someone who is completely inexperienced can easily use it.
The app can only delete duplicate files in the folders on a Mac. In other words, you can’t use it to weed out the duplicates in your Photos or iTunes. Therefore, it may not be desirable for Mac users. But it can be a choice to consider if the duplicate files on your Mac do reside in folders.
Pros
Able to look for photo duplicates and other common types of duplicates
Lightweight
Ease-to-use interface
Cons
Can’t identify the duplicates in iTunes and Photos
Sometime fail to detect all dupes
Limited customization
#7 dupeGuru for Mac (free)
Compatibility: macOS 10.12 or later
There are also free Mac apps available for the removal of duplicate files. What is the best free duplicate file finder for Mac? dupeGuru may be the answer.
dupeGuru is free to use and open source. There is some sort of maintenance, but the app hasn’t been properly updated for years. Therefore, there can be compatibility issues with newer macOS versions.
The freeware app comes with three modes: Standard, Music and Picture, allowing you to look for and delete duplicate pictures, duplicate music files and some others in folders on Mac. It’s not designed for Apple Photos and iTunes. Even though it allows you to scan Photos Library, its deduplication algorithm will damage your library and cause data loss.
Pros
Completely free to use
Open source
Offer 3 modes to handle different types of duplicate files
Fairly configurable
Can find certain visually similar pictures
Cons
Possible compatibility issues
No support for Photos and iTunes
Can’t find all dupes in the folder it scans
#8 Disk Drill for Mac (free)
Compatibility: macOS 10.12 or later
Disk Drill is actually a data recovery app, but it offers a feature called Find Duplicates. The feature is available in the free and paid versions of Disk Drill, which makes the app available as a free duplicate file finder.
You can find the feature in the sidebar under the Extra tools section. Like dupeGuru, this app can scan only folders for duplicates. To perform a scan, you need to add a folder and click the Start Scan button. There is no instant preview of duplicate files. To preview a duplicate, you need to click the eye icon next to it, which can cause inconvenience when it comes to image duplicates.
Pros
Free to use
Easy-to-understand interface
Scan Mac folders for file duplicates
Cons
Incapable of detecting all duplicate files
Can’t scan Photos and iTunes
Inconvenient preview
How to find and remove duplicate files on Mac with a duplicate file finder

I hope the list and reviews above are useful and helps you do a comparison so as to pick the app you need. This part will show you how duplicate removal software typically works.
1. Download and install the software. Open it.
2. Click the plus icon + to add a folder or drive. Click Scan.
3. Once it finishes scanning for duplicate files, you can view and preview the duplicates. It lets you view by file type.
4. Duplicates are already automatically selected for mass removal.
If not happy with auto-selection, you can select by hand. Or, highlight all items under the All tab with Command-A and then apply a desired selection rule.
5. Click Delete.
6. Click Yes to confirm the deletion. Now the unwanted duplicate files on your Mac are removed.
If you want to remove duplicates from Mac Photos app or iTunes app, it will require a couple of additional steps. Please see the official user guide for details.
Free Duplicate Finder For Mac
By the way, you can also manually eliminate the file duplicates in Mac folders by using Finder’s Find function, which can be a time-consuming and tedious process. Alternatively, it’s possible to find duplicate files on Mac using Terminal, the terminal emulator coming with macOS. But stay away from Terminal if you don’t have some command line knowledge.
Conclusion
Removing duplicate files can help free up storage space, possibly making your Mac run faster. Also, it’s easier to manage files on a duplicate-free computer. The best duplicate file finder for Mac can help you effortlessly, effectively and safely root out duplicates from your Mac, no matter where they reside and how deep they hide. In addition, there are other great apps to consider.
Which duplicate file finder for Mac you are using?
You can easily have multiple duplicate files without you even realizing it. Duplicate files are not noticeable as they create themselves as you go. It’s only at a later stage that they seem to have taken over the system. By the time you notice them, your Mac will be riddled with so many duplicate files, causing it to run low on storage.
For the everyday macOS consumer, the thought of finding duplicate files is a rare occurrence. Fortunately, finding duplicate files isn’t rocket science. After a while, the Mac storage system starts filling up with the entire collection of files and folders. Usually, before modifying any large media file, users duplicate it. Such duplicates are then left around unattended. Over time, they occupy such a large portion of the macOS they cause serious system lags.
Despite that, deleting and getting rid of duplicate files can be easy. Since not all file duplicates are visibly displayed on the screen, it becomes necessary to find them manually. Use smart folders to find duplicates files and get rid of them to clear your system.
Using Smart Folders to Find and Delete Duplicate Files on Mac
Finding all duplicate files that are occupying your space is rather simple. If you want the process to be easy, then follow the steps outlined:
Pro Tip: Scan your Mac for performance issues, junk files, harmful apps, and security threats that can cause system issues or slow performance.
Free Scan for Mac Issues
410.674downloads

Special offer. About Outbyte, uninstall instructions, EULA, Privacy Policy.
Go to your Mac’s desktop and under the menu bar, click on File.
A drop-down menu will appear. Select New Smart Folder from the list of options.
A new window will open. Under the new window, locate and click on the ‘+’ icon next to the Save option.
Narrow down your search for duplicate files by selecting the Kind drop-down menu, then click on the file type you want to start with.
Starting with the selected file type, thoroughly go over all the files that are stored on your macOS. Scroll through the file, one grid after the other until you find the duplicate files that interest you, then delete. Organize files by their name such that duplicates are replicated under the original and they are easier to identify then delete.
Do a double-take to confirm that you’re deleting duplicates before proceeding. Quickly select Get Info and check the information on each file. Alternatively, you can opt to open both the original and what appears to be the duplicate then manually compare the contents. Go through all the sections including Pictures, Downloads, Documents, Music, Desktop, Videos etc.
Right-click on a duplicate file and select Move to Bin/Trash to remove it from your Mac. After deleting, go to your Trash Bin and review. If you’re certain that deleted files are duplicates and what you wanted to delete, then right-click on the Trash Bin and permanently remove the files.
Your Mac will be rid of duplicated and unwanted files leaving you with so much free space for new and necessary files.
Now you know how to find and delete duplicate files on mac with smart folders. Using this simple built-in feature on your macOS only requires your time and concentration. Even so, you can still use other programs to find duplicate files on your system.
How to Find Duplicate Files on Mac Using Third-Party Finders
In addition to Smart Folders, there are means of finding these unnecessary files on your system. These are apps found on the App Store and available for every Mac user to select and use as they see fit. Some third-party duplicate file finders for Mac are more thorough and thus churn out better results than Smart Folders. So, they might be worth your while.
Although there are many utilities out there that promise to find duplicate files and leave your Mac system clean, there are a few that live up to the end of their deal. Therefore, it’s important to choose wisely when opting for a third-party finder software.
How to Remove ‘Other’ Data on Your Mac
Mastering how to use Smart Folders on a Mac is only complete if you also know how to remove the ‘other’ data. Even if you identify and delete duplicate files, if you leave ‘other’ data, then your macOS storage is still riddled with unnecessary loads. Periodically check your Mac for unwanted files and remove them to keep the system light and free.
If you want a permanent and more sustainable solution. Then consider using iCloud. Move most pictures, music and video files to the cloud. You can always access them from any Mac as long as you log in. This option leaves you with enough room to do as you please and at the same time, keep your Mac clear and clean of duplicate files and memory occupiers.
0 notes