#how to download and install windows 10
Explore tagged Tumblr posts
Visit Tumblr Blog
Explore Tumblr blogs with no restrictions, modern design and the best experience.
Last Seen Tumblr Blogs


Fun Fact
Tumblr has been banned in Indonesia for providing people with access to pornographic content.
Text
mac is like my ex but not abusive and with similar interests to me that is kinda unsettling. unfortunately. i must think of my puter. what would they think if i did not befriend mac. probably sputter a bit and then not launch task manager and cry for several minutes and do absolutely nothing. bc of the brain damage
#i love my puter but the os had to get installed several times because of system file corruption due to power outtages#for context if youbsee this post outside of normal radon lore#it runs windows 10 but for months it was stuck thinking it was updating all of the time bc the power went out during and update#and forcing my pc off improperly and turning it back on *sometimes* reloaded the update but it nrver finished#i just got it to work a few days ago by learning i can stop the update program and restart it and it's beeing going through updates for days#and works a lot better but it still has it's normal quirks like downloading a big file and then touching ANYTHING ELSE#will cause the pc to freeze and not respond for several minutes. like sometimes moving 2 a different tab. or opening my files#god forbid you even so much as think of unzipping anything. or even touching your mouse. you must let it sit or it will cry.#my xbox is a worse baby if you even leave the room the update will fail and i dont know why. even if you leave and reenter#it stopped working for several days and loaded a black screen for hours with only the long hold xbox button doing anything#and then it. fixed itself? and updated. idfk. i do tend to accidentally cause things to die faster or have weird bugs#but it's kinda getting ridiculous andbi didn't realize how bad it was until i got a laptop and it fucking works? insane. anyway
0 notes
Text
Joomla 4 installation on Localhost
This is Joomla 4 Installation and setup on Windows 10. You will learn how you can install Joomla Latest version 4.0.2 in localhost XAMPP. To install Joomla 4 you need PHP version 7.4+ and MySQL version 5.6+ if you have any issue with the installation or any other please comment, and I will try to help you.
youtube
View On WordPress
#how to install joomla#how to install joomla 4 in window 10#How to install joomla in localhost using xampp#how to install joomla in xampp#how to install joomla in xampp step by step#how to install joomla on windows 10#how to install joomla template on localhost#joomla 3 10 download#joomla 4#joomla 4 beta 8#Joomla 4 installations#joomla 4 templates#joomla overview#joomla review#JoomTech Solutions#Youtube
0 notes
Text
Hey everyone it seems there a malicious individual trying to hack the sims cc community again and fill it with malware you need to stay vigilant as a creator and a downloader so
i have some tips for both to stay safe while downloading:
1- sims cc file extension is always .Package never download anything that is .exe
2- do not auto unpack zip files and rar files into your mods folder directly, open each zip or rar individually check the file extensions and drag them to your mods folder one by one
3- the only mods that have a .ts4script extension are ones that affect gameplay or how the game works, understand that if you are downloading cas or bb items you shouldn't have a .ts4script file
4- if you are downloading gameplay mods that do have .ts4script make sure that A) the creator hasn't announced on their pages that its infected B) you are downloading from a link provided by the creator of the mods themselves not something off of google or a link you got sent and make sure dates of upload match dated of announcements
5- if the mod or cc creator has retired and hasn't posted for a while LOOK AT THE DATES OF THE UPLOAD if it has been "updated recently" after the creator has left the community its most likely re-uploaded by a hacker and infected
6- download mod gaurd by Twisted mexi and keep it updated and keep your windows defender or malware detector Program up to date and always running do not disable it
7- make sure everything you download comes from a direct link from the cc creator, in this day and age do not trust link shortners, adfly, linkverse, etc get the universal bypass extension and ublock extension to stay safe but genuinely NEVER CLICK ON THOSE no matter how much the creator reassures you its safe it. is. NOT.
8- this is more of a general saftey precaution but, create a system restore point weekly before you run the game with new mods that way if anything happens you could have a chance to restore your windows to an earlier date before you downloaded anything.
9- BACK UP YOUR SHIT im serious right now either weekly or monthly put your files somewhere safe like a usb a storage card a hard drive even an online cloud if you dont have any of the previous.
10- files you should back up are your media from games and media everything else, any mods, games saves, work files, passwords, saved bookmarks, any documents txt files word files pdfs, links you saved, brushes or actions for Photoshop if you have any, any digital bills or certificates if you have any, and keep a physical list of all programs you have installed and where you installed them from
11- turn on any 2 factor authentication and security measures for any account you have
12- google and firefox have the option to check your paswords and emails against any data leaks USE THIS FEATURE and change any leaked passwords
13- regularly check your logged in sessions to make sure all the logged in devices or computers are yours and log out any that aren't and any old devices or unused sessions do this for every website and app you have an account on if available
14- change your passwords often. I know this is a hassle i know its hard to come up with new passwords but changing your passwords every few months will help you against anything mention previously that wasn't detected.
15- and as a cc creator check your cc and the accounts you host cc on and its uplaod and update dates make sure nothing has been changed without your permission :(
16- generally try not to get swept up in the "i must get it" fever you do not need to "shop" for mods weekly or monthly you do not need to download everything by that one creator you do not need to download new cc everytime you want to make a sim, im guilty of this so i know how hard it is to resist but take a breath and think "do i want this or do i need it" before downloading.
These are prevention methods i cant claim they are 100% will prevent any hacking but its better to be safe than sorry and these do keep you safe so
Brought to you by someone who has had their laptop ruined and data leaked from downloading cc once upon a time
3K notes
·
View notes
Text
My GIF Making process: Screen capturing using MPV player, Organizing files, 3 Sharpening settings, Basic Coloring PSD + Actions set

This is a very long post so heads up.
I’ll try to be as thorough and true as much as possible to the way I make my gifs (I already use Photoshop Actions which I’ve long since set up but now for this tutorial I’m reviewing them to show you the exact steps I’ve learned to create my gifs 😃) and present them to you in a semi-coherent way. Also, please bear with me since English is my second language.
First things first. Below are the things and tools we need to do this:
Downloaded 4K or 1080p quality videos (let’s all assume we know where to get these—especially for high definition movies and tv series—so this post doesn’t get removed, okay? 😛)
Adobe Photoshop CC or the CS versions can work as well, but full disclosure I haven’t created gifs using the CS versions since 2020. I’m currently using Adobe Photoshop 2024.
mpv player. Use mpv player to get those frames/screenshots or any other video player that has a screen grabber feature. I’ve used adapter for the longest time but I’ve switched to mpv because the press to screenshot feature while the video is playing has been a game changer not to mention ultimate time saver for me. For adapter you need to play it in another video player (like VLC player), to get the start and end timestamps of the scene you want to gif which takes me ages before I can even open Photoshop.
Anyway! Please stop reading this post for a moment and head over to this amazing tutorial by kylos. She perfectly tells you how to install and use mpv player, both for Mac and Windows users.
One thing I have to share though, I had a tough time when I updated my MacOS to Sonoma since MPV is suddenly either duplicating frames or when I delete the duplicates the player seems to be skipping frames :/ I searched and found a solution here, though it didn’t work for me lol. My workaround for this in the meantime is decreasing the speed down to 0.70 then start screenshotting—it’s not the same pre Sonoma update but it works so I’ll have to accept it rather than have jumpy looking gifs.
Now, after this part of kylos’ tutorial:

you can continue reading the following sections of my gif tutorial below.
I want to share this little tip (sorry, this will only cater to Mac users) that I hope will be helpful for organizing the screenshots that MPV saved to the folder you have selected. Because believe me you don’t want to go through 1k+ of screenshots to select just 42-50 frames for your gif.
The Control + Command + N shortcut
This shortcut allows you to create a new folder from files you have pre-selected. As you can see below I have already created a couple of folders, and inside each folder I have selected screenshots that I want to include in one single gif. It's up to you how you want to divide yours, assuming you intend to create and post a Tumblr gifset rather than just one gif.

Another tip is making use of tags. Most of, if not all the time, I make supercorp gifs so I tag blue for Kara and red (or green) for Lena—just being ridiculously on brand and all that.
Before we finally open Photoshop, there's one more thing I want to say—I know, please bear with me for the third? fourth? time 😅
It's helpful to organize everything into their respective folders so you know the total number of items/frames you have. This way, you can add or delete excess or unnecessary shots before uploading them in Photoshop.
For example below there are 80 screenshots of Kara inside this folder and for a 1:1 (540 x 540 px) Tumblr gif, Photoshop can just work around with 42-50 max number of frames with color adjustments applied before it exceeds the 10 MB file size limit of Tumblr.

Sometimes I skip this step because it can be exhausting (haha) and include everything so I can decide visually which frames to keep later on. You'll understand what I mean later on. But it's important to keep the Tumblr 10 MB file size limit in mind. Fewer frames, or just the right amount of frames, is better.
So, with the screenshot organization out of the way, let's finally head over to Photoshop.
Giffing in Photoshop, yay!
Let’s begin by navigating to File > Scripts > Load Files into Stack…

The Load Layers window will appear. Click the Browse button next.
Find your chosen screenshots folder, press Command + A to select all files from that folder then click Open. Then click OK.
After importing and stacking your files, Photoshop should display the following view:

By the way, I'll be providing the clip I've used in this tutorial so if want to use them to follow along be my guest :)
If you haven't already opened your Timeline panel, navigate to Windows > Timeline.
Now, let's focus on the Timeline panel for the next couple of steps.
Click Create Video Timeline, then you’ll have this:

Now click the menu icon on the top right corner then go to Convert Frames > Make Frames from Clips

Still working on the Timeline panel, click the bottom left icon this time—the icon with the three tiny boxes—to Convert to Frame Animation
Select Make Frames From Layers from the top right corner menu button.
So now you have this:

Go and click the top right menu icon again to Select All Frames
Then click the small dropdown icon to set another value for Frame Delay. Select Other…

The best for me and for most is 0.05 but you can always play around and see what you think works for you.
Click the top right menu icon again to Reverse Frames.
I think Photoshop has long since fixed this issue but usually the first animation frame is empty so I just delete it but now going through all these steps there seems to be none of that but anyways, the delete icon is the last one among the line of feature buttons at the bottom part of the Timeline panel.
Yay, now we can have our first proper GIF preview of a thirsty Lena 😜

Press spacebar to watch your gif play for the very first time! After an hour and half of selecting and cutting off screenshots! ��� Play it some more. No really, I’m serious. I do this so even as early (lol) as this part in the gif making process, I can see which frames I can/should delete to be within the 10 MB file size limit. You can also do it at the end of course 🙂
Now, let’s go to the next important steps of this tutorial post which I’ve numbered below.
Crop and resize to meet Tumblr's required dimensions. The width value should be either 540px, 268px, or 177px.
Convert the gif to a Smart Object for sharpening.
Apply lighting and basic color adjustments before the heavy coloring. I will be sharing the base adjustments layers I use for my gifs 😃.
1. Crop and Resize
Click on the Crop tool (shortcut: the C key)

I like my GIFs big so I always set this to 1:1 ratio if the scene allows it. Press the Enter key after selecting the area of the frame that you want to keep.
Side note: If you find that after cropping, you want to adjust the image to the left or another direction, simply unselect the Delete Cropped Pixels option. This way, you will still have the whole frame area available to crop again as needed and as you prefer.
Now we need to resize our gif and the shortcut for that is Command + Opt + I. Type in 540 as the width measurement, then the height will automatically change to follow the ratio you’ve set while cropping.
540 x 540 px for 1:1
540 x 405 px for 4:3
540 x 304 px for 16:9
For the Resample value I prefer Bilinear—but you can always select the other options to see what you like best.
Click OK. Then Command + 0 and Command + - to properly view the those 540 pixels.

Now we get to the exciting part :) the sharpen settings!
2. Sharpen
First we need to have all these layers “compressed” intro a single smart object from which we can apply filters to.
Select this little button on the the bottom left corner of the Timeline panel.


Select > All Layers
Then go to Filter > Convert for Smart Filters
Just click OK when a pop-up shows up.
Now you should have this view on the Layers panel:

Now I have 3 sharpen settings to share but I’ll have download links to the Action packs at the end of this long ass tutorial so if you want to skip ahead, feel free to do so.
Sharpen v1
Go to Filter > Sharpen > Smart Sharpen…
Below are my settings. I don’t adjust anything under Shadows/Highlights.
Amount: 500
Radius: 0.4
Click OK then do another Smart Sharpen but this time with the below adjustments.
Amount: 12
Radius: 10.0

As you can see Lena’s beautiful eyes are “popping out” now with these filters applied. Click OK.
Now we need to Convert to Frame Animation. Follow the steps below.
Click on the menu icon at the top right corner of the Timeline panel, then click Convert Frames > Flatten Frames into Clips
Then Convert Frames > Convert to Frame Animation
One more click to Make Frames From Layers
Delete the first frame then Select All then Set Frame Delay to 0.05

and there you have it! Play your GIF and make sure it’s just around 42-50 frames. This is the time to select and delete.
To preview and save your GIF go to File > Export > Save for Web (Legacy)…
Below are my Export settings. Make sure to have the file size around 9.2 MB to 9.4 MB max and not exactly 10 MB.

This time I got away with 55 frames but this is because I haven’t applied lighting and color adjustments yet and not to mention the smart sharpen settings aren't to heavy so let’s take that into consideration.
Sharpen v1 preview:

Sharpen v2
Go back to this part of the tutorial and apply the v2 settings.
Smart Sharpen 1:
Amount: 500
Radius: 0.3
Smart Sharpen 2:
Amount: 20
Radius: 0.5
We’re adding a new type of Filter which is Reduce Noise (Filter > Noise > Reduce Noise...) with the below settings.

Then one last Smart Sharpen:
Amount: 500
Radius: 0.3
Your Layers panel should look like this:

Then do the Convert to Frames Animation section again and see below preview.
Sharpen v2 preview:

Sharpen v3:
Smart Sharpen 1:
Amount: 500
Radius: 0.4
Smart Sharpen 2:
Amount: 12
Radius: 10.0
Reduce Noise:
Strength: 5
Preserve Details: 50%
Reduce Color Noise: 0%
Sharpen Details: 50%
Sharpen v3 preview:

And here they are next to each other with coloring applied:
v1

v2

v3

Congratulations, you've made it to the end of the post 😂
As promised, here is the download link to all the files I used in this tutorial which include:
supercorp 2.05 Crossfire clip
3 PSD files with sharpen settings and basic coloring PSD
Actions set
As always, if you're feeling generous here's my Ko-fi link :) Thank you guys and I hope this tutorial will help you and make you love gif making.
P.S. In the next post I'll be sharing more references I found helpful especially with coloring. I just have to search and gather them all.
-Jill
#tutorial#gif tutorial#photoshop tutorial#gif making#sharpening#sharpening tutorial#photoshop#photoshop resources#psd#psd coloring#gif coloring#supercorp#supercorpedit#lena luthor#supergirl#my tutorial#this has been a long time coming#guys. i'm BEGGING you. use the actions set - it was a pain doing all this manually again ngl LMAO#i've been so used to just playing the actions#so this has been a wild refresher course for me too 😆
820 notes
·
View notes
Text
DUE TO COPYRIGHT ISSUES, THIS GUIDE IS CURRENTLY OBSOLETE.
hi, i just want to let everyone know, if any of you are frustrated with the state of TS4, i've compiled several different tutorials and made an all-in-one guide for playing TS2 on modern computers. it has all the fixes necessary to prevent crashes + pink flashing, and tips to make the game look just as nice as TS4, if not better!
please let me know if this guide is useful for you, or if anything needs to be changed/added/removed. i've tested it myself on multiple computers, and, while it works for me, there are many possibilities for error, considering that everyone's computer is different.
thank you for reading! i hope you like it :]
EDIT: i've set up a ko-fi, if anyone wants to show their appreciation for my work!! thank you so much to anyone who donates!!
EDIT 2: if you're going to copy my guide, especially if some parts are word-for-word, please give me credit, just like how i gave credit at the end of the tutorial to all of the creators whose guides i referenced in the creation of this carrd. as far as i'm aware, i came up with this idea of an all-in-one carrd first- having a large platform does not make you better than anyone else or "above" giving credit to others.
EDIT 3:
the web installer has been taken down for a copyright issue. i will have to find an alternative method of downloading. as of right now, this guide is obsolete, and reblogs will be turned off until the issue is fixed.
last updated: february 16th, 2025, update info in the replies.
#evie.txt ♡#evie's ts2 guide#the sims 2#sims 2#TS2#ts2cc#sims 2 cc#ok to reblog!#this all being said#while anyone can use my guide#i can and will block anyone anti-LGBTQ/anti-trans who interacts with this post specifically#i'm literally a nonbinary lesbian what are you doing here
924 notes
·
View notes
Text

EA: Origin shutdown - date and information
"On April 17, 2025, Origin will shut down, as Microsoft has stopped supporting 32-bit software. If you use Origin, you need to upgrade to the EA app, which requires a 64-bit version of Windows. If you need help, learn how to: - update to Windows 10 or Windows 11 - download and install the EA app."

"The EA app doesn’t support 32-bit versions of Windows. You’ll need to upgrade to a 64-bit operating system on your device to play your games. See if the version of Windows you’re running is 32 or 64-bit."
[source and more info]
327 notes
·
View notes
Text

A sketch of Kuras from Touchstarved. I’m not really happy with it but in my defence, I had to finish it with the “eraser” end of the stylus because the nib suddenly stopped reacting to anything other than maximum pressure. In better news, I managed to run the game on my phone.
On Android devices with Adreno GPUs, Winlator does the job. It took me a little over a week to figure this out because I may have damaged the game’s files somehow (redownloading it fixed everything), so I was on a goose chase looking for solutions to a problem that wasn’t real. I’m so done...
There are a few things you need to know before you download Winlator.
Is Winlator safe?
In version 10.0 (Hotfix), some internal programs were recompiled to address reports of a TestD3D.exe being infected with a floxif virus. There is no floxif in the VirusTotal results for the new TestD3D. While they show trojans now, threat labels look like false positives which seem common for Wine binaries. It could partially be because of vendors’ use of AI: when I transferred Winlator’s internal files to a PC and scanned them in Malwarebytes with AI detection off, TestD3D wasn’t flagged. The AV still suspected just about every .exe there (all generic Malware.Sandbox.1; it reacted the same to MiceWine’s). On the other hand, nothing at all was flagged by ESET. In the end, download at your own discretion.
Is my device supported?
Depends on the GPU. If yours is an Adreno, then most likely yes. There is a list for supported and unsupported Mali ones. Also, Touchstarved requires DirectX 10 while Mali GPUs generally cooperate only with DirectX 9 or below. The developer added some workarounds in version 10.1 that might work for you.
Why not use another emulator?
Here’s a fun thing about trying to run Touchstarved on Android: I’m 99% sure that the transition to the splash screen (the one with ‘press any button’) is a video file because of GStreamer-related errors I got in Winlator. Compatibility tools that are not able to play it don’t let you access the rest of the game: in MiceWine, Mobox, DarkOS, and GameSir GameHub, the music was there but the screen remained black after the Unity logo. It didn’t matter what components’ versions or presets were used. Termux-based tools didn’t care what packages I installed. I don’t know what it is that makes Touchstarved work in Winlator.
How to use Winlator?
Download the Windows release of Touchstarved.
Download and install Winlator (I used 10.0). Grant it storage permissions when prompted.
Create a new container (‘⋮≡’ → Containers → ‘+’). If you have an Adreno GPU, change the graphic driver it uses to Turnip, otherwise you’ll get a ‘Failed to initialize player’ error when trying to run Touchstarved.
When the container is created, start it and wait for a bit for the file explorer to open. From there, navigate to the archive. It should be in drive D.
Extract the archive by “right clicking” it (keep one finger on screen while short tapping with another) and selecting 7-zip → Extract to Folder in the menu.
Navigate to TOUCHSTARVED.exe. I recommend you create a shortcut before running it (Right click → Create Shortcut).
I followed ZeroKimchi’s advice and used a Box64 preset with BOX64_DYNAREC_CALLRET off (I’m pretty sure you can just set it to 0 in Shortcuts → ‘⋮’ → Settings → Environment Variables). I also put ‘-force-gfx-direct -force-d3d11-singlethread’ in Exec Arguments (Shortcuts → ‘⋮’ → Settings → Advanced) just in case.
How to open a keyboard inside the container?
Swipe from the left side of the screen to right. A menu with an option to bring up a keyboard will open.
How to prevent the game from crashing?
Where are the save files stored?
From the built-in explorer, the same as in Windows: ‘C:/users/xuser/AppData/LocalLow/Red Spring Studio/TOUCHSTARVED/NaninovelData/TouchstarvedSaves/’. Drive C is in ‘data/data/com.winlator/files/rootfs/home/xuser-1/.wine/drive_c/’. You can change the saves’ location to a different drive with Ajay-prefix. Winlator recognizes save files made on PC and vice versa.
How to access Winlator’s internal files?
Unless you have root access, only through Winlator’s file explorer or Android Studio’s Device Explorer (PC needed). ADB commands (PC needed) should work but I kept getting a ‘No such file or directory’ error.
I think that should be it.
#touchstarved#touchstarved game#touchstarved fanart#touchstarved kuras#kuras#sketch#art#digital art#visual novel
134 notes
·
View notes
Text
How to run The Sims 3 with DXVK & Reshade (Direct3D 9.0c)

Today I am going to show you guys how to install Reshade and use Direct3D 9.0c (D3D9) instead of Vulkan as rendering API.
This tutorial is based on @nornities and @desiree-uk's awesome guide on "How to use DXVK with The Sims 3", with the goal of increasing compatibility between DXVK and Reshade. For users not interested in using Reshade, you may skip this tutorial.
If you followed nornities and desiree-uk's guide, it is strongly recommended that you start from scratch, meaning you should uninstall DXVK AND Reshade completely. Believe me when I say this: it will save you a lot of time, frustration, and make your life so much easier.
For the purpose of this tutorial, I am on patch 1.69.47 and running EA App on Windows 10, but it should work for version 1.67.2 on Steam and discs, too. This tutorial does not cover GShade.
Before we start
Backup your files, even the entire folder (Program Files\EA Games\The Sims 3\Game\Bin) if you want to be extra safe; you will thank yourself later. If you do not wish to backup the entire folder, at least backup the following:
reshade-presets
reshade-shaders
Reshade.ini
Options.ini (Documents\Electronic Arts\The Sims 3)
Keep them somewhere secure, for your peace of mind (and sanity).

Done? Great stuff, let us begin!
Step 1:
If you installed DXVK following nornite and desiree-uk's guide, go to the bin folder and delete the following files to fully uninstall DXVK, we are starting from scratch:
d3d9.dll
TS3.dxvk-cache
dxvk.conf
TS3_d3d9.log (or TS3W_d3d9.log)
Step 2:
If you already have Reshade on your PC, uninstall it using this: https://reshade.me/downloads/ReShade_Setup_X.X.X.exe (replace X.X.X with version number)
Step 3:
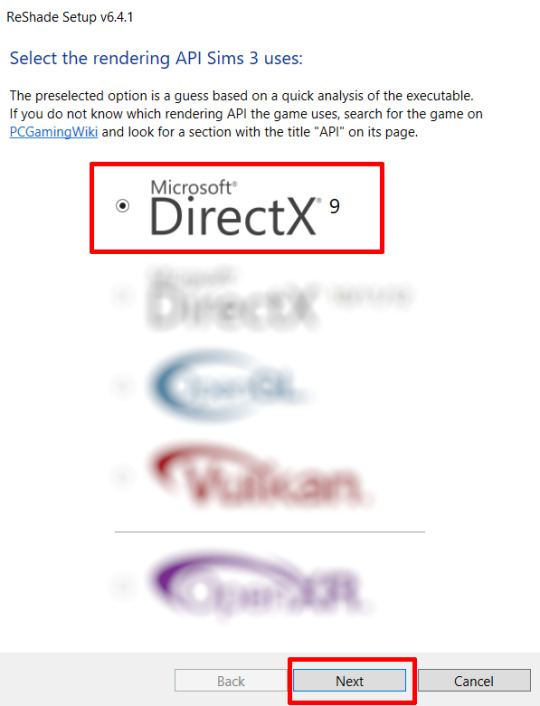
Perform a clean install of Reshade (I am using the latest version - 6.4.1 at the time of writing). Please note that you need a version no older than 4.5.0 or this method will not work. Choose DirectX9, click next.
Once the installation is complete, you should see a "d3d9.dll" file inside The Sims 3's bin folder (Program Files\EA Games\The Sims 3\Game\Bin):
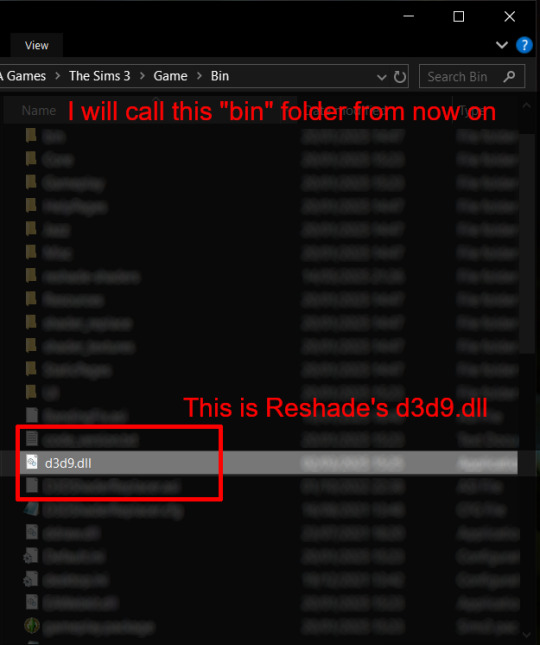
It may all seem familiar thus far. Indeed, this is how we installed Reshade in the past before using DXVK, but here comes the tricky part:
Step 4:
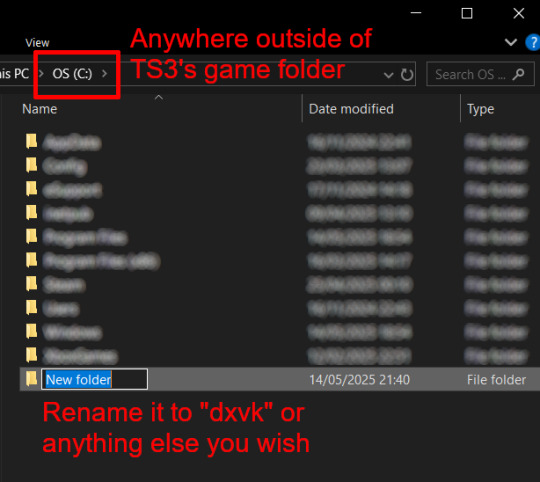
Create a new folder outside of The Sims 3's game folder (I created it on my C drive), name it "dxvk" or whatever else you like. Remember where you saved this folder, we will return to it later.
Step 5:
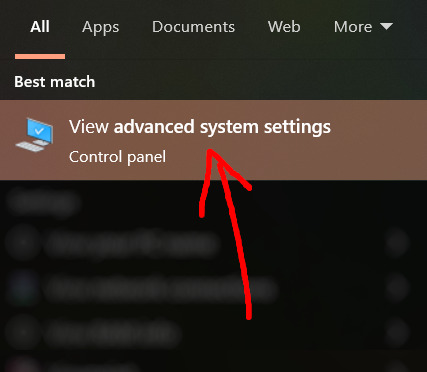
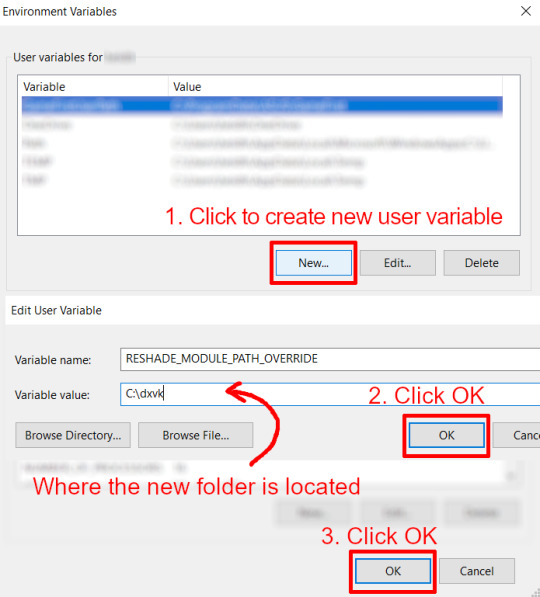
Now we need Reshade to load the next dll in order to chain Reshade with DXVK. Click on the search bar, and type in "View advanced system settings".
Click on "Environment Variables..."

Under "User variables", click "New..."
In the new pop-up window, find "Variable name:" and type in:
RESHADE_MODULE_PATH_OVERRIDE
for "Variable value:", paste in the directory that leads to the folder we created earlier. Once you are done, hit OK, and then hit OK again to save the changes made.
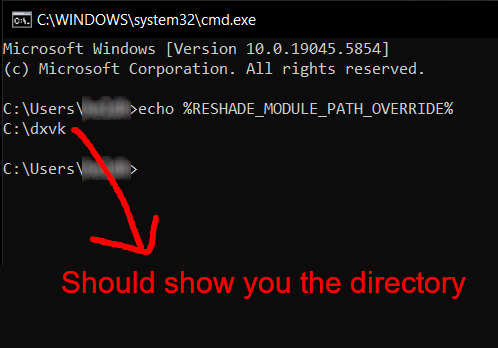
You can use Command Prompt to check if this new environment variable has been registered by entering:
echo %RESHADE_MODULE_PATH_OVERRIDE%
It should return you the folder's location. If not, make sure you have typed in the variable name correctly and confirm the folder's location.
Step 6:
Download DXVK (version 2.3.1) from here: https://github.com/doitsujin/DXVK/releases/tag/v2.3.1 and unzip "dxvk-2.3.1.tar.gz" (I use 7-Zip, but winRAR works, too). Remember to choose x32, and move only "d3d9.dll" to the folder we made earlier.
Now we have two "d3d9.dll" files, one from Reshade (lives in the bin folder), and the other from DXVK (in this new folder, outside of The Sims 3 game folder).

Step 7:
Download "dxvk.conf" here: https://github.com/doitsujin/dxvk/blob/master/dxvk.conf delete everything inside, and enter the following:
d3d9.textureMemory = 1 d3d9.presentInterval = 1 d3d9.maxFrameRate = 60 dxvk.hud = devinfo
Ctrl + S to save the document.
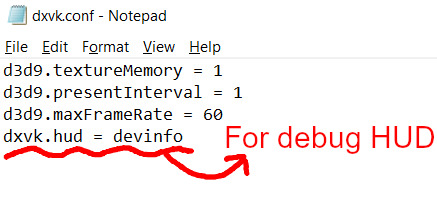
The first 3 lines are taken from @nornities and @desiree-uk's guide.
The last line is only for debugging purposes. Due to the inconvenient location occupied by the HUD (top left corner of your screen), it should be removed once the installation is successful.
Step 8:
Drag "dxvk.conf" into the bin folder, where Reshade's "d3d9.dll", "TS3.exe", and "TS3W.exe" all live.

Step 9:
Now fire up the game and check if both are showing up:

Lastly, check for “TS3.dxvk-cache” in the bin folder:
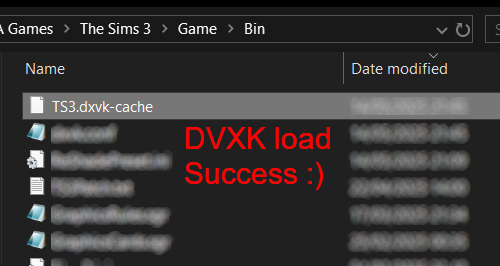
If it is there, congratulations! You have successfully installed DXVK and Reshade utilising D3D9 as API! You can now go to "dxvk.conf" and remove its last line "dxvk.hud = devinfo" and have fun! :)
Hope this tutorial isn't too confusing, the last thing I want is to over-complicate things. If you still need some help, comment down below or send me a DM/ask, I'll try and troubleshoot with you to the best of my ability.
Credits:
@nornities and @desiree-uk for their fantastic guide.
@criisolate for promulgating the usage of DXVK in TS3 community.
reddit user folieadeuxmeharder for helping me troubleshoot and informing me of this workaround.
doitsujin for creating DXVK.
crosire for creating Reshade.
160 notes
·
View notes
Text
How to use DXVK with The Sims 3
Have you seen this post about using DXVK by Criisolate? But felt intimidated by the sheer mass of facts and information?
@desiree-uk and I compiled a guide and the configuration file to make your life easier. It focuses on players not using the EA App, but it might work for those just the same. It’s definitely worth a try.
Adding this to your game installation will result in a better RAM usage. So your game is less likely to give you Error 12 or crash due to RAM issues. It does NOT give a huge performance boost, but more stability and allows for higher graphics settings in game.
The full guide behind the cut. Let me know if you also would like it as PDF.
Happy simming!
Disclaimer and Credits
Desiree and I are no tech experts and just wrote down how we did this. Our ability to help if you run into trouble is limited. So use at your own risk and back up your files!
We both are on Windows 10 and start the game via TS3W.exe, not the EA App. So your experience may differ.
This guide is based on our own experiments and of course criisolate’s post on tumblr: https://www.tumblr.com/criisolate/749374223346286592/ill-explain-what-i-did-below-before-making-any
This guide is brought to you by Desiree-UK and Norn.
Compatibility
Note: This will conflict with other programs that “inject” functionality into your game so they may stop working. Notably
Reshade
GShade
Nvidia Experience/Nvidia Inspector/Nvidia Shaders
RivaTuner Statistics Server
It does work seamlessly with LazyDuchess’ Smooth Patch.
LazyDuchess’ Launcher: unknown
Alder Lake patch: does conflict. One user got it working by starting the game by launching TS3.exe (also with admin rights) instead of TS3W.exe. This seemed to create the cache file for DXVK. After that, the game could be started from TS3W.exe again. That might not work for everyone though.
A word on FPS and V-Sync
With such an old game it’s crucial to cap framerate (FPS). This is done in the DXVK.conf file. Same with V-Sync.
You need
a text editor (easiest to use is Windows Notepad)
to download DXVK, version 2.3.1 from here: https://github.com/doitsujin/DXVK/releases/tag/v2.3.1 Extract the archive, you are going to need the file d3d9.dll from the x32 folder
the configuration file DXVK.conf from here: https://github.com/doitsujin/DXVK/blob/master/DXVK.conf. Optional: download the edited version with the required changes here.
administrator rights on your PC
to know your game’s installation path (bin folder) and where to find the user folder
a tiny bit of patience :)
First Step: Backup
Backup your original Bin folder in your Sims 3 installation path! The DXVK file may overwrite some files! The path should be something like this (for retail): \Program Files (x86)\Electronic Arts\The Sims 3\Game\Bin (This is the folder where also GraphicsRule.sgr and the TS3W.exe and TS3.exe are located.)
Backup your options.ini in your game’s user folder! Making the game use the DXVK file will count as a change in GPU driver, so the options.ini will reset once you start your game after installation. The path should be something like this: \Documents\Electronic Arts\The Sims 3 (This is the folder where your Mods folder is located).
Preparations
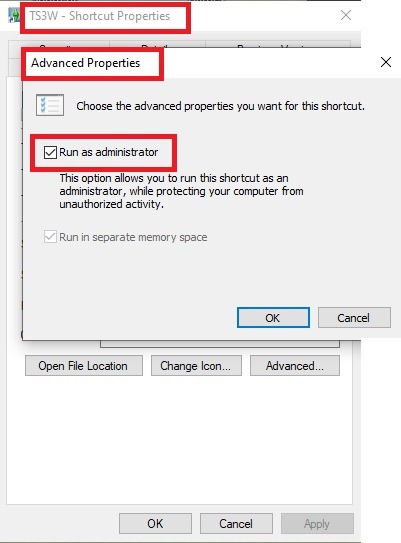
Make sure you run the game as administrator. You can check that by right-clicking on the icon that starts your game. Go to Properties > Advanced and check the box “Run as administrator”. Note: This will result in a prompt each time you start your game, if you want to allow this application to make modifications to your system. Click “Yes” and the game will load.
2. Make sure you have the DEP settings from Windows applied to your game.
Open the Windows Control Panel.
Click System and Security > System > Advanced System Settings.
On the Advanced tab, next to the Performance heading, click Settings.
Click the Data Execution Prevention tab.
Select 'Turn on DEP for all programs and services except these”:
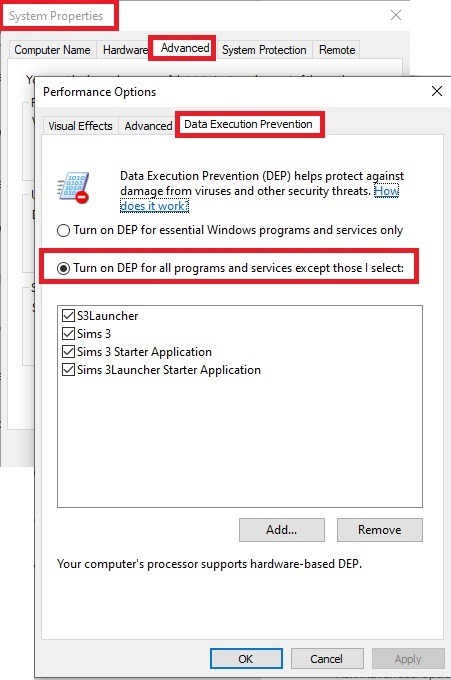
Click the Add button, a window to the file explorer opens. Navigate to your Sims 3 installation folder (the bin folder once again) and add TS3W.exe and TS3.exe.
Click OK. Then you can close all those dialog windows again.
Setting up the DXVK.conf file
Open the file with a text editor and delete everything in it. Then add these values:
d3d9.textureMemory = 1
d3d9.presentInterval = 1
d3d9.maxFrameRate = 60
d3d9.presentInterval enables V-Sync,d3d9.maxFrameRate sets the FrameRate. You can edit those values, but never change the first line (d3d9.textureMemory)!
The original DXVK.conf contains many more options in case you would like to add more settings.

A. no Reshade/GShade
Setting up DXVK
Copy the two files d3d9.dll and DXVK.conf into the Bin folder in your Sims 3 installation path. This is the folder where also GraphicsRule.sgr and the TS3W.exe and TS3.exe are located. If you are prompted to overwrite files, please choose yes (you DID backup your folder, right?)
And that’s basically all that is required to install.
Start your game now and let it run for a short while. Click around, open Buy mode or CAS, move the camera.
Now quit without saving. Once the game is closed fully, open your bin folder again and double check if a file “TS3W.DXVK-cache” was generated. If so – congrats! All done!
Things to note
Heads up, the game options will reset! So it will give you a “vanilla” start screen and options.
Don’t worry if the game seems to be frozen during loading. It may take a few minutes longer to load but it will load eventually.
The TS3W.DXVK-cache file is the actual cache DXVK is using. So don’t delete this! Just ignore it and leave it alone. When someone tells to clear cache files – this is not one of them!
Update Options.ini
Go to your user folder and open the options.ini file with a text editor like Notepad.
Find the line “lastdevice = “. It will have several values, separated by semicolons. Copy the last one, after the last semicolon, the digits only. Close the file.
Now go to your backup version of the Options.ini file, open it and find that line “lastdevice” again. Replace the last value with the one you just copied. Make sure to only replace those digits!
Save and close the file.
Copy this version of the file into your user folder, replacing the one that is there.
Things to note:
If your GPU driver is updated, you might have to do these steps again as it might reset your device ID again. Though it seems that the DXVK ID overrides the GPU ID, so it might not happen.
How do I know it’s working?
Open the task manager and look at RAM usage. Remember the game can only use 4 GB of RAM at maximum and starts crashing when usage goes up to somewhere between 3.2 – 3.8 GB (it’s a bit different for everybody).
So if you see values like 2.1456 for RAM usage in a large world and an ongoing save, it’s working. Generally the lower the value, the better for stability.
Also, DXVK will have generated its cache file called TS3W.DXVK-cache in the bin folder. The file size will grow with time as DXVK is adding stuff to it, e.g. from different worlds or savegames. Initially it might be something like 46 KB or 58 KB, so it’s really small.
Optional: changing MemCacheBudgetValue
MemCacheBudgetValue determines the size of the game's VRAM Cache. You can edit those values but the difference might not be noticeable in game. It also depends on your computer’s hardware how much you can allow here.
The two lines of seti MemCacheBudgetValue correspond to the high RAM level and low RAM level situations. Therefore, theoretically, the first line MemCacheBudgetValue should be set to a larger value, while the second line should be set to a value less than or equal to the first line.
The original values represent 200MB (209715200) and 160MB (167772160) respectively. They are calculated as 200x1024x1024=209175200 and 160x1024x1024=167772160.
Back up your GraphicsRules.sgr file! If you make a mistake here, your game won’t work anymore.
Go to your bin folder and open your GraphicsRules.sgr with a text editor.
Search and find two lines that set the variables for MemCacheBudgetValue.
Modify these two values to larger numbers. Make sure the value in the first line is higher or equals the value in the second line. Examples for values: 1073741824, which means 1GB 2147483648 which means 2 GB. -1 (minus 1) means no limit (but is highly experimental, use at own risk)
Save and close the file. It might prompt you to save the file to a different place and not allow you to save in the Bin folder. Just save it someplace else in this case and copy/paste it to the Bin folder afterwards. If asked to overwrite the existing file, click yes.
Now start your game and see if it makes a difference in smoothness or texture loading. Make sure to check RAM and VRAM usage to see how it works.
You might need to change the values back and forth to find the “sweet spot” for your game. Mine seems to work best with setting the first value to 2147483648 and the second to 1073741824.
Uninstallation
Delete these files from your bin folder (installation path):
d3d9.dll
DXVK.conf
TS3W.DXVK-cache
And if you have it, also TS3W_d3d9.log
if you changed the values in your GraphicsRule.sgr file, too, don’t forget to change them back or to replace the file with your backed up version.
OR
delete the bin folder and add it from your backup again.
B. with Reshade/GShade
Follow the steps from part A. no Reshade/Gshade to set up DXVK.
If you are already using Reshade (RS) or GShade (GS), you will be prompted to overwrite files, so choose YES. RS and GS may stop working, so you will need to reinstall them.
Whatever version you are using, the interface shows similar options of which API you can choose from (these screenshots are from the latest versions of RS and GS).
Please note:
Each time you install and uninstall DXVK, switching the game between Vulkan and d3d9, is essentially changing the graphics card ID again, which results in the settings in your options.ini file being repeatedly reset.
ReShade interface
Choose – Vulcan
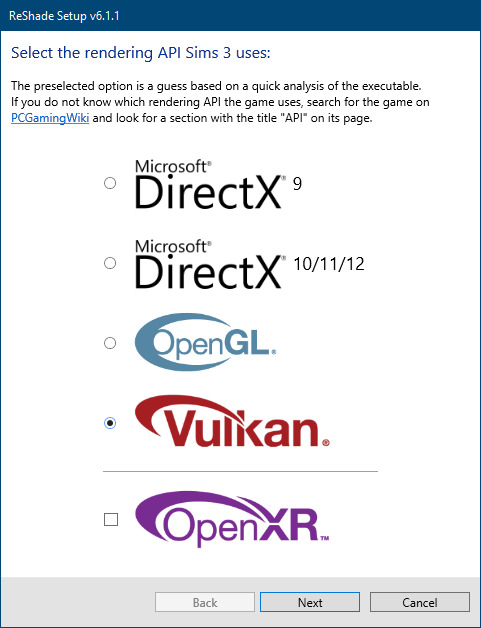
Click next and choose your preferred shaders.
Hopefully this install method works and it won't install its own d3d9.dll file.
If it doesn't work, then choose DirectX9 in RS, but you must make sure to replace the d3d9.dll file with DXVK's d3d9.dll (the one from its 32bit folder, checking its size is 3.86mb.)
GShade interface
Choose –
Executable Architecture: 32bit
Graphics API: DXVK
Hooking: Normal Mode
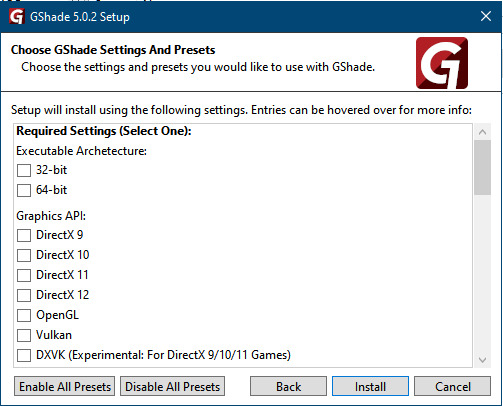
GShade is very problematic, it won't work straight out of the box and the overlay doesn't show up, which defeats the purpose of using it if you can't add or edit the shaders you want to use.
Check the game's bin folder, making sure the d3d9.dll is still there and its size is 3.86mb - that is DXVK's dll file.
If installing using the DXVK method doesn't work, you can choose the DirectX method, but there is no guarantee it works either.
The game will not run with these files in the folder:
d3d10core.dll
d3d11.dll
dxgi.dll
If you delete them, the game will start but you can't access GShade! It might be better to use ReShade.
Some Vulcan and DirectX information, if you’re interested:
Vulcan is for rather high end graphic cards but is backward compatible with some older cards. Try this method with ReShade or GShade first.
DirectX is more stable and works best with older cards and systems. Try this method if Vulcan doesn't work with ReShade/GShade in your game – remember to replace the d3d9.dll with DXVK's d3d9.dll.
For more information on the difference between Vulcan and DirectX, see this article:
https://www.howtogeek.com/884042/vulkan-vs-DirectX-12/
776 notes
·
View notes
Text
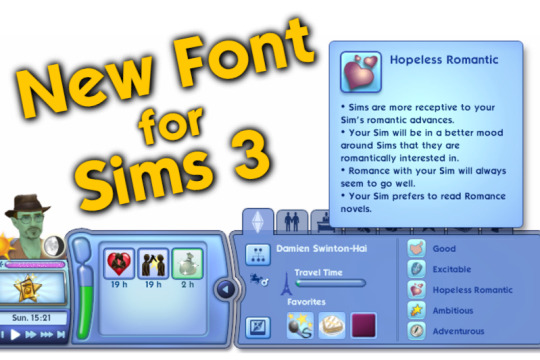
New Font for Sims 3 ✨
overrides the font used in game with the font "The Sims Sans"
Compatible: with every UI mod I could find, I tested it
Installation: just put the file in your packages-folder
Conflicts: Font Replacement by simstateTS3, poppins font override by shellseasims and font replacements by lwillowlthewicked
Patch: v1.67/v1.69
Download
ModTheSims | Simblr | SimFileShare

Installation
just put the file in your packages-folder, the usual way, nothing special required.
How to create your own font replacement:
1. Find your font somewhere online
2. Download your font as a ".ttf" file
3. Download my mod
4. Open my mod with S3PE 5. Right click on the "HelveticaNeueLTStd-Md" entry > Replace > choose your font in .tff format
6. Right click on the "TextStyles" entry > notepad > a new window with CSS Code opens (this really easy to read, believe me)
7. CTRL + H (to replace text within the file) > replace all occurences of The Sims Sans with the name of your font (do not remove anything else, only replace the name with your font name)
8. Check if all got replaced right. Each quote symbol has to be present, just like before. Then Save the file and close the text editor.
9. Save the package file in S3PE. You're done.
10. Test the result in game.
Technical Details
this mod edits two resources in the UI.package, located in the installation directory of sims
any other mod that overrides fonts conflicts with this mod
Conflicts: Font Replacement by simstateTS3, poppins font override by shellseasims and font replacements by lwillowlthewicked
Additional Credits: The Sims Sans Font Download @cowplantcartel on tumblr, for inspiring me to do this mod @shellseaisms on tumblr, for giving me a perfect mod template S3PE @you-will-never-find-me-anymore for letting me use her Bonehilda for my awesome profile picture
#ts3#the sims 3#sims 3#mod#ts3 mod#custom content#cc#ts3cc#sims 3 cc#the sims 3 cc#ui mod#ui#default replacement#font replacement#font#TheSimsSans#The Sims Sans
73 notes
·
View notes
Text
Not long ago I mentioned how in 2001 I had a TV Capture Card installed on my desktop PC, something I asked for as a Christmas present and was immensely excited to get because it would allow me to make these so-called "screen caps" of movies and tv shows! Oh my god no way! We did not have huge archives of media you could download online, or if we did, that was for rich people who could afford high-power computers and incredible 10 megabyte internet connections, people who could conceivably download a whole movie in only like, one day!!! So I was thrilled to bits to be able to play cable television on my computer and take pictures, and the first thing I ever did this with was the day one premiere of "Invader Zim." It took time for the card to generate a screenshot, and it taxed my Windows 95 system enough that sometimes the whole computer froze or crashed, but I was in awe of this astounding new digital power to create jpegs out of tv cartoons.
These are those screenshots, and yes at their original size, which I proudly displayed on a geocities webpage that archive.org never even successfully crawled, so I can't even prove I really put up the first-ever Invader Zim screenshots, but I'm almost positive I did:


I still have some from other episodes also


I can't remember if the card simply couldn't generate larger images, couldn't without killing my computer, or I saved them this size because I thought it was as large as pictures would ever need to be.
646 notes
·
View notes
Text
Have YOU got an old Windows PC Microsoft has told you can't run Windows 11? It's time to give it a new life!
How to install Windows 11 on unsupported PC Hardware using Rufus. You can also disable some other Windows 11 bullshit like data harvesting and needing a Microsoft account.
It has been in the news a lot lately that Windows 11 isn't allowed to be installed on PCs without certain requirements, including the TPM 2.0, a chip that was only included in PCs made in 2018 or later. This means that once Windows 10 stops receiving security updates, those PCs will not be able to (officially) run a safe, updated version of Windows anymore. This has led to an estimated 240 million PCs bound for the landfill. Thanks Microsoft! I get you don't want to be seen as the insecure one, but creating this much waste can't be the solution.
(I know nerds, Linux is a thing. I love you but we are not having that conversation. If you want to use Linux on an old PC you are already doing it and you don't need to tell me about it. People need Windows for all sorts of reasons that Linux won't cut.)
So lately I have been helping some under privileged teens get set up with PCs. Their school was giving away their old lab computers, and these kids would usually have no chance to afford even a basic computer. They had their hard drives pulled so I have been setting them up with SSDs, but the question was, what to do about the operating system? So I looked into it and I found out there IS actually a way to bypass Microsoft's system requirement and put Windows 11 on PCs as old as 2010.
You will need: Rufus: An open source ISO burning tool.
A Windows 11 ISO: Available from Microsoft.
A USB Flash Drive, at least 16GB.
A working PC to make the ISO, and a PC from 2018 or older you want to install Windows 11 on.
Here is the guide I used, but I will put it in my own words as well.
Download your Windows 11 ISO, and plug in your USB drive. It will be erased, so don't have anything valuable on it. Run Rufus, select your USB drive in the Device window, and select your Windows 11 ISO with the Select button. (There is supposed to be a feature in Rufus to download your ISO but I couldn't get it to work.?
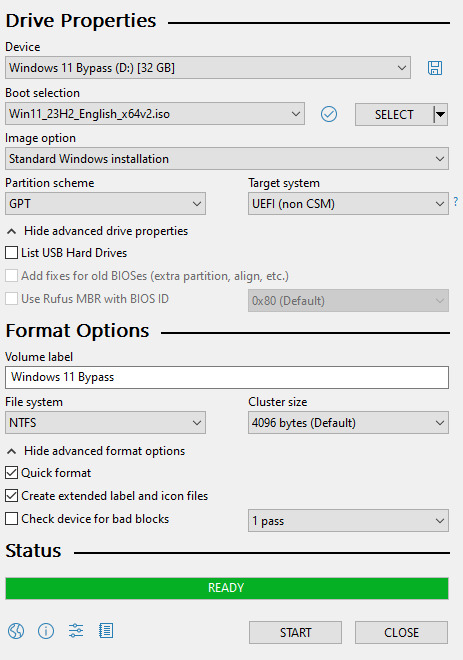
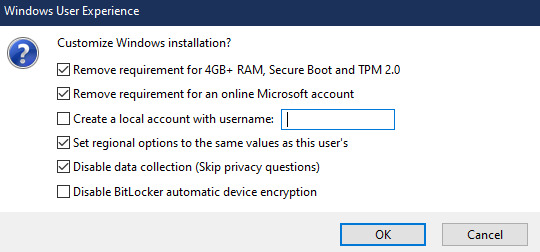
Choose standard windows installation, and follow the screenshot for your settings. Once you are done that, press Start, and then the magic happens. Another window pops up allowing you to remove the system requirements, the need for a microsoft account, and turn off data collecting. Just click the options you want, and press ok to write your iso to a drive.
From there you just need to use the USB drive to install windows. I won't go into details here, but here are some resources if you don't know how to do it.
Boot your PC from a USB Drive
Install Windows 11 from USB Drive
If you had a licensed copy of Windows 10, Windows 11 will already be licensed. If you don't, then perhaps you can use some kind of... Activation Scripts for Microsoft software, that will allow you to activate them. Of course I cannot link such tools here. So there you go, now you can save a PC made from before 2018 from the landfill, and maybe give it to a deserving teen in the process. The more we can extend the lives of technology and keep it out of the trash, the better.
Additional note: This removes the requirement for having 4GB Minimum of RAM, but I think that requirement should honestly be higher. Windows 11 will be unusable slow on any system with below 8GB of RAM. 8GB is the minimum I think you should have before trying this but it still really not enough for modern use outside of light web and office work. I wouldn't recommend trying this on anything with 4GB or less. I am honestly shocked they are still selling brand new Windows 11 PCs with 4GB of ram. If you're not sure how much RAM you have, you can find out in the performance tab of Task Manager in Windows, if you click the More Details icon on the bottom right. If you don't have enough, RAM for old systems is super cheap and widely available so it would definitely be worth upgrading if you have a ram starved machine you'd like to give a new life.

#Windows#Windows 11#tech#tech advice#pc#TPM 2.0#rufus#open source#open source software#technology#tech tips
725 notes
·
View notes
Text
Fixing Windows 11 - A Masterpost
Windows 11 is absolute crap for a good bunch of stuff so yeah, have a masterpost with most of the things I've found around to fix it haha (they're not all here because I did stuff around and I don't remember what)
YES, I KNOW at this point Linux would be a better alternative, however some here can't use Linux due to some proprietary programs that are not on Linux. This Masterpost is for the people in the same situation as I, aka those who have to have Windows or they can't do their job.
I am currently unemployed and haven't worked enough for the government to help me. I have a ko-fi if ever you want to help.
Stopping W11 from making you create an account/setting up your computer without internet (with a way to create gpedit.msc if your version doesn't have it)
Fixing the Taskbar (in case you also don't like the grouped Battery/internet/sound or the way the windows look)(there's more to it, check the settings)
There is the chance that Windows can't update because of this, you just have to uninstall it and reinstall it afterwards. They also completely nuked the Windows 10 look in the 24H2 update, so use the "Windows 10 (Explorer Patcher)" option instead of the plain "Windows 10".
Removing the rounded windows (since ExplorerPatcher doesn't do it anymore on 24H2)
https://github.com/valinet/Win11DisableRoundedCorners
How to move the volume and luminosity pop ups (so you can finally see those sweet sweet subtitles)
In case ModernFlyouts doesn't automatically start up, possible solution
Fixing the Start Menu (ExplorerPatcher can do that too, btw)
How to show all options right away
A way to bring back the Calendar
https://github.com/matej137/OutlookRemover
MICROSOFT FULLY NUKED THE CALENDAR!!! Possible fix is to downgrade the app (which is fine if you don't use the Mail), but do use the OutlookRemover to stop the automatic installation of the new version.
https://github.com/matej137/OutlookRemover/issues/15
Your Bluetooth suddenly doesn't work???
It happens sometimes for no clear reasons so here are a few things you can do:
Check if the icon is in the Taskbar. If not, verify if it is available in the pop up menu (the one from the gear icon)
If it's not here, check your parameter to see if you have the option to turn it on.
If it's still not here, reboot your PC.
If it's STILL not working, update your Bluetooth driver. You can do so by looking for "driver" in the menu and opening the Device Manager, then right click on the right Bluetooth component and update its driver.
If Windows says that the driver is up to date, try checking out this helper: https://support.microsoft.com/en-us/windows/fix-bluetooth-problems-in-windows-723e092f-03fa-858b-5c80-131ec3fba75c
If really nothing help, download and install a recent Bluetooth Driver. Be careful of what you download and from where.
Someone who stumbled on this post fixed it by downloading the Bluetooth Driver 5.0.1.1500 from Softonic (https://www.softonic.nl/download/bluetooth-driver/windows).
How to remove Copilot if you have it (I don't, but it might be because I'm in Europe??)
Archive
Apparently Copilot is being forced on people so hummm
Other stuff not specifically related to the shit W11 did
Changing the size of the scroll bars
How to fully remove Cortana
Website with tools to fix W10 and W11
2K notes
·
View notes
Text

It's here! Our newest product - VOXEJI !
If you don't know, a shimeji is a program where a character roams around your computer screen (in this case, it's our lovely Vox)
If you already know how to download them, here's the link:
https://www.mediafire.com/file/mmcj5k9riqe3lph/Vox_Shimeji.zip/file
Otherwise, see below for install instructions!
You need:
Java
Windows 10 or 11 (may work on other OSes, not tested)
Instructions:
1. Click the link above, and hit download 2. Find Vox Shimeji.zip in your downloads > right click > extract all > extract 3. You should now have a file called Vox Shimeji - open it, then open the Vox folder 4. Double click shimeji-ee.jar or shimeji-ee.exe 5. His little Voxtek logo should appear at the bottom right of the screen. On Windows 11, it might be inside the little ^ menu 6. A moment later, he should fall onto the screen! Right click him for more options or just let him run around
Edit: If the icon appears but Vox doesn't, please try this download link instead! https://www.mediafire.com/file/dy5ric3qa07h9yd/Vox_V2.zip/file
If you encounter any trouble, message me and I'll help fix it!
454 notes
·
View notes
Text
How to play the original Secrets Can Kill in 2025 without game discs
oh my god I almost just wrote 2015 instead of 2025
I've successfully been playing the original SCK for the past couple hours (including "changing discs" and reopening save files), but it's possible I could run into problems later, so no promises that this is a perfect solution.
This method still requires installing the game files, so I think it'll only work on Windows, sorry Mac users. I'm using Windows 11. I was also able to install and open the game on a Windows 10 computer, but I didn't actually attempt to play it there.
All you need are copies of the game .iso files and a virtual hard disk drive program. The post got long, so details are under the Keep Reading. It's not actually complicated, but apparently I talk a lot lol
The .iso files:
.iso files are digital replicas of optical discs (CDs, DVDs, etc). You probably don't have the original Secrets Can Kill discs, so you will need to...acquire these files.
[NOTE: My personal ethics say to not pirate shit from small studios or independent creators. HeR is a small studio and if people don't buy stuff from them, they can't afford to make new games. However, the original SCK is abandonware and literally can't be purchased, so imo, it's perfectly acceptable to pirate it.
I want to strongly discourage anyone from pirating any of the other games which can be purchased. They have 50% off sales all the time (including through today, 1/5/25) and a bunch of the games are as low as $5 when on-sale. The digital downloads don't come with any kind of restrictive licenses, so if you get a new computer, you can transfer the files and keep your games forever. Pls keep supporting HeR so that we can maybe keep getting new games]
I recommend getting the SCK .iso files from archive.org. That link will take you to a software search for Nancy Drew Secrets Can Kill. As of this post, there's only 1 result that's actually for the original SCK.
Anytime you're downloading software from a site where anyone can upload stuff, there's always a possibility of viruses. Check and see if the uploader seems sketchy (Are there comments on any of their uploads warning about viruses? Is the account brand new?). You could run the files through a virus checking program, but apparently .iso files frequently throw false positives. The SCK uploader seemed legit, but I initially downloaded and installed these on an old computer that I don't use, just in case.
There will be a bunch of files available to download. You specifically need to download the "ISO IMAGE" files. There should be two of them- disc 1 and disc 2. After downloading, I recommend moving the files out of your downloads folder because you'll need to access them frequently.
The virtual hard disk drive program:
Like I said above, .iso files are digital copies of physical discs. Similarly, the way to use the files is via a digital version of a physical disk drive. "Mounting" the .iso files to a virtual disk drive is analogous to inserting a disk into a physical drive.
Windows 8 and above has a built-in ability to mount .iso files, but when I tried that, I got a notice that the file was corrupted. The internet recommended that a dedicated program might have more functionality. I chose the Elby Virtual CloneDrive program, which is free.
Installing the game:
After downloading and installing the virtual disk drive software, navigate to your .iso files, and right click on the file for disc 1. Scroll to "Open with", and choose "Mount Files with Virtual CloneDrive". It will now show up as a CD drive in This PC in the file explorer:

Double-click to open the drive and scroll to "setup.exe". Open the file to run the game installer.
The game will install in a typical way. I think the only non-default option I chose was "No, I will install DirectX myself". I didn't actually install DirectX, but everything is working fine ¯\_(ツ)_/¯ idk, maybe now it's built-in to Windows or something.
Running the game:
To run the game, just open the game shortcut like a normal program. If you can't find the shortcut or didn't create one during the install, go to your C: drive -> Program Files (x86) -> Nancy Drew -> Secrets Can Kill -> Game.exe
In order for the game to run, you need to have Disc 1 still mounted to your virtual drive. Unless you specifically unmounted it, it should still be there, but if you get a pop-up that says to insert the disc, the problem is probably that the disc isn't mounted.
I was expecting that I would have to run the game in Compatibility Mode to handle that it was made for fucking Windows 98, but I didn't have to do anything. It just worked with no adjustments. A miracle!!
Changing discs:
The original Secrets Can Kill was too big to fit on a single disc at the time it was made! They split it across multiple discs by location. The school is on disc 2, while all other locations are on disc 1. So if you need to move from the diner to the school for example, you have to change discs.
When you need to change discs, you'll get this screen:

WITHOUT closing the game program, minimize the game. Easiest way is by either pressing the windows key or alt+tab. Navigate to your .iso files, right click on the new disc, and choose Mount.
Navigate back to the game and click OK. Easy as that!
Whenever you fully exit and re-open the game, you have to open it with disc 1 mounted. So if you saved while at the school, you'll open the game with disc 1, load your save, and immediately switch over to disc 2.
And I think that's everything! Phew! This got a lot longer than I planned on. Feel free to send me questions if you're having trouble, but I may not know the answer. I'm not an expert in this stuff, I just spent some time poking around at it last week is all.
Have fun! Go manatees!
142 notes
·
View notes
Note
Please, please explain how to install and use linux like I'm 5 years old. I'm so sick of windows adding AI and other bullshit to my already struggling elderly laptop but I'm really not good with computers at all so I have no idea where to start with Linux.
Okay, so, I'm going to break this down into steps I would give the average tumblr user first, and then if any of them are confusing or use words you don't understand, ask me and I'll explain that step in greater detail.
Step 0) BACK. UP. YOUR. SHIT.
NEVER EVER EVER CHANGE YOUR OPERATING SYSTEM WITHOUT A COMPLETE BACKUP OF ALL YOUR FILES.
Step 1) Learn your machine. You need to know:
How much RAM you have
If your processor is 32 or 64 bit
How big your hard drive is
On windows, you can find out all of this by going to the start menu, typing "about" and opening the first result on your system instead of the internet.
For additional instructions, visit this page.
Step 2) Pick your Linux.
There's like 10,000 kinds of Linux, each tailored to particular functions that the end-user (that is you!) might want to have. The sheer amount is very daunting, so first I'm going to give my suggestions, then I'll explain how to pick for yourself.
For Mac users, I suggest Kubuntu. For windows users, I suggest Mint Cinnamon. If your laptop is really REALLY old, I recommend Sparky Stable, which is the lightest weight Linux I would ever suggest for a new user. In every case, download the version suited to your processor (32 bit can be labelled "x86" or "32 bit"; 64 bit is always labelled "64 bit").
If you want to try a different type of linux, you'll need to make sure your laptop meets the "minimum specs" or "system requirements." These numbers tell you how much RAM, processor and hard drive space the linux will use. (That's why you needed those numbers at the beginning.)
Step 3) Collect your supplies. You're going to need:
An ISO burning program compatible with your current system, like Balena Etcher.
A copy of the ISO file for the Linux you want to use.
Your laptop.
An 8gb or larger USB flash drive.
Step 3) Make a bootable USB drive
Install Balena Etcher, hitting "okay" and "next" when prompted. Last I checked, Etcher doesn't have adware attached, so you can just hit next every time.
Plug your USB drive into the laptop.
Open Etcher.
Click "flash from file" and open the ISO file with your Linux on it.
Click "Select target" and open the USB drive location. Hit the "flash" button. This will start writing all the linux installer data to your flash drive. Depending on the speed of your machine, this could take as long as 10 minutes, but shouldn't be much longer.
Step 4) Boot to the USB drive
This is, in my opinion, the trickiest step for a lot of people who don't do "computer stuff." Fortunately, in a rare act of good will, Windows 10 made this process a lot easier.
All you'll need to do is go to settings, then recovery, then advanced startup and pick the button labelled "use a device."
This tutorial has images showing where each of those is located. It's considered an "advanced setting" so you may get a spooky popup warning you that you could "harm your system by making changes" but we're not doing anything potentially harmful so you can ignore that if you get it.
Step 5) Try out linux on the flash drive first.
Linux installs using a cool little test version of itself that you can play around in. You won't be able to make changes or save settings, but you can explore a bit and see if the interface is to your liking. If it's hideous or hard to navigate, simply pick a new linux version to download, and repeat the "make a bootable USB" step for it.
Step 6) Actually install that sucker
This step varies from version to version, but the first part should be the same across the board: on the desktop, there should be a shortcut that says something like "install now." Double click it.
Follow the instructions your specific linux version gives you. When in doubt, pick the default, with one exception:
If it asks you to encrypt your drive say no. That's a more advanced feature that can really fuck your shit up down the road if you don't know how to handle it.
At some point you're going to get a scary looking warning that says 1 of 2 things. Either:
Install Linux alongside Windows, or
Format harddrive to delete all data
That first option will let you do what is called "dual booting." From then on, your computer will ask every time you turn it on whether you want Windows or Linux.
The second option will nuke Windows from orbit, leaving only linux behind.
The install process is slower the larger your chosen version is, but I've never seen it take more than half an hour. During that time, most linux versions will have a little slideshow of the features and layout of common settings that you can read or ignore as you prefer.
Step 7) Boot to your sexy new Linux device.
If you're dual booting, use the arrow keys and enter key to select your linux version from the new boot menu, called GRUB.
If you've only got linux, turn the computer on as normal and linux will boot up immediately.
Bonus Step: Copy Pasting some code
In your new start menu, look for an application called "terminal" or "terminal emulator." Open that up, and you will be presented with an intense looking (but actually very harmless) text command area.
Now, open up your web browser (firefox comes pre-installed on most!), and search the phrase "what to do after installing [linux version you picked]"
You're looking for a website called "It's FOSS." Here's a link to their page on Mint. This site has lots and lots of snippets of little text commands you can experiment with to learn how that functionality works!
Or, if you don't want to fuck with the terminal at all (fair enough!) then instead of "terminal" look for something called "software manager."
This is sort of like an app store for linux; you can install all kinds of programs directly from there without needing to go to the website of the program itself!
297 notes
·
View notes