#i really need to experiment more with different crops/framing
Explore tagged Tumblr posts
Visit Tumblr Blog
Explore Tumblr blogs with no restrictions, modern design and the best experience.
Last Seen Tumblr Blogs


Fun Fact
After the announcement of the deal with Yahoo!, there were 170K signatures of unhappy Tumblr users petitioning to prevent the sale in 2013.
Text

horizon forbidden west | aloy 82/?
#horizon forbidden west#hfw#aloy#in the middle of a smoke bomb and i thought the hair was fun :D#i really need to experiment more with different crops/framing#it's difficult to go against my instincts but i usually end up liking it when i do#hfw aloy
29 notes
·
View notes
Text

Thunderous Rift Above The Summit - Thirty-six Views of Mount Coronet
Study/redraw of "Thunderstorm Beneath the Summit" from Thirty-six Views of Mount Fuji by the ukiyo-e master Hokusai. It was really fun to figure out how the colour layering was accomplished and how to represent the rift in this style!
Painted on @pokemagma's recent "Pokemon Museum" event.
OG reference and some more info under the cut :)

The aspect ratio / cropping was changed because I was fitting it into a frame on the art gallery session template. I also needed to make space for the rift as a focal point.
This style is really interesting to me! I did this wholly in Magma, though I ran the small image through Rebelle to upscale it on some paper texture, and I think it would look even cooler with proper ink simulation. Dark edges on the ink areas, variations in the wash, etc...
Also yoinked some actual paper from ukiyo-e prints online for the base and overlay texture, which is a fun touch I think haha

And it involved multiply layers for different colours as seen here in the layer stack. Really interesting workflow that makes the shapes very deliberate and graphic. I've been in a bit of a print mediums era recently, what with the CMYK halftones and my recent highlighter art experiments and such... it makes for such cool effects!
#pokemon legends arceus#legends arceus#pla#pokemon#pkmn#ukiyoe#hisui#mt coronet#// tikart#// tikposting#how many times have i drawn/painted this mountain XDDD#it's literally going to be 36 for real at some point /silly
125 notes
·
View notes
Text
I've been thinking about a new au that I hope to write someday, but it'll be a while. So have this post about it instead.
Warning now for age gap and power dynamics
It's when he's 19 that Grian caves and resorts to something he'd hoped he would never have to do. He's between jobs and desperate to scrape up enough money for rent, so he hesitantly makes an account on a camming site. He's not really expecting much - he knows he's not really one to look at, and he's incredibly inexperienced - but if he can at least get enough for rent...maybe it'd be worth it.
Scar's 47 when his wife finally pulls the rug out from under him and demands a divorce. He knows his marriage has been failing, and it's only grown more obvious as his two kids - 18yo and 19yo - go off to college, leaving the two of them home alone. He'd tried to save it, but it was a lost cause from the start.
Now, freshly divorced, Scar finds himself alone for the first time in over 20 years, in an empty apartment he'd gotten while they finalized the divorce. The house had always been under her name, and he'd graciously let her keep it without a fight. He doesn't need a big house, and he's got plenty of money to get his own place anyway. He's just not used to being on his own.
It only takes a few days for him to get a little frustrated. He'd been married for over 20 years, and while his marriage has had issues for quite a bit of it, he and his ex had sex pretty frequently in an attempt to fix it. It clearly didn't work, and now whenever he's horny he doesn't have a wife he can just turn to. He has to rely on his hand and deal with it himself.
He figures he may as well have a little fun with it, though. He looks through some sites before finding one that looks promising. He finds his eyes drawn to the barely legal category, and doesn't give it a second thought before he's clicking through the different videos and livestreams. He supposes there's one good thing about this - his wife has aged, and he has too, but at least now he can freely look at people much younger than him.
He wonders, briefly, about finding another wife. Someone much younger, who can give him more kids. Sure, he got a vasectomy years ago, but he could always just get it reversed and knock up a pretty young girl to give him some more kids. Maybe later - for now, he plans to soak in the single life a bit longer.
He looks through some of the streams, mostly bored, nothing catching his attention. They're all pretty, sure, but nothing really jumps out to him. At least, not until he sees hers. No - his, he thinks, as he reads the description. Seems like he's a trans guy. Well, that's fine. He's not picky. So long as they're pretty.
And this guy very much is. He's also very inexperienced, and while that's sometimes a turn off for him, with this guy, he's just endeared. It's clear he doesn't really know what he's doing, but that he's at least trying to make the experience good for the - he quickly checks - 5 viewers. 6, now, as he pulls it up into fullscreen. He eagerly watches the videos, watches the way his thighs shake as he tries to ride the toy. Watches the way the toy glistens with his slick when he pulls himself up, and watches as he slams it in, and the delicious way he cries out.
He gets a few donations, but not many. It's pretty obvious how desperate this kid is for the money if he's doing all this while clearly having no idea what he's doing. He hasn't even cropped his face out of the frame to give himself at least some privacy, meaning Scar can see exactly the way his face flushes a pretty red that spreads to the tips of his ears and down to his chest as Scar sends in a donation that's far more than what he'd been getting previously. He stumbles his way through a thank you, voice stuttering and eyes wide.
Grian had been doing this for almost two weeks, to only a few viewers and donations. He'd almost given up - sure he was making some money, but he always felt kind of...weird whenever doing these livestreams, both during and after. He just wasn't sure if it was really worth it when he wasn't making much off of it. But then someone joins and donates a couple hundred dollars in a single donation, and.....oh. Maybe it is worth it, actually.
By the time he ends the stream, the same person has donated a couple more times. He's easily got enough for rent now, as well as a good head start on the following month's rent. He can hardly believe it - just as he'd thought about quitting, someone comes in and donates a bunch. He can't help but wonder if there's some kind of catch, but...he can't just not message whoever had donated so much and thank them.
Grian sends them a quick message thanking them profusely for the donations, and even admits that he'd been thinking about quitting. From there, the two continue to talk. Grian learns his name - Scar, though whether that's his actual name or just a name to go by, he doesn't know - and that he's recently divorced. He doesn't explicitly know Scar's age, but he's mentioned that he has kids that recently started college, so he's gotta be quite a bit older than Grian. The thought makes him feel warm.
Scar gives him some tips on how to attract more attention to his streams. Things to say and do to make him more appealing. He suggests using more toys, and Grian admits he only has the one. He'd splurged on it once a while ago, after he got tired of having to rely on his hand. Scar offers to send him money for more, if he lets Scar pick what toys he buys. Grian, feeling almost drunk on the attention Scar is giving him, agrees.
Weeks pass. Grian continues to stream, and Scar is there for each one, commenting on his body and sending more money. Eventually, he offers to pay him for custom videos and pictures. Grian, desperate for the money (and Scar's attention), agrees easily. He sends videos of him using the toys Scar made him buy, or moaning and saying his name, or the way his cunt gapes a little after he uses the biggest toy Scar made him get. He gets soooo flustered whenever Scar compliments his body. Slowly, he stops streaming and focuses solely on Scar. He never got nearly as much money from anyone else that he gets from Scar, anyway.
While talking to Grian, Scar soon finds that he's...not all that great at this whole internet safety thing. He talks about the college he goes to with enough detail that Scar's able to figure out which one it is, and he's not even in the same state. He eagerly gives out information like his name and birthday, clearly enamored with all the attention Scar is giving him and desperate for more of it. It doesn't take much work to find a small house near the college, and for him to get a transfer from his work to one closer to it. (I don't really know what his job is. The important part is that it pays him Very Well lmao). He no longer has a wife and kids tying him to any location, so he moves in as quickly as possible.
Once he's moved in, he tells Grian, who's surprised at first. But he can't help but feel so, so flattered to know that someone moved just for him. And also feels like he's suddenly in way over his head - all he wanted was to make a couple extra bucks while in between jobs and now someone's moved for him.
In the past, Grian's bounced between jobs, never able to hold one for longer than a few months. A little after he started the camming, he got one at a nearby coffee shop. Between the money from that and from Scar, he's been able to fund his rent, HRT, and at least some of college. He's still desperate for more, though, wanting to get through college with the least amount of debt as possible. So when Scar offers for them to meet up, for Scar to pay even more for the chance to actually fuck him...well, what other choice does he have?
He'd been sort of hesitant at first -it feels a little like he's crossing a line if he actually meets up with the guy he's been talking to and sending videos and pictures to in exchange for money - but Scar had managed to wear him down, and now he's...kind of excited. Especially at the prospect of more money.
They'd started to talk about the details, when and where they'd meet up (Grian at least had the sense to suggest meeting up in public first), but they had to put their planning on pause when Grian had to go to work. Scar, of course, knows where he works. And maybe he can speed up the process a bit by meeting him there.
He goes up to the counter where Grian is, taking his order and, when he asks for his name, Scar tells him and gets to watch the way Grian pauses for a second, voice stuttering a little and eyes wide. Scar just smiles at him and asks when he gets off work, if he's got time to talk then.
When he walks away, one of Grian's coworkers who overheard at least some of their conversation is concerned and asks if Grian is okay, if he needs someone to walk him home after his shift or if they need to call the police or something. Grian, embarrassed, waves them off, says it's fine, that he knows the guy and had been hoping to see him, all while his heart is pounding and he keeps sneaking glances at him.
He's never seen what Scar looks like before. Though he'd tried, Scar had always refused. If their conversation about meeting up hadn't been interrupted by him needing to go to work, Grian would've pressed for a picture of him. Wouldn't have let Scar meet him without it. But with it happening when he wasn't expecting it...The first thing Grian notices is that he's hot. Salt and pepper hair, face and arms crisscrossed with scars, piercing eyes as he watches Grian's every move.
Throughout the shift, Grian can't help but look up at Scar every so often. He stays there the whole time, having brought a laptop to at least pretend like he's doing work, but really he's mainly just checking Grian out. When his shift finally ends, he kinda stiffly walks over to Scar, who gestures for him to sit. Grian glances at the counter, but the coworker that had expressed concern for him had already left a couple hours before, if a bit hesitantly.
The two of them start talking, though Grian's a bit quiet because he doesn't want anyone to overhear. Scar makes it clear upfront that he wants to fuck him, preferably as soon as possible. So that day they end up going to Grian's apartment. It's probably one of the only times they do it there - Scar can barely stand to see how shitty his apartment is, and the bed hardly even fits them. But it'll do. Scar's wanted to fuck Grian since the moment he saw them. He's not waiting a moment later now that he's finally got the chance.
Grian never thought his life would lead him to this. When he started that first livestream, he didn't expect it to eventually result in him being bent in half and fucked into by a guy more than twice his age. But he cant help the way it just feels so good. It's clear Scar's experienced, that he knows exactly how to thrust into him, his fingers rubbing circles around his clit with the right amount of pressure. He's bigger than most of his dildos (except for the very large one), and it fills him up so well.
Now, Scar and his ex had known for years that they didn't want more kids, so he got a vasectomy years ago. And he knows he could (and should) tell Grian, but...he wants to push just how desperate Grian is for the money. So when Grian tries to get him to wear a condom, he says he'll pay more for him to let Scar come inside. He'll pay double! Surely coming inside him once won't get him pregnant.
Grian's faced with having to weigh his desperation vs the fear. He could really use the extra money, but if he gets pregnant...in the end, though, his desperation wins, and he agrees. Scar smiles.
He likes the thought of filling Grian with his cum, even if he knows he can't actually get him pregnant. He doesn't do it then - doesn't want to scare his new toy away - but he's able to convince Grian to let him fuck him raw the next time, too. And many times after that. It's on one of these times that he really plays into the idea of it all. Pretends like he's gonna breed Grian, knock him up, make sure he stays with him. He's raised kids before. He knows how to do it, could easily raise a couple more with Grian at his side. He's been so, so lonely ever since his wife and kids left him...and if his current kids don't want anything to do with him, he may as well make more, right? If Grian's carrying his child, surely he won't walk out on him like his wife did.
(Cue Grian learning he has a breeding kink, even if he's terrified of actually getting pregnant)
He's sooooo scared of getting knocked up, but...surely just letting Scar do it a few times is fine, right? He's offering to pay so much extra, and Grian needs the money. That's how this all started. All for the money, and now he's getting regularly fucked by a guy who could've, in other circumstances, been something like a father figure to him, who gives him attention and that he likes talking to.
Scar keeps pressing to let him come inside, and it...scares Grian a little bit, but surely it's fine, right? Scar's always talking about how it feels so much better without a condom (Grian's never had sex with a condom, so he doesn't know what it's like), and how much Scar likes watching the way his cum drips out of him after. And he's constantly saying that with the way Grian clenches around him, he's practically milking his cock. Grian can't deny that feeling Scar come inside him feels good...
Part of what makes him so worried though is that he's been on T for some time now so he's not been getting his period for months. He has no idea what his cycle is, no idea if he's ovulating, if he's anywhere close to getting pregnant or if it's already too late. He breaks down crying about it eventually, blubbering through tears that he doesn't want to get pregnant, he's too young, he still has to finish college. It's then that Scar finally takes pity on him and tells him about the vasectomy. That he can't get Grian pregnant.
Grian's relieved to find that out, but he's also...kind of pissed? This has been going on for weeks now. He's questioned so many things. Are his tits more sensitive? Is he gaining weight or is it just his imagination? Even if he knows it'd be way too soon anyway, he can't help but wonder. He wonders why the hell Scar didn't tell him sooner.
Eventually, Scar offers for Grian to move in with him. He's a little closer to the college, and to his work, and it means Grian wouldn't have to live in his shitty apartment anymore. This definitely feels like crossing a line, but...what other choice does Grian have? He's been to Scar's place. It's where they usually have sex now. It's far nicer than his apartment. And being near Scar more often...he says he'll still pay him, so now he might get even more. Maybe he really will be able to finish college without any loans...
In the months since the divorce, Scar has had to get used to coming home to an empty home for the first time in 20+ years, so why not fill it with Grian? This'll give him easy access to him now too. And now he doesn't have to come home from work to an empty house. When Grian moves in with him, they share the bed, of course. And every morning, Scar eats him out before he goes to work. Sometimes Grian wakes up, sometimes he doesn't. He just looooves the sounds Grian makes, and it's the best way to start his day. Sometimes, on the days that he doesn't wake up, Scar will also fuck him and leave him with a sticky mess between his thighs and money on the bed stand. He also sends him to class or work with cum in his cunt and a plug keeping it in, sometimes with cum running down his thighs.
Okay last thing (for now) about these guys. They are soooo weird about each other. Grian's never really had many friends growing up and he's always had a bad relationship with his parents, but now he's got someone he can look up to, who gives him attention he's never gotten elsewhere. Even if that someone just so happens to regularly fuck him. And then Scar, who'd felt stuck in a failing marriage with kids who barely talked to him, now has freedom that he hasn't had in over two decades and a pretty little thing to give attention to.
---
Hehe :3 that's all I'm going to share of this au for now (though it's certainly not all I've thought up for it) but this thing is 3k and I have to end it somewhere. I'll probably make more posts about them. My freaks. Feel free to send asks about it too, I swear I'll get to them lol. I am thinking about them sooooo much. A fic will be written eventually.
#scrian#hermitnsfw#trafficnsfw#g#s#one day i will come up with an actual tagging system. for now we'll go with that#accidental sugar baby au#yes that's the name
55 notes
·
View notes
Photo
DE-GREEN GIFS in photopea — a coloring tutorial by kai at @photopeablr
howdy everyone! i come bearing another gift of a tutorial, as i’ve seen people run into this problem many times of giffing subjects being... incredibly difficult to de-green.
this tutorial requires:
photopea (free online photoshop)
basic giffing knowledge (check out our gif tutorials tag if you need to!)
with all that out of the way, let’s begin!
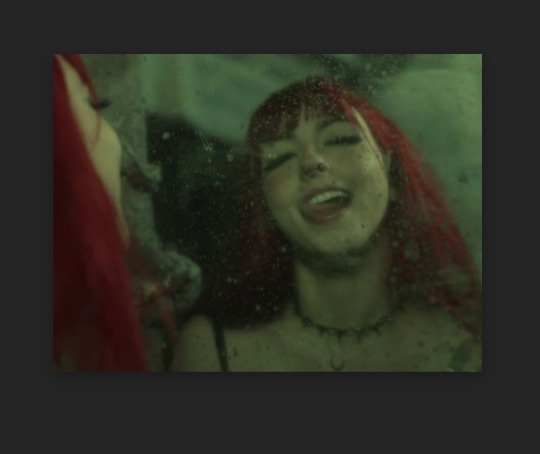
so first thing’s first, we need to get our gif loaded into photopea for us to start with. here’s a screenshot of my gif after i loaded in all the frames and cropped it to the size i wanted (540x400):
from here, we can start coloring! for those of you who haven’t read my coloring tutorial from a couple years ago, my method is more or less very similar to how it was back then. i still do the layer > adjustment layer > brightening/contrast step (though for this gif, i changed the opacity of the layer to 30%) and the layer > adjustment layer > levels, which i have set to these numbers in the pop up:

and doing all of that leaves us with our gif looking like this:
(i know the difference is very minimal but this tutorial is an entire process, give it a minute lol)
but now we get to the fun part: getting rid of that damn green filter.
in my original coloring tutorial, i used a channel mixer layer because i was following a method similar to this tutorial. while that tutorial is great for yellow-tinted scenes (i still use that method to this day), over the years, i realized that it wasn’t as great for green-tinted gifs. this is how i started to play around with another adjustment layer known as color balance.
color balance does exactly what it sounds like it does: it balances the colors of your gif. since we’re trying to balance out all the green that’s happening in this gif, it makes sense to use this adjustment layer. go to layer > adjustment layer > color balance (visual below):
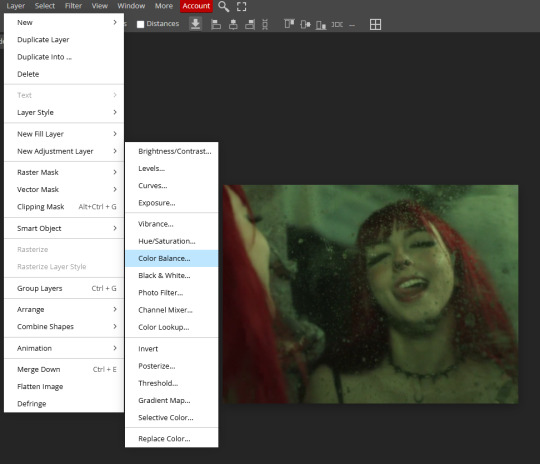
and you’ll get a pop up similar to the channel mixer adjustment layer, but just a bit different. this part of the tutorial requires for you to play around with this adjustment layer—the settings that you are going to use for any gif you make are gonna be different no matter what you’re giffing, so play around with the different settings to see how they mess with the colors of your gif until you get something that neutralizes the green for the gif you’re working with. for my gif here, these are the settings i used for the shadows, midtones, and highlights:

and in doing so, now my gif looks like this (with a before/after):

we’re only three adjustment layers in and it’s already MUCH better than what we had. color balance tends to do most of the work for us in getting the green filter out, so now we can do the rest of our coloring process (whatever that looks like for you) to finish the gif. here is the fully colored + sharpened gif:

and that’s it! a simple tutorial, but it’s immensely useful when giffing with weird green-toned scenes.
a couple things before i stop this tutorial: in some cases, sometimes you’ll need to combine a color balance layer with a channel mixer layer, but (at least in my gif experience) that’s few and far between. color balance is more or less the only layer i really need to use when trying to get rid of green tones, but sometimes scenes need a little extra touches with the channel mixer layer to help neutralize the gif a bit more so it’s easier to color later on in your coloring process. but, again, those are few and far between.
no matter what you’re giffing, color balance is a great base layer that you can build off of with other adjustment layers and should really help out in making that gross green filter go away!
#photopea#photopea tutorial#photopea gif tutorial#photopea tutorials#coloring tutorial#coloring tutorials#gif tutorials#gif tutorial#*#*kai#*tutorials#resources#usergoose#userheartbreak
43 notes
·
View notes
Text
Thoughts on the updated companions screenshots:
Lucanis: in a few screenshots now it's looked to me that Lucanis has a slightly 'crooked' nose and I love that feature! in this shot you can see that at the bottom of the 5 little vial things there's a small spike. the design of the opposite side has the impression of a ring pull. here the purple bit almost looks like fluid held in a sort of glassware. vials of poison for enemies (the Crows make use of poison), or something Lucanis needs to take regularly himself, with a sort of injection delivery system? or simply vials of something with a decorate spike at the base, and the part with the ring-pull looking bit is simply the lid/screw off top? in this shot you can also really appreciate the bird-like inspirations in Lucanis' whole character design. like he has an aquiline quality, the way his hair fluffs out a lil bit at the sides reminds of wings, etc.
Davrin: this shot is a more complete crop of one of the ones of Davrin from yesterday. ^^ in this widened crop, we can see that the person he's leaning in and leaning down to talk to is Assan (with Manfred and Rook appearing in other shots in this collection below, it means the gang's all here). 🥺 the expression on his face is so lovely and if you zoom in you can see that Assan has the impression of lil furry/feathery eyelashes. 🥺 the design of Davrin's jacket buttons reminds me of wheels. could this be a reference to aravel wheels? I hope that Davrin's relationship with his Dalish culture and clan is portrayed respectfully, that he's connected to them etc.
Bellara: this shot is a more complete crop of the ones of Bellara from yeserday. ^^ the wisps of hair around her ears.. 🥺
Harding: another shot of Harding injured 😭 aaah why 😭.. I count at least 5 now. (3 in that post, 1 from yesterday, and this one from today). again in this image she's clearly had her injuries for a while, she has stitches and the bruising is in fading mode. she's seated in her casual clothes - I think this shot was taken in the Lighthouse. it's a different seat, but the vibe is very much like Harding here. omg in her casual attire Harding's braid is down ♡ like still braided but not tied up. I feel like in the field it's more like tucked up or wound round her head? in this shot we also have a lovely and detailed look at the adorable flower pattern she has stitched on her shirt. Harding is never defeating the adorable allegations.
Neve: in the background is an eluvian, the way we've seen them look in this game when they have just been used or are just about to be used. I wonder if this is the eluvian that leads from the Lighthouse out into the world of Thedas, and if this shot is from an early point in the game. every time I see Neve I wanna drop to me knees lmao and even though we've seen it before, every time I see her I'm stunned by the care and detail by the devs that went into creating her outfit, every aspect of it. :') in the center at the bottom, just behind Neve near one side of the eluvian's frame is a purpley glow. I think that might be one of these (circled in yellow), from this scene in the release date reveal trailer.

these things presumably have something to do with how to work and use the ancient elven magic-tech of the eluvian. with her Veil Jumper experience and interest in ancient elven artifacts, Bellara presumably knows how to use it, or has an idea of how to do so. in the reveal trailer, it looks like she's demonstrating this, or 'opening' the eluvian, to show Rook and the party.
Emmrich: it looks like he's talking to the lady elven warrior Rook that we've seen a few times now in the promotional material (like in the recent warrior gameplay video). Emmrich has impeccable style. I love all the detailing on his clothes. like the skull pin at his collar, he also has two skull pins lower down on either side of his waist. (this is a fashion flair shared with Lucanis; he also has a pin at his collar and then two more, one on either side, elsewhere on his coat; only his are crow skulls of course). parts of the material of his clothes have that crushed velvet look. Emmrich has big "I tell the time by a beautiful antique pocketwatch I keep on a chain" vibes. :D on his shoulder pads there are arrow patterns. the background location looks Nevarran and/or Necropolis-y to me. it looks like there are candles which burn with green flame (I'm really curious about that. is it Veilfire?) and you can also see a hexagon. I wondered here based on prior screenshots if hexagons are an aspect of Nevarran art/design/tileset.
Taash: I would like to see a new screenshot of Taash beloved 👉👈
Manfred: he looks so cute and happy, this is a really detailed shot of him and I'm really curious about the material that composes the lenses of his goggles. they look like they could be cut gems. if you look closely at the detailing on them, there's a pattern like an eight-pointed star or something etched on each lens. it gives his expression a permanent "🤩"-type impression hhh. and I'm really curious again about the purpose of his goggles. depictions of them like in Emmrich's tarot-style card art make it look like they have something to do with the necromancy. he is very helpfully handing us a lantern. the glow of the light in it looks green, like the lighting fixtures we've seen in the Necropolis.
Bonus Neve shot: what are these lights in the background I wonder? ^^ this shot is a good reference for the handle of her wand-cane thing. I think the blue-lustre finish on the gold parts is pretty. btw, do you think the orb held in Neve's wand-cane functions the same way for Neve the way the orb in dagger-and-orb style does for dagger-and-orb/Spellblade mages?
#dragon age: the veilguard#dragon age the veilguard spoilers#dragon age: dreadwolf#dragon age 4#the dread wolf rises#da4#dragon age#bioware#video games#injury cw#long post#longpost
117 notes
·
View notes
Text


Are you calling Mimi a Mean Girl? 😂

...

*withdraws quietly*

Yay, the sky is back to normal! Just in time for the sun.

Photo op! Newborn bby! ❤️ I love how dramatic the puff of smoke and everybody's reactions are.

I love, love the image of Ogremon leaving like a wizened, grouchy ally being like "Ok, you kids have your fun. Bye." I've never really clocked Ogremon having white hair and being connected to old, but here it adds to the look.

Good for Gennai making a point about not being prejudice to Virus data types.

I have to wonder about the impressions of time the children have. Before they're told, they are ready to spend years in the Digital World with their partners since no time passes. That is fair. But were they thinking they would not age and go back to being kids once they were home? Even if they didn't age physically, gaining that much experience and maturity and then going back to ordinary lives afterward sounds like major whiplash. I think they were thinking of an eternal summer and not all the implications of "wait, how much time would it be before we need to leave?"


❤️❤️❤️


No! You were the bestest!


It's also okay if words are always a little difficult than it may be for others. (I will die on the AuDHD Koushiro hill.)


I enjoy Yamato and Gabumon having the least to say because they've already said everything they need to. Plus, cutting to Taichi's "shitshitshit, Yamato why now you're making me sentimental" is very amusing. The level of swearing is much more appropriate for an adolescent and tween, but the energy is there).


How about we split the difference and say you both messed up with Seadramon?


This is hard to explain, but I like the framing of the trees with the far away shot with Tailmon and Hikari. They do this with all the children and their partner's in some way. A part of their goodbyes are framed with the camera a respectable distance away. Sora's and Piyomon's are under the shade of a tree, Jou and Gomamon in the reflection of the water, Koushiro and Tentomon shown from outside the bus, a far shot of Takeru and Patamon holding hands, etc. The goodbyes feel very private and respectable for everyone and the audience just gets to be close for some of it.
The only one who really breaks that is Taichi, who starts out far away where he makes the aforementioned comment about Yamato's music, and then he walks up to Agumon to give him a hug. Seeing that those two are a couple of the more outgoing members of the group, that makes sense.


There's the distance framing again with Palmon and the Gekomon ^^.
Also, massive feels. Saying goodbyes are rough.


Yay! No regrets and failing to say what you wanted to!

👋
It's a small detail but I like the difference of which Digimon wave goodbye with both arms instead of just one. Plus, I see Agumon's claw cropped off but it is such a sweet scene I don't want to be harsh toward the animators.

I cheated on this subtitle because I wanted Mimi's hat on screen. It isn't what is being said at this point of the narration. I did the same on Taichi and Agumon talking, but that's more because I forgot to take a clean screencap without the subtitles XD.

Yay, 54 episodes done! I felt so old when the 1999 came up in the credits. Aaaiii...! Tomorrow, I will have my post for Our War Game to cap off the week. This and that also capped tumblr's image limit. lol. I just really like the shots of all the kid's saying goodbye.
(Final image from a clean screencap of the second ending.)
#digimon#digimon adventure 01#aly's digimon rewatch adventure#i... am much too tired to tag everyone#my stuff#long post#this has been fun :D
23 notes
·
View notes
Text
BLITZBEE WEEK DAY 2: SUNRISE
this is a two parter, art and a story

@blitzbee-week Day 2: Sunrise
story under cut:
“I’m sorry.” Blitzwing lamented with a solemn tone in his voice.
Bumblebee turned to Blitzwing with a confused expression on his face, “What are you sorry for?”
Blitzwing looked down at the ground. Heavy sadness plagued his spark, a dull throbbing sadness that stabbed his spark like ice.
“I’m sorry for not being the person you wanted me to be.” Blitzwing sighed, his optics starting to water.
Blitzwing loved Bumblebee, he really did, but in the back of his mind, he couldn’t help but believe that his sweetspark deserved something else, someone else. No bot in their right mind would love a con like him, one that was twisted beyond repair… a freak, a monster, Blitzwing could go on and on cursing himself.
But… would it be reasonable to call his sweetspark crazy for loving him? Blitzwing sat down to mull over this in his head. Maybe if they had met before the experiment had happened… he wouldn’t be beating himself up over this. No, there’s always the fact that they’re different factions. Warring factions. It would just make himself fret over being seen as a traitor.
It seems that every time he tried to think of a possible way that his problems could be alleviated, another problem seemed to crop up again, like a spider watching for her prey.
Suddenly, Blitzwing’s thoughts were interrupted as he felt two hands touch his neck right underneath his head. He focused his vision, and saw that Bumblebee was trying to hold him gently. Bumblebee’s fingers occasionally brushed against Blitzwing’s faceplate, touching it gingerly and softly.
Bumblebee smiled softly, “To me, you are perfect.”
Blitzwing stared at his sweetspark in a love filled gaze, his face switching and a big goofy smile appearing on his faceplate.
Bumblebee chuckled and kissed Blitzwing, “No Autobot or Decepticon, not even Primus himself, will make me think otherwise. I love you, Blitzwing. I love you from the bottom of my spark.”
Blitzwing felt his faceplate heat up from the kiss, his goofy smile getting bigger, “And I love you too sweetspark!”
He then started smooching Bumblebee all over, holding him in his arms. Bumblebee laughed all the way, squirming.
“Blitzy! Time out time out!” Bumblebee laughed before retaliating with kisses to Blitzwing’s chassis.
After a while of the kissing, they both stopped and relaxed.
The sun was starting to rise, peeking through the mountains with their luminous gaze. A few sun rays were shining on the both of them, making their frame glimmer and shine. Under the sun rays, Bumblebee glowed like a star, or even like the sun itself. If Bumblebee was the sun, then he would have been one of the moons, Blitzwing thought to himself as he cradled Bumblebee in his arms.
Blitzwing immediately started thinking up of new nicknames for Bumblebee: Sunshine, Sunrays, Sunspark…. He would need to work on them more before they were good enough to use.
“My sweetspark…” Blitzwing cooed as he snuggled Bumblebee in the warm rays of the sun.
This time he didnt care about himself, his traitorism, what could have happened, or the fact that he had to go back to the base soon. He just wanted to hug his sweetspark as much as he could.
He didnt want to loose Bumblebee.
#transformers#tffl#transformers: first labyrinth#bumblebee transformers#blitzwing#blitzbee#BlitzbeeWeek2024
40 notes
·
View notes
Note
hii i love ur gifs so i have been wondering if u know how to low down the size of a gif without losing its quality?? i hate when i want to post a certain gif and it being 13MB but if i cut it it's ugly 😔😔😔 sorry for my english 😔
hi, thank you 💕 i think i have answered similar questions before in my gif help tag, but i can offer some more (hopefully) helpful tips and things you should consider to help keep your gif under 10mb.
1. crop size & amount of frames
the two go hand-in-hand. big cropped gifs with a large number of frames will result in a big file size. if you're making a 540px wide gif, you're either gonna wanna make the gif shorter in height or use fewer frames. for a square gif, i try to keep it between 50-70 frames, but sometimes i still have to trim it down depending on how bright or colorful the gif is (i'll get to that in the next points).
however, making the gif a shorter height like 350px or 400px might give you a little more room for more frames without having to delete any. i like big gifs if i have a great quality file. 600px tall is as far as i'll go (though it's rare) and in that case, i try to keep it limited to 40-50 frames.
basically:
540px wide gifs = fewer frames or shorter height
268px wide gifs = more frames, more potential
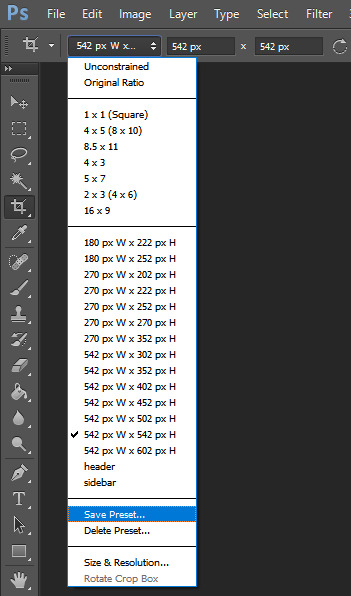
tip: for the sake of convenience, i really recommend making presets of all your go-to crop sizes by selecting "save preset" in the drop down menu next to your chosen dimensions. note that mine are all set two pixels more than i need because some photoshop versions leave a transparent border around gifs. when i use my convert to frames action, it deletes those two extra pixels for me and my gif will have the proper tumblr dimensions before i export.
more tips to get rid of extra frames:
delete frames with camera flashes, you will rarely notice a difference.
always check for duplicate frames.
original footage is slow motion? it's got duplicated frames. delete them.
2. sharpening
your sharpen settings can also increase the file size. here is a great post with examples of when to know when your sharpening is crossing into unchartered territory and how to avoid it. manually adding noise effects can also increase file size, so keep that in mind when you're doing it for aesthetics (i personally love noisy gifs too!).
3. brightening
adjustment layers that handle the "light" in a gif such as curves, levels, and exposure can all affect the file size in different ways. darkening the black points using these tools in your gif helps reduce grain as well as the amount of colors in the final product.
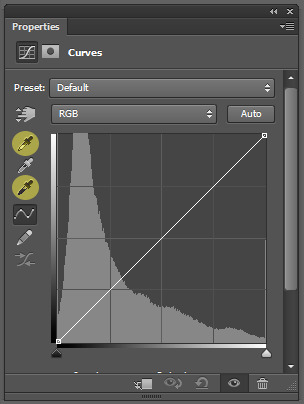
curves: use the white and black eye droppers to find the lightest and darkest points in the gif, thus adjusting the white balance of the footage if needed.
levels: move the left and right sliders inward to balance them out even more and bring back more details.
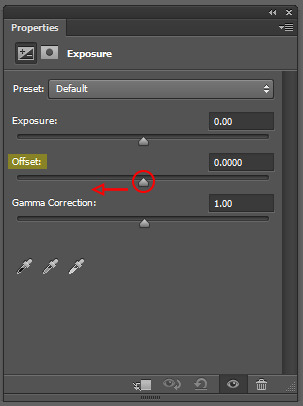
exposure: my favorite trick EVER to lowering the file size if it's over 10mb when i go to save for web is moving the "offset" slider of an exposure layer slightly to the left. it will darken the black points even more and add some contrast to your gif and it can minimize the file size by quite a lot.
3. coloring
you want to be able to save your gif with 256 colors without reducing the number manually in order to get it under 10mb (we've all been there). sometimes you can get away with doing that without losing much of your quality, but it's always ideal to NOT have to do this. selective coloring and color balance are your friends when it comes to enhancing and/or getting rid of tones you don't want. i can't give you a whole course on coloring alone, but i can say that ONCE AGAIN, darkening the blacks under the black tab in selective coloring will help. i usually go up to about +5 or more if i need to. neutralize your reds and yellows for skintones, especially when giffing idols. don't go too overboard with the vibrance if you use it. be conscious of colorwashing. experiment with photo filters or gradient maps if you're aiming for a cooler or warmer look.
i hope this helps, i am not a magician but i do think a lot of these key details help me a lot when my final gif is over 10mb and i need to go back and make adjustments.
19 notes
·
View notes
Text
Update to my tv theories and framework
Spoilers ahead
About a year ago, when I started following Welcome Home, they had barely mentioned the Question Answerer, but did say they were a big time archivist and museum professional.
With the Homewarming update, we learn from W that the Question Answerer was very ill.
I had taken a photo and listened to dialogue that I believed to be from the show itself. I felt like an idiot, I hadn’t recorded anything, I was so entranced by what I was seeing.
On reflection, could this be referring to the Julierella still on the TV? Is there another image on the original website that could be described this way? I don’t think so, and it was a question I had always had about the photo.
If it were playing an animation on the TV, why did we not have any animation from the still? There was no audio from this, so this must be the one (unless you guys can think of another photo of an animation or show). I had assumed before that this shot was from the QA because of the placement of the phone and red binder.
This changes some of my recent theorizing about the televisions, which also clarifies some of the boundaries between different voices or frame work. So, in this image we have a tv, and in the next picture we have the tv static.

Is the TV where W has seen the show, only gotten a picture, and didn’t record the information? This establishes the red notebook as for sure belonging to W. I pulled a pic from the video of eovwxy, to compare and see if this video is the same TV, and it’s hard to tell. The darkness around the frame means it might be the same TV, but it isn’t conclusive. The TV in the staff-only room:
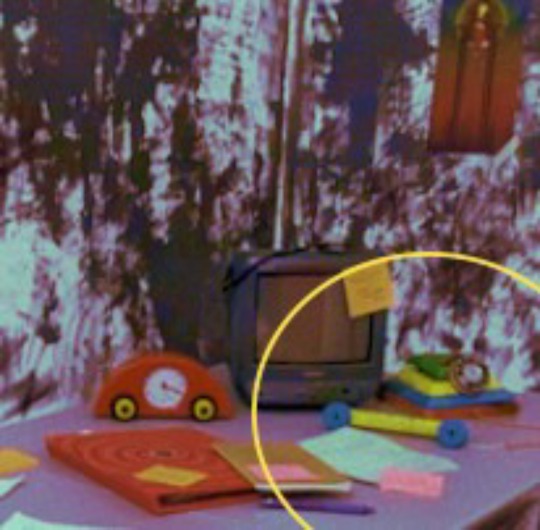
I really can’t say whether or not that is the same tv. In the original, it could be fit into a recess that makes those extra side bits. The picture above is a lightened version, so this is probably the best pic we can have of it. The second picture is too cropped to be able to tell.
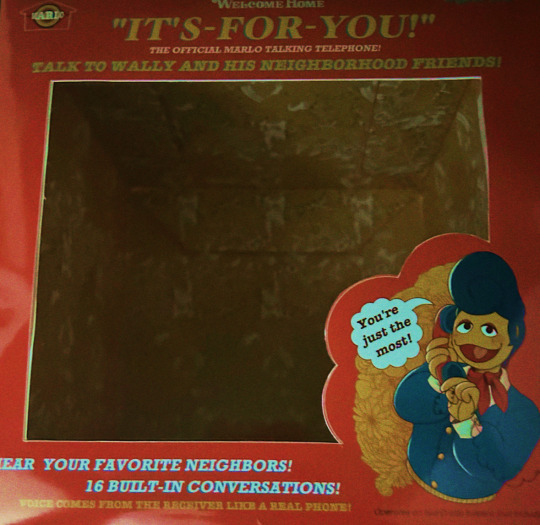
That means the odd phone that doesn’t match anything is there with W as well as later being with the QA. In the information from W on awayfrompryingeyes.net, W describes a phone call coming from a toy phone and gets a recording of it. W calls it Wally’s toy phone.
I keep tinkering with the Welcome Home toy phone, or rather I have been playing with it. It plays everything as it should. The only button that consistently changes is Wally’s, which either doesn’t play at all or warbles out something incorrectly.
Today it rang for me. Sometimes it will do this, I assume a button must be jammed to consistently play that noise. Instinctively I answer it but nothing will come out. I have caught myself saying hello into the receiver in the past, but I’ve stopped now.
There is a toy phone that we see in the Playfellow exhibition that has listed that the clip is broken, so I would assume, given that information, that this phone is the one that W is referring to. I need to review the QA’s information to confirm they are also hearing this phone. Given that the wooden phone is featured so prominently, I have assumed that this is the phone that is ringing, but the red phone is much more likely, because of the broken audio and the coloring of the phone.

So, they both have had these experiences, and W describes the QA as being very ill:
Nothing from our curator who has since recovered. I don’t know what happened to them to become so unwell, to create that page.
So, this verification that the QA created staff-only, and that W considers them to have either gone mad, or potentially they were physically unwell. There is no indication yet whether it is one or the other, or both.
This is already way too long. But it does seem to strengthen the boundaries of each portion of the site. W is in charge of the main site. Wally has his doodles and hidden sound clips, ans the QA has staff-only. It does lead me to wondering who this contributor is (as mentioned by W on the secret page, that they are unwilling to upset, lest the contributor stop sending things). As always, i have a theory. . .
#welcome home#welcome home theories#wally darling#welcome home arg#welcome home project#does tumblr have a word limit?
20 notes
·
View notes
Text
Fallout Series Positives:
Pretty faithful to the look and feel of Fallout, whether we're going BIG with technology and creatures, or small with food and tools
First episode an absolutely stellar introduction, got me hooked to the plot, got me invested in the characters, absolutely trashed my emotions and made me cry twice, first at the very beginning then again more towards the end
That Fallout branded mix of goofy, corny humor and absolutely sobering scenes of either how terrifying or deeply sad the world is
Action Sequences that either feel completely accurate to the standard game or like someone has Bloody Mess active.
Our main Vault Dweller is exactly how I felt first experiencing these games and it has been lovely watching her progression from sheltered/slightly off socialization to adapting to the surface while still maintaining the root of her core values
The Ghoul is a terrifying badass that is very entertaining to watch and whose experience with the world feels on par with how I approach the games now
Maximus clearly is on the road to being disillusioned with the Brotherhood and slowly becoming a better person, it is taking him time and effort and the journey is not yet over
Not sure if this would be a positive for everyone but watching the Knight go from intimidating figure to "I'm bored and want to shoot something." "*Sees creepy cave that clearly has something dangerous AND something they need in it* Fuck." "(uses companion as convenient meat shield/danger scout)" "*Is in fucking power armor but as soon as he is faced with something terrifying in nature and it is not going his way:* (running) fuck fuck fuck fuck" as much as he was an asshole it was hilarious seeing a representation of a True GamerTM experience.
I missed the more rotten ghouls of earlier games and so was pleasantly surprised by the inclusion of other ghouls that followed their design rules more than 4's raisin ghouls. Robert and Martha were devastating.
Some pretty good Vault horror honestly
A character's actions that were kind a messed up in a way that was clearly framed as comedic has SHARPLY turned sinister due to stuff that gets revealed at the very end and makes me very excited to see what more of their deal is the next time we see them.
Fallout Series ehhhs... (Will be containing spoilers):
Personal ehhhs:
Putting this ehhhh at the top because it's a very personal one that might be shared or might be different for other people, but a lot of the sexual things that cropped up (and for the most part seemed like they were meant to humorous? To get a laugh?) just really weren't doing it for me at best and making me deeply uncomfortable at worst. Would love a version with them cut. It does feel in line with a small part of Fallout 2's humor though so again mainly a personal ehhhh rather than disparaging the show for it.
This one might just be because I'm asexual but the romance between Maximus and Lucy feels forced? Allosexuals please advise, is it normal for infatuation to strike that fast and hold weight for so long after? I don't mind the two together, looking at their individual characters I do think that it could work, its just it feels off when the story is very clear about the intention that these two will end up together immediately upon them meeting. Again, I don't hate romance subplots in theory, it's just, in general, when they show up like this where it feels like it was tacked on in order to check a box, rather than fully explored into how that would develop, that kind of just bothers me.
As a small branch to that last one, if it is forced than it feels kind of bad that a lot of the positive developments of Maximus's character seem to only occur because of his crush on Lucy. Him wanting to help Lucy because he earnestly does want to follow the one value of the Brotherhood he's internalized, being a pillar of Justice for the wasteland, and her being a Vault Dweller following the Golden Rule clearly paints her as an innocent needing assistance and justice, well, that's all well and good, but her being able to influence his decisions because he doesn't want her to think bad of him in a romantic sense, if I'm reading that right... don't like it. Not to say that his character growth completely involves Lucy! His disillusionment with the Brotherhood happens without her, and he has positive growth with Thaddeus as well, it just seems like its easier for him to take steps back from his personal growth when she's not in the picture.
Production ehhhs:
some of the scenes had backgrounds that looked a little bit too much like they were taken straight from the game, with the actors in the foreground kind of visibly sticking out from them. I'm not sure if this is because they were using green screens for certain shots or what other explanation there might be for it. If it is green screens though... Amazon you cannot pull the wool over my eyes and claim that you did not have the funds to build actual sets for this tv show.
The initial introduction for CX404 was absolutely great and I was excited with how some frames seemed to emphasize her own perspective of what was going on around her and this one man that's cared for her since she was a pup, but any shots involving her after seem kind of weird with how they're cut and the perspective shots seemed to get dropped. Maybe I'm just spoiled with how well the shots were done with Jed in the Thing, and the perspective thing being dropped is really just a personal disappointment than anything wrong with the show, but, it's my blog so I'm gonna admit I'm disappointed that potential wasn't explored.
This one is kind of a true "ehhh," it's really all I can think to describe this thought when I remember John Boyega's role as Finn and watch this film. It feels off that, in this 3 protagonist cast, Aaron Moten and John Boyega both are in the role of a character whose background is coming from a deeply oppressive regime he's been brainwashed by since he was a child, and whose main soldiers are unilaterally recognized by the masked armor they wear. I do really like the archetypes they chose for the 3 protagonist cast! Pure of Heart Vault Dweller/Indoctrinated Brotherhood Scribe/Disillusioned Pre-War Ghoul, just... Thinking on the fact Aaron got the brotherhood role. Maybe this was done purposefully for a positive reason, but right now fresh off the show without digging into director/cast interviews that maybe explore this specifically it just. ehhh.
As much as I loved the horror set up for Vault 33 the span of time that goes between Norm and Chet discovering that and the next bit of investigation Norm does on the subject is. Incredibly long??? Brother clearly seems very resourceful and good at finding information, but with how the episodes are cut and framed it feels like a great amount of time goes by before he next tries to dig up anything on what happened to 33/why they were trying to get into Vault 31. I don't know man maybe this is because it's easier to do in a video game but I feel like if I found a bunch of corpses that wrote with their own blood how a discovered deception drove them to madness and were frozen in various states of doing whatever they conceivably could to break into a neighboring vault because of said discovery I think I would. Not sleep until I figured out just what was going on???
Lore ehhhs:
Same problem that usually occurs when Bethesda is at the seat of Worldbuilding. Philly might've fit ok in the West Coast back in Fallout 1 and 2 but it feels weird seeing a settlement like this 100 years in the future. 100 years ago for us was 1924, to kind of help put it into perspective. Having this all handwaved and explained as: "Well of course everyone's acting as if no progress was made since 100 years ago! Nukes were dropped on the NCR/Shady Sands and set them back to square one just recently!" Really isn't... good enough for me.
I've been away from the lore for a while so a lot of what I remember is vague rather than detailed, but I am getting the impression that Bethesda is making a bunch of tweaks to the history that was already set up by previous games and. I mean just honestly speaking I really don't trust their interpretations (to put it generously) of Fallout 1, 2, and even New Vegas's established lore. (EDIT: Oh no yeah I was definitely right they've straight up changed a lot and where they haven't made changes per say they have made choices for this present space of time that makes events in the first games kind of impossible)
The vials the Ghoul is reliant on. I've been generous with interpreting them as something that was recently invented, and used by ghouls who, at varying lengths of age, start showing signs of going feral. If the way the show seems to be framing them is true, that they are instead supposed to be things that have always existed and quietly used by ghouls to prevent every single one of them from going feral in the background of the games, then. No that is awful try again Bethesda. You cannot get me onboard with something like that, especially when it would've presented a really interesting quest opportunity AGES ago if true.
Character/Story ehhhs:
The amount of times something absolutely horrible happened that could've been prevented by something as simple as a character speaking up instead of just being set dropping is. Not small and pretty annoying. Miscommunication is pretty bad too. It's like watching a shitty romcom that knows the only way the scene will progress the way they want is if miscommunication happens but don't take the time to have that miscommunication occur in a believable way.
There is something very disjointed with our look at Cooper in the first episode vs. where he's ended up. The last shot we have of him is riding with his daughter as the bombs dropped, presumably trying in vain to put distance between them and the bombs/find shelter. His wife/her mother seems out of the picture at this point in time. But the Ghoul asks Lucy's dad where his family is, indicating that at some point between the bombs dropping his daughter ended up with his wife and he was separated from both of them. The only thing I can think of is that he somehow made it to his wife even though they were incredibly far from where ever she could possibly be with the Fallout quickly encroaching at their heels, and she took the daughter in a way that somehow kept Cooper from following/knowing their end destination and left him to succumb to the said encroaching Fallout. But, again, thinking about that very last shot of Cooper in the first episode, that feels really contrived and kind of implausible? If not impossible. Maybe they'll pull off an explanation that has me feeling less grumpy about it, though, who knows.
So okay hang on a minute. The overseer (look I forgot his name I'm sorry) was upset that his wife left the vault and took their two kids with her. The only possible way he could've thought to get his kids back was to nuke Shady Sands??? And he somehow had access to resources that would allow him to do that??? When he's been in the Vault and either entirely was frozen until recently or has periodically been put into and taken out of the freezer for 200 years??? The kids survived that/are not noticeably harmed by this experience???? The Brotherhood are somehow involved??? (I mean I can't think of any other reason why a knight was present as Little!Maximus stepped out and witnessed the devastation around him, they mostly stay in hiding on the West Coast by this point and for all they're so-called values they really aren't ever inclined to help out people in desperate need of it, so whatever they were doing it wasn't anything "good". Unless Bethesda is thinking of tweaking this aspect of their history as well which. It's not impossible unfortunately, considering they keep doing that/have already made changes in the show so far)
Don't get me started on Moldaver. I'm really disappointed we did not end this season with some kind of conversation between her and the Ghoul that would've given us any actual concrete information about her specifically that we weren't already shown by flashbacks and side characters talking about her. She is alive and looks exactly as she did 200 years ago. She doesn't appear to be a ghoul, as one from 200 years ago is obvious in appearance, it doesn't seem right that she would've been in cryostasis until recently, as she was clearly around when Lucy was a small child with barely developing memories and she, again, still looks EXACTLY the way she did before the bombs dropped. No explanation is given for this. I have a theory that she might be some kind of Phoenix-style new mutant that comes back to life no matter how many times she dies and so might not actually be dead, but that's relying a little (VERY) heavily on her Flame Mother epithet and again me being baffled that they killed the season antagonist when she seemed incredibly important to multiple characters and there's still so much mystery surrounding her. If I'm right that cryostasis is not the explanation for her still being alive and she's just been in the wasteland for 200 years, why has she only coordinated an attempt to get her research back now? How did she convince an Enclave Scientist of all people (granted, one who clearly has a soft spot) to get that research for her AND have it transported instead of kept for the Enclave? Why wait to go after the overseer at least a decade after the bombing and the murder of Rose? Why rely on raider help when she seems to be such a huge deal that she could've relied on better armed/more intelligent help? Why massacre a bunch of innocent people people who weren't in anyway involved with what happened to Shady Sands? Why not just wait until the cover of darkness, the newly wedded wife and all the other vault residents deeply sleeping, and whisk the overseer away then? Why put the two children that Rose clearly cared deeply for at risk? The raid of 32 was our kicker into this series, was incredibly interesting and investing, but now it just. Doesn't make any sense since we've learned who Moldaver actually is.
The reveal of the Vault 31-32-33 experiment and what was in Vault 31 was. Ok. Kind of deflating, honestly, considering how much was built up around it in Vault 33. Not to say that the experiment isn't still completely fucked up but. I don't know it doesn't seem as bad as to result in that kind of reaction that happened in 33. Maybe there is more to discover, though.
Actually no wait hold on. How did the raid in 32 even happen??? Bud is overseeing everything that happens in each vault, and the overseer (and possible any other originally vault 31 residents) of 33 had been dead for a long, LONG while before the raiders showed up. Bud didn't notice Vault 33 died?? If he did, this information wasn't passed on to the overseer of 32?? There was no suspicion on either Bud or the overseer's side that 33 has been quiet for so, again, VERY long, and no one investigated?? Bud didn't clock that the door had been opened by Rose, who was dead for at least a decade by this point?? The overseer wasn't suspicious AT ALL that he didn't recognize any of these supposed Vault 33 residents, especially considering the long silence beforehand??? This is an incredibly huge failure of management hoo boy. (The one, again, very generous interpretation I could give this is that the overseer did recognize Moldaver and her name, but only vaguely, fuzzily, which he chocked up as him not paying attention well enough to remember someone who must've been skilled enough in management to be made overseer. That doesn't explain the raiders with her. That doesn't explain the fact that somehow someone he knows is not from Vault 31 was made overseer when the last 33 overseer perished. Like we see that there were backup 31 vault dweller's hanging around 32, why wouldn't the same be true for 33 based off everything we've learned so far???)
#fallout#fallout series#fallout series spoilers#I was gonna kind of just ignore this series initially because#“Devastatingly Immoral Company Produces TV Series Where the Core is Devastatingly Immoral Companies Destroyed the World”#is not lost on me#but my dad watched it and really liked it + wanted a fellow Fallout nerd to be able to talk to about it#overall it is entertaining#it's got a whole host of problems if we want to accept it as canon and look any level of deeply into it#primarily west-coast lovers of fallout have every reason to be upset and everyone else has every reason to still like it#it does the job it set out to do fine enough
9 notes
·
View notes
Text
okay! this took a bit to type out, but here we are!
disclaimer: my way might not work for you and that’s okay! there’s no right or wrong to make gifs, so long as you enjoy the way you make them then that’s all that counts. this is only a detailed look into my own personal process and things i’ve learned along the way. i'm also an idiot who sometimes doesn't know what he's talking about, so if something doesn't make sense let me know so i can fix it!
but these are some of the things i'll be going into a little more detail than before:
tools
importing & converting to smart object
smart filters
coloring (lighting, basic, and gradient)
exporting
tools
there are a few things i use in the process, some new and some old. whether you want to use them is entirely optional, given that it can be a lot to take in at once.
photoshop 2024
if you use an older version of photoshop, then i think the layout is similar to newer versions. though iirc some older versions don’t have the timeline function so you might have to look that up yourself since i’m not familiar with any ps version without it.
handbrake
i only use handbrake if the recorded video is super long. usually i try to record each scenery shot (4-8 seconds at a time) or an entire cutscene so i don’t have to use handbrake to trim the video. if i do, then i have the settings set to export as super hq with 60 fps, deselecting align a/v start and passthru common metadata. the rest i leave alone.
vapoursynth
this is really useful and makes coloring easier imo. you can download it from the official site, but i found a portable version (i have the 200722 one) for windows here. i’m not sure how to set it up for mac users, and, truthfully, to this day i still don’t know how to use it entirely. i just followed a tutorial i i found on youtube and only changed the amount for the denoise filter and turned off the sharpen filter since i do that in photoshop itself. so it’s trial and error, and i’m erroring a lot sometimes ajdkjasvjdas. it’s also where i crop the video to my preferred dimensions, unless you choose to crop in ps.
jsfiddle code playground
if you want to have the text in the tumblr post be a gradient, then type whatever you want in the first box on the bottom right, change the color from red to your starting color of choice, then the same of the green for the ending color. hit run, copy the code, and paste it inside the text post while in html mode. ngl, i stared at the site for like ten minutes before i figured out how to use it asjdjasdasd
nvidia shadowplay
i use shadowplay since it comes with my laptop’s gpu, set to record in 1080p60. i’ve seen other giffers use obs for recording, but i don’t have any experience with it. there are scenepacks and gameplay walkthroughs on many sites, which you can use as long as you have the uploaders permission and credit them as they ask! please don't steal their videos!
reshade
i’ve started using reshade recently to tone out the blue tint of the game and sharpen it up a bit more. it makes a big difference and helps with coloring if you start out with near neutral colors. the effects i use are: • deband • clarity • sharpcontrast • emphasize • amd fidelityfx contrast adaptive sharpening • fxaa • prod_80_04_colorisolation • adaptivetonemapper i'm pretty sure some of these are redundant, but i’m too lazy to go back and see which ones i don’t need lol. but it’s all personally preference with how you want the game to look, and there are many effects to choose from.
importing & converting to smart object:
my preferred method is the video frames to layers, which is: file > import > video frames to layers, and then select the video. if you use vapoursynth, then there might be duplicates frames (or at least there are for me) so when the popup window appears i check the box to limit the frames to how ever many duplicates there are of each frame. usually in my case, it’s three.
after the video has been imported, i select all frames in the timeline and change the frame delay to either 0.03-0.04 depending on how fast or slow i want the gif to be. for converting to smart object, i recorded my own action set to save time by clicking on a couple of buttons, but the process is: select all layers currently > convert frame animation > convert to smart object.
let me know if you want the action set! it saves a lot of time in the process
smart filters
i don't think sharpening before or after coloring matters, but definitely do not sharpen before cropping if you haven't done already.
vapoursynth combined with the in game reshade sharpening effects doesn’t require as much sharpening as i normally use. just note that it varies from scene to scene, and whatever you're giffing. these are just the settings i used for the pirates’ cove set.:
smart sharpen #1: 500% with a radius of 0.2 px
smart sharpen #2: 10% and 10 px radius
gaussian blur: 0.7 px at 30% opacity
add noise: 1% uniform at 30% opacity
on to the coloring, which i'm breaking this up into three sections: lighting, basic coloring, and gradient coloring, with a brief description and the result after each section.
something to note is that all coloring is personal preference, and how you want your gifs to look. if you're just starting your giffing journey, here's a site i bookmarked that explains pretty well the adjustment layers and what they do if you have questions for how they work. but i'd be more than happy to answer any that you guys have!
lighting:
brightness/contrast:
with this, i’ve found that changing the blending mode to screen brightens it up well enough without having to move any on the sliders. if it’s too bright, then lowering the opacity should do the trick.
curves:
before, i used the white and black point with the eyedropper tool, but now i’ve started using the auto function that can be found in the four horizontal bars in the top right of the adjustment properties. i choose the find dark & light colors options and check the enhance brightness and contrast box. if it’s too bright or tinted too much one color, then i fiddle with the rgb curves individually to get it as neutral as i can.
levels:
with levels there’s not much to adjust other than moving the sliders for the shadows and midtones to give it a little more contrast.
basic coloring:
selective color #1:
for the first selective color set to absolute, i use it for the white/black colors to make them as white and black as possible. increasing the black can make it too dark, so i limit the increase by two or three. sometimes i change neutral if it needs it, after all the coloring is done if it still looks too much of one color that the other adjustment layers can’t fix. i don’t know exactly what the difference is between absolute and relative is, i just remember it being part of a tutorial i read and have been doing it ever since.
color balance:
i only change this as minimally as possible, usually one for cyan, one for magenta, and one for blue for all tones. sometimes i increase it more, but it all depends on how you want it.
selective color #2:
the last selective color i use it for all the other colors, set to relative, usually for reds, yellows, and blues. if there are people in the gif, then i focus mostly on skin tones, bringing out reds and yellows to make it look as natural as possible. a hue/saturation layer can be useful to even out darker skin tones by lowering the saturation for red or yellow. with scenery, i boost whatever dominate color pops up while lowering the other colors by adding in a lot of white if the lighting is bright, or adding black for dim scenes. again, if it needs it, adding in an optional hue/saturation layer, but this time to lower the saturation for less prominent colors.
gradient coloring:
if you’re satisfied with the coloring of your gif, then this step can be skipped!
i’ve recently fallen in love with using gradient fills. there are several preset gradients available, but if you search around online there are other gradients available to download and use. or you can make your own gradient of your colors of choice.
for me, i often use blue/pink or blue/purple gradient fills. the blue/pink preset is the one i used in this case.
gradient fill:
after adding the gradient fill and choosing the colors, i change the blending to soft light and lower the opacity anywhere from 30%-50%. with darker skin tones it might be tricky as it would involve more tweaking of the settings until it looks nice.
gradient map:
i follow it up with a gradient map to help with the sharpness (i think? i’ve forgotten exactly) set to soft light again with varying opacity given how dark the scene is.
vibrancy
this is completely optional here, but i like the colors cranked to the max, boosted to 80% or slightly lower. some minor adjustments might have to be made after this, usually with it being too red or possibly yellow.
exposure
the final adjustment layer to top it all off is exposure. i like my gifs to have a matte-ish look, so i change the offset anywhere from +0.0010 to +0.0030. if the gif is still a little on the dark side, increasing the exposure helps.
the gradient coloring takes the longest to get the colors to look good, but i love my colors so much and the end result is so worth it.

logo:
this is optional of course, but since there's quite a few people out there who love to steal gifs, it's probably a good idea to put your logo on the gif to help deter them. mine's simple and uses either the font code bold or moon. i have it saved as a png so that i can go to file > place embedded and resize it to my liking before moving it to the bottom right corner.
but for me those are too many steps to do for each gif, especially if i’ve been working on them for hours. so i open up an old psd with the same dimensions and duplicate the logo layer for each gif to save time.
exporting:
under file > save for web (legacy) the window for it should pop up. i don't usually mess around too much with the settings here, keeping it at selective diffusion and changing the matte to none.
sometimes the size will be too large for tumblr's limit since i like bright colors, and depending on how many frames are in each gif, most of them end up on the large side. i have to fight photoshop sometimes to make it work by either trimming a few frames or messing slighting with the lighting. occasionally i end up having to go back and reimport the videos to divide the frames equally if i don't want to trim any off. it’s a pain, and it’s something i should honestly try to plan out before that point lmao.
but if you're satisfied with how it looks, save, and you're good to post!
8 notes
·
View notes
Text


Wk 4: SDL - Portraits towards the brief -My best friends
"Coven"
Indoor photoshoot, just after sunset.
I had planned to try and get some outdoor photos in the evening light, but it was spitting rain, so I had to abandon that plan.
Tools:
I had picked up a piece of large a3 sized golden cardboard at Spotlight in the morning to test as a warm/goldish light reflector, and I picked up a couple of pieces of fabric to use as either backdrops or props or texture.
I also have a cheap softbox light that had either cool light mode, or warm, very simple, courtesy of Amazon, and I tried to light the different spaces as best I could.
I asked for Lael & Mish to bring outfits in warm tones and neutrals...and we tried different spaces, and different looks/moods.
I used a 50mm prime lens for the whole shoot. I had just gotten it, and I was really keen to practice, and test it out. My camera is an APS-C, crop sensor, and with a 50mm lens equipped (x 1.6) it works out to be equivalent to an 80mm lens on a full frame camera (I believe).
***
Reflections:
my gosh, that was my first time running a little photoshoot. omg, so proud.
Personally, the 50mm lens indoors felt like a bit of challenge...however, it allowed my camera to open up nice and wide and let in the most amount of light in (at night) compared to my kit lenses. I like how natural and real Lael & Michelle's portraits came out, nothing distorted, so pretty. I also really adore the gorgeous clarity of the images. I do think, however, indoors it was harder in small spaces to get the soft creamy background as my 'models' were typically close to their background, and I had to get as faaaaar back as possible to get the subject in frame. I was used to the ease of just making my camera fit what it need in or out with a kit lens. But, I do think the 50mm made me think about the composition more? I'm enjoying it a lot though.
the tripod came in insanely handy when it got much darker after sunset. I tried to avoid cranking up the ISO to avoid noisy photos. I did hate initially that I couldn't move instinctively at will due to the tripod, (it could be because its just a basic tripod), it doesn't have a gimbal-thingy either, so I felt like it took me a while to get precisely into a 'frame' I liked, (instead of just crouching or moving myself into the ideal spot within 30 seconds). I also hadn't realised that my tripod could shift the camera into a portrait position... I found that out much later, so initially whenever I used the tripod I thought I was cornered into just landscapes, but I worked with it. Glad to be learning new things on the mov though. Also my camera isn't fancy, so it struggled with low light, so I have some hits, but lots of misses where I had to trial & error my way into getting a photo with as low a shutter speed as possible without blur to let in as much light as possible, and working with my ISO level to correctly expose my image.
I think using the gold-cardboard 'reflector' from Spotlight was fun, and pretty, however there are photos where I noticed afterwards that there seems to be 'yellowish' staining/tones on the skin where the light was reflected toooo directly onto the skin, and it looks like a mistake. I should pay more attention to the light distribution and how harsh it is in future.
I hadn't learned about setting the AF area yet, and I couldn't figure out why in so many shots the eyes of my model weren't sharp, despite half-pressing and focusing in on their eyes initially. It seemed to focus in on their noses instinctively or a prop. Now I know that could be a potential cause. I also learned that I can focus on their cheek by their eye too.
Overall, we experimented with lots of different lighting. Starting with facing the natural evening light coming in through the wide window/French doors, indoor lights facing a different direction, gold cardboard as a reflector, using fabric from Spotlight as a backdrop and prop, different poses, my cheap amazon soft box light with various light modes, tripod in different heights and positions, and finally under my 'pinkish' toned lightbulb that can change hues.


0 notes
Text


1. This project is called gum printing. First of all, I just want to say this project is probably the most hardest of all of the projects I have ever experienced making. It’s because dealing with different types of paints and toxicity when my teacher said you can cause cancer by making this type of imagery. I was scared and terrified oh what this would do to me. So I stood up and stared the process.Once I started, I didn’t quite understand the process and it was super frustrating to the point that I would literally cry, but at the end of it and made more sense understanding how to do the process. I had to ask questions and writing things down in a notebook, it was super helpful to get the ingredients correctly by measure out everything to the point of making this mistake. I’m not going to lie, this project took over a century to finish. When the students in my class took over 40 hours or more just to make the perfect images. I was impressed by his work and intelligence for being the first time using this type of lab work.
Steps for this project:
1. Crop, frame and print. First, take the photo of any kind of your favorite image that you have taken in the past or recently put it into Photoshop. Second; crop your image in Photoshop. Make it black-and-white or split channels if preferred. invert your image after that, select all your layers and flatten the image. 
2. Print; once you’re done with the Photoshop, and everything else you have done for your photo, go to the printer, set up the settings and print your image to a negative.
3. Cut paper; take your paper take your negative lay on top of the paper to see what size you need before cutting. Cut your paper to the size of the negative make sure you have little bit of paper left in the corners to fit the negative.
4. Shrink your paper; once you’re done with all the paper, cutting and cropping, you go to the dark room and put your paper into soaking hot water to let the paper shrink for 30-1 hour.
5. PB8; once it’s done soaking you get the PBA make sure it’s all coded twice before exposing your paper into the V LIGHT. (Let it fully dry)
6. Expose V LIGHT ; put the negative onto the white piece of paper that you just coded with then expose it to one to two minutes depending how much you want to expose your picture.
7. Almost there; Put it into the chemicals and see the magic happen.
8: DONE: Get it out of the chemical, put it in water. Let it soak for three hours or overnight for the better results.
Note:
Well, you’re exposing your pictures you want to write down some notes in your journal to remember what you did and what exposure you have done so you can make sure you get the exposure correct on this second image.
Images:
Most of my images are people and portraits that I have done in the past or recently just to give a closer. Look on how I done the images. I only done two layers on one or two of the images because it is a lot of time and effort.
Overall for this class
Overall, I have really enjoyed this class by learning a lot of things how to print images from decades, and willing to understand what people had to go through to make their images. I enjoyed every single process and learning to accept the hard times and failures. Not only is frustrating but the same time it’s fun and time-consuming knowing that people have done this to give credit and just enjoy the process of making magic through chemicals and experiments of working in the lab.
Teacher:
I just want to say thank you so much for always helping, and helping others to an extent of really getting the knowledge of photography. You’ve been such a great help and everyone seems to really had a good time in this class. I know I did.
1. The first image is a baby. The baby is my friend child. It’s a boy in a crib.
2. The second image is me in my front yard. I thought it would be pretty to take a picture before of all the different colors. Wish I have put more effort to add more colors.
3. The third image is my sorority sister, on a balcony of Pismo Beach. I wanted to take a picture of her, just looking out and viewing the ocean. Thought it would be nice. I had two colors in here: ten and red together and it blend out nicely together.
4. The fourth image is a picture of my friend Ashley. She’s been in my pictures a lot and she helped me build my portfolio because she wants to become a model. I have two colors, red and blue and I forgot to put yellow to make her face pop.
5. The fifth image is a baby eating a cake with his fingers. He’s sitting on a ground with a tent behind him. it was his birthday that day. He’s so cute. I wanted to do a red because I thought it would look something cool and different. I like the dark and light from the behind. 
6. My other images are just images that I done just to sample and practice on my skills of this project.
Thank you for listening and caring.
This semester was really fun!
0 notes
Text
hello and welcome to my little blending + colouring tutorial !! in this tutorial, i will be guiding you through colouring blended gifs and how to blend them. i will be using ps 2023. this tutorial assumes you have prior knowledge of basic colouring and timeline !
please note this is the process that i have received the best results from - it might not work for everyone and it likely doesn’t work for every show. but, with the results i have been having, i feel like it’s something i want to share with others !!
p.s. : i will work this tutorial the best i can to accomodate to the new tumblr gif guidelines and bugs !!
GUIDES:
here’s the initial stuff that guided me with my blending and colouring !
blending tutorial by @ helloinej
colouring tutorial by @ helloinej
blending tutorial by @ disaster-lineage
blending tutorial by @ nelsonnicks
keep in mind each of the above have different styles of blending, each also being different to my own. if your final result isn’t the exact same as any tutorial, don’t beat yourself up over it !
STEP 1 - find your scenes.
this step is more important than you think. certain scenes simply don’t blend well and that’s just reality. here’s my preferences:
similar scenes (eg. similar lighting, colouring, setting) blend well.
one moderately well lit scene (ideally not outdoors) + a moderately dark scene (eg. you can clearly get an outline of a face, you’re not adding curves layer after curves layer) CAN blend well, depending.
scenes on two different ends of the spectrum like one daytime outdoors sunshining type scene + midnight dark, obscured faces scenes do not have potential to blend well.
however, you’ll come to know what works through experience !
also make sure that whatever scenes you pick, ideally, there is little to no movement !! this makes it easier when you actually colour the gif later on.
STEP 2 - organize your two gifs.
to blend your gifs, they need to be the same length. i load them into frames first and then i set the speed and trim them to the same amount of frames and layers and then i will crop. then, go convert to timeline > command + option + a (for mac) to select all on the layers + timeline, then right click on your layers and go ‘convert to smart object’.
do this on both of your gifs and then you can sharpen them (i do, so it gives me a better idea of how my gif is looking) or not, depending on how you like to do things.
STEP 3 - the blend.
with my two seperate gifs now, i will take one gif and duplicate it onto the other.
please note that simply performing ‘duplicate layer’ will not be sufficient if you are working with every frame and layer individually. having two seperate smart objects makes things much easier for me and only really changes one or two things that people would normally do.
now, to blend your gifs, go to the gif you duplicated over and change the blending mode to ‘screen’. some people may choose to use ‘lighten’ - do whatever looks best in your opinion.

right now, the background of my top gif is washing out my bottom gif of inej. no worries - we’re going to fix that now.
STEP 4 - the blend part ii (the harder half)
first off, i’m going to adjust the positions of my gifs. the top gif covers too much of the focal point of the bottom gif (inej’s face) so i’m going to move the top one a little to the right and then the bottom one a little to the left so i can get the best view.
now it looks like this:

to begin fixing it, add a ‘layer mask’ to both of the gifs. make sure your foreground colour on your layer mask is set to black. you need a layer mask on both of the gifs because different aspects of each have something interrupting the other.
now, select the ‘gradient’ tool and make sure you have the same setup:
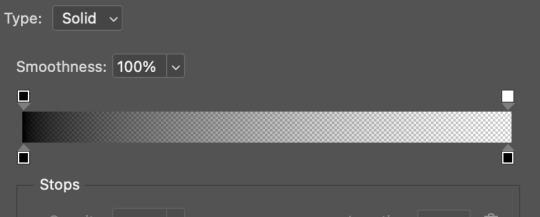
the black colour lets you blend and the transparent end means it does blend. now, using the gradient tool, do this:
and repeat:
(keep in mind i’m not 100% done here !!)
keep using the gradient (or brush) until you’re getting your desired results. do note that when you’re using the gradient tool and, if you have two layer masks (one per gif) that there is a chance that your gradients overlap and the middle point becomes opaque. in that case, i’ll either delete my layer masks and start again, move my gifs or use a brush with a WHITE colour to redo.
play around with your gradient though ! don’t be afraid of messing something up in this process; you can easily go back and fix it. experimenting allows you to learn.
it took me another five minutes to play around and get exactly what i wanted, but what i’m going to do next will actually assist my final result. here’s what it looks like atm:

there’s still a bit of an overlay from that top gif, but when i colour it, it will disappear.
STEP 5 - basic colouring.
this is your curves, levels, colour balance etc. ! there’s not much to say here as everyone does this bit different, but i do advise that whichever gif you work on, you turn off the visibility of the other, and disable the layer mask while you colour. this allows you to achieve the best results.
make sure to use a clipping mask for your colouring layers, and clip them to the corresponding gif.
now i’ve completed the basic colouring and i’m ready to give it some actual colour !!
STEP 6 - colourful colouring !!
next up - actually making it look cool !! start by adding 2-3 blank layers (make sure they’re clipped to the respective gif). with the first layer, go back to your gradient tool and draw a gradient on the “darker half” of your gif. if there isn’t one, just choose which one will help it blend best. also disable your layer mask while you do the colouring !!
where that little bit of the top gif was overlapping on the bottom one, i’ve added a black gradient to it so it blends better.

rn it looks a bit weird, but once you change the blending mode to ‘soft light’ it evens out a lot.
then with my other blank layer, i’ll change my brush to my desired colour and set the size to 200px. from there, i’ll do one half of her face then i’ll make ANOTHER layer, and do around the other half, as such:
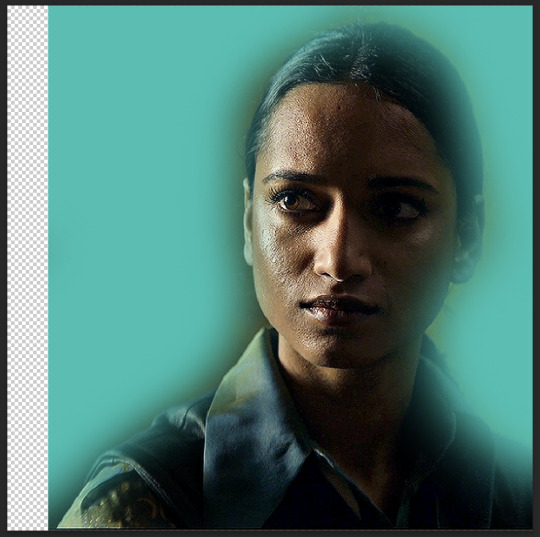
then, set the blending mode to either ‘colour’ or ‘hue’, whichever suits best !
after, make sure to clean up with an eraser so it won’t turn the subjects skin that colour. then, you can repeat the process for the other gif !! feel free to switch your colours up too.
here’s both my gifs, coloured individually:


don’t stress about having the perfect colouring where no skin is obscured by the colouring. it won’t be perfect (eg. there’s a tad bit of cyan on her ear) just as long as it works well with the motion !!
STEP 7 - final clean up and save !
and i’m done ! this process is relatively quick and has been giving consistent and high quality results for me, which has been so good. i’m aware that blending is not a quick thing to learn and wanting to incorporate colour is such a hard thing to start. hopefully this has helped <3
#*tutorial#gif tutorial#ps tutorial#userriel#userraffa#usercim#alielook#userrsun#userv#thingschanged#userzesty#userfaiths
293 notes
·
View notes
Text
How to make a gif + sharpening
Gifs are part of the Tumblr experience and you may want to learn how to do them.
If that is the case, here is a tutorial, showing all the tricks I learned in the past years.
Contents
Software needed
Videos
The process.
Software needed
Windows or Mac OS
Gom Player [download]
Photoshop (I use Photoshop CC 2018, but you can really use any version as long as it has the timeline option).
Talking about Photoshop. You should buy it - but for educational purposes, I can tell you that if you google, you can find many many tutorials on how to install it.
Here is the link to one & [another one]
Overall, I suggest you to google for tumblr tutorials - there are plenty.
Videos
To make HQ gifs you may want to get the scene you want to gif in the highest quality possible.
On Youtube there are a lot of 4K and 1080p videos (especially music videos)
If you are looking for a film or a TV show I am sure you know there are some websites that provide you with 1080p quality files (look for Bluray Rips, they have the best quality).
The process
Now for the fun part. Before starting I want to give you a little cheat sheet on Tumblr’s post dimensions (useful if you want to have really HQ gifs) [here].
Here is the gif I’m gonna make with you today:
It has no filter: just some sharpening.
STEP ONE: SCREENCAPPING
Run Gom Player and open the video you want to get the screencaps from.
See that little button there? You have to press it. It is called Control Panel.
Once you pressed on it, a pop-up window should load + make sure to click on the Video bar, and the Advanced Capture option:

These are my options:

Now, play the video and press the Burst Capture: once you’re done, press that same button again to stop the process.
Now, the designated folder where you saved the screencaps should have all of the saved frames.
STEP TWO: PHOTOSHOP
On Photoshop go to File > Scripts > Load Files into Stack
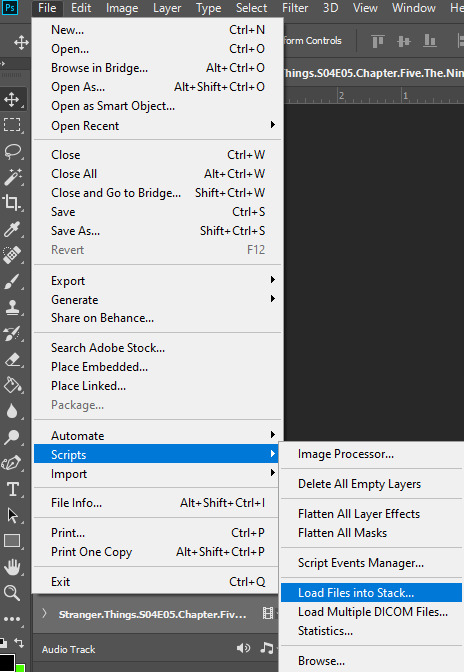
This window will pop up:
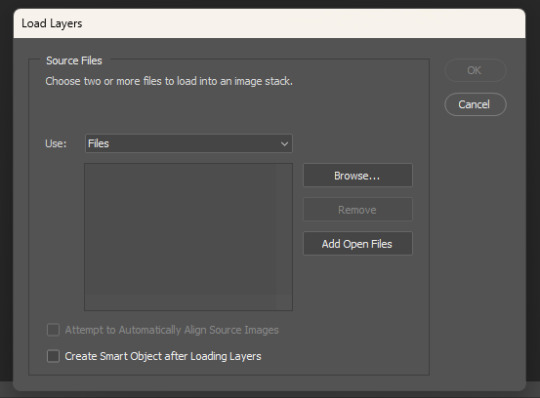
Click on Browse… and select your screencap folder, and select now all the frames of the scene you want to gif, you’ll get something like this:
Now press OK and let Photoshop do its job.
Before starting, make sure the timeline is on (it’s on if it has a tiny check next to it - see the picture below):
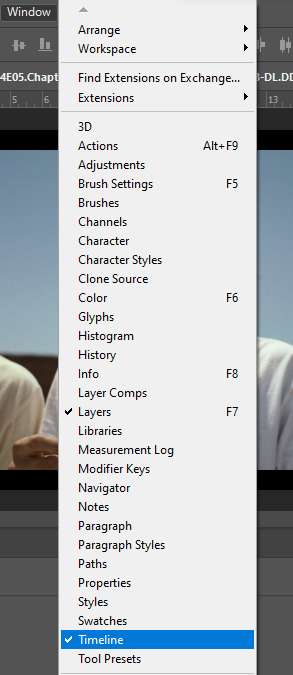
Now, your timeline should be visible at the bottom of your screen. Please select the Create Frame Animation option:


Once you’re done, click on the burger menu on top left (see image above):
Click on Make frames from layers
Click again on that menu
Now on Reverse frames
For the last time click on the menu
Select all frames.
Now all of your frames should be selected. Right click on one of those frames where you read “0 sec.”:

Select Other… and write 0.05 (or 0,05 - it's the same tho, for example, my version of Photoshop supports as decimal symbol the comma instead of the full stop!) and confirm.
STEP THREE: CROPPING
Ok, now cropping is really delicate. First, select the crop tool and on the top bar use the Ratio option, like this:
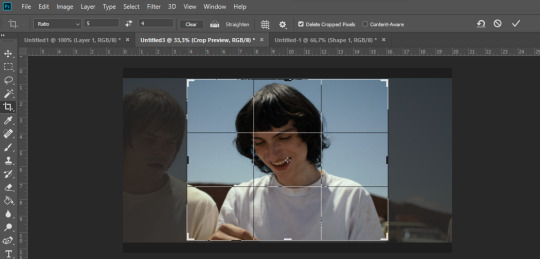
Now, really pick whatever ratio you want (mine is 5:4), and using the handles cut out the black portions of the scene - nothing more. Then confirm.
Go to Image > Image size and write the width based on the cheat sheet I linked above (if the little chain symbol is selected, the height will automatically adjust!) -> These are my options:
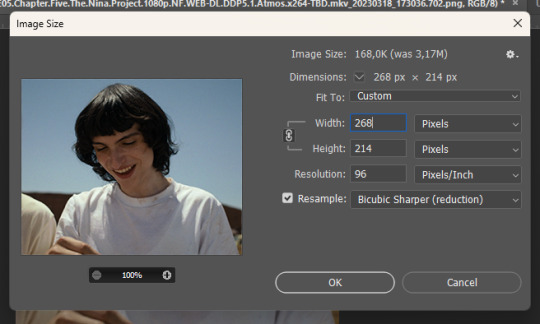
Note: if your resolution is different than 96, don’t change it - leave the number you have.
Confirm.
STEP FOUR: CREATING THE SMART OBJECT AND SHARPENING
Now, on the timeline, select the first frame, and on the bottom left there is this symbol you may want to click:

Select all the layers, right click and select Convert to Smart Object
Select the newly made smart object and go on the Filter > Sharpen menu and pick Smart Sharpen: these are my options
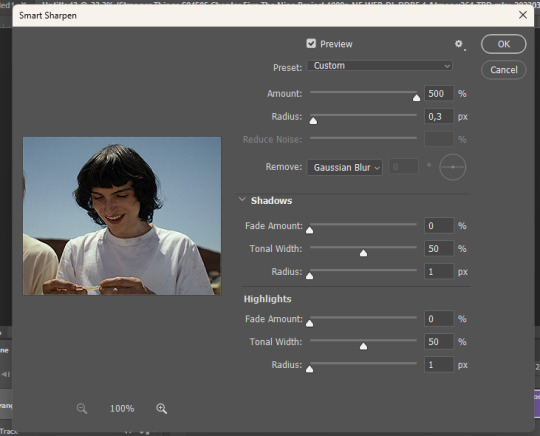

Press OK and then redo it (the smart object has to be sharpened twice).
STEP FIVE: SAVING
File > Export > Save for web

Make sure the looping setting is on Forever - click on save and you’re done!
[list of other tutorials here]
9 notes
·
View notes
Photo
💜 HOW TO MAKE A GIF WITH PHOTOPEA 💜
Hey everyone! I recently got asked to do a tutorial on how I make my gifs. I know that many people (such as myself) don’t have access to Photoshop for various reasons but they’d like to get into gif making. When I started making gifs, I only had a free trial of Photoshop, but when that ran out, I had to find another way to make gifs. Enter Photopea! A free, web-based software that you can use anywhere and that works just like Photoshop!
In this tutorial, I’ll teach you how to make a basic gif like the one I did above. I use a macbook air, but it should be doable on a regular pc too!
If you found this helpful, feel free to share it with your friends! The tutorial can be found under the cut below 💜
THINGS YOU’LL NEED
A browser (I switch between Safari and Chrome, more about this later)
A screencapping software (like MPlayer OSX Extended) or, alternatively, a presentation program like Keynote or Powerpoint.
A program to screenrecord or a program that let’s you download from YouTube
Lots of patience bc gifs are annoying little shits <3
1. GETTING A VIDEO BY SCREENRECORDING
First things first, you need to have the clip you want make a gif out of. There are plenty of ways that you can get them. I’ve seen some gifmakers say that they torrent entire movies and gif from that. The way I do is I screenrecord the part I want to gif directly from where I’m watching the movie or show (like Disney+ or Netflix [or something like 123movies if you’re a pirate 🏴☠️)]). That way, I don’t have to download the entire movie and I have just the part that I want.
To screenrecord, I use my macbook’s built-in program called Screenshot.
Open the program by pressing ctrl + command + 5 on your keyboard and you get these funny little buttons.
Click on the button that says record entire screen. The program is now recording your screen. Play the scene and make sure you expand the video into full screen so you get a full resolution. When you’re done, click the stop button that is at the top right of your screen (next to the wifi and battery symbols.)

If you don’t have Mac, I suggest you look into how to screenrecord on your computer, as I don’t know how other operating systems work. Sorry!
1B. GETTING A VIDEO FROM YOUTUBE WITH CLIPGRAB
Another way you can get videos is from Youtube. I use a program called ClipGrab for this. Download and open the program. You’ll get this window

Simply paste the link and chose the highest quality, then click ‘grab this clip!’. Done!
2. SCREENCAPPING
After we’ve obtained the clip we wanted, we can do this two ways. The first way is to use the program MPlayer OSX Extended. Here’s a tutorial on how to set it up, make sure you do this if it’s your first time using the program. Make sure that you have a special screenshot folder!
Open MPlayer, then go to file > open and find the video of the scene you screenrecorded or downloaded. MPlayer will now play the video. Use the left and right keys (< and >) to go go backwards or forwards 1 minute, but try not to move around too much because the software crashes if you do. If that happens, just click the reopen button when the popup comes on, and reload the video again.
When you’ve gotten to the point you want in the video, press the command + shift + s buttons at the same time and the program will now take a screencap of every single frame until you stop.
If everything goes smoothly, you should find all your frames in your screenshot folder that you’ve made before when setting up the program!
2B. USING A PRESENTATION SOFTWARE TO MAKE A GIF
If you want to skip the screencapping part and you want to have a fully completed gif, you can do the second option. That’s what I used to do before I got MPlayer. In my experience, it’s a really fast way to make a gif, but the quality isn’t really good.
Here’s a tutorial on how to turn a slide into a gif in Keynote.
Here’s a similar tutorial on how to make a gif on PowerPoint.
Basically, you make sure that the size of your presentation is the same as your video, and that you make sure to export one slide into a gif. Also make sure that you export in the highest quality!
3. LOADING THE FRAMES IN PHOTOPEA
Finally, we can start giffing! As I said at the start, Photopea can be used anywhere, but I switch between Safari and Chrome. The reason why is that if I upload the frames in Chrome, the frames will be out of order. In Safari, that doesn’t happen, but the downside is that once I start editing, Safari will reload the page because it takes up too much memory.
So, first I go to photopea.com on Safari. I click New Project and put in the same dimensions as the screencaps (in my case, they are 1440x900 px). You’ll get an empty project.
Then click file > open & place and select your screenshots. Wait until Photopea has loaded all the frames, then, at the speed of light, quickly click file > save as psd before Safari reloads! You’ll find it in your folder where all your downloads are.
Next, I open Chrome (I use the incognito window because I have adblock on my usual Chrome, the program won’t work as usual if you have it enabled) and I click Open From Computer, locate your saved .psd file that you saved from Safari.
Now, you’ll see all the frames as individual layers. Select everything by clicking on the first layer, then golding the shift button and clicking on the last layer. Press command + G to group the frames into a folder. Here’s how everything should look after you’ve grouped the layers.
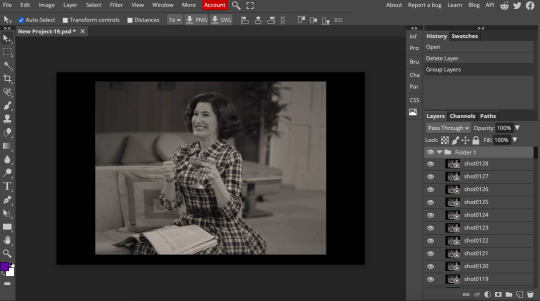
^^ See how Agnes approves! Agnes things you’re going a great job!
Now, it’s time to crop the gif and get rid of the black borders. Making sure that the folder is selected, click on the crop tool (or press C) and click on Fixed Size

W is Width and H is Height, write in your sizing here. Tumblr’s max width is 540, so I put the width as such. For the height, I use 405. Then you just drag the corners until you’ve selected the part that you want, like this
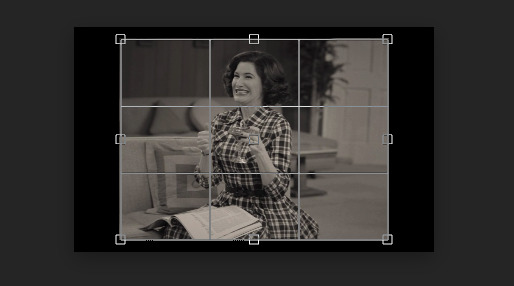
Press enter and the image will be sized down 540x405 px.
Now, our gif looks like this after cropping!
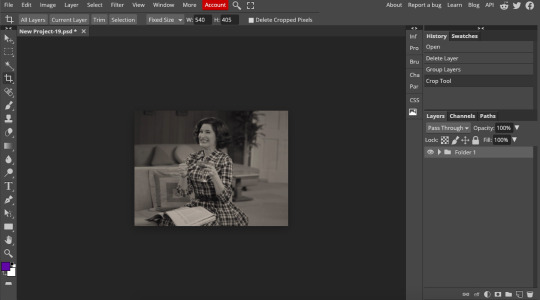
Open the folder so you can see all the layers. Select all your layers and right click on them, then click rasterize.
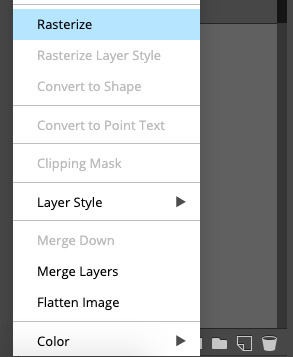
Then, go to layer > animation > make frames. You’ll now see that each layer begins with _a_ - this is crucial because this is how Photopea knows that the layers are part of a gif. If your layers don’t begin with _a_, then it will not play as a gif
If you instead already have a gif done, all you have to do instead is simply click open from computer when you first open Photopea and load your already finished gif and it’ll have the _a_ at the start of every layer. You won’t have to go through the steps of loading your frames into a new project to make your gif as it’s already done and in a folder :) Just start cropping once you load it
You can preview your work by going to file > export as > gif. Make sure to change the speed in the preview window until your gif plays the way you want it! I put my speed at 500%
4. SHARPENING
Hooray, we now have our gif! But to make it look a little nicer, it’s good to sharpen it. I always use Smart Sharpen when I sharpen my gifs, and many other gifmakers use that too. It’s really good :D
To sharpen your gif, again, make sure that all your layers are selected. Go to filter > sharpen > smart sharpen. I use two different settings for my gifs, it really depends on the gif.
Setting 1 (which is the default setting)
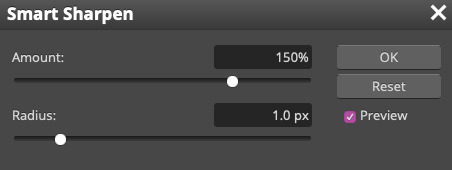
Setting 2
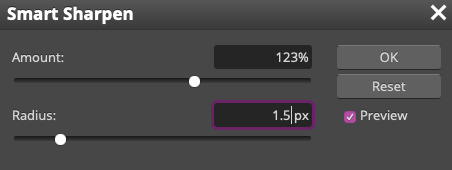
Again, it depends on the gif, play around until it looks good to you!
Here’s our gif after sharpening it
I ended up deleting the last few layers as the gif got bigger than 10mb (that’s Tumblr’s file limit, it your file is bigger than 10mb, it won’t upload). I also added a gradient map and it made the file size smaller, more about that in the next segment!
5. COLORING
Here’s the fun part! Now we get to play around with the gif, making it brighter and look Extra Nice™! Since this is a black and white scene, I make sure that the blacks and the whites really pop.
Notice how in the original scene it’s not actually b&w, it has a slight sepia tint to it. I want to remove this, so I add a gradient map by clicking on the white square with a black circle (I want to point out that we’ll be clicking on this button a lot in this step)

and I change the blending mode to Saturation
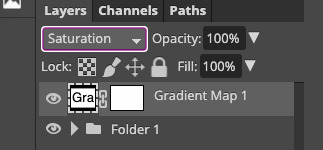
Then I add a curves layer using these settings
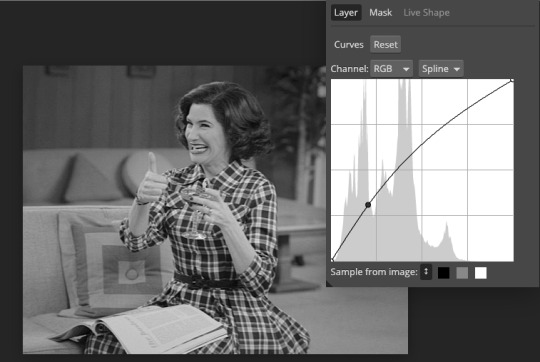
Then a second curves layer
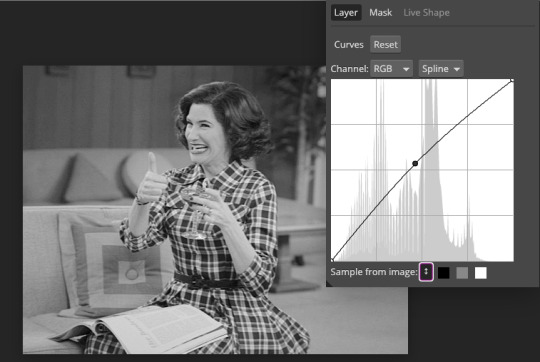
Brightness/contrast
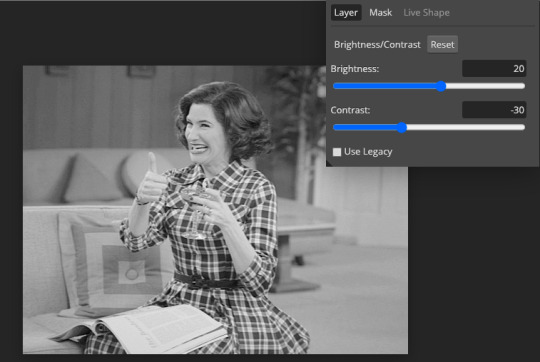
Then my favourite! Selective color! First layer, I deepen up the blacks
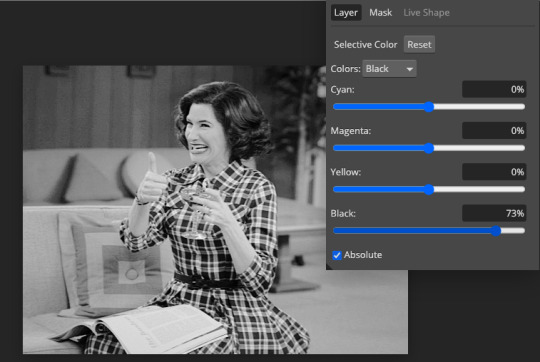
Then another selective color layer, this time the whites
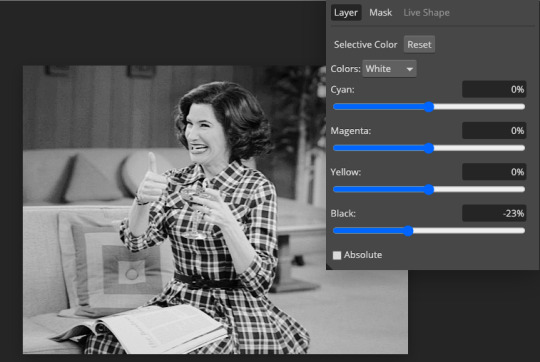
Lastly the neutrals

Here we have the final results!
Wasn’t this a gas! I hope this helped you out, let me know if you want to know anything else about gifmaking, I’m happy to help! Also, sorry if I wasn’t very clear, I’m bad at explaining 🙈
MORE RESOURCES:
Here are some other tutorials that are really helpful in making gifs. These users use Photoshop, but you can still use their tips most of the time in Photopea too, you just need to play around and see what works for you!
Gifmaking for beginners by @chloezhao (this one saved my life)
Pale coloring tutorial by @itsphotoshop
Two-Toned Gif Background by @clubgif
Text with white outline tutorial by @anya-chalotra
#resources#tutorial#gif tutorial#photopea#photoshop tutorial#photopea tutorial#tuserfran#userlaur#userlaura#usermirna#(tagging mutuals if you wanna share :P)#my tutorials
1K notes
·
View notes