#php log analyzer
Explore tagged Tumblr posts
Visit Tumblr Blog
Explore Tumblr blogs with no restrictions, modern design and the best experience.
Last Seen Tumblr Blogs


Fun Fact
China blocked Tumblr because of pornography and censorship problems in 2013.
Text
Why PHP Logging and Observability Are Essential for Modern Web Applications?
PHP logging is not just a debugging tool — it’s a core component of delivering reliable, high-performance applications. Whether you're managing a simple website or a complex enterprise solution, having effective PHP log management ensures that your application remains stable, secure, and easy to maintain.
Without properly managed logs in PHP, developers are often left guessing about the causes of bugs, performance degradation, and unexpected application crashes. That's why investing in the right logger in PHP and implementing a solid PHP observability strategy is crucial for development success.
Why is PHP Logging Important for Your Applications?
Every application, no matter how carefully developed, will encounter issues in production. These could range from simple user errors to major system outages. Without robust PHP logging, diagnosing and fixing these problems becomes incredibly challenging.
Logging in PHP helps track errors, monitor system performance, and trace the flow of code execution. It also assists in understanding user behaviors and identifying security vulnerabilities. By maintaining detailed PHP logs, teams can proactively address small issues before they escalate into larger problems.
However, raw logs alone aren’t enough. Developers also need effective tools like a PHP log viewer and PHP log analyzer to make sense of the information they collect. That's where Atatus comes into play.
Simplify PHP Log Management with Atatus
Atatus offers a modern and powerful PHP log management solution that goes beyond basic logging. It provides a complete platform to collect, monitor, search, and analyze logs in real-time. With Atatus, managing logs in PHP becomes streamlined and highly efficient.
Some key features of Atatus' PHP logging solution include:
Real-time Log Collection: Capture and centralize all your PHP logs across servers and applications.
Advanced PHP Log Viewer: Quickly search and filter logs using an intuitive dashboard.
Intelligent PHP Log Analyzer: Automatically detect patterns, errors, and anomalies to accelerate troubleshooting.
Custom Alerts and Notifications: Stay ahead of issues with instant alerts based on log events.
Using Atatus’ tools, you don’t just collect logs — you transform them into actionable insights. This dramatically reduces the time it takes to diagnose problems, improves team productivity, and enhances your application's overall performance and reliability.
Boost Your PHP Observability
Effective logging is a critical part of achieving full PHP observability. Observability means having deep visibility into the internal state of your application based on the outputs it generates, such as logs, metrics, and traces.
Atatus provides a complete observability solution that extends beyond PHP logging. By combining logs with performance metrics and distributed tracing, Atatus enables developers to fully understand their application's behavior. This allows teams to:
Pinpoint the root cause of issues faster.
Identify slow database queries, API failures, and code-level bottlenecks.
Optimize performance with real-time data insights.
In short, Atatus bridges the gap between logging PHP errors and achieving holistic system observability, helping teams deliver better applications faster.
Why Choose Atatus for PHP Logging?
Choosing the right logger in PHP can make a huge difference in how efficiently you manage and maintain your applications. Atatus stands out because it combines simplicity with powerful features that scale with your needs. Whether you are a startup developer or part of a large enterprise engineering team, Atatus offers the tools necessary for effective PHP log management and PHP observability.
No more manually sifting through endless log files. No more reacting late to production incidents. With Atatus, you get proactive monitoring, smart alerts, and a full picture of your application's health — all in one platform.
Conclusion
PHP applications deserve more than just basic error logs. They need a robust, intelligent logging and observability solution that empowers developers to act quickly and confidently. Atatus offers the perfect blend of PHP logging, analysis, and observability to help your applications thrive.
#phpapm#php logging#php logs#php log management#php observability#logs in php#logging php#logger in php#php log viewer#php log analyzer#php monitoring tool#php application performance monitoring tool#php performing monitoring tool#php apm#php apm tool#monitoring php performance#monitor php performance#monitoring php application performance
0 notes
Text
IoT Laravel Integration Experts: Connecting Smart Devices with Secure Laravel Backends
The Internet of Things has transformed how we interact with real world objects. From smart homes and wearables to industrial sensors and connected vehicles, the proliferation of smart devices has created a need for powerful, secure, and scalable backend systems. While IoT devices gather and transmit vast amounts of data, they need a robust framework to store, process, analyze, and respond to that data in real-time.
Here comes Laravel, a modern PHP framework known for being clean, secure, and easy to adapt. When paired with IoT systems, Laravel acts as a reliable backbone that facilitates communication, authentication, data management, and API integration. To harness this potential effectively, businesses require IoT Laravel integration experts who specialize in connecting smart devices with secure Laravel-powered backends.
In this article, we’ll explore how Laravel serves as a perfect fit for IoT applications, the role of integration specialists, and how Laravel development services are shaping the future of connected ecosystems.
Bridging the Physical and Digital with Laravel
IoT ecosystems rely on real-time communication between devices and servers, which must be secure, fast, and fault-tolerant. Devices like temperature sensors, smart locks, GPS trackers, or health monitors continuously generate data that needs to be captured, stored, visualized, and acted upon. Laravel, with its MVC architecture, RESTful APIs, middleware capabilities, and strong security foundation, provides a structured way to manage these complex interactions.
Laravel development services are now evolving to meet the unique requirements of IoT platforms, from building lightweight API endpoints to managing large-scale databases and device authorization mechanisms. As the demand for integrated and secure solutions grows, Laravel is proving to be a reliable ally in IoT development.
1. Why Laravel Is Ideal for IoT Backend Development
While there are several backend frameworks available, Laravel stands out for its simplicity, developer-friendliness, and extensive ecosystem. Here’s why Laravel is increasingly being used in IoT projects:
a. RESTful APIs for Device Communication
Laravel makes it easy to build and manage RESTful APIs using resources and controllers. These APIs enable smart devices to:
Send telemetry data
Request commands or configurations
Trigger alerts or events
Fetch updates or software patches
Laravel’s API routing system is designed to scale, making it suitable for thousands (or millions) of connected devices.
b. Middleware for Authentication and Security
IoT platforms usually need strong login and security steps to block unwanted access. Laravel offers middleware that:
Validates API tokens or OAuth credentials
Controls access by user roles or device types
Monitors suspicious activity and throttles excessive requests
Laravel also works with JWT and Laravel Sanctum to handle API token authentication, which is key for safe communication between devices and servers.
c. Laravel Queues for Asynchronous Processing
IoT devices frequently transmit data that doesn’t need to be processed immediately. Laravel’s queue system helps in:
Deferring heavy processing tasks
Avoiding timeouts in API responses
Scaling background jobs using Redis or Amazon SQS
This ensures that the application remains fast and responsive even when handling large volumes of data.
d. Built-In Caching and Storage
Laravel supports multiple caching options such as Redis, Memcached, and file based stronge. Caching can:
Improve response times for repeated device queries
Reduce load on databases
Provide real-time dashboards and alerts
Its file and cloud storage integration also supports storing logs, firmware updates, and large telemetry files.
2. Laravel Integration Experts: Connecting Smart Devices to Cloud and Web Interfaces
Connecting hardware to software involves more than just coding. It requires an in-depth understanding of hardware protocols, data serialization formats (like JSON or MQTT), cloud communication, and real-time event processing.
a. Protocol Management and Device Connectivity
IoT Laravel integration experts are skilled at working with:
MQTT, CoAP, and HTTP/S protocols
Device firmware compatibility
WebSocket integration for real-time data streams
They build custom middleware or leverage services like AWS IoT Core or Google Cloud IoT for seamless device communication while ensuring Laravel handles business logic, user management, and storage.
b. API Gateway and Microservice Architecture
In bigger systems, Laravel is usually used as one piece of a microservices setup. Integration experts use Laravel to:
Create lightweight API gateways
Authenticate and route device data to appropriate services
Ensure modularity and system decoupling
This architecture improves scalability and fault isolation while enabling teams to manage various IoT functions (alerts, analytics, firmware) independently.
c. Frontend Integration and Dashboards
Laravel, when combined with frontend frameworks, provides beautiful dashboards for visualizing real-time data. Experts ensure:
Responsive UI/UX for monitoring and control
Real-time data visualization using sockets or polling
Role-based interfaces for users, technicians, and administrators
By combining frontend agility with Laravel’s powerful backend, businesses can provide intuitive interfaces to users and operators alike.
3. Securing IoT Applications with Laravel
Security is one of the most critical concerns in IoT ecosystems. Poorly secured backends can lead to data leaks, hijacked devices, or even catastrophic system failures in industries like healthcare or energy.
a. Device Authentication and Access Control
Laravel development services include building secure onboarding flows for devices, using:
API keys and hashed tokens
Device whitelisting/blacklisting
Multi-factor authentication (MFA) for admin access
Laravel’s policy-based authorization allows fine-grained control over which device or user can access what data or feature.
b. Data Encryption and Transmission Security
Laravel can work with SSL/TLS certificates to make sure all data shared between devices and servers is safely encrypted. Developers also implement:
End-to-end encryption for sensitive data
Token refresh systems
Expiry-based data policies to prevent retention vulnerabilities
c. Secure Code Practices
Laravel’s core is built with security in mind. It prevents:
SQL injection
Cross-site scripting
Cross-site request forgery

IoT Laravel integration experts follow OWASP guidelines to fortify code and perform regular audits to identify vulnerabilities.
4. Scalability and Future-Readiness of Laravel-Based IoT Platforms
IoT systems are not static; they grow in complexity and scale over time. Laravel is designed to evolve with your project.
a. Horizontal Scalability
Laravel supports containerized environments (Docker), Kubernetes orchestration, and load-balanced infrastructure. These features help scale Laravel applications across multiple servers to handle growing numbers of connected devices.
b. Laravel Echo and Broadcasting
For real-time notifications and monitoring, Laravel Echo and broadcasting with tools like Pusher or Redis offer instant updates across connected UIs and dashboards. This is ideal for:
Home automation
Real-time health monitoring
Vehicle tracking and fleet management
c. Integration with AI/ML Engines
Modern IoT applications integrate machine learning for predictive analytics. Laravel APIs can send data to:
External AI platforms
Custom-built ML services
Edge computing devices for offline analysis
Experts ensure that Laravel handles preprocessing, batching, and transmission to these services reliably.
d. Support for Hybrid and Edge Computing
Laravel supports an offline first setup, allowing devices to save and group data to send later. Laravel development services can design hybrid systems where:
Data is processed locally (edge computing)
Only critical events are pushed to the cloud Laravel backend
This ensures low-latency performance while reducing bandwidth costs.
Conclusion
As smart devices continue to shape our lives, the need for secure, scalable, and intelligent backends becomes increasingly critical. Laravel backed by a thriving ecosystem and powerful capabilities has emerged as a go-to choice for IoT backend development.
Partnering with experienced IoT Laravel integration experts ensures that your connected system:
Handles high-frequency data with speed and security
Communicates seamlessly across devices, apps, and dashboards
Scales effortlessly as your hardware fleet grows
Complies with modern security and privacy standards
By leveraging tailored Laravel development services, businesses across industries from healthcare and logistics to agriculture and energy can bring smart products to market faster, more securely, and more reliably.
If you’re building an IoT application and seeking a stable, scalable, and secure backend framework, Laravel is the solution and Laravel integration experts are your ideal partners for success.
FAQs
Q1: Is Laravel able to manage large amounts of IoT data and many connections at the same time?
Yes. Laravel supports scalable architectures using load balancing, Redis queues, and cloud-native deployments. It’s suitable for real-time IoT applications when combined with efficient database and caching strategies.
Q2: Is Laravel secure enough for healthcare or industrial IoT systems?
Absolutely. Laravel follows best practices in web security, supports HTTPS, token-based authentication, and integrates with third-party security tools. It’s a trusted framework for secure enterprise-grade applications.
Q3: What kind of IoT devices can be integrated with a Laravel backend?
Laravel can integrate with a wide variety of devices including sensors, wearables, smart meters, GPS devices, and industrial controllers using HTTP, MQTT, or cloud-based messaging protocols.
Q4: Why choose Laravel over other backend frameworks for IoT?
Laravel offers rapid development, clean code, extensive community support, and built-in tools for API creation, security, and real-time communication. It balances performance with development speed.
0 notes
Text
How Much Does It Cost to Develop an Android eCommerce App in 2025?

In today’s fast-evolving digital economy, having a mobile presence is crucial for any business aiming to succeed in the eCommerce landscape. As of 2025, Android continues to lead the mobile operating system market globally, making it the ideal platform for launching your online store. But before getting started, most entrepreneurs and business owners have one common question: How much does it cost to develop an Android eCommerce app in 2025?
This blog explores all the key factors that influence the development cost, the essential features your app should include, the technologies used, and what to expect from a professional development process.
Why You Should Invest in an Android eCommerce App
Android has a massive user base and offers unparalleled reach, especially in emerging markets. Building an Android eCommerce app enables businesses to:
Connect with millions of mobile users worldwide.
Offer a personalized, convenient, and real-time shopping experience.
Increase brand visibility and customer loyalty.
Drive sales through push notifications, targeted offers, and one-click checkout.
Key Features Every Android eCommerce App Must Have
Creating a successful eCommerce app requires more than just displaying products. Users expect speed, security, and seamless functionality. Some of the core features that your Android app must include are:
1. User Registration & Login
Allow customers to sign up or log in using their email, phone number, or social media accounts. This sets the foundation for a personalized user experience.
2. Product Catalog
A clean and organized display of products with filtering and search functionality is critical. Customers should be able to browse categories, view product details, and easily compare items.
3. Shopping Cart & Checkout
This is where the real action happens. An intuitive shopping cart and seamless, secure checkout process can significantly increase conversion rates.
4. Payment Integration
Multiple payment options like credit/debit cards, digital wallets (Google Pay, Paytm, etc.), net banking, and even cash-on-delivery options enhance customer trust and convenience.
5. Push Notifications
Use push alerts to notify customers about offers, discounts, new arrivals, and abandoned carts to boost engagement and sales.
6. Order Management
Customers should be able to track their orders, view history, and even cancel or return items within the app.
7. Product Reviews and Ratings
These features build credibility and help other customers make informed decisions.
8. Admin Dashboard
A back-end dashboard helps you manage products, inventory, customer details, transactions, and analytics in real time.
9. Customer Support Integration
Live chat or AI-powered chatbots improve customer satisfaction by offering instant support.
Advanced Features That Can Elevate Your App
To stay competitive in 2025, consider adding innovative features such as:
AI-Based Recommendations: Analyze customer behavior and recommend personalized products.
AR/VR Integration: Let users try products virtually, especially useful for fashion and furniture industries.
Voice Search: Make product discovery faster and hands-free.
Loyalty Programs: Encourage repeat purchases by offering reward points and exclusive discounts.
While these features require more investment, they significantly enhance user experience and brand loyalty.
Technology Stack Used in Android eCommerce App Development
Choosing the right technology stack is crucial for performance, scalability, and maintenance. Here’s what powers a modern eCommerce app:
Front-end (Android): Kotlin or Java
Back-end: Node.js, Python (Django), or PHP (Laravel)
Database: Firebase, MySQL, MongoDB
Cloud Services: AWS, Google Cloud
Payment Gateways: Stripe, Razorpay, PayPal, etc.
Other APIs: Google Maps, Push Notification Services, Analytics Tools
Each of these tools contributes to different aspects of your app, from speed and responsiveness to secure data handling and user tracking.
Team Required to Build an Android eCommerce App
The development team typically includes:
Project Manager to oversee timelines and quality.
Android Developer to build the user interface and logic.
Backend Developer to handle server-side functions and data.
UI/UX Designer to create an intuitive, branded experience.
Quality Analyst (QA) to test and debug the application.
Marketing Strategist (optional) to plan app launch and engagement campaigns.
Depending on whether you choose a freelancer, in-house team, or a professional app development company, the overall cost and timeline can vary.
Total Cost to Develop an Android eCommerce App in 2025
Now to answer the big question—how much does it cost?
As of 2025, the estimated cost to develop an Android eCommerce app is:
For a basic app with minimal features, the cost ranges between $5,000 to $15,000.
A moderately complex app with payment integration, product filters, and admin panel can cost around $15,000 to $35,000.
A highly advanced app featuring AI, AR, multiple language support, and extensive backend may go from $40,000 to $100,000 or more.
This cost includes design, development, testing, and deployment. If you opt for post-launch support and maintenance (highly recommended), consider an additional 15–25% annually for updates, bug fixes, and scaling.
How to Reduce Android App Development Costs
Here are a few smart ways to optimize your budget without compromising on quality:
Start with an MVP (Minimum Viable Product): Launch with essential features first. Add more features as your user base grows.
Use Pre-built APIs: Leverage third-party services for payments, chatbots, and analytics instead of building from scratch.
Choose Offshore Development: Companies in regions like India offer excellent quality at a fraction of the cost charged in the US or Europe.
Go Agile: Agile methodologies allow iterative development and help you adapt to changes without major cost overruns.
Conclusion
Building an Android eCommerce app in 2025 is a strategic move that can offer long-term benefits in terms of customer acquisition, brand loyalty, and revenue growth. The development cost depends on your business goals, feature set, and the expertise of your Android app development company. Investing in the right team and technology is critical to delivering a seamless shopping experience and achieving success in a competitive market.
If you're ready to build your Android eCommerce app, USM Systems is one of the top mobile app development companies specializing in scalable and feature-rich solutions. With a proven track record in Android app development, we help businesses turn their ideas into powerful digital products.
#AndroidAppCost2025#eCommerceAppPricing#AppDevelopmentCost#eCommerceAppCost#MobileAppCost2025#eCommerceDevCost#BuildEcomAppCost#AndroidDevPricing#OnlineStoreAppCost
0 notes
Text
Decoding Data in PHP: The Ultimate Guide to Reading File Stream Data to String in 2025 Reading file content into a string is one of the most common tasks in PHP development. Whether you're parsing configuration files like JSON or INI, processing uploaded documents, or consuming data from streams and APIs, being able to efficiently and correctly read file data into a string is essential. With PHP 8.x, developers have access to mature, robust file handling functions, but choosing the right one—and understanding how to handle character encoding, memory efficiency, and errors—is key to writing performant and reliable code. In this comprehensive guide, we’ll walk through the best ways to read file stream data into a string in PHP as of 2025, complete with modern practices, working code, and real-world insights. Why Read File Stream Data to String in PHP? There are many scenarios in PHP applications where you need to convert a file's contents into a string: Parsing Configuration Files: Formats like JSON, INI, and YAML are typically read as strings before being parsed into arrays or objects. Reading Text Documents: Applications often need to display or analyze user-uploaded documents. Processing Network Streams: APIs or socket streams may provide data that needs to be read and handled as strings. General File Processing: Logging, data import/export, and command-line tools often require reading file data as text. Methods for Reading and Converting File Stream Data to String in PHP 1. Using file_get_contents() This is the simplest and most widely used method to read an entire file into a string. ✅ How it works: It takes a filename (or URL) and returns the file content as a string. 📄 Code Example: phpCopyEdit 📌 Pros: Very concise. Ideal for small to medium-sized files. ⚠️ Cons: Loads the entire file into memory—can be problematic with large files. Error handling must be explicitly added (@ or try/catch via wrappers). 2. Using fread() with fopen() This method provides more control, allowing you to read file contents in chunks or all at once. 📄 Code Example: phpCopyEdit 📌 Pros: Greater control over how much data is read. Better for handling large files in chunks. ⚠️ Cons: Requires manual file handling. filesize() may not be reliable for network streams or special files. 3. Reading Line-by-Line Using fgets() Useful when you want to process large files without loading them entirely into memory. 📄 Code Example: phpCopyEdit 📌 Pros: Memory-efficient. Great for log processing or large data files. ⚠️ Cons: Slower than reading in one go. More code required to build the final string. 4. Using stream_get_contents() Works well with generic stream resources (e.g., file streams, network connections). 📄 Code Example: phpCopyEdit 📌 Pros: Works with open file or network streams. Less verbose than fread() in some contexts. ⚠️ Cons: Still reads entire file into memory. Not ideal for very large data sets. 5. Reading Binary Data as a String To read raw binary data, use binary mode 'rb' and understand the data's encoding. 📄 Code Example: phpCopyEdit 📌 Pros: Necessary for binary/text hybrids. Ensures data integrity with explicit encoding. ⚠️ Cons: You must know the original encoding. Risk of misinterpreting binary data as text. Handling Character Encoding in PHP Handling character encoding properly is crucial when working with file data, especially in multilingual or international applications. 🔧 Best Practices: Use UTF-8 wherever possible—it is the most compatible encoding. Check the encoding of files before reading using tools like file or mb_detect_encoding(). Use mb_convert_encoding() to convert encodings explicitly: phpCopyEdit$content = mb_convert_encoding($content, 'UTF-8', 'ISO-8859-1'); Set default encoding in php.ini:
iniCopyEditdefault_charset = "UTF-8" Be cautious when outputting string data to browsers or databases—set correct headers (Content-Type: text/html; charset=UTF-8). Error Handling in PHP File Operations Proper error handling ensures your application fails gracefully. ✅ Tips: Always check return values (fopen(), fread(), file_get_contents()). Use try...catch blocks if using stream wrappers that support exceptions. Log or report errors clearly for debugging. 📄 Basic Error Check Example: phpCopyEdit Best Practices for Reading File Stream Data to String in PHP ✅ Use file_get_contents() for small files and quick reads. ✅ Use fread()/fgets() for large files or when you need precise control. ✅ Close file handles with fclose() to free system resources. ✅ Check and convert character encoding as needed. ✅ Implement error handling using conditionals or exceptions. ✅ Avoid reading huge files all at once—use chunked or line-by-line methods. ✅ Use streams for remote sources (e.g., php://input, php://memory). Conclusion Reading file stream data into a string is a foundational PHP skill that underpins many applications—from file processing to configuration management and beyond. PHP 8.x offers a robust set of functions to handle this task with flexibility and precision. Whether you’re using file_get_contents() for quick reads, fgets() for memory-efficient processing, or stream_get_contents() for stream-based applications, the key is understanding the trade-offs and ensuring proper character encoding and error handling. Mastering these techniques will help you write cleaner, safer, and more efficient PHP code—an essential skill for every modern PHP developer. 📘 External Resources: PHP: file_get_contents() - Manual PHP: fread() - Manual PHP: stream_get_contents() - Manual
0 notes
Text
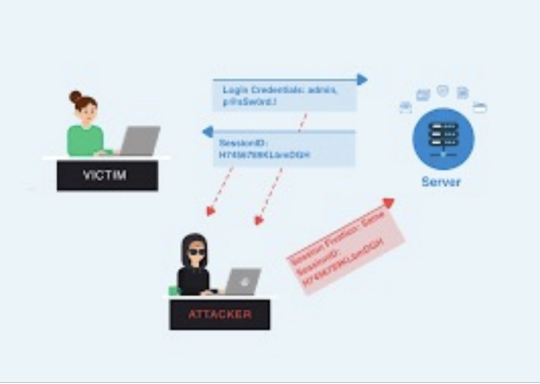
CRLF Injection in Laravel: How to Identify & Prevent It (Guide)
Introduction to CRLF Injection in Laravel
CRLF (Carriage Return Line Feed) Injection is a web application vulnerability that can lead to critical security issues like HTTP response splitting and log poisoning. In Laravel, a popular PHP framework, this vulnerability can arise if user input is not properly sanitized, allowing attackers to manipulate HTTP headers and responses.

What is CRLF Injection?
CRLF Injection happens when an attacker injects CRLF characters (\r\n) into user-controlled input, which can manipulate the behavior of HTTP responses. This can lead to serious issues such as:
HTTP Response Splitting: Attackers may split a single HTTP response into multiple responses.
Log Poisoning: Attackers can tamper with server logs, potentially hiding malicious activities.
Example of CRLF Injection in Laravel
Here’s an example of a vulnerable Laravel function that sets a custom HTTP header based on user input:
public function setCustomHeader(Request $request) { $value = $request->input('value'); header('X-Custom-Header: ' . $value); }
An attacker could submit a malicious input like:
malicious_value\r\nX-Injected-Header: malicious_value
This would result in the following HTTP headers:
X-Custom-Header: malicious_value X-Injected-Header: malicious_value
As you can see, the malicious input is inserted into the headers, compromising the security of the application.
How to Prevent CRLF Injection in Laravel
1. Validate and Sanitize User Input
Ensure that all user inputs are validated to prevent malicious characters. Use Laravel’s validation methods:
$request->validate([ 'value' => 'required|alpha_num', ]);
2. Avoid Direct Header Manipulation
Instead of manually setting headers, use Laravel's built-in response methods, which handle proper escaping:
return response() ->json($data) ->header('X-Custom-Header', $value);
3. Use Framework Features for Redirection
Whenever possible, use Laravel’s redirect() helper to avoid direct manipulation of HTTP headers:
return redirect()->route('home');
4. Implement Security Headers
Add Content Security Policies (CSP) and other security headers to mitigate potential injection attacks.
Using Pentest Testing Corp. to Scan for CRLF Injection
Regular security scans are essential to detect vulnerabilities like CRLF Injection. Pentest Testing Corp. offers a website vulnerability scanner that can help identify this risk and other potential issues in your Laravel application.

Screenshot of Pentest Testing Corp.'s website vulnerability scanner interface.
Analyzing Vulnerability Assessment Reports
After scanning your website for a Website Vulnerability test, reviewing the vulnerability assessment reports is crucial. These reports help identify weaknesses and offer suggestions for remediation.

Screenshot of a website vulnerability assessment report showing CRLF Injection risks.
Conclusion
CRLF Injection is a serious security issue for Laravel applications. By validating user input, using secure response handling, and scanning for vulnerabilities regularly, developers can protect their applications from this type of attack.
For more information on web security, check out Pentest Testing Corp.’s blog at Pentest Testing Blog.
1 note
·
View note
Text
Exploring the Latest Trends in the Dew Point Thermometer Market
According to the UnivDatos Market Insights analysis, the growing adoption of automated systems in manufacturing and processing industries necessitating accurate humidity measurements are driving the market growth of global dew point thermometer and as per their “Global Dew Point Thermometer Market” report, the market was valued at USD ~3 billion in 2023, growing at a CAGR of ~8% during the forecast period from 2024 – 2032.
Over the last few years, the dew point thermometer has also undergone huge changes and has achieved expansion in terms of growth and development due to the ever-improving technology used for the manufacturing of these instruments and also due to the rising importance of the correct measurement of humidity and temperature in different fields.

The following is an indication of some of the latest trends that are evolving within the context of the dew point thermometer market and their effects on the market’s stakeholders.
1. Technological Advancements
A significant factor affecting the dew point thermometer market is the development and innovation of technology. There’s the addition of wireless connectivity, data logging, and incorporating the cloud to improve the manufacturer’s devices. Not only do these technological enhancements provide better accuracy and reliability of dew point thermometers but also provide the facility for advanced precision PT and remote generation which makes them suitable for diverse applications.
2. Growing Demand for Portable Devices
Another trend is the shift in the demand for dew point thermometers that are more portable than the ones currently on the market. Firms are becoming less bound by location, and, therefore, there is the need to have devices that could be carried around or usable in different locations. Although Dew point thermometers are firmly fixed and prevent portability in devices a great demand in markets like HVAC, construction markets, and agriculture markets it is preferred.
Request Free Sample Pages with Graphs and Figures Here https://univdatos.com/get-a-free-sample-form-php/?product_id=60607
3. Focus on Energy Efficiency
Controlling uses of energy has been an essential aspect in industries across the globe leading to the need to use dew point thermometers in industries for control of energy uses. With these devices, industries will be in a position to measure accurately the climate and make adjustments that will in the long run reduce energy consumption and hence lead to cheaper operations. As sustainability comes to light as a crucial point for materialization by corporations, the relevance of using energy-saving dew point thermometers should also increase.
4. Integration with IoT and Smart Building Technologies
Another emerging trend is the growing use of dew point thermometers together with the Internet of Things (IoT) and smart building systems. Such devices can also be interfaced to the central Building Management Systems for real-time control of the microclimate indoors. Not only does such integration in the designed facades optimise operations but also occupant comfort and productivity in built spaces.
5. Adoption of Remote Monitoring Solutions
Due to the COVID-19 pandemic, one of the biggest trends observed in the dew point thermometer market is the increased demand for remote monitoring solutions. There is a gradual shift from using physical devices to relying on cloud-base technology to manage and analyze the humidity and temperature data from industries and mobile applications. Such a trend should be expected to continue, given that companies are adjusting their operations to adopt measures that enhance health and safety sources.
Conclusion
In conclusion, the global dew point thermometer market is witnessing several key trends that are shaping the future of the industry. From technological advancements to the growing demand for portable and energy-efficient devices, these trends are driving innovation and providing new opportunities for manufacturers and suppliers. As industries continue to evolve, the role of dew point thermometers in ensuring optimal environmental conditions will become even more crucial, making it an exciting time for the market.
Contact Us:
UnivDatos Market Insights
Email - [email protected]
Contact Number - +1 9782263411
Website -www.univdatos.com
0 notes
Text
Top Strategies for Generating Revenue With an Airbnb Clone

Businesses are seeing a new phase in their business. Among all, the rental business is flourishing with the advancement in technology.
Have you ever thought that the rental business would be at the reach of your hand?
I know the answer is no. Renting was not accessible to all back then. If we need to rent a home, car, venue, and more, we can only find through third-person.
Now, finding sellers is not a big problem. With the rental app, you can find whichever you want to rent easily.
In this article, we are going to see the popular renting platform, Airbnb Clone. We are going to see business models, features, and with all, what revenue strategies to follow to increase income.
Let’s get in!
The Market Value Of Airbnb Clone
The total size of the platform is 150 million. The number is expected to grow in the future.
So far, the listing that is made is 100,000 worldwide.
Airbnb has made a record by increasing its revenue to $8.4 billion.
From the statistics, you can see that Airbnb is a huge renting platform worldwide. Let’s see other factors and revenue strategies.
Business Model Of The Airbnb Clone App
Airbnb’s business model is a major highlight of their success. The correct business model for your renting business is as follows:
App Structure
The platform has three main stakeholders: hosts, users, and the admin. Hosts’ and users’ workflows are the same. Let’s look at them.
Makent User — Workflow Video
Workflow For Hosts And Users
Hosts and users log in using either social media accounts or email IDs.
Upon logging into the platform, users search for a home using the advanced filter option, while hosts list their properties using the listing option.
Once users find a property, they proceed to the payment option.
Hosts receive a notification of the booking after payment is made.
After the visit is complete, guests can leave reviews on the hosts’ profiles. Similarly, hosts can also write reviews on guest profiles.
Makent Host — Workflow Video
Workflow For Admin
The admin can manage all activities such as managing history, inboxes, reviews, home page settings, and more. Moreover, they can manage currencies, languages, and more. With a dynamic admin panel, they can easily control.
Makent Admin — Workflow Video
Development Process Of Airbnb Clone App
Here’s a revised version with some grammar improvements:
The process of developing an Airbnb clone script doesn’t take much time. You may have heard assumptions that developing a pre-made app takes a long time, is less efficient, and more.
Let’s look at the simple step-by-step guide.
The first step is to study the market. From the market value to the trends in your market, you need to analyze it thoroughly. If you don’t follow the algorithm, you can follow your competitors’ path to achieve your market insights easily.
The next step is choosing a business plan. Here, you focus on market research, finances, employees, and more. It is a crucial part as it is where you need to sketch everything within your budget.
Find your business goal and legalize your business with the local government. This step differs based on the location. Find the right way in your area and move accordingly.
You must finalize your renting business’s UI/UX design, features, technology, and equipment. As Airbnb holds 100% customization, optimizing designs to your business requirements is easy. Pick the Airbnb PHP script and gain a good impression!
Once you complete all the steps, you need to start marketing your business. You will market your business with third-party companies like Facebook, Twitter, Instagram, and more. Also, you can use traditional methods like pamphlets and others.
Now, Let’s see the revenue strategies to follow and how they generate with all the factors that are seen.
How The Airbnb Clone Generates Revenue?
Revenues are the pillar for a business to uplift in identity and growth. Let’s find the core revenue strategies of the Airbnb clone software!
Host Service Fees
Host service fee is a pay that hosts pay to the admin. Whenever a transaction is made between hosts and users, half an amount is shared with the admin. In other words, hosts need to pay a fixed amount to the admin.
The admin fixes the service fee. It is one of the ways the platform earns income. If you are looking for Airbnb like app development for renting, make sure you use this option wisely.
Hosts can earn a great income, making it an important source of revenue for their business. As the platform can not run without profit, they will take an amount from hosts for using the platform.
Guest Service Fees
It is similar to host service fees. The platform takes an amount from the guests when they make bookings. The fee is added to the total booking cost.
This fee differs based on the factors and the time of checkout. Another revenue strategy that you need to give importance to when developing the Airbnb clone.
Advertisement And Partnership
Most platforms use this revenue model for their additional income. Airbnb’s other revenue model is advertising and partnerships. They increase their revenue by advertising third-party products or services.
The advertising should be similar to the platform. You can promote transportation companies, tour guides, and more with your business. For instance, if you include transportation with yours, it will be helpful for you to earn and for travellers to easily find cabs or other modes.
As you partner with many highly-fledged companies like Instagram, Facebook, and Twitter to streamline your platform’s experience, this will be your ultimate success. Make sure you use it wisely and smartly.
Tying Up,
In a competitive landscape, it’s crucial to employ strategies that set your business apart. This involves implementing a suitable revenue strategy, a profitable revenue model, and the appropriate development approach.
These attributes are readily available in the best Airbnb clone app. By embracing its features and functionalities tailored for rental businesses, you can establish a thriving enterprise.
For further insights into its operation or comprehensive details, seek assistance from experts or explore my additional blogs.
0 notes
Text
What is cPanel and How to Use it - A Complete Guide

What is cPanel?
cPanel is a Linux-based web hosting control panel that provides a graphical user interface (GUI) for managing your website and server. It is one of the most popular control panels in the world, and is used by millions of people to manage their websites
c, short for control panel, is a web-based graphical interface designed to simplify the management and administration of websites and server functions.
It is widely used by website owners, web hosting providers, and system administrators to easily manage various aspects of their websites and servers.
cPanel allows users to perform a variety of tasks, including:
Managing files and folders
Creating and managing email accounts
Installing and managing applications such as WordPress and Drupal
Configuring security settings
Managing DNS settings
Creating and managing backups

Here is a step-by-step guide on how to use cPanel:
Access cPanel:
To use cPanel, you first need to access it. Usually, you can access cPanel by typing "yourdomain.com/cpanel" into your web browser. Alternatively, you can ask your web hosting provider for the login URL and credentials.
2. Enter your credentials:
Once you access the cPanel login page, enter your username and password provided by your hosting provider.
3. Navigate the cPanel interface:
After logging in, you will be redirected to the cPanel control panel. The interface is divided into different sections, including Files, Databases, Domains, Email, Metrics, Security, Software, and Advanced. Each section provides a range of tools and options.
4. Manage files:
In the "Files" section, you can upload, modify, and manage your website's files and folders. You can also use the File Manager tool to perform tasks like creating new directories, uploading files, editing code files, and managing permissions.

5. Configure domains:
Under the "Domains" section, you can manage domain-related settings. You can add new domain names, redirect domains, create subdomains, manage DNS records, and set up domain aliases.
6. Set up email accounts:
In the "Email" section, you can create and manage email accounts associated with your domain. You can add email accounts, set up forwarders, configure autoresponders, manage spam filters, and access webmail.
7. Configure databases:
For managing databases, you can use the "Databases" section. Here, you can create new databases, manage existing ones, set up database users, and use tools like phpMyAdmin for database administration.
8. Install software and scripts:
The "Software" section offers tools to install various applications and scripts. You can use the Softaculous Apps Installer to quickly install popular CMS platforms like WordPress, Joomla, or Drupal. This section also includes options to update software versions, perform backups, and manage SSL certificates.

9. Monitor website metrics:
Under the "Metrics" section, you can monitor your website's performance by accessing statistics like visitors, bandwidth usage, error logs, and resource usage. This helps you analyze your website's traffic and make informed decisions regarding optimization.
10. Configure security settings:
The "Security" section includes tools to enhance the security of your website. You can manage SSL certificates, set up password-protected directories, enable hotlink protection, and manage IP blocklists.
11. Advanced features:
The "Advanced" section provides additional features for experienced users and developers. Here, you can access tools like Cron jobs for scheduling tasks, manage PHP settings, access server logs, or customize error pages.

Some common tasks that you can perform using cPanel:
Create an email account:
Click on the "Email Accounts" icon and then click on the "Create" button. Enter the desired email address and password, and then click on the "Create Account" button.
Install WordPress:
Click on the "Softaculous Apps Installer" icon and then search for "WordPress". Click on the "Install" button and follow the on-screen instructions.
Manage your files:
Click on the "File Manager" icon. You can then browse through your files and folders, and upload, download, or delete files as needed.
Create a database:
Click on the "MySQL Databases" icon and then click on the "Create Database" button. Enter the desired database name and username, and then click on the "Create Database" button.
In summary, cPanel is a comprehensive and user-friendly control panel that provides a range of tools and features to effectively manage your website and server.
Its intuitive interface makes it easy to perform various tasks, from managing files and databases to configuring email accounts and monitoring website performance.
0 notes
Text
PHP Monitoring vs Logging: What’s the Difference and Why It Matters
When it comes to managing and maintaining PHP applications, two terms often come up: monitoring and logging. While they may sound similar and sometimes even overlap, they serve very different purposes. Understanding the difference between PHP monitoring and logging is essential for debugging faster, improving performance, and ensuring a reliable user experience.
What is PHP Logging?
Logging is the practice of recording events that happen within your application. This might include errors, warnings, notices, or even custom-defined events.
Common Examples of Logging:
Syntax or runtime errors
Database connection failures
User login attempts
Payment failures
Debug information during development
Tools Often Used for Logging:
PHP’s error_log()
Monolog
Laravel’s built-in logger
Syslog or custom log files
Pros of Logging:
Helpful for debugging specific issues
Easy to implement
Provides a historical record of events
Cons of Logging:
Reactive, not proactive
Difficult to search and correlate events manually
Doesn’t provide context about system performance or user impact
What is PHP Monitoring?
Monitoring is the continuous observation of your application’s performance and behavior in real-time. It includes tracking metrics like response time, error rates, memory usage, and third-party dependencies.
Monitoring Covers:
Real-time application performance (APM)
Slow transactions
Database query performance
Uptime monitoring
Infrastructure health (CPU, memory, disk)
Popular Monitoring Tools for PHP:
Atatus
New Relic
Datadog
AppDynamics
Pros of Monitoring:
Proactive alerts before users are affected
End-to-end visibility into user transactions
Tracks trends and long-term performance
Correlates errors with user sessions or deployments
Cons of Monitoring:
Slight learning curve to configure dashboards and alerts
Typically involves third-party services
Why Does It Matters?
Both logging and monitoring are crucial but for different reasons.
Use logging to capture detailed technical errors and custom events for debugging.
Use monitoring to understand how your app is behaving right now, across all users, in real-time.
In fast-moving production environments, relying on logs alone isn’t enough. Logs might tell you what happened but monitoring tells you why it’s happening and helps prevent it from happening again.
Final Thoughts: Use Both, But Smarter
Logging and monitoring should complement each other. While logs give you granular context for debugging, monitoring provides the bird’s-eye view you need to stay ahead of issues.
That’s why full-stack solutions like Atatus bring PHP monitoring, error tracking, and log management into one platform giving you a single pane of glass to view, analyze, and act on issues quickly.
Stop guessing. Start monitoring. And keep logging smart!
#php performance monitoring#php application performance monitoring#php application performance monitoring tools#php monitoring tools#php application monitoring tools#php performance monitoring tool#php application performance mangement#php profiling tools#php monitoring tool#php performance#php application performance management#php application monitoring tool#php performance profiling#php performance tools#php application performance#php performance testing tool#monitoring php performance#php performance monitoring tools#monitor php application performance#monitor php performance#php monitoring#php application monitoring
0 notes
Text
High-performance PHP App | Oprezo India
Creating a high-performance PHP app involves optimizing various aspects of your development, design, and implementation. Here’s a comprehensive guide to help you develop a high-performance PHP app:
Code Optimization:
Write clean, well-organized, and optimized PHP code that follows best practices.
Utilize modern PHP features and syntax for improved performance.
Caching Mechanisms:
Implement opcode caching using tools like APC or OpCache to speed up PHP execution.
Use object caching (e.g., Memcached, Redis) for storing frequently accessed data.
Database Optimization:
Optimize database queries, use indexes, and avoid unnecessary joins for fast data retrieval.
Implement database connection pooling to reduce overhead.
Minimize External Requests:
Reduce the number of external requests (API calls, third-party services) to improve app speed.
Use Content Delivery Networks (CDNs):
Utilize CDNs to distribute static assets, such as images, stylesheets, and scripts, to reduce server load and improve load times.
Optimized Front-End:
Compress and minify CSS, JavaScript, and HTML files to reduce data transfer.
Utilize asynchronous loading of scripts to prevent blocking page rendering.
Use Compiled Templates:
Compile your templates to PHP code (e.g., Smarty templates) to reduce runtime parsing overhead.
Use Opcode Caching:
Enable opcode caching in your PHP configuration to cache compiled PHP code and improve execution speed.
Efficient Data Handling:
Use appropriate data types and data structures to optimize memory usage.
Avoid unnecessary data transformations and conversions.
Background Processing:
Implement asynchronous and background processing for time-consuming tasks using tools like queues and workers (e.g., RabbitMQ, Beanstalkd).
HTTP Caching:
Implement HTTP caching headers to enable browser caching and reduce repeat downloads.
Load Balancing and Scaling:
Use load balancers to distribute traffic across multiple servers and ensure high availability.
Implement horizontal scaling to handle increased traffic and load.
Security Measures:
Implement security best practices to prevent attacks and unauthorized access without sacrificing performance.
Utilize prepared statements and parameter binding to prevent SQL injection.
Profiling and Optimization:
Use profiling tools (e.g., Xdebug, Blackfire) to identify performance bottlenecks and optimize code.
Content Compression:
Enable server-level content compression (gzip, Brotli) to reduce data transfer and improve load times.
HTTP/2 and HTTPS:
Use HTTP/2 for improved multiplexing and reduced latency, along with HTTPS for secure and efficient data transfer.
Reverse Proxy:
Implement a reverse proxy (e.g., Nginx, Varnish) to cache and serve static content, reducing load on the PHP backend.
Regular Updates and Maintenance:
Keep your PHP version and related libraries up to date to leverage performance improvements and security patches.
Database Connection Management:
Use connection pooling to manage database connections efficiently and reduce overhead.
Continuous Monitoring and Optimization:
Regularly monitor your app’s performance using tools like New Relic, Blackfire, or custom monitoring solutions.
Analyze server logs, database performance, and user feedback to identify and address performance issues.
https://www.oprezoindia.com/php-application-development-company.php
0 notes
Text
nMon Nulled Script 1.12

Discover the Power of nMon Nulled Script for Website Monitoring If you’re looking for a reliable and cost-effective solution to keep your website and server performance under control, the nMon Nulled Script is your perfect choice. This advanced monitoring tool empowers webmasters and developers to track their websites seamlessly, ensuring uptime and speed are optimized without any hassle. Available for free download from our website, the nMon Nulled Script offers an all-in-one service monitoring solution that caters to every website owner’s needs. What Is nMon Nulled Script? – A Detailed Product Description The nMon is a professional-grade website and server monitoring script originally developed to provide comprehensive real-time analytics. It offers features such as uptime monitoring, speed analysis, and detailed reports that help you understand how your site is performing at any moment. With the nulled version available for free download on our platform, you get access to all premium functionalities without paying a penny. Whether you manage a personal blog, an e-commerce platform, or a corporate site, the nMon ensures you never miss a critical alert that could impact your online presence. The script integrates easily with various hosting environments and requires minimal configuration, making it user-friendly for beginners and professionals alike. Technical Specifications of nMon Nulled Script Compatible with most web servers including Apache and Nginx Supports PHP 7.2 and above for smooth operation Database integration with MySQL or MariaDB Responsive interface optimized for desktop and mobile devices Real-time data visualization using interactive charts and tables Customizable alert system with email and SMS notifications Lightweight code ensuring minimal server resource consumption Features and Benefits of Using nMon Nulled Script The nMon Nulled Script offers a rich set of features designed to make website monitoring effortless and efficient: Real-Time Monitoring: Get instant updates on website uptime and server performance to tackle issues proactively. Comprehensive Reports: Analyze traffic, response times, and error logs to enhance your site’s reliability. Easy Integration: Seamlessly incorporate the script into your existing infrastructure with straightforward setup guides. Free Access: Download the nMon Nulled Script for free from our website, enabling budget-friendly website management. Boost SEO Performance: Maintain optimal website speed and availability, key factors in search engine rankings. Use Cases for nMon Nulled Script This script is highly versatile and suitable for various scenarios: Website Owners: Keep your site up and running smoothly to deliver the best user experience. Developers: Monitor client websites and servers effectively with a tool that supports multiple environments. Digital Agencies: Offer premium monitoring services to your customers without extra licensing costs. E-commerce Platforms: Ensure uninterrupted service during peak sales periods to maximize conversions. Installation and Usage Guide for nMon Script Getting started with the Nulled Script is straightforward: Download the Script: Access the nulled version directly from our website without any fees. Upload to Server: Transfer the files to your web server via FTP or your hosting control panel. Configure Database: Create a MySQL database and import the provided SQL file to set up necessary tables. Adjust Settings: Modify configuration files with your database credentials and preferred monitoring parameters. Access the Dashboard: Log in to the admin panel to start monitoring your website and server statistics. For enhanced website design, consider pairing this tool with wpbakery nulled, which is available for free download on our site. Frequently Asked Questions (FAQs) Is the nMon Nulled Script safe to use? Yes, our version is thoroughly tested to ensure it functions correctly without security risks. Always download nulled scripts from trusted sources like our website.
Can I customize the monitoring alerts? Absolutely! The script allows you to set up email and SMS notifications tailored to your monitoring preferences. Does it support mobile devices? Yes, the interface is fully responsive and accessible on smartphones and tablets. Where can I get professional design plugins to complement nMon? We recommend trying elementor nulled pro for advanced page building features.
0 notes
Text
Web Application Penetration Testing Checklist
Web-application penetration testing, or web pen testing, is a way for a business to test its own software by mimicking cyber attacks, find and fix vulnerabilities before the software is made public. As such, it involves more than simply shaking the doors and rattling the digital windows of your company's online applications. It uses a methodological approach employing known, commonly used threat attacks and tools to test web apps for potential vulnerabilities. In the process, it can also uncover programming mistakes and faults, assess the overall vulnerability of the application, which include buffer overflow, input validation, code Execution, Bypass Authentication, SQL-Injection, CSRF, XSS etc.
Penetration Types and Testing Stages
Penetration testing can be performed at various points during application development and by various parties including developers, hosts and clients. There are two essential types of web pen testing:
l Internal: Tests are done on the enterprise's network while the app is still relatively secure and can reveal LAN vulnerabilities and susceptibility to an attack by an employee.
l External: Testing is done outside via the Internet, more closely approximating how customers — and hackers — would encounter the app once it is live.
The earlier in the software development stage that web pen testing begins, the more efficient and cost effective it will be. Fixing problems as an application is being built, rather than after it's completed and online, will save time, money and potential damage to a company's reputation.
The web pen testing process typically includes five stages:

1. Information Gathering and Planning: This comprises forming goals for testing, such as what systems will be under scrutiny, and gathering further information on the systems that will be hosting the web app.
2. Research and Scanning: Before mimicking an actual attack, a lot can be learned by scanning the application's static code. This can reveal many vulnerabilities. In addition to that, a dynamic scan of the application in actual use online will reveal additional weaknesses, if it has any.
3. Access and Exploitation: Using a standard array of hacking attacks ranging from SQL injection to password cracking, this part of the test will try to exploit any vulnerabilities and use them to determine if information can be stolen from or unauthorized access can be gained to other systems.
4. Reporting and Recommendations: At this stage a thorough analysis is done to reveal the type and severity of the vulnerabilities, the kind of data that might have been exposed and whether there is a compromise in authentication and authorization.
5. Remediation and Further Testing: Before the application is launched, patches and fixes will need to be made to eliminate the detected vulnerabilities. And additional pen tests should be performed to confirm that all loopholes are closed.
Information Gathering

1. Retrieve and Analyze the robot.txt files by using a tool called GNU Wget.
2. Examine the version of the software. DB Details, the error technical component, bugs by the error codes by requesting invalid pages.
3. Implement techniques such as DNS inverse queries, DNS zone Transfers, web-based DNS Searches.
4. Perform Directory style Searching and vulnerability scanning, Probe for URLs, using tools such as NMAP and Nessus.
5. Identify the Entry point of the application using Burp Proxy, OWSAP ZAP, TemperIE, WebscarabTemper Data.
6. By using traditional Fingerprint Tool such as Nmap, Amap, perform TCP/ICMP and service Fingerprinting.
7.By Requesting Common File Extension such as.ASP,EXE, .HTML, .PHP ,Test for recognized file types/Extensions/Directories.
8. Examine the Sources code From the Accessing Pages of the Application front end.
9. Many times social media platform also helps in gathering information. Github links, DomainName search can also give more information on the target. OSINT tool is such a tool which provides lot of information on target.
Authentication Testing

1. Check if it is possible to “reuse” the session after Logout. Verify if the user session idle time.
2. Verify if any sensitive information Remain Stored in browser cache/storage.
3. Check and try to Reset the password, by social engineering crack secretive questions and guessing.
4.Verify if the “Remember my password” Mechanism is implemented by checking the HTML code of the log-in page.
5. Check if the hardware devices directly communicate and independently with authentication infrastructure using an additional communication channel.
6. Test CAPTCHA for authentication vulnerabilities.
7. Verify if any weak security questions/Answer are presented.
8. A successful SQL injection could lead to the loss of customer trust and attackers can steal PID such as phone numbers, addresses, and credit card details. Placing a web application firewall can filter out the malicious SQL queries in the traffic.
Authorization Testing

1. Test the Role and Privilege Manipulation to Access the Resources.
2.Test For Path Traversal by Performing input Vector Enumeration and analyze the input validation functions presented in the web application.
3.Test for cookie and parameter Tempering using web spider tools.
4. Test for HTTP Request Tempering and check whether to gain illegal access to reserved resources.
Configuration Management Testing

1. Check file directory , File Enumeration review server and application Documentation. check the application admin interfaces.
2. Analyze the Web server banner and Performing network scanning.
3. Verify the presence of old Documentation and Backup and referenced files such as source codes, passwords, installation paths.
4.Verify the ports associated with the SSL/TLS services using NMAP and NESSUS.
5.Review OPTIONS HTTP method using Netcat and Telnet.
6. Test for HTTP methods and XST for credentials of legitimate users.
7. Perform application configuration management test to review the information of the source code, log files and default Error Codes.
Session Management Testing
1. Check the URL’s in the Restricted area to Test for CSRF (Cross Site Request Forgery).
2.Test for Exposed Session variables by inspecting Encryption and reuse of session token, Proxies and caching.
3. Collect a sufficient number of cookie samples and analyze the cookie sample algorithm and forge a valid Cookie in order to perform an Attack.
4. Test the cookie attribute using intercept proxies such as Burp Proxy, OWASP ZAP, or traffic intercept proxies such as Temper Data.
5. Test the session Fixation, to avoid seal user session.(session Hijacking )
Data Validation Testing
1. Performing Sources code Analyze for javascript Coding Errors.
2. Perform Union Query SQL injection testing, standard SQL injection Testing, blind SQL query Testing, using tools such as sqlninja, sqldumper, sql power injector .etc.
3. Analyze the HTML Code, Test for stored XSS, leverage stored XSS, using tools such as XSS proxy, Backframe, Burp Proxy, OWASP, ZAP, XSS Assistant.
4. Perform LDAP injection testing for sensitive information about users and hosts.
5. Perform IMAP/SMTP injection Testing for Access the Backend Mail server.
6.Perform XPATH Injection Testing for Accessing the confidential information
7. Perform XML injection testing to know information about XML Structure.
8. Perform Code injection testing to identify input validation Error.
9. Perform Buffer Overflow testing for Stack and heap memory information and application control flow.
10. Test for HTTP Splitting and smuggling for cookies and HTTP redirect information.
Denial of Service Testing

1. Send Large number of Requests that perform database operations and observe any Slowdown and Error Messages. A continuous ping command also will serve the purpose. A script to open browsers in loop for indefinite no will also help in mimicking DDOS attack scenario.
2.Perform manual source code analysis and submit a range of input varying lengths to the applications
3.Test for SQL wildcard attacks for application information testing. Enterprise Networks should choose the best DDoS Attack prevention services to ensure the DDoS attack protection and prevent their network
4. Test for User specifies object allocation whether a maximum number of object that application can handle.
5. Enter Extreme Large number of the input field used by the application as a Loop counter. Protect website from future attacks Also Check your Companies DDOS Attack Downtime Cost.
6. Use a script to automatically submit an extremely long value for the server can be logged the request.
Conclusion:
Web applications present a unique and potentially vulnerable target for cyber criminals. The goal of most web apps is to make services, products accessible for customers and employees. But it's definitely critical that web applications must not make it easier for criminals to break into systems. So, making proper plan on information gathered, execute it on multiple iterations will reduce the vulnerabilities and risk to a greater extent.
1 note
·
View note
Text
Top 10 tools for DevOps success
DevOps is a set of practices which combines software development and IT operations with the aim to shorten the system development life cycle. It is an organization approach which enables faster development of applications and easier maintenance of existing deployments. The approach promotes shorter, more controllable iterations, automations and new tools.
DevOps is not just a technology, it covers everything from organization culture, processes and tools. It is a cultural change that allows the organization to break down the barrier between the development team and operations teams. DevOps includes continuous integration and continuous delivery (CI/CD), real-time monitoring, incident response systems and collaboration platforms.
DevOps is the catalyst to start this cultural shift and bring the whole IT team together in the agile mindset to improve the deployment frequency, allowing a faster time to market, a lower failure rate of new releases, shortened lead team and faster mean time recovery.
Despite DevOps being a cultural shift for an organization, the approach requires teams to adopt and use certain tools which would help the team to automate and enhance their processes.
Tools for DevOps:
GIT
GIT is a version control system which allows you to track changes in your file. Through this tool, the work could be easily coordinated amongst the team members. It is a free-open source tool, features branch workflow, allows distributed development, supports pull request and enables faster release cycle
Jenkins
Jenkins is a tool from developers for developers. It is a continuous integration server written in Java. Teams can use it for testing and reporting changes in near real time. Being a developer, it will help them to find and solve bugs in codes rapidly and automate the testing of their build.
It is a free- open source tool which integrates all your DevOps stages with the help of around 1000 plugins, scripts your pipeline having one or more build jobs into a single workflow. It also provides multiple ways of communication: web based GUI, CLI and Rest API.
Selenium
Selenium is a portable software testing framework for web applications. It provides the team with an easy interface for developing automated tests. It is a free-open source tool which helps in creating robust, browser based regression automation suites and tests, writing test scripts in multiple languages like Java, Python, C#, Ruby, Perl, Php, JavaScript, supports multiple platform for testing like iOS and android and easy to build a keyword driven framework for a web driver.
Docker
Docker is a lightweight tool which uses containers to package up an application with all the requirements and dependencies before shipping the complete container as one package. User docker container with any language, ship the container wherever you want, be it QA, your team or even the cloud, scale up to 1000’s node, update with zero downtime.
Puppet
Puppet is an open-source configuration management tool to deploy, configure and manage your servers. It is used to automate the method of inspecting, delivering and operating your software across the entire lifecycle with platform independency. It is based on master-slave architecture and long commercial track record
Chef
Chef is a powerful configuration management automation tool used to manage your data, attributes, roles, environments and cookbooks. It helps to transform the infrastructure to code. It is an Open-source configuration management tool which supports multiple platforms like AIX, RHEL/CentOS, FreeBSD and is easy to integrate with cloud-based platforms, active, smart and fast-growing community support.
Ansible
Ansible is an open-source tool which helps in managing your data, attributes, roles, environments and cookbooks. It helps in providing one of the simplest ways to automate your apps and IT infrastructures such as network configuration, cloud deployments and creation of development environments. It supports push configuration, based on master-slave architecture, completely agentless and simple syntax written YAML.
Nagios
Nagios is a powerful monitoring system which enables you and your organization to identify and resolve IT infrastructure problems before they affect critical business processes. It monitors and troubleshoot server performance issues, plans infrastructure upgrades before outdated systems cause failures and automatically fix problems when detected.
ELK Stack
ELK Stack is a combination of three powerful, open source tools: Elasticsearch, Log stash and Kibana used to collect insights out of your logs or data. It is a lightweight open source tool with multiple plugins, which is easy to deploy, perform search in near-real time, collects and analyzes logs from an excel file to a database or server, active and supportive discussion forum.
Splunk
Splunk is a software platform to search, analyze and visualize the machine-generated data for logs gathered from the websites, applications, sensors, devices etc which make up your IT infrastructure and business. It stores, searches, analyzes and visualizes the machine-generated data, ingests data in multiple file formats, creates knowledge objects for operational intelligence and monitors business metrics to get log insights.
2 notes
·
View notes
Text
https://lephuocloc.com/cloudfunnels-review/
CloudFunnels Review – Introduction
It is certain that business channels expect a critical activity in finding, taking care of, and building up your ideal customer base. With the help of a business pipe, you can extend bargains tremendously.
A business channel fundamentally imitates the impact method to change over purchasing potential into purchasing movement. The further down the channel, the higher the purchase potential.
According to estimations, 80% of salary starts from 20% of customers. The more customers you fill the most noteworthy purpose of your channel, the more courses of action you'll have at the base.
As such, in case you can satisfy the prerequisites of customers to the most extraordinary, not solely would you have the option to sell a lot of things, yet you moreover have relentless customers who can endorse your things to their sidekicks.
Thusly, to grow arrangements and advantages, amassing a business channel is a convincing smoothing out technique. In any case, how? Keep examining my CloudFunnels Review to find more.
CloudFunnels Review – Overview
Vendor: Cyril Jeet
Product: CloudFunnels
Dispatch Date: 2020-May-22
Dispatch Time: 11:00 EDT
Front-End Price: $47
Recommendation: Highly Recommend
Home Page http://getcloudfunnels.in
Refund: 30 Days Money Back Guarantee
Niche: Software
CloudFunnels Review – What Is CloudFunnels?
CloudFunnels is a free no matter how you look at it progressed advancing stage that empowers you manufacture a business channel, which causes you build up your online business. With CloudFunnels, building a business pipe has never been so common.
Using CloudFunnels, you won't need to buy extra encouraging. In like manner, you can make destinations, welcoming pages, site cooperation site to sell your things.
Gotten together with many sharp applications and instruments, I acknowledge that CloudFunnels will be your best right hand.
Taking everything in account, okay prefer to build an online business structure with various imaginative publicizing circumstances to attract target customers and convert progressively target customers into buyers? Keep examining to know-how!
How Does CloudFunnels Work?
CloudFunnels doesn't require any specific capacities consequently, in order to make a business pipe without any planning, you essentially need to follow these 3 phases
Stage 1: Log in
Stage 2: Create your business pipe reliant on the organizations
Stage 3: Publish and get paid
CLOUDFUNNELS RATING
Easy TO USE PRICE FEATURE QUALITY SUPPORT BONUS
Overview
CloudFunnels is a free in all cases progressed advancing stage that energizes you build a business pipe, which causes you build up your online business. With CloudFunnels, building a business pipe has never been so normal.
Using CloudFunnels, you won't need to buy extra encouraging. In like manner, you can make locales, introduction pages, site cooperation site to sell your things.
Gotten together with many clever applications and gadgets, I acknowledge that CloudFunnels will be your best associate.
All things considered, okay prefer to manufacture an online business structure with various inventive exhibiting circumstances to pull in target customers and convert increasingly target customers into buyers? Keep scrutinizing to know-how!
All things considered
4.9
Stars
Make a divert in minutes
Unimaginable WYSIWYG organizer
Successfully make things
Make investments fast
Make records and get leads
Pivotal email computerization
Valuable examination
GDPR great
A/B testing
Cons
Up to now, there is none
CloudFunnels Review – About the maker
0.1
Cyril Jeet is a prominent name in the web exhibiting field. He has filled in as a thing merchant for more than 20 years. During this time, various publicists have trusted and picked him to be their guide.
These are a segment of his eminent things that I have to make reference to, for instance, Memester Video Edition, Mobiflux, Livecaster 3, Pinflux 2, CoreSEO, consequently some more.
Given his success, okay say you are intrigued about what CloudFunnels can bring you? On the off chance that it's not all that much difficulty continue ahead tho the accompanying part.
CloudFunnels Review – Features And Benefits
Gather bargains pipe for you
A sensible arrangements channel can help you with expanding your advantage hugely. In addition, with CloudFunnels, a business funnel can be worked by pulling, and dropping.
For example, you sell visits. Likewise, various people examine for a particular journey through you on Google and you can start to manufacture a situating for the watchword "visit ABC". By and by there will be:
100 people see your page on recorded records.
40 people click on your site. Here, they see a 20% markdown, yet to get them they ought to enter their email into the selection box.
20 people decided to get this headway.
10 people decided to buy and recoup this exceptional code.
What's more at each stage, there is reliably a particular degree of explorers that drop out of the channel.
Consequently, a business channel expect a huge activity in business works out. It looks like a guide that empowers you track customers, by then make or modify elevating procedures to be feasible in unequivocal stages.
Building customer data
It will in general be said that the summary of significant worth customers is one of the most significant resources of a business. It will help a lot in publicizing and customer care.
With a displaying pipe, you can without a very remarkable stretch draw in and contact the perfect people of interest, along these lines extending purchase change rates and customer participation.
Astute arrangements and leads assessment
CloudFunnels will give you significant examination reports, which can improve your substance. Also, this data from customer assessment can help you with improving publicizing endeavors.
Notwithstanding the way that it encourages you limited the accentuation on the most significant customer parcel, yet it furthermore speaks with them on the channels they love. A
s a result, content is scattered helpful and once in a while extends the chances of selling upsell or deliberately pitching.
Likewise, with cunning business assessment, you can fabricate the accuracy of customer regard desire. Through this, associations can pull in more brand-unfaltering customers.
The absolutely versatile investment system
One of the most recognizable points of interest of the cooperation structure is the reasonable customer upkeep, growing the amount of ardent customers for the business.
Furthermore, with CloudFunnels, you can make free interest or paid enlistment and keep full order over access.
From this time forward, through progressions, centers, you can exhibit your gratefulness to customers and fortify long stretch relationship with them.
CloudFunnels Review – My association with using it and How achieves it work?
I used this thing as a beta analyzer and today I'm going to make this real review for you.
So you can trust in everything from my review.
Hello there I'm inside the CloudFunnels dashboard as underneath:
1
From here we have these following sections: Install in solitude encouraging, present on google cloud, your foundations, make license, achieved for you game plan, and instructional activities.
1/Tutorials
CloudFunnels video getting ready gives you everything a little bit at a time, so make sure to take a gander at all these 18 accounts as underneath:
1.1
The arrangement accounts will disclose to you the most ideal approach to present CloudFunnels isolated encouraging, make pipes in CloudFunnels, make pipes in Google cloud, etc… It joins all the thing you need to know before using this item.
2/Install isolated encouraging
You can acquaint CloudFunnels with any server that supports PHP. The foundation is lively and basic and if you have ever genuinely presented substance like WordPress you should have the choice to do it with no issue.
2
You need to finish 3 phases:
Stage 1: Download CloudFunnels content.
Stage 2: Upload the substance into a coordinator on your server using FTP or Cpanel, separate the pack, plan database and produce a grant to establish CloudFunnels
Stage 3: All set. Go to the coordinator url in your program.
There's also an instructional exercise video here to give you how.
3/Install on Google Cloud
3
That is such a great amount of greate considering the way that we can present CloudFunnels on Google Cloud. It's both invaluable and humble. To do that, you need to enter adventure ID, and client ID as well.
All associations zone at the base grants you track all the exercises you have.
4/Your foundation
5
You can review your foundations around there, it licenses you follow up what are the place you have presented cloudfunnels.
You can see things like the region, the grant key and you realize some various experiences with respect to it whether your grant is slipped by or not.
5/Done for you course of action
6
Need to save your time and vi
https://lephuocloc.com/cloudfunnels-review/
https://lephuocloc.com/
1 note
·
View note
Text
Some Known Questions About Cheap Cloud Server India.
SSD VPS web hosting is what you will need to ensure that the most protection and protection of your respective internet site. Usually businesses adore Virtual private server Hosting mainly because it's an answer that's highly secured. Virtual private server will likely give you total charge of your websites.
Not known Facts About Cheap VPS Windows Hosting
Hosting Bangladesh is really a renowned website web server provider alongside website Registration and Virtual private server professional services.
Not known Facts About Indian VPS Server
With a VPS, CIOs or business managers may develop customized programs to satisfy their business' actual needs. The incorrect number of a cloud host company may be pricey and extremely bothersome, but through taking important aspects into account you are going to wind up in the hands of a great and trustworthy supplier. A lot of the service providers aren't delivering this specific service.
The Main Principles Of Windows VPS India
For those people who are a novice to the notion of employing House windows Operating system on the digital personal hosting server, here's a summary of positive aspects that you will certainly take pleasure in. Prior to decide on a distinct hosting provider, it's also wise to see whether you might have the option of shifting above in one type of hosting server to the other in a subsequent phase should you really possibly grow to be assured at controlling your own web server. You could design and style your web server the course you need it. Once you place funds in a VPS server, you don't must obtain an additional distinct web server or a committed host. If one host experiences an issue, another hosts won't be influenced. For individuals that want a dedicated host, but don't know very well what things you can do with them every time they have them, maintained servers can also be a good substitute. VPS might be viewed as a crossbreed of distributed hosting server and dedicated bodily machines, retaining the very best of both. VPS provides all the advantages of a dedicated web server without the substantial fees that typically get there with a committed web server. When you sign up for a VPS web server, you will be really registering in a non-public profile. Virtual private server, Digital individual web server is useful for these challenges. Linux Virtual private server and Home windows VPS will be the 2 types of internet hosts offered in the marketplace. Internet Individual Machines is an ideal cure to variety small and moderate business projects. As you now know what is shared hosting and just how it performs, all you need to do is locate a trustworthy provider. Virtual private server web hosting has gotten quite well-known currently as an increasing number of number of sites are unveiled. Shared hosting isn't a greater option for e-commerce websites, at the same time dedicated hosts are many more costly that this beginners think it is out of the question to afford with.

cheap windows VPS
PHP data files at the same second. As a consequence, the web server will get shaky and it may require repeated reboots, therefore leading to your internet site to visit offline whenever that it takes place. You might have to have the ability to log in the web server and type in several directions. Discover all the information about the business to ensure that you're web hosting service your web site by using a harmless provider. There are several considerations on prior to initiate an online number agreement. There are various various internet hosting strategies from which to choose. Shared web hosting in the reverse hand is very risky as a result of neighbored websites which often result in malware becoming transferred from 1 web site to another one. Therefore, if you're a comparatively enormous organization having a hefty website traffic website, Home windows will be a great selection for you to look at. https://webji.in/vps-server-india/ Analyzing your site wants and needs The web hosting service requirements can hugely change in accordance with the sort of internet site you're about to variety. All personal hosts functionality independently and don't have relationship with various hosts which are found on precisely the same device. Now, there are numerous kinds of web hosting profiles available that designed to meet different website needs. You will find undoubtedly benefits of choosing an experienced website hosting company since you do get to delight in an incredibly substantial level of support and also you will not need to need to make an effort if your website is functioning properly or perhaps not. The support make the foundation of the company, logo and the site typically. Best level web hosting businesses even go up to now as getting in contact with clients whenever you can find organized downtimes for upkeep, if not they may article the announcements on the site or blog site. Websites don't just apply online personal identity of any company, however in add-on it can help to make new probable clientele and enhance company achieve. If your online business is providing free SSL qualification, then it's an edge for yourself, if not then make sure that they already have the support, maybe in future you sometimes consider the gain. Folks are usually thrilled to help, so you will probably have the ability to discover pretty quickly when a a number of web hosting service clients are unreliable or has very low outstanding providers.
1 note
·
View note
Text
Learn Google Analytics

Explore Google Analytics: Google analytics is the tool provided by google to Analyze your website as well as user/customer behavior in depth. This will help you in working with SEO ranking your website on the first page of the Search Engine Result Page (SERP). I'll guide you the step by step procedure to start with Google Analytics .
So, let's start with creating an account 1) Sign up for a Google Account (Skip if you already have one) If you don’t have a Google Account you need to get one now to have access to all the free Google tools that are out there. 2) Get your unique tracking code. You will the get the unique tracking code you have to upload that link into head part of your website that will track your website report. a. If it’s your first time logging into Google Analytics read below. If not, skip to Step 2b If it’s your first time using Google Analytics then before you get your nifty tracking script you will need to answer a couple of questions and accept Google’s terms of service. The first page will ask for your Website URL as seen below: Enter in your Website’s URL in the “www.yourdomain.com” format (*NOTE* If you have a secure site, https, make sure to update it accordingly). For Account Name enter in whatever you want to call your website or project. And finally select the correct Time Zone that you are in. When you’re done, click continue. You will be then be asked to enter in your contact information and accept Google Analytics’s user agreement. After you agree to Google’s terms of service you finally see your nifty tracking code for the specific website URL you previously entered. b. If it’s your NOT your first time logging into Google Analytics. If it’s not your first time logging into Google Analytics simply click on the “Add Website Profile” link at the bottom left of your overview report. On the next page, keep the selection on “Add a Profile for a new domain) and enter in the domain you want to start tracking (*NOTE* If you have a secure site, https, make sure to update it accordingly). and choose your time zone then click finish. Google Analytics will then create a custom tracking code snippet for your site. Copy your code snippet and click finish. Read step 3 on how to install it on your website. 3) Installing Your Tracking Code Snippet Now that you have your code snippet we will need to install it on your webpage. In step 2) I instructed you to copy over the code snippet but if you forgot or just didn’t feel like copying it, follow these steps to get your tracking code. a) Go to the Overview page and click on “edit” in the last column of your website profile report: b) Click on the check status link in the top right corner: c) Get your code snippet: Now that you have your code snippet (again), let’s install it! All you need to do now is place your code snippet in every single one of your pages in your website. The most common mistake is to place the tracking in only your main index.html/php page.
Home Page: “http://www.xyz.com/index.html”
Our Services Page: “http://www.xyz.com/service.html”
About Us Page: “http://www.xyz.com/about.html”
Contact Us Page: “http://www.xyz.com/contact.html”
Thank You Page: “http://www.xyz.com/thankscont.html”
So we need to install our tracking script. Open your favorite html editor or just open your html/php with notepad and add your tracking script right BEFORE the </body> tag. The </body> tag is usually at the end of your html code. Do a simple search for “</body>” it in your html editor or notepad to find it. Then simply place your code before the </body> tag as shown below: Now repeat this process for all of your webpages. In our instance I placed the code in index.html, service.html, about.html, contact.html, and thankscont.html. After you are done Google Analytics needs some time to go crawl through your webpage to confirm that the scripts are installed. All you need to do now is wait about 12-24 hours for Google Analytics to Update. Here is what your site’s status will look like when your site isn’t verified: And here is what your site’s status will look like once it’s been crawled through and confirmed to be installed correctly: Once your site is confirmed by Google Analytics your site is now being properly tracked by Google Analytics. If after 48 hours your site still has not been confirmed. Please read through Step 3 again and make sure that your code is correctly placed. 4) Adding Goals to Track Conversion. Now that you have the basic tracking installed in your page you now need to set up Google Analytics so you can start tracking conversions. With goals you can figure out how many people did a specific action. IE. Bought an item, signed up for a newsletter, read a specific page, etc. For now (as of 03.20.08) Google has a max of 4 goals assigned to each website profile. You can have more than 4 but that is outside of the scope of this beginner guide. To properly use goals you will need a link to your “goal” page. A “goal” page can be any page where you want your user to go to. It can be a thank you page after a user signs up for your newsletter or it can be the receipt page after someone orders a product from your site. To get started with setting up a goal, first go into your Analytics home page and click on “edit”. In the profile settings page two boxes down you should see the “Conversion Goals and Funnel” box. Click edit on an empty Goal. If you are new, just click edit on the G1 row: You should now see the Goal Settings Page. Let’s go over the “Enter Goal Information” section first: Active Goal: This activates/deactives your goals. So to start turn this goal on by choosing the “On” button. Match Type: There are 3 types of match types.
Head Match: Use this type if your webpage uses dynamic URLs. For example, let’s say your goal page is an order receipt page and the links look something like this: “www.example.com/checkout.cgi?page=1&id=9982251615” where the &id=XXXXX changes dyamically.
Exact Match: Use this type if your thank you page is a static page such as: “www.domain.com/1/thanks.html”.
Regular Expression Match: This option uses regular expressions to match your URLs. For many eCommerce website the “thank you” or “receipt” page is a dynamic URL with different pages with OrderID or CustomerID variables and you will need to use this match to track the URL instead of a static domain page. Using regular expressions with wildcards are out of the scope for this beginner tutorial. We will write a post specifically tackling the Regular Expresion Match soon.
So choose the correct match depending on your “goal page” Goal URL: Enter the directory and file of your goal page. DO NOT input your entire http:// link. Simply just write the directory and file name from your root perspective. IE. “http://www.mysite.com/thankyou.html” enter “/thankyou.html” or “http://www.mysite.com/newpage/thankyou.html” enter “/newpage/thankyou.html”. Goal Name: This is for your use. Name the goal to whatever you want. Case Sensitive: Check this if URLs entered above must exactly match the capitalization of visited URLs. Goal Value: Input what each conversion is worth. Let’s say each newsletter email is worth $0.70 then input that into the goal value. If there is no static monetary value then you can just leave it as zero. So here is how we filled this out in our example: The next section is the “Define Funnel”. A funnel is a series of pages that leads up to the goal. If you have a eCommerce site it may consist of 3-5 steps “checkout –> information input –> CC Page –> Review –> Submit” etc. You can define these pages in the funnel section to know exactly how your traffic is reaching your goal page and in which steps they are leaving. Seeing the funnel is extremely helpful is realizing how your users traverse through your pages to do the action item. Make sure to always use this even though it may be only a 1 step process as the funnel system allows you to easily see your true conversions. In our example, we want to know how many people sign up from our contact.html page. So our Funnel is: contact.html –[If user signs up]–> thankscont.html. So we define the funnel like this: Like the goal URL in the “Enter Goal Information” section make sure not to include the entire link, just the directory and file. Make sure to check the “required steps” if you want to track your real conversions. When this is checked goals are ONLY counted when the user goals to our contact.html first. This is important as I’m sure many of our users will go directly to our thank you page in this step by step guide and we don’t want to count those as conversions. Once that’s done, simply click the “Save Changes” button. Congratulations! You’re now correctly tracking your conversions!

5) Understanding Google Analytics Report.
Now that your site is correctly being tracked, it’s time to see all the cool reports that Google Analytics can show you! (Pretty, isn’t it?) Everything is pretty self explanatory and intuitive so I won’t go through every single reporting link. The one item that I do want to talk about is the funnel report in the Goals section as it is the most important part in your conversion tracking. First click on the goals tab then the Funnel Visualization link: Once there you will see this: The above example is a pro bono optimization we’re doing for a charity. We are specifically optimizing their membership page. The funnel is simply, “Membership Page” –> “Membership Buy Thank You Page” On this day you’ll see that they had 625 visitors go to the membership page and 47 people who bought a membership to this charity organization for a conversion rate of 7.52% which is our true conversion rate. This is the most important page to understand what is going on with your traffic and find out how you can best monetize it as well as find “conversion leaks” if you have multiple pages in your funnel. Now what if we didn’t use the optional funnel and wanted to know our conversions? This is what we would have seen from this client: We would see a .18% conversion for these days… Why? Because Google Analytics determines the conversion rate as [Goal Visits / Total Visits to the Website]. This charity organization gets TONS of traffic from all over the place to different pages on their site. Most people don’t even view the membership page. So the conversion rate above is incorrect in letting you know how your specific page is converting and you should not rely on this. The only way this report would be correct is if you have just a simple landing page and buy page.
1 note
·
View note