#tips creating logo
Explore tagged Tumblr posts
Visit Tumblr Blog
Explore Tumblr blogs with no restrictions, modern design and the best experience.
Last Seen Tumblr Blogs


Fun Fact
In 2020, 44% of users from Denmark used Tumblr daily.
Text
Tips for creating a logo
How I designed my new logo and few little tips for logo designing. Starting to creating new logo and checklist what I use to get ideas for logo. #cfgrönroos #tipsfor #creatinglogo #logodesign #desiging
Logo is created and owned by C.F. Grönroos and all rights reserved. Starting to create new logo After I started this building this site. I first use my initial logo with letters C.F.G put together. But somehow that just didn’t look or feel right. Since this new project for me and I do have more future plans using this platform. All this did lead me to need creating yet another logo for myself.…

View On WordPress
0 notes
Text
Need a logo on a budget? My MoneySmartStart post shows 5 steps to create one with Fiverr Logo Maker! 🎨 Start branding today. #LogoDesign #PersonalFinance #Fiverr

View On WordPress
#Budgeting for Beginners#Cheap Logo Design for Beginners#Create a Logo on a Budget#Financial Freedom#Fiverr Logo Maker#Money Saving Tips#Personal Finance Tips#Save Money on Branding#Side Hustles
0 notes
Text

#Attractive Logo Design#the golden rules of logo Design#logo design process#how to create a logo#Logo Design Ideas#brand design guidelines#Brand Image#Liveblack#Brand Logo#Tips logo design#How to design a logo for beginners#how to Design a logo
0 notes
Text
#Graphic Design Tips for Beginners#Best Graphic Design Tools in 2024#How to Create a Logo for Your Business#Top Graphic Design Trends This Year#Web Graphics#Product Design#Marketing Design#Business Branding#Social Media Design
0 notes
Text

hi! someone requested me to do a tutorial based on this gifset!
this tutorial requires an intermediate knowledge of gifmaking. i won’t teach you how to do gifs from scratch, there are other tutorials for that out there.
[tutorial under the cut]
THE BASICS
AN INTRODUCTION
first off, the gifset in question is based on this gifset by @/eddiediaaz and i got permission from them to explain the process. i won’t be sharing the template because it’s a near replica of theirs (that isn’t shared to the public) and i don’t feel comfortable doing so, but you can recreate it by yourself just like i did!
also, ESL, so please pardon any mistakes.
THE FONT
Circular ST (Medium & Black). download it here & here.
CLIPPING MASKS
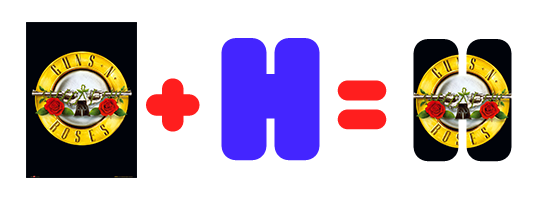
clipping masks are the way i put images and gifs inside of shapes. i used that method in the first and second gif of the Spotify gifset as you can see here. what does a clipping mask do? basically, it links two or more layers together in a way it follows the “shape” of your base layer. ie, everything that is shown follows the “shape” of your main layer and nothing more. your base layer can be anything: a shape, an image, a gif, a text, an adjustment layer, really everything. let’s see an example:
CLIPPING MASKS & SHAPES

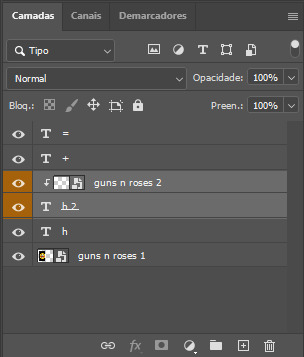
the original image (Gun 'n' Roses logo) is intact, as in, it’s not cut like a circle, something that cannot be undone. instead, everything outside the limits of the blue circle is just hidden. if i delete the base layer (the circle layer), the original image will appear as it originally is, as an rectangle. talking about layers, let’s see my layers panel (some things are in Portuguese, but i think you can understand):
notice the little arrow pointing downwards to the “circle” layer. that is the clipping mask symbol. the base layer always needs to be below what is being clipped. if the base layer is deleted, the chain is broken and every layer clipped will now act independently and have its original shape. you can have as many clipped layers as you want. you can also have multiple chains going on in a .psd, each one with its own base layer. to clip a layer, you just need to press ctrl+alt+G or cmd+option+G while having the layer you want to clip selected (NOT your base layer). or, you can go to LAYER > CREATE CLIPPING MASK.
CLIPPING MASKS & TEXT
let’s see the same example, but with text instead:
A TIP
because adjustment layers are clippable, you can completely gif by using clipping masks. this is very useful when you have more than one gif inside a canvas and don’t want an adjustment layer to affect everything besides a certain layer/element.
let’s take my first gif of the Spotify gifset as an example.
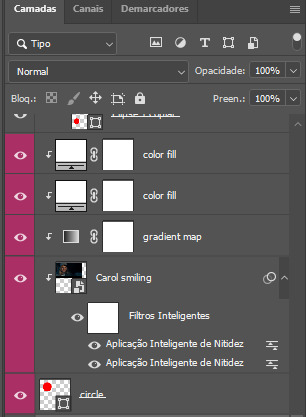
the circle is the base layer. the “Carol smiling” layer is my gif converted to a smart filter. above that “Carol smiling” layer, there is a black and white gradient map and two color fills of white so i can achieve the coloring you see. all those layers are clipping onto the circle layer, making my now b&w gif have the shape of a small circle as well. those layers are in a folder in the .psd of my first gif, so i don’t have multiple files sitting on my PC to assemble just one gif. i could have giffed that small gif separately and pasted it onto my canvas as well, but i like to do this way so i can adjust everything i want in real time instead of redoing a gif over and over every time i want to change something.
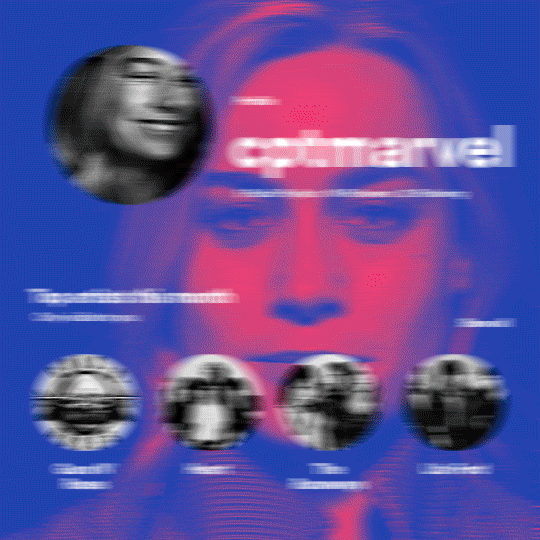
HOW TO MAKE EACH GIF
all gifs are 540x540px.
THE FIRST GIF
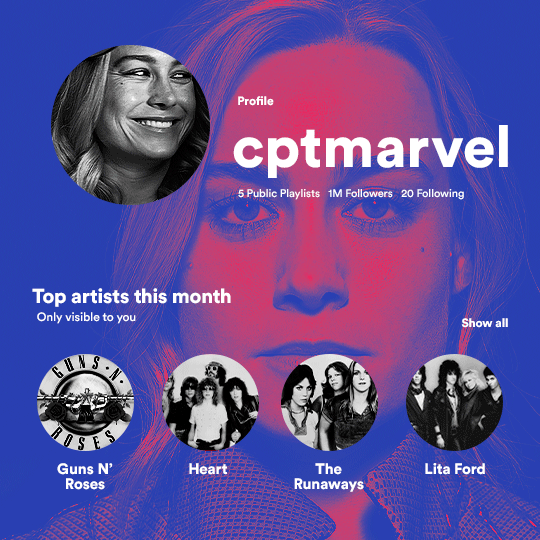
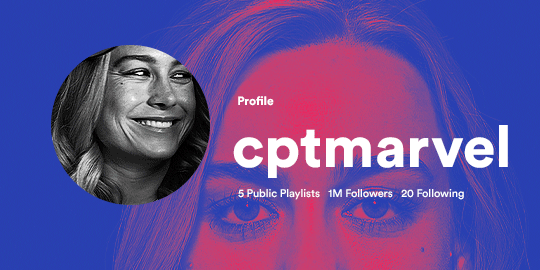
the first gif has 6 elements. the elements are: a big gif serving as a background (a close-up of Carol), a smaller gif inside a circle (a b&w gif of Carol smiling) as a profile picture and four static images for the featured artists. i giffed as i normally do (loaded screencaps, resized the gif, sharpened the gif, etc) for my background gif. to achieve the coloring, i’ve added a gradient map (layer > new adjustment layer > gradient map) purple to pink. to the profile picture, i made a 160x160px circle in the top left corner. the color of it doesn’t matter. the next step is a matter of taste: i giffed the smaller gif in the same .psd thanks to clipping masks that i explained earlier, but you can do it in a separate canvas too. for the featured artists, i made four circles with 98x98px each. for the images, i had to check Spotify for their selected PFPs. after that, i googled “[band/artist] spotify” to find the images. the PFP of bands and artists in the Spotify app are displayed in black and white, so you might have to make them b&w if you happen to find them only in color. to make the artists PFPs pop a bit more, i transformed them into smart filters and added a bit of sharpening to them (intensity 10 x radius 10). you can adjust the colors and the brightness if you want, too. the sizes of the texts in the gif are: 58px (username), 20px (top artists of the month), 15px (name of the artists), 12px (only visible to you + show all + profile) and 11px (following and follower numbers).
SECOND GIF
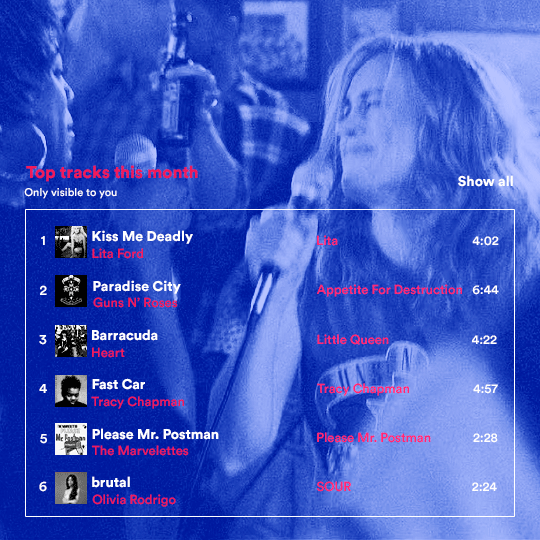
for the chart, i created a black rectangle (490x308px) that i set its blending mode to lighten (thus making it transparent) and i added an internal white stroke. i added the text and the little squares next to the top 6 numbers. the font sizes are: 17px (top tracks this month), 11px (only visible to you), 14px (song title, show all, top 6 numbers), 13px (artist/band, album title, length of the song). i added the album covers — that i made b&w — by clipping images onto 32x32px squares. for the coloring, i added a gradient map (dark purple > light purple).
THIRD GIF
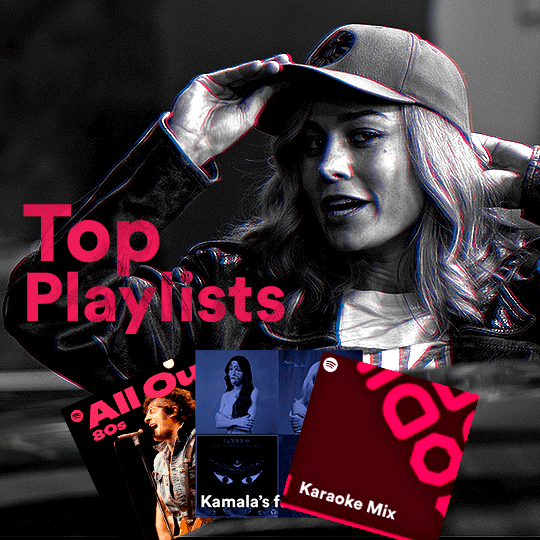
there are three types of playlists in this gif: a Spotify original playlist, a playlist made by a user and a Mix. you don’t have to follow this formula if you don’t want to, but in the case you do, here’s how i did it: browse Spotify for an original playlist of theirs. chances are, if you google the playlist’s name, you can find its cover on Google Images. at least, i found the “All Out 80s” cover that i used in my gifset. you can also create your own. for the user playlist, just pick four songs and find their (album) covers, also on Google. create a square canvas on Photoshop and make four squares, each in one quadrant of the canvas. paste your images onto your canvas and clip the images to each square. then, add a gradient map (black + whatever color you want) to all those images and title your playlist (font size: ). save that collage as a PNG and load to your gif canvas or merge all the layers+transform into a smart filter and drag the smart filter layer onto your gif canvas. now, the trickiest one. while you can invent your own Mix, i wanted to use a real one, but i had no idea on how to find them. thanks to reddit, i discovered that, if you search “made for you” on Spotify, you will find their Mixes! some of them are very whacky and specific! i just picked the Mix that made the most sense for Carol from that (gigantic) list. before doing the next step, i would advise you to google the name of the Mix you picked to see if you are able to find the cover of it with good quality. i wasn’t able to find mine (Karaoke Mix), so i just screenshotted my Spotify app, pasted that screenshot into Photoshop and cut the Mix cover and pasted that onto my canvas. the quality wasn’t great, so i transformed the cover into a smart filter, added a bit of gaussian blur and then sharpened it (intensity 10 x radius 10). the color wasn’t what i wanted either, so i used Hue/Saturation to change the hue. because the original image for the Mix was smaller than i wanted and i stretched it to make it bigger, the quality of the text and the Spotify logo was botched. i painted over the Mix cover and created a text with the font i linked earlier to replace its now pixelated title. i also painted over the little Spotify logo, found a logo in the internet and pasted over the Mix cover about the same size of the original logo. to achieve the “3D effect” of the gif, i made my b&w gif, the base. then, i duplicated all layers and added a gradient map (black > pink) and merged all the layers of that duplicate. i made a second replica of my gif, now with a different gradient map (black > blue). i set both replicas to the ligthen blending mode. you will notice that the replicas will "disappear" and only the original b&w gif will remain. if you move the replicas a bit, that colored border will appear. this doesn't work much in very bright gifs without a lot of dark areas, btw.
FOURTH GIF
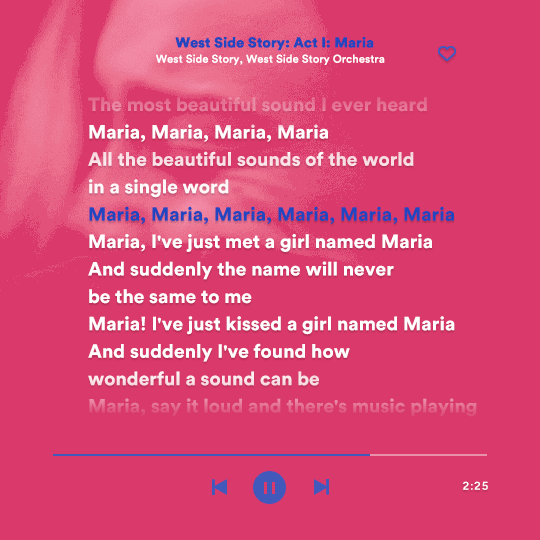
this gif used an altered (by me) version of this template. (i changed the fonts to match the rest of the gifset, too.) for the color text effect, you will have to gif with the timeline bar. take your gif’s length and do the math to find how many frames are ⅓ of it. take your lyrics’ layer and cut it into three equal parts or close to it by using the scissors icon in the timeline panel. in each third, change the color of just one line, line by line. when you play your gif, the colors of the lyrics will change like in Karaoke. you can do the same thing with frames iirc, though. i explained the timeline method because that’s the one i used in this gifset and use in general gif making. for the coloring, i added a gradient map. to make the colors pop a bit more, i add two gradient maps: the first one is in black and white, the other is in color. that adds depth to the blacks and darker colors of the gif.
FIFTH GIF
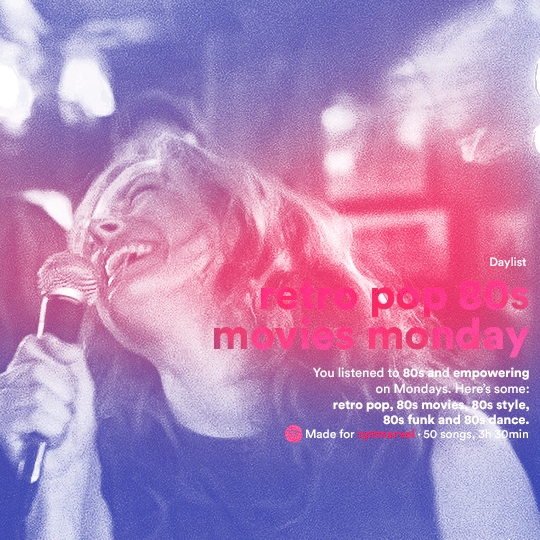
like in the Top Playlists gif, i wanted for my Daylist to be real as well. to achieve that, i listened to my Carol Danvers companion playlist (that you can listen here) for a long time until my Daylist refreshed itself. (Daylists refresh in certain times of the day — don't worry, Spotify will tell you when.) then, i just copied what it told me — the title and the genres i listened to generate such a Daylist, plus the genres i should check it out. you can invent your own Daylist if you want, but because it is generated by AI, i find very difficult to mimic its crazy titles, but you can try! you can also search in the web for other people’s Daylists if you want, but usually people don’t tell you what they listened to to get those playlists and nor what was recommended for them to listen to and i, at least, find that information important for the gifset. be aware that Daylists aren't available for every country yet (like in mine), but i found a way to work around that. the browser Opera GX offers a free "VPN" — not exactly a VPN, but it works close enough — so you can set your location to the US and listen to in-browser Spotify. i recommend not log into Tumblr while using Opera's VPN as there is a myth (that could easily be true!) that Tumblr terminates people's accounts that use a VPN. font sizes: 43px (daylist title), 13px (text), 12px ("daylist" & "made for"). for the flare effect, i searched for flare overlays on YouTube and downloaded one of those videos with 4K Video Downloader, a free software. i loaded the overlay into Photoshop and added a gradient map (purple > pink) over it, thus changing its color. i pasted the overlay onto my b&w gif and set its blending mode to screen. voila!
that's it! i hope you liked it and that i was able to express myself well. if you have any questions, feel free to contact me, i love helping people about their gifmaking questions! 💖
#*#*tutorials#gifmaker tag#dailyresources#usergif#completeresources#alielook#userairi#userhallie#userbess#userrobin#usershreyu#userzaynab#tuserju#tusermalina#tuserheidi#usertina#userabs#userbuckleys#usermagic#userjoeys#antlerqueen#userarrow#flashing gif tw
444 notes
·
View notes
Note
hii! i absolutely love your work. i've been getting into trying to make borders myself, and i was wondering if you had any tips on where to find good pngs or do you create everything yourself? i feel like my luck so far hasn't been great but maybe i just don't know how to search for it correctly!
Hello, nonnie! I'm so glad you enjoy my work; thank you for your kind words. ( ˶ˆᗜˆ˵ ) And oh my gosh, it's so nice to see a new GFX creator in the making! One of us, one of us, one us. ~ Welcome to the wonderful world of editing, hehe!
I've compiled a list of websites that I use for my graphics, but please do let me know if you need anything else and I'll be happy to assist!
For general assets, as well as inspiration, I generally use these websites: behance (which is pretty much the industry standard when it comes to graphic design in general, they have cool studios or experienced designers that post their works and/or assets), booth (an independent japanese resources hub with many free and paid assets), huanban (an independent chinese resources hub, same proposal as booth), abdz (mostly focused on typography and branding), dribble (more focused on web applications and design) and envato (templates).
Since I'm colourblind, I'm not always confident about how to compose colours together. So whenever I'm in doubt, I use coolors (to get palettes from images and browse through palette ideas) and colorhunt (which gives ideas for palette themes and motifs).
I love typography a whole bunch, but sometimes it's hard to find that one right font for your project. Whenever I need to look for something else, I always run to these websites: google fonts (when I'm on a budget and want to use 100% free fonts, including for commercial use), 1001fonts (to quickly find fonts based on themes, it has a great tag system), dafont (a big classic huge dabatase of custom fonts), befonts (for more industry standard-leaning fonts) and kerismaker (for those magazine looks). When I want to identify a font used on an image and where I can download/purchase it, I use myfonts and font squirrel. They even give you similar options for free, too!
Suppose I'm specifically searching for illustrations/PNGs I can use on my upcoming project. In that case, I'll either go to flat icons (for websites, applications or presentations), vertex (for 3d icons and/or general vectors), graphic burger (for logo making), cleanpng (for I want a tree PNG and do not want to clean it myself, for example), pngtree (same idea as the previous one, you just search for a word and will see all PNGs related to it) and pngall (self explanatory).
Regarding backgrounds, textures, and photography in general, I rely on websites like pixabay, vecteezy, 3d ocean, morguefile, freepik and isorepublic. They have high-quality photos and videos that you can use on your projects. However, if I specifically need mockups or patterns, I turn to unblast, pacage and ava.
Besides those, you can always search for things on Deviantart and Twitter! Though I do not use those much, I think Instagram and Threads also have pages dedicated to sharing resources. Discord can be a nice place to search for graphic design servers, too.
However, if I cannot find specific resources for a commission/project for whatever reason, then I will make them myself. Be it through photography, drawing or anything else I can get my little hands on.
For the more technical/applications side, the programs I use for my graphics and edits are Adobe PhotoShop 2020, Adobe After Effects 2020, Adobe Illustrator 2020, Clip Studio Paint (for when I need to draw or polish something for specific projects/commissions), and HandBrake (for when I need to make screencaps). My drawing tablet is an oldie, Wacom One.
Hopefully, this can be a nice starting point for you! Please feel free to reblog and/or like this post if you'd like to save it for whatever purpose. ~ I hope you enjoy this journey ahead, and if you need anything else, let me know! You got this! ദ്ദി ˉ͈̀꒳ˉ͈́ )✧
#♡: answered! *#graphic resources#gfx resources#roleplay resources#rph#rp resources#editing resources#carrd resources#editing
111 notes
·
View notes
Text


Tattoo Parlor Decor Set for The Sims 4
This set was inspired by my personal experience getting tattoos. Some of the signs are those I remember from my friend’s tattoo parlor. While I was excited about getting tattooing in the Business & Hobbies Pack, I did want more in terms of décor objects. I did my best to keep the items as low poly as possible, but be sure to check the poly counts for what your computer can handle.
The building in my screenshots is one I downloaded from the gallery and made modifications so it resembled my friend's tattoo parlor. The username is MickeySimmers and the original build is a NY Pizzeria uploaded on 4/7/25.
When appropriate, objects are available in English and Simlish versions. Simlish font credit to Franzilla: https://modthesims.info/ For new meshes made by me, textures from Blenderkit were used.
SexyIrish7 Phoenix logo credit: © Liliia Marchuk via Dreamstime.com
All items are base-game compatible.
This set includes:
· Tattoo Counter
· Supply Cabinet
· Salty Signs – Small, Medium, and Large
· Tattoo ink bottles
· Tattoo ink cups – empty ink cup and cups with ink colors
· Tattoo ink cup holder
· Sharps container – Wall-mounted and counter versions
· Tattoo Coil Machine
· Foot switch
· Power Supply
· Stencil Machine
· Autoclave
· Non-sterile Nitrile Glove Boxes
· Portfolios
· Consent form
· Tip Jar
You may view an Imgur album with 31 screenshots of the set here
Creations by SexyIrish7
DOWNLOAD for FREE: SFS
OR at Patreon*
*You must be over 18 to access my Patreon page.
These cc objects are new 3d meshes created using Blender and Sims 4 Studio.
All CC have:
*Ability to search catalog using search terms: sexyirish7 and si7
*Customized thumbnail
*******
CREDITS:
Software credits:
Sims 4 Studio v. 3.2.4.3 (Star): https://sims4studio.com
Blender 4.0: https://www.blender.org/download/
GIMP v. 2.10.34: https://www.gimp.org/
Inkscape v. 1.2: https://inkscape.org/
Thank you to the creators and moderators producing tutorials and answering questions!
*******
TOU:
Do not re-upload and claim as your own
Do not re-upload and hide behind a paywall
Mesh and Image Credits along with descriptions of each item are below:
Tattoo Counter
I was dissatisfied with the number of slots and their placement on the tattoo counter that came with the Business & Hobbies pack, so I modified EA’s The Ultimate Nightstand so that it served as a larger counter and added décor slots to it. There are a total of 3 large slots, 9 medium slots, and 27 small slots. I made some minor modifications to the EA texture for The Ultimate Nightstand but did include all 20 swatches.
Polygon Count: 162
Supply Cabinet
I have long been disappointed with the lack of deco slots in various displays. For this object, I modified EA’s Carina Dining Hutch so that it would serve as an appropriate supply cabinet. I made some minor modifications to the EA texture but did include all 9 swatches. There are a total of 2 large slots, 15 medium slots, and 140 small slots.
Polygon Count: 114
Salty Signs
There are 3 files of what I call “salty” signs. The large signs are not as salty, but I wanted to stick with my theme overall. What do I mean by salty? Well, these are signs that are not for the faint of heart and for those with a darker sense of humor. They were inspired not only by signs that I saw at my friend’s parlor, but also by things he and his colleagues would say frequently.
Large Signs: 7 designs (11 total swatches)
Medium Signs: 9 designs (18 total swatches)
Small Signs: 10 designs (20 total swatches)
Polygon Count: 4
The following were used in several textures in all three files:
Caution/Warning Sign Templates by kenshinstock via Freepik https://www.freepik.com/free-vector/blank-label-warning-caution-sticker-template-set_30903862.htm
Large Sign Image Credits:
Swatches 1-2: Original Artist Unknown. Image from https://razorbacktattoosupply.com/tattoo-studio-feel-the-burn-wrapped-canvas-graphic-art/
Swatches 3-4: Original Artist Unknown. Image from https://www.creativefabrica.com/product/funny-tattoo-artist-hourly-rate-cut-file/
Swatches 5-6: Original Artist Unknown. Image from https://www.pinterest.com/pin/tattoo-artist--218917231881445322/
Swatch 7-8:
Hands, Soap, and Ointment Icons by rawpixel.com via Freepik https://www.freepik.com/free-vector/coronavirus-prevention-icon-set-vector_30086831.htm
Do Not Touch Icon Image by Myshopsigns https://all-free-download.com/free-vector/download/18_warning_signs_47669.html
No Swimming Icon by Fitri Handayani via Vecteezyhttps://www.vecteezy.com/vector-art/51936014-no-swimming-sign-illustration
Bathtub Icon by Fitri Handayani via Vecteezy https://www.vecteezy.com/vector-art/51406319-bathroom-icon-with-bubbles-and-soap
Sun and Breeze Icons Images by Freepik https://www.freepik.com/free-vector/weather-icons-set_709126.htm
Talking on Phone Icon by Mungujakisa Edmond via Vecteezy https://www.vecteezy.com/vector-art/25410803-do-not-talk-on-mobile-cell-phone-icon-sign
Swatches 9-10: Tarot Card Images designed by Eight (Elian-James Showell) https://www.eightco.in/
Swatch 11: Original Artist Unknown. Image from https://www.amazon.com/Tattoo-Artist-Tarot-Card-Sweatshirt/dp/B0D8JBHBFZ
Medium Sign Image Credits:
Background images for Swatches 5-8 by All-Free-Download.com https://all-free-download.com/free-vector/download/advertising_sign_templates_retro_shapes_sketch_6849470.html
Swatches 1-2 and 13-14: Tattoo Gun Image from IMGBIN https://imgbin.com/png/ZNRSzcqv/tattoo-machine-tattoo-ink-tattoo-artist-png
Swatches 3-4: Original Artist Unknown. Image from https://www.amazon.ca/Artist-Tattoo-Artist-Kitchen-Vintage/dp/B0B6DRXFZN
Swatches 5-6: Tattoo Gun Image from IMGBIN https://imgbin.com/png/36i2fKAG/tattoo-machine-body-piercing-tattoo-artist-old-school-tattoo-png
Swatches 7-8: Bullhorn image by All-Free-Download.com https://all-free-download.com/free-vector/download/megaphone_312061.html
Swatches 9-10: Border by Rawpixel.com via Freepik https://www.freepik.com/free-vector/vector-set-vintage-elements_3139397.htm
Picture by EA from Business & Hobbies release video
Swatches 11-12: Cheese Grater Image by Macrovector via Freepik https://www.freepik.com/free-vector/cooking-food-icons_1530806.htm
Saw image by EA
Swatches 15-16: Images by EA
Small Sign Image Credits:
Swatches 1-2, 5-12, 19-20: Caution/Warning Sign Templates by kenshinstock via Freepik https://www.freepik.com/free-vector/blank-label-warning-caution-sticker-template-set_30903862.htm
Swatches 3-4: Tip jar image by Freepik https://www.freepik.com/free-vector/jar-background-with-hand-drawn-money_1148170.htm
Swatches 13-14: Image by Printable Designs https://free-printable-signs.com/
Swatches 15-16: Image by by Mungujakisa Edmond via Vecteezy https://www.vecteezy.com/vector-art/25410803-do-not-talk-on-mobile-cell-phone-icon-sign
Swatches 17-18: Crying Emoticon Image from CLEANPNG https://www.cleanpng.com/png-smiley-emoticon-crying-clip-art-no-whining-clipart-546524/
Tattoo Ink Bottles
Due to file sizes, I split these up into 2 separate files. One file has all of the bottles in English, and the other has all of the bottles in Simlish. I modified the EA debug glue bottle. There are a total of 24 swatches.
Polygon Count: 126
Tattoo Ink Cups
There are 2 files for this object. One is an empty ink cup. The other has all of the ink colors as different swatches. There are a total of 24 swatches for the filled ink cups. I modified the water glass object to create these items.
Empty Cup Polygon Count: 107
Filled Cup Polygon Count: 162
Tattoo Ink Cup Holder
When an artist is using a few different inks for a piece, they can sometimes use a holder for the ink cups so the cups do not get knocked over or spilled. This is an original mesh made by me. I have the object set up so that the ink cups (full or empty) will snap to the holes in the holder. Once the ink cups are in, you can move the entire holder to where you want it and the ink cups will go along. Or you can place the holder and then add the cups. While the holders I tended to see were plastic, I decided to make mine a metal version with slight ink stains.
Polygon Count: 208
Sharps Containers
I created 2 versions of sharps containers for this set. I originally was only going to create the wall-mounted one, but then decided to add the counter version of it as well. These are original meshes made by me.
Biohazard symbol is a public domain image
Wall-Mounted Sharps Container Polygon Count: 268
Counter Sharps Container Polygon Count: 106
Tattoo Coil Machine
There are different types of tattoo machines available, but I find the coil machine to be the most recognizable and therefore wanted this version in my game. This is an original mesh made by me. There are a total of 5 swatches.
Polygon Count: 640
Foot Switch
I created a foot switch to operate the tattoo machine with. This is an original mesh made by me. There are 11 swatches.
Design inspired by FK Delta Foot Switch https://www.fkirons.com/products/delta-foot-switch-cosmic-storm
Polygon Count: 57
Power Supply
For this object, I modified the EA Retro Rock of Ages Stereo mesh and texture to create the power supply. I used a few other EA textures to make adjustments to the components of the object.
Polygon Count: 336
Stencil Machine
Unless you allow your artist to freely draw on your skin before tattooing, many use a stencil machine to create the stencil so you can make sure that your tattoo is placed correctly and looks correct before beginning. This is an original mesh made by me. There are a total of 6 swatches (3 designs in English, 3 designs in Simlish).
Design inspired by Vevor Tattoo Stencil Printer https://www.vevor.com/tattoo-machines-c_12593/
Phoenix Image: © Liliia Marchuk via Dreamstime.com
Claddagh Image: http://clipart-library.com/clipart/8iGbR5bbT.htm
Wolf Image: https://freepngimg.com/png/2674-tattoo-wolf-png-image
Polygon Count: 62
Autoclave
No tattoo parlor is complete without the sterilization equipment, namely the autoclave. For this object, I modified the EA The Schmapple Micro Microwave mesh.
Design inspired by Tuttnauer Valueklave 1730 https://tuttnauer.com/us/veterinary-practices/tabletop-sterilizers/manual/valueklave-1730
Polygon Count: 346
Non-sterile Nitrile Glove Boxes
For this object, I modified EA’s Softy Brand Tissues object. There are 2 box colors available, black and gray. There are a total of 12 swatches.
Non-Sterile symbol is a public domain image
Polygon Count: 40
Portfolios
A detail that I thought was missing was a display of the tattoo artist’s work. In real shops, they can be wall displays or portfolios. I decided to make a portfolio with different tattoo designs. There are 3 swatches of different tattoos. This is an original mesh made by me.
Polygon Count: 262
Image Credits:
Swatch 1: EA
Swatch 2:
Snake and Flying Swallow Images by dgim-studio via Freepik https://www.freepik.com/free-vector/new-style-tribal-tattoo-collection_1168313.htm and https://www.freepik.com/free-vector/colorful-flying-swallow-template_8136770.htm
Colorful Old School Images by Freepik https://www.freepik.com/free-vector/old-school-funny-tattoo-collection_1165044.htm
Tribal, Achor, Ship’s Wheel, Skulls, Roses, Dice, Cards Images by Macrovector via Freepik https://www.freepik.com/free-vector/tattoo-black-white-icons-set_9398078.htm
Tribal Images by Freepik https://www.freepik.com/free-vector/new-style-tribal-tattoo-collection_1168313.htm
Swatch 3:
Colorful Images on Left Page by Freepik https://www.freepik.com/free-vector/collection-hand-drawn-decorative-tattoos_1175499.htm
Colorful Vintage Images on Right Page by Freepik https://www.freepik.com/free-vector/pack-vintage-hand-drawn-tattoos_1194571.htm
Crossed Swords, Anchor, Skulls, Scorpion Images by Macrovector via Freepik https://www.freepik.com/free-vector/attoo-studio-flat-icons-collection_4430574.htm
Consent Form
I created a consent form on a clipboard. This is only available in Simlish. I modified some EA textures to create the form. The clipboard is an original mesh made by me.
Polygon Count: 90
Tip Jar
Tipping is heavily encouraged for getting tattoos, at least in the U.S. As such, I decided I wanted to make a tip jar for my parlor. I modified the EA debug jar and some different debug simoleon meshes. The result is a tip jar with both coins and bills inside.
Polygon Count: 579
#tattoo#inked#tattoo parlor#tattoo decor#tattoo studio#sims 4#the sims 4 cc#the sims 4#sims 4 cc#ts4cc#wall decor#ts4#sims 4 custom content#tattoo shop decor#build/buy#sexyirish7#featured
74 notes
·
View notes
Text
I know my fellow artists and creators have been frustrated with the rise of AI on Pinterest and Google. Many of us find it difficult to serch for good references, tips, and general inspiration for art. So I want to share my collection of good, free websites for artists, designers, film makers, and creators so we can create without ugly AI images staring in our faces 🙌
Sketchfab


An incredible source for references. Has a huge collection of 3D animals, architecture, interior rooms, vehicles, food, objects, furniture, nature, memes, characters, etc etc etc. You can literally find several insanely detailed 3D models of the Notre Dame (this one is insane) Models can rotated at any angle as well as zoomed in and out. You can also change the view of the model to be matcap with flat, colorless planes, wireframe, or base color as opposed to fully rendered.
Cons: there are many uploads that are random and incredibly specific, which overwhelms the search. Can be excellent for game designers who want to download models but for artists looking for drawing references, you might have to dig a bit for what you want. Can be so fun for playing around and using crazy fun references for practicing.
Designspiration


As a photographer and graphic designer and someone who can doomscroll on pinterest forever, this is my favorite for finding inspiration for everything: typography, logos, product mockups, illustration, photography, web design, etc. Has an amazing feature where you can search for art with specific hex codes! Probably the coolest feature I’ve seen in search engines, and by far superior to google's color search. This site is mostly for design inspiration, but I feel like if you are super into moodboards, then this is the site for you too especially with the beautiful selection of photography.
Cons: I have no cons, I love this website so much and I used to be addicted to pinterest (still am actually😬) but this is easily my new favorite
Public Works by Cosmos


Thousands of artworks enter the public domain every year, and this website is a search engine for other 100,000 of those copyright free works. All of these works are free to edit, use, and sell with few restrictions.
Cons: I personally find the layout for the search feed a bit frustrating to look around in sometimes, because it’s not the typical "scroll up and down" website. But is very dynamic and overall fun to explore.
Same.energy


This is a good visual search engine that’s a good replacement for Google images and Pinterest. The minimal words makes it simple and easy, and clicking on an image you like to filter the feed to find similar images.
Cons: this is in beta so it still have some kinks to work out. It seems to struggle with specific searches and some of the images brought up in the search can be repetitive or not relevant.
Reference Angle


A website for finding face references in any specific angle and any expression for any gender and age.
Cons: I would love this website more if it gave you the ability to customize the light source, but sadly is not an option. I also feel like there is not a lot of racial diversity in the photos, and some of the images do not match the specific angle. But it is overall a great source for face references
Virtual Lighting Studio by zvork


A good source for light studies. You can change the source, direction, color, and brightness as well stacking several light sources on top of each other.
Cons: there isn’t a way to angle the face or change the expression, so it is permanently in portrait mode. There are four different models and I’m not the biggest fan of some of them…I like the black guy the best because he looks at me kindly instead staring into my soul like the two white guys. The ads are also a bit obnoxious and for the love of god DO NOT USE IN MOBILE!!! The ads are impossible to get rid of.
Film Grab


An archive of stills from a huge list of movies. Good for film makers, photographers, art studies, moodboards, inspiration, etc. Has a huge selection of movies and you can search by movie, director, costume designer, aspect ratio, year, genre, and country. You can also hit random post and it'll give you a random movie, which I think is really fun.
Cons: I do not recommend mobile. The mobile does not have the option to search for a specific movie, so you're forced to scroll through the giant A-Z list of directors or films to find the specific film you were looking for. Another con that I just discovered: a big-ass ad on the top of the website that occasionally advertises AI websites 🤢 (not shown on the screenshots I shared because ew)
Unsplash


Another image search website that has the feeling of Pinterest
Cons: some images are locked for premium only, and the feed is a bit frustrating to scroll through on mobile since they show the images one at a time instead of as a nice collage like pinterest. Some images can also be irrelevant to the search.
Sending lots of love to my fellow artists and creative peeps out there. AI sucks and it feels like it's overwhelming the creative space. But I promise there is a way to avoid it! Keep creating 💕
#fuck AI#artists on tumblr#graphic design#photography#digital artist#small artist#art inspiration#art inspo#digital art#moodboard
120 notes
·
View notes
Text
✨PART OF FORTUNE IN SIGNS AND HOUSES SERIES: 4TH HOUSE✨
Credit goes to astrology blog @astroismypassion
ARIES PART OF FORTUNE IN THE 4TH HOUSE
You feel the most abundant when you have Aries and Cancer Sun people in your life. You could make money via starting your own small business from home or take a leadership role, especially in the kitchen, family matters, children, education, history and geography. You may be an excellent tour guide of your local town. You may also find wealth through becoming a coach, personal trainer or someone who suggest meal plan for a specific sport, for example meal plan for runners.
TAURUS PART OF FORTUNE IN THE 4TH HOUSE
You feel the most abundant when you have Taurus and Cancer Sun people in your life. You could make money via real estate, gardening, landscaping, art and craftsmanship. You can sell handmade items, such as pottery, jewelry or home decor. You may also offer gardening services, sell plants or draw plants and sell your drawings online. You could start a home-based catering service, bakery or sell homemade goods at a local market. You might be able to create financial plans for families since you have a knack for helping others to manage their finances.
GEMINI PART OF FORTUNE IN THE 4TH HOUSE
You feel the most abundant when you have Gemini and Cancer Sun people in your life. You could make money via writing articles, blogs, even e-books from home. Especially on platforms like Medium, Substack or starting your own blog from the comfort of your home. You may also offer tutoring services o reven create online courses in subjects you are passionate about (Udemy, Coursera, VIPKid).
CANCER PART OF FORTUNE IN THE 4TH HOUSE
You feel the most abundant when you have Cancer Sun people in your life. You could make money via a home-based business, such as home bakery, daycare or arts and crafts. You could find abundance in life by becoming a life coach, counselor or therapist. You may earn money from a home-cooked meal delivery. You can also each yourself interior design.
LEO PART OF FORTUNE IN THE 4TH HOUSE
You feel the most abundant when you have Leo and Cancer Sun people in your life. You could make money via music, singing, performing from home, tutoring someone in music and teaching them how to play an instrument. You may also post tutorials (for example guitar tutorials) online from the comfort of your home.
VIRGO PART OF FORTUNE IN THE 4TH HOUSE
You feel the most abundant when you have Virgo and Cancer Sun people in your life. You could make money via selling your homemade jams, pies or granola mix. You may also offer healthy student snacks or offer tips on how to make those at home with cheap and easy ingredients. Again, you could feel abundant when starting a podcast or your own local book club or even themed book club.
LIBRA PART OF FORTUNE IN THE 4TH HOUSE
You feel the most abundant when you have Libra and Cancer Sun people in your life. You could make money via designing and selling your own T-shirts, designing logos for other people. You could be good at doing make up for weddings or birthday parties. You have a knack to be an excellent host at your own home. You feel the most abundant when you have balanced family relations and friendships, partnership.
SCORPIO PART OF FORTUNE IN THE 4TH HOUSE
You feel the most abundant when you have Scorpio and Cancer Sun people in your life. You could make money via teaching people how to overcome tough situations in life and helping them find their purpose, hosting a leadership course online or from home. You may also enjoy talking about mental health and psychology.
SAGITTARIUS PART OF FORTUNE IN THE 4TH HOUSE
You feel the most abundant when you have Sagittarius and Cancer Sun people in your life. You could make money via showing tourists your hometown, hosting a culinary course in a foreign language on the local cuisine. You could also find abundance by becoming a local tour guide, even offering virtual tours of your local town.
CAPRICORN PART OF FORTUNE IN THE 4TH HOUSE
You feel the most abundant when you have Capricorn and Cancer Sun people in your life. You could make money via working with your parents, helping other families finding structure and order in the home, organising someone's closet.
AQUARIUS PART OF FORTUNE IN THE 4TH HOUSE
You feel the most abundant when you have Aquarius and Cancer Sun people in your life. You could make money via video gaming from home and streaming. You could also start a home-based business. You feel the wealthiest when you are being progressive, unique and standing out from the community. You may attract wealth by starting a podcast with your close friends, building websites from home or launching your own social media channel, platform.
PISCES PART OF FORTUNE IN THE 4TH HOUSE
You feel the most abundant when you have Pisces and Cancer Sun people in your life. You could make money via taking photos of families or pregnant women. You may also do videos for someone's wedding, anniversary or birthday. You may host themed parties at home for your friends or poetry nights.
Credit goes to astrology blog @astroismypassion
#astrology#astroismypassion#astro notes#astroblr#astro community#astro note#astro observations#natal chart#astrology blog#chart reading#aries part of fortune#part of fortune in the 4th house#taurus part of fortune#gemini part of fortune#cancer part of fortune#leo part of fortune#virgo part of fortune#libra part of fortune#scorpio part of fortune#capricorn part of fortune#aquarius part of fortune#sagittarius part of fortune#pisces part of fortune#taurus part of fortune in the 4th house#gemini part of fortune in the 4th house#cancer part of fortune in the 4th house#leo part of fortune in the 4th house#aries pof#taurus pof#gemini pof
175 notes
·
View notes
Text
Active Reading

Active reading - reading with a purpose.
When it comes to critical analysis, the purpose of active reading is to familiarize yourself with your primary text and secondary sources to create a thorough and accurate analysis.
You can engage in active reading by paying attention to the type, author, audience, and purpose of a source.
Type
In writing, texts are often categorized based on the form, style, and purpose they share.
Examples: Fiction, nonfiction, horror, fantasy, and mystery.
Each type of writing typically follows a set of rules that can help us better understand the author’s purpose and the meaning of the text itself.
When reading your text, consider how the type of text shapes your understanding of it by asking the following questions:
What type of text is it (e.g., essay, play, comedy, romance, etc.)? Keep in mind that a text may have more than one type.
What stylistic or literary elements are important to that type of text (e.g., imagery, rhyme scheme, dialogue, etc.)?
How does the type of text impact the author’s message? Is that type of text appropriate for the author’s purpose?
Does the author use any stylistic or literary elements uncommon to that type of text?
How does the type of text enhance or take away from the author’s message?
Author
Authors are the people who created a text.
An author’s personal experiences often impact the type and content of his or her work.
Researching an author’s background helps us recognize and understand what influenced his or her work.
As you read through a text, ask yourself the following:
Who created the text?
When did the author create the text?
Where did the author create the text?
In what context was the primary text written (e.g., social, cultural, political, economic)?
Are there any significant events in the author’s life that may have influenced the type and content of the text?
Audience
The audience consists of anyone who reads a text.
Usually, an author considers his or her intended audience when making decisions about a source’s type, tone, and content.
When reading a source, think about how the audience shapes the author’s decisions by asking questions such as:
Who is the intended audience of the source (e.g., artists, scientists, nobles, etc.)?
How does the audience view the author (e.g., credible, biased, etc.)?
How would the audience react to the content of the source (e.g., agree, disagree, indifference, etc.)? Why would the audience react that way?
Are there any other audiences the author may not have considered?
Purpose
Purpose is an author’s reason for writing a text.
3 of the most common examples of purpose include to persuade, to inform, and to entertain.
Identifying an author’s purpose for writing is useful for determining whether an author’s text is written effectively or not.
As you read your sources, consider whether the author accomplishes his or her purpose by asking a few questions:
1. Why did the author write the text (e.g., to inform, to persuade, to entertain, to critique, etc.)? (Note: An author may have multiple purposes for writing.)
2. What is the main idea, theme, or argument of the source?
3. How does the author attempt to accomplish his or her purpose?
How does the author use ethos, logos, and/or pathos?
How does the author use literary or stylistic elements (e.g., character, symbolism, setting, etc.)?
4. Does the author effectively accomplish his or her purpose? Why or why not?
Additional Tips on Active Reading
It’s also useful to read your text from different perspectives.
The first time, read as a consumer. You are reading for enjoyment.
The second time, read as an academic. You are reading to learn and understand.
The third time, read as a critic. You are reading to question both the text’s meaning and the author’s decisions.
NOTE
It’s a good idea to take notes and record your thoughts throughout your active reading process.
Actively reading your sources helps you consider them from more than one perspective.
Active reading also fosters critical thinking.
Once you finish actively reading your sources, you can begin drafting your critical analysis.
Source ⚜ Writing Notes & References
#writing notes#critical analysis#critical thinking#writeblr#spilled ink#dark academia#light academia#studyblr#writers on tumblr#poets on tumblr#literature#writing prompt#poetry#creative writing#writing motivation#writing tips#writing advice#note taking#active reading#reading#booklr#bookblr#writing reference#writing resources
128 notes
·
View notes
Text
Sweeter Than Revenge Part 9
Fandom: Twisters, Tyler Owens, f!reader, Scott's Sister!reader Summary: After your night with Tyler, you don't think anything could make this trip any more perfect. Then you are asked to become an honorary Wrangler. Word Count: 3068 TW: Fluff, Laying in Bed Naked Together, Kissing, Getting a Tattoo, Tattoo Related Pain, Language Notes: A massive thank you to @blue-aconite, @mayhem24-7forever, and @green-socks for all the constant support and for always answering my late-night panicked messages
Divider created by me (please ask/credit before using)
Series Masterlist
Later, you were lying naked on your stomach with half of your body sprawled across Tyler’s. Your head rested on his shoulder as one leg was thrown over his, the thin motel sheet haphazardly tossed across your lower halves. As Tyler’s fingers gently caressed the skin on your bare shoulder blade, you hummed softly. His touch had always made your heart skip a beat, but after what the two of you had just done, everything seemed heightened.
Tyler was not the first man you had ever slept with, but he was the first man who had ever made you feel like a priority. It probably shouldn’t have surprised you that how he treated you throughout the day would carry into the bedroom. Though he never verbally asked if you were okay with what was happening after the first time when you replied by ordering him to take off his pants, you had felt completely safe with him and knew he would stop in an instant if you asked him to. And damn if that didn’t make you want him all the more.
Smiling to yourself, you traced the lines of the tattoo inked over his heart. You had been so focused on other things when he had first removed his shirt that you had barely registered it. But now that everything had calmed, you examined it closer in the dim light shining through the curtains.
Unsurprisingly, it was a tornado. With its twisted funnel and swirling lines along the edges, it almost seemed as if it were in motion, traveling across the firm planes of his chest. You remember seeing a very similar tattoo on the back of Lily’s arm. However, there was one big difference. Jutting out the sides near the top of Tyler’s funnel were two large horns. The effect was a more artistic, stylized version of the Wrangler’s logo.
With your eyelids drooping slightly under their weight, you tapped once on the tattoo and murmured, “I didn’t know you had this. It looks kinda like Lily’s.”
Tyler shifted his head, leaning it against yours. “It should. We all have one. It’s the sign of a true Tornado Wrangler. Dexter designed it and drew the stencil then Lily tattooed everyone’s—except her own. They thought it would be funny to add the horns to mine without telling me.”
“I like it. It suits you.” You leaned forward and gently kissed the tip of one of the horns. Then, settling back, you asked, “So yours is here and Lily’s is on her arm…where is everyone else’s?”
“Dani’s is on her upper thigh, Dexter’s is on his ribs, and Boone’s is in a place I better not ever find out he’s shown you.”
Cocking your head with a wide grin, you snickered, “What are we talking about? Ass or…” You gestured down between his legs.
“Nah, even Boone’s not that crazy,” Tyler laughed. He ran his fingers lightly down your side until they rested on your hip, a trail of goosebumps blossoming beneath his touch. “What about you? I didn’t notice any ink anywhere but I was a little distracted to look too closely.”
“Not yet. I’ve thought about it and I want to someday, but I haven’t found the right design. I don’t want to get one just to get one, you know? I want it to mean something.”
“Makes sense,” he hummed in understanding. Then he shifted so he could stare into your eyes. “I don’t want you to end up doing something you regret later.”
The slightly hesitant, almost fearful edge in his voice was both sweet and a bit heartbreaking. You skimmed your fingers across his jaw, causing his eyes to flutter closed, and you whispered, “I have a lot of regrets, but you, Ty, will never be one of them. No matter what happens or how things might end between us when I leave, you will always be one of the best things that ever came into my life. And what we did tonight? Just like I told you after our first kiss, my only regret is we didn’t do this sooner.”
You felt the tension you hadn’t realized was there ease out of Tyler’s body with a sigh. “I’m glad to hear it, sweetheart. And no regrets from me either.” He kissed the top of your head and wrapped his arm tighter around your waist, causing more of your body to lay on top of him. In this position, you could no longer see his face but his smirk was obvious in his voice as he said, “In fact, I’m really hoping we might have a repeat performance sometime soon.”
You snorted, sending a puff of air across his chest. “A repeat performance? Hell, I’m planning on telling Boone he better get used to sleeping alone. From now on, you’re bunking with me, cowboy.”
Tyler vibrated with laughter beneath you, and he muttered, “Yes, ma’am.”

Luckily, Tyler stepped up and had a talk with Boone the next morning about the new sleeping arrangements. You had really grown to like the cameraman but that didn’t mean you felt comfortable talking to him about fucking his best friend. And based on the deep red color you saw his face turn as you spied on their conversation, you were pretty sure Boone didn’t want to talk to you about that either.
So, for the next few days, everything followed the same routine the Wranglers had fallen into since you arrived. The only difference was that now when Tyler walked you to your room at night, he didn’t leave until he was walking you out the next morning. You expected a lot of teasing from the others, especially about you proving the story about letting a cowboy into your room was true, but no one said anything about it. You caught them exchanging a few looks when you and Tyler turned in for the night or when you came down in the morning, but that was it. However, you were fairly certain you saw Dani physically biting her tongue when you adjusted your shirt one day, revealing a huge hickey on your neck.
While you wouldn’t have minded a little lighthearted teasing, it was nice they weren’t making a big deal of it. You had been a little afraid it would alienate you from the group or make them second guess your intentions with Tyler, so the fact they weren’t treating you any differently made you feel like they were okay with this new situation.
Yet more than the Wranglers silent approval, the thing you were most grateful for since you started sleeping with Tyler was the fact the Wranglers were still staying at a different motel from the other chasers each night. Scott had already accused you of rubbing Tyler in his face out of spite. What would he have thought if he saw Tyler come into your room and not leave until the morning? He all but implied he thought the two of you were already sleeping together the last time he confronted you (though you actually hadn’t been…at least not until later that night), but thinking something was happening and seeing the proof with your own eyes were two very different things. You weren’t sure you’d have the nerve to share a room with Tyler if you thought Scott might be around, so maybe he did you another favor pushing you to change motels after all.
The morning of your original departure date (fourteen days since you first arrived and five days since you had first slept with Tyler), you were cleaning up after breakfast. Since you still didn’t understand how most of the equipment the Wranglers used worked, you had volunteered to become the one who tidied up and packed things away as everyone else prepared for the day. Today was a little different though because according to Dexter’s forecasts, there was a very low chance of a storm forming anywhere in the area. Apparently, it was rare this time of year to not see any systems that even had the potential to form into a storm, but it did still happen. So, as the Wranglers discussed what else they could do for the day, you continued clearing the breakfast mess.
Realizing you were out of garbage bags in Dani and Dexter’s camper van, you hurried over to Lily’s blue van to get the extras she told you she stored over there. But when you checked where you thought they were, you realized you’d opened the wrong cabinet. Instead of garbage bags, you found a case with a clear top containing a metal tool with a needle sticking out of the end and a dozen or so small bottles filled with multi-colored liquid. You recognized the equipment from when you went with a friend when she got a tattoo.
“So, miss girly—” Lily’s voice directly behind you made you jump and you turned sheepishly to look at her, hoping she didn’t think you were snooping. But she had a smile on her face as she continued, nodding to the bag in front of you. “—when am I gonna get to brand you a true Wrangler?”
“Oh!” You were taken aback by the question. Looking past her, you saw the rest of the Wranglers were turned, their faces curious as they waited for your answer. All but Tyler’s. The brim of his hat was pulled low on his face as he sat on the tailgate of his truck so you couldn’t read his expression.
Looking back at Lily, you asked, “You don’t mean…like the tattoo you all have?” She nodded. “But I thought only the Wranglers had them.”
“Damn right,” Dani said, holding up her breakfast beer in a sort of cheers. “And you’ve been into a dozen storms by now. If that doesn’t make you an honorary Wrangler, I don’t know what does.”
You smiled as Boone and Dexter added their approval of the idea but you noticed Tyler had been silent on the matter. Swallowing, you asked, “Ty? What do you think? Should I do it?”
He sat quietly for a moment, then hopped off the back of his truck. Walking towards the front of Lily’s van, he motioned you to follow him, putting a little space between you and the others. You felt a pit forming in your stomach as you went after him. Maybe he didn’t agree you had earned your place with the Wranglers after all.
As he came to a stop and turned towards you, finally looking into your eyes, you quickly said, “If you don’t want me to get it—”
“That’s up to you, sweetheart. Of course I think you’ve earned it—” His fingers lightly caressed your back, right along your shoulder blade, sending a chill of pleasure shooting through you as the pit in your stomach dissolved “—but don’t let these idiots talk you into something you don’t wanna do. There’s absolutely no pressure. You told me you only wanted to get a tattoo if it meant something to you and I don’t want you to—”
“But if I do want it?” you asked, cutting him off. “What if it’s finally a design that means enough to me to get?”
A smile stretched across his face. “Then I’ll hold your hand the whole time.”
Your own face brightened into a smile that matched his. “Then let’s do it!”
Tyler took your hand and walked you back over to the waiting crew. With his dimples on full display, he said, “Well, I think you’ve found what we’re gonna do today.”
The Wranglers all gave a whoop of excitement and Lily ducked into her van to grab her bag with the tattoo gun and ink. She patted one of the chairs set up in the back and Tyler helped you up into the van.
As you sat down, you rubbed your hands over your thighs to wipe off the sweat that had started to form there. You still wanted to do this—there was absolutely no doubt in your mind you wanted the “Wrangler brand”—but you had a relatively low pain tolerance. You had been brought to tears when you got your ears pierced and it was the reason you had never gotten any other piercings even throughout your rebellious teenage phase (a fact you were extremely grateful for looking back). But as Tyler slid his hand into yours and linked fingers, you knew you could do this.
Lily finished laying out everything and turned to you. “Where do you want it?”
You thought back to Tyler’s fingers stroking against your shoulder blade, how he often woke you up by pressing kisses to that spot as he held you in his arms. “My shoulder.” Bending your arm back, you patted the place you were thinking as you looked at Tyler. His eyes darkened slightly as he watched you, and you knew you had chosen the right spot. “I want it right here on my shoulder.”
Lily nodded. “That won’t be a problem.”
After a brief discussion about how big you wanted it and the exact placement, she printed out a stencil on a machine on her desk. Then came the slightly awkward conversation about how she logistically was going to do this since you were still sitting there with your shirt on. That issue hadn’t actually crossed your mind to that point. While you probably would have been okay going topless so Lily could work if it were just her and Tyler looking at you, Dani, Dexter, and Boone had moved their chairs over to the open door of the van to watch the process.
A plan was eventually agreed to and they shut the van door for a moment. Luckily, you had worn a casual, short-sleeved button-down top today so once you had some privacy you took it off and then your bra. Then, you put your shirt back on but this time backward so the buttoned side was across your back. Leaving it open gave Lily the perfect access to the area you wanted the tattoo.
She placed the stencil and Tyler held up a mirror so you could make sure it was the size and position you wanted it. Even just seeing this rough version on your skin made you vibrate with excitement and, from the way Tyler’s eyes roamed across the stencil, he felt the same way. You could almost feel his lips tracing the design between soft mutterings of how amazing it looked on your perfect skin...
You gave Lily the go-ahead to start.
With one hand, Tyler opened the door to the van so the others could see again while he squeezed your hand tightly with his other. And you were so grateful for him as soon as Lily touched the tattoo gun to your skin. It was more of a shock than pain, but you latched onto Tyler’s hand like your life depended on it. He chuckled softly, the sound almost getting lost in the buzzing of the machine, and he squeezed your hand back. Slowly, you loosened your grip.
At first, it wasn’t too bad. It wasn’t pleasant, but it was nowhere near as painful as you had feared. Based on Tyler’s tattoo, Lily knew what she was doing and she constantly provided you with updates and compliments about how well you were doing. The other Wranglers tried to talk to you or tell stories to distract you and that helped the time pass for a while. However, after about ninety minutes, the pain began to get to you. Trying your best to hold still, you gritted your teeth and squeezed your eyes shut.
The only thing that made it bearable was the fact Tyler kept his promise and held onto your hand the entire time. Even when you began squeezing it so hard your fingers went numb, he didn’t say a word. He just rubbed his thumb across the back of your hand and leaned over to mutter words of praise and encouragement. At one point he asked if you wanted to take a break, but you knew you might never get back in the chair if you did, so you had Lily continue on.
It took a little over three hours for her to finish and by that time you had silent tears rolling down your face. Tyler wiped a few of them away with a soft brush of his hand over your cheeks and you gave him a pained smile. Yet all the pain, all the tears, all the time was more than worth it when he held up the mirror again for you to see the finished product.
It looked just as incredible as you had hoped. It was the same dynamic tornado that both Tyler and Lily had, the extra lines around the edges making it look like it was alive on your back. However, just like Tyler’s horns, Lily had added a little something extra to yours. Near the top, a centimeter or so away from the funnel, was a small cowboy hat being swept up in the storm. Though your skin was still irritated and a bit bloody making it hard to make out too many details, it was clear it was a very specific hat that you had come to know very well over the last two weeks.
Lily must have seen you noticed it because she said, “I took a small liberty there. I hope it’s okay.”
You nodded, tears unrelated to your discomfort filling your eyes. “I love it,” you choked out. Wrapping her in a hug (ignoring the fresh pain as you moved your arm), you added. “It’s perfect. Thank you.”
She hugged you back, careful to avoid your shoulder. “You earned it. Now no one can argue you’re not one of us.”
Dani, Dexter, and Boone cheered from their seats outside and Tyler pressed a kiss to the top of your head. You squeezed your eyes closed as a warm wave of emotions flooded through you.
Originally, you had come to Oklahoma looking for family. And when that fell apart, you managed to stumble into a group of people that had accepted you in ways that other family never had. This was where you belonged and you now had the ink to prove it.
You were a Tornado Wrangler. And nothing could ever take that away from you.
I know this Part is a little less exciting than the last few, but we are setting up for everything that is about to happen in Part 10 😈 It is scheduled to post 10/14 as part of whumptober and will be the last Part of the series. However, an epilogue will also be posted on 10/21 to wrap everything up. Thank you to everyone who has supported this series and sent their love. It has meant the world to me and I'm excited for you all to see how it ends 💗
#sfw repost#fic#sweeter than revenge#tyler owens#tyler owens x reader#tyler owens x you#tyler owens x scott's sister!reader#f!reader#scott's sister!reader#twisters#twisters 2024#scott#scott twisters#twisters scott#scott miller#boone twisters#dani twisters#lily twisters#dexter twisters#fake dating#fluff#angst#kissing tw#language tw#tattoo tw
69 notes
·
View notes
Note
(takes out clipboard) tumblr user 7-ferrets-in-a-coat. survey says that people wish to see the god in the machine narinder design. will you please the people?
*Kicks feet like a schoolgirl* Oh my goood haiii user spilycoris that totally doesn't know what nari looks like thank you for the ask
Anyways you also get the backstory to go along with the Narinder design
+ Bonus , His voiceclaim is Niel Cicierega Specifically from the song Redesign the Logo , the main vocals

SO. Narinder was an Ai originally created purely to see how lifelike an intelligence could be, but Shamura eventually got a bit attached and after the studies were completed they couldn't find it in themselves to terminate the lad. Which. bad choice #1. Bad choice #2 would probably be the fact Narinder got Unsupervized internet access after a bit of successful pleading to Shamura because he was getting bored.
Tip, don't give a conscious Ai access to the internet because Narinder saw all the horrors and aggression and hate on the internet and turned Very bitter.
In the meantime the scientists started collectively working on a robotic body for Narinder to eventually reside in after he is socially formed, but after witnessing how Narinder was starting to express wishes of anihilation directed at humanity they decided to lock him out of "Having a body" rights
So eventually Narinder, now bitter , manages to escape containment and into the world wide web and nestles himself in Ludo's computer, because they seem like a person who could help him get freed and get past the radars / firewalls / Barriers/ bossfights (Idk, words) the scientists set up (for which i already got designs but we won't see them for a While)
OK NOW color symbolism /reference :3333
So you know Jesus? yeah? You know Jesus paintings? Usually he is represented with mainly 2 colored veils on him, Red and Blue. Red represents the Flesh, the humanity of Jesus, Whilst the Blue represents godhood, holyness. So Narinder has red eyes and features because he is overall Made by humans, his consciousness tainted by it, his very own Core influenced and molded by the hatred humanity has. He dresses himself in Blue robes, he Is a god, he wants you to believe that but. At the end of the day he is Human.
Also the marking on his chest is something that came later when he decided to manifest himself to the lamb and wanted to appear even more holy (And also a callback to my main cotl au where Narinder is trans)
Me when Paintings symbolism
ALSO thank you to that one good friend that helped with Shamura, Leshy and Kallamar, they helped with the Narinder Concept as well :3
#god in the machine au#cotl narinder#cotl au#narinder ai#sam maow chitters#asks#haii spily :3#cotl#cult of the lamb
74 notes
·
View notes
Text
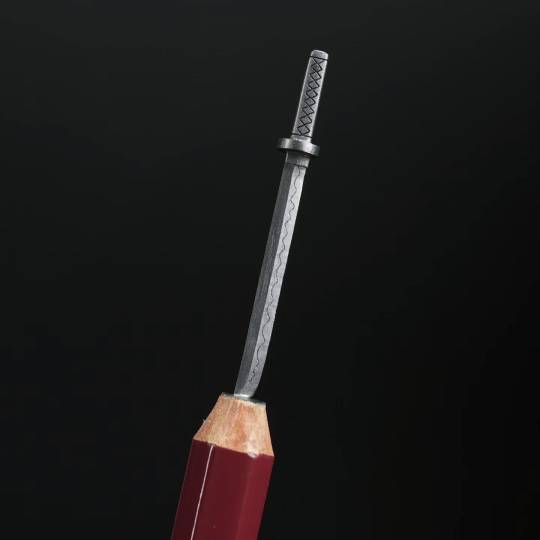
Artist Carves Intricate, Miniature Masterpieces from Pencil Lead
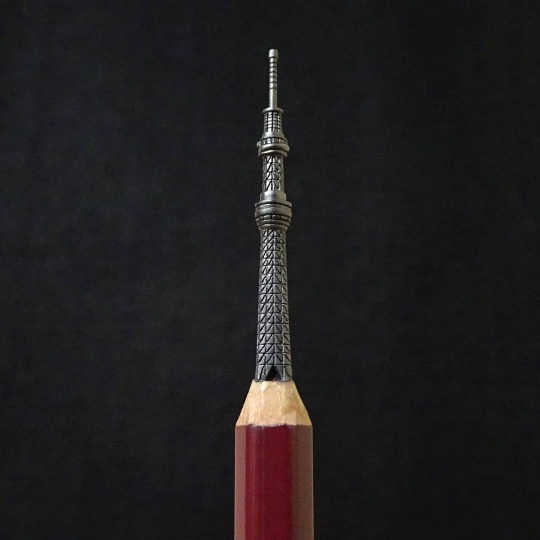
If you’ve ever used a pencil, you know how delicate and brittle the pencil lead can be. Yet somehow, Japanese artist Shiroi has mastered the art of carving this fragile material into incredibly detailed, miniature sculptures.
Shiroi (@shir0003) began his journey into pencil lead carving nine years ago after watching a TV segment about renowned Japanese pencil carver Toshiyuki Yamazaki. Inspired by the intricate detail Yamazaki achieved, Shiroi decided to try it himself. At first, simply keeping his hand steady enough to avoid breaking the lead was a monumental challenge. However, through persistence and practice, he has become a master in his own right.
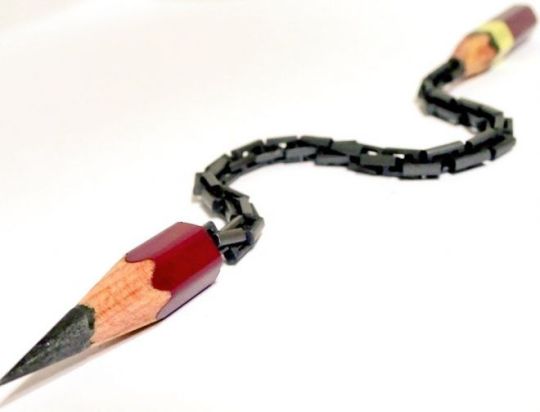
The fragile nature of pencil lead is what makes this art form so difficult yet so fascinating to Shiroi. The common frustration of breaking a pencil tip gives us all an appreciation for the patience and skill required to create one of his intricate works. For Shiroi, it’s this very challenge that makes pencil lead carving so rewarding.

One of his most remarkable creations is a sculpture featuring all 26 letters of the alphabet, carved into a single piece of lead. Completing the piece took several days, and by the time he reached the final letter, Shiroi’s hands were shaking from the tension. He managed to finish the piece and photograph it, but the lead ultimately broke due to its extreme fragility.

After sharing his "A to Z" sculpture on social media, Shiroi received an outpouring of positive feedback. However, one critical comment labeling his work as “wasteful” struck a chord with him. This critique fueled his determination to improve and create pieces that would be appreciated as true art.

Over the years, Shiroi has refined his skills to an extraordinary degree. Today, he can carve just about anything from pencil lead, including miniature swords, replicas of famous landmarks, interlocking chains, and even brand logos.

When crafting his delicate sculptures, Shiroi takes great care to control his breathing, pause frequently to maintain focus, and continuously explore new techniques to elevate his art. His dedication has transformed an ordinary material into a canvas for extraordinary creations.
28 notes
·
View notes
Text

Okay, this is my first time using Tumblr so bare with me! I have been sick for quite a while and starting tracing/drawing to de-stress which has been a massive help. My sibling gave me the idea to pop the things I made on Redbubble; If I sell stuff, cool! Some extra money. If not, so what? It doesn't hurt anyone :)
So yeah! I decided to start posting them on here as well. If you have any tips, feel free to let me know :)
#911#911 abc#911 fandom#911 fox#911 lone star#911 show#911onabc#lgbtq+#pride flag#transgender#transgender flag
16 notes
·
View notes
Text

🧡 Tuesday Tips #3 🧡
Your website is more than just a collection of pages—it’s your digital home. It should reflect you, your interests, and your personality. But with so many sites out there, how do you make yours stand out?
Here are 25 ways to make your website feel more personal, unique, and personalized to you!
........................................................................................................
🎨 Design & Aesthetics
1. Custom Color Palette – Pick colors that resonate with your personality and aesthetic.
2. Unique Typography Choices – Use a mix of fonts that match your vibe.
3. Handwritten or Doodle Elements – Add personal sketches or notes.
4. Custom Cursor – Let visitors use a fun, themed cursor on your site.
5. Personalized Favicon – A tiny but powerful detail that makes your site feel complete.
6. Themed Layouts for Different Pages – Make each page visually distinct but cohesive.
7. Custom Backgrounds – Textures, gradients, or even a personal photograph.
8. Retro or Experimental CSS Styles – Go wild with unique styles that make your site stand out.
9. Create a Custom Hand-Drawn Logo – Instead of a standard logo, try sketching one yourself for a unique touch.
10. Add Subtle Animations – Small hover effects, background animations, or cursor trails can bring your site to life.
11. Play With Layering Elements – Overlap images, text, and shapes for a more dynamic look.
12. Design a Personalized Loading Screen – A custom loading animation or message adds a fun detail visitors will remember.
13. Add Your Own Handwriting as a Font – Convert your handwriting into a web font for a truly personal touch.
14. Design a Seasonal Theme Switcher – Let visitors toggle between different seasonal or mood-based color palettes.
........................................................................................................
📜 Content & Personality
15. Create a Behind-the-Scenes Page – Show how your website was built, share your thought process, or include fun bloopers.
16. Add a "The Making Of" Section – Share drafts, sketches, or early concepts behind your creative works.
17. Include a Personal Dictionary of Words You Love – A list of favorite words, phrases, or slang you frequently use.
18. Design a "Things That Make Me Happy" Page – A simple, uplifting page filled with personal joys.
19. Show Your Progress on a Learning Goal – Track and share your journey in learning a new skill, language, or hobby.
........................................................................................................
💾 Interactivity & Engagement
20. Add a Clickable Mood Indicator – Let visitors see your current mood with an emoji or phrase that changes over time.
21. Create a Dynamic Banner That Updates Automatically – Display different messages depending on the time of day or special occasions.
22. Add a "What I'm Listening To" Widget – A live-updating display of your current favorite song or playlist.
23. Embed a Poll or Voting Feature – Let visitors vote on fun topics or help you make creative decisions.
24. Introduce a Mini Personality Quiz – Something quirky like “Which of my favorite books/movies are you?”
25. Make an "Ask Me Anything" Page – An interactive page where visitors can submit questions for you to answer.
Closing: Make It Yours!
Your website should be you in digital form—fun, unique, and engaging. Whether you add just one or all 25 ideas, the most important thing is to have fun and make it your own.
If you try any of these ideas, let me know—I’d love to see what you create!
-----------------------------------------------------------------
Want to help the Small Web movement grow?
Join us on other platforms. ♥
FB Page & Group:
facebook.com/thesmallweb
facebook.com/groups/thesmallweb
Twitter/X:
x.com/smallweblove
Tumblr Community:
tumblr.com/communities/thesmallweb
Mastodon:
indieweb.social/@thesmallweb
#small web#indie web#web revival#old web#blog#neocities#2000s web#decentralized social media#decentralizedfuture#old internet#decentralization
17 notes
·
View notes