
Don't wanna be here? Send us removal request.
Statistics
We looked inside some of the posts by anunorderedlistapart and here's what we found interesting.
Average Info
Notes Per Post
19
Likes Per Post
17
Reblog Per Post
2
Reply Per Post
0
Time Between Posts
2 months
Number of Posts By Type
Text
17
Last Seen Tumblr Blogs


Fun Fact
Women make up for the other 50% of Tumblr’s audience.
Text
Get on this CSS-GRID level

I like CSS frameworks a lot! Use them all the time. Very few complaints.
I’m also one of those front end developers that had no strong opinions on whichever framework I was using. Mostly.
I like bells and whistles in my CSS frameworks, and I don’t like to spend a lot of time configuring things. For the last year and change I’ve been enjoying Foundation quite a bit (Love you, rem-calc() and @breakpoint!), but before that I was a die hard Bootstrap enthusiast. Although I’ve heard the complaints that sometimes frameworks can be heavy or cumbersome, offer too much or too little, I personally appreciate them as it saved me a lot of unnecessary prework.
I probably would have gone on using CSS frameworks without a second thought until I saw that Foundation had upgraded yet again from version 6.3 to 6.4. I remember being involved with projects going from Foundation 5 to 6 being somewhat of a headache to get used to, so I could only imagine what Exedrin worthy moments that this versioning might entail as we were going from a grid on one plane (the X axis) to two plains (both X and Y).
Coincidentally, one of my coworkers introduced me to CSS grid as I was wrapping my head around a two dimensional grid system possibility and my mind was blown. I actually was unaware that the CSS grid was not a new idea put out by the people at Zurb, but rather a new feature that’s been en vogue this year (its currently a W3C Candidate Recommendation). But what is CSS grid all about?
In its simplest form, CSS grid is all about containers, and the display properties set on that container. A container dictates the grid display property, plus how many columns and rows within and gutters. Essentially, as front end developers we are free to come up with grids that suit our needs, and then in those grids place the items where they would be most useful.
But it gets even more interesting than that. Because we are free to create grids that fit our needs, within each grid cell we have free reign to put any element that we would like in there... including another grid. So, for example, if we wanted to have a widget on a larger grid that flexibly changed at different breakpoints, a nested CSS grid would handle that with ease.
Mind blowing, is it not?
To test it out, I made a test project (professing my preference for cats). I first got familiar with creating grids, rows and columns. Then I had some fun seeing these elements in action and tried adding in a nested grid that behaved differently at different breakpoints. You can check out the repository here, which has all of my notes added for future reference.
I found learning the concepts of CSS grid to be incredibly simple (if you’re a seasoned pro with any of the popular CSS frameworks out there), but the caveats really lied in the flexibility. For example, as I decided to use percentages for flexible columns, but also used fixed widths for images- which looked bizarre at certain breakpoints. Also, I stumbled a bit on vertical alignment on items of various heights, but once I remembered that I could define where in a grid or nested grid I wanted an item to be placed, it got much easier to get the alignment that I wanted.
Overall, learning to use CSS grid wasn’t hard to pick up, and offers greater control over the visual state of your application with less future upgrade headaches. CSS grid is also widely supported (save for some versions of internet explorer and Opera, which can be accommodated with a polyfill).
If you have the time and interest, Id suggest reading the MDN documentation as a starting point and try out a test project for yourself. In an afternoon or less, you too could be creating simple yet sophisticated layouts with a minimum of markup.
Although I may go back to using pre-established and battle tested frameworks out of habit, after trying out CSS grid, I no longer feel like writing my own grid system is out of the realm of possibility for me. CSS grid is superbly simple and incredibly enjoyable.
So perhaps I am starting to form that strong opinion...
0 notes
Text
Snazzie: On building a scaffold and NPM packages.

For awhile now, I’ve been working with and using a client side site tool that I built, and I love it. I call it Snazzie (as in “Hey, that’s a Snazzie looking site!”)and it has saved me countless headaches in just a few short months.
I’ve also wanted to take my project one step further by open sourcing it extensively, but I knew that if this was really going to be a successful project I had to make it easy to install and setup. The original Snazzie wasn’t difficult to get set up with, but it wasn’t a walk in the park either. So I challenged myself to revisit building NPM packages and get familiar with scaffolding tools. This has been an incredibly rewarding experience, let me tell you!
Embarking on this project, I wanted to build something that had a similar feeling to the Facebook React Boilerplate setup but for vanilla HTML/CSS/JS sites (like Github Pages). Like the React Boilerplate, I wanted the Snazzie Generator to initialize projects quickly and involve minimal configuration out of the box but allowed the user to customize their projects as they wished.
Although I the original Snazzie was working fine with some user configuration, it was a far cry from what the React Boilerplate did. This comes from the history of Snazzie itself, as I was (admittedly) hazy on what NPM “was” and what tools were out there to help me. Let me explain.
Quite awhile back, I had tried building an NPM package in hopes that I would be able to build the Snazzie Generator, but I was really confused as to what I’d need to do to build a scaffold from the command line. Would I have to write exported functions that build directories? What about subdirectories in those directories? How would I make the basic files with all the gulp functions I’d need? (Yes, I really thought I’d have to write all of that.) It was all so much to consider that I got overwhelmed and then I abandoned Snazzie for well over a year.
Although my confusion and project abandonment wasn’t the high point of this for me, I’m glad that all that time ago I had taken the time to learn the basic concepts of publishing packages with NPM, as a year and change later I was now able to understand concepts that I was previously struggling with and it was WAY easier the second time around (more on this in a second).
Like I was saying before with the React Boilerplate, I knew that there had to be other people who had solved this “lets make a scaffold” problem and I could probably use their tools for my project. I did some googling around and stumbled upon Slush, which was the EXACT tool that I was looking for. For those not familiar with it, Slush is a scaffolding system (described as an alternative to Yeoman) that relies on tasks similarly to how one would use Gulp in any of their other projects.
In my opinion, a slushfile is a fancier version of a gulpfile- which makes this tool really easy to pick up if you’re a Gulp enthusiast. After installing Slush globally, making a new repository for my project, reading a bit on how to use Slush and trying a few things out, I realized that I could add all the files that I needed into the templates directory in my new Slushy project and have a bona-fide scaffolding generator that could be reused over and over. Victory was mine!
Next, I was presented the problem of how to make this tool easy for other people to use- which is where my previous struggle with grasping the concept of what NPM “was” (as it was preparing me for what I was going to be doing today).
I started by taking a deep breath, going back to the NPM documentation, and reviewing what a NPM module was and how to publish packages. First things first.
This is where the dawn slowly came to my apartment. Although I had a high level overview of NPM packages, I had missed a key concept that the NPM documentation had pointed out- that anything could be published as an NPM package as long as it had a pacakge.json file. Read that again. Anything could be published as an NPM package as long as it had a pacakge.json file.
My repository publishing world was turned upside down. A great majority of my GitHub repositories had package.json files.. and thus they could ALL be published as NPM packages. All of them. Like tens of them. All of those github repositories were just “unpublished packages”. My confusion as to what NPM “was” now eliminated.

You see, when I had originally tried building Snazzie, I couldn’t wrap around my head what one of my friends had told me about NPM. NPM is just another way of publishing open source projects (but for node.js). Read that again slowly and let it sink in. Not so mind bending, eh?
In my mind NPM had a totally different feeling and thus use compared to GitHub. To me, NPM packages were focused, small, and usually used in conjunction with larger projects while GitHub seemed like the mamajama of anything built on the internet. What I had discovered while building the Snazzie Generator is that Github is more like reading the newspaper where you get a little bit of everything, while NPM is more like reading a magazine on your favorite topic. The subject you’re reading about may be covered in both the newspaper and the magazine, but the magazine wouldn’t have such a broad spectrum of topics in it. This is the key concept of NPM- its a focused open source platform.
Overall, building the Snazzie Generator has been a wonderful learning project for me for a few reasons. First, I finally locked in the concept of the usefulness of NPM and I’m excited to use it more for things that I want to use in multiple projects. Next, I did not reinvent the wheel. Instead, I found tools that helped me build what I was once convinced that I’d have to start from scratch (and they were really easy to get the hang of). Lastly, and most importantly, I got to build a tool that I and anyone else could use over and over. All three are winners in my book.
I hope that you take a minute to check out the documentation site that I made to go with this as well as the Snazzie Generator GitHub Repo. I hope that you take a minute to try out Snazzie yourself and then let me know how much you love it!
0 notes
Text
TIL: Subscriptions, Dispatch and Why <Provider /> is Awesome.

Although I’m feeling quite comfortable with React at this point, I’m still on the upswing with Redux (or any more complex state management, really). So today I had an epiphany when I discovered what subscribe and dispatch were actually doing, and how <Provider /> comes into play! (Queue angelic singing of enlightenment.)
Granted, there’s more to your state than dispatch and subscribe functions in Redux, but I found them to be the most interesting, as I understood the concept of an action, a reducer and a store on a high level thanks to the Redux documentation, but I was having a hard time understanding how the reducer knew what to do when, even though I carefully poured over the Todo app example.
My problem (and frustration level) could basically be boiled down to this:

And then I figured it out, thanks to Dan Abramov and Stack Overflow. I wasn’t understanding how to alert that I was changing something, nor listening for any state changes, really. I thought I was, but nope.
Lets go over what each of those functions are, to start.
When you dispatch an action, you’re essentially calling a function that has a type, and some other data that goes along with it (such as text or a number or many different things, like text and numbers). This function doesn’t have to be complex really, but it does need to have a type so that the reducer will know what to do when that type matches one of the cases listed therein. If no cases match, the current state is returned thanks to the default case.
Its also nice to note that with dispatch, the getState function will also be called simultaneously. This function gets whatever is currently in the store, so that you can make a copy of the current state with your changes to it, which will happen in the reducer itself.
Next, and my own stumbling block in this, was the subscribe function. Subscribe is triggered anytime an action is dispatched, and looks to see what changes might have happened.
Is this a reducer? Not as far as I can tell. Subscribe is just looking for whatever changes happened by calling getState in the callback function, then doing something with that state change. For example, if you were creating an application with redux and you added an item to a list (or removed it), then the subscribe function would listen for those changes only.
When I finally got this concept, I was like:

However, there’s a gotcha in there. Although you can use these functions willy nilly throughout your app, Redux’s Provider component does the listening for you, without you having to lift a finger- and then can map it to your components. Even Dan Abramov suggests not using subscribe directly, but instead to write a new function that observes for changes. (Personally, I would rather use something already written by the pros though, as I’m not an expert at pattern recognition in JavaScript.)
So that was my problem. I understood the concept of an action, that the reducer was making a copy of my state to use and that somehow I would be getting information back, but I wasn’t sure how to hook things up. Now I understand that I can use dispatch to say “Hey, something is going on here!” and I can use Provider’s mapStateToProps function to get those state changes so that I can apply them to my application as a whole.
So now that I’m more confident in how to get and apply the data I want to my application, I’m excited to try it out in some new projects! Redux is becoming less of a mystery every day, thankfully.
0 notes
Text
Node Upgrade 101: The (Literally) Forgotten Tutorial

I pride myself on being one of those people who keeps their software up to date regularly, diligently installing the newest upgrades whenever possible. (How could I not? I’m a developer.) However, just yesterday it occurred to me that I myself had committed a cardinal sin of web development..
... I was running a version of Node and NPM TWO versions out of date. Two!
My web development world had not ceased to exist by using an outdated version of these, but I knew that it wasn’t best practice and that eventually it would cause me problems as the web development world advances ever forward. So I decided to throw a bit of caution to the wind and upgrade.
Upgrading your version of Node and NPM is really easy to do, but also easy to forget. So I’ll write down all the steps for your handy reference, should you also be in the same boat as I someday.
If you have Homebrew installed, upgrading Node is really about as simple as typing in
brew upgrade node
If you don’t have Homebrew installed or don’t feel like using it, its also ridiculously easy to upgrade your versions of Node and NPM without it. You’ll just have to have a package installed beforehand to handle the upgrade. Here’s the non-Homebrew way:
If you don’t have N installed, first install that globally with npm install -g n.
Clean your NPM cache with npm cache clean -f.
Get ready to get rolling! Sudo install the latest stable version of node with sudo n stable. (Your password will be the one you use on your computer.)
Update NPM with npm update -g.
Rejoice.
That’s really all there is to it. If you’d now like to confirm that you’ve upgraded your packages correctly, you can check with
node -v
and
npm -v
.
Falling off your chair may be harder than upgrading Node.
As a side note, it may also be worth installing NVM as well on your computer, should you need to switch between versions for any reason, but this is entirely up to you.
Now that you know how to keep your node versions up to date, you can learn from my transgressions and keep your system running smoothly for years to come. Good luck!
0 notes
Text
Ready! Fire! Aim! Deploying The React Boilerplate To A Github Page.

The other day, I made my first redux based project, a todo app. Once I was satisfied with the end result, I thought to myself “Self, this would make a really great grocery list”.. so I had to try to deploy it to a GitHub page. Turns out, it was about as hard as falling off (ants on) a log to do.
If you’re using the Facebook create-react-app boilerplate as your base, deploying your new project to the world via a GitHub page is really easy. It takes only a few steps and a few minutes to do! Ready to unleash the power? Let’s go!
Once you’re happy with your locally running build, you’ll have to first modify your package.json file to include the homepage where you’d like to show your app. It should look a little something like this:
"homepage": "https://[YOUR USER NAME HERE].github.io/[YOUR REPO NAME HERE]"
I put mine at the end of the package, after my scripts.
Next, you’ll need to install the gh-pages npm package and save it as a development dependency. This is the package that does all the heavy lifting of getting all of your work to your github pages branch whenever you’re ready. You can do this in your repository by running
npm install gh-pages --save-dev
Lastly, you’ll need to add in a deploy script in your package.json. You’ll want to add in the following two lines (marked by plus signs) to the bottom of your scripts object, which run the building and deployment. The end result should look something like this:
"scripts": {
"build-css": "node-sass-chokidar src/ -o src/","watch-css": "npm run build-css && node-sass-chokidar src/ -o src/ --watch --recursive", "start-js": "react-scripts start",
"start": "npm-run-all -p watch-css start-js",
"build": "npm run build-css && react-scripts build",
"test": "react-scripts test --env=jsdom",
"eject": "react-scripts eject",
+ "predeploy": "npm run build",
+ "deploy": "gh-pages -d build"
}
Once you’ve done all of that, you’re ready to unleash the beast by first running npm run predeploy and then npm run deploy. The create-react-boilerplate does everything else for you.
For simple client side static sites, building your react apps to GitHub pages couldn’t be simpler. You’ll be up and running in under five flat! I’m quite enjoying the fruits of my labor... literally, with my todo app.
0 notes
Text
On Trying New Things: Redux

This weekend, I finally sat down, buckled up, and decided once and for all to stop skirting my state management and get to know Redux. I don’t know why it took me so long.
It was time. I had built a few test projects for myself and was feeling pretty confident in my rapidly solidifying knowledge base with React, but I admit that I had done almost everything possible to avoid learning about how to use Redux. State management intimidated me. I thought learning to use Redux would be this REALLY BIG THING and super impossible to learn, eventually leaving me with a headache, confusion, and a back shelved project lying somewhere on my computer (never to see the light of GitHub).
I really wish that I didn’t have this perception for so long, as getting to know Redux wasn’t nearly as heinous as I thought it would have been. If I can tackle this in a long afternoon and feel pretty OK about it, then I can assure you that you as well can learn the basics of and grasp the fundamentals of how Redux works too.
Although the documentation for Redux is very reader friendly and (along with a course or so from Wes Bos) I felt very comfortable with Redux, I like to really solidify what I’m learning by describing it after trying it out. I hope that if you too are scratching your head a bit with state management and/or Redux, this will be another tool in your own tool belt. Lets get started.
Redux is a state management composed of a few really important bits, and a couple of things that pass along information to presentational components. That’s it. Easy, right? (The rest is up to you to complicate it.) Lets go over the important bits, and then how all the information from them get passed on to the presentation components.
The important bits of Redux are your store, which stores all the states of an application, the reducer, which acts as a middleman between what’s going on and where the state is stored, and the action, which describes what’s happening when in your application for some part of your state.
The store is the alpha and the omega of your application. The man behind the curtain. The big brother to your creative genius. The store sits at the root of an application, acting like a Fort Knox of information. I personally think of it as a metaphorical very secure Tupperware container where all of the different states in your application are stored. The security is added by a couple of layers safeguarding the store, reducers and actions.
From the ground up, we first start with actions. Actions are, in my opinion, the interesting part of this triad of important bits, even though they don’t really do all that much. I think of the action as a highly excitable cheerleader for your application that exclaims that something is going on in your application that will require a state change. (Yaaay!) They have two parts to them, the type, which essentially says what’s happening in that function, and the parameters that will be handed off to the reducer.
Reducers are the grounding, stoic bouncers of state management. They work both with the overeager action and the untouchable store. A reducer connects to an action by receiving what is happening and then using a switch case statement to see if any of those actions meet one of the parameters in the reducer. If they do- great. The reducer then will use a pure function* to get a copy of the current state from the store, and return the updated state to your application as requested. If there is nothing that matches the parameters, then the default should be to just return the existing state and move on with life. (This is also handy as there’s one point of entry into the store. Reducers can be combined into one mamma jamma of requests bombarding the store at any given time.)
Actions, Reducers and Store are the three major players in redux, but there are also a few other tools that help usher information in and out of the store. These two tools are called provider and connect. These two parts should be considered the containerizing part of your application, as they’ll pass all that data to and from your visual components. The containers may or may not have visual components attached to them (I know, confusing), but really their main function is just to usher data in and out as its needed.
Provider is also at the root of your application and will encompass everything else in your application that a user could see and interact with. The provider is what passes out all the data to your application and passes it back, really.
I know that this might seem confusing a bit- such as “Wait, isn’t that the same as a reducer? And what about those actions?”, but bear with me here. If you think about an action as a trigger and they can be in a presentational component and the reducer is working as the bouncer to the store- then provider is kind of like the google maps of what’s going on with your state as neither your action or your reducer has a good sense of direction. Provider gives the directions on where the data should go from the actions and the reducers, and connect is the intermediary GPS in that it connects the newly modified state to the actual component.
Connect really makes the data readily transmissible between all those parts and the presentational component. Connect doesn’t do anything with the state in regards to mutating it, but it directly hands the information to the component as well as dispatching the information back upwards when a change is necessary. Simple and powerful. So where as an action may be saying “Hey, something is happening right now here!”, connect will say “Great, here’s how to get that information to where you want it go go. Go away.”
And that’s about it! There’s definitely more to learning Redux than just that (like what do to with asynchronous information, adding middleware and routing), but this is a high level overview that helped me get up and running. If you too are confused and intimidated by state management, don’t be. Trying out redux isn’t nearly the hurdle as picking up React was- and if you’ve got that, then you’ll totally have this.
*Its important to note why the function needs to be pure here. A reducer is a function that applies something to an accumulator and each item to condense them into a single item. It will make your life simple. Be sure to read more on MDN about what this does when considering your reducers.
0 notes
Text
Case Study: Little Pioneer Cider House Rebuild

Beginning in mid-2014 I began working on a project in my spare time, Little Pioneer Cider House. Its been an interesting project to pick up and put down, as I’ve learned so much with each tweak and iteration on the project. My most recent work on it has been the most impressive, so I’ve turned it into a case study.
About three years ago my friend Craig Levy, owner of Little Pioneer Cider House had a problem on his hands: his website was in dire need of an overhaul as it was impossible to update and expensive to maintain. About 10 years prior he had a site built that was excellent at the time and had many interesting features, but as time marched on the technology changed his site had become outdated for his needs and to build new features.
At the time, I as a project web developer at ESPN working on an Ad Production team, I was itching to take on side projects that pushed my technical and creative skillsets as a front end developer to the next level, so I offered to rebuild the site for him. As Craig mostly needed a way to showcase his work, his reviews and give people a way to contact him, I suggested using a GitHub page as a cost effective solution that met all of his requirements. Little Pioneer Cider House is still a GitHub page today, and still meets all of those requirements.
It has been a mutually beneficial web development relationship, as Craig got a shiny new responsive site (that cost a fraction of what his old site did to host) and I got an interesting side project under my belt. Life went on happily between Craig, his new site and I for the next few years. Every now and then I’d update the copy or add a photo, easy things to update. As I moved on from my role at ESPN to become a front end developer at Fast Company, I would periodically try new things out as I was learning them whenever I could. As time progressed, so did the complexity of working on the Little Pioneer Cider House repository, which became an ever growing problem for me. You can take a glance at that here.
The crux of the problem with Little Pioneer Cider House is that it lacked automation, but had a lot of optimization. Over time I decided to optimize images, compress the HTML and minify the CSS, at the benefit of the site but at the expense of making it easier for me to work with. Each time I made a change to something here or there on the site, this was my workflow:
Change the file name in the head of the document to the unminified version of the CSS, then start watching the CSS for changes.
Make the said changes to the HTML and CSS as needed.
Revert the file name to the minified version again when finished.
Take the unminified compiled CSS copy it into an online CSS minifier and run that. Then I’d have to delete the old minified CSS in favor of the new minified CSS and save.
Take the uncompressed HTML (which I labeled pagenameuncompressed.html), copy it and run that through a HTML compressor online. THEN paste that into a separate file (just labeled pagename.html) and save.
Push all those changes to master
On the gh-pages branch, rebase master.
Push to gh-pages.
Switch back to master.
Nine steps to get one thing done! Even the smallest copy change could take quite a bit of time to execute and the rate of human error was exponentially higher to boot.
The secondary problem with Little Pioneer Cider House is that although the site was technically responsive as it worked on mobile, tablet and desktop, it wasn’t a visually great experience in all places (Check it out). When I build this project initially I was using Bootstrap with some customized breakpoints as well as relying on some exact pixel measurements for various components. When I started out building Little Pioneer Cider House and with my experience level at the time, this worked out great. However, as other tools became available and I became a better front end developer, I knew that I was selling both the site and myself short as it didn’t look great on all devices, just.. Okay. Sometimes. As long as you didn’t look at it on certain orientations or, say, tablets.
To address the major issue of automation for Little Pioneer Cider House, I relied on a separate project that I had created about a year ago called Snazzie. Snazzie is a static site generator that allows me to quickly build sites, compress and minify all the assets and also pushes the end result to github pages. It was the perfect solution for the problem- taking a project that had nine steps to push to production down to three. Problem solved in about an hour or two, including all the time to set up the SASS files.
The second issue of responsiveness ended up being the more complex one to solve, and ultimately much more satisfying to complete. I’ll outline that here.
Before I even began iterating over the SASS files, I first thought of how I wanted to organize the project for present and future use. I decided to use BEM for this project and see how much I could abstract throughout, so that I could use a minimum of components in a maximum of places. In the last year or so I’ve become a huge fan of BEM as it makes modifications much easier to do by flattening classes.
Using BEM in Little Pioneer Cider House also left a lot of room for expansion in the future with naming conventions in place, which I liked. For example, although many of the pages have the same types of elements, they could have slightly different names attached to them for easy organization and possible encapsulation. (See here and here.) If I want to add more pages or elements in the future, I really just need to add more block level classes to the existing set and then modify in the page or component partial as needed.
Once I had my approach set, I tackled the heavy lifting of refining Little Pioneer Cider House. Generally speaking, I smoothed out a lot of the rough edges by first removing Bootstrap in favor of Foundation 6 (as I wanted to use their flex grid and rem-calc functions). It made aligning some elements easier, which improved the overall experience greatly with minimal changes. I also liked the happy medium of flexibility that rem-calc() provides over pixels or in favor of percentages. Although purely preference, I like to use rem-calc over percentages as that seemed more tangible for me to visualize at all breakpoints in development.
Although there are the breakpoints that come out of the box with Foundation that I could use for customization, I liked the custom breakpoints that I had been using with the original site and decided to keep those in place. I found that the custom ones oftentimes felt a bit smoother when transitioning between breakpoint sizes, but there’s still some room for expansion in that regard with screen orientation on smaller devices. This continues to be a work in progress.
Once I dug into the CSS of Little Pioneer Cider House, rather than being overwhelmed by the magnitude of the changes I was making, I focused on modular components throughout the redesigned site. For example, the navbar on all pages is exactly the same, as is the “Ready to Record?” call to action on most pages (except the index). Most of the rows and column arrangements are similar throughout the pages as with buttons and type treatments. The more that I could replace large swaths of code with (somewhat) abstracted components, the faster I was able to roll out page after page with less error and with greater cross-browser compatibility. This was a huge win for the project.
Overall, the time to redesign Little Pioneer Cider House from inception to finish was much faster than I had anticipated- partially due to the tools that I was using, but also thanks to the difference a few years of experience made. Although stop and start as I worked on other projects, in just a few days I was able to take the old site to a completely new experience with a minimal level of difficulty. Craig is happy with his new site and I’m happy that I can keep building out new features on it whenever we like. (There’s been a talk of a photo gallery for quite a while.) A satisfying ongoing side project indeed!
0 notes
Text
Be A Better Branch Manager

Git branches. They’re the best, yeah? Except for when you’ve accidentally committed something to master (which was clearly meant for your Work In Progress branch). Horrors!
Aside from getting in to familiar (good) habits of branching, what else can one do to prevent (annoying) mistakes on the command line? How can we be better Branch Managers?
Easy! Create a tool in your bash profile that lets you know exactly what branch you have checked out. You can even level up your game with branch management by changing the color to whatever your heart desires. You can do this in less than 10 minutes and it’ll save you endless frustration.
You’ll need a bash profile to get started. You may or may not have this already, so lets go over that first.
First, open up terminal and navigate to the root with cd
Next, type ls -la there. You may or may not see a file called .bash_profile or .bashrc (The latter is more likely if you’re on a linux machine)
If neither exist, type in touch ~/.bash_profile. If either exist, type in vim .bash_profile and hit enter.
Great, now you’re in your bash profile. Here you can add add whatever you need to make your command line experience more productive, such as aliases or this helpful little tool.
Now you need to be interactive mode with VIM, where you can add or modify the file. Do that by (literally) just hitting the “i” key. Then scroll down to one below the last line of text (if there is any) and paste this in (using the command-c, command-v way):
parse_git_branch() { git branch 2> /dev/null | sed -e '/^[^*]/d' -e 's/* \(.*\)/ (\1)/' } export PS1="\u@\h \W\[\033[32m\]\$(parse_git_branch)\[\033[00m\] $ "
What looks intimidating can be summed up as this: You’re calling a function that when you export this PS1 looks for the branch you’ve checked out and highlights it in a color that you’ve chosen. (I chose green.) If you have a PS1 already being exported, you’ll have to call the parse_git_branch somewhere in there.
Although I favor green, there’s many other colors that are available to choose from. To change this, where you see the opening brackets with numbers, replace the numbers above with the following:
Red: \033[0;31m
Yellow: \033[0;33m
Green: \033[0;32m
Ochre*: \033[38;5;95m
Blue: \033[0;34m
White: \033[0;37m
Once you’ve updated your profile to your liking, hit esc then w and q to exit VIM. Then restart your terminal. You should now see your branches highlighted in any repository!
And that’s it! The easy, painless way to becoming a stellar branch manager. In less than ten minutes you’ll have gone from zero to git branching hero!
(*Please don’t choose ochre. Its gross.)
0 notes
Text
Why Documentation is Important

Documentation! We should all be writing it, and writing it right, amiright? Every repository should have a readme from the jump, and every commit message should be concise and clearly written, each bit of every comment in your code should be illustrative, helpful and (ultimately) temporary. This is the gold standard of web development.
This week, I learned an important lesson on the value of having good documentation, and I’m sure I’m not alone in this.
.
As a developer with a few years under my belt, I know that I *should* write comprehensive documentation on all my repositories so that other developers (as well as future me) can get an idea of how something I’m working on works. But, for a variety of reasons, documentation seems to be either the last thing that I think of or something written quickly and poorly. Because of this, my bad habits recently came back to bite me.
This week I decided to finally sit down and redo my friend Craig’s music production site, Little Pioneer Cider House. LPCH has been an ongoing project since 2015 or so, and I’ve learned a lot from it and tried a lot with it. Since 2015 though the current build of this site has taken on a lot of technical debt, most notably an inefficient build that requires me to compress everything by hand each time I update the site. As at this point it was a once-in-a-while project, it didn’t bother me much to do that, but I know better and thus I was going to do better.
I thought I had a solution to my problem already set up about a year prior, so I went over to that repository and got to work. I called this project Snazzie, as in “Hey that’s a Snazzie looking website”. (Author’s note: I know its misspelled.) Snazzie is a static site generator using Gulp tasks to optimizes pages on build and deploys them to a GitHub page. Its a nice little project and it would have made my life so much easier, so I thought LPCH would be the perfect thing for Snazzie.
I merrily cloned my work, changed the remote address of the old repository to a fresh one, cracked my knuckles, scrolled to the readme and found.. almost nothing. Or, should I say, nothing useful. This is a screenshot of what I found I had written a year ago.

Does it say how to set up the project?
No.
Does it say where the assets for go?
Nah.
Does it list any helpful documentation when working with this repository?
Nope.
Does it tell me how to build the site?
Negatory.
Do the commit messages give me a hint on what was going on when I was making this?
Not at all.
Is this actually an incomplete project that I forgot about?
Yes!

This was no good, but I quickly discovered what the problem was. Snazzie was it a nonfunctional repository as apparently at the time I was thinking I was going to make this the magnum opus of NPM packages (which I never did), not a finished repository that I could clone and use over and over.
Fortunately, since the time I had written the code in that repository my skills as a developer have increased exponentially so troubleshooting wasn’t that onerous for Snazzie as it may have been in the past for me. I looked at the gulpfile as a guide, quickly made an app directory, set up a few subdirectories and files in the new app directory, and fired it up. Success! I later discovered on build that there were a few other directories in there that were creating other problems, so I then later went back and edited those and my package.json file to reduce the cruft.
This is why good documentation is important. I remember at the time when I built Snazzie I was thinking that I would wait until the project was finished before I wrote my magnum opus of documentation, so that I could impress any other developer who laid eyes upon it. However, as it does, time got away from me and I just never wrote anything or refactored.
If you get nothing else from this post, take away this: Documentation may not be your favorite thing to write or maintain, but its essential for reusable code. I guarantee you that if you write little, no, or poor documentation and walk away from a project for an extended period of time, you will forget how that project works, or have to troubleshoot things before using. It can only be worse for people who visit your open source projects as they have no connection to your projects and would probably not use them.
After this lesson, I took a few minutes to test out and write out a much more comprehensive readme for Snazzie, pushed a few refactors with better commit messages, and ultimately ended up with a reusable boiler plate that I could feel confident to sharing or using in the future. (You can check it out here.)
Learn from my lesson.
0 notes
Text
OOP 102: Getting Classy.

Now that I have a better handle on Object Orientation, I decided to level up and try class based inheritance. (I mean, it *is* 2017.) Admittedly I was wary of this initially, even though I use classes all day, but I’m really glad I took the time to try this out- it really snapped things into place for me
First, I had to think about a polymorphic scenario. Obviously, people. I decided to try a class based Object Oriented scenario based on an entire life circle, from infancy to adulthood.
Take a look at the Circle Of Life here before we go any further.
In their most general form, people generally have names, an age, and a gender. This became my base class, called Person. Everyone is always a person, that will never change. Like so:

The first stage of life is when we are babies. Babies can’t do much on their own, but they can let us know when they’re hungry. My babies, called Class Baby, are extraordinary- they all know their names, ages, gender (as they inherited all of that from Person) AND my babies can tell you exactly what they’re hungry for thanks to their hungry method.

The next phase of life is childhood. What at time! We go to school, we discover our interests- and we can recall memories! So in class Child, which inherits from Baby (and thus from Person), I’ve added some functionality to let my children tell you about what they like to do after school via their education and after school methods. Child gets interesting though- they’re still very hungry- and they call one of their inherited functions in their education method using super (which inherits from their parent class).

At the end of it all though we all grow up, and this is where class Adult comes in to play. In this class, our Child has grown up, gotten a top notch education and is now working out there in the world. Our adults still have a ravenous appetite, much like they did as a Child or Baby. And they’ll be able to tell you about their rich and full lives though their work and life experience modules.
Adult doesn’t just relay information though (unlike Child and Baby), Adult also has some simple logic to determine what to say if they are under a certain age. Because as we can see, these People grow up fast- they go straight from elementary school to college, entirely skipping out on high school! These People are all geniuses!

Although this isn’t the most mind-blowingly complex bit of code that has ever been written, it did make it incredibly clear how I could pass information from parent to child (which ironically is flipped in this case).
And this is just the beginning! I have yet to try using static methods with classes, which are also methods associated with a class but don’t need an instance of them, nor did I do any experimentation with getting and setting methods. But I did lay the groundwork for much more exploration in the future AND overcame my skittishness with classes overall!
0 notes
Text
OOP 101: Flex Shoe Zone

Object Oriented Programming, what is it, and how do you use it? I mean REALLY use it?
I literally asked myself this the other day. Sure, I can tell you on a high level about prototypical inheritance and polymorphism, but if someone laid a hundred bucks on the table and said “Write me out an example of OOP JavaScript ASAP” I’d be looking like Homer up there (sans bag of money).
So, knowing I’m a learner by doing, I decided to put my money where my mouth was and write out an example of using Object Orientation by creating a shoe store where more than the soles were flexing.
Before embarking on this journey, lets define what OOP means in layman’s terms.
Object Oriented Programming (OOP) is one of the seven common programming paradigms that is based on the ideas of objects that possibly store data, as well as methods and procedures. Objects in object oriented programming can manipulate data using the concept of “this” or “self” as well as being able to share data between other objects.
Object Oriented JavaScript (OOJS) is polymorphic- meaning that one basic object can be used in a variety of ways and extended. You’ll see more of this soon. Also, OOJS can be encapsulated - meaning some data can be stored in an object and not mutated. OOJS objects can be inherited by other objects- meaning new objects can be based on previously made objects (like a chain).
To establish the first (and soon to be third) points, I pondered the nature of a shoe. Although there are many types of shoe, there are two basic truths to your footwear: One, they have a bottom and Two, they have a way to attach to your foot. So I created a function to show just that- the starting point of my shoe.

As we can see in this function, the MakeShoe object is binding itself to whatever data you pass it along via the constructor, known as this. So, lets say if you had a clog and a high heel shoe, each time that shoe was called with the MakeShoe function, it would be bound to that type of shoe, like so:

MakeShoe() itself doesn’t really care what information its getting, it just keeps a reference to the information that is fed to it.
I could make any shoe my heart desired with this function, but as we can see it doesn’t make a convincing argument why one should purchase or wear those shoes. This is where inheritance, my third point, comes in handy.
If we have MakeShoe, then we can apply this function inside of other objects to build a certain type of shoe, like a sandal or a sneaker. Literally, we are inheriting MakeShoe(). Then, we could add to that shoe to really make it stand out in a crowd (pun intended).

Adding on to Sandals, I could add as many supporting features as I wished. I could give the shoes straps or high heels, and each one got a full description!

Sneakers, on the other hand, were a mixed bag. Some sneakers were designed specifically for a sport, whereas others ones were just made to look good when kicking it court side. So I created an object that could accommodate both.
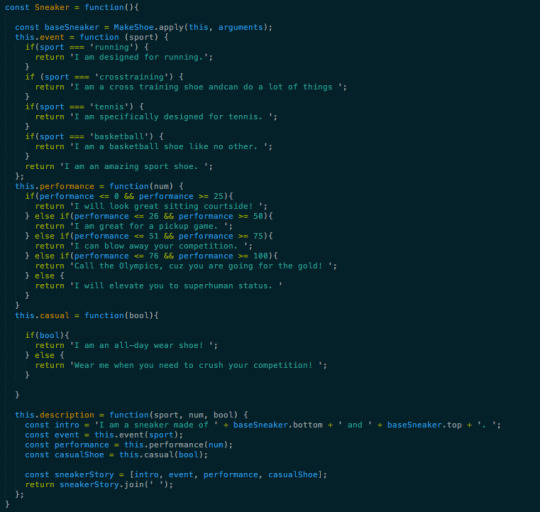
So now I have two types of shoes with a whole range of possibilities and convincing arguments for each. What happens when I assign these functions to different types of shoes? Lets find out.
First, I created three different types of sandals- a slide, wedge and huarache. They looked like this:

Next, I created two types of sneakers, one sporty and one sporty-looking, like this:

You may be saying to yourself presently “this isn’t complete! What about the properties on a Sneaker, where are those?” Easy. All of the parameters for making a good athletic shoe are passed into the description function.

What you may notice is that Sneaker() and Sandal() have access to MakeShoe’s properties- this happens by inheritance but at the expense of encapsulation. Although the purpose of this exercise for me was to focus on polymorphism via inheritance, data encapsulation is an important feature of object oriented programming.
So how could I show that, if I needed to? The answer lies in this.
Lets say that I wanted to pass along a greeting to my shoe shoppers, a simple hello. The hello would never change, its something that would come installed with every set of shoes.

Notice what’s different about the greeting compared to the sole, upper, or parts of the shoe itself? There is no binding on it via this. Thus, if I am in MakeShoe() , I could access the greeting and modify it, but outside of MakeShoe() I have no way to access and modify the greeting. Even if it has something truly great to wow the customers with.
And now we’re ready to get wowed by our shoes. I called each of my shoe types and their description functions, here’s what each had to say:

They’re flexing like its a game show, and I’m the biggest prize! But what does the humble MakeShoe() have to say about all this?

Nothing. Because at the heart of it, MakeShoe() is just there to store and manipulate the data we pass it as its needed. Its a workhorse, the base of our ever growing shoe tree.
By making my own shoe store, I learned how to form data, how to pass data, how to show how to reserve data and.. how much fun Object Orientation could be. Also, those Huaraches are sounding pretty nice about now, if you’ll pass me that hundred dollar bill.
0 notes
Text
Flipping The Script: Reversing Arrays Multiple Ways
For fun today, I decided to challenge myself with some coding questions. I wanted to see what would happen if I didn’t just dive in headfirst to a problem to fix it, but really examined how to solve something.
The problem I chose was this one, where you would reverse a list of words. Seems easy on the outset, but could also not be. Looking over the approach and the expected results, it originally appeared to be a head scratcher- as in “what is this N Test cases? What is L and W?” and “What other gotchas are hidden in there”? First, I looked at the problem and read it back to myself: ‘Given a list of space separated words, reverse the order of the words’. That I could work with. I began. I realized that really, there was no definition of what this list was, so I made the assumption that this list would be an array. (Who knows, it could be an object or a string or a function.) From there, here’s roughly the order of the questions I thought out:
How do I get the last item of each array?
Do I need to keep the original array intact?
Once I reverse this array, however I do it, how then do I get the output to be human readable?
I’m not entirely surprised at myself that my first thoughts were just getting all the last items in an array, and also not thinking of if I’d ever need to access the original after that fact. So I slowed down a bit and look at this before diving in, I realized that question two should be where to start, really, followed by question three, then ignore question one as its now a pitfall.
If I didn’t need to keep the original array intact, then the answer was simple on question two, just slap a reverse on that function and I would be good to go, like such:

Which would completely work for the first part but would mutate the original array. So that might be less than ideal, depending on the use case. If keeping the original array intact was important, then my next thought was that I needed to take a copy, THEN work with it. Also not hard. I would just need to slice the array from the beginning, then I could mutate the copy any which way I pleased while keeping the original array safe. Here’s how I did it and the outcome:

Now I had something to work with.
The next question is how to get this to be human readable. This is where a join comes in. By now I was really flowing with this and tried out both, which worked out perfectly, like this!

Although the question didn’t say that I had to print out the original list, I thought it was a nice touch.
In the end, it took me about 40 minutes from start to finish on this, examining both how I would approach the problem and checking my assumptions with the solutions I wanted to try out. There could have been other ways to approach this problem, such as a “First In, First Out” way, but I liked the straightforwardness of this solution I tried without being too fancy.
I also congratulated myself for stopping, reading THEN approaching this problem, rather than just diving in, making a mess, and hoping for the best. It really cut down my development time as it allowed me to create a concise plan of action even before I put my fingers to the keyboard. Not a minute of time wasted thinking “Well, try this!” to yield an unsatisfactory result.
0 notes
Text
DIY NPM PKGS.

As a developer, NPM packages are pretty commonplace. Open a repo, npm init it, and install those packages to your hearts content. I have no problem using them, but guess what:
Conceptually, I had no idea what an NPM package actually was. I could use them all day long, but I didn’t really understand what these things actually were.
Are you in the same boat? Or better yet, do you have some information that you’d like to share with the world (and don’t really know how to)? I can help with that!
Here’s the TL:DR on NPM packages: They’re really just another way to share information to the world, preferably in small chunks.
For a simple example, if you have a function that does one thing really well, and you’d like to re-use that in other projects, you could make that into an NPM package. All that would be needed in this case is a package.json file and an entry point to your function, such as an index.js file. From there, you could use that function neatly anywhere you see fit, or share it so that others could revel in your genius.
Of course, things could get more complex than just having two files sitting out there in the world, but the concept is the same: Have a package.json file which tells people about the package that you are creating, and a way to use the contents of the package via an entry point, such as index.js. (In your own work, you can call those functions wherever a package is required, or if the package is installed globally.)
So now that you know how to do do this, how does one get up and running with making NPM packages?
Personally, I found the NPM documentation to be very clear and comprehensive. I’d highly suggest starting with that and going forward.
Next, I’d suggest looking at packages that you like to use in your own projects (or the most popular ones) to see how those work.
Then, set up an account with NPM and try publishing your own package. (My heartbreaking work of staggering genius can be found here.)
Lastly, try using that package somewhere else, such as in a test directory. Make a JS file and see if you can get your package to do its thing. Although this seems obvious, it really clicked when I tried using something I had just made.
Once you wrap your head around the TL:DR of NPM packages, it’ll become way more interesting to see how others work and their valuable contributions to the JavaScript community. Who knows, you may even end up with a few new tricks up your sleeve!
0 notes
Text
PRODUCT FIRST.

I’m a front end developer, and someone who had gone to art school. I like building beautiful things for interesting people. So much so that I even put it on my website. By “beautiful” I mean both the inner and external beauty of well crafted software and user interfaces- but I’m here to say that I have a problem.
I’m paralyzed by good visual design.
This problem recently came to light when I was building a project for my father, a simple website for a book he had written. (Don’t judge it yet, read on.) As I started to string up a prototype, I got down to work on how snappy my end product was going to look and behave on all devices. Although this part of software development is a key component in what I do as a front end developer, I realized two things in the process:
First, I’m not a great designer when I have no parameters, and it was resulting in a subpar product.
And...
More importantly, I wasn’t really sure what I was building overall, and it was resulting in a subpar product.
As a creative person I think design and development can go hand in hand, but I had a serious problem that I wasn’t addressing in this project: I wasn’t putting the product itself first.
So here’s what I did. I took all the work that i had previously done and I scrapped it. Then, I sat back and asked myself these questions in this order:
1. What does my product need to do?
2. What are the most important parts of the product and project?
3. How can I make it most expandable?
In my case on this project, I needed a site that would get people to buy a book about walking tours in my hometown and contact my father for more information about his book. The important parts of the product were to offer a variety of non-invasive points to buy the book, then information about what was in the book, then about the author. I also knew that as the book is a work in progress, that I would need to have a flexible way to add and remove retailers, information as well as pages throughout the site. With these three questions answered, I opened up my text editor again and started implementing these features one by one, from most fundamental to most granular, which came together at an alarmingly fast speed.
As I wrote lines of code, I also thought of two more important components on this as a front end developer with creative leanings:
4. How can I make it efficient?
5. How does the Client (and I) want it to look?
I realize that these two parts in my current project are being refined constantly (this is where you can pass judgement on that site now). For instance, many of my components share basic column and row patterns, making it easy to adapt large chunks of code down the road. In future iterations, it would benefit me to use templates rather than using individual pages to display all the information (nav bars and footers, retailers, etc), for both efficiency and error proofing.
But, most impressively, question number five has come last in this process, and perhaps most smoothly. Things will be iterated over and improved progressively, rather than correcting and adjusting for independent elements. Instead of having the design world at our fingertips (and how does one design everything for everyone?), my father and I can sit down and examine how we think the best (and most attractive) way that we can make the information look and work while keeping the brand integrity. And, as things evolve, we can make changes with far less pain points, since we have to think of how all these things will play together.
It was really impressive to think of product first before design (which is counterintuitive to how I work) but in the end, its made my work more impressive and effective. Putting product first is how I should have been working all along from day one as a developer, and makes me a better designer as well, as I can design with my (preferred) level of granularity- as now I have the ability to focus on beautiful work for interesting people in the most effective way possible. I’m super excited to go forward with product development this way in the future, and I hope that all of you try it as well!
5 notes
·
View notes
Text
Be not afraid. Gulp.

Things that work for you are neat. Things that do that for you while you work on other more important things (like making software) are even better.
If you’re using Sass, then you’re familiar with this concept with
sass --watch
Where you can merrily code away while your CSS compiles every time you save your latest masterpiece.
If a sass watch (which I oftentimes refer to as a “sasquatch”) doesn’t phase you, then you’ll love Gulp, a node based task runner. Its easy to get started with and easily customizable with recipes galore, and quite a bit of readable documentation. Basically, if you can think it, you can Gulp it.
I recently tried out my first gulp project on a static node-express server, and fell in computer love. I wrote up a couple of tasks in just a couple of minutes to compile my CSS, crunch down my JavaScript and even one to tell me where I could have written my code better automatically! And all of this happened every time I saved my work! Pretty neat!
There’s a lot of really great primers out there on how to get started with Gulp, such as this one, this one and from the site itself , so I’ll save you the how to’s on that. Instead, I’ll give you my observations post first gulpfile.
First, with great (automating) power comes great (debugging) responsibility. For example, as I was going about my business linting, concatenating and minifying my javascript on this project on the fly, every time I saved my javascript file, Gulp just dumped another version of the same function into my neatly minified file because I didn’t include anything to overwrite the existing file. So I quickly learned that proper project planning is essential when using Gulp, as well as knowing what your tool does. (I later went back and reconfigured my gulpfile and index page references to reflect a development state as well as a production state.)
Secondly, it helps to know what all of your modules are really doing before you start mimicking someone’s pre-existing code. Originally, I tried Mark Goodyear’s tutorial (which I thought was great for understanding what I might be able to do) but had more bells and whistles than I had wanted on my first run. So rather than just copying and pasting his completed code snippet, I went through and carefully dissected what each module I was using was doing- or could be doing. By doing this, I was forced to think of how I wanted my gulp file to help me, and how to creatively do that.
Lastly, I examined how other people used Gulp in their projects. I thoroughly enjoyed meandering through recipes and blog posts, which encouraged me to think outside of the first tutorial box. I watched vlogs of people live coding through projects, explaining line by line what they were doing and thinking. It opened up the infinite realm of what my Gulp possibilities were.
Overall, getting started with Gulp is really easy for the JavaScript beginner and lets you get to the more important things- such as making great software. Be not afraid of your task runner. Take a big Gulp.
0 notes
Text
NO TIME FOR EXTENSIONS? BOOKMARKLET.

Recently, I was given a challenge in where I was to analyze data coming from a specific URL.
“No problem.” I thought, cracking my knuckles and waving my fingers at the keyboard. “I’ll just make an extension and have it do this, that and the other to get what I want. Easy peasy. Internet Superstar, right here.”
Famous last words.
I knew that developing Chrome extensions really wasn’t all THAT hard to do in theory (especially if you just needed to get a popup window to show up), and I was willing to bet that building extensions for other browsers wouldn’t be much more challenging either. However, left on my own with internet research and documentation, I discovered that as an inexperienced developer in this realm, building a reasonably complex Chrome extension is REALLY REALLY difficult. And, I hadn’t even touched any other browsers yet to meet their specifications.
So many (MANY) hours of frustration later, it occurred to me that kicking it old school with a bookmarklet might not be such a bad idea. It wouldn’t necessarily be as slick and seamless as an extension might be to get set up, but it would be widely supported in browsers (including Safari!) and considerably easier for a novice to implement. And it was!
If you also hadn’t heard of this “bookmarklet” thing up until now, let me tell you. A bookmarklet is a mini javascript application that allows the user to interact with their current webpage somehow. Unlike Extensions, bookmarklets are also click activated rather than installed (so that they may continuously run). So bookmarklets are quite handy on an “as needed” basis, such as to translate pages to other languages, add content to an RSS feed, et cetera.
Also, a bookmarklet is prefaced by the uri scheme name “javascript:” before the function that will be called, much like how you might type in a http: before a web address in the address bar.
Bookmarklets can be pretty minimal, or quite complex, with just a few lines of code to get started. They could be as simple as adding an alert message, or host external libraries and scripts to do amazing things. That’s all up to the developer!
So now that the definition is covered, lets write out a simple bookmarklet and implement it. I’ve written out the code here and you could try it “IRL” here.
The bookmarklet I’ve created simply adds in the Google Hosted jQuery library to any page that you like. To see how it works, I’ve also included an index page without any javascript included so that you can see the magic happen yourself. (You may also try it on the live page as well!)
Everything you’ll need to get started is located in bookmarklets.js. Here you can see that I’ve prefaced my immediately invoked function with the javascript uri scheme. Then I’ve just created an element (the script tag), noted the externally hosted source, and specified where I wanted the script to be placed. The log message was just to keep you on your toes.

To watch the magic happen, simply take that script and add it as a bookmark in whatever browser you like. (Safari, word to the wise, may be a bit of a pain if you’re trying this out on mobile devices.)
Once you have your bookmarklet installed, open up the index page either locally or on the link I have provided, fire up your inspector, and click on your bookmarklet that you’ve just added. If it works correctly, you should have jQuery added to your document smooth as butter. Its that easy!
Like I said, this is only a simple bookmarklet. The level of complexity is all up to you and your needs. Although extensions are by definition more robust in their capabilities, bookmarklets might be a good introduction to the realm of possibilities at the click of a button.
Good luck and get crack-a-lackin!
0 notes
Text
I GRADUATED ONE YEAR AGO.

Today marks exactly one year that I have been a developer. What has it been like?
Well, for me, this year has been nothing short of astounding.
I still firmly believe that going to The Flatiron School for their Full Stack Web Development Fellowship has been one of the best gifts that I have received. I’d recommend that everyone go for it given a chance, hands down.
Those five months of doing nothing but learn to code have presented me with jobs that I never would have earned on my own misguided efforts, and those jobs have taken me to places that I thought I’d never get to, with relative ease. (Hello foreign vacations.) I’m financially solvent, which has led my own personal growth, which translates to me being a productive, engaged, happy JavaScript based developer.
After my fellowship wrapped up, thus far I’ve had three great job experiences. Two were for small dev shops, one (my present) for a larger corporate entity. Compared to my classmates who by in large are still following their bliss at their first company, my career trajectory has not been the norm. However, I’m quite pleased that I’ve taken the road less traveled- as I have learned much about my values as a developer as much as what I want to do in this field from each experience I’ve had.
Let us recap these experiences in brief.
Not even a month after I had graduated from my fellowship, I had landed a job working for my first dev shop right over the Williamsburg Bridge. I stayed there for about three months and change and to date, this job has been my most rewarding. Here I learned how to work with the Agile methodology, my revision control skills increased exponentially, and I got to work with (and meet countless) developers who liked to make quality products for companies that they believe in.
As an added bonus here, I started at 10 in the morning and rarely worked after 6:30 (unless I really wanted to) and we all had a lot of fun working together. I met many other happy, productive, progressive developers while I was at this company both through on-site learning as well as attending many, many meetups.
What I took away from this job is that I value working with developers who value collaboration and camaraderie just as much as continuous learning. I also learned to love working Agile, and embraced building quality over rapid quantity.
Although this company was a dream come true for a new developer, I also became very aware that I still didn’t love Ruby or Rails while I was there- it just wasn’t, and still isn’t, my preferred development flavor. So when work became scarce at that company, I decided to pursue the front end route, and went to my next company. (Full disclosure, my first boss encouraged me to do this.)
Like my first employer, I really liked my boss and the location below 14th street, and I still biked to work. However, this experience was completely different.
In my second position as a front end developer l was rolling in every day to a shiny new dev shop with a design element. This company was slick- we worked in a We Work surrounded by other sexy looking startups, my boss was charming, we had a corner office all to ourselves with perks galore.
I loved the free lunches, paid health insurance and well designed offices- but I discovered (shockingly) that not everyone works the same way I do. I had grown used to working interdependently while in school and with my first employer and made the assumption that we would always have code reviews and use the newest build of our tools. I found it sometimes disappointing and frequently frightening that I was largely left to figure out what I needed to do solo, and could push to the production branch without a thorough code review. (Note: Don’t do that.) I learned here that I can like my coworkers all day long, but I can’t duct tape develop by the end of it as I’m still new, and I probably won’t build it fast.
So, with my adamant need to refactor, combined with my stubborn resolve not to be “full stack”, when that project wrapped up after about three months, so did my position. Although it was sad to leave that place culturally, I was relieved in other ways. At this position I learned the value of not being enticed by the externals, and I reinforced this notion that I should always keep learning, doing and teaching others to be the we can all be.
The position at my second company followed by a spell of unemployment, but I was happy to report that I could- for once- live off of savings while I looked for jobs. (Prior to becoming a developer, I didn’t have two of anything to rub together.) This period was fascinating to watch unfold, as I got to see what some of my work motivations are.
In the three months that I was unemployed, I interviewed at dozens of companies. Small sized, mid sized, corporate. Some companies I knew that I wasn’t what they were looking for off the bat, some I had a lingering feeling that I wasn’t going to fit well there either, and one I reluctantly said “no” to as it was perfect in every way except for that they couldn’t employ me full time.
In this stretch, I got honest. In my previous careers, I had been the master of my own ship through freelancing. It has only been a more recent event that I’ve learned to really work well with others- and I could see that if I stayed on my current startup track that I was going to end up doing the same thing that I had for my entire working life. I really wanted all the experiences that I had previously, but with stability. I wanted the true work-life balance where I’d have room to explore what I wanted to do on my time, as happy developers make better products. So I shot for corporate.
Working for a huge company like mine, I’ve pretty much struck gold in regards to the work-life balance, as we work at a sustainable pace and I have a lot of support. (Case in point: As I write this, I’m contemplating a trip to Belize and I haven’t wondered once if the server is going to crash/if there will be a project when I come back/if I need wifi to answer emergency frantic emails once. Its fabulous.) Also, the people are pretty friendly at my company. Its baked into the culture- as much as diversity and inclusion are. I like that they like me because I am a unique flower.
Simultaneously, I’ve also discovered some of my own quirks in my current position. For example, learning to be professional has been personally tough. For someone who has spent the last 15 years or so choosing jobs by if I can or can’t wear jeans and Vans every day to the office, learning to have a professional aura is somewhat foreign for me. Learning to write emails with less smiley emoji is (surprisingly) difficult at times. I’m casual by nature, but I’m learning its time to suit up, show up and be a professional here. I’m finally putting the polish on these skills that I’ve taken the time to cultivate.
So that leads me to today.
A year ago, I already knew something great was going to happen. I drank the Flatiron koolaid on day one, I had no real doubt that I could fail. I just had no idea how great things would have become in the year that has unfolded.
Not only do I get to incorporate all of my past career life experiences into a new path that I love more than I could have ever imagined possible, I make virtual creative things that make others happier, more informed, and more connected to their world. Seeing others enjoy my work delights me to no end as does helping others to get to this point.
I’d say that’s nothing short of astounding, wouldn’t you?
14 notes
·
View notes