
Love all things recycled, reused, repurposed, and homemade. Sometimes I throw in some other stuff like cooking and travel.
Don't wanna be here? Send us removal request.
Statistics
We looked inside some of the posts by dizzymaiden and here's what we found interesting.
Average Info
Notes Per Post
329
Likes Per Post
241
Reblog Per Post
88
Reply Per Post
0
Time Between Posts
19 days
Number of Posts By Type
Text
16
Photo
1
Last Seen Tumblr Blogs


Fun Fact
Tumblr was created by web developers David Karp and Marco Arment.
Text


Taormina, town in Sicily, Italy
Pistachio Cornetto "little horn" very similar to a croissant. This one is filled with homemade pistachio cream. I found myself ordering this every morning with a strong cup of espresso.
28 notes
·
View notes
Text

A day in Palermo, Sicily, Italy
Drinking local beer and eating arancini (fried rice balls filled with mozzarella).
5 notes
·
View notes
Text


"Pineapple Upside Sugar Cookies
Ingredients:
1 cup unsalted butter, softened
1 cup granulated sugar
1 egg
1 tsp vanilla extract
2½ cups all-purpose flour
½ tsp baking soda
¼ tsp salt
10–12 canned pineapple rings, well-drained and patted dry
1 Jar of Marachino cherries (drained)- Additional sugar for sprinkling
Instructions:
Step 1: Preheat oven to 350°F (175°C). Line baking sheets with parchment paper.
Step 2: In a large bowl, cream together the butter and sugar until light and fluffy.
Step 3: Beat in the egg and vanilla extract until well combined.
Step 4: In a separate bowl, whisk together flour, baking soda, and salt. Gradually add the dry ingredients to the wet mixture, mixing until a soft dough forms.
Step 5: Butter each tin and put in a pineapple ring, add cherry if you want.
Step 6: Roll dough into balls (about 1½ tablespoons each) and slightly flatten. Place over pineapple ring, gently pressing it down.
Step 7: Sprinkle a little sugar on top for crunch!
Step 8: Bake for 12–14 minutes, or until edges are golden and the cookies are set.
Step 9: Let cool on the pan for 5 minutes, then transfer to a wire rack to cool completely.
For crispier edges, bake 1–2 minutes longer.
Store in an airtight container for up to 4 days.
#pineapple#upside down pineapple#cookies#cherry#Marachino Cherry#dough#sugar#flower#flour#butter#fun#treat#dessert#homemade#sprinkle#egg#vanilla#cookie tin#retro aesthetic
5 notes
·
View notes
Text
What! I am so ready to do this! I can see using so many different pads for a homemade purse! Very cool
5 notes
·
View notes
Text
Love this...so fun!

Get your wardrobe summer ready… ✨🦋✨
17 notes
·
View notes
Text

It's my 17 year anniversary on Tumblr 🥳
1 note
·
View note
Text

In Singapore, a coffee shop has created an original experience called "Sweet Little Rain." This innovative concept involves serving coffee or tea with a cloud of cotton candy suspended above the cup. As the heat of the coffee rises, the steam slowly melts the sugar, causing the cloud to gently "rain" onto the drink. This sugar rain adds a sweet and visually stunning touch, turning the act of drinking coffee into a sensory show.
You all know what I am thinking....CAN I DIY THIS?!
Ingredients:
a blob of cotton candy
a cup of very hot coffee (no sugar added)
cream/milk optional
Perch cotton candy blob over coffee and presto "SWEET RAIN"
9 notes
·
View notes
Photo
This still feels right in 2024/2025!

doodling …. HAPPY NEW YEAR EVERYONE!!!
6 notes
·
View notes
Text

1 ½ cups coarsely ground espresso (from 8 ounces whole beans)
3 cinnamon sticks (each about 2 inches long)
1 bottle (750 milliliters) vodka, such as Smirnoff
1 1/2 to 2 1/2 cups Simple Syrup
2 teaspoons pure vanilla extract
ESPRESSO VANILLA
Step 1: Combine espresso, cinnamon sticks, and vodka in a large glass (nonreactive jar); cover and let stand at room temp 1 to 2 days. Strain though a cheese-cloth-lined sieve, then through a coffee filter. Stir in Simple Syrup (1 cup white sugar & 1 cup of water combined in a medium sauce pan over medium heat, bring to a boil, stir until sugar is dissolved...don't over heat! Allow to cool).
Divide among clean glass jars ( I like the mason jars but bottles work)
Add some pretty decorations and presto ..Holiday gift ready to go when a surprise party pops up.
Can be refrigerated up to 3 months.
P.S. IF YOU WANT THE VANILLA CAN BE GIFTED AS EXTRACT. Just need to add vanilla beans (split in the middle) to the jar and let it sit.
9 notes
·
View notes
Text
I could not resist reposting Martha Stewarts EASY Brown-Sugar Chocolate Chunk Shortbread recipe! You freeze them, wrap and give as a gift...so the person can pull out and cut up homemade cookies throughout the winter months!!

#diy#tutorial#recipe#craft#homemade#gift#sweet#christmas#cookies#frozen dough#brown sugar#chocolate#flour#sugar#shortbread#wrapping paper#vanilla#egg#butter#salt#dough
1 note
·
View note
Text

Flu/Cold - pop one of these in hot water (and a shot of brand or whisky if you wish) and enjoy the feeling of cozy healing.
Details: Prep Time: 10 minutes, Freeze Time: 1-2 hours
Total Time: 1-2 hours 10 minutes, Servings: 12 tea bombs
Ingredients:
1/4 cup honey
1 tbsp lemon juice
1 tsp grated ginger
1/2 tsp ground turmeric (with pinch of black pepper)
1/4 tsp ground cinnamon
1/2 tsp echinacea powder (optional)
1 tbsp green tea leaves (or 1-2 green tea bags)
Silicone mold for shaping (small, round molds work best)
Directions:
In a small bowl, mix the honey, lemon juice, grated ginger, turmeric, cinnamon, and echinacea powder (if using) until well combined.
Fill each silicone mold with about 1 teaspoon of the mixture, then press the green tea leaves on top, filling each mold completely. For tea bags, cut open and use the loose tea leaves.
Freeze the molds for 1-2 hours, or until the tea bombs are solid.
Pop the tea bombs out of the molds and store them in an airtight container in the freezer until ready to use.
To make the tea, place one tea bomb in a mug and pour 1 cup of hot water over it. Stir until the bomb dissolves, and enjoy the soothing flavors.
Questions? DM me!
#diy#tutorial#recipe#homemade#gift#sweet#christmas#craft#candy#flu#cold#tea#green tea#echinacea#cinnamon#turmeric#lemon#honey
18 notes
·
View notes
Text


I have a couple different "Tea Bombs" I make depending on the occasion. These are more of a gift ...and can be given any time of the year.
1 cup Isomalt 1/4 cup water Pink food coloring Tea bags (I used adorable herbal teas from Big Heart Tea Co.) Edible Flowers (not just organic, but edible) Round candy molds (I used two sets to make it easier)
Check out https://makeeverydayanevent.com/diy-hot-tea-bombs-recipe/
for the full instructions. So fun!
1 note
·
View note
Text
Want to smell like a yummy fresh baked gingerbread cookie?!
Make this for yourself or make a bunch for gifts!
Prep: 5 mins - EASY
1 cup of dark brown sugar
1/4 coconut solid oil
1 Tablespoon blackstrap molasses (FACT: molasses contains lactic acid and can help treat acne, eczema and rosacea. It also has anti aging antioxidants and it sooths skin!) So yeah...use it!
1 teaspoon cinnamon, dried ground ginger and 1/3 teaspoons of dried ground cloves.
Option: a teaspoon of vanilla
Mix all well in a bowl then transfer to mason jars. Add labels that say put on damp skin and scrub lightly. Wash off.
Also - warn them that they will smell like a snack so they might have to sing "catch me if you can I'm the gingerbread man" or replace with correct name :)

#diy#tutorial#recipe#craft#reuse#homemade#gift#sweet#recycle#upcycle#body scrub#scrub#ginger#gingerbread#brown sugar#molasses#christmas#christmas crafts#festive#holidays#happy holidays#coconut oil#skin#skin care#spices#cinnamon#cloves#vanilla#snack#smell
15 notes
·
View notes
Text

Dandelion (or any edible flower) & Honey Gummy Bears
Ingredients:
1 cup dandelion flowers (or any edible flower - color will change) (petals only, no green parts)
2 cups water
1/2 cup honey
1/4 cup lemon juice
3 tablespoons gelatin powder
Gummy bear molds
Instructions:
Prepare Dandelion Flowers:
Rinse the dandelion flowers thoroughly to remove any dirt or insects.
Make Dandelion Tea:
In a small saucepan, combine the dandelion petals and water. Bring to a boil, then reduce the heat and simmer for about 10 minutes.
Strain and Measure:
Remove from heat and let the mixture cool slightly. Strain the liquid through a fine mesh sieve or cheesecloth into a clean bowl, discarding the solids. You should have about 1 cup of dandelion tea.
Mix Honey and Lemon:
Return the dandelion tea to the saucepan. Add the honey and lemon juice, stirring until the honey is fully dissolved.
Bloom Gelatin:
Sprinkle the gelatin powder over the liquid mixture and let it sit for 1-2 minutes to bloom.
Dissolve Gelatin:
Heat the mixture over low heat, stirring constantly, until the gelatin is completely dissolved and the mixture is smooth. Do not let it boil.
Cool Slightly:
Remove from heat and let the mixture cool slightly.
Pour into Molds:
Carefully pour the mixture into gummy bear molds using a dropper or a small spoon.
Refrigerate:
Refrigerate the molds for at least 1-2 hours, or until the gummies are firm and set.
Store Gummies:
Once set, remove the gummy bears from the molds and store them in an airtight container in the refrigerator. They can be stored for up to 2 weeks.
#honey#tutorial#diy#homemade#edible flowers#gummy bear#sweet#treat#gelatin#gift#experiment#lemon#lemon juice#organic
6 notes
·
View notes
Text

No-Bake Orange Pineapple Swirl Cheesecake Recipe
Ingredients
To prepare this comforting No-Bake Orange Pineapple Swirl Cheesecake, you’ll need:
1 1/2 cups graham cracker crumbs
1/4 cup granulated sugar
1/2 cup unsalted butter, melted
3 packages (8 oz each) cream cheese, softened
1 cup granulated sugar
3 large eggs
1 cup sour cream
1 teaspoon vanilla extract
1/2 cup orange juice
Zest of 1 orange
1 cup whipped cream
1/2 cup pineapple chunks
1/2 cup mandarin orange slices
Fresh mint leaves and berries for garnish
How to Make No-Bake Orange Pineapple Swirl Cheesecake
Follow these steps to create your own delicious No-Bake Orange Pineapple Swirl Cheesecake:
Prepare the Crust: In a medium bowl, combine graham cracker crumbs, 1/4 cup sugar, and melted butter. Press the mixture into the bottom of a 9-inch springform pan. Refrigerate for 30 minutes to set.
Make the Filling: In a large bowl, beat the cream cheese and 1 cup sugar until smooth and creamy. Add the eggs one at a time, beating well after each addition. Mix in the sour cream, vanilla extract, orange juice, and orange zest until fully combined.
Layer the Cheesecake: Pour half of the cream cheese mixture over the crust. Evenly distribute half of the pineapple chunks and mandarin orange slices over the cream cheese mixture. Pour the remaining cream cheese mixture on top. Create a swirl pattern with additional orange juice if desired.
Refrigerate: For a fresh, subtle flavor, use orange juice. For a sweeter, more intense flavor and thicker swirl, use orange jelly. Refrigerate for at least 4 hours or until set.
Garnish and Serve: Top with whipped cream, pineapple chunks, mandarin orange slices, fresh mint leaves, and berries for garnish before serving.
9 notes
·
View notes
Text

Just feel like I need this in my life right now.
188 notes
·
View notes
Text
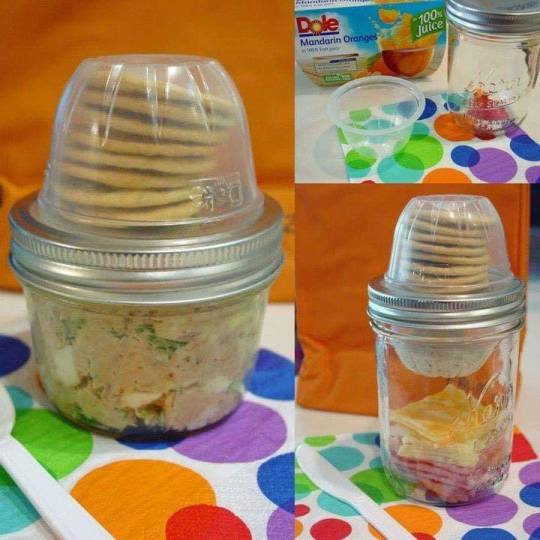
I thought you guys would like this idea! -Reusing empty fruitcups for a separate cracker/crouton container when paired with a canning jar snack/meal! (Note: With the bigger jars, you can use two fruit cups, -one inside beneath the seal, and one on top, held in-place by the lid's ring. -The one under the seal works great for "wet" items like dip and salad dressing. )
for double fruit cups you would put the first fruit cup right side up resting on the lip of the jar, put the seal lid on, then put the other cup on upside down and put the ring on to keep it all in place. See photo where the dip is inside the jar.
6 notes
·
View notes