
I make stuff. Cross stitch, sewing, small games and more.
Don't wanna be here? Send us removal request.
Statistics
We looked inside some of the posts by enuimakesstuff and here's what we found interesting.
Average Info
Notes Per Post
37K
Likes Per Post
21K
Reblog Per Post
16K
Reply Per Post
34
Time Between Posts
1 month
Number of Posts By Type
Text
15
Photo
1
Note
1
Last Seen Tumblr Blogs


Fun Fact
Tumblr Inc. is funded by 13 investors.
Text
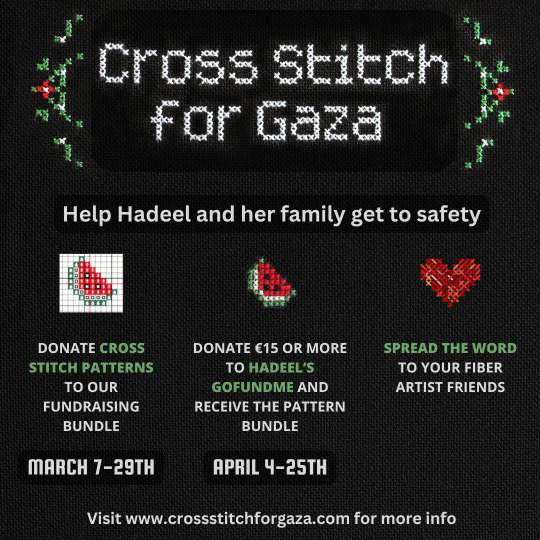
Cross-stitch artists of Tumblr-- let's make a difference!
Cross Stitch for Gaza is assembling a pattern bundle fundraiser: cross-stitch designers of any skill level are invited to submit a pattern of theirs (old or new) to be included in the pattern bundle. Once the bundle is complete, it will be offered as a reward to stitchers who make a donation of €15 or more to the GoFundMe of Hadeel Mikki and her family.
More info below the cut, and read the the full details at CrossStitchForGaza.com--

'To the Cross Stitch Community on Tumblr and Bluesky'
Our Goal
This pattern bundle is being assembled (by @mathysphere and friends) to help raise money for Hadeel Mikki and her family-- her mother, husband, two brothers, her two little girls, and her baby-- to escape and find safety out of Gaza. Their goal is to raise a total of €35,000 to pay for passage; as of this writing, they have already raised €20,000, so the aim of this campaign is to help raise the final €15,000. Plus, hopefully, a little extra, so that they will have something to live on once they cross over into Egypt.
If this fundraiser is successful at raising the money that Hadeel's family needs, then later donors may be directed to help with a campaign from another family. In that case, a family or individual will be chosen from the GazaVetter's list of verified campaigns.
The Bundle
For this fundraiser, we are collecting cross-stitch patterns to send as a bundle (one or more .ZIP files) to anyone who donates €15 or more to Hadeel Mikki's GoFundMe campaign during the duration of the campaign (March 7th to April 25th, 2025). Anyone who can make a cross-stitch pattern may 'donate' it to the cause-- you do not have to be an established or a professional pattern designer to contribute!
Once the fundraising event goes live, donors will be directed to give €15 or more to the GoFundMe campaign, and then submit a receipt or screenshot of their donation to the Cross Stitch for Gaza team. Within 24 hours, they will be sent back a .ZIP file or files containing the full set of patterns from the bundle. No money will be exchanged with the Cross Stitch for Gaza team at any point.
Each of the pattern-makers will also receive a copy of the full pattern bundle, as a thank-you. 🙏
The Tumblr cross-stitch community is not a large one, and not a rich one, but it doesn't have to be-- if we work together, we have the power to make a real difference for a family that desperately needs it.
In Hadeel's own words:
Maybe this fundraising effort is like a beacon in the darkness, our sole source of hope that we hold onto tightly. I urge the world to listen to my plea and the sorrowful cries of my Gaza kin. We desperately require the helping hand that can dry our tears and lead us to safety.
Your contribution is more than just money; it's a chance to reconstruct life and illuminate a brighter future. Join us in shaping a tale of hope, as we rely on your support to begin afresh.
Donate a Pattern | Donate to Hadeel | Spread the Word
331 notes
·
View notes
Text

This started as a different project that then took a different direction. But I was fond of the lettering I'd made, so I came up with a border to match the gothic vibe, and surrounded it with bats.
Size: 81 W x 81 H
Colours: 1
Stitched size on 14 count Aida is a smidge under 15x15 cm, 6x6 inches
free pattern downloand on ko-fi
#crafts#handmade#cross stitch#crossstitch#xstitch#free pattern#free cross stitch pattern#cross stitch pattern#embroidery#i made this#enui makes stuff#stuff i made#goth aesthetic#goth#home sweet home
44 notes
·
View notes
Text
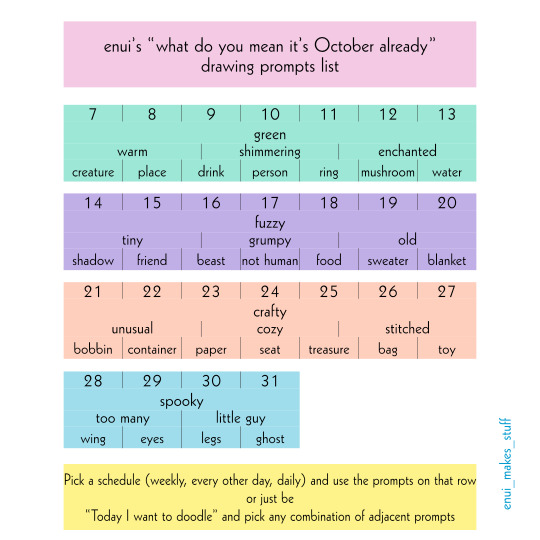
if you, like me, constantly get caught by surprise by time, and want a chill prompt list without feeling that you're already late and need to catch up, I made one
Pick a schedule (weekly, every other day, daily) and use the prompts on that row, or just be “Today I want to doodle” and pick any combination of adjacent prompts
5 notes
·
View notes
Text


An old one because the entire point of this account is to keep track of stuff I've made and if I don't write it down somewhere it becomes hard.
Finished October 2020, gift for a friend and also quest for PixelStich RPG which has now moved to its own forum.
This one was an Artist Study quest featuring Ink Circles. I choose the October 2007 freebie from Ink Circles, available on their website, then added a back and turned it into a biscornu.
The back is inspired by the one with the same sentiment by Shitpost Sampler, but I ended up designing it from scratch so that it would fit in the space I had.
I didn't take note of the colours I used for the front, back and frame are Sulky 12wt blendable, the sparkly frame around the writing was an afterthought after I received Kreinik Acquamarine #4 in a grab bag and I fell in love with it.
#crafts#handmade#cross stitch#embroidery#crossstitch#xstitch#free pattern#free cross stitch pattern#cross stitch pattern#knotwork#I've survived every bad day I even had
15 notes
·
View notes
Text

The pico tarot cross stitch pattern for the Major Arcana is up for sale! https://ko-fi.com/s/83ab7894b7
really fantastic work by @enuimakesstuff on the pattern and cover image :3
#pixel art#cross stitch#pattern#tarot#ko fi#cross stitch pattern#crossstitch#crafts#xstitch#embroidery#handmade
286 notes
·
View notes
Text
Full set of 22 mini cross stitch patterns is now available!
The pico tarot cross stitch pattern for the Major Arcana is up for sale! https://ko-fi.com/s/83ab7894b7
really fantastic work by @enuimakesstuff on the pattern and cover image :3
286 notes
·
View notes
Text
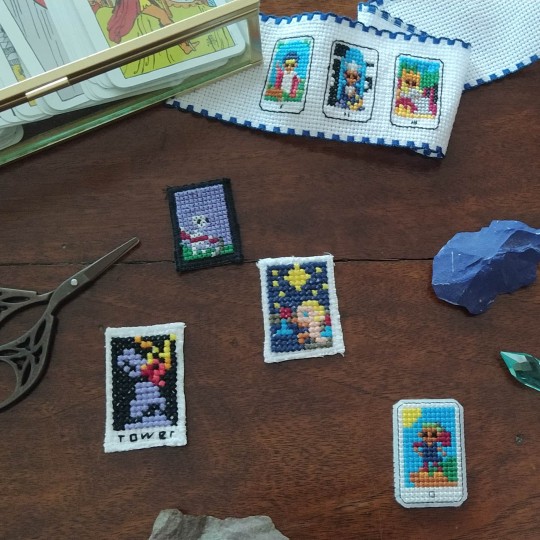
Pico Tarot : the Fool
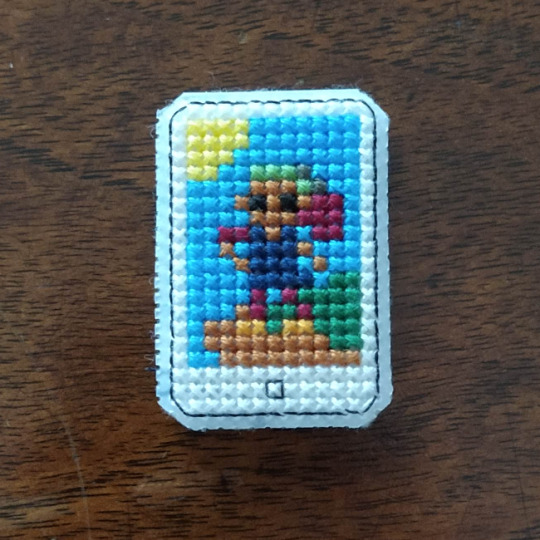
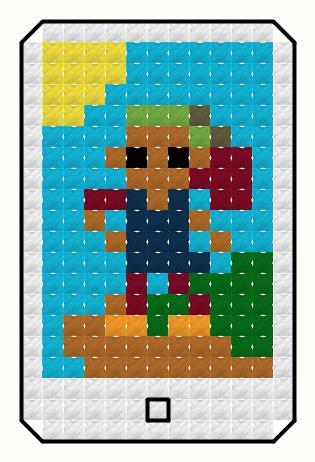
I've been working with @enuimakesstuff ( https://enui.itch.io/ ) to convert my pico-tarot deck into cross stitch patterns and we decided to put the first one, The Fool, out for PWYW! the results are incredibly cute and would make fantastic keychains imo! be sure to share your creations if you make one :D
https://ko-fi.com/s/451822b8ae
#pixel art#tarot#cross stitch#cross stitch pattern#crossstitch#xstitch#free cross stitch pattern#free pattern
15 notes
·
View notes
Photo
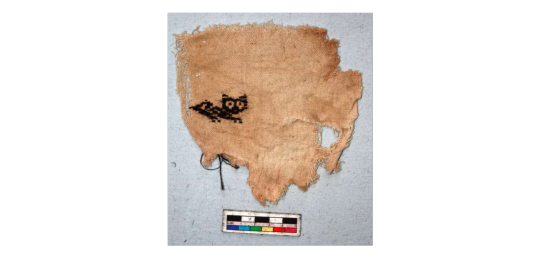
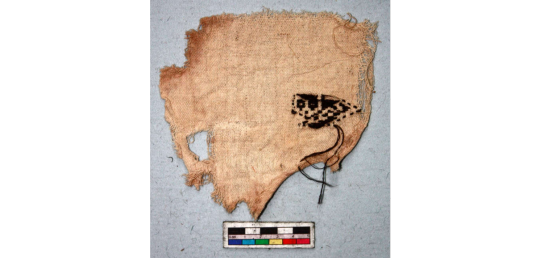
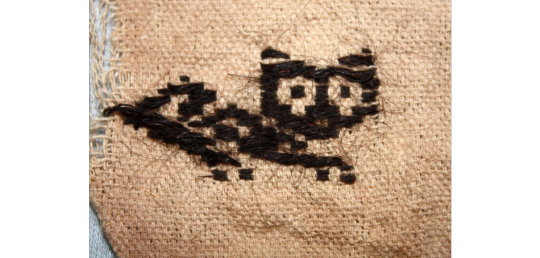
textile
Cultures/periods: Chimu (?) Chancay (?)
Production date: 900-1430
Made in: Peru
Provenience unknown, possibly looted
Textile fragment; cotton plain weave ground with paired warps; camelid supplementary weft patterning; feline figure; cream and black.
British Museum
32K notes
·
View notes
Text
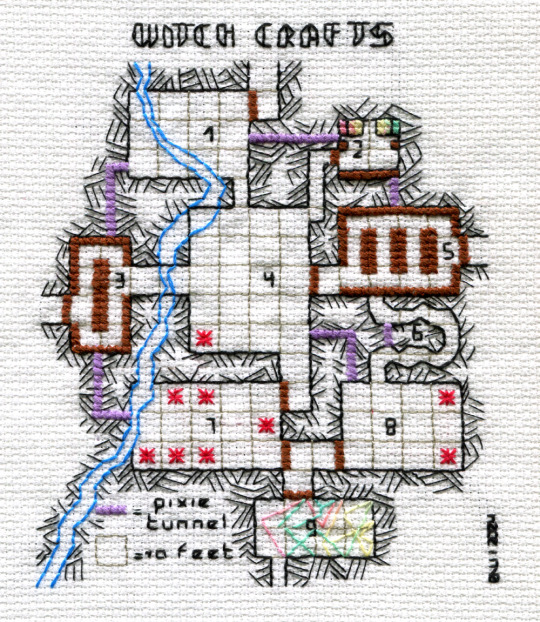
The campaign for Return to Perinthos: A Memorial Book Fundraiser in the Memory of Jennell Jaquays is now live!
I made a dungeon for this book. I don't remember how I got the idea of cross stitching the map, but once I got it, I couldn't get rid of it. I kept it small because I wanted to get it done in a reasonable time, and also to keep within the 750 words limit.
Several layers of inspiration ended up into this, even if they might not be apparent because I had to keep short (something I'm not very good at): Moirae, Ariadne's thread, SABLE (stash acquisition beyond life expectancy), redcaps, the generosity of crafters, how some fairies are offended by gifts of clothing, things that are not what they seem.
I am very happy with the cross hatching, I love Dyson Logos style maps and I wasn't sure if I would be able to convey it in stitches but I think I managed
#crafts#handmade#cross stitch#embroidery#i made this#stuff i made#dungeon#map#dungeon map#jennell jaquays#return to perinthos#fundraising#ttrpg#game#role playing game
68 notes
·
View notes
Text
The swallow pattern is also available from the designer's Etsy shop as part of a tattoo style set!
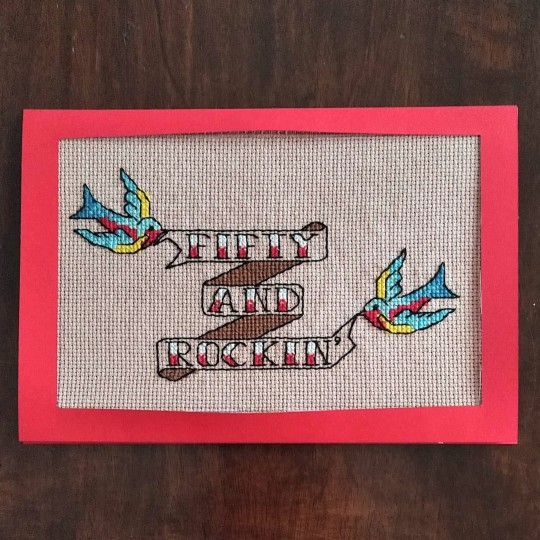
Made this a while ago for a friend's 50th birthday.
The idea was to do something in tattoo style so first I designed the banner with the words "fifty and rockin'". The swallows are based on the ones by Emma Congdon published in the March 2020 of the magazine Cross Stitch Crazy, but I felt that their cross stitched outline didn't go well with the backstitch banner, so I tweaked the design a bit. I also picked thread colours from what I had on hand rather than following the ones in the pattern.
Fabric is 14 count Aida that I dyed with green walnuts. It's a light brown with a pink undertone, pretty close to what you get using tea but that usually veers more towards yellow.
I miscounted in the top left corner, and realised it too late, so it's more cramped than I would have liked but 🤷
31 notes
·
View notes
Text
Mothman, the Plush
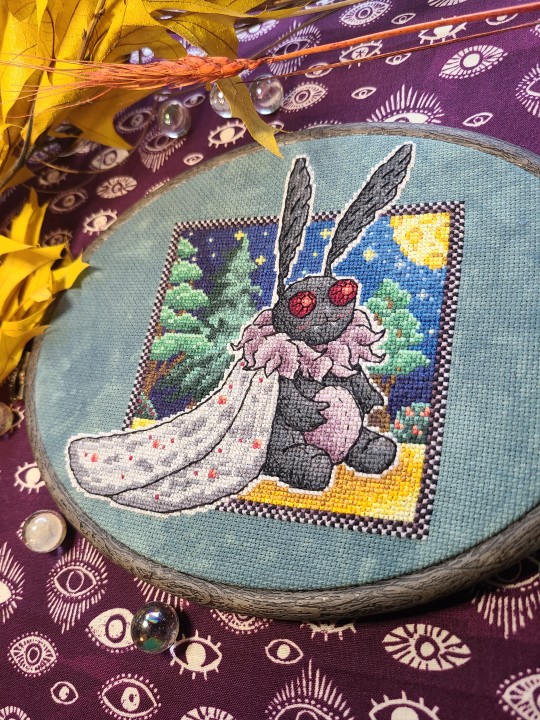
Please enjoy this little guy! If you'd like to stitch him yourself, it's possible :D The pattern can be found here for purchase:
Thank you so much, whether it be just looking, reblogging, or any other form of support. <3
77 notes
·
View notes

Text


Loom knit tarantula
#crafts#handmade#loom knitting#loom knit#i made this#stuff i made#diy#spider#tarantula#plush#spider toy
16 notes
·
View notes
Note
Any tips on learning to make buttonholes? I've been putting it off for.... *checks notes* like three years.... but better late than never and all that. I don't have any fancy machines so I gotta do it by hand but that seems right up your alley.
Thanks!
It IS up my alley, yes, I do most of my buttonholes by hand!
I'm actually part way through filming an 18th century buttonhole tutorial, but I expect it'll be a few more weeks before I finish that and put it on the youtubes, so in the meantime here's the very very short version. (The long version is looking like it'll probably be about 40 minutes maybe, judging by how much script I've written compared to my last video?)
Mark your line, a bit longer than your button is wide. I usually use a graphite mechanical pencil on light fabrics, and a light coloured pencil crayon on dark ones. (I have fabric pencils too, but they're much softer and leave a thicker line.) You may want to baste the layers together around all the marked buttonholes if you're working on something big and the layers are shifty and slippery. I'm not basting here because this is just a pants placket.

Do a little running stitch (or perhaps a running backstitch) in fine thread around the line at the width you want the finished buttonhole to be. This holds the layers of fabric together and acts as a nice little guide for when you do the buttonhole stitches.

Cut along the marked line using a buttonhole cutter, or a woodworking chisel. Glossy magazines are the best surface to put underneath your work as you push down, and you can give it a little tap with a rubber mallet if it's not going through all the way.

I'm aware that there are some people who cut their buttonholes open using seam rippers, and if any of them are reading this please know that that is abhorrent behaviour and I need you to stop it immediately. Stop it.
Go get a buttonhole cutter for 10 bucks and your life will be better for it. Or go to the nearest hardware store and get a little woodworking chisel. This includes machine buttonholes, use the buttonhole cutter on them too. If you continue to cut open buttonholes with a seam ripper after reading this you are personally responsible for at least 3 of the grey hairs on my head.
Do a whipstitch around the cut edges, to help prevent fraying while you work and to keep all those threads out of the way. (For my everyday shirts I usually do a machine buttonhole instead of this step, and then just hand stitch over it, because it's a bit faster and a lot sturdier on the thin fabrics.)

I like to mark out my button locations at this point, because I can mark them through the holes without the buttonhole stitches getting in the way.
For the actual buttonhole stitches it's really nice if you have silk buttonhole twist, but I usually use those little balls of DMC cotton pearl/perle because it's cheap and a good weight. NOT stranded embroidery floss, no separate strands! It's got to be one smooth twisted thing!
Here's a comparison pic between silk buttonhole twist (left) and cotton pearl (right). Both can make nice looking buttonholes, but the silk is a bit nicer to work with and the knots line up more smoothly.

I've actually only used the silk for one garment ever, but am going to try to do it more often on my nicer things. I find the cotton holds up well enough to daily wear though, despite being not ideal. The buttonholes are never the first part of my garments to wear out.
I cut a piece of about one arm's length more or less, depending on the size of buttonhole. For any hole longer than about 4cm I use 2 threads, one to do each side, because the end gets very frayed and scruffy by the time you've put it through the fabric that many times.
I wax about 2cm of the tip (Not the entire thread. I wax the outlining/overcasting thread but not the buttonhole thread itself.) to make it stick in the fabric better when I start off the thread. I don't tend to tie it, I just do a couple of stabstitches or backstitches and it holds well. (I'm generally very thorough with tying off my threads when it comes to hand sewing, but a buttonhole is basically a long row of knots, so it's pretty sturdy.)

Put the needle through underneath, with the tip coming up right along that little outline you sewed earlier. And I personally like to take the ends that are already in my hand and wrap them around the tip of the needle like so, but a lot of people loop the other end up around the other way, so here's a link to a buttonhole video with that method. Try both and see which one you prefer, the resulting knot is the same either way.


Sometimes I can pull the thread from the end near the needle and have the stitch look nice, but often I grab it closer to the base and give it a little wiggle to nestle it into place. This is more necessary with the cotton than it is with the silk.
The knot should be on top of the cut edge of the fabric, not in front of it.

You can put your stitches further apart than I do if you want, they'll still work if they've got little gaps in between them.
Keep going up that edge and when you get to the end you can either flip immediately to the other side and start back down again, or you can do a bar tack. (You can also fan out the stitches around the end if you want, but I don't like to anymore because I think the rectangular ends look nicer.)
Here's a bar tack vs. no bar tack sample. They just make it look more sharp, and they reinforce the ends.

For a bar tack to a few long stitches across the entire end.

And then do buttonhole stitches on top of those long stitches. I also like to snag a tiny bit of the fabric underneath.

Then stick the needle down into the fabric right where you ended that last stitch on the corner of the bar tack, so you don't pull that corner out of shape, and then just go back to making buttonhole stitches down the other side. Then do the second bar tack once you get back to the end.

To finish off my thread I make it sticky with a bit more beeswax, waxing it as close to the fabric as I can get, and then bring it through to the back and pull it underneath the stitches down one side and trim it off.


In my experience it stays put perfectly well this way without tying it off.
Voila! An beautiful buttonholes!


If you want keyhole ones you can clip or punch a little rounded bit at one end of the cut and fan your stitches out around that and only do the bar tack at one end, like I did on my 1830's dressing gown.

(I won't do that style in my video though, because they're not 18th century.)
Do samples before doing them on a garment! Do as many practice ones as you need to, it takes a while for them to get good! Mine did not look this nice 10 years ago.
Your first one will probably look pretty bad, but your hundredth will be much better!
4K notes
·
View notes
Text


Pumpkins!
When I started learning about the different loom knitting stitches, I decided to make some practice things, but making swatches felt boring and I wouldn't know what to do with them, so instead I made tubes and turned them into pumpkins, with i-cord stems.
All of these knitted pumpkins have been made with the same 24 pegs loom. The larger one is made with chenille yarn while the other four are made with the same yarn. As you will notice, the size difference between stitches can be quite dramatic.
After gathering the bottom, stuffing, gathering the top and adding the stems, I used running stitches to cinch and shape them, which made the size difference slightly less dramatic but I think it's still quite evident. It might also be my phone camera lens not helping because I think it looks more obvious IRL.
Flat knit stitch, u knit stitch, and e-wrap are basic stitches. At first I thought I would also make a purl stitch pumpkin but it takes much more effort compared to other stitches. It's a very useful stitch, and it's essential to make ribbing, and also when you alternate it with a knit stitch, it will makes panels that lie flat, rather than curling on themselves which is what happens when you use all knit stitches.
But I recently learned about the owl eye stitch, which was created by Deborah Shaw and it lies flat and it's much faster than purling and I am in love. I also dislike very much how garter stitch look, and while owl eye does look different from classic knit stitches, I find it much prettier so I think I'm going to use it a lot.
#crafts#handmade#loom knitting#loom knit#pumpkins#Halloween#🎃#knit pumpkin#stuff i made#i made this#knitting#knit toy
23 notes
·
View notes
Text
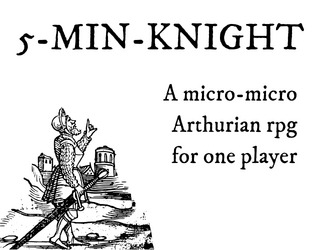
Games are stuff, right? I also make games.
5-min-Knight is the latest one, a solo journaling game to be played in 5 minutes, where you play an Arthurian knight going on a quest.
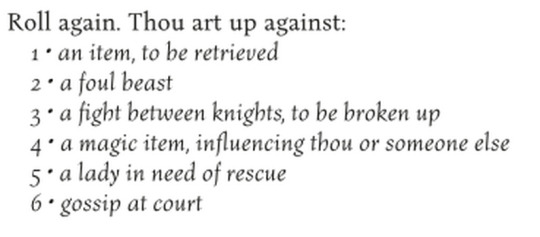
Created for the Jamelot game jam, it is based on 5-min-e
6 notes
·
View notes