
Statistics
We looked inside some of the posts by jessie-makes-maps and here's what we found interesting.
Average Info
Notes Per Post
9
Likes Per Post
8
Reblog Per Post
1
Reply Per Post
0
Time Between Posts
25 days
Number of Posts By Type
Text
7
Last Seen Tumblr Blogs


Fun Fact
Post activity is at the highest at 4:00 pm EDT; notes peak at 10:00 pm EDT.
Text
30 Day Map Challenge

I tried to do this last year, but completely forgot about it until about halfway through November. I figured this probably would be the best way to expand my portfolio before I graduate. I'm most excited to complete the 5 minute map, a bad map, music and "out of my comfort zone", as well as the color Fridays! Feel free to follow along for my journey to complete the #30DayMapChallenge on my instagram @jessie.makes.maps
1 note
·
View note
Text
Capstone Blog Post #4
I spent a lot of my time over the last couple of weeks constantly learning PowerBI, and once I got the hang of it, I found it quite simple. However, there were a lot of different tutorials out there, and some were contradicting. Here are a list of tips, either that I discovered on my own, or ones I found online!
PowerBI Desktop vs. Online?
When I originally set out to learn about dashboards, I found a lot of tutorials saying I needed to create a page in PowerBI Desktop for each chart, graph or table I wanted to present on my dashboard. Then I would publish these pages to a dashboard online. This resulted in a messy format, and allowed little customization. I found much more success using Desktop to create my dashboard, and then publishing it to the web. This is something I discovered, and so it really could just be a preference.
2. Using PowerPoint to make template backgrounds
If you ask me, creating a visually pleasing dashboard automatically makes me more interested. The video linked below shows a very simple method for creating a template background for different dashboards. This same action can be achieved through PowerBI alone, however it cannot be saved and reused as easily.
youtube
3. ArcGIS for PowerBI
ArcGIS for PowerBI is an extension created by Esri to help spatially analyze and visualize data. It's a cool tool that can add a lot to a dashboard. To add points, click on the ArcGIS for PowerBI icon, then drag the latitude and longitude to its respective places. If you don't have the coordinates, you can just use a generic location to tell the extension where the points need to go. Colors can change, sizes can change and you can even create a heatmap.
This is such a complicated tool, since it is so endless. I've attached some of my favorite tutorials that helped me use PowerBI!
youtube
1 note
·
View note
Text
Capstone Blog Post #3
I've run into a major issue regarding my data, I do not have nearly enough. I thought that with the recent patterns I've noticed, there would be more, but there is not.
So, what can someone do if there is not enough data to fulfill the experiment?
One course of action is to expand the perimeters for the data. This would mean instead of looking just at wire thefts, I would also have to include other types of theft. Due to the nature of Amtrak, very few thefts occur outside of the train car, and if they do occur outside of the train car, it is normally a wire theft.
Another way I could expand this data is to go further back. This poses two issues. The first is that I would have to manually go through the data on RMS so conclude if the incident was a wire theft. This would not be good use of my time and energy. I could also expand this data by waiting, but I feel as if I can no longer wait to
So I think I will have to re-think my capstone project. I have a lot of data in regards to fare evaders. A big problem I have faced with the people that input the data is that there is very little consistency with it. For example, one of my responsibilities back in the Spring was to analyze the patrol train rides. However, there was no way field specifically for train number, and it would (sometimes) be included in the narratives. I brought this up to my boss and mentioned that everyone would need to input their train numbers, and it worked! But, I feel as if I am finding more and more problems like this.
I love the idea of a dashboard, and we have continuously been using them to communicate to officers what patterns we are seeing. I have a lot of data already on fare evaders, as this is a large crime Amtrak faces. The only issue comes to the coordinates of the events. When I export the data to a CSV then join it to a shapefile (or just use the X & Y coordinates to make the points on the map), they only refer to the stations. This data would need to be manipulated to really include the segments of the routes that have the highest fare evaders.
So here's hoping that one works out.
1 note
·
View note
Text
Capstone Blog Post #2
Weeks 3 and 4 did not include as much progress as I hoped. However, I have found the variables I want to work with. One of the most interesting ones I'm excited to see if there is a relationship between the two is the price of copper. It's no secret that copper is used in railroads, but the price of copper has increased so much, so it attractive to criminals. It was honestly tricky to find the price of copper, and I was a bit confused as to why. I never found out why it was so difficult to find, but I did find the data. For every wire theft incident that has happened, I found the price of copper for that day on https://tradingeconomics.com/commodity/copper. Unfortunately, this was done slowly, since I did not want to pay for the CSV. Just by looking at the graph of the price of copper, but also the months where the wire thefts occurred, there seems to be little similarity. I've read the CSV into RStudio as well as the different shapefiles of the Amtrak rails and the other variables I am using. I mapped the different variables to make sure they were read correctly after projecting them into the same coordinate system. Crime Prevention through Environmental Design is one of my interests, and so I've included some variables that are environmental factors that could deter or encourage people to commit a crime. Demographic data is also important to look at, so I'm excited to look at these different variables and see what Amtrak can look out for, and eventually do to help prevent these crimes.
0 notes
Text
Capstone: Blog Post #1
For the past couple of weeks, I have been back at Amtrak’s Police Department (APD) in the Mid-Atlantic North Division (MAN). Projects cannot be limited to just one division since Amtrak trains travel throughout different states and typically through different divisions. A lot of my past projects have included data from the Mid-Atlantic South (MAS), New York (NY) and New England (NE) divisions. . For the capstone project, I will be using predictive statistics to help the APD prevent wire thefts. One of the main variables that affects the amount of wire thefts are broken fences, which hopefully can be one of many variables I can use in this analysis. Other variables may include the cost of copper wire (a type of wire that is often stolen due to the high price), as well as demographic data. The issue with demographic data is that it is not always guaranteed the offender lives in the same area where the incident occurred. One of my main goals these past couple of weeks was to collect and filter the data. RMS does allow the user to download the data as a CSV or Excel file. Unfortunately, the reporting system does not have the ability to filter out specific types of crimes. I could filter it by date, division and if the incident occurred on the train. This still returned a lot of results, but it made it more manageable to sort through. The details about the incidents are found in the narrative section. Since I want the tedious process of sorting through each incident (I believe there was about 450 total!), I just use control + F to search for the word ‘wire’. I imputed the CSV into ArcGIS Online just to see where the wire thefts are occurring. RMS does not include the narrative in the downloaded CSV, so the user must go through each incident narrative to find the details. Dates in RMS are recorded as ‘mm/dd/yyyy tt:tt Eastern’, so to clean up the data I like to create a column for month, time and day of the week. This makes it so much easier to decide if there are any patterns. I typically do this through the ‘=left’, ‘=mid’, ‘=right’ and ‘text(selected cell, “mmmm”)’.
0 notes
Text
Web Map: Philadelphia Public Art
Hi Everyone! Here is my GitHub URL so that my web maps can be accessed:
For each web map I post, I will provide a post to announce it. So here is my first collection of web maps, it includes three web maps focusing on the different fields of a dataset I found on OpenDataPhilly that shows public art in Philadelphia. The fields include: Neighborhood, Medium and Year of Creation. All these maps were created using Leaflet. The code is also featured on the GitHub under 'index'.
The Philadelphia Public Art GeoJson was copied and pasted into leaflet and saved as a JavaScript file(.js). From there I pretty much filtered down the neighborhood field to only include Center City, Poplar and University City. Each neighborhood had a separate filter. In the pop ups I included the title of the work, name of the artist, and year it was created.
Using the same JavaScript file, I created the medium map. This is probably my favorite of the three, since I really like the colors behind it. When you click on a piece of art, it provides you with the title, artist name, year, medium and location.
The final map is by year, and it's similar to the art medium map, but just has three categories: before 1970, 1970 to 1999 and then 2000 to present.
This project was my final for my Web Mapping class (which I enjoyed more than I thought, since I had zero programming experience going into the class). Originally, I wanted to create an interactive map of the income and test scores I completed for my Cartographic Design (see the post below this), but after some trouble with the GeoJson, I found this dataset and really enjoyed working on it. I've always loved art, and it was refreshing to work on a map about art!
Learning how to publish my maps was hard. I went through about 3 different tutorials on how to publish on GitHub. In the end, I found a template that was the most user-friendly!
Neighborhood:
Medium:
Year:
0 notes
Text
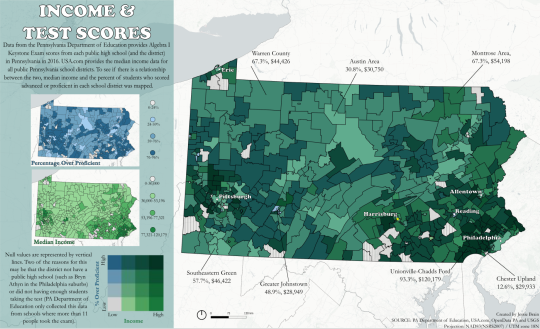
Median Income and % of Students who tested either Proficient or Advanced in their Math Keystone Exam in 2015. In my background in sociology, I learned about income disparities and how they can affect many aspects of someone's life, including quality of education.
This map was made as my final project for Cartographic Design. The median income data comes from USAToday.com and was included in a CSV file with the name of each School District. The test score data came from the PA Department of Education website. The original test score data only included the percentage below proficient, proficient, and advanced. To normalize the data, if there was only one high school in that district, the proficient and advanced percentages were added together. If there was more than one high school, the mean was taken from the sums of the proficient and advanced percentages.
The CSV was joined with a PA school district shapefile, which was obtained from OpenDataPA, in QGIS (or ArcPro, I tend to prefer ArcPro when it comes to joins, as I find the attribute table to be more user-friendly). I then put that shapefile into QGIS, I'll list the tutorial that helped me develop this map down below, but basically you just make two choropleth maps (which I actually included on the left!), then mess around with the opacity until you think it looks even. For the legend, I used the bivariate legend plug in on QGIS.
For the layout, I created a new print lay out in QGIS, then exported it to an SVG. I then opened Inkscape, imported the SVG and fiddled around with that until I liked the outcome, then exported it as a png. As you can tell, the quality is quite low. I'm not sure why that is, as other QGIS/Inkscape maps I have made don't come out low quality.
In retrospect, I wish I did more research on better bivariate colors. Obviously, I wanted to use green to represent income, but I think layered with the blue, it became to dark, so maybe yellow would have been a better option...
I really liked the title font when I completed this project, and so did my professor! Although I do think it makes the map seem a little less serious than I wanted it to come across.
I came into this class with no cartographic experience and little GIS experience (check out my about me section for more information about that), and was overwhelmed when we talked on the third week about our final project. Throughout this class I developed my style (which pretty much always includes this base map - it's my favorite!), and for my first infographic including a map, I felt pretty proud!
Here's the link to the tutorial and other websites I found helpful!
Tutorial: https://bnhr.xyz/2019/09/15/bivariate-choropleths-in-qgis.html
Includes some more help and example legend colors: https://www.joshuastevens.net/cartography/make-a-bivariate-choropleth-map/
#maps#gis#qgis#inkscape#choroplethmap#education#income#pennsylvania#PA#testscores#jessiemakesmaps#bivariatemap#infographic
6 notes
·
View notes