
Supposed to be an art blog but mostly just tutorials I’ve saved for myself ¯\_(ツ)_/¯ Follow me @languid_bones on insta and bluesky
Don't wanna be here? Send us removal request.
Statistics
We looked inside some of the posts by languid-bones and here's what we found interesting.
Average Info
Notes Per Post
35K
Likes Per Post
25K
Reblog Per Post
10K
Reply Per Post
51
Time Between Posts
3 days
Number of Posts By Type
Text
16
Note
1
Last Seen Tumblr Blogs


Fun Fact
Tumblr’s reach among the 26-to-35-year-olds in the US is 11%.
Text

“to be loved is to be changed”
💫 riso print
2K notes
·
View notes
Text

love lies bleeding
3K notes
·
View notes
Text
My Skeletá zoetrope vinyl came in today! Got the Papa V version which is awesome.
The quality control on these is defo lacking, the edges of this vinyl are hella rough but the audio seems fine which is what is most important.
25 notes
·
View notes
Text
YESSSSSSSSSSS
Every time someone shares their little MB desk buddy that they crafted, my day is made and I am obnoxious about it for the rest of the day.
Murderbot 3D Print Part 3 - FILES!!!
It's what many of you have been waiting for! THE 3D FILES!
The price??? It's free!
That's a lie, the price is actually that you send me pictures of the results so I can have the joy of seeing what you all make. (I mean it, this is a threat)
Based on comments so far, it seems like this will be the first dive into 3D printing and figure painting for some people so I'll go through some of my approach to give you an idea of how I got to this result.
This is actually my first time sculpting, printing and then painting something to completion, so I am not experienced and you can totally do it too. As you may see from my blog I am primarily a digital artist and I occasionally do gouache and ink work, I have literally never painted or sculpted a figure before. (This counts as foreshadowing if you run into any problems with my files lmao)
Sculpting:
I sculpted the model in Nomad Sculpt on my Ipad and tidied things up in blender. I am still a massive beginner with sculpting so I incorporated pieces from some other freely available models to assist me (these are credited in the listing with the model). You don't have to worry about this part!
Printing:
I printed this on my MARS ELEGOO 2 printer. The settings I used for my print are included on the model listing; with these settings the model took about 7.5 hours to print.
The Files
I have uploaded 3 different file formats, a .stl, a .chitubox and a .ctb. An stl is the basic 3D model on its own, it can be opened in most 3D software if you are looking to edit it and it can be imported into any slicing software (slicing is the process of cutting any model into layers for the printer). If you use this file you will have to add the supports to the model yourself (supports are very important in preventing catastrophic print failure).
The .chitubox and .ctb files are specifically from the slicing program I use which is chitubox. The .chitubox program is for the model with the supports for printing attached and the .ctb file is the sliced file that is ready for the printer. VERY IMPORTANT TO NOTE is that these two files are sized and prepared based on my 3D printer dimensions. If you want to use these files, I recommend checking either files in chitubox (and have it set up for the model printer you will be using) and checking the size before going ahead with printing. If the size is too big for your printer you will have to resize the model and add the supports again but you can use the files I have supplied as reference.
I specifically used Chitubox 64 for this as Chitubox basic hates me and won't slice the model so it is solid inside. Printing something solid is easier to print than printing it hollow and trying to cure the resin trapped inside/drain the model (uncured resin is nasty nasty and will also generate gas that builds up pressure and will crack your print).
I recommend using either the basic stl for printing or starting with the .chitubox file and setting up the slicing settings by yourself. The ctb is a good reference for how things should look but probably not the best starting point to guarantee a successful print. If you add supports yourself, I recommend looking up some youtube videos on how to properly support a model, and what parts of a model need the most support and avoiding visible marks on your models from supports.
Post-Printing
Its important to clean and cure your print properly after its done, but if you are getting it done at the library or somewhere else you may not have to worry about this.
To remove the supports I used a heat gun to warm and soften the resin supports and little clippers my friends use for gundam to cut them as flush to the model as possible.
The next thing you want to do is sanding, sand down the marks from the supports, any lines or imperfections from the printing. Resin is relatively soft so this is not hard. I personally bought some cheap sandpaper that went from 400-1000 grit, glued it to icecream sticks, disposable knives and some flat toothpick things and used that to get into small crevices. Sand with wet paper to prevent resin dust going everywhere.
Painting
After sanding I sprayed the model with a primer, I specifically used Mr. Finishing Surfacer 1500 in white. This was my choice simply because its what my local gundam store had and I chose white because I didn't want to use a darker base coat that I had to lighten for the armor (simply put most of the model is white and white is a pain in the ass to paint opaquely)
After this I went in with my standard run-of-the-mill acrylic paints. The key to getting a smooth finish with no brush marks and lumps is to thin/smooth out the paint a little with water and build up the colour in layers.
I painted my base colours (white for the armor, black for the shoes and visor and a dark grey for the suit underneath the armor). To get a cool beaten-up effect I laid some light blue into areas on the armor where shadows would fall, after that I dabbed panel line accent colour which gets into the crevices and lines of the print and accents them (you can also just use really watered down black paint for this, I was lucky to borrow supplies from a warhammer 40k friend). I also covered parts of the armor with it and rubbed it off for a grimy effect and then dabbed some brown paint in for extra colour variation. I then came in and dry-brushed some lighter colours on the dark areas and fixed up the white where I wanted it brighter.
Then finally I coated the whole thing in a matte varnish to protect it and it was done!! My own Murderbot completed!!
Hopefully if you haven't done something like this before, this helps you get started There are dozens and dozens of great tutorials out there for more info or if you want to take your design in a different direction to mine.
Most importantly?? Have fun!!
If you have any issues or questions feel free to message me and we can work on it together!
201 notes
·
View notes
Text
Do u see the vision
4K notes
·
View notes
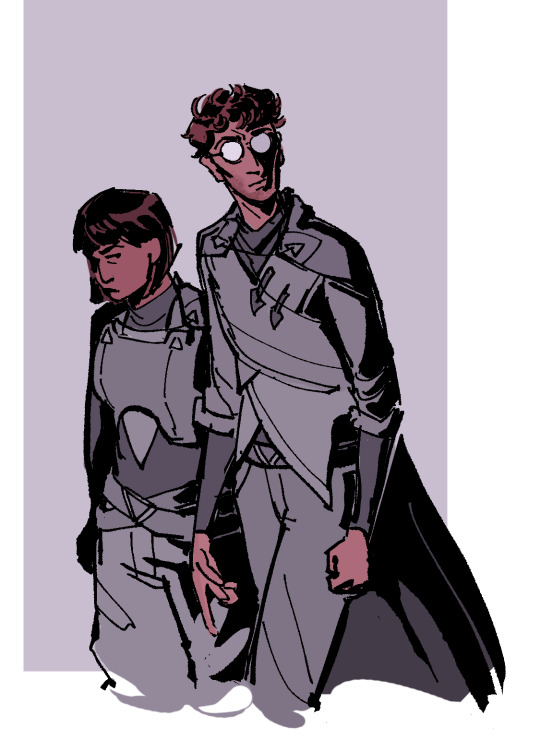
Text
I got commissioned to paint griddlehark imagined as a classic romance novel cover, which needless to say is one of the greatest commissions of all time and I had an absolute blast.

Per the commissioner's request, I've also uploaded this art to INPRNT (link here).
Art without typography and a mock-up for fun under the cut!


8K notes
·
View notes
Text

3D printing stuff

3D printed two of @languid-bones's Murderbot Desk Buddiess. One for me and one for @skeletalcat
Still need to do a little more clean up on the support nubbies.

Also trying to 3D print a plaque-thing of Handler Walter's emblem. 1 hour test print. It will be many more hours of printing if I blow it up to fill the build plate. It'll look nicer when the lines don't have to be at the limit of what the nozzle can do.
It's 5.5 hours if I do maximum buildplate.


Need to keep testing ironing settings. This sunlu filament turns out a bit different from my Elegoo filament's results. I prefer Sunlu.
Also I learned I now have 300+ hours on my Bambu. This thing is a beast.
29 notes
·
View notes
Text
I need to be medicated.

930 notes
·
View notes
Note
Hiya, I don’t own a 3D printer. Is there a way I can pay you for a Murderbot figure?
I would be happy to do so! I am however based in Australia if that poses a problem around shipping/getting it to you.
It may take me a little bit bc it takes about 8 hours to print the MB figure, usually I leave printing till the weekend when I have time at home to monitor my printer.
If the logistics of that are a little difficult I can also recommend looking up libraries or local 3D printing services which might be easier.
2 notes
·
View notes
Text

“I’m back to feed you more MB art!” I say, as if it’s not all of you feeding me with all of your perfect comments in my tags 👀
Anyway I messed around with somethin’ a little retro looking because I really wanna make a print in the style of the NASA travel posters but Murderbot.
607 notes
·
View notes
Text

451 notes
·
View notes
Text
me: idk about the murderbot show you guys… I’ve got some worries…
ratthi:

me: okay I will make an exception he looks very polite
#what a perfect Ratthi#The human cast actually all look so good fr#murderbot#murderbot show#mbd show
3K notes
·
View notes
Text
YESSSSSS OMGGGGGGGGGG IM SO KEEN TO SEE IT PAINTED HELL YEAHHHHHHHHHH AHDKSKKSF


@languid-bones
My friend did a PLA print with organic shaped supports and it looks like poor MB is being consumed by TargetControlSystem. It cleaned up nice tho! I was worried about the right hand fingers, where they don't touch the leg, but they cleaned up nice when I used the jewelry files. Next, paint!
#my day is made#the supports really do be like that tho#congrats on overcoming my terrible 3D modelling skills#its cool to see it work in PLA in addition to resin#murderbot fanart#the murderbot diaries#murderbot
67 notes
·
View notes
Text

multiples
4K notes
·
View notes
Text
sixth
6K notes
·
View notes
Text


BLASPHEMY! HERESY!
1K notes
·
View notes
Text
Theres a moment where Sec-Unit complains about ruining its favorite jacket because of the weapons in its arms. I love to think the solution is as simple as rolling up its sleeves. (It just doesn’t have time to)


In other note- My humanized version of Peri looks a lot like a tour guide. Or a “fancy show host” as a friend put it.

But since it canonically takes students on little excursions around the local galaxy all I could see was an snarky tour guide.
So here’s some stupid jokes I think it would make while teaching the groups.
“If you look to your left, you’ll see the left side of the universe. And if you look to your right you will see… the right side of the universe.”
“Have you considered studying astronomy at the university? Or are you just orbiting the idea?”
“I know everything there is to know about constellations, some might even say my knowledge of the night sky is astronomical.”
“Good books on anti- gravity are hard to put down”
“I’ve found that adolescents, like moons, tend to go through phases.” (Somewhere, Iris rolls her eyes)
441 notes
·
View notes