
Dulces recetas bilingües para compartir con el mundo/ Sweet bilingual recipes to share with the world
Don't wanna be here? Send us removal request.
Statistics
We looked inside some of the posts by ohlalabakery and here's what we found interesting.
Average Info
Notes Per Post
25
Likes Per Post
21
Reblog Per Post
4
Reply Per Post
0
Time Between Posts
6 days
Number of Posts By Type
Photo
17
Last Seen Tumblr Blogs


Fun Fact
Tumblr has been banned in Indonesia for providing people with access to pornographic content.
Photo

DONUTS DE TÉ CHAI LATTE/ BAKED CHAI TEA LATTE DONUTS
Después del desafío del pan de muerto de la semana pasada, hoy traemos al blog una receta sencilla que os va a encantar. Estos donuts de té Chai Latte seguro que se convertirán en vuestros favoritos. ¿La principal ventaja de la receta? No son fritos, así que además de ser (un poco) más sanos, se hacen en un momento en el horno. El olor otoñal a las especias os invitará a coger la mantita y a sentaros con un café calentito a ver alguna peli en el sofá. Planazo, ¿no?
Aquí tenéis la receta. ¡A disfrutar!
Ingredientes:
(para 6 donuts)
Donuts
3 cucharadas / 45 ml de chai latte
¾ taza de harina para todo uso
1/3 taza de azúcar morena granulada
1 cucharadita de levadura en polvo
½ cucharadita de canela
¼ de cucharadita de mix especias
1 huevo
3 cucharadas de yogur natural
3 cucharadas de mantequilla derretida
¼ cucharadita de sal
Glaseado de té chai
1 taza de azúcar glass
1 cucharadita de esencia de vainilla
½ cucharadita de sirope de arce
60 ml chai latte
Instrucciones:
Precalienta el horno a 375/190C.
Para hacer el chai latte, puedes calentar 3 tbps / 45 ml de leche, agregar 4 bolsas de té chai y dejar reposar durante 5 minutos, o puedes usar 1 cucharada / 15 ml de concentrado de té chai y agregar 2 tbps / 30 ml de leche. Prepara aparte los 60 ml que usarás para el glaseado. Reserva.
Mezcla los ingredientes secos (harina, azúcar, polvo de hornear, sal, canela y especias).
Agrega los ingredientes húmedos (huevo, yogur, chai latte, mantequilla y esencia de vainilla) y mezcla hasta que todo esté completamente integrado.
Engrasa una bandeja para donuts con un spray antiadherente.
Transfiere la masa a una bolsa para congelado o una manga pastelera y pon la masa uniformemente en la bandeja para donuts. Si no tienes una manga pastelera o bolsa, puedes usar una cuchara para llenar la bandeja.
Hornea de 10 a 12 minutos a 375F / 190C
Deja que los donuts se enfríen durante 5 minutos antes de pasarlos a una rejilla.
Haz el glaseado de té chai mezclando el azúcar en polvo, el extracto de vainilla y el sirope de arce. Añade poco a poco el chai hasta alcanzar la consistencia deseada.
Sumerge los donuts en el glaseado y ponlos de nuevo en la rejilla para que se endurezcan.
Decora los donuts. Puedes añadir algunas nueces picadas o espolvorear un poco de canela, azúcar moreno y chispas doradas.

Ingredients:
(yield 6 donuts)
Donuts
3 tablespoons/45 ml chai latte
¾ cup all-purpose flour
1/3 cup granulated brown sugar
1 teaspoon baking powder
½ teaspoon cinnamon
¼ teaspoon allspice
1 egg
3 t plain yogurt
3 tablespoons melted butter
¼ tsp salt
Chai tea glaze
1 cup powdered sugar
1 teaspoon vanilla extract
½ teaspoon maple syrup
60 ml chai latte
Instructions:
Preheat the oven to 375/190C.
To make the chai latte, you can either heat 3 tbps /45 ml of milk, add 4 chai tea bags and let steep for 5 minutes, or you can use 1 tbp/15 ml of chai tea concentrate and add 2 tbps/30 ml of milk. Set aside.
Whisk together dry ingredients (flour, sugar, baking powder, salt, cinnamon, and spices).
Stir in the wet ingredients (egg, yogurt, chai latte, butter, and vanilla extract) and mix until everything is fully incorporated.
Grease a donut pan with cooking spray.
Transfer the batter to a freezer bag or a piping bag and squeeze batter evenly into the donut pan. If you don’t have a piping bag you can use a spoon to fill the donut pan.
Bake 10-12 minutes at 375F/190C
Allow the donuts to cool for 5 minutes before transferring them to a cooling rack.
Make the chai glaze by stirring powdered sugar, and vanilla extract. Add chai milk until you get the desired consistency.
Dip the donuts in the glaze and return them to the cooling rack to let them set. Decorate as desired. You can add some chopped pecans, or sprinkle with some cinnamon, brown sugar, and golden sprinkles.
1 note
·
View note
Photo

PAN DE MUERTO/ DAY OF THE DEAD BREAD
Se acerca el Día de Muertos y en México esta fecha se celebra con altares para recordar a los seres queridos que ya no están. Entre las costumbres de esta celebración se encuentra el dulce que traemos hoy al blog: el pan de muerto. Un bollo tipo brioche muy suave y aromático. Se decora con una esfera en la parte superior que simboliza el cráneo y dispuestos en cruz se colocan los huesitos. No os vamos a mentir, no es sencillo, pero es de esos postres que bien merecen el esfuerzo.
Aquí dejamos la receta para esos valiente (y sobre todo pacientes) reposteros que lo quieran intentar. ¡De verdad que está de muerte!
¡A disfrutar!
Para 2 panes de muerto
Ingredientes:
2 tazas y media de harina normal
½ taza de azúcar blanco
1/3 de taza de leche tibia
7 g de levadura de panadería
2 huevos + 2 yemas
100 g de mantequilla
2/3 cucharadita de agua de azahar
Ralladura de 1 naranja y media
½ cucharadita de sal
Preparación:
Empieza preparando la mise en place de todos los elementos antes de empezar.
Para hacer la esponja primero pon en un cuenco la levadura y añade dos cucharadas de harina y media de azúcar. Vierte la leche tibia (a 110F/43C) y después remueve hasta que se disuelva todo bien. Cubre el bol con un plástico y déjalo reposar en un lugar cálido y soleado (si es posible) durante unos 20-25 minutos.
Pasado ese tiempo pon sobre la encimera de trabajo la harina y haz un hueco en el centro como si fuera un volcán. Vierte en el agujero la esponja. Rodea toda la parte externa de la harina con el azúcar y después rodea el azúcar con la sal.
Echa de uno en uno los huevos sobre la esponja e incorpóralos poco a poco con los dedos haciendo movimientos circulares y cogiendo de cada vez un poco de harina de alrededor. Cuando se hayan incorporado todos los huevos y yemas sigue incorporando más harina lentamente. Una vez acabada la harina, repite el proceso con el azúcar y después con la sal.
Cuando todo esté integrado tendremos una masa un poco líquida que se pega a las manos. Esto es totalmente normal. Agrega los trozos de mantequilla y amasa para incorporarlos a la mezcla.
Añade el agua de azahar y la ralladura de naranja y sigue amasando.
El tiempo de amasado es variable (entre 40-70min) pero sabrás que has terminado de cuando la masa deje de estar tan húmeda y no se te pegue a las manos ni a la mesa.
Haz una bola y ponla en un bol engrasado con un poco de aceite. Unta la masa también con un poco de aceite por encima para evitar que se seque. Cubre con un plástico y déjalo reposar en un lugar caliente y soleado entre 1-2 h.
Una vez que la masa haya duplicado su tamaño, vuélcala sobre la mesa y saca un poco el aire aplastándola con las manos. Forma un rectángulo y divido tu masa en 3 partes: 2 partes serán para formar los panes y la tercera para hacer los huesos y el cráneo.
Moldea la masa para formar los bollitos de pan. Es importante que la costura quede debajo.
Para hacer los huesitos toma un poco de la masa y forma un cilindro. Coloca un dedo en la mitad del cilindro y haz rodar tu dedo hacia delante y hacia atrás hasta lograr que casi se divida en dos. Continúa alargando la masa y repite el mismo proceso cerca de los dos extremos del cilindro hasta lograr tener 3 hendeduras.
Para hacer los cráneos haz bolas siguiendo el mismo procedimiento que con los bollos.
Para que se adhieran los huesos al pan pon un poco de agua con el dedo o un pincel encima del bollo siguiendo la forma X que tendrán los huesos y colócalos encima. Pon un poco más de agua y coloca en la intersección de la X el cráneo. Asegúrate de que quede bien fijo, ya que al hornearse la bola tiende a moverse.
Deja los panes crecer durante una hora antes de meterlos al horno. Acuérdate de precalentar el horno a 340F/170C cuando quede poco tiempo para llegar a la hora.
Prepara la bandeja con un papel de horno y pon los panes separados. Hornea a 340F/170C durante 20-25 minutos o hasta que estén dorados.
Saca los panes del horno y déjalos enfriar en una rejilla. Cuando estén tibios píntalos con mantequilla derretida y espolvorea el azúcar blanco por encima para decorarlos.

2 loaves
Ingredients:
2 and a half cups of all-purpose flour
½ cup white sugar
1/3 of cup of warm milk
7 g yeast
2 eggs + 2 yolks
100g butter
2/3 teaspoon orange blossom water
Zest of 1 and a half orange
½ teaspoon of salt
Instructions:
Start by preparing the mise en place of all the items before you begin.
To make the sponge, first put the yeast in a bowl and add two tablespoons of flour and half tablespoon of sugar. Pour in the warm milk (at 110F / 43C) and then stir until everything dissolves well. Cover the bowl with plastic wrap and let it sit in a warm, sunny place (if possible) for about 20-25 minutes.
After that time put the flour over the table or countertop and make a hole in the center as if it were a volcano. Pour the sponge into the hole. Surround all the outside of the flour with the sugar and then surround the sugar with the salt.
Pour the eggs one by one onto the sponge and gradually incorporate them with your fingers, making circular movements and taking a little flour from around each time. When all the eggs and yolks have been incorporated, continue to slowly add more flour. Once the flour is finished, repeat the process with the sugar and then with the salt.
When everything is integrated, you will have a slightly runny dough that sticks to the hands. This is totally normal. Add the pieces of butter and knead to incorporate them into the mixture.
Add the orange blossom water and the orange zest and continue kneading.
The kneading time is variable (between 40-70min) but you will know that you have finished when the dough stops being so wet and does not stick to your hands or the table.
Make a ball and put it in a bowl greased with a little oil. Spread the dough with a little oil on top to prevent it from drying out. Cover with plastic wrap and let it rest in a warm and sunny place for 1-2 hours.
Once the dough has doubled in size, turn it over on the table and push the air out a bit by squashing it with your hands. Form a rectangle and divide the dough into 3 parts: 2 parts will be to form the loaves and the third to make the bones and the skull.
Shape the dough to form the bread rolls. It is important that the seam is underneath.
To make the bones, take a little of the dough and form a cylinder. Place one finger in the middle of the cylinder and roll your finger back and forth until it almost divides in two. Continue to stretch the dough and repeat the same process near the two ends of the cylinder until you have 3 slits.
To make the skulls, make balls following the same procedure as with the buns.
For the bones to adhere to the bread, use some water and paint a cross with your finger or a brush on top of the bun and place the bones on top. Add a little more water and place the skull at the intersection of the cross.
Let the loaves rise for an hour before putting them in the oven. Preheat the oven to 340F / 170C.
Prepare the tray with a parchment paper and put the breads separated. Bake at 340F / 170C for 20-25 minutes or until golden brown.
Take the loaves out of the oven and let them cool on a rack. When they are warm, brush them with melted butter and sprinkle some white sugar on top to decorate them.
2 notes
·
View notes
Photo

GALLETAS CRAQUELADAS DE CALABAZA & MANDARINA / PUMPKIN & MANDARIN CRINKLE COOKIES
El otoño nos sigue regalando paisajes hermosos y recetas deliciosas. Uno de los ingredientes estrella de esta temporada es la calabaza. A nosotras nos encanta y llegada esta época nos volvemos locas con todas las recetas que hay para sacarle el máximo provecho a este fruto. Hoy os proponemos estas galletas craqueladas de calabaza y mandarina. ¡Vistosas por fuera y jugosas y tiernas por dentro!
Aquí tenéis la receta. ¡A disfrutar!
Ingredientes:
Masa para 12 galletas
½ taza de puré de calabaza
1 taza de harina
1 cucharadita de especias de pastel de calabaza
1 cucharadita de polvo de hornear
¼ de cucharadita de sal
½ cucharadita de bicarbonato de sodio
¼ taza de mantequilla derretida (50 g)
¼ taza de azúcar morena o panela
¼ taza de azúcar blanca
½ cucharadita de esencia de vainilla
Unas gotas de zumo de mandarina
Ralladura de mandarina
Preparación:
Precalienta el horno a 325F / 160C. Forra la bandeja con papel de horno.
Para hacer el puré de calabaza, pon en un bol la calabaza pelada y troceada con una cucharada de agua. Cubre con papel film y métela en el microondas durante 6-8 minutos. Deja enfriar y usa una licuadora o procesador de alimentos para hacer el puré. Reserva.
En un bol mediano, mezcla los ingredientes secos: harina, especias para pastel de calabaza, polvo de hornear, bicarbonato de sodio y sal. Reserva.
En otro bol, mezcla el azúcar moreno, el azúcar blanco, el puré de calabaza y la esencia de vainilla hasta que quede una mezcla sedosa. Agrega la ralladura de mandarina, las gotas de zumo de mandarina y la mantequilla y mezcla de nuevo. Con una espátula de silicona, añade la mezcla de harina poco a poco hasta que no queden ingredientes secos visibles.
Cubre el bol con papel transparente y déjalo en la nevera durante al menos 1-2 horas.
Pon el azúcar glass en un bol. Con una cuchara para galletas o helado o con las manos, forma bolas de galletas. Colócalas en el bol con azúcar glass y rebózalas con cuidado. Coloca las bolas en la bandeja con suficiente distancia entre ellas. Repite el proceso lo más rápido posible, ya que la masa absorberá el azúcar en polvo si se deja mucho tiempo.
Hornea durante 14-16 minutos o hasta que las galletas estén infladas y se hayan formado grietas. Las galletas aún estarán blandas. Déjalas enfriar durante 15 minutos antes de transferirlas a una rejilla para que se enfríen por completo.

Ingredients:
Yield 12 cookies
½ cup pumpkin puree
1 cup all-purpose flour
1 teaspoon pumpkin pie spice
1 teaspoon baking powder
¼ teaspoon salt
½ teaspoon baking soda
¼ cup salted butter, melted (50 g)
¼ cup brown sugar or panela
¼ cup white sugar
½ teaspoon of vanilla extract
Squeeze of mandarin
Mandarin zest
Instructions:
Preheat oven to 325F/160C. Line baking sheet with parchment paper.
To make the pumpkin puree, peel, cut in pieces, and add them to a bowl with a tablespoon of water. Cover with plastic wrap and microwave for 6-8 minutes. Once it is cooled, use a blender or food processor to make the puree. Set aside.
In a medium bowl, whisk together the dry ingredients: flour, pumpkin pie spice, baking powder, baking soda, and salt. Set aside.
In another bowl, whisk together the brown sugar, white sugar, pumpkin puree, and vanilla extract until smooth. Add the mandarin zest, mandarin juice, and butter and whisk until combined. Using a rubber spatula, fold in the flour mixture just until no dry ingredients remain visible.
Use some plastic wrap to cover the bowl and put it in the fridge for at least 1-2 hours.
Place the powdered sugar in a bowl. Using a cookie scoop or your hands form cookie balls. Place them in the powdered sugar bowl and roll to coat. Place the dough balls on the parchment lined baking sheet, at least 2-inches apart. Try to work quickly since the dough will absorb the powdered sugar if it sits too long.
Bake for 14-16 minutes or until the cookies are puffy, and cracks have formed. The cookies will still be soft. Allow the cookies to cool for 15 minutes before transferring them to a wire rack to cool completely.
7 notes
·
View notes
Photo

SWEET POTATO CHEESECAKE WITH LOTUS BISCOFF COOKIE CRUST/ CHEESECAKE DE BONIATO CON GALLETA LOTUS BISCOFF
La segunda receta de nuestra temporada otoñal tiene como protagonista la batata (también conocido como boniato, papa dulce o camote…). Se trata de una deliciosa cheesecake de batata con base de galleta Lotus Biscoff y crema chantilly de mandarina. Te aseguro que tanto el contraste entre la textura cremosa de la tarta de queso y la base de galleta, como la mezcla de sabores dulces, especiados y el toque salado del queso harán que este cheesecake se convierta en tu nuevo favorito. Con una taza de café o un té calentito está de vicio.
Aquí tenéis la receta. ¡A disfrutar!
Ingredientes:
Tarta de queso
16 galletas Lotus Biscoff
2 ½ cucharada de mantequilla con sal derretida
450 g/1 libra batata o boniato
450 g de queso crema
2 huevos a temperatura ambiente
½ taza de azúcar moreno
1 cucharadita de especias de pastel de calabaza
1 cucharadita de esencia de vainilla
Ralladura de una mandarina
¼ taza de nata
Mandarin-Vanilla Chantilly Cream
200 ml nata para montar
1 cucharada de azúcar
½ cucharadita de esencia de vainilla
Ralladura de mandarina
Preparación:
Precalienta el horno a 350F
Prepara un molde desmontable de 6 pulgadas y envuélvelo en papel de aluminio para evitar accidentes con el baño María.
Para la base de galletas mezcla las galletas trituradas y la mantequilla derretida en un bol.
Pon la mezcla en el molde y presiona en el fondo y los lados. Hornea durante 8 minutos. Sácalo del horno y deja enfriar.
Hornea las batatas y déjalas enfriar completamente. Pélalas y haz el puré con una licuadora o procesador de alimentos. Cuela si es necesario.
En el bol de la amasadora usa el accesorio de paleta para batir el queso crema hasta que quede suave. Añade el azúcar moreno y mezcla bien. Agrega los huevos de uno en uno, incorporando completamente el primero antes de añadir el segundo.
Pon la ralladura de mandarina, las especias para pastel de calabaza, la esencia de vainilla, el puré de batata y la nata y bate hasta que quede una masa sedosa.
Vierte la masa en la base preparada. Coloca el molde dentro de una fuente o recipiente apto para horno más grande y vierte agua hirviendo hasta que esté a la mitad de la altura del molde de la tarta de queso.
Hornea durante 50 -60 minutos. Apaga el horno, entreabre la puerta y deja reposar la tarta en el horno durante 45min-1 hora.
Saca la tarta del baño María y colócala en una rejilla para enfriar hasta que el pastel esté completamente frío.
Guárdelo en el frigorífico durante al menos 8 horas.
Para la crema Chantilly de mandarina y vainilla, pon la nata para montar en el bol de la batidora y añade el azúcar, la ralladura de mandarina y la esencia de vainilla.
Bate a velocidad alta hasta que forme picos y colócalo en una manga pastelera.
Decora el bizcocho con la crema Chantilly y agrega un poco de galleta Lotus en trozos y chispas doradas.

Ingredients:
Cheesecake
16 Lotus Biscoff cookies
2 ½ tbps melted salted butter
450 g/1pound sweet potatoes
450 g/16 oz cream cheese
2eggs (at room temperature)
½ cup brown sugar
1 tsp pumpkin pie spice
1 tsp vanilla extract
Zest of a mandarin
¼ cup heavy cream
Mandarin-Vanilla Chantilly Cream
200 ml whipping cream
1 tbsp white sugar
½ tbsp vanilla extract
Zest of a mandarin
Instructions:
Preheat oven to 350F
Prepare a 6-inch springform pan and wrap it in foil to prevent leaks when using the water bath.
In a bowl combine crushed cookies and melted butter.
Add the cookie-butter mix to the prepared pan and press the crumbs into the bottom and sides. Bake for 8 minutes. Remove pan from the oven and cool.
Bake sweet potatoes and let them cool completely. Peel and puree them with a blender or food processor.
In the bowl of a stand mixer fitted with your paddle attachment, beat the cream cheese until smooth. Add brown sugar and mix until combined. Add eggs, one at a time, fully incorporating the first egg before adding the second one.
Add in mandarin zest, pumpkin pie spice, vanilla extract, sweet potato puree, and heavy cream and mix until smooth.
Pour batter into prepared crust. Place pan into a larger pan or baking dish and pour boiling water until it is halfway up the side of the cheesecake pan.
Bake cheesecake for 50-60 minutes. Turn off the oven, leave the door a bit open and allow the cheesecake to rest in the cooling oven for 45min-1 hour.
Remove the cheesecake from the water bath and place on a cooling rack until the cake is completely cooled.
Put it in the refrigerator for at least 8 hours.
For the mandarin-vanilla Chantilly cream, put the whipping cream in the mixer bowl and add the sugar, mandarin zest, and vanilla extract.
Beat at high speed until it forms peaks and place in a piping bag.
Decorate the cake with the Chantilly cream and add some Lotus cookie crumbles and golden sprinkles.
0 notes
Photo

PASTEL DE ZANAHORIA/ CARROT CAKE
Si el otro día nos despedíamos del calor con un picnic veraniego con nuestras Madeleines con cobertura de chocolate negro y pistachos, hoy le damos la bienvenida al otoño con la primera de las recetas de la temporada otoñal. Os traemos una sencilla, deliciosa y permitidnos decirlo, bastante pintona, pastel de zanahoria. Esta está decorada con nueces y zanahorias de gel, pero os aconsejamos que vosotros os dejéis llevar por vuestra creatividad de reposteros. ¡El resultado sorprende hasta a uno mismo!
Bizcocho
1 ¼ tazas harina normal
1 ¼ taza azúcar moreno
3/4 taza aceite vegetal
2 ½ tazas zanahoria rallada
3 huevos L
2 Cdtas levadura
1 1/2 Cdtas canela
1/4 Cdta nuez moscada
½ Cdta sal
1 taza pasas
1 taza de nueces y pistachos triturados
Icing
100 g de mantequilla sin sal
150 g de queso crema (fría)
175 g de azúcar glass
½ cdta esencia de vainilla
Decoración
1 taza de nueces y pistachos triturados
Gel de color naranja y verde
Preparación:
Precalienta el horno a 350F/175C. Unta y enharina el molde.
En un bol mediano mezcla la harina, el bicarbonato de sodio, la canela, la nuez moscada y la sal. Reserva.
En un bol grande, mezcla el azúcar y el aceite. Agrega los huevos de uno en uno y bate hasta que los huevos se aclaren y la mezcla esté bien mezclada.
Añade los ingredientes secos poco a poco hasta que todo esté bien integrado en la mezcla.
Incorpora las zanahorias, nueces y pasas y mezcla bien.
Vierte la masa en el molde y hornea durante 35-40 minutos o hasta que al insertar un palillo en el centro del pastel salga limpio.
Deja que el pastel se temple y luego llévalo a una rejilla para que termine de enfriarse antes de cortarlo.
Para el glaseado, bate la mantequilla con una batidora de mano eléctrica primero a velocidad baja y luego a alta hasta que la mantequilla duplique su tamaño. Agrega el azúcar glass y la esencia de vainilla y repite el mismo proceso. Después haz lo mismo con el queso crema.
Monta las capas de bizcocho con el relleno. Cuando esté listo, cubre todo con el frosting y agrega las nueces picadas a los lados. Refrigera durante 30 minutos.
Con una manga pastelera, decora la parte superior del bizcocho y haz unas zanahorias con los geles de colores.

Ingredients:
Cake
1 1/2 cups all-purpose flour
1 ¼ cups brown sugar
1 ¼ cups vegetable oil
2 ½ cups shredded carrots
3 eggs
2 tsps baking soda
1 ½ tsp ground cinnamon
1/4 tsp ground nutmeg
½ tsp salt
1 cup raisins
1 cup chopped walnuts and pistachios
Icing
100 g unsalted butter
150 g cream cheese (refrigerated)
175 g icing sugar
½ tsp vanilla extract
Decoration
1 cup chopped walnuts and pistachios
Orange and green color gels
Instructions
Preheat oven to 350F/175C. Butter and flour the baking pan.
In a medium bowl whisk together the shifted flour, baking soda, cinnamon, nutmeg, and salt. Set aside
In a big bowl, whisk together the sugar and oil. Add eggs, one at a time, fully incorporating each before adding the next. Whisk until the eggs lighten in color and the mixture is thoroughly blended.
Add the dry ingredients little by little until everything is well combined into the mixture.
Add the carrots, nuts, and raisins and mix well.
Pour the batter into the prepared pan. Bake for 35-40 minutes or until a toothpick inserted in the center of the cake comes out clean.
Let the cake cool and then transfer to a cooling rack before leveling it.
For the frosting beat the butter with an electric hand mixer at low speed first and then at high until the butter has doubled in size. Add the icing sugar and vanilla extract and repeat the same process, and then the same with the cream cheese.
Assemble the cake layers with the filling. When all the layers are ready, cover everything with the frosting and add the chopped nuts on the sides. Refrigerate for 30 minutes.
With a piping bag, decorate the top of the cake and make some carrots with the color gels.
1 note
·
View note
Photo

MADELEINES CON COBERTURA DE CHOCOLATE NEGRO Y PISTACHOS/ DARK CHOCOLATE DIPPED MADELEINES SPRINKLED WITH PISTACHIOS
El otoño amenaza con llegar con sus días de lluvia y frío, así que nosotros hemos aprovechado uno de estos últimos días de “veranillo” para hacer una merienda picnic ¿Os acordáis de las Madeleines que preparamos hace unas semanas? Pues para esta ocasión nos hemos puesto aún más golosos y esta nueva versión de limón y vainilla la hemos bañado en chocolate y pistacho!! Por aquí os dejamos la receta.
¿Ya estás soñando con ellas? ¡A disfrutar!
Ingredientes
(1 docena de Madeleines)
2 huevos (a temperatura ambiente)
100 g de azúcar fina
20 g de miel
100 g de harina normal
3 g de levadura química
100 g mantequilla sin sal
1 chorrito de zumo de limón
Ralladura de medio limón
¼ cucharadita de esencia de vainilla
Preparación:
Derrite la mantequilla en el microondas y deja enfriar. Añade el zumo de limón. Reserva.
Combina los huevos con el azúcar en un bol y bate con varillas durante un minuto.
Agrega la miel y sigue batiendo durante otros 3-4 minutos hasta que la masa se vuelva espumosa.
Tamiza la harina y la levadura química sobre la mezcla y remueve hasta que se combinen.
Añade la mantequilla, la esencia de vainilla y la ralladura de limón y mezcla lentamente hasta obtener una consistencia lisa y uniforme.
Deja reposar la masa con un paño encima durante al menos 2 horas.
Cuando la masa esté lista, precalienta el horno a 425F / 220C.
Cubre el fondo del molde de Madeleines con mantequilla derretida y harina.
Llena ¾ del espacio con la masa con una cuchara o una manga pastelera.
Hornea durante 3 minutos a 425F / 220C y luego otros 7 minutos a 395F / 200C.
Déjalas enfriar durante 1 o 2 minutos antes de desmoldarlas con cuidado. Déjalas enfriar en una rejilla.
Para la ganache de chocolate calienta la nata en un cazo o en el microondas y añade el chocolate negro (en pepitas o trozos). Remueve hasta que se haya derretido el chocolate.
Moja las Madeleines, añade los pistachos triturados y mételas en la nevera durante 20 minutos. Consérvalas a temperatura ambiente.

Ingredients
(Yield a dozen madeleines)
2 eggs (at room temperature)
100 g caster sugar
20 g honey
100 g all-purpose flour
3 g baking powder
100 g unsalted butter
Squeeze of lemon
Lemon zest
1/4 teaspoon vanilla extract
Instructions
Melt the butter in the microwave. Add the lemon juice and salt. Set aside to cool.
Combine the eggs with the sugar in a bowl and whisk for one minute.
Add the honey and keep whisking for another 3-4 minutes until the batter becomes foamy.
Sift the flour and baking powder over the mixture and mix until combined.
Add the butter, vanilla extract, and lemon zest, and mix slowly until you get a nice and uniform consistency.
Leave the batter to rest with a cloth on top for at least 2 hours.
When the batter is ready preheat the oven to 425F/220C.
Coat the bottom of the madeleines mold with melted butter and flour.
Fill ¾ of the space with the batter with a spoon or a pipping bag.
Bake for 3 minutes at 425F/220C and then for another 7 minutes at 395F/200C.
Let them cool for 1 or 2 minutes before gently removing them from the mold. Let them finish cooling in a cooling rack
For the chocolate ganache, heat the cream in a saucepan or in the microwave and add the dark chocolate chips (or pieces). Stir until the chocolate is melted.
Dip the madeleines into the dark chocolate so that they are covered halfway and sprinkle some chopped pistachios over the chocolate. Chill in the refrigerator for about 20 minutes, and then keep them at room temperature.
1 note
·
View note
Photo

PA DE PESSIC/ CATALAN SPONGE CAKE
Hoy os traemos al blog una receta clásica de la repostería catalana: Pa de pessic de Vic. Un bizcocho alto, ligero y suave, tan esponjoso y delicado como una nube que cuenta con un delicioso sabor. Sencillo y perfecto para acompañar con una buena taza de chocolate ahora que empieza a llegar el fresquito ¿A quién le apetece un pellizco de cielo?
¡A disfrutar!
Ingredientes:
4 huevos L
125 g de azúcar
75 g de maicena
25 g de harina normal
5 g de polvo de hornear
Ralladura de medio limón
1/8 cucharadita de esencia de vainilla
Preparación:
Precalienta el horno a 320F/160C.
Prepara el molde desmontable de 24 centímetros, forrando la base y engrasando todo después con mantequilla. Espolvorea un poco de harina por encima y reparte bien.
En dos cuencos separa las claras y las yemas.
Con la ayuda de una batidora de varillas monta las claras. Primero bate hasta que se blanqueen las claras y añade la mitad del azúcar y una pizca de sal. Después sigue batiendo hasta alcanzar el punto de nieve. Reserva.
En el bol de las yemas, agrega el resto del azúcar y bate con las varillas. Añade la ralladura de medio limón y la esencia de vainilla y continúa batiendo hasta que blanqueen las yemas y queden con textura esponjosa.
En un bol aparte mezcla la maicena con la harina y el polvo de hornear.
Con la ayuda de un colador o tamiz incorpora un poco de la mezcla de ingredientes secos al bol de las yemas y remueve con cuidado con movimientos envolventes con la ayuda de una espátula. Incorpora un poco de claras a las yemas con el mismo movimiento envolvente. Repite el procedimiento alternando ingredientes secos y claras, asegurándote de llegar a la base del recipiente para que se mezcle de manera uniforme.
Pon la masa en el molde y da unos golpecitos para que suban las burbujas que pueda haber en el interior.
Mete el molde en el horno, precalentado a 160C/320F en la parte medio baja del horno y hornea durante 30-35 minutos. Comprueba que esté hecho por dentro con la ayuda de un palillo.
Desmolda el bizcocho en caliente y déjalo reposar sobre una rejilla. Cuando se enfríe, decóralo con un poco de azúcar glass.

Ingredients:
4 eggs L
125g sugar
75 g cornstarch
25 g all-purpose flour
5 g of baking powder
Zest of half a lemon
1/8 teaspoon vanilla extract
Preparation:
Preheat the oven to 320F / 160C.
Line the base of your 24cm springform pan with baking parchment, and then grease everything with butter. Sprinkle a little flour on top and spread well.
In two bowls, separate the egg whites and the yolks.
With the help of an electric hand mixer whisk the egg whites. First beat until the whites get lighter and add half the sugar, and a pinch of salt. Then continue beating until it forms stiff peaks. Set aside.
Add the rest of the sugar to the other bowl with the yolks and beat until everything is well combined. Add the lemon zest and the vanilla extract and continue beating until the yolks are light and fluffy.
In a separate bowl, mix cornstarch with flour and baking powder.
With the help of a strainer or sieve, fold in a little of the mixture of dry ingredients to the bowl of the egg yolks and stir carefully with enveloping movements with the help of a spatula. Add some egg whites to the yolks with the same enveloping and soft movements. Repeat the procedure alternating dry ingredients and egg whites, making sure to reach the bottom of the bowl so that it mixes evenly.
Put the batter in the mold and tap to raise any bubbles that may be inside.
Bake in the lower part of the oven and for 30-35 minutes at 160C/320F or until a toothpick inserted comes out clean.
Unmold the cake while hot and let it cool on a cooling rack. When it cools down, decorate with some icing sugar.
0 notes
Photo

TARTA ESPECIADA DE MELOCOTÓN DE NUEVA INGLATERRA Y BOURBON / SPICED NEW ENGLAND PEACH & BOURBON TART
Se nos va acabando el verano y eso significa que, además del calor, también se terminan algunas frutas de temporada como el melocotón. A modo de despedida traemos hoy al blog esta deliciosa receta con melocotones, en este caso de Nueva Inglaterra, que junto al Bourbon y las especias hacen que esté de escándalo. Ah, y de paso también reivindicamos el consumo de productos locales y de temporada.
Aquí está la receta para que os animéis. Si has hecho ya la Tarte Tatin, ésta será entonces un paseo. ¡A disfrutar!
Ingredientes:
75 g de mantequilla sin sal
100 g de azúcar fina
5-6 melocotones
1-2 unidades de anís estrellado
1 cucharada de bourbon
Mezcla de especias: canela, jengibre, nuez moscada, clavo (al gusto)
1 placa de hojaldre
Preparación:
Precalienta el horno a 190C / 375F.2.
En una sartén antiadherente apta para horno agrega el azúcar y deja que se disuelva a fuego medio. Recuerda no remover. Solo mueve la sartén hasta que se disuelva y se dore.
Mientras se cocina el caramelo, corta a la mitad los melocotones.
Una vez que el caramelo esté listo, echa los trozos de mantequilla, las especias y el anís estrellado y cuando el caramelo esté espumoso agrega el bourbon y cocina durante 2-3 minutos. Coloca las mitades de melocotón en el fondo de la sartén en círculos concéntricos y cocina 9-10 minutos a fuego lento.
Mientras se cocinan los melocotones, extiende el hojaldre de aproximadamente 1 cm de grosor y usa un plato o bol al revés para cortar un círculo del mismo tamaño que la parte superior de la sartén.
Con cuidado cubre la sartén con el hojaldre y mete los bordes. Pincha con un cuchillo o tenedor afilado y hornea durante 25-30 minutos o hasta que el hojaldre esté dorado.
Saca la sartén del horno y déjala enfriar 5 minutos. Coloca un plato encima y dale la vuelta con cuidado en el plato.

Ingredients:
75 g unsalted butter
100 g caster sugar
5-6 peaches
1-2-star anise
1 tablespoon Bourbon
1 teaspoon cinnamon
Mixed spices (cinnamon, ginger, nutmeg, clove) (to taste)
1 puff pastry sheet
Instructions:
Preheat oven to 190C/375F
Take a non-stick oven proof frying pan, add the sugar and let dissolve over a medium heat. Remember not to stir. Just shake the pan until dissolved and golden brown.
While the caramel is cooking, cut the peaches in half.
Once the caramel is ready, add the butter chunks, spices, and star anise. When the caramel is foaming add the Bourbon and cook for 2-3 minutes. Arrange the peaches halves in the bottom of the pan in concentric circles and cook for 9-10 minutes on low heat.
While the peaches are cooking roll out the puff pastry about 1 cm thick and use an upside-down plate or bowl to cut out a circle about the same size as the top of your pan.
Carefully top with the puff pastry and tuck the edges in. Prick with a small sharp knife or fork and bake for 25-30 minutes or until the puff pastry is golden.
Remove from the oven and leave to cool for 5 minutes. Place a plate on top of the pastry and very carefully invert the tart onto the plate.
2 notes
·
View notes
Photo

TARTA SEMARO/ SEMARO CAKE
Llevaba tiempo queriendo poner en el blog esta tarta. La hice en mayo para el cumpleaños de mi novio y hoy la comparto con todos vosotros. Para mí es muy especial porque fue el primer pastel que hice con la Kitchen Aid que me regaló él en abril por mi cumpleaños. Tenía ganas de estrenarla con una tarta de varios bizcochos, frutas y nata. Aquí está el resultado...Parece muy compleja pero en realidad no es para tanto. Sin duda, es el típico pastel que “te hace quedar bien” delante de tus comensales. ;)
Ah, por cierto, os estaréis preguntando por qué “Semaro”... Como la tarta está dedicada a mi chico se llama así por su acrónimo: Sergio Matiz Romero.
Aquí tenéis la receta. ¡A disfrutar!
Ingredientes:
Bizcocho genovés
3 huevos (a temperatura ambiente)
75 g de azúcar
75 g de harina normal
Almíbar de vainilla
200 g de azúcar
200 g de agua
1 cucharada de esencia de vainilla
Crema chantilly
500 ml de nata para montar
50 g de azúcar
Preparación:
Precalienta el horno a 355F/180C
En un bol pon los huevos a temperatura ambiente con el azúcar. Si están fríos puedes hacer un baño María hasta conseguir que la mezcla de los huevos alcance los 40 grados.
Bate la mezcla hasta triplicar su volumen.
Cuando llegue al punto de cinta agrega la harina tamizada y mezcla con una espátula con movimientos envolventes.
Vierte la mezcla en los moldes de 15 cm preparados previamente y hornea de inmediato durante 15 minutos.
Una vez listos déjalos reposar sobre una rejilla. Cuando estén completamente fríos nivela los bizcochos con un cuchillo o una lira.
En un cazo a fuego medio pon el agua y añade el azúcar. Remueve hasta que se disuelva todo el azúcar.
Cuando empiece a hervir añade el almíbar y deja hervir 4-5 minutos más.
Retira el cazo del fuego y déjalo enfriar.
Agrega el contenido a un biberón de cocina o botella. Reserva.
En el bol de la batidora pon la nata para montar y añade el azúcar.
Bate a velocidad alta hasta obtener picos y ponla en una manga pastelera.
Prepara las frutas del bosque (moras, frambuesas, arándanos y fresas). Lávalas y sécalas bien. Si son muy grandes puedes trocearlas un poco.
Para montar la tarta coloca una primera capa de bizcocho y añade el almíbar y coloca una capa de la fruta que prefieres en primer lugar. Añade la nata montada con ayuda de la manga. Pon la siguiente capa y presiona ligeramente para fijarla. Repite el mismo proceso con todas las capas, añadiendo una fruta diferente en cada capa.
Decora con nata montada en la capa superior y algunas frutas. Puedes espolvorear un poco de azúcar glass si quieres también.

Ingredients:
Genovese sponge cake
3 eggs (at room temperature)
75g sugar
75 g plain flour
Vanilla syrup
100g sugar
100g water
1 tbsp vanilla extract
Chantilly cream
500 ml whipping cream
50g sugar
Instructions:
Preheat oven to 355F/190C
In a bowl put the eggs at room temperature with the sugar.
Beat the mixture until it triples in volume.
When a ribbon forms, add the shifted flour and mix with a spatula with soft movements.
Pour the batter into the 6´´molds and bake immediately for 15 minutes.
Once ready let them rest on a cooling rack. When they are completely cold, level the cakes.
In a saucepan over medium heat put the water and add the sugar. Stir until all the sugar is dissolved.
When it starts to boil add the syrup and boil for 4-5 more minutes.
Remove the saucepan from the heat and let it cool.
Add the syrup to a squeeze bottle. Set aside.
Put the whipping cream in the mixer bowl and add the sugar.
Beat at high speed until it forms peaks and place in a piping bag.
Prepare the berries (blackberries, raspberries, blueberries and strawberries). Wash and dry them well. If they are big you can chop them a little.
To assemble the cake, place a first layer of sponge cake, add the syrup and put a layer of the fruit you prefer. Add the whipped cream with the help of the piping bag. Add the next layer of cake and press lightly to set. Repeat the same process with all the layers, adding a different fruit to each layer.
Garnish with whipped cream on the top layer and some fruits. You can sprinkle a little icing sugar for decoration.
0 notes
Photo
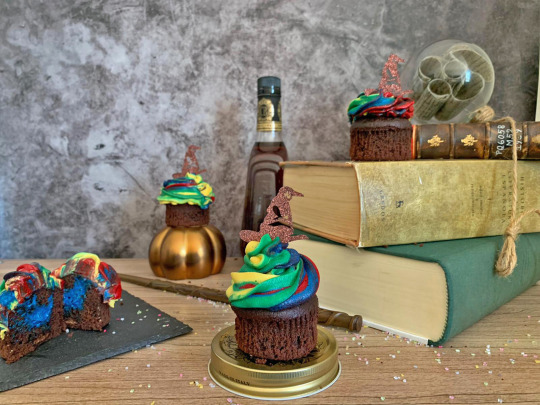
CUPCAKES DEL SOMBRERO SELECCIONADOR/ SORTING HAT CUPCAKES
Septiembre, el mes del eterno “volver a empezar”. Clases, trabajo, nuevos proyectos...En el mundo mágico, este mes también es sinónimo de comienzos y de vuelta a la realidad. Pero sobre todo, es el mes estrella del Sombrero Seleccionador, pues cada 1 de septiembre se encarga de determinar a qué casa pertenecerán los nuevos aprendices de Hogwarts.
Aquí os dejo esta divertida recreación en el mundo dulce del Sombrero Seleccionador que podéis hacer para una fiesta temática...o simplemente porque sí. A los amantes de Harry Potter (AKA Potterheads) les entusiasmará la idea de abrir estos cupcakes rellenos y descubrir el color de la casa a la que pertenecerán. ¡Toda una experiencia! ¡Ah y lo más importante...están de vicio!
¡A disfrutar! Y ánimo con la vuelta a la realidad ;)
Ingredientes:
Cupcake de chocolate (4 cupcakes)
60 g de harina normal
80 g de azúcar
40 ml de aceite de girasol
40 ml de leche
1 huevo
20 g de cacao en polvo (sin azúcar)
33 ml de agua caliente
Buttercream de 4 colores
150 g de azúcar glas
1/2 cucharadita de esencia de vainilla
150 g de mantequilla sin sal
Colorantes
Preparación:
Precalienta el horno a 180C/355F
En el bol de la amasadora o en un cuenco hondo bate el huevo (a temperatura ambiente) a velocidad media-alta hasta que tenga una consistencia espumosa.
Añade el azúcar y sigue batiendo un medio minuto más. Agrega el aceite, la leche y la vainilla y bate a velocidad baja.
Con ayuda de un colador o tamiz echa los ingredientes secos. Mezcla bien todo hasta incorporarse.
Añade el agua caliente y bate solo unos segundos más hasta que esté incorporado y tengas una masa brillante y ligera.
En un molde de muffins/cupcakes vierte la masa a partes iguales sobre las cápsulas de papel y hornea hasta que al introducir un palillo salga limpio.
Sácalos del horno y deja enfriar en una rejilla.
Para la buttercream bate la mantequilla sin sal atemperada a velocidad alta durante 5 minutos. Después baja la velocidad al mínimo y añade el azúcar glas. Cuando esté incorporado sube la velocidad de la batidora al máximo y bate durante otros 5 minutos. Por último, añade la esencia de vainilla y bate 2 minutos más.
Divide la buttercream en 4 bols y añade los colorantes hasta conseguir los tonos deseados (rojo, azul, verde y amarillo). Pon cada buttercream de un color en una manga pastelera con boquilla redonda.
Cuando los cupcakes estén totalmente fríos abre un hueco en la parte superior (puedes usar la parte de atrás de una boquilla para ello). Rellena cada hueco de un color.
Extiende un papel transparente sobre la mesa y añade una línea gruesa de cada color. Enrolla el papel y ciérralo (como si fuera un caramelo).
Corta uno de los extremos y mete en una manga pastelera con el extremo cortado hacia la boquilla.
Decora los cupcakes con la manga de buttercream de cuatro colores y coloca encima el adorno del Sombrero Seleccionador.

Ingredients:
Chocolate cupcake (4 cupcakes)
60 g plain flour
80g sugar
40 ml sunflower oil
40 ml milk
1 egg
20 g cocoa powder (unsweetened)
33 ml hot water
Four-Tone Buttercream
150 g icing sugar
1/2 teaspoon vanilla extract
150 g unsalted butter
icing colors
Preparation:
Preheat the oven to 180C / 355F
In the bowl of the mixer or in a deep bowl beat the egg (at room temperature) at medium-high speed until it has a foamy consistency.
Add the sugar and continue beating for 30 seconds. Add the oil, milk and vanilla and beat on low speed.
With the help of a strainer or sieve, add the dry ingredients. Mix everything well until well combined.
Add the hot water and beat just for a few seconds until it is combined, and you have a shiny and light mixture.
In a muffin / cupcake mold, pour the batter in equal parts over the paper cups and bake until a toothpick inserted comes out clean.
Take them out of the oven and let cool on a cooling rack.
For the buttercream, beat the unsalted butter at high speed for 5 minutes. Then lower the speed and add the icing sugar. When it is combined, increase the speed of the mixer to the maximum and beat for another 5 minutes. Finally, add the vanilla extract and beat for 2 more minutes.
Divide the buttercream into 4 bowls and add the food coloring until you get the desired tones (red, blue, green, and yellow). Put each buttercream in a piping bag.
When the cupcakes are completely cool, open a hole in the top (you can use the back of a nozzle tip). Fill each gap with one color.
Spread a plastic paper on the table and add a thick line of each color. Roll up the paper and close it (like a candy).
Cut off one end and put it in a piping bag with the cut end towards the tip nozzle.
Decorate the cupcakes with the buttercream and place the Sorting Hat decoration on top.
1 note
·
View note
Photo

TRÍO DE ALFAJORES/ALFAJOR TRIO
Esta semana os traemos una receta que apetece siempre: los alfajores. Estas ricas galletas rellenas varían según el país e incluso la región, aunque creo que todos estamos de acuerdo en su origen árabe. Hoy en día los alfajores argentinos son posiblemente los más populares y es que estos dulces son para ellos todo un símbolo de la patria.
La receta de alfajores de hoy es en realidad un trío maravilloso que seguro que os encanta:
1. Alfajor clásico: dulce de leche - coco rallado - azúcar glass
2. Alfajor frutal: confitura de higo - azúcar glass
3. Alfajor Lotus: crema de galleta Lotus - chocolate negro
¡A disfrutar!
Ingredientes:
Alfajores (Para 16 alfajores)
2 yemas de huevo
105 g de mantequilla sin sal (en pomada)
150 g de maizena
100 g de harina 00
75 g de azúcar glass
1 cucharadita de levadura química
½ cucharadita de bicarbonato de sodio
1 cucharadita de esencia de vainilla
Ralladura de medio limón
Rellenos: dulce de leche, crema de galleta Lotus, confitura de higo
Decoración: azúcar glass, coco rallado, chocolate negro fundido
Preparación:
En un bol grande mezcla los ingredientes secos (harina, levadura química y bicarbonato de sodio) previamente tamizados y resérvalos.
En el bol de la batidora pon la mantequilla y bate a velocidad media durante 5 minutos.
Añade el azúcar glass tamizado y vuelve a batir a velocidad media durante unos 2-3 minutos más.
Incorpora poco a poco las yemas de huevo batida hasta que se integren bien.
Agrega la esencia de vainilla y la ralladura de limón y vuelve a batir durante 1 o 2 minutos más.
Con la batidora a mínima velocidad añade a cucharadas la mezcla de ingredientes secos para que se vayan incorporando poco a poco.
Cuando no veas restos de harina haz una bolita con la masa y déjala reposar en la nevera envuelta en papel transparente durante 30-45 minutos.
Pasado ese tiempo estira la masa con la ayuda de un rodillo sobre una superficie enharinada hasta obtener un grosor de 5 mm. Con un cortador de galletas o un vaso forma las tapas de alfajores y pásalas a una bandeja de horno con papel de horno. Recuerda separar un poco las galletas para que no se peguen al expandirse en el horno.
Hornea durante 12-14 minutos a 150C/300F o hasta que los bordes empiecen a dorarse.
Déjalas enfriar fuera del horno antes de pasarlas a una rejilla.
Una vez frías coloca cada relleno en una manga pastelera. Pon un poco de relleno en el centro de la galleta y presiona ligeramente con la otra para que se extienda bien. Ten cuidado porque las galletas se pueden partir si lo haces con mucha fuerza.
Decora con azúcar glass. En mi caso también puse coco rallado alrededor del alfajor de dulce de leche y chocolate negro fundido sobre las tapas del alfajor de crema de lotus.

Ingredients:
Alfajores (Yield 16 alfajores)
2 egg yolks
105 g unsalted butter (in ointment)
150 g cornstarch
100 g 00 flour
75 g icing sugar
1 teaspoon of baking powder
½ teaspoon of baking soda
1 teaspoon vanilla extract
Zest of half a lemon
Fillings: dulce de leche, Lotus cookie butter, fig jam
Garnish: icing sugar, flaked coconut, melted dark chocolate
Preparation:
In a large bowl mix the dry ingredients (flour, baking powder and baking soda) previously sifted and set aside.
In the mixing bowl add the butter and beat on medium speed for 5 minutes.
Add the sifted icing sugar and beat again at medium speed for another 2-3 minutes.
Add the beaten egg yolks little by little until they are well combined.
Add the vanilla extract and the lemon zest and beat again for another 1 or 2 minutes.
With the mixer at low speed, add the mixture of dry ingredients by tablespoons little by little until well combined.
When you do not see any remaining flour, make a ball with the dough and let it rest in the fridge wrapped in plastic paper for 30-45 minutes.
After that time, stretch the dough with a rolling pin until it is 5 mm thick. With a cookie cutter or a cup form the alfajores cookies and transfer them to a baking tray with parchment paper. Remember to spread the cookies a bit so they don't stick together when expanding in the oven.
Bake for 12-14 minutes at 150C / 300F or until edges begin to brown.
Let cool out of the oven before transferring to a cooling rack.
Once cold, place each filling in a pastry bag. Put some filling in the center of the cookie and press lightly with the other so that it spreads well. Be careful because the cookies can break if you don’t do it carefully.
Decorate with icing sugar. I also put flaked coconut around the dulce de leche alfajor and melted dark chocolate on top of the Lotus cookie butter alfajor.
1 note
·
View note
Photo

PURPLE JOY CAKE
El pastel de hoy tiene nombre y dedicatoria. Os cuento que hoy 19 de agosto es el cumpleaños de mi tía Joy y el plan era pasar el día juntas en Boston y celebrarlo. Iba a venir desde Washington DC a pasar unos días y me había pedido que le hiciera una tarta de cumpleaños…pero en estos tiempos de pandemia los planes se truncan y no ha podido ser. No obstante, no he querido renunciar a su deseo y aquí está su tarta de cumpleaños que he diseñado con todo mi cariño para ella. Tiene 5 capas de bizcocho de diferentes tonalidades de morado y dos rellenos: buttercream de mascarpone y lavanda y una deliciosa lemon curd. El frosting también es de mascarpone y lavanda solo que en otro tono morado. Por si os estáis preguntando por qué este color…es el color con el que relaciono a mi tía porque sé que le encanta.
Me hubiera encantado que pudiera probar el pastel, pero aquí queda la receta para que cuando venga a verme se la pueda preparar…y de paso también os la dejo a vosotros. De verdad que está tremenda. ¡A disfrutar!
¡Feliz cumpleaños, tía! <3
Ingredientes:
Bizcocho (5 capas)
340 g de harina normal
160 g de mantequilla sin sal (a temperatura ambiente)
250 g de azúcar blanco
4 huevos L
200 g de chocolate blanco
160 ml de leche
Ralladura de 1 limón
3 cucharaditas de levadura química
Pizca de sal
Buttercream de lavanda
375 g mantequilla sin sal
330 g azúcar glass
250 g queso crema
¼ cucharadita de lavanda francesa en polvo
Lemon curd
3 huevos
65 ml de zumo de limón
120 g de azúcar
Ralladura de 1 limón
80 g de mantequilla sin sal
Preparación:
Precalienta el horno a 355F/180C.
Para hacer las capas de bizcocho pon en un bol pon la leche y el chocolate blanco y derrite la mezcla en el microondas. Reserva.
En el vaso de la amasadora pon la mantequilla en dados, la ralladura de limón y el azúcar. Bate a velocidad media durante 5 minutos.
Sin dejar de batir añade los huevos batidos en tres veces.
Una vez integrado todo añade sin batir la harina y la levadura química previamente tamizadas y la sal.
Remueve todo con una cuchara para integrar un poco los ingredientes y bate a velocidad baja durante unos segundos hasta que no haya restos de harina.
Añade poco a poco el chocolate blanco y bate hasta obtener una masa lisa. Si deseas añadir color a tus bizcochos separa la masa en diferentes cuencos y añade los diferentes hasta obtener las tonalidades deseadas.
Reparte la masa en los moldes de 15 cm/6inch y hornea durante 30-35 minutos a 355F/180C.
Cuando salgan del horno deja reposar los bizcochos en el molde durante unos 15 minutos antes de desmoldarlos y pasarlos a una rejilla para que terminen de enfriarse.
Para la lemon curd debes preparar un baño maría en un cazo a fuego medio. Pon un bol encima del cazo y añadimos los tres huevos, el azúcar, la ralladura de limón y el zumo.
Bate con unas varillas sin parar hasta que se vaya formando una crema. Para esta receta la crema no debe estar tan líquida, ya que es para un relleno, así que debes seguir batiendo sin parar hasta obtener una crema espesa.
Pasa la crema por un colador para retirar cualquier grumo que se haya podido formar.
Sobre la crema ya colada vierte los dados de mantequilla fría y remueve bien hasta que se haya incorporado completamente todo.
Déjala enfriar la crema en el bol con un papel transparente encima y cuando esté fría métela en la nevera durante un par de horas para que consiga la consistencia deseada.
Para la buttercream de lavanda bate la mantequilla con unas varillas eléctricas primero a velocidad baja y después alta hasta que la mantequilla haya duplicado su tamaño.
Incorpora el azúcar glass y la lavanda en polvo con el mismo procedimiento con la batidora de varillas y después lo mismo con el queso crema. Añadimos unas gotas de colorante seguimos batiendo hasta obtener el color deseado. Puedes crear diferentes tonos para el relleno, la cobertura y la decoración del pastel.
Monta las capas de bizcocho con los rellenos correspondientes. Una vez montado todo añade la cobertura de buttercream morada y usa una manga pastelera para decorar el pastel a tu gusto.

Ingredients:
Cake (5 layers)
340 g plain flour
160 g unsalted butter
250g white sugar
4 eggs L
200 g white chocolate
160 ml milk
1 tbs lemon zest (1 lemon)
3 teaspoons of baking powder
Pinch of salt
Lavender buttercream
375 g unsalted butter
330 g icing sugar
250 g cream cheese
¼ teaspoon powdered French lavender
Lemon curd
3 eggs
65 ml of lemon juice
120g sugar
1 tbs lemon zest (1 lemon)
80 g unsalted butter
Instructions:
Preheat the oven to 355F / 180C.
To make the cake layers put the milk and white chocolate in a bowl and melt the mixture in the microwave. Set aside.
In the mixing bowl, put the diced butter, lemon zest and sugar. Beat on medium speed for 5 minutes.
While beating add the beaten eggs little by little.
Once everything is integrated, add the sifted flour, baking powder, and salt.
Stir everything with a spoon to integrate the ingredients a little and then beat at low speed for a few seconds until there are no traces of flour.
Add the white chocolate little by little and beat until you get a smooth batter. If you want to add color to your cakes, separate the batter into different bowls and add different colors until you get the desired shades.
Divide the batter into the 15cm / 6inch molds and bake for 30-35 minutes at 355F / 180C.
When the cakes come out of the oven, let the cakes cool for about 15 minutes before unmolding and transferring them to a cooling rack.
For the lemon curd prepare a bain marie in a saucepan over medium heat. Put a bowl on top of the saucepan and add the three eggs, the sugar, the lemon zest and the juice.
Keep whisking until creamy and firm. For this recipe you want it not to be so liquid, since it is for a filling, so just continue beating until you get a thick cream.
Pass the cream through a strainer to remove any lumps that may have formed.
Over the already strained cream, pour the cubes of cold butter and stir well until everything is combined.
Let the cream cool in the bowl covered with plastic wrap and then put it in the fridge for a couple of hours to achieve the desired consistency.
For the lavender buttercream frosting, beat the butter with an electric hand mixer at low speed first and then at high until the butter has doubled in size.
Add the icing sugar and powdered lavender and repeat the same process, and then the same with the cream cheese. Add a few drops of food coloring and continue beating until you get the desired color. You can create different shades for the filling, frosting, and decoration.
Assemble the cake layers with the fillings. When all the layers are ready, cover everything with the purple frosting and decorate with a piping bag.
4 notes
·
View notes
Photo

MADELEINES DE NARANJA Y MIEL DE AZAHAR/ ORANGE & ORANGE BLOSSOM HONEY MADELEINES
Volvemos a Francia para deleitarnos con estas deliciosas madeleines. Este dulce tan característico de su repostería nos acompaña desde el siglo XIX y cuenta con infinidad de variedades espectaculares. Hoy hemos querido fusionar la receta original de la madeleine con los sabores de nuestra ciudad natal, Sevilla. Cierra los ojos: naranja, azahar...casi te puedes ver paseando al lado de la Giralda, ¿verdad?
Por aquí os dejo la receta. ¡A disfrutar!
Ingredientes:
(1 docena de madeleines)
2 huevos (a temperatura ambiente)
100 g de azúcar fina
20 g de miel de azahar
100 g de harina normal
3 g de levadura química
100 g mantequilla sin sal
1 chorrito de zumo de naranja
Ralladura de naranja
Preparación:
Derrite la mantequilla en el microondas y deja enfriar. Añade el zumo de naranja y la sal. Reserva.
Combina los huevos con el azúcar en un bol y bate con varillas durante un minuto.
Agrega la miel y sigue batiendo durante otros 3-4 minutos hasta que la masa se vuelva espumosa.
Tamiza la harina y la levadura química sobre la mezcla y mezcla hasta que se combinen.
Añade la mantequilla y la ralladura de naranja y mezcla lentamente hasta obtener una consistencia lisa y uniforme.
Deja reposar la masa con un paño encima durante al menos 2 horas.
Cuando la masa esté lista, precalienta el horno a 425F / 220C.
Cubre el fondo del molde de madeleines con mantequilla derretida y harina.
Llena ¾ del espacio con la masa con una cuchara o una manga pastelera.
Hornea durante 3 minutos a 425F / 220C y luego otros 7 minutos a 395F / 200C.
Déjalas enfriar durante 1 o 2 minutos antes de desmoldarlas con cuidado. Déjalas enfriar en una rejilla.
Espolvorea azúcar glass encima y añade un poco de glaseado de naranja si quieres antes de servir.

Ingredients:
Yield a dozen madeleines
2 eggs (at room temperature)
100 g caster sugar
20 g orange blossom honey
100 g all-purpose flour
3 g baking powder
100 g unsalted butter
Squeeze of orange
Orange zest
Instructions:
Melt the butter in the microwave. Add the orange juice and salt. Set aside to cool.
Combine the eggs with the sugar in a bowl and whisk for one minute.
Add the honey and keep whisking for another 3-4 minutes until the batter becomes foamy.
Sift the flour and baking powder over the mixture and mix until combined.
Add the butter and orange zest and mix slowly until you get a nice and uniform consistency.
Leave the batter to rest with a cloth on top for at least 2 hours.
When the batter is ready preheat the oven to 425F/220C.
Coat the bottom of the madeleines mold with melted butter and flour.
Fill ¾ of the space with the batter with a spoon or a pipping bag.
Bake for 3 minutes at 425F/220C and then for another 7 minutes at 395F/200C.
Let them cool for 1 or 2 minutes before gently removing them from the mold. Let them finish cooling in a cooling rack
Dust with powdered sugar on top and drizzle with orange glaze before serving.
0 notes
Photo

PONQUÉ DE ARÁNDANOS Y MANZANA/ BLUEBERRY & APPLE POUND CAKE
¿Cuántas veces has tenido visita y no has sabido muy bien qué preparar para la hora del té o la merienda? La próxima vez que te encuentres en tal situación, no tendrás que comerte la cabeza. Este pastel es perfecto para cualquier época del año y además, su textura y sabor a manzana y arándanos cautivará a todos sin excepción. ¡Éxito asegurado!
Os dejo por aquí la receta. ¡A disfrutar!
Ingredientes:
250 g de harina normal
125 g de mantequilla
1 cucharadita de levadura química
150 g de azúcar glass
2 huevos grandes
100 ml de leche
1 cucharadita de extracto de vainilla
175 ml de yogur griego
3 manzanas
200 g de arándanos
3 cucharadas de mermelada de albaricoque
Preparación:
Precalienta el horno a 180 ° C / 350 ° F
Derrite la mantequilla en el microondas o en un cazo a fuego medio. Deja enfriar un poco.
Pela y corta las manzanas. Lava los arándanos. Reserva.
Tamiza la harina y la levadura química en un bol. Agrega el azúcar y mezcla bien.
Bate los huevos, la leche, el yogur y el extracto de vainilla en una jarra o bol grande. Añade la mantequilla derretida mientras sigues batiendo.
Haz un poco hoyo en la base del bol de ingredientes secos y vierte la mezcla.
Mezcla todo hasta obtener una masa de pastel suave. Añade la mitad de las manzanas troceadas y los arándanos.
Engrasa y forra un molde desmontable de 8 pulgadas / 20 cm con papel vegetal y vierte la mezcla en el molde. Decora con las manzanas y arándanos restantes.
Hornea durante una hora y deja enfriar el pastel en una rejilla antes de desmoldar.
Caliente la mermelada de albaricoque en un cazo pequeño a fuego lento. Pon la mermelada sobre la parte superior del pastel con la ayuda de un pincel y sirve.

Ingredients:
250 g all purpose flour
125g butter
1 tsp baking powder
150g caster sugar
2 large eggs
100ml milk
1 tsp vanilla extract
175ml Greek yoghurt
3 apples
200g blueberries
3 tbsp apricot jam
Instructions:
Preheat the oven to 180°C/350°F
Melt the butter in the microwave or in a small pan over a medium heat. Allow to cool slightly.
Peel and slice the apples. Wash the blueberries. Set aside.
Sift the flour and baking powder into a bowl. Add the sugar and stir.
Whisk together the eggs, milk, yoghurt, and vanilla extract in a large jug or bowl. Add the melted butter while you keep whisking.
Make a little well in the base of the bowl of your dry ingredients and pour in the mix.
Mix everything until you have a smooth cake batter. Fold through half the apple slices and blueberries.
Grease and line a 8inch/20cm springform baking pan with parchment paper and pour the mixture into the pan. Decorate with the remaining apples and blueberries.
Bake for an hour and transfer to cooling rack before removing the cake from the pan.
Heat the apricot jam in a small saucepan over a low heat. Brush over the top of the cake and serve.
0 notes
Photo
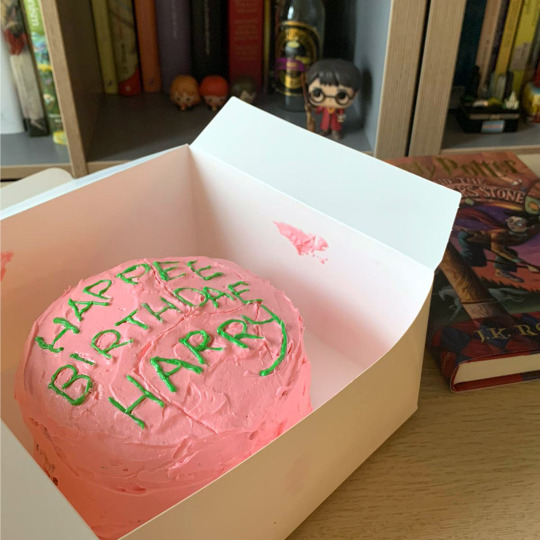
TARTA DE CUMPLEAÑOS DE HARRY POTTER/HARRY POTTER’S BIRTHDAY CAKE
“Anyway—Harry,” said the giant, turning his back on the Dursleys, “a very happy birthday to yeh. Got summat fer yeh here — I mighta sat on it at some point, but it’ll taste all right.” From an inside pocket of his black overcoat he pulled a slightly squashed box. Harry opened it with trembling fingers. Inside was a large, sticky chocolate cake with Happy Birthday Harry written on it in green icing” (Rowling 47-48).
Nuestro mago favorito cumple 40 años y lo celebramos con el famoso pastel que le regaló Hagrid por su undécimo cumpleaños. Como es una receta que solo conocemos por las referencias del libro y la película, la única pauta imprescindible es que el bizcocho sea de chocolate y que se parezca por fuera a la tarta original. Eso nos da la libertad de dar rienda suelta a la creatividad para crear ago espectacular. Para mí esta tarta ten��a que ser de cuatro capas y con un relleno de mascarpone, fresas y frambuesas.
Aquí os dejo la receta. Espero que os guste...y a Harry también.
¡Happee 40th Birthdae, Harry!
Ingredientes (Para 6 magos o muggles)
Bizcocho básico de chocolate:
120 g de harina normal
160 g de azúcar blanco
80 ml de aceite de girasol
80 ml de leche entera
2 huevos grandes
40 g de cacao en polvo sin azúcar
1 1/3 cucharadita de levadura química
½ cucharadita de esencia de vainilla
1/3 cucharadita sal
65 ml de agua caliente
Relleno de fresa, frambuesas y mascarpone:
1 taza de frambuesas y fresas
2 cucharadas de azúcar blanco
1.5 cucharadas de agua
1/3 taza de queso mascarpone
1 cucharadita de esencia de vainilla
2/3 taza de azúcar glass
1 ¾ taza de nata para montar fría
Cobertura rosa:
250 g de mantequilla sin sal (a temperatura ambiente)
220 g de azúcar glass
250 g de queso mascarpone
Colorante rosa y rojo
Preparación
Precalienta el horno a 180C/355F
En el bol de la amasadora o en un cuenco hondo mezcla los 3 huevos (a temperatura ambiente) durante 5 minutos a velocidad media-alta hasta que tengan una consistencia espumosa.
Añade el azúcar y sigue batiendo un minuto más. Agrega el aceite, la leche y la vainilla y bate a velocidad baja.
Con ayuda de un colador o tamiz echa los ingredientes secos. Mezcla bien todo hasta incorporarse.
Añade el agua caliente y bate solo unos segundos más hasta que esté incorporado y tengas una masa brillante y ligera.
Sobre dos moldes engrasados vierte la masa a partes iguales y hornea durante 30 minutos.
Deja enfriar antes de desmoldar y cortar los bizcochos en capas
Para el relleno pon en un cazo o sartén pequeña las fresas, las frambuesas, el azúcar y el agua y lo llevamos a ebullición. Cuando hierva, baja el fuego y deja cocinando 15 minutos más. Tritura con una batidora si es necesario y cuela la mezcla para obtener una especie de salsa o coulis liso.
En el bol de la amasadora pon el queso mascarpone y el extracto de vainilla y bate hasta que mascarpone se vuelva esponjoso. Agrega el azúcar glass y vuelve a batir. Añade la mitad de la nata fría, mezcla a velocidad baja al principio y luego a velocidad alta hasta que forme picos. Agrega el coulis, un poco de colorante rojo y el resto de la nata y repite el mismo procedimiento hasta que se formen picos.
Para la cobertura rosa bate la mantequilla con unas varillas eléctricas primero a velocidad baja y después alta hasta que la mantequilla haya duplicado su tamaño.
Incorpora el azúcar glass con el mismo procedimiento con la batidora de varillas y después igual con el queso crema. Añade unas gotas de colorante rojo y rosa y sigue batiendo hasta obtener el color deseado.
Monta las capas de bizcocho con el relleno. Si lo deseas puedes añadir también fresas en alguna de las capas. Cuando estén todas las capas del bizcocho cubre todo con la cobertura rosa con la ayuda de una espátula y la manga pastelera. Para las letras te aconsejo que las escribas primero sobre la cobertura con la ayuda de un palillo para asegurarte de que queden bien. Escribe las letras con el tubo de gel verde y añade las marcas propias de la tarta de Hagrid.

Ingredients (Yield 6 wizards or muggles)
Basic chocolate cake:
120 g plain flour
160 g white sugar
80 ml vegetable oil
80 ml whole milk
2 large eggs
40 g unsweetened cocoa powder
1 1/3 teaspoon baking powder
½ teaspoon of vanilla essence
1/3 teaspoon salt
65 ml hot water
Strawberry and mascarpone cheese filling:
1 cup of raspberries and strawberries
2 tablespoons of white sugar
1.5 tablespoons of water
1/3 cup of mascarpone cheese
1 Teaspoon vanilla extract
2/3 cup powdered sugar
1 ¾ cup cold whipping cream
Pink frosting:
250 g unsalted butter (at room temperature)
220 g of icing sugar
250 g of mascarpone cheese
Pink and red coloring
Instructions
Preheat oven to 180C / 355F
In a mixing or deep bowl, mix the 3 eggs (at room temperature) for 5 minutes at medium-high speed until foamy.
Add the sugar and continue beating for another minute. Add the oil, milk, and vanilla and beat slowly.
Add the dry ingredients with the help of a strainer or sieve. Mix everything well until well combined.
Add the hot water and beat just a few seconds more until it is combined and you have a shiny and light dough.
On two oiled molds pour the dough evenly and bake for 30 minutes.
Let cool before unmolding and leveling the cakes.
For the filling, put the strawberries, raspberries, sugar and water in a saucepan or small frying pan and bring to a boil. When it boils, lower the heat and cook for 15 more minutes. Blend with a mixer if necessary and strain the mixture to obtain a kind of smooth sauce or coulis.
In a mixer bowl add the mascarpone cheese and the vanilla extract and beat until the mascarpone cheese gets fluffy. Add in the icing sugar and beat again. Add half of the heavy cream, mix at low speed at the beginning and then at high speed until it forms peaks. Add the coulis, a little bit of red food coloring, and the rest of the heavy cream and repeat the same process until it forms peaks.
For the pink frosting, beat the butter with an electric hand mixer at low speed first and then at high until the butter has doubled in size.
Add the icing sugar and repeat the same process, and then the same with the cream cheese. Add a few drops of red and pink food coloring and continue beating until you get the desired color.
Assemble the cake layers with the filling. If you want, you can also add strawberries in one of the layers. When all the layers are ready, cover everything with the pink frosting. For the letters, write them first on the cover with the help of a toothpick to make sure they fit well. Write the letters with the green gel tube and add the own marks of the Hagrid cake.
1 note
·
View note
Photo

TARTA CREMOSA DE QUESO MANCHEGO CON SALSA DE UCHUVA Y FRESA / CREAMY MANCHEGO CHEESECAKE WITH CAPE GOOSEBERRY - STRAWBERRY SAUCE
Mañana, 30 de julio se celebra el Día Mundial de la Tarta de queso o Cheesecake. Una ocasión tan dulce merece ser conmemorada por todo lo alto y con una buena porción de esta tarta tan versátil. Desde luego hay infinidad de versiones a cual más rica y confieso que ha costado decidirse solo por una. No desesperéis porque más adelante compartiré otras recetas de tarta de queso. ¡Prometido!
Aquí os dejo la receta de la cheesecake elegida para hoy: tarta cremosa de queso manchego con salsa de uchuva y fresa. Combinación insuperable.
¡A disfrutar!
Ingredientes
Tarta:
225 g de queso crema
135 ml de nata para batir
45 g de queso manchego rallado
90 g de azúcar
4 huevos L (o 2 L y 1 XL)
Salsa de uchuva y fresa:
125 g de fresas
50 g de uchuvas
3 cucharadas soperas de azúcar
2 ½ cucharadas soperas de agua
Preparación
Precalienta el horno a 210C/410F.
Pon un cazo al fuego medio con la nata y añade el queso manchego rallado. Remueve con unas varillas hasta que el queso se disuelva. Reserva la mezcla en un bol para que se atempere.
En el vaso de nuestra amasadora ponemos el queso crema y batimos para que se vaya poniendo cremoso. Sin parar de batir añadimos la mezcla previa en forma de hilo.
Cuando esté incorporada la mezcla añadimos el azúcar sin dejar de batir.
Por último añadimos los huevos de uno en uno y batimos bien todo hasta que esté todo bien mezclado.
Forramos un molde desmontable de 6 pulgadas/15 cm con papel vegetal previamente humedecido para lograr darle forma. Añadimos la masa y lo llevamos al horno 30-35 minutos a 210C/410F.
Al sacarlo debe todavía temblar un poco y estar ligeramente dorada. Sin desmoldar, déjalo reposar al menos una hora y media.
Para hacer la salsa debes poner En un cazo pequeño todos los ingredientes a fuego fuerte. Cuando empiece a hervir baja el fuego y deja cocinar a fuego bajo durante 10-15 minutos. Deja enfriar y usa un colador para conseguir una textura lisa.
Y el paso final: Servir y disfrutar

Ingredients
Cheesecake:
225 g cream cheese
135 ml whipping cream
45 g grated Manchego cheese
90 g white sugar
4 eggs L (or 2 L and 1 XL)
Gooseberry-strawberry sauce:
125 g strawberries
50 g gooseberries
3 tablespoons sugar
2 ½ tablespoons water
Instructions
Preheat oven to 210C/410F.
Add the cream and grated Manchego cheese to a saucepan over medium heat. Stir with a whisk until the cheese dissolves. Transfer to a bowl and set aside to cool.
In the mixer bowl, put the cream cheese and beat so until creamy. Keep mixing and add the previous mixture little by little.
Add the sugar and continue mixing.
Once the batter is well combined, add the eggs one by one and keep beating.
Line a 6-inch/15 cm springform pan with some wet parchment paper to cover your springform pan and pour in the batter. Bake for 30-35 min at 210C/410F.
The cake should be a little jiggly and golden on top.Let it cool for at least one and a half hour before unmolding.
For the sauce use a small saucepan and put all the ingredients on high heat. When it starts to boil, lower the heat and cook over low heat for 10-15 minutes. Let cool and use a strainer to get a smooth texture
And the final step: serve and enjoy
3 notes
·
View notes
Photo

BIZCOCHO GLASEADO DE CÍTRICOS/ GLAZED CITRUS LOAF
¿Cómo era eso de “si la vida te da limones...”? Ah sí, “si la vida te da limones, haz un buen bizcocho glaseado”. Y si además tienes alguna naranja y limas por ahí, mejor que mejor. Esta receta tan refrescante y veraniega cuenta con los cítricos como protagonistas. Es bastante fácil de hacer y se puede conservar varios días sin problema. Todo ventajas.
Por aquí os dejo la receta. ¡Hala! ¡A disfrutar!
Ingredientes
Bizcocho:
1 taza de harina de almendras
1 taza de harina normal
½ taza de azúcar moreno
½ cucharadita de levadura química
½ cucharadita de bicarbonato de sodio
½ cucharadita de sal, ¼ taza de leche entera
1/3 taza de mantequilla derretida
1 cucharada de zumo de limón
1 cucharada de zumo de lima
1 cucharada de zumo de key lime
½ taza de zumo de naranja
1 huevo.
Glaseado:
1 cucharadita de ralladura de naranja y lima
2 cucharadas de zumo de naranja
1 taza de azúcar glass
Preparación
Precalienta el horno a 175C/350F.
En un bol mezcla todos los ingredientes secos y luego añade el zumo de los cítricos (naranja, limón, lima y lima) y la mantequilla derretida.
En otro bol bate el huevo con la leche y luego incorpora la mezcla a la masa anterior.
Prepara un molde con papel de aluminio, vierte la masa y hornea 50-55 minutos.
Saca del horno y deja enfriar.
Prepara el glaseado de cítricos mezclando todos los ingredientes y batiéndolos con la batidora.
Una vez que el bizcocho esté completamente frío, vierte el glaseado por encima y deja que se endurezca. Decora con un poco de ralladura de lima y disfruta.

Ingredients
Loaf:
1 cup almond flour
1 cup all purpose flour
½ cup brown sugar
½ tsp baking powder
½ tsp baking soda
½ tsp salt
¼ cup whole milk
1/3 cup melted butter
1tbsp lemon juice
1 tbsp key lime juice
1 tbsp lime juice
½ cup orange juice
1 egg
Glaze:
1 tsp orange and lime zest
2 tbsp orange juice
1 cup powdered sugar
Instructions
Preheat oven to 175C/350F.
In a bowl mix all dry ingredients and then add the citrus juices (orange, lemon, lime, and key lime) and the melted butter.
In a different bowl whisk the egg with the milk, and then mix into batter.
Prepare a loaf pan with foil, pour in the batter and bake for 50-55 minutes.
Remove from the oven and leave to cool.
Prepare the citrus glaze by mixing all the ingredients and whisking them with a mixer.
Once the loaf is completely cool pour over glaze and let it harden. Garnish with some lemon zest and enjoy.
1 note
·
View note