
Statistics
We looked inside some of the posts by petitbakes and here's what we found interesting.
Average Info
Notes Per Post
1K
Likes Per Post
816
Reblog Per Post
240
Reply Per Post
1
Time Between Posts
2 months
Number of Posts By Type
Text
17
Last Seen Tumblr Blogs


Fun Fact
Tumblr’s reach among the 26-to-35-year-olds in the US is 11%.
Text
Peach Cobbler Tarts

Wow! It’s crazy to think that a whole year has passed. There’s been so much going on in the world, a lot of changes in my life and somehow I drifted away from this space. I’ve made my way back and I’m ready to share some things for you to enjoy.
This recipe is quick and easy, using pre made puff pastry and a quick peach jam. It all comes together in no time, but with all the flavors you’d find in delicious peach cobbler. Peach cobbler happens to be one of my families favorite desserts and these did not disappoint. The puff pastry is light and flaky, coupled with the sweet cinnamony peach jam and a little cinnamon streusel on top makes a dessert that is seriously so good!
I hope you are staying safe and taking care. xo
Ingredients
1 sheet of puff pastry, thawed
quick peach jam
egg wash
sugar, for sprinkling
Quick peach jam:
2-3 peaches, peeled and diced
1/3c sugar
Bring the peaches and sugar to a simmer allow the peaches to break down lightly breaking them up with a spoon once the jam starts to thicken add a splash of vanilla and a few dashes of cinnamon, then allow to cool.
Streusel:
1/3c flour
2 tbsp brown sugar
1 tbsp cane sugar
2 tbsp butter, cold
1/4 tsp cinnamon
Combine ingredients until crumbles form, set aside.
Preparation
Preheat your oven to 400F. On a lightly floured surface, cut your puff pastry into 9 3x3 squares. Place the squares on your parchment lined baking sheet and spoon a tablespoon of jam into the center of each square. Top with streusel and brush the edges with egg wash and sprinkle the sides with sugar. Bake for 15 mins or until golden. Enjoy!
p.s I’ve given the blog a little makeover let me know what you think?
#puff pastry#dessert#Food Blog#food photography#delicious#pastries#pastry#baking#summer#eat#cooking#homemade#quick#quickfood#recipe
6 notes
·
View notes
Text
brown sugar streusel applesauce muffins
a muffin can be a lot of things. breakfast, snack, maybe even dessert if its decadent enough. i prefer them fresh from the oven, warm and buttered. dense and crumbly, bearing fruit and/or spice, a sugary top or buttery streusel, either way, is fine by me.

these applesauce muffins are a fine example of wholesome and delicious. being made with whole wheat pastry flour, applesauce, and oil they are as moist as ever but dense and hearty enough to hold you. various warming spices are thrown in for flavor and maple syrup brings on the sweetness. the buttery brown sugar streusel topping is what makes these a real treat and was definitely a favorite among everyone.

ill be baking up a few batches of these soon to freeze for early morning grabs and in between lesson snacks because the recipe is super simple and they hold up really well.
school will be starting back up in a few days and resuming schedule will certainly be a challenge as my body has enjoyed the extra rest in the mornings. the kids have made honor roll which is so exciting! seeing them progress further in their academics and little personalities is always a joyous thing to witness. they are growing up so fast and I'm trying to hold on to these little moments as much as I can. I’ve been thinking of a special treat for them to celebrate their achievements and I'm pretty sure it’ll be something sweet or maybe a new bike because that's been the talk of the house recently.

if you decide to bake up these muffins i’d like to point out that they can easily be adapted to fit your taste or mood. the applesauce can be replaced with any other fruit or squash puree, half maple for sugar, or maybe even add in some nuts or chopped fruit i wouldn't omit the streusel as i feel that it really makes these but its your choice.
i added some apple slices to some and really liked the results but tend to stay away from fruit on top muffins as it can become soggy as time goes on. these do last a few days on the counter and taste just as great if not better.

ingredients
1 1/4c applesauce (unsweetened)
2 eggs
1/3c neutral oil
1 tbsp vanilla
1/2c maple syrup
1 tsp cinnamon
1/2 tsp ground ginger
1/4 tsp cardamom
1 tsp baking soda
1/2 tsp sea salt
1 1/4c whole wheat pastry flour
3/4c all purpose flour
brown sugar streusel:
1/2 c brown
2tbsp cane sugar
3 tbsp melted butter
pinch of salt
1/4 tsp cinnamon
3/4c flour
combine all the dry ingredients, drizzle in the melted butter and work it in with your fingertips until crumble forms.
preparation
preheat oven to 375F. grease or line your muffin tin. whisk oil, eggs, vanilla, applesauce, maple syrup, and spices. then sift the flour, baking soda and salt over the bowl. stir just until there are no noticeable flour streaks. divide in the muffin tin evenly. top with brown sugar crumble and bake for 18-20 mins. enjoy!

#muffins#muffin#crumb muffin#breakfast#food#food photography#delicious#applesauce#morning#recipe#streusel
4 notes
·
View notes
Text
orange blossom brioche, two ways!

hey there!
just a quick post, I’ve been thoroughly enjoying our winter break and i’ve been baking a ton! of course, my baking to post ratio is way off. I’ve been baking to bake and not really baking to blog, if you get what i mean. one particular recipe that i would love to share however is this orange blossom brioche.

decadent, plush brioche scented with orange blossom turns out to be the best way to make brioche imo especially when you wrap it around sweet cream cheese like a soft blanket, bake it to golden deliciousness and then drizzle it with thick, vanilla icing!

this dough can be made days ahead and the possibilities are endless not to mention how easy it is to put together. seriously whatever you can think of, perhaps bake it up as a loaf and brush warm apricot jam on top and cut into thick slices to have with tea, or maybe you want some swedish buns filled with spiced brown sugar and sprinkled with crunchy, sweet pearl sugar to warm you up on these chilly winter days.

i’ve included the recipe for the dough and how to prepare it as pictured here because surprise! the dough makes enough for both.

if i had to choose which is better out of the two, nevermind i can’t just make both, seriously you won’t regret it!

orange blossom brioche dough:
3 1/2c all purpose flour
2 eggs
2/3c milk
2 tsp orange blossom
1/4c butter, melted
1/2 tsp vanilla
1/4c sugar
2 tsp active dry yeast
1 1/2 tsp sea salt
in a small saucepan, melt butter. remove from heat add the milk which will slightly warm it. add the eggs, sugar, vanilla, orange blossom water and yeast give everything a quick stir and set aside for the yeast to bloom. in a separate bowl, stir the salt into the flour. once the yeast is bloomed, add the flour all at once, stir until its difficult and then on a lightly floured surface knead the dough until smooth. in an oiled bowl, add the dough and allow to rise in warm place until doubled. after its double refrigerate the dough for at least an hr but preferably overnight.
when ready to use the dough take out the amount needed and allow to rest for about 30 mins. proceed to prepare the recipes as follows.
cream cheese brioche braid:
1lb orange blossom brioche
6oz cream cheese, softened
2 tsp lemon juice
1/2 tsp vanilla
3 tbsp sugar
roll out the dough into a 10x12 rectangle. place on a piece of parchment then spread the cream cheese down the middle. on each side cut the dough into 1/2 in strips and began crossing the dough, twisting it lightly being careful not to stretch the dough too thin as it might break while baking. allow this to proof for about 1hr. brush with an egg wash and bake at 375F for 15-18mins. allow the braid to cool before adding the icing.
vanilla icing:
1 cup powdered sugar
pinch of salt
1/2 tsp vanilla
2 tbsp heavy cream
spiced brown sugar swedish buns:
1 lb orange blossom brioche dough
1c light brown sugar
1 1/2 tsp ground cardamom
1/2 tsp cinnamon
3 tbsp butter, softened
pinch of salt
roll out the dough into a 15x11 rectangle spread on the butter and spiced brown sugar making sure to press it into the dough. next, fold the dough into thirds like a letter and making 1 1/2 inch slices cut the dough into strips. twist and shape the buns and place on a parchment lined baking sheet for proofing. after about 30 mins began preheating your oven to 375F. once the dough is puffy, lightly brush with an eggwash sprinkle on the pearl sugar and bake for 15 mins.
#breakfast#baking#bread#brioche#orange blossom#orange blossom water#danish#cream cheese danish#swedish buns#kanelbullar#food#food photography#delicious#dessert
17 notes
·
View notes
Text
cranberry clementine pound cake

we’ve been buying bags and bags of clementines. I can’t seem to stop eating them, something about that sweet, tart juiciness or maybe its their tiny cute size that makes them so addictive. i will literally have a pile of peels in front of me before i force myself to stop. since ive been buying so many of course i have to bake with them and i actually have quite a few recipes coming up using them. but first, this cake.


i’ve this cake a few times in the summer and knew right away that i would want to do a wintry version. flavors that brighten up the bite of temperamental weather.

ive been wanting to make something cranberry based but they can be a little too tart so to solve that problem we make a quick clementine cranberry jam and swirl it into the batter creating sweet but delightfully tart bites in this super moist pound cake.


i prefer this cake after it has rested overnight, and although that is not necessary the flavors become more detailed. another thing that i love is how it get softer and softer as the days go on, not that it will last that long.

the kids and I thoroughly enjoyed this cake and i probably ate way too many slices although i did share with a friend so its sort of justified, right? ( it goes great with tea and is super comforting).

ingredients
inspired by this cake
2c flour
2 eggs
1 c plain or vanilla yogurt (full fat)
zest of three clementines, about 1 tbsp
2 tbsp clementine juice
1 1/2c cane sugar
1 tbsp baking powder
1/2 tsp salt
1/2 tsp vanilla
3/4c neutral oil
cranberry clementine jam
1 clementine, zested, then peeled
1 1/2 c fresh cranberries
2 tbsp orange juice
1/3c sugar
glaze
2c powdered sugar
zest and juice of a clementine
preparation
preheat oven to 350F
to prepare the jam combine all of the ingredients and allow to simmer, the cranberries will begin to pop, mash them and the clementine to help thicken the jam until it sticks to the back of the spoon. remove from heat place in a glass jam jar and allow to completely cool.
generously butter and flour your bundt pan, don't skimp on this. whisk eggs, oil, zest, juice, yogurt and sugar until combined. sift in the flour, baking powder and salt and then stir until smooth. pour half of the batter into your pan. then dollop in the jam lightly swirling it into the batter. add the remaining batter and jam. bake for 35-40 mins and test for doneness. allow the cake to cool in the pan for about 10-15 minutes then invert onto a wire rack.
to prepare the glaze, stir the zest and juice into the powdered sugar, it should be thick but pourable.
let the cake completely cool and then generously add the glaze on top.
#cake#baking#winter#cranberry#clementine#food#food photography#delicious#cooking#pound cake#bundt cake#bundt
1 note
·
View note
Text
a promising pink cake

“can you make a cake mama, with cream all around it?”
“what kind of cake?”
“a pink cake!”
usually, being a four-year-old girl of many words she left me with this very vague request. did she want an actual pink cake or just a cake covered with pink “cream”
“oh, mama..”
“ yes?"
“no sprinkles please, that's for eid.”
“okay got it no sprinkles. and would you like strawberries with this pink cake?”
she seemed to think about it but answered presently, “no! they aren’t sweet anymore.”
okay, just a pink cake it is!
that was a few weeks ago, i honestly had forgotten about our little discussion but as many parents know these little requests live vividly with your children and so she came again asking for say cake. refusing to make her wait any longer i set off to the kitchen to create what i could only hope is what she’d been longing for.

i decided on a simple vanilla cake, its classic and you can’t go wrong with that. maybe some strawberry jam (her favorite!) in the center and a pretty speckled pink frosting made by using freeze-dried strawberry powder.

as i was preparing the frosting a huge smile crept on her face, its pink!
that's all i needed to know to reassure me that i had in fact done right. as we sat eating our slices of cake, her peachy cheeks beaming in between bites, i remembered myself as a girl and how big those little promises really meant to me.
so to my sassy, daring, compassionate little princess, a pink cake.

ingredients
adapted from violet bakery cookbook
1 1/2 sticks +2 tbsp butter, softened
1 1/2c sugar
1c milk, room temp
1 tbsp baking powder
2 3/4 c all-purpose flour
1 tsp salt
2 tsp vanilla
4 large eggs, room temp
frosting:
1 1/2 sticks butter, room temp
3 1/2c powdered sugar
a pinch of salt
1/2 tsp vanilla
1-2 tbsp freeze dried strawberry powder
1 tbsp heavy cream, cold
preparation
in a medium bowl, beat butter and sugar until pale and fluffy. began adding eggs one at a time along with the vanilla and salt.alternatively add half milk, half flour mixture until just combined. spread batter into two prepared 8in pans and bake for 35-45mins at 300F.
to prepare the frosting place the butter, strawberry powder, half the powdered sugar, salt and vanilla in thew to combine then add the remaining sugar and 1 tbsp of heavy cream beat on high for 2-3 mins until light and fluffy.
once cakes are cooled, level them off with a sharp cake knife, pipe a frosting dam and then spread 3 tbsp jam/preserves in the center and pipe a little frosting on top of the jam just to get things snug. add the other layer on top and began frosting the cake in your desired way. we prefer thin around the sides thick on the top.

#pink#pink aesthetic#cake#piece of cake#baking#food#homemade#frosting#strawberry#strawberries#cooking#delicious
1 note
·
View note
Text
petit pumpkin muffins w/ ginger vanilla glaze

still not sure what to do with that leftover pumpkin in the fridge? I’ve got something that could help!
i was recently writing down recipe ideas and going through old ones that i’d written out in my flooded evernote and came across this particular one. of course, i had to try it out first to see if it was worth sharing because although i remembered them to be delicious there had to be a reason i didn’t share, right? and let's be honest recipes have flaws sometimes, okay more than sometimes.

i feel that i’m constantly in the editing phase. it seems that either im trying to get a recipe just right, or trying to get the photos to translate how delish it actually is. don’t even get me started on the writing part. (i know i suck, its okay.)

now on to this say recipe, its fairly quick to put together. one bowl, all that and although i prefer them in the petit size you can definitely bake them in a standard size muffin tin. my favorite part about these muffins is not even the muffin part, its the glaze. thick, luscious and sets so beautifully. I decided to top these with pepitas to add a little texture. if you aren't a glaze person (what are you doing here?) these certainly taste fine without but i highly recommend.

ingredients
1/3c pumpkin puree
1/3c maple syrup
2 tbsp orange juice
1/3c cane sugar
1/2 tsp baking powder
1/2 tsp baking soda
1/2 tsp salt
1/4c neutral oil
1/2c white whole wheat flour
1/2c all purpose flour
1/2 tsp cinnamon
1/2 tsp ground ginger
1/3c plain kefir
1 egg
ginger vanilla glaze:
1c powdered sugar
2 tsp vanilla
1/2 tsp ground ginger
2 tbsp milk or water
preparation
line muffin tin with baking cups or grease lightly then preheat oven to 350F.
combine and whisk the dry ingredients in a medium bowl and then add the wet ingredients and stir until just combined. divide the batter evenly and bake for 15-20 mins although 18 minutes is my ideal muffin time. once they are done let them cool slightly in the pan then invert to a baking rack while you make the glaze. to make the glaze simply stir all the ingredients together. the glaze should be thick but run in a steady stream. began dipping straight down into the glaze and allowing the glaze to drip off. sprinkle on the pepitas quickly while the glaze is still wet. enjoy!
#baking#breakfast#snacks#cake#muffins#mini desserts#cooking#food#food photography#Pumpkin#Fall#homemade#glazed#pepita#ginger#vanilla
2 notes
·
View notes
Text
blueberry ginger welsh cakes

weekend mornings just got a lot better! these blueberry ginger welsh cakes are soft, flaky and adorably scrumptious! paired with your favorite tea, these make the perfect tea time treat, as well.


traditionally welsh cakes are made with currants/raisins and spices like nutmeg and cinnamon. I chose to use dried blueberries, a little lemon zest and ground ginger. the flavors are bright and gently spiced with a hint of sweet, spicy ginger.

these cute little cakes aren’t baked but rather made right on the stovetop. you start by making what closely resembles a scone dough. simply rolling out the dough and pan frying in pats of sizzling butter as you would a pancake. once golden brown and fluffy, we put them on a rack to cool and sprinkle with a bit of sugar. super easy i know!

we enjoyed these with some mixed berry ginger rhubarb jam (yay for homemade jam and actually saving it til fall/winter) and butter. my tea of choice was earl grey.

So perhaps the next time you have a craving for scones, give these little treats a try, you won’t regret it! while making them i thought how charming these would be served at a tea party, i might have to plan one soon!

happy weekend baking! x
ingredients
2 cups of self-rising flour (how to make your own.)
1 tsp baking powder
1/2 tsp salt
1 egg, beaten
2-3 tbsp plain kefir or buttermilk
1/2c butter (1 stick) cold, plus more for frying
zest of one small lemon
1/4 tsp ground ginger
1/2c dried blueberries
1/2 c sugar, plus more for sprinkling
preparation
In a medium bowl, whisk flour, baking powder, sugar and salt. began grating the cold butter into the flour and then add the blueberries, ginger and lemon zest. next, add in the beaten egg along with the kefir until a soft dough forms, sort of like a pie crust. on a lightly floured surface, gently create folds being careful not to overwork the dough. finally, roll out until about 1/4in thick and cut out the welsh cakes (I used a 2in cookie cutter).
In a frying pan, on med low/high heat add a small pat of butter and fry the cakes for about 2-3 mins each side being gentle when you flip them. once golden and fluffy transfer to a wire rack. sprinkle with sugar then serve warm with butter and jam along with your favorite tea. enjoy!

#baking#welsh cakes#cooking#tea#tea time#food#food photography#Food Blog#Fall#autumn#baker#english#breakfast#brunch#scones#sweets#blueberry#ginger#jam#homemade
1 note
·
View note
Text
dark & lovely ginger molasses cookies

Cookies are one of the things I used to bake a lot of when I first got into baking. It slowly toned down and transitioned into cakes, pies etc. I like to go back to them every once in a while because they do make some of the quickest, tasty treats. Gingersnaps happen to be one of my absolute favorites and while I still haven’t mastered a snappy gingersnap at home (I’m going nuts to find out the secret) these chewy counterparts are definitely doing their job in keeping me content.

another expectation if you will that I have of cookies is that they are flavorful. with gingersnaps, some recipes simply do not put enough spice and so you are basically left with a molasses cookie and while they in their own right are delicious they are not what you are exactly looking for when it comes to a spicy cookie that delightfully lingers on your tongue even after they are gone. Another thing that makes these cookies so delicious is the use of dark brown sugar and molasses both lending deep amber, caramel notes throughout intertwining perfectly with every spice while giving the cookies a lovely dark appearance.

just look at those crinkles and cracks! the glossy sparkles of sugar aren’t too shabby either.

These didn’t last long at all as we really love gingersnaps in this house and i’d probably make a double batch next time. I may even add a little fresh ginger to the mix as well because why not?
ingredients
adapted from here.
2c all purpose flour
2 tsp baking soda
1 tbsp ground ginger
2 tsp cinnamon
1/2 tsp allspice
1/4 tsp cayenne pepper
1/2 tsp cardamom
1/2 tsp salt
1 large egg
1/2c butter, melted
1/3c cane sugar
1/3c dark molasses
1/4c dark brown sugar
raw sugar for rolling
preparation
preheat oven to 375F. Began by whisking all of the spices with the flour and baking soda. In a separate bowl whisk egg, butter, sugars and molasses. Combine the wet and dry ingredients and with a small cookie scoop start scooping out your cookie balls. roll them in the sugar and place on parchment lined baking sheets. if your dough is too sticky to work with you can stick in the fridge beforehand. bake the cookies for about 8-10 mins turning the pan halfway through. you want them to be slightly underbaked. transfer to rack and allow to cool.

#baking#cookie#cookies#chewy cookies#ginger#gingersnaps#ginger snaps#cooking#food#food photography#Fall#dessert#delicious#homemade#snacks
5 notes
·
View notes
Text
whole wheat apple raisin buns

Guess who got to wear her cute little jacket for the first time since last fall/winter?! MEE. Its finally chilly enough here in the south to wear a jacket/sweater and im so happy because it’s hard to go full fall mode while its 70+ outdoors.

With the cooler mornings, i’m left craving something freshly baked from the oven with warm spices and while most days this is baked oatmeal *ahem* These whole wheat apple raisin buns will surely make a better debut for the weekends. Don’t be turned off by the words whole wheat these are the least bit of healthy especially if you are like me and must have a glaze on buns. They are bit wholesome though filled with tart apples, sweet raisins and spicy cinnamon.

getting a plush whole wheat dough isn’t always easy so we knead lightly add in a little sour cream to the dough and let it rest overnight to ensure they are nice and airy.

once baking, these buns will scent your house with a familiar autumn aroma even if its still fall-ish where you are.

ingredients
2/3c milk, warm + 2 tbsp sour cream, room temp
1/4c butter, melted and cooled
1 1/4c white whole wheat flour
1 1/4c all-purpose flour
1 egg
2 1/4 tsp active dry yeast
1 tbsp honey
1/4c sugar
1 1/2 tsp sea salt
filling:
1 large apple, grated (I used honeycrisp)
3/4c brown sugar
1 tbsp cinnamon
1/4c raisins
2 tbsp butter, softened
preparation
in a small saucepan, began melting the butter, once it is fully melted remove from heat and add in the milk, this will warm it. set it aside to cool a bit. now add the milk/butter mixture to your stand mixer bowl and sprinkle on the yeast. drizzle in the honey and sugar give it all a quick stir and allow the yeast to bloom. once foamy, add in the flours, salt and lightly beaten egg and sour cream. turn the mixer on low for about 3-4 mins until the dough comes together. increase the speed to medium and “knead” for 4-5 mins scraping the sides, as needed. scrape the dough from the bowl shape into round and lightly coat the bowl with oil. allow to rise for about 1 1/2 hrs to 2hrs at room temp. once doubled add the dough to the fridge overnight or up to three days but at least an hr.
When you’re all set, remove the dough from the fridge and give it a rest on the counter for about 40 mins. While it is resting you can prepare the filling.
Now when the dough is ready, it should roll out easily without much resistance. roll it into a 16x12 rectangle spread on the butter and cinnamon/brown sugar lightly rolls over the cinnamon sugar with the rolling pin then add the grated apple and raisins. roll tightly from the long side to your right. with a serrated knife or thread cut into 10 equal pieces. place the rolls on a parchment lined baking sheet leaving about an inch or so between them and allow to rise for an additional 30 minutes. preheat your oven during this time to 375F once they are proofed bake for 25-30mins until golden. Allow them to cool slightly and spread on your fav icing. I used some leftover cream cheese frosting I had in the freezer.
#fall#baking#food#dessert#Cinnamon Rolls#cinnamon buns#autumn#food photography#food blog#delicious#cooking#apples#apple#raisin#whole wheat
2 notes
·
View notes
Text
pumpkin croissants

hi friends! yes, it’s really me. it seems the transition into fall has called me back into the kitchen and naturally back to this space. i’m excited to share a few new recipes ive toggled up over the months but first things first, these pumpkin croissants!

these pumpkin croissants came about as a last minute idea for the virtual pumpkin party!! I’m sure you've heard of it by now but if you haven't bloggers from all over the internet gather thanks to Sara from Cake over Steak and bring their most delicious pumpkin (or other squash) based recipes. this happens to be my first year participating and i must say i’m pretty excited. i also cant wait to see what everyone else brings to the table this year. You can check out everyone's posts here.

deciding on what to bake for such an amazing event was a bit challenging because using an ingredient so popular its hard to be original. the first things that come to mind are pumpkin pie, bread etc which are all things ive been making lately but for the occasion, i decided to step out this baking comfort zone i’ve seemed to put myself in and get back to something that i love, pastry.

this recipe isn’t like your traditional croissant that being because you only do two turns of the croissant dough so it leaves you with a sort of flaky, fluffy fusion that is absolutely amazing! adding pumpkin to the recipe may seem like 1-2-3 but it really wasn’t. too much pumpkin and well it wouldn't be that flaky and too less could we really call it a pumpkin croissant? after a few tests and lots of butter later, i believe to have found the right ratio.

as they proofed i was a little concerned about the layers but all proved well after some heat was involved. the butter block in these are infused with autumnal spices such as cinnamon, ground ginger and cardamom making these a fall must have in my book.

you could certainly enjoy these as is, maybe with some butter, jam or favourite condiment but i decided to go with a maple vanilla glaze, thank me later.

as to be expected croissants do take some precious time and a bit of planning. if you were to start this afternoon you could have delicious croissants ready to be devoured by breakfast or your second cup of coffee? exciting stuff, i know.

ingredients
dough adapted from here.
pumpkin croissant dough:
2 1/2c bread flour
1 1/2c all purpose flour
1 tbsp yeast
2/3c pumpkin puree
1/4c milk + 2 tbsp
2/3c sugar
1c cold water
1/4c butter, melted
egg wash
butter block:
1 3/4 sticks, room temp
1 tbsp cinnamon
1 1/2 tsp ground ginger
1 1/2 tsp ground cardamom
maple vanilla glaze:
1c powdered sugar
1/2 tsp vanilla
1 tsp dark maple syrup
water as needed
preparation
in a large bowl add in the flour, milk, yeast, pumpkin puree, sugar and salt. then slowly add in the cold water and butter stir until dough forms. on a lightly floured surface, knead the dough by hand for about 10 minutes until smooth and elastic. put the dough back in the bowl, cover and allow to rise for an hr or until doubled. while the dough is rising, stir the butter with spices place the butter onto a piece and parchment and then top with another piece. make sure they are long enough.roll the butter out into a rough, thin rectangle. place on a baking sheet and set in the fridge to chill. now you can relax a little.
after the dough has proofed, roll it into a rectangle wrap in plastic wrap then place in the freezer 25 minutes. afterwards, transfer to the fridge for a few hrs.
when all is chilled, take out your butter sheet and let it sit for a little to soften.next, roll out your dough to a 15x20 rectangle, use additional flour sparingly, being sure to brush off excess. place the butter sheet on the lower half of the dough pressing it into any corners and then fold the remaining dough over it.flatten the dough with your hands and then turn it counter-clockwise, like a book.
with your rolling pin make indents starting at the center moving down and then from the center going up, this will help distribute the butter. again, use flour sparingly, if needed. began the first turn by rolling out the dough to about a half inch thick and then fold into thirds. wrap in plastic wrap and refrigerator for about an hr. repeat this to complete two turns, you can go for a third but i did not. i just let it rest overnight.
now is the time for baking! roll out the dough to an 8x24 inch rectangle. you will have to adjust along the way because the dough will retract. once you've got it trim the edges and began cutting out your triangles.each triangle should be about 3in at the base. i found that a pizza cutter was the quickest way to cut them out. began gently stretching the dough and then rolls them up to the point being sure to tuck it under and placing the croissants ‘point down’ on the baking sheet. this will help with any unravelling while proofing. place the first pan in the fridge while you work on the second half of the dough. once all the croissants are shaped cover the pans with plastic wrap and allow them to rise for about 2 hrs.
preheat the oven to 375F and then lightly brush the croissants with eggwash, i use my fingers to be as gentle as possible. once the oven is heated, baking for 20-25 mins. let them cool slightly on a wire rack.
to prepare the glaze, combine all the ingredients in a bowl adding water as needed til you reach your desired consistency. Drizzle the glaze onto the croissants. Yum!

#virtualpumpkinparty#pumpkin#croissants#croissant#pastry#baking#food#food photography#dessert#fall#fall 2018#autumn#delicious#recipe#breakfast#coffee#coffee break#tea#tea time
14 notes
·
View notes
Text
mini spiced date cakes with cream cheese frosting

oh, hello there! This is a quick post as i’ll be back early next week with something more detailed ;). These little cutie loaves came about because i happened to find some forgotten dates in the cabinet and decided to put them to good use.

first, sweet dates are boiled and mashed into a paste. swirled with warm, delicious spices like cinnamon and cardamom and then folded into a fluffy batter. once baked up we top them with the fluffiest, cloud-like cream cheese frosting and sprinkle a little pistachio on some for a little fancy.

I recently bought a mini loaf pan and was eager to use it and this was the perfect baking project for it. If you don't happen to have a mini loaf pan, get one. but if you are excited to make this recipe asap you can also bake it in a standard loaf pan, of course, adjusting the baking time accordingly.


the recipe makes about 7-8 mini loaves depending on how you fill each cavity, I got 8. where are the other two well the kids and i enjoyed them warm from the oven, of course.

okay well, i’m off, happy baking!
ingredients
1 cup white whole wheat flour
1 cup all-purpose flour
1 tsp baking powder
1 tsp baking soda
1/2 tsp sea salt
1 tsp cinnamon
1/4 tsp ground cardamom
1 cup of small dates, pitted
1 stick of butter, room temp
1 tsp vanilla
2 eggs
1 cup of milk
1 1/3 cup sugar ( I divided brown sugar and cane)
pistachios (optional)
preparation
Preheat the oven to 350F
In a medium bowl, whisk together all of your dry ingredients.
in a small saucepan, combine the dates and 1 cup of water and boil on med high heat until the dates began to break down. remove from heat and began mashing them with a fork until you have a smooth paste. add in the spices and allow to cool.
in your stand mixer, whip the butter and sugars, until creamy.add in the eggs one at a time, then add the vanilla. once the dates are cool add them to the butter whisking in briskly just to combine.
add in half of the dry ingredients, then half of the milk alternating like that, once combined, give the batter a good spin on full blast for about 10 secs.
spoon batter into the mini loaf pan, filling each about 2/3 full. bake for 25-30 mins. using a tester it should come out clean or a few moist crumbs. let them cool in the pan for a few minutes and then invert them on a wire rack to completely cool.
cream cheese frosting:
3 tbsp butter
4 oz cream cheese
1 1/2 cups powdered sugar
1 tsp vanilla
1-2 tbsp heavy cream
combine all the ingredients in your stand mixer, except the heavy cream. start on low until the sugar is incorporated. then on full blast whip and slowly pour in the heavy cream until fluffy. add a pinch of salt. pipe onto completely cooled cakes and enjoy!

#cake#baking#dessert#food#food photography#mini#mini desserts#dates#date cake#fall#autumn#fallbaking#recipe#cream cheese#cream cheese frosting#mini cakes#pistachio
10 notes
·
View notes
Text
citrus scones with dark chocolate
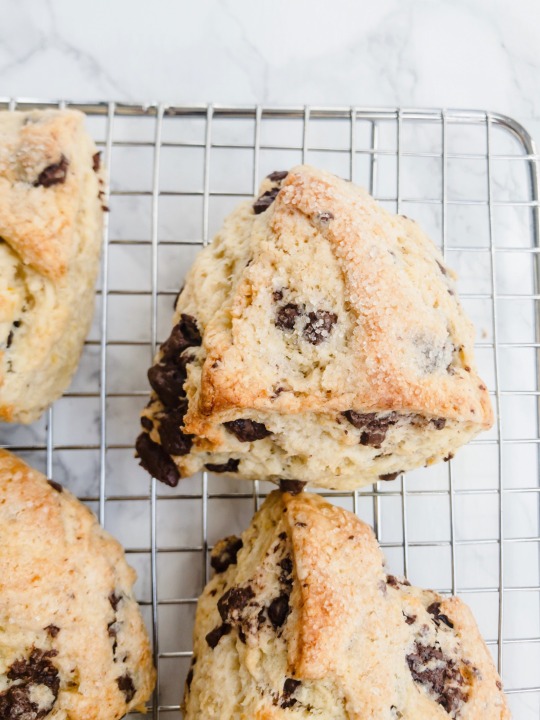
if it wouldn’t pain you too much i’d like to introduce you to the dreamiest scone flavor. the smell alone would make me think so but the taste is far more convincing. these petit scones are every bit of the buttery, soft, tender flakiness you want in this darling treat, bursting with sweet citrus flavor and bites of dark chocolate throughout.


i make scones a lot and i’ve made them with tons of variations but i keep coming back to this particular one. they do bake up light in color which is meant to be, as long as they are golden underneath and bits on the edges/top.
also, be sure to use bittersweet or quality dark chocolate not semisweet or milk because it would be far too sweet. also, be sure to choose an orange with a firm peel of deep color, they give the best flavor and are easier to zest.
eid is next week (omg!)i have tons of stuff planned including all the yummy things i can think of and i’m sure these scones will make an appearance.
ingredients
recipe adapted from vanilla bean baking book
2 1/4c flour
1 tbsp baking powder
2 tbsp sugar, more for dusting
2 tsp orange zest
1/2 tsp salt
1/4c yogurt
1/4c orange juice
1/2 tsp vanilla extract
1 egg
12 tbsp butter, cubed
4 ounces dark chocolate, chopped small
preparation
preheat oven to 400F.
in a large bowl, whisk together the dry ingredients and orange zest. in another bowl or measuring cup mix the yogurt, orange juice, vanilla and egg. add the butter to the dry ingredients working it in with your fingers until they are small pieces like peas. add the wet ingredients and fold everything in. gently fold in the chocolate. lightly knead the dough on a floured surface, the dough is quite sticky. once the dough is manageable pat it into a rectangle and start creating of three like a letter, about 3 or 4 times. shape dough into two discs and place in the freezer for a few mins. once the dough is cooled cut each round into fourths and place them on the baking sheet.brush with heavy cream and sprinkle with sugar. don’t skimp out on this part. bake for 18-25 mins turning the pan halfway through until the scones are lightly golden brown. let them cool slightly and enjoy!

#scones#scone#tea time#tea#coffee break#delicious#dessert#food#chocolate#orange#food photography#baking#breakfast#recipe
975 notes
·
View notes
Text
strawberry banana skillet cake

we’re about 2 weeks into ramadan now and before we know it this month will have passed. i’ve been trying to take advantage as much as possible. keeping busy helps me preserve my fast, i do some chores, read quran, have a lesson/activity with the kids and of course prep iftar. this keeping busy also includes less time on my phone which has helped me prioritize a lot better and i think is a habit i’d like to carry on outside of ramadan.
i typically eat a few dates and drink water in the morning for suhoor. this year i’ve added blackstrap molasses to that to help out with my low iron. i’ve tried adding oatmeal but i just can’t stomach it that early. here and there i’ll eat yogurt or a small bowl of cereal maybe a banana but i like to keep it very light.
a goal of mine was to try and keep dinners as easy as possible but things that i like to eat aren’t always easy haha. my favorite meal so far has to be ‘tandoori chicken subs’ which ended up tasting more like the best gyro ever which as you can guess isn’t bad at all.
by the time i break fast, pray and eat i am usually worn out and ready to retreat to my bed especially if i didn’t nap in the afternoon, which in my case has been bliss because i don’t tire easily at night. i had tons of desserts i wanted to try this month but honestly, after eating dinner i can’t fit anything else so dessert has been on hold until recently.
a cross between a quick bread and a teacake this skillet cake is bursting with fruity flavors. you prepare it sort of how you would banana bread but then we fold in chunks of sweet bananas and juicy, ripe strawberries, a splash of strawberry kefir for more of that berry flavor and bake it in a skillet, easy peasy! i didn’t get to taste until later on that night but the scent that lingered around the house was so dreamy and i already could tell it would be delicious.

skillet/upside down cakes are pinnacles to summer and i think this rustic cutie deserves some attention. it can easily be eaten as a breakfast cake, hello there’s fruit in there! an afternoon bite or maybe even a late night snack to help you finish up that chapter.
to make things even more simple i served up portions with a spoon, but regardless of how you choose to serve this cutie, add a scoop of ice cream!
ingredients
2c of all-purpose flour
1/4c strawberry flavored kefir
3 bananas
1c strawberries, diced
1 1/2 tsp baking powder
1/2 tsp baking soda
1/2 tsp salt
1/3c maple syrup
3 tbsp avocado oil
1 tsp vanilla extract
1 egg
preparation
preheat oven to 350F. in a medium bowl, whisk all of the dry ingredients. in a second smaller bowl, mash two of the bananas and then combine it with the syrup, oil, egg, and vanilla. dice the strawberries and bananas, then stir the wet ingredients into the dry and gently fold in the fruit. spread batter into a buttered 9 inch cast iron skillet. sprinkle with a dusting of sugar and bake for 18-25 mins. enjoy!
#strawberry#strawberries#banana#bananas#cake#cast iron skillet#skillet#summer#food#dessert#baking#food photography#skillet cake#strawberry banana
9 notes
·
View notes
Text
pastel donuts
“Happiness is having a large, loving, caring, close-knit family in another city.” ― George Burns


i originally made these about a month ago to celebrate going back home to jersey and visiting my family. also the coming of spring and just feeling generally joyful, blah blah lol i'm definitely still feeling joyful but on a different speed now, more on the side of contentment.

going back home was wonderful, seeing everyone together is something i can only lightly explain as beautiful. i thought i would cry as soon as i laid eyes on everyone but honestly, i couldn't stop smiling. the kids fell right at home like they've been there all of their little lives. also seeing my siblings being aunts and uncles was pretty cool and very comical at times. my favorite part of the trip was hanging with all of my siblings (its seven of us). they’ve grown up to be some really cool humans. we all have different parts of my father that show through us all mainly the undying sarcasm, wit, good looks, and goofiness. there’s no better feeling than having your own personal roster of friends who get you.
if you can’t already imagine it was a full house, the meals were epic and there was also a lot takeout thanks to my husband because he’s such a tourist whenever we travel and had to try all the spots that everyone suggested. that also had a lot to do with the weather being rainy and cold about 92% of the trip.
now being home again, back into the swing of things i keep feeling like somethings missing, i miss them. the kids repeatedly ask when we are going back and i hope its soon.
these pretty in pastel donuts are soft, feminine and spew happy joyful vibes. i decided to go the baked route because it is much faster and you can make as many as you want without all the labor indued. don’t let the appearance fool you they couldn't be any easier, a basic vanilla donut with a vanilla icing all dressed up and ready to charm.

p.s ramadan starts tomorrow and i plan to share all that i didn’t share last year. suhoor/iftar ideas, how to plan an iftar and desserts of course.
until next post,
Fatimah xo
ingredients
recipe from here.
1/4c butter
1/4c avocado oil
1/2c sugar
1/3c brown sugar
2 large eggs
1 1/2 tsp baking powder
1/4 tsp baking soda
1/2 tsp cinnamon
3/4 tsp salt
1 tsp vanilla
2 2/3c flour
1c milk
vanilla icing:
2 1/2c powdered sugar
3 tbsp milk
2 tbsp butter
1 tsp vanilla
food coloring (optional)
pinch of salt
preparation
preheat oven to 425F. prepare two donut pans.
in a medium-sized bowl beat the butter, oil, and sugar until smooth. add the eggs one at a time beating after each. stir in the baking powder, baking soda, salt, vanilla, and cinnamon. began adding in the flour and milk alternately, ending with flour. make sure the batter is thoroughly combined without over mixing. i like to put the batter in a piping bag and distribute the batter that way. easy cleanup and neat looking donuts! bake the donuts for 10 minutes, allow them to cool for about a minute and then turn them out onto a rack.
to prepare the icing, combine the powdered sugar, pinch of salt, and vanilla and slowly add in the milk stirring until you have a somewhat thick consistency that runs smoothly off the spoon in a steady stream. divide into four bowls and add in food colorings until you get your desired shades. dip the cooled donuts tilting the bowl slightly to cover sides and allow the icing to drip into the bowl then dip again this time placing the donuts on a wire rack to set.
best served the day they are made.

#donuts#pastel#spring#pretty#pretty food#food#baking#cooking#dessert#yummy#delicious#food photography#donut
2 notes
·
View notes
Text
homemade samosas

have i mentioned that i hate frying? surprisingly ive been doing it more than ever and its because of these. i hadn’t made samosas in a long while mostly because it became a treat whenever we went to go visit my mother. there's a nice spot near her house where they come in a brown paper bag still hot and oily and are served with a quick cup of shay (chai). now that ive made them at home though i don’t think we’ll be going back there anytime soon.
when it comes to samosas i prefer a meat filling, heavily spiced but not too spicy if that makes sense. i’ve tried quite a lot of samosas and everyone makes them differently, they are easily customizable to taste. we start out by making the dough, this is probably the simplest dough i will ever post on this blog. flour, salt, oil and just enough water to make it all come together. the dough is smooth and supple especially after a good rest and i actually prefer to make mine the night before.
for the filling, i recommend beef for the savoriest flavor, although lamb is a great contender. we began by sauteeing some onions until soft then adding in garlic and ginger just until fragrant. brown the meat add in all those delicious spices and a healthy amount of cilantro just at the end so it’s flavor is still bright.
now back to the dough, this part used to be so frustrating for me. my first time making them my samosas were far from cute, little golden pockets. more like wonkily shaped balls of dough that were thankfully still delicious out of the fryer.
i wanted to photograph this step more than anything because being a visual learner myself i know the struggle of trying to read instructions while im cooking. there are plenty of tutorials on the internet but i’ll try my best to explain.

divide the dough into ping pong sized balls. roll it out into a circle and then partition it into half moons. this will make two samosas. holding the dough in your hand, bring a corner to the center, the other side should look like a triangle, then fold it over and you will have what looks like a cone. if not so much then that is fine just make sure there are no openings at the bottom. take a spoonful of filling, carefully add it in and then seal the dough across the top. if all else fails just make sure it's sealed. you don't want it to open in the oil. remember they taste great no matter what they look like ;).
place the prepared samosas on parchment and continue until all your samosas are shaped. don’t worry if you don’t get it right at first, it does take some practice. bonus! there will be quite enough filling leftover, it tastes amazing over rice.
i usually start the oil at a higher temp to get it nice and hot and then lower it to medium heat. i also typically fry in batches of three because i like to fry them in my staub petite french oven. of course, if you are using a larger pot you can fry more at a time but be careful not to overcrowd. the samosas should start getting tiny bubbles on the surface shortly after they hit the oil.then just fry until golden on both sides. remove them from the oil with a slotted spoon and place on paper towels to soak up any excess oil. we like to eat them while still slightly hot with a thick ketchup. Is there a food that you enjoyed out but loved even more once you made it at home?
ingredients
dough:
2 cups of all-purpose flour
3 tbsp oil
1/4 tsp salt
1/2 cup of water more or less
filling:
1lb ground beef or lamb
2 tsp ground coriander
1 1/2 tsp cumin
1 tsp black pepper
1 tsp salt or to taste
1/4-1/2 tsp jalapeno or red chili powder
1 medium onion, finely chopped
3 garlic cloves, minced
1/2 inch piece of ginger, grated
a handful of cilantro, chopped
preparation
in a medium bowl, combine flour with salt add in the oil and gradually pour in the water while mixing with your hand until dough forms. knead the dough until smooth, allow to rest for a minimum of 10 mins, i prefer overnight.
for the filling, heat a skillet on medium heat began cooking your onions until soft and translucent. add the garlic and ginger until fragrant and then began browning the meat. once the meat is brown add the spices and a tiny amount of water just to prevent burning turn the temperature down to low and let the meat simmer for about 5 mins with a lid. add the cilantro and turn off the heat. let the meat cool, covered.
shape the samosas as instructed above and in a heavy bottom pot, filled with about 2-3′ inches of oil heat the oil on high it should pop then lower the temp to medium and began frying the samosas until golden. serve warm.

#samosa#samosas#sambusa#appetizer#food#food photography#comfort food#yummy#delicious#Food Blog#ketchup#fried food#cooking#sambusas#homemade
1 note
·
View note
Text
salted caramel filled chocolate cookies

don’t worry i haven’t forgotten about you, i’ve been meaning to post, really i have. letting you know about my busy weeks and how things are going with school, that i finally bought a pullman pan (ahhh!) and that it feels like spring outside *side-eye*...


You see my sweet tooth still hasn’t exactly gotten her groove back i’m more on a barely sweet, gimme the salty vibe right now and honestly, i haven’t baked much of anything for the past month (how sway?!)
i’m still a baker, just my baking has transitioned into making our weekly loaves of bread, too many samosas (so good!) and little treats here and there. that's where these cookies came from. i’ve made them before slightly different. they were filled with dulce de leche and not nearly as salted which i now see was a major flaw. this time around i filled them with salted caramel and loved them with more flakes of sea salt afterward. these cookies are delightfully chewy all around, deep in their chocolatey-ness and possibly overfilled with a buttery, salty caramel. straight out of the oven they are warm, soft and the caramel trickles along the sides but as they cool it they become chewy, teasing with amber puddles on top sinking deep inside, its love!!
if you do bake these don’t sleep on the salt its really what brings out all the wonderfulness in these cookies seriously, don’t skip it.
i plan on getting myself out this baking rut this weekend and if all goes well ill have something coming to the blog within a few days so be sure to check back! i’m thinking something citrusy...hmm?
i also have lots to catch up on with everyone's blogs, its so crazy how much you miss in so little time.

ingredients
recipe from here.
1/4c butter
3/4c brown sugar
1/4c dutch process cocoa
1/4 c + 1 tbsp dark chocolate chips or chopped 70% bar
1 egg
1/4 tsp baking soda
1/4 tsp sea salt + addtl for sprinkling
1 cup +2 tbsp flour
1/3c more or less salted caramel
preparation
In a small saucepan melt together the butter, sugar, cocoa powder and chocolate until smooth. Remove the pot from heat and whip in the egg. Next, combine the flour, baking soda, and salt and then add this to the wet ingredients. Your batter should be smooth. Refrigerate the dough for about 30 mins until firm. Began scooping out 1 tbsp worth of dough. Roll the dough into a ball and with your thumb make an indention, add a tsp of caramel and then with a small piece of dough pressed out press it along the cookie to conceal the caramel. Don’t mind it if it leaks out a little. Sprinkle liberally with sea salt and bake cookies at 350F for about 9-11 mins. Allow to cool on baking rack and throughly enjoy!
#baking#cookie#cookies#chocolate#dark chocolate#food#food photography#delicious#saltedcaramel#sea salt#maldon sea salt#food blog
3 notes
·
View notes
Text
winter squash cake

it seems to be only getting colder and as a person who usually bears winter, i am ready for its ending, not to mention im quite pale. i’m also not really inspired to write at the moment and my sweet tooth seems to be dwindling, which is making it a little difficult to come up with recipes being a dessert blogger and all, trust i am more at shock than you are.
i am craving savory goodness mostly lots of bread, soups, curries and things baked with cheese basically anything with a salty bite. if i do nosh on something sweet its been a bite or two of chocolate, i’ll never get tired of that, perhaps some muffins or a simple throw together quick bread.


i came across this recipe on food52 but later referenced to five and spices blog. the recipe makes two loaves and while i highly enjoyed huge slices slabbed with salted butter i turned the other loaf into something a bit fancier. namely a layered loaf, filled and topped with lightly sweetened cream cheese frosting and pomegranate arils on top for bursts of tart juiciness. this cake/bread is so amazing flavorwise. the brown butter really brings out the earthiness of the squash and as you can imagine its quite moist. I did sub some of the butter in the batter for a little oil only because i usually do this. i also added in cinnamon and cardamom as i don’t use nutmeg.
my squash of choice was butternut squash but im sure it would be just as delicious with kabocha or pumpkin. if you do make your loaves a bit more fancy like this one do make sure to refrigerate the leftover cake because of the cream cheese frosting. i happen to like cold slices of cake but if you don’t just let it come to room temp. or if you just prefer the cake as is with butter or maybe a delicious glaze i won’t be mad ;)
ingredients
2 cups of any winter squash puree
1/2c butter, browned
6 tbsp avocado oil
3 large eggs
1 1/2c cane sugar
1/2c brown sugar
3c flour
2 tsp baking powder
2 tsp baking soda
1 tsp sea salt
¼ tsp cinnamon
¼ tsp cardamom
cream cheese frosting:
1/2 stick butter
4 oz cream cheese
1/2 tsp vanilla
1-1 1/4c powdered sugar
Pinch of salt
preparation
preheat oven to 350F grease and parchment line two 9x5 pans. in a small saucepan began melting the butter, it will begin to foam, occasionally stir after the foam subsides you will begin to notice bits sinking to the bottom. shortly after they will begin to brown and you will smell a nutty scent. remove from the heat. allow it to cool completely. in a medium bowl, stir flour, baking powder, baking soda salt, and spices. next, beat the eggs and sugar on high until light in color, pour in the brown butter (be sure to get all the bits) and mix a bit more until smooth. add the squash puree and stir it in. then gradually add in your dry ingredients. mix on low until just incorporated. be sure to mix with a spoon to make sure you caught all of the flour. evenly pour the batter into the baking pans and bake for about 50 minutes or until the tester comes out clean. after removing from the oven wait about 10 minutes then remove from the baking pans and allow to cool completely on a baking rack.
For the frosting whip butter and cream cheese til smooth add the sugar mix on low til combined then add the vanilla and pinch of salt.

#winter#cake#quickbread#pomegranate#cream cheese#food#baking#food photography#winter squash#yummy#delicious
4 notes
·
View notes