#/dev/sda
Explore tagged Tumblr posts
Visit Tumblr Blog
Explore Tumblr blogs with no restrictions, modern design and the best experience.
Last Seen Tumblr Blogs


Fun Fact
Tumblr has 4 main sources of revenue.
Text
this is so surreal~~
No reblog this time cause I thought that it was too long at this point
are you telling me I've been installing linux on this computer wrong this entire time??
WE BACK ON LINUX BABY~~!!
all I had to do on install was just......
make grub boot from dev/sda1 instead of dev/sda
dev/sdb was the hard drive all of my data was stored on and if I didn't touch that, nothing would happen.
the cool thing here is that mounting the device here is password protected to actually mount and view the data. as opposed to windows having it mounted at all times.
this was simpler than I thought it was and now I feel really stupid...
Linux mint debian edition 6 lets go~~~~~~!!
I'm so excited~~!! come to find out that I've been installing the grub boot loader in the wrong place this entire time.....
*happy screaming*
now idk if I'm smarter than I think or dumber than I think. cause it could be both....
I didn't need to tinker with the bios at all~~ tho I am curious as to what it looks like now. maybe the windows boot loader isn't there anymore and is just the linux one?
#personal#thoughts#thinking#hype#im so excited#it was easier than I thought#and it turns out I was installing grub in the wrong place this whole time#not a reason to feel stupid tho cause I learned something#linux#linux mint#linux mint debian#linux mint debian edition#boot#boot issue#boot issues#boot issue solved#so make dev/sda1 the grub#instead of dev/sda
10 notes
·
View notes
Text
"you should install [distro]"
"no, [distro] is way better"
Install nothing.
cat /dev/null | sudo tee /dev/sda
39 notes
·
View notes
Text
Not doctor who related but I'm trying to to install Nobara and I tried twice, using 2 different USB sticks and both time I got the same error messages
"failed to start [email protected] media check on /dev/sda"
Can't find any real answers online
10 notes
·
View notes
Text
Understanding the Boot Process in Linux
Six Stages of Linux Boot Process
Press the power button on your system, and after few moments you see the Linux login prompt.
Have you ever wondered what happens behind the scenes from the time you press the power button until the Linux login prompt appears?
The following are the 6 high level stages of a typical Linux boot process.
BIOS Basic Input/Output System
MBR Master Boot Record executes GRUB
GRUB Grand Unified Boot Loader Executes Kernel
Kernel Kernel executes /sbin/init
Init init executes runlevel programs
Runlevel Runlevel programs are executed from /etc/rc.d/rc*.d/
1. BIOS
BIOS stands for Basic Input/Output System
Performs some system integrity checks
Searches, loads, and executes the boot loader program.
It looks for boot loader in floppy, cd-rom, or hard drive. You can press a key (typically F12 of F2, but it depends on your system) during the BIOS startup to change the boot sequence.
Once the boot loader program is detected and loaded into the memory, BIOS gives the control to it.
So, in simple terms BIOS loads and executes the MBR boot loader.
2. MBR
MBR stands for Master Boot Record.
It is located in the 1st sector of the bootable disk. Typically /dev/hda, or /dev/sda
MBR is less than 512 bytes in size. This has three components 1) primary boot loader info in 1st 446 bytes 2) partition table info in next 64 bytes 3) mbr validation check in last 2 bytes.
It contains information about GRUB (or LILO in old systems).
So, in simple terms MBR loads and executes the GRUB boot loader.
3. GRUB
GRUB stands for Grand Unified Bootloader.
If you have multiple kernel images installed on your system, you can choose which one to be executed.
GRUB displays a splash screen, waits for few seconds, if you don’t enter anything, it loads the default kernel image as specified in the grub configuration file.
GRUB has the knowledge of the filesystem (the older Linux loader LILO didn’t understand filesystem).
Grub configuration file is /boot/grub/grub.conf (/etc/grub.conf is a link to this). The following is sample grub.conf of CentOS.
#boot=/dev/sda
default=0
timeout=5
splashimage=(hd0,0)/boot/grub/splash.xpm.gz
hiddenmenu
title CentOS (2.6.18-194.el5PAE)
root (hd0,0)
kernel /boot/vmlinuz-2.6.18-194.el5PAE ro root=LABEL=/
initrd /boot/initrd-2.6.18-194.el5PAE.img
As you notice from the above info, it contains kernel and initrd image.
So, in simple terms GRUB just loads and executes Kernel and initrd images.
4. Kernel
Mounts the root file system as specified in the “root=” in grub.conf
Kernel executes the /sbin/init program
Since init was the 1st program to be executed by Linux Kernel, it has the process id (PID) of 1. Do a ‘ps -ef | grep init’ and check the pid.
initrd stands for Initial RAM Disk.
initrd is used by kernel as temporary root file system until kernel is booted and the real root file system is mounted. It also contains necessary drivers compiled inside, which helps it to access the hard drive partitions, and other hardware.
5. Init
Looks at the /etc/inittab file to decide the Linux run level.
Following are the available run levels
0 – halt
1 – Single user mode
2 – Multiuser, without NFS
3 – Full multiuser mode
4 – unused
5 – X11
6 – reboot
Init identifies the default initlevel from /etc/inittab and uses that to load all appropriate program.
Execute ‘grep initdefault /etc/inittab’ on your system to identify the default run level
If you want to get into trouble, you can set the default run level to 0 or 6. Since you know what 0 and 6 means, probably you might not do that.
Typically you would set the default run level to either 3 or 5.
6. Runlevel programs
When the Linux system is booting up, you might see various services getting started. For example, it might say “starting sendmail …. OK”. Those are the runlevel programs, executed from the run level directory as defined by your run level.
Depending on your default init level setting, the system will execute the programs from one of the following directories.
Run level 0 – /etc/rc.d/rc0.d/
Run level 1 – /etc/rc.d/rc1.d/
Run level 2 – /etc/rc.d/rc2.d/
Run level 3 – /etc/rc.d/rc3.d/
Run level 4 – /etc/rc.d/rc4.d/
Run level 5 – /etc/rc.d/rc5.d/
Run level 6 – /etc/rc.d/rc6.d/
Please note that there are also symbolic links available for these directory under /etc directly. So, /etc/rc0.d is linked to /etc/rc.d/rc0.d.
Under the /etc/rc.d/rc*.d/ directories, you would see programs that start with S and K.
Programs starts with S are used during startup. S for startup.
Programs starts with K are used during shutdown. K for kill.
There are numbers right next to S and K in the program names. Those are the sequence number in which the programs should be started or killed.
For example, S12syslog is to start the syslog deamon, which has the sequence number of 12. S80sendmail is to start the sendmail daemon, which has the sequence number of 80. So, syslog program will be started before sendmail.
There you have it. That is what happens during the Linux boot process.
for more details visit www.qcsdclabs.com
#qcsdclabs#hawkstack#hawkstack technologies#linux#redhat#information technology#awscloud#devops#cloudcomputing
2 notes
·
View notes
Text
Prevent Data Loss: How Regular Hard Disk Health Checks Can Save Your Files
Introduction
Data loss can be devastating, whether it’s personal documents, business files, or multimedia content. Hard drives, like any hardware, degrade over time, leading to potential failures. Regular hard disk health checks can help detect early signs of failure and prevent data loss. In this article, we’ll discuss the importance of hard disk monitoring, methods to check its health, and best practices to keep your data safe.
Why Regular Hard Disk Health Checks Are Important
Hard disks store critical data, and any failure can lead to permanent loss. Monitoring your hard disk health can:
Detect Issues Early: Identifying bad sectors, overheating, or mechanical failures in advance allows you to take action before a complete failure.
Improve System Performance: A failing hard drive can slow down your system and cause errors.
Prevent Unexpected Data Loss: Regular health checks allow for timely backups and disk replacements.
Common Causes of Hard Disk Failure
Understanding what leads to hard disk failures can help you take preventive measures. Some of the most common causes include:
Physical Damage: Drops, shocks, or exposure to high temperatures can damage the disk.
Bad Sectors: Over time, sections of the hard disk can become unreadable, leading to data corruption.
Power Surges: Sudden power cuts or voltage fluctuations can corrupt or damage a hard drive.
Software Errors and Malware: Virus attacks and corrupted system files can impact disk health.
Age and Wear: Traditional hard drives (HDDs) typically last 3-5 years, while SSDs can last longer but still degrade with use.
How to Check Hard Disk Health Regularly
1. Using SMART Monitoring
Most modern hard drives come with Self-Monitoring, Analysis, and Reporting Technology (SMART), which provides real-time diagnostics about disk health.
Windows Users:
Open Command Prompt (Win + R, type cmd, press Enter).
Type: wmic diskdrive get status and press Enter.
If the result is “OK,” your disk is healthy. If it says “Pred Fail,” consider replacing the drive.
Mac Users:
Open Disk Utility (Applications > Utilities > Disk Utility).
Select the drive and click First Aid to scan for errors.
Linux Users:
Open Terminal and type: sudo smartctl -H /dev/sda
Look for “PASSED” or “FAILED” status.
2. Running CHKDSK in Windows
Windows includes a built-in tool called Check Disk (CHKDSK) to scan and fix errors.
Open Command Prompt as Administrator.
Type: chkdsk C: /f /r /x (Replace C: with your drive letter).
If errors are found, follow the on-screen instructions to fix them.
3. Monitoring Temperature and Performance
Overheating can cause hard drive degradation.
Windows Users: Use built-in Task Manager (Ctrl + Shift + Esc > Performance Tab) to monitor disk usage.
Mac Users: Use Activity Monitor (Applications > Utilities > Activity Monitor).
Linux Users: Use iostat or hdparm commands for disk performance insights.
Best Practices to Prevent Data Loss
Regular Backups: Use external drives, cloud storage, or backup software like Acronis, Macrium Reflect, or Google Drive.
Keep Your System Updated: OS updates include security patches that protect against disk corruption and malware.
Use a UPS (Uninterruptible Power Supply): Protects against sudden power failures.
Avoid Overloading the Drive: Keeping at least 10-15% of free space allows the drive to function efficiently.
Replace Aging Drives: If a drive is over 5 years old and shows warning signs, replace it before failure occurs.
Conclusion
Regular hard disk health checks are essential for detecting problems early and preventing unexpected data loss. By using built-in tools like SMART monitoring, CHKDSK, and Disk Utility, you can ensure your drive remains in good condition. Implementing best practices such as regular backups, monitoring drive temperature, and replacing aging drives can further safeguard your data. Prioritizing hard disk maintenance today can save you from costly data recovery efforts in the future.
0 notes
Text
Linux CLI 29 🐧 fsck, mkfs and dd commands
New Post has been published on https://tuts.kandz.me/linux-cli-29-%f0%9f%90%a7-fsck-mkfs-and-dd-commands/
Linux CLI 29 🐧 fsck, mkfs and dd commands

youtube
a - fsck command fsck is used to verify the intergrity of a file system It checks for error( corrupted inodes, bad sectors, or broken file system structures) It can attempt to fix those errors before you check a filesystem you have to unmount it with umount sudo fsck -N /dev/sda → displays what it will do without doing anything sudo fsck /dev/sda → performs the check sudo fsck -n /dev/sda → perform a check but do not repair sudo fsck -f /dev/sda → forces a check -a → repairs errors automatically -v → verbose mode -t → test for bad sectors b - mkfs command mkfs → Make File System mkfs is used to create and format file systems write sudo mkfs and use TAB key to show the supported filesystem types Create a file system on a partition sudo mkfs -t ext4 /dev/sda or sudo mkfs.ext4 /dev/sda Note that mkfs creates a new filesystem on existing partition or drive It does not resize or delete it. For this task you can use fdisk c - dd command dd → Data description dd is used to copy and convert data from one place to another syntax → dd if=inputfile [bs=blocksize] [count=numcopies] Of=outputfile if → input file, where to read data from bs → sets the block size, default is 512 bytes (optional) count → specifies how many blocks will be transferred. All is default (optional) of → output file, where the data will be transferred to d - dd command examples dd If=input.txt Of=backup.txt → copy a file dd If=/dev/sda bs=4M count=10240 of=image.img → create an image file from /dev/sda dd If=/dev/sda Of=/dev/sdc → clone a disk to another dd if=/dev/sda1 of=~/sda1partition.img → backup a partition dd if=sda1partition.img of=/dev/sda1 → restore the previous backup and if you need to create an CD-ROM ISO dd if=/dev/cdrom of=tgsservice.iso bs=2048
0 notes
Text
Debian 12 w KDE Plasma let's go~~~
I've got no idea why I didn't like KDE before tbh.... cause trying it now, its kinda nice~~~ last time I tried it was idk how long ago.... when I started messing around with linux to begin with.
It, unlike xfce, has a software updater so I don't need to use the terminal on debian~~~ it looks really snazzy tbh.
last time I used it was idk how long ago..... a decade ago? and I guess now it's just Plasma and not KDE anymore? ??
annoying problem that I fixed~~~~ also for some reason the icons and stuff on my second hard drive have reverted back to dev/sda for my main OS partition and dev/sdb for where all the rest of my data is... and idk why~~~ but the lock icons on everything in that drive is gone~~ and idk what fixed it......
also time.... the date and time was incorrect and i had no idea why given I've selected the proper time zone.... I was just really confused and idk why.... but now I did and it's fixed~~ I had to change the BIOS time to UTC
and since there's no "sync w internet" and you need EXACT SECONDS now the time is slightly off cause I didn't time it down to the second.... but putting my BIOS time into UTC instead of local time fixed it~~~
also still don't know exactly why I can and could get debian to boot and install perfectly fine on my machine even with secure boot and the like from a windows install still on. when linux mint debian edition just.... wouldn't......
stupidly simple fix but I'm happy to have figured it out myself~~~ hope I like KDE more than I did a decade ago. idk why I didn't like it that far back... maybe it was worse? or there was too many customize options and it paralyzed me?
but now I like it so far~~~~ wonder if I can do it up like windows xp/95? lol. throw myself into customize options of KDE and be lost here forever :)
slowly figuring stuff out and my preferences in the linux world~~ idk why I liked xfce..... the KDE log in screen is nicer and more sleek and modern~~~
will gnome stuff work with kde? if I install gnome games? I always install gnome games and then never play any of them lol I mean I'd assume they would but idk~~
idk why I'm documenting my journey with trying different distributions or desktop environments here..... cause I feel no one really cares..... but I got no one around me to talk linux to... even if I am still (in my own eyes) a newbie at it....
welp~~~ back to system config~~ :) hope that's fun~~ and to find accessibility settings~~
what was up with the clock tho? why did I have to set my BIOS time to UTC to get it to be local time? how does linux configure time? never noticed that before~~~
I distro hop a lot I think~~~~
and would ya believe it my function keys STILL WORK~~~~ WOOOO~~
edit: there are swipe gestures to go back on browser?? gonna like KDE I think~~~
yet another edit: double check bios cause I'm a doofus sometimes~~ secure boot is still on but now greyed out and can't toggle it off, fast boot and something below fast boot are disabled~~
still have no idea why pure debian is able to load with secure boot on (permanently now I guess) and linux mint wasn't able to despite it being debian as well.... but debian 12 works so neat~~~~
bad thing tho about the "swipe to go back" is that I keep almost doing that while trying to scroll down~~ could just use the arrow keys but got so used to using the touchpad to scroll ...
#personal#thoughts#thinking#i think too much#operating system#operating systems#linux#linuxposting#debian#debian 12#KDE#KDE plasma#Plasma#DE#desktop environment#been a long time since I messed with KDE#got the time fixed#and that was stupidly simple#the drives being weird and having lock icons on everything straightened itself out and idk how#it looks sleeker and nicer than xfce tbh#maybe I was overwhelmed with all the configuration options when I first tried KDE?#cause just at a quick glance there's a lot
2 notes
·
View notes
Text
Switching my little sister's laptop from Ubuntu to fedora because it was just sooooo fucking janky and never worked properly.
My dumbass was too lazy to install balena etcher, so I just did "cp fedora.iso /dev/sda"
Big problem I didn't realise was that sda was actually the harddrive. On my laptop that's /dev/nvme0 and /dev/sda is always whatever usb I got.
Interestingly it now refuses to detect the harddrive as an install location, and I'm not sure it's because I fucked up big time or that it is detected as a fedora install medium and thus ignored
25 notes
·
View notes
Text
How to replace dead hdd in software raid woth mdadm
Lets say you have RAID1 array created with mdadm and you want to replace disk sdb with new one.
To view raid devices:
cat /prod/mdstat
Then remove associated partitions with md devices:
mdadm /dev/md0 --remove /dev/sdb2 mdadm /dev/md1 --remove /dev/sdb3
If it gives error that it cant be removed, then before removing make them failed:
mdadm /dev/md0 -f /dev/sdb2 mdadm /dev/md1 -f /dev/sdb3
Then insert new disk and copy partitions from working disk sda to new disk sdb:
sfdisk -d /dev/sda | sfdisk /dev/sdb
Then add new drive to arrays:
mdadm /dev/md0 --add /dev/sdb2 mdadm /dev/md1 --add /dev/sdb3
And finally install grub to new disk:
grub-install /dev/sdb
0 notes
Text
ESP32-C3 BLE / WiFi dev board with 0.42-inch OLED notes
I got some ESP32-C3 dev boards with built-in OLED screens for a Halloween costume project, and I've been troubled by the lack of documentation and general information about both the ESP32-C3 platform and the board, so here are some notes for future hackers:
OLED type is SH1106, not SSD1306, as seen in some forum posts and even in the blurry screenshot that accompanies these boards. Specifically, the U8G2 constructor for this board is U8G2_SH1106_72X40_WISE_F_HW_I2C(). With the SSD1306 driver, the screen pixels are shifted to the left and there's a column or two of corrupted data on the right-hand-side of the OLED screen.
Apparently the ESP32-C3 chip cannot measure its supply voltage internally, something that even ATtiny chips can do :(
Proper Arduino configuration is:
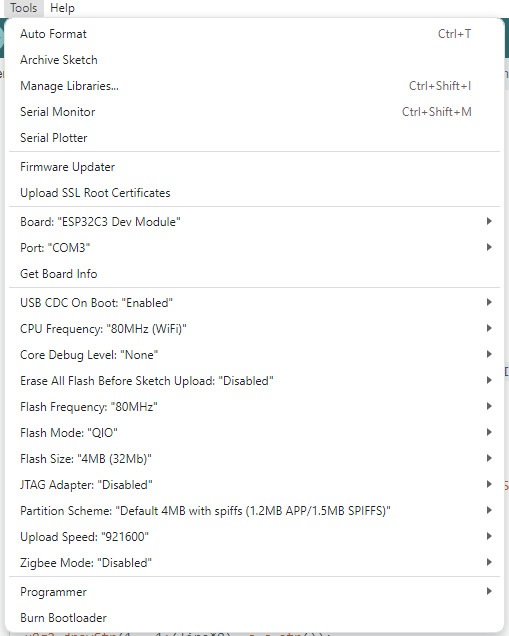
(CPU frequency and partition setup are of course configurable).
I'm not sure yet if I2C is actually hardware-offloaded here, but the pins are apparently non-default, with SDA=5, SCL=6. At least the display speed doesn't change at all when changing the I2C frequency. I don't have the equipment to measure this, but so far it looks like I2C clock speed is ignored. Anyway, I can get about 73 FPS, or about 11ms per frame draw on the built-in 72x40 OLED.
But overall, looks like a nice dev board, and it's neat that it's powered by a RISC-V microcontroller. Perfect for hobby projects that don't need many pins.
Buy the board here.
0 notes
Text
I did my first hardware upgrade. I added an HDD to my laptop that has an nvme SSD in it that was running out of space. since I made both the SSD and HDD have btrfs partitions, I was able to add the HDD to the existing filesystem to make all 1TB visible to my system at once. some time in the not far future, I can use these functions to upgrade my SSD with no data loss except having to remake my /efi partition.
add an external drive with space equal to the occupied space in the filesystem.
sudo btrfs device add /dev/sdb /
sudo btrfs device remove nvme0n1p1
wait for btrfs to restripe data to sda and sdb exclusively
shutdown
unscrew laptop
replace SSD
boot into live media.
partition the new disk with 1 fat32 efi partition, 1 swap partition, and the rest a btrfs partition with subvolumes for the appropriate mountpoints.
btrfs device scan --all-devices
mount <uuid> /mnt
mount /dev/nvme0n1p1 /mnt/efi
arch-chroot /mnt
btrfs device add /dev/nvme0n1p2 /
btrfs device remove /dev/sdb
kernel-install add all
bootctl install
exit
reboot
1 note
·
View note
Text
almost deleting all of my files by running a shell script meant for a computer who's files aren't on /dev/sda . But in my defense I thought I changed all of the lines of /dev/sda to /dev/sdb .
Reblog with your worst Linux mistake
#linux#no this was not a script for dd#but it was a script for making a bootable usb#be careful when making bootable usbs
322 notes
·
View notes
Text
USB disk as /dev/sda on a not-rooted smartphone using Termux, QEMU, Alpine Linux
https://gist.github.com/NoteAfterNote/7a197233de3d60ff1e23ca90ed2f595a
0 notes