#0655
Link
Check out this listing I just added to my Poshmark closet: Inv. . Columbia PHG Men's Fleece Orange Jacket Size: M.
0 notes
Photo
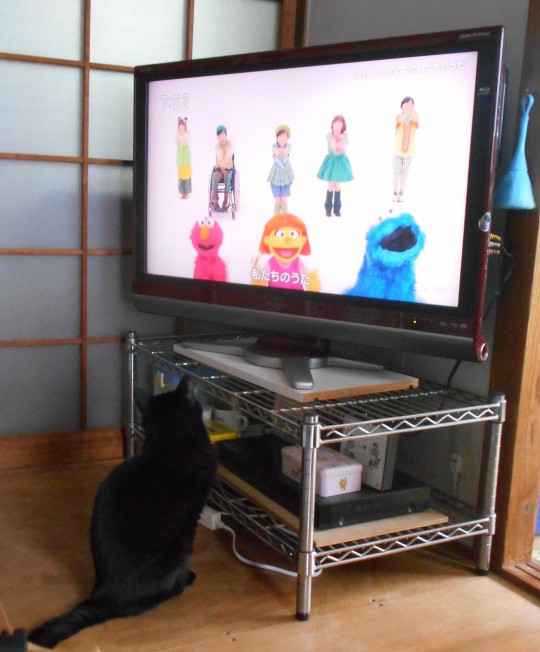
#たなくじ 忘れてた 放送は見れなかったのでNHK+をMacで視聴 兎年、この通りになってくれればいいな #2355 #0655 #年越しをご一緒にスペシャル #23550655年越しをご一緒にスペシャル #NHK #Eテレ #Apple #iPhone #iPhone13Pro https://www.instagram.com/p/Cm3by5Kv03K/?igshid=NGJjMDIxMWI=
0 notes
Text
Added these two beauties to the collection 🐓🐓(Chicken count: 11) I’ll make a full collection post once I reach 20!
#send me your cock pics in Pokémon go#trainer code 9851 0655 4831#ign jazzchimken#pokémon#po go#pokestop#pokemon go postcard#Pokémon go#trainer code#chicken collection#pokemon go gifts#that torchic sticker was a perfect choice#seriously thank you to whoever added me and sent me that#made my day
20 notes
·
View notes
Text
0655 DELPHOX // マフォクシー
1K notes
·
View notes
Text
More Maggie weirdness.
Her shop loses its name sometimes.
Here's a shot of what the name and the general top of the awning looks like:

There's a little bar above the awning and a gray frame around the name section. Swirly name.
Here's the shop when Crowley pulls up coming back to do the apology dance, s2e1 38:20, which is also when Maggie is locked in the cafe with Nina.

Here is the same shot, super brightened and overexposed to show where the name isn't. It should be in the big orange section above the gray looking bar, which isn't actually gray, you can see the orange on the far left and far right.

The name is not missing because it's night or because she's not in there. I looked at other night shots, the name is there.
Here's the shot of the shop when Maggie is also locked in the cafe a bit earlier, lamenting to Nina that just anyone could go steal stuff, at 36:34, also overexposed and brightened:

Notice there's two places for the shop name. The top one is definitely missing in the above Crowley shot, but I can't tell if the bottom one is also missing. I tried brightening the shot again, but there's too many shadow artifacts to be sure. If someone's got an OLED they can take a shot from and brighten that, I would like to know what you find.
I tried looking for other nighttime shots or other times we see the shop, either they didn't show it or it was there.
Here is another instance during the day of there being no name on the top, while Azi is driving away in the Bentley in e3 at 0655.

Bottom name is there, I think.

I don't think the original Vinyl Fetish store that was there in S1 had that extra bottom name. Here's some of the few shots we get of it. It does not look like there is an extra nameplate under the awning.


What's the point of Maggie's shop losing its name?
Orange represents god. People can no longer find or identify god? God is gone from this world? God is so changed that even those looking can't find her? Not a satisfying in-universe reason though. Shops don't just lose their names, I think this is more evidence we're looking at a memory and not real time.
When does it happen?
It doesn't happen just because the Bentley is leaving, because the first one has the Bentley pulling up, and here's another where Crowley has just parked during e5 at 01:01 and the names are there.

153 notes
·
View notes
Text


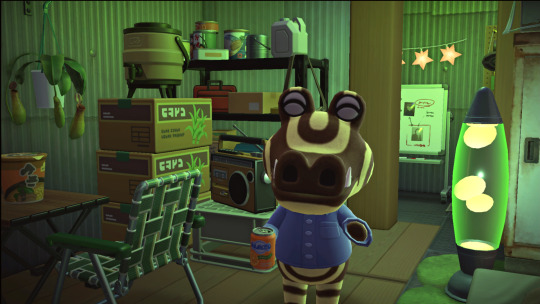
Cardamon is open for dream visits 🍂🌹
Cardamon is non-terraformed autumn suburban island. Basically it's a fall version of Evergreen with the same map and partially the same town layout. For now none of the houses are redecorated and the beaches are empty. I probably will work on that in near future, but for now the island is mostly finished.
DA-1354-0655-8821
#cardamon island#animal crossing#acnh#animal crossing community#acnh community#animal crossing screenshots#acnh screenshots#acnh gif#acnh dream address#acnh dream tour#acnh dream island
27 notes
·
View notes
Text
Pokemon #0655 - Delphox in the style of GSC (Normal + Shiny)

All of these sprites can be downloaded from the link below: https://drive.google.com/drive/u/1/folders/1KEnrztxTVIeBfBBA2-5QCD4yCOceHOuE
#pokemon#delphox#pokemon scarvi#sprites#gsc#8-bit art#8 bit#kalos#starter#braixen#fennekin#starter pokemon
207 notes
·
View notes
Text
おはようございます。
今朝のジン。Eテレのテレビ番組「あおきいろ」を視聴中。
このひとつ前にやってた「0655」で流れていた「虫へんが通ります」の歌では、画面の虫へんの動きに合わせて顔と視線を動かしてました(笑)。映像でお見せできないのが残念です。
19 notes
·
View notes
Text
Part 6 of A Treatise of Embroidery, crochet, and knitting with illustrations
By George C. Perkins, Anna Grayson Ford, and M. Heminway & Sons Silk co circa 1899.


Please note, this book was written in 1899, and as such uses a racist term to refer to the dyes that were used for the thread. If you'd like to read more about this period in time, the term, and the stereotypes that the Victorians had, I've actually linked the wikipedia article here that goes more in depth. It's not the end all be all of it, but it's a good starting place for anyone wanting to educate themselves on the topic.
Since the alt text was too long to fit in the actual pop up, I'm writing it down here!
Page 29.
Lessons In Embroidery.
This page has the pattern for the strawberry and blossoms embroidery on it. It resembles a paint by numbers/letters image with a table showing the corresponding colours. I will try my best to explain the image, but first the colour charts.
Berries-Ripe.
Red:
655 shade number 1, 655 shade number 2, 656 shade number 3, 657 shade number 4, 658 shade number 5, 659 shade number 6, 660 shade number 7, 661 shade number 8.
Blossoms:
691 shade number 9.
Centre:
647 shade number 10, 409 1/2 shade number 11, 410 shade number 12.
Unripe Berries:
682 shade number 13, 683 shade number 14, 684 shade number 15.
Leaves and Stems.
Green:
0428 shade letter A, 428 shade letter B, 429 Shade letter C, 429 1/2 shade letter D, 430 shade letter E, 431 Shade letter F, 372 shade letter K, 373 shade letter M.
Brown:
300 shade letter O, 301 Shade letter R.
Strawberry Design.
Materials. — M. Heminway & Sons' Oriental Dyes, Japan and Spanish Floss.
Berries. — Ripe and unripe; Red — "Sharpless variety" — 0655, 655, 656, 657, 658, 659, 660, 661. Unripe — 0655, 655, 656, 682, 683, 684. Blossoms.— 691, 682, 683, 0655. Centres. — 647, 409 1/2, 410. Leaves. — 0428, 428, 429, 429 1/2, 430, 431 ; or 370, 371, 372, 373, 374, 300, 301. Scallop. — 581 or 691. —Spanish Floss.
Design No. 153 — Strawberry. 18 inch. See Colored Plate C1.
Description.— Fill in berry crosswise, shortstitch on the wrong side, not much filling. For filling to raise the berry use M. Heminway & Sons' white Persian Floss. Start at the point of berry with two strands of red, 655, shading with one strand as dark red as 661. For an unripe berry start with light green, 682 and 683, shading into the green the light pink, 655, making the berry as ripe in color as 660. The seeds on the red berries put on with small stitches, gold, 409 1/2. On those that are not ripe use green, 428.
Blossoms. — White, 691, shadow of green, 682 on lower petals, touching a few of the new blossoms with light pink, 0655; pollen of 647, 409 1/2, 410.
Leaves. — On the outer edge of the leaf use two strands, shading toward centre with one, use a little brown, 300 and 301, for faded part of leaf.
Scallop. — Button-hole stitch in pink, 581, Spanish Floss, or 691, with an outline above scallop of one strand filo, 310.
Now I will describe the first illustration which shows the embroidery by letters/numbers diagram. I will be describing the image from the bottom to top as the spray of strawberries and blossoms flow in a diagonal from the bottom left to the upper right.
We start with two parallel, diagonal stems that branch off in multiple directions to hold the entirety of the design. The two stems are done in shade letters D and E. The rightmost stem slips under two leaves, forking into a third tendril, before the left fork curves gracefully to the right and ending in a strawberry. The right fork goes downwards and forms the triple fork from where the three large strawberry leaves all come from in this piece. An upper one, a bottom one, and one off to the right that is slightly twisted so the underside of the leaf tip is visible.
Shade letters for the bottommost leaf, from base to tip, left to right. Starting at the top where the base joins the stem:
1st row: E, O, R.
2nd row: E.
3rd row: F, C.
4th row: D, E, E, D.
5th row: B, D, C.
leaf tip: C.
For the twisted leaf at the right of the previous:
1st Row: C, D, C.
2nd Row: D, E, C.
3rd Row: C, D.
4th Row: E, D, B.
5th Row: F.
Leaf tip: A.
For the Upper Leaf:
1st Row: D, E.
2nd Row: C.
3rd Row: B, D, E, D.
4th Row: D, C, D, C, D.
5th Row: A, B.
6th row: A, R.
Leaf tip: A.
Back at the beginning, where the stems are parallel, the leftmost stem forks before the two separate bits slip under the upper large leaf that we described earlier. The right fork curves up and to the left into a strawberry while the left fork curves up behind it. It would seem a second strawberry also emerges from a stem coming from behind the same leaf, although it does not show a fork. This berry sits just under the other.
Higher Strawberry:
1st Row: 4, 6.
2nd Row: 3, 2, 5, 3, 3.
3rd Row: 2, 15, 4, 8, 3.
4th Row: 14, 2.
Strawberry Tip: 13.
Lower Strawberry:
1st Row: 8.
2nd Row: 5, 6, 7, 5.
3rd Row: 4, 4, 5, 4.
4th Row: 2, 2, 2, 2.
5th row: 1, 1, 1.
Only two of the little strawberry leaf tops have any kind of letter indication, all of them combinations of C, D, and B, so your guess is as good as mine.
Emerging from the top strawberry is another series of three stems, two of which appear to have forked somewhere behind the berry unseen. The left stem goes up and then promptly forks before slipping under a fully bloomed strawberry blossom, and then emerging from the top with a single leaf gracing the end. Somewhere behind the flower another tendril has forked off this one and goes up to end in a tiny blossom not yet bloomed. Next to that is the stem that will be described in a few paragraphs, and then another stem leading to a small blossom, that is also not fully bloomed.
Big Blossom:
This has 5 petals in total, and all the petals are tipped in shade number 9, and all excepting the leftmost petal gradiate to shade number 13. The leftmost petal gradiates to shade number 14, and then the center is shade number 10.
Small Blossom:
9 at the tip, 13 at the base, there are 3 petals showing.
Tiny Blossom:
same, 9 tip, 13 base, also 3 petals showing.
Back to under the blossom, the right stem from the original fork leads up to an elegant waving stem that branches off into several tendrils mostly decorated with a pair of leaves each.
The left tendril from that fork extends up a ways, waving a bit and is done in shade letter B, and then forks one last time culminating in a pair of tiny leaves on the right fork and a waving tendril on the left that finishes in shade letter A.
Leaf 1:
Base E, Tip D.
Leaf 2:
Base C, Tip B.
The right tendril from the fork that leads into the last also immediately forks again ending in a pair of tiny leaves coming from each tendril.
From lowest leaf to highest, base to tip:
Leaf 1 right tendril: E.
Leaf 2 right tendril: D, C.
Leaf 3 Left Tendril: D, E.
Leaf 4 Left tendril: C, B.
all the tiny leaves leaves save one are done in two colours, one for the base and one for the tip. So wherever you decide to put a tiny leaf, you can keep the colour schemes in mind.
There is an image at the bottom captioned Design No 153- Strawberry. 18 inch. See Coloured Plate C1.
This has what appears to be a doily with an embroidered scalloped edge and the large strawberry image placed at the top and bottom of the doily, flowing with the circular edge. There is a small smattering of petals coming off of an extra pair of fallen blossoms that were added to one edge, and a small detached strawberry on the other.
All in all, thank you for your patience while I try to get these out. If anyone has any suggestions to make these easier to understand, my inbox is always open.
I will be posting another pair of images sometime this week!
47 notes
·
View notes
Text
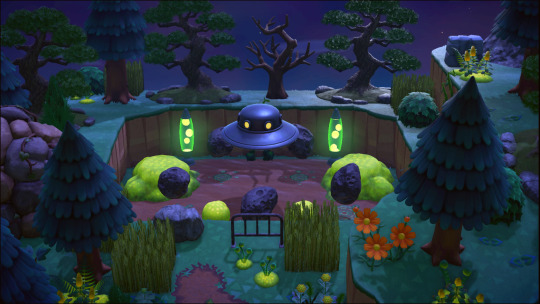


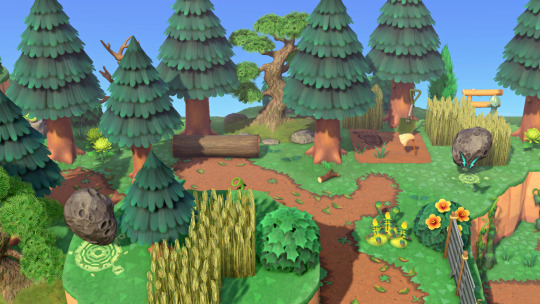

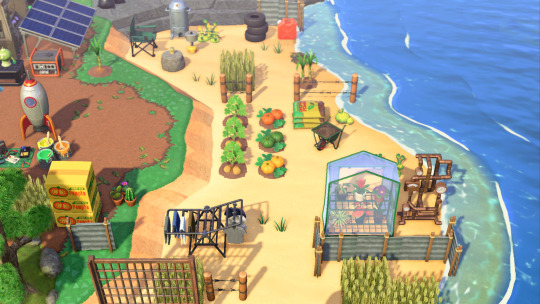
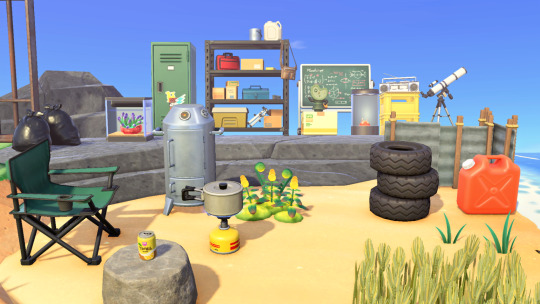

CRYPTID CAMPSITE + ALIEN BUNKER
Sick of seeing run-of-the-mill camping builds? Then this cryptid hiking trail & conspiracy theorist bunker is just the injection of weirdness you need!
There’s a loch ness monster lake, bigfoot trails, & UFO landing site. Our resident alien Roswell has even set up a prepper style bunker deep in the woods to hide out from all the earthlings while he hunts for evidence of cryptids. One day he’s going to blow the lid off all this & finally prove to his mothership that he isn’t totally delusional, just you wait.
So if you’re looking to add a heavy dose of quirky, convoluted storytelling into your Animal Crossing gameplay, this is the tinfoil lined weird speed build you’ve been searching for.
- CUSTOM CODES USED -
Dirt Path: MA-4147-2454-4020
Loch Ness Sign: MA-3745-7775-6285
Lake Monster Polaroids: MA-3745-7775-6285
Bigfoot Trail: MA-3745-7775-6285
Crop Circles: MA-0357-3870-5655
Glyph Blocks: MA-9738-0604-0491
Owl: MA-9421-2929-3714
UFO Newspaper: MA-7746-3776-0655
Alien Jacket: MO-XXTS-45MF-GD9T
Alien Hat: MA-1466-2448-3007
Eyebrows: MA-1409-5733-1266
Get the full scoop on YouTube here
#animal crossing new horizons#animal crossing#acnh#animal crossing alien#acnh alien#acnh ufo#animal crossing ufo#animal crossing alien build#animal crossing ufo build#acnh alien build#acnh ufo build#animal crossing cryptid#acnh cryptid#animal crossing alien island#acnh alien island#animal crossing weird build#animal crossing roswell#acnh roswell#animal crossing conspiracy#animal crossing bunker#acnh bunker#acnh conspiracy#acnh build ideas#animal crossing build ideas#animal crossing speed build#acnh speed build#acnh youtube#animal crossing youtube#animal crossing supernatural#acnh supernatural
38 notes
·
View notes

Link
Check out this listing I just added to my Poshmark closet: Inv. . Columbia PHG Men's Fleece Orange Jacket Size: M.
0 notes
Text
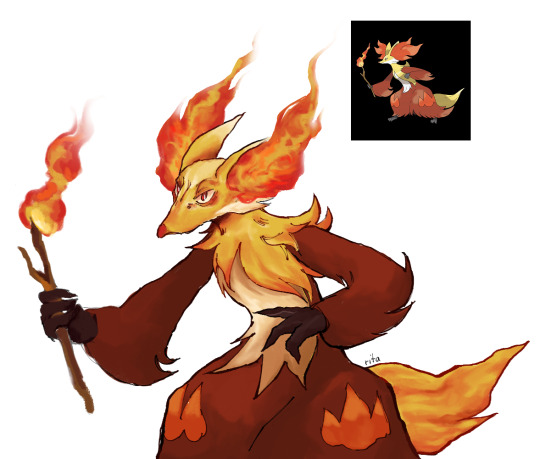
delphox #0655
for all we could have been (fire fairy starter)
#delphox#kalos#pokemon xyz#pokemon gen six#pokemon fanart#pokemon art#art#digital art#she would have been such a great fire fairy pokemon#its ok i still love her
59 notes
·
View notes
Text
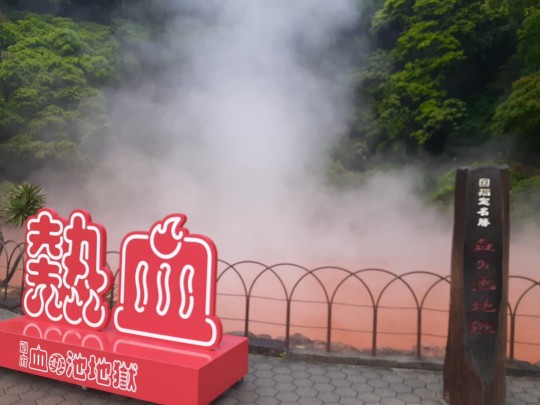
弾丸!別府お一人様旅 その2
大阪↔️別府間が往復16,000円で1日バス券付き。
本当は別府駅周辺の半日ガイドツアーに申し込みしたかったけど、予約しても当日の天気や体調が悪かったらどうしよう…と悩んで断念。
まだ、着いてもいないのに船内で買ったドーナツとコーヒーで朝食。
0655に別府フェリーターミナル着
持ち歩かない荷物は港のコインロッカーに預けた。(コインはリターン式)
朝早くから観光できる施設が限られているので、バスに乗り8時から血の池地獄へ


時々小雨がパラパラしたけど、傘はささず。
することがないので足湯、お腹が減ったので朝食(船内でドーナツ食べたけど)のため、施設の隣にある極楽亭というレストランへ

8時半から営業はありがたい。
玄米お握りとだんご汁のモーニング。熱々で猫舌の私は地獄だった。(が、旨い)
観光地で飲み物セット1,000円は良心的かも。


再びバスを乗り継いで約30分、紺屋地獄前にある温泉施設へ。
廃墟かと思うほど古い施設なので、空いてます。食事施設は無く飲料自販機のみ。
シャワーキャップを渡されるので必ず装着。
大浴場は混浴なので、木の板で少し囲われてる所から外を眺めただけ。
コロイド湯(硫黄)・鉱泥湯・蒸湯に入った。
熱くはないけど、成分が濃いので長湯禁止らしい。
汚くはないけど、春なので虫が浮いてたり、とにかく古めかしい見た目なので潔癖症の人は無理だと思う。
でも、確かに効きそう。
7 notes
·
View notes
Text
【売買マンション】 ライオンズマンション首里第2 ー202号室ー
ペット飼育可能(制限有)の1LDK物件になります!
価 格 1780万円
間 取 り 1LDK
建物構造 鉄筋コンクリート造
階/階建 2階 /7階建て
駐車場空有 無
専有面積 48.23㎡
バルコニー面積 7.27㎡
土地権利 所有権
修繕積立金 7,230円
管理費 6,300円
管理形態 全部委託
引き渡し 相談
リフォーム完了日 2024年8月31日
取 引 態 仲介


有限会社スタプランニング
TEL 098-855-0655 赤嶺まで… ♪
お気軽にお問い合わせ下さい。・・・(^_-)-☆
2 notes
·
View notes
Text

USAF 52 FW 510 FS Fairchild A-10A Thunderbolt 82-0655/SP (1993)
aviationphotocompany.com/p934046062/ee0…
More A-10 images: aviationphotocompany.com/p355958714
@AviationPhotoCo via X

14 notes
·
View notes
Last Seen Blogs


pinkpatrolpeace
Untitled

sweetcherrylime
TheInBetween

endlesshexagons
hello my name is e

regenesisspa
RegenesisSpa