#2 Elasticsearch
Explore tagged Tumblr posts
Visit Tumblr Blog
Explore Tumblr blogs with no restrictions, modern design and the best experience.
Last Seen Tumblr Blogs


hackinstagramaccounts2020-blog
{New} Hack Instagram Accounts 2020 No Survey No no verification
1 post


Fun Fact
US Tumblr user growth rate is estimated to slow down to 4.1%.
Text
Level Up Your Software Development Skills: Join Our Unique DevOps Course
Would you like to increase your knowledge of software development? Look no further! Our unique DevOps course is the perfect opportunity to upgrade your skillset and pave the way for accelerated career growth in the tech industry. In this article, we will explore the key components of our course, reasons why you should choose it, the remarkable placement opportunities it offers, and the numerous benefits you can expect to gain from joining us.
Key Components of Our DevOps Course
Our DevOps course is meticulously designed to provide you with a comprehensive understanding of the DevOps methodology and equip you with the necessary tools and techniques to excel in the field. Here are the key components you can expect to delve into during the course:
1. Understanding DevOps Fundamentals
Learn the core principles and concepts of DevOps, including continuous integration, continuous delivery, infrastructure automation, and collaboration techniques. Gain insights into how DevOps practices can enhance software development efficiency and communication within cross-functional teams.
2. Mastering Cloud Computing Technologies
Immerse yourself in cloud computing platforms like Amazon Web Services (AWS), Microsoft Azure, and Google Cloud Platform. Acquire hands-on experience in deploying applications, managing serverless architectures, and leveraging containerization technologies such as Docker and Kubernetes for scalable and efficient deployment.
3. Automating Infrastructure as Code
Discover the power of infrastructure automation through tools like Ansible, Terraform, and Puppet. Automate the provisioning, configuration, and management of infrastructure resources, enabling rapid scalability, agility, and error-free deployments.
4. Monitoring and Performance Optimization
Explore various monitoring and observability tools, including Elasticsearch, Grafana, and Prometheus, to ensure your applications are running smoothly and performing optimally. Learn how to diagnose and resolve performance bottlenecks, conduct efficient log analysis, and implement effective alerting mechanisms.
5. Embracing Continuous Integration and Delivery
Dive into the world of continuous integration and delivery (CI/CD) pipelines using popular tools like Jenkins, GitLab CI/CD, and CircleCI. Gain a deep understanding of how to automate build processes, run tests, and deploy applications seamlessly to achieve faster and more reliable software releases.
Reasons to Choose Our DevOps Course
There are numerous reasons why our DevOps course stands out from the rest. Here are some compelling factors that make it the ideal choice for aspiring software developers:
Expert Instructors: Learn from industry professionals who possess extensive experience in the field of DevOps and have a genuine passion for teaching. Benefit from their wealth of knowledge and practical insights gained from working on real-world projects.
Hands-On Approach: Our course emphasizes hands-on learning to ensure you develop the practical skills necessary to thrive in a DevOps environment. Through immersive lab sessions, you will have opportunities to apply the concepts learned and gain valuable experience working with industry-standard tools and technologies.
Tailored Curriculum: We understand that every learner is unique, so our curriculum is strategically designed to cater to individuals of varying proficiency levels. Whether you are a beginner or an experienced professional, our course will be tailored to suit your needs and help you achieve your desired goals.
Industry-Relevant Projects: Gain practical exposure to real-world scenarios by working on industry-relevant projects. Apply your newly acquired skills to solve complex problems and build innovative solutions that mirror the challenges faced by DevOps practitioners in the industry today.
Benefits of Joining Our DevOps Course
By joining our DevOps course, you open up a world of benefits that will enhance your software development career. Here are some notable advantages you can expect to gain:
Enhanced Employability: Acquire sought-after skills that are in high demand in the software development industry. Stand out from the crowd and increase your employability prospects by showcasing your proficiency in DevOps methodologies and tools.
Higher Earning Potential: With the rise of DevOps practices, organizations are willing to offer competitive remuneration packages to skilled professionals. By mastering DevOps through our course, you can significantly increase your earning potential in the tech industry.
Streamlined Software Development Processes: Gain the ability to streamline software development workflows by effectively integrating development and operations. With DevOps expertise, you will be capable of accelerating software deployment, reducing errors, and improving the overall efficiency of the development lifecycle.
Continuous Learning and Growth: DevOps is a rapidly evolving field, and by joining our course, you become a part of a community committed to continuous learning and growth. Stay updated with the latest industry trends, technologies, and best practices to ensure your skills remain relevant in an ever-changing tech landscape.
In conclusion, our unique DevOps course at ACTE institute offers unparalleled opportunities for software developers to level up their skills and propel their careers forward. With a comprehensive curriculum, remarkable placement opportunities, and a host of benefits, joining our course is undoubtedly a wise investment in your future success. Don't miss out on this incredible chance to become a proficient DevOps practitioner and unlock new horizons in the world of software development. Enroll today and embark on an exciting journey towards professional growth and achievement!
10 notes
·
View notes
Text
How To Setup Elasticsearch 6.4 On RHEL/CentOS 6/7?
What is Elasticsearch? Elasticsearch is a search engine based on Lucene. It is useful in a distributed environment and helps in a multitenant-capable full-text search engine. While you query something from Elasticsearch it will provide you with an HTTP web interface and schema-free JSON documents. it provides the ability for full-text search. Elasticsearch is developed in Java and is released as open-source under the terms of the Apache 2 license. Scenario: 1. Server IP: 192.168.56.101 2. Elasticsearch: Version 6.4 3. OS: CentOS 7.5 4. RAM: 4 GB Note: If you are a SUDO user then prefix every command with sudo, like #sudo ifconfig With the help of this guide, you will be able to set up Elasticsearch single-node clusters on CentOS, Red Hat, and Fedora systems. Step 1: Install and Verify Java Java is the primary requirement for installing Elasticsearch. So, make sure you have Java installed on your system. # java -version openjdk version "1.8.0_181" OpenJDK Runtime Environment (build 1.8.0_181-b13) OpenJDK 64-Bit Server VM (build 25.181-b13, mixed mode) If you don’t have Java installed on your system, then run the below command # yum install java-1.8.0-openjdk Step 2: Setup Elasticsearch For this guide, I am downloading the latest Elasticsearch tar from its official website so follow the below step # wget https://artifacts.elastic.co/downloads/elasticsearch/elasticsearch-6.4.2.tar.gz # tar -xzf elasticsearch-6.4.2.tar.gz # tar -xzf elasticsearch-6.4.2.tar.gz # mv elasticsearch-6.4.2 /usr/local/elasticsearch Step 5: Permission and User We need a user for running elasticsearch (root is not recommended). # useradd elasticsearch # chown -R elasticsearch.elasticsearch /usr/local/elasticsearch/ Step 6: Setup Ulimits Now to get a Running system we need to make some changes of ulimits else we will get an error like “max number of threads for user is too low, increase to at least ” so to overcome this issue make below changes you should run. # ulimit -n 65536 # ulimit -u 2048 Or you may edit the file to make changes permanent # vim /etc/security/limits.conf elasticsearch - nofile 65536 elasticsearch soft nofile 64000 elasticsearch hard nofile 64000 elasticsearch hard nproc 4096 elasticsearch soft nproc 4096 Save files using :wq Step 7: Configure Elasticsearch Now make some configuration changes like cluster name or node name to make our single node cluster live. # cd /usr/local/elasticsearch/ Now, look for the below keywords in the file and change according to you need # vim conf/elasticsearch.yml cluster.name: kapendra-cluster-1 node.name: kapendra-node-1 http.port: 9200 to set this value to your IP or make it 0.0.0.0 ID needs to be accessible from anywhere from the network. Else put your IP of localhost network.host: 0.0.0.0 There is one more thing if you have any dedicated mount pint for data then change the value for #path.data: /path/to/data to your mount point.
Your configuration should look like the above. Step 8: Starting Elasticsearch Cluster As the Elasticsearch setup is completed. Let the start Elasticsearch cluster with elastic search user so first switch to elastic search user and then run the cluster # su - elasticsearch $ /usr/local/elasticsearch/bin/elasticsearch 22278 Step 9: Verify Setup You have all done it, just need to verify the setup. Elasticsearch works on port default port 9200, open your browser to point your server on port 9200, You will find something like the below output http://localhost:9200 or http://192.168.56.101:9200 at the end of this article, you have successfully set up Elasticsearch single node cluster. In the next few articles, we will try to cover a few commands and their setup in the docker container for development environments on local machines. Read the full article
2 notes
·
View notes
Text
Mastering Elasticsearch in Django: A Comprehensive Guide
"Mastering Elasticsearch in Django: A Comprehensive Guide" would cover a wide range of topics, from the basics to advanced techniques, enabling you to harness the power of Elasticsearch within your Django applications. Here's an outline of what such a guide might include: Chapter 1: Introduction to Elasticsearch and Django
Chapter 2: Setting Up Elasticsearch and Django
Chapter 3: Indexing and Mapping
Chapter 4: Indexing Data from Django Models
2 notes
·
View notes
Text
Built-in Logging with Serilog: How EasyLaunchpad Keeps Debugging Clean and Insightful

Debugging shouldn’t be a scavenger hunt.
When things break in production or behave unexpectedly in development, you don’t have time to dig through vague error messages or guess what went wrong. That’s why logging is one of the most critical — but often neglected — parts of building robust applications.
With EasyLaunchpad, logging is not an afterthought.
We’ve integrated Serilog, a powerful and structured logging framework for .NET, directly into the boilerplate so developers can monitor, debug, and optimize their apps from day one.
In this post, we’ll explain how Serilog is implemented inside EasyLaunchpad, why it’s a developer favorite, and how it helps you launch smarter and maintain easier.
🧠 Why Logging Matters (Especially in Startups)
Whether you’re launching a SaaS MVP or maintaining a production application, logs are your eyes and ears:
Track user behavior
Monitor background job status
Catch and analyze errors
Identify bottlenecks or API failures
Verify security rules and access patterns
With traditional boilerplates, you often need to configure and wire this up yourself. But EasyLaunchpad comes preloaded with structured, scalable logging using Serilog, so you’re ready to go from the first line of code.
🔧 What Is Serilog?
Serilog is one of the most popular logging libraries for .NET Core. Unlike basic logging tools that write unstructured plain-text logs, Serilog generates structured logs — which are easier to search, filter, and analyze in any environment.
It supports:
JSON log output
File, Console, or external sinks (like Seq, Elasticsearch, Datadog)
Custom formats and enrichers
Log levels: Information, Warning, Error, Fatal, and more
Serilog is lightweight, flexible, and production-proven — ideal for modern web apps like those built with EasyLaunchpad.
🚀 How Serilog Is Integrated in EasyLaunchpad

When you start your EasyLaunchpad-based project, Serilog is already:
Installed via NuGet
Configured via appsettings.json
Injected into the middleware pipeline
Wired into all key services (auth, jobs, payments, etc.)
🔁 Configuration Example (appsettings.json):
“Serilog”: {
“MinimumLevel”: {
“Default”: “Information”,
“Override”: {
“Microsoft”: “Warning”,
“System”: “Warning”
}
},
“WriteTo”: [
{ “Name”: “Console” },
{
“Name”: “File”,
“Args”: {
“path”: “Logs/log-.txt”,
“rollingInterval”: “Day”
}
}
}
}
This setup gives you daily rotating log files, plus real-time console logs for development mode.
🛠 How It Helps Developers
✅ 1. Real-Time Debugging
During development, logs are streamed to the console. You’ll see:
Request details
Controller actions triggered
Background job execution
Custom messages from your services
This means you can debug without hitting breakpoints or printing Console.WriteLine().
✅ 2. Structured Production Logs
In production, logs are saved to disk in a structured format. You can:
Tail them from the server
Upload them to a logging platform (Seq, Datadog, ELK stack)
Automatically parse fields like timestamp, level, message, exception, etc.
This gives predictable, machine-readable logging — critical for scalable monitoring.
✅ 3. Easy Integration with Background Jobs
EasyLaunchpad uses Hangfire for background job scheduling. Serilog is integrated into:
Job execution logging
Retry and failure logs
Email queue status
Error capturing
No more “silent fails” in background processes — every action is traceable.
✅ 4. Enhanced API Logging (Optional Extension)
You can easily extend the logging to:
Log request/response for APIs
Add correlation IDs
Track user activity (e.g., login attempts, failed validations)
The modular architecture allows you to inject loggers into any service or controller via constructor injection.
🔍 Sample Log Output
Here’s a typical log entry generated by Serilog in EasyLaunchpad:
{
“Timestamp”: “2024–07–10T08:33:21.123Z”,
“Level”: “Information”,
“Message”: “User {UserId} logged in successfully.”,
“UserId”: “5dc95f1f-2cc2–4f8a-ae1b-1d29f2aa387a”
}
This is not just human-readable — it’s machine-queryable.
You can filter logs by UserId, Level, or Timestamp using modern logging dashboards or scripts.
🧱 A Developer-Friendly Logging Foundation
Unlike minimal templates, where you have to integrate logging yourself, EasyLaunchpad is:
Ready-to-use from first launch
Customizable for your own needs
Extendable with any Serilog sink (e.g., database, cloud services, Elasticsearch)
This means you spend less time configuring and more time building and scaling.
🧩 Built-In + Extendable
You can add additional log sinks in minutes:
Log.Logger = new LoggerConfiguration()
.WriteTo.Console()
.WriteTo.File(“Logs/log.txt”)
.WriteTo.Seq(“http://localhost:5341")
.CreateLogger();
Want to log in to:
Azure App Insights?
AWS CloudWatch?
A custom microservice?
Serilog makes it possible, and EasyLaunchpad makes it easy to start.
💼 Real-World Scenarios
Here are some real ways logging helps EasyLaunchpad-based apps:
Use Case and the Benefit
Login attempts — Audit user activity and failed attempts
Payment errors- Track Stripe/Paddle API errors
Email queue- Debug failed or delayed emails
Role assignment- Log admin actions for compliance
Cron jobs- Monitor background jobs in real-time
🧠 Final Thoughts
You can’t fix what you can’t see.
Whether you’re launching an MVP or running a growing SaaS platform, structured logging gives you visibility, traceability, and peace of mind.
EasyLaunchpad integrates Serilog from day one — so you’re never flying blind. You get a clean, scalable logging system with zero setup required.
No more guesswork. Just clarity.
👉 Start building with confidence. Check out EasyLaunchpad at https://easylaunchpad.com and see how production-ready logging fits into your stack.
#Serilog .NET logging#structured logs .NET Core#developer-friendly logging in boilerplate#.net development#saas starter kit#saas development company#app development#.net boilerplate
1 note
·
View note
Link
0 notes
Text
Where Can I Find DevOps Training with Placement Near Me?
Introduction: Unlock Your Tech Career with DevOps Training
In today’s digital world, companies are moving faster than ever. Continuous delivery, automation, and rapid deployment have become the new norm. That’s where DevOps comes in a powerful blend of development and operations that fuels speed and reliability in software delivery.
Have you ever wondered how companies like Amazon, Netflix, or Facebook release features so quickly without downtime? The secret lies in DevOps an industry-demanded approach that integrates development and operations to streamline software delivery. Today, DevOps skills are not just desirable they’re essential. If you’re asking, “Where can I find DevOps training with placement near me?”, this guide will walk you through everything you need to know to find the right training and land the job you deserve.

Understanding DevOps: Why It Matters
DevOps is more than a buzzword it’s a cultural and technical shift that transforms how software teams build, test, and deploy applications. It focuses on collaboration, automation, continuous integration (CI), continuous delivery (CD), and feedback loops.
Professionals trained in DevOps can expect roles like:
DevOps Engineer
Site Reliability Engineer
Cloud Infrastructure Engineer
Release Manager
The growing reliance on cloud services and rapid deployment pipelines has placed DevOps engineers in high demand. A recent report by Global Knowledge ranks DevOps as one of the highest-paying tech roles in North America.
Why DevOps Training with Placement Is Crucial
Many learners begin with self-study or unstructured tutorials, but that only scratches the surface. A comprehensive DevOps training and placement program ensures:
Structured learning of core and advanced DevOps concepts
Hands-on experience with DevOps automation tools
Resume building, interview preparation, and career support
Real-world project exposure to simulate a professional environment
Direct pathways to job interviews and job offers
If you’re looking for DevOps training with placement “near me,” remember that “location” today is no longer just geographic—it’s also digital. The right DevOps online training can provide the accessibility and support you need, no matter your zip code.
Core Components of a DevOps Course Online
When choosing a DevOps course online, ensure it covers the following modules in-depth:
1. Introduction to DevOps Culture and Principles
Evolution of DevOps
Agile and Lean practices
Collaboration and communication strategies
2. Version Control with Git and GitHub
Branching and merging strategies
Pull requests and code reviews
Git workflows in real-world projects
3. Continuous Integration (CI) Tools
Jenkins setup and pipelines
GitHub Actions
Code quality checks and automated builds
4. Configuration Management
Tools like Ansible, Chef, or Puppet
Managing infrastructure as code (IaC)
Role-based access control
5. Containerization and Orchestration
Docker fundamentals
Kubernetes (K8s) clusters, deployments, and services
Helm charts and autoscaling strategies
6. Monitoring and Logging
Prometheus and Grafana
ELK Stack (Elasticsearch, Logstash, Kibana)
Incident alerting systems
7. Cloud Infrastructure and DevOps Automation Tools
AWS, Azure, or GCP fundamentals
Terraform for IaC
CI/CD pipelines integrated with cloud services
Real-World Applications: Why Hands-On Learning Matters
A key feature of any top-tier DevOps training online is its practical approach. Without hands-on labs or real projects, theory can only take you so far.
Here’s an example project structure:
Project: Deploying a Multi-Tier Application with Kubernetes
Such projects help learners not only understand tools but also simulate real DevOps scenarios, building confidence and clarity.
DevOps Training and Certification: What You Should Know
Certifications validate your knowledge and can significantly improve your job prospects. A solid DevOps training and certification program should prepare you for globally recognized exams like:
DevOps Foundation Certification
Certified Kubernetes Administrator (CKA)
AWS Certified DevOps Engineer
Docker Certified Associate
While certifications are valuable, employers prioritize candidates who demonstrate both theoretical knowledge and applied skills. This is why combining training with placement offers the best return on investment.
What to Look for in a DevOps Online Course
If you’re on the hunt for the best DevOps training online, here are key features to consider:
Structured Curriculum
It should cover everything from fundamentals to advanced automation practices.
Expert Trainers
Trainers should have real industry experience, not just academic knowledge.
Hands-On Projects
Project-based assessments help bridge the gap between theory and application.
Flexible Learning
A good DevOps online course offers recordings, live sessions, and self-paced materials.
Placement Support
Look for programs that offer:
Resume writing and LinkedIn profile optimization
Mock interviews with real-time feedback
Access to a network of hiring partners
Benefits of Enrolling in DevOps Bootcamp Online
A DevOps bootcamp online fast-tracks your learning process. These are intensive, short-duration programs designed for focused outcomes. Key benefits include:
Rapid skill acquisition
Industry-aligned curriculum
Peer collaboration and group projects
Career coaching and mock interviews
Job referrals and hiring events
Such bootcamps are ideal for professionals looking to upskill, switch careers, or secure a DevOps role without spending years in academia.
DevOps Automation Tools You Must Learn
Git & GitHub Git is the backbone of version control in DevOps, allowing teams to track changes, collaborate on code, and manage development history. GitHub enhances this by offering cloud-based repositories, pull requests, and code review tools—making it a must-know for every DevOps professional.
Jenkins Jenkins is the most popular open-source automation server used to build and manage continuous integration and continuous delivery (CI/CD) pipelines. It integrates with almost every DevOps tool and helps automate testing, deployment, and release cycles efficiently.
Docker Docker is a game-changer in DevOps. It enables you to containerize applications, ensuring consistency across environments. With Docker, developers can package software with all its dependencies, leading to faster development and more reliable deployments.
Kubernetes Once applications are containerized, Kubernetes helps manage and orchestrate them at scale. It automates deployment, scaling, and load balancing of containerized applications—making it essential for managing modern cloud-native infrastructures.
Ansible Ansible simplifies configuration management and infrastructure automation. Its agentless architecture and easy-to-write YAML playbooks allow you to automate repetitive tasks across servers and maintain consistency in deployments.
Terraform Terraform enables Infrastructure as Code (IaC), allowing teams to provision and manage cloud resources using simple, declarative code. It supports multi-cloud environments and ensures consistent infrastructure with minimal manual effort.
Prometheus & Grafana For monitoring and alerting, Prometheus collects metrics in real-time, while Grafana visualizes them beautifully. Together, they help track application performance and system health essential for proactive operations.
ELK Stack (Elasticsearch, Logstash, Kibana) The ELK stack is widely used for centralized logging. Elasticsearch stores logs, Logstash processes them, and Kibana provides powerful visualizations, helping teams troubleshoot issues quickly.
Mastering these tools gives you a competitive edge in the DevOps job market and empowers you to build reliable, scalable, and efficient software systems.
Job Market Outlook for DevOps Professionals
According to the U.S. Bureau of Labor Statistics, software development roles are expected to grow 25% by 2032—faster than most other industries. DevOps roles are a large part of this trend. Companies need professionals who can automate pipelines, manage scalable systems, and deliver software efficiently.
Average salaries in the U.S. for DevOps engineers range between $95,000 to $145,000, depending on experience, certifications, and location.
Companies across industries—from banking and healthcare to retail and tech—are hiring DevOps professionals for critical digital transformation roles.
Is DevOps for You?
If you relate to any of the following, a DevOps course online might be the perfect next step:
You're from an IT background looking to transition into automation roles
You enjoy scripting, problem-solving, and system management
You're a software developer interested in faster and reliable deployments
You're a system admin looking to expand into cloud and DevOps roles
You want a structured, placement-supported training program to start your career
How to Get Started with DevOps Training and Placement
Step 1: Enroll in a Comprehensive Program
Choose a program that covers both foundational and advanced concepts and includes real-time projects.
Step 2: Master the Tools
Practice using popular DevOps automation tools like Docker, Jenkins, and Kubernetes.
Step 3: Work on Live Projects
Gain experience working on CI/CD pipelines, cloud deployment, and infrastructure management.
Step 4: Prepare for Interviews
Use mock sessions, Q&A banks, and technical case studies to strengthen your readiness.
Step 5: Land the Job
Leverage placement services, interview support, and resume assistance to get hired.
Key Takeaways
DevOps training provides the automation and deployment skills demanded in modern software environments.
Placement support is crucial to transitioning from learning to earning.
Look for comprehensive online courses that offer hands-on experience and job assistance.
DevOps is not just a skill it’s a mindset of collaboration, speed, and innovation.
Ready to launch your DevOps career? Join H2K Infosys today for hands-on learning and job placement support. Start your transformation into a DevOps professional now.
#devops training#DevOps course#devops training online#devops online training#devops training and certification#devops certification training#devops training with placement#devops online courses#best devops training online#online DevOps course#advanced devops course#devops training and placement#devops course online#devops real time training#DevOps automation tools
0 notes
Text
How to Build a YouTube Clone App: Tech Stack, Features & Cost Explained
Ever scrolled through YouTube and thought, “I could build this—but better”? You’re not alone. With the explosive growth of content creators and the non-stop demand for video content, building your own YouTube clone isn’t just a dream—it’s a solid business move. Whether you're targeting niche creators, regional content, or building the next big video sharing and streaming platform, there’s room in the market for innovation.
But before you dive into code or hire a dev team, let’s talk about the how. What tech stack powers a platform like YouTube? What features are must-haves? And how much does it actually cost to build something this ambitious?
In this post, we’re breaking it all down—no fluff, no filler. Just a clear roadmap to building a killer YouTube-style platform with insights from the clone app experts at Miracuves.
Core Features of a YouTube Clone App
Before picking servers or coding frameworks, you need a feature checklist. Here’s what every modern YouTube clone needs to include:
1. User Registration & Profiles
Users must be able to sign up via email or social logins. Profiles should allow for customization, channel creation, and subscriber tracking.
2. Video Upload & Encoding
Users upload video files that are auto-encoded to multiple resolutions (360p, 720p, 1080p). You’ll need a powerful media processor and cloud storage to handle this.
3. Streaming & Playback
The heart of any video platform. Adaptive bitrate streaming ensures smooth playback regardless of network speed.
4. Content Feed & Recommendations
Dynamic feeds based on trending videos, subscriptions, or AI-driven interests. The better your feed, the longer users stay.
5. Like, Comment, Share & Subscribe
Engagement drives reach. Build these features in early and make them seamless.
6. Search & Filters
Let users find content via keywords, categories, uploaders, and tags.
7. Monetization Features
Allow ads, tipping (like Super Chat), or paid content access. This is where the money lives.
8. Admin Dashboard
Moderation tools, user management, analytics, and content flagging are essential for long-term growth.
Optional Features:
Live Streaming
Playlists
Stories or Shorts
Video Premiere Countdown
Multilingual Subtitles
Media Suggestion: Feature comparison table between YouTube and your envisioned clone
Recommended Tech Stack
The tech behind YouTube is serious business, but you don’t need Google’s budget to launch a lean, high-performance YouTube clone. Here’s what we recommend at Miracuves:
Frontend (User Interface)
React.js or Vue.js – Fast rendering and reusable components
Tailwind CSS or Bootstrap – For modern, responsive UI
Next.js – Great for server-side rendering and SEO
Backend (Server-side)
Node.js with Express – Lightweight and scalable
Python/Django – Excellent for content recommendation algorithms
Laravel (PHP) – If you're going for quick setup and simplicity
Video Processing & Streaming
FFmpeg – Open-source video encoding and processing
HLS/DASH Protocols – For adaptive streaming
AWS MediaConvert or Mux – For advanced media workflows
Cloudflare Stream – Built-in CDN and encoding, fast global delivery
Storage & Database
Amazon S3 or Google Cloud Storage – For storing video content
MongoDB or PostgreSQL – For structured user and video data
Authentication & Security
JWT (JSON Web Tokens) for secure session management
OAuth 2.0 for social logins
Two-Factor Authentication (2FA) for creators and admins
Analytics & Search
Elasticsearch – Fast, scalable search
Mixpanel / Google Analytics – Track video watch time, drop-offs, engagement
AI-based recommendation engine – Python + TensorFlow or third-party API
Media Suggestion: Architecture diagram showing tech stack components and flow
Development Timeline & Team Composition
Depending on complexity, here’s a typical development breakdown:
MVP Build: 3–4 months
Full Product with Monetization: 6–8 months
Team Needed:
1–2 Frontend Developers
1 Backend Developer
1 DevOps/Cloud Engineer
1 UI/UX Designer
1 QA Tester
1 Project Manager
Want to move faster? Miracuves offers pre-built YouTube clone app solutions that can cut launch time in half.
Estimated Cost Breakdown
Here’s a rough ballpark for custom development: PhaseEstimated CostUI/UX Design$3,000 – $5,000Frontend Development$6,000 – $10,000Backend Development$8,000 – $12,000Video Processing Setup$4,000 – $6,000QA & Testing$2,000 – $4,000Cloud Infrastructure$500 – $2,000/month (post-launch)
Total Estimated Cost: $25,000 – $40,000+ depending on features and scale
Need it cheaper? Go the smart way with a customizable YouTube clone from Miracuves—less risk, faster time-to-market, and scalable from day one.
Final Thoughts
Building a YouTube clone isn’t just about copying features—it’s about creating a platform that gives creators and viewers something fresh, intuitive, and monetizable. With the right tech stack, must-have features, and a clear plan, you’re not just chasing YouTube—you’re building your own lane in the massive video sharing and streaming platform space.
At Miracuves, we help startups launch video platforms that are secure, scalable, and streaming-ready from day one. Want to build a revenue-generating video app that users love? Let’s talk.
FAQs
How much does it cost to build a YouTube clone?
Expect $25,000–$40,000 for a custom build. Ready-made solutions from Miracuves can reduce costs significantly.
Can I monetize my YouTube clone?
Absolutely. Use ads, subscriptions, tipping, pay-per-view, or affiliate integrations.
What’s the hardest part of building a video streaming app?
Video encoding, storage costs, and scaling playback across geographies. You’ll need a solid cloud setup.
Do I need to build everything from scratch?
No. Using a YouTube clone script from Miracuves saves time and still offers full customization.
How long does it take to launch?
A simple MVP may take 3–4 months. A full-feature platform can take 6–8 months. Miracuves can cut that timeline in half.
Is it legal to build a YouTube clone?
Yes, as long as you’re not copying YouTube’s trademark or copyrighted content. The tech and business model are fair game.
1 note
·
View note
Text
Enhance Commerce and Search with Magento Modules and Elasticsearch in Python
In the digital commerce space, two pillars define performance: platform flexibility and data accessibility. Magento, with its modular architecture, offers the flexibility to build custom commerce experiences. On the other hand, Elasticsearch, when used with Python, provides blazing-fast, scalable search and analytics capabilities across vast datasets.
At Bluethink Inc, we specialize in developing Magento custom modules and building advanced search systems using the Elasticsearch Python client. Together, these technologies allow businesses to build smarter, faster, and more personalized digital experiences.
Custom Magento Modules: Beyond Out-of-the-Box
Magento 2 is a powerful open-source eCommerce platform built for customization. While its out-of-the-box capabilities cover most standard features, every business is unique. That’s where custom module development comes into play.
What Is a Magento Custom Module?
A custom module in Magento 2 is a standalone package that adds or modifies functionality without changing the core code. It follows Magento’s architecture principles, allowing developers to extend admin features, frontend behavior, and system logic.
What Can You Do with a Custom Module?
With Magento custom modules, you can:
Automate order processing logic
Add new payment or shipping options
Build integrations with external APIs
Customize product attribute behavior
Create admin panel enhancements for staff efficiency
Enable user-specific promotions or loyalty programs
Our team at Bluethink Inc has implemented modules that support everything from custom reporting tools to complex checkout experiences integrated with third-party tools.
Elasticsearch with Python: Unlocking Fast, Smart Search
Elasticsearch is a distributed search and analytics engine, commonly used for log analysis, product search, and business intelligence. When paired with Python, it becomes even more powerful—allowing developers to build intelligent search features and dashboards using minimal code.
The Elasticsearch Python client (elasticsearch-py) is the official low-level client for interacting with Elasticsearch clusters. It is built for reliability, speed, and compatibility with Elasticsearch's RESTful API.
Why Use Elasticsearch with Python?
Real-time indexing and querying of large datasets
Advanced full-text search with scoring and ranking
Support for aggregations, filters, and facets
Seamless integration with Django, Flask, or standalone Python apps
Custom scripts and ML-driven search ranking via Python
We use Elasticsearch in a wide variety of scenarios—from creating intelligent product recommendations to processing behavioral data and powering admin search dashboards.
Combined Use Case: Magento + Elasticsearch Search Intelligence
Client Challenge: A fashion retailer wanted to enhance product discovery and improve backend reporting. Magento’s default search lacked flexibility, and the admin reporting tools were too limited.
Bluethink Solution:
Built a custom Magento module to track real-time search queries and purchasing behavior.
Developed a Python microservice using the Elasticsearch client to process, index, and serve data from Magento in real time.
Added advanced search filters, auto-complete, and relevancy tuning for frontend users.
Created a dashboard that allowed business users to view high-performing search queries and low-converting results.
Outcome:
40% increase in product search engagement
25% improvement in conversion rates from internal search
Actionable insights for merchandising and marketing teams
Why Bluethink Inc?
At Bluethink, we bring together deep platform knowledge with robust data engineering experience. Whether you're extending Magento’s capabilities or building a fast search engine with Python and Elasticsearch, we offer full-spectrum expertise.
What Sets Us Apart:
Magento 2 Certified Developers
Experienced Python and Elasticsearch engineers
API-first development approach
End-to-end delivery from planning to deployment
Performance optimization and long-term support
From custom checkout flows to intelligent search engines, we build tools that help your business scale efficiently.
Our Development Process
Discovery & Planning Understand your business model, pain points, and integration requirements.
Architecture & Design Plan modular, scalable solutions tailored to your systems.
Custom Module or API Development Build clean, upgrade-safe Magento modules or high-performance Python apps.
Testing & Optimization Validate functionality, stress-test search performance, and ensure data integrity.
Deployment & Support Go live with confidence, backed by post-launch monitoring and support.
Final Thoughts
Today’s eCommerce businesses need more than static platforms. They need flexible infrastructure that adapts to customer behavior and business change. By combining custom Magento module development with Elasticsearch search intelligence in Python, you can unlock transformative capabilities across your entire digital operation.
At Bluethink Inc, we don’t just implement features—we help architect the systems that power next-generation commerce.
Build Your Smarter Commerce Engine Today
Talk to Bluethink Inc to explore how Magento custom modules and Elasticsearch-powered Python applications can take your digital business to the next level.
0 notes
Text
Creating and Configuring Production ROSA Clusters (CS220) – A Practical Guide
Introduction
Red Hat OpenShift Service on AWS (ROSA) is a powerful managed Kubernetes solution that blends the scalability of AWS with the developer-centric features of OpenShift. Whether you're modernizing applications or building cloud-native architectures, ROSA provides a production-grade container platform with integrated support from Red Hat and AWS. In this blog post, we’ll walk through the essential steps covered in CS220: Creating and Configuring Production ROSA Clusters, an instructor-led course designed for DevOps professionals and cloud architects.
What is CS220?
CS220 is a hands-on, lab-driven course developed by Red Hat that teaches IT teams how to deploy, configure, and manage ROSA clusters in a production environment. It is tailored for organizations that are serious about leveraging OpenShift at scale with the operational convenience of a fully managed service.
Why ROSA for Production?
Deploying OpenShift through ROSA offers multiple benefits:
Streamlined Deployment: Fully managed clusters provisioned in minutes.
Integrated Security: AWS IAM, STS, and OpenShift RBAC policies combined.
Scalability: Elastic and cost-efficient scaling with built-in monitoring and logging.
Support: Joint support model between AWS and Red Hat.
Key Concepts Covered in CS220
Here’s a breakdown of the main learning outcomes from the CS220 course:
1. Provisioning ROSA Clusters
Participants learn how to:
Set up required AWS permissions and networking pre-requisites.
Deploy clusters using Red Hat OpenShift Cluster Manager (OCM) or CLI tools like rosa and oc.
Use STS (Short-Term Credentials) for secure cluster access.
2. Configuring Identity Providers
Learn how to integrate Identity Providers (IdPs) such as:
GitHub, Google, LDAP, or corporate IdPs using OpenID Connect.
Configure secure, role-based access control (RBAC) for teams.
3. Networking and Security Best Practices
Implement private clusters with public or private load balancers.
Enable end-to-end encryption for APIs and services.
Use Security Context Constraints (SCCs) and network policies for workload isolation.
4. Storage and Data Management
Configure dynamic storage provisioning with AWS EBS, EFS, or external CSI drivers.
Learn persistent volume (PV) and persistent volume claim (PVC) lifecycle management.
5. Cluster Monitoring and Logging
Integrate OpenShift Monitoring Stack for health and performance insights.
Forward logs to Amazon CloudWatch, ElasticSearch, or third-party SIEM tools.
6. Cluster Scaling and Updates
Set up autoscaling for compute nodes.
Perform controlled updates and understand ROSA’s maintenance policies.
Use Cases for ROSA in Production
Modernizing Monoliths to Microservices
CI/CD Platform for Agile Development
Data Science and ML Workflows with OpenShift AI
Edge Computing with OpenShift on AWS Outposts
Getting Started with CS220
The CS220 course is ideal for:
DevOps Engineers
Cloud Architects
Platform Engineers
Prerequisites: Basic knowledge of OpenShift administration (recommended: DO280 or equivalent experience) and a working AWS account.
Course Format: Instructor-led (virtual or on-site), hands-on labs, and guided projects.
Final Thoughts
As more enterprises adopt hybrid and multi-cloud strategies, ROSA emerges as a strategic choice for running OpenShift on AWS with minimal operational overhead. CS220 equips your team with the right skills to confidently deploy, configure, and manage production-grade ROSA clusters — unlocking agility, security, and innovation in your cloud-native journey.
Want to Learn More or Book the CS220 Course? At HawkStack Technologies, we offer certified Red Hat training, including CS220, tailored for teams and enterprises. Contact us today to schedule a session or explore our Red Hat Learning Subscription packages. www.hawkstack.com
0 notes
Text
特殊数据库与通用数据库的区别与联系
在信息爆炸与数字化转型加速的今天,数据库技术已成为企业数据管理与分析的核心支撑。而在实际应用中,数据库根据用途和结构的不同,通常可以分为两类:通用数据库与特殊数据库。理解二者的区别与联系,有助于我们根据实际需求选择更适配的数据管理方案,提升效率与安全性。
一、什么是通用数据库?
通用数据库,顾名思义,是指广泛适用于多种行业和通用业务场景的数据库系统。常见的如 MySQL、PostgreSQL、SQL Server、Oracle 等。这类数据库强调结构标准化、查询灵活性和可扩展性,适用于大多数企业、网站、管理系统等。
通用数据库的主要特点:
通用性强:适用于财务、人事、客户管理、电商等多种业务;
支持多种数据类型:如文本、数字、时间、布尔值等;
标准化高:采用 SQL 语言作为标准查询语言;
可扩展性好:支持海量数据和复杂的数据模型;
生态成熟:配套工具、文档和社区资源丰富。
二、什么是特殊数据库?
特殊数据库则是指针对特定行业、领域或数据结构设计的数据库。这些数据库通常拥有专门的数据模型、查询语言或处理机制,以更高效地解决某一类问题。
常见的特殊数据库类型包括:
图数据库(如 Neo4j):适用于社交网络、知识图谱、推荐系统等需要处理节点关系的场景;
时序数据库(如 InfluxDB):专为处理时间序列数据而设计,常用于物联网、监控数据、金融行情等;
文档数据库(如 MongoDB):适合存储 JSON 格式的非结构化或半结构化数据,广泛用于互联网应用;
地理信息数据库(如 PostGIS):用于处理 特殊数据库 地理空间数据,服务于地图、城市规划、测绘等专业场景;
生物信息数据库:如用于存储基因序列、蛋白质结构等生物医学数据。
三、通用数据库与特殊数据库的主要区别
对比维度通用数据库特殊数据库应用范围多行业、标准化场景专业领域、特定需求数据结构表格型、结构化数据为主多为非结构化或半结构化,结构定制化查询语言统一使用 SQL可能使用专用语言(如 Cypher、Flux)性能优化方向面向通用读写操作面向特定查询/存储优化开发成本相对较低,学习曲线平缓对专业性要求高,定制成本较大
四、通用数据库与特殊数据库的联系
尽管通用数据库与特殊数据库在使用场景和结构设计上存在较大差异,但两者并非互相独立、割裂,而是可以互补,甚至集成使用。

1. 互为补充的技术组合
很多大型系统采用“混合数据库架构”——通用数据库处理用户、订单等基础信息;特殊数据库负责图谱分析、日志监控或时序数据分析。这种模式使系统既能保持通用性,又具备专业处理能力。
2. 数据同步与接口融合
现代数据库之间普遍支持数据同步、API接口对接、ETL工具转换等方式,实现不同类型数据库的数据流通和整合。例如,企业可以将业务数据从 MySQL 同步至 Elasticsearch,用于搜索优化。
3. 技术栈融合趋势增强
一些通用数据库也开始引入特殊功能,如 PostgreSQL 通过插件支持时序数据(TimescaleDB)、地理信息处理(PostGIS)等,正逐步打破通用与特殊的界限,走向平台化、多功能发展。
五、如何选择合适的数据库类型?
选择数据库不是“通用更好”或“特殊更优”的问题,而应根据业务需求、技术能力、数据结构和使用场景综合考量。
选择建议:
小型项目/业务通用:优先考虑通用数据库,部署简单、维护成本低;
面对特定数据结构或高性能需求:选择专业的特殊数据库,提高处理效率;
数据多样化系统:采用多数据库组合架构,用不同数据库处理不同类型的数据;
预算有限的初创团队:使用功能丰富、可扩展性强的开源通用数据库,如 PostgreSQL。
六、总结
特殊数据库与通用数据库的区别在于其设计初衷、应用场景和数据处理方式,但它们也有着密切的联系,共同构成了现代数据管理的多元生态。企业在数字化转型过程中,应根据自身业务类型和数据特征合理选择数据库类型,甚至采用多种数据库组合,以实现数据的高效存储、精准分析和安全管理。
理解这两类数据库的定位与融合趋势,不仅有助于提升数据架构的灵活性,也能为未来的数据驱动决策打下坚实的基础。
0 notes
Text
What Is SRE? A Beginner's Guide to Modern Reliability Engineering
The Evolution of Site Reliability Engineering
Large-scale system management has changed significantly with the rise of Site Reliability Engineering (SRE) Foundation. It started at Google in the early 2000s when software engineers were given the responsibility of using code to solve operations problems. By introducing a software-centric approach to infrastructure management, this change sought to close the gap between development and operations.

Flexible in nature, traditional system administration concentrated on resolving problems after they came up. A proactive, engineering-driven model with a focus on automation, dependability, and performance was introduced by SRE. Teams were able to measure and strike a balance between innovation and system stability thanks to concepts like SLAs, SLOs, and error budgets.
These days, SRE principles are not limited to tech giants. SRE is used by businesses of all sizes to increase uptime, decrease labor, and promote cooperation between the operations and development teams. SRE keeps evolving in response to the growing complexity of systems and the need for resilience; it is essential to the development of scalable, dependable, and effective digital services.
DevOps vs. SRE: What’s the Difference?
1. Origin
DevOps is a cultural movement that emerged to improve collaboration between development and operations.
SRE was created at Google as a way to apply software engineering to operations tasks.
While DevOps evolved as a philosophy to break silos, SRE is a concrete set of practices rooted in engineering discipline.
2. Focus
DevOps emphasizes faster delivery through automation and collaboration.
SRE focuses on ensuring reliability, scalability, and performance.
DevOps is about speed and efficiency; SRE ensures systems stay reliable as they scale.
3. Approach
DevOps promotes practices like CI/CD and Infrastructure as Code.
SRE uses SLAs, SLOs, SLIs, and error budgets to manage risk.
SRE adds measurable, reliability-focused engineering to the DevOps workflow.
4. Roles and Teams
DevOps encourages shared responsibility across teams.
SRE introduces a dedicated role with strong coding and ops skills.
SREs often act as reliability guardians, while DevOps promotes a collaborative environment.
Top Tools Every Site Reliability Engineer Should Know
Site Reliability Engineers (SREs) Training play a critical role in maintaining the reliability and performance of modern systems. To do this effectively, they rely on a robust toolkit that covers monitoring, automation, logging, and infrastructure management.
1. Prometheus – An open-source monitoring system that collects time-series data and provides powerful alerting capabilities. It's often the go-to tool for system health checks.
2. Grafana – Frequently used with Prometheus, Grafana offers rich dashboards and visualization for system metrics, helping teams quickly detect anomalies.
3. ELK Stack (Elasticsearch, Logstash, Kibana) – This trio helps with centralized logging and data analysis. SREs use it to search logs, identify root causes, and track trends over time.
4. Chaos Monkey – Developed by Netflix, this chaos engineering tool randomly terminates instances in production to test a system’s resilience and recovery strategy.
5. Kubernetes – A container orchestration platform that automates deployment, scaling, and management of containerized applications, making it essential for managing complex infrastructure.
6. Terraform – A leading Infrastructure as Code (IaC) tool used to automate infrastructure provisioning and ensure consistency across environments.
The Future of SRE
In 2025, Site Reliability Engineering (SRE) is adapting to new demands as technology advances. One significant trend is increasing use of AI and machine learning in incident response and observability. SREs use predictive analytics to identify and fix problems before affecting users.
Another shift is the rise of platform engineering, where internal developer platforms (IDPs) streamline infrastructure and reliability practices across teams. SREs are playing a key role in building and maintaining these platforms.
Security and compliance are also becoming core responsibilities, with reliability now extending to areas like zero-trust architecture and data governance.
Additionally, multi-cloud and edge computing environments are challenging SREs to rethink monitoring, automation, and resilience strategies.
SREs are not just problem solvers—they’re strategic partners driving innovation, scalability, and trust in digital systems.Uncover details: Site Reliability Engineering Courses
0 notes
Text
7 Benefits of Using Search Engine Tools for Data Analysis

We often think of search engines as tools for finding cat videos or answering trivia. But beneath the surface, they possess powerful capabilities that can significantly benefit data science workflows. Let's explore seven often-overlooked advantages of using search engine tools for data analysis.
1. Instant Data Exploration and Ingestion:
Imagine receiving a new, unfamiliar dataset. Instead of wrestling with complex data pipelines, you can load it directly into a search engine. These tools are remarkably flexible, handling a wide range of file formats (JSON, CSV, XML, PDF, images, etc.) and accommodating diverse data structures. This allows for rapid initial analysis, even with noisy or inconsistent data.
2. Efficient Training/Test/Validation Data Generation:
Search engines can act as a cost-effective and efficient data storage and retrieval system for deep learning projects. They excel at complex joins, row/column selection, and providing Google-like access to your data, experiments, and logs, making it easy to generate the necessary data splits for model training.
3. Streamlined Data Reduction and Feature Engineering:
Modern search engines come equipped with tools for transforming diverse data types (text, numeric, categorical, spatial) into vector spaces. They also provide features for weight construction, metadata capture, value imputation, and null handling, simplifying the feature engineering process. Furthermore, their support for natural language processing, including tokenization, stemming, and word embeddings, is invaluable for text-heavy datasets.
4. Powerful Search-Driven Analytics:
Search engines are not just about retrieval; they're also about analysis. They can perform real-time scoring, aggregation, and even regression analysis on retrieved data. This enables you to quickly extract meaningful insights, identify trends, and detect anomalies, moving beyond simple data retrieval.
5. Seamless Integration with Existing Tools:
Whether you prefer the command line, Jupyter notebooks, or languages like Python, R, or Scala, search engines seamlessly integrate with your existing data science toolkit. They can output data in various formats, including CSV and JSON, ensuring compatibility with your preferred workflows.
6. Rapid Prototyping and "Good Enough" Solutions:
Search engines simplify the implementation of algorithms like k-nearest neighbors, classifiers, and recommendation engines. While they may not always provide state-of-the-art results, they offer a quick and efficient way to build "good enough" solutions for prototyping and testing, especially at scale.
7. Versatile Data Storage and Handling:
Modern search engines, particularly those powered by Lucene (like Solr and Elasticsearch), are adept at handling key-value, columnar, and mixed data storage. This versatility allows them to efficiently manage diverse data types within a single platform, eliminating the need for multiple specialized tools.
Elevate Your Data Science Skills with Xaltius Academy's Data Science and AI Program:
While search engine tools offer valuable benefits, they are just one component of a comprehensive data science skillset. Xaltius Academy's Data Science and AI program provides a robust foundation in data analysis, machine learning, and AI, empowering you to leverage these tools effectively and tackle complex data challenges.
Key benefits of the program:
Comprehensive Curriculum: Covers essential data science concepts, including data analysis, machine learning, and AI.
Hands-on Projects: Gain practical experience through real-world projects and case studies.
Expert Instruction: Learn from experienced data scientists and AI practitioners.
Focus on Applied Skills: Develop the skills needed to apply data science and AI techniques to solve real-world problems.
Career Support: Receive guidance and resources to help you launch your career in data science and AI.
Conclusion:
Search engine tools offer a surprising array of benefits for data science, from rapid data exploration to efficient model development. By incorporating these tools into your workflow and complementing them with a strong foundation in data science principles, you can unlock new levels of efficiency and insight.
0 notes
Text
Algolia vs. Connector Search Tools: A Comprehensive Comparison
Evaluating Performance, Features, and Usability to Help You Choose the Right Search Solution.
When it comes to implementing a powerful search and discovery solution for eCommerce, two major players often come up: Algolia and Constructor. While both provide advanced search capabilities, their workflows, implementations, and approach to AI-driven product discovery set them apart. This blog takes a deep dive into their differences, focusing on real-world applications, technical differentiators, and the impact on business KPIs.
Overview of Algolia and Constructor
Algolia
Founded in 2012, Algolia is a widely recognized search-as-a-service platform.
It provides instant, fast, and reliable search capabilities with an API-first approach.
Commonly used in various industries, including eCommerce, SaaS, media, and enterprise applications.
Provides keyword-based search with support for vector search and AI-driven relevance tuning.
Constructor
A newer entrant in the space, Constructor focuses exclusively on eCommerce product discovery.
Founded in 2015 and built from the ground up with clickstream-driven AI for ranking and recommendations.
Used by leading eCommerce brands like Under Armour and Home24.
Aims to optimize business KPIs like conversion rates and revenue per visitor.
Key Differences in Implementation and Workflows
1. Search Algorithm and Ranking Approach
Algolia:
Uses keyword-based search (TF-IDF, BM25) with additional AI-driven ranking enhancements.
Supports vector search, semantic search, and hybrid approaches.
Merchandisers can fine-tune relevance manually using rule-based controls.
Constructor:
Built natively on a Redis-based core rather than Solr or ElasticSearch.
Prioritizes clickstream-driven search and personalization, focusing on what users interact with.
Instead of purely keyword relevance, it optimizes for "attractiveness", ranking results based on a user’s past behavior and site-wide trends.
Merchandisers work with AI, using a human-interpretable dashboard to guide search ranking rather than overriding it.
2. Personalization & AI Capabilities
Algolia:
Offers personalization via rules and AI models that users can configure.
Uses AI for dynamic ranking adjustments but primarily relies on structured data input.
Constructor:
Focuses heavily on clickstream data, meaning every interaction—clicks, add-to-cart actions, and conversions—affects future search results.
Uses Transformer models for context-aware personalization, dynamically adjusting rankings in real-time.
AI Shopping Assistant allows for conversational product discovery, using Generative AI to enhance search experiences.
3. Use of Generative AI
Algolia:
Provides semantic search and AI-based ranking but does not have native Generative AI capabilities.
Users need to integrate third-party LLMs (Large Language Models) for AI-driven conversational search.
Constructor:
Natively integrates Generative AI to handle natural language queries, long-tail searches, and context-driven shopping experiences.
AI automatically understands customer intent—for example, searching for "I'm going camping in Yosemite with my kids" returns personalized product recommendations.
Built using AWS Bedrock and supports multiple LLMs for improved flexibility.
4. Merchandiser Control & Explainability
Algolia:
Provides rule-based tuning, allowing merchandisers to manually adjust ranking factors.
Search logic and results are transparent but require manual intervention for optimization.
Constructor:
Built to empower merchandisers with AI, allowing human-interpretable adjustments without overriding machine learning.
Black-box AI is avoided—every recommendation and ranking decision is traceable and explainable.
Attractiveness vs. Technical Relevance: Prioritizes "what users want to buy" over "what matches the search query best".
5. Proof-of-Concept & Deployment
Algolia:
Requires significant setup to run A/B tests and fine-tune ranking.
Merchandisers and developers must manually configure weighting and relevance.
Constructor:
Offers a "Proof Schedule", allowing retailers to test before committing.
Retailers install a lightweight beacon, send a product catalog, and receive an automated performance analysis.
A/B tests show expected revenue uplift, allowing data-driven decision-making before switching platforms.
Real-World Examples & Business Impact
Example 1: Searching for a Hoodie
A user searches for "hoodie" on an eCommerce website using Algolia vs. Constructor:
Algolia's Approach: Shows hoodies ranked based on keyword relevance, possibly with minor AI adjustments.
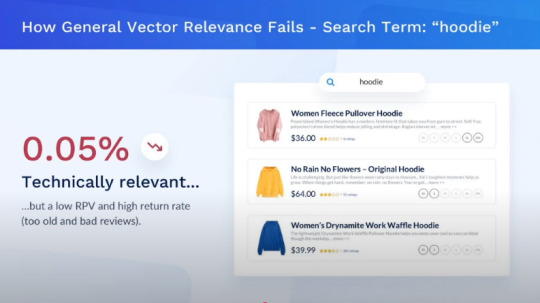
Source : YouTube - AWS Partner Network
Constructor's Approach: Learns from past user behavior, surfacing high-rated hoodies in preferred colors and styles, increasing the likelihood of conversion.

Source : YouTube - AWS Partner Network
Example 2: Conversational Search for Camping Gear
A shopper types, "I'm going camping with my preteen kids for the first time in Yosemite. What do I need?"
Algolia: Requires manual tagging and structured metadata to return relevant results.
Constructor: Uses Generative AI and Transformer models to understand the context and intent, dynamically returning the most relevant items across multiple categories.
Which One Should You Choose?
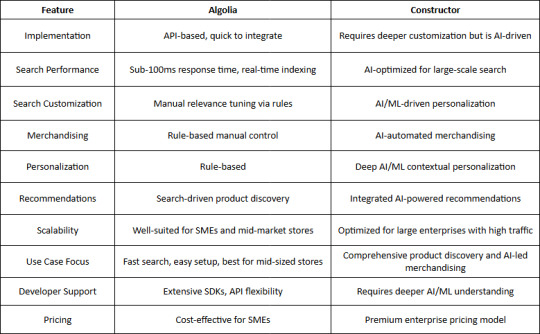
Why Choose Algolia?
Ease of Implementation – Algolia provides a quick API-based setup, making it ideal for eCommerce sites looking for a fast integration process.
Speed & Performance – With real-time indexing and instant search, Algolia is built for speed, ensuring sub-100ms response times.
Developer-Friendly – Offers extensive documentation, SDKs, and a flexible API for developers to customize search behavior.
Rule-Based Merchandising – Allows businesses to manually tweak search relevance with robust rules and business logic.
Cost-Effective for SMEs – More affordable for smaller eCommerce businesses with straightforward search needs.
Enterprise-Level Scalability – Can support growing businesses but requires manual optimization for handling massive catalogs.
Search-Driven Recommendations – While Algolia supports recommendations, they are primarily based on search behaviors rather than deep AI.
Manual Control Over Search & Merchandising – Provides businesses the flexibility to define search relevance and merchandising manually.
Strong Community & Developer Ecosystem – Large user base with extensive community support and integrations.
Why Choose Constructor?
Ease of Implementation – While requiring more initial setup, Constructor offers pre-trained AI models that optimize search without extensive manual configurations.
Speed & Performance – Uses AI-driven indexing and ranking to provide high-speed, optimized search results for large-scale retailers.
Developer-Friendly – Requires deeper AI/ML understanding but provides automation that reduces manual tuning efforts.
Automated Merchandising – AI-driven workflows reduce the need for manual intervention, optimizing conversion rates.
Optimized for Large Retailers – Designed for enterprises requiring full AI-driven control over search and discovery.
Deep AI Personalization – Unlike Algolia’s rule-based system, Constructor uses advanced AI/ML to provide contextual, personalized search experiences.
End-to-End Product Discovery – Goes beyond search, incorporating personalized recommendations, dynamic ranking, and automated merchandising.
Scalability – Built to handle massive catalogs and high traffic loads with AI-driven performance optimization.
Integrated AI-Powered Recommendations – Uses AI-driven models to surface relevant products in real-time based on user intent and behavioral signals.
Data-Driven Decision Making – AI continuously optimizes search and merchandising strategies based on real-time data insights.
Conclusion
Both Algolia and Constructor are excellent choices, but their suitability depends on your eCommerce business's needs:
If you need a general-purpose, fast search engine, Algolia is a great fit.
If your focus is on eCommerce product discovery, personalization, and revenue optimization, Constructor provides an AI-driven, clickstream-based solution designed for maximizing conversions.
With the evolution of AI and Generative AI, Constructor is positioning itself as a next-gen alternative to traditional search engines, giving eCommerce brands a new way to drive revenue through personalized product discovery.
This Blog is driven by our experience with product implementations for customers.
Connect with US
Thanks for reading Ragul's Blog! Subscribe for free to receive new posts and support my work.
1 note
·
View note
Text
蜘蛛池购买有哪些可视化工具?TG@yuantou2048
在数字化时代,数据的收集、分析与展示变得尤为重要。对于从事网络爬虫工作的人来说,选择合适的可视化工具能够极大地提升工作效率和数据分析的准确性。本文将介绍一些在蜘蛛池购买过程中常用的可视化工具,帮助大家更好地理解和利用这些工具。
1. Tableau:Tableau 是一款强大的数据可视化工具,它可以帮助用户轻松地创建交互式图表和仪表板。对于需要处理大量数据的蜘蛛池购买者来说,Tableau 提供了丰富的数据连接选项和灵活的图表类型,使得数据呈现更加直观易懂。
2. Echarts:作为一款开源的 JavaScript 图表库,Echarts 支持多种图表类型,并且可以自定义样式。它不仅适用于前端开发人员,也适合那些希望快速生成美观图表的非专业技术人员。通过 Echarts,用户可以轻松地将复杂的数据转化为易于理解的图形,从而提高决策效率。
3. Power BI:微软推出的 Power BI 是一个功能强大的商业智能平台,它集成了数据准备、分析及报告于一体。Power BI 提供了丰富的视觉组件库以及高级分析能力,使用户能够在几分钟内完成从原始数据到洞察结果的全过程。
4. Kibana:基于 Elasticsearch 的 Kibana 是一个用于日志管理和搜索的开源软件。它支持实时数据流的可视化,并允许用户创建复杂的查询来探索数据集。这对于监控网络爬虫运行状态或调试错误非常有用。
5. Grafana:Grafana 是一个开源的度量数据和时间序列数据库的仪表板解决方案。它可以连接到各种数据源(如 Prometheus、InfluxDB 等),并提供了一个简单易用的界面来构建动态面板。此外,Grafana 还支持插件扩展,这意味着你可以根据自己的需求定制化显示内容。
6. Superset:Apache Superset 是一个轻量级的业务智能应用,特别适合那些希望通过拖拽方式快速创建复杂报表的人群。
7. Qlik Sense:Qlik Sense 是一款企业级的商业智能平台,它结合了自助服务式分析与集中管理的功能。Qlik Sense 具有独特的关联引擎技术,能够自动发现数据之间的关系,从而为用户提供深入的见解。
以上就是一些在蜘蛛池购买过程中常用的可视化工具推荐。每种工具都有其独特的优势和适用场景,请根据具体需求选择最适合自己的方案。希望这篇文章能对你有所帮助!
加飞机@yuantou2048

EPS Machine
相关推荐
0 notes
Text
How to Become a Full Stack Java Developer in 6 Months – Full Roadmap

Are you looking to kickstart your career in software development? Becoming a Full Stack Java Developer is one of the most sought-after skills in today’s tech industry. With expertise in both frontend and backend development, Full Stack Java Developers are in high demand. In this article, we will provide a six-month roadmap to help you master Full Stack Java Training in KPHB efficiently.
Why Choose Full Stack Java Development?
Java is one of the most powerful programming languages, and its robust ecosystem makes it an excellent choice for full stack development. Companies across the globe rely on Java for developing scalable, secure, and efficient applications. By mastering the Full Stack Java Training in KPHB, you can unlock numerous job opportunities and excel in your career.
6-Month Roadmap to Becoming a Full Stack Java Developer
Month 1: Core Java and Fundamentals
Before diving into advanced topics, you need to have a strong grasp of Core Java.
Topics to Cover:
Java Basics – Variables, Data Types, Operators, Control Statements
Object-Oriented Programming (OOP)
Exception Handling
Collections Framework
Multithreading & Concurrency
File Handling & Serialization
JDBC (Java Database Connectivity)
Month 2: Advanced Java and Web Development Basics
Advanced Java:
Servlets & JSP
Hibernate
Spring Core
Spring Boot Basics
Frontend Development:
HTML5, CSS3, JavaScript
Bootstrap for Responsive Design
React.js Basics
Month 3: Spring Boot & Microservices Development
Spring Boot Advanced:
Spring MVC
Spring Security
RESTful APIs Development
Microservices Architecture
Spring Cloud & Service Discovery
Database:
SQL & PL/SQL (Oracle)
CRUD Operations with Java & SQL
Month 4: DevOps and Build Tools
Version Control & Build Tools:
Git, GitHub
Maven & Gradle
DevOps Tools:
Jenkins (CI/CD Automation)
Docker & Containerization
Sonarqube (Code Quality Analysis)
Datadog for Monitoring
ELK (Elasticsearch, Logstash, Kibana) for Logging
Month 5: Testing & Deployment
Testing Frameworks:
JUnit for Unit Testing
Mockito for Mocking
JMeter for Performance Testing
Cloud Deployment:
AWS Basics
Heroku Deployment
Month 6: Agile & Final Project
Agile Tools:
Jira for Project Management
Chef for Configuration Management
Capstone Project:
Develop a Full Stack Java Application using all the learned technologies
Deploy and optimize your project
Final Thoughts
Becoming a Full Stack Java Developer requires dedication, consistent learning, and hands-on practice. By following this six-month roadmap and enrolling in a structured Full Stack Java Training in KPHB, you can fast-track your career in software development. Stay committed, build real-world projects, and keep updating yourself with the latest tools and technologies.
If you’re serious about Full Stack Java Training in KPHB, start today and take the first step towards a successful career in Java development!
#coding#programming#artificial intelligence#software engineering#javascript#javaprogramming#java#fullstack#developer
1 note
·
View note
Text
Monitoring Kubernetes Clusters with Prometheus and Grafana
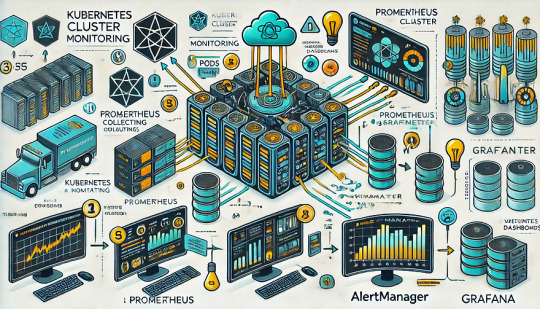
Introduction
Kubernetes is a powerful container orchestration platform, but monitoring it is crucial for ensuring reliability, performance, and scalability.
Prometheus and Grafana are two of the most popular open-source tools for monitoring and visualizing Kubernetes clusters.
In this guide, we’ll walk you through setting up Prometheus and Grafana on Kubernetes and configuring dashboards for real-time insights.
Why Use Prometheus and Grafana for Kubernetes Monitoring?
Prometheus: The Monitoring Backbone
Collects metrics from Kubernetes nodes, pods, and applications.
Uses a powerful query language (PromQL) for analyzing data.
Supports alerting based on predefined conditions.
Grafana: The Visualization Tool
Provides rich dashboards with graphs and metrics.
Allows integration with multiple data sources (e.g., Prometheus, Loki, Elasticsearch).
Enables alerting and notification management.
Step 1: Installing Prometheus and Grafana on Kubernetes
Prerequisites
Before starting, ensure you have:
A running Kubernetes cluster
kubectl and Helm installed
1. Add the Prometheus Helm Chart Repository
Helm makes it easy to deploy Prometheus and Grafana using predefined configurations.shhelm repo add prometheus-community https://prometheus-community.github.io/helm-charts helm repo update
2. Install Prometheus and Grafana Using Helm
shhelm install prometheus prometheus-community/kube-prometheus-stack --namespace monitoring --create-namespace
This command installs: ✅ Prometheus — For collecting metrics ✅ Grafana — For visualization ✅ Alertmanager — For notifications ✅ Node-exporter — To collect system-level metrics
Step 2: Accessing Prometheus and Grafana
Once deployed, we need to access the Prometheus and Grafana web interfaces.
1. Accessing Prometheus
Check the Prometheus service:shkubectl get svc -n monitoring
Forward the Prometheus server port:shkubectl port-forward svc/prometheus-kube-prometheus-prometheus 9090 -n monitoring
Now, open http://localhost:9090 in your browser.
2. Accessing Grafana
Retrieve the Grafana admin password:shkubectl get secret --namespace monitoring prometheus-grafana -o jsonpath="{.data.admin-password}" | base64 --decodeForward the Grafana service port:shkubectl port-forward svc/prometheus-grafana 3000:80 -n monitoring
Open http://localhost:3000, and log in with:
Username: admin
Password: (obtained from the previous command)
Step 3: Configuring Prometheus as a Data Source in Grafana
Open Grafana and navigate to Configuration > Data Sources.
Click Add data source and select Prometheus.
Set the URL to:
sh
http://prometheus-kube-prometheus-prometheus.monitoring.svc.cluster.local:9090
Click Save & Test to verify the connection.
Step 4: Importing Kubernetes Dashboards into Grafana
Grafana provides ready-made dashboards for Kubernetes monitoring.
Go to Dashboards > Import.
Enter a dashboard ID from Grafana’s dashboard repository.
Example: Use 3119 for Kubernetes cluster monitoring.
Select Prometheus as the data source and click Import.
You’ll now have a real-time Kubernetes monitoring dashboard! 🎯
Step 5: Setting Up Alerts in Prometheus and Grafana
Creating Prometheus Alerting Rules
Create a ConfigMap for alerts:yamlapiVersion: v1 kind: ConfigMap metadata: name: alert-rules namespace: monitoring data: alert.rules: | groups: - name: InstanceDown rules: - alert: InstanceDown expr: up == 0 for: 5m labels: severity: critical annotations: summary: "Instance {{ $labels.instance }} is down"
Apply it to the cluster:shkubectl apply -f alert-rules.yaml
Configuring Grafana Alerts
Navigate to Alerting > Notification Channels.
Set up a channel (Email, Slack, or PagerDuty).
Define alert rules based on metrics from Prometheus.
Step 6: Enabling Persistent Storage for Prometheus
By default, Prometheus stores data in memory. To make the data persistent, configure storage:
Modify the Helm values:yamlprometheus: server: persistentVolume: enabled: true size: 10Gi
Apply the changes:shhelm upgrade prometheus prometheus-community/kube-prometheus-stack -f values.yaml
Conclusion
In this guide, we’ve set up Prometheus and Grafana to monitor a Kubernetes cluster. You now have: ✅ Real-time dashboards in Grafana ✅ Prometheus alerts to detect failures ✅ Persistent storage for historical metrics
WEBSITE: https://www.ficusoft.in/devops-training-in-chennai/
0 notes