#250gb
Text
i really really need to get a new laptop coz the one i have rn is my father's old laptop that barely turns on anymore and i need one that can run all the programs my uni needs but also one that has the space for & can run my endless gigabytes of um. legally acquired games. so naturally im looking into getting a gaming laptop but i dont know ANYTHINGGGGGGG about computers like literally what's a cpu whats a gpu whats a ram whats a core. im fucking dying out here
#i wanna play fnv and bg3 and rdr2 and modded-to-hell skyrim but my (father's) laptop can#barely handle discord lmfao😭😭😭 not to mention the several programs i need for school as well as my art stuff#also it doesn't have a D drive and C only has 250gb of space which is NUFFINNNN#and I wanna put windows 7 on it so fucking bad i literally despise windows 10. idc about security risks#barking
3 notes
·
View notes
Text
god I didn’t know how good I had it when I was complaining about this corpus full of .flac files taking up 11GB on my laptop, because I since had to convert all of those to .wav (at least meaning I could delete the .flac ones), and then extract and normalise all the mel features, meaning I have thousands of .h5 files storing mel-spectrograms on my laptop which itself is a 10GB folder 🫠
#my 250GB 2020 MacBook Air doing all this like 😰#very aware my laptop is not old but the storage leaves a lot to be desired rn lmaoo#but also I need more power than this#this audio stuff is taking longer than it needs to cause I have to micromanage my storage at every step
5 notes
·
View notes
Text
I spent a not inconsiderable amount of time deleting stuff off my laptop today so I could install the CK and see if I could at least try to get it to work and

.dll files. my favorite.
#I DONT KNOW WHAT I EXPECTED#this also prevents me from running skyrim#oblivion funnily enough runs fine#anyway it turns out i cant safely launch programs off an external hard drive#at least not big persnickety ones like this#you know i am this close to seeing if i can factory reset my old '14 thinkpad and maybe get it to run the ck#this fucking close#depends on how well my laptop handles with skyrim installed#i am so glad i forked up the extra $50 for the 250gb hard drive on this thing#the default option was 100gb and i was like 'i mean i dont plan on saving anything to it but lets go a size bigger just in case'#in fact i genuinely wish id gone for the bigger one but like. at least im in a workable place#im afraid if i want to install my usual mod library im going to have to delete bullroarer tho#vanilla skyrim... gross#i can probably reasonably alternate#uninstall skyrim to install bullroarer when i want to use it and vice versa#its a lot of work but its cheaper than buying a new computer
4 notes
·
View notes
Text
I need to start deleting old drawings from my drawing app cuz uhh the whole thing is taking 23gb of space in my 128 tablet and it's not looking good
#i am at 88% full storage#and i *do* have an sd card for storing images#its not enough#i really dont want a new tablet this one works perfectly fine#its just that i wish i had gotten the one with 250gb storage instead 2 years ago...
7 notes
·
View notes
Text
Waiting for my Mac to update to the latest OS, mentally ready for whatever bullshit it might fuck up.
Every damn year these stupid machines need to update. It's dumb.
#slurkurants#Think this will be the las OS I upgrade too#Next one I'll have an entire new machine as intel Macs are obsolete now and the M1 and M2 look pretty nice.#Just hope they have some 1T machines out by then those little 250gb pissbaby PCs ain't it#Def getting the purple one
2 notes
·
View notes
Text
why must cleaning out ur hard drive be such a laborious task i want it to magically know which files are redundant or otherwise useless puter we r supposed to be in this together dont u know me by now
#i used up over 900gb of my 1tb hard drive apparently#but over the past few days i've freed up abt 130gb#i'm aiming for at least 250gb of free space minimum so i'll have room for new work stuff#and i'm almost there#originally i wanted to free up to 300gb but that's a lot of deleting
5 notes
·
View notes
Text
8 year old laptop is bulging right where the battery is so guess who's sleeping in the oven till the computer store opens
#plan is to pray she doesnt blow up before i can get a hard drive to put my shit on#computer repair store opens tomorrow#theres a 1tb drive on newegg im looking at but if repair guy has like 250gb for a decent price im gonna go for that for speeds sake#id keep her in a dutch oven but shes too big and i dont wanna fuck with getting the battery out so
0 notes
Text
.
#enski is a dork#and completely forgot that he has sugarsync#every! time!! i have like 250gb available#but i keep dumping files on drive/dropbox/one drive LMAO#i need to just save vtuber voice packs there#i think I'll remember to use it more if i do that#(and not just use it to store art adopts)
0 notes
Text
Omfg…. I just havent been using my 1tb hardrive on my laptop i feel like such a DUMBASS
1 note
·
View note
Text
How to format samsung ssd 850 evo 250gb

#How to format samsung ssd 850 evo 250gb drivers#
#How to format samsung ssd 850 evo 250gb upgrade#
#How to format samsung ssd 850 evo 250gb windows 10#
#How to format samsung ssd 850 evo 250gb android#
#How to format samsung ssd 850 evo 250gb software#
I find this sort of total none logic fault rectifying very exasperating, as is the 'switch it off then back on again' ploy - which worryingly works quite often.Īs someone wrote many years ago regarding Microsoft, 'would you buy a car which when the engine failed to start could be cured by adjusting the wing mirrors' ? I didn't bother with loading Magician as it's just as easy to cut and paste stuff over as I wish. but why did Windows not have the ability to diagnose this as my Sony tablet had done?
#How to format samsung ssd 850 evo 250gb windows 10#
I then plugged it back into Windows 10 where it was instantly recognized by my PC and appeared in my drive list. It immediately came up with 'drive corrupt' requires formatting click here, which I did.
#How to format samsung ssd 850 evo 250gb android#
I tried various fixes then plugged the SSD into my Sony Android tablet. The Samsung was listed in Device Manager but not in My PC drives list. I had a problem with Windows 10 versus Samsung SSD 850. I'm an average 72 year old used to nuts and bolts so this technology is most exasperating. V2.7 came with the drive but the latest is V3.0// In the end I upgraded Samsung Data Migration app from their website and everything worked fine. It was very frustrating and there's are many suggestions out here. Is there anyone who have had solved such problem with installing windows 10 on a brand new Samsung 850 EVO SSD? I am not that technologic but with clear instructions from internet I have fixed some problems.
#How to format samsung ssd 850 evo 250gb drivers#
I've update all the chipset drivers om my PC without solving the problem. I thought it was so easy, just plug in - run - clone - change harddrive, but it is giving me head ache. Att this I have tried with the SSD connected through SATA to USB 3 externally on PC. In BIOS ACHI is activated and the SSD doesn't appear in BIOS.
#How to format samsung ssd 850 evo 250gb software#
I wanted to clone the OS partition/system but Samsung software (Magician and Data transfer manager) can't find the SSD. I bought a Samsung 850 EVO 250GB SSD with a USB 3-SATA cable (came included in the SSD box). Unfortunaly I started updating Windows to Windows 10 and I can't downgrade to Windows 7.
#How to format samsung ssd 850 evo 250gb upgrade#
I am about to upgrade my Asus EeeBox EB1501p with more RAM and a SSD. Too basic questions, but I want to learn. Can it easily be recognised if connected internally? How will I connect it? Do I need to unplug the current HHD and use its port for the SSD? I yes, how can I clone that HHD if it's unplugged from the motherboard? I have read people comment on connecting the SSD internally through SATA II and a power cable. In the thread you mention they seem to have solved the problem with earlier windows, not Windows 10.ĭo you think it is worth trying other cloning software (instead of Samsung Data Migration and Magician) even when the SSD is not recognised in windows explorer or BIOS? The SATA- USB 3-cable I used came with the EVO SSD. Once you've SE'd the drive you can then run the data migration program." If Samsung Magician recognizes the drive then Secure Erase it to restore it to a fresh-out-of-the-box condition. Http /" Remove the SSD from the enclosure and connect it to your laptop with the cable that came with it and then run Samsung Magician and see if it recognizes the drive. Try following the instructions provided by the answerer: I would rather be using Samsungs dedicated software as it includes various optimisation tools (and probably most importantly, firmware updating - I think I am correct in saying this).Ī similar problem appears here for the 840 Evo. My plan is to format my ssd once the Samsung migration software has been updated to accommodate windows 10 and start all over again (for now I have windows 10 on both my ssd and hdd). And once finished move the documents back onto your secondary hdd. Simple to get around if you have an external harddrive to back up your documents, then clone everything that is left (OS etc). The samsung migration/magician tool apparently lets you select what you want to move (helpful if you are keeping a secondary hdd like myself to store docs and pics etc). It seems ok but as far as I can see you can't select what you want to migrate, it's all or nothing. Therefore I used Macrium Reflect (free version did it for me). I thought about waiting until Samsung updated their migration software - but I am far too impatient for that. I had exactly the same problem as you (same samsung ssd, already installed windows 10 etc).
0 notes
Text
i've been meaning to post this for a while now, so here it is
The Gateway GP6-400
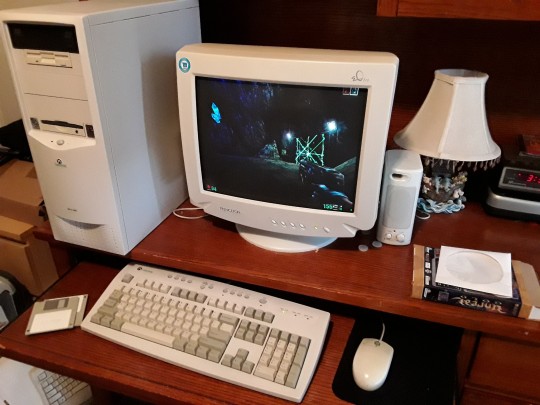
this is my retro pc setup - a modified gateway gp6-400 from 1999. this model in particular really appealed to me; it's powerful enough to run most games up to around 1998 or so, but it still has fairly realistic performance for a typical gaming pc of that era. i still went ahead and swapped out some parts as well as added some new ones in order to get exactly what i want out of it, however.
here's the specs:
- Pentium II 400mhz
- 128mb RAM
- 250gb HDD (win98 partition only uses 6.4gb for accuracy
- Voodoo3 AGP graphics card
- Integrated Ensoniq AudioPCI audio
- ES1868F ISA audio card for DOS gaming
- DVD-RW drive
- 3.5" floppy drive
- 250mb ZIP drive
on the pc there exist two operating systems: windows 98 second edition and ms-dos 6.2 with windows 3.1. now, you likely find this odd considering that ms-dos 7.1 is already accessible from windows 98, but i reeeally wanted a true early 90s dos experience. so, i have a full installation of dos 6.2 on a separate 425mb partition (the size of a decent hdd from 1994 or so) that i access via boot disk.
as you can also see from the pictures, there's a crt monitor as well: the 17" princeton eo710. it was expensive - well-kept crt monitors tend to be that way unfortunately - but it works wonderfully and the display is gorgeous. i try to keep it at around half brightness and contrast, which can make seeing things in games hard at times, but i really would rather not risk wearing it down lol.
overall, it works splendidly. i'm able to run any games made up to around 2001 or so fairly well, and while there's been issues dealing with stupid win98 bullshit, it hasn't been too bad to work on. it's been a dream of mine to own a computer like this for ages, and now that i finally have one...i'm really happy :)
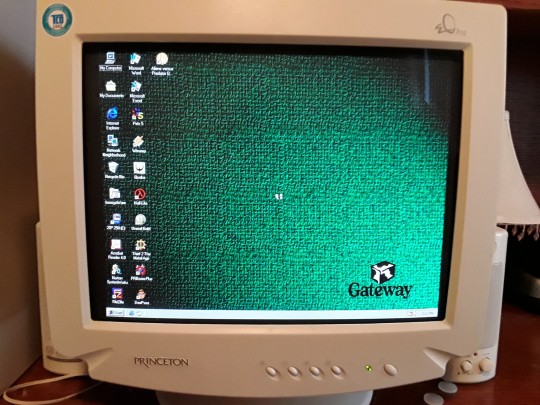
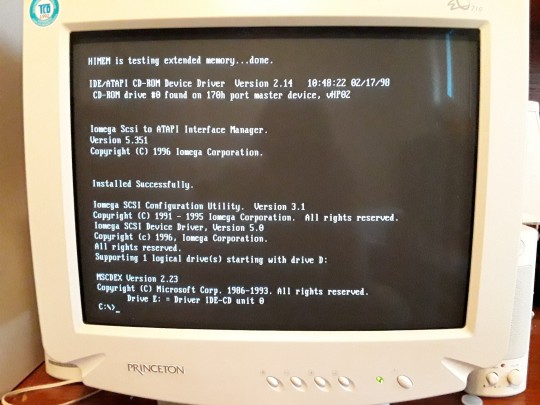
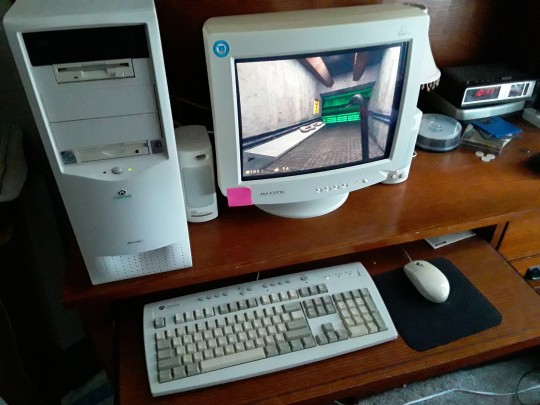
here's some more pics
the windows 98 desktop:
running dos:
@esselfortium 's KDIKDIZD looking amazing on the crt (it looks so much better in person):

and finally, some half-life along with a better view of the front of the pc:
#more people should know about kdikdizd#go play it#retro#retrocomputing#pc#pc games#crtv#crt monitor#unreal#half life#doom#windows 98#win98#ms dos#old pc games#3dfx#tech#stupid hobby stuff#crt#196
381 notes
·
View notes
Text
I upgraded my PC & am starting fresh!
I built my first PC in 2017, and the other day I basically rebuilt it!
CPU: intel i7 6700K -> Ryzen 7 7800X3D
GPU: MSI GTX 1080 Gaming X -> ASUS RTX 4070 Dual OC
RAM: 32GB DDR4 2400MHz -> 32GB DDR5 5200MHz
Storage: 250GB SSD + 1TB SSD + 3TB HDD -> 1TB M.2 SSD + 4TB M.2 SSD
What this means for my Sims 2:
While I still have all my old files on my old drives, I do not plan on copying anything over. This means, I am starting my Sims 2 Downloads folder over from scratch. So, I definitely won't be playing the game for quite some time. I am unsure if this is the end of my Veronaville - I left it in a really random spot and I was getting bored, but I am very attached to those sims so I may see if its playable with all my CC changed one day.
I can't promise I will maintain motivation and get back to the game quicky, but expect to see mod releases and videos along the way.
More info in the form of my 2024 Simming Goals coming soon.

72 notes
·
View notes
Text
My Rotbtd project just keeps growing larger in overall size (now it's like +50gb), so I finally got myself a bigger usb memory stick (250gb) to store the whole thing in one place😂 If even this one runs out of space, I'm completely unhinged and need to re-think my life!

#random ramblings#maskings take away at least half the space lmao#if i run out of space again i have to seclude myself to a mountain until i've learned self-control
53 notes
·
View notes
Text
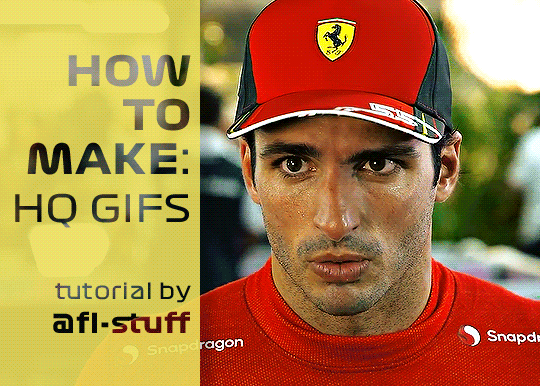
How to Make High Quality Gifs
A few people have asked me for a gif tutorial, so here we go! As a disclaimer, there are many parts of gif-making that are subjective, and this is just my personal process/preferences. If anyone is confused about a particular step, or wants more in-depth info about something, just message me!
Tools:
✧Laptop/computer
✧Adobe Photoshop 2024
✧External Hard Drive (mine is 250GB)
✧Video Downloader (I use the Video Downloadhelper extension on Firefox)
PHASE ONE: Make Animated Gif
1. Download high quality video
This is very important! You should download the highest quality of the video you can find. I use the free Video DownloadHelper extension on Firefox, but it doesn't download audio sometimes (it could be me not using it properly, or they want you to pay to get audio). No audio is fine for gifs, but if I'm doing a video edit, I either need to record the audio separately with Quicktime or use a free online downloader for youtube, twitter, or instagram videos.
For this gif, I downloaded an HD interview from the F1 website with the Video DownloadHelper extension on Firefox.
Tip: Make sure your video file is an .mp4 -> photoshop can struggle with .mov files bc they're larger
2. Import: Video Frames to Layers...
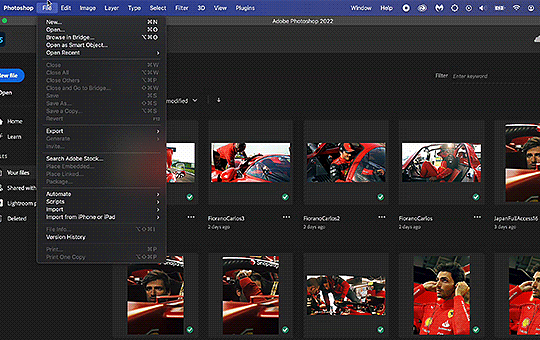
File -> Import -> Video Frames to Layers... -> Open your video -> Selected Video Range -> Make Frame Animation
If photoshop has to load a while to make the frames, it means you should select a smaller portion of the video to animate.
Tip: If you discover that there are duplicates of every frame or that there are way too many frames for the portion of video you want to gif, you may need to re-import and check the "Limit to Every _ Frames" box, and write in "2". This will import every other frame of the video and get rid of duplicates or too many frames.
Once your frames are imported, make sure you're working in the "Motion" workspace by going to the top to Window -> Workspace -> Motion.
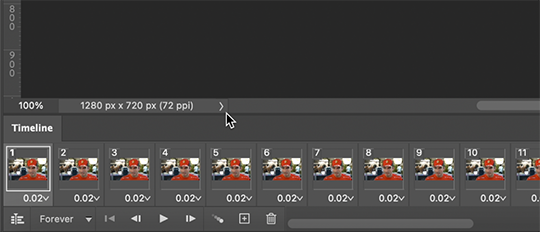
Now, all your frames should appear at the bottom in the Timeline. Make sure that the box in the left corner is set to "Forever", and now it should play the frames and loop back to the beginning each time.
3. Choosing your frames
I usually aim for around 60 frames total for a gif, but sometimes I'll go under or over that number. This particular gif is 55 frames in total. In general, I want my gif to be around 3 seconds in length bc under that feels too short and over that starts to be a large file size. Totally subjective, though! (edit: I have started to experiment with up to 80 frames for some gifs, which comes out to about 4 sec.)
Play through your frames and if you want to delete some, select them and click on the trashcan icon, which you can see in the screenshot above. (If you don't delete them this way, you'll have issues later.)
4. Set Frame Delay

Once you're happy with your frames, select all of them and click on the part that says "0.02", then go to "Other..." I usually choose 0.05 or 0.06, to land my gif around 3 seconds, but it depends on the video and how many frames you have. This particular gif is set to 0.06 because it looked good and brought me to around 3 seconds.
You can always choose a delay and if you don't like it, go back and change it! Just do what looks good to you.
5. Convert to Video Timeline
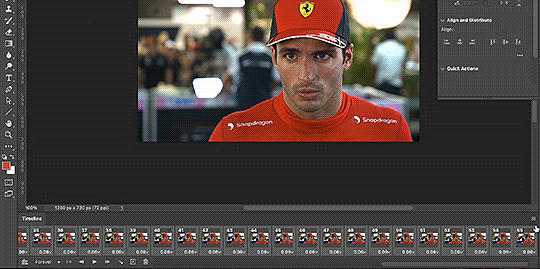
Click on the symbol that looks like 4 lines stacked, and choose "Convert to Video Timeline". Now is usually when I play through the gif to see what the speed is looking like/if I like the frame delay and it's landing somewhere around 3 seconds. If not, you can just Undo and adjust anything when it's still in the frame animation stage.
Next, scroll through the Layers on the right side and delete any layers that don't have the "eye" symbol next to them -> these are frames you deleted in the frame animation stage, but they need to be deleted in the timeline stage as well. Lastly, select all your remaining layers (which should all have the "eye" symbol) so they're all highlighted.
6. Convert to Smart Object
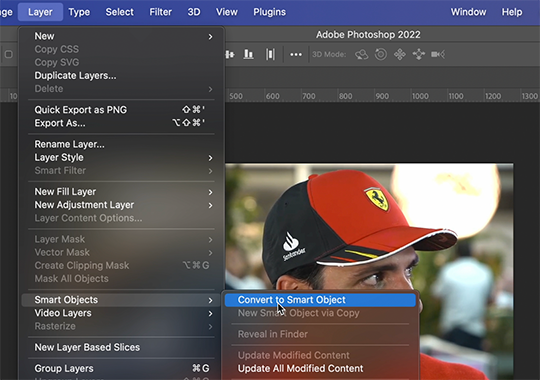
With all layers selected, go to the top to Layer -> Smart Object -> Convert to Smart Object. Ta da! You have a gif.
I always make sure to save my file at this point (you can do it before, but it just depends on how fast you work). Remember to frequently save your progress while gif-making: sometimes, photoshop gets overwhelmed and quits while you're mid-color correction 🥲. You never want to start over from scratch...
Now, some people like to crop & resize their gifs first. Or do sharpening before color. Or color, resize, then sharpen. It's really up to you. The order I like to do is Color, Sharpen, Crop, Resize, Export.
PHASE TWO: Color & Sharpening
(the fun part!)
1. Brightness/Contrast
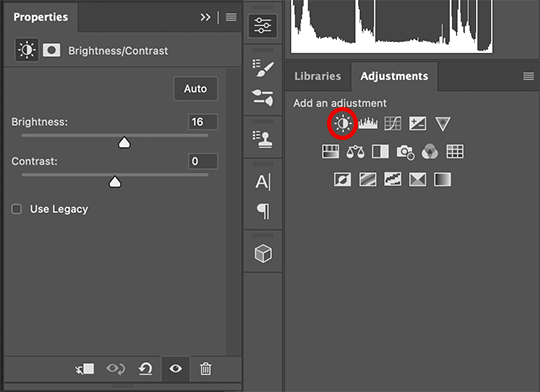
So here's where we start getting into the really subjective stuff. I always use the Brightness/Contrast and the Selective Color adjustment layers to do my coloring. I rarely touch the contrast bc that can be adjusted in selective color, but almost always, the gif needs overall brightening.
Tip: Even when I think a video looks bright to my eyes, sometimes I post the gif and they look dark once they're in the app. My advice is to always brighten a little bit, even when you don't think it's needed...

Here shows the very subtle shift in brightness I did for this gif. It can be a lot more intense depending on the video quality/lighting. The difference will also look a lot more stark after the color layer is applied.
2. Selective ColorNext is color. This is totally up to you and what looks good to your eyes. Make sure you have any software turned off that might change the color of your screen (like a nighttime filter or something that removes blue light).
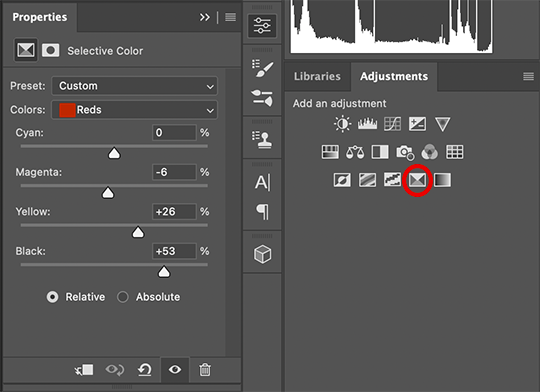
I use selective color bc you can adjust the levels of cyan, magenta, yellow, and black in each color channel independently. This is how I adjust the specific color of red that Charles and Carlos wear, or the amount of cyan in the blacks, etc. The "Neutral" layer effects the whole image, so I'll sometimes add some yellow there if I'm wanting a warmer image, or I'll add or remove black to brighten or darken the mid-tones.
Just play around! Sometimes, I'll take the slider from +100 to -100 back and forth just to see what it's doing to the gif. And I frequently turn on and off the color layer to see what the gif looked like before and after color. (I've found that most F1 content is really magenta-skewed, which you may not even notice until you've corrected it out).
Above is Color vs. No Color.
It might look extreme to you presented this way, but when the whole gif is colored, no one questions it! As long as there's consistency across gifs, that's all that matters. I frequently copy and paste my adjustment layers onto another gif from the same interview/video so the look stays consistent.

Above is Color w/ Brightening vs. Without.
This gives you a better idea of how much of a difference that Brightness/Contrast layer makes.
3. Sharpening
I got my Sharpening routine of choice from this tutorial on gif-making. To be honest, I don't know if it's the best sharpening procedure bc I haven't taken the time to in-depth compare to other ways of doing it, but it looks good to me! So I've stuck with it. (edit: I've also added a Reduce Noise filter to my sharpening routine. But as always, just do what looks nice to you!)
I copy and past the sharpening from my other gifs onto new ones so I don't have to do all the steps again. There are quicker ways of doing this, like using quick actions and stuff, but how I do it is fast enough for me.
If you want to figure out your own Sharpening routine:
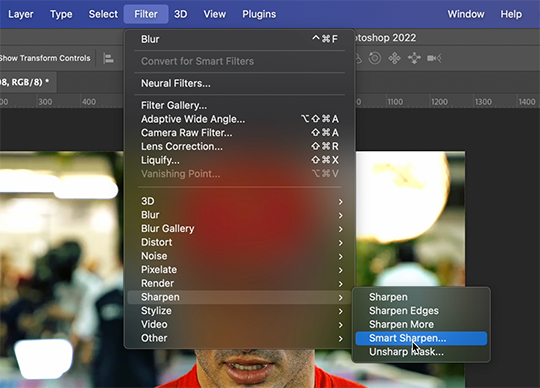
With the gif layer selected, go to the top to Filter -> Sharpen -> Smart Sharpen. It will bring up this window:
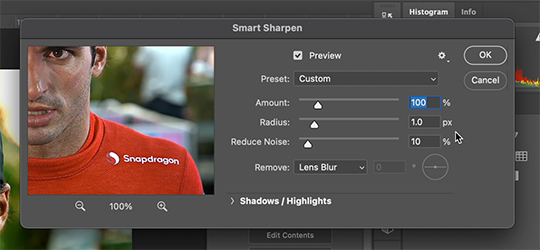
Here you can play around with the amount, radius, noise reduction, etc. and see what you like.
I also add a Gaussian Blur effect, which you'll find under Filter -> Blur -> Gaussian Blur.
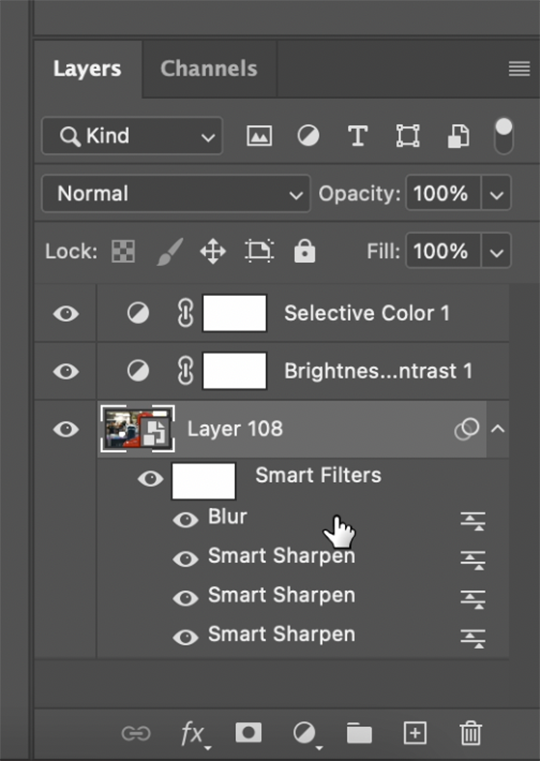
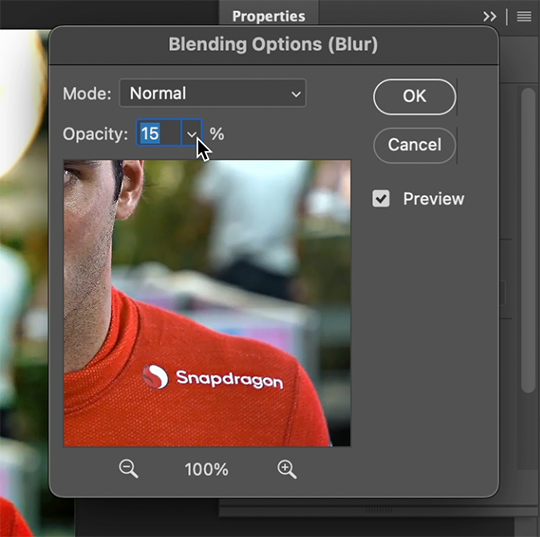
^All of your Sharpen and Blur effects will stack up underneath your gif layer like this. To adjust the opacity of one of these effects, double click on its adjustment/slider symbol to the right, and it'll bring up the Blending Options window.
If there's any sharpening or blurring layer you don't like, you can easily drag it into the trashcan symbol to get rid of it.
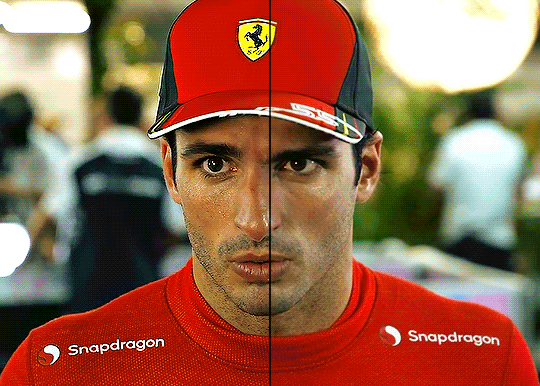
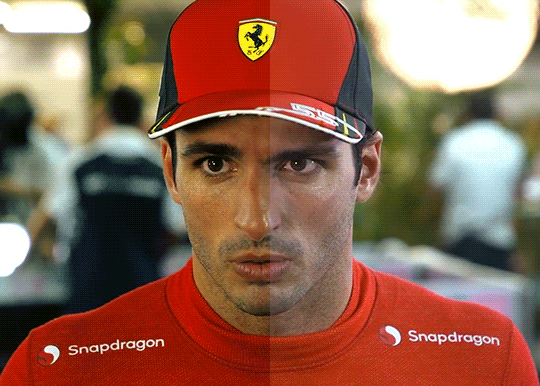
Above is a visual of Sharpened vs. None.
You can really tell with the difference in the Snapdragon logo on either shoulder. But I also personally love how much more Carlos' eyes pop to me on the Sharpened side.
As you can see, it's up to your preference. Sometimes, I really love gifs I see that aren't sharp, but rather really smooth and almost painterly. It's up to the gif-maker!
PHASE THREE: Crop & Resize
1. Cropping
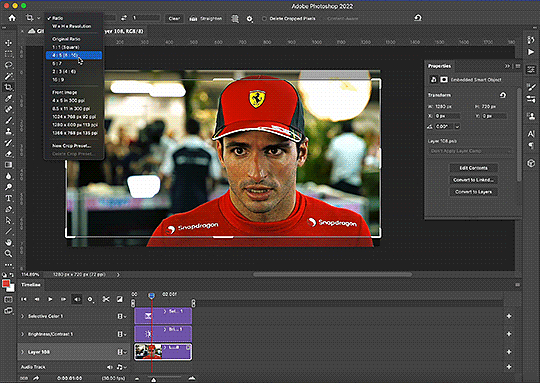
Go to the toolbar on the left and choose the Crop Tool. Above where it says "Ratio", you can choose from preset ratios that photoshop has, or you can make your own. I like to use the presets, or at the very least, clear numbers that you can apply to a whole gifset. Free transforming without a ratio makes it nearly impossible to maintain consistency across a gifset.

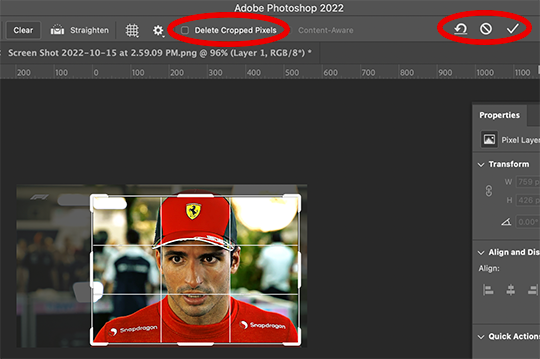
If it isn't already, uncheck "Delete Cropped Pixels". This will allow you to move the gif around inside the cropped area later if you want to adjust what's in frame. It also gives you the option to increase the frame later, if you want. You can also click the gear icon next to "Delete Cropped Pixels" and change how you view the gif during cropping.
When you're done, click the check mark or hit Enter. Now, you've got a cropped gif!
2. Resizing
Go to the top to Image -> Image Size...
Make sure you have Pixels selected. For the Resample tab, I have it set to Automatic here, but sometimes I'll use Bicubic smooth or sharpen, depending on what I'm doing. Here's a cool post that compares the different settings. Just experiment with it.
(edit: I no longer change the resolution to 150. I've found that increasing the resolution, and therefore the size, before ultimately resizing down to 540 px means you are compressing even more (the larger something is, the more it has to be compressed within 540 px). I now leave the resolution at 72, which is what it's set at originally, and if the image composition allows it, try to crop in as close to 540 px as I can get so that when I resize, there's the least amount of compression happening.)
If I know a gif is going to be the full width of a tumblr post, I'll resize the width to 540 pixels (the height doesn't matter). But if I make a portrait-style gif which will be sharing a row with another gif, I'll resize anywhere from 270 px -> 350 px. If it's smaller than 270 px, tumblr will enlarge the gif and it'll look bad. If it's wider than 270 px, tumblr might reduce its quality a bit and it won't look as good. But personally, I prefer that if someone clicks on the gif to enlarge it, it looks better enlarged, so I usually will leave it around 345 px as long as the file isn't too big.
PHASE FOUR: Export (last one!)
Once you're happy with everything about your gif, it's time to export. (Remember to save your progress frequently!)
Go to the top to File -> Export -> Save for Web (Legacy)...
^It'll bring up this Save window.
These are the settings I like to use for gifs. You'll find a lot of differing opinions out there about Adaptive vs. Perceptual/Pattern vs. Diffusion, but you should always have "GIF" selected, "Transparency" checked with "No Transparency Dither" selected, Looping set to "Forever", and Colors set to "256". I like "Bicubic Sharper" for my Quality tab, but there are whole tutorials just about comparing those settings. The best thing to do though is to try them out and compare for yourself.
(edit: I've discovered that if a gif is slightly too large and I don't want to shorten it or resize it down, I can try to reduce the colors from 256 to 128 to get it under the limit. I'll never go below 128, and sometimes I will go to 200 or 170 to try to eliminate as little color variety as possible, but often there is not a noticeable difference in your finished gif. But always compare, of course, to make sure.)
On the bottom left is where the size of the gif is shown -> tumblr requires gifs 10MB and under, but in my experience, gifs load/play best on tumblr when they're around 6MB. I always leave a little growing room as well, bc it might say 5.8MB in this window, but after it saves, the file will have grown a little bit and will likely be over 6MB at that point. (edit: I now regularly post gifs that are around 9.5MB and tumblr seems to be able to handle it better.)

AND THAT'S ALL!
If you've made it this far...congratulations! haha
I know this is a whole lot of information and you might be feeling overwhelmed! But I hope, if anything, this shows you just how complex gif-making can be, and how it is absolutely an art! No one should be stealing anyone's gifs, as a lot of hard work and love goes into the process.
This doesn't include things like adding text to a gif, or more complex adjustments and corrections like masking or key frames. But I'm happy to do more of these if there are specific questions people have.

Let me know what you're curious about or if something is unclear! And happy gif-making! ❤️
#wooow this was a process to make lol#people can let me know if they're curious about adding text or more complex adjustments - i am at your service!#gif tutorial#ask
199 notes
·
View notes
Text
i think one of the biggest steps we, as a society, will be able to take towards sustainability (of, like... everything) is to eliminate the concept of manufactured obsolescence. For big stuff like houses and buildings, but also smaller stuff, especially electronics of all kinds.
And this got a bit long, but the TL;DR (too long; didn't read) is: capitalism is evil and gonna destroy the entire planet unless we abolish it as soon as possible.
There's no real reason why any kind of computer/tablet/phone/etc. can't last more than like 3 years max.
It should be highly illegal for companies to push updates onto our electronics that purposely slow them down, or to stop support of "old" operating systems that aren't even 5 years old yet, in favor of getting a new phone with a new operating system for no reason other than to sell people a new phone.
Same goes for storage, kinda. I have an SD card that's about as big as a SIM card and can store 250GB of data. There's no reason why my phones internal storage is only 25GB, except to push "cloud storage" onto people for companies to secretely mine that data to push more advertising onto us.
And why is it always ads, anyway? Like, at least offer me a service, but they're not doing that.
And not just phones, but literally everything. There's no reason why a fridge or an oven or an automatic feeder or ANY kind of smart device should need a wifi connection to just do the one thing it's supposed to do. None. These things worked just fine in the part when we didn't have any internet of things type bullshit, there's no reason to make these things worse except to squeeze more money out of people.
(I am aware that "smart things" can be incredibly helpful for disabled people to live an independent life. However, in those cases as well, there's no reason why "no internet" should be a fatal point of failure, and there's no reason why something like a thermostat needs to have an internet connection to recieve voice commands. I mean it needs to know like... 3 or 4 words: an activating phrase, "higher", "lower", and numbers. It cannot be complicated enough to require regular updates via internet.)
and non-electronics as well.
Just take clothes.
So many clothes are made out of "polyesther" or "polyacryl" or something else with the word "poly-" at the start, which usually just means "plastic".
And I'm sure there are some uses for plastic clothes like if someone has complicated allergies to a bunch of natural fibers, but there's no reason to have more than 80% of all clothes available on the market be either pure plastic or half plastic.
1) it's absolutely atrocious for the environment, because these clothes leech microplastics into waters like no tomorrow while only lasting like 5 years at best
2) they're just terrible quality-wise. I used to wear a plastic jacket in winter, and i would either sweat to death with it closed without even exhausting myself, or freeze like hell with it open. Neither of which are ideal.
Then i got a cotton sweater to wear in winter and i didn't sweat, but i wasn't cold either. I was comfortably warm without getting sweaty, because the sweater let my skin breathe. Plastic can't do that.
3) Vegans can yell about this one all they want, but "vegan leather" is also just plastic. there's no such thing as "vegan leather", but ACTUAL leather may harm an animal (though with as much beef that's sold all over the world, there's no way there's a shortage of cow leather), but it's only gonna "harm" ONE animal. Not every single animal on earth due to byproducts of the manufacturing process and the fact that it never fucking goes away.
And real leather is so durable. Like, sure, you kill one animal and get its skin for leather (but also its meat for food and everything else, i don't even know how much), if you care for the thing you made from its skin, you're set for literal generations, because it doesn't break after like 5 years. And if that thing does eventually break, you can still break it up and use the leather for new, smaller, things. And once those things break, too, to the point where the leather can't be reused, you can throw it away, knowing that it will decompose soon, instead of sticking around forever.
And I'm sure there's plenty more things, but it all ends up leading back to money and capitalism.
Capitalism tells companies to get money. More money. More money. Get absolutely obscene amounts of money.
and of course the first question that regular people always ask is "but why?"
But here's the thing: the "why" isn't important in capitalism. There's no reason behind the hoarding of wealth, because the hoarding of wealth is the reason.
and remember the saying "When the Last Tree Is Cut Down, the Last Fish Eaten, and the Last Stream Poisoned, You Will Realize That You Cannot Eat Money"?
Yeah, capitalism doesn't care about the fact that you're cutting down the last tree, killing the last fish, and poisoning the last stream. As long as you're making money, the damage you're doing is irrelevant. There's no cost too great for making money, as long as that cost isn't money.
14 notes
·
View notes
Note
Guys, am I the only one fr stressing about the LD economy?
I think 1-2 years ago, even KNOWING someone with an rlc was like a super rare thing. Not even 6 months ago, the cheapest RLC was 250gb (no matter what gen), and even at that price, they went fast. I'm seeing G5 rlcs not selling at 150gb suddenly.
What happened? What's going on with the conmunity? Why are the Lioden devs not taking a total economic crash seriously? Maybe I'm just paranoid, but honestly? Hoard everything. Start getting as much gb as possible because when it crashes (and it will, likely soon), it will crash HARD.
.
7 notes
·
View notes
Last Seen Blogs

d-vewing
inactive! moved to @adorcubus

ash-vertigo
Ash.The.Zebra

dahliaslove
slasher slut

powersentaifan-blog
Power Rangers & Super Sentai Heroines Fan

yntcd
on my tallest tiptoes