#ACL linux
Explore tagged Tumblr posts
Visit Tumblr Blog
Explore Tumblr blogs with no restrictions, modern design and the best experience.
Last Seen Tumblr Blogs


Fun Fact
In 2020, 27% of US Tumblr users had an annual household income of over $100,000.
Text
Unlock the full potential of #AWS with comprehensive courses at your fingertips. Stay updated on cloud advancements and harness the power of Amazon Web Services for your projects. https://www.dclessons.com/amazon-virtual-private-cloud
#aws#amazonwebservices#amazonvpc#virtualprivatecloud#cloudcomputing#networking#security#ec2#elasticcomputecloud#ec2instances#virtualmachines#linux#windows#ubuntu#centos#subnets#routetables#securitygroups#acls#natgateway#igw#vpn#directconnect#vpcpeering#dhcpoptionssets#dns#vpcflowlogs#availabilityzones#region#learnaws
0 notes
Text
“Ağ mühendisliği yolculuğuma başlarken CCNA benim için büyük bir dönüm noktasıydı. Konular karmaşık görünüyordu, neye nasıl çalışmam gerektiğini bilmiyordum. Ancak doğru kaynaklar ve istikrarlı çalışmayla bu süreci başarıyla geçtim. Şimdi edindiğim deneyimi sizinle paylaşmak istiyorum.”
CCNA Nedir?
Cisco’nun 200-301 CCNA sınavı, ağ yönetimi, IP adresleme, güvenlik, otomasyon gibi temel konuları kapsayan, ağ mühendisliğinde bir temel taşıdır.
CCNA Sınav Konuları ve Ağırlıkları:
Network Fundamentals (%20)
Network Access – VLAN, Trunk, STP (%20)
IP Connectivity – Routing, OSPF, Static Routes (%25)
IP Services – DHCP, DNS, NAT (%10)
Security Fundamentals – ACL, Port Security (%15)
Automation & Programmability (%10)
Hazırlık Stratejileri:
Güvenilir Kaynaklar:
Kitap: Wendell Odom – CCNA Official Cert Guide
Online Eğitim: Orhan Ergun CCNA Eğitimi ← 🔗 (Backlink buraya yerleştirildi)
Simülasyonlar: Cisco Packet Tracer, GNS3, EVE-NG
Katmanlı Öğrenme: OSI modelini temel alarak konuları sırasıyla öğrenin. Önce subnetting, ardından VLAN, sonra routing vb.
Günlük Plan: 30 gün boyunca günde en az 3 saatlik çalışma programı oluşturun. Her 3 günde bir konuları tekrar edin ve simülasyonlar yapın.
Son Gün Hazırlıkları:
500+ pratik soru çözmüş olun.
Cisco’nun deneme sınavlarına girin.
Gerçek sınav ortamı simülasyonu yapın.
CCNA'nın Size Katkısı:
Bu sınavdan sonra iş görüşmelerinde daha çok çağrıldım, hatta birkaç iş teklifini karşılaştırma şansım bile oldu.
Siz de aynı şekilde kariyerinize güçlü bir başlangıç yapmak istiyorsanız, kendi yol haritanızı oluşturmanız şart.
.
1 note
·
View note
Text
*satire:* think n o w of each it fail inyourlife eachbluescreen each beep each aaaaw cmooon! each what the each youneed a newdevice each : and wallow forever inthat : is what these clowns weasel in be rather negative than correct *endofsatire.*
*satire:* think n o w of each it fail inyourlife eachbluescreen each beep each aaaaw cmooon! each what the each youneed a newdevice each : and wallow forever inthat : is what these clowns weasel in be rather negative than correct *endofsatire.* /// tja dann stelle dumal verschrobene acl filepermissions in linux wieder her des gesamten betriebssystems und dann die linux treiber in xorg.conf…
0 notes
Text
Using Linux for Database Administration: MySQL, PostgreSQL, MongoDB
Linux is the go-to operating system for database administration due to its stability, security, and flexibility. Whether you’re managing relational databases like MySQL and PostgreSQL or working with a NoSQL database like MongoDB, Linux provides the ideal environment for robust and efficient database operations.
In this post, we’ll explore how Linux enhances the administration of MySQL, PostgreSQL, and MongoDB, along with best practices for maintaining high performance and security.
Why Use Linux for Database Administration?
Stability and Performance: Linux efficiently handles high workloads, ensuring minimal downtime and fast processing speeds.
Security Features: Built-in security mechanisms, such as SELinux and iptables, provide robust protection against unauthorized access.
Open-Source and Cost-Effective: With no licensing fees, Linux offers complete flexibility and cost savings for startups and enterprises alike.
Community Support and Documentation: A vast community of developers and system administrators ensures continuous support and updates.
1. Managing MySQL on Linux
Overview of MySQL
MySQL is a popular open-source relational database management system known for its speed and reliability. It is widely used in web applications, including WordPress, e-commerce platforms, and enterprise solutions.
Key Administrative Tasks in MySQL
User Management: Create, modify, and delete database users with specific roles and permissions to enhance security.
Backup and Recovery: Regular backups are crucial for data integrity. Linux provides tools like cron to automate backup schedules.
Performance Tuning: Optimize query performance by configuring buffer sizes and enabling caching.
Security Configurations: Implement security measures such as data encryption, firewall configurations, and access control lists (ACLs).
Best Practices for MySQL on Linux
Regularly update MySQL and the Linux OS to protect against vulnerabilities.
Monitor system performance using tools like top, htop, and vmstat.
Secure remote access by restricting IP addresses and using SSH keys for authentication.
2. Managing PostgreSQL on Linux
Overview of PostgreSQL
PostgreSQL is an advanced open-source relational database known for its powerful features, including support for complex queries, custom data types, and full ACID compliance. It is commonly used in enterprise applications and data analytics.
Key Administrative Tasks in PostgreSQL
User and Role Management: Assign granular permissions and roles for enhanced security and access control.
Backup and Restoration: Use robust tools like pg_dump and pg_restore for consistent and reliable backups.
Performance Optimization: Tune query execution by optimizing indexes, adjusting shared buffers, and analyzing query plans.
Replication and High Availability: Implement streaming replication for high availability and disaster recovery.
Best Practices for PostgreSQL on Linux
Regularly maintain and vacuum databases to optimize storage and performance.
Enable logging and monitoring to detect slow queries and optimize performance.
Secure database connections using SSL and configure firewalls for restricted access.
3. Managing MongoDB on Linux
Overview of MongoDB
MongoDB is a popular NoSQL database that stores data in flexible, JSON-like documents. It is known for its scalability and ease of use, making it suitable for modern web applications and big data solutions.
Key Administrative Tasks in MongoDB
User Authentication and Authorization: Secure databases using role-based access control (RBAC) and authentication mechanisms.
Data Replication and Sharding: Ensure high availability and horizontal scalability with replication and sharding techniques.
Backup and Restore: Perform consistent backups using tools like mongodump and mongorestore.
Performance Monitoring: Monitor database performance using MongoDB’s built-in tools or third-party solutions like Prometheus and Grafana.
Best Practices for MongoDB on Linux
Use the WiredTiger storage engine for better concurrency and data compression.
Monitor and optimize memory usage for improved performance.
Secure communication with SSL/TLS encryption and IP whitelisting.
Performance Tuning Tips for Linux Databases
Optimize Memory Usage: Adjust buffer sizes and cache settings to enhance database performance.
Enable Query Caching: Speed up repeated queries by enabling caching mechanisms.
Monitor System Resources: Use monitoring tools like Nagios, Prometheus, and Grafana to track resource usage and database performance.
Automate Maintenance Tasks: Schedule routine tasks like backups, vacuuming, and indexing using Linux cron jobs.
Enhance Security: Secure databases with firewalls, SELinux, and role-based access controls.
Conclusion
Using Linux for database administration provides unmatched stability, performance, and security. Whether you are working with MySQL, PostgreSQL, or MongoDB, Linux offers a robust environment for managing complex database operations. By following best practices for installation, configuration, performance tuning, and security, you can ensure high availability and reliability of your database systems. For more details click www.hawkstack.com
0 notes
Text
Are you ready to take your networking skills to the next level and become a certified expert in network analysis and ethical hacking? Look no further! The Certified Wireshark Expert course is your ultimate guide to mastering the art of network analysis using the powerful Wireshark tool.
In this comprehensive and hands-on course, you will delve deep into the world of network analysis, learning how to secure networks, detect vulnerabilities, and gain invaluable insights into network traffic. Wireshark is the go-to tool for network analysts and ethical hackers, enabling them to dissect packets, analyze protocols, and uncover potential security risks.
Starting with the fundamentals, you will learn the inner workings of network protocols and understand the intricacies of the TCP/IP model. You will set up your own ethical hacking lab by installing Kali Linux and virtual machines, creating a safe and controlled environment for your network analysis experiments.
With a focus on practicality, you will explore the importance of promiscuous mode, discover how switches influence data transmission, and gain a comprehensive understanding of Protocol Data Units (PDU) and their significance in network analysis. Through real-world examples, you will uncover the secrets of email communication and learn how packets flow across the internet.
The course takes you on a journey through the essential features of Wireshark, teaching you how to navigate its user-friendly interface, utilize powerful display filters, and leverage plugins to gain deeper insights into captured data. You will gain expertise in capturing and analyzing network traffic, detecting anomalies, and identifying potential security breaches.
As you progress, you will delve into advanced topics, including intrusion detection systems (IDS), access control lists (ACL), firewalls, and the role they play in securing networks. You will master the art of capturing traffic with Wireshark, applying live filters, and understanding different signal types encountered in network analysis.
One of the highlights of this course is mastering TCP states and their significance in troubleshooting network issues. You will gain the skills to analyze network protocols, dissect packet structures, and enhance your ability to troubleshoot and optimize network performance.
Throughout the course, you will engage in practical exercises, real-world case studies, and interactive demonstrations, ensuring that you not only understand the theoretical concepts but also develop the necessary hands-on skills to excel in network analysis and ethical hacking.
By the end of this course, you will have the knowledge and practical expertise to become a certified Wireshark expert, ready to tackle complex network analysis challenges and enhance the security of any network infrastructure. Whether you are a network administrator, cybersecurity professional, or aspiring ethical hacker, this course will empower you to succeed in the ever-evolving world of networking.
Don't miss this opportunity to unlock your network analysis potential and become a certified expert in Wireshark. Enroll now and embark on a transformative journey towards mastering network analysis and ethical hacking
0 notes
Text
https://www.reddit.com/r/PleX/comments/k2lj2n/problem_mounting_ntfs_drives_so_they_can_be_seen/
There is a much simpler method to add f.i. a (usb) ntfs (or other) media disk to Plex.
Just plug it in your usb port of the plex server/computer.
The problem is that it will be mounted under /media/<user> (where user is your login)
Linux restricts access to /media/<user> via acls to the <user>
sudo getfacl /media/<user>
The problem is that while adding media to Plex, it cannot "cd" over/to /media/<user>
To fix this, simply add the user "plex" to the acl of /media/<user> wth this command:
sudo setfacl -m u:plex:rx /media/<user>
Optionally you can create a symbolic link to your media folder.
Suppose your media folder is called "films" and it is located on a drive auto-mounted as /media/<user>/mydrive, then you can create a symbolic link at /film:
ln -s /media/<user>/mydrive/films /film
Now you can browse in Plex to that folder /film and view and index your media.
0 notes
Text
Real-World Applications of RHCSA and RHCE Skills
The Red Hat Certified System Administrator (RHCSA) and Red Hat Certified Engineer (RHCE) certifications are highly regarded in the IT industry. These certifications validate an individual's skills in managing and automating Red Hat Enterprise Linux environments. However, the value of these certifications extends beyond just passing exams; the skills acquired are directly applicable to various real-world scenarios in the IT domain. Let's explore some of the practical applications of RHCSA and RHCE skills.
1. Server Management and Maintenance
RHCSA:
User and Group Management: Creating, modifying, and managing user accounts and groups. This is crucial for maintaining security and organization within a server environment.
File Permissions and ACLs: Setting appropriate permissions and access control lists to protect sensitive data and ensure users have the necessary access to perform their jobs.
Service Management: Starting, stopping, enabling, and disabling services using systemctl. This is essential for maintaining the uptime and performance of services.
RHCE:
Advanced System Monitoring: Using tools like top, htop, vmstat, and iotop to monitor system performance and diagnose issues.
Network Management: Configuring and troubleshooting network interfaces, firewalls, and SELinux settings to secure and optimize network communications.
2. Automating System Administration Tasks
RHCSA:
Shell Scripting: Writing basic scripts to automate repetitive tasks, such as backups, user creation, and log rotation.
Cron Jobs: Scheduling routine tasks to run automatically at specified times, ensuring consistent system maintenance without manual intervention.
RHCE:
Ansible Automation: Utilizing Ansible for configuration management and automation. Creating playbooks to automate complex multi-tier deployments and configurations.
Automating Deployments: Streamlining the process of deploying applications and services using automated scripts and configuration management tools.
3. System Security and Compliance
RHCSA:
Security Enhancements: Implementing basic security measures such as configuring firewalls with firewalld, and managing SELinux to enforce security policies.
Auditing and Logging: Setting up and maintaining system logs to monitor and audit system activities for compliance and troubleshooting purposes.
RHCE:
Advanced Security Configurations: Applying more sophisticated security measures such as configuring advanced SELinux policies, managing TLS/SSL certificates for secure communications, and implementing secure SSH practices.
System Auditing and Reporting: Using tools like auditd to create detailed security audits and reports, ensuring systems comply with security policies and standards.
4. Troubleshooting and Problem Solving
RHCSA:
Basic Troubleshooting: Using commands like journalctl, dmesg, and systemctl to diagnose and resolve common issues related to system performance, boot processes, and service failures.
Disk Management: Managing storage with LVM (Logical Volume Management) and understanding disk usage with tools like df and du.
RHCE:
Advanced Troubleshooting: Diagnosing complex issues involving network services, storage systems, and application performance. Using advanced tools and techniques to pinpoint and resolve problems.
System Recovery: Implementing disaster recovery plans, including restoring from backups, repairing boot issues, and recovering corrupted file systems.
5. Managing Enterprise Environments
RHCSA:
Package Management: Installing, updating, and managing software packages using yum or dnf, ensuring that systems have the necessary software and updates.
Network Configuration: Setting up and managing basic network configurations, including IP addresses, DNS settings, and hostname configurations.
RHCE:
Centralized Authentication: Setting up and managing centralized authentication services such as LDAP, Kerberos, and integrating with Active Directory.
Clustering and High Availability: Configuring and managing Red Hat High Availability Clustering to ensure critical services are always available.
6. DevOps and Continuous Integration/Continuous Deployment (CI/CD)
RHCSA:
Version Control Systems: Basic knowledge of version control systems like Git, which is fundamental for managing code and configuration files.
Containerization: Introduction to containerization concepts using tools like Docker.
RHCE:
CI/CD Pipelines: Setting up and managing CI/CD pipelines using tools like Jenkins, GitLab CI, or Red Hat OpenShift, enabling automated testing, integration, and deployment of applications.
Advanced Container Management: Managing and orchestrating containers using Kubernetes and Red Hat OpenShift, ensuring scalable and reliable deployment of containerized applications.
Conclusion
The skills acquired through RHCSA and RHCE certifications are not just theoretical but have direct, practical applications in the real world. Whether it's managing and securing servers, automating administrative tasks, or setting up robust enterprise environments, these certifications equip IT professionals with the knowledge and tools necessary to excel in their careers. By applying these skills, professionals can ensure efficient, secure, and high-performing IT operations, ultimately driving organizational success.
For more details click www.qcsdclabs.com
#redhatcourses#information technology#containerorchestration#kubernetes#docker#linux#container#qcsdclabs#rhcsa#rhce#devops#ansibleautomation
1 note
·
View note
Text
How to Manage Your Azure Storage Resources with Azure Storage Explorer
Azure Storage is a cloud service that provides scalable, durable, and highly available storage for your data. You can use Azure Storage to store and access blobs, files, queues, tables, and disks. However, managing your Azure storage resources can be challenging if you don’t have the right tools.
That’s why Microsoft offers Azure Storage Explorer, a free and cross-platform application that lets you easily work with your Azure Storage data on Windows, macOS, and Linux. With Azure Storage Explorer, you can:
Upload, download, and copy blobs, files, queues, tables, and disks
Create snapshots and backups of your disks
Migrate data from on-premises to Azure or across Azure regions
Manage access policies and permissions for your resources
Monitor and troubleshoot your storage performance and issues
In this article, we will show you how to get started with Azure Storage Explorer and how to use it to manage your Azure storage resources.
Download and Install Azure Storage Explorer
To download and install Azure Storage Explorer, follow these steps:
Go to the Azure Storage Explorer website and select the download link for your operating system.
Run the installer and follow the instructions to complete the installation.
Launch Azure Storage Explorer from your desktop or start menu.
Connect to Your Azure Storage Account or Service
To connect to your Azure storage account or service, you have two options:
Sign in to your Azure account and access your subscriptions and resources
Attach to an individual resource using a connection string, a shared access signature (SAS), or an Azure Active Directory (Azure AD) credential
To sign in to your Azure account, follow these steps:
In Azure Storage Explorer, select View > Account Management or select the Manage Accounts button.
Select Add an account and choose the Azure environment you want to sign in to.
A web page will open for you to sign in with your Azure account credentials.
After you sign in, you will see your account and subscriptions under ACCOUNT MANAGEMENT.
Select the subscriptions you want to work with and select Apply.
You will see the storage accounts associated with your selected subscriptions under EXPLORER.
To attach to an individual resource, follow these steps:
In Azure Storage Explorer, select Connect or select the Connect to Azure Storage button.
Select Use a connection string or a shared access signature URI or Use a storage account name and key or Sign in using Azure Active Directory (Azure AD) depending on the type of credential you have.
Enter the required information for your credential type and select Next.
Enter a display name for the resource and select Next.
You will see the resource under Local & Attached > Storage Accounts.
Manage Your Azure Storage Resources
Once you have connected to your Azure storage account or service, you can start managing your resources using Azure Storage Explorer. Here are some of the common tasks you can perform:
To upload or download blobs or files, right-click on a container or a file share and select Upload or Download. You can also drag and drop files from your local machine to a container or a file share.
To copy blobs or files between different accounts or services, right-click on a blob or a file and select Copy URL. Then go to the destination container or file share and select Paste Blob or Paste File.
To create snapshots of your disks, right-click on a disk and select Create Snapshot. You can also restore a disk from a snapshot by selecting Restore Disk from Snapshot.
To migrate data from on-premises to Azure or across Azure regions, use the AzCopy tool that is integrated with Azure Storage Explorer. You can access it by selecting Edit > Copy AzCopy Command.
To manage access policies and permissions for your resources, right-click on a resource and select Manage Access Policies or Manage Access Control Lists (ACLs). You can also use the role-based access control (RBAC) feature of Azure AD to grant permissions to users and groups.
To monitor and troubleshoot your storage performance and issues, use the metrics and logs features of Azure Monitor that are integrated with Azure Storage Explorer. You can access them by selecting View > Metrics or View > Logs.
Understand Your Azure Storage Costs
Azure Storage offers different pricing options for different types of services and usage scenarios. You can use the Azure pricing calculator to estimate your costs based on your expected usage.
Some of the factors that affect your Azure storage costs are:
The type of storage account you choose (standard or premium)
The redundancy option you choose (locally redundant, zone redundant, geo-redundant, or geo-zone redundant)
The performance tier you choose (hot, cool, or archive)
The amount of data you store and the number of transactions you perform
The data transfer and network fees for moving data in and out of Azure
To optimize your Azure storage costs, you can use the following best practices:
Choose the right storage account type, redundancy option, and performance tier for your workload requirements and availability needs
Use lifecycle management policies to automatically move your data to lower-cost tiers based on your access patterns
Use reserved capacity to save money on predictable storage usage for one or three years
Use Azure Hybrid Benefit to save money on storage costs for Windows Server virtual machines
Monitor your storage usage and costs using Azure Cost Management and Billing
Conclusion
Azure Storage Explorer is a powerful and convenient tool that helps you manage your Azure storage resources. You can use it to upload, download, copy, backup, migrate, and secure your data. You can also use it to monitor and troubleshoot your storage performance and issues. Moreover, you can use it to understand and optimize your Azure storage costs.
#app development#it consulting#software#web developers#web development#website design#web developing company#webdevelopment#business#design#azure#microsoft
0 notes
Text
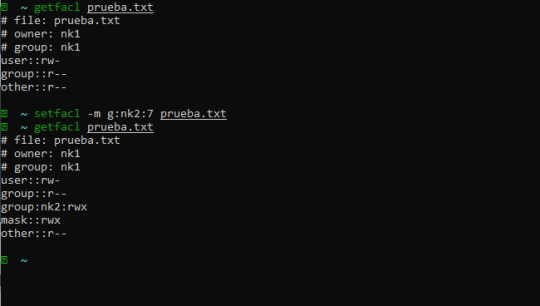
Gestión de ACL mediante los comandos Getfacl y Setfacl en Linux
Gestión de ACL mediante los comandos Getfacl y Setfacl en Linux
Listas de control de acceso (también conocidas como ACL’s) son un método flexible para establecer permisos en Linux. Todos los sistemas operativos tienen algún nivel de ACL, que asignan permisos a usuarios y grupos en archivos y directorios. Entonces, ¿por qué se requieren ACL en cualquier variante de Linux? Cada archivo que creamos en Linux tiene unos permisos, que se aplican a todos los…
View On WordPress
0 notes
Text
SSH Shell

Price: KiTTY is free to use. KiTTY is an SSH client that is based on PuTTY’s 0.71 version.
The Secure Shell extension works with non-Google HTTP-to-SSH proxies via proxy hooks, and third-party application nassh-relay can use those hooks to enable the Secure Shell extension to establish an SSH connection over XMLHttpRequest or WebSocket transport.
Ssh Shell For Mac
Ssh Shell Mac
Ssh Shell Script Example
Ssh Shell For Windows
SSH.NET is a Secure Shell (SSH-2) library for.NET, optimized for parallelism. This project was inspired by Sharp.SSH library which was ported from java and it seems like was not supported for quite some time. This library is a complete rewrite, without any third party dependencies, using parallelism to achieve the best.
This is quite a common task for Linux system administrators, when it is needed to execute some command or a local Bash script from a one Linux workstation or a server on another remote Linux machine over SSH.

In this article you will find the examples of how to execute a remote command, multiple commands or a Bash script over SSH between remote Linux hosts and get back the output (result).
This information will be especially useful for ones, who want to create a Bash script that will be hosted locally on a one Linux machine but would be executed remotely on the other hosts over SSH.
Cool Tip: Connect to a remote SSH server without typing a password! Configure a passwordless authentication! Only 3 easy steps! Read more →
SSH: Execute Remote Command
Execute a remote command on a host over SSH:
Examples
Get the uptime of the remote server:
Reboot the remote server:
SSH: Run Multiple Remote Commands
Ssh Shell For Mac
In the most cases it is not enough to send only one remote command over SSH.
Much more often it is required to send multiple commands on a remote server, for example, to collect some data for inventory and get back the result.
There are a lot of different ways of how it can be done, but i will show the most popular of them.
Run multiple command on a remote host over SSH:
– or –
– or –
Cool Tip: SSH login is too slow? This can be fixed easily! Get rid of delay during authentication! Read more →
Examples
Get the uptime and the disk usage:
Get the memory usage and the load average:
Show the kernel version, number of CPUs and the total RAM:
SSH: Run Bash Script on Remote Server
The equally common situation, when there is some Bash script on a Linux machine and it needs to connect from it over SSH to another Linux machine and run this script there.
The idea is to connect to a remote Linux server over SSH, let the script do the required operations and return back to local, without need not to upload this script to a remote server.
Certainly this can be done and moreover quite easily.
Cool Tip: Want to ROCK? Start a GUI (graphical) application on a remote Linux workstation over SSH! Read more →
Example
Execute the local script.sh on the remote server:
-->
Secure Shell (SSH) allows you to remotely administer and configure your Windows IoT Core device
Using the Windows 10 OpenSSH client
Important
The Windows OpenSSH client requires that your SSH client host OS is Windows 10 version 1803(17134). Also, the Windows 10 IoT Core device must be running RS5 Windows Insider Preview release 17723 or greater.
The OpenSSH Client was added to Windows 10 in 1803 (build 17134) as an optional feature. To install the client, you can search for Manage Optional Features in Windows 10 settings. If the OpenSSH Client is not listed in the list of installed features, then choose Add a feature.
Next select OpenSSH Client in the list and click Install.
Ssh Shell Mac
To login with a username and password use the following command:
Where host is either the IP address of the Windows IoT Core device or the device name.
The first time you connect you see a message like the following:
Type yes and press enter.
If you need to login as DefaultAccount rather than as administrator, you will need to generate a key and use the key to login. From the desktop that you intend to connect to your IoT Device from, open a PowerShell window and change to your personal data folder (e.g cd ~)
Register the key with ssh-agent (optional, for single sign-on experience). Note that ssh-add must be performed from a folder that is ACL'd to you as the signed-in user (BuiltinAdministrators and the NT_AUTHORITYSystem user are also ok). By default cd ~ from PowerShell should be sufficient as shown below.
Tip
If you receive a message that the ssh-agent service is disabled you can enable it with sc.exe config ssh-agent start=auto
To enable single sign, append the public key to the Windows IoT Core device authorized_keys file. Or if you only have one key you copy the public key file to the remote authorized_keys file.
If the key is not registered with ssh-agent, it must be specified on the command line to login:
If the private key is registered with ssh-agent, then you only need to specify DefaultAccount@host:
The first time you connect you see a message like the following:
Type yes and press enter.
You should now be connected as DefaultAccount
To use single sign-on with the administrator account, append your public key to c:dataProgramDatasshadministrators_authorized_keys on the Windows IoT Core device.
You will also need to set the ACL for administrators_authorized_keys to match the ACL of ssh_host_dsa_key in the same directory.
To set the ACL using PowerShell
Note
If you see a REMOTE HOST IDENTIFICATION CHANGED message after making changes to the Windows 10 IoT Core device, then edit C:Users<username>.sshknown_hosts and remove the host that has changed.

See also: Win32-OpenSSH
Using PuTTY
Download an SSH client
In order to connect to your device using SSH, you'll first need to download an SSH client, such as PuTTY.
Ssh Shell Script Example
Connect to your device
In order to connect to your device, you need to first get the IP address of the device. After booting your Windows IoT Core device, an IP address will be shown on the screen attached to the device:
Now launch PuTTY and enter the IP address in the Host Name text box and make sure the SSH radio button is selected. Then click Open.
If you're connecting to your device for the first time from your computer, you may see the following security alert. Just click Yes to continue.
If the connection was successful, you should see login as: on the screen, prompting you to login. Enter Administrator and press enter. Then enter the default password p@ssw0rd as the password and press enter.
If you were able to login successfully, you should see something like this:
Update account password
It is highly recommended that you update the default password for the Administrator account.
Ssh Shell For Windows
To do this, enter the following command in the PuTTY console, replacing [new password] with a strong password:
Configure your Windows IoT Core device
To be able to deploy applications from Visual Studio 2017, you will need to make sure the Visual Studio Remote Debugger is running on your Windows IoT Core device. The remote debugger should launch automatically at machine boot time. To double check, use the tlist command to list all the running processes from PowerShell. There should be two instances of msvsmon.exe running on the device.
It is possible for the Visual Studio Remote Debugger to time out after long periods of inactivity. If Visual Studio cannot connect to your Windows IoT Core device, try rebooting the device.
If you want, you can also rename your device. To change the 'computer name', use the setcomputername utility:
You will need to reboot the device for the change to take effect. You can use the shutdown command as follows:
Commonly used utilities
See the Command Line Utils page for a list of commands and utilities you can use with SSH.
1 note
·
View note
Text
tja dann stelle dumal verschrobene acl filepermissions in linux wieder her des gesamten betriebssystems und dann die linux treiber in xorg.conf fuer beide gpu s zur treiberbeschleunigung um dann dichmitlogin greeters fuer die gui zuplagen du aeh profi
tja dann stelle dumal verschrobene acl filepermissions in linux wieder her des gesamten betriebssystems und dann die linux treiber in xorg.conf fuer beide gpu s zur treiberbeschleunigung um dann dichmitlogin greeters fuer die gui zuplagen du aeh profi alsbelohnung hastdu immerhineinen screenshot von lxqt xfce und gnome I am Christian KISS BabyAWACS – Raw Independent Sophistication #THINKTANK +…
0 notes
Text
Qué significa iniciar sesión Uso en tecnología de la información En tecnologías de la información, mediante autorización, se establecen los derechos de acceso a los recursos de información y sistemas de procesamiento de datos. Para ello, se utilizan varios tipos de autorización, que se pueden dividir en tres clases: Control de acceso discrecional En el caso del control discrecional (selectivo) (DAC), el acceso a objetos, datos o funciones se otorga a sujetos, usuarios o grupos de usuarios explícitamente especificados. Cada objeto tiene un sujeto adjunto: el propietario, que establece los derechos de acceso al objeto. Además, el sistema tiene un sujeto dedicado: el superusuario, que tiene derecho a establecer derechos de acceso para todos los sujetos. Y cualquier sujeto puede transferir los derechos que tiene a otros sujetos. Dicho acceso se utiliza en sistemas operativos modernos, donde el uso más común de autorización y listas de control de acceso (ACL) para la autorización. Control de acceso obligatorio El acceso obligatorio (MAC) consiste en dividir la información según el grado de secreto y los usuarios según los niveles de acceso a esta información. La principal ventaja del acceso obligatorio es que limita los derechos del propietario del objeto. Los derechos de los sujetos sobre los objetos que crean dependerán de su nivel de acceso, por lo que no pueden delegarlos accidental o deliberadamente a usuarios no autorizados. De acuerdo con los requisitos de FSTEC, el control de acceso obligatorio es una diferencia clave entre los sistemas de protección de los Secretos de Estado de la Federación de Rusia de las clases superiores 1B y 1B de las clases inferiores de sistemas de protección basados en el modelo discrecional. El soporte de control de acceso obligatorio está presente en algunos sistemas operativos como Ubuntu, SUSE Linux, FreeBSD. También se utiliza en sistemas de gestión de bases de datos. A veces se utiliza junto con el control de acceso discrecional. Control de acceso basado en roles El desarrollo de la política de acceso selectivo es el control de acceso basado en roles (RBAC), donde el acceso a los objetos del sistema se forma teniendo en cuenta las especificidades de su aplicación en función del rol de los sujetos en cada momento. Los roles le permiten definir reglas de control de acceso que son comprensibles para los usuarios. El rol combina las propiedades de control de acceso selectivo, asignando objetos a sujetos, y obligatorio, al cambiar de rol también cambiará el acceso a un grupo de archivos, pero este tipo de acceso es más flexible que los anteriores y puede simularlos. RBAC ahora se usa ampliamente para administrar los privilegios de los usuarios dentro de un solo sistema o aplicación. La lista de dichos sistemas incluye Microsoft Active Directory, SELinux, FreeBSD, Solaris, Oracle Database, PostgreSQL 8.1, SAP R / 3, Lotus Notes y muchos otros. Uso bancario Autorización de tarjeta bancaria El término "autorización" en relación con el sector bancario significa el procedimiento para obtener el permiso del banco emisor u otra entidad legal (por ejemplo, una empresa de procesamiento), que actúa en su nombre, para realizar una transacción con tarjeta. Una solicitud de autorización contiene información sobre una tarjeta bancaria, el monto de la compra o emisión en una tarjeta bancaria. Una respuesta positiva a la autorización indica que esta tarjeta bancaria es válida y el saldo en ella le permite realizar la operación necesaria. Una respuesta negativa a la autorización, respectivamente, puede ser el resultado de un mal funcionamiento en el sistema de pago o la falta de fondos en la cuenta de la tarjeta. Una vez completada la transacción, el dispositivo electrónico emite un cheque. Incia Sesion
1 note
·
View note
Photo
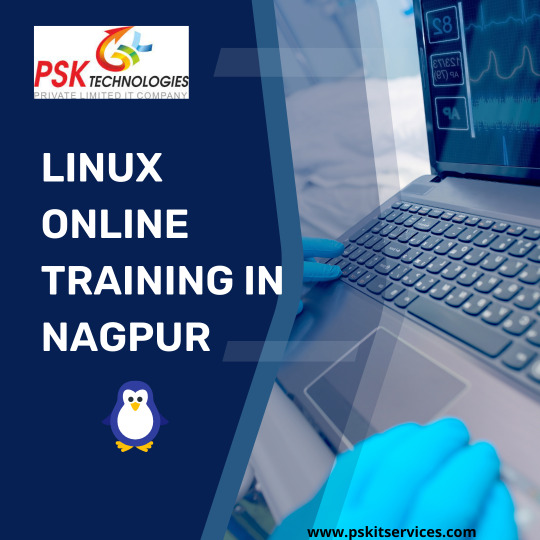
LINUX ONLINE TRAINING IN NAGPUR
PSK TECHNOLOGIES PVT. LTD.
We provide the best online training in Linux
Free Demo classes for 3 Days
Regular Batch
Full Practical Knowledge
Provide All Type Of Notes
Duration: 1 month
Earliest Start Date: Contact Us
All Languages: English, Hindi, Marathi
Study Type: Online
Time: Part-time
What is Linux?
Linux is an open source operating system (OS). An operating system is the software that directly manages a system’s hardware and resources, like CPU, memory, and storage. The OS sits between applications and hardware and makes the connections between all of your software and the physical resources that do the work.
Our course in Linux
Introduction to Unix & Linux
History of Unix & Linux
Basic Concepts of Operating Systems,
Kernel, shell and file system structure
System Structure
Basic concepts of Linux
Differences between Red Hat Enterprise Linux & cent os
Commands of Linux
Installation Of Linux
Interactive installation
INIT Process
Software Package Administration
Installing and deleting software packages
Querying and updating software packages
User and Group Administration
Creating and deleting users from the systems
Modifying users profile
Creating and deleting groups
Important system files related to user administration
Creating, deleting and modifying users and group & policy
Advanced File Permissions
Creating, modifying and deleting ACL’s
Disk Partitioning and Mounting File System
Backup and recovery
NFS SERVER
NIS SERVER
DNS SERVER
Web Server (Apache)
Basics of Web Service
Introduction to Apache
Configuring Apache for main site
Configuring Apache for multiple sites using IP-based, portbased and
name-based virtual hosting
FTP Server (vsftp daemon)
Basics of File Transfer Protocol
Configuring vsftpd for anonymous ftp service
Samba Service
Basics of file sharing in Windows ,Configuring Samba service for
file sharing with windows systems
Troubleshooting your system
Recovering the super user password
0 notes
Text
関連:なぜWindowsはまだNTFSを使っているのでしょうか?なぜフラグメンテーションが起きにくいLinuxのext4ではないのでしょうか?
興味深い回答がたくさんついていますね(訳注:英語版Quoraで)。この質問については私からのちょっと変わった視点からお答えしたいと思います。私はUNIX用のジャーナリングファイルシステム開発に携わり、Windows NT 3.1が出る直前に販売に漕ぎつけました。私はWindows NT 3.1がまだベータ版だったころから開発を始め、Windowsの内部の仕組み、特にファイルシステムについて多くのことを学びました。私は1996年に「Windowsのファイルシステムの開発」と題したセミナーを開催しており、後にマイクロソフトに入社してNTFSの開発リーダーとなる男性が52人の出席者の中にいました。彼とは先月にまた会う機会があり(いつも会ってますが)、たまたまファイルシステムの話になりました。 ファイルシステムはデータを長期���保管するというその目的から、ソフトウェアの寿命としては長寿になる傾向があります。高い信頼性が求められます。ウェブブラウザがメモリを使い果たしてクラッシュした場合、ウェブブラウザを再起動すれば問題は解決するでしょう。しかしファイルシステムがメモリ不足でクラッシュした場合、コンピューターを再起動することになり、データを失ったことが後で判明します。問題はその後も残ってしまうでしょう。 NTFSの設計は当時としては最先端のファイルシステムでした。彼らはファイルシステムをマイクロカーネルの手法で開発しようとしていたため、ファイルシステムを別プロセスにしていましたが、当時のハードウェアは非常に非力であり、深刻なパフォーマンスの問題が起きたため、結局この方針は断念されました。この実装の名残は今日にも残されています(キューに投入したファイルシステムの操作要求を処理するファイルシステムプロセス(Fsp)というルーチンがあります)。Windows NTを設計したデビッド・カトラーは長年マイクロカーネルの信奉者でした(まだ誰もマイクロカーネルの概念を知らなかった1973年に発表された論文であるSOSPの共著者で、マイクロカーネルの設計について解説されています)。NTFSは耐障害性を高めるために事前にジャーナルを書き出すトランザクション方式を採用しており、これは恐らくその数年前に開発されたCedarファイルシステムの研究成果が基になっているものと思われます。それにはきめの細かいACL制御が搭載されていました(私が開発していたファイルシステムも同じで、POSIXセキュリティのドラフト版で全く同じ概念が採用されているのを知っていたので、ACLの実装を見たときは非常に安心感がありました)。 1つのファイルに複数の異なるデータの単位(ストリーム)がありました(私たちのファイルシステムでは別の用語が使われており、大きな制約がありました)。OS/2由来の拡張属性がありました。大文字と小文字を区別しないようになっていました(POSIX.1に準拠するため)。ファイルの特徴を示すエクステント領域が使われました(当時のVeritasファイルシステムに似ていました)。ファイルの属性をディレクトリにも重複して持たせる斬新なアイデアにより、属性によるディレクトリの列挙が劇的に高速になりました。 内部的には極めて標準的な(しかし今日でも使われている)フラットなインデックステーブルが使われていました(ほとんどの階層式ファイルシステムはフラットなテーブル上に構築され、フラットなネームスペース上で論理的に階層が作られています)。 インラインファイルをサポートしています(ディスクのinodeに相当するMFTレコードにデータ��保存されます)。ほとんど全てのコードで16ビットのUNICODEにネイティブで対応しています(例外は拡張属性の名前で、8ビットのASCII文字列です)。 その後も機能が追加されていきました。圧縮機能、暗号化機能、共有ACL(ACLを各ファイルにコピーするのではなく、ACLのテーブルを持つ形とし、スペースを節約できる)などです。 NTFS ファイルシステムにはアプリケーションからトランザクションを制御するためのインターフェイスがあり、複数のファイル名変更をアトミックに実行するなどの操作が可能で、ディスクフォーマットの変更は不要でした。設定データベースであるレジストリにはトランザクション機能があり、内部でNTFSのトランザクション機能を利用しています(必ずトランザクションを使わなければならないということではななく、利用したいときに利用すればよいもので、複雑化していませんので念のため)。独自のトランザクションモニタを実装することもできますが、ファイルシステムに機能としてあるのであれば、ファイル処理のスクリプトをトランザクションとして実行できます。 1980年代後半から90年代前半にかけて、ファイルシステム内部ではなく外部のツールとしてデフラグメンテーションをすることが一般的になりました。もしファイルシステムでこれを実装するとなると、複雑な機能をユーザーモードからカーネルモードに移すのと同じような話になり、カーネル側はシンプルに保つのが普通ですので、これは推奨されません(カーネルモードの誤動作はユーザーモードの誤動作よりも深刻な結果をもたらします)。また同様に、ファイルシステムがプログラムのロード処理を高速化するチューニングをすることもやりたくありません。そのような仕事はアプリケーションに任せ、ファイルシステムはそのための情報を記録するだけです。プログラムローダーはその情報を使って各プログラムを高速にロードします。 Windows Vistaからは、稼働状態のまま破損を修復できる機能がNTFSに搭載されました(FASTが2018年に世界で初めてこれを実装したと主張した時は笑ってしまいました、NTFSで実装されてから10年以上経っていましたから)。その後も稼働中に修復する機能は改善が続けられ、オフラインのリカバリーツールも改善されて熟達の域に達しましたが、リカバリーツールを使う機会はほぼなくなりました。 今日のWindows 10に搭載されるNTFSは、間違いなく最先端と言えるDAXストレージをサポートしています(自分のファイルシステムを研究するためにストレージクラスのメモリを取得することもままなりません)が、それにも関わらず盤石の安定性を示しています。現在も活発にメンテナンスされており、もし私がバグレポートを提出すれば修正されるでしょう(実際何度かNTFSのバグレポートを何年にも渡って送っており、それらは修正されています)。 私が知る限り、Windowsはディレクトリ名の検索キャッシュ(DNLC)をまだ持っておらず、パフォーマンスに影響が出ています。私が過去に開発したWindows用��ファイルシステムでは高速検索キャッシュを使っていました。CPUあたりのシングルエントリーキャッシュは、Win 32のAPIからNTのネイティブなAPIへ���変換が入るため、当時の記録で80%以下のヒット率を示していました(ネイティブのAPIではハンドルで処理をするのに対し、Win 32のAPIでは名前で処理をします)。これはファイルシステムではなくOSの問題であり、年月とともにネイティブでも名前による操作が増加し、またWin 32のAPIでも逆にハンドルによる操作が増えてきました。 ファイルシステムの性能は、ディスク上の構造よりも、関数の実装の問題であることが多いです。ディスクドライブ用に設計されたファイルシステムは、SSDなどに最適化する必要があるでしょう。同様に、メインメモリに直接アクセスするときはページキャッシュのような仕組みがパフォーマンスの障害になります。 28年前に設計されたにしては、NTFSはむしろよく持ちこたえていると言えます。最新のハードウェア、障害対策の新たな知見、1万倍に増えたディスクやメモリの容量などを利用して、性能を改善できるでしょうか? できないわけがありません。でも今のハードウェアに最適であるように設計されたファイルシステムが普及期に入るまでには10年以上かかるでしょう。もし新しいファイルシステムを開発したいのであれば、今現在のハードウェアではなく、10年後のハードを見越して設計しましょう。 結論: NTFSは1980年代に設計されたジャーナリングファイルシステムでありながら、機能とパフォーマンスのバランスがとれた、現在もまだ素晴らしいと言える実装です。
0 notes
Text
Dàn âm thanh nhạc sống đám cưới chuyên nghiệp
Dàn âm thanh nhạc sống đám cưới hiện đang là xu hướng được rất nhiều bạn trẻ yêu thích và lựa chọn trong buổi lễ đám cưới trọng đại của mình. Chính vì vậy người làm sự kiện cho thuê âm thanh đám cưới cần phải nắm bắt được xu hướng này thì mới có thể theo kịp thời đại và luôn đắt Show.
Nên mua dàn âm thanh nhạc sống đám cưới ở đâu?
Là đơn vị chuyên cung cấp các thiết bị âm thanh đám cưới và lắp đặt các dàn âm thanh nhạc sống đám cưới chuyên nghiệp uy tín hàng đầu tại Việt Nam. Khang Phú Đạt Audio luôn tự hào được khách hàng trên cả nước tin tưởng và lựa chọn khi có nhu cầu mua sắm và lắp đặt các dàn âm thanh nhạc sống đám cưới chuyên nghiệp và các thiết bị âm thanh khác. Tại đây chúng tôi luôn cung cấp các sản phẩm được nhập khẩu chính hãng từ các thương hiệu âm thanh nổi tiếng như JBL, Martin, Koda, Yamaha , Nanomax, Shure, Soundcraft, Soundking, Crown, Peavay, …
Đặc biệt tại các Showroom của chúng tôi luôn có nhiều các cấu hình dàn nhạc sống đám cưới Khang Phú Đạt khác nhau cho khách hàng lựa chọn. Giá cả phù hợp với khả năng đầu tư của khách hàng Việt Nam mang lại lợi ích đích thực cho khách hàng đầu tư sinh lời.
Cấu hình dàn âm thanh nhạc sống đám cưới chuyên nghiệp tại Khang Phú Đạt Audio gồm những thiết bị sau:
Loa JBL JRX 115
Loa JBL SRX 725
Loa JBL JRX 125
Loa siêu trầm JBL SRX 728S
Cục đẩy Ca 20
Cục đẩy công suất Yamaha P7000s
Vang số AAP K9000
Đầu ổ cứng Việt KTV 3TB Plus
Micro không dây BCE UGX12
Bàn mixer Yamaha MG 166CX
Tủ thiết bị 16U
Chi tiết về thông số kỹ thuật của các hạng mục thiết bị của dàn âm thanh nhạc sống đám cưới
1. Loa JBL JRX 115
Công suất âm thanh: 1000W
Tần số cao nhất: 16kHz
Tần số thấp nhất : 38Hz
Đường tiếng: 2 đường
Trọng lượng: 27.5kg
Màu sắc: Màu đen
Trở kháng: 8Ω
Mức độ âm thanh: 98dB
Kích thước: 699 x 432 x 460
2. Loa JBL SRX 725
Công suất: 1200 W / 2400 W / 4800 W
Tần số thấp nhất: 37Hz
Tần số cao nhất: 20kHz
Dải tần: 37 Hz – 20kHz (-10 DB)
Trở kháng: 8Ω
Kích thước (H x W x D): 121.9 cm x 54.1 cm x 50.8 cm
Mức độ âm thanh: 136 dB
Trọng lượng: 45Kg
3. Loa JBL JRX 125
Công suất: 500 W / 2000 W
Dải tần số: 36 Hz – 16 kHz (-10 dB)
Tần số đáp ứng: 45 Hz – 12 kHz (±3 dB)
Độ nhạy: 100 dB SPL (1w/1m)
Trở kháng: 4 ohms
Công suất khuếch đại: 500 W – 1000 W into 4 ohms
Kích thước: 1099 x 464 x 432 (mm)
Trọng lượng: 42.6 kg (94 lb)
Kết nối đầu vào: Neutrik® Speakon® NL-4 (x1); .25 in TS phone jack (x1); parallel
4. Loa siêu trầm JBL 728S
Dải tần số: 27 Hz – 220 Hz
Đáp ứng tần số: 33 Hz – 220 Hz
Điện năng Rating (liên tục * 1 / Program / Peak): 1600 Watts, 3200 Watts, 6400 Watts
Tối đa SPL * 2: 136 dB SPL cao điểm
Độ nhạy: 98 dB SPL
LF Driver: 2 x JBL 2268H 457 mm (18 in)
Danh nghĩa Trở kháng: Song song: 4 ohms / Rời rạc: 8 ohms x 2
Tunings: dbx DriveRack, tất cả các mô hình.
Hình dáng: Hình chữ nhật, gỗ ép 18 mm, 13 lớp gỗ dán bạch dương
Lưới tản nhiệt: Bột tráng màu đen, đục 1- đánh giá thép
Cổng kết nối: Neutrik Speakon NL-4 (x2)
Kích thước: 602 x 1067 x 838 (mm)
Trọng lượng: 76 kg
5. Cục đẩy CA 20
Công suất:
+Ohm Stereo – 1000 W
4 Ohm Stereo – 1800 W
2 Ohm Stereo – 2500 W
8 Ohm Bridged – 3600 W
4 Ohm Bridged – 5000 W
Biến áp điện được thiết kế hình xuyến
Thế hệ mới nhất của tốc độ cao, thiết bị đầu ra rộng băng thông
Twin-đường hầm làm mát với lưu lượng không khí trở lại để phía trước
Nam và cân bằng đầu vào XLR nữ với chuyển đổi cấu hình XLR cực và lựa chọn độ nhạy
Speakon (r) hoặc năm cách kết nối bài ràng buộc đầu ra (thị trường phụ thuộc)
Âm thanh nổi, song song, nối-mono chuyển đổi chế độ chọn
Phía trước bảng điều khiển chuyển mạch-breaker
Tín hiệu hiện tại/hoạt động, BẢO VỆ, và ACL LED
6. Cục đẩy công suất Yamaha P7000S
Loại: Cục đẩy công suất 2 kênh
Điện năng động: 1kHz 20ms Nonclip
Công suất đầu ra: 1kHz
4Ω – 750W x 2
8Ω – 525W x 2
8Ω -Cầu – 1500W
Công suất đầu ra: 20Hz – 20kHz
4Ω – 700W x 2
8Ω – 500W x 2
8Ω – Cầu – 1400W
7. Vang số AAP K9000
16 băng tần EQ để chỉnh nhạc
16 băng tần EQ để chỉnh Micro
6 đường tín hiệu ra và có EQ cho từng đường
Kết nối sử dụng qua USB, WIFI (I POND, I PD, LAPTOP)
Nhớ 21 chương trình ( 10 chương trình mặc định và 10 chương trình nhớ do người sử dụng đặt )
4 chế độ cắt rít tự động ( bảo đảm khi vặn to không rít micro)
Chế độ đặt giới hạn tốt đa âm lượng ( bảo đảm không cháy loa)
Tích hợp đầy đủ Cossover, Compresor, Equalizer, Driver rack
Trọng lượng của mixer AAP audio K9000 : 3kg
Kích thước của mixer AAP audio K9000 ( dài rộng cao)(mm): 480*118*45
8. Đầu ổ cứng Việt KTV 3TB Plus
Điện áp: 110-240V ~ 50/60Hz
Công suất: 50W
Ổ cứng: 3TB
Hệ điều hành: Linux
WIFI: 1 USB WIFI chuẩn 802.11 b/g/n
Cổng USB: 2 cổng
Cổng mạng: 1 cổng RJ-45
Cổng quang Optical: 1 cổng
Cổng AV: 1 cổng
Cổng HDMI: 1 cổng
Kích thước: (dài x cao x sâu) 427 x 50 x 255 (mm)
Trọng lượng: 2.5 kg
9. Micro không dây BCE UGX 12
Số tay micro: 2
Nguồn:Pin AA 1.5V thời lượng sử dụng 8 giờ
Tần số đáp ứng:80Hz-18kHz (+/- 3dB)
Tỷ lệ méo tiếng: <0,5%
Tần số sóng do micro phát ra: 740MHz-790MHz
Phạm vi sử dụng: 100m
10. Bàn mixer Yamaha MG 166CX
Ngõ vào Mic/Line: 10
Ngõ vào Line: 8 mono + 4 stereo
Kênh Mixer: 16
Nhóm: 4
AUX: 3
Có cổng kết nối USB
Độ méo tiếng: <0.1%, 20Hz-20kHz
Đáp tuyến tần số: 0, +1, -3dB, 20Hz-20kHz
Tỉ lệ S/N: -128dBu
Độ nhiễu xuyên âm: -70dB
Nguồn điện: PA-30 AC adaptor (AC35VCT, 1.4A); 100V, 120V, 220V, 230V or 240V, 50/60Hz
Công suất tiêu thụ: 35W
Kích thước: 478 x 105 x 496 mm
Trọng lượng: 5.5 kg
11. Tủ đựng thiết bị 16U
Kích thước : 830mm x 600mm x 800mm
Tải trọng : 300 Kg
Vật liệu : Thép tấm dày từ 1.5mm – 2.0mm, được xử lý bề mặt và sơn tĩnh điện
Di chuyển : 04 bánh xe đa hướng, 04 chốt định vị
CÔNG TY THIẾT BỊ ÂM THANH KHANG PHÚ ĐẠT AUDIO Địa chỉ: Số 12, Ngõ Simco, Phạm Hùng, Mỹ Đình, Hà Nội Hotline bàn hàng: 096 779 3333 Khang Phú Đạt Audio: www.khangphudataudio.com Email: [email protected]
1 note
·
View note
Text
[Azure DataLake] Métodos para dar acceso
Hay muchos artículos que hablan sobre la creación de una plataforma unificada de datos, donde equipos de Analítica (bajo diferentes nombres) arman un data lake con ETLs y procesos de ingesta tomando datos de múltiples fuentes de información, almacenando y organizando datos para alimentar modelos de Business Intelligence, Data Science, Machine Learning, y otras ramas relacionadas de la analítica.
En este proceso de crecimiento, tanto en volumen como en fuentes de datos a considerar, siempre llega el momento en el que hay que compartir datos que tenemos en nuestro data lake con personas/equipos que desean usarlos y accederlos, externos al equipo que desarrollo la ingesta y transformación de datos. Este es un punto que muchos saben que eventualmente habrá que hacer, pero como no es vital al comienzo de un proyecto entonces se saltea (la conocida “deuda técnica”) y luego cuando aparece la necesidad, ¡estamos en un apuro por resolverlo! En este articulo voy a mostrar algunas de las opciones que tenemos para dar este tipo de permisos sin que esto sea un peligro para todo el trabajo que venimos realizando.
1- Azure Data Share
La primera opción que vamos a ver es Azure Data Share. Este recurso (distinto al data lake), nos va a permitir compartir snapshots de determinadas carpetas dentro de nuestro data lake. Esta opción es práctica pero tiene varias desventajas, la principal es que estamos replicando datos fuera de nuestro data lake (quien recibe el Data Share, debe mapear el snapshot a su propio data lake), esto da pie a que haya diferentes “versiones” de los datos y quien desee consultarlos no estará usando los datos actualizados, además de estar pagando por almacenamiento que no debería con otras opciones.
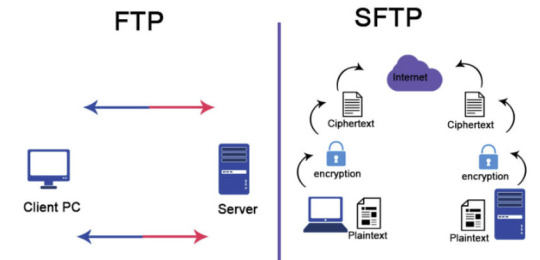
2- SFTP
¡La segunda opción que veremos es más directa que la anterior! El único requisito es que nuestro data lake debe tener activada la jerarquía de carpetas (Hierarchical Namespace en un Data lake Storage Gen2). Si tenemos eso deberíamos ver la opción en el portal para activar SFTP (preview por ahora). Esta opción nos permitirá levantar un servidor SFTP (ssh file transfer protocol) que leerá directamente desde nuestro data lake. La configuración es bastante sencilla, simplemente se crea un usuario (local al FTP, no será parte del Active Directory), se selecciona el contenedor que queremos compartir y los permisos (el mínimo sería READ y LIST). ¿Desventajas de este método? El permiso elegido en el FTP será independiente de la configuración de permisos RBAC, ABAC o ACLs que tengamos dispuesto en nuestro data lake, y los permisos rigen para todo el contenedor, no solo una carpeta. Otras desventajas son: esta opción no permite que el usuario lea directamente el data lake como otras opciones, y este servidor SFTP no es accesible por Data Factory (por ahora, ojalá cambie esto en un futuro).
Muchos clientes son capaces de conectarse a un servidor SFTP como si se tratase de una “carpeta remota” para descargar o subir archivos, de modo que es una opción practica para compartir datos con usuarios de todo tipo (negocio o técnicos). Los clientes clásicos para windows son WinSCP o FileZilla, pero ¡hay muchos más! (ni hablar para linux)
3- SAS
El tercer método que veremos para conectarnos es mediante un SAS (Shared Access Signature) y este sí que nos permitirá conectarnos y leer directamente el data lake desde cualquier software que pueda hacerlo (por ejemplo, código Python, desde Databricks, u otros servicios de Azure como Data Factory). Un SAS es básicamente una cadena de conexión, generada a partir de las Access Keys del lake, que permite que nos conectemos al data lake con determinados permisos que son elegidos al momento de crear esta SAS. Crear un SAS es muy sencillo, vamos a la opción homónima en el portal de Azure, elegimos que servicio deseamos habilitar (por lo general Blob), completamos las siguientes opciones según nuestras necesidades y finalmente damos click en Generar. La desventaja de este método es que los permisos que definamos valen para TODO el data lake, no solo para un contenedor o una carpeta, por lo que es fácil caer en dar demasiados permisos con este método. Arreglarlo es sencillo, ya que como los SAS son creados a partir de las Access Keys, renovando estas últimas todos los SAS que la utilizaron quedaran sin efecto.
Desde el explorer del lake, podemos generar SAS para una carpeta o archivo especifico, con lo que ganaremos mucho en seguridad sobre el método de creación de SAS anterior. Les dejo una imagen, no es para nada complicado, simplemente navegamos hasta la carpeta que queremos y damos click con el botón derecho:
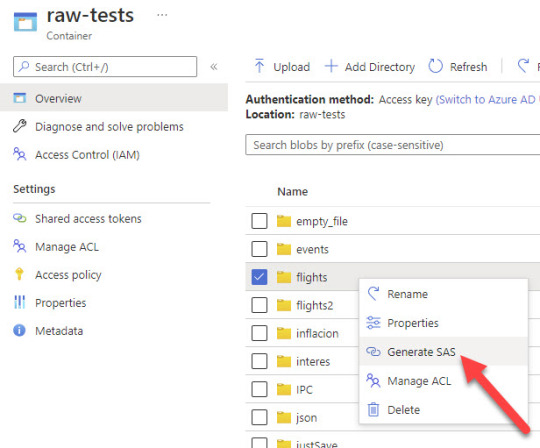
Recordemos que los permisos mínimos para poder conectarnos y ver que archivos hay dentro de la carpeta son READ (obvio) y LIST. Este último es fácil de olvidar, pero si no lo agregamos el SAS podrá leer los archivos solo si le indicamos el nombre y la ruta exactos del archivo que queremos leer.
4- Service principal
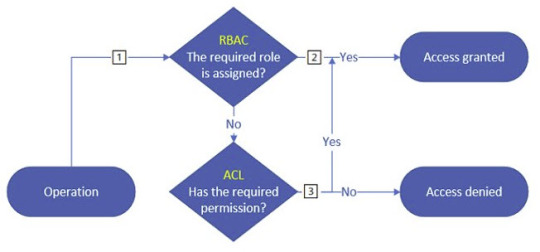
El cuarto método que veremos para conectarnos es mediante un Service Principal. Esto es crear un usuario de servicio (App Registration) y luego asignarle los permisos necesarios para conectarse y leer el data lake. Este método es el recomendado por ser el más seguro de todos, ya que podemos definir los permisos de este usuario como lo haríamos con cualquier otro, mediante RBAC, ACL o el nuevo ABAC.
SPOILER: Si no sabes que significan estas siglas, atentos porque habrá un artículo sobre esto próximamente.
Básicamente, este método es el único mediante el cual tendremos un control más granular sobre los permisos que estamos dando dentro de nuestro data lake.
5- Autorizar usuario AD - ¡NO recomendada!
Este método es prácticamente igual al anterior, solo que en lugar de autorizar un Service Principal, lo haremos con un usuario de AD. La razón por la que no es recomendado hacer esto es porque no ofrece ninguna ventaja sobre hacerlo con un Service Principal y compartir sus credenciales (secret key o certificado). Además, como regla general y buena práctica, ningún proceso automatizado debería estar autenticándose con un usuario de AD.
Con esto concluye el artículo, por supuesto que ¡estas opciones no son todas las disponibles! Siempre hay muchas formas de lograr el mismo resultado, y decidí dejar afuera los requisitos específicos de algunos recursos como Synapse por ejemplo, que requiere que asignemos permisos RBAC al MSI del workspace, pero eso puede ser tema para otro post 😊
¡Espero que les sea de ayuda! Nos vemos en la próxima.
Escrito por Martin Zurita
#datalake#azure data lake#azure storage account#Azure datalake#service principal#azure#azure cordoba#azure argentina#azure jujuy#azure data platform
0 notes