#Admin Menu Editor
Explore tagged Tumblr posts
Visit Tumblr Blog
Explore Tumblr blogs with no restrictions, modern design and the best experience.
Last Seen Tumblr Blogs


Fun Fact
Tumblr’s reach among the 26-to-35-year-olds in the US is 11%.
Text
How to Make WordPress Simpler and Easier to Use for Clients | Edit Role Wise Menu Item
How to Make WordPress Simpler and Easier to Use for Clients | Edit Role Wise Menu Item | Admin Menu Editor As a WordPress site owner, the WordPress admin dashboard is the most important part of your website. It’s like a control center where you can find all the information, tools, and plugins to manage your site easily. You can create new pages, change themes, and set up your entire site with…
View On WordPress
0 notes
Text
Tuesday, July 16th, 2024
🌟 New
On web, you can now navigate away from your current feed (Dashboard, searches, tags, and more) without worrying about losing your spot when returning via your browser’s back and forward buttons.
Communities now include helpful tooltips to point out features that are new to you.
Community admins can now generate invite links, which will allow new members to join (until the population limit is reached). The link can be refreshed if it accidentally goes out to the wrong place, invalidating old invite links. Send them to a friend, post them to your blog, write them on a postcard, print them on business cards, the options are endless!
Community admins can now remove community members. There’s an option in the meatball menu in the members list.
Community admins will now receive a push notification and activity item when their requested community has been approved.
Community members will now receive a push notification and activity item when they’re promoted to (or demoted from) moderator.
The Android app’s post editor now has an improved blog picker that includes communities, so you can post directly to them quickly.
🛠 Fixed
Privacy Data exports were failing to generate for some users. This has now been fixed, and all failed exports are being regenerated.
“Post to another blog or community” no longer appears every time you start a new post.
Logged out users were briefly not able to view public communities. This has now been fixed.
Community notifications were briefly not dismissible. This has now been fixed.
The community invite box has received clarity improvements.
A handful of push notifications have received clarity improvements.
Avatars on bundled activity items have been repositioned, which does indeed improve clarity.
🚧 Ongoing
No ongoing incidents to speak of right now.
🌱 Upcoming
Community admins will soon be able to ban community members entirely.
Experiencing an issue? Check for Known Issues and file a Support Request if you have something new. We’ll get back to you as soon as we can!
Want to share your feedback about something? Check out our Work in Progress blog and start a discussion with the community.
Wanna support Tumblr directly with some money? Check out the new Supporter badge in TumblrMart!
324 notes
·
View notes
Text
YouTube Downloads through VLC: Step by Step
[EDIT: I've been receiving reports for some time now that this method no longer works. I suspect something about the switch to YouTube Music as a separate app, and/or YouTube's ongoing attempts to force Chrome use, broke the compatibility with the Github version of youtube.luac -- I haven't managed to look into whether there's an updated working version out there yet. Sorry!]
So this guide to easily downloading off YouTube is super helpful, but there's enough important information hidden in the reblogs that (with the permission of OP @queriesntheories ) I'm doing a more step-by-step version.
Please note: these downloads will be in YouTube quality. My test video download is coming through at 360p, even though the video I'm starting from is set to 720p. They're legible, but they won't look great on a TV. For high visual quality, you'll want to seek out other methods.
This guide is written for Windows 10, since that's what I can test on. It's been tested on Firefox, Chrome, and Edge (which is a Chromium browser, so the method should work in other Chromium browsers too). So far, I haven't tracked down a way to use this download method on mobile.
BASIC KNOWLEDGE:
I'll try to make this pretty beginner-friendly, but I am going to assume that you know how to right-click, double-click, navigate right-click menus, click-and-drag, use keyboard shortcuts that are given to you (for example, how to use Ctrl+A), and get the URL for any YouTube video you want to download.
You'll also need to download and install one or more programs off the internet using .exe files, if you don't have these programs already. Please make sure you know how to use your firewall and antivirus to keep your computer safe, and google any names you don't recognize before allowing permission for each file. You can also hover your mouse over each link in this post to make sure it goes where I'm saying it will go.
YOU WILL NEED:
A computer where you have admin permissions. This is usually a computer you own or have the main login on. Sadly, a shared computer like the ones at universities and libraries will not work for this.
Enough space on your computer to install the programs listed below, if you don't have them already, and some space to save your downloaded files to. The files are pretty small because of the low video quality.
A simple text editing program. Notepad is the one that usually comes with Windows. If it lets you change fonts, it's too fancy. A notepad designed specifically to edit program code without messing it up is Notepad++, which you can download here.
A web browser. I use Firefox, which you can get here. Chrome or other Chrome-based browsers should also work. I haven't tested in Safari.
An Internet connection fast enough to load YouTube. A little buffering is fine. The downloads will happen much faster than streaming the entire video, unless your internet is very slow.
VLC Media Player, which you can get here. It's a free player for music and videos, available on Windows, Android, and iOS, and it can play almost any format of video or audio file that exists. We'll be using it for one of the central steps in this process.
If you want just the audio from a YouTube video, you'll need to download the video and then use a different program to copy the audio into its own file. At the end of this post, I'll have instructions for that, using a free sound editor called Audacity.
SETUP TO DOWNLOAD:
The first time you do this, you'll need to set VLC up so it can do what you want. This is where we need Notepad and admin permissions. You shouldn't need to repeat this process unless you're reinstalling VLC.
If VLC is open, close it.
In your computer's file system (File Explorer on Windows), go to C:\Program Files\VideoLAN\VLC\lua\playlist
If you're not familiar with File Explorer, you'll start by clicking where the left side shows (C:). Then in the big main window, you'll double-click each folder that you see in the file path, in order - so in this case, when you're in C: you need to look for Program Files. (There will be two of them. You want the one without the x86 at the end.) Then inside Program Files you're looking for VideoLAN, and so forth through the whole path.
Once you're inside the "playlist" folder, you'll see a lot of files ending in .luac - they're in alphabetical order. The one you want to edit is youtube.luac which is probably at the bottom.
You can't edit youtube.luac while it's in this folder. Click and drag it out of the playlist folder to somewhere else you can find it - your desktop, for instance. Your computer will ask for admin permission to move the file. Click the "Continue" button with the blue and yellow shield.
Now that the file is moved, double-click on it. The Microsoft Store will want you to search for a program to open the .luac file type with. Don't go to the Microsoft Store, just click on the blue "More apps" below that option, and you'll get a list that should include your notepad program. Click on it and click OK.
The file that opens up will be absolutely full of gibberish-looking code. That's fine. Use Ctrl+A to select everything inside the file, then Backspace or Delete to delete it. Don't close the file yet.
In your web browser, go to https://github.com/videolan/vlc/blob/master/share/lua/playlist/youtube.lua
Click in the part of the Github page that has a bunch of mostly blue code in it. Use Ctrl+A to select all of that code, Ctrl+C to copy it, then come back into your empty youtube.luac file and use Ctrl+P to paste the whole chunk of code into the file.
Save the youtube.luac file (Ctrl+S or File > Save in the upper left corner of the notepad program), then close the notepad program.
Drag youtube.luac back into the folder it came from. The computer will ask for admin permission again. Give it permission.
Now you can close Github and Notepad. You're ready to start downloading!
HOW TO DOWNLOAD:
First, get your YouTube link. It should look something like this: https://www.youtube.com/watch?v=abc123DEF45 If it's longer, you can delete any extra stuff after that first set of letters and numbers, but you don't have to.
Now open VLC. Go to Media > Open Network Stream and paste your YouTube link into the box that comes up. Click Play. Wait until the video starts to play, then you can pause it if you want so it's not distracting you during the next part.
(If nothing happens, you probably forgot to put youtube.luac back. coughs)
In VLC, go to Tools > Codec Information. At the bottom of the pop-up box you'll see a long string of gibberish in a box labeled Location. Click in the Location box. It won't look like it clicked properly, but when you press Ctrl+A, it should select all. Use Ctrl+C to copy it.
In your web browser, paste the entire string of gibberish and hit Enter. Your same YouTube video should come up, but without any of the YouTube interface around it. This is where the video actually lives on YouTube's servers. YouTube really, really doesn't like to show this address to humans, which is why we needed VLC to be like "hi I'm just a little video player" and get it for us.
Because, if you're looking at the place where the video actually lives, you can just right-click-download it, and YouTube can't stop you.
Right-click on your video. Choose "Save Video As". Choose where to save it to - I use my computer's built-in Music or Videos folders.
Give it a name other than "videoplayback" so you can tell it apart from your other downloads.
The "Save As Type" dropdown under the Name field will probably default to MP4. This is a good versatile video format that most video players can read. If you need a different format, you can convert the download later. (That's a whole other post topic.)
Click Save, and your video will start downloading! It may take a few minutes to fully download, depending on your video length and internet speed. Once the download finishes, congratulations! You have successfully downloaded a YouTube video!
If you'd like to convert your video into a (usually smaller) audio file, so you can put it on a music player, it's time to install and set up Audacity.
INSTALLING AUDACITY (first time setup for audio file conversion):
You can get Audacity here. If you're following along on Windows 10, choose the "64-bit installer (recommended)". Run the installer, but don't open Audacity at the end, or if it does open, close it again.
On that same Audacity download page, scroll down past the installers to the "Additional resources". You'll see a box with a "Link to FFmpeg library". This is where you'll get the add-on program that will let Audacity open your downloaded YouTube video, so you can tell it to make an audio-only file. The link will take you to this page on the Audacity support wiki, which will always have the most up-to-date information on how to install the file you need here.
From that wiki page, follow the link to the actual FFmpeg library. If you're not using an adblocker, be careful not to click on any of the ads showing you download buttons. The link you want is bold blue text under "FFmpeg Installer for Audacity 3.2 and later", and looks something like this: "FFmpeg_5.0.0_for_Audacity_on_Windows_x86.exe". Download and install it. Without this, Audacity won't be able to open MP4 files downloaded from YouTube.
CONVERTING TO AUDIO:
Make sure you know where to find your downloaded MP4 video file. This file won't go away when you "convert" it - you'll just be copying the audio into a different file.
Open up Audacity.
Go to File > Open and choose your video file.
You'll get one of those soundwave file displays you see in recording booths and so forth. Audacity is a good solid choice if you want to teach yourself to edit soundwave files, but that's not what we're here for right now.
Go to File > Export Audio. The File Name will populate to match the video's filename, but you can edit it if you want.
Click the Browse button next to the Folder box, and choose where to save your new audio file to. I use my computer's Music folder.
You can click on the Format dropdown and choose an audio file type. If you're not sure which one you want, MP3 is the most common and versatile.
If you'd like your music player to know the artist, album, and so forth for your audio track, you can edit that later in File Manager, or you can put the information in with the Edit Metadata button here. You can leave any of the slots blank, for instance if you don't have a track number because it's a YouTube video.
Once everything is set up, click Export, and your new audio file will be created. Go forth and listen!
#reference#vlc media player#youtube downloader#youtube#uh what other tags should i use idk#how to internet#long post
230 notes
·
View notes
Text
MXRP RE-BUILD BETA IS LIVE
And as you look upon the body, you hear something you didn't expect; a heartbeat.
THE BACKER-EXCLUSIVE BETA IS GOING LIVE! PHASE 1: GROUP CHATS
The ever-powerful Hex has finished up all we need to launch the initial beta of the MXRP 2023 REBUILD in all its (unfinished) glory. As stated before, though; this phase of the beta will be primarily focusing on group chats in order to test chat functionality, stress test network connection, and gauge reception to the new stuff we have cooking. It will also be exclusive to those who backed the original Kickstarter, the previous Patreon, and the CURRENT patreon prior to this post going live. Once I hit post on this, I'll be shooting all of you your beta codes. Slowly. (Because there's a lot of you and I have to do it one by one).
THINGS TO NOTE:
As the site is still in dev, pretty much everything you see is subject to change. The visuals aren't final (we've actually discussed something internally that we're not ready to speak on yet in regard to this, but I'll announce if we end up doing it), the settings menu is a little sparse, etc. In one weeks' time, I'll be posting a survey to collect feedback for me and Hex to shovel into our slavering maws and guide our hands going forward.
As this is a functionality beta, several features are currently a little fuckity wuckity (don't work). These include:
Quirking
Chat User editing (IE, acronym, name, color, etc). Site admins can change someone's defaults if they really, absolutely need it. It's a top priority to get patched in after the beta starts though.
Kicking (Kind of redundant, and the logic is weird. Hex is getting to it later)
Bbcode does not reflect live in the editor, but it does render in messages.
Certain parts of the new in-chatbar formatter don't work right (Blockquotes, etc)
The beta will also be updating periodically, as Hex will be patching features in as we go along.
For those of you who have a Beta Code from the old Patreon:
Go on your Patreon account and click Community, from here navigate to Direct Messages. You should have one from a now deleted account that looks something like this:

(This is my beta code but i own the site so uhhhhhhhh steal it from me I guess who cares ill generate myself a new one.)
For those of you who have a Beta Code from the old Kickstarter:
Check your emails- like, not recently but check 'em. Somewhere in there you should have a message from Kickstarter containing your beta code! If that fails, check your Kickstarter messages themselves! You should have a beta code!
If you encounter and wish to report a bug, or have a feature suggestion and can't wait for the survey, please use This Link! (Click the green NEW ISSUE button!)
Welcome back, MxRP-
No, welcome back MSPARP.
EDIT: I FORGOT OOPS HERES THE LINK OOPS FUCK
19 notes
·
View notes
Text
Basic Steps to Build Your Shopify Website — Softhunters

Shopify makes it effortless to set up an e-commerce website. Even a novice user can accomplish it in parts. Shopify is because of its friendly design coupled with powerful features; Shopify is one of the most widely used e-commerce platforms by both small and large businesses. Some of the services they offer include customizable online store templates and effective payment gateways. Shopify website design company can create a strong online presence if they sell tangible products, services, or even digital items.
Read More :- https://softhunters.in/basic-steps-to-build-your-shopify-website/
The Shopify store is simple to use, allowing you to run your business without requiring extensive technical knowledge. This blog post will enumerate the fundamentals of creating a Shopify website.
Creating a Shopify Account
The first step in growing your Shopify store is to create an account. To try this, visit Shopify.com and click on the “Start free trial” button in the top right corner. Then, offer your e-mail address, password, and store name.
The store name will initially function as your number one domain. After developing your account, Shopify will ask you some questions about your business. Fill these out and click on “Enter my store” to proceed. This initial setup system is designed to be short and clean, allowing you to begin building your savings properly away.
Establishing Your Shopify Store
Once you have got your account installation, it is time to configure your keep settings. Access the menu on the left aspect of your Shopify dashboard, which incorporates hyperlinks to all of your save gear and features. Use the settings button at the left to set your keep name, time quarter, forex, and other number one settings.
This step is essential as it inspires the way your shop operates and how clients will perceive it. Make certain all information is correct to ensure easy operations and compliance with local regulations.
Selecting A Theme
Your themes control the presence and design of your site. To select a theme, go to the “online store” in the sales channel in the left sidebar, and then select the theme “Theme.” Some free themes are available for your use in Shopify, and you can also visit the theme stores for the paid ones.
Choose a theme that fits your brand and niche. Check reviews to determine if they can serve your goals and be supported by any additional features you want to integrate in the future. The subject should appeal to the eyes and provide an excellent user experience to maintain customers.
Including Products and Services
Now that your store displays as you want it to, it has time to populate it with your products. Return to the Shopify Admin Dashboard. On the Left Menu, click “Product.” To upload a product, click “Add the Product”. You can include the title, description, price, images, and additional details per product.
Ensure to categorize your products using collections or categories for easy visibility. This is essential as it will directly impact your sales and customer satisfaction.
Be sure to detail product descriptions and use high-quality images so buyers can make quality purchasing decisions.
Personalize Your Theme
Once you have chosen a theme, you may use it to represent your brand in a more customized manner. To try this, click on the “Online Store” tab, after which, at the theme you have selected, hover over it and click “Customize.” From the left-hand equipment inside the editor, you can regulate hues, fonts, and layouts. You also can add or delete sections.
Customization is crucial to making your save stand out and mirror your emblem identification. Ensure that your design stays consistent on all pages so that you can give it an expert touch.
Pages Setup and Content Preparation
You can create additional pages for your website, furthermore, your products. The same applies to the ‘Contact’ and ‘FAQ’ pages — a setup guide and live builder are available. For sharing more details regarding your brand or products, blogs can assist you in promoting the business and help in audience engagement. Also, every content must be created in a manner that makes the customer confident and loyal towards the brand.
Instructions for Setting Up Payment Options
If you want to sell, you need to select a payment option first. Under Settings or Setup Guide, scroll to Payment. Log into your cash account and choose Shopify payment or any other provider if you wish to use PayPal.This is essential to ensure the payment setup works properly and securely. It also determines whether you can process transactions and get paid directly.
Sourcing Suppliers and Additional Funding
Reexamine yourself. What is the profile of the partner you want to work with? In what manner do you intend to work with them? When looking to outsource, do not run away from your network. Existing contacts are the best place to start with a Shopify web development Agency. Easy deals and fewer problems are sometimes discovered just one step away.
Additionally, analyze what you can do within a certain budget. Let’s take a more realistic view to ensure you can achieve practical things and trace the path to interesting opportunities within a budget.
Additional Suggestions for Achieving Success
The following tips can aid in improving your Shopify store.
Establish A Brand Style Guide
Create a general style guide rule document comprising typography, color scheme, and logo style for your brand before commencing the designing of your website. This will help in maintaining said standards throughout your site and marketing resources.
Think About Store Layout
Always keep in mind customer trust, aesthetics, and mobile devices when it comes to modern e-commerce design principles. Launch with a minimum viable product (MVP) and refine through the feedback of your customers.
Make Use of Shopify Apps
There is a suite of apps available within Shopify that can assist in improving features within your store. Consider apps that can enhance customer satisfaction, bot automation, and revenue generation.
Blogging on The Shopify platform
Shopify enables users to store blog posts so that pre-approved content can be designed and managed within the store. This could generate traffic and keep customers engaged.
Conclusion
The process of building a Shopify store is a straightforward one and can be achieved in various stages. With these tips and regular improvements in your store, you can make a successful online presence and build your business accordingly.
Always pay attention to the identity of your brand and the experience of customers for long-term success. The best web development company is always present to provide you with all the support for your Shopify website.
#Shopify Website#Shopify Website Design#Shopify Website Developer#Shopify Website Builder#Shopify Website Designer
2 notes
·
View notes
Text
Pembaruan
🌟 Baru
Di web, Anda sekarang dapat menjelajah jauh dari umpanAnda saat ini (Dasbor, pencarian, tagar, dan banyak lagi) tanpa khawatir kehilangan posisi saat kembali dengan tombol peramban Anda.
Komunitas sekarang menyertakan keterangan alat-alat yang berguna untuk menunjukkan fitur baru bagi Anda.
Admin komunitas sekarang dapat membuat tautan undangan, yang memungkinkan anggota baru untuk bergabung (sampai batas populasi tercapai). Tautan dapat disegarkan jika secara tidak sengaja keluar ke tempat yang salah, hal ini membuat tautan undangan lama tidak berlaku. Kirimkan kepada teman Anda, postinglah ke blog Anda, tuliskan di kartu pos, cetaklah di kartu nama, pilihannya tidak terbatas!
Admin komunitas sekarang dapat menghapus anggota komunitas. Opsinya terdapat pada menu tiga titik pada daftar anggota.
Admin komunitas sekarang akan menerima notifikasi push dan item aktivitas ketika komunitas yang mereka ajukan telah disetujui.
Anggota komunitas sekarang akan menerima notifikasi push dan item aktivitas ketika mereka dipromosikan menjadi (atau diturunkan dari posisi) moderator.
Editor postingan pada aplikasi Android kini memiliki pemilih blog yang lebih baik untuk menyertakan komunitas, sehingga Anda dapat memposting langsung ke komunitas tersebut dengan cepat.
🛠️ Perbaikan
Ekspor Data Privasi gagal pada beberapa pengguna. Hal ini sekarang telah diperbaiki, dan semua ekspor yang gagal sedang diulang.
“Posting ke blog atau komunitas lain” tidak lagi muncul setiap kali Anda memulai postingan baru.
Pengguna yang keluar sempat tidak dapat melihat komunitas publik. Hal ini telah diperbaiki.
Pemberitahuan komunitas sempat tidak dapat diterima. Hal ini telah diperbaiki.
Kotak undangan komunitas kini semakin jelas.
Beberapa notifikasi push semakin jelas.
Avatar pada item aktivitas yang digabungkan telah diposisikan ulang, hal ini meningkatkan resolusi gambarnya.
🚧 Dalam Progres
Tidak ada insiden yang dapat kami laporkan hari ini.
🌱 Segera Hadir
Admin komunitas akan dapat memblokir anggota komunitas secara keseluruhan.
Menghadapi masalah? Periksa masalahnya lalu kirimkan Permintaan Dukungan dan kami akan kembali menghubungi Anda secepatnya!
Ingin membagikan saran atau hal lainnya? Cek pembaruan di blog Staf kami dan mulailah berdiskusi dengan komunitas.
Ingin mendukung Tumblr secara langsung? Cek lencana Pendukung terbaru di TumblrMart!
3 notes
·
View notes
Text
hypixel admins you need to hire me ONLY as a wiki editor bc this forge wiki page sucks wtf is this
i collapsed everything for the sake of fitting in a tumblr post but
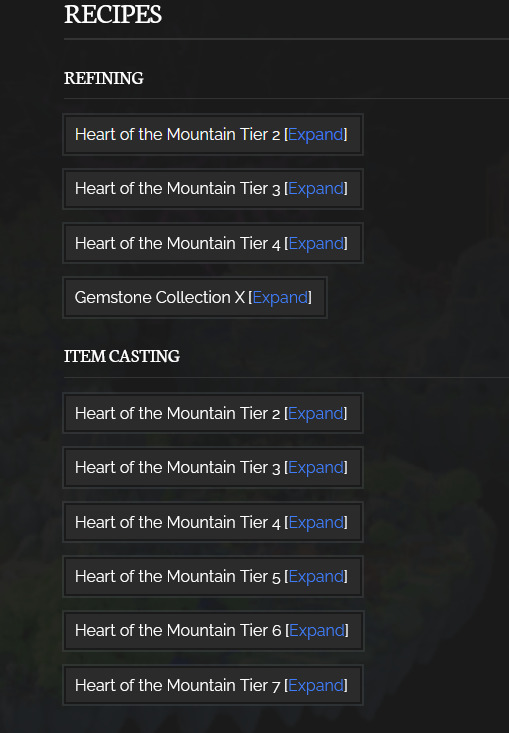
is there not... ANY better way to do this. maybe a duplicate of the forger's GI menu and clicking one of the items takes you to where it is in THIS menu to show you unlock requirements. the readability is atrocious, let me play around with it and find a better solution please this hurts
also no hotm10 yet i just wanted to come here to see what materials i need for my next upgrades >:( we really need a way to view forge recipes without having a forge slot open to look at all the forge items...
3 notes
·
View notes
Text
The Future of Mobile Applications: How Technology is Transforming the Way We Interact
Every e-commerce person needs to know how to build pages with WP bakery page builder. This theme provides support for the Visual Composer plugin as well as a custom-made plugin named “Visual Composer Extension” for our customers. The Visual Composer plugin and extension adds a range of drag-and-drop plugins to your dashboard, allowing you to create your site quickly and easily. This theme provides support for the Visual Composer plugin as well as a custom-built plugin named “Visual Composer Extension” for our customers.
The Visual Composer plugin and extension adds a plethora of drag-and-drop plugins to your dashboard, allowing you to create your site quickly and easily. Creating pages for your WordPress platform is also as simple as a few clicks and drag-and-drop operations with WPBakery Page Builder‘s elaborate but intuitive front-end and back-end editors. I’ll teach you how to add WPBakery Page Builder to your WordPress installation and walk you through all of the key features in this Visual Composer guide.
Requirements for WP Bakery Page Builder
You’ll need the following items to follow along with this WPBakery Page Builder tutorial:
WordPress 5.0 or higher is essential.
a subscription to Envato
In addition, I recommend reading the following article to better understand how to use Visual Composer and why you should use WPBakery Page Builder instead of any of the other page-builder plugins available today:
WPBakery Page Builder Installation
WPBakery Page Builder is a WordPress premium plugin. It’s available on Code Canyon, so sign up with your Envato account and buy a license. It’s still commonly is in reference as Visual Composer. Once you’ve paid for it, you’ll be able to download a ZIP file containing various plugin data.
Look for a file called js composer.zip after extracting the ZIP file. This is a WordPress plugin archive file that you must add to your server. So, go to Plugins > Add New in your WordPress admin line. Then pick js composer.zip from the Upload Plugin drop-down menu. To begin the update, click the Install Now button. When the installation is over, click the Enable Plugin button. You’ll be guided to the WPBakery Page Builder welcoming screen as soon as you do so.
Make Sure WPBakery Page Builder Plugin Is Installed & Active
Make sure the WPBakery Page Builder plugin is turned on. Since this plugin is not included with the theme (for good reason), it must be installed and allowed as described in the “Installing Recommended Plugins” guide. You should have been asked to install the recommended plugins after downloading the theme. Now is the time to install the Visual Composer if you haven’t already.
Configuring the WP Bakery Page Builder Plugin
It’s easy to learn how to use WPBakery Page Builder. The plugin is highly customizable, with hundreds of configuration choices to tailor it to your specific needs. To see them, press the Settings button on the welcome pad.
WP Bakery Page Builder with general settings
The plugin comes with a well-thought-out default setup that will suffice for the majority of use cases. For example, you can see that it supports responsive design right out of the box in the General Settings tab. The plugin also attempts to add different optimizations so that the pages you generate with it load quickly. For example, it defaults to using only the Latin script subset of Google fonts. All you have to do is change the Google fonts subsets option to accept other scripts.
You’ll note that this plugin is only available for your WordPress site’s pages in the Role Manager tab. Select Custom in the Post styles list and allow the post feature if you want it to be eligible for your posts as well.
Configuring post types:
Scroll down and press the Save Changes button once you’ve made the changes.
Finally, go to the Template Options tab and search the Use custom design area if you want to configure the look and feel of WPBakery Page Builder’s content elements. You’ll be able to adjust the plugin’s pre-set colors, margins, and widths after you’ve done so.
Define Main Settings for WP Bakery Page Builder
To configure the plugin, go to Settings > WPBakery Page Builder. The most crucial step is to turn on the composer for the post forms you choose to use it for. This is achieved through the “Role Manager” tab and the “Post Types” options. You can make the page builder accessible based on the user function, but you’ll really just want to change the “Administrator” settings.
Using the WP Bakery Page Builder Plugin
The Visual Composer is really simple and doesn’t need much explanation; for a short guide, see the screenshots below (you can also check out this more detailed Visual Composer guide). To begin, choose if you want to use the Backend or Frontend editor and press the appropriate button.
The Visual Composer Backend Editor
In this Visual Composer tutorial, this is a crucial step. There are two powerful editors included with WPBakery Page Builder: a back-end editor and a front-end editor. They can only be accessed from inside a website or a tweet. As a result, I recommend that you make a new page by heading to Pages > Add New for the time being. You can select which editor you want to use in the page construction GUI. To open the backend editor, first press the Backend Editor button.
You can conveniently connect a number of widely used elements to the website using this editor. Simple elements including text blocks, pictures, and separators are available in WPBakery Page Builder. Advanced features include Facebook “Like” icons, Google Maps, charts, and animated carousels. The components are grouped into four groups for easy access: text, social, structure, and WordPress widgets.
The elements that are available are listed below:
Content elements, as the name implies, are elements that are often used to construct the contents of a blog or an article. Social features, on the other hand, are ones that make it simple for people to share your profile on social media sites. Structure components, on the other hand, are intended for more experienced users who are familiar with writing code. They allow you to add raw HTML and JavaScript to your website directly.
To add an element, simply click the Add Element button and choose the desired element. Alternatively, you should use the Add Text Block button to add text to the website directly.
Text editor
If you don’t like the way an aspect looks by default, you can always change its styles by going to the Design Options page. Once you’ve added a few items, you’ll find that each one has a toolbar with a few buttons associated with it. These buttons show intuitive icons and enable you to perform essential operations like dragging and dropping an entity to alter its position, duplicating, removing, or editing its contents.
Keep in mind to save your page once you’ve finished adding components.
The Visual Composer Frontend Editor
The frontend Visual Composer has the same page building choices as the backend Visual Composer. The main distinction is that instead of position holders, you will see the individual page elements when you insert theme.
Using the WYSIWYG Front-End Editor
The back-end editor is perfect for pages with a number of elements that are lengthy and complicated. You get to deal on the final presentation of your website right from the start if you use the WYSIWYG front-end editor instead. You can swap between editors at any time, so scroll up and click the Frontend Editor button to launch the latest one.
Frontend Editor
Only when you mouse over a feature in this editor can you see the toolbars associated with it. Toolbars and the features they provide are somewhat close to those provided by the back-end editor in frontend editors demo options. You will now see how the website appears on different screen sizes using the front-end editor. You can also continue editing the page in whatever screen size you choose.
Using Templates
Using models is another critical part of learning how to use WPBakery Page Builder. Any page or post you make with WPBakery Page Builder can be turned into a prototype. You will reduce the amount of tedious work you do when making pages for your WordPress site by using this feature.
Open the Templates dialogue, assign the template a tag, and click the Save Template button to save the new layout of your page as a template.
Save the template in the Save Template dialogue box
Working with your own models isn’t the only choice. This plugin has a huge template library that is maintained on a daily basis. Switch to the Template Library tab and hit the Access Library button to access the library. In the template library, you’ll find that the library has a large number of high-quality layout models. You will do any of them for free. However, before you can use them, you must first unlock your WPBakery Page Builder certificate.
0 notes
Text
QuickQR Nulled Script 6.3.7

Download QuickQR Nulled Script – The Ultimate QR Menu Maker Looking for a fast, efficient, and modern way to digitize restaurant menus? QuickQR Nulled Script is the perfect solution for businesses aiming to offer contactless menus using powerful QR code technology. This incredible tool empowers restaurants, cafes, bars, and other food service providers to enhance customer experience while embracing the digital era—completely free from our platform. What is QuickQR Nulled Script? QuickQR Nulled Script is a premium QR code menu maker originally designed for restaurant owners. With this script, businesses can create dynamic, visually appealing, and mobile-optimized menus accessible via scannable QR codes. It eliminates the need for printed menus and allows for seamless real-time menu updates, enhancing safety, hygiene, and convenience. Best of all, you can now download this powerful solution absolutely free—without any licensing restrictions. Take your restaurant's service to the next level without breaking the bank. Technical Specifications Script Name: QuickQR Nulled Script Version: Latest stable release Languages Supported: Multi-language support Database: MySQL Compatibility: PHP 7.4+ Responsive Design: Yes – fully mobile-optimized Admin Dashboard: Included with advanced analytics Features and Benefits Contactless QR Code Menus: Enhance customer safety and hygiene by eliminating physical menus. Drag-and-Drop Menu Editor: Customize your digital menu effortlessly with a visual editor. Multi-Restaurant Support: Manage multiple outlets with one script installation. Modern User Interface: Beautiful and intuitive design that works flawlessly on all devices. Real-Time Menu Updates: Make instant changes to your items, prices, or descriptions without needing to reprint anything. Integrated Analytics: Track views, scans, and engagement with comprehensive reporting. Use Cases Whether you own a cozy cafe, a bustling food truck, or a chain of fine-dining restaurants, QuickQR Nulled Script offers a scalable solution that meets your needs. It's perfect for: Restaurants and cafes aiming to go digital Bars and pubs offering seasonal menus Hotels with in-room dining services Event planners and caterers showcasing menu options on-the-go How to Install QuickQR Nulled Script Installing QuickQR Nulled Script is a straightforward process: Download the script package from our website. Upload the files to your web server using FTP or cPanel. Create a MySQL database and import the provided SQL file. Update your configuration settings to connect the script to your database. Access the admin panel, customize your settings, and start building your digital menu. No coding skills are required. The user-friendly dashboard guides you through every step, making it perfect even for beginners. Frequently Asked Questions (FAQs) Is the QuickQR Nulled Script safe to use? Yes. The script is tested for performance and security. We ensure all downloadable files are free of malware and safe to use in live environments. Can I use this script for multiple restaurants? Absolutely. QuickQR Nulled Script supports multi-restaurant setups, allowing you to manage all outlets from a single dashboard. Are future updates available? While official updates from the original publisher require a license, you can revisit our website regularly for the latest nulled releases and improvements. How do I get started? Simply download from our nulled plugins section, install the script, and start creating your QR-based digital menu today. Conclusion If you want a powerful, stylish, and fully functional QR menu system without paying a dime, the QuickQR is your best bet. Digitize your menu offerings, impress your customers, and take control of your restaurant’s digital presence today. Want more tools like this? Check out wpforms nulled and other premium scripts you can download for free.
0 notes
Text
Website Development Using WordPress

WordPress is the world's most popular website building platform, powering over 40% of all websites on the internet. With its user-friendly interface, powerful plugins, and customizable themes, WordPress makes it easy for anyone to create professional websites without coding experience.
What is WordPress?
WordPress is a free, open-source content management system (CMS) that allows you to build and manage websites. There are two versions:
WordPress.org: Self-hosted, full control, installable on your web hosting
WordPress.com: Hosted service, more limited features (ideal for beginners)
Why Choose WordPress?
No coding required (but customizable with HTML/CSS/PHP)
Thousands of free and premium themes and plugins
SEO-friendly by design
Large support community
Supports blogs, business websites, portfolios, and online stores
How to Get Started
Choose a Domain Name: Example: mywebsite.com
Select a Hosting Provider: Bluehost, SiteGround, Hostinger, etc.
Install WordPress: Most hosting providers offer 1-click installation
Log in to the WordPress Dashboard: Go to yourdomain.com/wp-admin
Choosing a Theme
A theme controls the appearance of your site. You can choose one from:
WordPress Theme Directory
Premium theme marketplaces like ThemeForest
To install a theme:
Go to Appearance > Themes
Click Add New
Search for a theme and click Install then Activate
Essential Plugins to Install
Elementor: Drag-and-drop page builder
Yoast SEO: Optimize your content for search engines
WooCommerce: Create an online store
Wordfence: Security and firewall protection
UpdraftPlus: Backup and restore your site
Creating Pages and Posts
Pages are static (Home, About, Contact), while Posts are dynamic (Blog articles).
Go to Pages > Add New or Posts > Add New
Use the Gutenberg block editor or install a page builder
Add text, images, videos, and customize layout
Customizing Your Site
Go to Appearance > Customize to modify site identity, colors, menus, etc.
Use widgets to add content to sidebars and footers
Create menus for navigation from Appearance > Menus
Tips for a Professional Website
Use a responsive theme for mobile compatibility
Install SSL for security (HTTPS)
Add Google Analytics for visitor tracking
Keep WordPress, themes, and plugins updated
Write quality content and use proper headings (H1, H2, H3)
Conclusion
WordPress empowers you to create stunning, functional websites with ease. Whether you're building a blog, a business page, or an e-commerce store, WordPress offers the flexibility and power to bring your vision to life.
0 notes
Text
FoodAI Studio Review – Start Your Own Uber Eats-Style Websites
Welcome to my FoodAI Studio Review. The food delivery industry is booming, and entrepreneurs are constantly looking for innovative ways to enter the market. Enter FoodAI Studio is a game-changing platform that promises to help users create self-updating, AI-powered, UberEats-style websites in just 60 seconds.

In this in-depth review, we will explore the features, benefits, pricing, and potential drawbacks of FoodAI Studio to help you make an informed decision. So, don’t miss this chance, guys.
What Is FoodAI Studio?
FoodAI Studio is an AI-powered platform that allows users to create fully functional food delivery websites similar to UberEats, DoorDash, and Grubhub. The platform is designed for entrepreneurs, marketers, and businesses looking to enter the booming online food delivery industry without dealing with inventory, logistics, or customer service.

The software uses artificial intelligence to automatically update menus, prices, and restaurant details, eliminating the need for manual updates. FoodAI Studio promises to revolutionize the food delivery business landscape with its user-friendly interface and automation capabilities.
FoodAI Studio Review: Overview of Product
Product Creator: Loveneet Rajora
Product: FoodAI Studio
Launch Date: 2025-Feb-10
Launch Time: 11:00 EST
Front-End Price: $17 (One-time payment)
Official Site: Click Here To Visit Official Salespage
Product Type: Tools and Software
Support: Effective and Friendly Response
Discount: Get The Best Discount Right Here!
Recommended: Highly Recommended
Bonuses: YES, Huge Bonuses
Skill Level Required: All Levels
Discount Coupon: Use Code “AIFOODMAX” for 30% off (Full Funnel)
Refund: YES, 30 Days Money-Back Guarantee
FoodAI Studio Review: About Authors

Loveneet Rajora is the amazing brain behind this idea. He developed new AI technology that changes how we use courses, voice over, audio files, podcasts, Audiobook, Ebook, and Flipbook strategies. His idea for FoodAI Studio is to simplify the capturing and use of AI-Powered App for individuals and organizations. His dedication to excellence and pushing AI limitations make Loveneet a digital marketing and software development expert.
He also owns a number of well-known products, including Procut AI, ProBook AI, VoxCraftAI Studio, CourseAI Studio, TubeBlog AI, AISonic Studio, ProClip AI Studio, AILogo Studio, VidProAI Studio, IntelliVid AI Studio, CaptivateAI Studio, Vidgram Studio, and many more.
Amazing Key Features of FoodAI Studio
✍Build Stunning Websites In Minutes No Tech Skills Needed!
Choose from professionally designed, customizable templates built specifically for food businesses. Use the drag-and-drop editor to make it uniquely yours. Every design is mobile-optimized for a seamless experience, no matter the device. With FoodAI, creating a website is as easy as playing a game.
✍Smart Menu Management That Sells For You
Add food items effortlessly with categories, descriptions, images, and prices. Whether it’s vegan specials, gluten-free options, or daily deals, your menu is optimized to drive sales. FoodAI even lets you handle multiple cuisines and menu sections with ease.
✍Real-Time Order Management That Never Misses A Beat
Get instant notifications for every order whether you’re an admin or a customer. Track orders in real-time, from preparation to delivery, with automated status updates like ”Order Confirmed” and ”Out for Delivery.” FoodAI keeps everything running like clockwork
✍Payment Integration That Makes You Money Faster
Accept payments from anywhere with options like Stripe, PayPal, Razorpay, and more. Support for Cash on Delivery and digital wallets makes it easy for customers to pay. Plus, enjoy automatic tax calculations and invoice generation no manual work needed.
✍Delivery Management That Puts You In Control!
Set up in-house delivery with GPS tracking for precision. Configure delivery radiuses and schedules to fit your business needs. With FoodAI, you’re always in control of how and where deliveries happen.
✍Built-In Marketing Tools To Skyrocket Sales!
Run discounts, promo codes, and customer engagement campaigns with built-in email and SMS marketing tools. Seamlessly connect to social media platforms to advertise menus, promotions, and deals. Let AI handle your marketing while you watch the profits roll in.
✍Keep Customers Coming Back With Smart Management
Give customers their own accounts to save order histories, addresses, and preferences. Collect feedback and reviews to improve services and build loyalty. FoodAI makes managing your customers simple and effective
✍AI-Driven Insights That Print Money!
Get real-time reports on your sales, top-performing dishes, customer behavior, and delivery performance all powered by AI. Spot trends, fix weak spots, and make smarter decisions that lead to more profits. It’s like having a crystal ball for your business.
✍Analytics That Print Money
Get a real-time dashboard that shows sales trends, top-selling items, and customer feedback. Track delivery performance and export detailed reports in formats like CSV or PDF. With FoodAI, data-driven decisions are just a click away
✍Go Global With Multi-Language & Currency Support
Serve customers worldwide with multilingual websites and automatic currency conversion. Whether it’s dollars, euros, or yen, FoodAI handles payments seamlessly, breaking barriers and boosting your reach.
✍SEO & Social Media Tools That Drive Traffic Like Crazy
With SEO-optimized site structures and pre-built integrations for social media, your website gets noticed. Sync with Google My Business and Google Analytics to maximize visibility and track your performance
✍Hosting & Domain That Keeps You Online 24/7!
Get free domain options or bring your own custom domain. Enjoy secure, reliable cloud hosting with SSL certification included. Your website stays live, fast, and protected guaranteed.
✍Add-Ons & Integrations To Take You Even Further
Easily track inventory with seamless integrations. Want multi-vendor support? Done. Need a chatbot for customer service? Included. FoodAI gives you every tool you need to expand and grow.
✍Launch Under Your Brand No One Else’s
With full white-label capabilities, launch websites under your own brand, with your own logos, colors, and designs. Customers will never know FoodAI is behind the scenes it’s all you.
✍AI Features That Work Harder Than You
From menu recommendations based on past orders to AI-driven marketing ideas, FoodAI handles the heavy lifting. Automated chatbots answer customer questions while you focus on scaling. It’s like having a team of experts working 24/7.
✍Resell Websites & Build a Second Income Stream!
Use the reseller dashboard to manage clients, sales, and marketing materials. Sell websites as white-label solutions and keep 100% of the profits. With FoodAI, you’re not just building a business you’s building a legacy.
✍Domain Integration!
Easily integrate your own domain in just 3 easy clicks.
FoodAI Studio Review: How Does It Work?
Your 3-Step Shortcut to Food Business Domination Build, Launch, and Profit from AI-Powered Food Ordering Websites in Minutes!
Step #1: Login
Sign in to the AI-Powered FoodAI Business Dashboard By Clicking On Any Of The Buttons Below.
Step #2: Create
With just a few clicks, build your own branded food ordering website complete with menus, online payments, and delivery management. No coding. No headaches. No waiting.
Step #3: Launch & Profit
Go live instantly and start taking orders or selling these websites to clients. AI handles the hard work, and you keep all the profits.
Awesome Benefits of FoodAI Studio
Launch Your AI-Powered Food Ordering Empire in Minutes… No coding, no design skills
ZERO Limits. Run Unlimited Businesses. Sell Unlimited Websites. Make Unlimited Money.
Built-In AI Marketing Suite That Attracts Customers like a Magnet!
Take Your Business Global with Multi-Language and Multi-Currency Support!
AI-Optimized Menu Builder That Practically Writes Itself… Upload your food items, and let AI organize, optimize, and upsell for you
Sell DFY Food Websites for $1,000+ Each & Keep 100% Profits.
No Subscriptions, No API Costs, No Hidden Fees
AI Handles Everything for You Focus on growth while AI-powered tools manage orders, track deliveries, and handle customer interactions.
Sell Your Own Branded Food Ordering Websites for Massive Profits!
Let AI Do the Heavy Lifting While You Watch the Profits Roll In!
Tap Into the Trillion-Dollar Food Delivery Industry Without Cooking, Delivering, or Owning a Restaurant!
AI-Powered Sales Dashboard to Track Revenue, Trends & Growth Instantly!
Automated Promotions That Bring in New Customers Daily!
Zero Upfront Cost And Zero Monthly Fees
30 Days Money-Back Guarantee
FoodAI Studio Review: Who Should Use It?
Affiliate Marketer
CPA Marketer
Ecommerce
Freelancers
Coaches
Offline Marketers
Dropshipping
Real Estate
Product Owners
Video Marketers
Local Business Owners
Bloggers & Vloggers
Digital Product Sellers
And Many Others
FoodAI Studio Review: OTO’s And Pricing
Add My Bundle Coupon Code “AIFOODMAX″ – For 30% Off Any Funnel OTO Below
Front End Price: FoodAI Studio ($17)
OTO1: FoodAI Studio Pro ($37)
OTO2: FoodAI Studio Unlimited ($47)
OTO3: FoodAI Studio DFY ($97)
OTO4: FoodAI Studio Automation ($37)
OTO5: FoodAI Studio Profit ($47)
OTO6: FoodAI Studio Traffic ($97/$87)
OTO7: FoodAI Studio Agency ($147/$97)
OTO8: FoodAI Studio Reseller ($127)
OTO9: FoodAI Studio Income Streams ($37)
OTO10: FoodAI Studio Whitelabel ($397)
FoodAI Studio Review: Money Back Guarantee
You Have No Risk With Our 30 Days Iron Clad Money Back Guarantee
Look, FoodAI avoids being considered low-quality or untested even though you will trust its powerful capabilities when you use Food AI Studio today. All our customer receive our unconditional refund policy as part of their benefits. Get 30 days of Food AI Studio without risk because you will receive a complete refund if technical problems make the product unusable. Send us your exact technical problem report to receive our resolution immediately without question.
FoodAI Studio Review: Pros and Cons
Pros:
Easy to Use – No technical skills required.
AI Automation – Updates itself, saving time and effort.
Unlimited Listings – No caps on restaurant and menu additions.
SEO Optimization – Built-in tools to drive organic traffic.
Fast Setup – Launch within 60 seconds.
Multiple Monetization Methods – Earn via orders, ads, and commissions.
Mobile-Friendly Design – Works smoothly on all devices.
Cons:
Requires a one-time Fee.
Requires stable internet connection.
Nothing wrong with it, it works perfectly!
My Own Customized Exclusive VIP Bonus Bundle
***How To Claim These Bonuses***
Step #1:
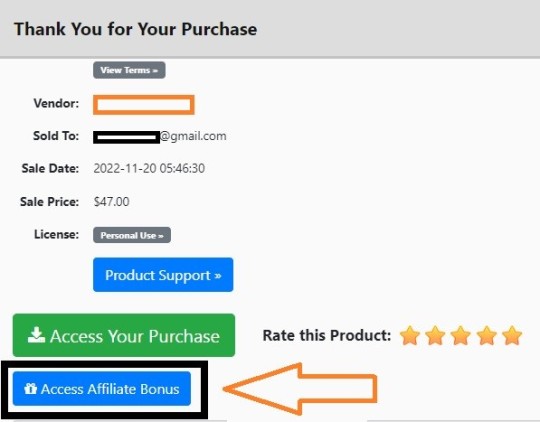
Complete your purchase of the FoodAI Studio: My Special Unique Bonus Bundle will be visible on your access page as an Affiliate Bonus Button on WarriorPlus immediately after purchase. And before ending my honest FoodAI Studio Review, I told you that I would give you my very own unique PFTSES formula for Free.
Step #2:
Send the proof of purchase to my e-mail “[email protected]” (Then I’ll manually Deliver it for you in 24 HOURS).
FoodAI Studio Free Premium Bonuses
Frequently Asked Questions (FAQ’s)
Q. Do I need any experience to get started?
None, all you need is just an internet connection. And you’re good to go.
Q. Is there any monthly cost?
Depends, if you act now, NONE. But if you wait, you might end up paying $997/mo it’s up to you.
Q. How long does it take to make money?
Our average member made their first sale the same day they got access to FoodAI.
Q. Do I need to purchase anything else for it to work?
Nop, FoodAI is the complete thing. You get everything you need to make it work. Nothing is left behind.
Q. What if I failed?
While that is unlikely, we removed all the risk for you. If you tried FoodAI and failed, we will refund you every cent you paid and send you $300 on top of that just to apologize for wasting your time.
Q. How can I get started?
Awesome, I like your excitement, all you have to do is click any of the buy buttons on the page, and secure your copy of FoodAI at a one-time fee.
My Recommendation
FoodAI Studio delivers on its promise of creating AI-powered, self-updating UberEats-style websites in just 60 seconds. With its user-friendly interface, robust AI automation, and diverse monetization options, it is an excellent investment for those wanting to capitalize on the booming food delivery market.
However, like any online business, success depends on how well you market and optimize your site. If you’re ready to start a profitable food delivery website with AI-driven automation, FoodAI Studio is a solid choice!
>>> Click Here To Get Instant Access FoodAI Studio Now <<<
Check Out My Previous Reviews: AI Live School Builder Review, Healix AI Review, $500 Google Payday Review, Human AI Review, and AI Worker Review.
Thank for reading my “FoodAI Studio Review” till the end. Hope it will help you to make purchase decision perfectly
#foodaistudio#foodaistudioreview#foodaistudiocoupon#foodaistudiohonestreview#foodaistudiofeatures#foodaistudioworks#whatisfoodaistudio#foodaistudioreviews#buyfoodaistudio#foodaistudioprice#foodaistudiodiscount#foodaistudiofe#foodaistudiooto#getfoodaistudio#foodaistudiobenefits#foodaistudiobonus#howtofoodaistudioworks#foodaistudiosoftware#foodaistudioFunnels#marketingprofitmedia#foodaistudioUpsell#foodaistudioinfo#purchasefoodaistudio#software#traffic#foodaistudioexample#foodaistudioworthgorbuying#ai#aiapp#aitool
0 notes
Text
How to Set Up Facebook Business Manager for Your Brand
Facebook Business Manager is a must-have tool for businesses looking to manage their online presence on Facebook and Instagram efficiently. It serves as a centralized hub for managing multiple pages, ad accounts, and team permissions, ensuring seamless coordination and improved security. Whether you're a small business owner or a marketing professional, setting up Facebook Business Manager is a crucial first step toward streamlining your brand’s digital marketing efforts.
Here’s a step-by-step guide to help you set up Facebook Business Manager for your brand effectively.

Step 1: Create a Facebook Business Manager Account
Visit the Facebook Business Manager Website Navigate to business.facebook.com.
Click on “Create Account” You’ll need a personal Facebook account to create a Business Manager account. Click on “Create Account” and log in using your personal credentials.
Provide Business Details
Enter your business name, your name, and your email address.
Ensure the email address is one you check frequently, as Facebook will use it for important updates.
Submit and Verify Click “Submit” to create your account. Facebook may send a verification email. Confirm your email to activate your Business Manager account.
Step 2: Add Your Facebook Page
Once your Business Manager account is set up, the next step is to connect your business’s Facebook page.
Go to the “Business Settings” Section On the Business Manager dashboard, click on “Business Settings” in the sidebar.
Select “Accounts” > “Pages” From the menu, choose “Pages” under the “Accounts” section.
Add Your Page
If you own the page, click “Add a Page” and enter the page name or URL.
If you’re managing someone else’s page, request access by clicking “Request Access to a Page.”
Assign Roles Grant access to your team members by assigning appropriate roles such as Admin, Editor, or Analyst.
Step 3: Add an Ad Account
To run ads on Facebook or Instagram, you’ll need to add an ad account to your Business Manager.
Navigate to “Ad Accounts” in Business Settings Under “Accounts,” select “Ad Accounts.”
Add Your Ad Account
Click on “Add” and choose one of the following options:
Add an existing ad account.
Create a new ad account.
Request access to another business’s ad account.
Set Up Payment Details Add your payment method to ensure a smooth ad campaign process. Navigate to “Payment Settings” and input your credit card or PayPal details.
Step 4: Add Team Members and Assign Permissions
Collaborating with a team? Facebook Business Manager allows you to add team members and assign specific roles based on their responsibilities.
Go to “People” Under Business Settings In the “Users” section, select “People.”
Invite Team Members
Click on “Add” and enter the email addresses of the people you want to invite.
Assign roles such as Admin, Employee, or custom roles tailored to their tasks.
Grant Access to Assets Assign permissions for pages, ad accounts, and other assets as needed.
Step 5: Connect Instagram and Other Assets
Integrating Instagram with your Business Manager allows you to manage both platforms seamlessly.
Go to “Instagram Accounts” Under “Accounts,” click “Instagram Accounts.”
Add Your Instagram Account
Click “Add” and log in using your Instagram credentials.
Grant access to the ad accounts or pages connected to this Instagram account.
Connect Other Assets Link apps, data sources, and pixels to enhance your campaigns.
Step 6: Set Up Facebook Pixel
Facebook Pixel is a powerful tool that tracks user interactions on your website and helps you create targeted ad campaigns.
Go to “Data Sources” > “Pixels” In the Business Settings menu, select “Data Sources” and then “Pixels.”
Create a Pixel
Click “Add” and name your pixel.
Enter your website URL to integrate the pixel.
Install the Pixel Code
Copy the pixel code provided and paste it into your website’s header.
Use tools like Google Tag Manager to simplify this process.
Verify Pixel Integration Use the Facebook Pixel Helper extension to confirm that the pixel is working correctly.
Step 7: Test Your Setup
Before launching campaigns, ensure that everything is working as expected:
Test page permissions and roles.
Verify ad account settings and payment details.
Check pixel data collection on your website.
Benefits of Facebook Business Manager
Centralized Management: Manage pages, ad accounts, and team permissions from one dashboard.
Enhanced Security: Protect sensitive information with restricted access.
Improved Collaboration: Assign roles and collaborate with team members seamlessly.
Advanced Insights: Gain access to detailed analytics and reporting.
Conclusion
Setting up Facebook Business Manager is an essential step for any brand looking to elevate its digital marketing game. By following the steps outlined in this guide, you can efficiently manage your brand’s presence on Facebook and Instagram while improving collaboration and security.
Get started with Facebook Business Manager today and take control of your brand’s digital strategy!
0 notes
Text
Pembaruan
🌟Baru
Meluncurkan desain baru antarmuka untuk pengguna Blaze di Web. Pembaruan ini meningkatkan visibilitas kampanye postingan Blaze.
Kami memperbarui notifikasi push untuk memberikan lebih banyak konteks postingan dalam notifikasi, bukan menggunakan teks umum.
🛠️ Perbaikan
Kami telah memperbaiki masalah pada editor postingan web yang mencegah seseorang menggunakan karakter tanda tanya (?) pada konten atau tagar postingan saat mereblog postingan yang ditemukan dari hasil pencarian blog.
Di web, tombol yang menampilkan semua blog Anda yang lain pada menu "reblog cepat" ditampilkan secara aneh. Sekarang hal ini sudah diperbaiki.
Memperbaiki bug yang mencegah pengguna membeli lencana Zodiak.
Memperbaiki bug di mana anggota blog grup dapat menjeda antrean. Hal ini telah diperbaiki dan dibatasi hanya untuk admin blog grup.
Memperbaiki masalah di mana postingan yang dihapus tetap muncul pada daftar antrean.
Pada Firefox, kolom balasan sekarang menampilkan spasi berturut-turut (misalnya spasi ganda di antara kata) dan bukannya menciutkannya. Hal ini tidak memengaruhi tampilan balasan itu sendiri, yang juga menampilkan spasi berurutan.
🚧 Dalam Progress
Tidak ada yang dapat kami laporkan hari Ini.
🌱Segera Hadir
Tidak ada yang dapat kami laporkan hari Ini.
Menghadapi masalah? Kirimkan Permintaan Dukungan dan kami akan kembali menghubungi Anda secepatnya!
Ingin membagikan saran atau hal lainnya? Cek pembaruan di blog Staf kami dan mulailah berdiskusi dengan komunitas.
Ingin mendukung Tumblr secara langsung? Cek lencana Pendukung terbaru di TumblrMart!
3 notes
·
View notes
Text
Is It Possible to Add Blogger Accounts in GMB Briefcase Without Errors?
youtube
Managing multiple platforms can be a challenge, but GMB Briefcase makes it easy to streamline your blogging workflow by allowing you to integrate Blogger accounts seamlessly. If you’re wondering whether it’s possible to add Blogger accounts to GMB Briefcase without errors, the answer is yes! With the right approach and resources like the GMB Briefcase | Help Center, you can enjoy a hassle-free integration process.
This article explores the steps, common pitfalls, and tips for a smooth Blogger account integration with GMB Briefcase.
Why Add Blogger Accounts to GMB Briefcase? Integrating Blogger accounts into GMB Briefcase offers numerous advantages:
Centralized Management: Control all your blogs from a single dashboard. Enhanced Productivity: Save time by managing, scheduling, and analyzing content in one place. Team Collaboration: Assign roles and manage permissions for streamlined teamwork. Error-Free Operations: Avoid common login and synchronization issues with a unified system. To ensure a smooth experience, the GMB Briefcase | Help Center provides detailed guides and troubleshooting tips.
Steps to Add Blogger Accounts in GMB Briefcase Without Errors Follow these steps to ensure a seamless integration:
Log In to Your GMB Briefcase Account Start by logging into your GMB Briefcase account. If you’re new to the platform, create an account to get started.
Access the Integration Settings Navigate to the settings menu in your dashboard. Click on the Integrations tab to view the list of available platforms.
Select Blogger From the list of integrations, choose Blogger. This will initiate the setup process.
Authenticate Your Blogger Account A pop-up window will prompt you to log into your Blogger account. Grant GMB Briefcase the necessary permissions to access your Blogger account. Tip: Ensure you’re using the correct Blogger credentials and have administrative access to the account.
Assign Team Roles Once the account is linked, assign specific roles (e.g., Admin, Editor, Viewer) to team members. Role-based access ensures secure and efficient collaboration.
Verify the Integration Check your GMB Briefcase dashboard to confirm the Blogger accounts are successfully integrated. You should see your blogs listed and ready for management.
Start Managing Your Blogger Accounts Begin using GMB Briefcase to manage, schedule, and analyze your Blogger content with ease.
For more detailed guidance, visit the GMB Briefcase | Help Center for step-by-step instructions.
Tips to Avoid Errors During Integration Even though GMB Briefcase simplifies the process, it’s important to take precautions to avoid potential errors:
Update Your Software: Ensure you’re using the latest version of GMB Briefcase to avoid compatibility issues.
Use Correct Credentials: Double-check your Blogger login details before authentication.
Grant Necessary Permissions: Make sure to allow GMB Briefcase access to your Blogger account during the setup process.
Stable Internet Connection: A reliable internet connection is crucial to prevent interruptions during integration.
Check Account Settings: Verify that your Blogger account has administrative rights to make changes and link external platforms.
For troubleshooting assistance, the GMB Briefcase | Help Center is your go-to resource.
Common Issues and Their Solutions While integrating Blogger accounts is usually error-free, here are some common issues and solutions:
Authentication Failures: Ensure the correct credentials are used, and grant all requested permissions. Missing Blogs: Double-check that you’ve linked the correct Blogger account. Integration Errors: Update your GMB Briefcase software and retry the process. For additional troubleshooting steps, refer to the GMB Briefcase | Help Center for expert guidance.
Benefits of a Smooth Integration By successfully adding Blogger accounts to GMB Briefcase without errors, you unlock the following benefits: Simplified Operations: Manage all blogs from one intuitive dashboard. Enhanced Efficiency: Streamline workflows with built-in scheduling and analytics tools. Secure Access: Protect sensitive login credentials while enabling team collaboration.
Conclusion So, is it possible to add Blogger accounts in GMB Briefcase without errors? Absolutely! By following the steps outlined in this article and leveraging resources like the GMB Briefcase | Help Center, you can ensure a smooth and error-free integration process. Take advantage of GMB Briefcase to centralize your blogging operations, boost productivity, and manage your team more effectively. Start integrating your Blogger accounts today and experience the benefits of a streamlined workflow!
Find Us Online
Facebook
LinkedIn
Twitter
YouTube Channel
0 notes
Text
BeMusic Php Script v3.1.3 - Music Streaming Engine
https://themesfores.com/product/bemusic-php-script-music-streaming-engine/ Would you be interested in the ultimate music streaming solution? BeMusic PHP Script v3.1.3 is your answer! This all-in-one platform lets you easily create stunning music streaming and sharing websites. Whether you’re building a site like Spotify, SoundCloud, or Mixcloud, BeMusic delivers unmatched performance and versatility. ���️ Top Features: Create personalized music streaming platforms. Fully responsive design for all devices. Advanced audio streaming and playlist features. User-friendly interface for seamless navigation. Easily customizable to match your brand. ✔️ Why Choose BeMusic? BeMusic combines powerful functionality with ease of use, making it the ideal choice for entrepreneurs, music enthusiasts, and developers. With its SEO-friendly structure and blazing-fast performance, your site will stand out on search engines like Google. Get BeMusic today and revolutionize the way music is shared and streamed! BeMusic Php Script Features: Automation – BeMusic can be set to “automated” mode which will automatically import and update artists, albums, tracks, channels and other information from 3rd party sites as well as stream music and video using youtube API. Content Management – All automation functionality can be disabled, which allows BeMusic to be used as a content management system. Control what content appears on the site by creating and managing it from admin area. This includes artists, albums, tracks, channels, videos and more. User Artists – Allow users to set up their profile and upload and share their music with others. Waveforms – Uploaded songs will get auto-generated realtime waveform. Sharing – Users can comment, repost, like, embed and playlist their favorite tracks and albums as well as easily share them via social media. User & artist profiles – Users can personalize their profile pages with custom avatar, background image, description, social links, location and more. Follower System – Users can stay up to date with other user and artist activities by following them. Easy Installation – Install BeMusic easily with no coding or server knowledge in a few minutes with our easy to use installer and documentation. Editable Landing Page – Default landing page can be easily edited via built-in appearance editor with live preview and no coding knowledge. SaaS mode – Earn money with built in premium subscription system. Create different plans for users to subscribe to and control what functionality and limitations each plan has. High Performance – BeMusic is lightweight and has lighting fast performance and page load time out of the box. User Libraries – Users can add songs, albums and artists to their library on BeMusic in addition to playlists. Playlists – Users can create, share and follow playlists. Player – Fully-featured player including shuffle, repeat, lyrics, queue and more. Dark Mode – BeMusic comes with pre-built light and dark themes. You can fully customize them or add new themes via appearance editor. Channels – Create automated or manually managed channels to display content matching specific criteria or ordered by a particular value. For example: top 50 tracks by plays, newly released albums, popular genres, albums ordered by plays and more. Search – When “automated” mode is enabled, virtually any artist, album or track can be found via search. Custom Pages – Custom pages (for example terms of service, about us etc) can be created using built-in WISIWYG editor. Menu Editor – All the menus across the site can be easily edited and reordered via drag and drop without any coding knowledge. Appearance Editor – Easily manage your site appearance (colors, logo, landing page, menus etc) via built-in appearance editor. Ads – Paste ad codes into integrated ad slots in admin panel and BeMusic will display them automatically. Roles & Permissions – Assign roles and permissions to users to give or restrict access to specific functionality on the site. Analytics – Google analytics are integrated right into admin panel so you don’t need to open a separate page to see how your site is doing. Translatable – Site can be easily translated from admin panel, it also has multi-language suport. Responsive – BeMusic is fully responsive and will work on desktop, mobile, tablet and other devices. Documentation – BeMusic comes with in depth documentation that explains everything from installation to all the features. SEO Editor – SEO tags for all pages can be modified directly from appearance editor in admin area. Authentication – Fully featured authentication system with social login (facebook, twitter and google), normal login, registration, password recovery, account settings and more. Disable Registration – Registration can be fully disabled from admin panel so only users you create manually from admin panel will be able to login. Professional Design – Pixel-perfect professional design based on google’s material design. Settings – Admin panel has many settings that allow you to fine-tune the site to your needs. Multiple Homepages – Choose between multiple homepages including channels, landing page, login page or your own custom html page. Source Code – You will receive full, unencrypted source code upon purchase, allowing easy custom modifications. Requirements: PHP >= 8.1 PDO Extension (enabled by default) php_fileinfo Extension (enabled by default) MySQL Database Demo: Click Here https://themesfores.com/product/bemusic-php-script-music-streaming-engine/ #PHPScript
0 notes